

Page 1
12-2182.fm Page 1 Friday, September 3, 1999 7:31 AM
10 Disc CD Changer
Cat. No. 12-2182
OWNER’S MANUAL
Please read before using this equipment.
Page 2

12-2182.fm Page 2 Friday, September 3, 1999 7:31 AM
FEATURES
Your RadioShack 10 Disc CD Changer
is a versatile, hig h-quali ty sound system
that lets you load and pla y up to ten of
your favorite CDs in your vehicle.
The CD changer plays CDs through
your vehicle’s ex isting sound system. If
your sound system do es not have RCA
input jacks, the Audio Adapter’s/FM
modulator converts the CD changer’s
sound to an FM signal so you can hear it
by tuning your vehic le’s st ereo to an FM
frequency. If your vehicle’s sound system has a pair of RCA input j acks, you
can use an RC A cable to connect your
system to the CD changer’s out put signal through the supplied Audio Adapter/
Ground Isolator.
Important:
• To connect the CD changer, your
vehicle’s sound system must have
an FM tuner and an antenna jack
(for the connection to the CD
changer with the Audio A dapter/FM
modulator), or an RCA Input jack (to
work with the Audio Adapter/grou nd
isolator).
• To be safe, we recommen d you do
not change your CD changer’s or
sound system’s settings in heavy
traffic or during hazardous driving
conditions.
Your CD changer has these features:
10-Disc CD Cartridge
— lets you load
and play up to ten CDs.
Controller with Infrared Wireless Remote Control
— lets you control many
of the CD changer ’s functio ns from an ywhere in your vehic l e tha t has di rect l in e
of sight with the changer.
Eight-Times Oversampling with Digital Filtering
— improves the CD’s
sound by multiplying the standard 44.1
kHz sample rate by eight and using a
digital filter to reduce or elim inate dis tortion.
1-Bit DAC
— uses the latest in digitalto-analog conversion circuitry to accurately reproduce all sound levels with
virtually no distortion.
Horizontal/Vertical Mounting
— lets
you quickly and easily install the CD
changer’s components in almost any vehicle.
Repeat Play
— automatically repeats
the current track or the disc.
Shuffle Play
— randomly selects and
plays tracks from any loaded CD.
Intro Scan
— scans and plays the first
10 seconds of each track on a CD, so
you can find a specific track.
©
1999 Tandy Corporation.
RadioShack is a registered trademark used by Tandy Corporation.
All Rights Reserved.
2
Page 3
12-2182.fm Page 3 Friday, September 3, 1999 7:31 AM
3-Beam Laser Track ing Sy stem
— improves the quality of the CD changer’s
sound.
Spring-Loaded, Oil-Dampened Suspension System
— helps keep the CD
changer steady when you drive over
rough roads.
Track Search
— lets you quickly locate
the beginning of any track wh ile playing
a CD.
Track Skip
— lets you rapidly play a CD
in either direction to locate a desired
section of track.
This CD changer is made and tested to
meet exacting safety standards.
Warning:
This system e mploys a laser
light beam. Only a qu alified serv ice person should remo ve the c over or attempt
to service this device, due to possible
eye injury.
CDs that can be played on this CD pl ay er have this mark on them:
3
Page 4

12-2182.fm Page 4 Friday, September 3, 1999 7:31 AM
CONTENTS
A Look at Your CD Player ....................................................................................... 5
Preparation .............................................................................................................. 6
Before You Begin ................................................................................................ 6
Choosing Mounting Locations ............................................................................ 6
For the CD Changer ..................................................................................... 7
For the Audio Adapter .................................................................................. 7
For the CD Changer Controller .................................................................... 8
Removing the Transport Screws ........................................................................ 8
Installing the Remote Control’s Batteries ................. ...... .................................... 8
Installation ............................................................................................................. 10
Connecting the Audio Adapter .......................................................................... 10
Using RCA Jacks ....................................................................................... 10
Using a Vehicle’s Antenna ......................................................................... 10
Connecting the CD Changer ............................................................................ 12
Connecting the CD Changer Controller ............................................................ 12
Testing the Connections ................................................................................... 13
Mounting the Components ............................................................................... 13
Mounting the CD Changer ......................................................................... 13
Mounting the Audio Adapter ...................................................................... 14
Mounting the CD Changer Controller ......................................................... 15
Reconnecting the Vehicle’s Battery ............................................................ 15
Operation ............................................................................................................... 16
Loading and Unloading the CD Magazine ........................................................ 16
Loading and Unloading the CD Changer .......................................................... 16
Playing CDs ...................................................................................................... 17
Using Track Search .................................................................................... 18
Using Track Skip ........................................................................................ 18
Selecting a CD ........................................................................................... 18
Intro Scan . ...... ....... ...... ...... .............................................. ...... ..................... 19
Repeat Play ............................................................................................... 19
Shuffle Play ................................................................................................ 19
Switching Between the CD Player and the Radio ............................................ 19
Resetting the Audio Adapter ............................................................................. 20
Troubleshooting .................................................................. .................................. 21
Care and Maintenance .......................................................................................... 23
The FCC Wants You to Know ........................................................................... 24
CD Care Tips .................................................................................................... 24
Resetting the CD Changer ............................................................................... 24
Replacing a Fuse .............................................................................................. 25
Specifications ......................... .......................... .......................... ......................... .. 26
4
Page 5
12-2182.fm Page 5 Friday, September 3, 1999 7:31 AM
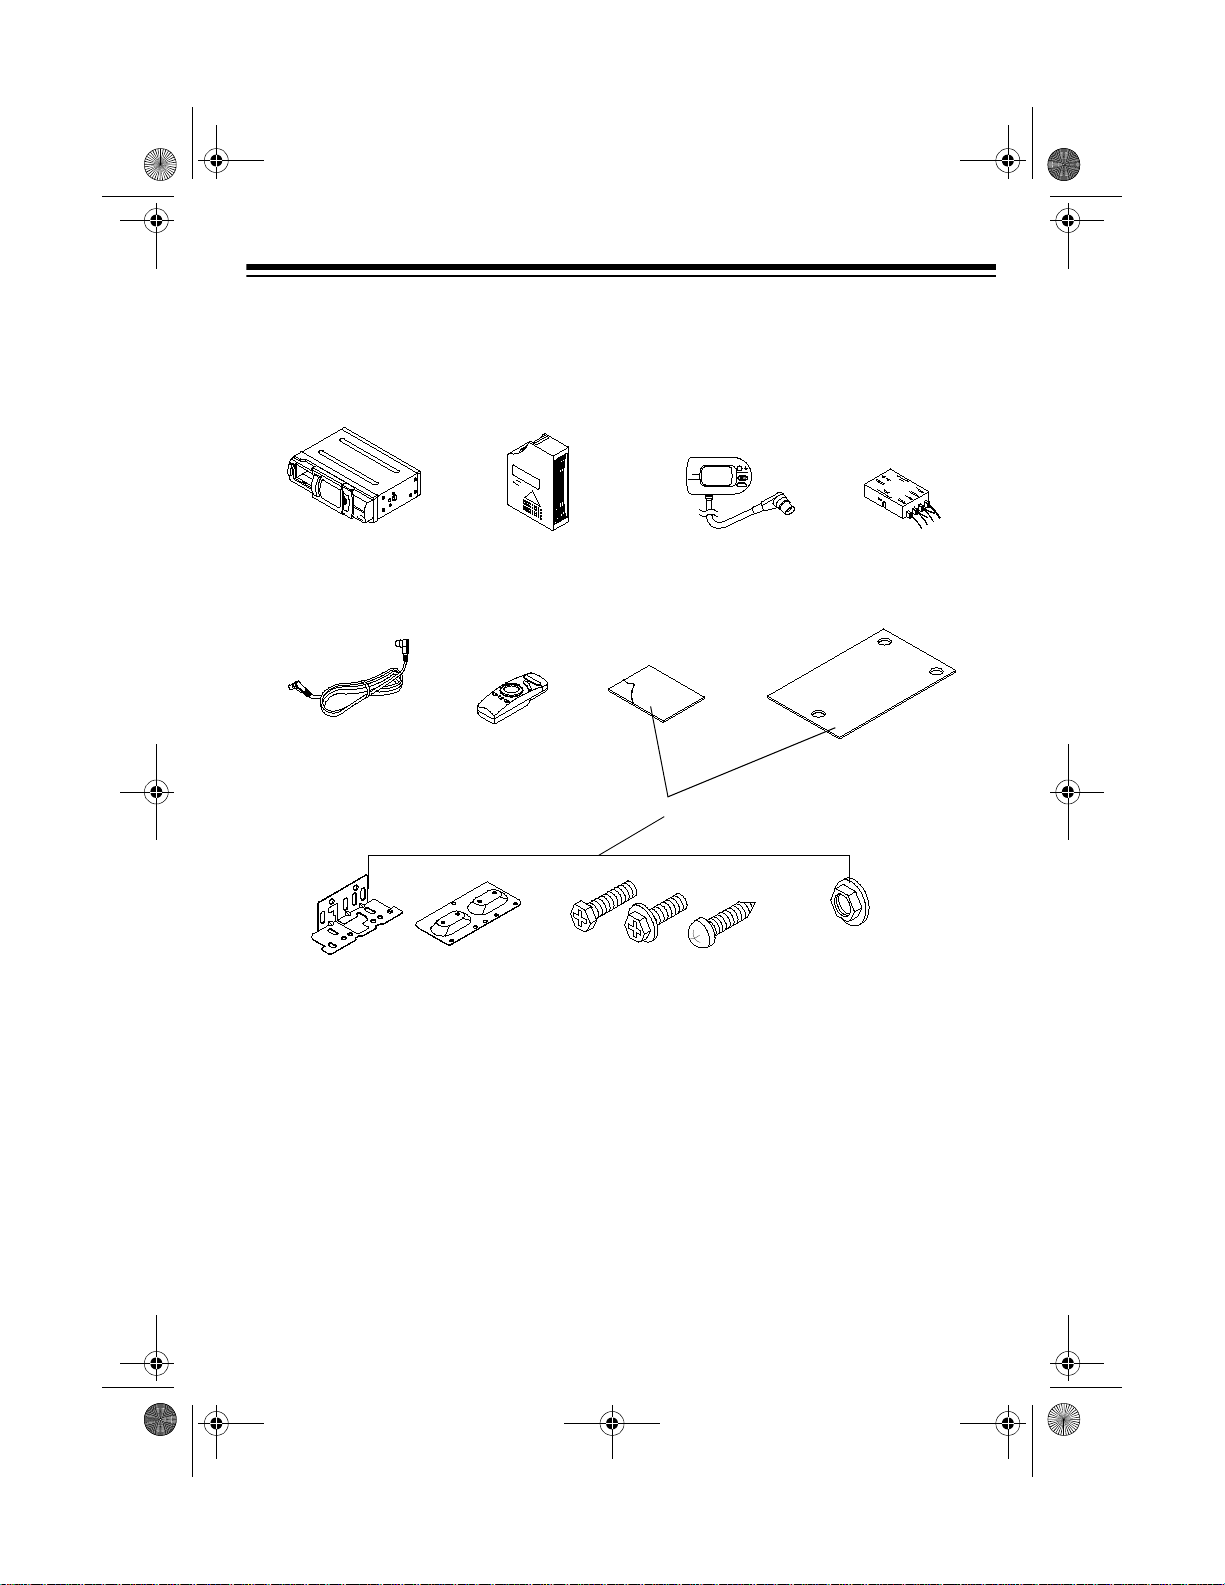
A LOOK AT YOUR CD PLAYER
The CD changer includes the following components:
CD Changer
R
a
d
io
S
h
a
c
k
d
IS
C
CD Changer
Cable
Power Cable
(Yellow)
NOT SHOWN
CD Magazine
d
IS
C
Infrared
Remote
Controller
Changer
Controller
ISC
d
Mounting Kit
CD
RadioShack
CD
CHANGER CONTROLLER
Audio Adapter
(FM Modulator
and
Ground Isolator)
OFF
R
E
T
P
IO
A
D
D
U
A
A
Note:
If your CD changer is missing any of these components, contact the Ra-
dioShack store where you purchased it.
5
Page 6
12-2182.fm Page 6 Friday, September 3, 1999 7:31 AM
PREPARATION
BEFORE YOU BEGIN
Before you install your CD changer’s
components, rea d all the instructi ons in
this owner’s manual. You should be able
to answer all of these questions about
your vehicle’s electric al and sound systems:
• Does my vehicle’s sound system
have a power amplifier with a pair of
RCA input jacks? If not, can my
vehicle’s sound system tune FM
broadcasts and does it have an
antenna jack?
• Which terminal in my vehicle’s fuse
box is for accessories?
• How do I connect a wire to the fuse
box?
• Which of the CD change r’s wires is
the power wire?
• Does my vehicle have a 12-volt negative ground system?
• small-and medium-sized screwdrivers.
CHOOSING MOUNTING
LOCATIONS
Choose locations for mounting the CD
changer and its components where:
• You can easily reach them.
• Wires and cables will not interfere
with the vehicle’s pedals or other
moving parts.
• No component is directly in front of
heating vents.
• All wires and cables wil l reach their
connection points.
Before attempting to mount the CD
changer and its components, confirm
that they will fit the selected mounting
areas.
Installation in your vehicle might
Note:
require cutting or modifying your vehicle.
Important:
stereo, CD changer, and you r vehi cle’s
electrical system, you must follow the order of installation shown in this manual,
including instructions for making connections and testing.
In addition to the supplied hardwar e kit,
you need these items to install your CD
changer:
• cable ties or electrical tape
• isopropyl alcohol
6
To avoid damage to your
Caution:
tions behind all mounting surfaces.
Be careful to avoid obstruc-
Page 7
12-2182.fm Page 7 Friday, September 3, 1999 7:31 AM
For the CD Changer
You can mount the CD changer horizontally or vertical ly in your vehicle’s tr unk,
on the floorboard, or under a seat.
Caution:
upside down.
Notes:
• The CD changer’s mounting area
• When you choose a mo unting area
• Do not mount the CD changer any-
• Mount the CD changer as level as
Do not mount the CD changer
must be at least 13 inches (33 cm)
deep.
for the CD changer, make sure it is
close enough to the Audio Adapter’s
mounting area so you can connect
both components with the supplied
16-foot (5 meter) CD changer cable.
where in your vehicle that is
exposed to direct su nlight (such as
the front or rear deck) or extreme
heat (such as the engine compartment). Direct sunlight or extreme
heat can damage CDs and the CD
changer.
possible. If you cannot mount the
CD changer exactly level, make
sure it will not tilt more than 15
degrees from the horiz ontal or vertical mounting position.
• Make sure there is en ough room for
you to insert and remove the supplied CD magazine from the CD
changer.
For the Audio Adapter
You can mount the supplied Audio
Adapter (ground isol ator and FM modulator) under your vehicle’s dashboard.
Notes:
• The Audio Adapter’s mounting area
must be at least 5 inches (12 7 mm)
wide and 1
by 3
• When you choose a mounting area
for the Audio Ad apter, make s ure it
is close enough to your vehicle’s
ground, power, and sound system
so you can connect them with the
FM modulator and Ground Isolator’s
wires and plugs (see “Connecting
the Audio Adapter” on Page 10).
1
3
/16 inches ( 26. 3 m m ) hi gh
/5 inches (91 mm) deep.
7
Page 8
R
a
d
io
S
h
a
c
k
12-2182.fm Page 8 Friday, September 3, 1999 7:31 AM
For the CD Changer Controller
For ease of use, you can mount the supplied CD changer controller on the dashboard using the su pplied hook-and-lo op
fastening tape.
RadioShack
ISC
d
OFF
CD
CHANGER CONTROLLER
When you choose a mounting
Note:
area for the controller, make sure it is
close enough to the Audio Adapter’s
mounting area so the controller’s cord
will reach the Audio Adapter. The controller’s cord is about 5 feet (152 cm)
long.
REMOVING THE
TRANSPORT SCREWS
Save the shipping screws in case you
might want to install the CD changer in
another vehicle. You can secure them to
the back of the CD changer with a piece
of tape.
INSTALLING THE
REMOTE CONTROL’S
BATTERIES
Your infrared remote control requires 2
AA batteries (not supplied) for power.
For the best performance and longest
life, we recommend RadioShack alkaline batteries.
The transport screws help protect the
Cautions:
CD changer from damage during shipment.
• Use only fresh batteries of the
required size and recommended
Before you mount the CD changer, use
a small screwdriver to remove the three
transport screws from the bottom of the
CD changer.
type.
• Do not mix old and new batteries,
different types of batteries (standard, alkaline, or rechargeable), or
rechargeable batteries of different
If you do not remove the s hipping
Note:
capacities.
screws from the CD changer, the changer will not operate.
8
Page 9
12-2182.fm Page 9 Friday, September 3, 1999 7:31 AM
Follow these steps to install batteries.
1. Slide the battery compartment cover
in the direction of the arrow to
remove it.
2. Place the batteries in the compartment as indicated by the polarity
symbols (+ and –) marked inside.
3. Replace the cover.
When the remote control stops operating properly, replace the batteries.
Warning:
Dispose of old batteries
promptly and properly. Do not burn or
bury them.
Caution:
If you do not plan to use the
remote control for a long time, remove
the batteries. Batteries can leak che micals that can destroy electronic parts.
9
Page 10

12-2182.fm Page 10 Friday, September 3, 1999 7:31 AM
INSTALLATION
Before you mount the CD changer and
its components, test it by temporarily
making all the required connections.
Cautions:
• For added safety and to protect your
CD changer and sound syst em, disconnect the cable from your vehicle
battery’s negative (–) terminal
before you begin.
• You must make all other connec-
tions before you reconnect the cable
to your vehicle’s battery. If you do
not make the connections in the
order shown, the CD changer and
sound system might be damaged if
any wire connections are made
incorrectly.
CONNECTING THE AUDIO
ADAPTER
The supplied Audio Adap ter includes all
of the lead wires for connecting to your
vehicle’s, ground, power and sound system. There are two wa ys to conne ct the
Audio Adapter to the CD changer and
the vehicle’s sound system.
Using RCA Jacks
If your vehicle’s sound system has a pair
of RCA input jacks (either on the stereo
head unit or the power amplifier), you
can connect the CD changer to the
sound system’s output jacks.
1. Use a screwdriver to slide
TOR
on the side of the Audio
Adapter to
2. Connect the Audio Adapter’s
output jack to the sound system’s
RCA input jack by using a cable of
the proper length for your connection with 2 RCA plugs at each end.
Your lo cal RadioShac k store carri es
a wide range of RCA cables.
ON
.
ISOLA-
RCA
Using a Vehicle’s Antenna
If your vehicle’s sound system does not
have RCA input jacks, use the Audio
Adapter to convert the CD changer’s
sound to an FM signal, which you can
hear by tuning your vehicle’s radio to the
corresponding FM frequency.
1. Disconnect your vehicle’s antenna
from your vehicle’s sound system,
then connect the antenna to the
Audio Adapter’s large black antenna
connector.
10
2. Connect the Audio Adapter’s
antenna plug to your sound system’s antenna jack.
Page 11

12-2182.fm Page 11 Friday, September 3, 1999 7:31 AM
3. Connect the Audio Adapter’s black
ground wire to a chassis ground,
such as a met al sc r ew a tt ac he d to a
metal part of the vehicle’ s frame. Be
sure that the screw is not insulated
from the chassis by a plastic part.
Black
4. Connect the Audio Adapter’s red
power wire (with inli ne fuse holder)
to a point in your vehicle’s fuse
block that has power o nly when y ou
turn the vehicle’s key to either the
accessory (ACC) or START position.
5. Connect the Au dio Adapter ’s yellow
memory back up wire (with in-line
fuse holder) to your vehicle battery’s
positive (+) terminal or to a fus e tha t
provides a co ntinuous source of 12
volts.
Yellow
This connection p rovides power for
the CD changer and its components, and con tinuou s pow er fo r th e
CD changer’s memory when the
ignition is turned off.
6. Use a screwdriver to slide
TOR
on the side of the Audio
Adapter to
OFF
.
ISOLA-
Red
This connection turns on the CD
changer and its components when
you turn on the ignition or turn the
key to ACC, and turns off the CD
changer and its components when
you turn off the ignition. This prevents your vehicle’s battery from
being drained if you leave the CD
changer on when you turn off the
ignition.
7. Set
88.7MHz/89.1MHz
on the side of
the Audio Adapter to an active frequency in your area, if available.
This is the f requen cy you tune o n t o
your vehicle’s sound system to hear
the CD changer.
If there is no FM broadcast on
Note:
either 88.7 MHz or 89.1 MHz in your
area, you might hear static when the
CD changer is not playing a CD.
11
Page 12

12-2182.fm Page 12 Friday, September 3, 1999 7:31 AM
CONNECTING THE CD
CHANGER
1. Disconnect the cable from your
vehicle battery’s negative (–) terminal.
2. Connect the CD changer to the
Audio Adapter by inserting the plug
on one end of the CD changer cable
into the 8-pin
the Audio Adapter. Then insert the
plug on the cable’s other end into
DIN 8PIN
the
the CD changer.
AUDIO
ADAPTER
3. Connect the black gro und wire to a
chassis ground, such as a metal
screw attached to a metal part of the
vehicle’s frame. Be sure that the
screw is not insulated from the
chassis by a plastic part.
CD CHANGER
jack on
jack on the left side of
h
S
io
d
a
R
and CD changer. Do not force them.
The recess mark on the metal rim of
the DIN plug should face down.
• To disconnect the CD changer cable
from the Audio Adapter and CD
changer, squeeze each plug, then
gently pull it out.
• Never pull on the CD changer cable.
CONNECTING THE CD
CHANGER CONTROLLER
To connect the CD c ha nge r c ont ro ller t o
the Audio Adapter, inser t the CD cha ng-
k
c
a
er controller cable’s plug into the 6-pin
CONT.
jack on the Audio Adapter.
4. Connect the yellow memory back up
wire (with in-line fuse holder) to your
vehicle battery’s positive (+) terminal or to a fuse that provides a continuous source of 12 volts.
This connection pr ovides power for the
CD changer and its components, and
continuous power f or the CD changer’s
memory when the ignition is turned off.
Cautions:
• The CD changer cable’s plugs fit
only one way into the Audio Ada pte r
12
Cautions:
• The plug fits only one way into the
Audio Adapter. Do not force it. The
oval recess mark on the metal rim of
the DIN plug should face down.
• To disconnect the controller from the
Audio Adapter, gently pull it out.
• Never pull on the controller’s cable.
Page 13

12-2182.fm Page 13 Friday, September 3, 1999 7:31 AM
TESTING THE
CONNECTIONS
Make sure all connections are secure
before continuing with the installation.
Then reconnect the cable to the vehi cle
battery’s negative (–) terminal.
Verify that you connected the CD changer correctly by turning on the changer
and playing a CD. T ry t o u se the rem ote
control by pointing the fro nt towards the
wired CD change r controller and pr ess-
PLAY/PAUSE
ing
POWER OFF
or
.
If everything is connected correctly,
make sure the connec tions are co rrectl y
marked or identified. T hen follow the instructions in “Mounting the Components.”
MOUNTING THE
COMPONENTS
Before you mount the CD changer and
its components, be sure i t is connected
correctly. Then disconnect the cable
from the vehicle battery’s negative (–)
terminal.
Mounting the CD Changer
R
a
d
io
S
h
a
c
k
R
a
d
io
S
h
a
c
k
1
0
-
C
D
C
H
A
N
G
E
R
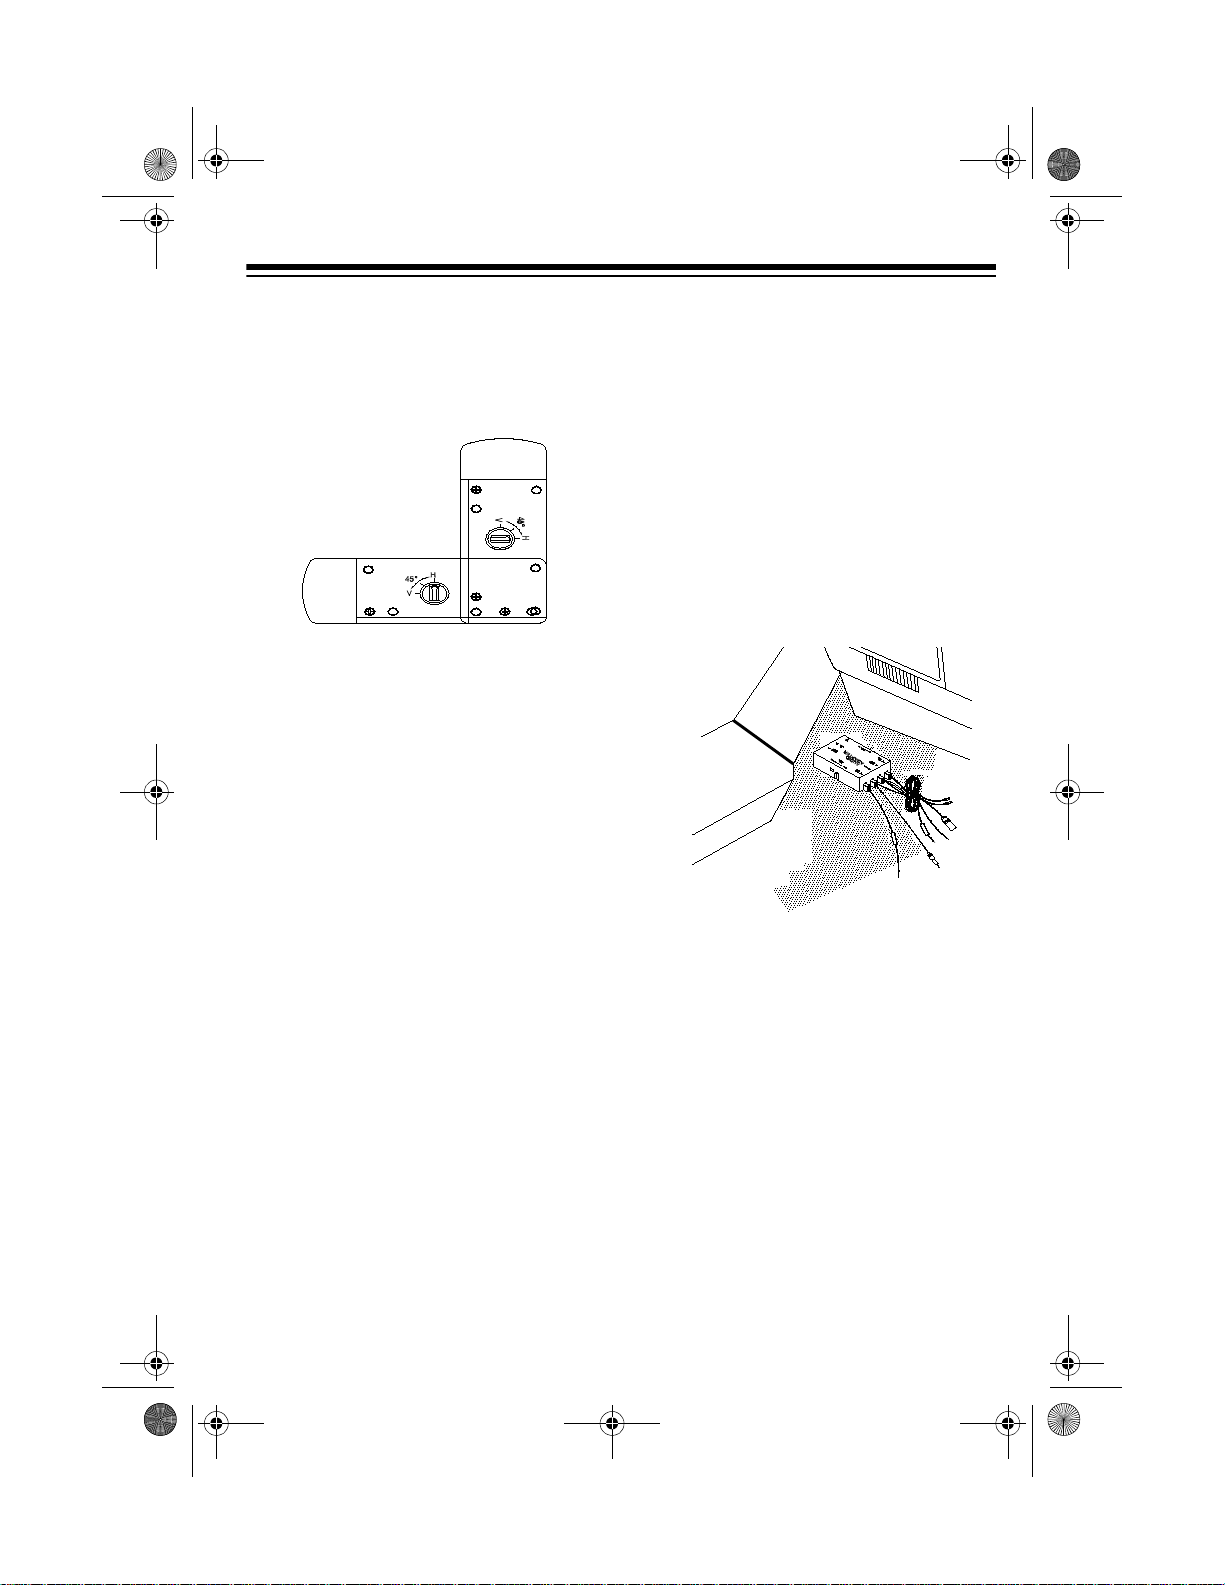
1. Set
SPRING ATTACHMENT H/V
zontal/vertical) on both sides of the
CD changer for the mounting axis
you chose.
SPRING ATTACHMENT H/V
H
to
. If you are mounting the CD
changer horizontal ly, go on to Step
2.
Vertical Mounting
1
0
-C
C
H
D
A
N
G
E
R
Horizontal Mounting
is preset
(hori-
13
Page 14

12-2182.fm Page 14 Friday, September 3, 1999 7:31 AM
If you are mounting the CD cha nger
vertically, use a screwdriver to
remove the screws on both sides of
the CD changer from
SPRING ATTACHMENT H/V
H
and turn
to V on
both sides, then repla ce the screws
V
into
.
Caution:
If you do not set
ATTACHMENT H/V
on both sides of
SPRING
the CD changer to the correct
mounting axis, the CD changer
might skip during play .
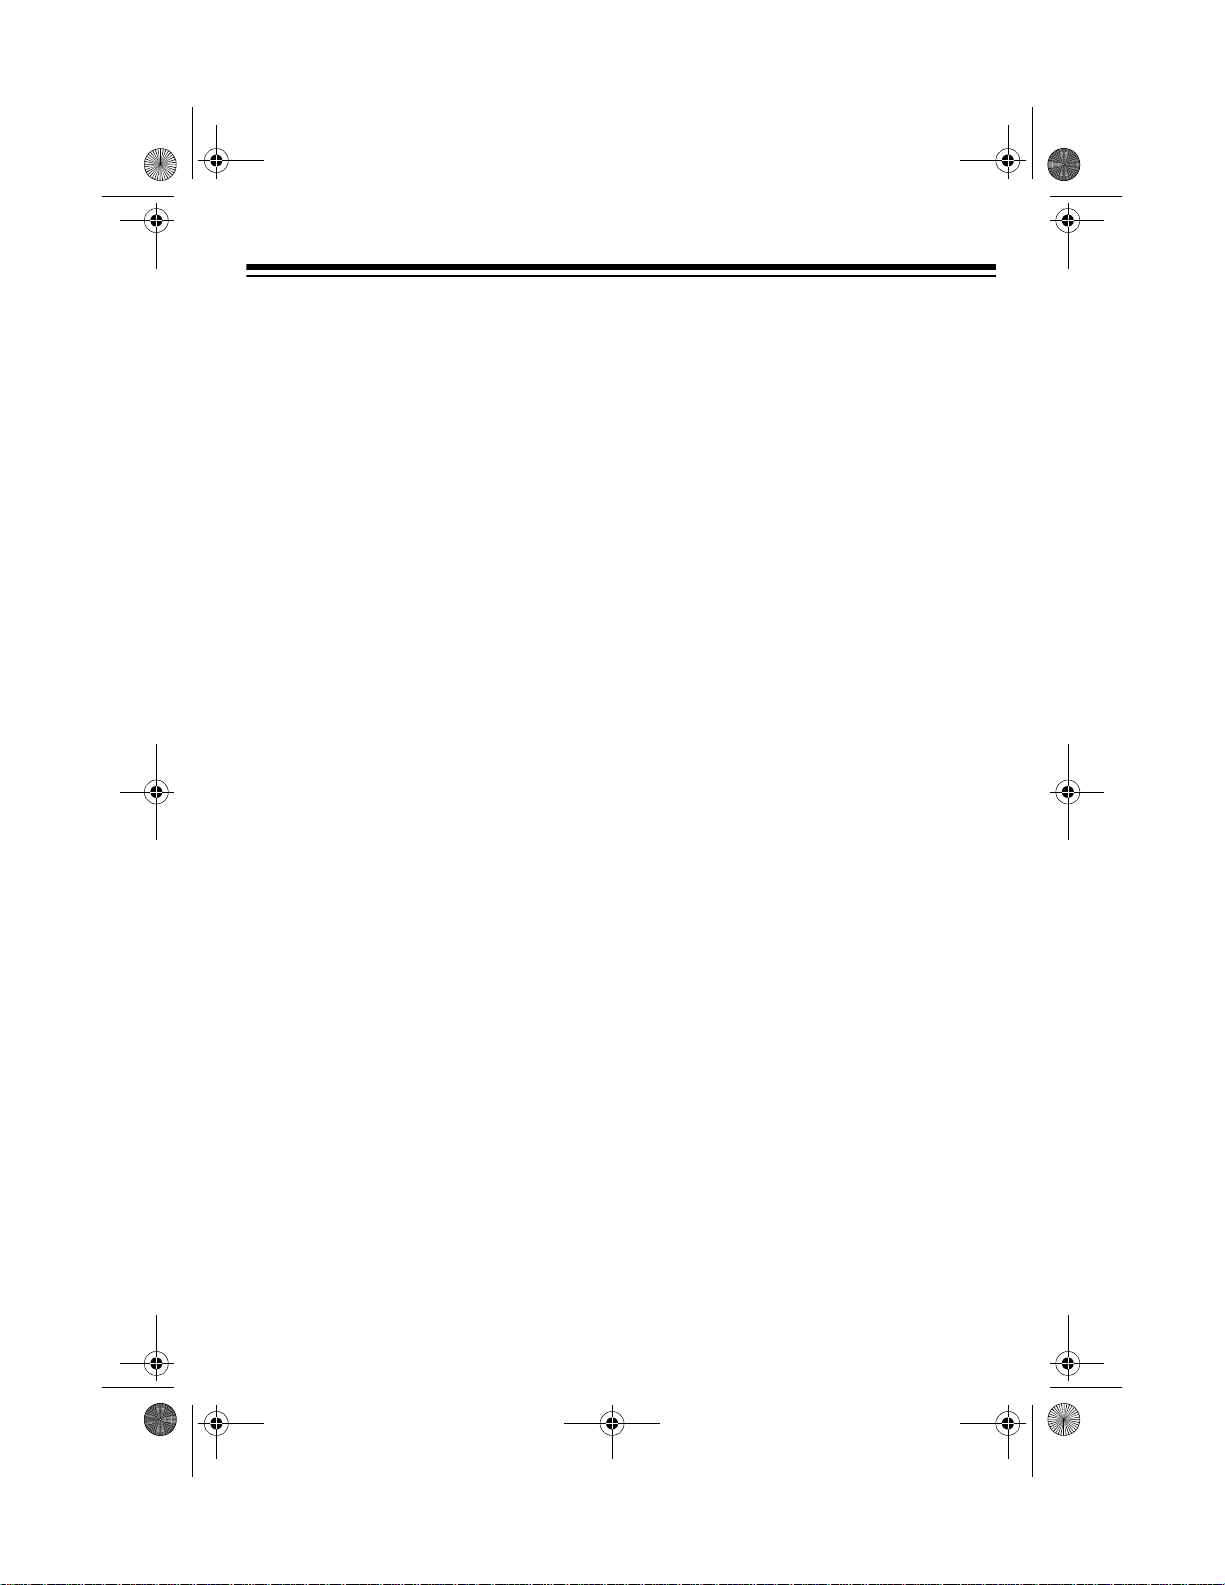
2. Use a medium-sized screwdr iver to
attach the suppli ed mounting br ackets to the sides of the CD changer.
Mounting
Stud
Mounting
Bracket
3. Using the supplied mounting studs
as templates and the width betwee n
the mounting brackets as a guide,
mark the positions for the mountin g
holes.
4. Attach the mounting studs to the
mounting surface
using the supplied
screws.
5. Attach the CD changer to the
mounting studs using the supplied
nuts.
R
adioS
hack
1
0
-C
D
C
H
A
N
G
E
R
14
Mounting the Audio Adapter
Use the supplied screws to attach the
Audio Adapter under th e vehi cle’s dashboard.
Use cable ties (not supplied) to secure
the Audio Adapter‘s wires under the vehicle’s dashboard.
Page 15

12-2182.fm Page 15 Friday, September 3, 1999 7:31 AM
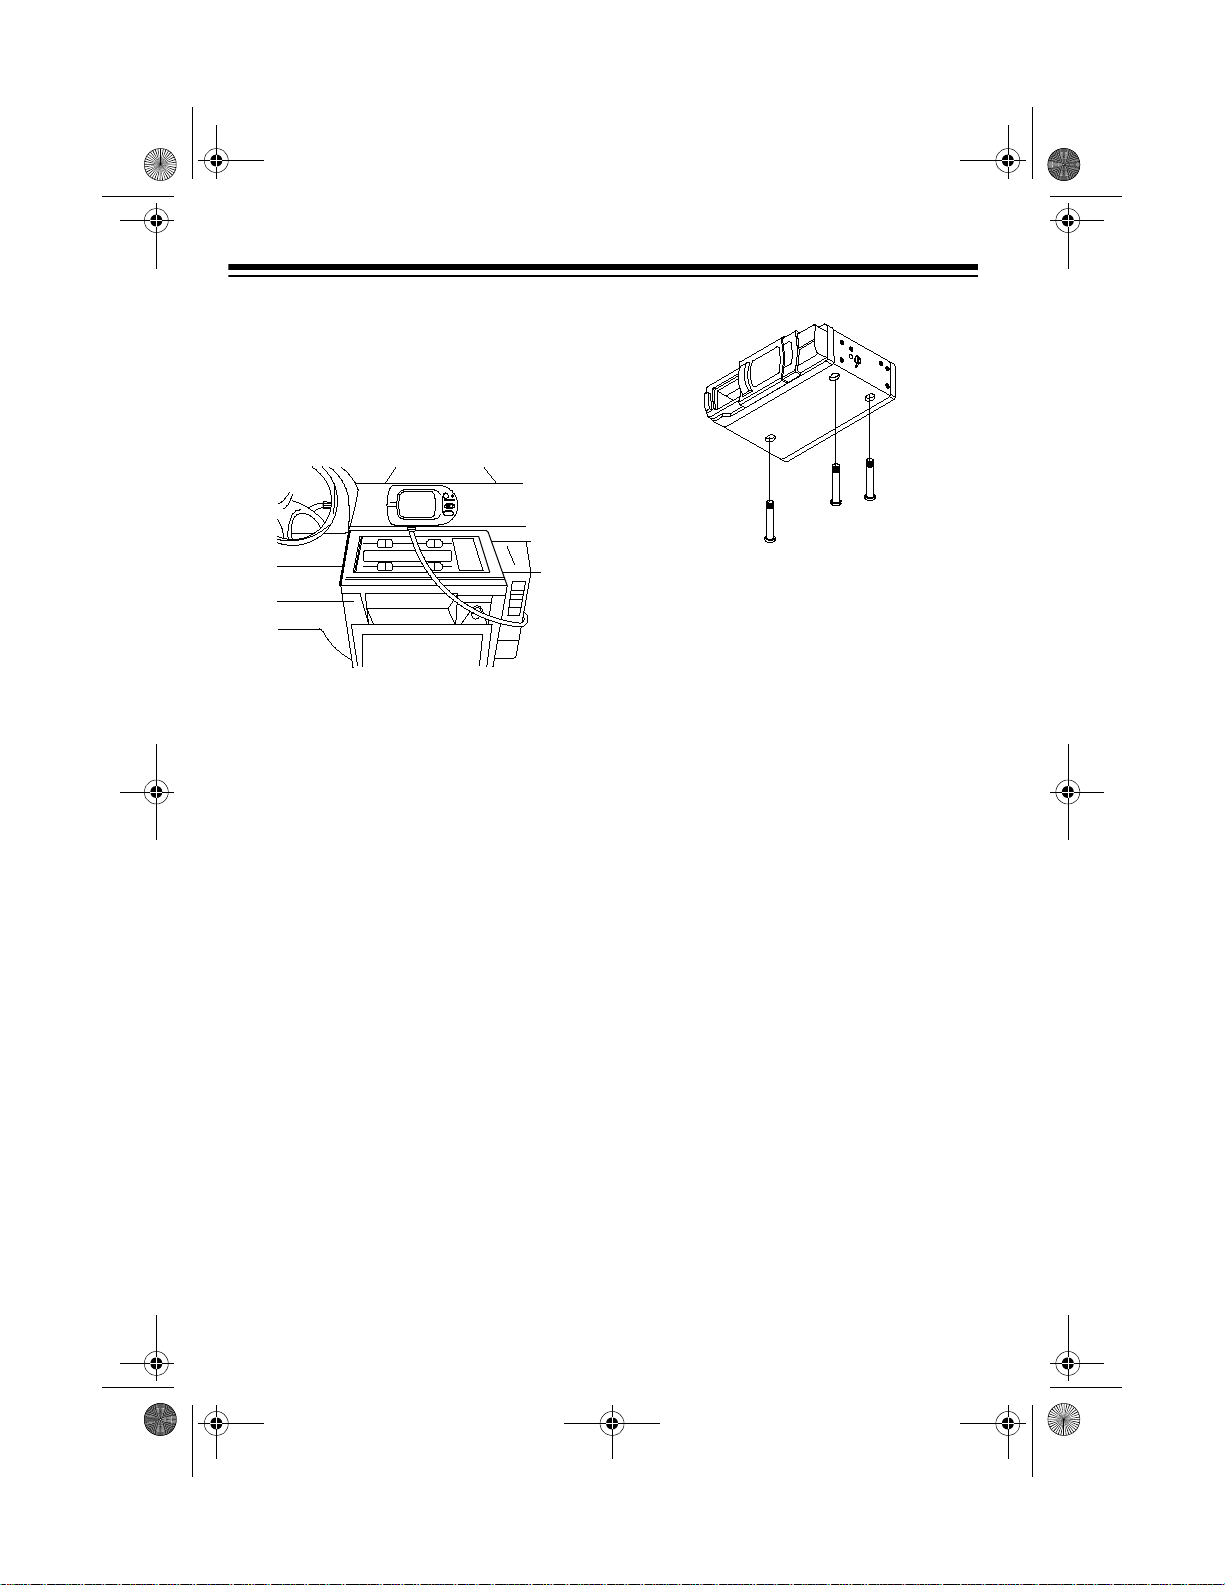
Mounting the CD Changer
Controller
The supplied hook-and-loop fastener
lets you secure ly mount the CD changer
controller on the dashboard and easily
remove it when you need it.
Select a mounting location, then follow
these steps to secure the controller.
1. Clean both mounting surfaces with
isopropyl alcoho l and allow them to
completely dry.
2. Peel the backing from one side of
the hook-and-loop fastener and
attach it to the mounting location.
3. Peel the backing from the ot her si de
of the hook-and-loop fastener and
press the controller onto the fastener.
Reconnecting the Vehicle’s
Battery
When you finish mounting the components, reconnect the cable to the vehicle
battery’s negative (–) terminal.
15
Page 16

C
H
A
N
G
E
R
10-CD
RadioShack
12-2182.fm Page 16 Friday, September 3, 1999 7:31 AM
OPERATION
LOADING AND
UNLOADING THE CD
MAGAZINE
You can load as many as ten CDs in the
supplied CD magazine.
1. Hold the CD magazine so the clea r
CD window faces you and the highest CD number (
the CD window.
2. Slide all of the disc levers on the
back edge of the CD m agazine fully
in.
3. Use a pencil to record the titles of
the CDs you load in the CD magazine on one of the supplied index
labels, then peel off the backi ng a nd
affix the label to the side of CD magazine.
10
) is at the top of
Cautions:
• Do not insert more than one CD int o
the same slot in the CD magaz ine.
This will damage the CD magazine ,
the CD changer, and the CDs.
• Do not insert an ything other t han 5inch CDs into the CD magazine.
To unload CDs from the CD magaz ine,
hold down the disc lever for the CD you
want to unload. The CD pops out. Grasp
the CD by its edges and remove it.
LOADING AND
UNLOADING THE CD
CHANGER
Follow these step s to load the CD m agazine into the CD changer.
1. Slide the CD changer ’s door all the
way to the right until it locks into
place.
As you insert a CD into the CD magazine, the disc lever moves to the right.
16
Page 17

12-2182.fm Page 17 Friday, September 3, 1999 7:31 AM
2. Hold the CD magazine with the
highest CD number (
10
) on top with
the arrow on the top of the CD mag azine pointing toward the CD
changer.
R
a
d
io
S
h
a
c
k
3. Gently push the CD magazine into
the CD changer until it clicks. You
can see the index lab el through the
opening.
Caution:
The CD magazine fits i nto
the CD changer only one way. Do
not force it.
4. Slide the CD changer ’s door all the
way to the left to close it.
To unload the CD magazine from the
CD changer, slide the CD changer’s
door open, then press
EJECT
to eject
the magazine.
PLAYING CDS
Cautions:
• The CD changer has a wide
dynamic range. If you turn up your
radio’s volume too high during soft
(low volume) sections of a program,
your speakers might be damaged
when a sudden loud passage
occurs.
• If the CD changer is jolted during
play, the rotation speed might suddenly change or the CD changer
might make an unus ual noise. This
is not a malfunction.
Notes:
• To play CDs, you must load them
into the CD magazin e, then load the
magazine into the CD changer. The
display continues to flash if you did
not load CDs into the m agazine, or
did not load the magazine into the
changer. The changer displays the
number for each CD loaded in the
magazine (1–10). Then the changer
selects the CD you loaded into the
lowest slot number.
The CD changer must be con-
Note:
nected to power to eject the magazine.
• If you connected the Audio
Adapter’s antenna plug to your
sound system’s antenna jack, you
must select the FM band on your
sound system’s radio and tune to
the same frequency as the
88.7MHz
setting on the Audio
89.1MHz/
Adapter. For easy operation, store
this setting as one of your sound
system’s preset stations.
17
Page 18

12-2182.fm Page 18 Friday, September 3, 1999 7:31 AM
To turn on the CD changer and play a
CD, press
(Play/Pause) on either
the infrared remote control or the CD
changer controller. The CD starts to play
from Track 1 of the CD in the lowestnumbered slot. The display shows
and the track number.
DISC
RadioShack
d
ISC
Note:
The CD changer controller has
only and
CD CHANGER CONTROLLER
OFF
OFF
buttons. To control
other functions, use the i nfrared remote
control.
After the CD changer plays each track
on the CD, it automatically selects the
next loaded CD (from l owest to highe st)
and plays all trac ks on that CD , starting
with Track 1.
When the CD changer has played all
tracks on all loaded CDs, it automatically
plays the lowest loaded CD, starting with
Track 1. Play continues until you stop
the CD changer.
CD changer resumes playing the last
song played.
RadioShack
ISCd
CD CHANGER CONTROLLER
OFF
OFF
Using Track Search
To move to the beginnin g of the next or
previous track on th e CD, press or
. Repeatedly press or to
move to another track. The display
shows the current track number.
Using Track Skip
To search for a particular section of a
track on the current CD , hold down
or during play. The CD changer
rapidly plays the CD backward or forward. Release or to resume
normal play.
The display shows the rotating disk
moving faster and or flashes.
Press while a CD is playing to temporarily stop play. appears on the display. Press again to resume play.
When play is paused for 5 min-
Note:
utes, the CD changer automatically
turns off.
To stop play and turn off the CD ch anger, press
OFF.
When you press , the
18
Selecting a CD
To select a parti cular CD loaded in the
CD magazine, repeated ly press
– DISC
or
number under
until the display shows the CD
DISC.
+ DISC
Page 19

12-2182.fm Page 19 Friday, September 3, 1999 7:31 AM
Intro Scan
You can set the CD changer to play the
first 10 seconds of each track on the current CD, to help you fi nd the track you
want to hear.
SCAN
Press
play shows
scanning.
To stop scanning and resume to playback, press
pears from the display.
to begin the scan. The di s-
and the track number
SCN
SCAN
again.
SCN
disap-
Repeat Play
Press
current track plays repeatedly.
Hold down
more.
rent disc plays repeatedly.
Press
REPEAT
.
REPEAT
DISC RPT
REPEAT
again to end repeat play.
appears and the
RPT
for three se co nds o r
appears and the cur-
tracks on all discs in th e CD magazine
have played. Then shuffle play stops.
Press
play.
SHUFFLE
again to end shuffle
SWITCHING BETWEEN
THE CD PLAYER AND THE
RADIO
If you connected the Audio Adapter’s
antenna plug to your sound system’s antenna jack and you wan t to listen to the
radio, turn off the CD changer, then tune
the radio to the station you want to hear.
If you do not stop o r turn off the
Note:
CD changer, the CD continues to play
while you listen to the radio.
To return to the CD, tune the radio to the
same FM frequency as the
7 MHz
setting on the FM modulator.
89.1 MHz/88-
Shuffle Play
Press
the tracks on t he c ur rent dis c pla y i n ra ndom order. When all tracks on the current disc have playe d, the y p lay again in
a differ ent order.
Hold down
or more.
all the tracks on a randomly-selected
disc are played in ran dom order. When
all tracks on thst disc have played, all
the tracks on a different randomly-selected disc play. Thi s continues until all
SHUFFLE
. SHUFF appears, and
SHUFFLE
for three seconds
DISC SHUFFLE appears and
19
Page 20

12-2182.fm Page 20 Friday, September 3, 1999 7:31 AM
RESETTING THE AUDIO
ADAPTER
If the CD changer displays an error code
(
Err 1–Err 10
work properly, press the hole on the bottom of the Audio Adapter marked
with a pointed object, such as a straightened paper clip, for 1 or 2 seconds.
), locks up, or doe s not
RESET
RESET
20
Page 21

12-2182.fm Page 21 Friday, September 3, 1999 7:31 AM
TROUBLESHOOTING
If your CD changer is not working as it should, these sug gestions might help you
eliminate the problem. If the CD changer still does not operate properly, take it to your
local RadioShack store for assistance.
Symptom Possible Cause Suggestion
No power — display
does not light after vehicle power is turned on.
No sound. Vehicle radio’s volume set to
CD changer does not
work.
Po wer problem.
CD changer/component’s
not connected to sound system/vehicle correctly.
minimum.
Vehicle radio not set to the
proper FM frequency.
CD changer/comp onents not
connected to sound system/
vehicle correctly.
Transport screws not
removed from the CD
changer.
No CDs loaded in CD magazine.
CD magazine not loaded in
theCD changer.
Check the CD changer’s and
sound system’s fuses and
replace them if necessary (see
“Replacing a Fuse” on P age 25).
Check all connections.
Adjust the vehicle radio’s volume.
Set the vehicle’s radio to FM
band and tune to the frequency
set on the FM modulator (89.1
MHz or 88.7 MHz ).
Check all connections.
Remove the transport screws
from the CD changer (see
“Removing the Transport
Screws” on Page8).
Load CDs in the CD magazine.
Load the CD magazine in the
CD changer.
CD loaded upside down in
the CD magazine.
CD is dirty or defective. Clean the CD (see “CD Care
CD changer must be reset. Reset the CD changer (see
Load the CD correctly.
Tips” on Page 24).
Try another CD.
“Resetting the CD Changer” on
Page24).
21
Page 22

12-2182.fm Page 22 Friday, September 3, 1999 7:31 AM
Symptom Possible Cause Suggestion
Sound from CD skips. CD is dirty or defective. Clean the CD and try it again or
try another CD (see “CD Care
Tips” on Page 24).
Static sounds on radio
when CD stops playing.
CD magazine does not
eject from CD changer
when is pressed.
set incorrectly. Check
H/V
FM modulator not set to a
frequency with an active
radio station.
CD changer requires power
to eject CD magazine.
on both sides of CD
H/V
changer and reset if necessary
(see “Mounting the CD
Changer” on Page 13).
Set
88.7 MHz/89.1 MHz
to a frequency with an active radio station (if available).
If there is no active broad-
Note:
cast on 88.7 MHz or 89.1 MHz,
you cannot eliminate these
static sounds.
Turn on your vehicle’s ignition
and try again.
Check the CD changer’s and
sound system’s fuses and
replace them if necessary (see
“Replacing a Fuse” on Page 25).
22
Page 23

12-2182.fm Page 23 Friday, September 3, 1999 7:31 AM
CARE AND MAINTENANCE
Your
10 Disc CD Changer System
ship. The following s ugges tions wi ll help y ou care for yo ur CD cha nger s o you can
enjoy it for years.
Keep the CD changer dry. If it gets wet, wipe it dry immediately. Liquids
might contain minerals that can corrode the electronic circuits.
Use and store the CD changer only in normal temperature environments. Temperature e xtremes can shorten th e life of electronic dev ices, damage batteries, and distort or melt plastic parts.
Keep the CD changer away from dust and dirt, which can cause premature wear of parts.
Handle the CD changer gently and carefull y. Dropping it can damag e
circuit boards and cases and can c ause the CD changer to work improperly.
Use only fresh batteries of the required size and recommended type.
Batteries can leak c hemicals that damage your remo te control’s electronic parts.
is an example of superior design and craftsman-
Wipe the CD changer with a damp c loth oc casion ally to k eep it l ooking
new. Do not use harsh chemi cals, cleaning solvents, or strong detergents to clean the CD changer.
Modifying or tampering with the C D cha nger’s internal components can cause a
malfunction and mig ht invalidate its warranty and v oid your FCC authorization to
operate it. If your CD changer is not performing as it should, take it to your local RadioShack store for assistance.
23
Page 24

12-2182.fm Page 24 Friday, September 3, 1999 7:31 AM
THE FCC WANTS YOU TO
KNOW
Your CD changer might c ause TV or ra dio interference even w hen it is operating properly. To dete rmine whether you r
CD changer is causin g the interference,
turn off your CD changer. If the interference goes away, your CD changer is
causing it. Try to eliminate the interference by:
• Moving your CD changer away from
the receiver.
• Contacting your local RadioShack
store for help.
If you cannot eliminate the interference,
the FCC requires that you stop using
your CD changer.
CD CARE TIPS
Even though a CD is very durabl e, you
should handle it with care. We recommend the following precautions.
• Keep the CD in its protective case or
sleeve when you are not playing it.
• Handle a CD by it s edges to avoid
fingerprints which can prevent the
CD changer’s laser beams from
accurately reading the CD. Your
local RadioShack store sells a suitable CD cleaner kit.
• Keep the CD dry. A water drop can
act as a lens and affect the laser
beam’s focus.
• If you park you r vehicle in the sun,
temperatures insi de the vehicle can
easily reach levels that could damage your CDs. T o prevent heat damage, avoid leaving yo ur CDs in your
vehicle.
• If a CD skips when you play it, the
CD might be scratched. Your local
RadioShack store sells a Scratch
and Fix kit that might help remove
the scratch and stop the skip.
RESETTING THE CD
CHANGER
If your CD changer or any component
locks up or doe s not work pr operly, or i f
the vehicle’s batte ry loses power , follow
these steps to reset the CD changer.
1. Turn on your vehicle’s ignition.
2. Slide the CD changer ’s door all the
way to the right.
3. With a pointed object, such as a
straightened paper clip, press the
reset hole (to the left of
inside the CD changer) for abou t 2
seconds.
EJECT
• Do not write on either side of the
CD, particularly the non-label side.
(Signals are read from the non -label
side.)
24
Page 25

12-2182.fm Page 25 Friday, September 3, 1999 7:31 AM
REPLACING A FUSE
If the CD changer or its component s do
not operate, you m ight need to replace
the fuse from one or more o f the power
wires with one of the supplied fuses.
Check all fuses.
The fuse for the yellow power wire on
the CD changer must be 5.0 amp s. On
the Audio Adapter, the red power wire’s
fuse should be 0.5 amps, while the yellow continuous power wire’s fuse must
be 5 amps.
Warning:
Before you begin , disconnect
the cable from the vehicle ba ttery’s negative (–) terminal.
1. Unlatch the two latches on the fuse
holder, so the holder springs open.
2. If a fuse is blown, replace it. Use
only standard 1
1
/4-inch fuses with
the proper rating.
Caution:
The supplied spare fuses
have the proper rating s. Make sure
you replace a fuse only with ano the r
fuse of the same rating.
3. Reassemble the fuse holder by
squeezing it together.
4. Reconnect the cable to the vehicle
battery’s negative (–) terminal.
25
Page 26

12-2182.fm Page 26 Friday, September 3, 1999 7:31 AM
SPECIFICATIONS
CD CHANGER
Frequency Response:
20 Hz ................................................................................................................. ± 3dB
10 kHz ............................................................................................................... ± 3dB
20 kHz ............................................................................................................... ± 3dB
Signal-to-Noise Ratio (1 kHz) ........................................................................... 60 dB
Harmonic Distortion (1 kHz) ................................................................................ 0.3%
Signal Format :
D-A Conversion ...................................................................... 2-Channel Sigma Delta
Sampling Type/Frequency ................................................. 8
Pick-Up:
System................................................................................................. Sanyo M90281
Wavelength ............................................................................................. 785–815 nm
CD Used (Diameter) ..................................................................... 5 Inches (127 mm)
Power Source ................................................................. 14.4V DC Negative Ground
× Oversampling 44.1kHz
Power Consumption ............................................................................... 3A Maximum
Unit Weight .................................................................................. 6 Ibs, 7 oz (2920 g)
Unit Dimensions (HWD) ....................... 3
1
/2 × 117/16 × 75/8 Inches (90 × 290 × 194 mm)
CONTROLLER/FM MODULATOR
Power Source ........................................................... 14.4 Volts DC Negative Ground
Unit Weight:
Controller .................................................................................................. 4 oz (120 g)
FM Modulator and Ground Isolator ........................................................ 14 oz (390 g)
Unit Dimensions (HWD):
Controller .................................................. 1
FM Modulator and Ground Isolator ............. 1
13
/16 × 39/16 × 13/16 Inches (47 × 91 × 2 mm)
1
× 4
/8 × 39/16 Inches (26 ×105 × 90 mm)
Specifications are typical; individual units might vary. Specifications are subject to
change and improvement without notice.
26
Page 27

12-2182.fm Page 27 Friday, September 3, 1999 7:31 AM
NOTES
27
Page 28

12-2182.fm Page 28 Friday, September 3, 1999 7:31 AM
Limited One-Year Warranty
This product is warrante d by RadioSha ck against manufac turing defect s in material and wor kmanship under normal use for one (1) year from the date of purchase from RadioShack company-owned
stores and authorized RadioShack franchisees and dealers. EXCEPT AS PROVIDED HEREIN, RadioShack MAKES NO EXPRESS WARRANTIES AND ANY IMPLIED WARRANTIES, INCLUDING
THOSE OF MERCHANTABILITY AND FITNESS FOR A PARTICULAR PURPOSE, ARE LIMITED
IN DURATION TO THE DURATION OF THE WRITTEN LIMITED WARRANTIES CONTAINED
HEREIN. EXCEPT AS PROVIDED HEREIN, RadioShack SHALL HAVE NO LIABILITY OR RESPONSIBILITY TO CUSTOMER OR ANY OTHER PERSON OR ENTITY WI TH RESPECT TO ANY
LIABILITY, LOSS OR DAMAGE CAUSED DIRECTLY OR INDIRECTLY BY USE OR PERFORMANCE OF THE PRODUCT OR ARISING OUT OF ANY BREACH OF THIS WARRANTY, INCLUDING, BUT NOT LIMITED TO, ANY DAMAGES RESULTING FROM INCONVENIENCE, LOSS
OF TIME, DATA, PROPERTY, REVENUE, OR PROFIT OR ANY INDIRECT, SPECIAL, INCIDENTAL, OR CONSEQUENTIAL DAMAGES, EVEN IF RadioShack HAS BEEN ADVISED OF THE
POSSIBILITY OF SUCH DAMAGES.
Some states do not allow the limitations on how long an implied warranty lasts or the exclusion of incidental or consequential damages, so the above limitations or exclusions may not apply to you.
In the event of a pr oduct defect durin g the warranty pe riod, take the pro duct and the RadioShack
sales receipt as proof of purchase date to any RadioShack store. RadioShack will, at its option, unless otherwise provid ed by law: (a) correct the defect by product repair wi tho ut c har ge for parts and
labor; (b) replace the product wi th one of the same or similar design; or (c) refund the purch ase
price. All replace d parts a nd prod ucts, and p roducts o n which a refund is made, become th e property of RadioShack. New or recond itioned parts a nd products may be used in the performance of
warranty service. Re paired or replace d parts and pro ducts are warran ted for the rem ainder of the
original warranty period. You will be charged for repair or replacement of the product made after the
expiration of the warranty period.
This warranty does not cover: (a) damage or failure caused by or attributable to acts of God, abuse,
accident, misuse, i mproper or abnormal usag e, fa ilu re to fo ll ow i nstructi o ns, imp rop er installation or
maintenance, altera tion, lightning or othe r incidence of excess voltage or current; (b ) any repairs
other than those provided by a RadioShack Authorized Service Facility; ( c) consumables such as
fuses or batteries; (d) cosmetic dam age; (e) tra nsportation , shipping or insurance costs; or (f) costs
of product removal, installation, set-up service adjustment or reinstallation.
This warranty give s you specific l egal rights, an d you may al so have other r ights which var y from
state to state.
RadioShack Customer Relations, 200 Taylor Street, 6th Floor, Fort Worth, TX 76102
We Service Wh at We Sell
04/99
RadioShack
A Division of Tandy Corporation
Fort Worth, Texas 76102
09A99 Printed in China
 Loading...