

Page 1
Large LCD Talking Calendar Watch
OWNER’S MANUAL — Please read before using this equipment.
FEATURES
Your RadioShack Large LCD Talking Calendar Watch combines a
simple design with advanced technology. You can set the watch to announce the time, date, and alarm time. It even counts up from a set
time. Your watch is ideal for the visually impaired.
Its features include:
Large Liquid Crystal Display
— shows you large, easy-to-read dig-
its.
Voice Announcement
— lets you hear the date and time whenever
you like, with the touch of a button.
Four Daily Alarms
— let you set up to four alarms daily, reminding
you of impor tant events.
Hourly Announcement
— lets you set the watch to announce the
time on every hour.
Talking Stopwatch
— lets you time events up to 24 hours and record
lap times.
Date/Time Display
— shows the y ea r , mo nt h , d at e , day of we ek , a nd
time in 12-hour format.
100-Year Calendar
— gives you the calendar from 1990 to 2090.
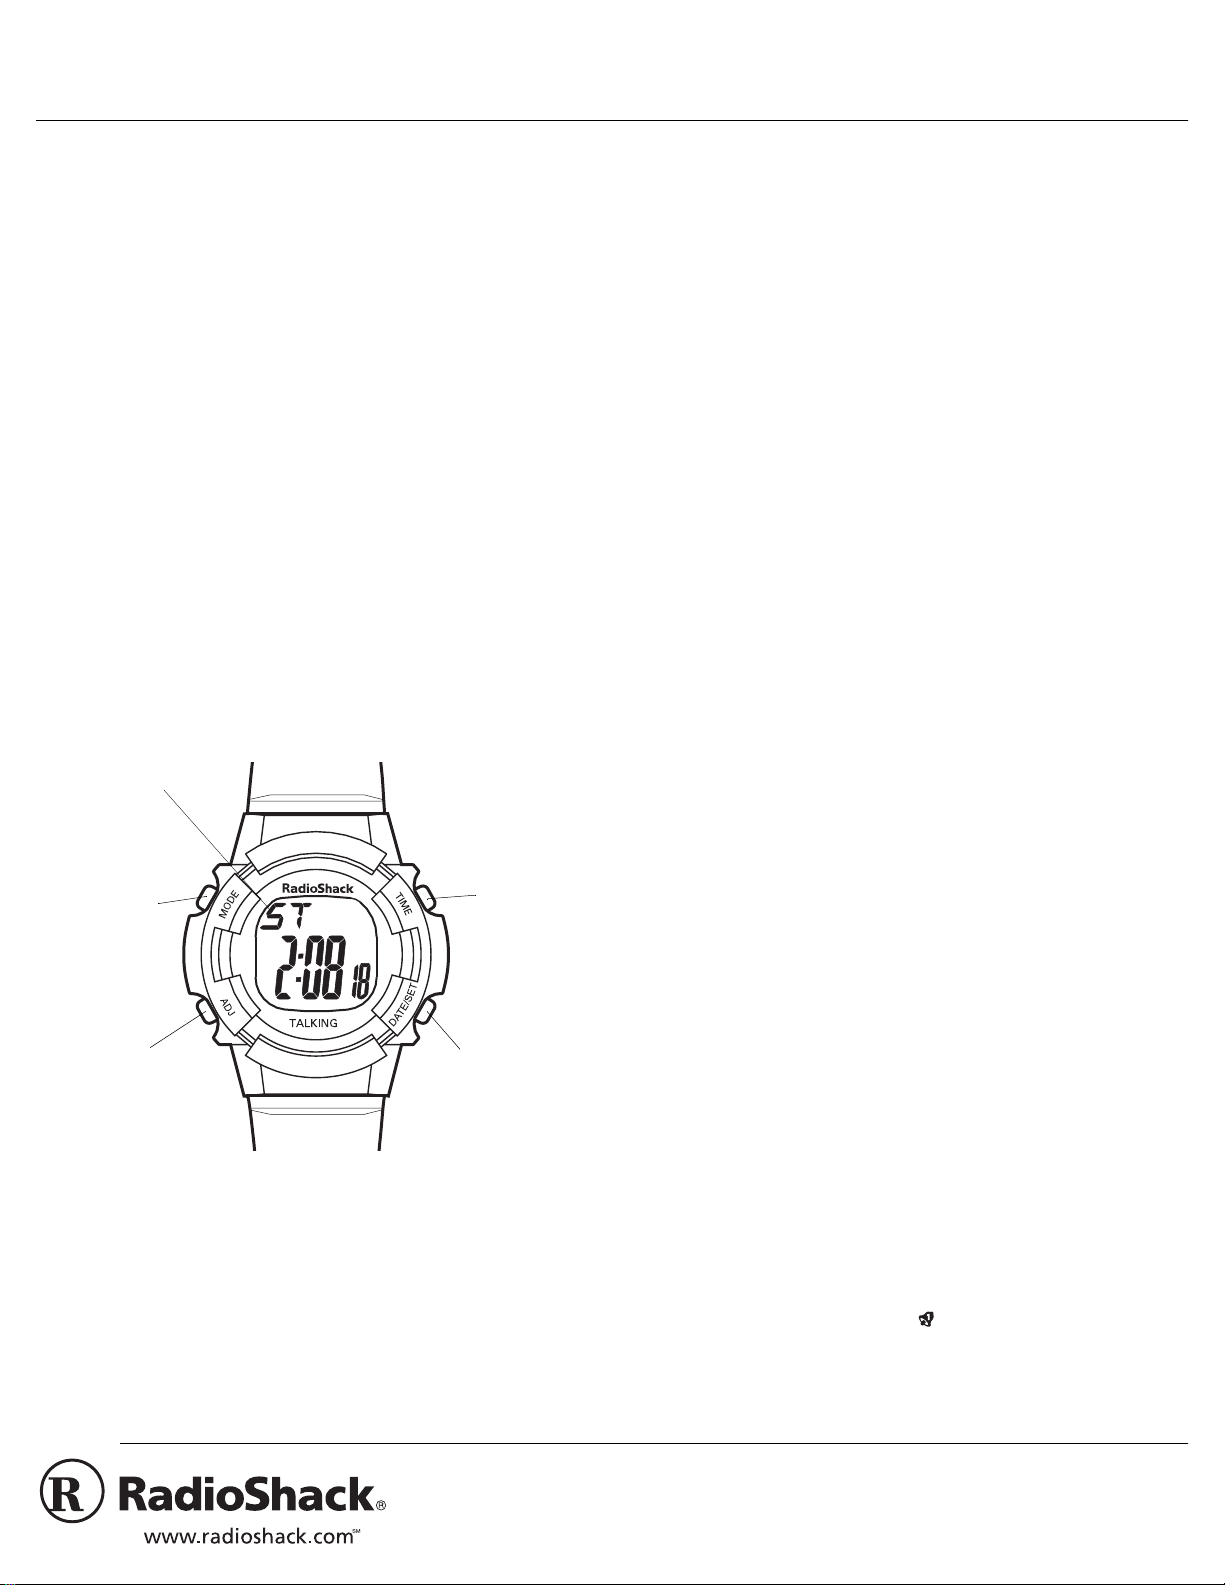
A QUICK LOOK AT YOUR WATCH
STOPWATCH
3. Repeatedly press (or hold down)
ADJ
to set the correct hour. The
watch announces the hour as it advances on the display.
4. Press
DATE/SET
to store the hour. The wa tch an nou nc es “mi nu t e
set” and the minute digits flash.
5. Repeat Steps 3 and 4 to set the minutes, year, month, and date.
6. Press
MODE
to finish setting the watch. The watch beeps once
then returns to the time display.
Notes
:
• After setting the correct day, the watch automatically sets the day
of the week.
• The watch announces the time and date as they advance.
The watch uses a 12-hour format.
•
appears at the left of the
PM
display for a PM hour.
Using Voice Announcement
To hear the time, press
To hear the date, press
date. For example, if you press
watch announces “Toda y is the second,” and
To display the current year, press
TIME
. The watch announces the current time.
DATE/SET
once. The watch announces the
DATE/SET
on December 2nd, the
12 M 02 D
DATE/SET
again.
appears.
Setting the Alarm Time
The watch lets you set up to four daily alarms. Follow these steps to
set the desired alarm time.
MODE
ADJ
TIME
DATE/SET
OPERATION
Setting the Time, Year, Month, Date, and Day
Note
: While setting the time and date, if you do not press any key for
more than 1 minute, the watch returns to the current time display.
MODE
1. Repeatedly press
the time.
2. Hold down
DATE/SET
“time set” and “hour set,” and the hour digits flash.
until the watch announces and displays
for about 2 seconds. The watch announces
1. Repeatedly press
until the watch announces “alarm 1.”
MODE
and 1 (the current alarm number) appear.
2. Hold down
DATE/SET
for about 2 seconds. The watch announces
“alarm 1 set” and “hour set,” and the hour digits flash.
3. Repeatedly press (or hold down)
ADJ
to set the correct hour. The
watch announces the hour as it advances on the display.
4. Press
DATE/SET
to store the hour. The watch announces “minute
set” and the minute digits flash.
5. Repeat Steps 3 and 4 to set the minute.
MODE
6. Press
to finish setting the alarm time.
7. Repeat Steps 1–6 to set alarms 2, 3, and 4.
Turning the Alarm On and Off
Repeatedly press
ADJ
once to turn the alarm on. The watch announces “alarm,” the selected alarm number, and “on,” and (or the currently selected alarm
number) appears. After turning on the alarm, repeatedly press
to return to the current time.
Note
: If you do not press a key within about 30 seconds after turning
on the alarm, the current time display automatically appears.
©
RadioShack and RadioShack.com are trademarks used by RadioShack Corporation.
MODE
until the desired alarm setting appears. Press
2000 RadioShack Corporation.
All Rights Reserved.
AL
MODE
Page 2
At the preset alarm time, the watch announces the time. For example,
if you set alarm 1 to sound at 10:35 AM, the watch repeatedly announces “Alarm 1. Good morning. It is 10:35 AM,” then repeatedly
sounds a series of four beeps for about 1 minute. To silence the alarm
sooner, press any key.
MODE
To turn off the ala rm so it does not so und, repeatedly press
the desired alarm setting appears, then repeatedly press
watch repeatedly announces “alarm” and the selected alarm number
“off,” and disappears.
ADJ
until
until the
Turning the Hourly Time Announcement On and Off
Follow these steps to measure lap times.
Repeatedly press
1.
The stopwatch display and
is flashing , press
: If
Note
reset the stopwatch to
2. Press
When the first lap is finished, press
3.
play freezes, but the stopwatch timer c ontinues to ru n. The
the elapsed time flashes.
:
ADJ
to start the stopwatch timer.
until the watch announces "stopwatch".
MODE
appear.
ST
then press
ADJ
0:00 00
.
DATE/SET
DATE/SET
. The stopwatch dis-
twice to
:
in
You can set the watch so it announces the time on the hour. When the
ADJ
watch displays the current time, press
“hourly report on,” and appears. To turn off the hourly report, press
ADJ
again. The watch announces “hourly report off,” and disap-
pears.
Note
: The hourly time announcement sounds at the beginning of each
hour between 6:00 AM and 10:00 PM.
. The watch announces
USING THE STOPWATCH TIMER
The stopwatch counts elapsed time up to 23 hours, 59 minutes and 59
seconds. When the timer reaches
and begins counting up again.
Follow these steps to operate the stopwatch.
Repeatedly press
1.
and
ST
Notes
•
• To reset the stopwatch to
2. Press
announces timing and the display shows the advancing time.
3. Press
4. To restart the stopwatch timer, press
continues from the elapsed time in Step 3.
Press
5.
0:00 00
Note
: While the stopwatch is running, you can press
watch’s other features.
0:00 00
:
If
0:00 00
not runni ng. Press
.
00
while the timer is running. The watch announces “all clear” and
the timer changes to
ADJ
to start the stopwatch timer. The stopwatch starts and
ADJ
. The stopwatch timer stops and the display freezes.
to stop the timer, then press
ADJ
. The watch announces "all clear."
MODE
(the stopwatch) appear.
does not appear and : does not flash, the timer is
DATE/SET
23:59 59
until the watch announces “stopwatch.”
to reset the stopwatch to
0:00 00
0:00 00
.
, it reset s to
, press
ADJ
DATE/SET
then
ADJ
. The stopwatch timer
to reset it to
MODE
0:00 00
0:00
DATE/SET
to use the
4. When you have documented the lap time, press
display changes to show the advancing time on the stopwatch
timer.
5. Repeat Steps 3 and 4 for each additional lap.
Press
6.
the display to
The stopwatch timer announces the elapsed time according to this table.
Elapsed Time Announcement
1 to 10 seconds Each second
11 seconds to 1 minute Every 10 seconds
1 to 10 minutes Every minute
10 minutes to 24 hours Every 10 minutes
For example, the stopwatch announces “5 minutes” if
pears.
You also can press
while the stopwatch is running.
to stop the stopwatch. Then press
ADJ
0:00 00
TIME
.
to hear the voice announcement at any time
DATE/SET
DATE/SET
0:05 00
. The
to reset
ap-
CARE
Keep the watch dry; if it gets wet, wipe it dry immediately. Use and
store the watch only in normal temperature environments. Handle the
watch carefully; d o not d rop it. Keep th e wa tch awa y from dust and di rt,
and wipe it with a damp cloth occasionally to keep it looking new.
Modifying or tampering with the watch’s internal components can
cause a malfunction and invalidate its warranty. If your watch is not
performing as it should, take it to your local RadioShack store for assistance.
REPLACING THE BATTERY
RECORDING LAP TIMES
The watch’s lap function lets you freeze the display, document the
timed reading, then return to the stopwatch timer to see the advancing
time. You can monitor lap times continuously as long as the stopwatch
continues to run.
Your watch comes with one CR2025 lithium battery installed for power. When the display dims or the watch stops operating properly, replace the battery.
Note:
The screws are small and can be easily misplaced. Be sure you
note where you place them. Also, the metal clip is difficult to remove
and easy to bend when re-installing. If you are unsure whether you
can do this, we recommend that you take the watch to your local RadioShack store to have the battery replaced.
2
Page 3

1. Use a Phillips screwdri ve r to re mo ve the four screws from the battery compartment cover.
SPECIFICATIONS
Power Source ........................................................ CR2025 3V Lithium Battery
Clock Accuracy ................................... ........................... ..... ± .67 Seconds/Day
Current Drain ........................................................................... Less Than 5 µA
Operating Temperature ....................... ........................... ................... 32°-104° F
(0°-40°C)
Dimensions (HWD) ..................................................... 10
Weight ........................................ ........................................ .................... 1.41 oz
Battery Life ........................................................... 80 Hours (Continuously Talk)
Specifications are typical; individual units might vary. Specifications are subject
to change and improvement without notice.
1
/32 × 17/8 × 5/8 Inches
(25.5 × 4.74 × 1.59 cm)
(40 g)
2. Use a flat-blade screwdriver to gently pry off the metal clip.
3. Remove the old battery. Place a fresh battery in the compartment
with its positive (+) side facing up. Then replace the metal clip.
4. Replace the cover and secure it with the screws.
Warnings:
• Dispose of old batteries promptly and properly. Do not burn or
bury them.
• Keep button-cell batteries away from children. Swallowing a button-cell battery can be fatal.
3
Page 4

Limited One-Year Warranty
This product is warrante d by RadioShack aga inst manufacturi ng defects in mate rial and workma nship under normal use for one (1) year from the date of purchase from RadioShack company-owned
stores and authorized RadioShack franchisees and dealers. EXCEPT AS PROVIDED HEREIN, RadioShack MAKES NO EXPRESS WARRANTIES AND ANY IMPLIED WARRANTIES, INCLUDING
THOSE OF MERCHANTABILITY AND FITNESS FOR A PARTICULAR PURPOSE, ARE LIMITED
IN DURATION TO THE DURATION OF THE WRITTEN LIMITED WARRANTIES CONTAINED
HEREIN. EXCEPT AS PROVIDED HEREIN, RadioShack SHALL HAVE NO LIABILITY OR RESPONSIBILITY TO CUSTOMER OR ANY OTHER PERSON OR ENTITY WIT H RESPECT T O ANY
LIABILITY, LOSS OR DAMAGE CAUSED DIRECTLY OR INDIRECTLY BY USE OR PERFORMANCE OF THE PRODUCT OR ARISING OUT OF ANY BREACH OF THIS WARRANTY, INCLUDING, BUT NOT LIMITED TO, ANY DAMAGES RESULTING FROM INCONVENIENCE, LOSS
OF TIME, DATA, PROPERTY, REVENUE, OR PROFIT OR ANY INDIRECT, SPECIAL, INCIDENTAL, OR CONSEQUENTIAL DAMAGES, EVEN IF RadioShack HAS BEEN ADVISED OF THE
POSSIBILITY OF SUCH DAMAGES.
Some states do not allow limitations on how long an implied warranty lasts or the exclusion or limitation of incidental or consequential damages, so the above limitations or exclusions may not apply to
you.
In the event of a pro duct defect duri ng the warranty period, take the p roduct and the Ra dioShack
sales receipt as proof of purchase date to any RadioShack store. RadioShack will, at its option, unless otherwise provide d b y l aw: (a ) co rre ct t he defect by product rep air w it hou t ch arg e f or par ts a nd
labor; (b) replace the product with one of the same or simil ar design; or (c) refun d the purchase
price. All replace d parts a nd produ cts, and p roducts on which a refund is made, become th e property of RadioShack. New or recondit ioned parts and products may be use d in the perfor mance of
warranty service. Re paired or repl aced parts and p roducts are warr anted for the r emainder of the
original warranty period. You will be charged for repair or replacement of the product made after the
expiration of the warranty period.
This warranty does not cover: (a) damage or failure caused by or attributable to acts of God, abuse,
accident, misuse, improper or abnorma l usag e, failure to fo llow in struction s, improp er inst allatio n or
maintenance, alteratio n, lightning or other incidence of excess voltage or cur rent; (b) any repairs
other than those provided by a RadioShack Authorized Service Facility; (c) consumables such as
fuses or batteries; (d) cosmetic da mage; (e) transpo rtation, shipp ing or insu rance co sts; or (f) c osts
of product removal, installation, set-up service adjustment or reinstallation.
This warranty give s you specific le gal rights, and you may also h ave other right s which vary fro m
state to state.
RadioShack Customer Relations, 200 Taylor Street, 6th Floor, Fort Worth, TX 76102
We Service What We Sell
12/99
RadioShack Corporati on
Fort Worth, Texas 76102
63-5103
06A00
Printed in China
 Loading...