

Page 1

User Manual
QPrint FM
Page 2

2
Dear valued customer!
On behalf of our proud company we wish to welcome you to the QUORION family of fine business
machines. We sincerely hope you will appreciate the many benefits of being associated with a
distinguished product name that represents both quality and commitment to customer satisfaction
It is therefore with great pride that we look forward to continuing our close collaboration with our
customers.
Sincerely,
Your QUORION Team
Page 3

3
Index
1. Safety Precautions .................................................................................. 4
2. General information ................................................................................. 5
2.1 Technical data ....................................................................................................................... 5
2.2 Components .......................................................................................................................... 6
2.3 Control panel ......................................................................................................................... 7
2.4 Function keys ........................................................................................................................ 7
2.5 Interfaces ............................................................................................................................... 7
3. Getting started ......................................................................................... 9
3.1 Unpacking .............................................................................................................................. 9
3.2 Loading the paper roll ........................................................................................................... 9
3.3 Self test ................................................................................................................................ 10
4. Application for countries with fiscal law .............................................. 11
4.1 Topology .............................................................................................................................. 11
4.2 Programming ....................................................................................................................... 11
4.3 Activation of the Fiscal Memory ......................................................................................... 11
4.4 Operation with QProg ......................................................................................................... 12
4.5 Operation with function keys ............................................................................................. 12
5. Information on the Electromagnetic Compatibility and Safety........... 14
Page 4

4
1. Safety Precautions
This section presents important information intended to ensure safe and effective use of the QPrint
FM. Please read this section carefully and store it in an accessible location.
• Be sure the voltage of your main power net corresponds to the input voltage printed on the
rating plate of the system. Do not connect power adapters from other manufacturers. Use this
product only for its intended application. Improper usage may lead to equipment damage, fire,
or shock.
• Be sure your power cable meets the relevant safety standards and includes a power-system
ground terminal (PE terminal). Otherwise shock may result.
• Never attempt to stretch the cables to enable a connection. The power cable and DC cable
must have adequate slack at all times during use.
• Do not connect to electrical outlets close to devices that generate voltage fluctuations or
electrical noise. In particular, stay clear of devices that use large electric motors.
• Never insert or disconnect the power plug with wet hands. Doing so may result in severe
shock.
• Always connect the DC cable before plugging the power cable into the wall outlet.
• When disconnecting the DC cable, hold it firmly at the connector area. Do not tug on the cable
itself.
• Never attempt to repair this product yourself. Improper repair work can be dangerous.
• Never disassemble or modify this product. Tampering with this product may result in injury, fire,
or electric shock.
• Be sure to set this unit on a firm, stable, horizontal surface. Product may break or cause injury
if it falls.
• Keep the system away from all conditions, which may cause damage, fire or accidents: Direct
sunlight, high temperature and humidity, extreme changes in temperature, heating and cooling
equipment, or humidity, volatile materials, high levels of dust, vibration, and impact.
• Keep away any liquids from the system. If water or other liquid spills into the equipment, unplug
the power cable immediately, and then contact your dealer for advice. Continued usage may
lead to fire or shock.
• To prevent possible harm to the environment or human health please separate this product
from other waste streams to ensure that it can be recycled in an environmentally sound
manner. For more details on available collection facilities please contact your local dealer
where you purchased this product.
Page 5

5
2. General information
2.1 Technical data
Technical Data of Printer:
Print principle: Thermal Printer Model „LK-T21“
Print width: 72mm
Paper width: 80mm
Print speed: 200mm/sec.
Sheet feeder: drop in
Life time: 100km
MCBF: 70 mill. lines
Cutter: Guillotine cutter
Max. Number o cuts: 1, 5 mills.
Technical Data of FM Electronic:
Processor: 32 bit ARM 966E
Type: STR912
Program memory: 1, 5 MB FLASH ROM
Operating memory: 600 KB SRAM
Data memory: up to 4 MB FLASH ROM
Electronic journal: SD-Card up to 1GByte
FM memory: especially protected flash 512kByte
Power supply: external power supply 24V/60W
Extern Interface of QPrint:
Port 1 (RS232) Communication with PC / extern Devices
Port 2 (RS232) (*1 Extern 2-Line-LCD Display (autom.scanned)
Port 3 (RS232) (*1 Extern Keyboard (autom.scanned)
Port 4 (RS232) Printer (intern/fix)
LAN 10/100 Mbit Communication with PC / Extern Devices
USB (*2 Communication with PC / Extern Devices
Direct keys 4 keys – Direct controlling (Front side)
Drawer Cash-Drawer (special Interface)
Power Power supply 24V/ 2, 5 A
Operating and Environmental Condition:
Safety character: CE, UL
Electrical security: EN 60 950
EMC: EN 55022 / EN 61000–3-2 / EN 55024
MTBF: > 5 years
Operating temperature: 5º – 45º C
Storage and transport temperature: -5º – 50º C
Noise level thermal printer: < 60 dB
Generally:
Application in the professional range: Working time > 8h/Tag
Reliability > 5 years
Process quality: According to DIN EN ISO 9001:2000
(*1 – Qprint scanned automatic Port 2, 3 with power on, sought after known external devices (display, keyboard, terminal) and used these. That is for
example the display can be connected with Port 2 or Port 3. When QPrint do not find such a device, QMP can used these ports (like the configuration).
(*2 – are used, when PC-Port is equal “16” (default is “1” – Port 1)
Page 6
6
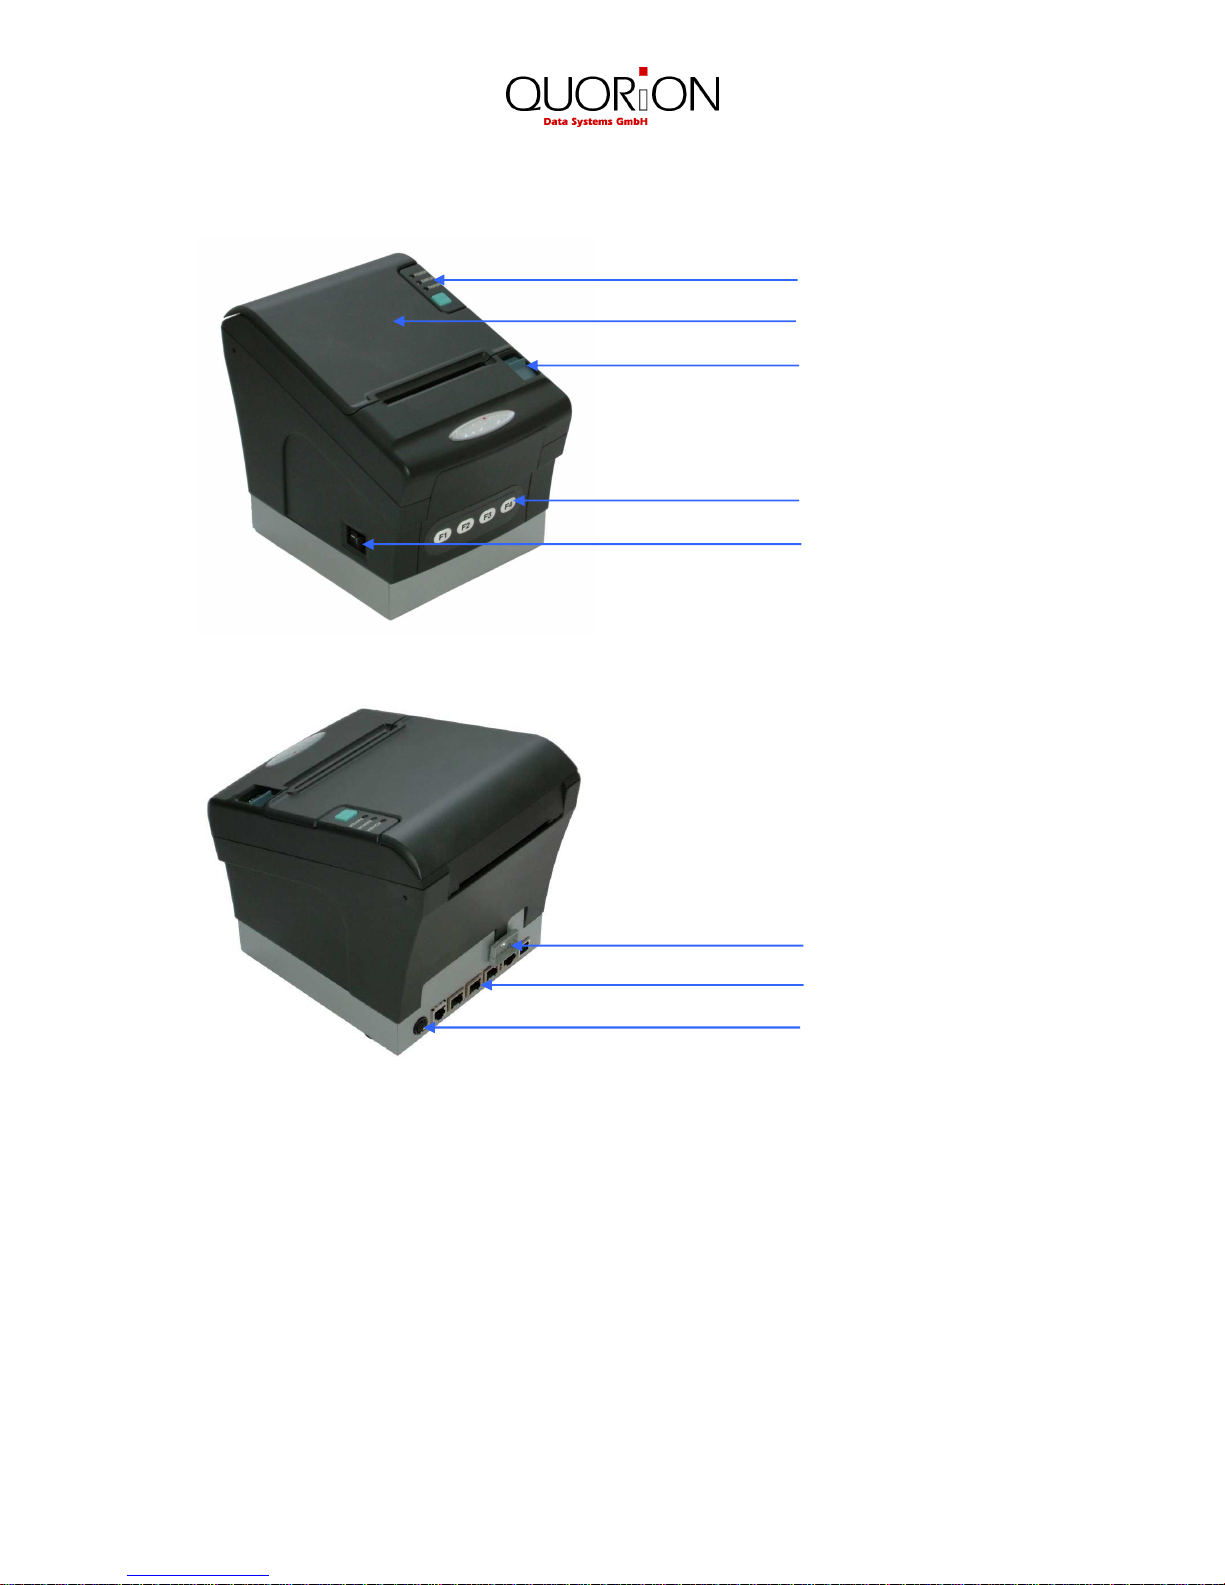
2.2 Components
Control panel: LED’s to indicate printer status and paper feed key.
Printer cover: Open this cover to load or replace the paper roll.
Cover open lever: Pull down this lever to open the printer cover.
Function keys: Used to program and operate special fiscal functions.
Power switch: Used to turn on/off power to the printer.
Fiscal seal: Protects the electronic and fiscal memory from manipulation.
Interfaces: Used to transmit data from/to the printer.
Power connector: Connection of the external power supply.
Control panel
Power switch
Function keys
Printer cover
Cover open lever
Interfaces
Power connector
Fiscal seal
Page 7
7
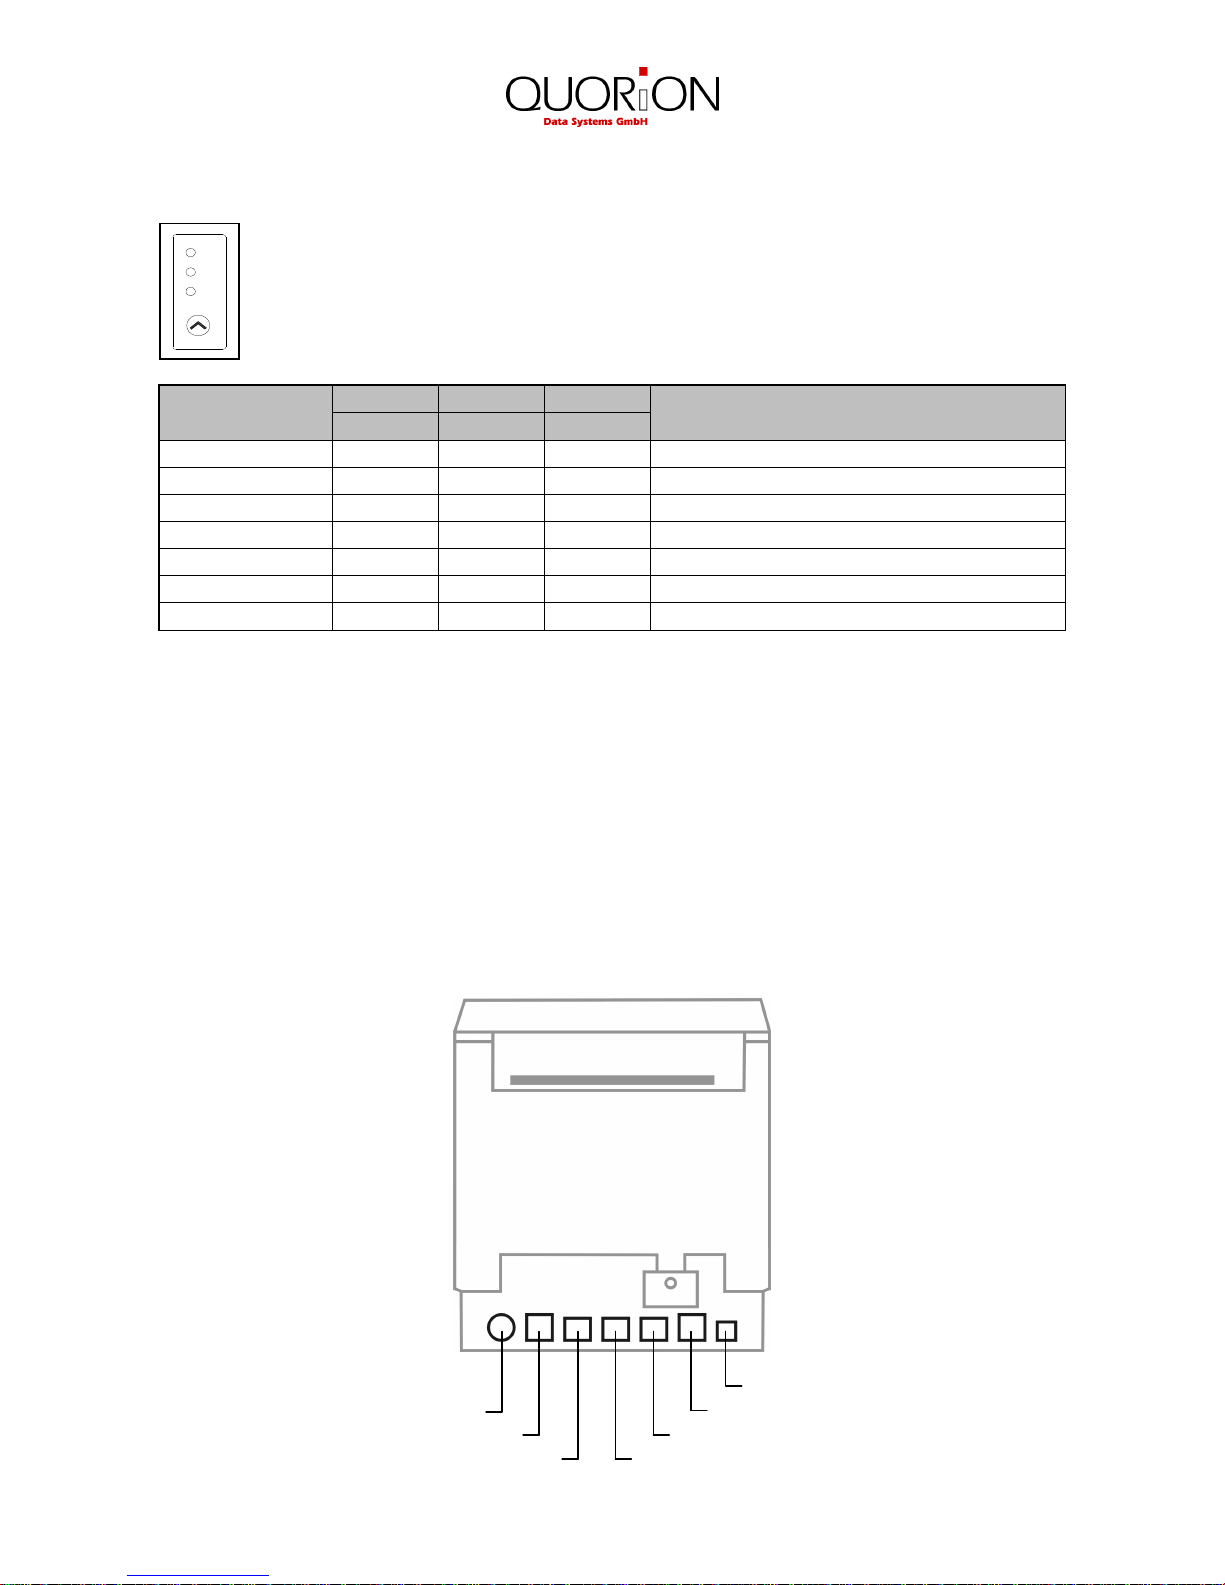
2.3 Control panel
You can control the basic paper feeding operations of the printer with the button on the
control panel. Press the FEED button once to advance paper one line. If you hold down
the FEED button the paper will be feed continuously.
The indicator lights help you to monitor the printer status. Please check the following
table for different patterns signaled by the three LED indicators
STATUS
PAPER
ERROR
POWER
REMARKS
RED
RED
GREEN
Power off OFF OFF OFF Normal power is not supplied to the printer
Power on OFF OFF ON Normal power is supplied to the printer
On line OFF OFF ON Normal error-free mode
Cover open OFF ON ON Close cover
Paper empty OFF ON ON Insert new paper roll
Paper near end ON OFF ON Paper is low
Test mode OFF OFF ON Ignored error led
2.4 Function keys
The function keys are four special keys at the front side of the QPrint FM which allow operating the
fiscal printer without external PC or keyboard. They are especially used to program data, print out
the reports and perform special fiscal operations. For detailed information about the usage please
check chapter 4.
2.5 Interfaces
The QPrint FM is equipped with three serial RS232-interfaces to establish connections to PC,
external display and keyboard. Alternatively you may connect the PC by LAN or USB. Furthermore
there is a connection to a cash drawer installed.
USB
Power supply LAN
Cash drawer RS232 port 1 (PC)
RS232 port 3 (keyboard) RS232 port 2 (display)
PAP ER
POW ER
ERR OR
FE ED
Page 8

8
Power supply 1: +24V DC
2: GND
3: NC
Cash drawer 1: GND
2: Drawer +
3: Sensor
4: Drawer 5: NC
6: GND
RS232 ports 1 to 3 1: +5V DC (max. 0,5A)
2: RxD
3: TxD
4: DTR
5: GND
6: DSR
7: RTS
8: CTS
LAN 1: TX+
2: TX 3: RX+
6: RX-
USB device 1: VCC
2: USB N1
3: USB P1
4: GND
Adapter cables from the QPrint FM to peripheral devices you may order from your local QUORION
dealer.
Page 9

9
3. Getting started
3.1 Unpacking
Your printer box should include these items. If any items are damaged or missing, please contact
your dealer for assistance.
Printer User manual Paper roll
Interface cables Power supply
Place the QPrint FM on a stable and even surface. Use it only within the operation temperature
range (see technical data) and protect it from splash and high air humidity.
The QPrint FM is delivered with an external power supply. First, please check if the specifications
printed on the label fit to your local power supply network. If so, connect the power pack to the
QPrint FM. The power connection of the printer is at the back beside the interfaces. Now connect
the power supply with the power network.
If desired, you can now connect the interface cables to PC, display and keyboard. They are all
connected to the connector panel on the back side of the printer as described in chapter 2.5.
Please make sure that the printer is turned off before connecting any cable.
3.2 Loading the paper roll
Please be sure only to use paper rolls that meet the specifications. Do not use paper rolls that
have the paper glued to the core because the printer cannot detect the paper end correctly.
1. Make sure that the printer is not receiving data. Otherwise data may be lost.
2. Open the paper roll cover by pulling down the cover-open button.
3. Remove the used paper roll core if there is one inside.
4. Insert new paper roll as shown below. Note the correct direction of the paper roll.
Page 10

10
6. Pull out a small amount of paper as shown below. Then close the cover.
7. Tear off the paper as shown.
3.3 Self test
The self-test lets you know if your printer is operating properly. It checks the control circuits, printer
mechanisms, print quality, ROM version and DIP switch settings.
This test is independent of any other equipment or software.
Running the self test:
1. Make sure the printer is turned off and the printer cover is closed properly.
2. While holding down the FEED button, turn on the printer using the switch on the front of the
printer to begin the self-test. The Self Test prints the printer settings and then prints the
following, Cuts the paper, and pauses. (Error LED On)
Self-test printing
Please press the PAPER FEED button.
3. Press the FEED button to continue printing. The printer prints a pattern using the built-in
character set.
4. The self test automatically ends and cuts the paper after printing the following:
*** Completed ***
The printer is ready to receive data as soon as it completes the self-test.
Page 11

11
4.
Application for countries with fiscal law
4.1 Topology
4.2 Programming
The firmware, default configuration, character set or grapfic logo of the QPrint FM can be
programmed with QFlash, similarly to the QMP cash register series.
It is necessary to start the Boot-mode of QPrint:
- Switching On the QPrint holding key “F1” and “F3” depressed
(in the display appear “BOOTBLOCK V0.xx”).
- Connect the PC with a RS232-cabel to Port1 of the QPrint or
used a LAN-cabel to the Ethernet connector.
(the download is possible only about Port1 or LAN)
- Start the program “QFlash” and send the new data to the QPrint.
After it is necessary to make a Soft Reset of QPrint.
Switching On the QPrint with holding key “F2” and “F4” depressed.
Note: When the fiscal memory is active, it is necessary to make a recovery procedure (see special
description “Activation of Fiscal Memory” – regard the fiscal country)
Using QProg, the customer data can be programmed to the printer. Please check the
corresponding QFlash and QProg manuals for further information. Normally the printer will be preconfigured when delivered, so there is no need to program it.
4.3 Activation of the Fiscal Memory
The FM-module can be activated either directly with an external keyboard and display or using a
special software at the PC.
Page 12

12
4.4 Operation with QProg
Use Q Driver-Commands about the interface (see „Q Driver Manual“)
- Use „OPOS“-Driver of the PC (communicate with the Q Print about the IF).
- Direct communication with the NO-Fiscal-CR (Concerto, Q Touch, ..).
All reports can be started about the „Q Prog“(see „Q Prog Manual“) or „Q Driver“-Commands (see
„Q Driver Manual“) or direct about the extern keyboard
4.5 Operation with function keys
All main functions of the QPrint FM can be operated using the four function keys at the front side.
The meaning of these keys is as follows:
MENU ENTER
F1 – Start function mode or break function (clear)
F2 – next function or number
F3 – previous function or number
F4 – Enter function
The key F1 starts the function menu. With the keys F2 and F3 you can select one of the following
functions. Use the F4 key to enter the selected function or press F1 again to quit the function
menu.
[ ***** EXIT ***** ]
▼
[ FINANCE X REPORT ]
▼
[ FISCAL Z REPORT ]
▼
[ FM DUMP BY Z ]
▼
[ FM DUMP BY DATE ]
▼
[ INFO QPRINT ]
▼
[ TEST QPRINT ]
Finance X Report
QPrint FM starts the printout of the daily X report. The report memory will not be cleared.
Fiscal Z Report
QPrint FM starts the printout of the daily Z report. The report memory will be cleared. The fiscal
data are saved in the FM-module.
F4
F3 F2 F1
Page 13

13
FM Dump by Z
QPrint FM starts the FM Dump. In the external display the start-Z-number appears, for instance:
0001
Use the keys
• F1 to select the last position (shift to right) and quit the menu
• F2 to move the cursor to the left (blink)
• F3 to move the cursor to the right (blink)
• F4 to confirm the setting and select the next cursor position (shift to left)
If finished, the start-Z-Number is confirmed and in the display appears the end-Z-number, for
instance:
0014
Follow the same procedure to enter the end-Z-number. If finished, the end-Z-Number is confirmed
and the printout of the FM dump starts.
FM Dump by date
QPrint FM starts the FM Dump. In the external display the start-date appears, for instance:
10122007
Use the keys
• F1 to select the last position (shift to right) and quit the menu
• F2 to move the cursor to the left (blink)
• F3 to move the cursor to the right (blink)
• F4 to confirm the setting and select the next cursor position (shift to left)
If finished, the start-date is confirmed and in the display appears the end-date, for instance:
10122007
Follow the same procedure to enter the end-date. If finished, the end-date is confirmed and the
printout of the FM dump starts.
Info QPrint
QPrint start the printout of the version info, for instance:
=====================
P:QF070904FIR_09
C:QF070904FIR_09
D:00-LT1320-WE
RAM: 384k
MAC:00 16 4B 01 00 04
FM:Venez (#09)
=====================
Page 14

14
Test QPrint
QPrint starts a special testing printout (all 5 s are printed 2 lines).
=====================
** CHECK Q_Printer **
=====================
** CHECK Q_Printer **
The printout is stopped with pressing any of the keys F1..F4 or power off.
5. Information on the Electromagnetic Compatibility and Safety
CE Conformance
This QUORiON cash register conforms to the European Community’s EMV 2004/108 directive.
The cash register fulfills the following technical European requirements:
• EN 55022 – „Norm values and measuring procedures for radio interference
properties- characteristics of information technology devices“
• EN 55024 – „Norm values and measuring procedures for the interference
resistance properties– characteristics of information technology
devices“
• EN 60950 – „Security measurements for the installation of IT“
A "conformance explanation" in accordance with the directives and standards cited on top has
been delivered and can be reviewed with
QUORiON Data Systems GmbH
An der Klinge 6
99195 Erfurt.
(E-mail: rd@quorion.de; web: www.quorion.de)
REMARK: If the cash register is installed in a system with other devices and components, all other
devices and components must each show EMV conformance to the norm. According to the EMV
2004/108 directive as well as EC and national laws, the system integrator is responsible to ensure
that the built system complies with regulations.
Page 15

15
Disposal of Old Electrical & Electronic Equipment (applicable in the European Union and
other European countries with separate collection systems)
This symbol on the product or on its packaging indicates that this product shall not be treated as
household waste. Instead it shall be handed over to the applicable collection point for the recycling
of electrical and electronics equipment.
For more detailed information about recycling of this product, please contact your local city office,
your household waste disposal service or the shop where you purchased the product.
1.50.417298 BA-englisch GB Qprint Fiscal QUORION CE (Stand: 03.02.09)
 Loading...