

Page 1

Operating Manual
QMP 18
Page 2

QUORiON Data Systems GmbH
An der Klinge 6
99095 Erfurt
Germany
Phone: +49 362 04 542-0
Fax: +49 362 04 542-12
E-Mail: info@quorion.de
Original operating manual
The information contained in this document is property of QUORiON Data Systems Gmb H.
Publishing its content, either partially or in full, requires the permission of QUORiON Data Systems GmbH.
© 2015 QUORiON Data Systems GmbH
Subject to error and modification
Further information and updates you will find at www.quorion.com
Page 3

Dear valued customer!
On behalf of our company we wish to welcome you to the QUORiON family of fine business machines.
We sincerely hope you will appreciate the many benefits of being associated with a distinguished product
name that represents both quality and commitment to customer satisfaction.
The QUORiON QMP 18 is fully customizable and yet simple to operate. Users can easily adapt it to any type
of retail/scanning or hospitality system. Moreover, our dynamic software generates a compatible
environment for a wide array of peripheral devices.
It is exactly this versatility and quality that has made us successful among our multinational customers.
It is therefore with great pride that we look forward to continuing our close collaboration with our
customers.
Your QUORiON Team
Page 4

Table of Contents
4
QMP 18
Table of Contents
1 Information on This Document ............................................................................ 6
1.1 Validity........................................................................................................................... 6
1.2 Additional Information ................................................................................................... 6
1.3 Symbols Used and Signal Words ..................................................................................... 6
1.3.1 Design of Warnings ................................................................................................................. 6
1.3.2 Design of Additional Information ............................................................................................ 6
1.3.3 Pictograms Used ..................................................................................................................... 7
1.3.4 Symbols Used ......................................................................................................................... 7
1.3.5 Typographies .......................................................................................................................... 7
1.3.6 Nomenclature ......................................................................................................................... 7
2 Safety .................................................................................................................... 8
2.1 Intended Use.................................................................................................................. 8
2.2 General Safety Precautions ............................................................................................. 9
2.3 CE Declaration of Conformity ........................................................................................ 10
3 Scope of Delivery ................................................................................................ 11
4 Product Description ............................................................................................ 12
4.1 Overview QMP 18 ........................................................................................................ 12
4.2 Type Label .................................................................................................................... 13
4.3 Technical Data .............................................................................................................. 14
4.4 Interfaces ..................................................................................................................... 15
5 Commissioning ................................................................................................... 16
5.1 Connect the POS System to the Power Supply ............................................................... 16
5.2 Install Receipt Roll ........................................................................................................ 16
5.3 Switching on the POS System ........................................................................................ 18
Page 5

Table of Contents
QMP 18
5
6 Operation ............................................................................................................ 19
6.1 Names of Keys and their Functions ............................................................................... 19
6.2 Operating Modes ......................................................................................................... 20
7 Cleaning and Maintenance ................................................................................. 21
8 Decommissioning ............................................................................................... 22
8.1 Switching off the POS System ....................................................................................... 22
8.2 Disconnect the POS System from the Power Supply ...................................................... 22
9 Disposal............................................................................................................... 23
Page 6

Information on This Document
6
QMP 18
1 Information on This Document
1.1 Validity
This document is valid for device type QMP 18. This document is intended for end users.
1.2 Additional Information
Additional information can be found in the support area at www.quorion.com:
Category
Content
Documentation
─ User manuals
─ Knowledgebase
─ FAQ-QTouch
Self Help Assets
─ Training Kits
─ Video Tutorials
─ QUORiON Wiki
POS Software Files
─ Demo Downloads
─ Business Ready Configurations
─ Floor Plan Design
Other Resources
─ Find a Reseller near You
─ QDriver
1.3 Symbols Used and Signal Words
1.3.1 Design of Warnings
WARNING
Indicates a hazardous situation which, if not avoided, could result in death or serious injury
CAUTIO N
Indicates a hazardous situation which, if not avoided, could result in minor or moderate injury
NOTICE
Indicates a situation which, if not avoided, can result in property damage
1.3.2 Design of Additional Information
HINT!
Information that is important for a specific topic or goal
Page 7

Information on
This Document
QMP 18
7
1.3.3 Pictograms Used
In the following table you will find the explanation of the pictograms used in this document.
Symbol
Explanation
Danger from electric current
Fire hazard
1.3.4 Symbols Used
In the following table you will find the explanation of the symbols used in this document.
Symbol
Explanation
Condition which must be met for a particular result or
additionally required material that is needed for a specific result
Desired result
Call to action
1. … x.
Call to actions that must be performed chronologically
─
Listing
Cross reference „see chapter/table… „xx“ on page „xx“
1.3.5 Typographies
Typography
Usage
Example
bold
─ Buttons
─ Click the button Operating Mode
(C) in the status bar.
italic
─ Menus
─ Dialog boxes
─ opens the menu Function M ode
1.3.6 Nomenclature
Complete designation
Designation in this document
QMP 18
POS system (Point Of Sale system)/product
Page 8

Safety
8
QMP 18
2 Safety
2.1 Intended Use
The POS system is a data collection tool that was developed for the sale of goods and/or services.
The POS system is used for the settlement of payment transactions. These can be executed with
cash or cashless. The executed transactions are recorded by the POS system and visualized by
means of reports and receipts.
The interfaces of the POS systems allow the connection of various peripherals (receipt printer,
scales, scanners, etc.).
The POS system is designed for indoor use only.
The POS system must only be operated at ambient temperatures from 0 °C to +45 °C.
The POS system must not be exposed to extreme temperatures, temperature fluctuations,
heating and cooling systems, direct solar irradiation, high levels of dust, vibrations and impacts,
extreme humidity or moisture.
Do not connect the POS system to electrical outlets close to devices that generate voltage
fluctuations or voltage peaks. In particular, stay clear of devices that use large electric motors.
Any use of the product other than described in the intended use section does not qualify as
intended use.
The POS system has been manufactured according to the current state of the art standards and
recognized safety regulations. However, improper use may cause lethal hazards for the operator
or third parties or may damage the POS system and other property.
The POS system may only be used in technically perfect condition, as intended, in a safetyconscious and hazard-conscious manner as well as in compliance with the operating manuals.
Any cause of disorder, especially when affecting the safety, must be eliminated immediately!
The enclosed documentation is an integral part of this product. The operating manual must be
read and observed. Keep this manual and distribute the product only with the manual and the
accessories supplied to third parties.
Page 9

Safety
QMP 18
9
2.2 General Safety Precautions
To prevent physical injuries and/or damage to property, the following general safety precautions
must be observed.
Risk of accident due to electric shock or fire
The use of accessories or spare parts that have not been approved by QUORiON as well as
inappropriate use of the POS system and its components may result in accidents in which people
can be seriously injured or killed.
─ Only use original QUORiON components or components and peripherals approved by
QUORiON.
─ Do not make any modifications to the device and its components and peripherals.
─ Never use a damaged POS system or components.
─ Opening the device as well as maintenance and repair work has to be carried out by qualified
service technicians only.
Moisture entering the device may result in accidents in which people can be seriously injured or
killed.
─ Keep away any liquids from the POS system and do not place any containers with liquids on
the POS system.
─ If any liquid spills into the equipment, unplug the power cable immediately and contact your
local distributor for advice.
Risk of tripping, falling due to improperly installed cables
Not properly installed cables may lead to tripping, falling. People could be injured.
─ Cables should be installed in a manner that no one can step on or trip over.
─ Never attempt to stretch the cables to enable a connection. The power cable must have
adequate slack at all times during use.
Damage caused by improper handling or failure to follow these precautions and warnings are not
subject to warranty. No liability for resulting damages is assumed by QUORiON!
Page 10

Safety
10
QMP 18
2.3 CE Declaration of Conformity
HINT!
If the POS system is installed in a system with other devices and components, the system including the POS
system and all other devices and components have to show EMC compliance to the norm. The system
integrator is responsible for compliance with the EMC 2004/108 directive as well as EC and national laws for
installed systems, system devices and system components that have not been supplied or tested and
approved by QUORiON Data Systems GmbH.
QUORiON Data Systems GmbH confirms herewith that the POS system described in this
documentation is in compliance with the fundamental requirement and other relevant provisions
of the below-mentioned directives.
Document No.
Title
2014/35/EU
Low Voltage Directive
2004/108/EC
Directive on electromagnetic compatibility of electrical and e lectronic
products
The entire declaration of conformity can be found at QUORiON Data Systems GmbH:
QUORiON Data Systems GmbH
An der Klinge 6
99095 Erfurt
Germany
E-Mail: info@quorion.de
www.quorion.com
Page 11

Scope of Delivery
QMP 18
11
3 Scope of Delivery
Check the scope of delivery for completeness and any externally visible damage. Contact your
local specialized distributor, if the scope of delivery is incomplete or damaged.
Figure 1: Components included in the scope of delivery
Position
Quantity
Designation
A
1
Power adapter
B
1
Cover cap
C
1
Receipt roll
D
1
POS system
E
1
Power cord
F
31
Key caps
G
1
Operating manual
Page 12

Product Description
12
QMP 18
4 Product Description
4.1 Overview QMP 18
Figure 2: Components Q MP 18
Position
Designation
A
Printer cover
B
Operator display
C
Power button
D
Keyboard (42 keys)
E
Interfaces
F
Customer display
Page 13
Product Description
QMP 18
13
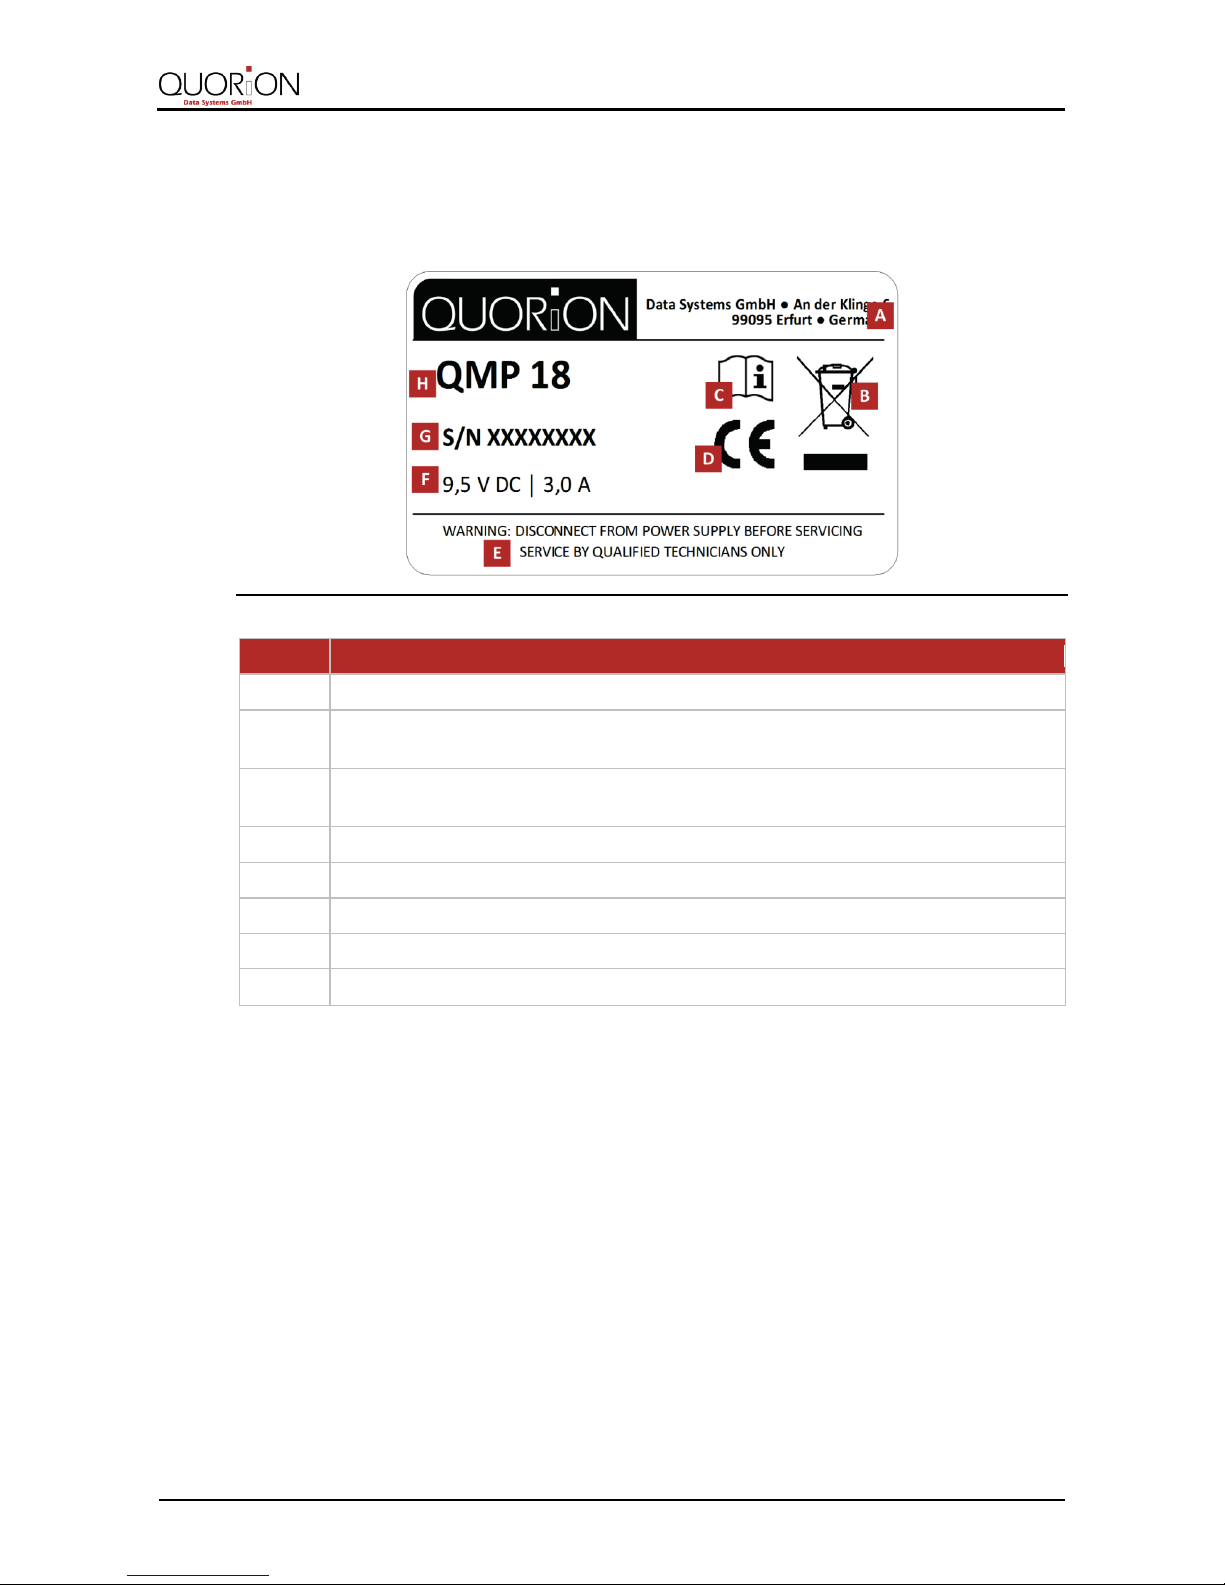
4.2 Type Label
The type label clearly identifies the POS system. The type label is located on the rear side of the
housing. You will require the information on the type label, when seeking customer support from
your specialized distributor.
Figure 3: Type label QMP 18
Position
Designation
A
Manufacturer address
B
Symbol indicates separate collection of electrical and electronic equipment.
The POS system and its components may not be disposed as normal household waste.
C
Read the operating manual, before using the device.
Observe the safety instructions in the operating manual.
D
CE marking
E
Safety Precaution
F
Information on power supply
G
Serial number
H
Device type
Page 14

Product Description
14
QMP 18
4.3 Technical Data
All indicated parameters are maximum values, which can only be reached with corresponding
configuration!
Processor
CPU
32 Bit ARM 966E
Memory
Program Memory
1 MB Flash ROM
Data Memory
96 kB SRAM (battery buffered)
Working Memory
2 MB Flash ROM
Memory Expansion
Micro-SD card slot
Display
Operator Display
128 x 64 LCD graphical, with backlight
Customer Display
12 digits LED numerical
Keyboard
Internal
42 keys raised
Printer
Internal
58 mm thermal, without cutter
Paper roll specifications
Width: 57 mm, max. Ø: 46 mm
Interfaces
Serial
2 x RS232-5V (RJ45)
USB
1 x USB 2.0 (Type B)
Cash Drawer
1 x RJ11-9V
Software
Application
Application software QMP-Lite
Number of PLU’s
10 000
Number of Departments
100
Number of Clerks
50
Number of Sales Persons
50
Number of Customer Reports
10
Specifications
Dimension (L x W x H)
290 x 240 x 110 mm
Weight
2,0 kg
Power Supply
Primary: 100 – 240 V AC, 1.0 A
Secondary: 9.5 V DC, 3.0 A
Operating Temperature
0°C – + 45°C
Storage Temperature
- 20°C – + 60°C
Humidity Range
up to 95% (not condensing)
Page 15

Product Description
QMP 18
15
4.4 Interfaces
The QMP 18 is equipped with two RS232, one USB device and one cash drawer interfaces.
The RS232 ports are used to connect peripheral devices like scanner, display, QuoriLog etc.
The USB port is only prepared for PC communication. It is not to be used with USB devices, like
memory sticks, scanners, printers etc.
HINT!
Use only shielded cables and connector plugs for connecting any peripheral devices. Switch off the POS
system before connecting or disconnecting any peripheral devices. Please note also the maximum cable
lengths of 5 meters for USB and 15 meters for RS232.
HINT!
Please note that all interfaces have to be programmed before connecting any external devices. If you have
any questions about the programming, please ask your local QUORiON dealer.
Figure 4: Overview in terfaces
Position
Designation
A
USB Type B
B
Cash Drawer (DRW 9 V, 5 Ω)
C
RS232 5V Port 1
D
RS232 5V Port 2
E
Power connection
Page 16

Commissioning
16
QMP 18
5 Commissioning
5.1 Connect the POS System to the Power Supply
WARNING
Risk of death due to electric current
Improper commissioning and use of the POS system can result in electric shocks. People could be seriously
or fatally injured.
Only connect the device to a socket with a grounded protective conductor.
Before connecting the device make sure that the voltage of your main power net corresponds to the
input voltage of your device.
Never connect or disconnect the power plug with wet hands.
CAUTIO N
Risk of injury from falling POS system
The setting up of the POS system on uneven surface can cause the POS system to fall. People could be
injured.
Place the POS syste m on a firm, stable, horizontal surface.
NOTICE
Risk of damage due to improper commissioning and use
The POS system and external devices can be damaged by improper use.
Switch off the device before connecting any peripheral devices.
Procedure:
1. Connect the power cord to the power adapter.
2. Connect the power adapter to the POS system.
3. Connect the POS system to the electrical outlet.
The POS system is properly connected to the power supply.
5.2 Install Receipt Roll
Procedure:
1. Open the printer cover. For this purpose
fold the printer cover forwards (A) and
lift it upwards from the lower brackets
(B).
Page 17
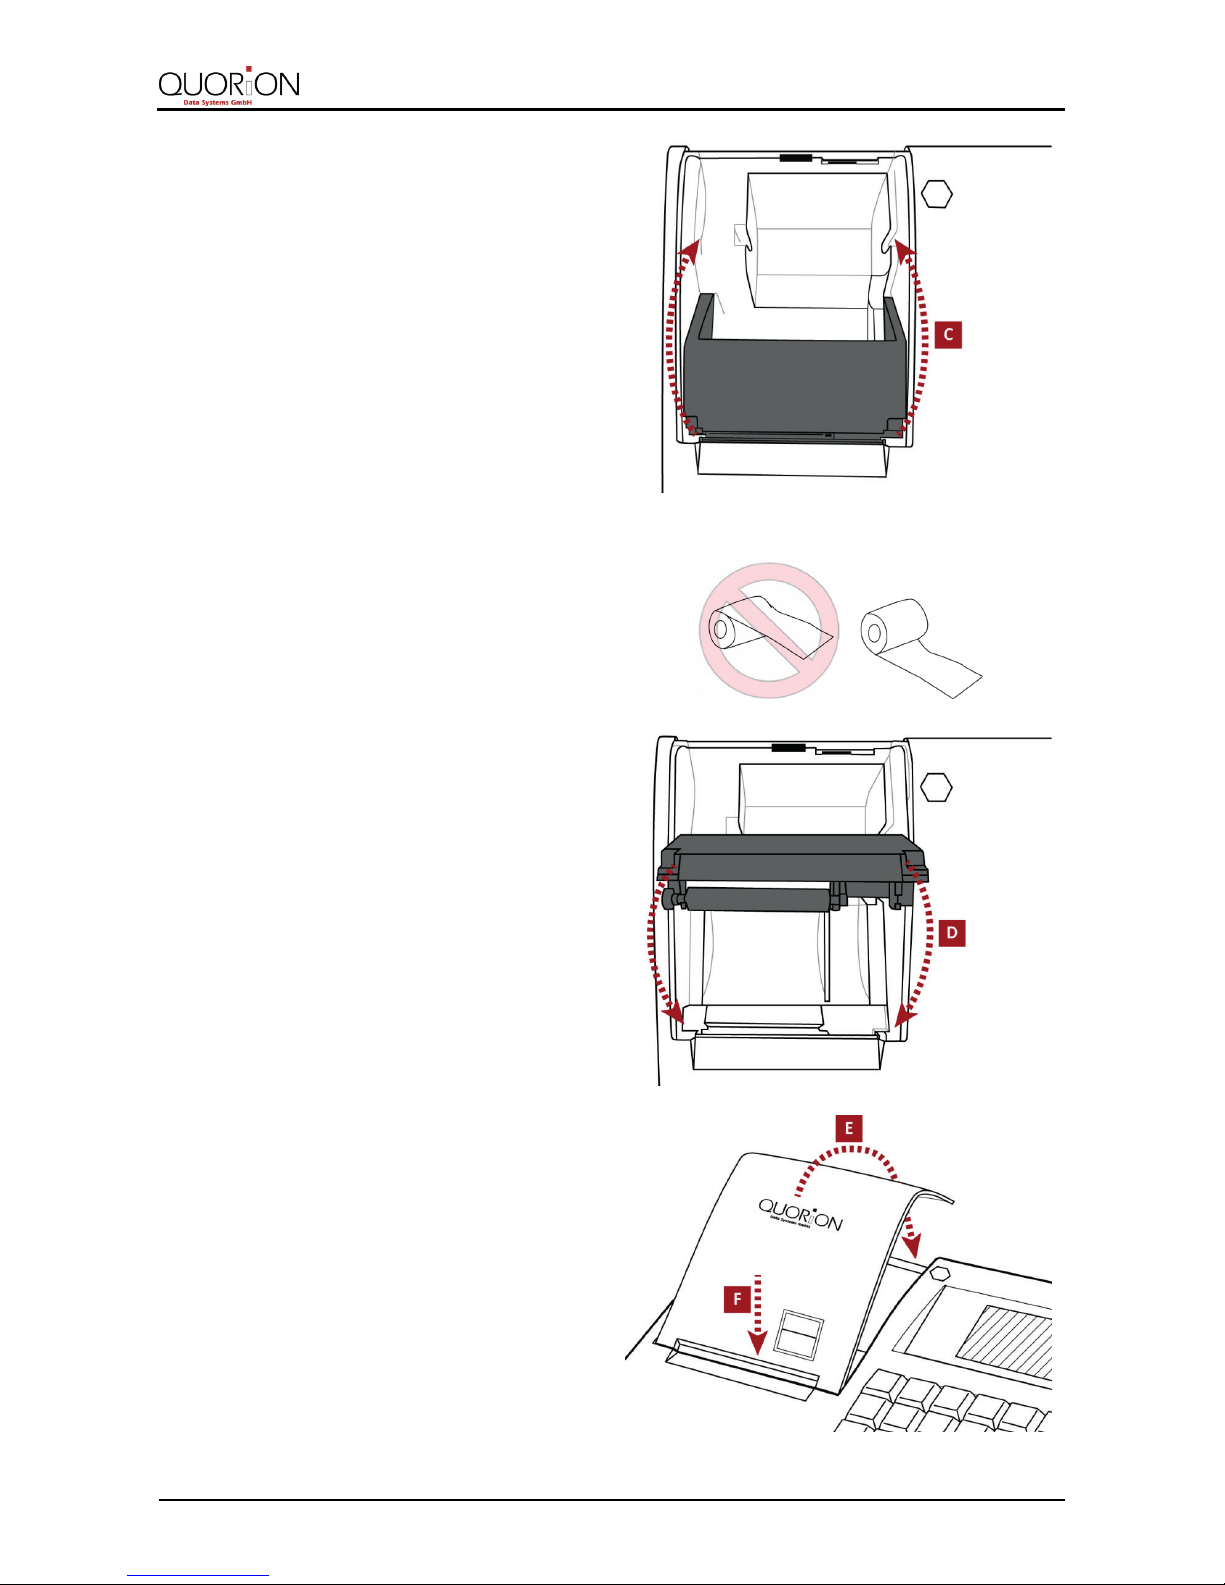
Commissioning
QMP 18
17
2. Fold the easy load cover up (C).
3. If you want to replace an empty receipt roll, remove the existing one.
4. Insert a new receipt roll into the paper
device.
5. Close the easy load cover carefully (D).
The easy load cover locks in place
audibly.
6. Close the printer cover.
For this purpose insert the printer cover
in the lower brackets (F) and fold the
printer cover backwards (E).
The Receipt roll is properly installed.
Page 18

Commissioning
18
QMP 18
5.3 Switching on the POS System
Procedure:
Switch the POS system on by pressing
and holding the power button (A) for 3
seconds.
The POS System loads the POS software.
Page 19

Operation
QMP 18
19
6 Operation
6.1 Names of Keys and their Functions
HINT!
For detailed description of all operating functions of your POS system with factory settings and information
for individual configuration, refer to the operating instructions of the QMP software on www.quorion.com
( Chapter 1.2, p. 6).
Key label
Designation
Function
Receipt Feed
─ advances the receipt paper
Scroll cursor upwards
─ used to scroll the display selection upwards by
one line
Scroll cursor downwards
─ used to scroll the display selection downwards by
one line
Clerk
─ used to enter a preset clerk ID numeric code no
Paid Out
─ used to record payments out from the drawer
─ alternates the keyboard mode
Received on Account
─ used to record payments to the drawer
─ enables hexadecimal input
Power key
─ switches the POS system on/off
Multiplication
─ used to enter multiplications
─ used to switch the operating mode of the cash
register
PLU Price Entry
─ used to manually change a preset PLU price
PLU
─ used to access preset PLU items
─ saves changes (in programming mode)
Departments
─ used to enter items to the respective departments
Percent Minus
─ used to deduct percentage values from the total
─ invokes the system reports (in programming
mode, X mode, Z mode)
Numeric Keys
─ used to enter numbers
─ used to enter letters in P-mode
Comma Key
─ Enters a comma
Refund
─ used to return an article
─ printing (in programming mode)
Page 20

Operation
20
QMP 18
Key label
Designation
Function
Void
─ voids a previously entered tr ansaction
─ sets the date
Error Correction
─ deletes the last registration
─ sets the time
Clear
─ clears incorrect entries and stops the error alarm
No Sale
─ prints a reference number / opens the cash
drawer
─ deletion (in programming mode)
Sub Total
─ calculates sub total
─ prints out receipt copy if no receipt opened
Cash Payment
─ used to tender payments in cash
─ prints the invoice
─ confirming (in programming mode)
6.2 Operating Modes
Your POS system offers five different modes for registration, reporting, configuration and use of
certain functionalities that require manager rights. The selection of an operating mode can be
done by the multiplication key on the keyboard. The multiplication key alternates between the
modes R-X-Z-M-P.
Operating Mode
Information
Function
Registration
– REG –
R
─ all sales operations and registrations
X-Report
– – X – –
X
─ shows and prints of all reports without clearing
Z-Report
– – Z – –
Z
─ shows and prints of all reports with clearing
Manager
– MGR –
M
─ all sales operations and registrations
─ easy programming
Programming
– – P – –
P
─ programming of all functions
Page 21

Cleaning and Maintenance
QMP 18
21
7 Cleaning and Maintenance
NOTICE
Risk of damage due to improper cleaning and maintenance
Disconnect the system from the power supply before cleaning.
Do not use any abrasive substances or agents containing solvents.
HINT!
The POS system does not contain any components, which can be serviced or repaired by the user. Please
have all maintenance performed by a qualified QUORiON distributor. Unauthorized manipulations may lead
to a loss of warranty.
To clean your POS system, please use a lint-free dry cloth.
For heavier staining you should use a slightly damp cloth. Please use only warm water or a special
screen cleaner to damp the cloth. The cloth should only be damp, but not wet!
Page 22

Decommissioning
22
QMP 18
8 Decommissioning
8.1 Switching off the POS System
Requirements:
All direct bookings are finished.
Procedure:
Switch the POS system off by pressing
and holding the power button (A) for 3
seconds.
The POS system will shut down after a few seconds.
8.2 Disconnect the POS System from the Power Supply
WARNING
Risk of death due to electric current
Improper decommissioning and use of the POS system can result in electric shocks. People could be
seriously or fatally injured.
Never connect or disconnect the power plug with wet hands.
NOTICE
Risk of damage due to improper decommissioning and use
The POS system and external devices can be damaged by improper use.
When disconnecting the power cable, hold it firmly at the connector area. Do not tug on the cable
itself.
Switch off the device before disconnecting any peripheral devices.
Procedure:
1. Disconnect the POS system from the electrical outlet.
2. Disconnect the power adapter from the POS system.
3. Disconnect the power cord from the power adapter.
The POS system is properly disconnected from the power supply.
Page 23

Disposal
QMP 18
23
9 Disposal
HINT!
When disposing of the POS system, in countries outside the EU, the local laws and regulations must be
observed.
According to the EU Directive 2002/96/EC (WEEE Directive) and equivalent national laws,
electrical and electronic devices must not be disposed with household waste.
The incorrect disposal of this type of waste can have negative effects on environment and health,
due to potential hazardous substances in electrical and electronic devices.
Dispose of the device at a suitable collection point.
For more details on available collection points, please contact your specialized distributor.
Page 24

 Loading...