

Page 1
User and Programming Manual
Electronic Cash Register
CR 2500 series
Page 2

...designed to Succeed
Dear valued customer!
On behalf of our proud company we wish to welcome you to the QUORION family of fine
business machines. We sincerely hope you will appreciate the many benefits of being
associated with a distinguished product name that represents both quality and
commitment to customer satisfaction.
The QUORION cash register is fully customizable and yet simple to operate. Users can
easily adapt it to any type of retail or scanning system. Moreover, our dynamic software
generates a compatible environment for a wide array of peripheral devices. It is exactly
this versatility and quality that has made us successful among our multinational
customers.
It is therefore with great pride that we look forward to continuing our close collaboration
with our customers.
Sincerely,
Your QUORION Team
2
Page 3

Index
Introduction ........................................................................................................................ 5
1. Before Starting Operations ........................................................................................... 6
1.1 External View .............................................................................................................. 6
1.2 Displays ...................................................................................................................... 6
1.3 General Precautions ................................................................................................... 7
1.4 Printer Precautions ..................................................................................................... 7
1.5 Setting up the Cash Register ...................................................................................... 7
2. Installing the Cash Register ......................................................................................... 7
2.1 Installing paper rolls .................................................................................................... 8
2.2 Installing and replacing the ribbon cassette ................................................................ 8
2.3 Thermal printer ........................................................................................................... 9
2.3.1 Insert thermal paper ............................................................................................ 9
2.4 Keyboard .................................................................................................................. 10
2.5 Control Lock and Control Lock Keys......................................................................... 12
2.6 Key Names and their Function ................................................................................. 13
3. Programming ............................................................................................................... 16
3.1 Programming of System Flags.................................................................................. 16
3.1.1 Reset/System CLEAR ....................................................................................... 16
3.1.2 Clearing the Electronic Journal .......................................................................... 16
3.1.3 Programming Hints ............................................................................................ 17
3.1.4 Basic Program - System Flag Programming...................................................... 17
3.1.5 System Flags Printout ....................................................................................... 23
3.2 Department Programming ........................................................................................ 24
3.2.1 Department printout ........................................................................................... 25
3.2.2 Group Name Programming ............................................................................... 25
3.3 PLU Programming .................................................................................................... 26
3.3.1 PLU Printout ...................................................................................................... 27
3.3.2 Direct Key Programming .................................................................................... 27
3.4 Menu Programming .................................................................................................. 28
3.5 Tax Rate Programming ............................................................................................. 29
3.6 Clerk Programming ................................................................................................... 29
3.7 Programming of Restaurant Logo / Commercial Message ....................................... 30
3.8 Tendering names programming ................................................................................ 31
3.9 Foreign Currency Exchange Programming (FCE) .................................................... 31
3.10 Percentage Rates Programming............................................................................. 33
3.11 Macro Keys ............................................................................................................. 34
3.11.1 Printout of Macro Keys .................................................................................... 34
3.12 Programming text of extended guest invoice ......................................................... 34
3.13 Programming logo for external display ................................................................... 35
4. Cash Register Operation ............................................................................................. 35
4.1 Registration (Sales-Mode) ........................................................................................ 35
4.1.1 Electronic Journal Printout ................................................................................. 35
4.1.2 Clerk Sign-On .................................................................................................... 36
3
Page 4

4.1.3 Assigned Clerk Area and Compulsory Invoice .................................................. 36
4.1.4 Opening and Closing a Table ............................................................................ 37
4.1.5 Entry Corrections ............................................................................................... 37
4.1.5.1 Correction of incorrect numbers .................................................................. 37
4.1.5.2 Deleting the last Entry (EC/Error Correction) .............................................. 37
4.1.5.3 Voiding earlier Entries ................................................................................. 37
4.1.5.4 Refund ........................................................................................................ 37
4.1.6 Re-opening a Table ........................................................................................... 38
4.1.7 Closing a Table with Guest Check Printing ....................................................... 38
4.1.8 Table Transfer ................................................................................................... 38
4.1.8.1 Separation of a registered Item ................................................................... 39
4.1.9 Tax Shift (Take out sales) .................................................................................. 39
4.1.10 Price Shift ........................................................................................................ 39
4.1.11 Using the FCE Function .................................................................................. 39
5. Management Reports .................................................................................................. 40
5.1 Reports without Reset .............................................................................................. 40
5.2 Reports with Reset ................................................................................................... 41
5.3 Flash Reports . ......................................................................................................... 41
5.4 Clearing the Grand Total .......................................................................................... 42
6. Accessories and Options ............................................................................................ 42
6.1 Ribbon Cassettes ..................................................................................................... 42
6.2 Option PC Interface .................................................................................................. 42
7. Maintenance ................................................................................................................ 42
7.1 Emergency Drawer Opening .................................................................................... 42
8. Information on the Electromagnetic Compatibility and Safety ................................ 43
9. Error Messages ............................................................................................................ 44
10. General Specifications .............................................................................................. 45
11. Peripheral Devices ..................................................................................................... 46
11.1 Activation of a Serial Interface RS 232 ................................................................... 46
11.2 Using a Kitchen Printer ........................................................................................... 47
4
Page 5

Introduction
This electronic Cash Register is designed to help you manage your business even more
efficiently and effectively.
Start-up is quick and easy. Customize the system according to your requirements by
taking advantage of the numerous programmable options.
Detailed financial and management reports will provide you with the information you need
to know to maximize your productivity.
Here are just a few of the Register’s many valuable features:
• 24 departments allow you to efficiently categorize your merchandize.
• 500 Price Look Up (PLU) allow for fast entry and registration of any item.
• 16 Cashier names and codes are programmable.
• Large 16 x 2 characters operator display and 11 x 1 characters customer display for
easy viewing.
• Automatic tax computation for 4 different tax rates, including ADD ON and VAT.
• Electronic Journal
• Periodic management reports provide up to date sales analysis, including hourly
report, end-of-day, weekly or monthly totals.
• Memory protection maintains financial records during power outage.
• Cash Register automatically prints date, time, cashier’s name, cash register and
receipt numbers and records the number of transactions on the receipt.
• Training mode available for trainees.
• Customize the fully programmable keyboard to your requirements.
• Optional interfaces, PC programming, memory expansion and the connection of a wide
array of peripheral devices broaden the possibilities of your Cash Register.
• Inter-register communication with up to 25 Cash Registers.
5
Page 6
1. Before Starting Operations
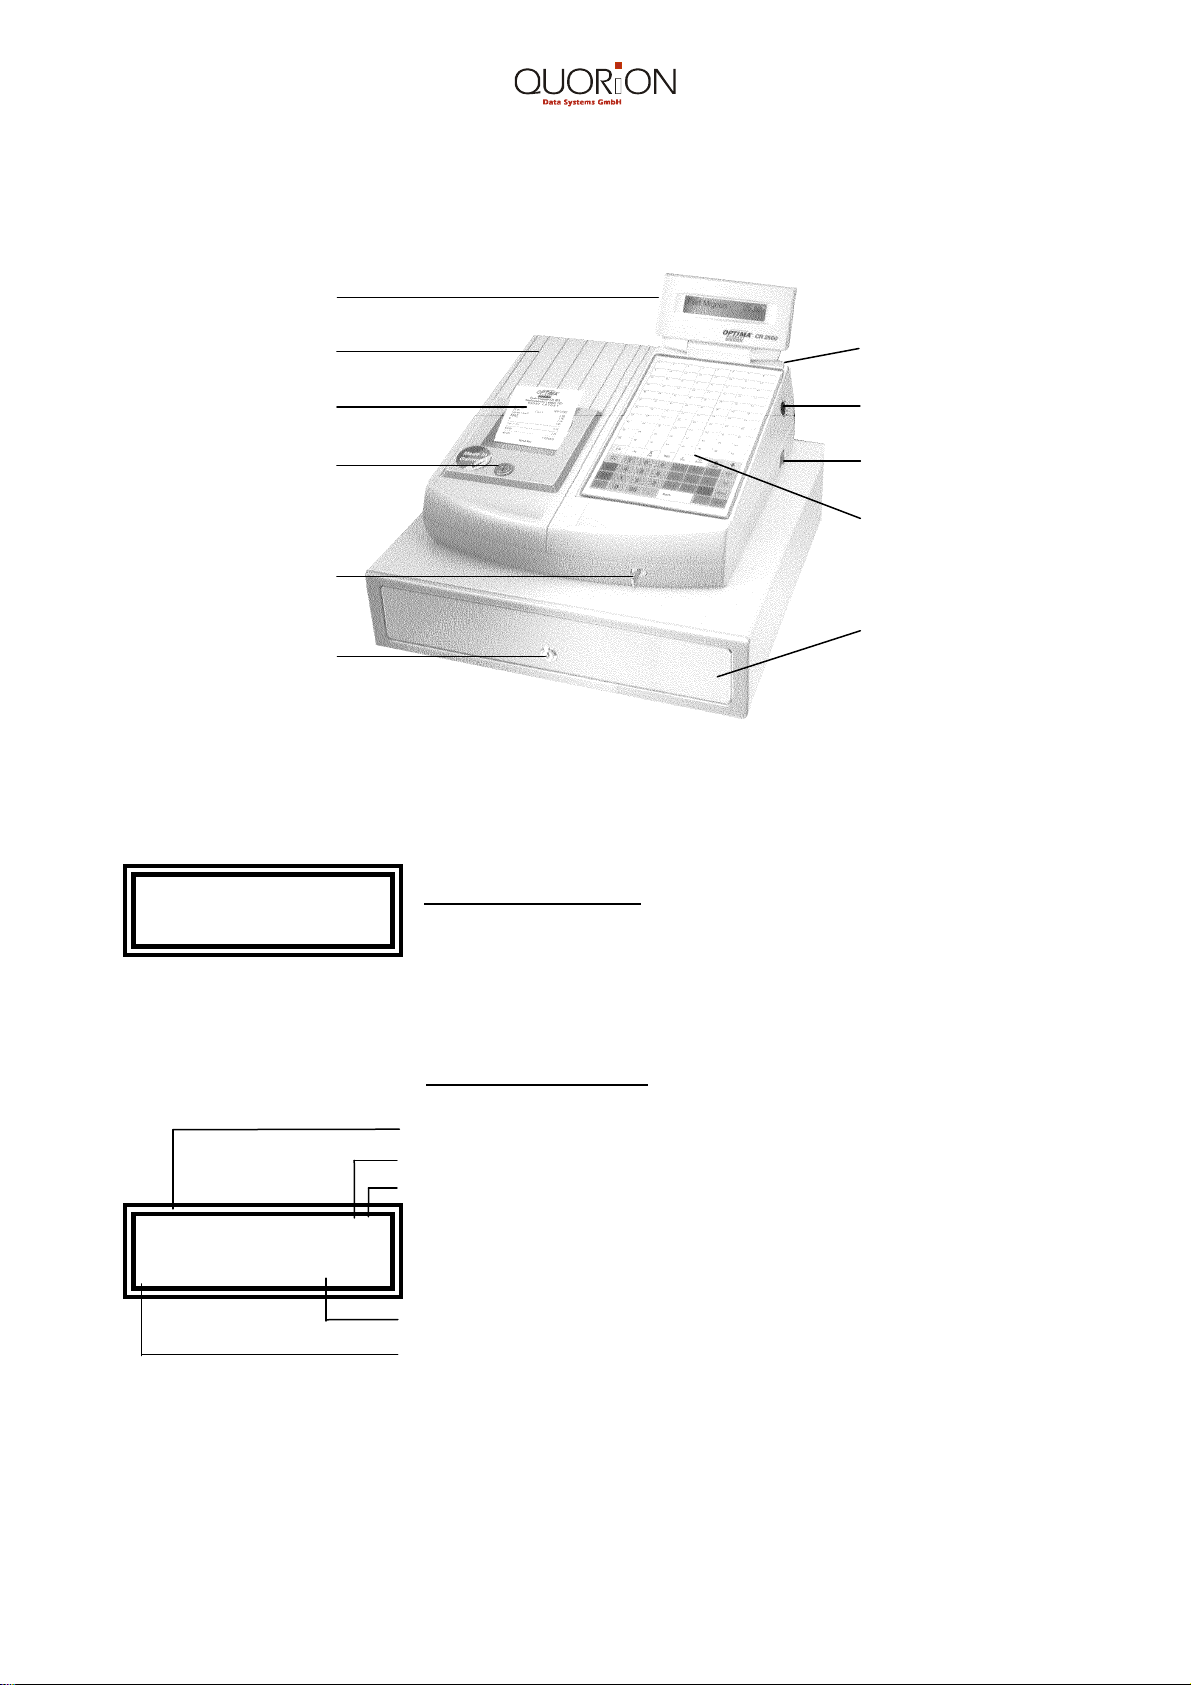
1.1 External View
Operator Display
Printer Cover
Receipt
Printer Cover Lock
Waiter Lock
Drawer Lock
1.2 Displays
Customer
AMOUNT
Customer
Display
Control Lock
ON/OFF Switch
Keyboard
Cash Drawer
1 line 11 characters 7 Segment Display (VFD)
19.00
Operator
2 lines 16 characters Display (LCD)
display:
PLU’s, Menus, Departments name or No.
Price shift level 1 or 2
1st to 3rd Direct key shift levels
drinks 1 1
2 X 3.78
Amount, Sub Total, Total, Change Due
Quantity
6
Page 7

1.3 General Precautions
• In case of malfunction do not repair the Cash Register by yourself. Please contact your
nearest dealer or sales person.
• Do not insert any metal objects such as screwdriver, paper clips etc. into your Cash
Register. This may damage your Cash Register or subject you to electrical shocks.
• Clean your Cash Register from time to time with a soft, dry or slightly damp cloth.
• Never use water or any volatile chemicals, such as benzene for cleaning. This may
damage your Cash Register.
1.4 Printer Precautions
• Never use the printer without a ribbon or without paper rolls.
• Do not pull the paper out during the printing process.
• Only use good quality paper free of wood pulp.
• Do not to attempt to move gears or the printing head by hand or with a screwdriver.
• Immediately install new paper rolls when ”paper-near-end” is indicated.
• Change the cassette ribbon as soon as the print becomes faint.
• Thermal sensitive paper is necessary for thermal printers. The thermal paper has to
weigh between 55 gr. and 72 gr. and have a thickness of 65 µm to 125 µm. Good print
quality will be achieved with middle sensitivity.
1.5 Setting up the Cash Register
• Make sure the local voltage corresponds with the voltage indications on the serial
number plate of your Cash Register.
• To assure a proper charge of the protection circuit, it is recommended that the Cash
Register is recharged several hours prior to use.
• Place the Cash Register conveniently close to a standard wall outlet.
2. Installing the Cash Register
• Plug your Cash Register into a standard electrical wall outlet with the ON/OFF switch in
OFF position.
• Activate the power ON/OFF switch to power up your Cash Register.
• Insert the OWP key into the control lock and turn it to position ”T” (train mode).
• Install the ribbon cassette and paper rolls. Follow the instructions on page 7.
• You can now use the Cash Register for simulated operations without affecting the
memory.
7
Page 8
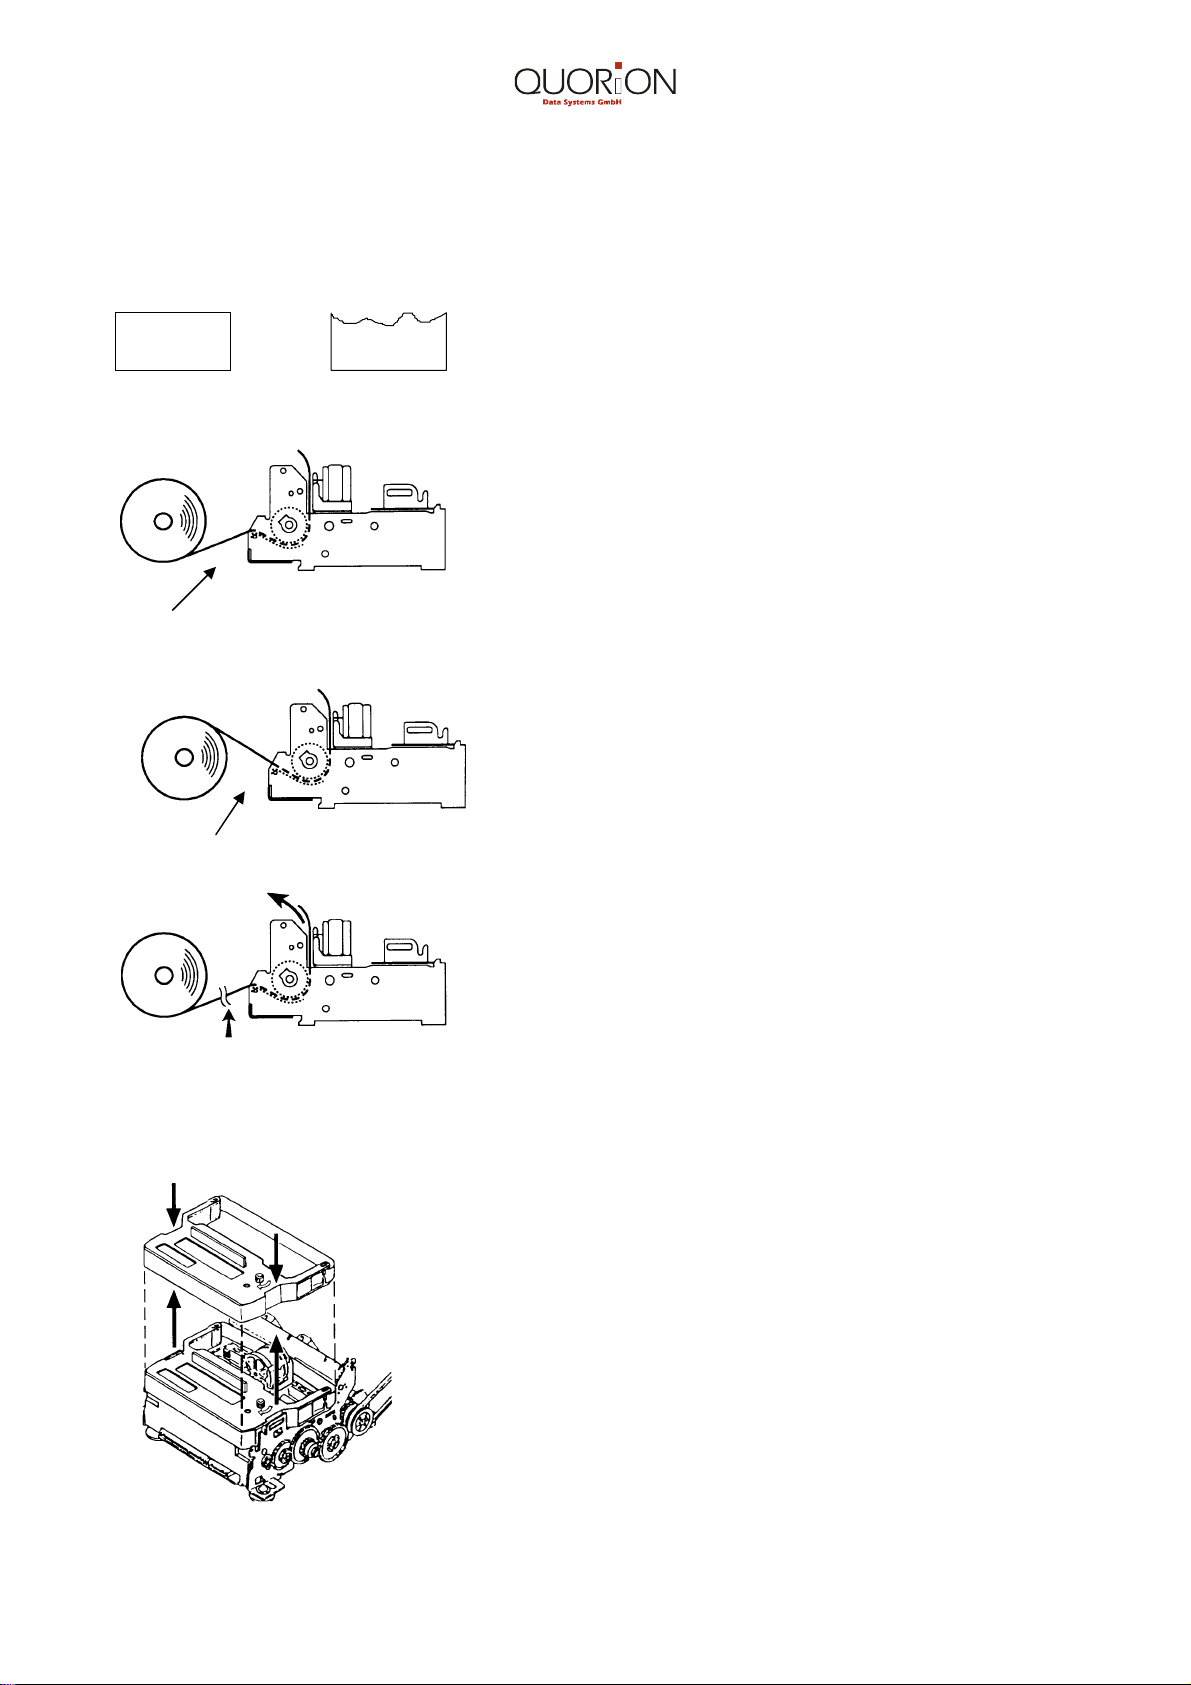
2.1 Installing paper rolls
Cut the edge Do not try to feed
to be fed straight the paper if it is
like this like this
this way
not this way
cut the paper here
2.2 Installing and replacing the ribbon cassette
1. Lift up and remove the printer
cover.
2. Load the paper rolls into their
respective receptacles. The end of
the paper roll must feed from
below.
3. Feed the end of the paper roll into
the paper entrance of the printer.
Press and hold the “Journal Feed“
key and feed enough paper so it
can be inserted into the slot of the
take-up reel. Wind two or three
turns of paper around the reel.
4. Now feed the end of the receipt
paper roll into the printer. Press
and hold the “Receipt Feed“ key to
pass the paper through the printer.
5. Feed the paper from below
through the paper slot of the
printer cover and reinstall the
printer cover.
To remove a paper roll, cut as shown
and feed out the cut-off paper with the
respective “PAPER FEED“ key.
1. Lift up and remove the printer cover.
2. Fit the left side clip of the ribbon
cassette into its receptacle of the
cassette holder and press down on the
cassette for a proper fit. To remove a
used ribbon cassette push it to the left
and lift it out.
3. Reinstall the printer cover.
8
Page 9
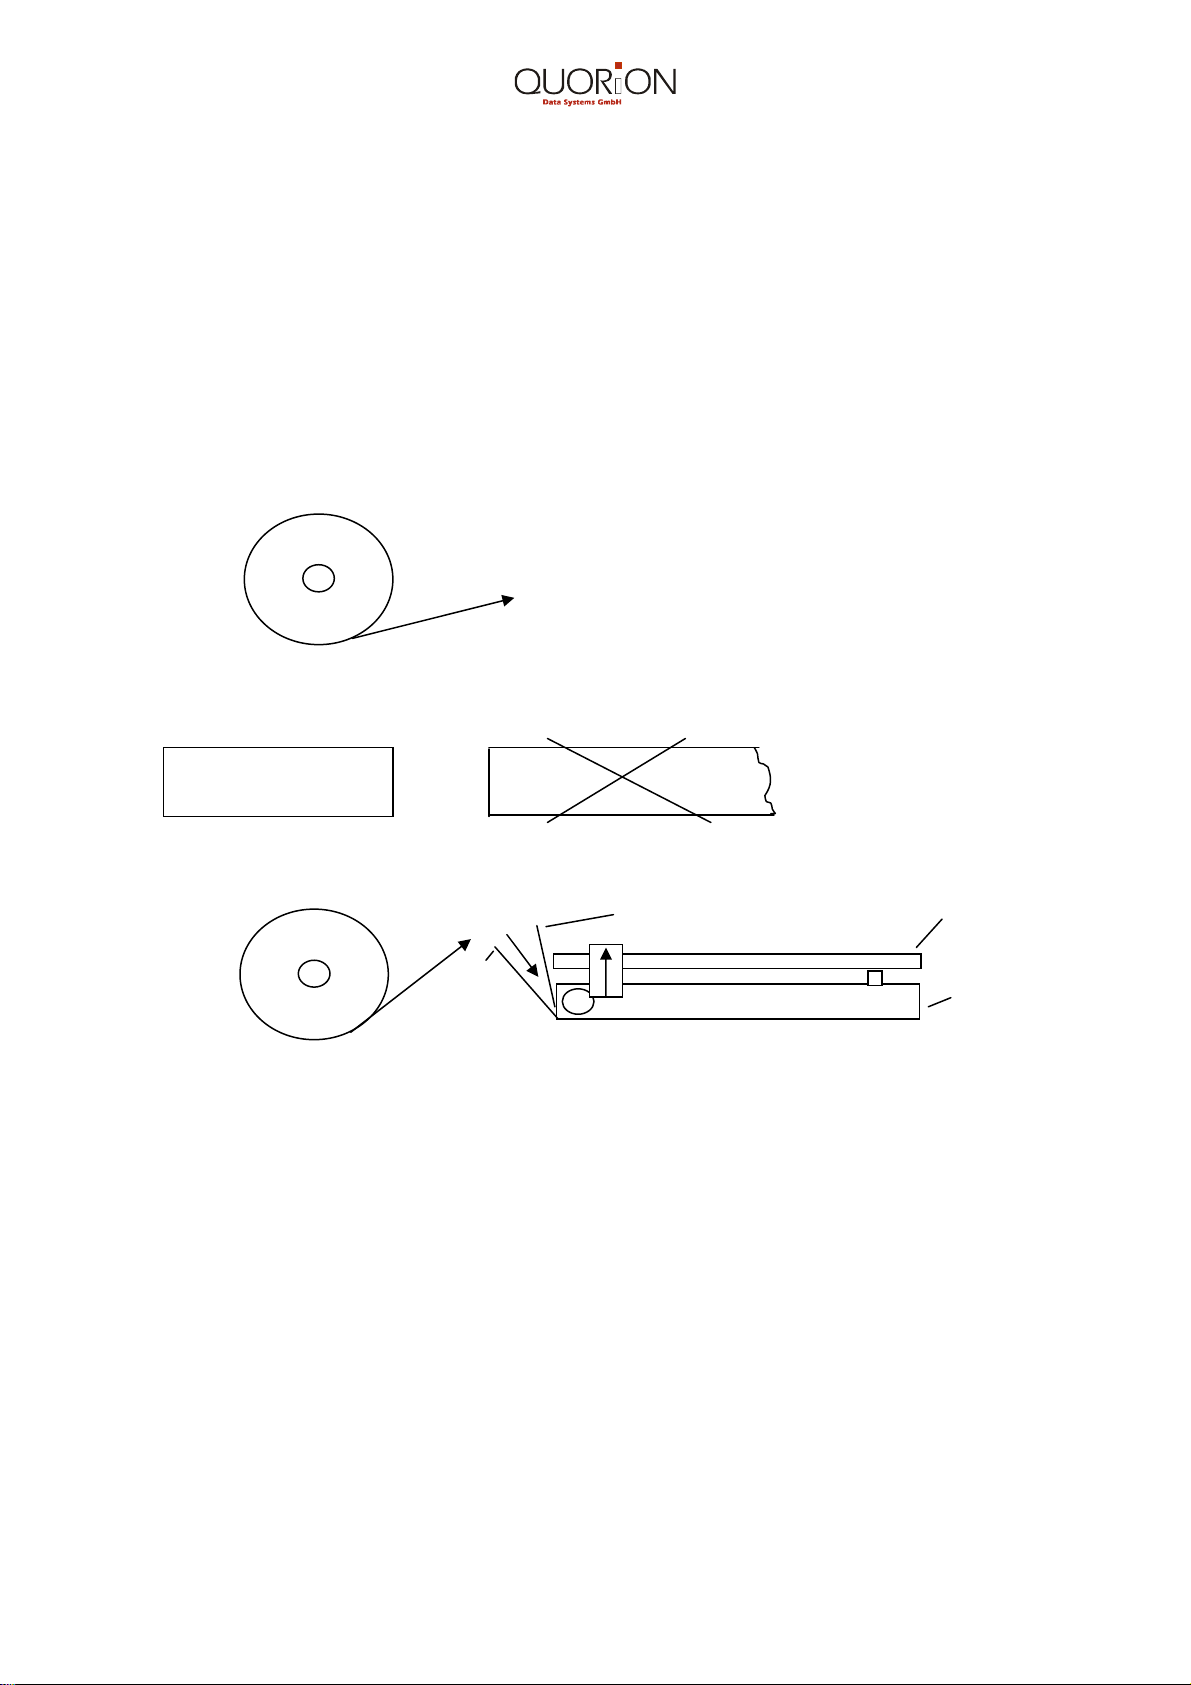
2.3 Thermal printer
Fehler! Textmarke nicht definiert.
2.3.1 Insert thermal paper
1. Remove the printer cover.
2. Switch on cash register
3. Load the paper rolls into their respective receptacles. The end of the paper roll must
feed from below.
4. Cut the end of the paper roll
5. Feed the end of the paper roll into the paper entrance of the printer.
Paper entrance Cutter
Printer
paper is pulled in automatically and severed.
6. Close printer cover
Removing Paper Roles
Note: Only remove the paper by pressing the Receipt key !
2.4 Keyboard
The keyboard of the CR 655 Series consists of 64 keys which are freely programmable.
The flat keyboard with 128 keys is used in the CR 2500 Series and is freely programmable
as well.
9
Page 10
CHARGE
C
RECEIPT
EL.
JOURNAL
GUEST
INVOICE
PLU
ENTER
REFUND
VOID
EC
CURSOR
TABLE
TRANS
# NS
X
TIME
7
4
1
CURSOR
INVOICE
REL
PLU
8
5
2
TAX
SHIFT
PLU
SHIFT
9
6
3
CLERK
I.D.
13
17
21
M
Q
U
1
A
5
E
9
Y
I
CARD
10
14
18
22
2
B
6
F
J
N
R
V
Z
SUB-
TOTAL
3
7
G
11
K
15
O
19
S
23
W
CHECK
4
D
8
H
12
L
16
P
20
T
24
X
CLEAR
0
00
.
TABLE #
CASH
Cover
Display
Keysheet
To change a keysheet, remove the cover no further then 5 cm from the Display.
You can place the cover over the display for easier handling.
Important: Do not remove the cover completely!
10
Page 11
/
1
a
9
i
17
q
25
y
33 34 35 36 37 38 39 40
41 42 43 44 45 46 47 48
49 50 51 52 53 54 55 56
57 58 59 60 61 62 63 64
2
b
10
j
18
r
26
z
3
c
11
k
19
s
27
empty space
4
d
12
l
20
t
28
5
e
13
m
21
u
29 30 31 32
6
f
14
n
22
v
7
g
15
o
23
w
8
h
16
p
24
x
65 66 67 68 69 70 71 72
73 74 75 76 77 78 79 80
GUEST
INVOICE
+ % - %
REFUND
VOID
EC
PRICE
SHIFT
CHARGE
X
TIME
SHIFT
PLU
7 8 9
4 5 6
1 2 3
PLU
TAX
SHIFT
SEPARATE
INVOICE
PLU
ENTER
CLERK
I.D.
P/O R/A FCE
RECEIPT
RECEIPT
ON/OFF
EL.
JOURNAL
TABLE
TRANS
CURSOR
#
NS
REL CARD 1
SUB-
TOTAL
CURSOR
CARD 2
CHECK
CLEAR
0 00 .
TABLE # TABLE #
CASH CASH
11
Page 12
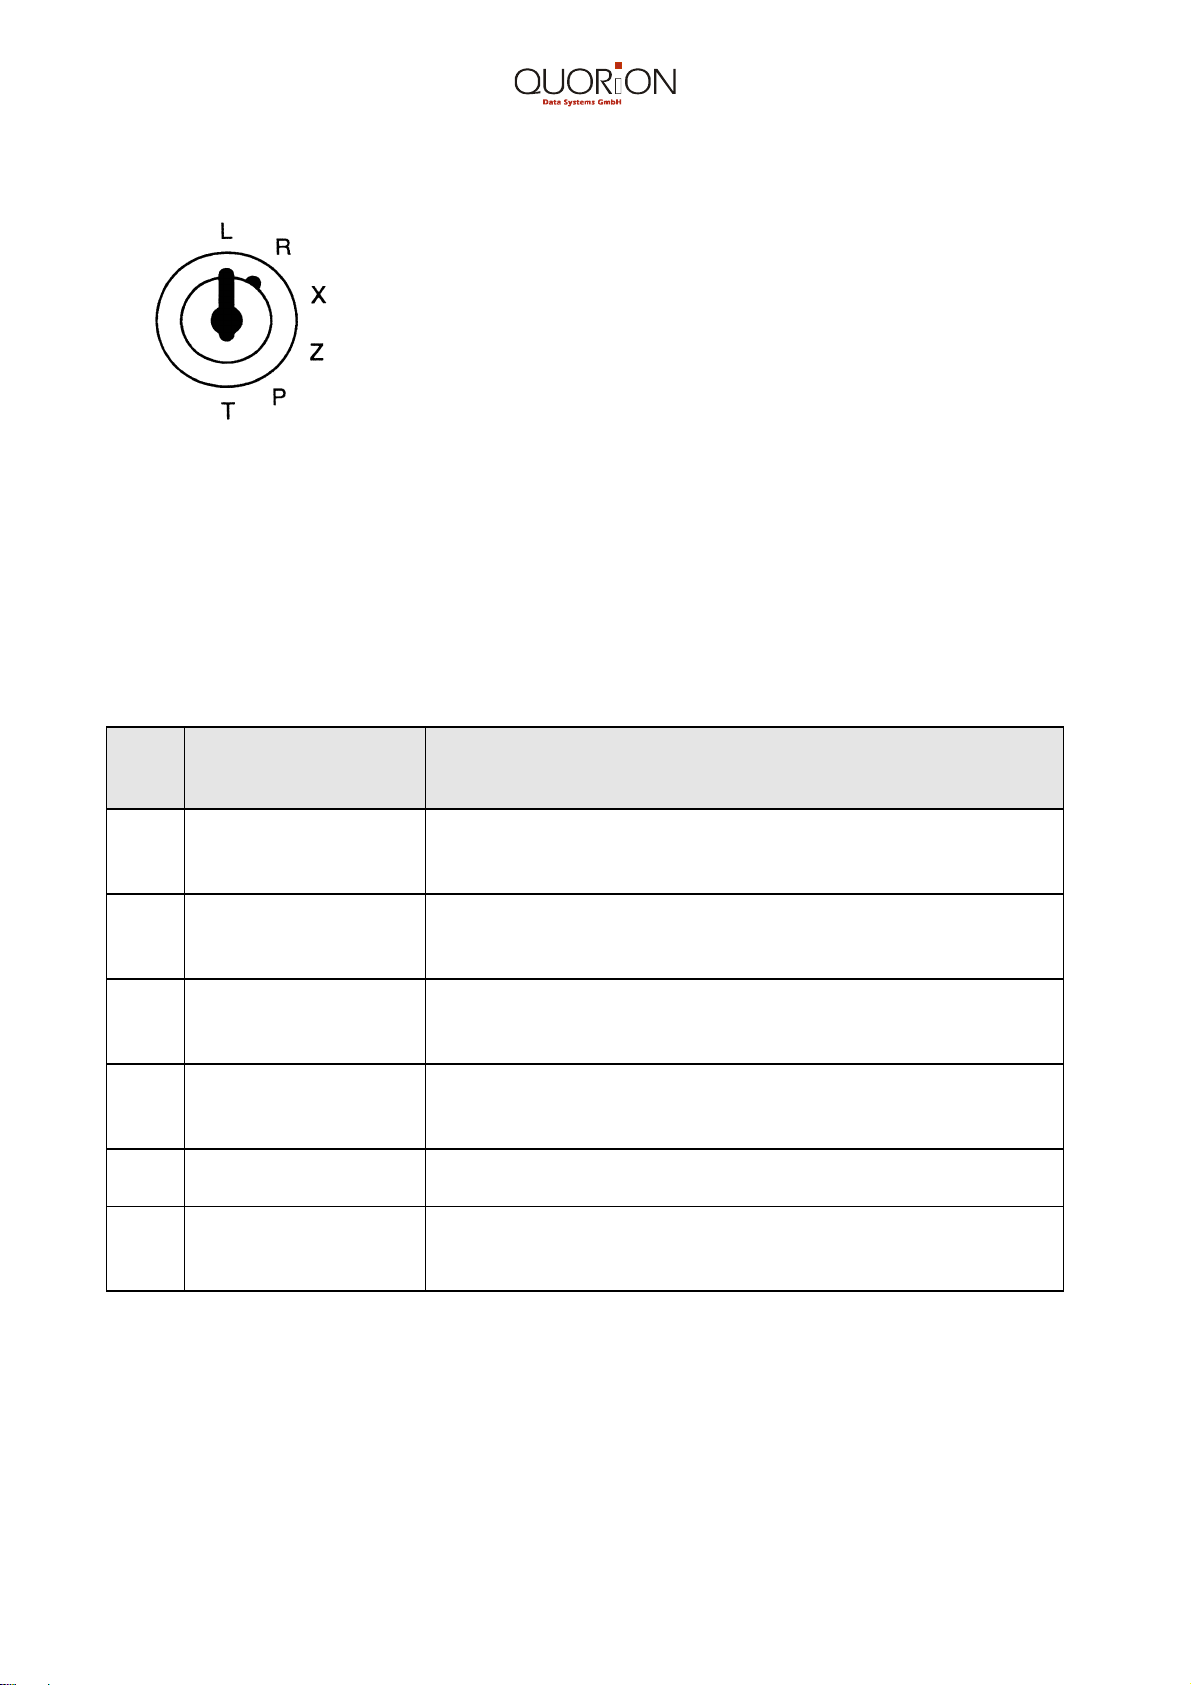
2.5 Control Lock and Control Lock Keys
The control lock has six different positions for the various
operation modes of your Cash Register. Each of the keys provide
access to specific modes.
Control Lock
The following keys are included:
OP - Operator key for modes: L - R - X
OW - Owner key for modes: L - R - X - Z - P
OWP - Owner Program key for modes: L - R - X - Z - P - T
Key
Pos.
L
R
X
Z
P
T
Display Mode/Function
Sale Mode
Time: 13:45:46
X-REPORT 11
ACTIVE TABLE 00
Z-REPORT 11
ACTIVE TABLE 00
PROGRAM Program Mode
Train Mode Training Mode
Lock Mode
Turns off the Cash Register and disables all operations.
All data is maintained in the memory.
Registration Mode
Registration, Transaction Mode.
Used for all registrations and transactions.
Read Mode
Used to display and print reports at any time
without clearing the data.
Reset Mode
Used to print reports at any time
and clearing the data.
Used for any Cash Register programming.
Used for training new operators without registering the
simulated sales transactions.
12
Page 13
2.6 Key Names and their Function
Key Label Key Name Function
0…9
PAPER
CURSOR
CURSOR
EL.
JOURNAL
CLEAR
VOID
REFUND
CLERK
I.D.
PLU
PLU
ENTER
1...80
PLU
SHIFT
TIME
EC
X
#
NS
Numeric Keys Entering amounts, quantities and programming.
Receipt Feed
Key
Cursor Key Up
Cursor Key
Down
Electronic
JOURNAL Key
CLEAR Key
Error Correct
Key
VOID Key Voids the transaction indicated by the cursor.
REFUND Key Used for refund transactions.
Clerk Sign-On
Key
Price-Look-Up
Key
PLU Enter Key Used to manually change a pre-set PLU price.
PLU/DEPT/
Menu Keys
PLU/Department
Shift Key
Multiplication/
Time Key
No Sale Key
Advances the receipt paper.
Scrolling upwards through the PLU’s of a department or
through the transactions of an open table.
Scrolling downwards through the PLU’s of a department
or through the transactions of an open table
Used to print out transactions stored in the Electronic
Journal.
Clears incorrect entries before registration and stops the
error alarm.
Deletes the last registration immediately after
registration.
Used to enter a pre-set numeric clerk ID code.
Used to access pre-set PLU items.
Used to access pre-set PLU’s or free price entering.
Used to register an item of a department or a menu.
Used to switch shift levels for PLU’s and departments.
Used for multiplication and displaying of the current time.
Used to print a reference code number or open the cash
drawer.
SUB-
TOTAL
INVOICE
CHARGE
CARD 1, 2
Sub Total Key Displays the sub total during operations.
Used to print out a pro-forma invoice of a not yet
Check Key
Charge Key Used to finalize a registration on account.
Credit Card Keys Used to register payments made on credit cards.
finalized table.
Used to enable the printout of the guest check
(compulsory guest check).
13
Page 14
Key Label Key Name Function
GUEST
INVOICE
CASH
TABLE #
REL
Tax
SHIFT
PRICE
SHIFT
SEPARATE
P/O
R/A
Guest Invoice
Key
Cash Key
Table Number
Key
Release Key
Tax Shift Key
Price Shift Key Used to shift to the 2nd price level.
Paid-Out Key Used for all cash paid out of the drawer.
Received-On-
Account
Separation Key Used to transfer an item from one table to another.
Must be pressed before finalization of a table.
Used to print additional text lines at the bottom of a
receipt.
Used for finalization of all registrations and transactions,
change due is shown in the display and the cash drawer
is opened.
Used to open and close a table.
Used to cancel PLU price and enter a new one.
Used to cancel a department chosen in error.
Used to shift to tax rat 2 e.g. take-out and in-
house sales.
Used for all payments received in cash, by check or on
credit cards.
RECEIPT
ON/OFF
FCE
Direct Alphanumeric Name Programming
The Cash Register allows a direct programming of department, menu and PLU names,
logos etc. by using the keys 1...28.
The ”PLU SHIFT”
(direct key shift) key is used to switch to the capital letters in shift level 2 and special
characters in shift level 3.
Special Characters
Special characters can be programmed by using the hexadecimal codes (see character
code chart).
Receipt On/Off
Key
Foreign
Currency
Exchange Key
Used to switch receipt off/on.
Used to calculate in foreign currency.
14
Page 15
2.7 Character Code Chart
A B C D E
Ñ Ò Ó Ô Õ Ö
0 1 2 3 4 5 6 7 8 9 A B C D E F
Space
2
0 1 2 3 4 5 6 7 8 9 : ; < = > ?
3
@
4
P Q R S T U V W X Y Z
5
` a b c d e f g h i j k l m n o
6
p q r s t u v w x y z
7
8
9
A
B
C
D
° ± ² ³ ´ µ ¶ · ¸ ¹ º » ¼ ½ ¾ ¿
À Á Â Ã Ä Å Æ Ç È É Ê Ë Ì Í Î Ï
"
!
¡ ¢ £ ¤ ¥ ¦ § ¨ © ª « ¬ - ® ¯
# $ % & ‘ ( ) * + , - . /
F G H I J K L M N O
[ \ ] ^ _
{ | } ~ Ä
I II III
× Ø Ù Ú Û Ü İ Þ ß
↑ ↓
à á â ã ä å æ ç è é ê ë ì í î ï
E
ð
F
Hexadecimal codes are used in shift level 3.
For entering digits 0...9 use numeric keys 0...9.
For hexadecimal codes A...F use the direct keys 1...6.
Example: Character ”A” = 41 (numeric keys 4, 1)
Character ”O” = 4F (numeric key 4, direct key 6
ñ ò ó ô õ ö ÷ ø ù ú û ü ý þ ÿ
Western Europe
15
Page 16

3. Programming
3.1 Programming of System Flags
3.1.1 Reset/System CLEAR
(Initialize your Cash Register by performing a System CLEAR)
Control Lock Key Position: P
No.
1.
2. SUBTOTAL Press “SUBTOTAL“ key to complete the initialization.
Note:
All programmed parameters and values will revert to the original factory defaults. The
electronic journal, all tables, and reports will be erased.
Entering a Uniform Price
No.
1.
2a. 0...9
2b. SUBTOTAL Press the “SUBTOTAL“ key.
3.1.2 Clearing the Electronic Journal
Key Description
444
SUBTOTAL
Key Description
333
SUBTOTAL
Enter 444. Press “SUBTOTAL“ key.
Display: CLEAR
Enter 333. Press “SUBTOTAL“ key.
Display: DEFAULT
Through the use of the numeric keys, all departments and PLU’s can
be given a uniform price.
(Programmed Flags will not be erased)
No.
1. REFUND Press ”REFUND”.
2. VOID The electronic journal is erased.
Key Description
16
Page 17

3.1.3 Programming Hints
1
Prog Sysflag
2
3
4
r
d
5
Use these keys to program the cash register.
Key Description
1
SUB TOTAL
SUB
TOTAL
CASH The “CASH” key ends the programming.
Note: In the column “Digit Entry ” an enabled function is indicated with y (yes) and a
disabled function with n (no). The factory default (Default) is in bold print.
3.1.4 Basic Program - System Flag Programming
Press ”1” + "SUBTOTAL" key to enter the System-Flag programming mode. Enter the
Flag number + “Sub Total” which you wish to program. You may also just press “Sub
Total” and start with Flag 1.
No.
1 DATE:
2 TIME 1158
The 1st Flag (date) of the system Flags is displayed.
The ”SUB TOTAL” key confirms the changed Flag and advances to the
next Flag.
Display Description Digit Entry
11
010197
Date entry
(always enter in this order)
6 digits for day, month, year.
Time entry
4 digits for hours, minutes.
2 digits each
2 digits each
3 CR-No. 00
4 FEED 3397
5 NS/Shift 20
Cash Register ID number. From 00 to 99
Logo Lines / Receipt Advance.
1st Entry: Number of headers. 0 1 2 3 4 5 6 7 8 9
2nd Entry: Number of footers. 0 1 2 3 4 5 6 7 8 9
3
Entry: Paper advance
before header.
4th Entry: Paper advance after
footer.
Receipt for NS / Department Shift.
1st Entry: 0 2
Intermittent Shift.
2nd Entry: always enter 0. 0
0 1 2 3 4 5 6 7 8 9
0 1 2 3 4 5 6 7 8 9
n y
17
Page 18

6
7
8
55
9 9 HEAD
10 10 REPORTS
02
No.
8 ROUND #2
Display Description Digit Entry
6 TAX 32
7 ROUND #1
05
PRICE inclusive/exclusive of tax /
Date format.
1st Entry: 0 1 2 3
Price exclusive tax.
Price inclusive tax.
month/day/year (USA).
day/month/year (Europe).
2nd Entry: 0 1 2 3
Number of decimal places.
Tax symbol /price rounding.
1st Entry: 0 1 2
Print tax symbol.
Print tax in %.
2nd Entry: 5
Rounding of tax.
Rounding of division /discount.
1st Entry: 5
y y n n
n n y y
y n y n
n y n y
y
n y n
n n y
y
Rounding of division.
2nd Entry: 5
Rounding of discount.
00
Print tax and receipt format.
1st Entry: 0 1 2 3 4 5 6 7
Print tax.
Reset Grand Total with daily report
Partition lines.
2nd Entry: 0 1 2 3 4 5 6 7
Print time.
Print clerk ID number.
Print CR ID no, receipt no. & date.
Print format of ”Z” report & receipt.
1st Entry: 0 1 2 3 4 5 6 7
Print Grand Total.
Print Z-counter.
Consecutive receipt no. is reset to 0.
2nd Entry: 0 1 2 3 4 5 6 7
Print % calculation of departments.
Reset Grand Total with periodic report.
Print logo.
y
y
y n y n y n y n
n n y y n n y y
y y y y n n n n
y n y n y n y n
y y n n y y n n
y y y y n n n n
y n y n y n y n
y y n n y y n n
y y y y n n n n
y n y n y n y n
y y n n y y n n
n n n n y y y y
18
Page 19

11 TAB, WAIT
12
12 DISTR/RCPT
13 13
14
14 KP/PLU
15
15 DIS/TAX
No.
11
Display Description Digit Entry
Compulsory clerk sign-on &
2nd Entry: 0 1
LOGO/BON 01
00
00
Compulsory table no.
1st Entry: 0 1
Compulsory entry of table no.
2nd Entry: 0 1
Compulsory clerk sign-on.
Enforced server area by table no. /
Compulsory guest check printing.
1st Entry: 0 1 2 3
Enforced server area in R mode
Enforced server area in X mode
Compulsory guest check printing.
Logo lines / sorting courses on KP
1st Entry: 0 1 2 3
Print text logo lines.
Print graphic logo
2nd Entry: 0 1
n y
n y
n y n y
n n y y
n y
y n y n
y y n n
00
01
Sorting courses on KP.
Kitchen printer / Slip printer / PLU.
1st Entry: 0 1 2 3 4 5 6 7
Kitchen printer on.
Slip printer on.
Print PLU’s on KP in sales mode
without table.
2nd Entry:
Paper advance for slipprinter header
Display mode / print short or
complete tax information.
1st Entry: 0 1
Display mode (no print).
2nd Entry: 0 1 2 3
CR printer prints short tax
information.
CR printer prints complete tax
information with groups.
n y
n y n y n y n y
n n y y n n y y
n n n n y y y y
0 (From 0 to 9)
y n
n y n y
n n y y
19
Page 20

16
16 KP_
17
17 SL
18
18 RCP/T
19
19 NoPrintNS
20 20 Price/TaxSh
n
21
21 Masterkey
22
22 TrainClerk
23 23 PLUShift
24 24 StartHappy
No.
Display Description Digit Entry
Print price, number, single price of
PLUstat
-length
-Flag 00
05
00
02
PLU on kitchen printer.
1st Entry: 0 1
Disable price-overwrite for direct
PLU's.
2nd Entry: 0 1 2 3 4 5 6 7
Print single PLU price.
Print PLU number.
Print sum of PLU prices.
Number of lines which can be
printed on a pre-printed slip printer
receipt.
Print “TRAIN” on receipt & kitchen
printer.
1st Entry: 0 1
Receipt on/off with Code - number
2nd Entry: 0 1 2 3
Print “TRAIN” on receipt.
Print “TRAIN” on kitchen printer.
Do not print “NO SALE” on receipt &
on kitchen printer.
1st Entry: 0
2nd Entry: 0 1 2 3
Print “NO SALE” on receipt.
Print “NO SALE” on kitchen printer.
n y
n y n y n y n y
n n y y n n y y
n n n n y y y y
0...99
n y
y n y n
y y n n
y n y n
n n y y
00
100
00
00
00
Tax shift & price shift.
1st Entry: 0 1 2 3 4 5 6 7
Enable price shift .
Intermittent shift for each PLU.
Intermittent shift for transaction.
2nd Entry: 0 1 2
Enable tax shift.
tax shift only for 1 PLU
Define one clerk as manager. All
restrictions are disabled.
Define one clerk as trainee. No
report is maintained.
Off-set between PLU shift levels.
Factory default: 100.
Start Happy Hour. 0...24
y n y n y n y
n n y y n n y y
n n n n y y y y
y n y
n n y
0...99
0...99
0...999
20
Page 21

25
25 PrtDeptRep
26 26 PrtBillRep
27 2
28 28 NoPrtRfd
29 29 Draw
GST Mode (reserved, do not change).
30 30 PLUPrint
No.
Display Description Digit Entry
7 NoPrtECVd 00
0
0
0 Print department report for clerks
(X / Z-report).
1st Entry: 0 1
Print department report.
Print sales in clerk report (X / Z-rep.).
1st Entry: 0 1
Print sales.
Print number of “Void” and "EC"
(X / Z-report).
1st Entry: 0 1
Print EC
nd
2
Entry: 0 1
Print Void.
Print no of “REFUND” (X / Z-report).
1st Entry: 0 1
Print “Refund”.
n y
n y
y n
y n
y n
er/GST
02
00
Drawer open and GST Mode.
1st Entry: 0 1
Drawer open by clerk settings
nd
2
Entry: 0 1
Print kitchen receipt and PLU price
on local printer.
1st Entry: (only for thermal printer) 0 1 2 3 4 5 6 7
Print PLU name double height.
Print table number double height.
Print receipt number double height.
2nd Entry: 0 1 2 3
Print PLU price.
Print tax symbol for PLU.
n y
y n
n y n y n n n y
n n y y n n y y
n n n n y y y y
n y n y
n n y y
21
Page 22

31
31 ReptSet1
Print receipt number in double height.
32
33
34
No.
Display Description Digit Entry
Print kitchen printer receipt number
00
at top or bottom.
1st Entry: 0 1 2 3 4 5 6 7
Print receipt no. on kitchen printer.
Print header lines in double height
Print PLU name in double height
n y n y n y n y
n n y y n n y y
n n n n y y y y
2nd Entry: 0 1 2 3
Print receipt number in normal size.
y n y n
n y n y
32 Swiss. R.
00
Print receipt number at top.
Print receipt number at bottom.
Special Rounding function (only for
Switzerland).
1st Entry:
1 = Removing the clerk-key triggers
CASH key
4 = Showing the clerkname in the
y y n n
n n y y
display on
33 Autofeed
34 Menue_prnt 00
01
2nd Entry:
Enables rnd. function for
Switzerland.
Enable/Disable Autofeed (Thermal
Printer)
1st Entry:
Reserved
2nd Entry:
Autofeed on.
menue print control
1st Entry:
printing of PLUs in menue
2nd Entry:
Reserved
0 1
n y
0 1
n y
0 1
n y
22
Page 23

35
36
37
16 = disable to sale PLU's with
38
39
No
Display Description Digit Entry
35 Bon2cntrl 000
2. Bon print control
1st Entry:
1 = enable multiple duplicate
receipts
0 1
n y
4 = reports from PC will not printed
16 = print the Z report with the date
of yesterday
32 = print the copy of the
orderreceipt as single
receipts on kitchenprinter
128 = total X/Z reports disabled for
normal clerks
36 EJ contrl 0
electronic journal control
1st Entry:
enable warning when the electronic
journal is near full (100 entries
0 1
n y
before full)
37 PLU ACCESS 00
38 Zcounter 0000
39 RCPTcount 0000
PLU access control setting
price=0 (except descriptive PLU)
Z counter
receiptcounter
0000 ... 9999
0000 ... 9999
Note: Your Cash Register does not function properly if Time and Date have not been
programmed.
3.1.5 System Flags Printout ä
No.
1.
Key Description
1
SUB-
TOTAL
Press “SUB TOTAL“ key to access system flag programming mode.
The first flag indicates the date.
2. CHECK Press “CHECK” key to start printout.
23
Page 24

3.2 Department Programming
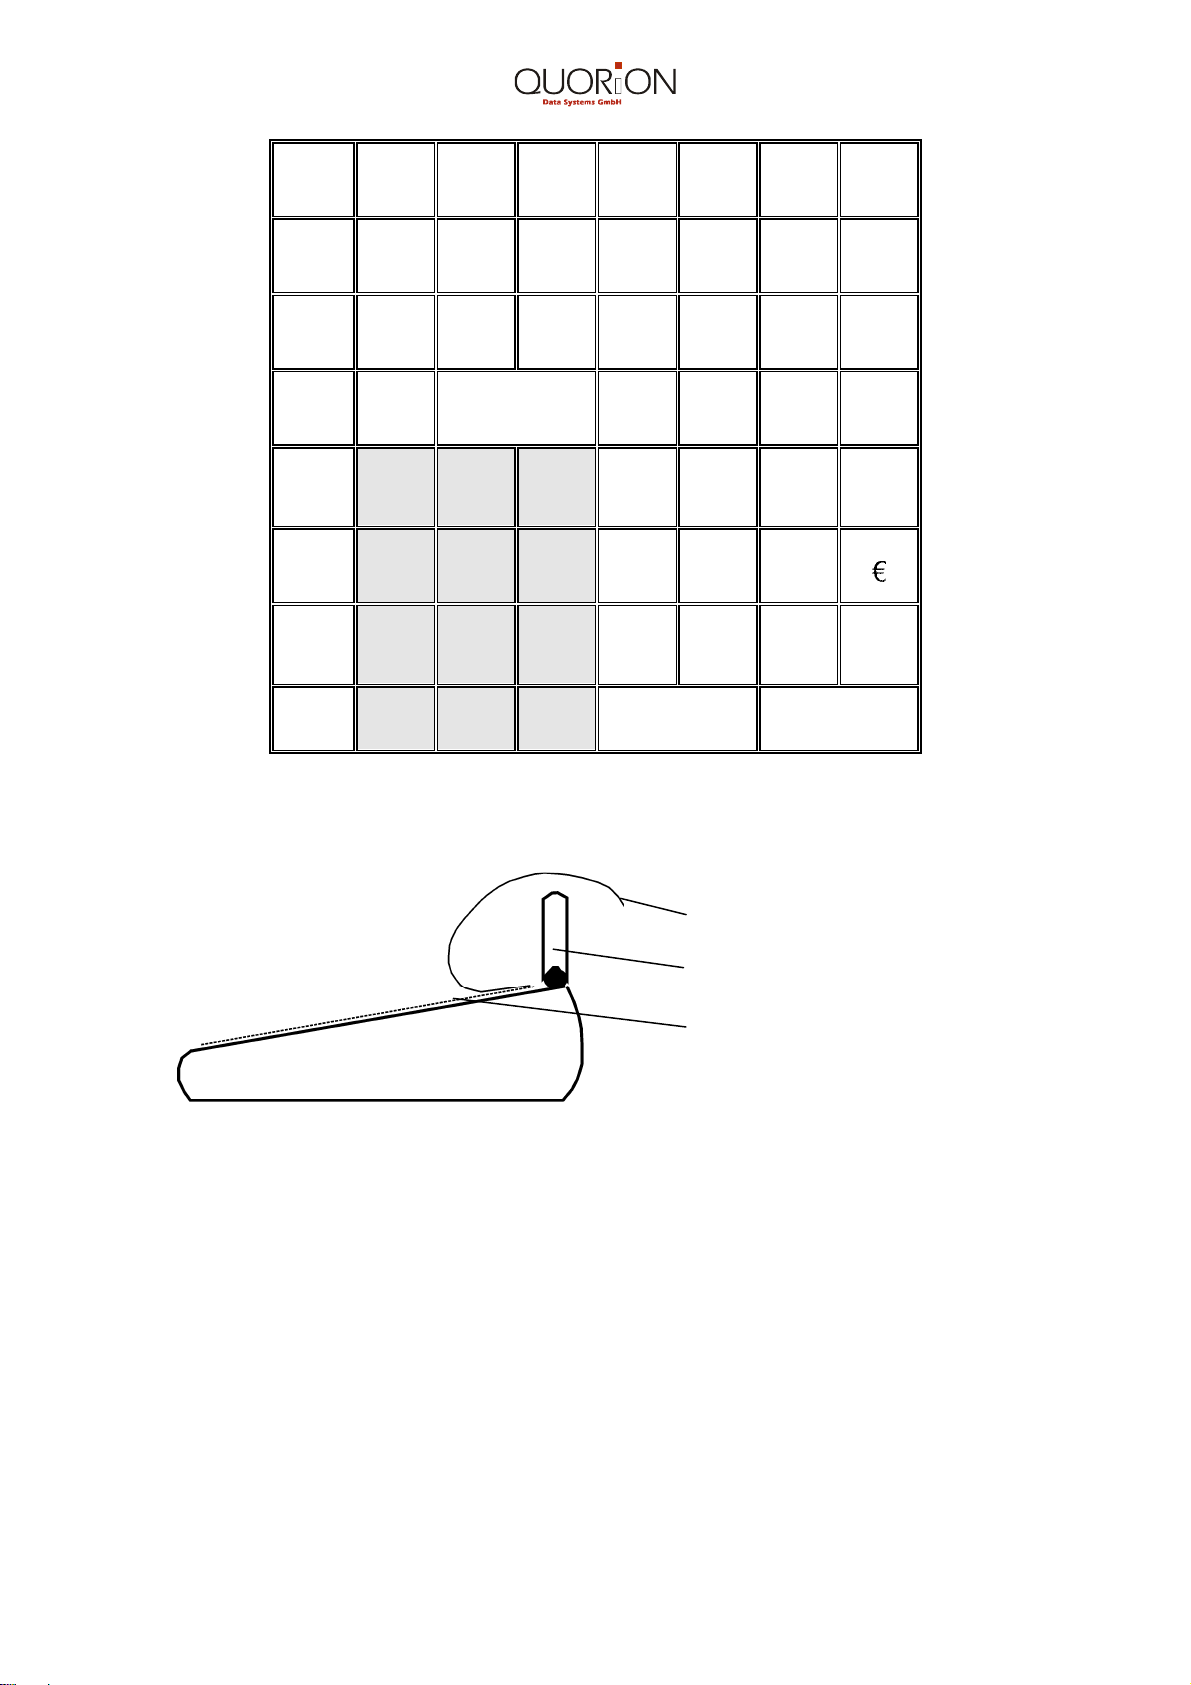
Your Cash Register can be programmed with max. 24 departments.
Press keys “2“ + “SUB TOTAL“ to start programming.
No.
Key Display Description
2
1.
SUB
TOTAL
2. 0...9
3.
4.
SUB
TOTAL
SUB
TOTAL
5. a...z
6.
SUB
TOTAL
7. 0...9
8.
SUB
TOTAL
9. 0...9
10.
11.
12.
SUB-
TOTAL
0...9
SUB
TOTAL
13. 0...8
14.
SUB
TOTAL
15. 0...9
16.
SUB
TOTAL
17. 0...9
Prog DEPT 11
Prog DEPT 01 11
Prog DEPT 01 11
DEPT 01
Dept Name 01 11
ABCDE
Prog DEPT 01 11
Price1: 00000100
Starts department programming.
Enter number of department to be programmed
(optional).
Confirm department number with SUBTOTAL.
Press “ SUB TOTAL ” to confirm department number.
Enter the department name followed by SUBTOTAL.
Enter price and press “ SUBTOTAL ” to confirm.
Enter price without decimals (for ex. 200 = 2,00)
Prog DEPT 01 11
GRP. 01
Press “SUBTOTAL" to enter group programming.
Enter the group number to which this department
should be assigned. Enter 0 if department should not
be assigned.
Prog DEPT 01 11
TAX 000
Press “SUBTOTAL" to confirm the group.
0 = no tax
1 = tax I, 4 = tax III
2 = tax II, 8 = tax IV
3, 5, 7, 9 not used / reserved
Prog DEPT 01 11
HDLO 08
Prog DEPT 01 11
Flag:01 000
Prog DEPT 01 11
Flag:02 000
Press “SUBTOTAL" to confirm the tax.
8 = maximum digits (0 ... 8 ),
H.D.L.O.(High-Digit-Lock-Out).
Press “SUBTOTAL" to confirm the HDLO.
064 = “German Cigarette function ".
Press “SUBTOTAL" to confirm the FLAG 1.
000 = prints one receipt per PLU at kitchen printer.
001 = prints two receipts per PLU at kitchen printer.
002 = prints all PLU’s sorted on one receipt at kitchen
printer.
003 = prints all PLU’s sorted on one receipt at kitchen
printer with a 2. copy of the list
128 = negative price (example: negative price and all
PLU's sorted on one receipt at kitchen printer:
128 + 002 = 130).
24
Page 25

Enter group number to be programmed(optional)
Group name 01 11
No.
18.
19. CASH
3.2.1 Department printout
No.
1.
2.
3. SUBTOTAL
4. 0...9
5. Check
Key Display Description
SUB-
TOTAL
SUBTOTAL
Prog DEPT 02 11
Key Description
2
0...9
Starts department programming.
Starting value for department range to be printed (optional).
Press “SUBTOTAL" to confirm the starting value.
Ending value for department range to be printed (optional).
Press “Check” to start print out.
Press SUB TOTAL to confirm Flag 2.
Press “CASH“ key to end programming.
3.2.2 Group Name Programming
No.
1.
2. 0...9
3.
4. a...z
5. SUB-TOTAL
6. CASH
Key Display Description
12
SUB-TOTAL
SUB-TOTAL
Group name 11
Group name 01 11
GROUP 01
ABCDE
Starts group name programming.
Confirm group name.
Enter name of Group 01.
Press SUB TOTAL to confirm the group name.
Press “CASH“ key to end programming.
25
Page 26

3.3 PLU Programming
A PLU number, name, price, and Flag can be assigned to each sales item. It can then
also be linked to a specific department. By pressing the “3” and “Sub Total” keys you may
enter PLU programming directly.
No.
1.
2. 0...9
3.
4.
5. a...z
6.
7.
8.
9.
10.
11.
12.
13. 0...9
14.
15. 0...8
16.
17. 0...9
18.
Key Display Description
3
SUB-
TOTAL
SUB
TOTAL
SUB
TOTAL
SUB
TOTAL
0...9
SUB
TOTAL
Key
0...9
SUB
TOTAL
0...9
SUB
TOTAL
SUB
TOTAL
SUB
TOTAL
SUB
TOTAL
Prog PLU No 11
Prog PLU No 0001
PLU Name 001
00001PLU
PLU Name 001
ABCDE
Prog PLU No 0001
Price1: 00000100
Pro PLU No 0001
Price1: 200
Pro PLU No 0001
Price1: 00000200
Pro PLU No 0001
Price2: 00000200
Prog PLU No 0001
Price2: 200
Prog PLU No 0001
Link to PLU 0000
Prog PLU No 0001
DEPT 01
Prog PLU No 0001
HDLO 8
Prog PLU No 0001
Flag:1 000
Prog PLU No 0001
Flag:2 000
Starts PLU programming.
Enter the PLU number to be programmed
(optional).
Press “ SUBTOTAL ” to start programming.
Press “ SUBTOTAL ” to confirm.
Enter PLU name (max. 24 characters).
Press “ SUBTOTAL ” to enter price programming.
Enter price for 1. price shift level without decimals
(example 200 = 2,00).
Press “ SUBTOTAL ” to confirm.
Enter price for 2. price shift level without decimals
(example 200 = 2,00).
Press “ SUBTOTAL ” to confirm.
Enter the PLU number which should be linked to
this PLU. Enter 0 if PLU should not be linked.
Press “ SUBTOTAL ” to confirm.
Enter the department number to which this PLU
should be assigned.
Press “ SUBTOTAL ” to confirm.
8 = maximum digits (0 ... 8 ),
H.D.L.O.(High-Digit-Lock-Out).
press “ SUBTOTAL ” to confirm.
0 = normal
32 = inhibit PLU
64 = descriptive PLU
(example: inhibit + descriptive PLU 32 + 64 = 96)
press “ SUBTOTAL ” to confirm
26
Page 27

No.
19. 0...9
20.
21. 0...9
22.
23. CASH Press “CASH” to end PLU programming.
3.3.1 PLU Printout
No.
Key Display Description
0 = course 1
1 = course 2
2 = course 3
16 = kitchen printer 1 on
32 = kitchen printer 2 on
128 = local kitchen printer on (thermal printer)
SUB
TOTAL
SUB
TOTAL
Key Description
Prog PLU No 0001
Flag:3 000
Prog PLU No 0002
press “ SUBTOTAL ” to confirm.
0 = normal
2 = PLU requires a descriptive PLU followed
Press “ SUBTOTAL ” to confirm.
3
1.
2. 0...9 Starting value for PLU range to be printed (optional).
3.
4. 0...9 Ending value for department range to be printed (optional).
5. Check Press “Check” to start print out.
3.3.2 Direct Key Programming
Keys 1 through 80 may be programmed as needed with either PLU’s , departments or
menus. The number of direct keys for PLU’s may be expanded by using the 2nd and 3rd
shift level. The number of direct keys for departments may be expanded by using the 2nd
shift level.
The off-set between PLU shift levels is pre-set at 100 (see Flag 23). The off-set between
department shift levels is fixed at 12. There is no shift level for menus.
You can enter the 2nd or 3rd level during a sales transaction by pressing the ”PLU SHIFT”
key before selecting a PLU or department.
Example: Key 1 = PLU # 1 on 1st level
Key 1 = PLU # 101 on 2nd level
Key 1 = PLU # 201 on 3
Key 2 = DEPT 5 on 1st level
Key 2 = DEPT 17 on 2nd level
SUB-
TOTAL
SUB
TOTAL
Starts PLU programming.
Press “ SUBTOTAL ” to confirm the PLU number.
rd
level
27
Page 28

No.
1.
2. 1…80
3.
0…9
4.
5. CASH End direct key programming.
Key Display Description
10
SUB-
TOTAL
SUB-
TOTAL
Key program mode
Press key.
Press key 11
<PLU> 0080
Press key
<DEPT> 0024
press key
<PLU> 0100
Key program mode
Press key.
Starts direct key programming.
Press a key from 1 to 80 (e.g. key 80).
Choose a direct key function (PLU, department,
menu or 0) with the cursor key.
Enter the number, which will be assigned to the
function key selected in step 3.(e. g. PLU
0100).
Press „SUB-TOTAL“ to confirm.
3.4 Menu Programming
Before a menu can be programmed a key must be designated as a menu key. Please
see 3.3.2 Direct Key programming.
No.
1. 1...80
2. a...z
3.
4. 0...9
5.
6. 0...9
7.
8.
9. 0...9
10.
Key Display Description
SUB-
TOTAL
SUB-
TOTAL
SUB-
TOTAL
SUB-
TOTAL
Menu 01 Name 11
Menu 01
Menu 01 Orde01 11
PLU No. 0001
Menu 01 Orde01 11
PLU Count 0001
Menu Price 11
00002400
Menu 02 Name 11
Menu 02
Press ”1...80” to start menu programming.
Enter the menu name e.g. “BBQ Chicken”.
Confirm the menu name.
Enter the first PLU No. of this menu.
The current quantity of PLU’s contained in the menu
is displayed.
Enter the quantity of this PLU contained in the menu.
Repeat steps 3 – 6 for the remaining 6 PLU’s
contained in this menu, even if you do not wish to
program them.
The menu price is calculated by adding the individual
PLU prices.
Enter a menu price, if you wish to change the price
calculated in step 8.
Press SUB TOTAL to confirm.
11. CHECK
12. CASH
Press “CHECK” to print menu programming.
End menu programming.
28
Page 29

3.5 Tax Rate Programming
No.
1.
2. 0...9 Enter tax rate to be programmed (optional).
3.
4.
5.
6. a...z
7.
8. CHECK Press “CHECK” to print tax rate programming.
9. CASH End tax rate programming.
Key Display Description
8
SUB
TOTAL
SUB
TOTAL
0...9
SUB
TOTAL
SUB
TOTAL
Prog Taxrate 11
TAX RATE 01 11
100000
TAX RATE 01 11
160000
TAX NAME 01 11
TAX1
TAX NAME 01 11
ABCDE
TAX 02 11
200000
Starts the tax rate programming.
Start tax rate programming for tax rate 1.
Default tax rate is 10 %.
Enter tax rate, e.g. 16%.
Confirm tax rate and enter name.
Enter name.
Press “SUB TOTAL” to confirm tax rate 1 and
proceed to next tax rate. Repeat steps 4 – 7.
3.6 Clerk Programming
No.
1.
2. 0...9
3.
4. 0...9
5.
6. a...z
7.
8. 0...9
Key Display Description
5
SUB
TOTAL
SUB
TOTAL
SUB
TOTAL
SUB
TOTAL
CLERK 11
CLERK 01 11
CLERK# 0001
CLERK 01 11
CLERK# 123
CLERK 01 11
CLERK 01
CLERK 01 11
ABCDE
CLERK 01 11
Function 000
Starts clerk programming.
Enter a clerk code number to be programmed
(optional).
Confirm clerk ID. programming.
Enter clerk code number with max. 4 digits
(ex. 123).
Confirm clerk code number.
Enter name of CLERK 01 .
Press “SUB TOTAL“ to confirm.
“Access denied” options for CLERK 01:
1 = VOID
2 = Refund
4 = Pay Out
8 = EC
16 = Discount
(ex: Clerk 01 has no access to Void
and Refund: 1 + 2 = 3)
29
Page 30

Logo line 1 11
No.
9.
10. 0...9
11.
12. CHECK
13. CASH End clerk ID. programming.
Key Display Description
SUB
TOTAL
SUB
TOTAL
CLERK 01 11
Flag: 000
Press “SUB TOTAL“ to confirm.
Drawer open and settings for CLERK 01 (reg.
systemflag 29):
0 = no drawer opens
1 = drawer 1 opens
2 = drawer 2 opens
4 = Priceshift disabled
8 = PLU shift only with Code input possible
128= Enable single clerk Z report
Confirm “ Drawer open ” options for CLERK 01
and proceed to next CLERK. Repeat steps 4 –
11.
Press “CHECK” to print clerk programming
(optional).
3.7 Programming of Restaurant Logo / Commercial Message
A total of 18 lines can be used for logo and/or commercial messages. Up to 9 lines each
can be programmed as header or footer.
No.
1.
2. 0...9
3.
4.
5. a...z
6.
Key Display Description
4
SUB
TOTAL
SUB
TOTAL
EC
Void
Refund
SUB
TOTAL
Logo line 1 11
Logo line 1 11
ABCDEF
Logo line 2 11
Starts logo programming.
Logo line number to be programmed (optional).
Confirm logo programming.
Print settings are optional.
Press “EC“ to double the fond width of 1st
character.
Press “Void“ key to double the fond width of
entire line.
Press “Refund“ to reset the fond width to normal
size.
Enter commercial message.
Press “SUB TOTAL“ to confirm message and
proceed to the next line. Repeat steps 4 to 6.
7. CHECK Press “CHECK” to print logo (optional).
8. CASH End logo programming.
30
Page 31

3.8 Tendering names programming
No.
1.
2. 0...9
3.
4. a...z
5.
6. 0...9
7.
8. CHECK
9. CASH End tendering names programming.
Key Display Description
6
SUB
TOTAL
SUB
TOTAL
SUB
TOTAL
SUB
TOTAL
Payments 11
Payments 1 11
CASH
Payments 1 11
ABCDE
Press “SUB TOTAL“, to confirm tender 1 name.
Payments 1 11
Flag : 000
Starts tendering programming.
Enter tender number to be programmed (optional).
Confirm tendering programming.
Enter tender 1 name.
1 = Over payment for this tender is not permitted.
2 = Compulsory tendering.
Press “SUB TOTAL“ to confirm tender 1 FLAG and
proceed to next tender. Repeat steps 4 to 7.
Press “CHECK” to print tendering programming
(optional).
Note: Tender 1 must always be “CASH“ since it is used to calculate change.
3.9 Foreign Currency Exchange Programming (FCE)
No.
1. 7
2. 0...9 Enter number of FCE to be programmed
3. SUB TOTAL
4. SUB TOTAL
5. a...z
6. SUB-
7. 0...9 Enter new exchange rate
8. SUB TOTAL
Key Display Description
Starts FCE programming.
(optional).
Note: local currency is programmed after
FCE programming is completed.
Confirm FCE programming.
Default name of FCE1 is displayed.
Enter name of foreign currency.
Default exchange rate is displayed.
(without decimal point and zeros before the
decimal point).
Number of digits after decimal point of
foreign currency is displayed.
SUB TOTAL
TOTAL
FCE 11
FCE 1
FCE Name 1
EURO
FCE Name 1 01
ABCD
FCE 1
Rate: 10000000
FCE 1
Commas 2
31
Page 32

No.
Confirm FCE1 and proceed to the next FCE.
Key Display Description
9. 0...9
10. SUB TOTAL
11. 0...9 Enter drawer number (1 or 2).
12. SUB TOTAL
13. 0...9 Enter new number of digits of the exchange
14. SUB TOTAL
15. 0...9 Options for FCE Flag 1.
16. SUB TOTAL
17. 0...9 Options for FCE Flag 2
18. SUB TOTAL
19. SUB TOTAL
20. SUB TOTAL
21. a...z
22. SUB TOTAL
23. 0...9 Enter new exchange rate (without decimal
24. SUB TOTAL
25. 0...9 Enter drawer number (1 or 2).
26. SUB TOTAL
27. 0...9 Enter number of digits after decimal point.
28. SUB TOTAL
29. 0...9 Options for FLAG 1.
Enter new number of digits after decimal
point of foreign currency (max. 2).
FCE 1
Drawer 1
FCE 1
Decimals 7
FCE 1
Flag : 1 001
FCE 1
Flag 2 000
FCE 2
Loc. Curr.
Loc. Curr. 01
DM
Loc. Curr. 01
ABC
Loc. Curr.
Rate: 19558300
Loc. Curr.
Drawer 1
Loc. Curr.
Decimals 7
Loc. Curr.
Flag: 1 000
Drawer number assigned to foreign currency
is displayed.
Number of digits after decimal point for
exchange rate is displayed.
rate.
Flag 1 is displayed.
1 = FCE active
2 = Change in foreign currency.
16 = always print converted total.
32 = always print converted taxes.
64 = always print converted change.
128 = always print exchange rate.
Flag 2 is displayed.
16 = currency in EURO.
32 = cash payment in foreign currency is
not permitted.
Repeat steps 4 – 18.
Local currency programming.
Factory default name for local currency.
Enter local currency name.
Factory default exchange rate.
point and zeros before the decimal point).
Drawer number assigned to local currency is
displayed.
Number of digits after decimal point for
exchange rate is displayed.
Flag 1is displayed.
1 = print local currency name.
32
Page 33

No.
Key Display Description
30. SUB TOTAL
31. CHECK Press “CHECK” to print FCE programming.
32. CASH End FCE programming.
Loc. Curr.
Confirm FLAG1.
3.10 Percentage Rates Programming
No.
1.
2. 0...9
3.
4. 0...9
5.
6. a...z
7.
8. 0...9
9.
Key Display Description
13
SUB
TOTAL
SUB
TOTAL
SUB
TOTAL
SUB
TOTAL
SUB
TOTAL
Percent 11
Percent 1 11
Rate: 1000
Percent 1 11
Rate: 1234
Percent 1 11
Service %
Percent 1 11
ABCDE
Percent 1 11
Flag: 000
Starts percentage rates programming.
Enter number of percentage rate to be
programmed (optional).
Confirm percentage rate programming.
Factory default : 10%.
Enter percent rate
(from 0 to 9999 for rates from 0% to 99,99%).
Confirm percentage rate.
Enter name of percentage rate 1.
Press “SUB TOTAL“ key to confirm the name of
percentage rate 1.
FLAG programming of percentage rate 1.
0 = surcharge percentage (+%).
1 = discount percentage (-%).
2 = manual entry of percentage rate not
permitted.
4 = no access to this percentage rate.
8 = manual entry may not exceed programmed
percentage rate.
16 = percentage on sub total not permitted.
32 = percentage on single items not permitted.
64 = only 1 percentage per transaction allowed.
Confirm percentage rate1 and proceed to next
percentage rate. Repeat steps 4 - 9.
10. CASH End percentage rates programming.
33
Page 34

3.11 Macro Keys
There is no pre-defined ”Macro” key on the keyboard. So, to operate plural steps at one
key, you must program the other keys to be used as the ”Macro” key.
No
1.
2. 0...9 Enter number of Macro Key (can be skipped)
3. SUB-TOTAL
or
1.
4. SUB-TOTAL
5.
6.
CASH Leave programming with CASH
3.11.1 Printout of Macro Keys
Key-
Sequence
16
SUB-TOTAL
Macro1..
Macro16
every
Key
Macro1..
Macro16
Display Description
Prog. Macro 11
Prog. Macro 001
Prog. Macro 001
Prog. Macro 001
01:
Prog. Macro 002
01:
Start programming Macro Keys
Confirm with SUB-TOTAL
Start programming Macro Keys
Confirm with SUB-TOTAL
Enter the Keys, which should be executed by the
macro. Max. 10 Keys can be linked to one macro.
Can be skipped, if no changes should be done.
Confirm Macro and step to next Macro Key
No
1.
2. 0...9 Enter number of Macro Key (can be skipped)
3.
or
1.
3. CHECK
Key-
Sequence
16
SUB-
TOTAL
SUB-
TOTAL
Macro1...
Macro16
Description
Start programming Macro Keys
Confirm with SUB-TOTAL
Start programming Macro Keys
Start printing with CHECK.
3.12 Programming text of extended guest invoice
The text of the extended guest invoice is programmable.
No
1.
2.
3.
Key-
Sequence
14
SUB-
TOTAL
SUB-
TOTAL
Display Description
Ext. Invoice 11
-------------------------------
Ext. Invoice 1 11
-------------------------------
Access Logo Program.
Index number logo line (can be skipped)
Confirm Logo Program.
34
Page 35

No.
4.
5.
Key Display Description
a...z
SUB-
TOTAL
CHECK
CASH
Alphan. In. 11
ABCDEF
Ext. Logo 2 11
DATA SYS
Press “CHECK“ key to print out the logo lines.
Press “CASH“ key to finalize programming.
Enter the new name "ABCDEF".
Press “SUB TOTAL“ key to store 1st line and
to advance to 2nd line.
3.13 Programming logo for external display
In times out of work (display of the ECR shows time) the external display can show a logo
or an advertising message.
No
1.
2.
3.
4.
5.
Cash register of the CR655/2510 series can drive an external display over a RS 232 port.
The display must support EPSON ESC/POS® command set and have two lines with 20
characters. The settings for the RS 232 are:
9600 BAUD; 8 data bit; no parity bit; 1 stop bit
To activate this feature you must set one communication port of the ECR (refer chapter 11
of the manual).
Key-
Sequence
19
SUB-
TOTAL
1..2
SUB-
TOTAL
a...z
SUB-
TOTAL
CHECK
CASH
Display Description
Ext. Logo 11
..................................
Ext. Logo 1 11
Welcome!
Alphan. In. 11
ABCDEF
Ext. Logo 2 11
DATA SYS
Press “CHECK“ key to print out the logo lines.
Press “CASH“ key to finalize programming.
Access Logo Program.
Index number logo line (can be skipped)
Confirm Logo Program.
Enter the new name "ABCDEF".
Press “SUB TOTAL“ key to store 1st line and
to advance to 2nd line.
4. Cash Register Operation
4.1 Registration (Sales-Mode)
4.1.1 Electronic Journal Printout
All transactions are stored in a memory chip called the electronic journal. The capacity of
this journal is determined by the amount of memory and the number of PLU’s. Once the
capacity is exceeded the first transaction will be deleted in order to store the latest
transaction.
35
Page 36

No.
1.
2. 6688
3. 0…9
4.
4.1.2 Clerk Sign-On
A compulsory clerk sign-on can be programmed. Please see the System Flags
programming section. Before registering a transaction the clerk must sign on.
Signing on with the Clerk Lock
The clerk lock allows six clerks to sign on. Each of the six keys is individually encoded. All
transactions are then assigned to the individual clerks during the report generation and
performance can be evaluated.
Key Display Description
EL.
JOURNAL
SUB-
TOTAL
Electr. Journal
CODE - - - Electr. Journal
Input No.:
Electr. Journal
Input
Printout of the last transactions.
Starts electronic journal printout.
Enter code 6688.
Enter the number of transactions you wish to print.
Signing on with the Clerk I.D Number
The numeric ”Clerk” code enables clerks to sign on by entering a programmed clerk ID
number.
No.
1.
2. 0…9 Enter the Clerk I.D. number (max. 4 digits).
3.
All transactions are now saved under the clerk currently signed on.
4.1.3 Assigned Clerk Area and Compulsory Invoice
Assigned Clerk Area
After having previously signed on, registered and closed that specific table, can only be
re-opened if the same clerk signs on again.
Compulsory Invoice
The programmed compulsory guest check (Flag 12) requires the clerk to press the
”INVOICE” key before he can finalize the guest check with the tendering key. This
prevents an accidental finalization of a guest check.
Key Display Description
CLERK
I.D.
CLERK
I.D.
Enter 11
Clerk Code
Sale Mode
Time: 13:34:45
Press ”CLERK I.D.”.
Press ”CLERK I.D.” to confirm.
36
Page 37

4.1.4 Opening and Closing a Table
No.
1. 0…9
2. TABLE #
3.
4. TABLE #
4.1.5 Entry Corrections
4.1.5.1 Correction of incorrect numbers
No.
1. CLEAR
4.1.5.2 Deleting the last Entry (EC/Error Correction)
Key Display Description
Table # 11
2
DEPT/PLU/
Menus
Key Description
00004PLU 11
1.00x 4,00
N. BALANCE 11
4,00
Press ”CLEAR” key to clear incorrect entries before registration or to
clear error messages shown in the display.
Enter the table number.
Press ”TABLE #” key.
Registration of departments, PLU’s and menus.
Within a department (e.g. soups) the linked PLU’s
may be viewed by using the
confirmed by pressing ”PLU”.
Press ”TABLE #” to close and save the registered
items without printing a guest check. The next table
can be opened.
“
” keys and
No.
1. EC Press ”EC” to delete the last item registered.
4.1.5.3 Voiding earlier Entries
Earlier PLU or menu entries can be voided if the registrations have not yet been finalized.
No.
1.
2. VOID Press ”VOID” to delete the item displayed.
4.1.5.4 Refund
Delete sales registrations after the transactions have already been finalized.
No.
1. REFUND Press ”REFUND” to start refund function.
2.
or
2.a
Key Description
Key Description
Key Description
0...9
PLU
1...80
By using the “Cursor” keys you may review the previous transactions.
Enter the PLU number.
The PLU price is displayed.
Press a direct key or review within a department using the
display the item to be refunded.
keys to
3. CASH Press ”PLU” to finalize.
37
Page 38

4.1.6 Re-opening a Table
No.
1. 0…9 Enter the table number.
2. TABLE #
3. TABLE #
4.1.7 Closing a Table with Guest Check Printing
Press ”INVOICE” if the compulsory invoice is programmed in Flag 12.
Printout proforma invoice (optional).
No.
1. 0…9 Enter the table number.
2. INVOICE Press ”INVOICE” to start printing the proforma guest invoice.
Extended guest invoice
Key Description
Press ”TABLE #”. The accumulated total is displayed. Further
transactions can now be added or previous ones voided. By using the
cursor keys
Press ”TABLE #” to close and save the registered items without printing
an invoice. The next table can be opened.
Key Description
you may review all previous transactions.
No.
3.
Printout the final invoice
No.
4. 0...9 Enter the table number.
5. TABLE # Press ”TABLE #”.
6.
4.1.8 Table Transfer
If required, a table may be transferred to a different clerk or customers may want to be
seated at a different table.
No.
1. 0…9
Key Description
GUEST
INVOICE
Key Description
Tendering
keys
Key Display Description
Press ”GUEST INVOICE” in order to print out the extended guest
invoice (optional).
Finalization of a table; the guest invoice is printed and the table with all
transactions is cleared.
Enter table number (e.g.10).
2.
3. 0…9
4.
TABLE
TRANS
TABLE
TRANS
Table Transfer 11
0010 To
Table Transfer 11
0010 To 12
Table Transfer
OK!
Press ”TABLE TRANS”.
Enter the table number to which Table 10 should be
transferred, as in our example to Table 12.
Press "TABLE TRANS" to finalize transfer.
38
Page 39

Table #
4.1.8.1 Separation of a registered Item
Note : The destination table must be opened before using the SEPARATE function.
No.
1. 0…9
2. TABLE #
3.
4. SEPARATE
5. 0…9
6.
4.1.9 Tax Shift (Take out sales)
You may switch to the second tax rate by pressing the tax shift key. All registrations are
now assigned to this tax rate. After the finalization of the transactions it automatically
reverts to the first tax rate.
No.
Key Display Description
1
SUB-
TOTAL
Key Display Description
00001PLU 11
1.00x 5,00
00001PLU 11
Separ. Table
Separ. Table
003 OK!
Enter the table number (e.g. 1).
Press ”TABLE #” key to open the table 1.
By using the cursor keys
previous transactions. Select the desired item which
is to be transferred.
Press "SEPARATE" key to separate this item.
Enter the table number (e.g. 3) to which the item
should be transferred.
Finalization of separation.
you may review all
1.
2. 1...80 Press direct keys to register the items as described.
4.1.10 Price Shift
No.
1.
2.
4.1.11 Using the FCE Function
Program the ”FCE” key according to your requirements as described under FCE
Programming.
No.
1. FCE
TAX
SHIFT
Key Description
PRICE
SHIFT
PRICE
SHIFT
Key Description
Tax Shift On (Off)
Press "PRICE SHIFT" to enter the 2nd price level of PLU's.
Reverts back to the 1st price level (depending on Flag 20).
Press ”FCE” before finalization of the transactions. The total will be
converted to the foreign currency.
Press ”TAX SHIFT” to switch the tax rate.
2. CASH Press tendering key to finalize.
39
Page 40

5. Management Reports
5.1 Reports without Reset
The number of active tables is displayed.
Control Lock Key Position: X
No.
1
2
3
4
5
7
8
9
10
11
12
Key Description
11 + Sub Total
12 + Sub Total
13 + Sub Total
14 + Sub Total
15 + Sub Total
DEPT1...100
DEPT1...100 + 0...9 +
SUB TOTAL
33 + Sub Total
0...9 + PLU #
0...9 + PLU # + 0....9 +
SUB TOTAL
PLU #
Daily Report with Departments.
Daily Report without Departments.
short Daily Report without Departments/clerks with
taxes.
short Daily Report without Departments/clerks/taxes.
(only finacial)
short Daily Report only with taxes.
Individual Department Report.
Selective Department Report.
All Departments Report.
Individual PLU Report.
Selective PLU Report.
All PLU Report.
13
14
15
16
17
18
34 + Sub Total
31 + Sub Total
1...6 + CLERK. No.
CLERK No.
21 + Sub Total
22 + Sub Total
Financial Report.
Hourly Report.
Individual Clerk Report.
All Clerk Reports.
Periodic Report with departments.
Periodic Report without departments.
40
Page 41

5.2 Reports with Reset
The number of active tables is displayed.
Control Lock Key in Position: Z
No.
1
2
3
4
5
6
7
8
9
Key Description
11 + Sub Total
12 + Sub Total
13 + Sub Total
14 + Sub Total
15 + Sub Total
21 + Sub Total
22 + Sub Total
PLU #
32 + Sub Total
Daily Report with Departments.
Daily Report without Departments.
short Daily Report without Departments/clerks with
taxes.
short Daily Report without Departments/clerks/taxes.
(only finacial)
short Daily Report only with taxes.
Periodic Report with Departments.
Periodic Report without Departments.
PLU Report.
Hourly Report.
Note: After printout of reports all statistics will be deleted except for the Grand Total.
Periodic (Monthly) Report
Although the periodic report looks like the “Z-full“ Report, it actually derives data from the
back-up storage inaccessible to other reports. This back-up storage is designed to
accumulate system statistics over a long period of time, i.e. one or two months. Meanwhile
you may issue several “Z-full“ Reports and still retain the periodic data. All periodic data,
except the Grand Total, will be erased after printing the periodic report. This Grand Total,
initially equal to zero, is the Grand Total you find in the last “Z-full“ Report.
5.3 Flash Reports
Control Lock Key in Position : X
No. Key Description
1
2
3
4
5
84+SUB TOTAL
50+ SUB TOTAL + WG1...100
72+ SUB TOTAL +0...9+ SUB TOTAL
(without entering the “h“!)
81+ SUB TOTAL +0...9+ SUB TOTAL
61+ SUB TOTAL
Daily turnover
Turnover by department
Daily turnover by groups
Hourly Report (0...23h),
turnover of the current hour
Calculated amount in cash drawer
41
Page 42

5.4 Clearing the Grand Total
Control Lock Key in Position : Z
No.
1.
2.
Key Description
VOID
SUB
TOTAL
Clear Grand Total.
Press “SUB TOTAL“ key to confirm.
6. Accessories and Options
6.1 Ribbon Cassettes
Ribbon cassettes are available at your dealer.
6.2 Option PC Interface
The Cash Register can be equipped with up to 6 serial interfaces. For technical details
please ask your dealer.
7. Maintenance
Do not disassemble your Cash Register for cleaning purposes. For cleaning use a dry or
slightly damp soft cloth. Never use water or volatile chemicals such as thinner, benzene or
alcohol.
Do not drop any metal objects such as paper clips into the Cash Register or printer as this
may lead to shorts, damage or electrical shocks.
7.1 Emergency Drawer Opening
The cash drawer may be opened manually by pulling the drawer opening lever underneath
the cash drawer in the rear.
42
Page 43

8. Information on the Electromagnetic Compatibility and Safety
CE Conformance
This QUORiON cash register conforms to the European Community’s EMV 2004/108
directive.
The cash register fulfills the following technical European requirements:
• EN 55022 – „Norm values and measuring procedures for radio interference
properties – characteristics of information technology devices“
• EN 55024 – „Norm values and measuring procedures for the interference
resistance properties– characteristics of information technology
devices“
• EN 60950 – „Security measurements for the installation of IT“
A "conformance explanation" in accordance with the directives and standards cited on top
has been delivered and can be reviewed with
QUORiON Data Systems GmbH
An der Klinge 6
99195 Erfurt
(E-mail: rd@quorion.de; web: www.quorion.de)
REMARK: If the cash register is installed in a system with other devices and components,
all other devices and components must each show EMV conformance to the norm.
According to the EMV 2004/108 directive as well as EC and national laws, the system
integrator is responsible to ensure that the built system complies with regulations
Power Cord Exchange
The power cord can only be exchanged by a certified technician. The same type of cord
has to be used.
43
Page 44

9. Error Messages
Error Message
E00_KEY Incorrect key was pressed.
E01_KEY Incorrect key sequence.
E02_KEY
E03_SUM The sum exceeds the digit capacity.
E04_HDLO The limit for HDLO, High-Digit-Lock-Out has been exceeded.
E06_CLRK_NR The clerk ID code was not entered.
E07_SUBTOT The subtotal key was not pressed
E20_BUFFER The available capacity for entries per receipt has been exceeded.
E21_EJ_FULL The electronic journal has reached it's end.
E30_PAPEND End of paper roll.
E31_PRINTER Printer blocked.
The number entered manually is incorrect or the digit limit has been
exceeded.
Reason
E35_FCE Error in foreign currency calculation
E50_FM_FIN
E51_FM_FIN Fiscal Memory full.
E53_FM_BL Defective or blocked Fiscal Memory.
E54_FM_VAT Check sum error of the Fiscal Memory due to incorrect VAT-number.
To clear an error message press the ”CLEAR” key.
Precautionary signal before Fiscal Memory reaches capacity
(30 memory blocks left).
44
Page 45

10. General Specifications
Model CR-655 CR-655T CR-2500 CR-2500T CR-2510 CR-2510T
Printer
Type 1 station 1 station 2 station 2 station 1 station 1 station
dot
matrix
Paper width 76 mm 80 mm 2 x 38
Characters per line 40 36 18 18 40 36
Printing speed 3 lines/s 20 lines/s 3 lines/s 20 lines/s 3 lines/s 20 lines/s
Display
Customer VFD 7 segment, 11 digits x 1 line
Operator LCD alphanumeric, 16 digits x 2 lines
Keyboard
Type key button flat keyboard
Matrix 8 x 8 8 x 16
Memory
Program memory 512 kB Flash
Data memory 512 kB RAM
Data memory expansion optional up to 2 MB RAM (4 x 512 kB)
PLU 500 (optional up to 30,000)
Departments 24
Menus 40
Clerks 16
Tables 150
Electronic journal 3,500 lines (optional up to 40,000)
Fiscal memory optional
Data protection 1 year
Interfaces
RS-232 1 standard (optional up to 6)
RS-485 (IRC) optional network with PC and up to 25 cash registers
Cash drawer
Type 5 bills / 8 coins
Technical Data
Dimensions 330 (W) x 380 (D) x 180 (H) mm
Weight cash register 3.25 kg
Weight cash drawer 7.5 kg
Operating voltage 110 - 240 V
Operating current 0.3 - 0.13 A
Frequency 50 - 60 Hz
thermal dot
matrix
mm
for thermal printer models only
thermal
2 x 38
mm
dot
matrix
76 mm 80 mm
thermal
45
Page 46

11. Peripheral Devices
11.1 Activation of a Serial Interface RS 232
Your Cash Register can be equipped with up to 6 RS 232 C serial interfaces.
Location of interfaces with 6 x RS 232 C (rear view):
IF 2 IF 1
Location of interfaces with 3 x RS 232 C and 1 x RS 485 IRC (rear view):
IF 2 IF 1
Each of the interfaces can be used for peripheral devices after activation. However, you
may choose any interface for a peripheral device once it has been activated. You may
program the Identification Number of the peripheral devices to be used. The PC is
detected automatically by the Cash Register.
Programming the RS 232 for external devices:
No.
IF 5/6 IF 3/4
IRC
Key Display Description
IF 3
11
1.
2. 0..4
3.
4. 0...9
5.
6. CASH
SUB
TOTAL
SUB
TOTAL
SUB
TOTAL
Interface
Interface 1 11
Interface 1 11
Device: 70
Interface 1 11
Device: 70
Starts the interface programming.
Enter the interface number (optional ).
Press Subtotal to proceed to desired interface.
Example: Interface COM1, 70 = kitchen printer 1.
Enter the ID. number of the desired peripheral
device.
Press “SUB TOTAL” to confirm and proceed to the
next interface. Repeat steps 3 to 5.
End interface programming.
46
Page 47

Identification numbers for peripheral devices
PC = 10
External display = 11
Smart Card Terminal = 30
Credit Card Terminal = 40
Scale = 50
Modem = 60
Kitchen Printer 1 = 70
Kitchen Printer 2 = 71
Slip Printer = 80
11.2 Using a Kitchen Printer
The kitchen printer TM-U210 can be connected to the Cash Register. For further details
please ask your dealer. The kitchen printer must be activated by programming Flag 14.
Cable for Kitchen Printer TM-U210
Use a RS232C interface connection cable. The transmission protocol must have the
following parameters:
- Data format: 1 start bit, 8 data bits, 1 stop bit, no parity
- Baud rate: 9600 Baud (Standard)
- Hand shake signals: DTR / DSR
Pin assignment: TM-U210 Cash Register
(D-Sub connector, female, 25 pins); (D-Sub connector, male 9 pins)
1 SHIELD DCD 1
2 TxD RxD 2
3 RxD TxD 3
4 RTS DTR 4
5 CTS GND 5
6 DSR DSR 6
7 GND RTS 7
8 DCD CTS 8
20 DTR RI 9
22 RI
1.50.417084 BA-englisch GB CR2500 Series QUORION CE (Stand 12.02.09)
47
 Loading...