

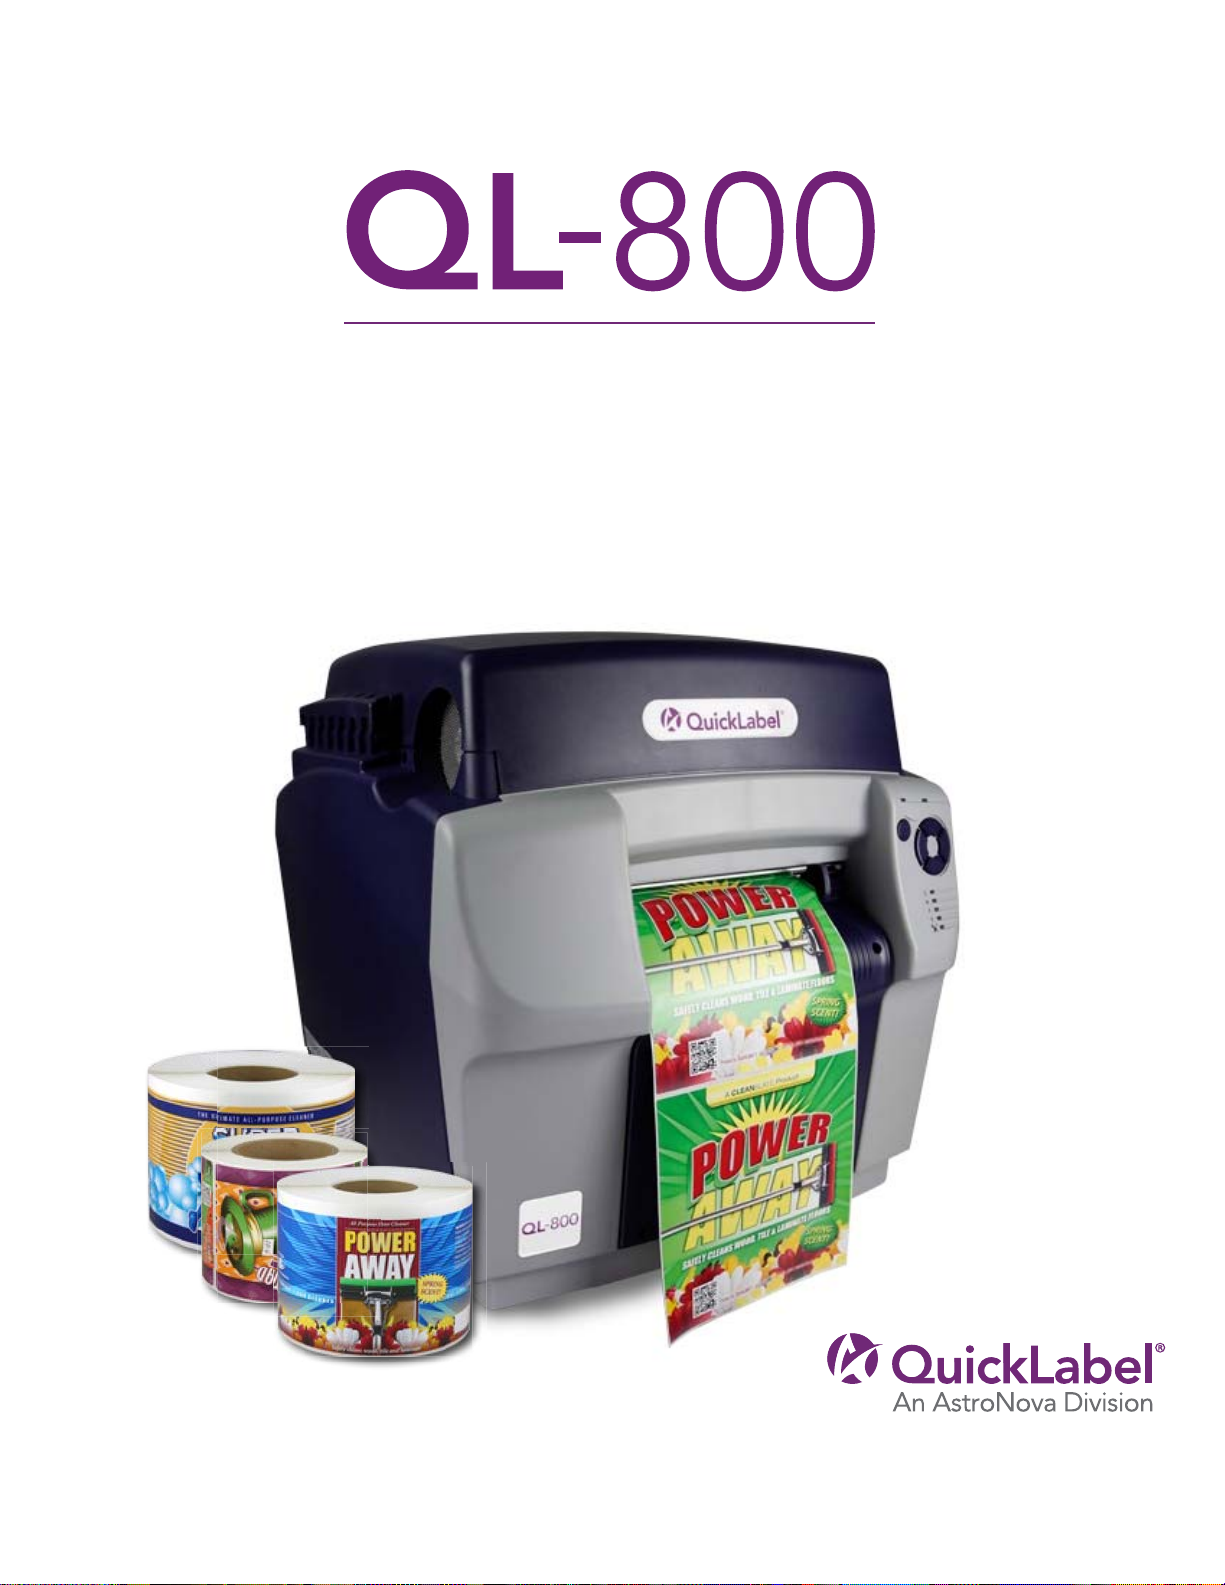
QuickLabel QL-800 User Manual
Part Number: 22834649-EN-E
QLB156A 20170822
www.quicklabel.com
Toll-Free: 877-757-7978
Tel: +1 401-828-4000
USER GUIDE
• High print speed up to 12 inches per second
• Superior resolution up to 1600 dpi
• High-yield, vivid inks
• Complete with color labeling software


QL-800 User Guide
Part Number 22834649-EN-E
Revision 1.5
10/2017
QuickLabel, An AstroNova™ Division
World Headquarters
600 East Greenwich Ave., West Warwick, RI 02893
Tel: +1 (401) 828-4000 Fax: +1 (401) 822-2430
E-mail: info@QuickLabel.com
www.QuickLabel.com
Technical Support
Tel: +1 (401) 828-4000
E-mail: support@QuickLabel.com
www.QuickLabel.com/support/

© 2017 AstroNova, Inc. All Rights Reserved
This manual is copyrighted with all righ ts reserved. No part of this manua l may be reproduced,
transmitted, transcribed, stored in a retrieval system, or translated into any language in any
form by any means without written permission of QuickL ab e l.
Trademarks
QL-800® and Custom QuickLabel Omni® are registered trademarks of AstroNova, In c.
Adobe®, Photoshop®, and Illustrator® are registered trademarks of Adobe Systems, Inc.
Corel® is a registered trademark of Corel Corporation.
Microsoft® Windows® 7, Windows® 8, and Windows® 10 are registered trademarks of
Microsoft Corporation.
Goo Gone® is a registered trademark of Weiman Products, LLC.
QL-800 Limited Warranty
QuickLabel, An AstroNova Division, warrants all components of this product, except wea r parts
and consumables, against defects in materials or workmanship for a pe riod of one (1) year from
the date of original purchase. Wear parts include the transport u nit, maintenance roller,
maintenance cartridge, cutter blades and the like. Consumables include ink cartridg es and
labels, which are covered under a separate war rant y . If the cust om e r disc overs a defect, this
defect must be reported promptly to QuickLabel or an authorized QuickLabel dealer.
QuickLabel will, at its option, repair the printer or repair or replace its defective component(s)
at no additional charge. Repair parts and replacement parts will be furnished on an exchange
basis and will be either reconditioned or new. The customer is responsible for freight to return
the printer or component to our factory or authorized service center. We will ship the repaired
or replaced printer or component ba ck to you vi a standar d g round fre ight se rvice. All rep laced
parts become the property of QuickLabel. Travel, freight and other expenses related to
warranty repairs are not covered.
In the first year of product ownership, you may be covered by a separate Customer Support
Agreement purchased from or issued by QuickLabel or an authorized QuickLabel dealer. In
such a case, you would be entitled to an on-site installation and/or training visit. Otherwise,
Customer Support Agreements and renewals are available for purchase and provide on-site
support.
This warranty is void if the product has been damaged by accident, abuse, neglect or
misapplication or by the use of incompatible consumables or parts, or if the product has been
improperly installed, or if the product has been modified without the express written permission
of QuickLabel. QuickLabel is not responsible for products lost or dama ged in transit.
QuickLabel makes no warranty, either express or implied, with respect to this product's
merchantability or fitness for a particular purpose. In no event shall QuickLabel be held liable
for any direct, indirect, special, incidental, or consequential damages, whether based on a
contract, tort, or any other legal theory and whether advised of the possibility of such damages.

Ink Limited Warranty
This warranty covers QuickLabel QL-800 ink cartridge sold by QuickLabel.
Each QL-800 ink cartridge is warranted to be free from defects in materials and workmanship
for up to 24 months from the date of manufacture if in origin al unopene d packagin g, or up to 3
months after installation, whichever occurs first. This warranty applies only to the ink cartridges
as used in the QuickLabel QL-800 printing system.
If the customer suspects a defect in a QL-800 ink cartridge, the customer must notify
QuickLabel or an authorized QuickLabel dealer within the warranty period. Upon return of the
ink cartridge and QuickLabel's verification of the defect, QuickLabel will, at its option, either:
1. Replace the defective ink cartridge; or,
2. If the customer has used the ink, pro-rate the price of a new ink based upon the estimated
life remaining for the ink, as reported by the QL-800 system. The QL-800 provides the
estimated life remaining, and QuickLabel may obtain this information from the system remotely
or request the customer to furnish this information.
This warranty does not cover QL-800 ink cartridges that have been emptied, refilled,
remanufactured, modified, refurbished, misused, or tampered with, or that have expired, or
when used to print on label or tag media that is not compatible with the QL-800.
This warranty is void if the QL-800 ink cartridge has been damaged by accident, abuse, neglect
or misapplication, if the product has been improperly installed or maintained, if the product has
been used outside of its environmental specifications, or if the product has been modified
without the express written permission of QuickLabel.
QuickLabel makes no warranty, either express or implied, with respect to this product's
merchantability or fitness for a particular purpose. In no event shall QuickLabel be held liable
for any direct, indirect, special, incidental, or consequential damages, whether based on a
contract, tort, or any other legal theory and whether advised of the possibility of such damages.
Printhead Limited Warranty
QuickLabel warrants the printhead from the date of purchase for a period of 90 days or for
250,000 inches of printing, whichever comes first, contingent upon the use of QuickLabel ink
and labels. The QL-800 printhead is calibrated for use with QuickLabel ink and labels and
performs optimally only when used with these materials. This specific printhead warranty does
not apply to printheads damaged by accident, abuse, neglect, misapplication or the like. This
warranty is void if the product has been damaged by accident, abuse, neglect or misapplication,
or if the product has been improperly installed, o r if th e prod uct has b een modified without the
express written permission of QuickLabel.
ICC Profile
ICC Profile Powered by X-Rite Incorporated
Obtaining Service
To obtain warranted service, please contact QuickL abel Technical Su pport th rough one of the
Factory Sales and Service Centers.

Contact Information
World Headquarters
600 East Greenwich Ave.
West Warwick, RI 02893 USA
Toll-Free: 877-757-7978 | Tel: +1 401-828-4000
quicklabel.com
European Headquarters
Waldstrasse 70
63128 Dietzenbach | Germany
Tel: +49 (0) 6074-31025-00
quicklabel.de
Canada
3505 Rue Isabelle
Suite O
Brossard, QC J4Y 2R2
Tel: +1 800-565-2216
quicklabel.ca
Latin America
Av Insurgentes Sur No 1602, 4º Piso
Suite 467
Col. Credito Constructor
Ciudad de Mexico CDMX 03940
Mexico
Tel: +52 55 1000-9116
quicklabel.com/es
Denmark
Marielundvej 46A, 2.
2730 Herlev
Tel: +45 29 64 00 05
trojanlabel.com
France
Parc Euclide
ZA la Clef de St Pierre
10A Rue Blaise Pascal
78990 Elancourt
Tel: +33 (1) 34 82 09 00
quicklabel.fr
United Kingdom
A5 Westacott Business Centre
Westacott Way, Maidenhead
Berkshire, SL6 3RT
Tel: +44 (0) 1628 668836
quicklabel.co.uk

China
1F, Bldg2#,
458 North Fu Te Road,
Shanghai Waigaoqiao F.T.Z., 200131
Tel: +86 21 5868 2809
quicklabel.cn
Ownership Information
Congratulations and thank you for your business. Your purchase of a QuickLabel digital label
printer is an investment in production flexibility and packaging efficiency. Please record the
model number and serial number of your product.
FCC Part 15 Compliance
NOTE: This equipment has been tested and found to comply with the limits for a Class A digital
device, pursuant to part 15 of the FCC rules. These limits are designed to pr ovide reasonable
protection against interference in a residential installation. This equipment gen erates, uses, and
can radiate radio frequency energy and, if not installed and used in accordance with the
instruction manual, may cause interference to radio communications. However, there is no
guarantee that interference will not occur in a particular installation.
If this equipment does cause interference to radio or television reception, which can be
determined by turning the equipment off and on, the user is encouraged to try to correct the
interference by one or more of the following measures:
• Reorient or relocate the receiving antenna .
• Increase the separation between the equipment and receiver.
• Connect the equipment into an outlet on a circuit differen t from that to which the receiver is
connected.
• Consult the dealer or an experienced radio/TV technician for help.
CAUTION: Changes or modifications to this equipment not expressly approved by the party
responsible for compliance could void the user's authority to operate the equipment.

RoHS2 Compliance
The QL-800 Label Printer does not contain the substances specified within ANNEX II of
“Directive 2011/65/EU of the European Parliament and of the Council of 8 June 2011 on the
restriction of the use of certain hazardous substances in electrical and electronic equipment
(RoHS)”, that is, lead, mercury, cadmium, hexavalent chromium, polybrominated biphenyls
(PBB) and polybrominated diphenyl ethers (PBDE) exceeding their specified maximum
concentration values tolerated by weight in homogeneous materials, except for the exemptions
set in ANNEX Ill of the Directive and its amendments.
This information is offered in good faith to the be st of our kno wledge, but is sub ject to revision
as new information becomes available.
WEEE Directive
European Union (and EEA) only.
These symbols indicate that this product is not to be disposed of with your household waste,
according to the WEEE Directive (2002/96/EC), the Battery Directive (2006/66/EC) and/or your
national laws implementing those Directives.
If a chemical symbol is printed beneath the symbol shown above, in accordance with the
Battery Directive, this indicates that a heavy metal (Hg = Mercury, Cd = Cadmium, Pb = Lead)
is present in this battery or accumulator at a concentration above an applicable threshold
specified in the Battery Directive.
This product should be handed over to a designated collection point, e.g., on an authorized
one-for-one basis when you buy a new similar product or to an authorized collection site for
recycling waste electrical and electronic equipment (EEE) and batteries and accumulators.
Improper handling of this type of waste could have a possible impact on the environment and
human health due to potentially hazardous substances that are gen erally associated with EEE.
Your cooperation in the correct disposal of this product will contribute to the effective usage of
natural resources.
For more information about the recycling of this product, please contact your local city office,
waste authority, approved scheme or your household waste disposal service.
(EEA: Norway, Iceland and Liechtenstein)

WEEE Compliance - India only
This product is not to be disposed of with your household waste, according to the e-waste
(Management and Handling) Rules, 2011. This product should be hand ed over to a designated
collection point, e.g., to an authorized collection site for recycling waste electrical and electronic
equipment (EEE). Improper handling of this type of waste could have a possible negative
impact on the environment and human health due to po tentially hazardous substances that are
generally associated with EEE. At the same time, your cooperation in the correct disposal of
this product will contribute to the effective usage of natural resources. For more information
regarding return and recycling of WEEE products, please contact QuickLabel.
Also, this product complies with the “India E-waste Rule 2011” and prohibits use of lead,
mercury, hexavalent chromium, polybrominated biphenyls or polybrominated diphenyl ethers
in concentrations exceeding 0.1 % by weight and 0.01 % by weight for Cadmium, except for the
exemptions set in Schedule ll of the Rule.
Battery - For CA, USA only
Included battery contains Perchlorate Material ---- special handling may apply.
See http://www.dtsc.ca.gov/hazardouswaste/perchlorate for details.
Declaration of Conformity
Declaration de Conformité
Ubereinstimmungserklärung
Dichiarazione di Conformità
ID DoC-22834649
Manufacturer’s name and address
Nom et adresse du fabricant
Hersteller
Nome del costruttore
Model No.
Modele No.
Model Nr.
Modello No.
Description of Products
Description des produits
Produktbeschreibungen
Descrizione dei Prodotti
Standards to which conformity is declared
Standards auquel la conformité appartient
Normen für welche Übereinstimmung erklärt wird
Norme per le quali si dichiara la conformità
Application of Council Directives
Application des Decisions du Conseil
Anwendbar fur die Richtlinien
Applicazione delle Direttive del Comitato
I, the undersigned, hereby declare that the equipment specified above conforms to the above Directive and Standard.
Je, Soussigné, déclare que l’équipment spécifié ci-dessus est en conformité avec la directive et le standard ci-dessus.
Ich, der unterzeichnende erkläre hiermit, daß das oben beschriebene Gerät den vorgenannten Richtlinien und Normen entspricht.
Il sottoscritto dichiara che l’apparecchio sopra specificato è conforme alle Direttive e Norme sopra specificate.
AstroNova, Inc.
600 East Greenwich Avenue
West Warwick, RI 02893 USA
QL-800, QL-800 w/ Rewinder
Color Label Printer
FCC 47CFR Part 15 Subpart B (3/2017)
IC ICES-003:2016 Ed.6
EN 55032 ED 2:2015
EN 55024:2010 + AMD1:2015
IEC 60950-1:2005 (Second Edition) + Am 1:2009 + Am 2:2013
EN 60950-1:2006/A11:2009/A1:2010/A12:2011/A2:2013
ANSI/UL 60950-1:2007 Ed.2 +R:14Oct2014
CSA C22.2#60950-1:2007 Ed.2+A1;A2
2014/30/EU
2014/35/EU
Steven Holbrook
Quality Assurance Manager
AstroNova, Inc.
CE Label First Affixed Date: 16
European Contact: Your local AstroNova, Inc. Sales and Service Office.
FRANCE - Parc Euclide, ZA la Clef de St Pierre, 10A Rue Blaise Pascal 78990 Elancourt
Tel: (+33) 1 34 82 09 00, Fax: (+33) 1 34 82 05 71
GERMANY - Waldstraße 70, D-63128 Dietzenbach
Tel. +49 (0) 6074 31 025-00, Fax: +49 (0) 6074 31 025-99
UNITED KINGDOM - Westacott Way, Maidenhead Berkshire, SL6 3RT
Tel: +44 (0)1628 668836 • Fax: +44 (0)1628 664994
Date of issue: 10/6/2017
Place of issue: West Warwick, RI

Contents
Chapter 1: Getting Started . . . . . . . . . . . . . . . . . . . . . . . . . . . . . . . . . . . . . 17
About the QL-800 . . . . . . . . . . . . . . . . . . . . . . . . . . . . . . . . . . . . 17
Installation and Setup Overview . . . . . . . . . . . . . . . . . . . . . . . . . . . . . 18
Unpacking the Printer . . . . . . . . . . . . . . . . . . . . . . . . . . . . . . . . . . 19
Checking the Included Parts . . . . . . . . . . . . . . . . . . . . . . . . . . 21
Before Installing the Printer . . . . . . . . . . . . . . . . . . . . . . . . . . . . . . . 21
Choosing an Installation Location . . . . . . . . . . . . . . . . . . . . . . . . 21
Installation Precautions . . . . . . . . . . . . . . . . . . . . . . . . . . . . . 22
System Requirements . . . . . . . . . . . . . . . . . . . . . . . . . . . . . . 23
Powering On . . . . . . . . . . . . . . . . . . . . . . . . . . . . . . . . . . . . . . . 23
Installing the Printer Driver . . . . . . . . . . . . . . . . . . . . . . . . . . . . . . . . 24
Installing the Printer Driver (USB) . . . . . . . . . . . . . . . . . . . . . . . . 24
Installing the Printer Driver (Network) . . . . . . . . . . . . . . . . . . . . . . 25
Changing Printer Networking Settings . . . . . . . . . . . . . . . . . . . . . 26
Using the After Shipping Wizard . . . . . . . . . . . . . . . . . . . . . . . . . . . . . 26
Preparing the Maintenance Roller . . . . . . . . . . . . . . . . . . . . . . . . 27
Installing Ink Cartridges . . . . . . . . . . . . . . . . . . . . . . . . . . . . . 28
Installing the Printhead . . . . . . . . . . . . . . . . . . . . . . . . . . . . . 29
Loading and Unloading Media . . . . . . . . . . . . . . . . . . . . . . . . . . . . . . 32
Loading Media . . . . . . . . . . . . . . . . . . . . . . . . . . . . . . . . . . 32
Loading Media with Manual Feed Mode . . . . . . . . . . . . . . . . . . . . 33
Unloading Media . . . . . . . . . . . . . . . . . . . . . . . . . . . . . . . . 35
Working with Wide Gap Media . . . . . . . . . . . . . . . . . . . . . . . . . 36
Working with Reflective Mark Media . . . . . . . . . . . . . . . . . . . . . . 36
QuickLabel Services . . . . . . . . . . . . . . . . . . . . . . . . . . . . . . . . . . . 36
QL-800 Label Materials . . . . . . . . . . . . . . . . . . . . . . . . . . . . . 36
QuickLabel BPO Blanket Purchase Order Program . . . . . . . . . . . . . . 36
Media Specialists . . . . . . . . . . . . . . . . . . . . . . . . . . . . . . . . 37
Chapter 2: QL-800 Overview . . . . . . . . . . . . . . . . . . . . . . . . . . . . . . . . . . . . 39
Printer Part Names and Functions . . . . . . . . . . . . . . . . . . . . . . . . . . . . 39
QL-800 User Guide 11

Contents
Front View . . . . . . . . . . . . . . . . . . . . . . . . . . . . . . . . . . . . 39
Back View . . . . . . . . . . . . . . . . . . . . . . . . . . . . . . . . . . . . 40
Operation Panel . . . . . . . . . . . . . . . . . . . . . . . . . . . . . . . . . . . . . 41
LED Indicators . . . . . . . . . . . . . . . . . . . . . . . . . . . . . . . . . . . . . .42
Color Basics . . . . . . . . . . . . . . . . . . . . . . . . . . . . . . . . . . . . . . .43
Color and Computers . . . . . . . . . . . . . . . . . . . . . . . . . . . . . . 43
Color Profiling . . . . . . . . . . . . . . . . . . . . . . . . . . . . . . . . . . 43
Display Profiling . . . . . . . . . . . . . . . . . . . . . . . . . . . . . . . . . 44
QuickLabel QL-800 Color Profiles . . . . . . . . . . . . . . . . . . . . . . . . 44
A Profile for Each Device . . . . . . . . . . . . . . . . . . . . . . . . . . . . 44
Chapter 3: Designing and Printing Labels . . . . . . . . . . . . . . . . . . . . . . . . . . . . 45
Designing Labels . . . . . . . . . . . . . . . . . . . . . . . . . . . . . . . . . . . . . 45
Choosing Design Software . . . . . . . . . . . . . . . . . . . . . . . . . . . 45
Disabling Anti-aliasing . . . . . . . . . . . . . . . . . . . . . . . . . . . . . . 45
Planning Full-Bleed and Non-Bleed Labels . . . . . . . . . . . . . . . . . . . 45
Setting up the Label Design Software . . . . . . . . . . . . . . . . . . . . . . . . . . 46
Setting up Labels in Custom QuickLabel Omni . . . . . . . . . . . . . . . . . 46
Setting up Labels in Third-Party Design Applications . . . . . . . . . . . . . . 46
Setting up the Printer Driver . . . . . . . . . . . . . . . . . . . . . . . . . . . . . . . 47
Setting up General Options . . . . . . . . . . . . . . . . . . . . . . . . . . . 47
Setting up a Custom Label Size . . . . . . . . . . . . . . . . . . . . . . . . . 49
Setting up Media Options . . . . . . . . . . . . . . . . . . . . . . . . . . . . 50
Using Service Options . . . . . . . . . . . . . . . . . . . . . . . . . . . . . . 52
Saving and Recalling Driver Settings . . . . . . . . . . . . . . . . . . . . . . 54
Importing and Exporting Driver Settings . . . . . . . . . . . . . . . . . . . . 55
Setting up the Driver for Full-Bleed Printing . . . . . . . . . . . . . . . . . . . 57
Printing Labels . . . . . . . . . . . . . . . . . . . . . . . . . . . . . . . . . . . . . .58
Using the Status Monitor . . . . . . . . . . . . . . . . . . . . . . . . . . . . . . . . . 60
Viewing the Printer Status . . . . . . . . . . . . . . . . . . . . . . . . . . . . 60
Viewing the Job Status and Canceling Jobs . . . . . . . . . . . . . . . . . . 61
Viewing Ink and Consumable Levels . . . . . . . . . . . . . . . . . . . . . . 62
Estimating Ink Use . . . . . . . . . . . . . . . . . . . . . . . . . . . . . . . . . . . . 62
Chapter 4: QL-800 Maintenance Utility . . . . . . . . . . . . . . . . . . . . . . . . . . . . . . 65
About the Maintenance Utility . . . . . . . . . . . . . . . . . . . . . . . . . . . . . . 65
Printer Information Tab . . . . . . . . . . . . . . . . . . . . . . . . . . . . . . . . . 65
Viewing Printer Information . . . . . . . . . . . . . . . . . . . . . . . . . . . 65
Upgrading the Printer and Print Module Firmware . . . . . . . . . . . . . . . 66
Setting the Clock . . . . . . . . . . . . . . . . . . . . . . . . . . . . . . . . 67
Print Settings Tab . . . . . . . . . . . . . . . . . . . . . . . . . . . . . . . . . . . . 67
Setting the Vertical Baseline . . . . . . . . . . . . . . . . . . . . . . . . . . 68
Setting the Horizontal Baseline . . . . . . . . . . . . . . . . . . . . . . . . . 69
Setting the Cut/Stop Position . . . . . . . . . . . . . . . . . . . . . . . . . . 70
Setting up External Unwind Mode . . . . . . . . . . . . . . . . . . . . . . . . 70
Cleaning Tab . . . . . . . . . . . . . . . . . . . . . . . . . . . . . . . . . . . . . . .71
Setting up Auto-Maintenance . . . . . . . . . . . . . . . . . . . . . . . . . . 71
Updating Cleaning Procedures . . . . . . . . . . . . . . . . . . . . . . . . . 72
Cleaning Printheads . . . . . . . . . . . . . . . . . . . . . . . . . . . . . . . 72
Preparing for Moving . . . . . . . . . . . . . . . . . . . . . . . . . . . . . . 73
Preparing for Shipping . . . . . . . . . . . . . . . . . . . . . . . . . . . . . 73
System Logs Tab . . . . . . . . . . . . . . . . . . . . . . . . . . . . . . . . . . . . 74
Viewing the Error History . . . . . . . . . . . . . . . . . . . . . . . . . . . . 74
12 QL-800 User Guide

Contents
Saving Log Files . . . . . . . . . . . . . . . . . . . . . . . . . . . . . . . . . 75
Parts Replacement Tab . . . . . . . . . . . . . . . . . . . . . . . . . . . . . . . . . 75
Replacing the Printhead . . . . . . . . . . . . . . . . . . . . . . . . . . . . . 76
Replacing the Cutter . . . . . . . . . . . . . . . . . . . . . . . . . . . . . . 76
Replacing the Aerosol Filter . . . . . . . . . . . . . . . . . . . . . . . . . . . 76
Replacing the Maintenance Cartridge . . . . . . . . . . . . . . . . . . . . . . 77
Replacing the Maintenance Roller . . . . . . . . . . . . . . . . . . . . . . . 78
Advanced Tab . . . . . . . . . . . . . . . . . . . . . . . . . . . . . . . . . . . . . . 78
Chapter 5: Printer Maintenance . . . . . . . . . . . . . . . . . . . . . . . . . . . . . . . . . . 79
Replacing Ink Cartridges . . . . . . . . . . . . . . . . . . . . . . . . . . . . . . . . . 79
Cleaning . . . . . . . . . . . . . . . . . . . . . . . . . . . . . . . . . . . . . . . . .81
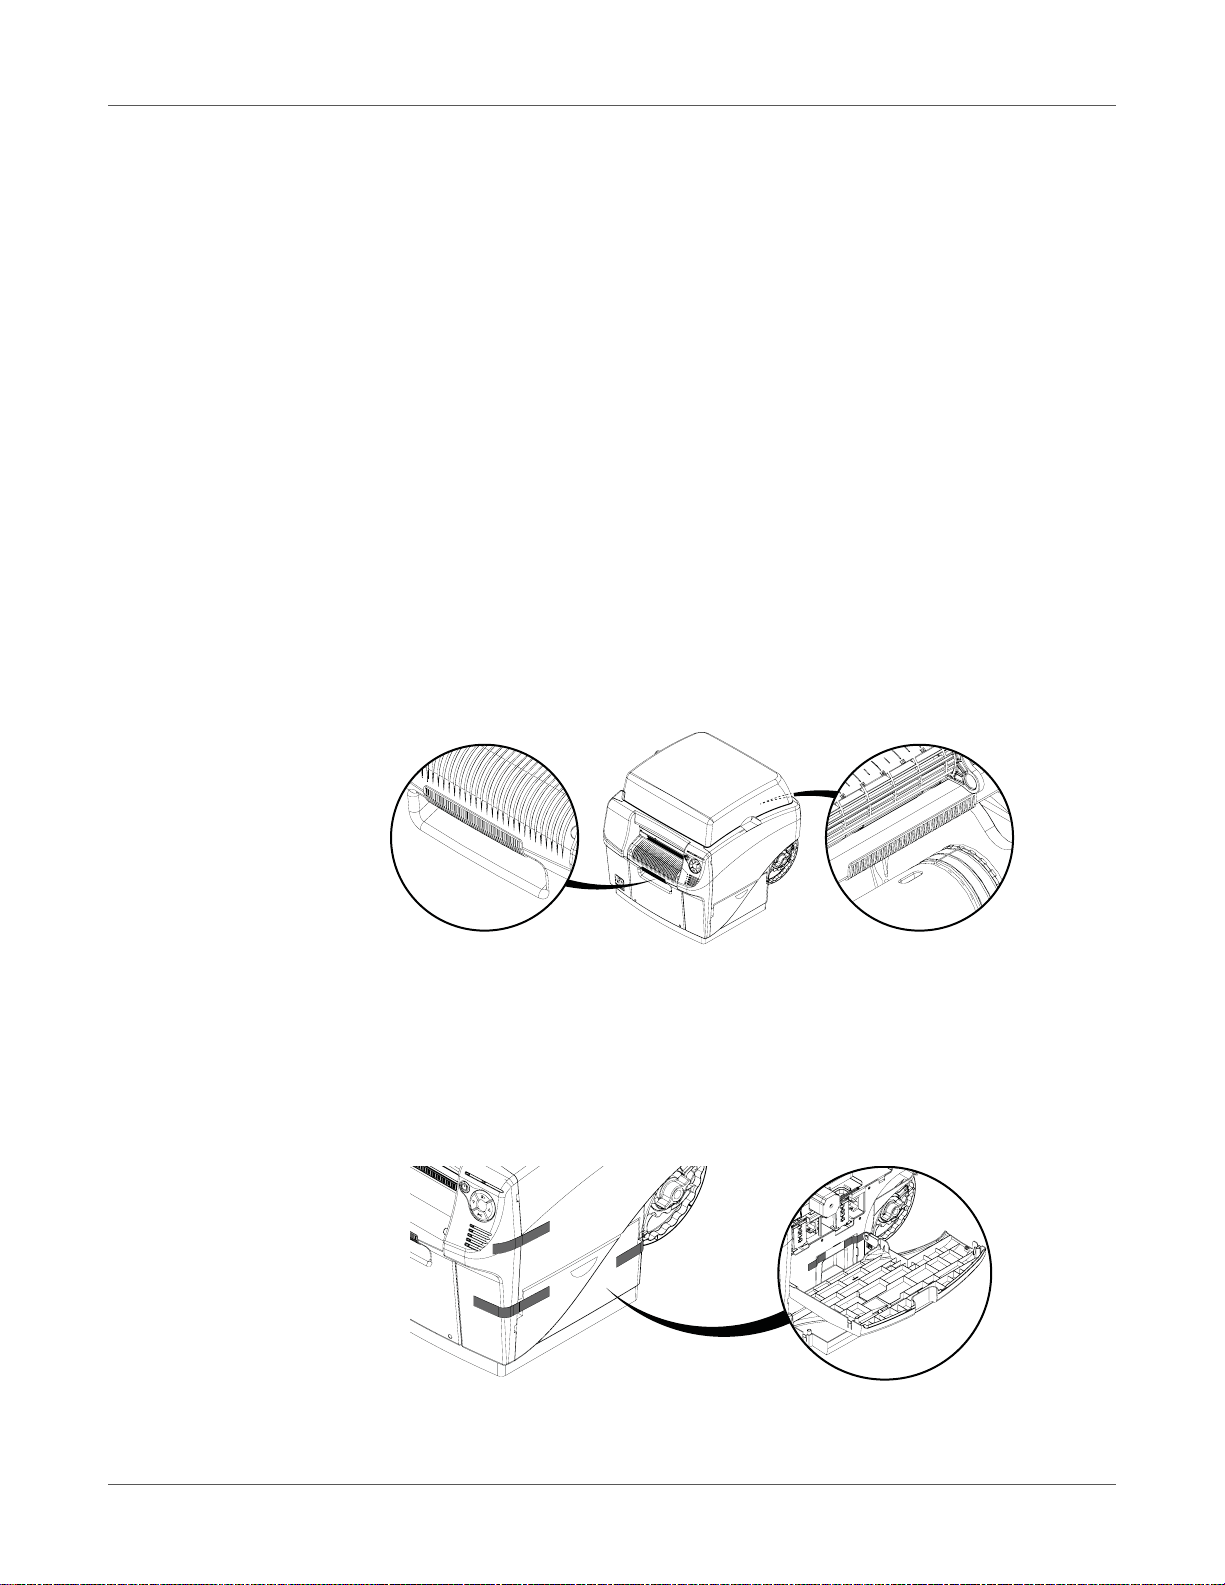
Cleaning the Printer Exterior . . . . . . . . . . . . . . . . . . . . . . . . . . 81
Cleaning the Input Pinch Rollers . . . . . . . . . . . . . . . . . . . . . . . . 81
Cleaning the Maintenance Tray Area . . . . . . . . . . . . . . . . . . . . . . 82
Cleaning the Transport Belts . . . . . . . . . . . . . . . . . . . . . . . . . . 83
Cleaning the Ink Cartridge Contacts . . . . . . . . . . . . . . . . . . . . . . 84
Cleaning the Printhead Manually . . . . . . . . . . . . . . . . . . . . . . . . 86
Powering Up After Extended Downtime . . . . . . . . . . . . . . . . . . . . . . . . . 87
Upgrading the Printer Driver and Utilities . . . . . . . . . . . . . . . . . . . . . . . . 88
Chapter 6: Error Messages . . . . . . . . . . . . . . . . . . . . . . . . . . . . . . . . . . . . . 89
Error 1001 - Paper Path Error . . . . . . . . . . . . . . . . . . . . . . . . . . . . . . 89
Solutions . . . . . . . . . . . . . . . . . . . . . . . . . . . . . . . . . . . . 89
Error 1002 - No Media at Pinch . . . . . . . . . . . . . . . . . . . . . . . . . . . . . 89
Solutions . . . . . . . . . . . . . . . . . . . . . . . . . . . . . . . . . . . . 89
Error 1003 - Unwind too Slow . . . . . . . . . . . . . . . . . . . . . . . . . . . . . . 90
Solutions . . . . . . . . . . . . . . . . . . . . . . . . . . . . . . . . . . . . 90
Error 1004 - Unwind too Fast . . . . . . . . . . . . . . . . . . . . . . . . . . . . . . 91
Solutions . . . . . . . . . . . . . . . . . . . . . . . . . . . . . . . . . . . . 91
Error 1005 - Out of Media . . . . . . . . . . . . . . . . . . . . . . . . . . . . . . . . 91
Solutions . . . . . . . . . . . . . . . . . . . . . . . . . . . . . . . . . . . . 91
Error 1006 - Cutter Jam . . . . . . . . . . . . . . . . . . . . . . . . . . . . . . . . . 91
Solutions . . . . . . . . . . . . . . . . . . . . . . . . . . . . . . . . . . . . 91
Error 1007 - Reserved . . . . . . . . . . . . . . . . . . . . . . . . . . . . . . . . . . 93
Error 1008 - Continuous Media Selected . . . . . . . . . . . . . . . . . . . . . . . . 93
Solutions . . . . . . . . . . . . . . . . . . . . . . . . . . . . . . . . . . . . 93
Error 1009 - Can't Calibrate Media . . . . . . . . . . . . . . . . . . . . . . . . . . . . 94
Solutions . . . . . . . . . . . . . . . . . . . . . . . . . . . . . . . . . . . . 94
Error 100A - Main Side Door Open . . . . . . . . . . . . . . . . . . . . . . . . . . . 94
Solutions . . . . . . . . . . . . . . . . . . . . . . . . . . . . . . . . . . . . 94
Error 100B - Top Cover Open . . . . . . . . . . . . . . . . . . . . . . . . . . . . . . 95
Solutions . . . . . . . . . . . . . . . . . . . . . . . . . . . . . . . . . . . . 95
Error 100C - Maintenance Cartridge Missing . . . . . . . . . . . . . . . . . . . . . . 97
Solutions . . . . . . . . . . . . . . . . . . . . . . . . . . . . . . . . . . . . 97
Error 100D - Transport not Installed . . . . . . . . . . . . . . . . . . . . . . . . . . . 97
Solutions . . . . . . . . . . . . . . . . . . . . . . . . . . . . . . . . . . . . 97
Error 100E - Belt Motor Stall . . . . . . . . . . . . . . . . . . . . . . . . . . . . . . . 97
Solutions . . . . . . . . . . . . . . . . . . . . . . . . . . . . . . . . . . . . 97
Error 100F - Pinch Motor Stall . . . . . . . . . . . . . . . . . . . . . . . . . . . . . . 98
Solutions . . . . . . . . . . . . . . . . . . . . . . . . . . . . . . . . . . . . 98
Error 1010 - Can't Start Vacuum Fans . . . . . . . . . . . . . . . . . . . . . . . . . . 98
Solutions . . . . . . . . . . . . . . . . . . . . . . . . . . . . . . . . . . . . 98
QL-800 User Guide 13

Contents
Error 1011 - Unwind Over Current . . . . . . . . . . . . . . . . . . . . . . . . . . . . 98
Solutions . . . . . . . . . . . . . . . . . . . . . . . . . . . . . . . . . . . . 98
Error 1012 - TOF Mark not Found . . . . . . . . . . . . . . . . . . . . . . . . . . . . 99
Solutions . . . . . . . . . . . . . . . . . . . . . . . . . . . . . . . . . . . . 99
Error 1013 - Internal Error . . . . . . . . . . . . . . . . . . . . . . . . . . . . . . . . 99
Solutions . . . . . . . . . . . . . . . . . . . . . . . . . . . . . . . . . . . . 99
Error 1014 - Internal Error . . . . . . . . . . . . . . . . . . . . . . . . . . . . . . . . 99
Solutions . . . . . . . . . . . . . . . . . . . . . . . . . . . . . . . . . . . . 99
Error 1015 - Internal Error . . . . . . . . . . . . . . . . . . . . . . . . . . . . . . . 100
Solutions . . . . . . . . . . . . . . . . . . . . . . . . . . . . . . . . . . . 100
Error 1016 - Can't Tighten Unwind . . . . . . . . . . . . . . . . . . . . . . . . . . . 100
Solutions . . . . . . . . . . . . . . . . . . . . . . . . . . . . . . . . . . . 100
Error 1017 - Print Engine Start Timeout . . . . . . . . . . . . . . . . . . . . . . . . 100
Solutions . . . . . . . . . . . . . . . . . . . . . . . . . . . . . . . . . . . 100
Error 1018 - Reserved . . . . . . . . . . . . . . . . . . . . . . . . . . . . . . . . . 101
Error 1019 - Reserved . . . . . . . . . . . . . . . . . . . . . . . . . . . . . . . . . 101
Error 101A - TOF Calibration . . . . . . . . . . . . . . . . . . . . . . . . . . . . . 101
Solutions . . . . . . . . . . . . . . . . . . . . . . . . . . . . . . . . . . . 101
Error 1020 - Shared Memory Read Timeout . . . . . . . . . . . . . . . . . . . . . . 101
Solutions . . . . . . . . . . . . . . . . . . . . . . . . . . . . . . . . . . . 101
Error 1021 - Shared Memory Write Timeout . . . . . . . . . . . . . . . . . . . . . . 102
Solutions . . . . . . . . . . . . . . . . . . . . . . . . . . . . . . . . . . . 102
Error 1022 - Shared Memory Response Timeout . . . . . . . . . . . . . . . . . . . 102
Solutions . . . . . . . . . . . . . . . . . . . . . . . . . . . . . . . . . . . 102
Error 1023 - System Initialization Timeout . . . . . . . . . . . . . . . . . . . . . . . 102
Solutions . . . . . . . . . . . . . . . . . . . . . . . . . . . . . . . . . . . 102
Error 1024 - Unexpected Engine Response . . . . . . . . . . . . . . . . . . . . . . 103
Solutions . . . . . . . . . . . . . . . . . . . . . . . . . . . . . . . . . . . 103
Error 1025 - Shutdown Timeout . . . . . . . . . . . . . . . . . . . . . . . . . . . . 103
Solutions . . . . . . . . . . . . . . . . . . . . . . . . . . . . . . . . . . . 103
Error 1030 - Can't Erase EEPROM . . . . . . . . . . . . . . . . . . . . . . . . . . 103
Solutions . . . . . . . . . . . . . . . . . . . . . . . . . . . . . . . . . . . 103
Error 1031 - Can't Program EEPROM . . . . . . . . . . . . . . . . . . . . . . . . . 104
Solutions . . . . . . . . . . . . . . . . . . . . . . . . . . . . . . . . . . . 104
Error 1032 - Invalid EEPROM Checksum . . . . . . . . . . . . . . . . . . . . . . . 104
Solutions . . . . . . . . . . . . . . . . . . . . . . . . . . . . . . . . . . . 104
Error 1038 - Upgrade Failure . . . . . . . . . . . . . . . . . . . . . . . . . . . . . 105
Solutions . . . . . . . . . . . . . . . . . . . . . . . . . . . . . . . . . . . 105
Error 1039 - Upgrade Failure . . . . . . . . . . . . . . . . . . . . . . . . . . . . . 105
Solutions . . . . . . . . . . . . . . . . . . . . . . . . . . . . . . . . . . . 105
Error 103A - Upgrade Failure . . . . . . . . . . . . . . . . . . . . . . . . . . . . . 105
Solutions . . . . . . . . . . . . . . . . . . . . . . . . . . . . . . . . . . . 105
Error 1040 - Failed to Read Job Status . . . . . . . . . . . . . . . . . . . . . . . . 106
Solutions . . . . . . . . . . . . . . . . . . . . . . . . . . . . . . . . . . . 106
Error 1042 - Can't find Job Parameter . . . . . . . . . . . . . . . . . . . . . . . . . 106
Solutions . . . . . . . . . . . . . . . . . . . . . . . . . . . . . . . . . . . 106
Error 1043 - Can't find Job Parameter . . . . . . . . . . . . . . . . . . . . . . . . . 106
Solutions . . . . . . . . . . . . . . . . . . . . . . . . . . . . . . . . . . . 106
Error 1044 - Can't find Job Parameter . . . . . . . . . . . . . . . . . . . . . . . . . 107
Solutions . . . . . . . . . . . . . . . . . . . . . . . . . . . . . . . . . . . 107
Error 1045 - Can't find Job Parameter . . . . . . . . . . . . . . . . . . . . . . . . . 107
Solutions . . . . . . . . . . . . . . . . . . . . . . . . . . . . . . . . . . . 107
Error 1046 - Can't find Job Parameter . . . . . . . . . . . . . . . . . . . . . . . . . 107
Solutions . . . . . . . . . . . . . . . . . . . . . . . . . . . . . . . . . . . 107
14 QL-800 User Guide

Contents
Error 1050 - The Maint Cartridge is Full . . . . . . . . . . . . . . . . . . . . . . . . 108
Solutions . . . . . . . . . . . . . . . . . . . . . . . . . . . . . . . . . . . 108
Error 1051 - Not ready to print . . . . . . . . . . . . . . . . . . . . . . . . . . . . . 109
Solutions . . . . . . . . . . . . . . . . . . . . . . . . . . . . . . . . . . . 109
Error 2001 - Faulty Printhead . . . . . . . . . . . . . . . . . . . . . . . . . . . . . 109
Solutions . . . . . . . . . . . . . . . . . . . . . . . . . . . . . . . . . . . 109
Error 2002 - Incorrect Printhead . . . . . . . . . . . . . . . . . . . . . . . . . . . . 110
Solutions . . . . . . . . . . . . . . . . . . . . . . . . . . . . . . . . . . . 110
Error 2003 - Printhead Missing . . . . . . . . . . . . . . . . . . . . . . . . . . . . 110
Solutions . . . . . . . . . . . . . . . . . . . . . . . . . . . . . . . . . . . 110
Error 2004 - Unlicensed Printhead . . . . . . . . . . . . . . . . . . . . . . . . . . . 110
Solutions . . . . . . . . . . . . . . . . . . . . . . . . . . . . . . . . . . . 110
Error 2005 - Unusable Printhead . . . . . . . . . . . . . . . . . . . . . . . . . . . 111
Solutions . . . . . . . . . . . . . . . . . . . . . . . . . . . . . . . . . . . 111
Error 2006 - Printhead Unprimed . . . . . . . . . . . . . . . . . . . . . . . . . . . 111
Solutions . . . . . . . . . . . . . . . . . . . . . . . . . . . . . . . . . . . 111
Error 2007 - Maintenance Busy . . . . . . . . . . . . . . . . . . . . . . . . . . . . 112
Solutions . . . . . . . . . . . . . . . . . . . . . . . . . . . . . . . . . . . 112
Error 2008 - 1000 Series Error Occurred . . . . . . . . . . . . . . . . . . . . . . . 112
Error 2009 - Maintenance Jam . . . . . . . . . . . . . . . . . . . . . . . . . . . . . 112
Solutions . . . . . . . . . . . . . . . . . . . . . . . . . . . . . . . . . . . 112
Error 200A - Black Cartridge is Missing . . . . . . . . . . . . . . . . . . . . . . . . 114
Solutions . . . . . . . . . . . . . . . . . . . . . . . . . . . . . . . . . . . 114
Error 200B - Magenta Cartridge is Missing . . . . . . . . . . . . . . . . . . . . . . 114
Solutions . . . . . . . . . . . . . . . . . . . . . . . . . . . . . . . . . . . 114
Error 200C - Yellow Cartridge is Missing . . . . . . . . . . . . . . . . . . . . . . . 115
Solutions . . . . . . . . . . . . . . . . . . . . . . . . . . . . . . . . . . . 115
Error 200D - Cyan Cartridge is Missing . . . . . . . . . . . . . . . . . . . . . . . . 115
Solutions . . . . . . . . . . . . . . . . . . . . . . . . . . . . . . . . . . . 115
Error 200E - Multiple Cartridges are Missing . . . . . . . . . . . . . . . . . . . . . 115
Solutions . . . . . . . . . . . . . . . . . . . . . . . . . . . . . . . . . . . 115
Error 200F - Black Ink Out . . . . . . . . . . . . . . . . . . . . . . . . . . . . . . . 115
Solutions . . . . . . . . . . . . . . . . . . . . . . . . . . . . . . . . . . . 115
Error 2010 - Magenta Ink Out . . . . . . . . . . . . . . . . . . . . . . . . . . . . . 116
Solutions . . . . . . . . . . . . . . . . . . . . . . . . . . . . . . . . . . . 116
Error 2011 - Yellow Ink Out . . . . . . . . . . . . . . . . . . . . . . . . . . . . . . 116
Solutions . . . . . . . . . . . . . . . . . . . . . . . . . . . . . . . . . . . 116
Error 2012 - Cyan Ink Out . . . . . . . . . . . . . . . . . . . . . . . . . . . . . . . 116
Solutions . . . . . . . . . . . . . . . . . . . . . . . . . . . . . . . . . . . 116
Error 2013 - Multiple Inks Out . . . . . . . . . . . . . . . . . . . . . . . . . . . . . 116
Solutions . . . . . . . . . . . . . . . . . . . . . . . . . . . . . . . . . . . 116
Error 2014 - Missed TOF . . . . . . . . . . . . . . . . . . . . . . . . . . . . . . . 117
Solutions . . . . . . . . . . . . . . . . . . . . . . . . . . . . . . . . . . . 117
Error 2015 - Page Sequence Error . . . . . . . . . . . . . . . . . . . . . . . . . . 117
Solutions . . . . . . . . . . . . . . . . . . . . . . . . . . . . . . . . . . . 117
Error 2016 - Cartridge Error . . . . . . . . . . . . . . . . . . . . . . . . . . . . . . 117
Solutions . . . . . . . . . . . . . . . . . . . . . . . . . . . . . . . . . . . 117
Error 2017 - Encoder Error . . . . . . . . . . . . . . . . . . . . . . . . . . . . . . . 117
Error Occurs Prior to Media Moving . . . . . . . . . . . . . . . . . . . . . . 118
Error Occurs During Printing . . . . . . . . . . . . . . . . . . . . . . . . . 118
Error 2100 - Unspecified Paper Path . . . . . . . . . . . . . . . . . . . . . . . . . 119
Error 3XXX - Software Communication Error . . . . . . . . . . . . . . . . . . . . . 119
Solutions . . . . . . . . . . . . . . . . . . . . . . . . . . . . . . . . . . . 119
QL-800 User Guide 15

Contents
Chapter 7: Troubleshooting . . . . . . . . . . . . . . . . . . . . . . . . . . . . . . . . . . . 121
Removing a Media Jam . . . . . . . . . . . . . . . . . . . . . . . . . . . . . . . . 121
Removing a Media Jam in the Input Pinch Rollers . . . . . . . . . . . . . . 124
Removing a Media Jam in the Transport Unit . . . . . . . . . . . . . . . . . 125
Removing a Media Jam in the Transport Area Inside the Printer . . . . . . . 127
Known Issues . . . . . . . . . . . . . . . . . . . . . . . . . . . . . . . . . . . . . 129
Printing Variable Data on Continuous Media Results in Blank Media
Feeding . . . . . . . . . . . . . . . . . . . . . . . . . . . . . . . . . . . . 129
Color Shifts or Drops Out During Printing . . . . . . . . . . . . . . . . . . . 129
Powering On with the Main Side Door Open Results in Incomplete
Initialization . . . . . . . . . . . . . . . . . . . . . . . . . . . . . . . . . . 129
Resolving Windows 7/8/10 USB Installation Issues . . . . . . . . . . . . . . . . . . 130
Resolving USB Communication Issues . . . . . . . . . . . . . . . . . . . . . . . . 131
Identifying and Resolving Priming Problems . . . . . . . . . . . . . . . . . . . . . . 134
Chapter 8: Rewinder . . . . . . . . . . . . . . . . . . . . . . . . . . . . . . . . . . . . . . . 135
Before Installing the Rewinder . . . . . . . . . . . . . . . . . . . . . . . . . . . . . 135
Installing the Rewinder . . . . . . . . . . . . . . . . . . . . . . . . . . . . . . . . . 136
Installing the Rewinder when using the External Unwinder . . . . . . . . . . . . . . 137
Rewinding Labels . . . . . . . . . . . . . . . . . . . . . . . . . . . . . . . . . . . 138
Chapter 9: External Unwinder . . . . . . . . . . . . . . . . . . . . . . . . . . . . . . . . . . 141
Before Installing the External Unwinder . . . . . . . . . . . . . . . . . . . . . . . . 141
Installing the External Unwinder . . . . . . . . . . . . . . . . . . . . . . . . . . . . 142
Unwinding Labels with the External Unwinder . . . . . . . . . . . . . . . . . . . . . 144
Chapter 10: Shipping Precautions . . . . . . . . . . . . . . . . . . . . . . . . . . . . . . . . 147
Use the Before Shipping Feature . . . . . . . . . . . . . . . . . . . . . . . . . . . 147
Pack the Printer Carefully . . . . . . . . . . . . . . . . . . . . . . . . . . . . . . . 147
Chapter 11: Safety Warnings and Precautions . . . . . . . . . . . . . . . . . . . . . . . . . . 149
Location . . . . . . . . . . . . . . . . . . . . . . . . . . . . . . . . . . . . . . . . 149
Power Supply and Power Cord . . . . . . . . . . . . . . . . . . . . . . . . . . . . 150
General Safety . . . . . . . . . . . . . . . . . . . . . . . . . . . . . . . . . . . . . 150
Moving the Printer . . . . . . . . . . . . . . . . . . . . . . . . . . . . . . . . . . . 151
Ink Cartridge and the Maintenance Cartridge . . . . . . . . . . . . . . . . . . . . . 152
Chapter 12: Specifications . . . . . . . . . . . . . . . . . . . . . . . . . . . . . . . . . . . . . 153
Printer Specifications . . . . . . . . . . . . . . . . . . . . . . . . . . . . . . . . . 153
Label Specifications . . . . . . . . . . . . . . . . . . . . . . . . . . . . . . . . . . 156
Index . . . . . . . . . . . . . . . . . . . . . . . . . . . . . . . . . . . . . . . . . . 159
16 QL-800 User Guide

1
About the QL-800
When you start printing your own labels in your office or factory with the QL-800 from
QuickLabel, you'll stop production delays and reduce excess inventory. You will achieve
flexibility and cost-savings because you are digitally printing the right label for the right
customer in the right quantity, just-in-time.
Getting Started
As a true digital printer, the QL-800 easily prints labels with any text, barcode, or graphics in
affordable small batches, perfect for labeling multiple different products or labeling for differe nt
wholesale customers. The QL-800 is the best tool for customizing your product labels in
affordable small quantities.
• Fast print speed, up to 305 mm/s
• Excellent print quality up to 1600 dpi
• High-yield, vivid inks
• Complete with color labeling software
QL-800 User Guide 17

Getting Started
The QL-800 is designed with all the power of a high-end digital label printing press, but it's sold
at just a fraction of the price and fits on your desk or tabletop. The QL-800 is a versatile,
in-house digital color label printer that prints both labels in a range of widths at high speeds,
and in high-quality.
The QL-800 makes great-looking labels that perform well even in challenging conditions. Your
products will look appealing and professional, with bright, vivid inks that reproduce a wide
gamut of colors. Genuine QL-800 inks are available in large capacity, high-yield separate cyan,
magenta, yellow, and black (CMYK) cartridges.
Installation and Setup Overview
Refer to the installation and setup summary for an outline of the required steps.
1 Unpack the printer. See “Unpacking the Printer” on page 19.
2 Ensure all parts are included. See “Checking the Included Parts” on page 21.
3 Before installing the printer, select an appropriate location and ensure system requirements
are met.
• See “Choosing an Installation Location” on page 21.
• See “Installation Precautions” on page 22.
• See “System Requirements” on page 23.
4 Connect the power cable to the printer. Switch the printer power on. See “Po wering On” on
page 23.
5 Install the printer driver.
• See “Installing the Printer Driver (USB)” on page 24.
• See “Installing the Printer Driver (Network)” on page 25.
6 Use the After Shipping wizard in the QL-800 Maintenance Utility. See “Using the After
Shipping Wizard” on page 26. This wizard will guide you through the following actions.
• Foam support block removal - See “Preparing the Maintenance Roller” on page 27.
• Ink cartridge installation - See “Installing Ink Cartridges” on page 28.
• Printhead installation - See “Installing the Printhead” on page 29.
7 Load media. See “Loading Media” on page 32.
18 QL-800 User Guide
Unpacking the Printer
The printer is secured using packing tape and cushioning materials to protect it against
vibrations and shock during transportation. Use the following procedure to unpack the printer.
Keep the packing materials for future transportation.
Note: If you open the top cover of the printer, you will see a foam block installed over the
maintenance roller. You will remove this block later when using the After Shipping Wizard to
prepare the maintenance roller, install ink cartridges, and install the printhead. See “Using the
After Shipping Wizard” on page 26.
1 Remove the packing straps from the shipping carton. Cut the tape securing the top of the
carton. Then open the top of the carton.
2 Remove the accessory box and packing materials from the shipping carton.
3 Lift the shipping carton off the printer and shipping pallet.
4 With help from another person, lift the printer off the shipping pallet.
Caution: The printer is heavy and moving it requires two people. One person should lift
the front by the indicated lift point, while the other person should lift the back by the
indicated lift point. Do not lift the printer by the mandrel. Lift the front of the printer by the
recessed handle. Lift the rear of the printer by the flat area of the purple frame above the
mandrel. Keep the printer level while lifting it.
Getting Started
5 Place the printer on a sturdy, flat horizontal surface that can support at least 100 pounds
(45.4 kilograms).
6 Remove all packing tape from the printer exterior. This tape is used to secure the doors and
covers in place.
There is also tape holding the maintenance cart ridge in place. Open the main side door and
lower side door to access and remove this tape.
QL-800 User Guide 19
Getting Started
7 With the main side door open, remove the yellow transport unit shipping lock by rotatin g it
counterclockwise approximately 45 degrees, aligning it, and then pulling it straight out.
Save the lock for future shipping purposes.
Note: The printer will function with the transport shipping lock installed. However, the
transport unit cannot be removed while the lock is in place.
8 Grasp the transport unit handle and pull the transpor t unit straight out of the printer.
An absorbent pad is positioned above the transport unit for shipping. Remove this pad.
9 Reinstall the transport unit. Ensure it is fully inserted in the printer.
10 Close the main side door but leave the lower side door open.
20 QL-800 User Guide

Getting Started
11 Grasp the maintenance cartridge and pull it straig ht ou t of the pr int er . Th en reinst all the
maintenance cartridge. Ensure it is fully inserted in the printer.
12 Close the lower side door.
Checking the Included Parts
Check to make sure the following items are included with the printer.
• Power cable
• USB cable (do not connect until prompted during driver installation)
• Printhead
• Four ink cartridges (one for each color)
• Installation CD
Before Installing the Printer
Choosing an Installation Location
The installation environment must be as described in this section.
• The printer power cord must be able to conn ec t to an o utlet (100 V - 24 0V AC). T his outl et
must be easily accessible.
• Avoid installing the printer near a faucet, water heater, humidifier, or refrigerator.
• Ensure the environment temperature is within 41 to 95 degrees Fahren heit (5 to 35 degrees
Celsius). For optimal print quality, an environment temperature of approximately 73
degrees Fahrenheit (23 degrees Celsius) is recommended.
• Ensure the environment humidity is within 20% to 80% (n on-condensing) relative humidity.
For optimal print quality, a relative humidity of approximately 60% is recommended.
• Avoid placing the printer in areas exposed to high temperature and humidity, extremely low
temperature, severe temperature changes, or direct sunlight. Especially, avoid placing the
printer near fire, outdoors, in distribution warehouses, or in refrigerated areas.
• Avoid installing the printer in areas subject to dust.
• The room must be properly ventilated.
• No printer feet should float. The printer must be held level constantly.
QL-800 User Guide 21
Getting Started
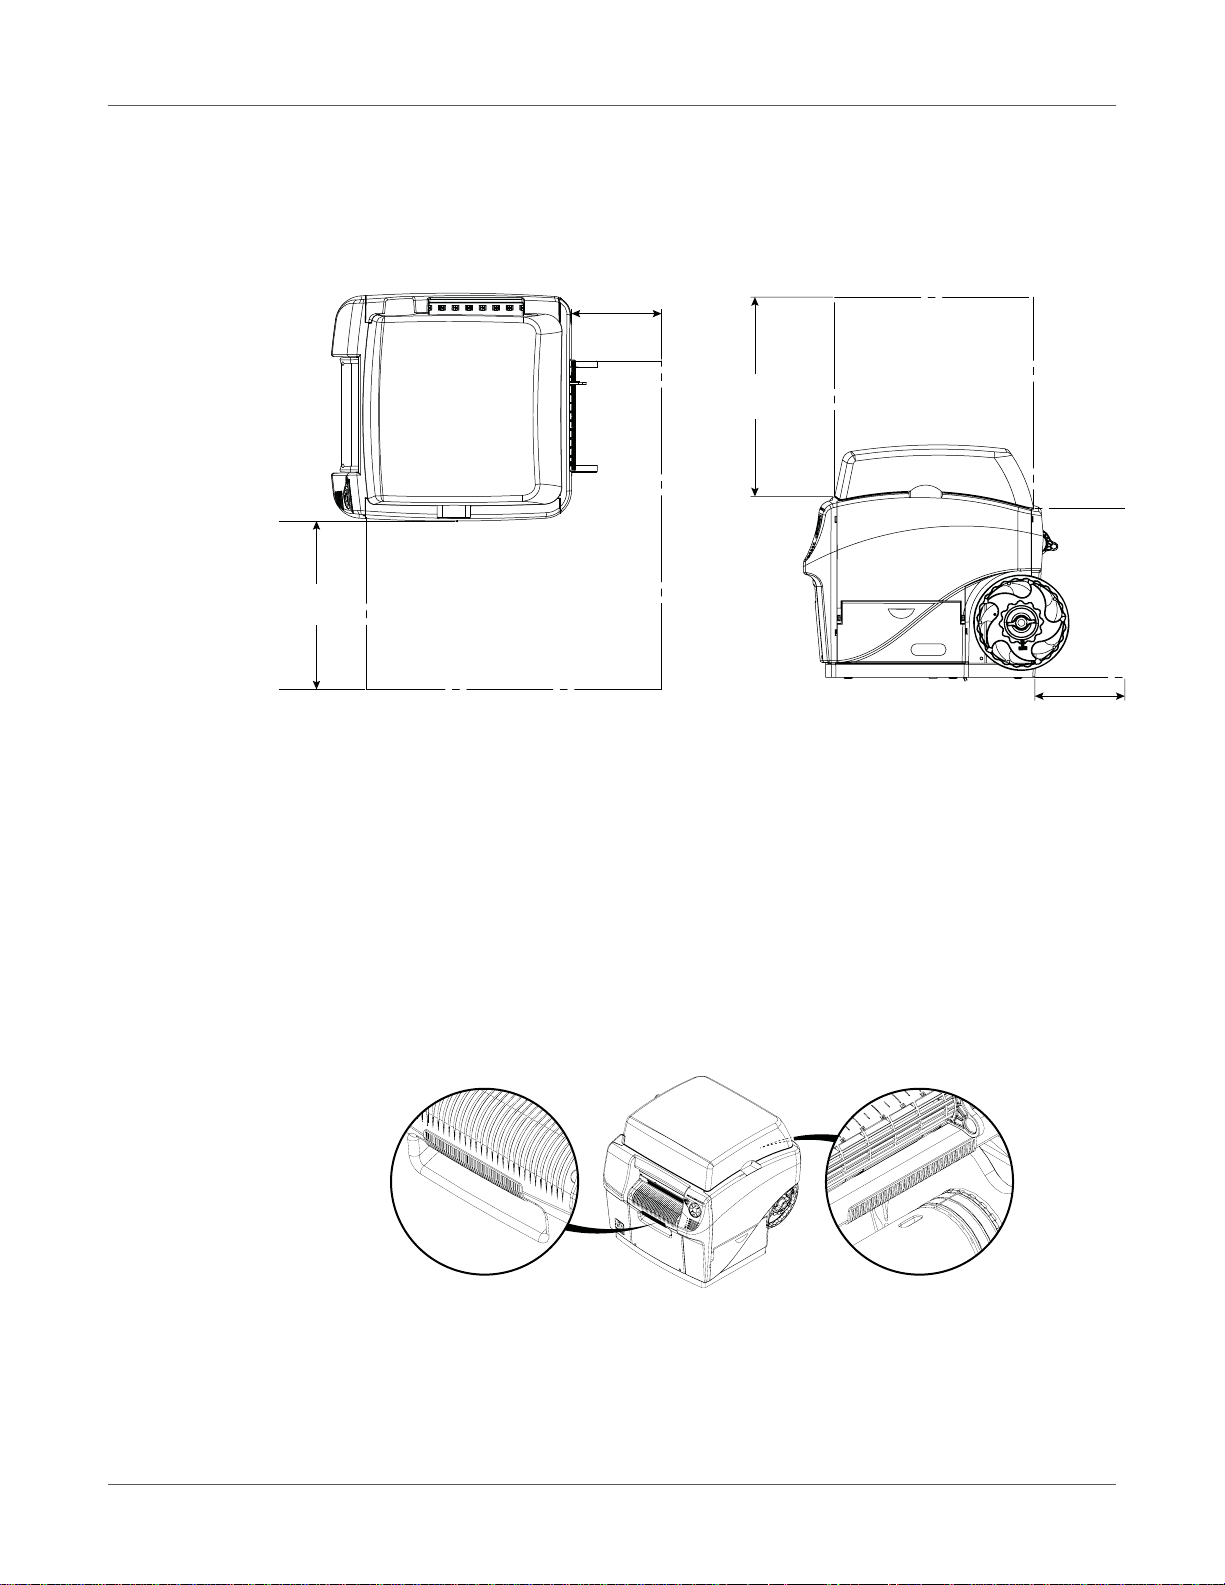
8 inches
203 mm
15 inches
381 mm
17.75 inches
451 mm
8 inches
203 mm
• When placing the printer on a desk, table, or other similar surface, it must be sturdy and
stable enough to support the weight of the printer. The table mu st be rated fo r a minimu m
of 100 pounds.
• The minimum space required for installation and maintenance is shown below.
Installation Precautions
When installing the printer, observe the following precautions.
• Imaging faults can result from dew condensation that occurs when the printer is moved
from a cold place to a warm place. Leave the unpacked printer as is for at least two hours
before installing it.
• The printer is heavy and moving it requires two people. One person should lift the front by
the indicated lift point, while the other person should lift the back by the indicated lift point.
Do not lift the printer by the mandrel. Lift the front of the printer by the recessed handle. Lift
the rear of the printer by the flat area of the purple frame above the man drel. Keep the
printer level while lifting it.
• The printer has rubber feet that help secu re the pr inter a nd preven t acciden tal movement.
When moving the printer on the installation surface, apply slight upward lifting pressure.
Dragging the printer may result in damage to the rubber feet.
22 QL-800 User Guide
System Requirements
[1]
[2]
[3]
• Windows® 10/8/7 Server 2012/2008
• Microsoft .NET Framework 3.5 SP1
• 350 MB free hard drive space
• CD/DVD drive (or Internet connection)
• One available USB 2.0 port for USB installation or network connectivity for network
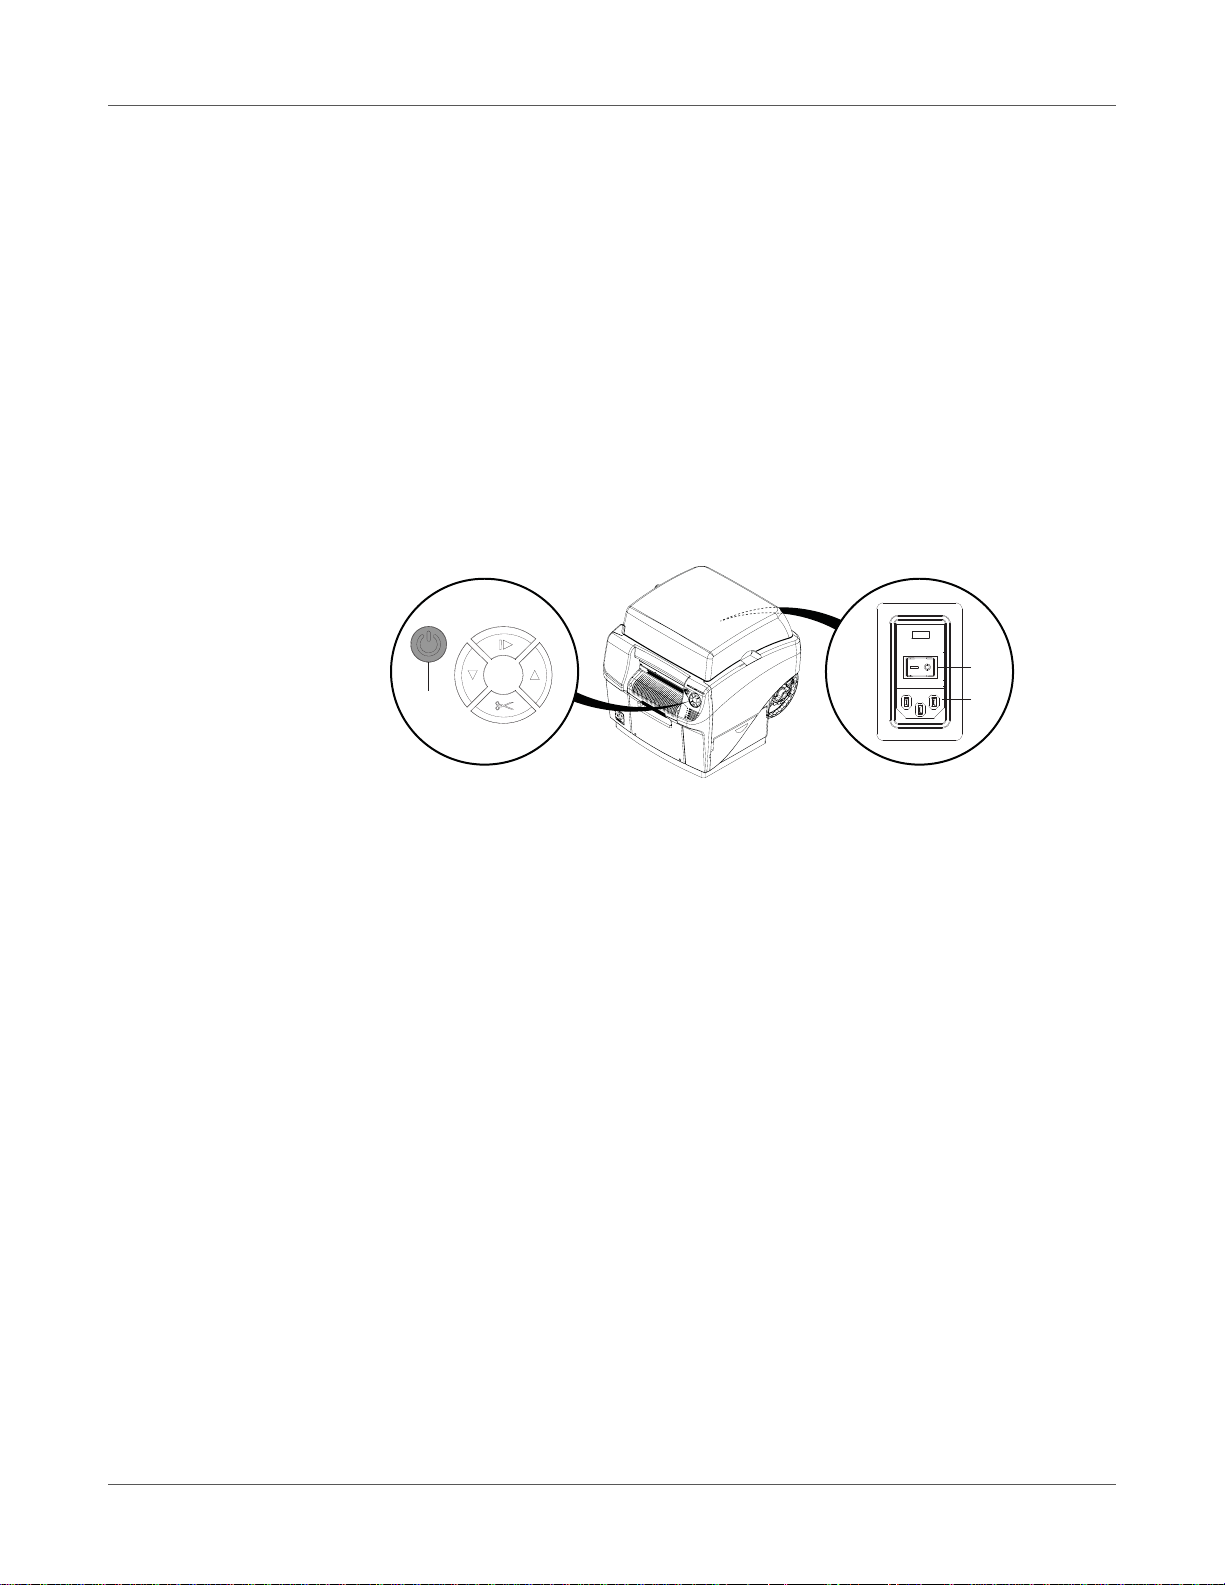
Powering On
1 Connect the power cable to the printer power inlet [1]. Connect the other end of the power
Getting Started
installation
cable to the power source. Then turn on the power via the power inlet switch [2].
2 Press and hold the power key [3] for one second to turn the printer on.
The printer will begin the power-up process, including opening the printhead latch, and the
green LED will flash momentarily. When the green LED stops flashing and remains on, the
printer will be ready to use.
Note: The red error LED will be on until you use the After Shipping wizard later in this
guide.
Note: If the printer is on, you can press and hold the power key [3] for three seconds to
turn it off.
Related Topics:
- "Powering Up After Extended Downtime" on page 87
QL-800 User Guide 23
Getting Started
Installing the Printer Driver
Installing the Printer Driver (USB)
1 Ensure the QL-800 is powered on but not connected to your PC via the USB cable.
2 Power on your PC and insert the QL-800 Installer CD in the CD drive. The Installer CD
wizard will open. Choose Install Driver.
If the autorun program does not start automatically, use Windows Explorer to launch the
“Setup.exe” file located on the CD.
Note: If you do not have a CD drive, you can obtain the software from
www.QuickLabel.com/downloads.
3 Choose Install Printer Software. The software installation wizard will start.
Note: If the Windows logo testing or publisher verification warning messages appear
during installation, choose to continue the installation.
4 When prompted to select a printer connection method, choose Configure to print using
USB. Then choose Next.
Note: A USB configuration is required for the initial installation. You can later install the
printer as a network printer.
5 When prompted, connect the QL-800 to your PC with a USB cable. The installation will
continue once the USB connection is made.
6 When prompted, select whether the QL-800 will be set as the default printer.
7 Choose Finish.
Related Topics:
- "Resolving Windows 7/8/10 USB Installation Issues" on page 130
24 QL-800 User Guide
Getting Started
Installing the Printer Driver (Network)
Use the following instructions to install the printer via a network connection.
For detailed information about the topic of networking, refer to documentation applicable to your
network environment and/or contact your network administrator.
1 Ensure the QL-800 is powered on and connected to the network via a LAN cable.
2 Power on your PC and insert the QL-800 Installer CD in the CD drive. The Installer CD
wizard will open. Choose Install Driver.
If the autorun program does not start automatically, use Windows Explorer to launch the
“Setup.exe” file located on the CD.
Note: If you do not have a CD drive, you can obtain the software from
www.QuickLabel.com/downloads.
3 Choose Install Printer Software. The software installation wizard will start.
Note: If the Windows logo testing or publisher verification warning messages appear
during installation, choose to continue the installation.
4 When prompted to select a printer connection method, choose Configure t o print over the
network. Then choose Next.
5 When prompted, view the list of printers discovered on your network.
• If your QL-800 printer is on the list, select it.
• If your QL-800 printer is not on the list, choose Other Printer. You can search for the
printer by entering its IP address. See “Changing Printer Ne tworking Settings” on page
26. When the printer is found, select it.
With your QL-800 printer selected, choose Next.
6 When prompted, select whether the QL-800 will be set as the default printer.
7 Choose Finish.
QL-800 User Guide 25

Getting Started
Changing Printer Networking Settings
You can view and change printer networking settings with the QL-800 Toolbox application. This
application is available in the following situations:
• Your PC is connected to the printer via USB and th e driver softwar e has been installe d for
USB printing.
• Your PC is connected to the printer via the network and the driver software has been
installed for network printing.
The QL-800 Toolbox application allows you to enable/disable DHCP and change the IP
address of the printer.
Note: Some QL-800 Toolbox features are not supported. Use only the features described in
this procedure.
1 Open the QL-800 Toolbox application from a PC connected to the printer via USB.
From the Windows Start Menu, choose Start > All Programs > QuickLabel QL-800 >
Toolbox.
A web browser will open and display the QL-800 Toolbox application.
2 Choose the Diagnostics link to display the Diagnostics information.
The IP address for the printer is displayed on this page. Note the IP add ress for refe rence
purposes.
3 If the IP address does not appear, or you would li ke to ch ange the IP address, choo se the
Network Config link. Network configuration information will be displayed.
• If you would like to automatically assign a new IP address based on DHCP, select the
dhcp and autoip options. Then choose Submit.
• If you would like to assign a specific IP address, ensure the dhcp and autoip options
are not checked. Enter the new IP address in the ip_address field and choose Submit.
4 Choose the Diagnostics link to return to the Diagnostics information. Confirm the network
settings before exiting the application.
Close the web browser to exit the QL-800 Toolbox application.
Using the After Shipping Wizard
After installing the driver, the QL-800 Maintenance Utility will be available for use. You will use
the After Shipping wizard in this utility to prepare the maintenance roller, install ink cartridges,
and install the printhead.
1 Launch the QL-800 Maintenance Utility.
From the Windows Start Menu, choose Start > All Programs > QuickLabel QL-800 >
QL-800 Maintenance Utility. A language and printer prompt will open.
Select a display language and the QL-800 printer you want to connect to. Choose OK.
2 Choose the Cleaning tab.
26 QL-800 User Guide
Getting Started
[1]
[2]
3 Choose After Shipping. Follow the on-screen instructions to complete this procedure. This
wizard will guide you through the following actions.
• Preparing the Maintenance Roller - See “Preparing the Maintenance Roller” on page
27.
• Installing Ink Cartridges - See “Installing Ink Cartridges” on page 28.
• Installing the Printhead - See “Installing the Printhead” on page 29.
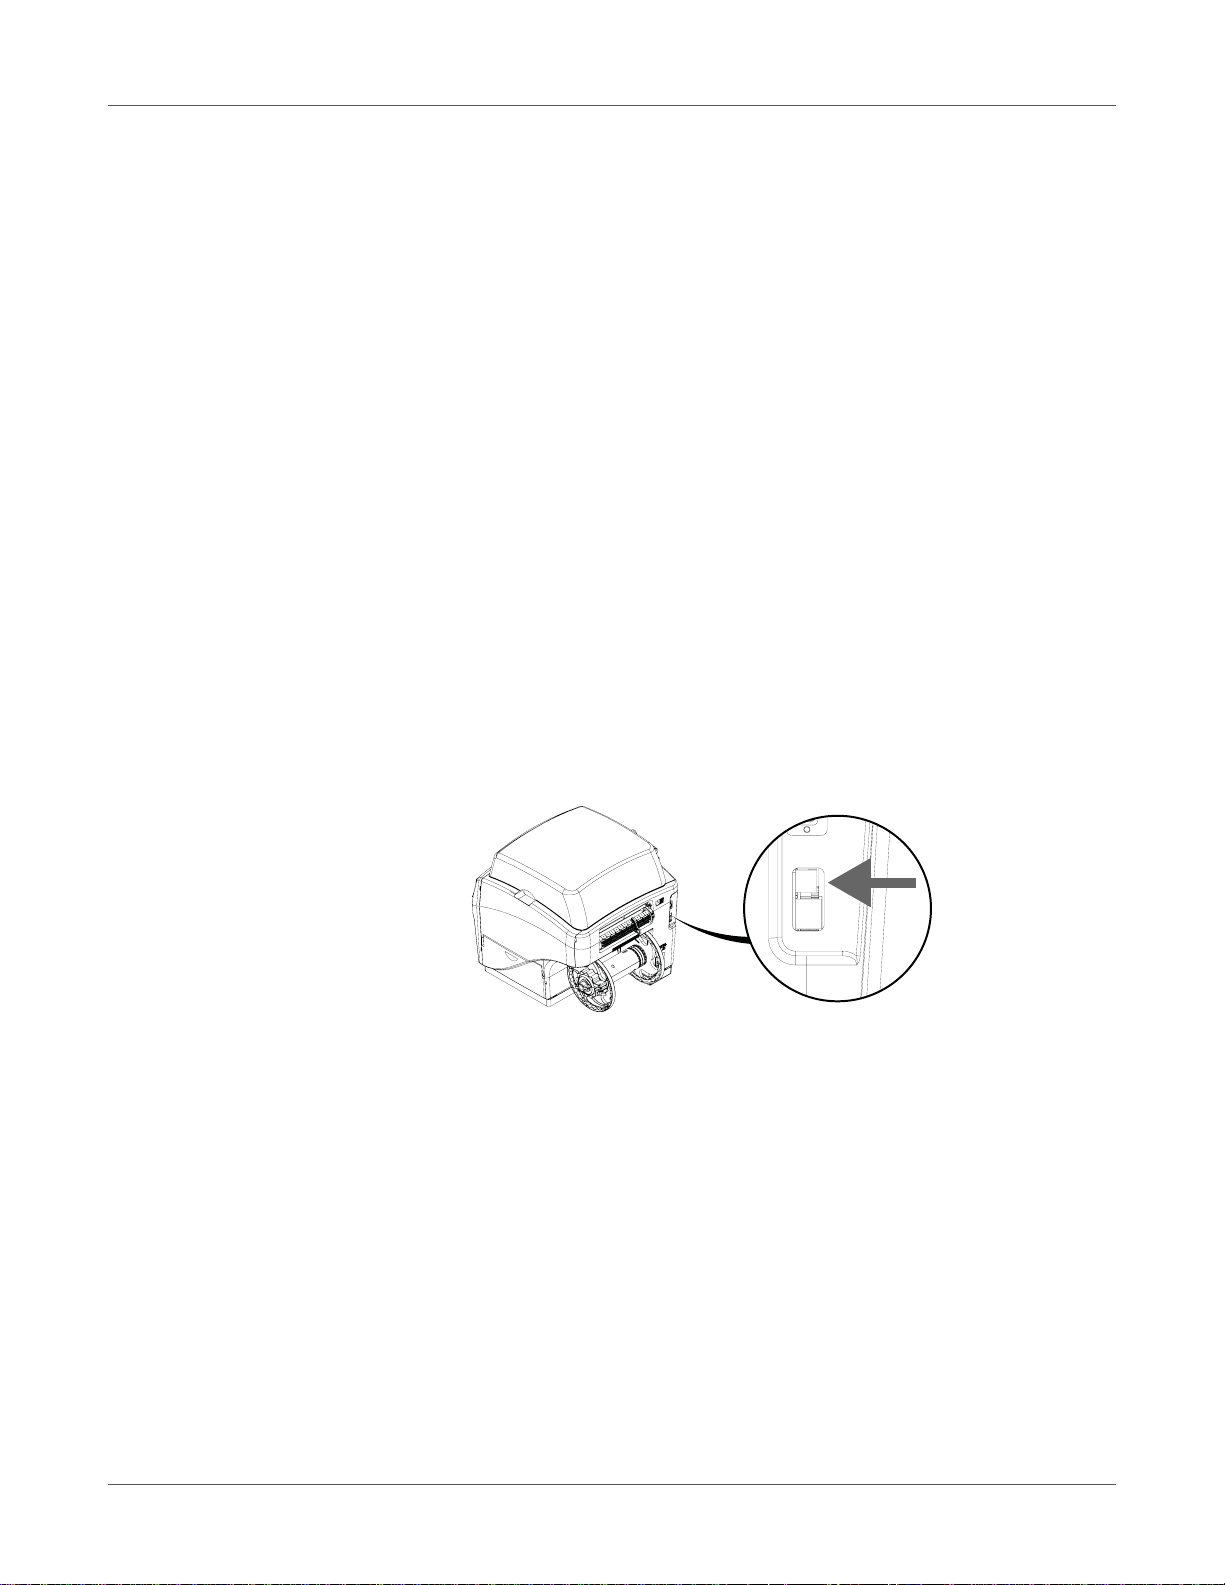
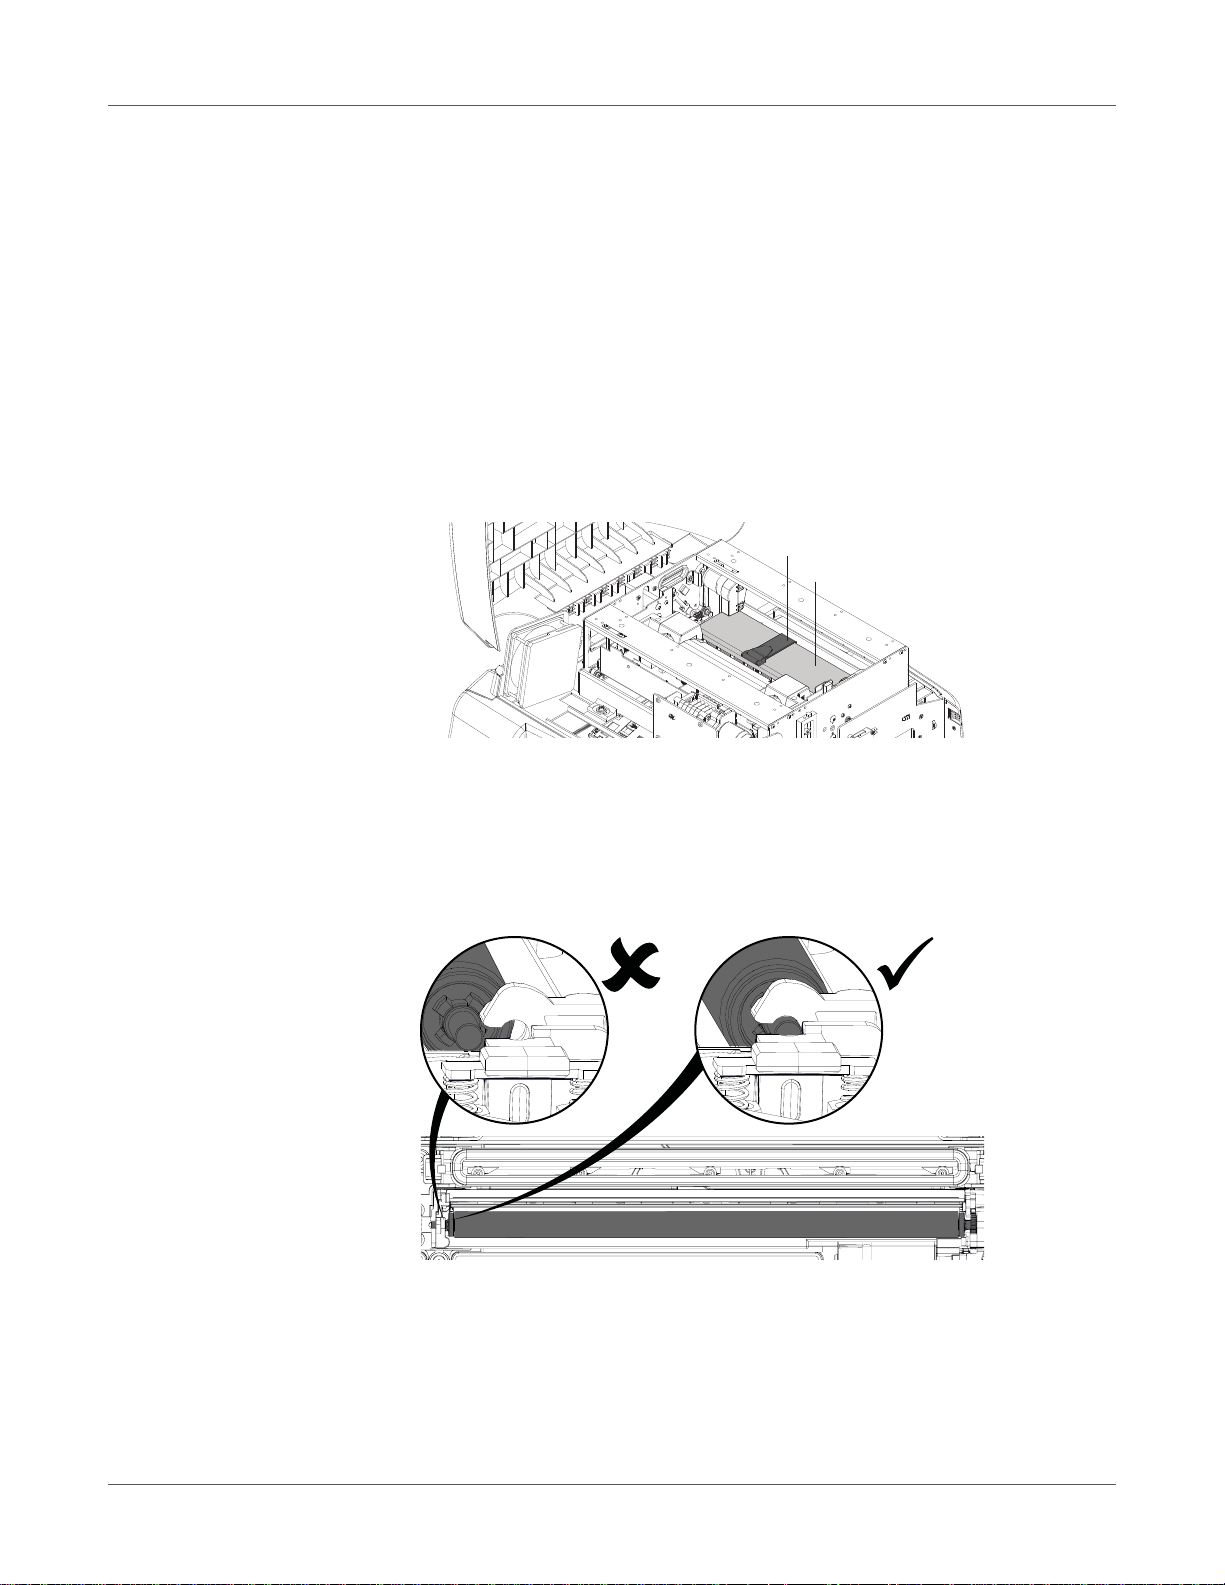
Preparing the Maintenance Roller
A foam block is installed over the maintenance roller to protect it during shipping. Use the
following instructions to remove this foam block.
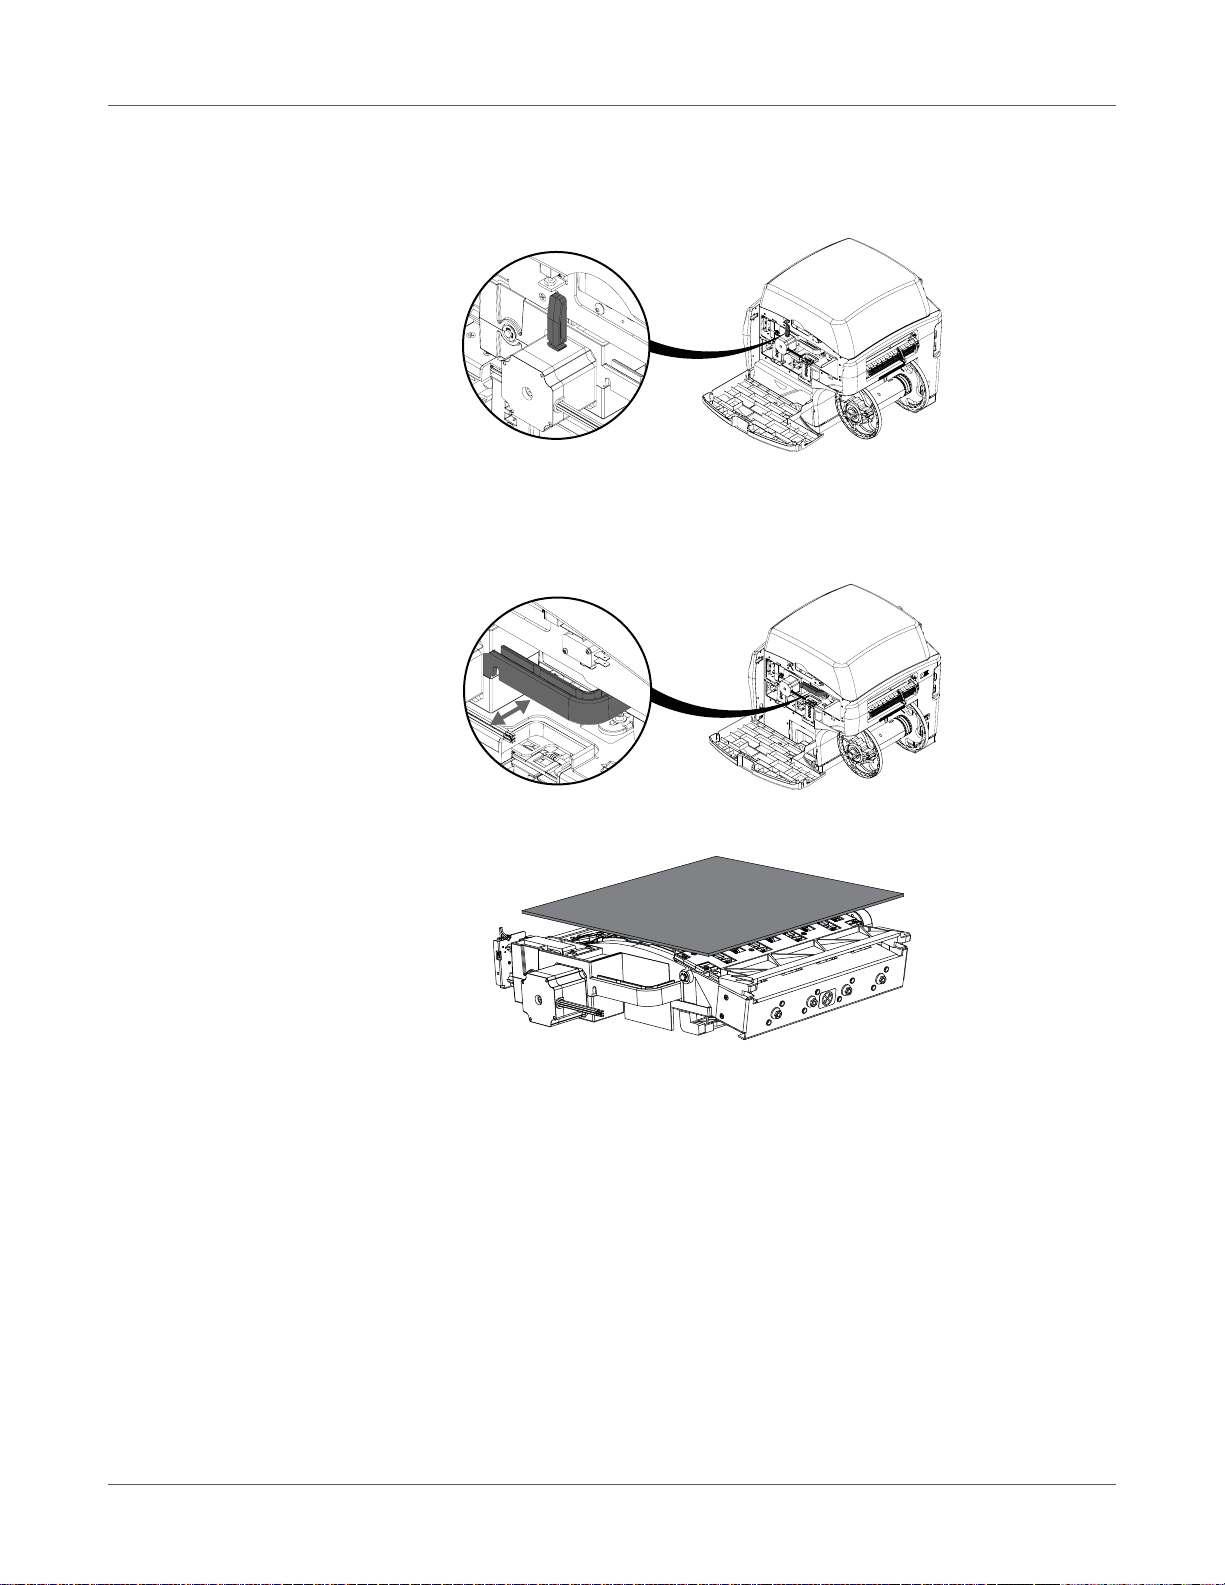
1 Open the top cover and remove the cinch strap [1].
2 Remove the foam support block [2] from the printer. Use caution when removing the block
to avoid dislodging the maintenance roller assem bly .
Save the foam support block and strap for future shipping purposes.
3 Verify that the maintenance roller assembly is level and in stalled properly. Ma ke sure both
ends of the roller are snapped into place.
QL-800 User Guide 27
Getting Started
[1]
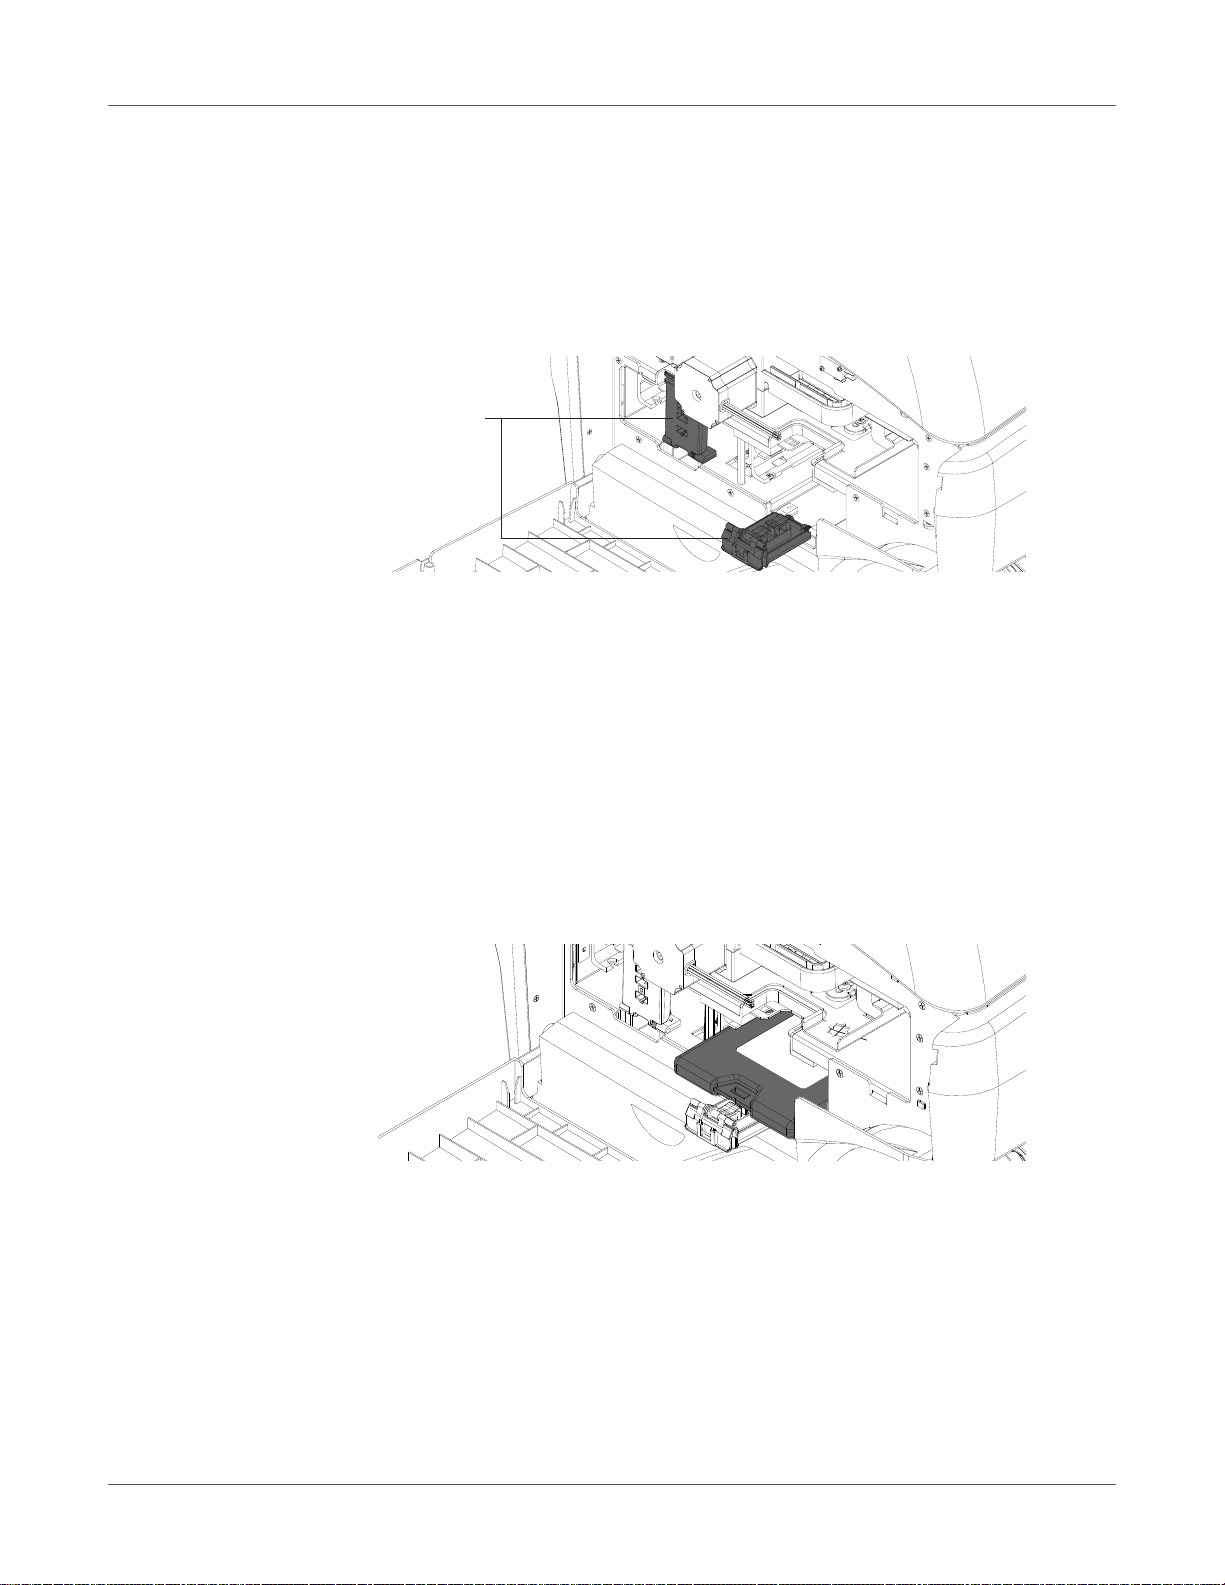
Installing Ink Cartridges
Use the following instructions to install ink cartridges.
Danger: For safety, keep ink cartridges out of the reach of children. If ink is accidentally
ingested, contact a physician immediately.
1 Open the main side door. Open both ink cartridg e latches [1]. Each latch can be opened by
pressing down on the top of the locking mechanism and pulling outward.
The ink cartridge latches have labels showing where each ink color will be installed.
2 Remove the four absorbent pads from the ink cartridge slots. Save the pads for future
shipping purposes.
3 Slide in the ink cartridge, nozzle end first, label side up. Push the cartridge in all the way.
You will feel slight resistance near the end of this process as the nozzle engages the ink
needles inside the printer. Repeat this step for each color.
Caution: There are sharp needles in the ink cartridge slot. Never put your fingers in this
area.
Note: The printer is designed so that ink cartridges cannot be inserted in the wrong slo ts.
Do not attempt to insert ink cartridges in the wrong slots.
4 Close the ink cartridge latches. Then close the main side door.
28 QL-800 User Guide
Getting Started
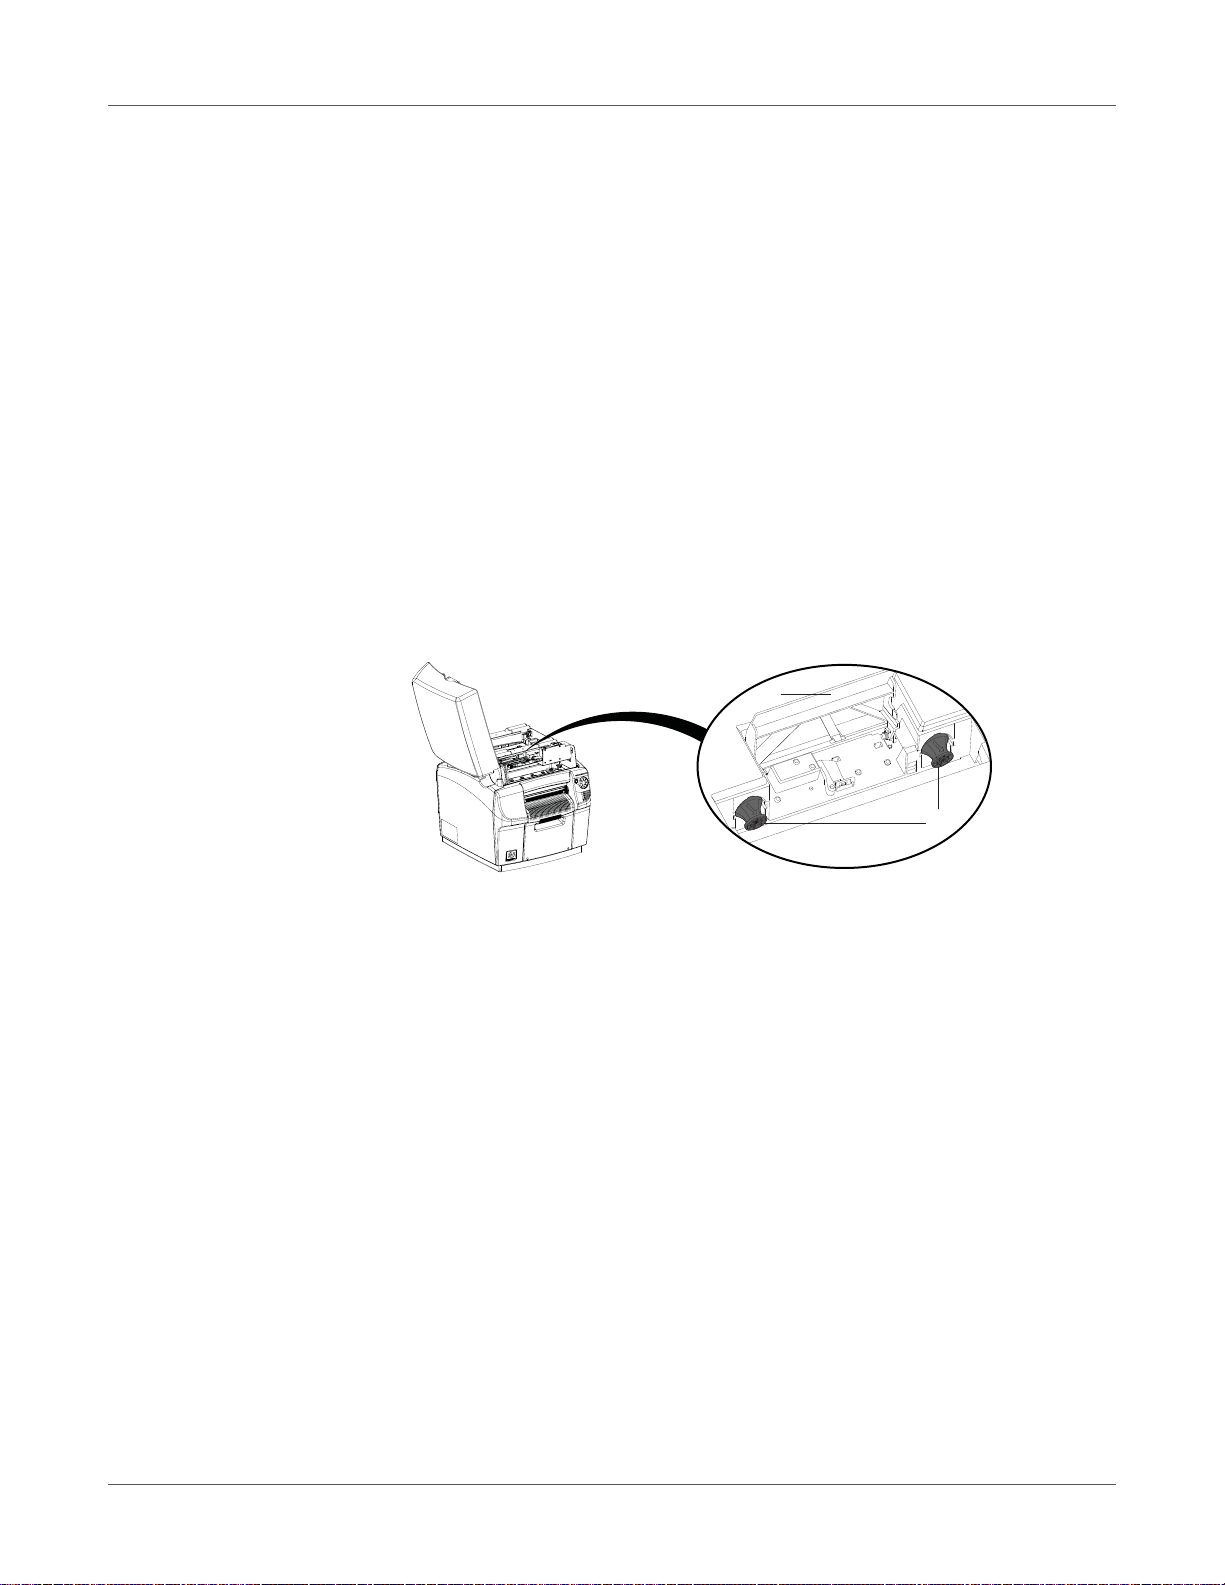
Installing the Printhead
Use the following instructions to install the printhead.
Caution: The printhead is sensitive to electrostatic discharge (ESD). Use ESD protection
when handling the printhead.
Caution: Do not touch the printhead cartridge ink couplings, nozzle surface, or the electrical
contacts when installing the printhead cartridge. Hold the printhead cartridge ONLY by the
handles.
Caution: To avoid drying out the printhead, do not open the printhead packaging until you are
ready to use it.
Caution: Open the printhead packaging over an appropriate receptacle to safely capture any
excess shipping fluid.
1 Ensure the printer is powered on and the ink cartridges have been installed.
2 Open the top cover.
3 Make sure the printhead latch [1] is in the open (vertical) position. Remove the cap
protectors [2] from the two fluidic couplings.
[1]
[2]
Note: The printhead latch will be in the open position. Do not close the latch before
installing the printhead. If the latch is accidentally closed, do not pry it open. Turn the printer
off and back on again. The latch automatically opens during power up if no printhead is
installed.
4 Remove the printhead from the packaging.
Note: If the foil packing is damaged, report the issue to Technical Support or your reseller.
Caution: Do not place the unprotected printhead cartridge on any surface. Protect the
printhead cartridge at all times from contamination such as dust or fibers.
5 Wipe any excess shipping fluid from the printhead cartridge with a clean, lint-free cloth.
QL-800 User Guide 29

Getting Started
No less than 45°
6 Remove the orange protective plastic cover from the printhead cartridge, holding the
printhead by the handle.
• Remove the flaps covering the ink ports.
• Remove the clip holding the cover near the center of the printhead cartridge.
• Carefully remove the protective cover. Do not touch any of the ink ports or nozzle plate
after the orange cover is removed.
7 Hold the printhead cartridge by the handle with one hand. Carefully re move the protective
plastic strips with the other hand.
• Grasp the pull tab and slowly peel back the plastic strip covering the electrical contacts.
• Grasp the pull tab and slowly peel back the plastic strip covering the printhead nozzles.
Maintain an angle of no less than 45 degrees with the printhead surface when pulling
on the strip.
Caution: Dispose of the removed strips immediately and do not allow the removed strips
to touch the electrical contacts or printhead nozzles.
8 Carefully remove the plastic bracket from the printhead cartridge.
9 Point the ink ports away from the front (label exit side) of the printer.
10 Align the printhead cartridge with the printhead slot.
30 QL-800 User Guide
 Loading...