


482 Pronto!

486 • 482 • 863 • 682
QuickLabel.com
Part Number: 22834571-EN-E | Revision 2.0
Pronto! 486
• Prints or laminates in
600 dpi at up to 4 ips
Pronto! 482
• Prints or laminates in
200 dpi at up to 10 ips
Pronto! 863
• Prints or laminates in
300 dpi at up to 6 ips
on labels up to 8.5” wide
Pronto! 682
• Prints or laminates in
200 dpi at up to 8 ips
on labels up to 6.5” wide


QuickLabel Pronto! 482/486/682/863
User Guide
Part Number 22834571-EN-E
Revision 2.0
12/13
Specifications are subject to change without notice
___________________________________________
QuickLabel Systems®
an Astro-Med, Inc. Product Group
World Headquarters
600 East Greenwich Ave., West Warwick, RI 02893
Tel: 877-757-7978 Fax: 401-822-2430
E-mail: info@QuickLabel.com
www.QuickLabel.com
___________________________________________
Technical Support
Tel: 877-757-7310
support@QuickLabel.com
www.QuickLabel.com/support/

Copyright © 2013 Astro-Med ®, Inc.
This manual is copyrighted with all rights reserved. No part of this manual
may be reproduced, transmitted, transcribed, stored in a retrieval system, or
translated into any language in any form by any means without written
permission of QuickLabel Systems and Astro-Med, Inc.
Trademarks
Windows® is a trademark of Microsoft Corporation.
QuickLabel® is a registered trademark of QuickLabel Systems and Astro-
Med, Inc.
Pronto! Printer Limited Lifetime Warranty
QuickLabel Systems, An Astro-Med Inc. Product Group, warrants this
product against defects in materials or workmanship for the lifetime of the
product. This warranty excludes printhead and print platen, which are
separately warranted. This warranty also excludes any cutter blade that may
be incorporated in a cutter accessory installed in, integrated with or attached
to the Pronto! printer. The product lifetime is defined as the period during
which the fair market value of the product exceeds the cost to repair the
product, as determined by the condition of the product at the time the defect
is reported to QuickLabel. If during the lifetime of the product the customer
discovers a defect, this defect must be reported promptly to QuickLabel.
QuickLabel will, at its option, repair the printer or repair or replace its
defective part(s) at no additional charge under our QuickSwap Repair &
Loaner Service.
If QuickLabel determines that repair at QuickLabel's factory is required, the
customer may be asked to return the printer to QuickLabel at the customer's
expense, and a loaner printer will be shipped via ground freight at
QuickLabel's expense for use during the repair process. In the event that a
repair can be performed by the customer through parts exchange, repair parts
or replacement parts will be shipped to the customer via ground freight.
Repair parts and replacement parts will be either reconditioned or new. The
customer is responsible for freight to return the loaner printer or any replaced
parts to our factory, and the customer should insure the shipment in case the
product is lost or damaged in transit. QuickLabel is not responsible for
damage during shipment. If the QuickSwap loaner printer or replaced parts
are not returned to the factory, the customer will be billed at list price for the
parts. All replaced parts become the property of QuickLabel. Travel, freight
and other expenses related to warranty repairs are not covered.
The Pronto! warranty excludes the cost to repair damage to the product
caused by labels, tags or thermal transfer ribbons that are not compatible with
the product.

This warranty is void if the product has been damaged by accident, abuse,
neglect or misapplication, or if the product has been improperly installed or
maintained, or if the product has been used outside of its environmental
specifications, or if the product has been modified without the express
written permission of QuickLabel.
QuickLabel makes no warranty, either express or implied, with respect to this
product's merchantability or fitness for a particular purpose. In no event shall
QuickLabel be held liable for any direct, indirect, special, incidental, or
consequential damages, whether based on a contract, tort, or any other legal
theory and whether advised of the possibility of such damages.
Pronto! Printhead and Platen Warranty
QuickLabel Systems warrants the printhead and the platen from the date of
purchase for a period of 90 days or for 1 million inches of thermal transfer
ribbon, whichever comes first, contingent upon the use of QuickLabel
Systems thermal transfer ribbon. QuickLabel Systems printheads are
calibrated for use with QuickLabel Systems thermal transfer ribbon and
perform optimally only when used with this ribbon. This specific Printhead
and Platen Warranty does not apply to printheads damaged by accident,
abuse, neglect, misapplication or the like.
Obtaining Service
To obtain warranted service, please contact QuickLabel Technical Support
through one of the Factory Sales and Service Centers listed below.
Contact Information for Factory Sales and Service Centers
QuickLabel USA and World Headquarters
600 East Greenwich Avenue
West Warwick, RI 02893 USA
Toll Free: (877) 757-7978
Toll-Free Sales: (877) 757-7978
Toll Free Technical Support: (877) 757-7310
Tel: (401) 828-4000
Fax: (401) 822-2430
Web Site: www.QuickLabel.com
Sales E-mail: info@QuickLabel.com
Technical Support E-mail: support@QuickLabel.com

QuickLabel Canada
#111 - 3555 Isabelle, Borssard, QC J4Y 2R2 Canada
Tel: (800) 565-2216
Fax: (450) 619-9976
Web Site: www.QuickLabel.ca
Sales E-mail: info@QuickLabel.ca
Technical Support E-mail: support@QuickLabel.ca
QuickLabel Deutschland
Astro-Med GmbH, Senefelderstraße 1/ T6 D-63110 Rodgau
Tel. +49 (0) 6106-28368-20
Fax: +49 (0) 6106-771121
Web Site: www.QuickLabel.de
Sales e-mail: info@QuickLabel.de
Technical Support e-mail: support@QuickLabel.de
QuickLabel France
Parc Euclide
ZA la Clef de St Pierre
10A Rue Blaise Pascal
78990 ELANCOURT
Tel: 33 1 34 82 09 00
Fax: 33 1 34 82 05 71
Web Site: www.QuickLabel.fr
Sales E-mail: info@QuickLabel.fr
Technical Support E-mail:support@QuickLabel.fr
QuickLabel United Kingdom
Astro-Med House, 11 Whittle Parkway
Slough, Berkshire SL1 6DQ
Tel: 01628 668836
Fax: 01628 664994
Web Site: www.QuickLabel.co.uk
Sales e-mail: info@QuickLabel.co.uk
Technical Support e-mail:support@QuickLabel.co.uk

Ownership Information
Congratulations and thank you for your business. Your purchase of a quality
QuickLabel product is an investment in the finest of state-of-the-art printing
and labeling technology.
Please use the spaces below to list the model number and serial number of
your product. If, for any reason, it should be necessary for you to contact us
regarding your purchase, please refer to:
Serial Number:
FCC Compliance Statement
This equipment has been tested and found to comply with the limits for a
Class A digital device, pursuant to Part 15 to the FCC Rules. These limits are
designed to provide reasonable protection against harmful interference when
the equipment is operated in a commercial environment. The equipment
generates, uses, and can radiate radio frequency and, if not installed and used
in accordance with the instruction manual, may cause harmful interference to
radio communications. Operation of this equipment in a residential area is
likely to cause harmful interference in which case the user may be required to
correct the interference at his own expense.
UL Compliance
Pronto 482, Pronto 486, Pronto 682, and Pronto 863 have been investigated by
Underwriters Laboratories Inc.® (UL) or any authorized licensee of UL in
accordance with the Standard(s) indicated:
UL 60950-1, Information Technology Equipment - Safety - Part 1: General
Requirements
CSA C22.2 No. 60950-1-07, Information Technology Equipment - Safety -
Part 1: General Requirements

RoHS Compliance
We declare that the Pronto! 482/486/682/863 complies with The European
RoHS Directives 2011/65/EU and 2002/95/EU (Restriction of the Use of
Certain Hazardous Substances in Electrical and Electronic Equipment).
This declaration is based on information provided by suppliers based on
reasonable inquiry. This declaration is rendered invalid if the product is
altered by someone other than Astro-Med, Inc.
Declaration of Conformity
Declaration de Conformité
Ubereinstimmungserklärung
Dichiarazione di Conformità
ID DoC-22834571
Manufacturer’s name and address
Nom et adresse du fabricant
Hersteller
Nome del costruttore
Astro-Med, Inc.
600 East Greenwich Avenue
West Warwick, RI 02893 USA
Model No.
Modele No.
Model Nr.
Modello No.
Pronto 482
Pronto 486
Pronto 483
Pronto 682
Pronto 863
Standards to which conformity is declared
Standards auquel la conformité appartient
Normen für welche Übereinstimmung erklärt wird
Norme per le quali si dichiara la conformità
EMC: EN 60950-1 :2006+A11:2009
+A12:2011+A1:2010
EN 61558-1:2005+A1:2009
EN 55022:2010
EN 55024:2010
EN 61000-3-2:2006+A1:2009+A2:2009
EN 61000-3-3:2008
Safety: UL 60950-1
CSA C22.2 No. 60950-1-07
Application of Council Directives
Application des Decisions du Conseil
Anwendbar fur die Richtlinien
Applicazione delle Direttive del Comitato
2006/95/EC
2004/108/EC
I, the undersigned, hereby declare that the equipment specified above conforms to the above Directive
and Standard.
Je, Soussigné, déclare que l’équipment spécifié ci-dessus est en conformité avec la directive et le stan-
dard ci-dessus.
Ich, der unterzeichnende erkläre hiermit, daß das oben beschriebene Gerät den vorgenannten Richtlin-
ien und Normen entspricht.
Il sottoscritto dichiara che l’apparecchio sopra specificato è conforme alle Direttive e Norme sopra spec-
ificate.
Steven Holbrook
Quality Assurance Manager
Astro-Med, Inc.
Date of issue: 12/13/
2013
Place of issue: West Warwick, RI
European Contact: Your local Astro-Med, Inc. Sales and Service Office.
FRANCE - Astro-Med SNC, Parc d'Activities de Pissaloup, 1, rue Edouard Branly, 78190 Trappes (Tel.
331-3482-0900 Fax: 331-3482-0571 Email:AstroMedFrance@astromed.com)
GERMANY - Astro-Med GmbH, Senefelderstrasse 1/T6, D-63110 Rodgau (Tel. +49(0)6106-28368-0 Fax:
49-6106-771121 Email: AstroMedDeutschland@astromed.com)
UNITED KINGDOM - Astro-Med, Inc., Astro-Med House, 11 Whittle Parkway, Slough, SL1 6DQ. (Tel.
44-1628-668836 Fax: 44-1628-664994 Email: AstroMedUK@astromed.com)

Declaration of Conformity
Declaration de Conformité
Ubereinstimmungserklärung
Dichiarazione di Conformità
ID DoC-22834571-ER4
Manufacturer’s name and address
Nom et adresse du fabricant
Hersteller
Nome del costruttore
Astro-Med, Inc.
600 East Greenwich Avenue
West Warwick, RI 02893 USA
Model No.
Modele No.
Model Nr.
Modello No.
ER4
Standards to which conformity is declared
Standards auquel la conformité appartient
Normen für welche Übereinstimmung erklärt wird
Norme per le quali si dichiara la conformità
EMC: EN 55022:1998 +A1:2000 +A2:2003
EN 61000-3-2:2000
EN 61000-3-3:1995 +A1:2001
EN 55024:1998 +A1:2001 +A2:2003
EN 61000-6-2:2001
Application of Council Directives
Application des Decisions du Conseil
Anwendbar fur die Richtlinien
Applicazione delle Direttive del Comitato
98/37/EG
2006/95/EG
2004/108/EG
I, the undersigned, hereby declare that the equipment specified above conforms to the above Directive
and Standard.
Je, Soussigné, déclare que l’équipment spécifié ci-dessus est en conformité avec la directive et le stan-
dard ci-dessus.
Ich, der unterzeichnende erkläre hiermit, daß das oben beschriebene Gerät den vorgenannten Richtlin-
ien und Normen entspricht.
Il sottoscritto dichiara che l’apparecchio sopra specificato è conforme alle Direttive e Norme sopra spec-
ificate.
Steven Holbrook
Quality Assurance Manager
Astro-Med, Inc.
Date of issue: 0
2/26/2009
Place of issue: West Warwick, RI
European Contact: Your local Astro-Med, Inc. Sales and Service Office.
FRANCE - Astro-Med SNC, Parc d'Activities de Pissaloup, 1, rue Edouard Branly, 78190 Trappes (Tel.
331-3482-0900 Fax: 331-3482-0571 Email:AstroMedFrance@astromed.com)
GERMANY - Astro-Med GmbH, Senefelderstrasse 1/T6, D-63110 Rodgau (Tel. +49(0)6106-28368-0 Fax:
49-6106-771121 Email: AstroMedDeutschland@astromed.com)
UNITED KINGDOM - Astro-Med, Inc., Astro-Med House, 11 Whittle Parkway, Slough, SL1 6DQ. (Tel.
44-1628-668836 Fax: 44-1628-664994 Email: AstroMedUK@astromed.com)
Declaration of Conformity
Declaration de Conformité
Ubereinstimmungserklärung
Dichiarazione di Conformità
ID DoC-22834571-CS4
Manufacturer’s name and address
Nom et adresse du fabricant
Hersteller
Nome del costruttore
Astro-Med, Inc.
600 East Greenwich Avenue
West Warwick, RI 02893 USA
Model No.
Modele No.
Model Nr.
Modello No.
CS4
Standards to which conformity is declared
Standards auquel la conformité appartient
Normen für welche Übereinstimmung erklärt wird
Norme per le quali si dichiara la conformità
EMC: EN 55022:2006
EN 55024:1998+A1:2001+A2:2003
EN 61000-3-2:2006
EN 61000-3-3:1995+A1:2001+A2:2005
Application of Council Directives
Application des Decisions du Conseil
Anwendbar fur die Richtlinien
Applicazione delle Direttive del Comitato
2004/108/EC
I, the undersigned, hereby declare that the equipment specified above conforms to the above Directive
and Standard.
Je, Soussigné, déclare que l’équipment spécifié ci-dessus est en conformité avec la directive et le stan-
dard ci-dessus.
Ich, der unterzeichnende erkläre hiermit, daß das oben beschriebene Gerät den vorgenannten Richtlin-
ien und Normen entspricht.
Il sottoscritto dichiara che l’apparecchio sopra specificato è conforme alle Direttive e Norme sopra spec-
ificate.
Steven Holbrook
Quality Assurance Manager
Astro-Med, Inc.
Date of issue: 0
7/09/2010
Place of issue: West Warwick, RI
European Contact: Your local Astro-Med, Inc. Sales and Service Office.
FRANCE - Astro-Med SNC, Parc d'Activities de Pissaloup, 1, rue Edouard Branly, 78190 Trappes (Tel.
331-3482-0900 Fax: 331-3482-0571 Email:AstroMedFrance@astromed.com)
GERMANY - Astro-Med GmbH, Senefelderstrasse 1/T6, D-63110 Rodgau (Tel. +49(0)6106-28368-0 Fax:
49-6106-771121 Email: AstroMedDeutschland@astromed.com)
UNITED KINGDOM - Astro-Med, Inc., Astro-Med House, 11 Whittle Parkway, Slough, SL1 6DQ. (Tel.
44-1628-668836 Fax: 44-1628-664994 Email: AstroMedUK@astromed.com)


Pronto! 482/486/682/863 1
Ta b l e of Cont e n t s
Chapter 1:
Introduction & Installation ...................................................................... 1-1
Safety and the environment ..................................................................................... 1-2
Intended use ........................................................................................................... 1-2
Safety notes............................................................................................................. 1-2
Environmentally-friendly disposal ..................................................................... 1-3
Unpacking the label printer ..................................................................................... 1-4
Setting up the label printer ....................................................................................... 1-5
Connecting the label printer to power ....................................................................1-6
Connecting to the power supply .........................................................................1-6
Connecting the label printer to a computer ........................................................... 1-7
RS-232 serial interface ........................................................................................... 1-8
Ethernet interface ................................................................................................... 1-8
USB interface ........................................................................................................ 1-10
Optional Interfaces ..............................................................................................1-11
Switching the label printer on and off.............................................................. 1-12
Chapter 2:
Operating panel ........................................................................................ 2-1
About the Operating Panel ....................................................................................... 2-2
Layout of the operating panel..............................................................................2-3
Functions of the operating panel during printing ................................................ 2-4
Symbol indicators .................................................................................................. 2-4
Power-Save mode .................................................................................................. 2-5
'Ready' mode .......................................................................................................... 2-5
'Printing Label' mode ............................................................................................ 2-6
'Pause' mode ...........................................................................................................2-6
'Fault - correctable' mode......................................................................................2-6
'Fault - irrecoverable' mode.................................................................................. 2-7
'System error' mode ............................................................................................... 2-7
Chapter 3:
Offline menu.............................................................................................. 3-1
Offline menu ...............................................................................................................3-2
Structure of the offline menu ............................................................................... 3-2
Navigating the offline menu ................................................................................3-6
Chapter 4:
Device types .............................................................................................. 4-1
Standard device ......................................................................................................... 4-2
Peel-off device version .............................................................................................. 4-3

2 Pronto! 482/486/682/863
Chapter 5:
Configuration ............................................................................................ 5-1
Configuration via the operating panel ...................................................................5-2
Local settings ..........................................................................................................5-2
Device settings........................................................................................................5-3
Printing parameters...............................................................................................5-5
Interfaces .................................................................................................................5-8
Status line ..............................................................................................................5-10
Security..................................................................................................................5-12
Configuration via the printer website ...................................................................5-14
Calling up the printer website ...........................................................................5-14
Description of the printer website.....................................................................5-14
Status tab ...............................................................................................................5-15
Setup tab................................................................................................................5-17
System messages tab............................................................................................5-19
Printer status line tab...........................................................................................5-21
Fonts tab ................................................................................................................5-22
Devices tab ............................................................................................................5-23
Chapter 6:
Loading media........................................................................................... 6-1
Opening and closing the support bracket Pronto! 863 .........................................6-2
Loading labels from a roll .........................................................................................6-3
Positioning the label roll on the roll retainer .....................................................6-3
Inserting a label strip into the printhead ............................................................6-4
Setting the label sensor..........................................................................................6-4
Winding up the label strip in Rewind mode .....................................................6-5
Winding up the liner in Peel-Off mode ..............................................................6-6
Setting the head locking system .......................................................................... 6-7
Removing the wound roll .........................................................................................6-8
Loading fanfold labels ...............................................................................................6-9
Loading transfer ribbon ..........................................................................................6-10
Setting the feed path of the transfer ribbon .........................................................6-11
Removing and installing the rewind guide plate, dispense plate or tear-off plate
6-12
Removing and installing the locking system .......................................................6-13
Chapter 7:
Printing ...................................................................................................... 7-1
Synchronization .........................................................................................................7-2
Tear-Off mode ............................................................................................................7-2
Peel-Off mode .............................................................................................................7-2
Internal rewinding .....................................................................................................7-2

Pronto! 482/486/682/863 3
Chapter 8:
Accessories ................................................................................................ 8-1
Cutter ........................................................................................................................... 8-2
External keyboard ......................................................................................................8-2
Connecting external keyboard............................................................................. 8-2
Special key functions............................................................................................. 8-2
Key assignment and special characters ..............................................................8-3
External Rewinder (ER1) .......................................................................................... 8-6
Safety Instructions ................................................................................................. 8-6
Delivery Contents.................................................................................................. 8-6
Mounting the External Rewinder........................................................................ 8-8
Selection of the Rewind Method.......................................................................... 8-9
Rewinding directly onto the Rewind Axle ...................................................... 8-10
Rewinding onto 3 in (76 mm) Cardboard Core............................................... 8-12
Rewinding onto 1.56 in (40 mm) Cardboard Core..........................................8-14
External Rewinder (ER4) ........................................................................................ 8-16
Intended Use.........................................................................................................8-16
Safety Instructions ............................................................................................... 8-16
Environment......................................................................................................... 8-17
Function................................................................................................................. 8-17
Device Overview.................................................................................................. 8-18
Contents of Delivery............................................................................................ 8-19
Connecting to Power Supply .............................................................................8-19
Selection of the Rewind Direction.....................................................................8-20
Aligning the Guide Axle.....................................................................................8-21
Rewinding Directly onto the Rewind Axle......................................................8-22
Rewinding onto 40 mm (1.6 in) Cardboard Core............................................8-24
Rewinding onto 76 mm (3 in) Cardboard Core...............................................8-26
External Unwinder (EU4) ....................................................................................... 8-28
Safety Instructions ............................................................................................... 8-28
Delivery Contents................................................................................................8-28
Placing the Unwinder .........................................................................................8-29
Media Loading ..................................................................................................... 8-30
Preparing the Winding Axle and the Flanges ................................................. 8-30
Retaining Rolls with 1.56 in (40 mm) Cardboard Core on the Winding Axle 8-
31
Retaining Rolls with 3 in (76 mm) Cardboard Core on the Winding Axle . 8-33
Insertion of the Prepared Winding Axle ..........................................................8-34
Adjusting the Unwinder..................................................................................... 8-35
Label Present Sensor (PS6) ..................................................................................... 8-36
Product Description............................................................................................. 8-36
Operation Modes ................................................................................................. 8-37
Safety Instructions ............................................................................................... 8-39

4 Pronto! 482/486/682/863
Mounting...............................................................................................................8-39
Printer Configuration ..........................................................................................8-40
Operation ..............................................................................................................8-41
Overview Signals .................................................................................................8-42
Explanation of the Signals ..................................................................................8-43
Circuit Diagram of Inputs...................................................................................8-45
Circuit Diagram of Outputs ...............................................................................8-45
Examples External Circuits to operate Present Sensor PS6 ...........................8-46
Pause Adapter PS7 ...................................................................................................8-48
Product Description.............................................................................................8-48
Mounting the Pause Adapter.............................................................................8-49
Modes of Operation.............................................................................................8-50
Pin Assignment of the Peripheral Interface .....................................................8-51
Explanation of the Signals ..................................................................................8-52
Circuit Diagram of Inputs...................................................................................8-54
Circuit Diagram of Outputs ...............................................................................8-55
WLAN-Card .............................................................................................................8-56
Function.................................................................................................................8-56
Mounting...............................................................................................................8-56
Setup ......................................................................................................................8-57
External Operating Panel ........................................................................................8-58
Delivery Contents ................................................................................................8-58
Function.................................................................................................................8-58
Mounting...............................................................................................................8-59
Antistatic Brush ........................................................................................................8-60
Delivery Contents ................................................................................................8-60
Function.................................................................................................................8-60
Mounting...............................................................................................................8-60
Adjustment ...........................................................................................................8-61
Chapter 9:
CU4 Cutter Accessory ............................................................................. 9-1
Cutter ...........................................................................................................................9-2
Cutter .......................................................................................................................9-2
Perf/Cutter...............................................................................................................9-2
Safety Instructions .....................................................................................................9-3
CAUTION!..............................................................................................................9-3
Mounting the Tear-off Plate / Dispense Plate ........................................................9-4
Mounting the Cutter Tray ........................................................................................9-5
Mounting the Cutter ..................................................................................................9-6
Printer Configuration ................................................................................................9-7
Cut Position ............................................................................................................9-7
Label Sensor............................................................................................................9-7

Pronto! 482/486/682/863 5
Backfeed .................................................................................................................. 9-8
Media Loading ........................................................................................................... 9-8
Operation ....................................................................................................................9-9
Standard Operation............................................................................................... 9-9
Lubrication ................................................................................................................9-10
Cleaning .................................................................................................................... 9-11
Changing the Blades ................................................................................................ 9-12
Adjusting the Circular Blade and the Clock Wheel ............................................ 9-14
Chapter 10:
CS4 Cutter/Stacker Accessory.............................................................. 10-1
CS4 Cutter/Stacker ................................................................................................... 10-2
Safety Instructions ................................................................................................... 10-3
Installation ................................................................................................................ 10-5
Preparing the Printer........................................................................................... 10-5
Mounting the Stacker to the Printer.................................................................. 10-6
Adapting the Stacker to the Media Size ........................................................... 10-7
Printer Configuration ............................................................................................ 10-10
Loading Material ...................................................................................................10-12
Operation ................................................................................................................10-12
Maintenance ........................................................................................................... 10-14
Error Messages .......................................................................................................10-16
Chapter 11:
Cleaning and basic maintenance........................................................... 11-1
Maintenance plan .................................................................................................... 11-2
Tools and cleaning agents ......................................................................................11-3
General cleaning ...................................................................................................... 11-3
Cleaning the print roller ......................................................................................... 11-4
Cleaning the printhead ...........................................................................................11-5
Cleaning the label sensor ........................................................................................ 11-6
Replacing the printhead on Pronto! 482/486 models .......................................... 11-7
Replacing the printhead...................................................................................... 11-7
Replacing the printhead on Pronto! 682/863 ........................................................ 11-9
Replacing the printhead...................................................................................... 11-9
Replacing the print roller and rewind assist roller ........................................... 11-12
Chapter 12:
Test functions.......................................................................................... 12-1
Overview ................................................................................................................... 12-2
Short status ............................................................................................................... 12-3
Status print ................................................................................................................12-5
Font list ...................................................................................................................... 12-7
Device list .................................................................................................................. 12-9

6 Pronto! 482/486/682/863
WiFi Status ..............................................................................................................12-11
ASCII Dump Mode ................................................................................................12-12
Test grid ...................................................................................................................12-14
Label profile ............................................................................................................12-15
Chapter 13:
Service functions..................................................................................... 13-1
Performing firmware update .................................................................................13-2
Copying new firmware via interface ................................................................13-2
Copying new firmware from memory medium..............................................13-3
Error messages during the firmware update...................................................13-4
Save settings .............................................................................................................13-5
Load settings .............................................................................................................13-6
Cleaning Interval ...................................................................................................... 13-7
Chapter 14:
FTP printer management...................................................................... 14-1
FTP logon ..................................................................................................................14-2
Directory structure of the FTP server ...................................................................14-3
FTP firmware update ..............................................................................................14-4
Chapter 15:
Memory media........................................................................................ 15-1
Suitable Memory Media ..........................................................................................15-2
Installation ................................................................................................................15-2
Formatting .................................................................................................................15-3
Directory Structure ..................................................................................................15-3
Writing .......................................................................................................................15-4
Memory media functions in the offline menu .....................................................15-5
Label from card ....................................................................................................15-5
Print directory.......................................................................................................15-6
Copy memory card..............................................................................................15-6
Format card...........................................................................................................15-7
Printing file contents............................................................................................15-8
Chapter 16:
Error treatment...................................................................................... 16-1
Error types ................................................................................................................16-2
Troubleshooting .......................................................................................................16-3
Error messages and recovery .................................................................................16-5
Chapter 17:
Specifications........................................................................................... 17-1
Cutter .........................................................................................................................17-2
External Rewinder (ER1) ........................................................................................17-3

Pronto! 482/486/682/863 7
External Rewinder (ER4) ........................................................................................17-4
External Unwinder (EU4) ....................................................................................... 17-5
Appendix A:
Menu Map ................................................................................................. A-1

8 Pronto! 482/486/682/863

Pronto! 482/486/682/863 1-1
Chapter 1:
Introduction & Installation
This chapter contains the following sections:
• Safety and the environment - Provides safety precautions and disposal
information
• Unpacking the label printer - Describes how to unpack and inspect the
printer
• Setting up the label printer - Describes how to set up the printer after
unpacking
• Connecting the label printer to power - Provides information about
power connections
• Connecting the label printer to a computer - Provides information about
data connections

1-2 Introduction & Installation
Safety and the environment
Read these operating instructions carefully before using the label printer for
the first time. The operating instructions describe all of the functions of the
label printer during operation. The available functions depend on the version
used for a specific job.
Intended use
• The label printer is a state-of-the-art device which complies with the
recognized safety-related rules and regulations. Despite this, a danger to
life and limb of the user or third parties could arise and the label printer
or other property could be damaged while operating the device.
• The label printer may only be used while in proper working order and for
the intended purpose. Users must be safe, aware of potential dangers and
must comply with the operating instructions! Faults, in particular those
which affect safety, must be remedied immediately.
• The label printer is solely intended to print suitable media which have
been approved by the manufacturer. Any other or additional use is not
intended. The manufacturer/supplier is not liable for damage resulting
from misuse. Any misuse is at your own risk.
• Intended use includes heeding the operating instructions, including the
maintenance recommendations/regulations specified by the
manufacturer.
Safety notes
• The label printer is designed for power supply systems from 100 V AC to
240 V AC. Connect the label printer only to electrical outlets with a
ground contact.
• Couple the label printer to devices using extra low voltage only.
• Before making or undoing connections, switch off all devices involved
(computer, printer, accessories etc.).
• Operate the label printer in a dry environment only and do not get it wet
(sprayed water, mist etc.).
• If the label printer is operated with the cover open, ensure that clothing,
hair, jewelry and similar personal items do not contact the exposed
rotating parts.
• The print mechanism can become hot during printing. Do not touch it
during operation and allow it to cool down before changing the media or
before removal or adjustment.

Pronto! 482/486/682/863 1-3
• Carry out only the actions described in these operating instructions.
Other tasks may only be performed by trained personnel or service
technicians.
Environmentally-friendly disposal
Used devices contain valuable recyclable materials which should be utilized.
Dispose of used devices separately from other waste, i.e. via an appropriate
collection site.
The modular nature of the label printer allows it to easily be disassembled
into its component parts so that the parts can be turned in for recycling.
The PCB of the label printer has a lithium battery.
Dispose of this battery in a collection container for old batteries at the store or
with the public waste disposal authority.
DANGER! Risk of death via mains voltage! Do not open the housing of the
label printer.

1-4 Introduction & Installation
Unpacking the label printer
1 Lift the label printer out of the box via the straps.
2 Check label printer for damage which may have occurred during
transport.
3 Check delivery for completeness.
• Label printer
• Empty cardboard core, mounted on ribbon take-up hub
• Tear-off plate (basic devices only) or Dispense plate (peel-off device
version only)
•Power cable
•USB cable
• Documentation
Note: Retain the original packaging for subsequent transport.
Pronto! 482/486/682/863 1-5
Setting up the label printer
Caution: The device and the print media can be damaged by moisture and
water. The label printer may only be set up in a dry place protected from
sprayed water.
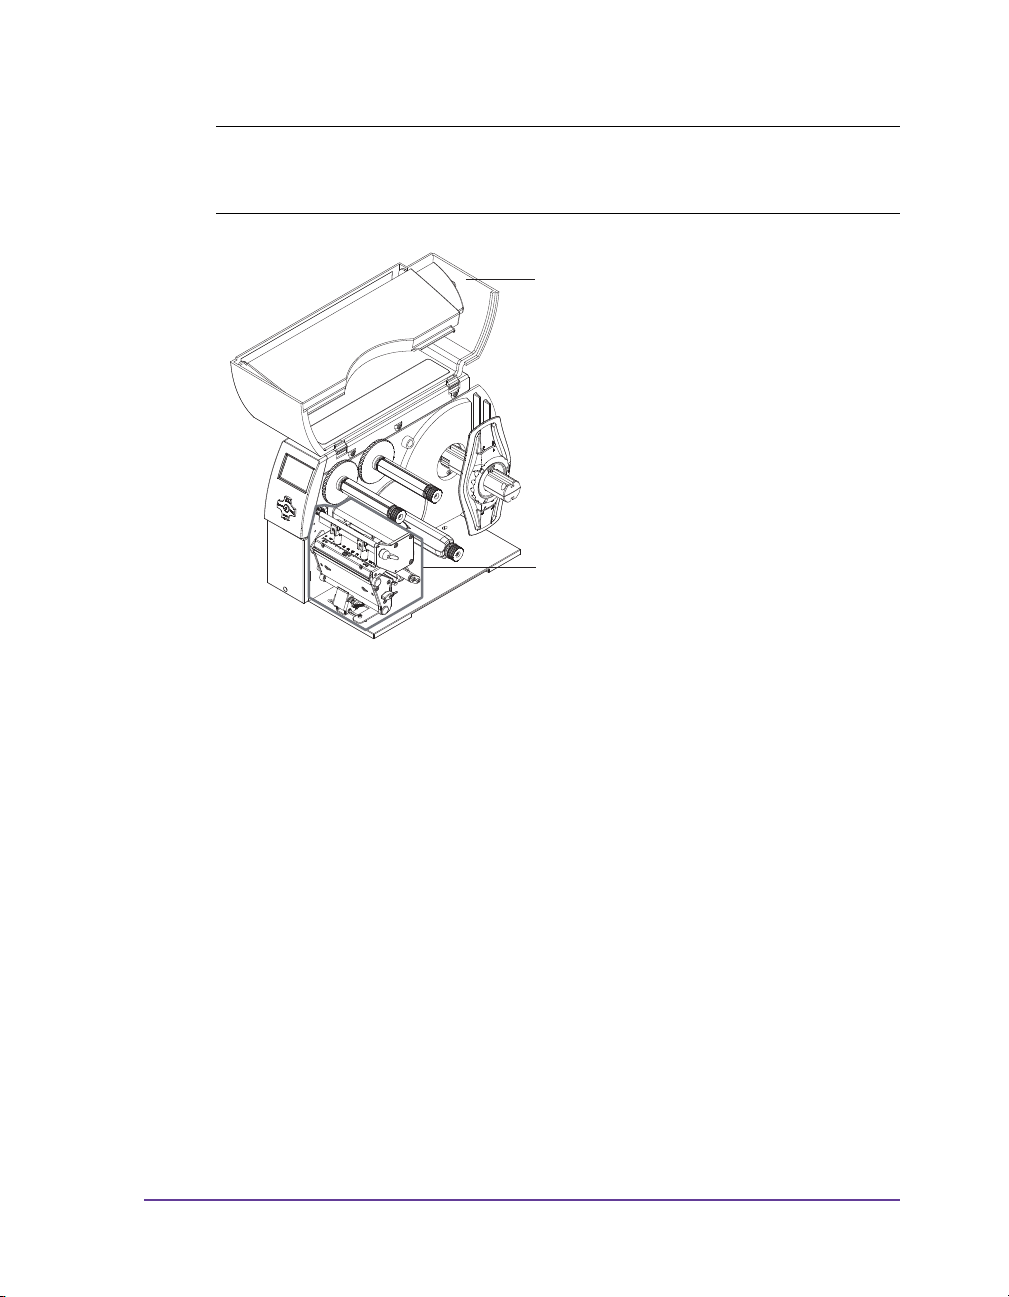
• Set up printer on a level
surface.
• Open cover (1) of the label
printer.
• Remove foam transportation
safeguards near the printhead
(2).
1
2
1-6 Introduction & Installation
Connecting the label printer to power
Connecting to the power supply
The printer is equipped with a versatile power supply unit. The device may
be operated with a mains voltage of 230 V AC/ 50 Hz or 115 V AC/60 Hz
without any adjustments or modifications.
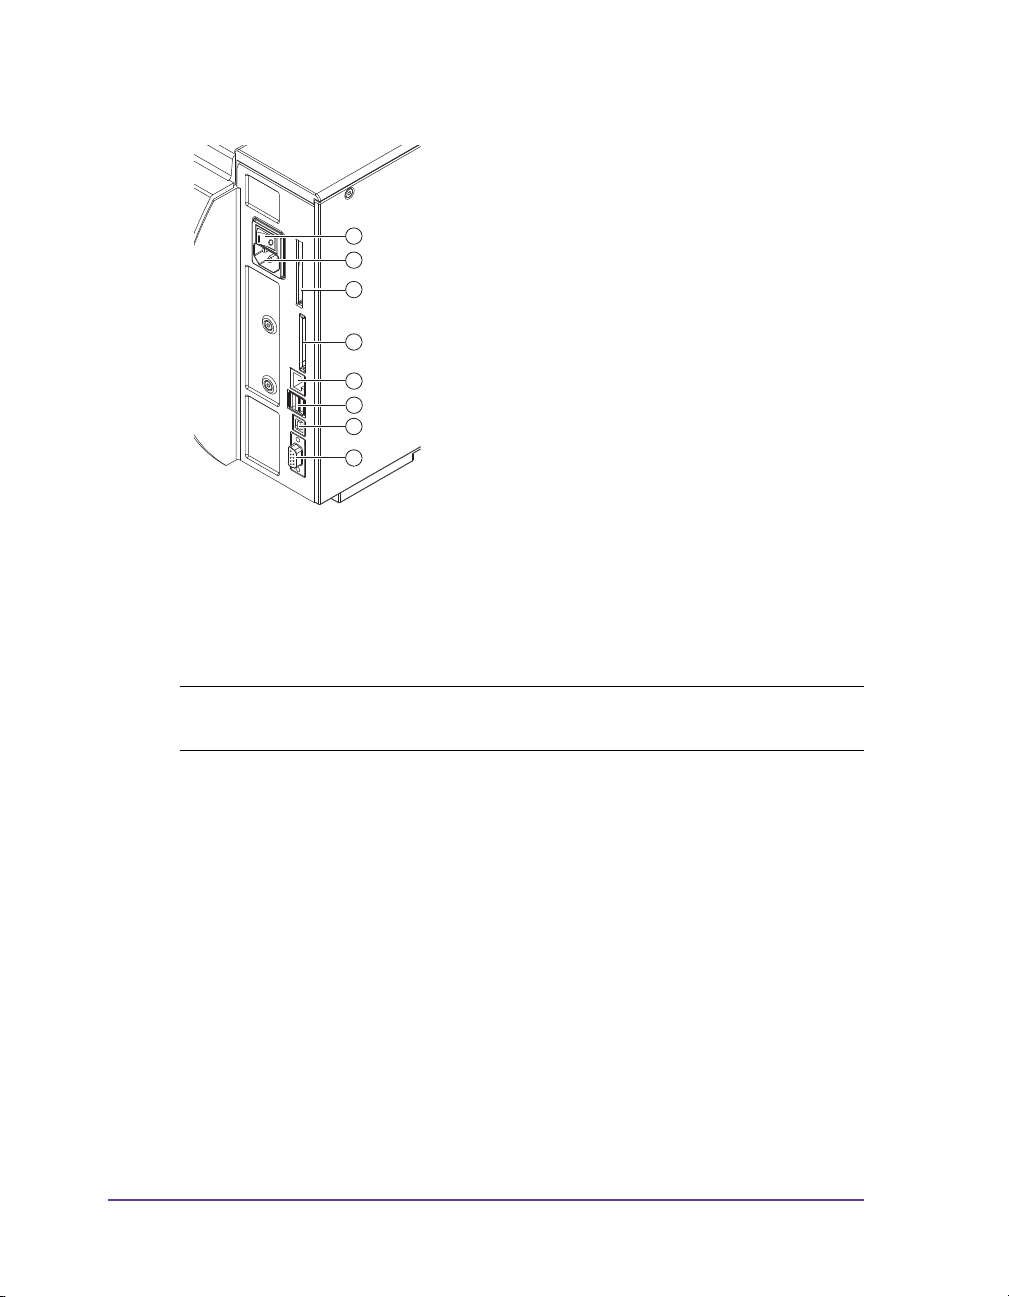
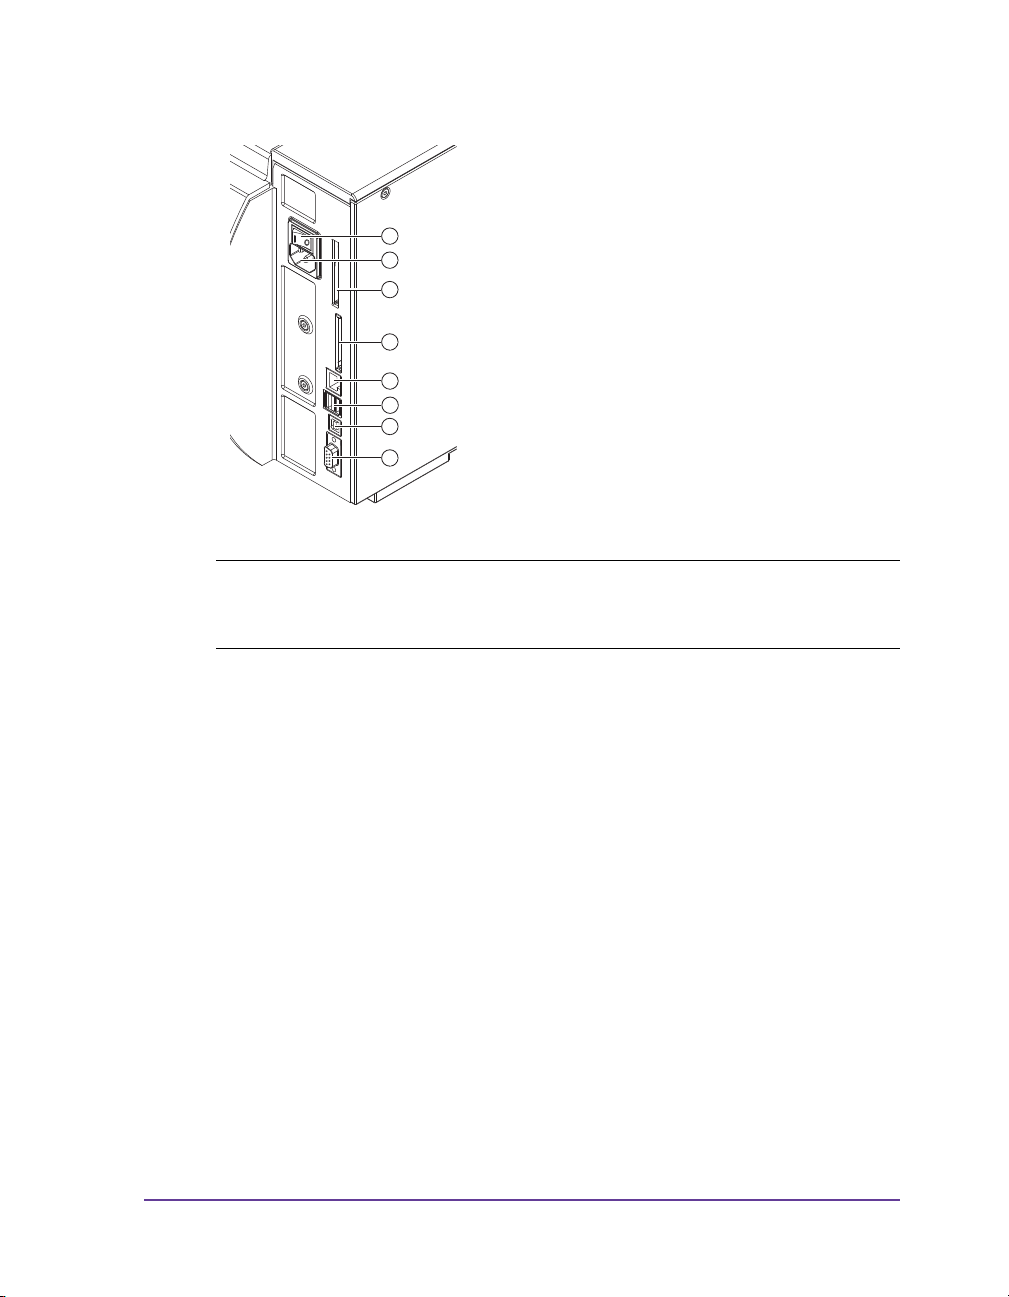
1 Insert power cable into power connection jack (6).
2 Insert plug of the power cable into a grounded electrical outlet.
1 Serial RS-232 interface
2 USB 2.0 high speed slave
interface
3 Two USB master interfaces for
keyboard, scanner, optional
interface adapters, or USB
flash drive
4 Ethernet 10/100 Base T
interface
5 Slot for CompactFlash
memory card
6 Power connection jack
7 Slot for type II PC card or
WLAN card
8 Power switch
Caution: The device can be damaged by undefined switch-on currents. Set
the power switch (8) to “O” before plugging in the device.
1
2
3
4
5
6
7
8
Pronto! 482/486/682/863 1-7
Connecting the label printer to a computer
Choose from the following options for connecting a computer to the label
printer:
• Direct connection to the serial RS-232 interface
• Direct connection to the Ethernet interface
• Connection via a computer network to the Ethernet interface
• Direct connection to the high-speed USB slave interface
• Connection via an optional interface adapter (Parallel/Centronics, RS-422/
485) to a USB master interface
• Connection to a wireless network via optional WLAN card installed in
the slot for type II PC card.
1 Serial RS-232 interface
2 USB 2.0 high speed slave
interface
3 Two USB master interfaces for
keyboard, scanner, optional
interface adapters, or USB
flash drive
4 Ethernet 10/100 Base T
interface
5 Slot for CompactFlash
memory card
6 Power connection jack
7 Slot for type II PC card or
WLAN card
8 Power switch
Warning: Insufficient or missing grounding can cause faults during
operation. Ensure that all computers and connection cables connected to the
label printer are grounded.
1
2
3
4
5
6
7
8
1-8 Introduction & Installation
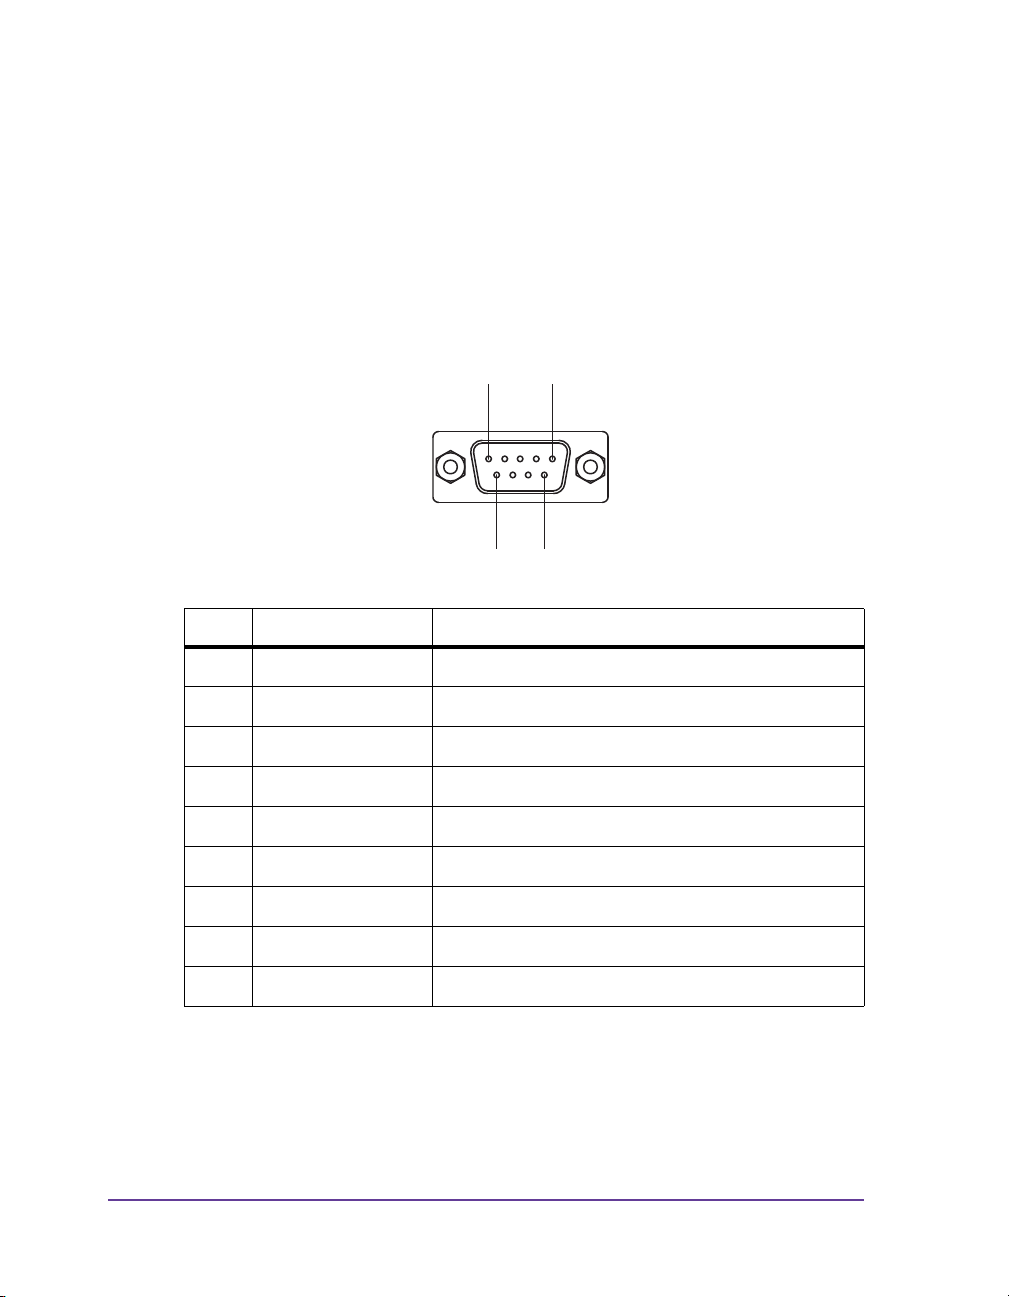
RS-232 serial interface
The RS-232 interface is operated via an RS-232 cable.
1 Connect computer and label printer with a suitable cable.
2 Secure cable connections with the screws found at the plugs.
3 Configure the RS-232 interface of the printer to match the settings of the
connected computer (see Interfaces on page 5-8).
If problems occur, contact the computer manufacturer for interface
assignments and note the pin assignments below.
Ethernet interface
To connect the label printer to a network jack, you will require a patch cable
with an RJ45 plug for 10 Base T or 100 Base T. For direct connection of the
Pin Designation Function
1 CD Carrier Detect
2 TxD Transmit Data
3 RxD Receive Data
4 DTR Data Terminal Ready (not connected)
5 GND Ground
6 DSR Data Set Ready (not connected)
7 RTS Request To Send
8 CTS Clear To Send
9 RI Ring Indication (not connected)
Pin5 Pin1
Pin9 Pin6

Pronto! 482/486/682/863 1-9
printer to the Ethernet card of a local computer, you will need an appropriate
crossover cable.
1 Connect computer and label printer with a suitable cable.
2 Press the menu button. Select Setup > Interfaces. Make basic settings for
operation of the Ethernet interface.
3 Call up the printer website (see Configuration via the printer website on
page 5-14).
4 Open the “Setup” tab on the printer website.
5 Set the parameters described in the path Setup > Interfaces > Ethernet. See
Setup tab on page 5-17.
6 Click Set on the “Setup” tab.
7 Enter PIN and click Confirm (see Security on page 5-12).
8 Set up print service if necessary (see below).
9 Adjust Windows printer setting (see below).
Print services Raw-IP and LPD in MS Windows
The print services Raw-IP and LPD are not available in all operating systems.
In general, special tools are required to set up print services. Information on
this can be obtained from your dealer.
Windows 2000 offers the port monitor SPM (Standard Port Monitor) which is
installed automatically when setting up the TCP/IP protocol. The SPM can be
configured for Raw-IP or LPD.
Information on installation can be obtained from the Windows
documentation.
Caution: A shielded cable must be used to connect the printer to the network.
Note: Do not change the settings of the "IP" and "Gateway" on the printer
website, as otherwise the connection to the printer may be lost.
Print service Windows 2000 Windows XP Windows Vista Windows 7
Raw-IP Not available Available Available Available
LPD Available, but
not installed
Available Available Available

1-10 Introduction & Installation
During the installation of both print services, additional connections for print
output are set up:
• Raw-IP: Enter the same port address in the printer which you have
selected during installation.
• LPD: “lp” (line printer) must be entered as the name of the printer on the
computer (queue name).
Adjusting Windows printer setting
If the printer driver valid for your Windows version is installed on your
computer, you can use the Windows standard applications to edit the label
contents and to start the print jobs. To use the Raw-IP or LPD print services,
you must adjust the Windows printer settings:
1 Open the folder containing the printers via Start > Settings > Printers.
2 Right-click the icon of the label printer. A pop-up menu appears.
3 Select “Properties” in the pop-up menu.
4 Open the “Details” or “Connections” tab.
This tab contains, among other things, the connections which were also
set up when the print services were installed. The names of these
connections depend on the installation tool used.
5 Select the Raw-IP or LPD connection.
6 Click OK.
USB interface
The high-speed USB interface allows the label printer to be operated via a
USB interface of a computer running the operating system Windows 7
32bit/ 64bit, Windows 2000, Windows XP 32bit / 64bit, Windows 2003 32bit /
64bit and Windows Vista 32bit /64bit.
A printer driver must be installed if a USB interface will be used for
connection.
1 Switch the label printer off.
2 Connect the computer and label printer with a USB A-B cable.
3 Switch computer on.
4 Place the “Printer Accessories CD” in the CD-ROM drive.
5 Exit all programs currently running.
 Loading...