


d i g i t a l c o l o r l a b e l p r i n t e r
O p e ra t io n & S e t u p G u ide

Digital Color Label Printer
Operation & Setup Guide
Part Number 22834486
Version 2.0
10/11
Firmware V 2.1
Specifications are subject to change without notice
___________________________________________
QuickLabel Systems® an Astro-Med, Inc. Product Group
World Headquarters
600 East Greenwich Ave., West Warwick, RI 02893
Tel: 877-757-7978 Fax: 401-822-2430
E-mail: info@QuickLabel.com
www.QuickLabel.com
___________________________________________
Technical Support
Tel: 877-757-7310 support@QuickLabel.com www.QuickLabel.com/support/
Copyright © 2011 Astro-Med, Inc.
This manual is copyrighted with all rights reserved. No part of this manual may be reproduced, transmitted, transcribed, stored in a retrieval system, or translated into any language in any form by any means without written permission of QuickLabel Systems.
Trademarks
Microsoft Word™ and Windows™ are trademarks of Microsoft Corporation PostScript™ and Adobe Illustrator™ are trademarks of Adobe Systems, Inc. CorelDRAW!™ is a trademark of Corel Corporation
PCL™ is a trademark of Hewlett-Packard Corporation Ethernet™ is a trademark of Xerox Corporation QuickLabel® is a registered trademark of Astro-Med, Inc.
Custom QuickLabel™ and RibbonRation™ are trademarks of Astro-Med, Inc.
Limited Warranty
QuickLabel Systems, An Astro-Med Inc. Product Group, warrants this product against defects in materials or workmanship for a period of one year from the date of original purchase. This warranty excludes printhead and print platen, which are separately warranted. If the customer discovers a defect, this defect must be reported promptly to QuickLabel Systems.
QuickLabel Systems will, at its option, repair or replace the defective component at no additional charge. Repair parts and replacement parts will be furnished on an exchange basis and will be either reconditioned or new. All replaced parts become the property of QuickLabel Systems. Travel, freight and other expenses related to warranty repairs are not covered. Service Agreements are available for purchase and may provide on-site service and/or loaner equipment.
QuickLabel Systems warrants the printhead and the platen from the date of purchase for a period of 90 days or for 1 million inches of thermal transfer ribbon, whichever comes first, contingent upon the use of QuickLabel Systems thermal transfer ribbon. QuickLabel Systems printheads are calibrated for use with QuickLabel Systems thermal transfer ribbon and perform optimally only when used with this ribbon. This specific printhead warranty does not apply to printheads damaged by accident, abuse, neglect, misapplication or the like.
This warranty is void if the product has been damaged by accident, abuse, neglect or misapplication, or if the product has been improperly installed, or if the product has been modified without the express written permission of QuickLabel Systems.
QuickLabel Systems makes no warranty, either express or implied, with respect to this product’s fitness for a particular purpose.
Obtaining Service
To obtain warranty service, call QuickLabel Systems Technical Support at 401-828-4000 or Toll-Free in the USA and Canada at 877-757-7310. QuickLabel Systems, An Astro-Med Inc. Product Group, is not responsible for products lost or damaged in transit.
Contact Information for Factory Sales and Service Centers
QuickLabel USA and World Headquarters
600 East Greenwich Avenue
West Warwick, RI 02893 USA Toll Free: (877) 757-7978
Tel: (401) 828-4000
Fax: (401) 822-2430
Web Site: www.QuickLabel.com Sales e-mail: info@QuickLabel.com
Technical Support e-mail: support@QuickLabel.com
QuickLabel Canada
#111 – 3555 Isabelle, Brossard, QC J4Y 2R2 Canada Tel: (800) 565-2216
Fax: (450) 619-9976
Web Site: www.QuickLabel.ca Sales e-mail: info@QuickLabel.ca
Technical Support e-mail: support@QuickLabel.ca
QuickLabel Deutschland
Astro-Med GmbH, Senefelderstraße 1/ T6 D-63110 Rodgau Tel. +49 (0) 6106-28368-20
Fax: +49 (0) 6106-771121
Web Site: www.QuickLabel.de Sales e-mail: info@QuickLabel.de
Technical Support e-mail: support@QuickLabel.de
QuickLabel France
Astro-Med SNC, Parc d'Activités de Pissaloup, 1 rue Edouard Branly, 78190 Trappes
Tel: 33 1 34 82 09 00
Fax: 33 1 34 82 05 71
Web Site: www.QuickLabel.fr Sales e-mail: info@QuickLabel.fr
Technical Support e-mail:support@QuickLabel.fr
QuickLabel United Kingdom
Astro-Med House, 11 Whittle Parkway Slough, Berkshire SL1 6DQ
Tel: 01628 668836
Fax: 01628 664994
Web Site: www.QuickLabel.co.uk Sales e-mail: info@QuickLabel.co.uk
Technical Support e-mail:support@QuickLabel.co.uk

Ownership Information
Congratulations and thank you for your business. Your purchase of a quality QuickLabel Systems product is an investment in the finest of state-of-the-art printing and labeling technology. Please use the spaces below to list the model name/number and serial number of your product.
Model Name/Number: ____________________
Serial Number: |
____________________ |
FCC Compliance Statement
This equipment has been tested and found to comply with the limits of a Class A digital device, pursuant to Part 15 of the FCC Rules. These limits are designed to provide reasonable protection against harmful interference when the equipment is operated in a residential environment. This equipment generates, uses, and radiates radio frequency energy, and if not installed and used in accordance with the instructions, may cause harmful interference. However, there is no guarantee that interference will not occur. If this equipment does cause interference to radio or television reception, which can be determined by turning the equipment off and on, the user is encouraged to correct the interference by one of the following measures:
•Reorient or relocate the receiving antenna.
•Increase separation between the equipment and receiver.
•Connect the equipment to an outlet on a circuit different from which the receiver is connected.
•Consult QuickLabel Technical Support.
Warning: Modifications not expressly approved by Quick Label Systems could void user authority to operate the equipment.
Canadian Compliance Statement
This Digital apparatus meets all the requirements of the Canadian Interference-Causing Equipment Regulations.
Cet appareil numerique respecte les exigences du Reglement sur le material broilleur du Canada.
ETL Certification
This product has met the United States of America and Canada electrical product safety requirements and has earned the ETL Listed Mark.
RoHS Compliance
We declare that the QLS-4100 Xe complies with The European RoHS Directive 2002/95/EC (Restriction of the Use of Certain Hazardous Substances in Electrical and Electronic Equipment), as of 6/6/2007.
This declaration is based on information provided by suppliers based on reasonable inquiry. This declaration is rendered invalid if the product is altered by someone other than Astro-Med, Inc.

Declaration of Conformity
Declaration de Conformité
Ubereinstimmungserklärung
Dichiarazione di Conformità
ID |
DoC-22834486 |
|
|
|
|
Manufacturer’s name and address |
Astro-Med, Inc. |
|
Nom et adresse du fabricant |
600 East Greenwich Avenue |
|
Hersteller |
West Warwick, RI 02893 USA |
|
Nome del costruttore |
|
|
|
|
|
Model No. |
QLS-4100 Xe |
|
Modele No. |
|
|
Model Nr. |
|
|
Modello No. |
|
|
|
|
|
Standards to which conformity is declared |
Safety: |
EN 60950-1 |
Standards auquel la conformité appartient |
|
|
Normen für welche Übereinstimmung erklärt wird |
EMC: |
EN 55022, Class A |
Norme per le quali si dichiara la conformità |
|
|
|
|
|
Application of Council Directives |
2004/108/EC |
|
Application des Decisions du Conseil |
2006/95/EC |
|
Anwendbar fur die Richtlinien |
|
|
Applicazione delle Direttive del Comitato |
|
|
|
|
|
I, the undersigned, hereby declare that the equipment specified above conforms to the above Directive and Standard.
Je, Soussigné, déclare que l’équipment spécifié ci-dessus est en conformité avec la directive et le standard ci-dessus.
Ich, der unterzeichnende erkläre hiermit, daß das oben beschriebene Gerät den vorgenannten Richtlinien und Normen entspricht.
Il sottoscritto dichiara che l’apparecchio sopra specificato è conforme alle Direttive e Norme sopra specificate.
Steven Holbrook |
|
|
|
|
|
|
|
Quality Assurance Manager |
Date of issue: 12/21/2009 |
||
Astro-Med, Inc. |
Place of issue: West Warwick, RI |
||
|
|
|
|
European Contact: Your local Astro-Med, Inc. Sales and Service Office.
FRANCE - Astro-Med SNC, Parc d'Activities de Pissaloup, 1, rue Edouard Branly, 78190 Trappes (Tel. 331-3482-0900 Fax: 331-3482-0571 Email:AstroMedFrance@astromed.com)
GERMANY - Astro-Med GmbH, Senefelderstrasse 1/T6, D-63110 Rodgau (Tel. +49(0)6106-28368-0 Fax: 49- 6106-771121 Email: AstroMedDeutschland@astromed.com)
UNITED KINGDOM - Astro-Med, Inc., Astro-Med House, 11 Whittle Parkway, Slough, SL1 6DQ. (Tel. 44- 1628-668836 Fax: 44-1628-664994 Email: AstroMedUK@astromed.com)
Table of Contents
Chapter 1: Quick Start ........................................................................... |
1-1 |
QuickLabel Systems media ...................................................................................... |
1-2 |
Quick Start Guide ...................................................................................................... |
1-3 |
Chapter 2: Physical Setup ..................................................................... |
2-1 |
Unpacking the Printer............................................................................................... |
2-2 |
Printer Orientation..................................................................................................... |
2-3 |
Features of the QLS-4100 Xe..................................................................................... |
2-4 |
Side view ................................................................................................................ |
2-5 |
Rear Panel View .................................................................................................... |
2-6 |
Installing the Media Unwind Mandrel ................................................................... |
2-7 |
Power Connection ..................................................................................................... |
2-8 |
Computer Connections ............................................................................................. |
2-9 |
Centronics Parallel Port........................................................................................ |
2-9 |
RS-232 Serial Port................................................................................................ |
2-10 |
Ethernet Port and TCP/IP Communication..................................................... |
2-11 |
Print Servers......................................................................................................... |
2-12 |
Utility Port Connection ........................................................................................... |
2-13 |
Compressed Air Connection .................................................................................. |
2-14 |
Preparing the Air Regulator .............................................................................. |
2-14 |
Connecting the Air Supply ................................................................................ |
2-14 |
Chapter 3: Loading Media and Calibration ......................................... |
3-1 |
Loading Thermal Transfer Ribbon .......................................................................... |
3-2 |
Loading Label or Tag Media .................................................................................... |
3-4 |
Adjusting the Media Sensor ..................................................................................... |
3-7 |
Calibrating for Media Types .................................................................................... |
3-8 |
Calibrating Gap Media......................................................................................... |
3-8 |
Calibrating Reflective Media............................................................................. |
3-11 |
Calibrating Continuous Media.......................................................................... |
3-13 |
Calibrating Inverted Gap Media....................................................................... |
3-13 |
Chapter 4: Keypad Controls and Menus ............................................. |
4-1 |
Keypad Layout and Functions................................................................................. |
4-2 |
Print/Pause............................................................................................................. |
4-3 |
Form Feed/Advance ............................................................................................. |
4-3 |
Cancel ..................................................................................................................... |
4-3 |
Menu Overview ......................................................................................................... |
4-4 |
Ready State & Adjust Menu ..................................................................................... |
4-9 |
Print Intensity ........................................................................................................ |
4-9 |
QLS-4100 Xe |
i |
Print Speed........................................................................................................... |
4-11 |
Print Line Adjustment ........................................................................................ |
4-12 |
Cross Web Adjustment....................................................................................... |
4-14 |
Vertical Offset ...................................................................................................... |
4-16 |
Horizontal Offset................................................................................................. |
4-17 |
Display Counter .................................................................................................. |
4-19 |
Cut Offset ............................................................................................................. |
4-20 |
Label Reprint ....................................................................................................... |
4-21 |
Form Stop Adjust ................................................................................................ |
4-21 |
Peel Delay............................................................................................................. |
4-22 |
Cal & Setup Menu.................................................................................................... |
4-23 |
Calibrate ............................................................................................................... |
4-23 |
Test Print .............................................................................................................. |
4-24 |
Vertical Baseline .................................................................................................. |
4-25 |
Horizontal Baseline............................................................................................. |
4-26 |
Printer Settings .................................................................................................... |
4-27 |
Variable Maximum Gap..................................................................................... |
4-29 |
Cutter Baseline..................................................................................................... |
4-30 |
Operation Menu....................................................................................................... |
4-31 |
Pull Back............................................................................................................... |
4-31 |
Label Reprint ....................................................................................................... |
4-34 |
Synchronize Labels ............................................................................................. |
4-35 |
Ribbon Menu ............................................................................................................ |
4-37 |
Ribbon Type......................................................................................................... |
4-37 |
Drop/Lift Adjust.................................................................................................. |
4-38 |
Ribbon Sensor...................................................................................................... |
4-40 |
Communications Menu........................................................................................... |
4-41 |
Data Port............................................................................................................... |
4-41 |
Parallel Mode....................................................................................................... |
4-42 |
RS232 Baud Rate.................................................................................................. |
4-43 |
RS232 Handshaking............................................................................................ |
4-44 |
TCP/IP: IP Address ............................................................................................. |
4-45 |
TCP/IP Subnet Mask........................................................................................... |
4-46 |
TCP/IP Gateway.................................................................................................. |
4-47 |
TCP/IP Connections............................................................................................ |
4-48 |
System Menu ............................................................................................................ |
4-49 |
Display Counter .................................................................................................. |
4-49 |
Memory Card - Write Protection ...................................................................... |
4-50 |
Front Panel Lock/Unlock.................................................................................... |
4-51 |
Memory Card - Formatting ............................................................................... |
4-54 |
Time ...................................................................................................................... |
4-55 |
ii |
QLS-4100 Xe |
Date....................................................................................................................... |
4-56 |
Factory Reset........................................................................................................ |
4-57 |
Options Menu........................................................................................................... |
4-59 |
Mirror Mode ........................................................................................................ |
4-59 |
Cutter.................................................................................................................... |
4-60 |
Cut Flag ................................................................................................................ |
4-61 |
Pull Back - Enable/Disable ................................................................................. |
4-63 |
Applicator ............................................................................................................ |
4-65 |
Image Normalization.......................................................................................... |
4-66 |
“No Air” Warning............................................................................................... |
4-67 |
Ignore Host Commands..................................................................................... |
4-68 |
System Configuration......................................................................................... |
4-69 |
Print & Peel .......................................................................................................... |
4-70 |
Chapter 5: Operation.............................................................................. |
5-1 |
Printing with the QLS-4100 Xe................................................................................. |
5-2 |
Powering the Printer On ...................................................................................... |
5-2 |
Operating Without Compressed Air.................................................................. |
5-3 |
Memory Card Detection....................................................................................... |
5-3 |
Printer Indicators ....................................................................................................... |
5-4 |
Error Messages........................................................................................................... |
5-5 |
Color Alignment ........................................................................................................ |
5-9 |
Common Adjustments and Tasks ......................................................................... |
5-11 |
Test Patterns ........................................................................................................ |
5-11 |
Print Line Adjustment........................................................................................ |
5-11 |
Cross Web Adjustment ...................................................................................... |
5-11 |
Advancing the Media ......................................................................................... |
5-11 |
Print Speed........................................................................................................... |
5-11 |
Evaluating Print Quality......................................................................................... |
5-12 |
Enabling and Disabling RibbonRation™.............................................................. |
5-14 |
Printing Labels ......................................................................................................... |
5-15 |
Chapter 6: Advanced Adjustments....................................................... |
6-1 |
Printhead Tangency Alignment............................................................................... |
6-2 |
Printhead Angularity Adjustment .......................................................................... |
6-3 |
Ribbon Wrinkling Adjustments............................................................................... |
6-4 |
Printhead & Drive Station Lift ................................................................................. |
6-6 |
Vertical Baseline......................................................................................................... |
6-7 |
Horizontal Baseline ................................................................................................... |
6-8 |
Chapter 7: Maintenance and Repair .................................................... |
7-1 |
Recommended Tool List ........................................................................................... |
7-2 |
Routine Cleaning ....................................................................................................... |
7-3 |
QLS-4100 Xe |
iii |
Printhead Replacement ............................................................................................. |
7-5 |
Platen Replacement ................................................................................................... |
7-7 |
Drive and Pinch Roller Replacement ...................................................................... |
7-9 |
Drive roll replacement.......................................................................................... |
7-9 |
Pinch Roller Replacement .................................................................................. |
7-10 |
Changing the Fuse or Line Voltage ....................................................................... |
7-11 |
Firmware Upgrades................................................................................................. |
7-12 |
Upgrading additional printers with the CompactFlash card........................ |
7-15 |
Chapter 8: Print & Peel .......................................................................... |
8-1 |
Print & Peel System Overview................................................................................. |
8-2 |
Compatibility Notes.............................................................................................. |
8-2 |
Compatible Media................................................................................................. |
8-3 |
Important Safety Features.................................................................................... |
8-4 |
Print & Peel Installation ............................................................................................ |
8-5 |
Refitting an Existing QLS-4100 Xe ...................................................................... |
8-6 |
Installing the Print & Peel System ...................................................................... |
8-8 |
Print & Peel Setup.................................................................................................... |
8-11 |
Enabling/Disabling Print & Peel ............................................................................ |
8-13 |
Printing and Peeling Labels.................................................................................... |
8-15 |
Adjusting the Liner Guide...................................................................................... |
8-16 |
Liner Guide Adjustment Notes......................................................................... |
8-17 |
Print & Peel Adjustment Options .......................................................................... |
8-19 |
Form Stop Adjust ................................................................................................ |
8-19 |
Peel Delay............................................................................................................. |
8-20 |
Appendix A: Physical Data................................................................... |
A-1 |
Appendix B: Specifications.................................................................. |
B-1 |
Appendix C: Replacement Parts.......................................................... |
C-1 |
Appendix D: Custom QuickLabel® setup ............................................ |
D-1 |
Appendix E: Windows Printer Driver Setup........................................ |
E-1 |
Appendix F: Format error codes .......................................................... |
F-1 |
Appendix G: Menu Structure ............................................................... |
G-1 |
iv |
QLS-4100 Xe |

Chapter 1:
Quick Start
Congratulations ! You have purchased QuickLabel System’s best digital color label printer - ever. The QLS-4100 Xe represents years of careful research and development to perfect digital color label printing technology.
The QLS-4100 Xe represents . . .
QuickLabel Systems’ Best Image Quality - Ever The all-new print station design maintains a high degree of color registration - down to ± 1/2 dot throughout an entire print run.
QuickLabel Systems’ Enhanced RibbonRation™ system which further economizes the use of ribbons making it even more cost-effective for long and short label runs.
QuickLabel Systems’ Easiest Printer to Use featuring a virtually adjustment free platform that ensures consistent, smooth operation and repeatable print quality, day after day.
QuickLabel Systems’ Most Reliable Printer featuring industrial-grade, allmetal construction, large rollers, long-life bearings, and highly accurate media sensing just to name a few enhancements resulting in trouble-free operation.
This Operation and Setup Guide provides all the information you will need to operate and maintain the QLS-4100 Xe. This Quick Start chapter provides a step-by-step guide for experienced or trained users to quickly get up and running.
QLS-4100 Xe |
1-1 |
QuickLabel Systems media
Your QLS-4100 Xe has been designed to provide optimal print quality only when used with Genuine QuickLabel Systems Labels, Tags and Thermal Transfer Ribbon. QuickLabel Systems Thermal Transfer Ribbon is formulated to provide the most vibrant and durable image while helping to maintain long printhead life.
QuickLabel Systems offers a unique media purchase program called a Media Requirements Contract (MRC). With an MRC, your media costs will be tailored to annual usage, not individually-purchased quantity. The benefit to you is fixed low pricing for the products you plan to purchase anyway. The benefit to us is the ability to plan our production more efficiently. You will also receive free printhead replacement for the duration of the contract.
Some benefits of an MRC include:
Flexible Ordering - Order what you need, when you need it. An MRC never locks you into purchasing media you don’t want. There is no minimum spending requirement, no frequency requirement, no advance payment, and you may add new items at any time.
Freeze Your Costs - Your one-year commitment to purchase your ribbons and labels commits us to sell you media only at the contracted price. And, with an MRC your costs will remain fixed, so you can safely budget expenses as far as a year in advance.
Free Printhead Replacement - As an added incentive, QuickLabel Systems guarantees you free and unlimited replacement of all printheads worn by normal use during the life of your contract. You can be confident that your printhead wear will be “normal” because you will be using only the ribbons and labels for which your printer was designed.
Fast Delivery - Your MRC is designed to let you place your label and ribbon orders as you need them, anywhere from a week to a year in advance of shipping. You decide the products you need and leave the rest to us. Your ribbon and labels will arrive on schedule so you never experience production downtime.
Contact your QuickLabel Systems Media Sales Specialist for more information or to enroll in the MRC program.
1-2 |
Quick start |
Quick Start Guide
If you are an experienced user of a QuickLabel Systems Digital Color Printer or you have attended QuickLabel Systems College training, use this Quick Start Guide as a reference to begin producing beautiful color labels immediately.
In general, these operations should be performed in the sequence listed below, skipping over any items that may have been previously completed.
Page 2-2 |
Unpack the printer |
Page 2-7 |
Install the media unwind mandrel |
Page 2-8 |
Connect the AC power cord |
Page 2-9 |
Connect the host computer interface |
Page 2-14 |
Connect the compressed air source |
Page 3-2 |
Load thermal transfer ribbon |
Page 3-4 |
Load label or tag media |
Page 3-7 |
Adjust the media sensor |
Page 3-8 |
Calibrate the printer to the appropriate media type |
Setup software parameters |
|
Appendix D Printing from Custom QuickLabel |
|
Appendix E |
Printing from a Windows application with the QuickLabel |
|
Systems Windows Printer Driver |
QLS-4100 Xe |
1-3 |
1-4 |
Quick start |

Chapter 2:
Physical Setup
This chapter will help you to familiarize yourself with the orientation and components of the QLS-4100 Xe. This chapter also covers the various connections that need to be made to the printer before it can be operated.
This chapter provides the following information:
•Instructions on unpacking and orienting the printer
•An overview of the features and components of the printer
•Instructions for connecting power and communication cables to the printer
•Instructions for connecting compressed air to the printer
QLS-4100 Xe |
2-1 |

Unpacking the Printer
1Remove the printer from the packing carton.
2Ensure that the printer has suffered no visible signs of damage during shipment.
3Verify that the following items have been included in the packing carton:
AC Power Cord |
Centronics Parallel Cable |
|
(IEEE-1284) |
Media Retainer |
Memory Card |
||
|
|
|
|
|
|
|
|
Warranty Registration Card |
Operation & Setup Guide |
Windows Printer Driver CD
Note: Retain all packaging should the printer need to be transported at a later time.
2-2 |
Physical setup |
Printer Orientation
The illustration below is provided to orient you to the QLS-4100 Xe printer. The keypad and display is the printer’s user interface.
QLS-4100 Xe |
2-3 |
Features of the QLS-4100 Xe
Facing the left side of the QLS-4100 Xe with its cover lifted, you can view the media unwind, print stations, and related mechanical parts.
The items below identify the QLS-4100 Xe components as shown in the sideview illustration on the following page:
1Media Retainer
2Media Supply Mandrel
3Thermal Transfer Ribbon Rewind - print station # 4
4Thermal Transfer Ribbon Supply - print station # 4
5Thermal Transfer Ribbon Rewind - print station # 3
6Thermal Transfer Ribbon Supply - print station # 3
7Thermal Transfer Ribbon Rewind - print station # 2
8Thermal Transfer Ribbon Supply - print station # 2
9Thermal Transfer Ribbon Rewind - print station # 1
10Thermal Transfer Ribbon Supply - print station # 1
11Print Station Lift Lever
12Drive Roller Lift Lever
13Drive Roller
14Pinch Roller
15Print Station # 1
16Print Station # 2
17Print Station # 3
18Print Station # 4
19Media Speed Roller
20Media Sensor Assembly - Gap and Reflective
21Lower Media Guide Roller
22Media Dancer Arm
23Upper Media Guide Roller
2-4 |
Physical setup |

Side view
QLS-4100 Xe |
2-5 |
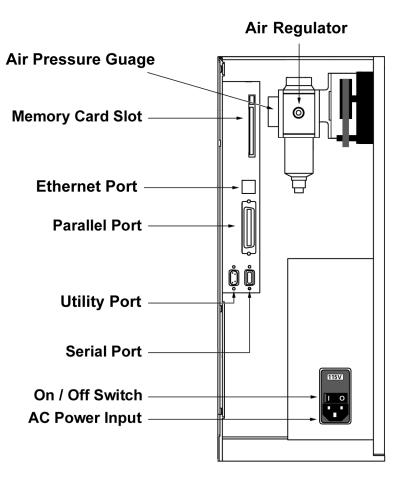
Rear Panel View
Facing the rear panel of the printer, you will observe the air intake regulator, power connection, and other interface connections as shown in the illustration below.
2-6 |
Physical setup |

Installing the Media Unwind Mandrel
Your QLS-4100 Xe was shipped with the media unwind mandrel uninstalled to protect it from damage during transit. The mandrel is easily installed by following the procedure outlined below.
Tools Needed:
1/8” Allen Wrench
1Slide the media unwind mandrel onto the shaft until the back plate flange is seated firmly against the collar located on the inside of the shaft. The outside of the shaft should be flush with the surface of the mandrel.
2Firmly tighten the supplied Allen set screw against the shaft.
QLS-4100 Xe |
2-7 |

Power Connection
1Locate the AC Power Input at the bottom of the rear panel.
2Plug the power cord into the printer. Be sure to use only the AC Power Cord supplied with the printer. Ensure that the power switch is in the OFF position before proceeding to the next step.
3Connect the opposite end of the AC Power Cord into an earth grounded AC receptacle. Do not power the printer on until you have finished making the remaining connections described in this chapter.
Warning: Do not use any type of receptacle adapter or AC Power Cord that has not been supplied with the unit. Doing so can result in damage to the printer.
Note: The printer has been set at the factory for the correct line voltage for your country. The voltage setting can be viewed in a window at the top of the AC Power Input. If this setting needs to be changed, refer to the procedure in Chapter 7 of this manual.
Note: It is recommended that an AC line conditioner / surge suppressor is used. Select a unit that is capable of handling the power requirements of the printer and protecting from surges and spikes. A VA rating of at least 1350 VA is required.
2-8 |
Physical setup |

Computer Connections
The parallel interface is normally the primary method of sending data from the host computer to the printer. A high-speed parallel cable (IEEE-1284) is supplied with the printer.
The RS-232 Serial Port is a secondary method of sending data to the printer, if a parallel port is not available on the host. Data transmission via the serial port is much slower and therefore, the parallel port is recommended.
An ethernet connection is also available to provide a high-speed, bi-directional connection to the printer in networked environments.
Centronics Parallel Port
1Using the parallel cable supplied with the printer, connect the larger connector to the parallel port on the printer.
Note: Only the supplied parallel or high-speed IEEE-1284 parallel cable should be used to ensure reliable performance. This cable should be stamped with an “IEEE-1284” marking to indicate that it is a high-speed parallel cable.
2Lock the two metal rings on the parallel port into the connector to secure it to the printer.
3Connect the opposite end of the parallel cable to the host computer. Be sure to note which port (LPT1, LPT2, etc.) you have connected the printer to as this will later be needed for driver or software setup.
Note: The maximum recommended parallel cable length is 10 feet (3 m).
QLS-4100 Xe |
2-9 |
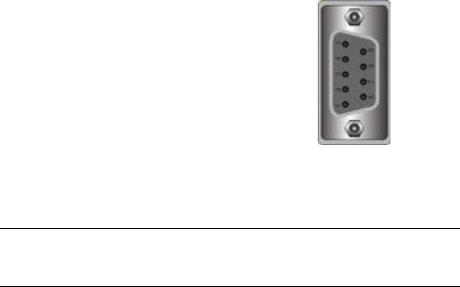
RS-232 Serial Port
1Using a standard (straight through connection) RS-232 serial cable, connect the appropriate mating end of the cable into the printer.
2Tighten the cable securing screws into the serial port to secure the cable to the printer.
3Connect the opposite end of the serial cable to the host computer. Be sure to note which port (COM1, COM2, etc.) you have connected the printer to as this will later be needed for software setup.
Pin Assignments |
|
|
|
Pin |
Signal |
5 |
|
1 |
N/C |
9 |
|
|
|
|
|
2TXD
3RXD
4 |
DTR |
6 |
5 |
GND |
1 |
|
6DSR
7RTS
8CTS
9N/C
Note: The maximum RS-232 serial cable length is dependent on the communication parameters being used. For best performance and reliability, only serial cables supplied by QuickLabel Systems should be used.
2-10 |
Physical setup |
Ethernet Port and TCP/IP Communication
The QLS-4100 Xe is a 10Base-T device that provides a 10Mbps ethernet connection. Using hubs and routers, the printer can be connected directly into a network using standard Category 5 (CAT5) cable or similar with a RJ-45 connector.
TCP/IP (Transmission Control Protocol/Internet Protocol) communication provides a direct link to the QLS-4100 Xe printer via the ethernet port. Using standard twisted-pair wiring, the printer can be connected to your existing network and shared by all network users.
This method of communication provides a fast, bi-directional, real-time link to the printer. However, it does not provide print server functionality. If you require print server functionality and protocols other than TCP/IP, refer to the following section for print server information.
Every ethernet device on the network contains a unique ethernet address known as the MAC address. This address is programmed at the factory and cannot be modified. Additionally, each device contains a TCP/IP layer identified by a configurable IP address. Every TCP/IP device on the network contains a unique IP address.
Your network administrator must assign IP addresses for your QLS-4100 Xe printers. This is a common task performed on computers, printers, fax machines, etc. to identify the devices by their unique IP addresses. The QLS-4100 Xe printer does not support Dynamic Host Configuration Protocol (DHCP), which automatically assigns an IP address to each device on the network.
For simple printer/computer networks, you can assign IP addresses and subnet masks manually and ensure that all devices are identified by unique addresses. The default gateway address can remain at the default factory setting of 0.0.0.0.
For detailed information on the topic of networking, refer to documentation applicable to your network environment and/or contact your network administrator.
QLS-4100 Xe |
2-11 |
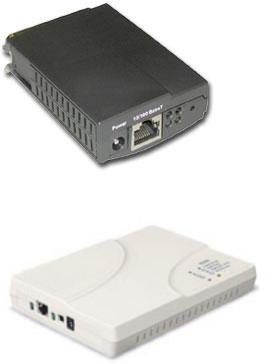
Print Servers
The QLS-4100 Xe can be connected to a Local Area Network (LAN) using an appropriate external print server.
The print server must be capable of passing ASCII data to the printer without corrupting or modifying the data stream. Any printer language emulations such as PostScript™ or PCL™ should be disabled.
QuickLabel Systems can supply a compatible print server to be used in PCbased or midrange/mainframe-based host environments. Please contact QuickLabel Systems for additional information.
QuickLabel Systems PS-ENET Print Server for Windows Networks.
QuickLabel Systems Print Server for AS/400 Networks.
2-12 |
Physical setup |
 Loading...