

QuickLabel QL-60, QL-30 User Manual

USER GUIDE
QLB180 20170918
www.quicklabel.com
Toll-Free: 877-757-7978
Tel: +1 401-828-4000


QL-30/60 User Guide
Part Number 22834676-EN-E
Revision 1.1
10/2017
QuickLabel, An AstroNova™ Division
World Headquarters
600 East Greenwich Ave., West Warwick, RI 02893
Tel: (877) 757-7978 Fax: (401) 822-2430
E-mail: info@QuickLabel.com
www.QuickLabel.com
Technical Support
Tel: (877) 757-7310
E-mail: support@QuickLabel.com
www.QuickLabel.com/support/

Copyright © 2017 AstroNova ®, Inc.
This manual is copyrighted with all rights reserved. No part of this manual may be reproduced,
transmitted, transcribed, stored in a retrieval system, or translated into any language in any
form by any means without written permission of QuickLabel.
Trademarks
QL-30®, QL-60® and Custom QuickLabel Omni® are registered trademarks of AstroNova, Inc.
Windows® is a registered trademark of the Microsoft Corporation.
TrueType® is a registered trademark of Apple Computer, Inc.
ZPL® is a registered trademark of Zebra Technologies Inc.
QL-30/60 Printer Limited Warranty
QuickLabel, an AstroNova Division, warrants all components of this product, except wear parts
and consumables, against defects in materials or workmanship for a period of one (1) year from
the date of original purchase. Wear parts include the printhead and print platen. This warranty
also excludes any cutter blade that may be incorporated in a cutter accessory installed in,
integrated with or attached to the printer. If the customer discovers a defect, this defect must
be reported promptly to QuickLabel. QuickLabel will, at its option, repair the printer or repair or
replace its defective component(s) at no additional charge under our QuickSwap™ Parts
Service. Repair parts and replacement parts will be furnished on an exchange basis and will
be either reconditioned or new. The customer is responsible for freight to return the printer or
component to our factory. We will ship the repaired or replaced printer or component back to
you via standard ground freight service. All replaced parts become the property of QuickLabel.
Travel, freight and other expenses related to warranty repairs are not covered.
The printer warranty excludes the cost to repair damage to the product caused by labels, tags
or thermal transfer ribbons that are not compatible with the product. This warranty is void if the
product has been damaged by accident, abuse, neglect or misapplication, or if the product has
been improperly installed or maintained, or if the product has been used outside of its
environmental specifications, or if the product has been modified without the express written
permission of QuickLabel.
QuickLabel makes no warranty, either express or implied, with respect to this product's
merchantability or fitness for a particular purpose. In no event shall QuickLabel be held liable
for any direct, indirect, special, incidental, or consequential damages, whether based on a
contract, tort, or any other legal theory and whether advised of the possibility of such damages.
QL-30/60 Printhead and Platen Warranty
QuickLabel Systems warrants the printhead and the platen from the date of purchase for a
period of 90 days or for 1 million inches of thermal transfer ribbon, whichever comes first,
contingent upon the use of QuickLabel thermal transfer ribbon. QuickLabel printheads are
calibrated for use with QuickLabel thermal transfer ribbon and perform optimally only when
used with this ribbon. This specific Printhead and Platen Warranty does not apply to printheads
damaged by accident, abuse, neglect, misapplication or the like.

Contact Information
World Headquarters
600 East Greenwich Ave.
West Warwick, RI 02893 USA
Toll-Free: 877-757-7978 | Tel: +1 401-828-4000
quicklabel.com
European Headquarters
Waldstrasse 70
63128 Dietzenbach | Germany
Tel: +49 (0) 6074-31025-00
quicklabel.de
Canada
3505 Rue Isabelle
Suite O
Brossard, QC J4Y 2R2
Tel: +1 800-565-2216
quicklabel.ca
Latin America
Av Insurgentes Sur No 1602, 4º Piso
Suite 467
Col. Credito Constructor
Ciudad de Mexico CDMX 03940
Mexico
Tel: +52 55 1000-9116
quicklabel.com/es
Denmark
Marielundvej 46A, 2.
2730 Herlev
Tel: +45 29 64 00 05
trojanlabel.com
France
Parc Euclide
ZA la Clef de St Pierre
10A Rue Blaise Pascal
78990 Elancourt
Tel: +33 (1) 34 82 09 00
quicklabel.fr
United Kingdom
A5 Westacott Business Centre
Westacott Way, Maidenhead
Berkshire, SL6 3RT
Tel: +44 (0) 1628 668836
quicklabel.co.uk

China
1F, Bldg2#,
458 North Fu Te Road,
Shanghai Waigaoqiao F.T.Z., 200131
Tel: +86 21 5868 2809
quicklabel.cn
Ownership Information
Congratulations and thank you for your business. Your purchase of a QuickLabel digital label
printer is an investment in production flexibility and packaging efficiency. Please record the
model number and serial number of your product.
FCC Part 15 Compliance
NOTE: This equipment has been tested and found to comply with the limits for a Class A digital
device, pursuant to part 15 of the FCC rules. These limits are designed to provide reasonable
protection against interference in a residential installation. This equipment generates, uses, and
can radiate radio frequency energy and, if not installed and used in accordance with the
instruction manual, may cause interference to radio communications. However, there is no
guarantee that interference will not occur in a particular installation.
If this equipment does cause interference to radio or television reception, which can be
determined by turning the equipment off and on, the user is encouraged to try to correct the
interference by one or more of the following measures:
• Reorient or relocate the receiving antenna.
• Increase the separation between the equipment and receiver.
• Connect the equipment into an outlet on a circuit different from that to which the receiver is
connected.
• Consult the dealer or an experienced radio/TV technician for help.
CAUTION: Changes or modifications to this equipment not expressly approved by the party
responsible for compliance could void the user's authority to operate the equipment.
RoHS2 Compliance
The QL-30/60 Label Printer does not contain the substances specified within ANNEX II of
“Directive 2011/65/EU of the European Parliament and of the Council of 8 June 2011 on the
restriction of the use of certain hazardous substances in electrical and electronic equipment
(RoHS)”, that is, lead, mercury, cadmium, hexavalent chromium, polybrominated biphenyls
(PBB) and polybrominated diphenyl ethers (PBDE) exceeding their specified maximum
concentration values tolerated by weight in homogeneous materials, except for the exemptions
set in ANNEX Ill of the Directive and its amendments.
This information is offered in good faith to the best of our knowledge, but is subject to revision
as new information becomes available.
Declaration of Conformity
Declaration de Conformité
Ubereinstimmungserklärung
Dichiarazione di Conformità
ID DoC-22834676
Manufacturer’s name and address
Nom et adresse du fabricant
Hersteller
Nome del costruttore
Model No.
Modele No.
Model Nr.
Modello No.
Description of Products
Description des produits
Produktbeschreibungen
Descrizione dei Prodotti
Standards to which conformity is declared
Standards auquel la conformité appartient
Normen für welche Übereinstimmung erklärt wird
Norme per le quali si dichiara la conformità
Application of Council Directives
Application des Decisions du Conseil
Anwendbar fur die Richtlinien
Applicazione delle Direttive del Comitato
AstroNova, Inc.
600 East Greenwich Avenue
West Warwick, RI 02893 USA
QL-30
QL-60
QL-30P
QL-60P
QL-30M
QL-60M
QL-30MP
QL-60MP
Color Label Printer
EN 60950-1:2006+A11:2009+A12:2011+A1:2010+A2:2013
EN 55032:2012
EN 55024:2010
EN 61000-3-2:2014
EN 61000-3-3:2013
EN 61000-6-2:2005
EN 50581:2012
2014/35/EU
2014/30/EU
2011/65/EU
I, the undersigned, hereby declare that the equipment specified above conforms to the above Directive and Standard.
Je, Soussigné, déclare que l’équipment spécifié ci-dessus est en conformité avec la directive et le standard ci-dessus.
Ich, der unterzeichnende erkläre hiermit, daß das oben beschriebene Gerät den vorgenannten Richtlinien und Normen entspricht.
Il sottoscritto dichiara che l’apparecchio sopra specificato è conforme alle Direttive e Norme sopra specificate.
Steven Holbrook
Quality Assurance Manager
AstroNova, Inc.
European Contact: Your local AstroNova, Inc. Sales and Service Office.
FRANCE - Parc Euclide, ZA la Clef de St Pierre, 10A Rue Blaise Pascal 78990 Elancourt
Tel: (+33) 1 34 82 09 00, Fax: (+33) 1 34 82 05 71
GERMANY - Waldstraße 70, D-63128 Dietzenbach
Tel. +49 (0) 6074 31 025-00, Fax: +49 (0) 6074 31 025-99
UNITED KINGDOM - Westacott Way, Maidenhead Berkshire, SL6 3RT
Tel: +44 (0)1628 668836 • Fax: +44 (0)1628 664994
Date of issue: 10/10/2017
Place of issue: West Warwick, RI

QL-30/60 User Guide 9

Contents
Part 1: Operation . . . . . . . . . . . . . . . . . . . . . . . . . . . . . . . .15
Chapter 1: Introduction . . . . . . . . . . . . . . . . . . . . . . . . . . . . . . . . . . . . . . . 17
Instructions . . . . . . . . . . . . . . . . . . . . . . . . . . . . . . . . . . . . . . . . 17
Intended Use . . . . . . . . . . . . . . . . . . . . . . . . . . . . . . . . . . . . . . .17
Safety Instructions . . . . . . . . . . . . . . . . . . . . . . . . . . . . . . . . . . . . 17
Environment . . . . . . . . . . . . . . . . . . . . . . . . . . . . . . . . . . . . . . .18
Chapter 2: Installation . . . . . . . . . . . . . . . . . . . . . . . . . . . . . . . . . . . . . . . 19
Device Overview . . . . . . . . . . . . . . . . . . . . . . . . . . . . . . . . . . . . . 19
Overview . . . . . . . . . . . . . . . . . . . . . . . . . . . . . . . . . . . . 19
Print unit . . . . . . . . . . . . . . . . . . . . . . . . . . . . . . . . . . . . . 20
Connections . . . . . . . . . . . . . . . . . . . . . . . . . . . . . . . . . . . 21
Unpacking and Setting-up the Printer . . . . . . . . . . . . . . . . . . . . . . . . . . 22
Installing the WLAN stick . . . . . . . . . . . . . . . . . . . . . . . . . . . . . . . . 22
Connecting the Device . . . . . . . . . . . . . . . . . . . . . . . . . . . . . . . . . . 23
Connecting to the Power Supply . . . . . . . . . . . . . . . . . . . . . . . . 23
Connecting to a Computer or Computer Network . . . . . . . . . . . . . . . . 23
Switching on the Device . . . . . . . . . . . . . . . . . . . . . . . . . . . . . . . . . 23
Chapter 3: Touchscreen Display . . . . . . . . . . . . . . . . . . . . . . . . . . . . . . . . . .25
Start Screen . . . . . . . . . . . . . . . . . . . . . . . . . . . . . . . . . . . . . . .25
Structure of the Menu . . . . . . . . . . . . . . . . . . . . . . . . . . . . . . . . . . 29
Navigation in the Menu . . . . . . . . . . . . . . . . . . . . . . . . . . . . . . . . . 32
Service Key . . . . . . . . . . . . . . . . . . . . . . . . . . . . . . . . . . . . . . .35
Chapter 4: Loading Media . . . . . . . . . . . . . . . . . . . . . . . . . . . . . . . . . . . . . 37
Loading Roll Media . . . . . . . . . . . . . . . . . . . . . . . . . . . . . . . . . . . 37
Positioning the Media Roll on the Roll Retainer . . . . . . . . . . . . . . . . . 37

Contents
Inserting the Media Strip into the Printhead . . . . . . . . . . . . . . . . . . . 38
Setting the Label Sensor . . . . . . . . . . . . . . . . . . . . . . . . . . . . 39
Winding up the Media Strip in Rewind Mode . . . . . . . . . . . . . . . . . . 40
Removing the Wound Roll . . . . . . . . . . . . . . . . . . . . . . . . . . . 41
Winding up the Liner in Peel-Off mode . . . . . . . . . . . . . . . . . . . . . 42
Loading Fanfold Media . . . . . . . . . . . . . . . . . . . . . . . . . . . . . . . . . . 43
Setting the Head Locking System . . . . . . . . . . . . . . . . . . . . . . . . . . . . 44
QL-30, QL-60, QL-30P, QL-60P . . . . . . . . . . . . . . . . . . . . . . . . 44
QL-30M, QL-60M, QL-30MP, QL-60MP . . . . . . . . . . . . . . . . . . . . 45
Removing and Installing the Rewind Guide Plate, Dispense Plate or Tear-off
Plate . . . . . . . . . . . . . . . . . . . . . . . . . . . . . . . . . . . . . . . . . . . 46
Removing a plate . . . . . . . . . . . . . . . . . . . . . . . . . . . . . . . . 46
Installing a plate . . . . . . . . . . . . . . . . . . . . . . . . . . . . . . . . . 46
Loading Transfer Ribbon . . . . . . . . . . . . . . . . . . . . . . . . . . . . . . . . . 47
Setting the Feed Path of the Transfer Ribbon . . . . . . . . . . . . . . . . . . . . . . 48
Chapter 5: Printing Operation . . . . . . . . . . . . . . . . . . . . . . . . . . . . . . . . . . . 49
Synchronization of the Media Feed . . . . . . . . . . . . . . . . . . . . . . . . . . . 49
Tear-off Mode . . . . . . . . . . . . . . . . . . . . . . . . . . . . . . . . . . . . . .49
Peel-off Mode . . . . . . . . . . . . . . . . . . . . . . . . . . . . . . . . . . . . . .50
Internal Rewinding . . . . . . . . . . . . . . . . . . . . . . . . . . . . . . . . . . . . 50
Chapter 6: Cleaning . . . . . . . . . . . . . . . . . . . . . . . . . . . . . . . . . . . . . . . . . 51
Cleaning Information . . . . . . . . . . . . . . . . . . . . . . . . . . . . . . . . . . . 51
Cleaning the Print Roller . . . . . . . . . . . . . . . . . . . . . . . . . . . . . . . . . 51
Cleaning the Printhead . . . . . . . . . . . . . . . . . . . . . . . . . . . . . . . . . . 51
Cleaning the Label Sensor . . . . . . . . . . . . . . . . . . . . . . . . . . . . . . . . 52
Chapter 7: Fault Correction . . . . . . . . . . . . . . . . . . . . . . . . . . . . . . . . . . . . 53
Error Display . . . . . . . . . . . . . . . . . . . . . . . . . . . . . . . . . . . . . . .53
Error Messages and Fault Correction . . . . . . . . . . . . . . . . . . . . . . . . . . 54
Problem Solution . . . . . . . . . . . . . . . . . . . . . . . . . . . . . . . . . . . . . 57
Chapter 8: Media . . . . . . . . . . . . . . . . . . . . . . . . . . . . . . . . . . . . . . . . . . 59
Media Dimensions . . . . . . . . . . . . . . . . . . . . . . . . . . . . . . . . . . . . 59
Device Dimensions . . . . . . . . . . . . . . . . . . . . . . . . . . . . . . . . . . . 61
Reflective Mark Dimensions . . . . . . . . . . . . . . . . . . . . . . . . . . . . . . . 63
Cut-out Mark Dimensions . . . . . . . . . . . . . . . . . . . . . . . . . . . . . . . . 64
Part 2: Configuration . . . . . . . . . . . . . . . . . . . . . . . . . . . . . .67
Chapter 9: Connecting Label Printer to Computer . . . . . . . . . . . . . . . . . . . . . . . . 69
Print Services Raw-IP and LPR/LPD in MS Windows . . . . . . . . . . . . . . . . . . 70
Adjusting Windows Printer Setting . . . . . . . . . . . . . . . . . . . . . . . . . . . . 70
Connecting Label Printer via Ethernet Interface . . . . . . . . . . . . . . . . . . . . . 70
Setting Up a WLAN Connection . . . . . . . . . . . . . . . . . . . . . . . . . . . . . 71
Connecting Label Printer via USB Interface . . . . . . . . . . . . . . . . . . . . . . . 71
Connecting Label Printer via RS-232 interface . . . . . . . . . . . . . . . . . . . . . 72
Setting Up a Bluetooth Connection . . . . . . . . . . . . . . . . . . . . . . . . . . . 73
10 QL-30/60 User Guide

Contents
Chapter 10: Info . . . . . . . . . . . . . . . . . . . . . . . . . . . . . . . . . . . . . . . . . . . . 75
Chapter 11: Security . . . . . . . . . . . . . . . . . . . . . . . . . . . . . . . . . . . . . . . . . 77
Chapter 12: Configuration . . . . . . . . . . . . . . . . . . . . . . . . . . . . . . . . . . . . . . 79
Configuration via Control Panel . . . . . . . . . . . . . . . . . . . . . . . . . . . . . 79
Printing . . . . . . . . . . . . . . . . . . . . . . . . . . . . . . . . . . . . . 79
Labels . . . . . . . . . . . . . . . . . . . . . . . . . . . . . . . . . . . . . . 82
Ribbon . . . . . . . . . . . . . . . . . . . . . . . . . . . . . . . . . . . . . . 83
Tearing-off . . . . . . . . . . . . . . . . . . . . . . . . . . . . . . . . . . . . 83
Cutting . . . . . . . . . . . . . . . . . . . . . . . . . . . . . . . . . . . . . . 84
Peeling-off . . . . . . . . . . . . . . . . . . . . . . . . . . . . . . . . . . . . 85
Labeling . . . . . . . . . . . . . . . . . . . . . . . . . . . . . . . . . . . . . 85
Interfaces . . . . . . . . . . . . . . . . . . . . . . . . . . . . . . . . . . . . 87
Errors . . . . . . . . . . . . . . . . . . . . . . . . . . . . . . . . . . . . . . 91
Region . . . . . . . . . . . . . . . . . . . . . . . . . . . . . . . . . . . . . . 92
Time . . . . . . . . . . . . . . . . . . . . . . . . . . . . . . . . . . . . . . . 93
Display . . . . . . . . . . . . . . . . . . . . . . . . . . . . . . . . . . . . . 94
Interpreter . . . . . . . . . . . . . . . . . . . . . . . . . . . . . . . . . . . . 94
ZPL . . . . . . . . . . . . . . . . . . . . . . . . . . . . . . . . . . . . . . . 95
Configuration via the Web Interface . . . . . . . . . . . . . . . . . . . . . . . . . . . 95
Calling Up the Web Interface . . . . . . . . . . . . . . . . . . . . . . . . . . 95
Status Tab . . . . . . . . . . . . . . . . . . . . . . . . . . . . . . . . . . . . 96
Setup Tab . . . . . . . . . . . . . . . . . . . . . . . . . . . . . . . . . . . . 97
Security Tab . . . . . . . . . . . . . . . . . . . . . . . . . . . . . . . . . . . 98
Devices Tab . . . . . . . . . . . . . . . . . . . . . . . . . . . . . . . . . . . 99
Fonts Tab . . . . . . . . . . . . . . . . . . . . . . . . . . . . . . . . . . . 100
Help Menu . . . . . . . . . . . . . . . . . . . . . . . . . . . . . . . . . . . 101
Chapter 13: Test Functions . . . . . . . . . . . . . . . . . . . . . . . . . . . . . . . . . . . . 103
Overview . . . . . . . . . . . . . . . . . . . . . . . . . . . . . . . . . . . . . . . . 103
Status Print . . . . . . . . . . . . . . . . . . . . . . . . . . . . . . . . . . . . . . . 103
Font list . . . . . . . . . . . . . . . . . . . . . . . . . . . . . . . . . . . . . . . . . 104
Device List . . . . . . . . . . . . . . . . . . . . . . . . . . . . . . . . . . . . . . . 105
Test Grid . . . . . . . . . . . . . . . . . . . . . . . . . . . . . . . . . . . . . . . . 107
WiFi Status . . . . . . . . . . . . . . . . . . . . . . . . . . . . . . . . . . . . . . . 108
Chapter 14: Diagnostic Functions . . . . . . . . . . . . . . . . . . . . . . . . . . . . . . . . . 111
ASCII Dump Mode . . . . . . . . . . . . . . . . . . . . . . . . . . . . . . . . . . . 111
Example . . . . . . . . . . . . . . . . . . . . . . . . . . . . . . . . . . . . 112
Label Profile . . . . . . . . . . . . . . . . . . . . . . . . . . . . . . . . . . . . . . 112
Event Log . . . . . . . . . . . . . . . . . . . . . . . . . . . . . . . . . . . . . . . 114
Save Data Stream . . . . . . . . . . . . . . . . . . . . . . . . . . . . . . . . . . . 115
Save Print Image . . . . . . . . . . . . . . . . . . . . . . . . . . . . . . . . . . . . 116
Save System Log . . . . . . . . . . . . . . . . . . . . . . . . . . . . . . . . . . . 117
Chapter 15: Extras . . . . . . . . . . . . . . . . . . . . . . . . . . . . . . . . . . . . . . . . . 119
Firmware Update . . . . . . . . . . . . . . . . . . . . . . . . . . . . . . . . . . . . 119
Save Settings . . . . . . . . . . . . . . . . . . . . . . . . . . . . . . . . . . . . . 119
Load Settings . . . . . . . . . . . . . . . . . . . . . . . . . . . . . . . . . . . . . 120
Reset Settings . . . . . . . . . . . . . . . . . . . . . . . . . . . . . . . . . . . . . 120
Reset Passwords . . . . . . . . . . . . . . . . . . . . . . . . . . . . . . . . . . . 121
QL-30/60 User Guide 11

Contents
Cleaning Interval . . . . . . . . . . . . . . . . . . . . . . . . . . . . . . . . . . . . 121
Legal Notices . . . . . . . . . . . . . . . . . . . . . . . . . . . . . . . . . . . . . 122
Chapter 16: Help . . . . . . . . . . . . . . . . . . . . . . . . . . . . . . . . . . . . . . . . . . 123
Chapter 17: Service Functions . . . . . . . . . . . . . . . . . . . . . . . . . . . . . . . . . . 125
Reset Service Counter . . . . . . . . . . . . . . . . . . . . . . . . . . . . . . . . . 125
Calibrate Label Sensor . . . . . . . . . . . . . . . . . . . . . . . . . . . . . . . . . 125
Length Correction . . . . . . . . . . . . . . . . . . . . . . . . . . . . . . . . . . . 126
Printer Model . . . . . . . . . . . . . . . . . . . . . . . . . . . . . . . . . . . . . . 126
Chapter 18: I/O Interface . . . . . . . . . . . . . . . . . . . . . . . . . . . . . . . . . . . . . . 127
Pin Assignment . . . . . . . . . . . . . . . . . . . . . . . . . . . . . . . . . . . . 127
Circuit Diagram of Inputs and Outputs . . . . . . . . . . . . . . . . . . . . . . . . . 130
Solution Examples . . . . . . . . . . . . . . . . . . . . . . . . . . . . . . . . . . . 131
Peeling-off on Demand with Present Sensor PS800 / PS900 . . . . . . . . . 131
Peeling-off on Demand without Present Sensor . . . . . . . . . . . . . . . 133
Cutting on Demand with Cutter CU400 . . . . . . . . . . . . . . . . . . . . 139
Pausing and Continuing a Print Job . . . . . . . . . . . . . . . . . . . . . . 141
Chapter 19: FTP Printer Management . . . . . . . . . . . . . . . . . . . . . . . . . . . . . . . 143
FTP Login . . . . . . . . . . . . . . . . . . . . . . . . . . . . . . . . . . . . . . . 143
FTP Printing . . . . . . . . . . . . . . . . . . . . . . . . . . . . . . . . . . . . . . 143
FTP Access to Storage Devices . . . . . . . . . . . . . . . . . . . . . . . . . . . . 144
FTP Firmware Update . . . . . . . . . . . . . . . . . . . . . . . . . . . . . . . . . 144
Chapter 20: Storage Devices . . . . . . . . . . . . . . . . . . . . . . . . . . . . . . . . . . . 145
Suitable Storage Devices . . . . . . . . . . . . . . . . . . . . . . . . . . . . . . . 145
Installation . . . . . . . . . . . . . . . . . . . . . . . . . . . . . . . . . . . . . . . 145
Directory Structure . . . . . . . . . . . . . . . . . . . . . . . . . . . . . . . . . . . 145
Writing . . . . . . . . . . . . . . . . . . . . . . . . . . . . . . . . . . . . . . . . . 146
Example . . . . . . . . . . . . . . . . . . . . . . . . . . . . . . . . . . . . 146
Storage Device Functions . . . . . . . . . . . . . . . . . . . . . . . . . . . . . . . 146
Load Label . . . . . . . . . . . . . . . . . . . . . . . . . . . . . . . . . . 146
Print File List . . . . . . . . . . . . . . . . . . . . . . . . . . . . . . . . . 147
Copy Files . . . . . . . . . . . . . . . . . . . . . . . . . . . . . . . . . . . 147
Format Storage . . . . . . . . . . . . . . . . . . . . . . . . . . . . . . . . 148
Default Storage . . . . . . . . . . . . . . . . . . . . . . . . . . . . . . . . 148
Chapter 21: Remote Access via VNC . . . . . . . . . . . . . . . . . . . . . . . . . . . . . . . 149
Preparing the Computer . . . . . . . . . . . . . . . . . . . . . . . . . . . . . . . . 149
Preparing the Printer . . . . . . . . . . . . . . . . . . . . . . . . . . . . . . . . . . 149
Establishing a Connection . . . . . . . . . . . . . . . . . . . . . . . . . . . . . . . 149
Chapter 22: External Keyboard . . . . . . . . . . . . . . . . . . . . . . . . . . . . . . . . . . 151
Connecting External Keyboard . . . . . . . . . . . . . . . . . . . . . . . . . . . . 151
Keyboard Assignment . . . . . . . . . . . . . . . . . . . . . . . . . . . . . . . . . 151
Special Key Functions . . . . . . . . . . . . . . . . . . . . . . . . . . . . . . . . . 152
General . . . . . . . . . . . . . . . . . . . . . . . . . . . . . . . . . . . . 152
In the menu and for entry of variable data . . . . . . . . . . . . . . . . . . 153
12 QL-30/60 User Guide

Contents
Chapter 23: Firmware Updater . . . . . . . . . . . . . . . . . . . . . . . . . . . . . . . . . . . 155
Index . . . . . . . . . . . . . . . . . . . . . . . . . . . . . . . . . . . . . . . . . . 157
QL-30/60 User Guide 13

Contents
14 QL-30/60 User Guide

Part 1
This part provides information about printer operations. This part contains the following
chapters:
• “Introduction” on page 17
• “Installation” on page 19
• “Touchscreen Display” on page 25
• “Loading Media” on page 37
• “Printing Operation” on page 49
Operation
• “Cleaning” on page 51
• “Fault Correction” on page 53
• “Media” on page 59
QL-30/60 User Guide 15

16 QL-30/60 User Guide

1
Instructions
Important information and instructions in this documentation are designated as follows:
Danger: Draws attention to an exceptionally great, imminent danger to your health o r life due
to hazardous voltages. Draws attention to a danger with high risk which, if not avoided, may
result in death or serious injury.
Warning: Draws attention to a danger with medium risk which, if not avoided, may result in
death or serious injury.
Caution: Draws attention to a danger with low risk which, if not avoided, may result in minor
or moderate injury.
Attention: Draws attention to potential risks of property damage or loss of quality.
Note: Advice to make work routines easier or on important steps to be carried out.
Intended Use
Introduction
• The device is manufactured in accordance with the current technological status and the
recognized safety rules. However, danger to the life and limb of the user or third parties
and/or damage to the device and other tangible assets can arise during use.
• The device may only be used for its intended purpose and if it is in perfect working order,
and it must be used with regard to safety and dangers as stated in the user guide.
• The device is intended exclusively for printing suitable materials that have been approved
by the manufacturer. Any other use or use going beyond this shall be regarded as improper
use. The manufacturer/supplier shall not be liable for damage resulting from unauthorized
use; the user shall bear the risk alone.
• Usage for the intended purpose also includes complying with the user guide, including the
manufacturer‘s maintenance recommendations and specifications.
Safety Instructions
• The device is configured for voltages of 100 to 240 V AC. It must be plugged into a
grounded socket.
• Only connect the device to other devices which have a protective low voltage.
• Switch off all affected devices (computer, printer, accessories) before connecting or
disconnecting.
• The device may only be used in a dry environment. Do not expose it to moisture (sprays of
water, mists, etc.).
• Do not use the device in an explosive atmosphere.
QL-30/60 User Guide 17

Introduction
• Do not use the device close to high-voltage power lines.
• If the device is operated with the cover open, ensure that people‘s clothing, hair, jewelry
etc. do not come into contact with the exposed rotating parts.
• The device or parts of it can become hot while printing. Do not touch during operation, and
allow to cool down before changing material and before disassembly.
• Risk of crushing when closing the cover. Touch the cover at the outside only. Do not reach
into the swivel range of the cover.
• Perform only those actions described in this user guide. Work going beyond this may only
be performed by trained personnel or service technicians.
• Unauthorized interference with electronic modules or their software can cause
malfunctions.
• Other unauthorized work on or modifications to the device can also endanger operational
safety.
• Always have service work done in a qualified workshop, where the personnel have the
technical knowledge and tools required to do the necessary work.
• There are various warning stickers on the device. They draw your attention to dangers.
Warning stickers must therefore not be removed, as then you and other people cannot be
aware of dangers and may be injured.
• The maximum sound pressure level is less than 70 dB(A).
Danger: Danger to life and limb from power supply. Do not open the device casing.
Warning: This is a class A product. In a domestic environment this product may cause radio
interference in which case the user may be required to take adequate measures.
Environment
Obsolete devices contain valuable recyclable materials that should be sent for recycling. Send
to suitable collection points, separately from residual waste.
The modular construction of the printer enables it to be easily disassembled into its component
parts. Send the parts for recycling.
The electronic circuit board of the device is equipped with a lithium battery. Take old batteries
to collection boxes in shops or public waste disposal centers.
18 QL-30/60 User Guide

2
3
5
6
7
8
4
1
9
10
2
11
Device Overview
Overview
Installation
Figure 1: Overview
# Description
1 Cover
2 Margin stop (only “M” devices)
3 Margin stop
4 Roll retainer
5 Ribbon supply hub
6 Ribbon take-up hub
7 Internal rewinder (only “P” devices)
QL-30/60 User Guide 19
Installation
13
14
18
19
16
12
21
22
15
17
20
# Description
8Print unit
9 Cover (not on QL-30P, QL-60P, QL-30MP, QL-60MP)
10 Touchscreen display
11 LED “Power on”
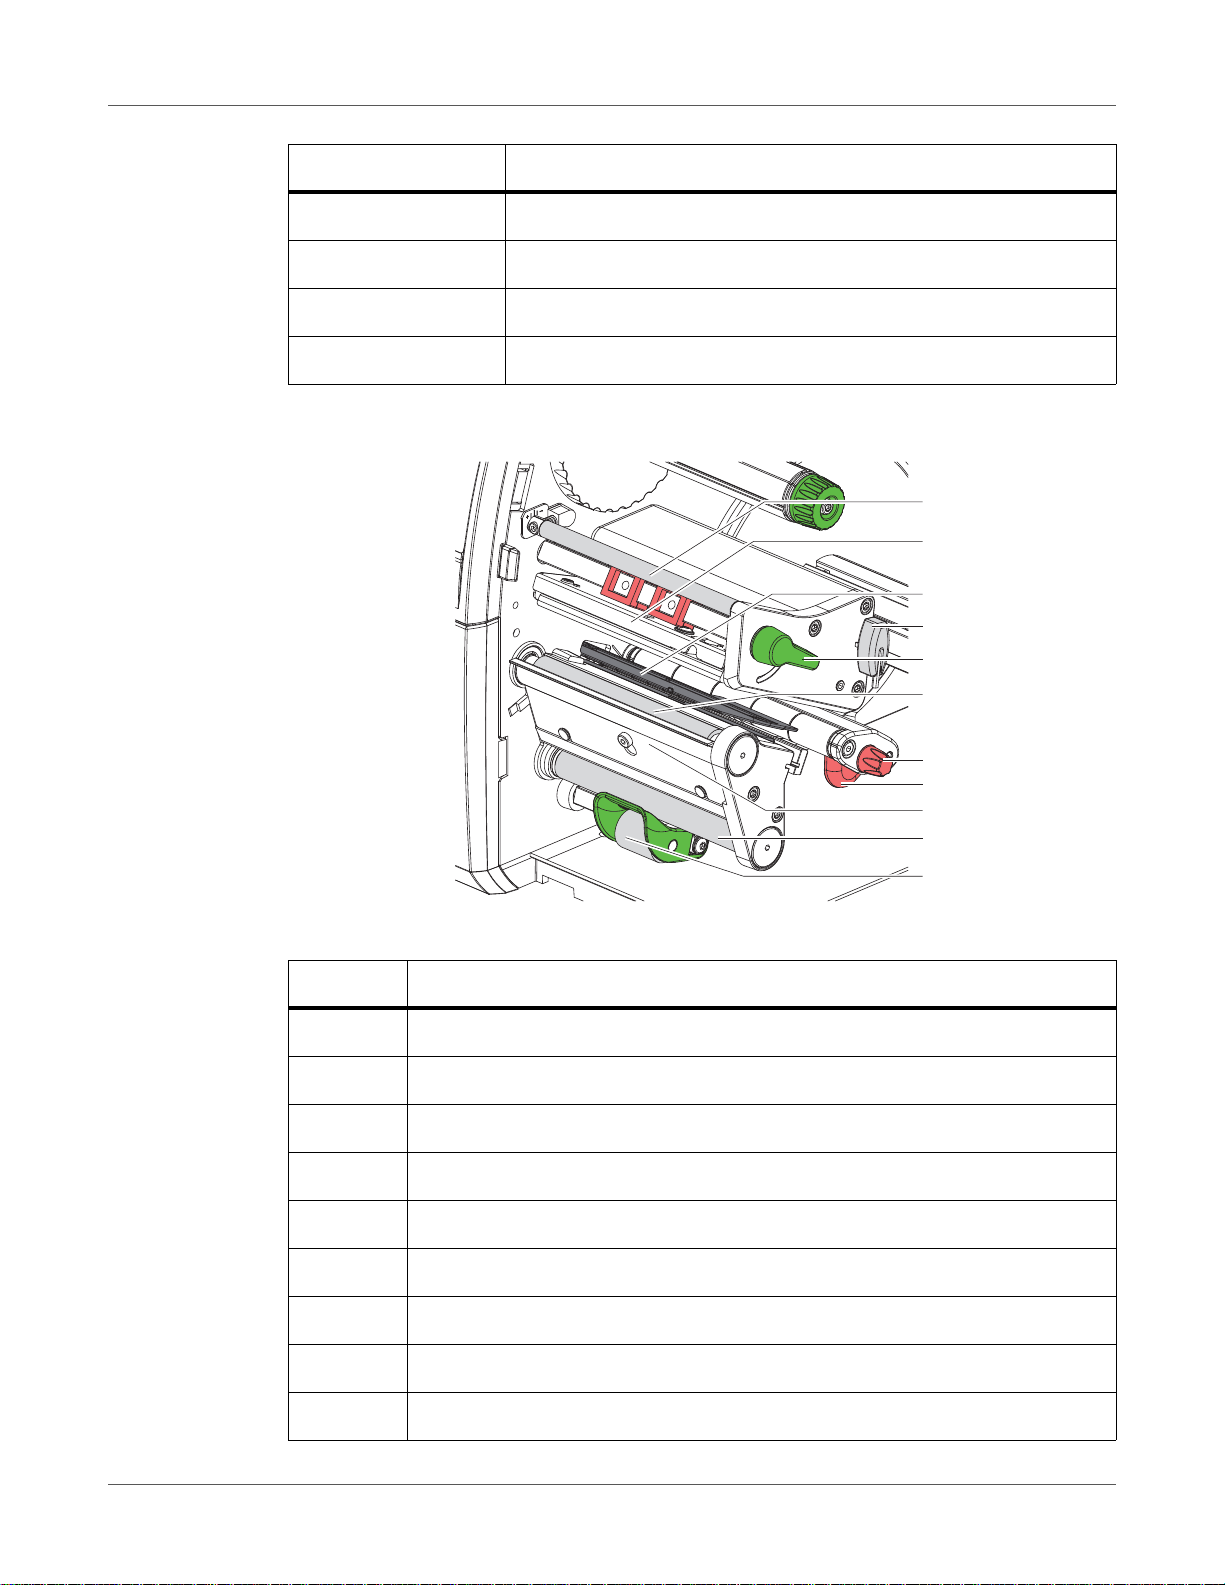
Print unit
Figure 2: Print unit
# Description
12 Ribbon deflection
13 Printhead retainer with printhead
14 Label sensor
15 Allen key
16 Printhead locking lever
17 Print roller
18 Guide adjusting knob
19 Guide
20 Dispense plate
20 QL-30/60 User Guide
# Description
27
28
31
29
30
33
32
34
35
21 Rewind assist roller (only “P” devices)
22 Locking system (only “P” devices)
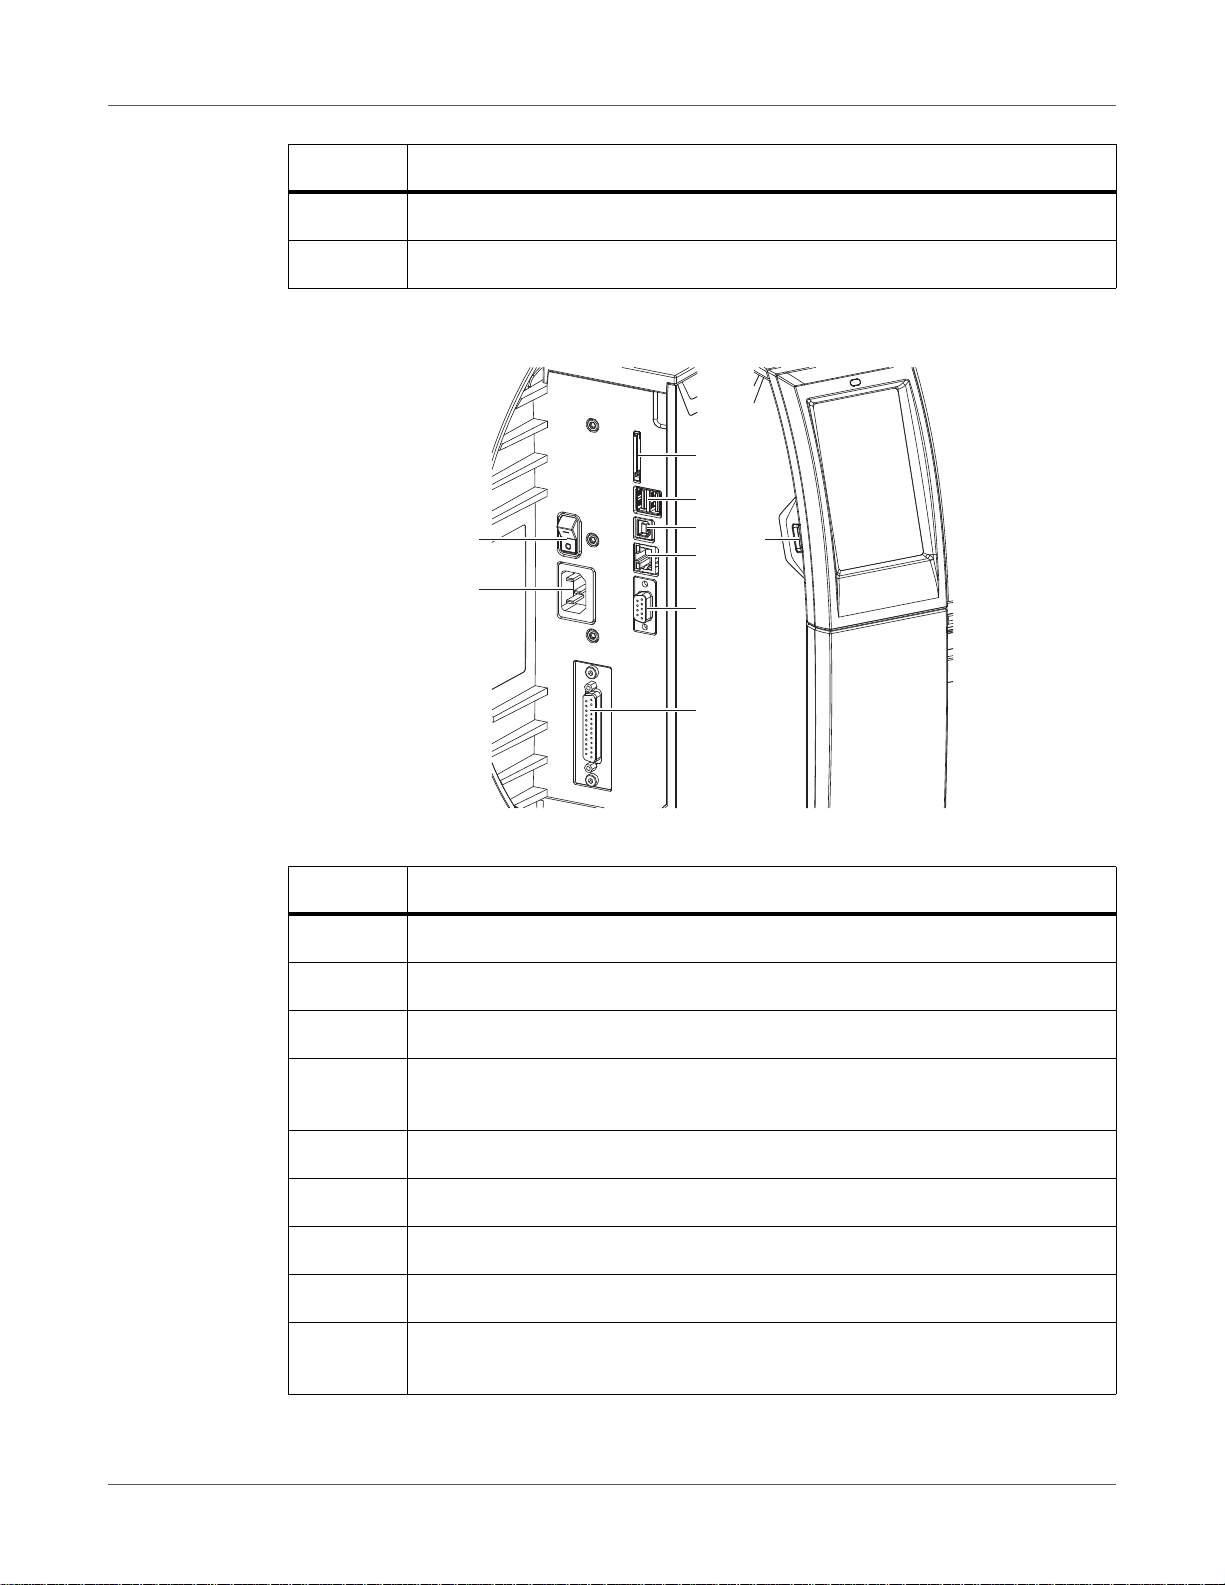
Connections
Installation
Figure 3: Connections
# Description
27 Power switch
28 Power connection jack
29 Slot for SD card
30 2 USB host ports for keyboard, scanner, USB memory stick, Bluetooth
adapter or service key
31 USB full-speed device port
32 Ethernet 10/100 Base-T
33 Serial RS-232 port
34 I/O interface (Option)
35 USB host port for keyboard, scanner, USB memory stick, Bluetooth adapter or
service key
QL-30/60 User Guide 21
Installation
3
4
Unpacking and Setting-up the Printer
1 Lift the label printer out of the box.
2 Check label printer for damage which may have occurred during transport.
3 Set up the printer on a level surface.
4 Remove foam transportation safeguards near the printhead.
5 Check delivery for completeness.
• Label printer
• Power cable
• USB cable
• WLAN stick
• Installation software
• Documentation
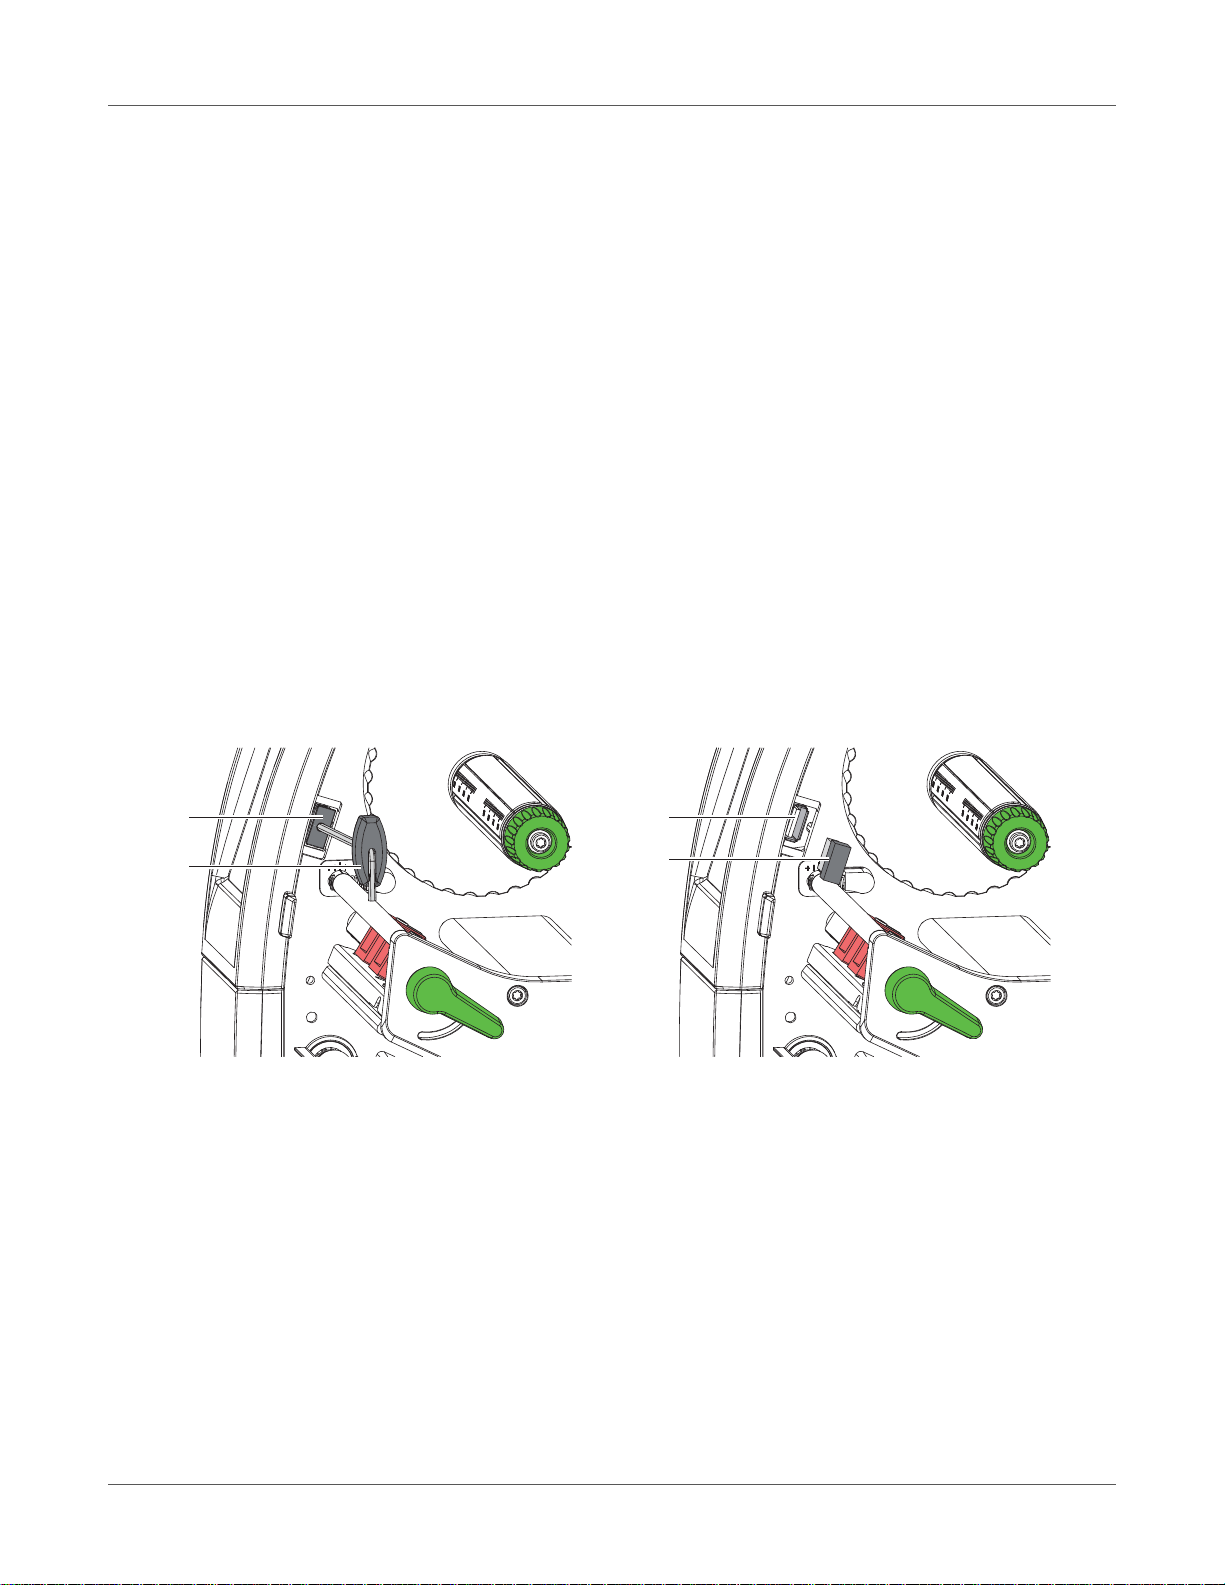
Installing the WLAN stick
1
2
Figure 4: Installing the WLAN stick
1 Remove the cover (1) with the Allen key (2).
2 Connect the WLAN stick (4) to the USB interface (3) in the control panel.
22 QL-30/60 User Guide

Connecting the Device
The standard available interfaces and connectors are shown in Figure 3.
Connecting to the Power Supply
The printer is equipped with a wide area power unit. The device can be operated with a supply
voltage of 230 V~/50 Hz or 115 V~/60 Hz without adjustment.
1 Check that the device is switched off.
2 Plug the power cable into the power connection socket (28).
3 Plug the power cable into a grounded socket.
Connecting to a Computer or Computer Network
Attention: Inadequate or no grounding can cause ma lfunctions during operations. Ensure that
all computers and cables connected to the label printer are grounded.
1 Connect the label printer to a computer or network by a suitable cable.
For details of the configuration of the individual interfaces, refer to “Connecting Label
Printer to Computer” on page 69.
Installation
Switching on the Device
When all connections have been made:
1 Switch the printer on at the power switch (27).
The printer performs a system test, and then shows the system status Ready in the display
(10).
QL-30/60 User Guide 23

Installation
24 QL-30/60 User Guide

3
The user can control the operation of the printer with the control panel (“Configuration” on page
79), for example:
• Issuing, interrupting, continuing and canceling print jobs
• Setting printing parameters, e.g. heat level of the printhead, print speed, interface
• Control stand-alone operation with a memory module
• Update the firmware
Many functions and settings can also be controlled by software applications or by direct
programming with a computer using the printer’s own commands.
Settings made on the touchscreen display make the basic settings of the label printer.
Note: It is advantageous, whenever possible, to make adaptations to various print jobs in the
software.
Start Screen
Touchscreen Display
configuration, language and time of day
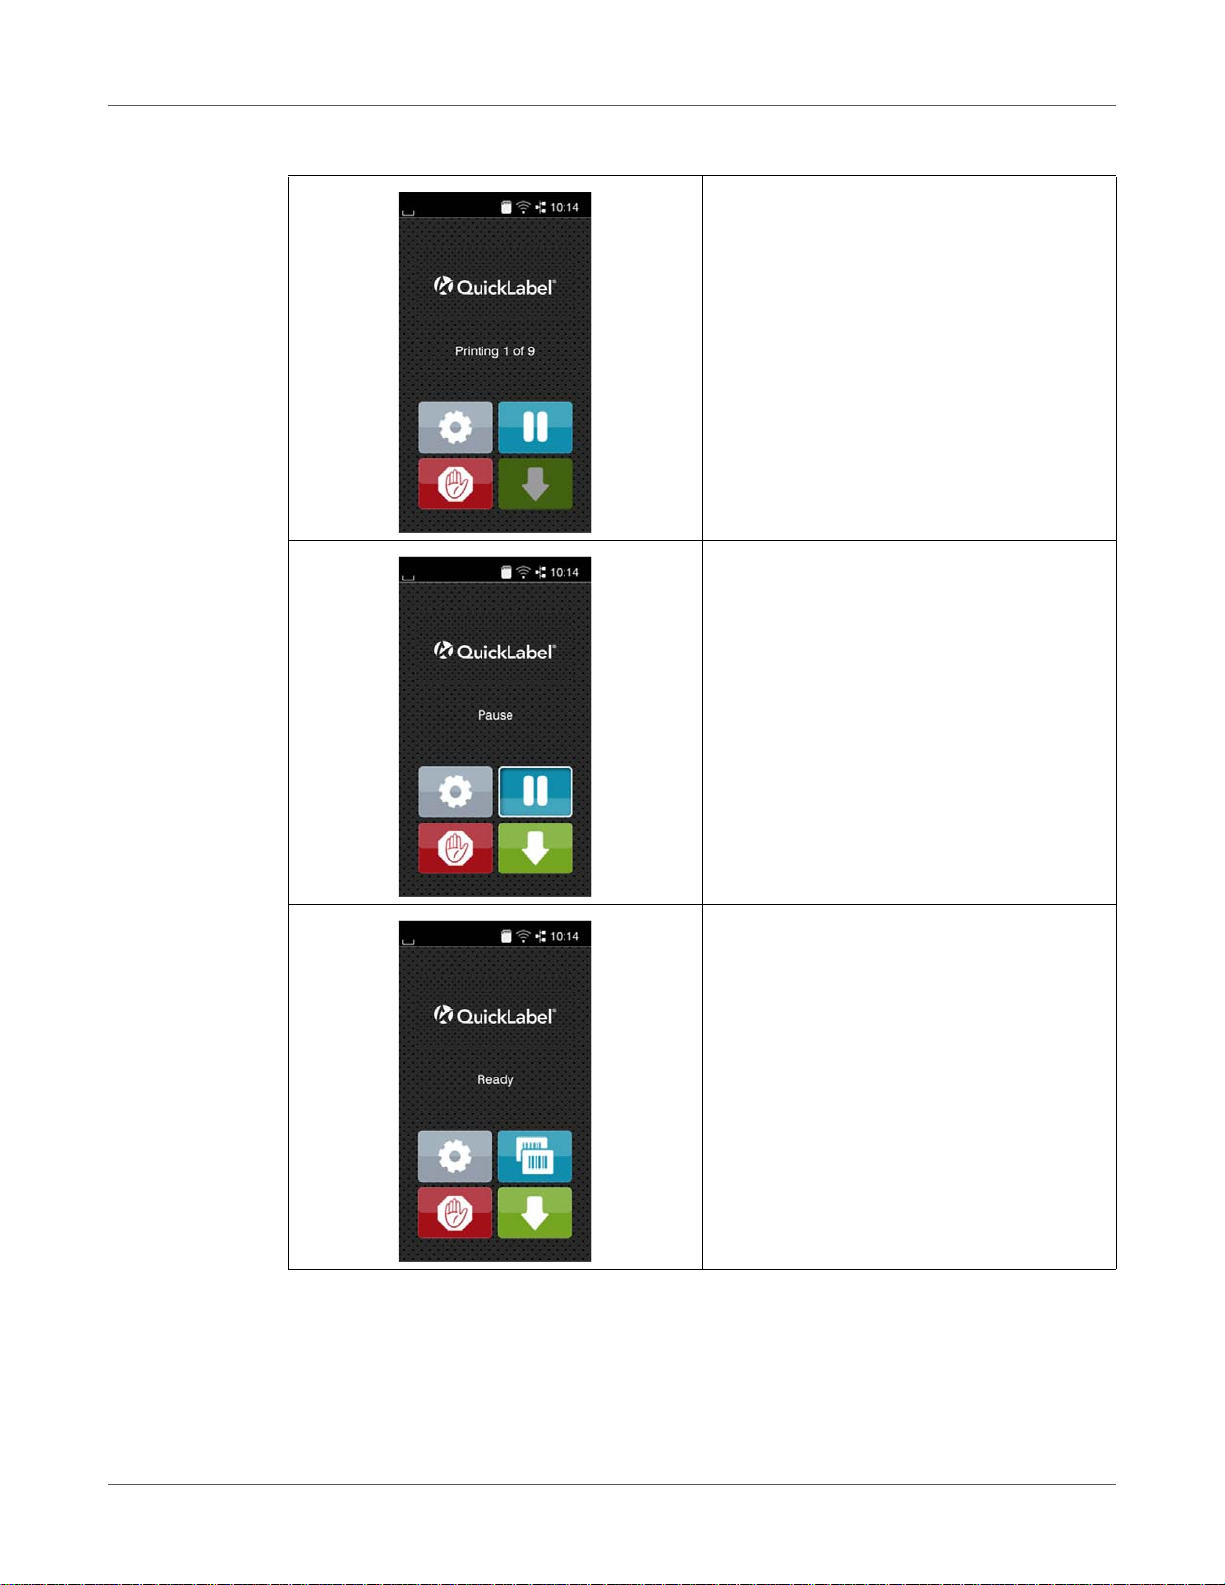
Table 1: Start screen
After switching on
QL-30/60 User Guide 25
Touchscreen Display
Table 1: Start screen (Continued)
During printing
In pause state
After print job
The touchscreen display is operated directly by touch:
• To open a menu or select a menu item lightly touch the corresponding symbol.
• To scroll in lists slide finger up or down on the display.
26 QL-30/60 User Guide
Touchscreen Display
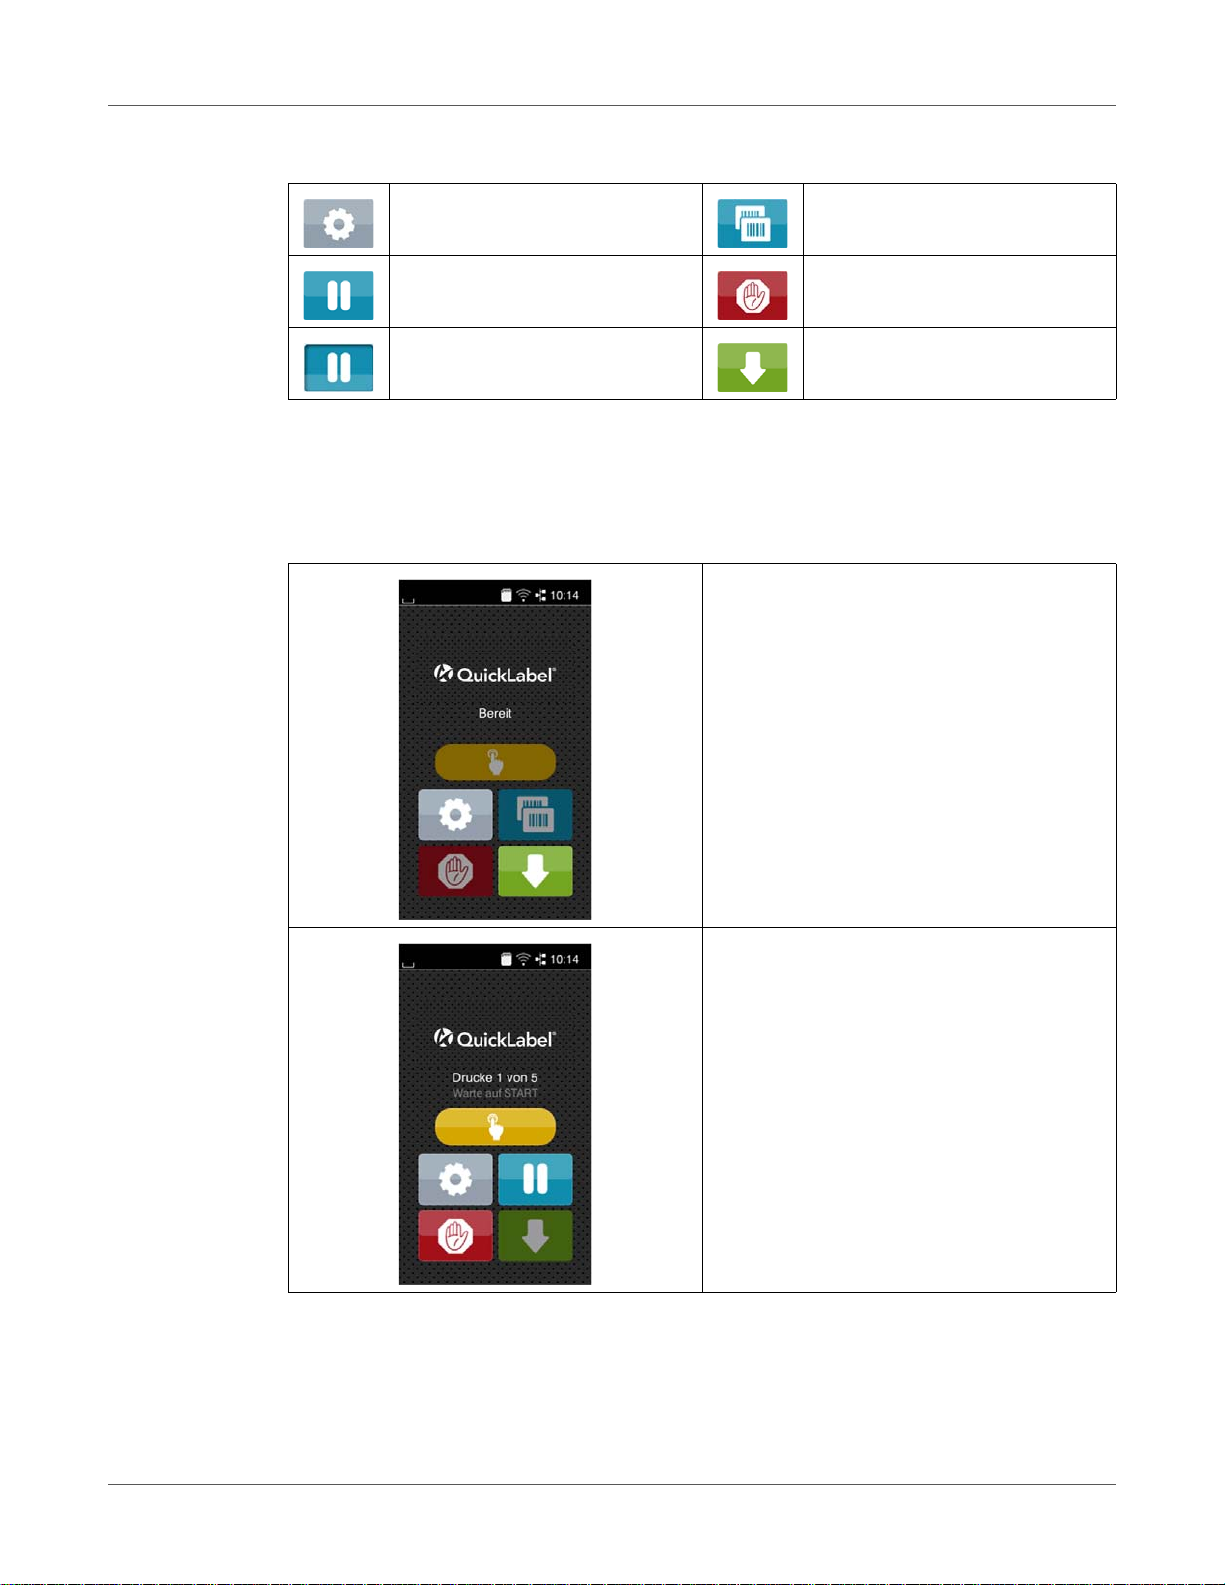
Table 2: Symbols on the start screen
Open the menu Repeat the last printed label
Interrupt the print job Cancel all print jobs
Continue the print job Feed a blank label
Note: Inactive symbols are shaded.
With special software or hardware configurations additional symbols appear on the start
screen:
Table 3: Optional symbols on the start screen
Printing on demand without print job
Printing on demand within print job
QL-30/60 User Guide 27
Touchscreen Display
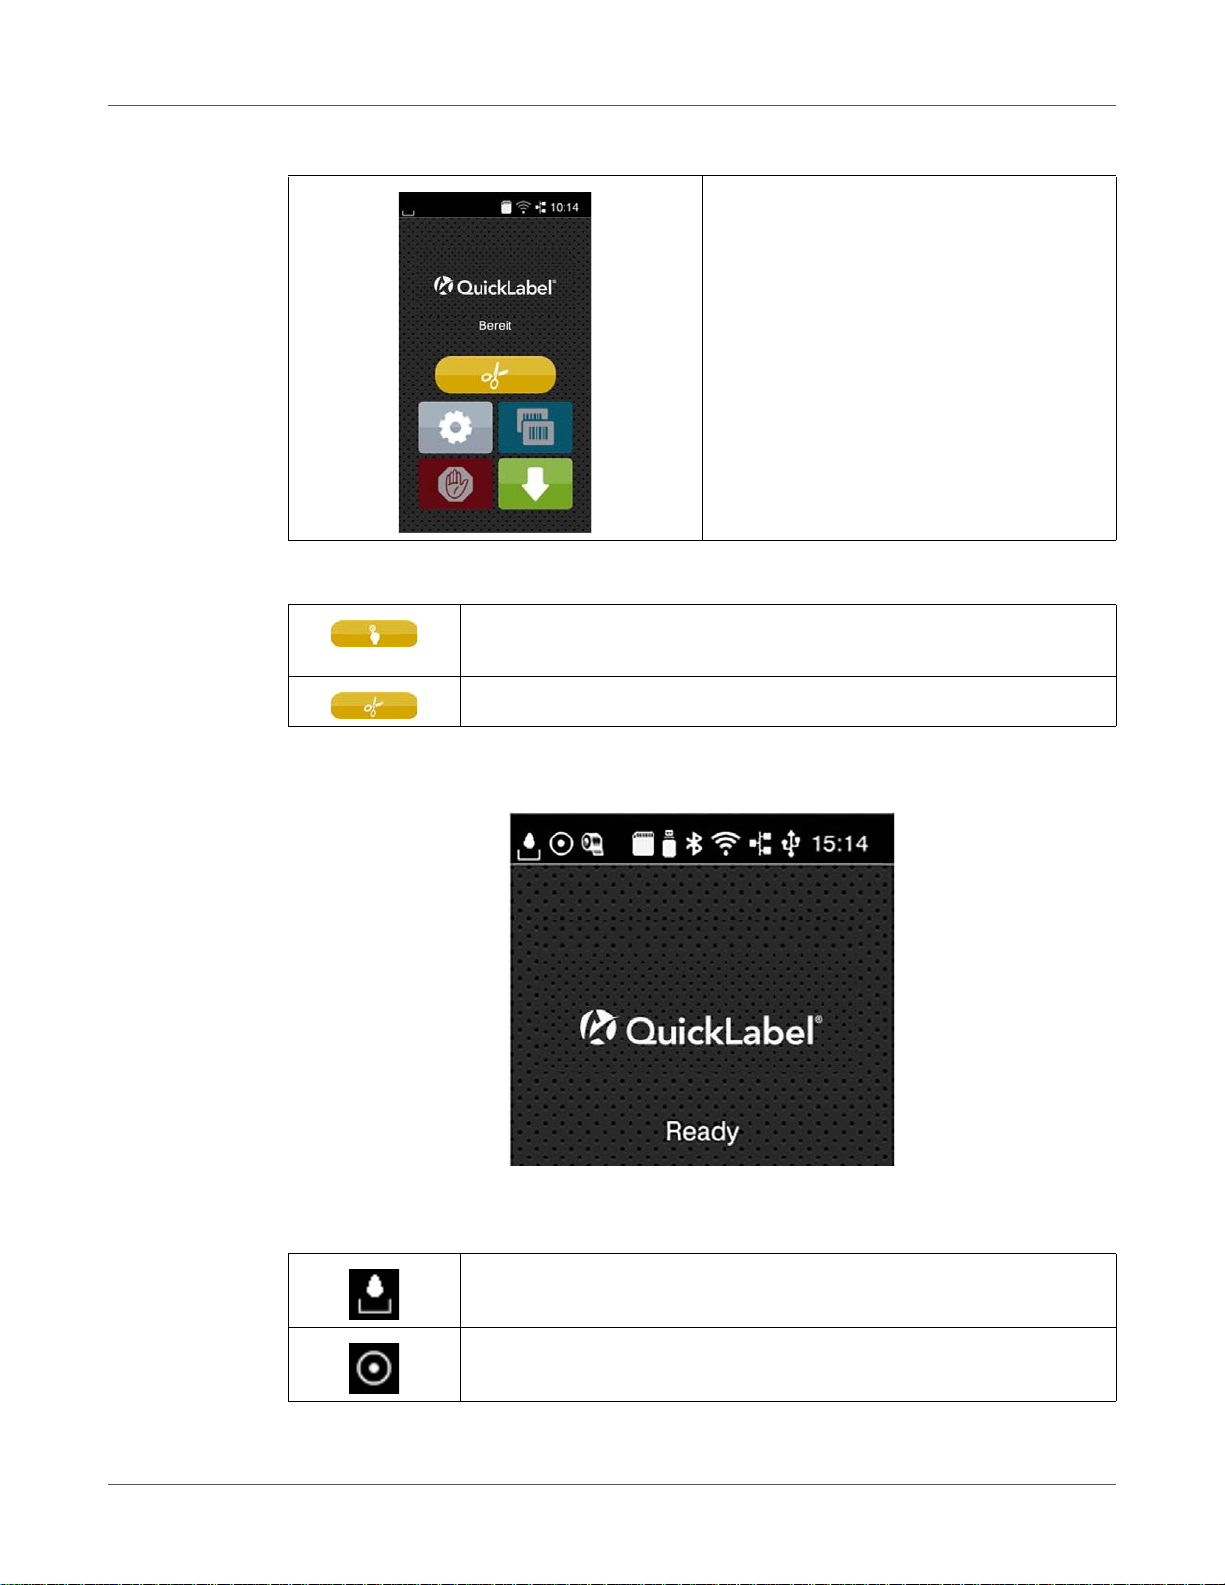
Table 3: Optional symbols on the start screen (Continued)
Direct cut with CU, PCU or ST cutter
installed
Table 4: Optional symbols on the start screen
Release printing of a single label within a print job including peeling-off,
cutting...
Release a direct cut without media feed
In the headline several types of information are displayed as widgets depending on the
configuration:
Figure 5: Widgets in the start screen
Table 5: Widgets in the start screen
Displays the current data transfer in the form of a falling drop.
The Save data stream function is active. All received data are stored in
a .lbl file. See “Save Data Stream” on page 115.
28 QL-30/60 User Guide

Table 5: Widgets in the start screen (Continued)
Warning ribbon end. The remaining diameter of the ribbon supply roll
undershoots the set value.
SD card installed
USB memory installed
Gray: Bluetooth adapter installed
White: Bluetooth connection active
WiFi connection active. The WiFi strength is displayed by the number of
white arcs.
Ethernet connection active
USB connection active
Touchscreen Display
Structure of the Menu
The menu contains setting options on several levels for configuring the label printer. In addition,
the menu features test and diagnostic functions for supporting the configuration or checking the
function of the label printer.
Table 6: Structure of the menu
1st Selection Level 2nd Selection Level 3rd Selection Level
Info
Storage
Setup Printing
Clock time
QL-30/60 User Guide 29

Touchscreen Display
Table 6: Structure of the menu (Continued)
1st Selection Level 2nd Selection Level 3rd Selection Level
Labels
Ribbon
Tearing-off
Cutting
Peeling-off
Labeling
Interfaces Ethernet
WLAN
Network
services
RS-232
Errors
Region
Time
Display
Interpreter
ZPL
30 QL-30/60 User Guide
 Loading...