

QuickLabel Kiaro! 200 User Manual
The Labels You Want When You Need Them.
®
USER
GUIDE
Congratulations on owning a Kiaro!
200 inkjet color label printer. This
User Guide will help you start printing
labels, re-load printing supplies,
troubleshoot problems, and
perform routine maintenance.
• Create Custom Labels 4"-8" wide
• Print 1200 dpi at 8" per second
• No wasting labels
QuickLabel.com


Kiaro! 200 User Guide
Part Number 22834630-EN-E
Revision 1.4
8/2016
QuickLabel, An AstroNova™ Division
World Headquarters
600 East Greenwich Ave., West Warwick, RI 02893
Tel: (877) 757-7978 Fax: (401) 822-2430
E-mail: info@QuickLabel.com
www.QuickLabel.com
Technical Support
Tel: (877) 757-7310
E-mail: support@QuickLabel.com
www.QuickLabel.com/support/

© 2016 AstroNova, Inc. All Rights Reserved
This manual is copyrighted with all rights reserved. No part of this manual may be
reproduced, transmitted, transcribe d, stored in a retrieval system, or translated into any
language in any form by any means without written permission of QuickLabel.
Trademarks
Kiaro! 200® and Custom QuickLabel Omni® are registered trademarks of AstroNova,
Inc.
Adobe®, Photoshop®, and Illustrator® are registered trademarks of Adobe Systems,
Inc.
Corel® is a registered trademark of Corel Corporation.
Windows is a registered trademark of Microsoft Corporation in the United States and
other countries.
Kiaro! 200 Limited Warranty
QuickLabel, An AstroNova Division, warrants all components of this product, except
wear parts and consumables, against defects in materials or workmanship for a period
of one (1) year from the date of original purchase. Wear parts include the purge units,
blade cleaners, maintenance cartridge, cutter blades and the like. Consumables
include ink cartridges and labels, which are cove red under a separate warranty. If the
customer discovers a defect, this defect must be reported promptly to QuickLabel.
QuickLabel will, at its option, repair the printer or repair or replace its defective
component(s) at no additional charge under our QuickSwap™ Parts Service. Repair
parts and replacement parts will be furnished on an exchange basis and will be either
reconditioned or new. The customer is responsible for freight to return the printer or
component to our factory. We will ship the repaired or replaced printer or component
back to you via standard ground freight service. All replaced parts be come the property
of QuickLabel. Travel, freight and other expenses related to warranty repairs are not
covered.
In the first year of product ownership, you may be covered by a separate Customer
Support Agreement purchased from or issued by QuickLabel or an authorized
QuickLabel dealer. In such a case, you would be entitled to an on-site installation
and/or training visit. Otherwise, Customer Support Agreements and renewals are
available for purchase and provide on-site support and/or QuickSwap Parts Service.
This warranty is void if the product has been damaged by accident, abuse, neglect or
misapplication or by the use of incompatible consumables or parts, or if the product has
been improperly installed, or if the product has been modified without the express
written permission of QuickLabel. QuickLabel is not responsible for products lost or
damaged in transit.
QuickLabel makes no warranty, either express or implied, with respect to this product's
merchantability or fitness for a particular purpose. In no event shall QuickLabel be held
liable for any direct, indirect, special, incidental, or consequential damages, whether
based on a contract, tort, or any other legal theory and whether advised of the
possibility of such damages.

Ink Limited Warranty
This warranty covers QuickLabel Kiaro! 200 ink cartridge sold by QuickLabel.
Each Kiaro! 200 ink cartridge is warranted to be free from defects in materials and
workmanship for up to 24 months from the date of manufacture if in original u nopened
packaging, or up to 6 months after installation, wh ic he ve r oc cu rs first. This warranty
applies only to the ink cartridges as used in the QuickLabel Kiaro! 200 printing system.
If the customer suspects a defect in a Kiaro! 200 ink cartridge, the customer must notify
QuickLabel within the warranty period. Upon return of the ink cartridge to the
QuickLabel factory and QuickLabel's verification of the defect, QuickLabel will, at its
option, either:
1. Replace the defective ink cartridge; or,
2. If the customer has used the ink, pro-rate the price of a new ink based upon the
estimated life remaining for the ink, as reported by the Kiaro! 200 system. The Kiaro!
200 provides the estimated life remaining, and QuickLabel may obtain this information
from the system remotely or request the customer to furnish this information.
This warranty does not cover Kiaro! 200 ink cartridges that have been emptied, refilled,
remanufactured, modified, refurbished, misused, or tampered with, or that have
expired, or when used to print on label or tag media that is not compatible with the
Kiaro! 200.
This warranty is void if the Kiaro! 200 ink cartridge has been damaged by accident,
abuse, neglect or misapplication, if the product has been improperly installed or
maintained, if the product has been used ou tside of its environmental specifications, or
if the product has been modified without the express written permission of QuickLab el.
QuickLabel makes no warranty, either express or implied, with respect to this product's
merchantability or fitness for a particular purpose. In no event shall QuickLabel be held
liable for any direct, indirect, special, incidental, or consequential damages, whether
based on a contract, tort, or any other legal theory and whether advised of the
possibility of such damages.
Printhead Limited Warranty
QuickLabel warrants the printheads from the date of purchase for a period of 90 days
or for 1 million inches of printing, whichever comes first, contingent upon the use of
QuickLabel ink and labels. The Kiaro! 200 printheads are calibrated for use with
QuickLabel ink and labels and performs optimally only when used with these materials.
This specific printhead warranty does not apply to printheads damaged by accident,
abuse, neglect, misapplication or the like. This warranty is void if the product has b een
damaged by accident, abuse, neglect or misapplication, or if the product has been
improperly installed, or if the product has been modified without th e express written
permission of QuickLabel.
ICC Profile
ICC Profile Powered by X-Rite Incorporated

Obtaining Service
To obtain warranted service, please contac t QuickLabel Technical Support through
one of the Factory Sales and Service Centers.
Contact Information for Factory Sales and Service
QuickLabel USA and World Headquarters
600 East Greenwich Avenue
West Warwick, RI 02893 USA
Toll Free: (877) 757-7978
Toll-Free Sales: (877) 757-7978
Toll Free Technical Support: (877) 757-7310
Tel: (401) 828-4000
Fax: (401) 822-2430
Web Site: www.QuickLabel.com
Sales E-mail: info@QuickLabel.com
Technical Support E-mail: support@QuickLabel.com
QuickLabel Canada
#111 - 3555 Isabelle, Borssard, QC J4Y 2R2 Canada
Tel: (800) 565-2216
Fax: (450) 619-9976
Web Site: www.QuickLabel.ca
Sales E-mail: info@QuickLabel.ca
Technical Support E-mail: support@QuickLabel.ca
QuickLabel Deutschland
Senefelderstraße 1/ T6 D-63110 Rodgau
Tel. +49 (0) 6106-28368-20
Fax: +49 (0) 6106-771121
Web Site: www.QuickLabel.de
Sales E-mail: info@QuickLabel.de
Technical Support E-mail: support@QuickLabel.de
QuickLabel France
Parc Euclide
ZA la Clef de St Pierre
10A Rue Blaise Pascal
78990 ELANCOURT
Tel: 33 1 34 82 09 00
Fax: 33 1 34 82 05 71
Web Site: www.QuickLabel.fr
Sales E-mail: info@QuickLabel.fr
Technical Support E-mail:support@QuickLabel.fr
QuickLabel United Kingdom
11 Whittle Parkway
Slough, Berkshire SL1 6DQ
Tel: 01628 668836
Fax: 01628 664994
Web Site: www.QuickLabel.co.uk
Sales E-mail: info@QuickLabel.co.uk
Technical Support E-mail:support@QuickLabel.co.uk

Ownership Information
Congratulations and thank you for your business. Your purchase of a QuickLabel digital
label printer is an investment in production flexibility and packaging efficiency. Please
record the model number and serial number of your product.
FCC Part 15 Compliance
NOTE: This equipment has been tested and found to comply with the limits for a
Class A digital device, pursuant to part 15 of the FCC rules. These limits are designed
to provide reasonable protection against interference in an industrial installation. This
equipment generates, uses, and can radiate radio frequen cy energy and, if not installed
and used in accordance with the instruction manual, may cause interference to radio
communications. However, there is no guarantee that interference will not occur in a
particular installation.
If this equipment does cause interference to radio or television reception, which can be
determined by turning the equipment off and on, the user is encouraged to try to correct
the interference by one or more of the following measures:
• Reorient or relocate the receiving antenna .
• Increase the separation between the equipment and receiver.
• Connect the equipment into an outlet on a circuit different from that to which the
receiver is connected.
• Consult the dealer or an experienced radio/TV technician for help.
CAUTION: Changes or modifications to this equipment not expressly approved by the
party responsible for compliance could void the user's authority to operate the
equipment.
Canadian Compliance Statement
This Class A digital apparatus meets all requirements of the Canadian
Interference-Causing Equipment Regulations.
Cet appareil numérique de la classe A respecte toutes les exigences du Réglement sur
le matériel brouilleur du Canada.
RoHS2 Compliance
The Kiaro! 200 Label Printer and optional Rewinder accessory do not contain
substances specified within ANNEX II of “Directive 2011/65/EU of the European
Parliament and of the Council of 8 June 2011 on the restriction of the use of certain
hazardous substances in electrical and electronic equipment (RoHS)”, that is, lead,
mercury, cadmium, hexavalent chromium, polybrominated biphenyls (PBB) and
polybrominated diphenyl ethers (PBDE) exceeding their specified maximum
concentration values tolerated by weight in homogeneous materials, except for the
exemptions set in ANNEX III of the Directive and amendments.
This information is offered in good faith to the best of our knowledge, but is subject to
revision as new information becomes available.

WEEE Directive
European Union (and EEA) only.
These symbols indicate that this product is not to be disposed of with your household
waste, according to the WEEE Directive (2002/96/EC), the Battery Directive
(2006/66/EC) and/or your national laws implementing those Directives.
If a chemical symbol is printed beneath the symbol shown above, in accordance with
the Battery Directive, this indicates th at a heavy metal (Hg = Mercury, Cd = Cadmium,
Pb = Lead) is present in this battery or accumulator at a concentration above an
applicable threshold specified in the Battery Directive.
This product should be handed over to a designated collection point, e.g., on an
authorized one-for-one basis when you buy a new similar product or to an authorized
collection site for recycling waste electrical and electronic equipment (EEE) and
batteries and accumulators. Improper handling of this type of waste could have a
possible impact on the environment and human health due to potentially hazardous
substances that are generally associated with EEE.
Your cooperation in the correct disposal of this product will contribute to the effective
usage of natural resources.
For more information about the recycling of this pr oduct, please conta ct your local city
office, waste authority, approved scheme or your household waste disposal service.
(EEA: Norway, Iceland and Liechtenstein)

WEEE Compliance - India only
This product is not to be disposed of with your household waste, according to the
e-waste (Management and Handling) Rules, 2011. This product sh ould be handed over
to a designated collection point, e.g., to an authorized collection site for recycling waste
electrical and electronic equipment (EEE). Improper handling of this type of waste
could have a possible negative impact on the environment and human health due to
potentially hazardous substances that are generally associat ed with EEE. At the same
time, your cooperation in the correct disposal of this product will contribute to the
effective usage of natural resources. For more information regarding return and
recycling of WEEE products, please contact QuickLabel.
Also, this product complies with the "India E-waste Rule 2011" and prohibits use of
lead, mercury, hexavalent chromium, polybrominated biphenyls or polybrominated
diphenyl ethers in concentrations exceeding 0.1 % by weight and 0.01 % by weight for
Cadmium, except for the exemptions set in Schedule ll of the Rule.
Battery - For CA, USA only
Included battery contains Perchlorate Material ---- special handling may apply.
See http://www.dtsc.ca.gov/hazardouswaste/perchlorate for detail.
European Union (and EEA) only
Contains a preservative to control microbial deterioration.
Contains 1,2-benzisothiazol-3(2H)-one.
May produce an allergic reaction.
Contains less than 30% of components with unknown hazards to the aquatic
environment.
Safety data sheet available on request.
Declaration of Conformity
Declaration de Conformité
Ubereinstimmungserklärung
Dichiarazione di Conformità
ID DoC-22834630
Manufacturer’s name and address
Nom et adresse du fabricant
Hersteller
Nome del costruttore
Model No.
Modele No.
Model Nr.
Modello No.
Standards to which conformity is declared
Standards auquel la conformité appartient
Normen für welche Übereinstimmung erklärt wird
Norme per le quali si dichiara la conformità
AstroNova, Inc.
600 East Greenwich Avenue
West Warwick, RI 02893 USA
Kiaro! 200 & Kiaro! 200E
Kiaro! 200 & Kiaro! 200E with Rewinder
Kiaro! 200D & Kiaro! 200D with Rewinder
ANSI/UL 60950-1,Issued:2007/03/27 Ed:2 Rev:2011/12/19 UL
Standard for Safety for Information Technology Equipment
Safety Part 1: General Requirements
CSA C22.2 No. 60950-1Issued: 2007/03/27 Ed: 2 (R2012)
Information Technology Equipment Safety Part 1: General
Requirements; Amendment 1: 2011
CISPR 22 ed 6.0 (2008-09)
CISPR 24 ed 2.0 (2010-08)
FCC Part 15 Subpart B:2013 “Class A”
ICES-003 Issue 5 August 2012
IEC 61000-3-2 ed 3.2 (2009-04-20)
IEC 61000-3-3 ed 3.0 (2013-05-14)
IEC 61000-4-2:2008
IEC 61000-4-3:2006 +A1:2007 +A2:2010
IEC 61000-4-4:2004
IEC 61000-4-5:2005
IEC 61000-4-6:2008
IEC 61000-4-8:2009
IEC 61000-4-11:2004
Application of Council Directives
Application des Decisions du Conseil
Anwendbar fur die Richtlinien
Applicazione delle Direttive del Comitato
I, the undersigned, hereby declare that the equipment specified above conforms to the above Directive and Standard.
Je, Soussigné, déclare que l’équipment spécifié ci-dessus est en conformité avec la directive et le standard ci-dessus.
Ich, der unterzeichnende erkläre hiermit, daß das oben beschriebene Gerät den vorgenannten Richtlinien und Normen entspricht.
Il sottoscritto dichiara che l’apparecchio sopra specificato è conforme alle Direttive e Norme sopra specificate.
Steven Holbrook
Quality Assurance Manager
AstroNova, Inc.
European Contact: Your local AstroNova, Inc. Sales and Service Office.
FRANCE - Parc Euclide, ZA la Clef de St Pierre, 10A Rue Blaise Pascal 78990 Elancourt
Tel: (+33) 1 34 82 09 00, Fax: (+33) 1 34 82 05 71
GERMANY - Senefelderstrasse 1/T6, D-63110 Rodgau
Tel. +49 (0) 6106-28368-20, Fax: +49 (0) 6106-771121
UNITED KINGDOM - 11 Whittle Parkway, Slough, Berkshire, SL1 6DQ
Tel: +44 (0)1628 668836, Fax: +44 (0)1628 664994
Note: The Kiaro! 200D is identical to the Kiaro! 200E except for the ink type used. Kiaro! 200D uses a pigment based aqueous ink while the
Kiaro! 200 & Kiaro! 200E uses a dye based ink.
2004/108/EC
2006/95/EC
Date of issue: 7/13/2016
Place of issue: West Warwick, RI

Contents
Chapter: 1 Quick Start Guide . . . . . . . . . . . . . . . . . . . . . . . . . . . . 1
Before Installing the Printer . . . . . . . . . . . . . . . . . . . . . . . . . . . . . . . 1
Choosing an Installation Location . . . . . . . . . . . . . . . . . . . . . . . . 1
Installation Precautions . . . . . . . . . . . . . . . . . . . . . . . . . . . . . 2
System Requirements . . . . . . . . . . . . . . . . . . . . . . . . . . . . . . 2
Unpacking the Printer . . . . . . . . . . . . . . . . . . . . . . . . . . . . . . . . . . 3
Checking the Included Parts . . . . . . . . . . . . . . . . . . . . . . . . . . 4
Installing the Printer . . . . . . . . . . . . . . . . . . . . . . . . . . . . . . . . . . . 5
Loading Ink Tanks . . . . . . . . . . . . . . . . . . . . . . . . . . . . . . . . 5
Initial Ink Filling . . . . . . . . . . . . . . . . . . . . . . . . . . . . . . . . . 7
Loading Media . . . . . . . . . . . . . . . . . . . . . . . . . . . . . . . . . . . . . . 8
Verifying Label Width . . . . . . . . . . . . . . . . . . . . . . . . . . . . . . 12
Installing the Printer Driver (USB) . . . . . . . . . . . . . . . . . . . . . . . . . . . . 13
Resolving Windows 7 and Windows 8 USB Installation Issues . . . . . . . . . 14
Installing the Printer Driver (Network) . . . . . . . . . . . . . . . . . . . . . . . . . . 16
Chapter: 2 Introduction . . . . . . . . . . . . . . . . . . . . . . . . . . . . . . .19
About the Kiaro! 200 . . . . . . . . . . . . . . . . . . . . . . . . . . . . . . . . . . . 19
Printer Part Names and Functions . . . . . . . . . . . . . . . . . . . . . . . . . . . . 20
Kiaro! 200 Left Side View . . . . . . . . . . . . . . . . . . . . . . . . . . . . 20
Kiaro! 200 Right Side View . . . . . . . . . . . . . . . . . . . . . . . . . . . 21
Printer Details . . . . . . . . . . . . . . . . . . . . . . . . . . . . . . . . . . 22
Inside the Printer . . . . . . . . . . . . . . . . . . . . . . . . . . . . . . . . 23
Operation Panel . . . . . . . . . . . . . . . . . . . . . . . . . . . . . . . . . 24
Switching the Printer On and Off . . . . . . . . . . . . . . . . . . . . . . . . . . . . . 25
Switching the Printer On . . . . . . . . . . . . . . . . . . . . . . . . . . . . 25
Switching the Printer Off . . . . . . . . . . . . . . . . . . . . . . . . . . . . 26
QuickLabel Services . . . . . . . . . . . . . . . . . . . . . . . . . . . . . . . . . . . 27
Kiaro! 200 Label Materials . . . . . . . . . . . . . . . . . . . . . . . . . . . 27
QuickLabel BPO Blanket Purchase Order Program . . . . . . . . . . . . . . 27
Media Specialists . . . . . . . . . . . . . . . . . . . . . . . . . . . . . . . . 27
QuickLabel Kiaro! 200 Support . . . . . . . . . . . . . . . . . . . . . . . . . 27
Chapter: 3 Designing and Printing Labels . . . . . . . . . . . . . . . . . . . . .29
Designing Labels . . . . . . . . . . . . . . . . . . . . . . . . . . . . . . . . . . . . . 29
Choosing Design Software . . . . . . . . . . . . . . . . . . . . . . . . . . . 29
Disabling Anti-aliasing . . . . . . . . . . . . . . . . . . . . . . . . . . . . . . 29
Planning Full-Bleed and Non-Bleed Labels . . . . . . . . . . . . . . . . . . . 29
Printing Black . . . . . . . . . . . . . . . . . . . . . . . . . . . . . . . . . . 30
Verifying Label Width . . . . . . . . . . . . . . . . . . . . . . . . . . . . . . 30
Setting up the Label Design Software . . . . . . . . . . . . . . . . . . . . . . . . . . 30
Setting up Labels in Custom QuickLabel Omni . . . . . . . . . . . . . . . . . 30
Setting up Labels in Third-Party Design Applications . . . . . . . . . . . . . . 31
Setting up the Printer Driver . . . . . . . . . . . . . . . . . . . . . . . . . . . . . . . 32
Selecting a Label Stock . . . . . . . . . . . . . . . . . . . . . . . . . . . . . 32
Setting up a Custom Label Stock . . . . . . . . . . . . . . . . . . . . . . . . 33
Setting up Appearance Options . . . . . . . . . . . . . . . . . . . . . . . . . 35
Kiaro! 200 User Guide i

Contents
Setting Advanced Color Options . . . . . . . . . . . . . . . . . . . . . . . . 37
Setting up Layout Options . . . . . . . . . . . . . . . . . . . . . . . . . . . . 40
Printing Labels . . . . . . . . . . . . . . . . . . . . . . . . . . . . . . . . . . . . . .41
Using the Manual Cutter . . . . . . . . . . . . . . . . . . . . . . . . . . . . 42
Using the Status Monitor . . . . . . . . . . . . . . . . . . . . . . . . . . . . . . . . . 44
Viewing the Printer Status . . . . . . . . . . . . . . . . . . . . . . . . . . . . 44
Viewing the Job Status and Cancelling Jobs . . . . . . . . . . . . . . . . . . 45
Viewing Ink and Maintenance Cartridge Levels . . . . . . . . . . . . . . . . . 45
Changing or Replacing Media . . . . . . . . . . . . . . . . . . . . . . . . . . . . . . 46
Removing Media . . . . . . . . . . . . . . . . . . . . . . . . . . . . . . . . 46
Loading Media . . . . . . . . . . . . . . . . . . . . . . . . . . . . . . . . . . 49
Chapter: 4 Kiaro! 200 Maintenance Utility . . . . . . . . . . . . . . . . . . . . .55
About the Maintenance Utility . . . . . . . . . . . . . . . . . . . . . . . . . . . . . . 55
Printer Information Tab . . . . . . . . . . . . . . . . . . . . . . . . . . . . . . . . . 55
Viewing Printer Information . . . . . . . . . . . . . . . . . . . . . . . . . . . 56
Upgrading the Printer Firmware . . . . . . . . . . . . . . . . . . . . . . . . . 56
Setting the Clock . . . . . . . . . . . . . . . . . . . . . . . . . . . . . . . . 57
Position Tab . . . . . . . . . . . . . . . . . . . . . . . . . . . . . . . . . . . . . . .58
Setting the Vertical Baseline . . . . . . . . . . . . . . . . . . . . . . . . . . 58
Setting the Horizontal Baseline . . . . . . . . . . . . . . . . . . . . . . . . . 59
Setting the Stop Position . . . . . . . . . . . . . . . . . . . . . . . . . . . . 60
Cleaning Tab . . . . . . . . . . . . . . . . . . . . . . . . . . . . . . . . . . . . . . .61
Cleaning Printheads . . . . . . . . . . . . . . . . . . . . . . . . . . . . . . . 61
Preparing for Moving . . . . . . . . . . . . . . . . . . . . . . . . . . . . . . 62
Preparing for Shipping . . . . . . . . . . . . . . . . . . . . . . . . . . . . . 62
Priming the Printheads . . . . . . . . . . . . . . . . . . . . . . . . . . . . . 63
Refreshing Kiaro! 200D Ink . . . . . . . . . . . . . . . . . . . . . . . . . . . 63
Test Print Tab . . . . . . . . . . . . . . . . . . . . . . . . . . . . . . . . . . . . . .64
Printing a Test Pattern . . . . . . . . . . . . . . . . . . . . . . . . . . . . . 64
Adjustments Tab . . . . . . . . . . . . . . . . . . . . . . . . . . . . . . . . . . . . . 65
Setting the Vertical Printhead Alignment . . . . . . . . . . . . . . . . . . . . 65
Setting up Standard Registration . . . . . . . . . . . . . . . . . . . . . . . . 67
Setting up Manual Registration . . . . . . . . . . . . . . . . . . . . . . . . . 71
Using the Slant Adjustment . . . . . . . . . . . . . . . . . . . . . . . . . . . 74
Using the Missing Nozzle Adjustment . . . . . . . . . . . . . . . . . . . . . . 76
Adjusting the Top-of-Form Threshold . . . . . . . . . . . . . . . . . . . . . . 79
Turning On Auto-Calibration . . . . . . . . . . . . . . . . . . . . . . . . . . 81
Adjusting the Density . . . . . . . . . . . . . . . . . . . . . . . . . . . . . . 81
System Logs Tab . . . . . . . . . . . . . . . . . . . . . . . . . . . . . . . . . . . . 83
Viewing the Error History . . . . . . . . . . . . . . . . . . . . . . . . . . . . 83
Saving Log Files . . . . . . . . . . . . . . . . . . . . . . . . . . . . . . . . . 84
Parts Replacement Tab . . . . . . . . . . . . . . . . . . . . . . . . . . . . . . . . . 85
Replacing the Printhead Assembly . . . . . . . . . . . . . . . . . . . . . . . 85
Replacing the Purge Unit . . . . . . . . . . . . . . . . . . . . . . . . . . . . 86
Replacing the Blade Cleaner . . . . . . . . . . . . . . . . . . . . . . . . . . 86
Advanced Tab . . . . . . . . . . . . . . . . . . . . . . . . . . . . . . . . . . . . . . 87
Chapter: 5 Printer Maintenance . . . . . . . . . . . . . . . . . . . . . . . . . . .89
Replacing Ink Tanks . . . . . . . . . . . . . . . . . . . . . . . . . . . . . . . . . . . 89
Replacing the Maintenance Cartridge . . . . . . . . . . . . . . . . . . . . . . . . . . 92
Cleaning the Printer . . . . . . . . . . . . . . . . . . . . . . . . . . . . . . . . . . . 94
Upgrading the Printer Firmware . . . . . . . . . . . . . . . . . . . . . . . . . . . . . 98
ii Kiaro! 200 User Guide

Contents
Chapter: 6 Troubleshooting . . . . . . . . . . . . . . . . . . . . . . . . . . . . .99
Error and Warning Messages . . . . . . . . . . . . . . . . . . . . . . . . . . . . . . 99
Operator Call Error Messages . . . . . . . . . . . . . . . . . . . . . . . . . 99
Removing a Paper Jam . . . . . . . . . . . . . . . . . . . . . . . . . . . . . . . . . 99
Printer Not Operating Correctly . . . . . . . . . . . . . . . . . . . . . . . . . . . . 101
Power Off . . . . . . . . . . . . . . . . . . . . . . . . . . . . . . . . . . . 101
Printer Does Not Start or Printer Stops During Print Jobs . . . . . . . . . . 101
Paper is Not Feeding Correctly . . . . . . . . . . . . . . . . . . . . . . . . 102
Status Monitor Does Not Start . . . . . . . . . . . . . . . . . . . . . . . . 102
Print Results are Unsatisfactory . . . . . . . . . . . . . . . . . . . . . . . . . . . . 103
Random Characters are Printed . . . . . . . . . . . . . . . . . . . . . . . 103
Slow to Print . . . . . . . . . . . . . . . . . . . . . . . . . . . . . . . . . . 103
Print Quality is Poor . . . . . . . . . . . . . . . . . . . . . . . . . . . . . . 103
Printed Colors Appear Incorrect . . . . . . . . . . . . . . . . . . . . . . . . 104
Print Samples and Solutions . . . . . . . . . . . . . . . . . . . . . . . . . . . . . . 104
Spur Gear Mark . . . . . . . . . . . . . . . . . . . . . . . . . . . . . . . . 104
Background Pattern . . . . . . . . . . . . . . . . . . . . . . . . . . . . . . 105
Printhead Not in Correct Position . . . . . . . . . . . . . . . . . . . . . . . 106
Media Contacting Printheads . . . . . . . . . . . . . . . . . . . . . . . . . 107
Poor Print Quality . . . . . . . . . . . . . . . . . . . . . . . . . . . . . . . 108
Media Surface Contamination . . . . . . . . . . . . . . . . . . . . . . . . . 109
Scuffing of Surface Material . . . . . . . . . . . . . . . . . . . . . . . . . . 110
Non-Functioning Nozzle . . . . . . . . . . . . . . . . . . . . . . . . . . . . 111
Clogged Nozzle . . . . . . . . . . . . . . . . . . . . . . . . . . . . . . . . 112
Debris on Printhead . . . . . . . . . . . . . . . . . . . . . . . . . . . . . . 113
Wide Voids in Print . . . . . . . . . . . . . . . . . . . . . . . . . . . . . . 114
Changes in Density Due to Torque . . . . . . . . . . . . . . . . . . . . . . 115
Physical Smearing of Wet Ink . . . . . . . . . . . . . . . . . . . . . . . . . 116
Media Being Pulled at Label Exit . . . . . . . . . . . . . . . . . . . . . . . 117
Printhead Contamination . . . . . . . . . . . . . . . . . . . . . . . . . . . 118
Setting up Image Placement for Full-Bleed Printing . . . . . . . . . . . . . . . . . . 119
Chapter: 7 Rewinder . . . . . . . . . . . . . . . . . . . . . . . . . . . . . . . . 121
Before Installing the Rewinder . . . . . . . . . . . . . . . . . . . . . . . . . . . . . 121
Installing the Rewinder . . . . . . . . . . . . . . . . . . . . . . . . . . . . . . . . . 121
Rewinding Labels . . . . . . . . . . . . . . . . . . . . . . . . . . . . . . . . . . . 123
Adjusting Rewinder Alignment . . . . . . . . . . . . . . . . . . . . . . . . . . . . . 125
Chapter: 8 Safety Warnings and Precautions . . . . . . . . . . . . . . . . . . 127
Location . . . . . . . . . . . . . . . . . . . . . . . . . . . . . . . . . . . . . . . . 127
Power Supply and Power Cord . . . . . . . . . . . . . . . . . . . . . . . . . . . . 128
General Safety . . . . . . . . . . . . . . . . . . . . . . . . . . . . . . . . . . . . . 129
Moving the Printer . . . . . . . . . . . . . . . . . . . . . . . . . . . . . . . . . . . 130
Ink Tank and the Maintenance Cartridge . . . . . . . . . . . . . . . . . . . . . . . 131
Chapter: 9 Specifications . . . . . . . . . . . . . . . . . . . . . . . . . . . . . 133
Kiaro! 200 User Guide iii

Contents
iv Kiaro! 200 User Guide

1
Before Installing the Printer
Choosing an Installation Location
The installation environment must be as described in this section.
• The printer power cord must be able to connect to an outlet (100-240 VAC 50-60
Hz 3.5A). This outlet must be easily accessible.
• Avoid installing the printer near a faucet, water heater, humidifier, or refrigerator.
• Ensure the environment temperature is within 59 to 86 degrees Fahrenheit (15 to
30 degrees Celsius).
• Ensure the environment humidity is within 10% to 90 % relativ e hu m idity.
• Avoid installing printer near fire, in a dusty place, or in a place where ammonia gas
is generated. When installing printer in a place exposed to direct sunlight, it is
recommended that curtains be hung over the window.
• No printer feet should float. The printer must be held level constantly.
Quick Start Guide
• When placing the printer on a desk, table, or other similar surface, it must be sturdy
and stable enough to support the weight of the printer.
• The room must be properly ventilated.
• Install printer at least 3.5 inches (88.9 mm) away from each wall with a sufficient
work space around it.
Kiaro! 200 User Guide 1

Quick Start Guide
Installation Precautions
When installing the printer, observe the following precautions.
• Imaging faults can result from dew condensation that occurs when the printer is
moved from a cold place to a warm place. Leave the unpacked printer as is for at
least two hours before installing it.
• The printer can weigh up to 170 poun ds (77 kilograms). Three persons are required
to lift the printer. Lift only by the black frame on the bottom of the printer. Do not
grasp any other part of the printer to lift it. Do not lift the unit by the print engine.
Attempting to lift the printer in an improper position can result in fall of the printer
or injury.
System Requirements
• 32-bit or 64-bit Microsoft® Windows® XP, Windows Vista®, Windows 7, or
Windows 8
• Microsoft .NET Framework 3.5 SP1
• 350 MB free hard drive space
• CD/DVD drive
• One available USB 2.0 port for USB installation or network connectivity for network
installation
2 Kiaro! 200 User Guide
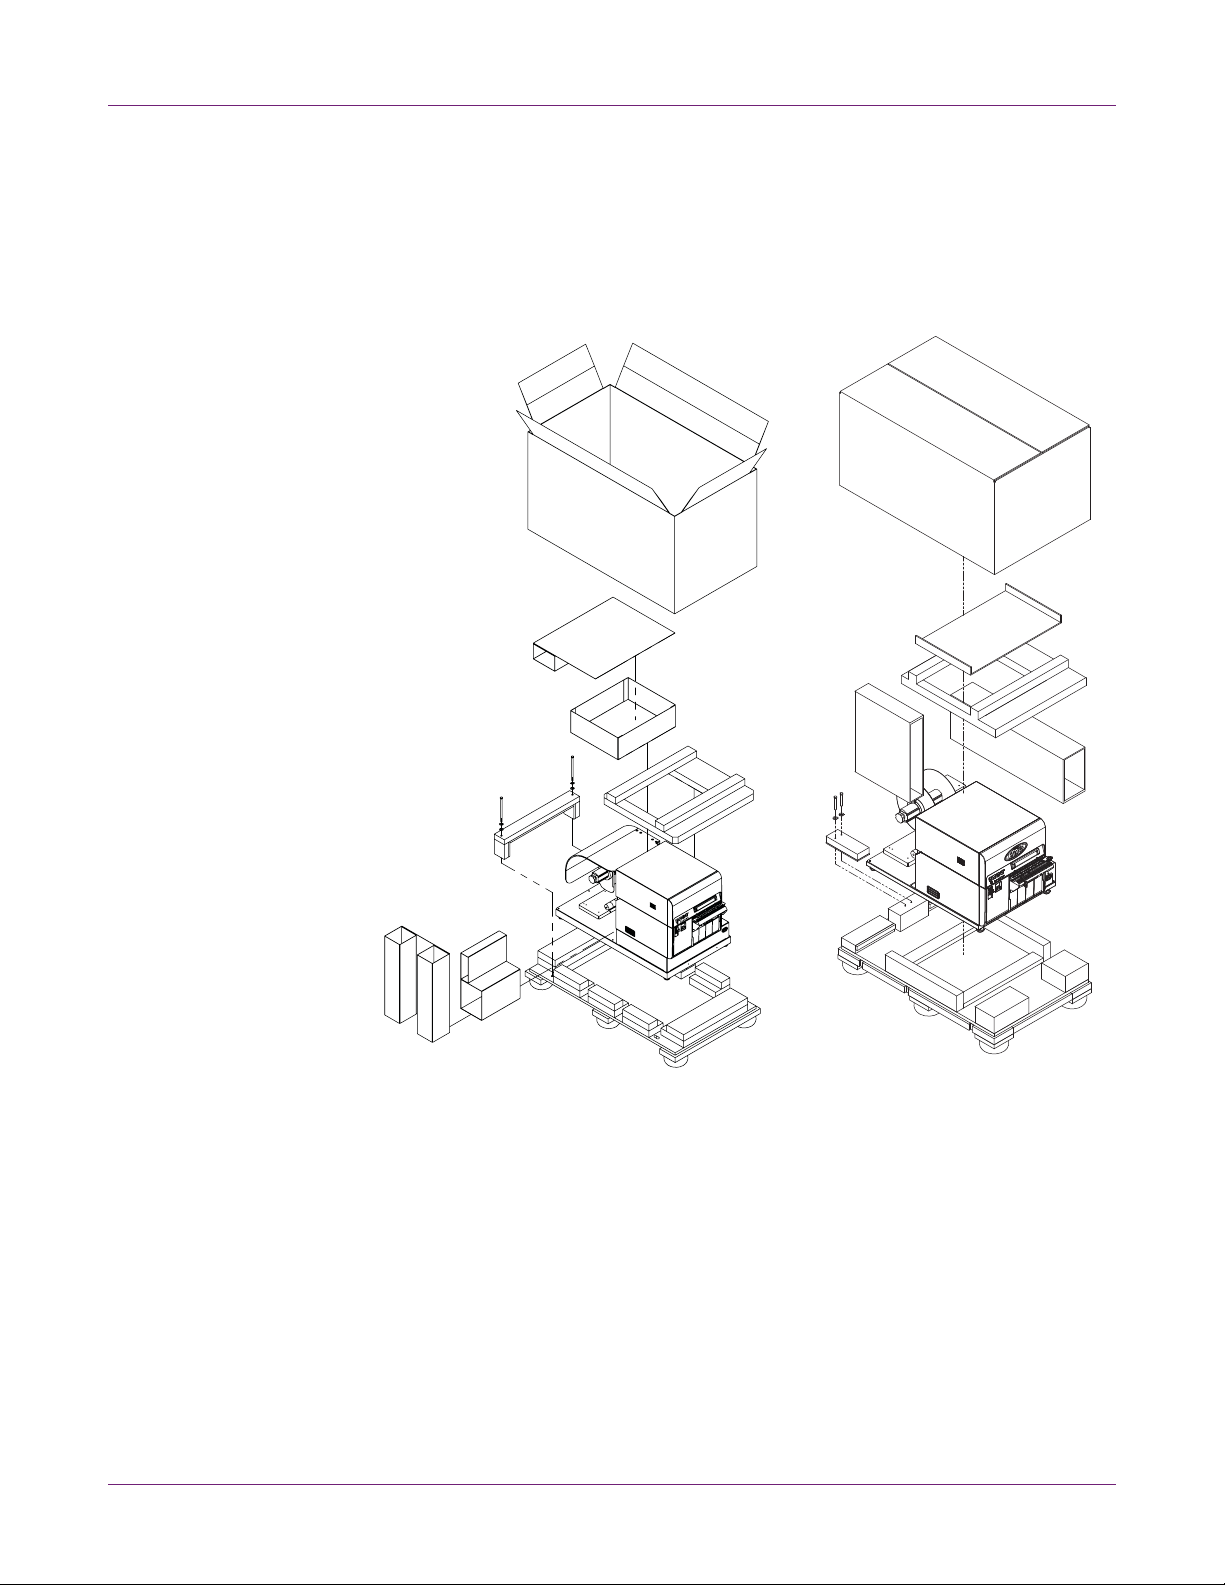
Unpacking the Printer
The printer is secured using cushioning materials to protect it against vibrations and
shock during transportation. Use the following procedure to unpack the printer. Keep
the packing materials for future transportation.
1 Remove the cardboard box and other shipping materials from the pallet.
Quick Start Guide
Note: The printer model on the left has the roll cover. The printer model on the
right does not have the roll cover.
2 Use a wrench to remove the two 9/16” bolts from the bracket that secures the
printer to the pallet. Remove the bracket.
Kiaro! 200 User Guide 3

Quick Start Guide
3 Holding the black frame at the bottom of the printer, lift the printer to take it out from
the pallet base. Lift from the illustrated points. Do not hold the front side of the
printer.
Note: The printer can weigh up to 170 pounds (77 kilograms). Three persons are
required to lift the printer. Lift only by the black frame on the bottom of the printer.
Do not grasp any other part of the printer to lift it. Do not lift the unit by the print
engine. Attempting to lift the printer in an improper position can result in fall of the
printer or injury.
4 Place the printer on a horizontal table. Then remove all pieces of packing tape and
cushioning materials visible on the exterior of the printer.
5 If necessary, you can rotate the feet on the bottom of the frame to adjust the height
of each corner. Use these adjustments to keep the printer level.
Checking the Included Parts
Check to make sure the following items are included with the printer.
• Starter ink tanks (one for each color)
• Starter roll of labels
• AC power cable
• USB cable
• Quick Start Guide
• Installation CD
4 Kiaro! 200 User Guide

Installing the Printer
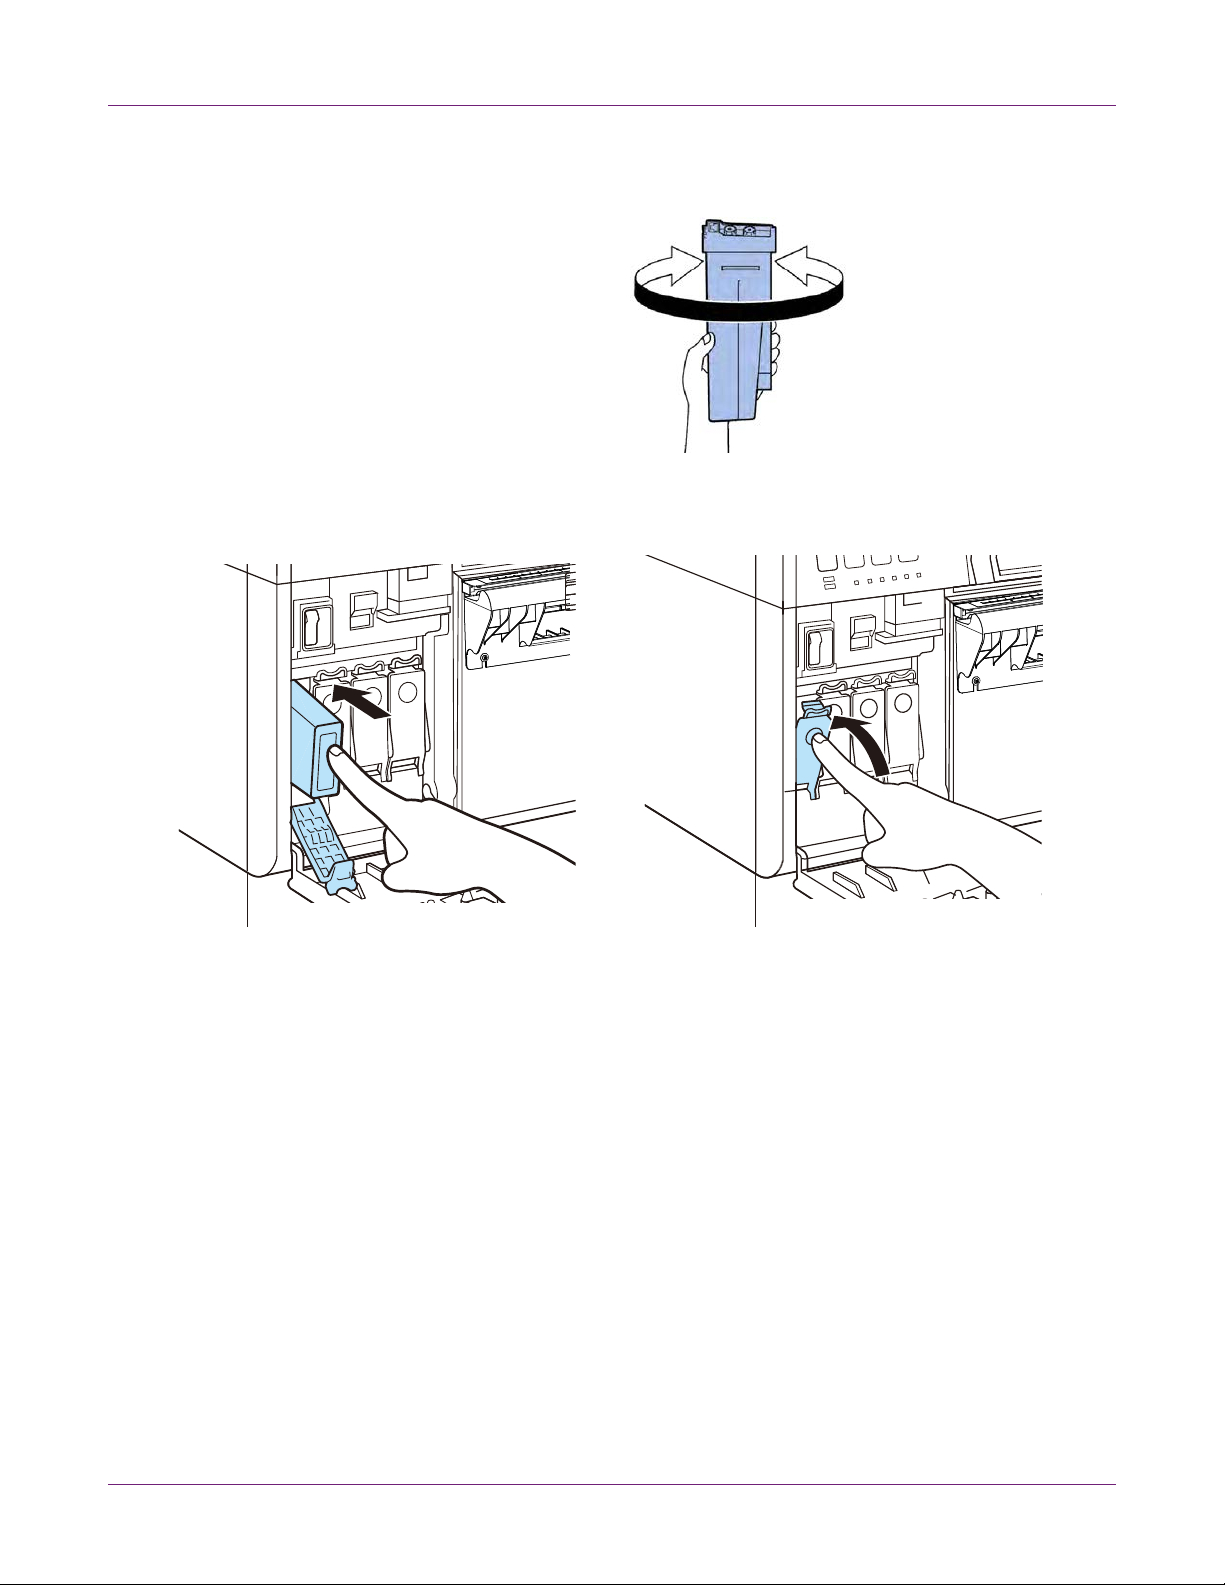
Loading Ink Tanks
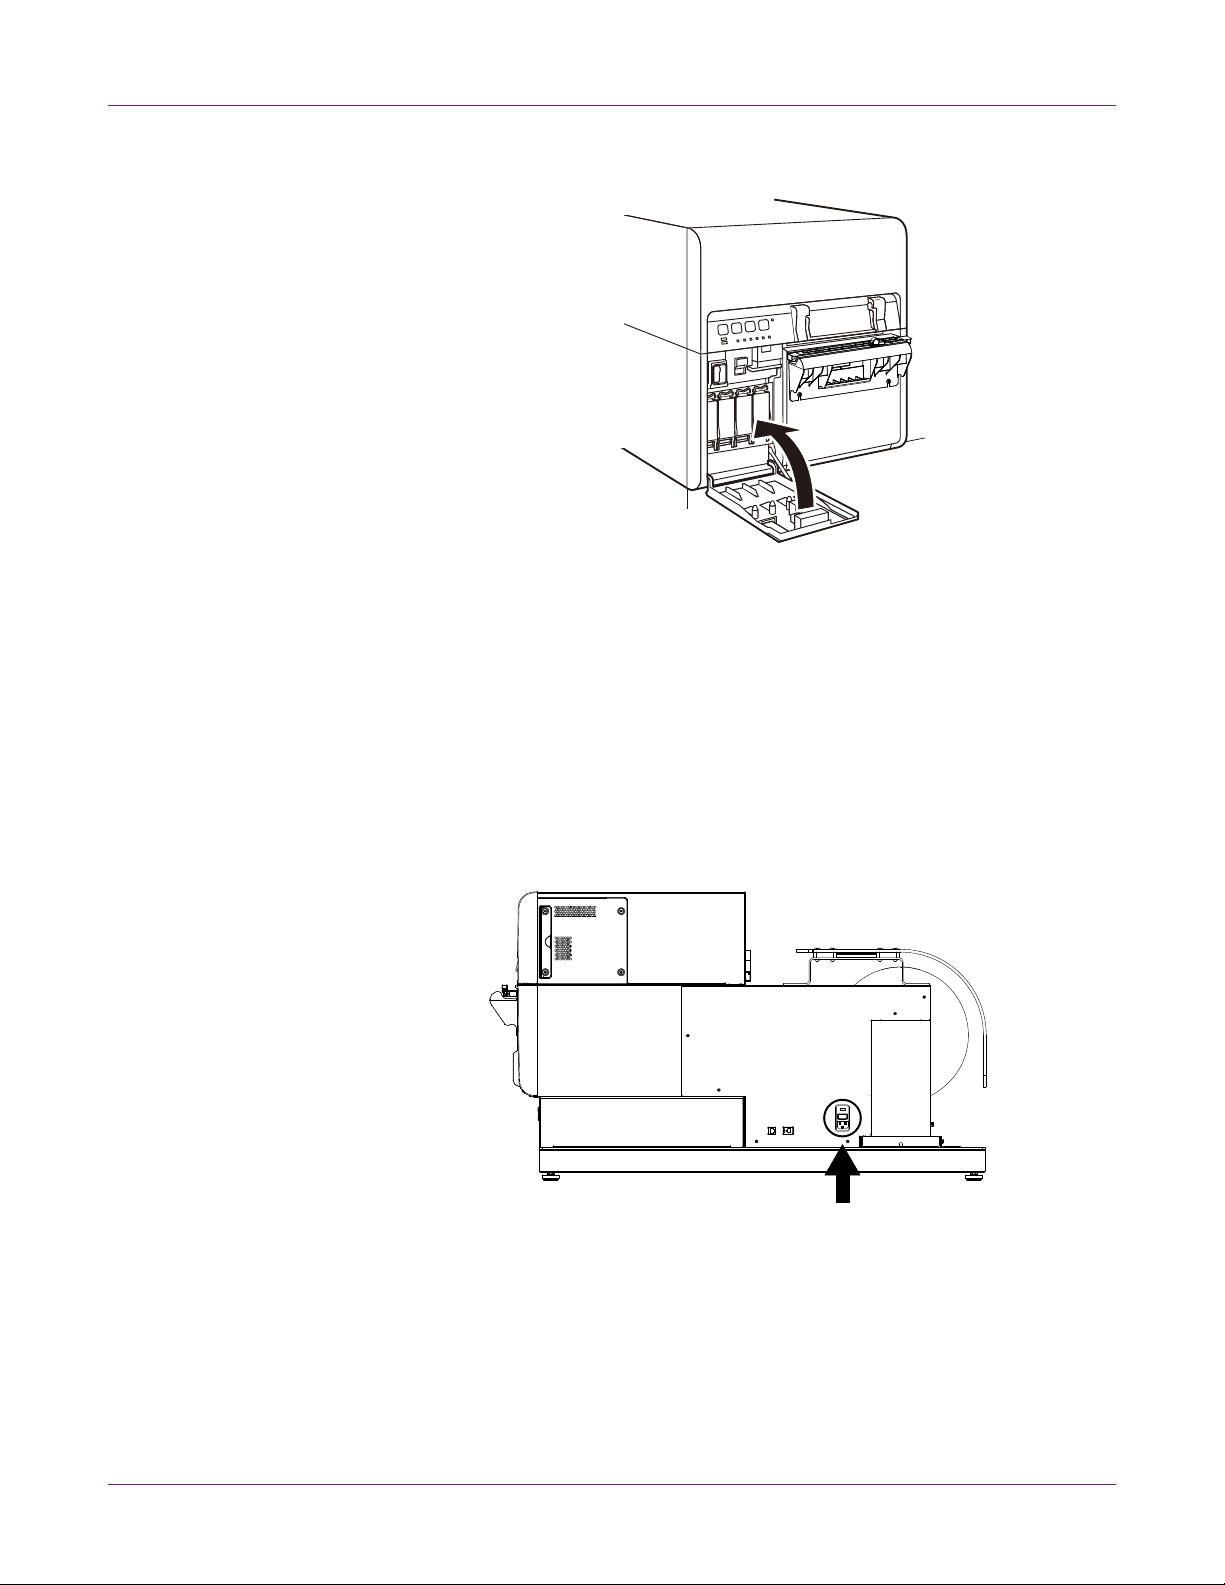
1 Open the ink tank door.
2 Open the ink tank lever for each color while pushing it downward.
Quick Start Guide
3 Take out the ink tanks from the package. Then remove the packing materials.
Do not touch the ink outlet and terminal to prevent soiling of the surrounding work
area, damage to the ink tank, and poor printing. Never drop or apply excessive
force to an ink tank.
4 If you are using the Kiaro! 200D printer, rotate the ink tank to stir the ink.
Kiaro! 200 User Guide 5
Quick Start Guide
Note: This step applies only to the Kiaro! 200D ink. If you are using the standard
Kiaro! 200, skip this step.
5 Slowly insert the ink tank as far as it will go, and then close the ink tank lever.
Caution: There are sharp pins in the ink tank slot. Never put your fingers in this
area.
Note: The printer is designed so that ink tanks cannot be inserted in wrong ink
tank slots. Do not attempt to insert ink tanks in wrong ink tank slots forcibly.
6 Kiaro! 200 User Guide
6 After loading all ink tanks, close the ink tank door.
Initial Ink Filling
Caution: Do not turn the power off during ink loading.
Quick Start Guide
Caution: If the power is turned off during ink loading, the printer stops ink loading. In
such a case, turn on the power to start ink loading again.
Caution: Restarting the ink loading causes extra ink waste.
1 Connect the power cord to the printer. Use the power cord appropriate for the
power supply used at the installation site.
Caution: Never use a wrong power cord.
2 Connect the power cord to the outlet.
3 Turn on the main power switch. This switch is located directly above where the
power cord connects to the unit.
Kiaro! 200 User Guide 7
Quick Start Guide
[1]
[2]
[3]
[4]
[5]
[2]
[4]
[3]
[1]
[5]
Loading Media
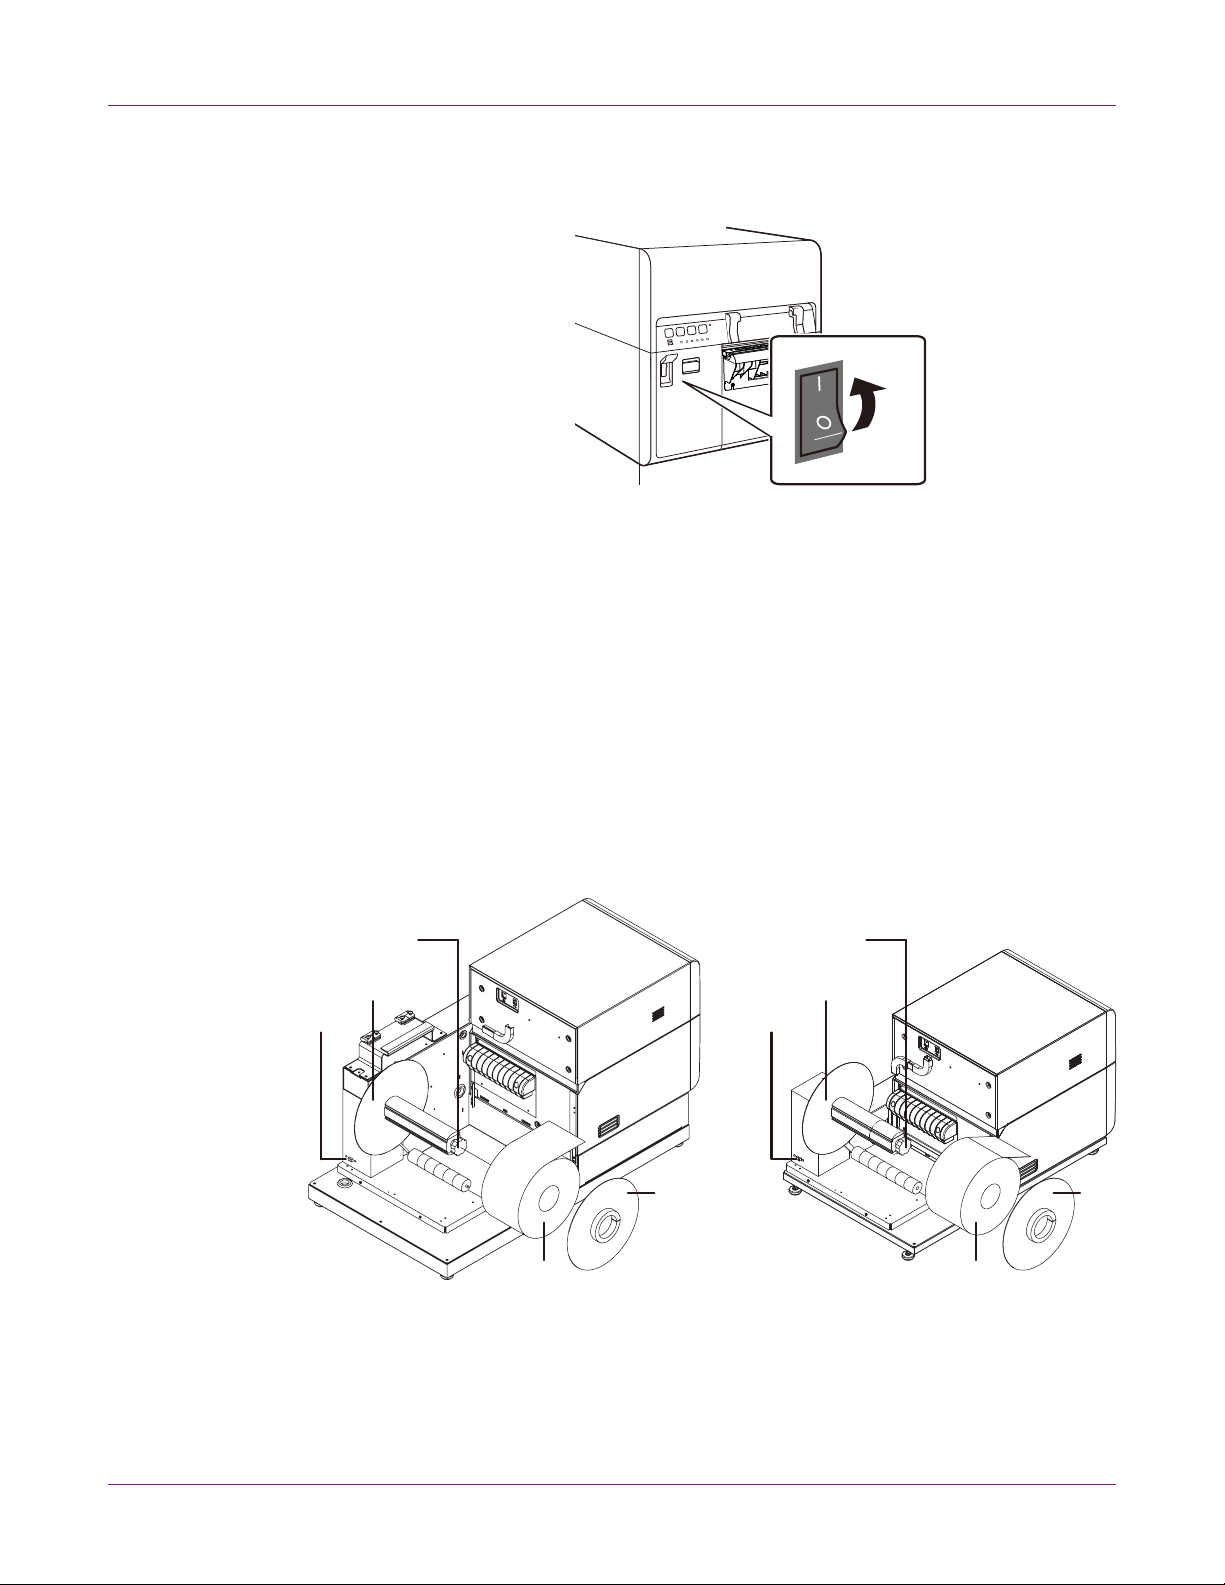
4 Turn on the printer power switch. Initial ink filling starts automatically when the
power is turned on.
When ink loading is complete, the STATUS LED changes from flashing to lit and a
beep sounds.
Note: Initial ink loading takes about 30 minutes.
Some steps for loading media will differ slightly depending on the Kiaro! 200 model you
are using. You can identify the Kiaro! 200 model based on whether it has a roll cover
over the supply mandrel area.
1 If your printer model has a roll cover, open it.
2 Ensure the power switch [1] on the supply mandrel is in the off position.
Note: The printer model on the left has the roll cover (not illustrated). The printer
model on the right does not have the roll cover.
Caution: Do not turn the supply mandrel by hand to advance the media. Turning
the mandrel by hand can result in printer damage.
8 Kiaro! 200 User Guide

Quick Start Guide
3 Turn the mandrel adjustment knob [3] counterclockwise to loosen the mandrel.
4 Remove the outer flange [4] from the mandrel.
5 Orient a roll of label media [5] as illustrated and seat it on the mandrel. Ensure the
side of the roll contacts the inner flange [2].
6 Reinstall the outer flange [4]. Refer to the information below to determine whether
to tighten the mandrel.
• If your printer model has a roll cover, turn the mandrel adjustment knob [3]
clockwise to tighten the mandrel.
• If your printer model does not have a roll cover, do not tighten the mandrel at
this time.
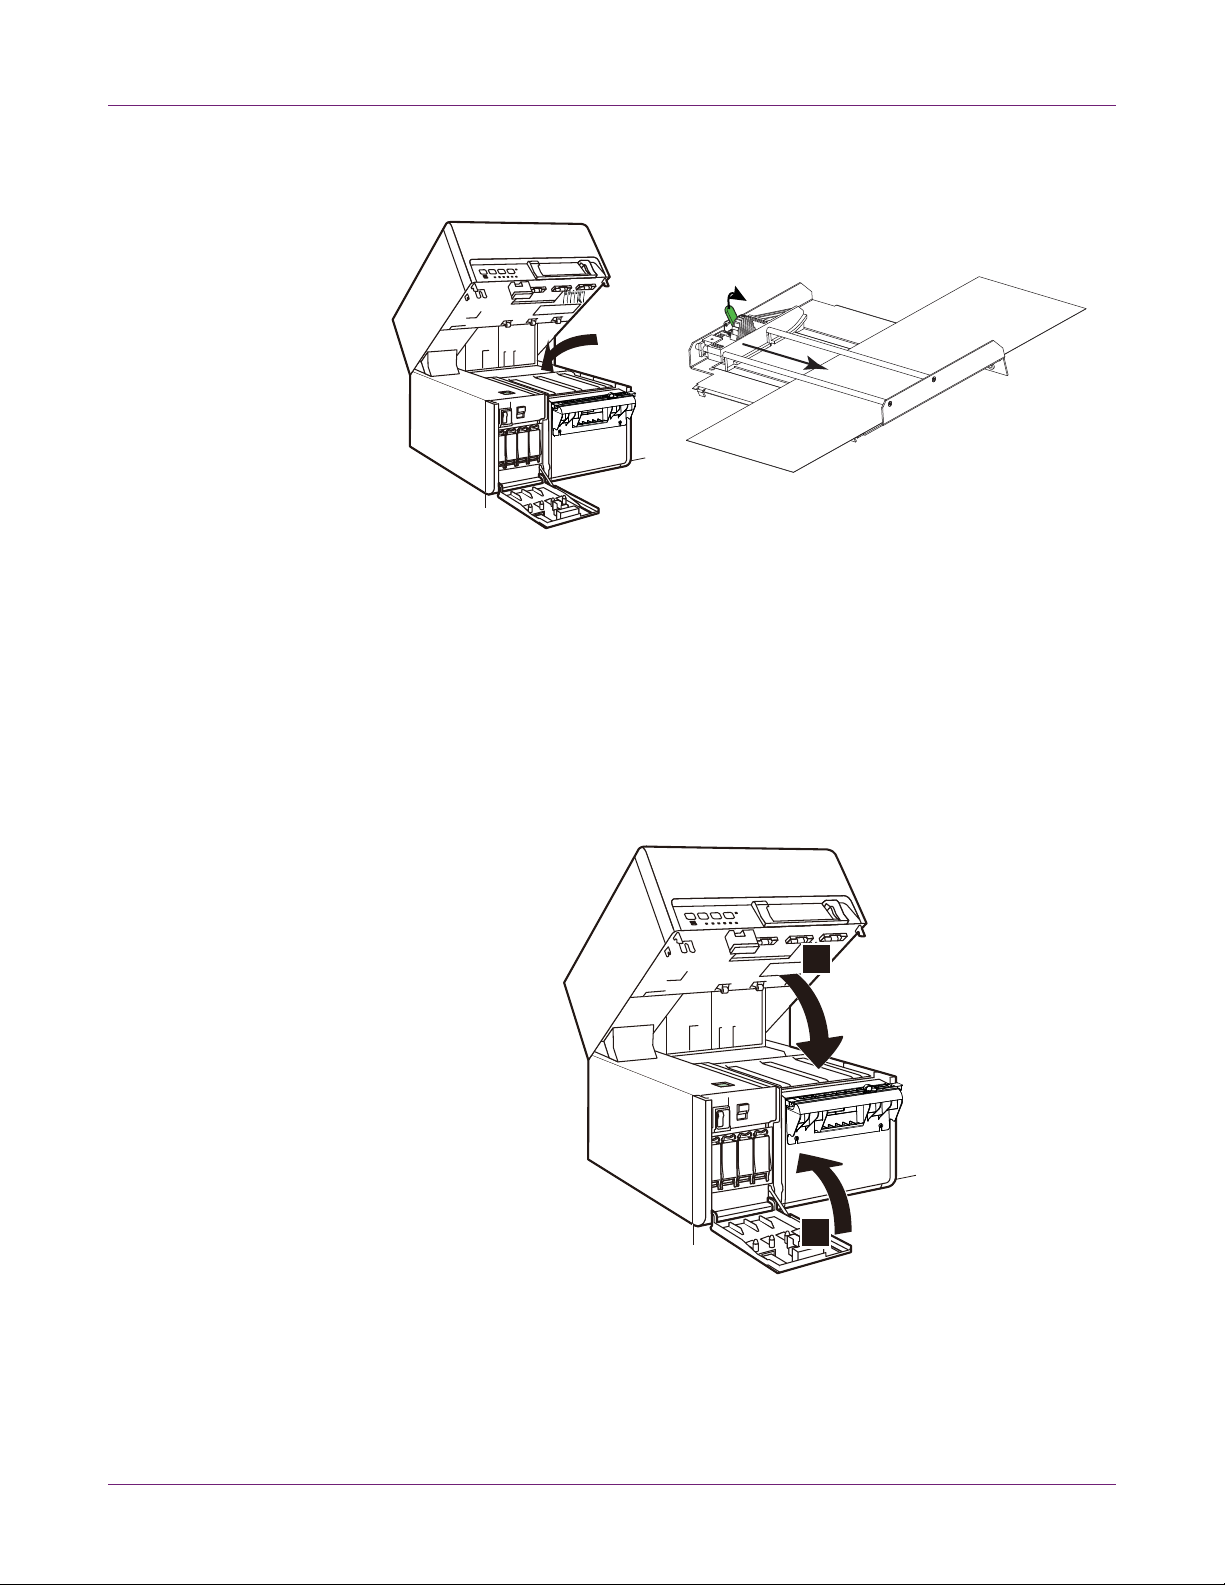
7 Open the ink tank door.
8 Push the upper unit release lever up to open the upper unit.
Kiaro! 200 User Guide 9
Quick Start Guide
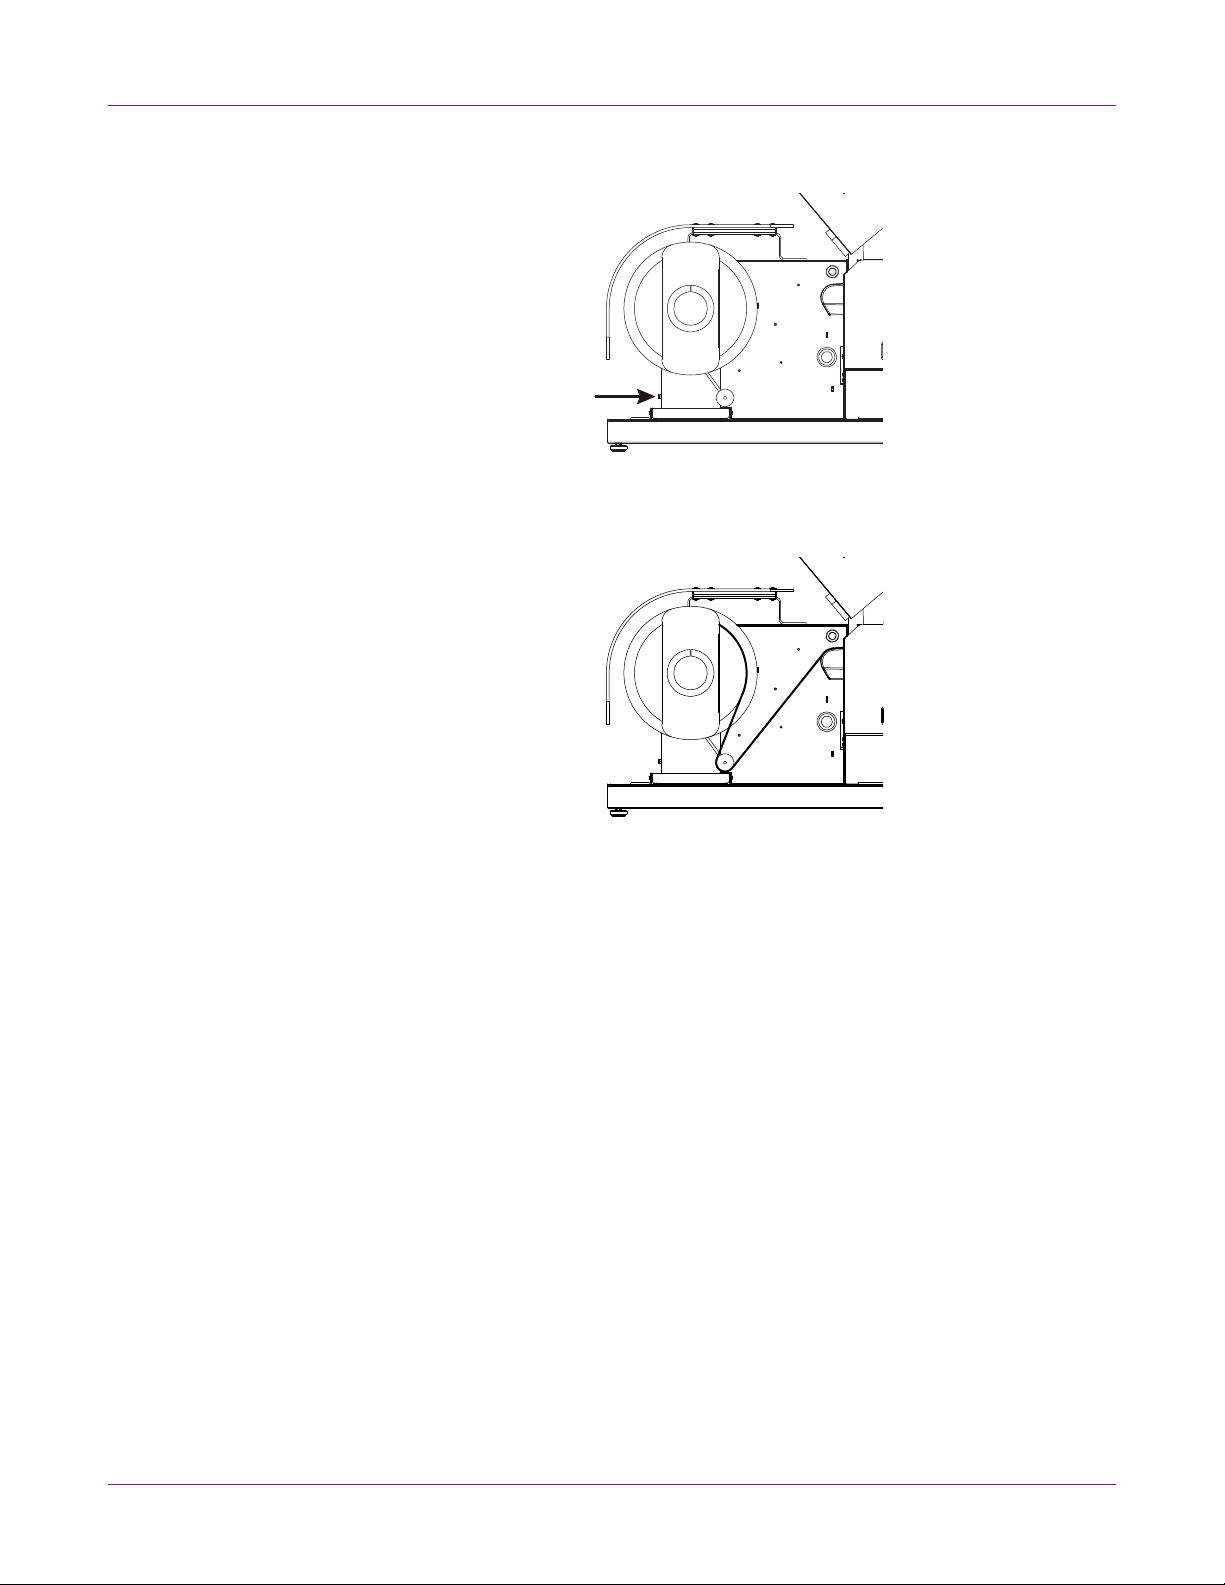
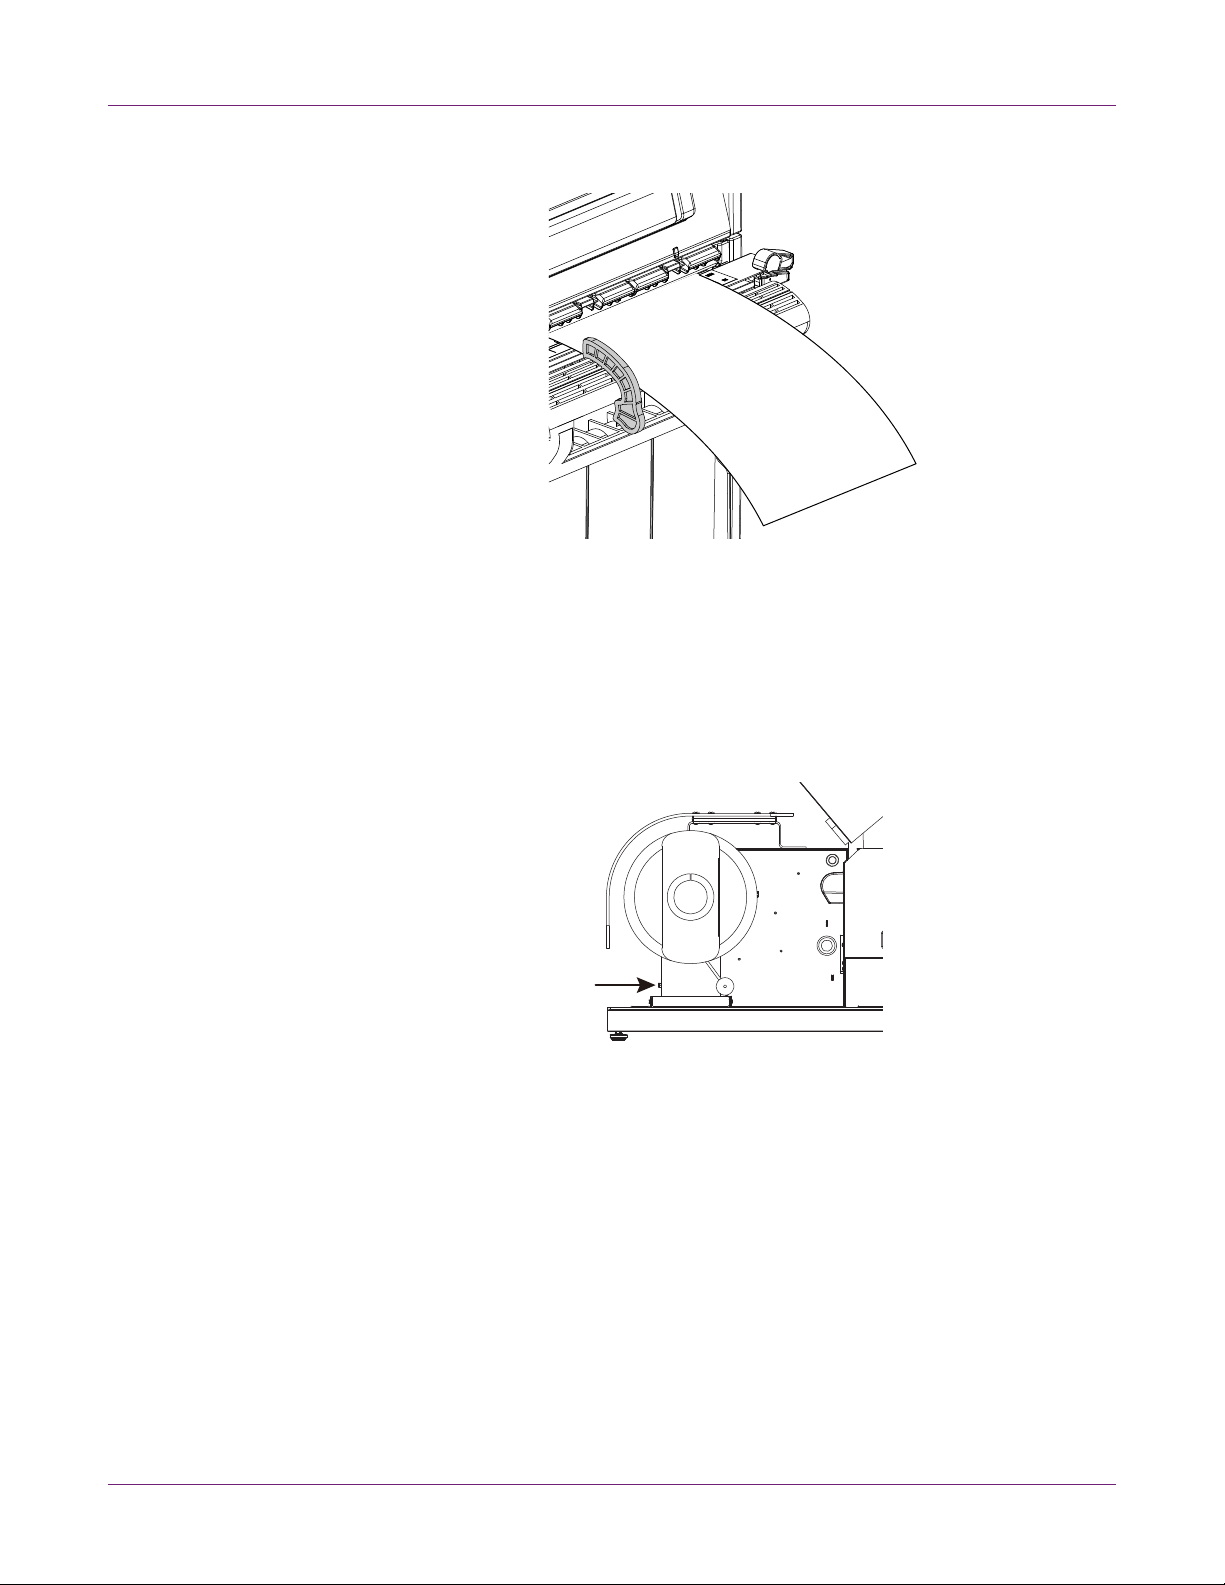
9 Turn the power switch on the supply mandrel to the on po sitio n.
10 Feed the media under the dancer arm and up into th e entry slot o n the rear of the
printer. The media path is illustrated below.
• If your printer model has a roll cover, the mandrel will unwind and feed media
as the dancer arm is lifted. Do not turn th e supply mandrel by hand to advance
the media.
• If your printer model does not have a roll cover, ensure the mandrel is not
tightened at this time. The media roll should rotate freely on the mandrel during
this process.
10 Kiaro! 200 User Guide
Quick Start Guide
11 Adjust the input guide inside the upper unit. Press the green lever and slide the
guide just before it contacts the media. Then release the green lever.
1
Label media should be able to move smoothly with out being hind ered by the input
guide.
Note: The guide should be positioned to just touch the edge of the liner and not
cause exposed liner to curl on either side.
12 Pull the media until it advances slightly past the manual cutter.
13 If your printer model does not have a roll cove r, turn the m andrel adjustmen t knob
[3] clockwise to tighten the mandrel.
14 Close the upper unit and then close the ink tank door.
1
2
Kiaro! 200 User Guide 11
Quick Start Guide
15 Position the media exit guide just before it contacts the media.
Label media should be able to move smoothly without being hindered by th e exit
guide.
Note: The guide should be positioned to just touch the edge of the liner and not
cause exposed liner to curl.
16 If your printer model has a roll cover, close it.
17 Ensure the power switch on the supply mandrel is in the on position.
Verifying Label Width
When designing labels, ensure the width of your label design matches the width o f the
media you will be using. If your label file is wider than the media, the printer will attempt
to print the full width of your label. In this situation, ink will be injected into the transport
assembly and will require cleaning.
Use the ruler on the manual cutter to verify the width of your label media before printing.
12 Kiaro! 200 User Guide

Installing the Printer Driver (USB)
Use the following instructions to install the printer via USB 2.0 on Windows XP,
Windows Vista, Windows 7, or Windows 8.
Note: When the Windows logo testing, publisher verification, or digital signing warning
messages appear, choose to continue the installation. These messages indicate that
the driver has not been “logo tested” by Microsoft. However, it has been tested
thoroughly by QuickLabel, and will not cause any of the problems listed in these
messages.
1 Ensure the Kiaro! 200 is powered on but not connected to your computer via the
USB cable.
2 Power on your computer and insert the Kiaro! 200 Installer CD in the CD drive. The
Installer CD wizard will open. Choose Next.
Note: If the autorun program does not start automatically, use Windows Explorer
to launch the “Setup.exe” file located in the root level of the CD.
3 Use the driver installation wizard to install the driver. Refer to the following
information during this process.
Quick Start Guide
• Choose the USB connection method when prompted.
• Select an installation location for the Kiaro! 200 Maintenance Utility when
prompted.
Choose Finish in the installation wizard after successfully installing the Kiaro! 200
Maintenance Utility and driver.
4 Connect the smaller end of the USB cable to the Kiaro! 200 USB type B port.
Connect the larger end of the USB cable to an available USB 2.0 port on your
computer.
5 Once the USB connection is made, the Windows Found New Hardware Wizard will
start. This wizard will guide you through the rest of the installation process. Refer
to the following general guidelines when using this wizard.
• If you are prompted to connect to Windows Update to search for software,
choose no.
Kiaro! 200 User Guide 13

Quick Start Guide
• Choose to install the software automatically when you are presented with this
option.
• If the Windows logo testing or publisher verification warning messages appear,
choose to continue the installation.
Resolving Windows 7 and Windows 8 USB Installation Issues
When you install the printer driver via USB, you first run the installation wizard on the
Kiaro! 200 Installer CD and then connect the printer to your PC via the USB cable.
If you connected the USB cable before running the installation wizard on the Kiar o! 200
Installation CD, Windows 7 and Windows 8 will not recognize the printer correctly. In
this case, the Kiaro! 200 will be listed as an Unspecified item in the Devices and
Printers window.
Use the following procedure to correct this issue. This procedure assumes you have
already installed the printer driver via the Kiaro! 200 Installer CD.
Note: This procedure requires administrator level access in Windows.
1 Open the Devices and Printers window in Windows 7 or Windows 8.
14 Kiaro! 200 User Guide
Quick Start Guide
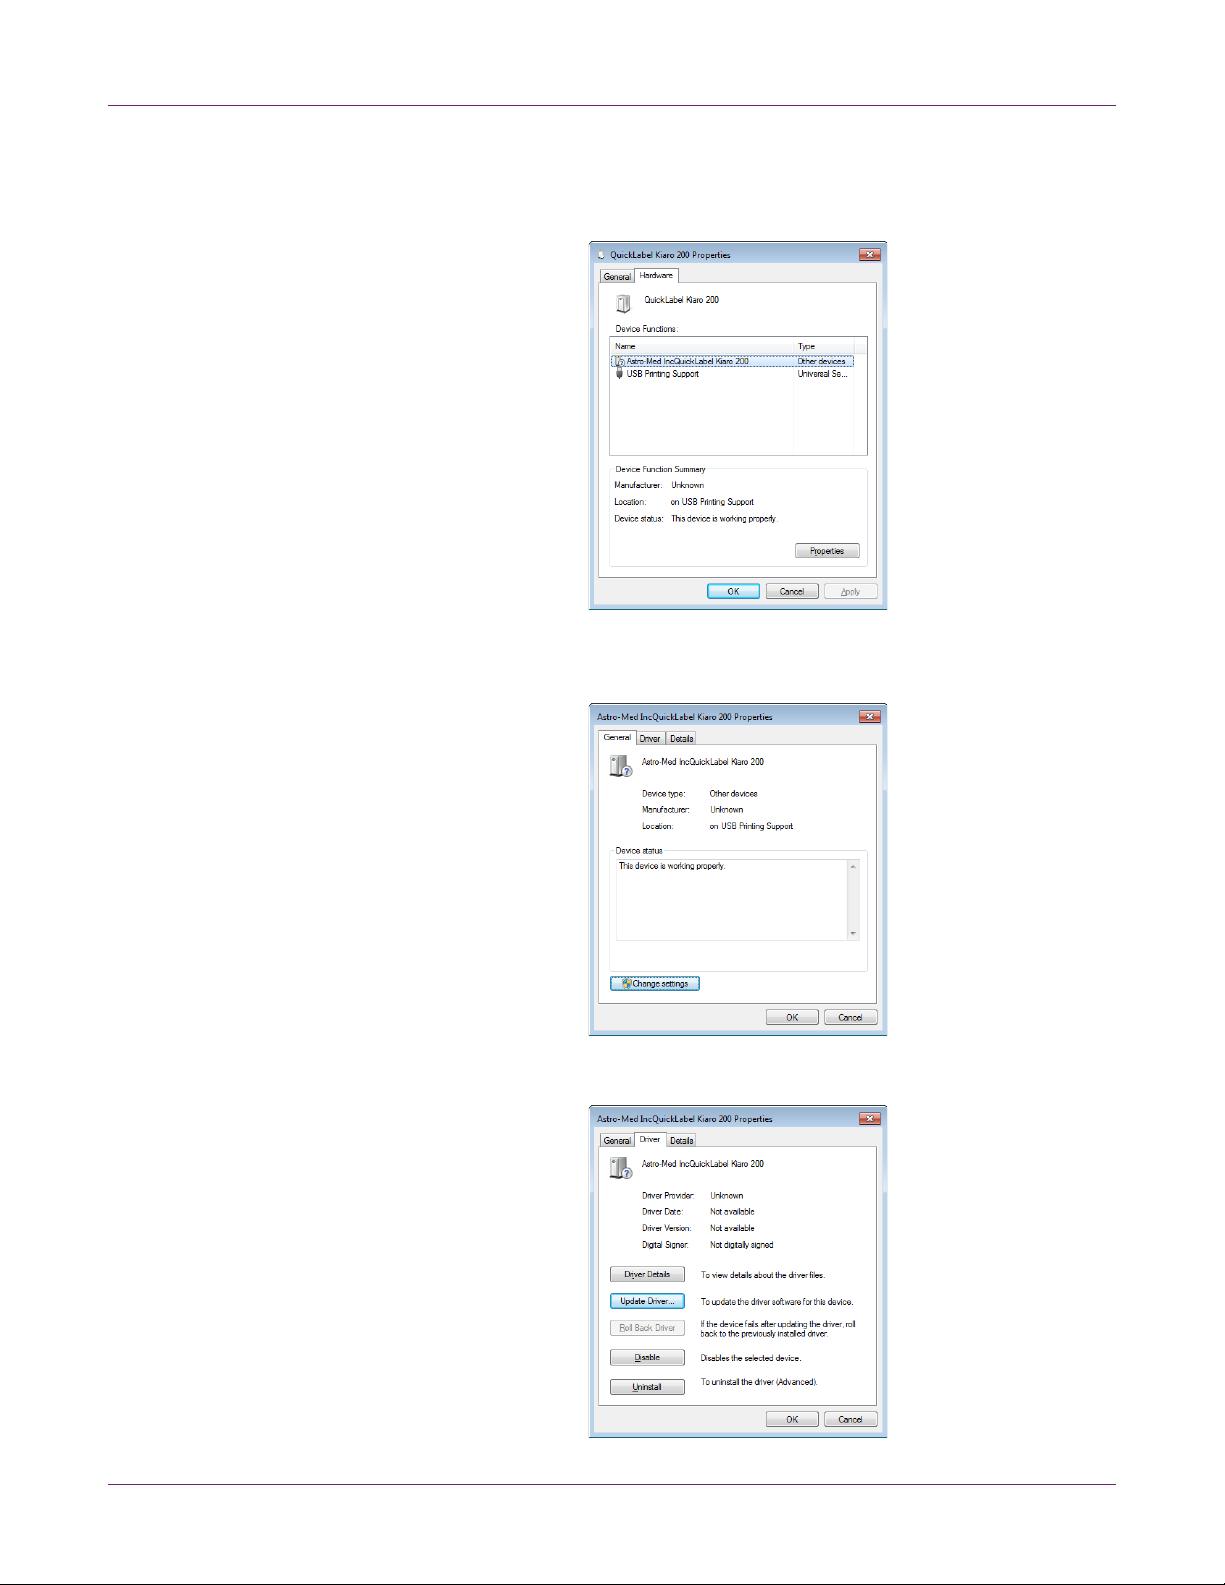
2 Right-click the QuickLabel Kiaro 200 in the Unspecified list. Then choose
Properties. The QuickLabel Kiaro 200 Properties window will open. Choose the
Hardware tab.
3 Select Astro-Med IncQuickLabel Kiaro 200 and choose Properties. The Properties
window will open. Choose the General tab.
4 Choose Change Settings. Then choose the Driver tab.
Kiaro! 200 User Guide 15

Quick Start Guide
5 Choose Update Driver. When you are prompted, select the Search automatically
for updated driver software option. Windows will locate the driver on your system
and create a printer item.
Installing the Printer Driver (Network)
Use the following instructions to install the printer via a network connectio n on Windows
XP, Windows Vista, Windows 7, or Windows 8.
For detailed information about the topic of networking, refer to documentation
applicable to your network environment and/or contact your network administrator.
The printer uses the following ports: TCP 50000,50001,9100, UPD 50001,50002. The
printer cannot be used on a network where other devices on the network use the same
ports.
Note: When the Windows logo testing, publisher verification, or digital signing warning
messages appear, choose to continue the installation. These messages indicate that
the driver has not been “logo tested” by Microsoft. However, it has been tested
thoroughly by QuickLabel, and will not cause any of the problems listed in these
messages.
1 Ensure the printer is powered on and connected to the network via a LAN cable.
2 Power on your computer and insert the Kiaro! 200 Installer CD in the CD drive. The
Installer CD wizard will open. Choose Next.
Note: If the autorun program does not start automatically, use Windows Explorer
to launch the “Setup.exe” file located in the root level of the CD.
3 Use the driver installation wizard to install the driver. Refer to the following
information during this process.
• Choose the Ethernet connection method when prompted.
• Allow the installer to access the network if prompted.
• Choose the Kiaro! 200 printer in the printer list when prompted . Alternately, you
can choose to find a specific printer by IP address or MAC address.
16 Kiaro! 200 User Guide
 Loading...