

Page 1

A Guide to QuarkXPress
Server 8.5
Page 2

CONTENTS
Contents
About this Guide...............................................................................6
What we're assuming about you............................................................................6
Where to go for help..............................................................................................6
Conventions............................................................................................................7
Getting started with QuarkXPress Server........................................8
Understanding QuarkXPress Server.......................................................................8
Server templates and static projects...............................................................................9
The document pool.........................................................................................................9
Projects and layouts........................................................................................................9
Caching...........................................................................................................................9
QuarkXPress Server preferences...................................................................................10
Quark License Administrator.........................................................................................10
Master-subrenderer environment..................................................................................10
The Keepalive script......................................................................................................11
Understanding QuarkXPress Server XTensions software.....................................11
The QuarkXPress Server XTensions API........................................................................11
Launching QuarkXPress Server.............................................................................12
Exit Codes.....................................................................................................................13
The QuarkXPress Server user interface..........................................15
Server Configuration dialog box...........................................................................15
Server (Tab)...................................................................................................................15
Logging (Tab)................................................................................................................19
HTTP (Tab).....................................................................................................................21
Email (Tab).....................................................................................................................22
Server preferences................................................................................................23
Preferences — Application — Display..........................................................................24
Preferences — Application — Input Settings................................................................24
Preferences — Application — Font Fallback.................................................................25
Preferences — Application — Open and Save.............................................................25
Preferences — Application — XTensions Manager......................................................25
Preferences — Application — Fonts.............................................................................26
Preferences — Application — EPS................................................................................26
Preferences — Application — Error Reporting.............................................................26
ii | A GUIDE TO QUARKXPRESS SERVER 8.5
Page 3

CONTENTS
Preferences — Application — Full Res Preview............................................................26
Preferences — Application — Job Jackets...................................................................27
Preferences — Application — Modifier.........................................................................27
Preferences — Application — PDF...............................................................................28
Preferences — Application — PSD Import....................................................................28
Preferences — Application — Placeholders..................................................................29
Preferences — Application — Fraction/Price................................................................29
Preferences — Application — Picture Effects...............................................................30
Preferences — Project — General.................................................................................30
Preferences — Project — XML Import..........................................................................30
Preferences — Layout — General.................................................................................30
Preferences — Layout — Measurements......................................................................31
Preferences — Layout — Paragraph.............................................................................32
Preferences — Layout — Character..............................................................................33
Preferences — Layout — Trapping...............................................................................35
Preferences — Layout — Grid Cell Fill..........................................................................36
Preferences — Layout — Color Manager......................................................................36
Preferences — Layout — Layers....................................................................................37
Style sheets...........................................................................................................37
Creating and editing character style sheets..................................................................38
Creating and editing paragraph style sheets................................................................39
Colors....................................................................................................................40
Creating a color.............................................................................................................41
Trap Specifications........................................................................................................42
H&Js......................................................................................................................44
Controlling hyphenation and justification.....................................................................45
Output styles........................................................................................................47
Working with EPS styles................................................................................................48
Working with PPML Styles.............................................................................................49
Working with PDF Styles...............................................................................................51
Working with print styles...............................................................................................52
Font mapping........................................................................................................54
Source setups........................................................................................................55
Creating a source setup................................................................................................55
Output setups.......................................................................................................57
Creating an output setup..............................................................................................57
PPML consumers...................................................................................................58
Working with PPML consumers.....................................................................................59
Server XTensions Manager...................................................................................60
Status Monitor......................................................................................................62
Other QuarkXPress Server menu items................................................................63
A GUIDE TO QUARKXPRESS SERVER 8.5 | iii
Page 4

CONTENTS
Creating URL requests....................................................................65
Understanding URL requests................................................................................65
Understanding QuarkXPress Server namespaces.................................................66
Looking up a namespace..............................................................................................66
Understanding QuarkXPress Server parameters..................................................67
Looking up a parameter................................................................................................67
QuarkXPress Server Web Integration Guide overview........................................67
Render types.................................................................................................................67
General parameters.......................................................................................................67
Specialized parameters.................................................................................................68
Server control parameters.............................................................................................68
Document providers......................................................................................................68
Preference administration parameters.................................................................68
Modifying layouts with XML...........................................................71
QuarkXPress Server XTensions software.......................................72
CopyDeskArticle XTensions software...................................................................72
Rendering articles..........................................................................................................72
Exporting articles...........................................................................................................72
Adding articles to projects............................................................................................73
Creating and deleting components..............................................................................73
PDF Filter XTensions software.............................................................................74
PPML Export XTensions software........................................................................74
Modifier XTensions software................................................................................75
Using Modifier XTensions software...............................................................................76
Creating XML for Modifier XTensions software............................................................76
QuarkVista XTensions software............................................................................76
Creating preset files......................................................................................................77
Using QuarkVista XTensions software...........................................................................77
Removing QuarkVista effects........................................................................................78
QuarkXPress Server Layer XTensions software...................................................78
InteractiveDesignerSXT Server XTensions software............................................79
Telegraph XTensions software........................................................80
Setting Telegraph preferences.............................................................................80
Adding a server.............................................................................................................81
Using Telegraph XTensions software...................................................................82
Identifying QuarkXPress items and groups...................................................................82
Naming items and groups.............................................................................................83
Uploading templates.....................................................................................................84
Uploading missing or modified pictures.......................................................................85
iv | A GUIDE TO QUARKXPRESS SERVER 8.5
Page 5

CONTENTS
QuarkXPress Server Monitor..........................................................86
QuarkXPress Server Manager.........................................................87
Understanding QuarkXPress Server Manager......................................................87
Load balancing..............................................................................................................87
Request timeout interval...............................................................................................88
Determining QuarkXPress Server instance availability..................................................89
Logging.........................................................................................................................89
Caching.........................................................................................................................90
Web services.................................................................................................................90
Working with QuarkXPress Server Manager........................................................90
Starting QuarkXPress Server Manager..........................................................................91
Request handler binding...............................................................................................93
Configuring QuarkXPress Server instances...................................................................93
Managing the cache......................................................................................................97
Managing logs...............................................................................................................99
Controlling load balancing..........................................................................................102
Using a proxy server....................................................................................................103
Generating automatic e-mail messages......................................................................104
Using other global settings.........................................................................................105
Saving a server configuration......................................................................................107
Exporting a server configuration.................................................................................107
Using custom error messages.....................................................................................107
Sending requests from a browser...............................................................................109
QuarkXPress Server Manager Scripting Environment..................111
Scripting Environment configuration..................................................................111
Working with the Scripting Environment...........................................................112
Creating a script.................................................................................................112
Executing a script manually................................................................................113
Scheduling a script..............................................................................................114
Glossary........................................................................................115
Legal notices.................................................................................116
A GUIDE TO QUARKXPRESS SERVER 8.5 | v
Page 6

ABOUT THIS GUIDE
About this Guide
You do not need to read this guide from cover to cover. Instead, use this guide to quickly
look up information, find out what you need to know, and proceed with your work. Use
the detailed table of contents at the beginning of the guide to find information quickly.
What we're assuming about you
In writing this guide, we assume that you are familiar with your computer and know how
to:
• Launch an application
• Open, save, and close files
• Use menus, dialog boxes, and palettes
• Work within a networked computing environment
• Use the mouse, keyboard commands, and modifier keys
Consult the documentation provided with your computer or other resources if you need
more information in any of these areas.
Where to go for help
If you're new to QuarkXPress® Server, or if you want to explore one of its other longstanding
features, consult the following resources:
• A Guide to QuarkXPress Server
• The QuarkXPress Server Web Integration Guide
• Third-party books
• General books about desktop publishing
If your issues are at the system level — saving files, moving files, activating fonts, for
example — consult the documentation resources provided with your computer.
6 | A GUIDE TO QUARKXPRESS SERVER 8.5
Page 7

ABOUT THIS GUIDE
Conventions
Formatting conventions highlight information to help you quickly find what you need.
• Bold type style: The names of all dialog boxes, fields, and other controls are set in bold
type. For example: "Click OK."
• References: In descriptions of features, parenthetical references guide you in accessing
those features. For example: "The Find/Change dialog box (Edit menu) lets you find and
replace text."
• Arrows: You will often see arrows (>), which map out the menu path to a feature. For
example: "Choose Edit > Style Sheets to display the Style Sheets dialog box."
• Icons: Although many tools and buttons are referenced by name, which you can see by
displaying ToolTips, in some cases icons are shown for easy identification. For example,
"Click the button on the Measurements palette to center text."
• Cross-platform issues: This application is quite consistent across operating systems. However,
some labels, buttons, key combinations, and other aspects of the application must differ
between Mac OS® and Windows® because of user interface conventions or other factors.
In such cases, both the Mac OS and Windows versions are presented, separated by a slash,
with the Mac OS version presented first. For example, if the Mac OS version of a button
is labeled Select, and the Windows version is labeled Browse, you are directed to "Click
Select/Browse." More complex cross-platform differences are mentioned in notes or
parenthetical statements.
A GUIDE TO QUARKXPRESS SERVER 8.5 | 7
Page 8
GETTING STARTED WITH QUARKXPRESS SERVER
Getting started with
QuarkXPress Server
QuarkXPress Server lets you render QuarkXPress projects in a variety of formats.
Understanding QuarkXPress Server
QuarkXPress Server lets you output customized QuarkXPress layouts in a variety of formats
— including JPEG, Portable Document Format (PDF), and PostScript® — from a centralized
QuarkXPress Server application. To send a request to a QuarkXPress Server application, all
you need to do is enter a URL into your Web browser's address field. For example, the
following URL instructs the QuarkXPress Server application named "QXPServer" to return
the file "MyProject.qxp" as a PDF file:
http://QXPServer:8080/pdf/MyProject.qxp
The QuarkXPress Server application receives these requests, renders (creates) the requested
projects in the requested formats, and then returns the rendered file to the client application
(in this case, the Web browser).
The format of QuarkXPress Server URL requests is described in detail in "Creating URL
requests" and in the QuarkXPress Server Web Integration Guide.
You can also create custom applications that communicate with a QuarkXPress Server
application using HTTP, Simple Object Access Protocol (SOAP), or another protocol. For
more information, see the QuarkXPress Server Web Integration Guide.
You can think of QuarkXPress Server as a special version of QuarkXPress that runs on a
server with the following main differences:
• Instead of accepting input from a keyboard and mouse, QuarkXPress Server accepts input
in the form of URLs and other types of requests.
• Instead of sending a project to a printer, QuarkXPress Server renders (creates) output in a
particular format and sends the rendered file to a client.
8 | A GUIDE TO QUARKXPRESS SERVER 8.5
Page 9

GETTING STARTED WITH QUARKXPRESS SERVER
Server templates and static projects
QuarkXPress Server can open, render, and serve two types of projects:
• Static projects are QuarkXPress projects that can be rendered and served as-is in a variety
of formats by the QuarkXPress Server application. For example, you might make a product
manual available as a static project and allow customers to download that manual in a
variety of formats.
• Server templates are QuarkXPress projects that can be manipulated by the QuarkXPress Server
application before being rendered and served. For example, you might make a sales piece
available as a server template so that each person who downloads it receives a personalized
copy.
QuarkXPress Server can open QuarkXPress documents, projects, and templates created in
any language edition of QuarkXPress 5.0 or later. QuarkXPress Server can save and export
projects in QuarkXPress 7.x and QuarkXPress 8.x format. QuarkXPress Server can also
export projects in QuarkXPress 6.x Japanese format and QuarkXPress 6.x Korean format.
The document pool
QuarkXPress Server reads server templates and static projects from a directory called the
document pool. The document pool can be any directory that is available to
QuarkXPress Server through a file system or an FTP server. You can use any of the following
methods to place files in the document pool:
• Drag the files to the document pool directory.
• Upload the files using FTP to the document pool directory.
• Use Telegraph XTensions® software to upload the files to the document pool from within
QuarkXPress. (For more information about Telegraph XTensions software, see "Telegraph
XTensions software.")
For more information about the document pool, see "Server Configuration dialog box."
QuarkXPress Server can also serve documents from a database, a content management
system, or other sources. Collectively, the document pool and any other source of files to
be served are referred to as document providers.
Projects and layouts
QuarkXPress projects can contain one or more layouts, and only one layout can be rendered
at any given time. If you do not specify a layout when you send a rendering request,
QuarkXPress Server renders the first layout in the project.
Caching
To maximize efficiency, QuarkXPress Server uses cached versions of all rendered projects
whenever possible. You can configure projects so that they are never cached, so that they
are cached for a particular amount of time, or so that they are rendered every time they
are served. For more information about caching, see "Server Configuration dialog box
A GUIDE TO QUARKXPRESS SERVER 8.5 | 9
Page 10

GETTING STARTED WITH QUARKXPRESS SERVER
QuarkXPress Server preferences
When you launch QuarkXPress Server, the application creates preferences files that are
functionally and structurally equivalent to the preferences files created by QuarkXPress.
These preferences files reside in the QuarkXPress Server "Preferences" folder.
QuarkXPress Server also creates a "QuarkXPress Server.prf" file in the "Preferences" folder.
This file contains preference settings that are specific to QuarkXPress Server.
QuarkXPress Server uses these preferences the same way QuarkXPress uses them. If an
XTensions module creates a project in QuarkXPress Server, that project draws its settings
from the QuarkXPress Server preferences just as a new QuarkXPress project draws its settings
from the QuarkXPress preferences.
Preferences files are stored in the following locations:
•
Mac OS: [User]/Library/Preferences/Quark
•
Windows 2003 and Windows XP: C:\Documents and
Settings\[username]\Application Data\Quark\QuarkXPress Server
8\Preferences
• Windows 2008 and Windows Vista, when QuarkXPress Server is running as a service under
the "local system user" account: C:\ProgramData\Quark\QuarkXPress Server
8\Preferences
• Windows 2008 and Windows Vista, when QuarkXPress Server is running normally or as
a service under the "Domain user" account :
C:\Users\Administrator\AppData\Local\Quark\QuarkXPress Server 8
For more information about preferences, see "Server preferences."
Quark License Administrator
To prevent unauthorized use, QuarkXPress Server requires the presence of a Quark® License
Administrator (QLA) server to launch. QuarkXPress Server follows the configuration and
control rules that are enforced by QLA. For more information about QLA, see the QLA
documentation included with QuarkXPress Server.
Master-subrenderer environment
Requests for project renders are stored in a connection queue. The requests in the rendering
queue can be processed by a single QuarkXPress Server application, or by a master
QuarkXPress Server application and several subrenderers (additional instances of
QuarkXPress Server). The master QuarkXPress Server application launches the available
number of subrenderers and then passes the requests in the connection queue to those
subrenderers as they become available. The number of subrenderers available for launch
is determined by the number of licenses available from the QLA server.
The master QuarkXPress Server application and all of the subrenderers it launches share
the following elements:
10 | A GUIDE TO QUARKXPRESS SERVER 8.5
Page 11

GETTING STARTED WITH QUARKXPRESS SERVER
• The same application preferences (each subrenderer has its own preferences files, but
QuarkXPress Server keeps them synchronized)
• The same document cache in memory
• The same memory cache
• The same server XTensions modules (a separate instance of each XTensions module runs
with each subrenderer)
• The same server document pool (if defined in the QuarkXPress Server preferences or if a
document provider is used in place of the document pool)
If a subrenderer unexpectedly quits, the master QuarkXPress Server restarts the subrenderer
without requiring any action from you.
By default, QuarkXPress Server launches in master-subrenderer mode. You can change this
setting by changing the parameters in the "QuarkXPress Server.config" file. For more
information, see "Launching QuarkXPress Server."
The Keepalive script
A script called the keepalive script can monitor a QuarkXPress Server application and restart
the application if it fails. To use this feature, launch QuarkXPress Server by running the
"keepalive.sh" script (Mac OS) or "keepalive.bat" (Windows) script. Note that the keepalive
script works only if you run it before you launch QuarkXPress Server. You can also manually
restart QuarkXPress Server using this script.
On both platforms, information about unexpected shutdowns (including the error date,
time, code, and description) is stored in an error log file. For more information about
logging, see "Logging (Tab)"
Understanding QuarkXPress Server XTensions software
QuarkXPress Server ships with a collection of XTensions software that adds capabilities to
QuarkXPress Server. For example, PDF Export XTensions software lets QuarkXPress Server
serve content in PDF format; Modifier XTensions software lets you retrieve, manipulate,
and reconstruct XML representations of projects; and QuarkCopyDesk® Renderer XTensions
software lets you create QuarkCopyDesk articles. Telegraph XTensions software works with
QuarkXPress to allow designers to name boxes in template files so that those boxes can
be addressed by URLs.
For more information about XTensions software included with QuarkXPress Server, see
"QuarkXPress Server XTensions software" and "Telegraph XTensions software."
The QuarkXPress Server XTensions API
In addition to the XTensions modules included with QuarkXPress Server, developers can
create custom XTensions software that add features. The complete server XTensions
Application Programming Interface (API) documentation is available in the
QuarkXPress Server XTensions Developer's Kit (XDK).
A GUIDE TO QUARKXPRESS SERVER 8.5 | 11
Page 12

GETTING STARTED WITH QUARKXPRESS SERVER
As of version 8.0, the QuarkXPress Server XDK is Unicode-compliant.
The QuarkXPress Server XDK lets you create XTensions modules that provide the following
abilities:
• The ability to register request handlers
• The ability to register project providers
• The ability to register new render formats
• The ability to add items to the list of response properties, cookies, and HTTP header items
• The ability to log messages in log files and in the status monitor
• The ability to initiate a new transaction to be processed by the server
• The ability to completely control how projects are processed by the server
In addition, QuarkXPress Server XTensions software can register for the following basic
callbacks:
• Pre-processing
• Content loading
• Layout modification
• Post-processing
• Removing slugs while running the QuarkXPress project renderer
• Analyzing the server after a transaction is complete
• Pre- and post-transaction callback
Launching QuarkXPress Server
QuarkXPress Server consists of a single executable that can be executed in two modes.
Both modes are available on Mac OS and Windows.
• When executed in console mode, QuarkXPress Server displays a limited user interface for
configuring the server. To access QuarkXPress Server in console mode, double-click the
program icon.
• When executed in no-UI mode, QuarkXPress Server displays no visible user interface and
must be controlled (started and stopped) from a command prompt. Running
QuarkXPress Server in no-UI mode will slightly improve its performance.
To control which mode QuarkXPress Server launches in, edit the "QuarkXPress Server.config"
file, which is located at the root level of the QuarkXPress Server application folder. This
file supports the following options:
12 | A GUIDE TO QUARKXPRESS SERVER 8.5
Page 13

GETTING STARTED WITH QUARKXPRESS SERVER
•
The -noui option makes the server run without any user interface. This is the normal
mode for production use of QuarkXPress Server.
•
The -nonetwork parameter makes the server run without loading any network interfaces;
in this mode, the only transactions a server can run are those passed to it by another
process.
•
The -subrenders parameter lets you specify how many subrenderers to use.
•
The -tm parameter makes the transaction layer of the server mask exceptions into
transaction errors.
•
The -tt parameter makes the transaction layer of the server throw exceptions to the server
layer.
•
The -monitorsubrenders option turns on subrenderer monitoring.
To use the subrenderer monitoring feature, add the following command line parameters
to the "QuarkXPress Server.config" file:
-monitorsubrenders -queryinterval x -noofretries y -recycle
If a subrenderer process has been attempting to fulfill a request for the specified number
of retries (with the specified query interval in seconds between retries), the subrenderer
monitor recyles that process.
Windows only: If the recycle parameter is not supplied, the subrenderer monitor performs
a periodic memory check on all subrenderer processes. If the memory used by a subrenderer
process does not change within the specified number of retries with the specified query
interval, that process is recycled.
By default, the contents of the "QuarkXPress Server.config" file are as follows:
COMMANDLINE=-subrenders 1
To launch QuarkXPress Server with the options specified in the "QuarkXPress Server.config"
file, double-click the "QuarkXPress Server" icon.
Exit Codes
When the server shuts down, QuarkXPress Server returns exit codes. The "keepalive.sh"
file (Mac OS) or "keepalive.bat" file (Windows) uses these codes to check the type of
QuarkXPress Server shutdown. If the exit code indicates that QuarkXPress Server shut
down unexpectedly, the "keepalive" utilities automatically relaunch QuarkXPress Server.
Valid exit codes are as follows:
• QUARKXPRESS SERVER_EXIT_NORMAL (0): The server exited normally.
• QUARKXPRESS SERVER_EXIT_EXCEPTION (6969): The server exited as a result of an
exception that was handled by the server layer.
• QUARKXPRESS SERVER_EXIT_STARTUP (6970): The server exited as a result of a startup
problem. In this case, restarting does not solve the problem. You must relaunch QLA.
A GUIDE TO QUARKXPRESS SERVER 8.5 | 13
Page 14

GETTING STARTED WITH QUARKXPRESS SERVER
• QUARKXPRESS SERVER_EXIT_RESTART (6971): The server exited as a result of a remotely
requested restart.
• QUARKXPRESS SERVER_EXIT_SHUTDOWN (6972): The server exited as a result of a
remotely requested shutdown.
14 | A GUIDE TO QUARKXPRESS SERVER 8.5
Page 15

THE QUARKXPRESS SERVER USER INTERFACE
The QuarkXPress Server user interface
This chapter describes the QuarkXPress Server user interface and explains how you can
use it to configure and customize your QuarkXPress Server application and manage your
server XTensions modules. Menu items are covered in the same order they display in the
user interface, from left to right and top to bottom.
When you open a dialog box in the QuarkXPress Server user interface, the HTTP server
pauses to prevent conflicts with any jobs that are being processed. When you close the
dialog box, the HTTP server starts again.
Server Configuration dialog box
The Server Configuration dialog box (Server/QuarkXPress Server menu) lets you specify
the document pool location and control cache memory sizes, log options, HTTP settings,
and other options related to the functioning of QuarkXPress Server.
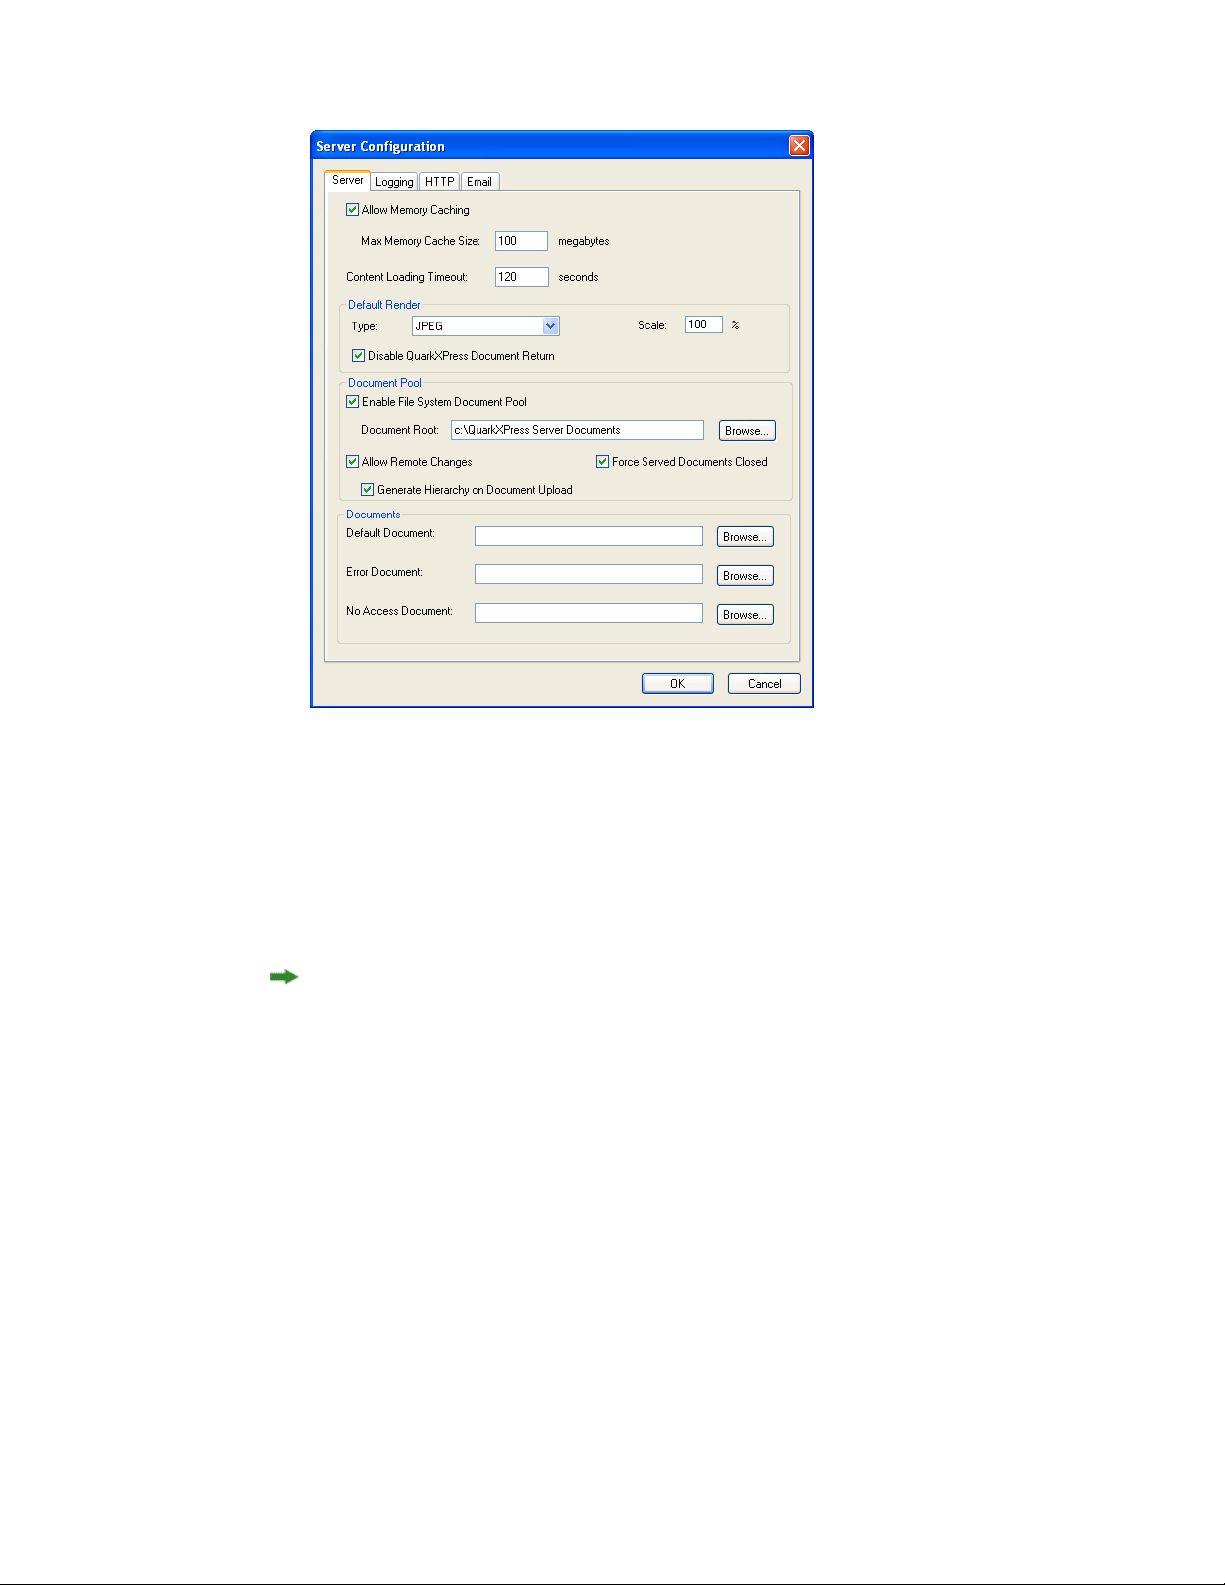
Server (Tab)
The Server tab in the Server Configuration dialog box (QuarkXPress Server > Server
Configuration) lets you control memory and timing settings. You can also define the
location of the document pool and designate default documents for display.
A GUIDE TO QUARKXPRESS SERVER 8.5 | 15
Page 16
THE QUARKXPRESS SERVER USER INTERFACE
Server tab of Server Configuration dialog box
Check Allow Memory Caching to store disk-based documents in a memory-resident cache.
Documents from external document providers also use this cache. Allow Memory Caching
is checked by default.
In the Max Memory Cache Size field, enter the maximum memory size allocated to the
cache memory. The default value is 100MB. The acceptable range of values is from 10MB
to 1024MB.
All subrenderers in a master-subrenderer environment share the same memory cache.
In the Content Loading Timeout field, enter the amount of time (in seconds) the server
should wait for a server XTensions module (or another document provider) to load content
asynchronously before timing out the transaction. The default value is 120 seconds. Valid
values are from 1 second to 3600 seconds.
Use the Default Render area to specify the format in which QuarkXPress Server renders
QuarkXPress projects if the client does not specify a format. You can change the render
type using URL parameters in the HTTP request.
To indicate the default rendering format for the server, choose an option from the Default
Rendering Type drop-down menu:
• EPS Document: Returns an Encapsulated PostScript (EPS) file
• JPEG: Returns a JPEG file
16 | A GUIDE TO QUARKXPRESS SERVER 8.5
Page 17
THE QUARKXPRESS SERVER USER INTERFACE
• PDF: Returns a PDF file
• PNG: Returns a Portable Network Graphics (PNG) file
• PostScript: Returns a PostScript file
• PPML: Returns a PPML file
• QCDDOC: Returns a QuarkCopyDesk article
• QuarkXPress Document: Returns a QuarkXPress project
• Raw Custom: Returns a file in internal QuarkXPress format for use by server XTensions
software developers
• RLE Raw Custom: Returns a file in internal QuarkXPress format (compressed using Run
Length Encoding) for use by server XTensions software developers
If a copy of QuarkXPress Server running on Mac OS renders a project that was created in
Mac OS and returns the project in QuarkXPress format, the resulting project has no resource
fork. (A resource fork is a hidden file that contains information about the application that
created a file.) You cannot preview a project that does not have a resource fork, but such
projects function normally in all other respects.
You can set up helper applications on local systems to display files in formats such as
PostScript on the screen, but this feature is not built into QuarkXPress Server.
In the Scale field, enter the default scale at which QuarkXPress Server should render
projects.
Scale is not available for PDF, PostScript, Personalized Print Markup Language (PPML),
and QuarkXPress project rendering formats.
Check Disable QuarkXPress Document Return to prevent QuarkXPress Server from
returning QuarkXPress projects to clients.
Use the Document Pool area to control location and configuration of the document pool.
Check Enable File System Document Pool to enable the Document Root field and the
Browse button. This box is checked by default. To specify the document pool directory,
click Browse or enter a path in the Document Root field.
The document pool directory can be on the same computer as the QuarkXPress Server
application or on a file server that is accessible on a Local Area Network (LAN) or a Wide
Area Network (WAN), as long as the drive containing the pool can be mounted.
You cannot specify the QuarkXPress Server application folder as the document pool
directory.
Check Allow Remote Changes to allow other applications to upload items to or delete
items from the document pool. You can upload or delete QuarkXPress projects and their
associated files. This box is checked by default.
A GUIDE TO QUARKXPRESS SERVER 8.5 | 17
Page 18

THE QUARKXPRESS SERVER USER INTERFACE
Check Force Served Documents Closed to make QuarkXPress Server close projects from
the document pool after it renders them, regardless of the Telegraph XTensions software
setting. Uncheck Force Served Documents Closed to keep such projects open on the
server. This box is checked by default.
The ability of project to remain open is determined by whether Allow Document to Stay
Open is checked in the QuarkXPress Server pane of the QuarkXPress Preferences dialog
box when Telegraph XTensions software uploads the file. (For more information, see
Chapter 5, "Telegraph XTensions software.") If a project is not set to remain open by the
Telegraph XTensions software, unchecking Force Served Documents Closed does not
cause the project to remain open.
Setting a project to remain open does not guarantee that the project will be left open. This
is because server memory and load requirements are also involved. For example, if the
server requires memory to open additional projects, it might close a project that has been
left open. The maximum number of open projects is 32. This feature enhances performance,
and the cache can be cleared at any moment.
Check Generate Hierarchy on Document Upload to make QuarkXPress Server
automatically generate any file hierarchy that is requested when a user uploads content
to the document pool from Telegraph XTensions software. For more information, see
Chapter 5, "Telegraph XTensions software." This box is checked by default.
Use the Documents area of the Server tab to specify which HTML files should display by
default when a client accesses QuarkXPress Server, when errors occur, and when access is
denied to a client.
To specify which HTML file should display by default when a client accesses
QuarkXPress Server, enter the file's path in the Default Document field or click Browse
and navigate to the file. This file must be an HTML file.
To specify which HTML file should display by default when QuarkXPress Server cannot
process a request, enter the file's path in the Error Document field or click Browse and
navigate to the file. This file must be an HTML file.
Your error document can contain whatever information you like. QuarkXPress Server also
supports the following special tags:
•
If you include an <!--ERRORNUMBER — > comment in the file, QuarkXPress Server
replaces that comment with a number that identifies the particular error that occurred.
•
If you include an <!--ERRORSTRING — > comment in the file, QuarkXPress Server
replaces that comment with details about the particular error that occurred.
To specify which HTML file should display by default when a client is denied access to a
server function or project, enter the file path in the No Access Document field or click
Browse and navigate to the file. This file can contain whatever information you like, but
it must be an HTML file.
18 | A GUIDE TO QUARKXPRESS SERVER 8.5
Page 19

THE QUARKXPRESS SERVER USER INTERFACE
Logging (Tab)
Click the Logging tab in the Server Configuration dialog box (QuarkXPress Server >
Server Configuration) to control how errors and transactions are logged.
Logging tab of Server Configuration dialog box
The log folder contains two log files: The transaction log and the error log. You can
configure the system to save the log folder to your computer or to a file server that is
accessible over a LAN or a WAN, as long as the drive containing the folder can be mounted.
Check Logging Enabled to enable the Log Folder field and then enter the path to the
folder or click Browse and navigate to the folder.
You cannot specify the QuarkXPress Server application folder as the document pool
directory.
Check Log Errors to log PDF-generation and PostScript-generation errors. Checking this
box enables the Use Log Folder check box.
Check Log Transactions to enter every non-error response returned from transactions on
QuarkXPress Server into the transaction log.
Depending on the render type, certain transactions must include transaction timing data.
Check Log Detailed Timing Data to include the following transaction timing data
(measured in milliseconds) in the transaction log for each transaction:
• Connection acceptance and closure time: The duration between the network connection
opening and closing time.
• HTTP request and body parsed time: The total time duration in which the following
operations are performed: The client connects to the server and sends a request, timing
starts, a request is parsed, QuarkXPress Server processes the request, and timing stops.
• QuarkXPress Server request processing time: Same as Connection acceptance and
closure time, but timing starts after request parsing is complete.
• Opening QuarkXPress document time: The time required to open a QuarkXPress project
for rendering.
A GUIDE TO QUARKXPRESS SERVER 8.5 | 19
Page 20

THE QUARKXPRESS SERVER USER INTERFACE
• Instantiate document time: The time required to carry out the dynamic publishing
process.
• Total of rendering process time: The total amount of time spent rendering a project.
• Time required to generate an image of the QuarkXPress document: The time required
for the generation of files that use JPEG, PNG, or any other compressed format.
• Closing QuarkXPress document time: The time required to close a QuarkXPress project.
• Data ready and all sent to client: The difference between the time when all data for the
page return has been processed and is ready to be sent and the time when the last bit of
data is sent to the client.
Server XTensions software can be configured to add module-specific timing entries to the
transaction log.
Check Log Server Events to record QuarkXPress Server events that are not related to error
conditions in the transaction log. Server events include the following:
• Server Started: The date and time at which the server was started.
• Server Stopped: The date and time at which the server was stopped.
• Errors Starting Up: The server records errors, such as issues loading XTensions software,
in the error log. In no-UI mode, errors that cause an alert to display in the console mode
are recorded in the error log.
• Exceptions Caught (Windows only): Any exceptions logged by the server.
• Application exception-type errors: An "exception masked" notice and a code. You can
use this information for troubleshooting.
Check Log Document Problems to include problem descriptions in transaction log files.
Logged problems include the following:
• Missing Fonts: If fonts are missing from a project that has been requested for rendering,
a one-line description of each missing font is added to the error log. If QuarkXPress Server
receives a request to render a project and does not have access to the fonts required by the
project, it uses the font specified in the Fonts tab of the Preferences dialog box (see
"Preferences — Application — Fonts"). If this font is also unavailable, QuarkXPress Server
substitutes Helvetica (Mac OS) or Arial (Windows). This behavior is the same as it is in
QuarkXPress.
• Missing SXTs: If a required server XTensions module is missing when a rendering request
is received, a one-line description of each missing module is added to the error log. If the
name of the missing module is not returnable, the XTensions module ID number is
returned.
• Text Encoding/Character Set Problems: If text is sent to a text box in the template and
the system does not have access to the correct font glyph, the issue is logged. The log data
indicates the character set that the system attempted to convert. For example, the log
entry might show that a request for Japanese characters was sent to an English project.
20 | A GUIDE TO QUARKXPRESS SERVER 8.5
Page 21

THE QUARKXPRESS SERVER USER INTERFACE
Check Log Non-conformant SXT Dialog Messages to prevent server XTensions modules
from displaying dialog boxes.
HTTP (Tab)
Click the HTTP tab in the Server Configuration dialog box (QuarkXPress Server > Server
Configuration) to control port and connection settings.
HTTP tab
Check Enable HTTP Interface to activate the HTTP 1.0 server that is built in to
QuarkXPress Server and enable the other controls in this area.
In the Port Number field, enter the port number of the HTTP server. The acceptable range
of values is from 1024 to 65,535 (Mac OS) or from 1 to 65,535 (Windows). When the HTTP
server is initialized, an alert displays if this value falls outside this range or if the specified
port number is already in use. If QuarkXPress Server is running in no-UI mode, an entry
regarding this alert is made in the log file. The default value for this field is 8080.
In the Max Connections field, enter the maximum number of rendering requests to be
recognized and processed by the QuarkXPress Server connection queue. The acceptable
range of values is from 1 to 16. The default value for this field is 16.
A GUIDE TO QUARKXPRESS SERVER 8.5 | 21
Page 22

THE QUARKXPRESS SERVER USER INTERFACE
In the Max Listens field, enter the maximum number of requests to be queued up for
processing while waiting for an open connection. An alert displays if this value exceeds
the maximum number of listens. The acceptable range of values is from 1 to 32. The default
value for this field is 20.
In the Default Buffer Size field, enter the total size (in kilobytes) of the HTTP buffer. The
HTTP buffer is the size of the data block that is sent to the client from the server as part
of the HTTP response. The smaller the block size, the less memory consumed by the
application. Large blocks facilitate faster performance, but might cause memory shortages
in other parts of the application. The acceptable range of values is from 16KB to 256KB.
The default value for this field is 32KB.
In the Connection Timeout field, enter the total time in seconds before an HTTP
connection should time out. The client must send a request within this period. The
acceptable range of values is from 1 second to 32,767 seconds. The default value for this
field is 120 seconds.
Check Realm Verif. for Admin. Requests to enable the User Name, Password, and
Confirm fields. These fields let youcontrol access to administrative parameters and features.
You must enter valid values that contain at least four characters in the User Name,
Password, and Confirm fields, and you can enter up to 32 characters. This box is
unchecked by default.
Check Use Connection Filters to enable controls that let you enter and modify IP addresses
and subnet masks in the connection filters list. This box is unchecked by default.
• Click Insert to display the Insert Connection Filter dialog box, in which you can enter
an IP address between 1 and 254 and a subnet mask between 0 and 255. The maximum
number of allowed IP addresses/subnet masks is 128.
• Click Modify to display the Modify Connection Filter dialog box, in which you can
specify an action for a particular IP address, edit an IP address, and edit a subnet mask.
Each field in the Modify Connection Filter dialog box accepts a value between 0 and 255.
The default setting is Deny Connection.
• Click Remove to delete the selected IP address from the connection filters list.
•
Click or to move the selected IP address up or down in the connection filters list.
• If no rules have been applied to an IP address, you can select the IP address and click Allow
Connections to allow the IP address to be used or click Deny Connections to prevent the
IP address from being used. The "allow" and "deny" actions are performed on IP addresses
in the order they display in the connection filters list.
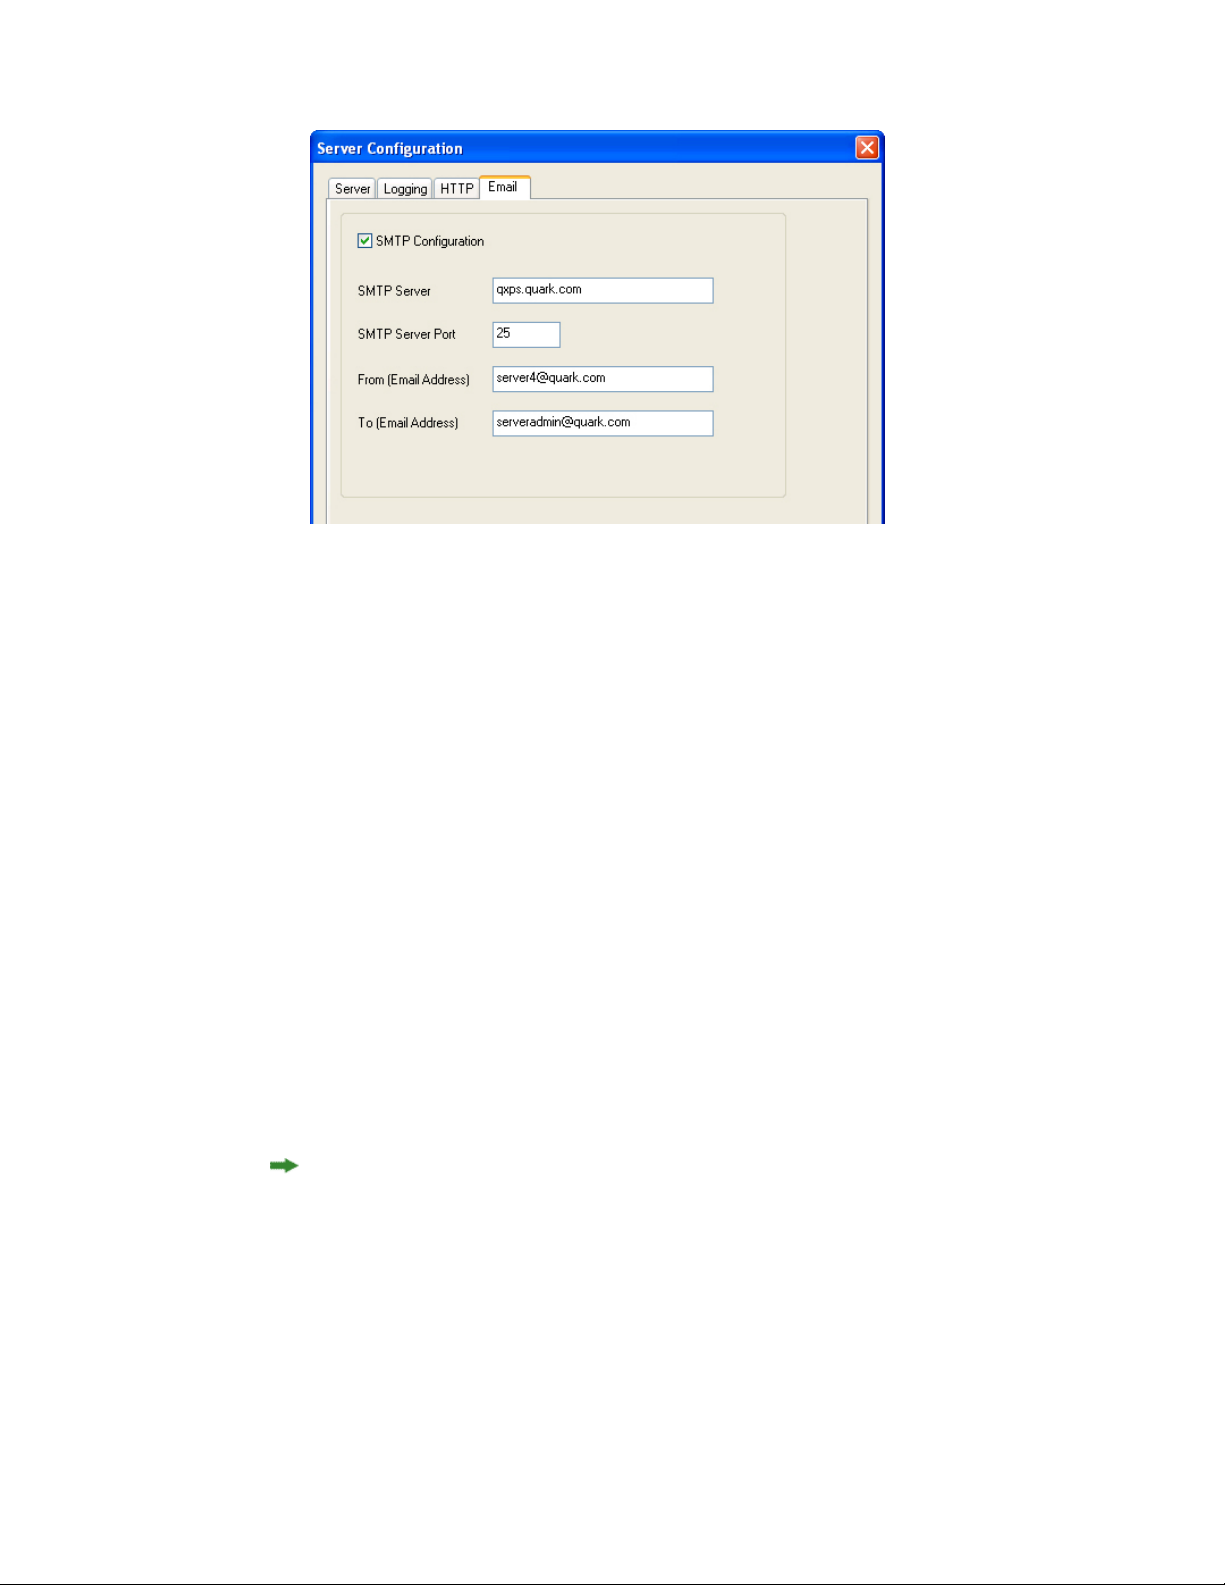
Email (Tab)
Click the Email tab in the Server Configuration dialog box (QuarkXPress Server > Server
Configuration) to display controls that let you set up automatic e-mail messages to warn
of license expiration.
22 | A GUIDE TO QUARKXPRESS SERVER 8.5
Page 23
THE QUARKXPRESS SERVER USER INTERFACE
Email tab
Check SMTP Configuration to enable QuarkXPress Server to send an e-mail to an
administrator when the application's QLA license expires. Checking this box enables the
other controls in this area. This box is unchecked by default.
In the SMTP Server field, enter the domain name or IP address of the e-mail server that
QuarkXPress Server should use to send messages (for example, mail.quark.com).
In the SMTP Server Port field, enter the port number of the e-mail server that
QuarkXPress Server should use to send messages. The acceptable range of values is from
0 to 255. The default value for this field is 25.
In the From (Email Address) field, enter the source e-mail address the QuarkXPress Server
application should use to send messages (for example, QXPSserver1@quark.com).
In the To (Email Address) field, enter the e-mail address to which the QuarkXPress Server
application should send messages (for example, QXPServerAdmin@quark.com).
Server preferences
Use the Preferences dialog box (Server/QuarkXPress Server > Preferences) to set up
default preferences for use when projects are created in QuarkXPress Server.
Many of these preferences come into play only when you create a project in
QuarkXPress Server. You cannot directly create projects in the QuarkXPress Server user
interface, but XTensions software can create projects.
Changes to preferences in the Application category affect all projects. For example, when
you create a project using a server XTensions module or other external software, preference
settings in the Application category are applied to the new project.
A GUIDE TO QUARKXPRESS SERVER 8.5 | 23
Page 24

THE QUARKXPRESS SERVER USER INTERFACE
Changes to preferences in the Project category affect all layouts in the active project. If
you change project preferences with no projects open, the new preferences become the
default settings for all new projects.
Changes to preferences in the Default Layout categories affect all layouts of that type
created in QuarkXPress Server.
Preferences — Application — Display
Use the Display pane of the Preferences dialog box (Server/QuarkXPress Server >
Preferences) to specify how TIFF files display on screen for all projects.
Use the Color TIFFs drop-down list to specify the color depth of screen previews created
for color TIFFs when they are imported.
Use the Gray TIFFs drop-down list to specify the resolution of screen previews created for
grayscale TIFFs when they are imported.
Choose a profile that corresponds to your monitor from the Monitor Profile drop-down
menu, or choose Automatic. Profiles can be placed in the "Profiles" folder in the
QuarkXPress Server application folder.
Preferences — Application — Input Settings
Use the Input Settings pane of the Preferences dialog box (Server/QuarkXPress Server >
Preferences) to customize the display of quotation marks and the selection of characters
used to specify page ranges.
Use the Quotes area to choose a style for converting and entering quotation marks. The
preferences set in the Quotes area of QuarkXPress Server override the preferences set for
a project.
Use the Format drop-down menu to specify the default characters to be used with the
Smart Quotes feature and Convert Quotes option in the Get Text dialog box (File > Get
Text).
Check Smart Quotes to force QuarkXPress to replace feet (')and inches (") marks
automatically with the specified quotation marks.
Hyphens and commas are the default separators for indicating sequential and nonsequential
ranges in the Pages field of the Print dialog box for a print project. In the Sequential and
Nonsequential fields, enter new characters to be used as separators when the project is
rendered by QuarkXPress Server. The preferences set in the Page Range Separators area
of QuarkXPress Server override the preferences set for a project.
Check Maintain Picture Box Attributes to make a picture box "remember" its scaling and
other attributes by default when you import a new picture into the box.
By default, you can input text directly into text boxes the same way you would in a
system-supplied input window for East Asian characters. To disable this feature, uncheck
Inline Input .
24 | A GUIDE TO QUARKXPRESS SERVER 8.5
Page 25

THE QUARKXPRESS SERVER USER INTERFACE
To also allow OpenType® fonts to be scanned at print, check Enable OTF Printer Font
Scan.
Preferences — Application — Font Fallback
Use the Font Fallback pane of the Preferences dialog box (Server/QuarkXPress Server >
Preferences) to control what happens when the application opens a project that uses
missing fonts.
Check Font Fallback to activate the Font Fallback feature. When this feature is active, if
the application encounters a character it cannot display in the current font, it attempts
to find a font that can display the character.
If the application encounters a missing font when opening a project, it uses the preferences
in this pane to determine which substitute fonts to use.
If you add characters to an exising project and the font cannot support those characters,
the application will search the system for a font that can display the characters.
Check Search to have the application search for a suitable font that is used in the active
project. To restrict the search to a particular range, check Last and then enter a number
in the Paragraphs field. To expand the search to the entire story where a missing font
occurs, check Entire Story.
To indicate which fallback fonts should be used when no other font can be found (taking
the Search settings into account), choose an option in the Font column for each
script/language listed in the Script/Lang column.
To indicate which font should be used for the slug line when a layout is printed with
registration marks turned on, choose an option from the Slug Line Font drop-down menu.
Preferences — Application — Open and Save
Use the Save pane of the Preferences dialog box (Server/QuarkXPress Server >
Preferences) to control Unicode options.
Under Non-Unicode Support, choose an option from the Encoding drop-down menu to
indicate how the applications should display characters in non-Unicode text.
Preferences — Application — XTensions Manager
Use the XTensions Manager pane of the Preferences dialog box
(Server/QuarkXPress Server > Preferences) to control when the XTensions Manager
dialog box displays.
If the XTensions Manager dialog box displays as a result of the When > Error occurs
while loading XTensions setting, the server stops (as it does when any dialog box displays).
This can be a problem during an automatic restart, because it will prevent the server from
completely restarting.
A GUIDE TO QUARKXPRESS SERVER 8.5 | 25
Page 26

THE QUARKXPRESS SERVER USER INTERFACE
Preferences — Application — Fonts
Use the Fonts pane of the Preferences dialog box (Server/QuarkXPress Server >
Preferences) to specify the following preferences.
In the Font Mapping area:
• To specify default replacement fonts, check Specify Default Replacement Font and choose
options from the Roman and East Asian drop-down menu.
• To highlight characters that are in a Traditional Chinese encoding's UDA/VDA (User
Defined Area/Vendor Defined Area) range so that these characters can be visually verified,
check Highlight character ranges defined by Traditional Chinese font vendors.
Preferences — Application — EPS
Use the EPS pane of the Preferences dialog box (Server/QuarkXPress Server > Preferences)
to specify options related to imported EPS pictures.
To control whether the application should generate a preview of an EPS file or use the
preview (if any) embedded in the file, choose an option from the Preview drop-down list.
The option specified in this pane is used only when the EPS preview is being created. If
you change the preference, you need to reimport the EPS file.
Mac OS only: To increase the amount of virtual memory available for rendering large EPS
files during a Save Page as EPS operation, increase the value in the Virtual Memory field.
Preferences — Application — Error Reporting
Use the Error Reporting pane of the Preferences dialog box (Server/QuarkXPress Server >
Preferences) to control how the application reports problems to Quark.
To have the application send error reports to Quark directly over the Internet, check Send
Error Report via Internet. To have the application send error reports to Quark in e-mail
if direct Internet connection fails, check On Internet Failure, Send Error Report via
Email.
Preferences — Application — Full Res Preview
Use the Full Res Preview pane of the Preferences dialog box (Server/QuarkXPress Server >
Preferences) to control where QuarkXPress Server caches high-resolution images.
To control where the application caches high-resolution images for display, either click
QuarkXPress Server Preferences Folder or click Other Folder and then indicate a different
location.
To indicate a maximum size for the preview cache folder, enter a value in the Maximum
Cache Folder Size field.
In the Display Full Resolution Previews For area:
• When All Full Resolution Previews is selected, all pictures in the project that are set to
display at full resolution are displayed at full resolution.
26 | A GUIDE TO QUARKXPRESS SERVER 8.5
Page 27

THE QUARKXPRESS SERVER USER INTERFACE
• When Selected Full Resolution Previews is checked, pictures set to display at full resolution
will only do so when they are selected.
You may want to turn off Full Resolution Preview if you are experiencing a performance
issue that you think might be related to this XTensions module. To turn off Full Resolution
Preview when opening a project, check Disable Full Resolution Previews on Open.
Preferences — Application — Job Jackets
Use the Job Jackets pane of the Preferences dialog box (Server/QuarkXPress Server >
Preferences) to specify preferences for automatic layout evaluation and to indicate a default
location for Job Jackets® files.
Use the options in the Layout Evaluation area to control when the application
automatically executes the File > Evaluate Layout command. For example, by checking
On Output, you can make sure that you always evaluate a layout before you send it to
output. The options are:
• At Open
• At Save
• At Output
• At Close
Use the options in the Job Jacket Location area to specify where Job Jackets files are stored
by default. To save Job Jackets files in the default location, click Use Default Path for
Shared Jackets. The default location is the "Documents" folder on Mac OS and the "My
Documents" folder on Windows.
Preferences — Application — Modifier
Use the Modifier pane of the Preferences dialog box (Server/QuarkXPress Server >
Preferences) to set preferences pertaining to the way Modifier XTensions software updates
text in projects.
The Modifier pane displays only if Modifier XTensions software is loaded. For more
information, see "Modifier XTensions software."
In the Amount by which Text will Increase/Decrease field, enter the percentage by
which Modifier XTensions software can increase or decrease text size when the parameter
<FITTEXTTOBOX> is used. Valid values for this field are from 0% to 20%. For example, if
the font size in use is 10pt, and you enter 20% in this field, the font size can vary from
8pt to 12pt when <FITTEXTTOBOX> is used.
In the Font Size Min and Max fields, enter the minimum and maximum font size that
the Modifier parameter <SIZE> can apply to text in a text box. The default values are "2pt"
(Min) and "720pt" (Max).
A GUIDE TO QUARKXPRESS SERVER 8.5 | 27
Page 28

THE QUARKXPRESS SERVER USER INTERFACE
The value of the <SIZE> parameter does not override the value in the Amount by which
the Text will Increase/Decrease field.
Check Allow Text to Grow to allow the Modifier parameter <FITTEXTTOBOX> to increase
the font size of text in a text box.
Check Adjust Other Font Attributes to enable the font attributes in this area. You can
then use the check the boxes to allow Modifier XTensions software to set Horizontal
Vertical Scale, Tracking Amount, and Baseline Shift for text.
To use a particular default XSLT file, check Use default XSLT and then click Browse and
navigate to the XSLT file.
Preferences — Application — PDF
Use the PDF pane of the Preferences dialog box (Server/QuarkXPress Server > Preferences)
to set preferences for rendering in PDF format.
The PDF pane displays only if PDF Filter XTensions software is loaded. For more
information, see "PDF Filter XTensions software"
Use the PDF Workflow area to set a location for PDF files:
• Click PDF Direct to generate PDF output in the browser. This is the default option.
• Click PDF to Folder to generate and save PDF files to a folder. Click Select/Browse to
specify a location for the folder in the Watched Folder field, and choose a default name
for PDF files from the Default Name scroll list.
• Click PostScript File for Later Distilling to generate a PostScript file. Click Select/Browse
to specify a location for the folder in the Watched Folder field, and choose a default name
for PostScript files from the Default Name scroll list.
Use the Error Settings area to specify whether and where PDF-generation and
PostScript-generation errors are logged.
Check Log Errors to log PDF-generation and PostScript-generation errors. Checking this
box enables the Use Log Folder check box.
To specify where errors should be logged, check Use Log Folder and then click
Select/Browse and navigate to the target folder. If you do not check this box, log files are
stored in the watched folder for PDF generation, as defined in the PDF pane.
In Mac OS, you can define the amount of memory your system allocates for rendering PDF
files by entering a value in the Virtual Memory field.
Preferences — Application — PSD Import
Use the PSD Import pane of the Preferences dialog box (Server/QuarkXPress Server >
Preferences) to control where previews of imported PSD files are cached and how large
the cache is allowed to become.
28 | A GUIDE TO QUARKXPRESS SERVER 8.5
Page 29

THE QUARKXPRESS SERVER USER INTERFACE
To create the cache in the preferences folder, click QuarkXPress Server Preferences. To
create the cache in a different folder, click Other Folder and select a different folder. To
set the size of the cache folder, enter a value in the Maximum Cache Folder Size field.
You may want to clear the PSD Import cache if previews look incorrect. To clear this cache,
click Clear Cache.
Preferences — Application — Placeholders
Use the Placeholders pane of the Preferences dialog box (Server/QuarkXPress Server >
Preferences) to set text placeholder display preferences.
Use the Color button in the Text Placeholder area to specify the color of the text
placeholders in the layout. Choose a shade percentage for the color from the Shade
drop-down menu.
Use the Color button in the TextNode Placeholder area to specify the color of the text
node placeholders in the layout. Choose a shade percentage for the color from the Shade
drop-down menu.
Preferences — Application — Fraction/Price
Use the Fraction/Price pane of the Preferences dialog box (Server/QuarkXPress Server >
Preferences) to format fractions and prices automatically.
In the Numerator area, the Offset option positions the numerator in relation to the
baseline; the VScale option determines the height of the numerator as a percentage of
font size; the HScale option determines the width of the numerator as a percentage of
normal character width; and the Kern option adjusts the spacing between the characters
and the forward slash.
In the Denominator area, the Offset option positions the denominator in relation to the
baseline; the VScale option determines the height of the denominator as a percentage of
font size; the HScale option determines the width of the denominator as a percentage of
normal character width; and the Kern option adjusts the spacing between the characters
and the forward slash.
In the Slash area, the Offset option positions the forward slash in relation to the baseline;
the VScale option determines the height of the forward slash as a percentage of font size;
the HScale option determines the width of the forward slash as a percentage of normal
character width; and the Kern option adjusts the spacing between the characters and the
forward slash. Check Fraction Slash to retain type size when you choose Style > Type
Style > Make Fraction.
In the Price area, the Underline cents option places an underline beneath the cents
characters and the Delete Radix option removes the decimal or comma character from
the price.
A GUIDE TO QUARKXPRESS SERVER 8.5 | 29
Page 30

THE QUARKXPRESS SERVER USER INTERFACE
Preferences — Application — Picture Effects
You can sometimes get improved performance by specifying a cache folder located on a
different drive from the drive or drives where the application and project are located. Use
the Picture Effects pane of the Preferences dialog box (Server/QuarkXPress Server >
Preferences) to specify the location of the cache folder for picture editing.
The Picture Effects pane displays only if QuarkVista XTensions software is loaded. For
more information, see "QuarkVista XTensions software."
Preferences — Project — General
Use the Project version of the General pane of the Preferences dialog box
(Server/QuarkXPress Server > Preferences) to specify default settings for auto picture
import, single layout mode, and OpenType kerning (for OpenType fonts).
Use the Auto Picture Import area to control whether QuarkXPress automatically updates
pictures that have been modified since you last opened a layout.
• To enable the Auto Picture Import feature, click On. When you open a project, the
application automatically reimports modified pictures into each layout using the modified
files.
• To disable the Auto Picture Import feature, click Off.
• To receive an alert before the application imports modified pictures, click Verify. Note
that if the Missing/Modified dialog box displays as a result of Verify being checked, the
server stops (as it does whenever any dialog box displays). This can be a problem during
an automatic restart, because it will prevent the server from completely restarting.
Checking Single Layout Mode will cause new projects to be created in single-layout mode.
Only the project name is used when saving PDF files or in AppleScript references.
Check Use OpenType Kerning to activate the default kerning values for OpenType fonts.
When OpenType kerning is active, it overrides any kerning specified through Kerning
Table Edit (Utilities menu) for OpenType fonts. To disable kerning for full-width characters
when using OpenType kerning, check Do Not Kern Full Width Characters.
Preferences — Project — XML Import
The controls in the XML Import pane of the Preferences dialog box
(Server/QuarkXPress Server > Preferences) are not relevant to QuarkXPress Server and
should be ignored.
Preferences — Layout — General
Use the Layout versions of the General pane of the Preferences dialog box
(Server/QuarkXPress Server > Preferences) to specify various default settings for page
layout, such as the colors of hyperlinks and anchors.
30 | A GUIDE TO QUARKXPRESS SERVER 8.5
Page 31

THE QUARKXPRESS SERVER USER INTERFACE
Use the Hyperlinks area to choose the color for anchor icons and hyperlinks. You might
want to choose anchor and hyperlink colors for a Print layout if you are planning to export
that layout as a PDF file.
Use the Master Page Items area to control what happens to master items when master
pages are applied. New master pages are applied to layout pages whenever you (1) drag
and drop a master page icon from the master page area in the Layout palette onto a layout
page icon in the Layout palette (Window > Show Layout); (2) delete a master page that
is applied to layout pages using the Layout palette; or (3) add, delete, or move an odd
number of pages in a facing-page layout.
• Click Keep Changes if you intend modified master items on your layout pages to remain
when a new master page is applied. The items that are kept are no longer master items.
• Click Delete Changes if you want modified master items on your layout pages to be deleted
when a new master page is applied.
Use the Framing area to specify whether frames are placed inside or outside text and
picture boxes.
• When you click Inside, the distance between the text and the frame is determined by the
box's Text Inset values (Item > Modify). When you place a frame inside a picture box,
the frame overlaps the picture.
• When you click Outside, the frame is placed outside the box, increasing the box's width
and height. The frame cannot extend beyond a constraining box or the pasteboard.
Use the Auto Page Insertion options (Print layouts only) to determine whether pages are
inserted automatically to contain text overflow from an automatic text box or a chain of
text boxes (on a page associated with a master page that contains an automatic text box).
The drop-down menu also enables you to determine where any pages will be inserted.
Preferences — Layout — Measurements
Use the Measurements pane of the Preferences dialog box (Server/QuarkXPress Server >
Preferences) to specify default measuring units for layout rulers and the Measurements
palette.
Use the Horizontal and Vertical drop-down menus to specify the measurement system
for the rulers displayed along the top and left of the layout window. Horizontal corresponds
to the top ruler; Vertical corresponds to the left ruler.
Use the Points/Inch field to override the default value of 72 points per inch. The application
uses the value here as the basis for all point and pica measurements, as well as for all point-
and pica-to-inch conversions. The desktop publishing standard for points per inch is 72.
However, the traditional typographic standard used on most metal typographic rulers is
usually approximately 72.27 or 72.307 points per inch (range = 60 to 80 pt, measurement
system = points, smallest increment = .001).
A GUIDE TO QUARKXPRESS SERVER 8.5 | 31
Page 32

THE QUARKXPRESS SERVER USER INTERFACE
Use the Ciceros/cm field to specify a ciceros-to-centimeter conversion value different from
the standard 2.1967 (range = 2 to 3 c, measurement system = ciceros, smallest
increment = .001).
Use the Item Coordinates buttons (Print layouts only) to specify whether the increments
of the horizontal ruler repeat from zero for each Page or are continuous across a Spread.
This setting determines the coordinates of items displayed in fields. The default option is
Page.
Use the Measurement Units drop-down menu to set the default measurement unit for
new layouts.
Preferences — Layout — Paragraph
Use the Paragraph pane of the Preferences dialog box (Server/QuarkXPress Server >
Preferences) to control various paragraph-level settings.
Use the Auto Leading feature to automatically set line spacing. You can apply this setting
to a paragraph by entering "auto" or "0" in the Leading field of the Paragraph Attributes
dialog box (Style > Leading). Unlike paragraphs with absolute leading (identical line
spacing above every line), paragraphs with auto leading may include lines with different
leading when fonts and font sizes are mixed in the same paragraph.
Auto leading starts with a base amount of leading, which the application calculates by
examining the ascent and descent values built into the fonts used in an auto-leaded line
and the line above it; however, the user-specified text size (Style > Size) plays the largest
part in determining this base amount. Finally, a value specified by the user in the Auto
Leading field is added to the base amount to arrive at the total amount of leading.
To specify percentage-based auto leading, enter a value from 0% to 100% in 1% increments.
This value determines the amount of leading between two lines of text as follows: The
largest font size in the line above is multiplied by the percentage value. This outcome is
added to the base amount of auto leading between the two lines. Although the design of
certain fonts complicates the process, here is a simplified example: 10-point text styled
consistently in a "standard" font with Auto Leading set to 20% has 12 points of leading
(10 pts + [20% of 10] = 12 pts). To specify incremental auto leading, enter a value preceded
by a plus sign (+) or a minus sign (–) from –63 points to +63 points using any measurement
system. Entering "+5" will add 5 points of leading to the base amount of auto leading;
entering "+5 mm" will add 5 millimeters.
Use the Maintain Leading check box to control the placement of a line of text that falls
immediately below an obstruction in a column or box. If Maintain Leading is checked,
the line's baseline is placed according to its applied leading value. If Maintain Leading is
unchecked, the ascent of the line will abut the bottom of the obstruction or any applied
runaround value (Item > Runaround).
In the Lock to Grid Based On area:
• Click Ascent and Descent to lock text to grid based on the ascenders and descenders of
characters.
32 | A GUIDE TO QUARKXPRESS SERVER 8.5
Page 33

THE QUARKXPRESS SERVER USER INTERFACE
• Click Font Size (Em Box) to lock text to grid based on the size of the em boxes of the
characters.
For each language in the Hyphenation list, use the Method drop-down menu in the
Hyphenation area to specify the method the application uses to automatically hyphenate
paragraphs when no corresponding entry is found in your Hyphenation Exceptions
dictionary. The setting you choose affects only paragraphs for which Auto Hyphenation
(Edit > H&Js) is enabled:
• Choose Standard to hyphenate using the algorithm built into versions of QuarkXPress
prior to 3.1. Documents created in versions of QuarkXPress prior to 3.1 default to
Standard when they are opened in version 3.1 or later.
• Choose Enhanced to hyphenate using the algorithm built into QuarkXPress
version 3.1 and later.
• Extended 2 uses the same algorithm as Enhanced but checks any built-in hyphenation
dictionaries before resorting to the algorithm. Extended 2 uses the Dieckmann exception
resources and algorithm for hyphenation. This option was first introduced in
QuarkXPress 4.11 for German (Reformed) and has been expanded to other languages in
more recent versions. If available for a language, it is the default method for projects created
in QuarkXPress Server.
Preferences — Layout — Character
Use the Character pane of the Preferences dialog box (Server/QuarkXPress Server >
Preferences) to specify how the application constructs typographic styles such as Superscript
and Subscript:
• Use the Superscript area to control the placement and scale (size) of superscript characters.
The Offset value determines how far below the baseline the application places a superscript
character. The Offset value is measured as a percentage of font size. The default value is
33%. The VScale value determines the vertical size of the character and is a percentage of
font size. The HScale value determines width and is a percentage of the normal character
width (as specified by the font designer). The default value for both scales is 60% (range =
0 to 100%, measurement system = percentage, smallest increment = .1).
• Use the Subscript area to control the placement and scale (size) of subscript characters.
The Offset value determines how far above the baseline the application places a subscript
character. The Offset value is measured as a percentage of font size. The default value is
33%. The VScale value determines the vertical size of the character and is a percentage of
font size. The HScale value determines width and is a percentage of the normal character
width (as specified by the font designer). The default value for both scales is 100% (range =
0 to 100%, measurement system = percentage, smallest increment = .1).
• Use the Small Caps area to control the scale of characters with the Small Caps type style
applied to them. The VScale value determines the vertical size of the character and is
measured as a percentage of font size. The HScale value determines width and is measured
as a percentage of the normal character width (as specified by the font designer). The
A GUIDE TO QUARKXPRESS SERVER 8.5 | 33
Page 34

THE QUARKXPRESS SERVER USER INTERFACE
default value for both scales is 75% (range = 0 to 100%, measurement system = percentage,
smallest increment = .1).
• Use the Superior area to control the scale of superior characters. The VScale value
determines the vertical size of the character and is measured as a percentage of font size.
The HScale value determines width and is measured as a percentage of the normal character
width (as specified by the font designer). The default value for both scales is 60% (range =
0 to 100%, measurement system = percentage, smallest increment = .1).
• Use the Ligatures area to use ligatures built into a font. A ligature is a typographic
convention in which certain characters are combined into a single glyph. Most fonts
contain ligatures for the characters "f" followed by "i" and "f" followed by "l". The Break
Above field enables you to specify the kerning or tracking value (measured in 1/200 em
space increments) above which characters will not be combined into ligatures. For example,
a headline with a large tracking value would probably not contain ligatures. The default
value is 1 (range = 0 to 10, measurement system = .005 [1/200] em space, smallest
increment = .001). To prevent the second two letters in "ffi" and "ffl" (as in office and
waffle) from being combined into ligatures, check Not "ffi" or "ffl". Three-character ligatures
for these combinations, common in traditional typesetting systems, are not standardized
in fonts designed for Mac OS, so some typographers prefer to keep all three letters separate
rather than combine only two of them. Note that many PostScript fonts do not have "ffi"
and "ffl" ligatures, but most OpenType fonts do. This option is unchecked by default.
• Check Auto Kern Above to specify that the application should use kerning tables, which
are built into most fonts, to control intercharacter spacing. The Auto Kern Above field
enables you to specify the point size above which automatic kerning must be used. The
Auto Kern Above feature also implements custom tracking information specified in the
Tracking Values dialog box for a selected font (Utilities > Edit Tracking). This option is
checked by default, with a 4-point threshold (range = 0 to 72 pt, measurement system =
various [", pt, cm, etc.], smallest increment = .001).
• Check Standard Em Space to specify an em-space equivalent to the point size of the text
(for example, 24pt text has a 24pt em space). If Standard Em Space is unchecked, the
application uses the width of the two zeros in the current font as the em-space width. This
option is checked by default. You can insert an em space in text by pressing
Option+space/Ctrl+Shift+6.
• Use the Flex Space Width field to change the 50% default width of a flexible space. To
create a breaking flexible space, press Option+Shift+space/Ctrl+Shift+5; to create a
nonbreaking flexible space, press Command+Option+Shift+space/Ctrl+Alt+Shift+5. The
Flex Space Width value is expressed as a percentage of the normal en space for a given
font and font size (range = 0 to 400%, measurement system = percentage, smallest
increment = .1).
• Use the Accents for All Caps check box to specify whether to include accent marks on
accented characters with the All Caps type style applied. This option is checked by default.
• Use the Space between CJK & R field to indicate how much space should be included by
default between a Chinese, Japanese, or Korean character and an adjacent Roman character.
34 | A GUIDE TO QUARKXPRESS SERVER 8.5
Page 35

THE QUARKXPRESS SERVER USER INTERFACE
Preferences — Layout — Trapping
Use the Trapping pane of the Preferences dialog box (Server/QuarkXPress Server >
Preferences) to set default trapping for Print layouts.
Select a Trapping Method:
• Click Absolute to trap using the values in the Auto Amount and Indeterminate fields
according to the object and background colors involved. If the object color is darker, the
object is choked by the background using the Auto Amount value. If the object color is
lighter, the object is spread into the background using the Auto Amount value.
• Click Proportional to trap using the value in the Auto Amount field multiplied by the
difference between the luminance (lightness or brightness) of the object color and the
background color.
• Click Knockout All to turn off trapping and print objects with a zero trap amount.
• Check Process Trapping to trap each process separation plate individually when a page
contains overlapping process colors.
• Check Ignore White to specify that an object color in front of multiple background colors
(including white) does not take white into account when trapping.
Enter a trapping value in the Auto Amount field or choose Overprint:
• Enter a value in the Auto Amount field to control the amount of trapping that QuarkXPress
applies to object and background colors that have an Auto Amount specified in the Trap
Specifications dialog box (Edit > Colors > Edit Trap), and to control the amount of
trapping applied to items with an Auto Amount (+) Trap Information or (–) specified
in the Trap Information palette (Window > Trap Information).
• Choose Overprint to cause overprinting for object and background colors with an Auto
Amount specified in the Trap Specifications dialog box (Edit > Colors > Edit Trap), as
well as for items with an Auto Amount (+) or (–) specified in the Trap Information palette
(Window > Trap Information).
Enter a trapping value in the Indeterminate field or choose Overprint:
• Enter a value in the Indeterminate field to control the amount of trapping that
QuarkXPress applies to object colors that are in front of indeterminate backgrounds
(multiple colors with conflicting trapping relationships).
• Choose Overprint to cause an object color to overprint an indeterminate background.
Enter a Knockout Limit value. The knockout limit is the value (expressed as a percentage
of darkness of the object color) that enables you to control the point at which an object
color knocks out a background color.
Enter an Overprint Limit value. Overprint limit is a trapping setting that allows an object
set to overprint to trap according to the Auto Amount value if the object's shade is less
than a particular percentage.
A GUIDE TO QUARKXPRESS SERVER 8.5 | 35
Page 36

THE QUARKXPRESS SERVER USER INTERFACE
Preferences — Layout — Grid Cell Fill
Use the Grid Cell Fill pane of the Preferences dialog box (Server/QuarkXPress Server >
Preferences) to control how design grid cells are filled.
To specify which cells will be filled, check Increment Fill and enter a value in the field.
For example, to fill cells four, eight, and twelve, enter 4.
To restart cell counting at the beginning of each line in a text box, click Start of Line. To
start cell counting from the beginning of the grid and continue counting regardless of line
breaks, click Start of Story.
Preferences — Layout — Color Manager
Use the Color Manager panes of the Preferences dialog box (Server/QuarkXPress Server >
Preferences) to define colors so they display or output consistently across all devices.
In the Transformation Method area:
• To specify an engine for color transformation, choose an option from the Color Engine
drop-down menu.
• To achieve the darkest possible blacks in all output methods, check Black Point
Compensation.
In the Source Options area:
• Use the Source Setup drop-down menu to specify the source color space of pictures and
colors used in the application.
• To enable the Profile Information command in the Window menu and the Color
Management tab in the Import Picture dialog box, check Enable access to image profiles.
This option allows you to view information about profiles.
Print layouts only: To specify how layouts display when you use the View > Proof Output
submenu, use the options in the Soft Proofing area (Print layouts only):
• To specify a default proof output setup, choose an option from the Proof Output drop-down
menu.
• To specify a rendering intent for soft proofing, choose an option from the Rendering
Intent drop-down list. Perceptual scales all the colors in the source gamut so that they
all fit within the destination gamut. Relative Colorimetric retains colors that are in both
the source gamut and the destination gamut. The only source colors that are changed are
those that are not within the destination gamut. Saturation considers the saturation of
source colors and changes them to colors with the same relative saturation in the
destination gamut. Absolute Colorimetric retains colors that are in both the source gamut
and the destination gamut. Colors that are outside the destination gamut are adjusted in
relation to how they would look when printed on white paper. Defined by Sources uses
the rendering intents defined in source setup for all colors and images.
Print layouts only: In the Vector EPS/PDF Files area:
36 | A GUIDE TO QUARKXPRESS SERVER 8.5
Page 37

THE QUARKXPRESS SERVER USER INTERFACE
• To color manage vector content in imported EPS and PDF files, check Color Manage
Vector EPS/PDF. Note that this preference applies only to EPS and PDF files imported
after this box is checked.
• To color manage vector content in EPS and PDF files that have already been imported in
the active project, check Include Existing Vector EPS/PDF in Layout.
Interactive layouts only: To specify an output profile for SWF export, choose an option from
the SWF Export drop-down menu.
Preferences — Layout — Layers
Use the Layers pane of the Preferences dialog box (Server/QuarkXPress Server >
Preferences) to specify the settings used when a new layer is created.
• To make new layers visible by default, check Visible.
• To suppress the printout of new layers by default, check Suppress Output.
• To make new layers locked by default, check Locked.
• To maintain runaround on new layers so that text on visible layers flows around items on
hidden layers, click Keep Runaround.
Style sheets
The Style Sheets command (Server/QuarkXPress Server > Document Controls > Style
Sheets) displays the Default Style Sheets dialog box, which lets you create and manage
paragraph and character style sheets.
Default Style Sheets dialog box
A GUIDE TO QUARKXPRESS SERVER 8.5 | 37
Page 38

THE QUARKXPRESS SERVER USER INTERFACE
Default style sheets can be applied to content in projects using Modifier XTensions software.
For more information, see "Modifier XTensions software."
Creating and editing character style sheets
A character style sheet is a named package of character attributes. You can apply all of a
character style sheet's formatting attributes to text by simply applying the style sheet to
the text. To create, edit, or delete character style sheets, use the Default Style Sheets dialog
box (Server/QuarkXPress Server > Document Controls > Style Sheets).
To create a character style sheet, choose Character from the New drop-down button. The
Edit Character Style Sheet dialog box displays. Use the controls in this dialog box to
configure the attributes of the style sheet.
Edit Character Style Sheet dialog box
First, configure the controls in the General tab:
• Name: Enter a name in this field, or the application will use the default "New Style Sheet"
name.
• Keyboard Equivalent: To define a keyboard command for the style sheet, enter one in
the Keyboard Equivalent field. You can enter any combination of Command, Option,
Shift, or Control/Ctrl or Ctrl+Alt, along with a function or keypad key.
• Based On: To base the attributes of a new style sheet on an existing one, choose a style
sheet from the Based On drop-down menu.
38 | A GUIDE TO QUARKXPRESS SERVER 8.5
Page 39

THE QUARKXPRESS SERVER USER INTERFACE
Next, choose character attributes from the lower section of the Edit Character Style Sheet
dialog box. When you're done, click OK.
Creating and editing paragraph style sheets
A paragraph style sheet is a named package of paragraph and character attributes. You can
apply all of a paragraph style sheet's formatting attributes to text by simply applying the
style sheet to the text. To create, edit, duplicate, or delete paragraph style sheets, use the
Default Style Sheets dialog box (Server/QuarkXPress Server > Document Controls >
Style Sheets).
To create a paragraph style sheet, choose Paragraph from the New drop-down button.
The Edit Paragraph Style Sheet dialog box displays. Use the controls in this dialog box
to configure the attributes of the style sheet.
Edit Paragraph Style Sheet dialog box
First, configure the controls in the General tab:
• Name: Enter a name in this field, or the application will use a default "New Style Sheet"
name.
• Keyboard Equivalent: To define a keyboard command for the style sheet, enter one in
the Keyboard Equivalent field. You can enter any combination of Command, Option,
Shift, or Control/Ctrl or Ctrl+Alt, along with a function or keypad key.
A GUIDE TO QUARKXPRESS SERVER 8.5 | 39
Page 40

THE QUARKXPRESS SERVER USER INTERFACE
• If you define a keyboard equivalent for a style sheet with a key sequence that also defines
an existing command, the style sheet command will override the existing command when
the Content tool is selected and a text box is active.
• Based on: To base the attributes of a new style sheet on an existing one, click the Based
on drop-down menu and choose a style sheet from the list. Note that if you use the Based
on drop-down menu in the Edit Paragraph Style Sheet dialog box to base a style sheet
on an existing one, changes you make to the original style sheet are automatically applied
to those based on it.
• Next Style: To select a transition from one paragraph style sheet to another after entering
a carriage return, choose a paragraph style sheet from the Next Style drop-down menu.
• Style: To associate a character style sheet with the paragraph style sheet, choose an option
from the Style drop-down menu in the Character Attributes area. To create a character
style sheet, see "Creating and editing character style sheets."
Next, use the Formats, Tabs, and Rules tabs to specify additional attributes for your
paragraph style sheet. When you're done, click OK.
Colors
The Colors command (Server/QuarkXPress Server > Document Controls > Colors)
displays the Colors dialog box, which enables you to create and manage colors. You can
also change the way a color traps to other colors.
Default Colors dialog box
Default colors can be applied to content in projects using Modifier XTensions software.
For more information, see "Modifier XTensions software."
40 | A GUIDE TO QUARKXPRESS SERVER 8.5
Page 41

THE QUARKXPRESS SERVER USER INTERFACE
Creating a color
To create a color, choose (Server/QuarkXPress Server > Document Controls > Colors)
to display the Default Colors dialog box, and click New to display the Edit Color dialog
box. Then, enter a name in the Name field and specify the color model for your new color.
Edit Color dialog box
• RGB: This additive color system is most often used with slide recorders or color video
monitors, and also works well for Web pages. Red, green, and blue light is mixed to
represent colors on a video screen.
• HSB: This color model is often used by artists because it resembles the manner in which
they mix colors. Hue describes color pigment; saturation measures the amount of color
pigment; and brightness measures the amount of black in a color.
• LAB: This color space is designed to be independent of differing interpretations imposed
by monitor or printer manufacturers. The LAB color model, also referred to as LAB color
space, is a standard three-dimensional model for representing colors. Colors are specified
by a luminance coordinate (L) and two chrominance coordinates (A for green-red), and
(B for blue-yellow).
• Multi-Ink: This color model is color based on tint percentages of existing process or spot
inks.
• CMYK: CMYK is a subtractive color model used by professional printers to reproduce colors
by combining cyan, magenta, yellow, and black inks on a press.
• Web Safe or Web Named Colors: Web-safe colors are used for color consistency in Web
layouts.
• To select a color from a color matching system and add it to your color list, choose one
of the standardized color matching systems from the Model drop-down menu.
A GUIDE TO QUARKXPRESS SERVER 8.5 | 41
Page 42

THE QUARKXPRESS SERVER USER INTERFACE
Trap Specifications
Click Edit Trap in the Default Colors dialog box (Server/QuarkXPress Server > Document
Controls > Colors) to display the Trap Specifications dialog box for a chosen color. Use
the Trap Specifications dialog box to specify trapping values for any object color relative
to any background color. By specifying Overprint, Knockout, Auto Amount (+) for
spreads, Auto Amount (–) for chokes, or Custom trap values in the Trap drop-down
menu, you can control the trapping relationships for every color except White and
Registration.
Trap Specifications dialog box
Color-specific trapping values you specify in the Trap Specifications dialog box directly
affect color relationships and override all default trapping preferences.
A spread occurs when items with a lighter color enlarge slightly to overlap a darker
background color. A choke occurs when items with a darker color are trapped by a slight
reduction in the size of the "knocked out" area in a lighter background color.
The Background Color column displays all the colors defined for the project, with the
exception of White, Registration, and the object color. When the object color is placed
against a background of more than one color with which the object color has conflicting
trapping relationships or against a color QuarkXPress is unable to identify, the program
traps according to the value specified for the Indeterminate background color.
The Trap drop-down menu determines the trapping relationship when the selected
Background Color occurs behind the object color selected in the Default Colors dialog
box. The Trap column displays the current setting. Entries different from the default values
are marked with an asterisk (*).
42 | A GUIDE TO QUARKXPRESS SERVER 8.5
Page 43

THE QUARKXPRESS SERVER USER INTERFACE
Trap drop-down menu
• The Default option works like the Auto Amount (+/–) settings, but when Default is chosen,
an algorithm determines which colors choke, which colors spread, and which colors
overprint or knock out. The amount of a choke or spread is based on the Auto Amount
value specified in the Trapping pane of the Preferences dialog box (QuarkXPress Server >
Preferences). However, when Default is chosen, black always overprints and white always
knocks out.
• The Overprint option specifies that the object color named in the dialog box title overprints
the selected background color in all instances where the shade value of the object color is
greater than the percentage entered in the Overprint Limit field of the Trapping pane of
the Preferences dialog box (QuarkXPress Server > Preferences).
Even with Overprint specified, overprinting occurs only when an object color has a shade
value greater than the Overprint Limit value specified in the Trapping pane of the
Preferences dialog box (QuarkXPress Server > Preferences).
• The Knockout option specifies that the object color named in the dialog box title knocks
out the selected background color using no trapping.
• The Auto Amount (+) option assigns the default spread value (the value specified in the
Auto Amount field of the Trapping pane of the Preferences dialog box) to the object
color named in the dialog box title.
• The Auto Amount (–) option assigns the default choke value (the negative of the value
specified in the Auto Amount field of the Trapping pane of the Preferences dialog box)
to the object color named in the dialog box title.
• The Custom option displays the Custom dialog box, which enables you to specify a custom
trapping value for the object and background color. Enter a value and click OK. A negative
value causes the background color to choke. A positive value causes the object color to
spread. A value of zero knocks out the object from the selected background color with no
trapping.
Smallest IncrementMeasurement SystemRange
.001points±36pt
A GUIDE TO QUARKXPRESS SERVER 8.5 | 43
Page 44

THE QUARKXPRESS SERVER USER INTERFACE
If you specify a negative Custom value between the object color named in the dialog box
title and the Indeterminate background color, text to which the object color is applied is
not choked; instead, it is knocked out of the background without any trapping.
The Dependent Traps/Independent Traps drop-down menu determines whether the
Trap and Reverse drop-down menu settings directly affect each other. The Reverse column
indicates how trapping occurs when the selected Background Color takes on the role of
object color and vice versa.
Dependent/Independent drop-down menu
• Choose Dependent Traps for QuarkXPress Server to calculate a reverse trap value
automatically.
• Choose Independent Traps to specify a custom reverse trap value.
The Reverse drop-down menu determines how trapping occurs when the selected
Background Color takes on the role of object color, and the color identified in the name
of the dialog box takes on the role of background color. The Reverse value is calculated
automatically when you choose Dependent Traps. If you change the Reverse value when
Dependent Traps is chosen, the corresponding opposite trap is calculated automatically.
Reverse drop-down menu
The Reverse column displays the current setting. When an entry is different from the
default values, it is marked with an asterisk (*). The options available in the Reverse
drop-down menu are the same as those in the Trap drop-down menu.
H&Js
Hyphenation and justification specifications (H&Js) are sets of automatic hyphenation
rules and justification settings that you can apply to paragraphs. The H&Js command
(Server/QuarkXPress Server > Document Controls > H&Js) displays the H&Js dialog box,
which enables you to create and manage hyphenation and justification specifications.
You apply hyphenation and justification specifications to selected paragraphs using the
44 | A GUIDE TO QUARKXPRESS SERVER 8.5
Page 45

THE QUARKXPRESS SERVER USER INTERFACE
H&J drop-down menu in the Formats tab of the Edit Paragraph Style Sheet dialog box.
Hyphenation and justification specifications are included in paragraph style sheets.
Default H&Js dialog box
Default H&Js come into play only when you create a project in QuarkXPress Server. You
cannot directly create projects in the QuarkXPress Server user interface, but client requests
can trigger the creation of projects.
Controlling hyphenation and justification
A hyphenation and justification (H&J) specification is a named package of settings for
hyphenating words that go over the margin of a line of text and for justifying spaces
between words and characters. You can apply H&Js to individual paragraphs, or you can
associate an H&J with a paragraph style sheet. Use the Edit Hyphenation & Justification
dialog box (QuarkXPress Server/Edit > Document Controls > H&Js > New) to control
these settings.
A GUIDE TO QUARKXPRESS SERVER 8.5 | 45
Page 46

THE QUARKXPRESS SERVER USER INTERFACE
The Edit Hyphenation & Justification dialog box
• Auto Hyphenation: Specify whether automatic hyphenation is allowed.
• Smallest Word: Specify the minimum number of characters a word must contain to allow
hyphenation.
• Minimum Before: Specify the minimum number of characters before a hyphen.
• Minimum After: Specify the minimum number of characters after a hyphen.
• Break Capitalized Words: Specify whether hyphenation of capitalized words is allowed.
• Hyphens in a Row: Specify how many words can be hyphenated in consecutive line ends.
• Hyphenation Zone: For words containing Roman characters, specify the area before the
right indentation in which hyphenation can occur. For example, if you set the hyphenation
zone to .05", the word is hyphenated when an acceptable hyphenation point falls
within .05" of the right indentation. The word preceding the hyphenated word must not
fall within the hyphenation zone.
• Justification Method: Specify how words and characters are spaced.
• Non-Breaking Char Set: Choose a non-breaking character set from the drop-down menu.
• Non Breaking Method: Choose a non-breaking method from the drop-down menu. When
the last character in a line of justified text is a non-breaking character that cannot end a
line, Run Back pulls the first character of the next line up to the current line, based on
the value in the Max. field. When the last character in a line of justified text is a
non-breaking character that cannot begin a line, Run Down pushes the character to the
next line, based on the value in the Min. field.
46 | A GUIDE TO QUARKXPRESS SERVER 8.5
Page 47

THE QUARKXPRESS SERVER USER INTERFACE
• R Space: Specify the amount of space between words containing Roman characters in
justified paragraphs. Specify the optimum amount of space between words containing
Roman characters in all paragraphs, regardless of their alignment.
• EA Punct: Specify the minimum and maximum amount of space between East Asian
punctuation characters in justified paragraphs. Specify the optimum amount of space
between East Asian punctuation characters in all paragraphs, regardless of their alignment.
• Kana/Hangul/ZhuYin: Specify the minimum and maximum amount of space between
Kana, Hangul, or Zhu Yin characters in justified paragraphs. Specify the optimum amount
of space between Kana, Hangul, or Zhu Yin characters in all paragraphs, regardless of their
alignment.
• Han: Specify the minimum and maximum amount of space between Han characters in
justified paragraphs. Specify the optimum amount of space between Han characters in all
paragraphs, regardless of their alignment.
• R Char: Specify the minimum and maximum amount of space between Roman characters
in justified paragraphs. Specify the optimum amount of space between Roman characters
in all paragraphs, regardless of their alignment.
• Flush Zone: Specify the area before the right indentation within which the last word in
the last line of a justified paragraph must fall in order to justify that line. For example, if
you enter 1", the last line of a paragraph to which the hyphenation and justification
specification is applied will not be justified until the last word in the line falls within 1"
of the right indentation.
• Single Word Justify: Specify whether a single word on a line in a justified paragraph
extends from the left indentation to the right indentation. When the box is unchecked,
a single word on a line is left-aligned.
• Break on Spaces: Specify whether Chinese, Japanese, and Korean text breaks on spaces.
Output styles
The Output Styles dialog box (Server/QuarkXPress Server > Document Controls >
Output Styles) enables you to create and manage custom output styles. An output style
is a group of print settings that you implement at output. Using output styles eliminates
the need to re-create complex or frequently used print settings every time you print. Output
styles are available when rendering a project in EPS, PDF, PPML, and PostScript format.
When QuarkXPress Server renders a project, any output style that was applied by
QuarkXPress is overridden. If the client specifies an output style in the request, that output
style is used; otherwise, the default QuarkXPress Server output style is applied instead.
A GUIDE TO QUARKXPRESS SERVER 8.5 | 47
Page 48

THE QUARKXPRESS SERVER USER INTERFACE
Output Styles dialog box
Working with EPS styles
Use the the Edit EPS Style dialog box to create or edit EPS output styles. To display the
Edit EPS Style dialog box, choose EPS from the New drop-down button or click Edit or
Duplicate in the Default Output Styles dialog box (Server/QuarkXPress Server >
Document Controls > Output Styles).
Edit EPS Style dialog box
To specify a name for the EPS style, enter the name in the EPS Style drop-down menu.
To specify a format for the EPS file, choose an option from the Format drop-down menu.
48 | A GUIDE TO QUARKXPRESS SERVER 8.5
Page 49

THE QUARKXPRESS SERVER USER INTERFACE
Use the General pane to specify the scale of the EPS file, the format of the EPS file's preview,
whether to treat the page's white areas as transparent or opaque in the EPS file, and whether
to output the EPS file as a spread.
Use the Color pane to choose an output setup for the EPS file and to select which plates
should be included in the output.
Use the Fonts pane to specify which fonts are embedded within the exported EPS file.
Use the Marks pane to specify the positioning, width, and length of registration marks in
the EPS file.
Use the Bleed pane to designate a symmetric or asymmetric bleed type and specify bleed
distance around the EPS file.
Use the Transparency pane to turn transparency on or off, and to control the resolution
of flattened items in the EPS file.
Use the OPI pane to specify options for including high-resolution original images in the
EPS file, and to control TIFF and EPS options separately.
Use the JDF pane to indicate whether a Job Definition Format (JDF) file should be created
at the same time as the EPS file. You might choose to do this if you're using Job Jackets in
a JDF workflow.
Use the Advanced pane to choose whether the EPS adheres to PostScript Level 2 or
PostScript Level 3.
Use the Summary pane to view a summary of the settings in the other panes.
Working with PPML Styles
Use the the Edit PPML Style dialog box to create or edit PPML output styles. To display
the Edit PPML Style dialog box, choose PPML from the New drop-down button or click
Edit or Duplicate in the Default Output Styles dialog box (Server/QuarkXPress Server >
Document Controls > Output Styles).
A GUIDE TO QUARKXPRESS SERVER 8.5 | 49
Page 50

THE QUARKXPRESS SERVER USER INTERFACE
Edit PPML Style dialog box
In the PPML Style field, enter a name for a new PPML output style or rename an existing
PPML output style.
Choose the target PPML consumer from the Consumer drop-down menu.
Use the Device pane to control device-specific settings, including PostScript Printer
Description (PPD) selection and page positioning.
Use the Pages pane to specify various methods of rendering pages.
Use the Colors pane to specify whether output will be created in composite format or as
separations.
Use the Pictures pane to specify whether fonts will be embedded in the exported output:
Use the Marks pane to include crop marks and registration marks in the output. Crop
marks are short vertical and horizontal lines printed outside the page's final trim size to
indicate where to cut the page. Registration marks are symbols that are used to align
overlaying plates.
Use the Bleed pane to define different bleed values for each edge of the page, or to use
layout items such as boxes and lines to define the bleed. Bleed settings apply to every page
in the layout.
The Bleed pane displays only if Custom Bleeds XTensions software is loaded. For more
information, see "QuarkXPress Server XTensions software."
Use the JDF pane to specify whether to save a JDF file from the project's Job Jackets structure
at rendering.
Use the Advanced pane to set the level of PostScript used in embedded EPS files.
Use the Summary pane to view a summary of the settings in the other panes.
50 | A GUIDE TO QUARKXPRESS SERVER 8.5
Page 51

THE QUARKXPRESS SERVER USER INTERFACE
Working with PDF Styles
Use the the Edit PDF Style dialog box to create or edit EPS output styles. To display the
Edit PDF Style dialog box, choose PDF from the New drop-down button or click Edit or
Duplicate in the Default Output Styles dialog box (Server/QuarkXPress Server >
Document Controls > Output Styles).
Edit PDF Style dialog box
In the PDF Style field, enter a name for a new PDF output style or rename an existing PDF
output style.
To create PDF files that adhere to the PDF/X standard, choose an option from the
Verification drop-down menu:
• PDF/X–1a: 2001: Choose this option to create PDF files that adhere to the PDF/X–1a
specification.
• PDF/X–3: 2002: Choose this option to create PDF files that adhere to the PDF/X–3
specification.
The PDF/X 1a and PDF/X 3 specifications are subsets of the widely accepted PDF/X standard
for print submission. Each PDF/X type contains its own set of restrictions as to what is or
is not acceptable in a PDF. The PDF/X 3 standard is a superset of PDF/X–1a (a PDF/X–1a
file meets all of the requirements of PDF/X–3), and all of the tools designed to read PDF/X–3
are also able to read PDF/X 1a files. A major distinction between the two is that a PDF/X
3 file can also contain color-managed data.
To use a PDF output style, choose an option from the PDF Style drop-down menu. To
create a PDF output style using the current settings, choose New PDF Output Style.
A GUIDE TO QUARKXPRESS SERVER 8.5 | 51
Page 52

THE QUARKXPRESS SERVER USER INTERFACE
To use PDF/X verification, choose an option from the Verification drop-down menu.
Available options include PDF/X 1a and PDF/X 3. Note that PDF/X 1a verification permits
only CMYK and spot colors, while PDF/X 3 verification allows you to include colors and
pictures that use other color spaces, along with ICC color profiles (which are defined in
the source and output setups for color management).
Use the Color pane to specify whether to create composite output or separations, to choose
an output setup for the PDF file, and to select which plates should be included in the
output.
Use the Compression pane to specify compression options for different image types in
the PDF file.
Use the Pages pane to specify whether to export spreads, whether to export each page as
a separate PDF file, whether to include blank pages, and whether to embed a thumbnail
of the PDF file.
Use the Marks pane to specify the positioning, width, and length of registration marks in
the PDF file.
Use the Hyperlink pane to specify how links and lists from the layout export and how
hyperlinks should appear in the PDF. You can also use this pane to specify the default
zoom of the PDF file.
Use the Meta Data pane to provide the details that display in the Description tab of the
Document Properties dialog box in Adobe Acrobat Reader.
Use the Fonts pane to specify which fonts are embedded within the exported PDF file.
Use the Bleed pane to specify how bleeds are handled in the PDF file.
Use the Layers pane to specify which layers to include in the PDF file.
Use the Transparency pane to turn transparency on or off, and to control the resolution
of flattened items in the PDF file.
Use the OPI pane to specify options for including high-resolution original images in the
PDF file (not available when you choose PDF/X 1a or PDF/X 3 from the Verification
drop-down menu).
Use the JDF pane to indicate whether a Job Definition Format (JDF) file should be created
at the same time as the PDF file. You might choose to do this if you're using Job Jackets
in a JDF workflow.
Use the Summary pane to view a summary of the settings in the other panes.
Working with print styles
Use the the Edit Print Style dialog box to create or edit print output styles. To display the
Edit Print Style dialog box, choose Print from the New drop-down button or click Edit
or Duplicate in the Default Output Styles dialog box (Server/QuarkXPress Server >
Document Controls > Output Styles).
52 | A GUIDE TO QUARKXPRESS SERVER 8.5
Page 53

THE QUARKXPRESS SERVER USER INTERFACE
Edit Print Style dialog box
In the Print Style field, enter a name for a new print output style or rename an existing
print output style.
From the Sequence drop-down menu, choose one of the following options:
• All to print all related pages
• Odd to print only odd-numbered pages
• Even to print only even-numbered pages
To make output smaller or larger than the original, enter a percentage in the Scale field.
The default is 100%.
Check Collate to print more than one copy of a layout so that they output with all pages
in the correct order for binding.
If you print three copies of a layout and check Collate, QuarkXPress Server prints one
complete copy of the layout before beginning the second copy. Uncheck Collate to print
three copies of the first page, then three copies of the second page, and so on.
Check Spreads to print two or more adjoining pages side-by-side on the film or paper.
Check Back to Front to print a multiple-page layout in reverse order. The last page in the
layout prints first.
Check Fit Print Area to reduce or enlarge the size of pages to fit the imageable area of the
output media.
Use the Device pane to control device-specific settings, including PPD selection and page
positioning.
Use the Pages pane to specify page orientation, tiling, page flipping, and related options.
Use the Pictures pane to control the way pictures are printed.
A GUIDE TO QUARKXPRESS SERVER 8.5 | 53
Page 54

THE QUARKXPRESS SERVER USER INTERFACE
Use the Fonts pane to specify which fonts are included in output. Note that many of the
options in this pane are available only when printing to a PostScript output device.
Use the Color pane to control color output.
Use the Marks pane to include crop marks, registration marks, and bleed marks in the
output. Crop marks are short vertical and horizontal lines printed outside the page's final
trim size, indicating where to cut the page. Registration marks are symbols that are used to
align overlaying plates. Bleed marks indicate where page bleeds end.
Use the Layers pane to specify which layers to output and which layouts to suppress.
Use the Bleed pane to allow items to bleed (extend beyond the page edges) at printout.
Bleed settings apply to every page in the layout.
Use the Transparency pane to specify how transparency is handled at export.
Use the JDF pane to specify whether to save a JDF file from the project's Job Jackets
structure. When you check Output JDF, the Include Job Jacket Contact drop-down list
becomes available; choose a contact from among the Contact Resources in the project's
Job Jacket structure.
Use the OPI pane to control settings for Open Prepress Interface (OPI).
In the Advanced pane, you can specify the PostScript level of the output device.
Use the Summary pane to view a summary of the settings in the other panes.
Font mapping
Use the Font Mapping dialog box (Server/QuarkXPress Server > Document Controls >
Font Mapping) to set rules for missing fonts on the server. If required fonts are not available
to QuarkXPress Server, rendered layouts display a substitute font.
The Font Mapping dialog box
54 | A GUIDE TO QUARKXPRESS SERVER 8.5
Page 55

THE QUARKXPRESS SERVER USER INTERFACE
To edit a font-mapping rule, select the rule and click Edit to display the Edit Font Mapping
dialog box, then choose a replacement font from the Replacement drop-down menu.
Click Export to export the current set of font mapping rules as an XML file. Click Import
to import an XML file that contains font-replacement rules.
Source setups
The Source command (Server/QuarkXPress Server > Document Controls > Color Setups >
Source) displays the Default Source Setups dialog box, which enables you to create and
manage source setups.
Default Source Setups dialog box
A source setup describes colors in a layout as they exist prior to output — in other words,
where the colors came from. A source setup contains profiles and rendering intents for
both solid colors and pictures in RGB, CMYK, LAB, and grayscale. In addition, it includes
information about the underlying color space for named colors (such as Pantone Process
Coated colors) and inks (such as cyan, magenta, yellow, black, and multi-inks). You might
create source setups for clients based on their standard workflows, or you might create
source setups for a specific project.
To get started in creating a source setup, you will need to know some details about the
hardware and software involved in a client's workflow — what type of digital camera and
scanner they use, for example — and you'll need to make sure the relevant profiles are
available. It's also helpful to see sample projects so you know what types of pictures, colors,
inks, and devices they're working with, such as logos, charts and graphs, photographs,
duotones, etc., output to SWOP or displayed on the Web.
Creating a source setup
To configure a source setup:
A GUIDE TO QUARKXPRESS SERVER 8.5 | 55
Page 56

THE QUARKXPRESS SERVER USER INTERFACE
Click New in the Default Source Setups dialog box to display the Edit Source Setup
1
dialog box.
Edit Source Setup dialog box
In the Name field, enter a name.
2
In the RGB, CMYK, LAB, and Gray tabs, review and make changes to the Profile and
3
Rendering Intent selected for Solid Colors and Images.
In the RGB and CMYK tabs, if you want color management transformations to occur even
4
within the same color space, check Color Manage RGB Sources to RGB Destinations or
Color Manage CMYK Sources to CMYK Destinations, respectively.
In the Named Colors tab, specify the source color space for each of the named default
5
colors stored in your preferences. To do this, select a color and choose an option from the
Source Space drop-down menu: LAB, RGB, or CMYK. The default setting, Automatic,
uses the largest color space available to describe the color.
In the Inks tab, specify the source color space for each ink that might be output from the
6
layout. To do this, select an ink and choose an option from the Underlying Color Space
drop-down menu. You cannot modify Black, Cyan, Magenta, and Yellow because their
source color space will always be CMYK. You can, however, change the setting for Any
New Ink or for any inks you create, such as a custom varnish plate. The Automatic setting
uses the largest color space available to describe the color, first considering LAB, then RGB,
and finally CMYK.
To finish the source setup, click OK.
7
56 | A GUIDE TO QUARKXPRESS SERVER 8.5
Page 57

THE QUARKXPRESS SERVER USER INTERFACE
Output setups
The Source command (Server/QuarkXPress Server > Document Controls > Color Setups >
Source) displays the Default Output Setups dialog box, which enables you to create and
manage output setups.
Default Output Setups dialog box
An output setup describes the capabilities of various types of output devices and determines
how colors are handled in various output scenarios. You can think of an output setup as
"where colors are going." An output setup specifies composite or separation output, the
output mode, and an output profile. In QuarkXPress Server, you create output setups for
output in print, PDF, and other formats.
As with source setups, to get started in creating an output setup, you need to know details
about typical jobs, output methods, and equipment. For example, it's helpful to know the
name and have the profiles for any composite printing devices. QuarkXPress Server provides
default output setups for various workflows.
Creating an output setup
To create an output setup:
Click New, Edit, or Duplicate in the Default Output Setups dialog box to display the
1
Edit Output Setup dialog box.
A GUIDE TO QUARKXPRESS SERVER 8.5 | 57
Page 58

THE QUARKXPRESS SERVER USER INTERFACE
Edit Output Setup dialog box
In the Name field, enter a name.
2
Select an option from the Mode drop-down menu to specify the type of output: Composite
3
or Separations.
If you select Composite mode, you can specify an output color space from the Model
4
drop-down menu: Grayscale, RGB, CMYK, As Is, or DeviceN. If you select Separations
mode, you can select Host-based Separations or In-RIP Separations from the Model
drop-down menu.
Based on the Model you specify, select an output profile from the Profile drop-down
5
menu. If you need to load custom profiles, use the Profile Manager dialog box (Utilities
menu).
If you choose CMYK or RGB from the Model drop-down menu, you can configure the
6
output setup to simulate output to a particular output device (output setup) and rendering
intent. You might choose to do this, for example, if you want to use an RGB output device
to simulate a layout's appearance when printed to a CMYK press. To make use of this
feature, check Proof Separations and then choose options from the Output Simulation
and Rendering Intent drop-down menus.
To finish the output setup, click OK.
7
PPML consumers
To edit the list of consumers for PPML output, choose Server/QuarkXPress Server > Edit
PPML Consumers. The PPML Consumers dialog box displays.
58 | A GUIDE TO QUARKXPRESS SERVER 8.5
Page 59

THE QUARKXPRESS SERVER USER INTERFACE
PPML Consumers dialog box
Working with PPML consumers
A PPML consumer describes a particular application or device that accepts PPML input.
Use the the Edit PPML Consumers dialog box to create or edit PPML consumers. To display
the Edit PPML Consumers dialog box, click New, Edit, or Duplicate in the PPML
Consumers dialog box (Server/QuarkXPress Server > Edit PPML Consumers).
A GUIDE TO QUARKXPRESS SERVER 8.5 | 59
Page 60

THE QUARKXPRESS SERVER USER INTERFACE
Edit PPML Consumers dialog box
In the Name field, enter a name for the PPML consumer.
In the Element pane, check the options that are appropriate for this PPML consumer.
In the Edit PPML Consumers pane, check options to determine how various types of
pictures are handled by the PPML consumer.
Server XTensions Manager
The Server XTensions Manager command (Server/QuarkXPress Server menu ) displays
the Server XTensions Manager dialog box. Use the Server XTensions Manager dialog
box to control which XTensions modules load and to create and modify sets of XTensions
modules.
60 | A GUIDE TO QUARKXPRESS SERVER 8.5
Page 61

THE QUARKXPRESS SERVER USER INTERFACE
XTensions Manager dialog box
A set is a group of specific XTensions modules that load together. For example, you might
make sets of third-party XTensions software that are required only for specific projects or
for certain clients. From the Set drop-down menu, choose an XTensions software set to
load:
• All XTensions Enabled loads all your XTensions software.
• All XTensions Disabled does not load any XTensions software.
• QuarkXPress Server XTensions loads all your server XTensions software.
Click Save As to create a set from the XTensions software that are currently checked in
the Enable column. The Save As button displays the Save Set dialog box, which enables
you to name and save the new XTensions software set. XTensions software sets are saved
in the "XPressServer Preferences.prf" file, in the QuarkXPress Server "Preferences" folder.
Click Delete to delete the set displayed in the Set drop-down menu.
Click Import to import a set of XTensions software from an exported file. Click Export
to export the current set of XTensions software as a file.
Check Enable to include an Xtensions software among the software that is loaded.
The Name column displays all the XTensions software in the "XTensions" and "XTensions
Disabled" folders within the QuarkXPress Server application folder.
The SXT column indicates the type of XTensions software: If Yes displays in the SXT
column, that XTensions software is written specifically for QuarkXPress Server. If No
displays in the column, the XTensions software was written for QuarkXPress, but it can
be used with QuarkXPress Server.
The Status column defines whether the XTensions software is Active (currently loaded)
or Inactive (disabled). If QuarkXPress Server was unable to load the XTensions software,
the Status is Error.
A GUIDE TO QUARKXPRESS SERVER 8.5 | 61
Page 62

THE QUARKXPRESS SERVER USER INTERFACE
Click About to display detailed information about the selected XTensions software.
Status Monitor
The Status Monitor command (Server/QuarkXPress Server menu) displays the Status
Monitor dialog box, which shows the status of the server.
Because the status monitor consumes resources, Quark recommends that you use it for
debugging and investigating specific issues rather than leaving it open at all times.
QuarkXPress Server Status Monitor window
When the Status Monitor dialog box is open, you can choose Verbose Status Monitoring
from the QuarkXPress Server menu for more detailed monitoring options.
The Status field shows the current status of the QuarkXPress Server. The Status field
displays a status of Running, Paused, or Stopped.
The Port field displays the port number QuarkXPress Server is using. You can set the port
number in the HTTP tab of the Server Configuration dialog box (QuarkXPress Server
menu).
The Transactions field displays the number of transactions completed by
QuarkXPress Server since its start. It makes no difference whether the status monitor is on
or off; all transactions are counted.
62 | A GUIDE TO QUARKXPRESS SERVER 8.5
Page 63

THE QUARKXPRESS SERVER USER INTERFACE
The Connections field displays the maximum number of simultaneous connections that
are allowed. Set this value in the HTTP tab of the Server Configuration dialog box
(QuarkXPress Server menu).
The In Use field displays the current number of simultaneous connections.
The Queued field displays the current number of connections waiting for a renderer to
become available.
The Memory Usage field displays the amount of memory used by memory-cached projects.
The Server Usage bar displays the length of time from when the server was started (the
time from when the server had at least one renderer working).
The Memory Cache bar displays the percentage of allocated memory cache space in use.
The Connection Load bar displays the percentage of connections being used. This
percentage is based on connections used since the start of QuarkXPress Server and is time
sensitive. For example, if all connections have been used since the server started, the load
is 100%. If the number of connections used drops to half the maximum value, instead of
dropping immediately to 50%, the percentage load gradually declines over time.
The Current field displays the rendering operations that are currently active. When
QuarkXPress Server is running in master-subrenderer mode, the Current field displays the
number of active and idle QuarkXPress Server subrenderers.
The Connection Status area displays the status for each active connection. The information
that displays for each connection includes the name of the project being processed and a
progress bar that displays the relative completion of the transaction. When the transaction
is complete, the status displays as idle until the connection is used to process another
transaction.
The Status Monitor dialog box displays a total of 16 status areas. The number of active
displays is determined by the number of available connections as specified in the HTTP
tab of the Server Configuration dialog box (QuarkXPress Server menu).
The information displayed in the Text Area for Transaction Status area depends on
whether Verbose Status Monitoring has been chosen. Regardless, all transactions generate
an entry in the status monitor, and the entry provides information about successful
transactions or errors.
To display more detailed information in the Status Monitor dialog box, check Verbose
Status Monitoring. Note that Verbose status monitoring slightly degrades the performance
of QuarkXPress Server.
Other QuarkXPress Server menu items
To display the QuarkXPress Server splash screen, choose Server/QuarkXPress Server >
About QuarkXPress Server.
A GUIDE TO QUARKXPRESS SERVER 8.5 | 63
Page 64

THE QUARKXPRESS SERVER USER INTERFACE
To check the QuarkXPress Server license out of Quark License Administrator, choose the
Check Out License command.
To pause the QuarkXPress Server HTTP server, choose the Pause Server command. To start
the server again, choose Server/QuarkXPress Server > HTTP Server > Start Server.
To start the HTTP server, choose Server/QuarkXPress Server > HTTP Server > Start Server.
To stop the QuarkXPress Server HTTP server without closing the QuarkXPress Server
application, choose Stop Server.
To shut down the QuarkXPress Server HTTP server and close the QuarkXPress Server
application, choose Shut Down Server.
64 | A GUIDE TO QUARKXPRESS SERVER 8.5
Page 65

Creating URL requests
You can use URL requests to make QuarkXPress Server render projects in a variety of
formats, to use the features of server XTensions modules, and to control the server. The
topics below provide an overview of how to construct server requests and use URL
parameters.
This chapter also lists functions that let you control the server. For detailed information
CREATING URL REQUESTS
about constructing other types of URL requests, see the QuarkXPress Server Web Integration
Guide.
Understanding URL requests
QuarkXPress Server URL requests should use the following format:
http://server:port/namespace/path/projectname?parameter=value
•
server: Indicates the name or IP address of the QuarkXPress Server computer.
•
port: Indicates the QuarkXPress Server application's port number. The default port number
is 8080.
•
namespace: Sets the render type (or indicates another server functionality to access). For
more information, see "Understanding QuarkXPress Server namespaces"
•
path: Indicates the path to the directory where the target project file is stored. Paths are
evaluated relative to the document pool directory.
•
projectname: Identifies the project to be rendered.
•
parameter=value: Optional parameters that provide more detailed control over how the
target project should be rendered. Multiple parameter/value pairs, separated by the "&"
character, can be included. For more information, see "URL parameters for PDF rendering"and
"URL parameters for PPML rendering."
For example, the following URL asks the QuarkXPress Server application named "QXPServer"
to return the file "MyProject.qxp" as a PDF file with hyperlinks and all fonts embedded:
A GUIDE TO QUARKXPRESS SERVER 8.5 | 65
Page 66

CREATING URL REQUESTS
http://QXPServer:8080/PDF/MyProject.qxp?includehyperlinks=1&embedallfonts=1
Some URL parameters require Boolean arguments. For such parameters, valid values include
1 or 0, true or false, y or n, and yes or no.
You can also send requests to QuarkXPress Server using the HTTP GET and POST protocols
and using XML with XSLT. For more information about these approaches, see the
QuarkXPress Server Web Integration Guide.
Understanding QuarkXPress Server namespaces
QuarkXPress Server namespaces differentiate among types of requests that are otherwise
identical. For example, consider the following three URLs:
http://QXPServer:8080/project1.qxp
http://QXPServer:8080/pdf/project1.qxp
http://QXPServer:8080/postscript/project1.qxp
These requests are identical, except each uses a different namespace (in italic). (The first
request does not specify a namespace, but this simply means the project is to be rendered
using the server's default render type.)
Namespaces can be used to determine the format in which a rendered project is returned,
as indicated above, but they can also be used to direct a request to XTensions software
that performs other functions. For example, if you use Modifier XTensions software's xml
namespace, Modifier XTensions software can return an XML representation of the project.
Looking up a namespace
The QuarkXPress Server Web Integration Guide lists the namespaces for every
QuarkXPress Server function. There is no single list of namespaces because some functions
do not require a particular namespace or are available in multiple namespaces. To determine
which namespace you want to use:
Open the QuarkXPress Server Web Integration Guide.
1
Choose Complete API List from the QuarkXPress Server Functions menu at the top of
2
the page.
Click the link for the render type you want or the function you want to use. (The link
3
might be a dynamic publishing process, a renderer, or a request handler.) The page
corresponding to that render type or function displays.
Locate the Namespace row. If the render type or function has an associated namespace,
4
that namespace is listed here.
Third-party XTensions can add their own namespaces. For information about a third-party
namespace, see the documentation for the XTensions module that adds that namespace.
66 | A GUIDE TO QUARKXPRESS SERVER 8.5
Page 67

CREATING URL REQUESTS
Understanding QuarkXPress Server parameters
Parameters let you control the details of how a request is executed. For example, you can
use the page parameter to create a request that returns only the third page of a project:
http://QXPServer:8080/jpeg/project1.qxp?page=3
You can include multiple parameters in the same request; simply separate them with an
ampersand (&). For example, here's a new version of the above URL that returns page three
at a scale of 50%:
http://QXPServer:8080/jpeg/project1.qxp?page=3&scale=.5
Looking up a parameter
The QuarkXPress Server Web Integration Guide lists the parameters that are available for
every QuarkXPress Server function. To determine which parameters you can use with a
request:
Open the QuarkXPress Server Web Integration Guide.
1
Choose Complete API List from the QuarkXPress Server Functions menu at the top of
2
the page.
Click the link for the render type you want or the function you want to use. (The link
3
might be a dynamic publishing process, a renderer, or a request handler.) The page
corresponding to that render type or function displays.
Locate the Parameters row. This row lists all available parameters, and includes a description
4
and a list of valid values for each parameter.
QuarkXPress Server Web Integration Guide overview
The topics below provide an overview of the contents of the QuarkXPress Server Web
Integration Guide.
Render types
QuarkXPress Server render types let you render content in a variety of formats, including
EPS, JPEG, PNG, PDF, PostScript, PPML, QuarkXPress, QuarkCopyDesk, and SWF (Flash).
You can also return documents in two different "raw" formats. Developers can implement
additional rendering formats through server XTensions software.
For more information, see the QuarkXPress Server Web Integration Guide.
General parameters
General parameters are parameters that are applicable to most render types. These
parameters allow you to render an individual box, component, layout, page, or spread.
You can also render a particular selection of layers, pages, and spreads. In addition, you
can control whether the pasteboard is included and how the output should be scaled.
A GUIDE TO QUARKXPRESS SERVER 8.5 | 67
Page 68

CREATING URL REQUESTS
For more information, see the QuarkXPress Server Web Integration Guide.
Specialized parameters
Specialized parameters are parameters that serve special purposes. Some of these parameters
work by asking the server to read the contents of XML files.
For more information, see the QuarkXPress Server Web Integration Guide.
Server control parameters
Server control parameters let you perform a variety of server administration tasks, including
adding and deleting files from the document pool, retrieving information about files, and
flushing caches.
For more information, see the QuarkXPress Server Web Integration Guide.
Document providers
Document providers allow QuarkXPress to render the following types of documents:
•
copydesk: Allows QuarkXPress Server to render article files created by QuarkCopyDesk.
•
Preference administration parameters
PortNumber
MaxListens
MaxConnections
qcddoc: Allows QuarkXPress Server to render projects created by QuarkXPress.
For more information, see the QuarkXPress Server Web Integration Guide.
The /getprefs handler lets clients remotely retrieve an XML representation of the current
QuarkXPress Server preferences, as described below.
The /setprefs handler lets clients remotely control QuarkXPress Server preferences. For
example,
http://<servername>:<port>/setprefs?AddConnectionFilter=action=allow;
ipaddr=206.195.80.80;mask=255.255.255.1;pos=0 permits connection filters and
specifies the IP address and the subnet mask of the connection.
DescriptionTypeAttribute
integer
Specifies a port number from 1024 to 65,535 (Mac OS) or 1 to
65,535 (Windows).
Specifies the maximum number of listens from 1 to 32.integer
Specifies the maximum number of connections from 1 to 16.integer
CacheSize
DocumentRootFolder
AllowAddFile
68 | A GUIDE TO QUARKXPRESS SERVER 8.5
Specifies the memory cache size from 1MB to 1024MB.integer
Specifies the document root directory.string
Allows the addition of files to the document root directory.Boolean
Page 69

CREATING URL REQUESTS
DescriptionTypeAttribute
LoggingEnabled
LogFolder
LogErrors
LogTransactions
LogTiming
LogEvents
ForceServedDocumentsClosed
AllowMemoryCaching
DefaultDoc
ErrorDoc
NoAccessDoc
string
Boolean
Boolean
Boolean
Boolean
string
string
string
Controls whether transactions and errors are logged.Boolean
Specifies the path to the log folder, which contains the error and
transaction log files.
Specifies whether to log error conditions.Boolean
Specifies whether to log all successful transactions.Boolean
Specifies whether to include timing information (such as
processing time and opening time) in the transaction log.
Specifies whether to log server events that are not related to error
conditions.
Causes QuarkXPress Server to close projects that are loaded into
cache from the document pool after rendering them.
Specifies whether to store disk-based projects in a
memory-resident cache.
Specifies the default HTML file to be returned when the server
is accessed through HTTP.
Specifies the HTML file to be retrieved when an error occurs on
the server.
Specifies the HTML file to be returned when access is denied to
a server function or project file.
DefaultRenderType
EnableFileSystemDocPool
VerboseStatusMonitoring
LogDocProblems
LogBadSXTDialogs
EnableHTTPInterface
ConnectionTimeout
UseConnectionFilters
DefaultBufferSize
RequireAdmin Verification
VerificationUsername
string
Boolean
Boolean
integer
Boolean
integer
string
Sets the default. Valid values include PNG, PDF, EPS, PSCR, QXPD,
RAW, RLER, JPEG, and PPML.
Controls whether you can specify a folder as the document pool.
The default value is YES.
Specifies whether to allow verbose status monitoring.Boolean
Specifies whether to log any project problems.Boolean
Specifies whether to log server XTensions software dialog boxes
that do not conform to QuarkXPress Server expectations.
Turns the built-in HTTP server on or off.Boolean
Specifies the amount of time (in seconds) before a connection
times out. Valid values are from 1 to 32,767.
Specifies whether to allow the addition and modification of
IP addresses.
Specifies the size (in KB) of the HTTP buffer. Enter a value from
16 to 256.
Specifies whether to require a user name and password.Boolean
Lets you supply a user name. Minimum length is 4 characters;
maximum length is 32 characters.
A GUIDE TO QUARKXPRESS SERVER 8.5 | 69
Page 70

CREATING URL REQUESTS
DescriptionTypeAttribute
VerificationPassword
ConfirmPassword
GenerateHierarchy
AddConnectionFilter
ipaddr
mask
pos
RemConnectionFilter
DisableQxdReturn
ContentLoadingTimeout
string
string
Boolean
(allow/deny)
string
string
boolean
integer
Lets you supply a password. Minimum length is 4 characters;
maximum length is 32 characters.
Confirms a password. Minimum length is 4 characters; maximum
length is 32 characters.
On an OnAddfile request, specifies whether to create a new file
hierarchy as files are added to the document pool.
Specifies whether to allow the addition of connection filters.Boolean
Specifies an IP address for use with connection filters. Use the
following format: 123.456.789.123.
Specifies a subnet mask for use with connection filters. Use the
following format: 123.456.789.123.
Specifies the position at which to add a connection filter.integer
Removes a filter at a given index.integer
Controls whether a project can be rendered as a QuarkXPress
project.
Controls the amount of time (in seconds) the server waits for a
server XTensions module or other document provider to load
content asynchronously before timing out the transaction.
70 | A GUIDE TO QUARKXPRESS SERVER 8.5
Page 71

Modifying layouts with XML
The xml namespace deconstructs a project according to the Modifier DTD. The construct
namespace lets the server turn an XML representation of a QuarkXPress project back into
an actual project. With these namespaces, you can deconstruct a project into an XML
representation, change the XML in accordance with the Modifier DTD, and then have the
server generate an updated version of the QuarkXPress project. You can even create new
MODIFYING LAYOUTS WITH XML
QuarkXPress projects from scratch using XML.
In addition, you can use the construct namespace to:
• Create a page based on master page
• Create a project from XML, using a Job Jackets™ file as the basis for the project
• Modify text font and style, including OpenType® styles
• Apply style sheets and local formatting to text
• Create and populate tables
• Import pictures into picture boxes and specify picture attributes
The DTD used for XML construction and deconstruction is completely Unicode®-compliant,
making it ideal for use in international publishing. Furthermore, the use of this DTD
ensures that the schema of XML output created by Constructor does not change when
server preferences change. This DTD is provided in the QuarkXPress Server application
folder and fully documented in the QuarkXPress Server Web Integration Guide.
Deconstructor XTensions software and the deconstruct namespace are no longer
supported.
A GUIDE TO QUARKXPRESS SERVER 8.5 | 71
Page 72

QUARKXPRESS SERVER XTENSIONS SOFTWARE
QuarkXPress Server XTensions software
Just as XTensions software provides additional functionality to QuarkXPress, XTensions
software enables QuarkXPress Server to do things it can't do by default. The XTensions
modules included with QuarkXPress Server allow clients to render projects as PDF files,
apply QuarkVista picture effects to pictures, dynamically update pictures in picture boxes
and text in text boxes (as well as boxes themselves), import data on the fly, manipulate
layers in projects, and more.
CopyDeskArticle XTensions software
CopyDeskArticle XTensions software allows QuarkXPress Server to do the following things:
• Render QuarkCopyDesk articles
• Export QuarkCopyDesk articles from a QuarkXPress project
• Add a QuarkCopyDesk article to an existing QuarkXPress project
• Create and delete components in a QuarkCopyDesk article within a QuarkXPress project
Rendering articles
To render QuarkCopyDesk articles, use the copydesk namespace, as follows:
http://[server]:[port]/[render type]/copydesk/[articlename]
For example, to render "Article.qcd" as a PDF file, you could use a URL like the following:
http://QXPServer.8080/pdf/copydesk/Article.qcd
Exporting articles
To export an article from a QuarkXPress project, use the QCDDOC namespace, as follows:
http://[server]:[port]/qcddoc/[project name]?article=[article name or
ID]
72 | A GUIDE TO QUARKXPRESS SERVER 8.5
Page 73

QUARKXPRESS SERVER XTENSIONS SOFTWARE
For example, to export the article named "Article1" from the project named "Project1.qxp,"
you could use a URL like the following:
http://QXPServer.8080/qcddoc/Project1.qxp?article=Article1
You cannot export an article from a QuarkXPress project unless the article has been created
and named in QuarkXPress using CopyDeskArticleXT XTensions software.
To export an article in a particular format, use the format parameter.
•
To export a standard article, use format=fullfeatured.
•
To export an article in lightweight mode, use format=lightweight.This format can be
useful in situations where file size is an issue. The lightweight file format includes only
those items that a QuarkCopyDesk user is supposed to work on.
For example:
http://QXPServer.8080/qcddoc/Project1.qxp?article=Article1?format=lightweight
You cannot export page pictures in lightweight mode.
Adding articles to projects
You can use Modifier XTensions software to create a QuarkCopyDesk article within an
existing QuarkXPress project. For example, to add an article named "New Article" to the
project named "Project1.qxp," you could use XML like the following:
<PROJECT PROJECTNAME="Project1.qxp" XMLVERSION="8.0">
<LAYOUT POINTSPERINCH="72">
<ID NAME="Layout 1" UID="1"/>
<ARTICLE OPERATION="CREATE" DOCFORMAT="FULLFEATURED">
<ID NAME="New Article" UID="4"/>
<RGBCOLOR BLUE="98" GREEN="254" RED="0"/>
<COMPONENT BOXNAME="Box1" BOXUID="1" COMPONENTCLASS="CT_TEXT"
NAME="Component 1" UID="1"/>
</ARTICLE>
</LAYOUT>
</PROJECT>
For more information, see the QuarkXPress Server Web Integration Guide.
Creating and deleting components
You can use Modifier XTensions software to create and delete components in
QuarkCopyDesk articles. For example, to add a component named "New Component" to
the article named "Article 1" in the project named "Project1.qxp," you could use XML like
the following:
<PROJECT JOBJACKET="Project1 Job Jacket" JOBTICKET="Default Job Ticket
1:Project1"
PROJECTNAME="Project1.qxp" XMLVERSION="8.0">
<LAYOUT POINTSPERINCH="72">
<ID NAME="Layout 1" UID="1"/>
<ARTICLE DOCFORMAT="FULLFEATURED">
<ID NAME="Article 1" UID="1"/>
<COMPONENT OPERATION="CREATE" BOXUID="9" COMPONENTCLASS="CT_TEXT"
NAME="New Component"/>
</ARTICLE>
A GUIDE TO QUARKXPRESS SERVER 8.5 | 73
Page 74

QUARKXPRESS SERVER XTENSIONS SOFTWARE
</LAYOUT>
</PROJECT>
To delete the component named "New Component" from the article named "Article1.qcd,"
you could use XML like the following:
<PROJECT JOBJACKET="Project1 Job Jacket" JOBTICKET="Default Job Ticket
1:Project1"
PROJECTNAME="Project1.qxp" XMLVERSION="8.0">
<LAYOUT POINTSPERINCH="72">
<ID NAME="Layout 1" UID="1"/>
<ARTICLE DOCFORMAT="FULLFEATURED">
<ID NAME="Article 1" UID="1"/>
<COMPONENT OPERATION="DELETE" NAME="New Component"/>
</ARTICLE>
</LAYOUT>
</PROJECT>
For more information, see the QuarkXPress Server Web Integration Guide.
PDF Filter XTensions software
PDF Filter XTensions software allows QuarkXPress Server to render a QuarkXPress project
as a PDF file.
PDF Filter XTensions software adds a PDF pane to the Preferences dialog
box (QuarkXPress Server > Preferences). For more information, see "Server preferences."
To take advantage of more detailed preferences, create a PDF output style and use that
output style when rendering projects as PDF files. For more information, see "Output styles."
To render QuarkXPress projects as PDF files when PDF is not the QuarkXPress Server default
render type, use the PDF namespace, as follows:
http://[server]:[port]/pdf/[projectname]
For information about the parameters for exporting in this format, see the
QuarkXPress Server Web Integration Guide.
PPML Export XTensions software
PPML Export XTensions software allows QuarkXPress Server to export a QuarkXPress
project in PPML format. This module can be used in conjunction with the XML Import
XTensions module to produce customized versions of a layout for different customers.
To render QuarkXPress projects in PPML format when PPML is not the QuarkXPress Server
default render type, use the PPML namespace, as follows:
http://server:port/ppml/projectname?path=[path of output directory on
server]
For information about the parameters for exporting in this format, see the
QuarkXPress Server Web Integration Guide.
74 | A GUIDE TO QUARKXPRESS SERVER 8.5
Page 75

QUARKXPRESS SERVER XTENSIONS SOFTWARE
Modifier XTensions software
Modifier XTensions software lets clients perform all of the following tasks using XML:
• Modify the properties of pictures in a QuarkXPress project
• Modify the text in text boxes within a QuarkXPress project
• Modify the properties of text boxes and picture boxes in a QuarkXPress project
• Create and delete picture boxes and text boxes in a QuarkXPress project
• Import text or text strings into text boxes within a QuarkXPress project
• Import pictures into picture boxes within a QuarkXPress project
• Save modified QuarkXPress projects in any supported format to any location on the network
(and also in the QuarkXPress Server document pool)
• Create and delete pages
• Create and delete layers
• Move items within layers
• Create and delete tables
• Modify tables and their contents
• Create QuarkCopyDesk articles and components
• Create lines, anchored boxes, and Bézier boxes
• Create lists
• Group and ungroup boxes
• Divide layouts into sections
To use Modifier XTensions software, a client creates an XML file indicating the actions to
be taken and sends that XML file to the QuarkXPress Server application, where Modifier
XTensions software reads the XML and makes the requested changes. Clients can use a
single XML file or string to manipulate multiple documents and boxes.
For more specific information about Modifier XTensions software, and for the Modifier
DTD, see the QuarkXPress Server Web Integration Guide.
Modifier XTensions software supports both GET and POST functionality.
Modifier XTensions software supports XML containing code that uses Unicode UTF-8 and
UTF-16 encodings. Use the encoding attribute of the XML declaration to specify an
encoding, as you would with any other XML file.
Modifier XTensions software adds a Modifier pane to the Preferences dialog box
(QuarkXPress Server > Preferences). For more information, see "Server preferences."
A GUIDE TO QUARKXPRESS SERVER 8.5 | 75
Page 76

QUARKXPRESS SERVER XTENSIONS SOFTWARE
Using Modifier XTensions software
To use Modifier XTensions software:
Create a QuarkXPress project. Note the IDs or names of any text and picture boxes you
1
want to manipulate.
Upload the project to the QuarkXPress Server document pool.
2
Create XML that describes the changes you want, as described in "Creating XML for Modifier
3
XTensions software."
Send the XML to the server in one of the following ways:
4
• Put the XML in a file on the server and then use a URL to point to the file, as follows:
http://server:port/namespace/path/projectname?modify=file:absolute
path to XML file on server
• Put the XML in the URL, as follows:
http://server:port/namespace/path/projectname?modify=XML string
Clients can also send XML in the form of a POST request.
Creating XML for Modifier XTensions software
All XML used with Modifier XTensions software uses the Modifier DTD. This DTD is
documented in full in the QuarkXPress Server Web Integration Guide.
In general, the structure for addressing items in a particular layout is as follows:
<PROJECT>
<LAYOUT>
<ID NAME="[name of layout]">
<[Item being addressed]>
<[Parameters of item]>
</[Item being addressed]>
</LAYOUT>
</PROJECT>
For more information, see the QuarkXPress Server Web Integration Guide.
QuarkVista XTensions software
A QuarkVista preset file is a file that contains a list of one or more QuarkVista picture effects
and instructions for applying those effects. You can use QuarkVista XTensions software
to apply and remove preset files containing QuarkVista effects to pictures in picture boxes
before rendering a project.
QuarkVista effects work only with projects that were last saved in QuarkXPress 6.0 or later.
76 | A GUIDE TO QUARKXPRESS SERVER 8.5
Page 77

QUARKXPRESS SERVER XTENSIONS SOFTWARE
Creating preset files
To create a preset file, open a project in a copy of QuarkXPress that is running QuarkVista
XTensions software, select a picture box that contains a picture, apply effects to the picture,
and then click the Save Preset button on the Picture Effects palette. The effects you apply
are saved in a preset (.vpf) file at the location you indicate. (By default, preset files are
stored in the location specified in the Picture Effects pane of the Preferences dialog box.)
To use preset files in QuarkXPress Server, copy them to the folder indicated by the Picture
Effects Presets field in the Picture Effects pane of the QuarkXPress Server Preferences
dialog box (QuarkXPress Server menu).
Using QuarkVista XTensions software
To indicate which preset file should be applied, use the applyvistaeffect parameter.
To indicate which picture box the preset file should be applied to, use the vistabox
parameter. The URL syntax is as follows:
http://[server]:[port]/[namespace]/[path]/[projectname]?applyvistaeffect=[preset
file name]&vistabox=[picture box name]
For example, consider the following URL:
http://QXPServer:8080/abc.qxp?applyvistaeffect=color.vpf&vistabox=pb2
In this example, color.vpf is the name of the preset file containing the QuarkVista
effects, and pb2 is the name of the box to which the preset file is applied.
You can apply the same preset file to multiple pictures using a single URL. For example,
consider the following URL:
http://QXPServer:8080/abc.qxp?applyvistaeffect=color.vpf&vistabox=p1,p2,p3
Here, the color.vpf preset is applied to the picture boxes named p1, p2, and p3.
If the picture in the target box is not compatible with the QuarkVista effects in the preset
file, an alert displays in the Web browser. If Log Errors is enabled (QuarkXPress Server >
Server Configurations > Logging tab), an entry is made in the QuarkXPress Server error
log file.
If the specified preset file that contains the QuarkVista effects is not in the preset location,
an alert displays in the Web browser. If Log Errors is enabled (QuarkXPress Server >
Server Configurations > Logging tab), an entry is made in the QuarkXPress Server error
log file.
If you specify multiple picture boxes in a URL, and the picture in one of those boxes is not
compatible with the QuarkVista effects in the preset file, the effects are applied to the
remaining files.
A GUIDE TO QUARKXPRESS SERVER 8.5 | 77
Page 78

QUARKXPRESS SERVER XTENSIONS SOFTWARE
Removing QuarkVista effects
Clients can remove all QuarkVista effects applied to images using the deletevistaeffect
parameter. Consider the following example:
http://QXPServer:8080/abc.qxp?deletevistaeffect=pb2
This URL removes any QuarkVista effects applied to the picture in the picture box named
pb2.
Clients can remove a QuarkVista effect applied to multiple images from a single URL.
Consider the following example:
http://QXPServer:8080/abc.qxp?deletevistaeffect=p1,p2,p3
This URL removes any QuarkVista effects applied to pictures in the picture boxes named
p1, p2, and p3.
If you apply and remove QuarkVista effects in the same URL, the deletevistaeffect
parameter takes precedence.
If you open a project that uses QuarkVista effects, but QuarkVista XTensions software is
not enabled, the QuarkVista effects are ignored. If Log Errors is enabled
(QuarkXPress Server > Server Configurations > Logging tab), an entry is made in the
QuarkXPress Server error log file.
QuarkXPress Server Layer XTensions software
You can use QuarkXPress Server Layer XTensions software to control the visibility of
specific layers in a rendered QuarkXPress project. You can also add layers, delete layers,
edit layer attributes, and control whether layers are rendered.
When you use the getdocinfo namespace, QuarkXPress Server returns information about
items on all of the layers in the QuarkXPress project, including layers that are not visible.
QuarkXPress Server Layers XTensions software adds a Layers pane to the Preferences
dialog box (QuarkXPress Server > Preferences). For more information, see "Server
preferences."
Clients can use the layer parameter to specify a layer (even a hidden layer) to be rendered.
For example, the URL http://QXPServer:8080/doc.qxp?layer=layer1 renders only
the layer named "layer1" in the project named "doc.qxp."
Clients can specify more than one layer in a single URL. For example, the URL
http://QXPServer:8080/doc.qxp?layer=layer1,layer2 renders the layers named
"layer1" and "layer2."
For information about the parameters for this feature, see the QuarkXPress Server Web
Integration Guide.
78 | A GUIDE TO QUARKXPRESS SERVER 8.5
Page 79

QUARKXPRESS SERVER XTENSIONS SOFTWARE
If Suppress Output is selected for a layer, QuarkXPress Server does not render that layer
when producing PDF, EPS, or PostScript files.
InteractiveDesignerSXT Server XTensions software
InteractiveDesignerSXT XTensions software allows QuarkXPress Server to render both Print
and Interactive layouts in QuarkXPress projects as SWF (Flash) files. If you render a Print
layout as an SWF file, you can use the right and left arrow keys to navigate between pages
in the SWF file.
InteractiveDesignerXT XTensions software adds SWF and Presentation panes to the
Preferences dialog box (QuarkXPress Server > Preferences). For more information, see
"Server preferences."
To render an Interactive layout in a QuarkXPress project as a SWF file when SWF is not
the QuarkXPress Server default render type, use the SWF namespace, as follows:
http://[server]:[port]/swf/[projectname]?layout="[layoutname]"
For information about the parameters for exporting in this format, see the
QuarkXPress Server Web Integration Guide.
A GUIDE TO QUARKXPRESS SERVER 8.5 | 79
Page 80

TELEGRAPH XTENSIONS SOFTWARE
Telegraph XTensions software
Unlike the other XTensions software described in this guide, Telegraph XTensions software
works with QuarkXPress, rather than with QuarkXPress Server. You can use Telegraph
XTensions software to create QuarkXPress projects that can serve as templates in
QuarkXPress Server. Using Telegraph XTensions software, you can assign unique names
to individual items, define server caching parameters, and upload the template directly to
a QuarkXPress Server computer.
These topics explain how to use Telegraph XTensions software. It is assumed that you are
already familiar with the functionality and user interface of QuarkXPress.
Setting Telegraph preferences
Telegraph XTensions software adds the QuarkXPress Server pane to the QuarkXPress
Preferences dialog box (QuarkXPress/Edit menu). You can use this pane to configure
settings for QuarkXPress Server templates, specify where to store your projects on the
server, and control how projects are cached.
80 | A GUIDE TO QUARKXPRESS SERVER 8.5
Page 81

TELEGRAPH XTENSIONS SOFTWARE
QuarkXPress Server pane of Preferences dialog box (QuarkXPress/Edit menu)
For information on adding a server, see "Adding a server."
To edit the properties of a server in the Server list, select the server name and then click
Edit.
To remove a server from the Server Setup list, select the server and then click Remove.
To allow projects checked in from this copy of QuarkXPress to remain open on the server
after it has been served, check Allow Document to Stay Open.
To load projects checked in from this copy of QuarkXPress into the server memory cache,
check Allow Document in Memory Cache.
Adding a server
The Server Setup area of the QuarkXPress Server pane lists servers that are potential
repositories for QuarkXPress projects. You can add, edit, and remove servers in this list.
To add a server to the Server Setup list:
Click Add. The Add Server dialog box displays.
1
A GUIDE TO QUARKXPRESS SERVER 8.5 | 81
Page 82

TELEGRAPH XTENSIONS SOFTWARE
Add Server dialog box
Enter an identifying name for the server in the Server Name field.
2
Enter the server's address in the Address field. You can enter either an IP address or the
3
name of the server.
Enter the server's port number in the Port field. The default port number is 8080. Valid
4
values are from 1 to 65535.
In the Document Pool Path field, enter the path to the document pool directory on the
5
server, or to a subdirectory within the document pool. If you leave this field blank, the
path defaults to the document pool directory path specified in the QuarkXPress Server
Document Root field (QuarkXPress Server > Server Configuration > Server tab).
If you enter a folder path that does not exist, QuarkXPress Server can create the folders in
the path when you upload the template to a QuarkXPress Server. To create folders when
you upload, check Generate Hierarchy On Document Upload in the Server tab of the
QuarkXPress Server Server Configuration dialog box (QuarkXPress Server > Server
Configuration) before you upload the template to the server.
Click OK.
6
Using Telegraph XTensions software
Once you have configured preferences for Telegraph QuarkXTensions software, you can
begin creating QuarkXPress Server templates. After you complete a template, Telegraph
XTensions software can upload the file to a QuarkXPress Server computer.
Identifying QuarkXPress items and groups
The Box Identifiers palette lets you associate names with items and groups. To display
this palette, choose Window > Box Identifiers.
82 | A GUIDE TO QUARKXPRESS SERVER 8.5
Page 83

TELEGRAPH XTENSIONS SOFTWARE
Box Identifiers palette
To edit the name of an item or group, select its name in the Box Modifiers palette and
then click Edit Box Name .
To scroll to the location of a named item or group, double-click the target item or group’s
name in the Box Modifiers palette. Alternatively, you can select the name and click Go
To .
To delete an item’s or group’s name (without deleting the item or group itself), select the
name in the Box Modifiers palette and then click Delete .
To make sure that all named boxes display in the Box Identifiers palette, click Populate
Named Boxes .
Each QuarkXPress item also has an identification number that you can use when you want
to render individual project items in QuarkXPress Server. The number displays in the Box
ID field in the upper right corner of the palette.
In a chain of text boxes, all boxes use the same Box Name. However, each box has a unique
Box ID number.
Naming items and groups
To specify a name for an item or group:
Using the Item tool, select the target item or group.
1
2
In the Box Identifiers palette, click New Box Name . The New Box Name dialog box
displays.
New Box Name dialog box
Enter a name for the item or group in the Box Name field.
3
A GUIDE TO QUARKXPRESS SERVER 8.5 | 83
Page 84

TELEGRAPH XTENSIONS SOFTWARE
Click OK. The name of the item or group displays on the Box Identifiers palette, next to
4
the item’s item ID and page number.
In addition to items on layout pages, you can also name items on master pages. Items on
layout pages that are based on items on master pages have a default name of "<Item name
on master page><New box UID>"
Uploading templates
Telegraph QuarkXTensions software can upload a project to the QuarkXPress Server
computer in one simple step. You can also upload any required pictures and fonts, if you
choose to collect the fonts and pictures during the upload. To upload the active project:
Choose Utilities > Upload Template. The Upload Template dialog box displays.
1
If you have edited the project since you last saved it, QuarkXPress prompts you to save
the project.
Upload Template dialog box
Choose a server from the Server drop-down menu. This drop-down menu includes the
2
servers listed in the QuarkXPress Server pane of the Preferences dialog box
(QuarkXPress/Edit menu).
If you specified a directory path for the server, that path automatically displays in the
3
Directory Path field. If you did not specify a directory path in the preferences, this field
remains blank. This path defaults to the document pool directory specified in
QuarkXPress Server.
If you are uploading to QuarkXPress Server, and you have configured that server to require
4
authentication, enter a valid user name and password in the User Name and Password
fields. (If the QuarkXPress Server application does not require authentication, leave these
fields empty.)
84 | A GUIDE TO QUARKXPRESS SERVER 8.5
Page 85

TELEGRAPH XTENSIONS SOFTWARE
To specify authentication information for a QuarkXPress Server application, display the
HTTP tab of the QuarkXPress Server Preferences dialog box, check the Realm Verif. for
Admin. Requests box and enter a user name and password.
To collect and upload fonts used by the project, check Fonts.
5
To collect and upload pictures used by the project, check Pictures. This will upload high-
6
or low-resolution pictures that are linked to or embedded in the project.
If picture files are missing or have been modified since they were imported into the project,
an alert displays. For more information about missing or modified picture files, see
"Uploading missing or modified pictures."
Click OK.
7
If you check Fonts, an alert reminds you of possible restrictions regarding copying font
software. Click OK to continue uploading the project with the fonts, click Do Not Collect
Fonts to upload the project without the fonts, or click Cancel to stop the upload.
The Upload Status window displays a progress bar that displays the status of the upload.
When the upload is complete, a message notifies you whether the project uploaded
successfully.
Uploading missing or modified pictures
If the picture files linked to the project are missing or have been modified since they were
imported into the project, an alert displays at upload. Choose from among the following
options:
• To continue the upload with low-resolution versions of the pictures, click OK.
• To stop the upload, click Cancel.
• To locate missing pictures or update modified pictures, click List Pictures.
If you click List Pictures, the Missing/Modified Pictures dialog box displays:
• To view a picture in the project, select the picture's name in the list and click Show.
• To locate a missing picture file, select it and click Update. The Find dialog box displays.
Locate and choose the appropriate file, and then click Open.
• To update a modified picture file, click Update. Every instance of the modified picture in
the project is updated.
• When OK displays in the Status column for each picture, click Collect. If the status of
any picture is still Missing or Modified when you click Collect, that picture file will not
be uploaded, but a low-resolution preview will remain in the project.
• To stop the upload and return to the project window, click Cancel.
A GUIDE TO QUARKXPRESS SERVER 8.5 | 85
Page 86

QUARKXPRESS SERVER MONITOR
QuarkXPress Server Monitor
QuarkXPress Server Monitor is no longer included with QuarkXPress Server. All
QuarkXPress Server Monitor functionality is available in QuarkXPress Server Manager. For
more information, see "QuarkXPress Server Manager."
86 | A GUIDE TO QUARKXPRESS SERVER 8.5
Page 87

QUARKXPRESS SERVER MANAGER
QuarkXPress Server Manager
QuarkXPress Server Manager is a server application that efficiently routes rendering requests
in an environment that uses one or more QuarkXPress Server applications.
QuarkXPress Server Manager uses load-balancing methods to determine which server in
the QuarkXPress Server pool can best process a document request, and uses caching to
improve speed and efficiency. QuarkXPress Server Manager also provides failsafe capability
by reliably resubmitting failed requests, either to the same QuarkXPress Server instance
or to a different one (depending on the error message returned by the server instance).
QuarkXPress Server does not require QuarkXPress Server Manager, but a QuarkXPress Server
Manager server can coordinate multiple QuarkXPress Server applications so that they work
together with maximum speed, reliability, and availability.
QuarkXPress Server Manager also provides a Web services interface that allows developers
to use QuarkXPress Server features without having to use the HTTP interface.
To configure a QuarkXPress Server Manager server application, you must use the
QuarkXPress Server Manager client application. The topics below explain how the
QuarkXPress Server Manager client application works and provide examples for using it.
Understanding QuarkXPress Server Manager
Before you begin, take time to review the topics below so that you understand how this
chapter is structured and how you can get the most out of it.
Load balancing
Load balancing ensures that each rendering request is sent to a server that is likely to be
able to handle it quickly. QuarkXPress Server Manager lets you use choose from three
load-balancing settings:
• Random: Each rendering request is sent to a random server.
A GUIDE TO QUARKXPRESS SERVER 8.5 | 87
Page 88

QUARKXPRESS SERVER MANAGER
• Round robin: Requests are sent to servers in a set order. For example, if you have three
QuarkXPress Server instances and QuarkXPress Server Manager receives ten rendering
requests, the requests are distributed as follows:
QuarkXPress Server instance usedRequest
11
22
33
14
25
36
17
• Dynamic: The QuarkXPress Server Manager server considers file size and throughput
requirements for each request. For example, assume the following series of requests is sent
to QuarkXPress Server Manager in an environment that uses two QuarkXPress Server
instances:
SizeRequest
8MB1
1MB2
2MB3
The first request is assigned to server #1, and the second request is assigned to server #2.
When the third request arrives, QuarkXPress Server Manager checks the loads that the two
servers are already handling and assigns the task to the server with the smallest load — in
this case, server #2.
If a request fails because a server stops responding or because of a "File Not Found" error,
QuarkXPress Server Manager does not resubmit that request to that server.
The Dynamic setting is typically the most efficient setting for environments with more
than one QuarkXPress Server instance.
For information about choosing a load-balancing setting, see "Controlling load balancing"
Developers can implement their own load-balancing systems; for more information, see
the QuarkXPress Server Web Integration Guide.
Request timeout interval
QuarkXPress Server Manager attempts to send each request to a QuarkXPress Server instance
that can promptly handle that request. However, in some situations a QuarkXPress Server
88 | A GUIDE TO QUARKXPRESS SERVER 8.5
Page 89

QUARKXPRESS SERVER MANAGER
instance might be unable to process a request in a reasonable amount of time (for example,
if the server is working on a large rendering job, or if the server computer has stopped
functioning). If you specify a certain period of time as the request timeout interval,
QuarkXPress Server Manager will wait for the response until that period of time elapses,
and then send the request to a different QuarkXPress Server instance. This ensures that a
request does not get "lost" if its assigned QuarkXPress Server instance does not become
available promptly.
For information about setting a request timeout interval, see "Using other global settings."
If a client request fails despite being sent to multiple QuarkXPress Server instances,
QuarkXPress Server sends the end user a customizable error message or exception so that
the end user can appropriately handle the failure. A QuarkXPress Server Manager server
can also automatically send e-mail to an administrator in the event of a problem; for more
information, see "Generating automatic e-mail messages."
Determining QuarkXPress Server instance availability
QuarkXPress Server Manager uses two methods to determine the availability of a
QuarkXPress Server instance: ping and ping document.
Ping
QuarkXPress Server Manager periodically sends a ping request to all of its QuarkXPress Server
instances to determine whether they are available. Ping requests use the following format:
http://[Server]:[Port]/getprocessid
Ping document
QuarkXPress Server Manager periodically sends a render request to all of
its QuarkXPress Server instances to determine whether they can render a document. Ping
document requests use the following format:
http://[Server]:[Port]/[PingDocumentName.qxp]
You can specify the document to be used for this render request. To avoid long ping
document rendering times, use a simple document.
You can specify the interval between pings and ping documents in the Other Settings
pane in the Global Settings pane of the QuarkXPress Server Manager window (see "Using
other global settings").
Logging
QuarkXPress Server Manager logs all interactions with QuarkXPress Server instances.
QuarkXPress Server Manager log files contain the following information:
• Render requests
• QuarkXPress Server responses
A GUIDE TO QUARKXPRESS SERVER 8.5 | 89
Page 90

QUARKXPRESS SERVER MANAGER
• Information about events (such as alerts) that occur during the render-request process
• Details about requests that were sent to a different QuarkXPress Server instance after the
first assigned QuarkXPress Server instance was unable to process the request
Within the logs, each QuarkXPress Server instance is identified by its IP address and port
number.
You can export log files in XML (Extensible Markup Language) or comma-separated values
(CSV) format. For more information, see "Exporting log files"
Caching
To increase speed and efficiency, QuarkXPress Server Manager caches information in
memory. If the response to a render request, URL request, or file request is included in the
QuarkXPress Server Manager memory cache, QuarkXPress Server Manager returns the
response from the disk cache instead of sending the request to a QuarkXPress Server
instance. For more information, see "Managing the cache"
Requests that contain a binary parameter and multipart responses are not cached, regardless
of whether global caching or command-specific caching is enabled.
When the QuarkXPress Server Manager server application receives response data from a
QuarkXPress Server instance, QuarkXPress Server Manager can return that response directly
or write it as a file and return the file's URL. The second approach maximizes efficiency
for SOAP-based clients, because SOAP transfers binary data very slowly. Cached response
files have names that begin with "TMP_", and they are removed when they reach the age
specified in the cache settings (see "Managing the cache"). QuarkXPress Server Manager uses
the cache file this way regardless of whether caching is turned on or off; however, you can
override this behavior by setting the responseasurl parameter to false for every request.
Web services
QuarkXPress Server Manager provides a Web services interface that makes it easy for
developers to create applications that use QuarkXPress Server. This Web services interface
provides the same functionality that is available through the QuarkXPress Server HTTP
interface. For more information about the Web services interface, see the QuarkXPress Server
Web Integration Guide.
Working with QuarkXPress Server Manager
The general process for using QuarkXPress Server Manager is as follows:
Install QuarkXPress Server Manager software.
1
Launch one or more QuarkXPress Server instances on your network.
2
90 | A GUIDE TO QUARKXPRESS SERVER 8.5
Page 91

QUARKXPRESS SERVER MANAGER
Launch the QuarkXPress Server Manager Console application (see Starting the Manager
3
server application").
From the QuarkXPress Server Manager Console application, start the Server Manager server
4
application (see Starting the Manager server application").
Launch the QuarkXPress Server Manager client application (see Starting the Manager
5
client application").
Using the QuarkXPress Server Manager client application, connect to a QuarkXPress Server
6
Manager server (see "Starting QuarkXPress Server Manager").
Use the Manage QuarkXPress Server pane of the QuarkXPress Server Manager window
7
to add QuarkXPress Server instances and specify information about those servers (see
"Configuring QuarkXPress Server instances").
Configure logging options, caching options, a load-balancing method, proxy server settings,
8
automatic e-mail settings, and various other settings in the Global Settings pane of the
QuarkXPress Server Manager window (see "Controlling load balancing," "Using a proxy
server," "Generating automatic e-mail messages," and "Using other global settings").
As necessary, export and delete logs using the Manage Logs pane of the
9
QuarkXPress Server Manager window (see "Managing logs").
As necessary, delete cache items and clear the QuarkXPress Server Manager server cache
10
using the Manage Cache pane of the QuarkXPress Server Manager window (see "Managing
the cache").
Starting QuarkXPress Server Manager
You can use one copy of the QuarkXPress Server Manager client application to administer
multiple copies of the QuarkXPress Server Manager server application (but only one at a
time). Each QuarkXPress Server Manager server can handle multiple QuarkXPress Server
instances.
A GUIDE TO QUARKXPRESS SERVER 8.5 | 91
Page 92

QUARKXPRESS SERVER MANAGER
QuarkXPress Server Manager diagram
Starting the Manager server application
To launch the QuarkXPress Server Manager server application:
•
Mac OS: Open the QuarkXPress Server Manager/Server folder inside the applications
folder and double-click "tomcat_start.command."
• Windows: Choose Start > Programs > QuarkXPress Server Manager > Start
QuarkXPress Server Manager.
You can access API documentation in HTML format by navigating to
http://[server]:[port] , where [server] identifies the computer on which
QuarkXPress Server Manager is running.
Starting the Manager client application
To launch the QuarkXPress Server Manager client application:
• Mac OS: Double-click the "Client Administrator" icon.
• Windows: Choose Start > Programs > QuarkXPress Server Manager > Client
Administrator.
When you launch the QuarkXPress Server Manager client application, the Log On dialog
box displays.
92 | A GUIDE TO QUARKXPRESS SERVER 8.5
Page 93

QUARKXPRESS SERVER MANAGER
Log On dialog box
To log on to a particular QuarkXPress Server Manager server:
Do one of the following things:
1
• Choose the server name or IP address from the Server Name/IP Address drop-down menu.
• Choose Add Server from the Server Name/IP Address drop-down menu, and then enter
the server's DNS name or IP address, followed by the server's port number, in the fields
below the drop-down menu.
Click OK. The QuarkXPress Server Manager window displays.
2
Request handler binding
When you add a QuarkXPress Server instance to QuarkXPress Server Manager, you can
choose to bind that server instance to particular rendering type or request type. When
QuarkXPress Server Manager receives a matching request, it will send the request to only
those server instances that are bound to that rendering type or request type. If multiple
server instances are bound to a particular rendering type or request type, QuarkXPress Server
Manager balances the load of such requests between the server instances.
An instance of QuarkXPress Server Manager that is not bound to any specific type of
request is called a generic server. If a request is not bound to a particular server instance,
QuarkXPress Server Manager sends that request to a generic server. If more than one generic
server is available, QuarkXPress Server Manager balances the load of such requests between
them.
You can bind a server to more than one rendering type or request type.
Configuring QuarkXPress Server instances
The Manage QuarkXPress Server pane of the QuarkXPress Server Manager window lists
the QuarkXPress Server instances the QuarkXPress Server Manager server is handling. You
can use this pane to add QuarkXPress Server instances, edit the description of existing
QuarkXPress Server instances, and delete QuarkXPress Server instances.
A GUIDE TO QUARKXPRESS SERVER 8.5 | 93
Page 94

QUARKXPRESS SERVER MANAGER
Manage QuarkXPress Server pane
Adding and enabling a QuarkXPress Server instance
When you add and enable a QuarkXPress Server instance in the Manage
QuarkXPress Server pane of the QuarkXPress Server Manager window, the
QuarkXPress Server Manager server begins routing rendering requests to that
QuarkXPress Server instance.
If you add and enable a QuarkXPress Server instance in this pane, be sure that clients are
no longer sending rendering requests directly to that QuarkXPress Server instance; otherwise,
the server will be handling both direct requests and routed requests, and the server might
become overly busy. Note also that requests sent directy to such a QuarkXPress Server
instance do not benefit from QuarkXPress Server Manager features such as load balancing,
caching, and logging.
To add and enable a QuarkXPress Server instance:
Display the Manage QuarkXPress Server pane of the QuarkXPress Server Manager
1
window.
Click Add. The Add QuarkXPress Server dialog box displays.
2
94 | A GUIDE TO QUARKXPRESS SERVER 8.5
Page 95

QUARKXPRESS SERVER MANAGER
Add QuarkXPress Server dialog box
Enter the QuarkXPress Server instance's DNS name or IP address in the Name/IP Address
3
field.
Enter the QuarkXPress Server instance's port number in the Port Number field.
4
To specify an alternate name for the server, enter a value in the Alias field. The Alias value
5
displays in the Manage QuarkXPress Server pane of the QuarkXPress Server Manager
window.
If you choose to use a particular ping document for this server (see "Ping document"), make
6
sure the project file is in the QuarkXPress Server instance's document pool and then enter
the project's file name in the Ping Document field. The ping document is used only if
the global Ping Type is set to Ping Document (see "Using other global settings"). Note that
if you do not set a ping document here, and no global ping document is set (see "Using
other global settings"), an error message might display to indicate that the server is registered
but inactive.
Enter the QuarkXPress Server instance user name and password in the Admin User and
7
Admin Password fields.
A GUIDE TO QUARKXPRESS SERVER 8.5 | 95
Page 96

QUARKXPRESS SERVER MANAGER
To restrict this server to one or more particular types of rendering, check the appropriate
8
boxes in the Request Binding area. To add additional render types (for example, render
types provided by QuarkXPress Server XTensions software), check Other and enter the
appropriate namespaces in the corresponding field as a comma-separated list. For more
information, see "Request handler binding."
To specify that QuarkXPress Server Manager should begin sending rendering requests to
9
this QuarkXPress Server instance, check Enable.
Click OK.
10
Editing a QuarkXPress Server instance
To edit the description of a QuarkXPress Server instance, display the Manage
QuarkXPress Server pane of the QuarkXPress Server Manager window, select the server
in the list, and then click Edit. The options in the Edit QuarkXPress Server dialog box
are the same as the options in the Add QuarkXPress Server dialog box (see "Adding and
enabling a QuarkXPress Server instance").
Enabling and disabling routing to QuarkXPress Server instances
The Status column in the Manage QuarkXPress Server pane of the QuarkXPress Server
Manager window shows the status of each QuarkXPress Server instance. A green icon
indicates that the server successfully replied to the last ping or ping document request, a
red icon indicates that the server is not responding, and a gray icon indicates that the
server is inactive.
The status list is not updated automatically. To update the list with the current status of
all servers, click Refresh.
To enable routing to a QuarkXPress Server instance, do one of the following things:
• Control+click/right-click the server name to display a context menu and then choose
Enable.
• Select the server, click Edit to display the Edit QuarkXPress Server dialog box, check
Enable, and then click OK.
To disable routing to a QuarkXPress Server instance, do one of the following things:
• Control+click/right-click the server name to display a context menu and then choose
Disable.
• Select the server, click Edit to display the Edit QuarkXPress Server dialog box, uncheck
Enable, and then click OK.
96 | A GUIDE TO QUARKXPRESS SERVER 8.5
Page 97

QUARKXPRESS SERVER MANAGER
Manage QuarkXPress Server pane
Displaying information about a QuarkXPress Server instance
To display information about a QuarkXPress Server instance, double-click the server's name
in the Manage QuarkXPress Server pane of the QuarkXPress Server Manager window.
The QuarkXPress Server Details dialog box displays.
QuarkXPress Server Details dialog box
Deleting a QuarkXPress Server instance
To delete a QuarkXPress Server instance from the list of available servers in the
QuarkXPress Server Manager window, display the Manage QuarkXPress Server pane of
the QuarkXPress Server Manager window, select the server name or IP address, and then
click Delete.
Deleting a QuarkXPress Server instance from this dialog box does not shut down the
QuarkXPress Server instance, but it does prevent the QuarkXPress Server Manager server
from routing rendering requests to the QuarkXPress Server instance.
Managing the cache
Each QuarkXPress Server Manager server has an in-memory cache (in which it stores the
keys to recently accessed items) and a disk-based cache (in which the items themselves
are stored). If a request for a recently used item arrives, and a QuarkXPress Server Manager
server has that request in its memory cache, the server can simply return the response
from its disk cache instead of having to send the request to a QuarkXPress Server instance.
Requests are stored in the cache only if the cache is turned on. For more information, see
"Configuring cache options."
A GUIDE TO QUARKXPRESS SERVER 8.5 | 97
Page 98

QUARKXPRESS SERVER MANAGER
The cache stores only the results of requests that do not deliberately bypass the cache.
Viewing a QuarkXPress Server Manager server cache
To view the list of files in the QuarkXPress Server Manager server's cache, display the
Manage Cache pane of the QuarkXPress Server Manager window. This pane lists the
URL of each file in the cache, the file's size, and the date and time of the file's generation.
To view a cache file, double-click the file name in the list.
Manage Cache pane
Deleting files from the cache
There is usually no need to manually delete files from a QuarkXPress Server Manager
server's cache. When the cache reaches 95% of its capacity, QuarkXPress Server Manager
automatically begins deleting the least recently used files in the cache to make room for
new files. However, you can also manually clear files from the cache.
To manually delete cache files:
If you want to delete specific files, select those files in the list.
1
Click Clear Cache. The Clear Cache alert displays.
2
If you want to delete specific files, uncheck Delete all cache files. If you want to clear all
3
files from the cache, check Delete all cache files.
Click OK.
4
98 | A GUIDE TO QUARKXPRESS SERVER 8.5
Page 99

QUARKXPRESS SERVER MANAGER
Configuring cache options
To configure cache options, display the Cache Settings pane in the Global Settings pane
of the QuarkXPress Server Manager window.
• To set the maximum number of files allowed in the cache, enter a value in the Cache
Count field. When the number of files in the cache reaches the number you set here,
QuarkXPress Server Manager begins deleting the least recently used files to make room in
the cache.
• To set the maximum disk cache size, enter a value in the Cache Disk Size field. When the
disk cache reaches this size, QuarkXPress Server Manager begins deleting the least recently
used files to make room in the cache.
• To specify an interval after which the cache should be periodically cleared, enter a value
in the Cache Cleanup Interval field.
• To specify where cache files for the QuarkXPress Server Manager server should be stored,
enter a path in the Cache Folder field.
• The Cache radio buttons let you control caching for the QuarkXPress Server Manager
server. To turn caching on, click On. To turn caching off, click Off.
Cache Settings pane
Managing logs
A QuarkXPress Server Manager server maintains logs of all of the requests it receives, the
responses from the QuarkXPress Server instances, information about events (such as alerts)
that occur during the render-request process, dates and times, and details about each
request that was sent to a different QuarkXPress Server instance after its first assigned
QuarkXPress Server instance was unable to process the request.
A GUIDE TO QUARKXPRESS SERVER 8.5 | 99
Page 100

QUARKXPRESS SERVER MANAGER
To control what information is stored in the logs, use the Log Settings pane in the Global
Settings pane of the QuarkXPress Server Manager window. For more information, see
"Configuring logging options."
Manage Logs pane
Exporting log files
You can export log files to your local file system in XML and CSV format. To export a log
file, display the Manage Logs pane of the QuarkXPress Server Manager window,
Control+click/right-click the log file's name and choose Export as XML or Export to CSV
format.
Viewing log file details
To view information about a log file, display the Manage Logs pane of the
QuarkXPress Server Manager window, and then either double-click the log file name or
Control-click/right-click the log file name and choose View Log Details. The log detail
information displays in your system's default Web browser.
Deleting log files
To delete log files:
Display the Manage Logs pane of the QuarkXPress Server Manager window.
1
Select the one or more log file names in the list.
2
Click Delete. The Clear Logs dialog box displays.
3
100 | A GUIDE TO QUARKXPRESS SERVER 8.5
 Loading...