

Page 1

SuperLoader™ Bar Code Reader Upgrade
Quick Start Guide
This Quick Start Guide contains a
sequence of steps recommended for
unpacking and installing a bar code
reader in the Quantum SuperLoader.
Warning: The bar code
reader is a Class 1 laser
product, complying
with 21 CFR 1040.10
and 1040.11. The use of
controls or adjustments
or the performance of
procedures other than those
specified herein may result
in hazardous radiation
exposure.
It is recommended that
authorized service personnel
perform this upgrade.
For additional information, visit
www.quantum.com, refer to the
Quantum Superloader Automated
Tape Library User Manual
a PDF (portable document format) file
on the SuperLoader Documentation
CD, or contact Quantum Technical
Support and Customer Service by
calling 1-800-284-5101.
installed as
Step 1: Unpack the Bar Code Reader
a. Place the carton on an electrostatic discharge (ESD) safe work surface. As you place
the carton on the work surface, look for markings on the shipping carton that
indicate the top of the carton so you can position the carton top-side up.
b. Using scissors, a utility knife, or other appropriate tool, carefully cut the packing
tape along the length and ends of the carton.
c. Fold open the box flaps.
d. Remove the plastic bag containing instructions and warranty information.
e. Remove the top piece of foam from the carton.
f. Reach into the carton and lift out the bar code reader. The bar code reader should
be enclosed in an antistatic package.
Caution: This device is static-sensitive. Proper grounding and electrostatic
discharge (ESD) handling precautions are required before removing the bar
code reader from its packaging.
g. Set the bar code reader down on the work surface.
Step 2: Unmount the SuperLoader
Warning: Two persons are required to lift the SuperLoader or unmount it
from a rack.
Note: Adobe® Acrobat® Reader
4.0 or later is required to view
and print PDF documents.
To download a free copy of
Adobe Acrobat Reader, go to
www.adobe.com.
Before you can install the bar code reader, you must remove the right magazine or
magazine blank from the SuperLoader and then remove the SuperLoader from its
rack or cabinet. For instructions about removing magazines and unmounting the
SuperLoader from a rack, refer to the
Note: Unmounting the SuperLoader requires a #1 PHILLIPS® screwdriver. This
screwdriver will also be required during the remainder of the bar code reader
upgrade procedure.
Quantum SuperLoader User’s Guide
.
Page 2
SuperLoader Bar Code Reader Upgrade Quick Start Guide
Page 2
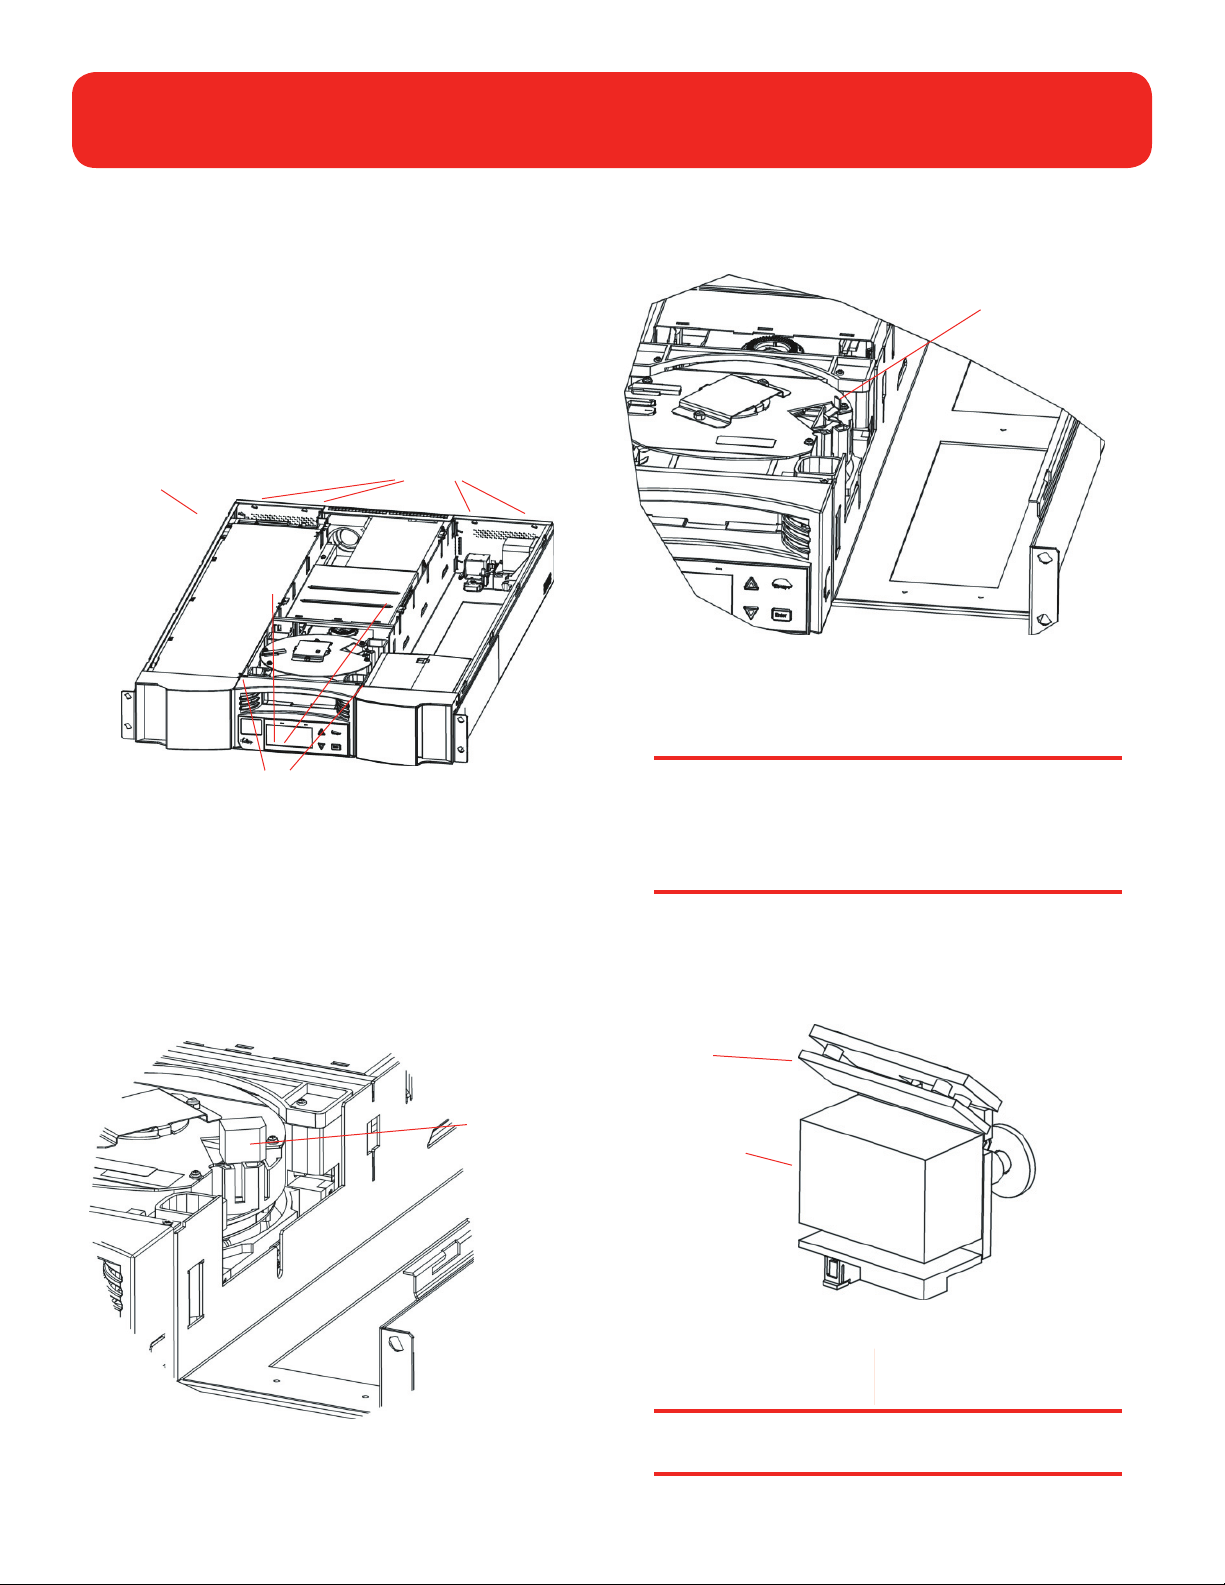
Step 3: Prepare the Bar Code Reader
Bay
a. With the SuperLoader on a flat work surface, remove the top
cover of the SuperLoader as follows:
(1) Remove the PHILLIPS screws (SuperLoader LTO has four
screws, SuperLoader DLTTM has two screws) from the top
of the SuperLoader and four PHILLIPS screws from the
back.
SuperLoader
(with top cover
removed)
Screws (top)
(2) Slide the cover backwards approximately 2 inches
(5.0 cm), and then lift it off.
Screws (back)
e. Locate the small flex cable inside the bar code reader bay.
Gently pull up on this cable to straighten it.
Flex cable
Step 4: Install the Bar Code Reader
Caution: These instructions are for both the
SuperLoader DLT and the SuperLoader LTO due to the
nature of their similarities. The bar code reader is not
interchangeable. Please order the appropriate part
numbers when replacing this item.
c. Locate the bar code reader bay directly above the picker. A
foam insert protects the electronics.
d. Pull the foam insert straight up to remove it. Then, discard
the foam insert.
Foam insert
(being removed)
a. Take appropriate ESD precautions including creating an
antistatic work area and wearing an antistatic wrist strap and
other antistatic apparel (smock, etc.).
Mirror
Bar code reader
b. Remove the bar code reader from its antistatic packaging.
Avoid touching the bar code reader mirror.
Caution: Touching the mirror can cause the reader to
malfunction.
Page 3

SuperLoader Bar Code Reader Upgrade Quick Start Guide
Page 3
c. Carefully extend the strain relief mechanism on the bar code
reader zero insertion force (ZIF) connector.
Alignment tab
ZIF connector
Strain relief
(extended)
d. Insert the end of the flex cable into the ZIF connector as far
as it can go. Then push in on the strain relief mechanism to
secure the connection.
e. Slide the bar code reader into the bay and do the following:
• Make sure the washer and attached screw fit into the slot
on the wall of the bar code reader bay.
• Make sure the bar code reader is seated in the pocket of
the bay. The top of the alignment tab on the bar code
reader should be flush with the top of the bar code
reader bay wall.
• Tighten the attached screw while maintaining downward
pressure on the bar code reader. Tighten just enough
to secure the bar code reader in the bay; do not
overtighten.
Alignment tab
Washer and
attached screw
Washer and
attached
screw
ZIF connector
(with strain relief
open)
Flex cable
ZIF connector (with
strain relief closed)
Slot
Bar code reader
Bar code
reader bay
(in correct
orientation)
Bar code reader
(installed)
Alignment tab
(flush with
wall)
Verify
level with a
straight edge
across DCA
and bar code
reader
Washer and screw
(positioned in slot)
Caution: Before replacing the cover, place a straight
edge across the DCA fan cover and the top of the
bar code reader. The bar code reader must be flush,
or slightly below the level of the DCA fan shroud to
avoid damage to the bar code reader.
Page 4

SuperLoader Bar Code Reader Upgrade Quick Start Guide
Page 4
For more information,
visit our Web site at
www.quantum.com
United States of America
Quantum Corporation
Storage Solutions Group
141 Innovation Drive
Irvine, CA 92612
U.S.A.
phone 949.856.7800
Europe
7 Lindenwood
Chineham Business Park
Basingstoke, RG24 8QY
United Kingdom
phone +44 1256 818300
fax +44 1256 848700
Asia Pacific
Level 3
200 Creek Street
Brisbane, Qld 4000
Australia
phone +61 7 3839 0950
fax +61 7 3839 0955
fax 949.856.7799
© 2004 Quantum Corporation. All rights reserved. DLTtape, the DLTtape logo, Quantum, the Quantum logo, SuperDLTtape, the Super DLTtape logo, and SuperLoader are trademarks of
Quantum Corporation registered in the U.S.A. and other countries. Products mentioned herein are for identification purposes only and may be registered trademarks or trademarks of their
respective companies. All other brand names or trademarks are the property of their respective owners.
81-81266-01 A01 Rev. August 2004
6207947-07cN 01
 Loading...