

Page 1

DLT-S4 Tape Drive
Quick Start Guide
English- - - - - - - - - - - 1
German - - - - - - - - - - 4
Spanish - - - - - - - - - - 7
French - - - - - - - - - - 10
Japanese - - - - - - - - 13
Korean - - - - - - - - - - 16
Simplified Chinese - 19
Getting Started 0
This guide describes how to install the tape drive. To get started:
1 Inspect the shipping box and contents of the box for damage.
If you find any damage, report it to the shipping company or contact
Quantum immediately.
2 Save the shipping box and packing material in case you need to move or ship
the tape drive.
3 Verify that the enclosed cable is compatible with the SCSI connector on the
host computer.
For more information, see the documents on the product CD-ROM or visit
www.quantum.com. For help installing the tape drive, contact Quantum Tech-
nical Support at 1-888-827-3378.
NOTE: For more information about compatibility, see the DLT-S4 Product
Manual.
4 Confirm that the host computer’s SCSI controller card matches the tape drive’s
Ultra320 interface for optimum performance.
5 Verify that the backup software and operating system are compatible with the
tape drive.
Visit www.quantum.com for additional compatibility information.
Checking the Tape Drive 0
To check that the tape drive works and is not damaged:
1 Connect the power cord to the tape drive and plug it into an AC outlet.
2 Power on the tape drive using the switch on the back panel. See figure 1.
Figure 1 Check the Tape Drive
On/off switch
Page 2
DLT-S4 Tape Drive Quick Start Guide
The tape drive performs a self-diagnostic test, called a
Power-On Self-Test (POST), each time you power it on.
3 During POST, each LED lights in sequence. When POST
has completed successfully, the middle LED stops
flashing and remains illuminated and the left and right
LEDs remain off.
NOTE: The DLT-S4 tape drive is equipped with a soft-load
mechanism that automatically loads tape cartridges
into the tape drive. This mechanism is “parked” prior
to first power-on. Upon first power-on, the soft-load
mechanism becomes “un-parked” and ready for use.
When moving or shipping the unit, you must “park”
the soft-load mechanism. For instructions, see the
DLT-S4 Product Manual.
4 Power off the tape drive and disconnect the power cord
from the AC outlet.
Connecting the Tape Drive 0
To connect the tape drive:
1 Make sure the tape drive and host computer are
powered off.
2 Each SCSI device attached to the SCSI bus must have a
unique SCSI ID. The tape drive’s pre-set SCSI ID is 3. If
necessary, change the SCSI ID using the SCSI ID switch
on the rear of the tape drive. See
CAUTION: Do not use SCSI ID 7 — this ID is in use by the
SCSI card.
figure 2.
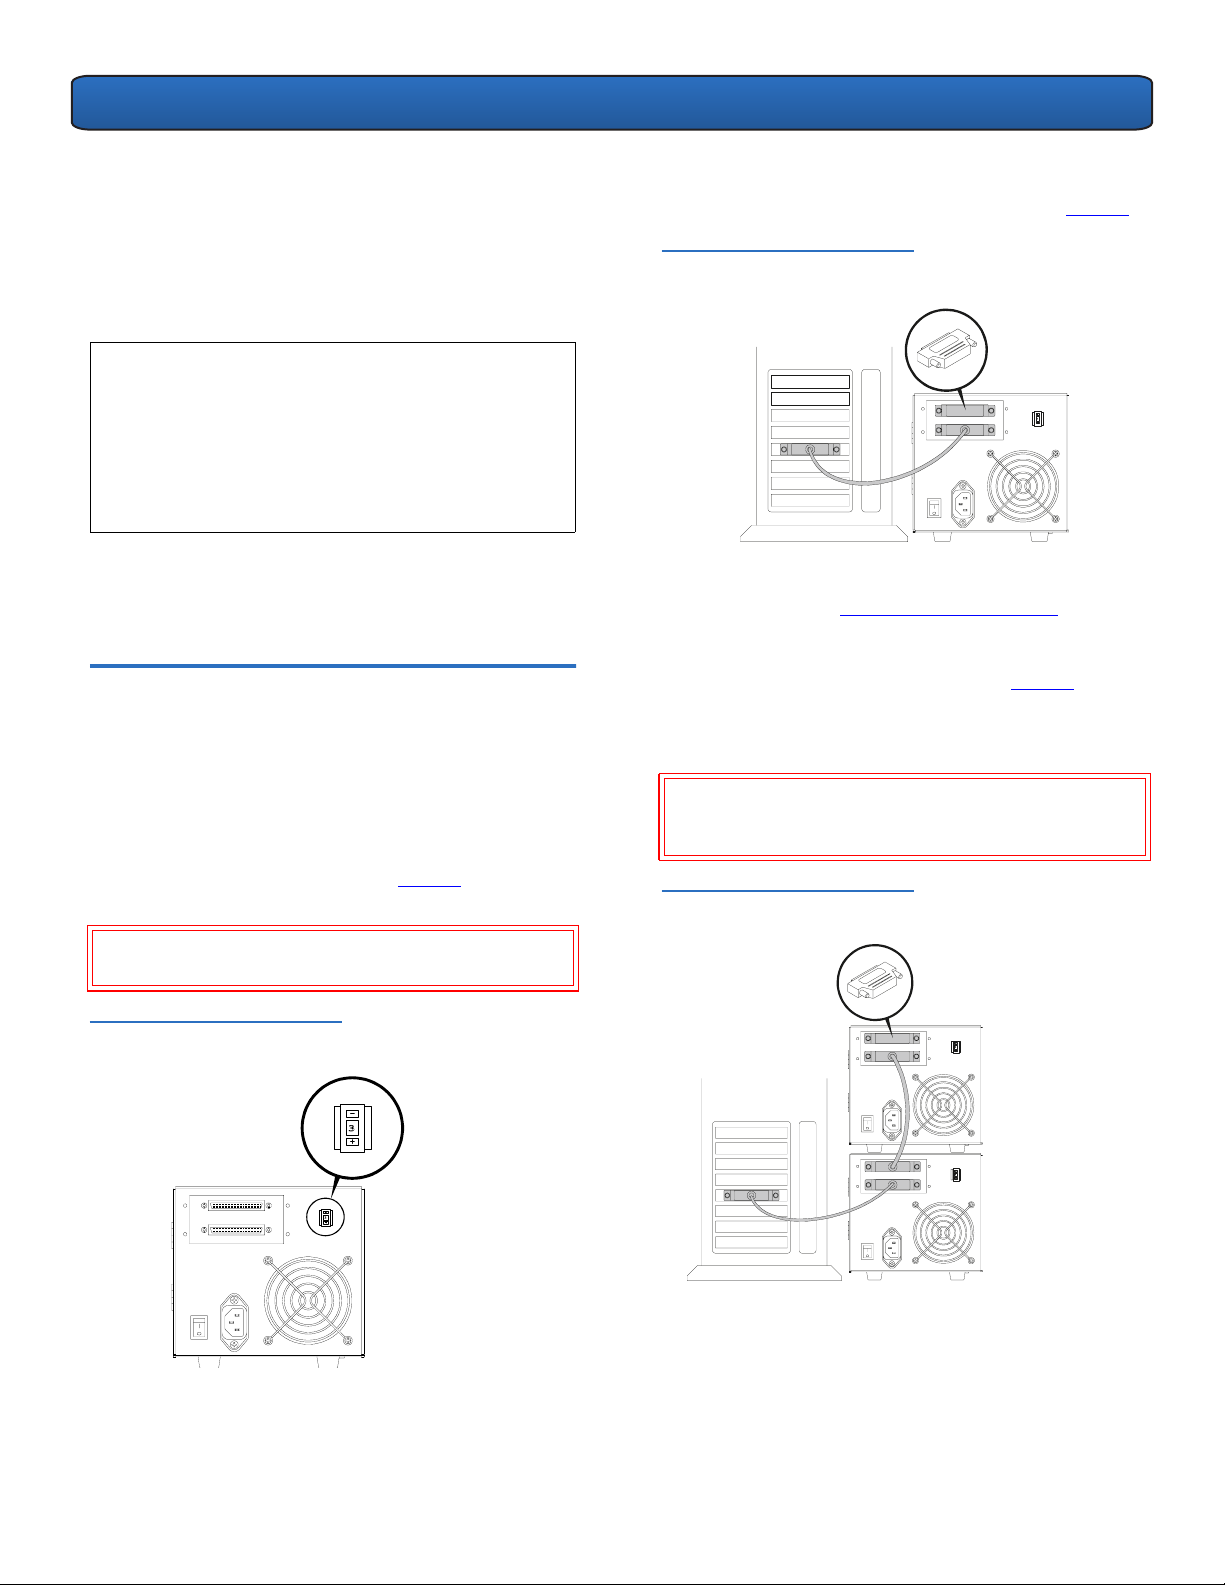
4 Terminate the SCSI bus by connecting a SCSI terminator
to the tape drive’s upper SCSI connector. See
Figure 3 Connecting the SCSI
Cable (Single Tape Drive)
5 Verify that the tape drive communicates properly with
the host computer before adding more SCSI devices to
the SCSI bus (see
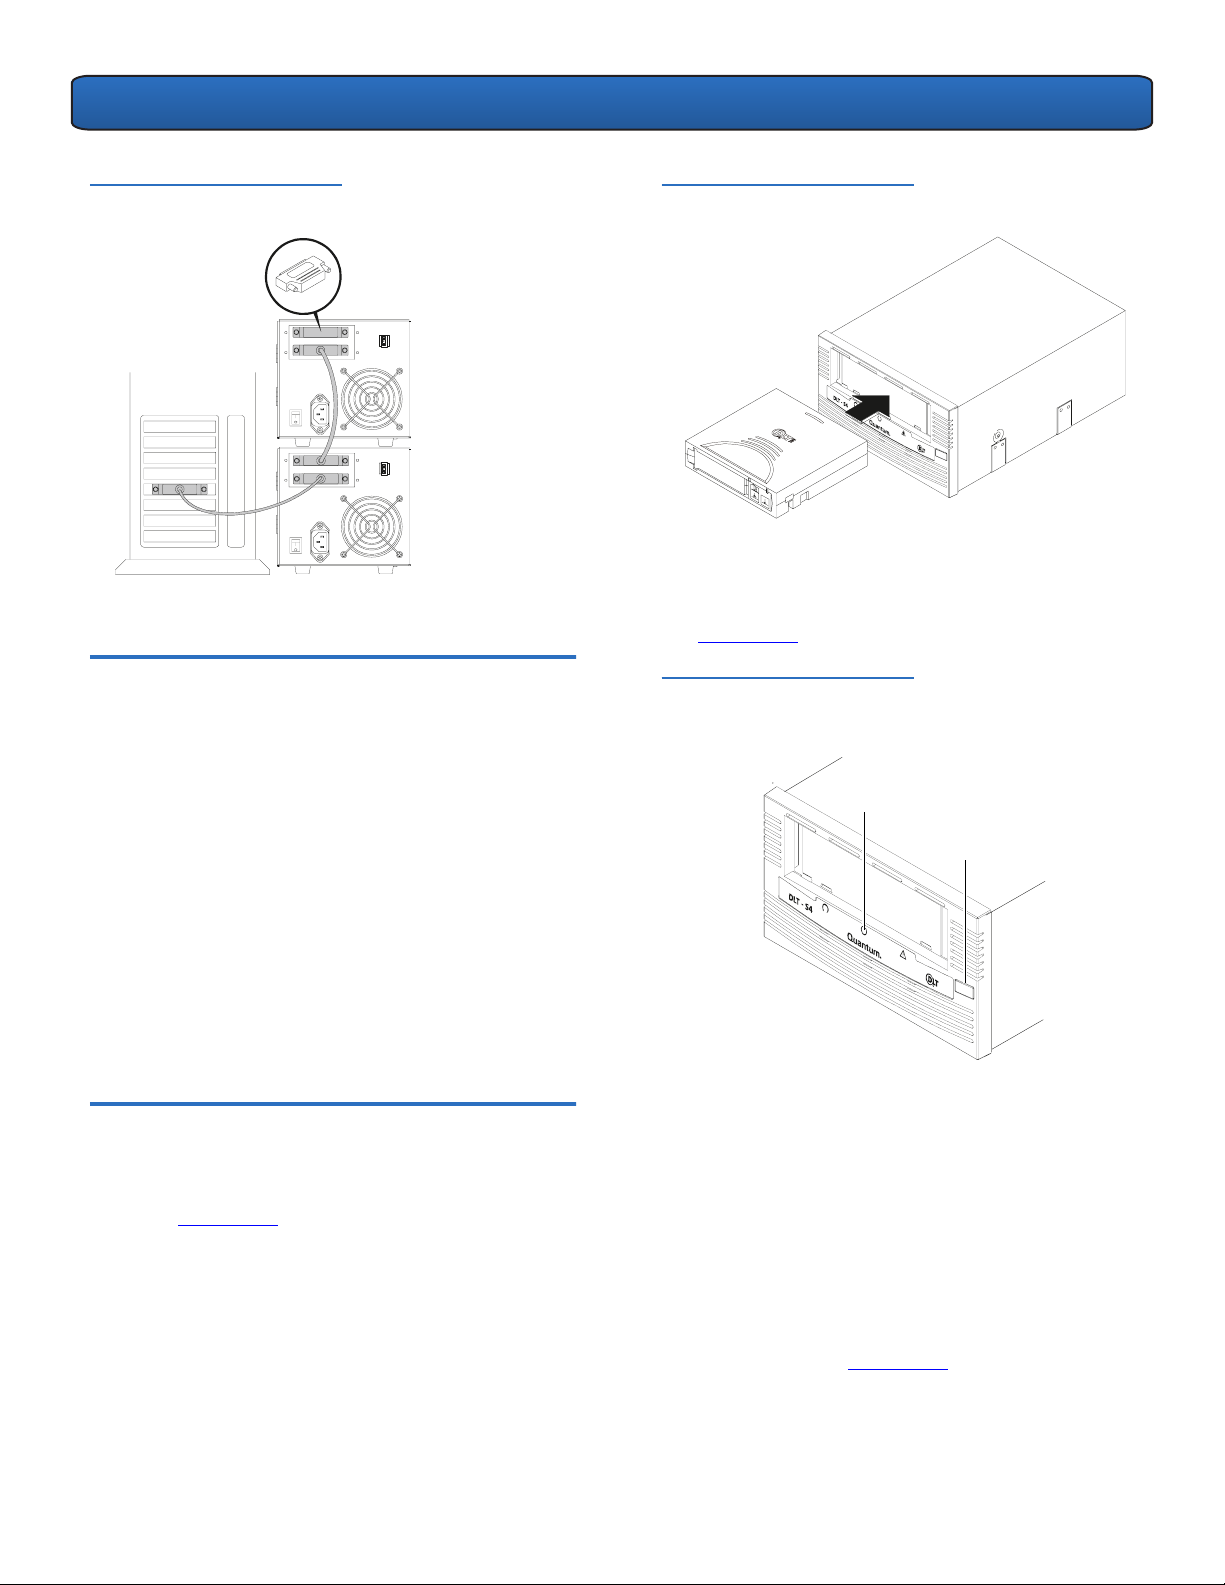
6 Add SCSI devices in a daisy chain by removing the SCSI
terminator and connecting the tape drive’s upper
connector to the next SCSI device (see
7 Terminate the last SCSI device in the daisy chain by
connecting a terminator to the SCSI device’s next
unused SCSI connector.
CAUTION: You must terminate the SCSI bus by
connecting a terminator to the last SCSI device in
the chain.
Figure 4 Connecting the SCSI
Cables (Daisy Chain)
Confirming the Installation).
Terminator
figure 3.
figure 4).
Figure 2 Setting the SCSI ID
Terminator
3 Connect the tape drive’s lower SCSI connector to the
host computer. Make sure the connector is firmly
seated.
2
Page 3

DLT-S4 Tape Drive Quick Start Guide
Confirming the Installation 0
Follow these steps to confirm that the installation was
successful:
1 Connect the power cord, then power on the tape drive
and the host computer.
2 Confirm that the computer recognizes the tape drive by
watching the BIOS, OS, and SCSI controller information
displayed at startup.
3 Let the tape drive finish its Power-On Self-Test.
4 Launch your backup software.
5 Confirm that the backup software recognizes the tape
drive.
Performing a Trial Backup 0
To perform a trial backup:
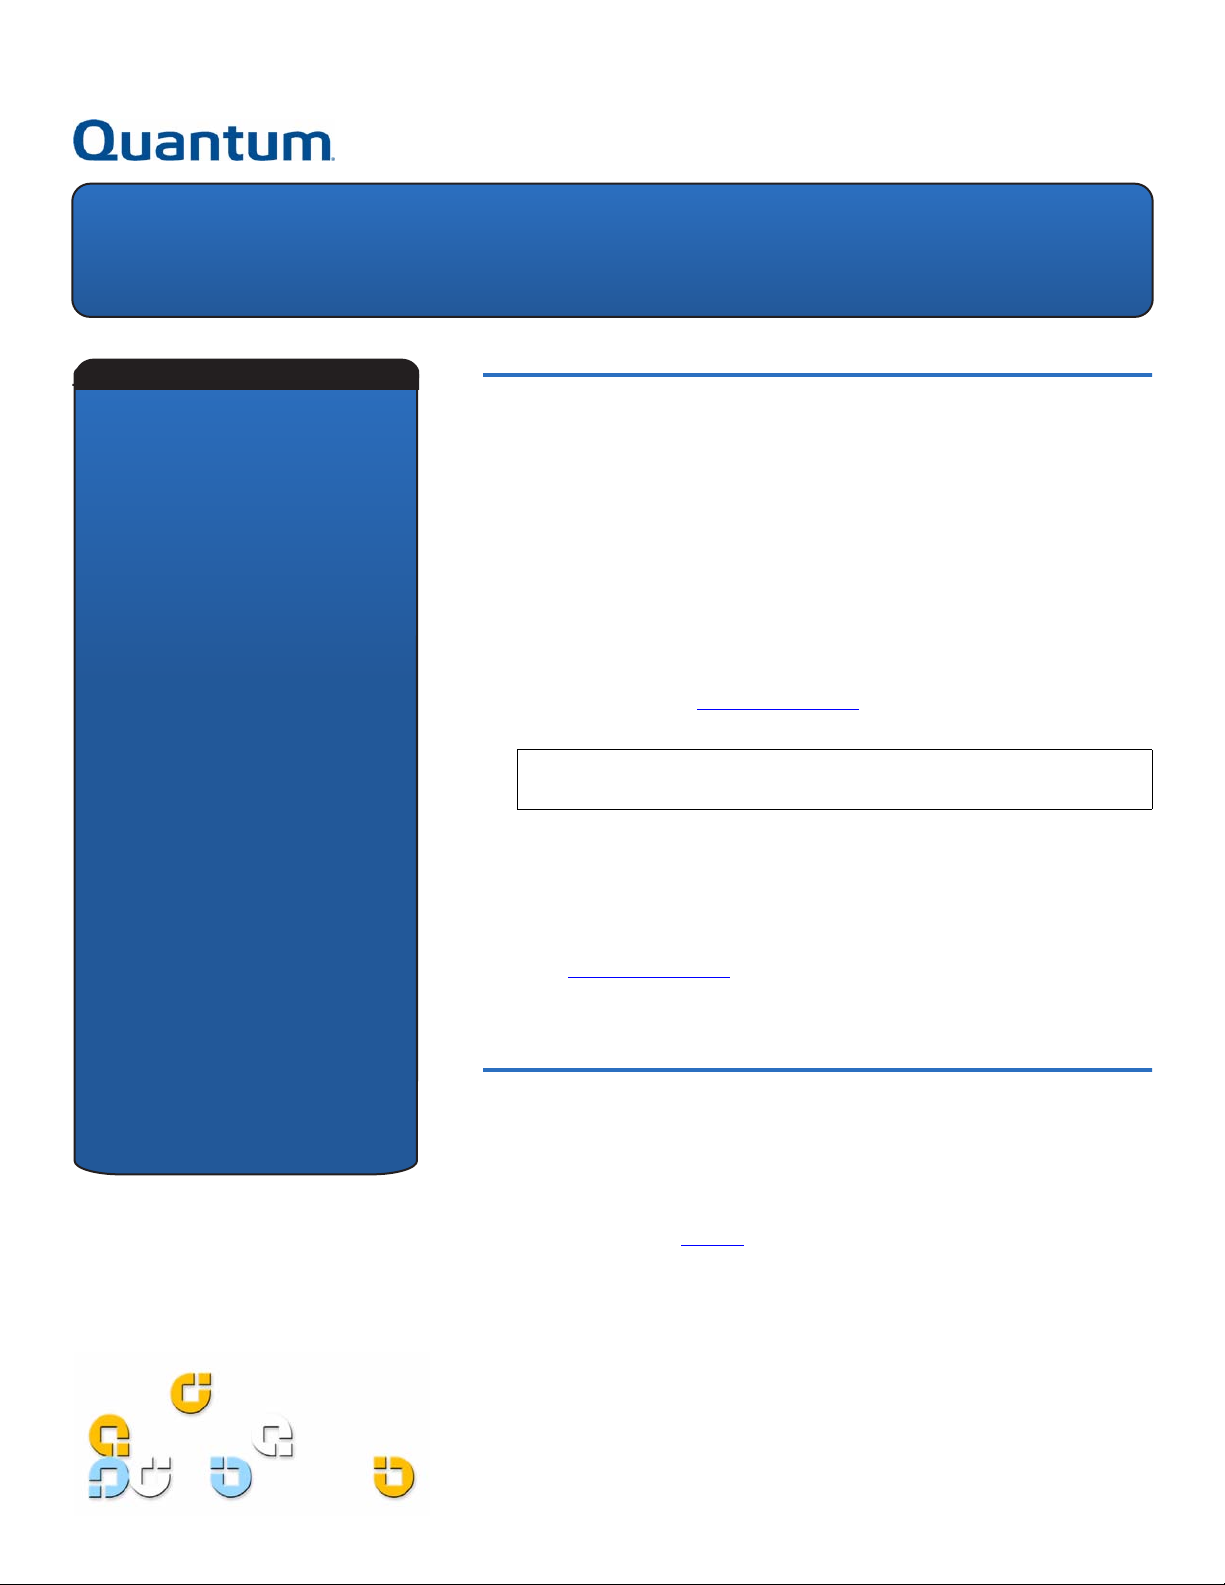
1 Insert a data cartridge into the tape drive (see figure 5).
Ensure that you are using a DLTtape S4 data cartridge.
Figure 5 Inserting a Data
Cartridge
Figure 6 Middle LED and Eject
Button Locations
Middle LED
Eject button
3 Back up a sample set of files and then restore the file
set.
If the backup and restore complete without error, you
have installed the tape drive correctly. If you encounter
errors, make sure you have installed the tape drive as
described in this guide. For troubleshooting informa
tion, see the DLT-S4 Product Manual.
4 Unload the cartridge by pressing the Eject button on
the front of the tape drive and return the media to its
protective case (see
figure 6).
-
2 Push the cartridge partially into the tape drive until the
tape drive loads the media automatically. The middle
LED lights steadily when the tape drive is ready (see
figure 6).
3
Page 4

DLT-S4-Bandlaufwerk
Kurzanleitung
Englisch- - - - - - - - - - 1
Deutsch - - - - - - - - - - 4
Spanisch - - - - - - - - - 7
Französisch - - - - - - 10
Japanisch- - - - - - - - 13
Koreanisch- - - - - - - 16
Vereinfachtes
Chinesisch - - - - - - - 19
Zum Einstieg 0
In diesem Handbuch wird die Installation des Bandlaufwerks beschrieben. Erste
Schritte:
1 Untersuchen Sie den Versandkarton und dessen Inhalt auf Schäden.
Sollten Sie Schäden feststellen, teilen Sie diese umgehend dem
Versandunternehmen mit oder verständigen Sie Quantum direkt.
2 Bewahren Sie den Versandkarton und das Verpackungsmaterial für den Fall
auf, dass Sie das Bandlaufwerk an einen anderen Ort bringen oder versenden
müssen.
3 Prüfen Sie, ob das beiliegende Kabel mit dem SCSI-Steckverbinder auf dem
Hostcomputer kompatibel ist.
Weitere Informationen finden Sie in den Dokumenten auf der Produkt-
CD-ROM und im Internet unter
tion des Bandlaufwerks zu erhalten, wenden Sie sich telefonisch an den tech-
nischen Support von Quantum unter 1-888-827-3378.
ANMERKUNG: Weitere Informationen zur Kompatibilität befinden sich im
DLT-S4-Produkthandbuch.
www.quantum.com. Um Hilfe bei der Installa-
4 Bestätigen Sie, dass die SCSI-Controllerkarte des Hostcomputers mit der
Ultra320-Schnittstelle des Bandlaufwerks übereinstimmt, um optimale
Leistung zu erzielen.
5 Überprüfen Sie, ob die Backup-Software und das Betriebssystem mit dem
Bandlaufwerk kompatibel sind.
Weitere Informationen zur Kompatibilität finden Sie unter
www.quantum.com.
Bandlaufwerk überprüfen 0
Überprüfen, ob das Bandlaufwerk arbeitet und unbeschädigt ist:
1 Verbinden Sie das Netzkabel mit dem Bandlaufwerk, und stecken Sie das Kabel
in eine Netzsteckdose.
2 Betätigen Sie den Schalter an der Rückseite des Bandlaufwerks, um dieses
einzuschalten. Siehe
Abbildung 1.
Page 5

DLT-S4-Bandlaufwerk: Kurzanleitung
Abbildung 1 Bandlaufwerk
überprüfen
Netzschalter
Das Bandlaufwerk führt bei jedem Einschalten einen
Selbstdiagnosetest, genannt POST, aus.
3 Während des POST leuchten alle LEDs nacheinander
auf. Wenn der POST erfolgreich abgeschlossen ist, hört
die mittlere LED auf, zu blinken und leuchtet konstant.
Die linke und rechte LED bleiben ausgeschaltet.
ANMERKUNG: Das DLT-S4-Bandlaufwerk ist mit einem
Soft-Load-Mechanismus ausgerüstet, so dass
Bandkassetten automatisch im Bandlaufwerk geladen
werden. Dieser Mechanismus befindet sich vor dem
erstmaligen Einschalten im Wartezustand. Beim
erstmaligen Einschalten wird der Wartezustand des SoftLoad-Mechanismus aufgehoben und er ist einsatzbereit.
Wenn das Gerät an einen anderen Ort verlegt oder
versandt wird, muss der Soft-Load-Mechanismus wieder
in den Wartezustand versetzt werden. Eine Anleitung
hierzu befindet sich im DLT-S4-Produkthandbuch.
Abbildung 2 Einstellen der SCSI-ID
Terminator
3 Verbinden Sie den unteren SCSI-Steckverbinder des
Bandlaufwerks mit dem Hostcomputer. Stellen Sie
sicher, dass der Anschluss fest sitzt.
4 Schließen Sie den SCSI-Bus durch die Verbindung eines
SCSI-Terminators mit dem oberen SCSI-Anschluss des
Bandlaufwerks ab. Siehe
Abbildung 3 Anschließen des
SCSI-Kabels (Einzelbandlaufwerk)
Abbildung 3.
4 Schalten Sie das Bandlaufwerk aus, und ziehen Sie das
Netzkabel aus der Netzsteckdose.
Anschluss des Bandlaufwerks 0
Das Bandlaufwerk anschließen:
1 Stellen Sie sicher, dass das Bandlaufwerk und der
Hostcomputer ausgeschaltet sind.
2 Alle an den SCSI-Bus angeschlossenen SCSI-Geräte
müssen eine eindeutige SCSI-ID besitzen. Die SCSI-ID
des Bandlaufwerks ist auf 3 voreingestellt. Ändern Sie
die SCSI-ID bei Bedarf mithilfe des SCSI-ID-Schalters an
der Rückseite des Bandlaufwerks. Siehe
VORSICHT: Die SCSI-ID 7 darf nicht verwendet werden diese ID wird von der SCSI-Karte verwendet.
Abbildung 2.
5 Prüfen Sie, ob das Bandlaufwerk ordnungsgemäß mit
dem Hostcomputer kommuniziert, bevor Sie weitere
SCSI-Geräte am SCSI-Bus anschließen (siehe
Überprüfung der Installation).
6 Fügen Sie SCSI-Geräte in einer Reihenschaltung hinzu,
indem Sie den SCSI-Terminator entfernen und den
oberen Anschluss des Bandlaufwerks mit dem nächsten
SCSI-Gerät verbinden (siehe
7 Schließen Sie das letzte SCSI-Gerät in der
Reihenschaltung ab, indem Sie einen Terminator in den
nächsten unbenutzten SCSI-Anschluss des SCSI-Geräts
stecken.
VORSICHT: Der SCSI-Bus muss abgeschlossen werden,
indem ein Terminator an das letzte SCSI-Gerät in der
Kette angeschlossen wird.
Abbildung 4).
5
Page 6
DLT-S4-Bandlaufwerk: Kurzanleitung
Abbildung 4 Anschließen der
SCSI-Kabel (Reihenschaltung)
Terminator
Überprüfung der Installation 0
Überprüfen Sie mit den folgenden Schritten, ob die
Installation erfolgreich war:
1 Schließen Sie das Netzkabel an, und schalten Sie dann
das Bandlaufwerk und den Hostcomputer ein.
2 Prüfen Sie, ob der Computer das Bandlaufwerk erkennt,
indem Sie die beim Hochfahren angezeigten
Informationen des BIOS, Betriebssystems und SCSIControllers verfolgen.
3 Lassen Sie das Bandlaufwerk den POST-Test
abschließen.
4 Starten Sie die Backup-Software.
5 Prüfen Sie, ob die Backup-Software das Bandlaufwerk
erkennt.
Abbildung 5 Einlegen einer
Datenkassette
2 Legen Sie die Kassette ein Stück weit ins Bandlaufwerk
ein, bis das Bandlaufwerk das Medium automatisch
einzieht. Die mittlere LED-Anzeige leuchtet konstant,
wenn das Bandlaufwerk betriebsbereit ist (siehe
Abbildung 6).
Abbildung 6 Position der
mittleren LED-Anzeige und der
Auswurftaste
Mittlere LED
Auswurftaste
Versuchs-Backup durchführen 0
Versuchs-Backup durchführen:
1 Legen Sie eine Datenkassette in das Bandlaufwerk ein
Abbildung 5). Stellen Sie sicher, dass Sie eine
(siehe
DLTtape-S4-Datenkassette verwenden.
3 Sichern Sie einen Musterdateisatz und stellen Sie dann
den Dateisatz wieder her.
Wenn Backup und Wiederherstellung ohne Fehler abge-
schlossen werden, haben Sie das Bandlaufwerk ordnungsgemäß installiert. Wenn Fehler auftreten,
überprüfen Sie, ob Sie das Bandlaufwerk den in diesem
Handbuch beschriebenen Anweisungen gemäß installi
ert haben. Informationen zur Fehlerbehebung befinden
sich im DLT-S4-Produkthandbuch.
4 Werfen Sie die Kassette durch Betätigen der
Auswurftaste an der Vorderseite des Bandlaufwerks
aus und stecken Sie das Medium wieder in die
Schutzhülle (siehe
Abbildung 6).
-
6
Page 7
Unidad de cinta DLT-S4
Manual de referencia
Inglés - - - - - - - - - - - - 1
Alemán- - - - - - - - - - - 4
Español - - - - - - - - - - 7
Francés - - - - - - - - - 10
Japonés - - - - - - - - - 13
Coreano - - - - - - - - - 16
Chino simplificado - 19
Para comenzar 0
Esta guía describe cómo instalar la unidad de cinta. Para comenzar:
1 Inspeccione la caja de embarque y el contenido de la caja para ver si hay algún
daño.
Si encuentra algún daño, infórmelo a la compañía de envíos o comuníquese
con Quantum inmediatamente.
2 Conserve la caja de envío y el material de empaque en caso que requiera
trasladar o enviar la unidad de cinta.
3 Verifique que el cable incluido sea compatible con el conector SCSI del equipo
host.
Para mayor información, consulte los documentos contenidos en el CD-ROM
del producto, o visite
unidad de cinta, llame a soporte técnico de Quantum, al 1-888-827-3378.
NOTA: Para obtener información acerca de compatibilildad, consulte el
Manual del producto DLT-S4.
www.quantum.com. Para obtener ayuda para instalar la
4 Para obtener un rendimiento óptimo, compruebe que la tarjeta del
controlador SCSI del equipo host coincida con la interfaz de la unidad de cinta
Ultra320.
5 Verifique que el software para copias de seguridad y el sistema operativo sean
compatibles con la unidad de cinta.
Visite www.quantum.com para obtener información adicional sobre compati-
bilidad.
Comprobación de la unidad de cinta 0
Para comprobar que la unidad de cinta funciona y que no está dañada:
1 Conecte el cable de alimentación a la unidad de cinta y enchúfelo en un
tomacorriente de CA.
2 Encienda la unidad de cinta utilizando el interruptor ubicado en el panel
trasero. Consulte la
figura 1.
Page 8

Unidad de cinta DLT-S4 Manual de referencia
Figura 1 Comprobación de la
unidad de cinta
Interruptor de
encendido/
apagado
La unidad de cinta realiza una prueba de autodiagnóstico,
llamada autoprueba de encendido (POST), cada vez que
usted la enciende.
3 Durante la POST, todos los indicadores LED se
encienden en secuencia. Cuando la autoprueba de
encendido (POST) concluye con éxito, el indicador LED
del centro deja de parpadear y permanece encendido, y
los indicadores LED de la izquierda y de la derecha
permanecen apagados.
NOTA: La unidad de cinta DLT-S4 está equipada con un
mecanismo de carga mediante software, el cual carga los
cartuchos de cinta automáticamente en la unidad de
cinta. Este mecanismo está “estacionado” previo al
primer encendido. Al realizar el primer encendido, el
mecanismo de carga mediante software se vuelve "no
estacionado" y listo para usarse. Para trasladar o enviar la
unidad, debe volver a "estacionar" el mecanismo. Para
obtener instrucciones, consulte el Manual del producto
DLT-S4.
Figura 2 Configuración del
identificador SCSI
Terminador
3 Conecte el conector SCSI inferior de la unidad de cinta
al equipo host. Asegúrese de que el conector esté
firmemente asentado.
4 Termine el bus SCSI conectando un terminador SCSI al
conector SCSI superior de la unidad de cinta. Consulte
la figura 3.
Figura 3 Conexión del cable SCSI
(Unidad de cinta única)
4 Apague la unidad de cinta y desconecte el cable de
alimentación del tomacorriente de CA.
Conexión de la unidad de cinta 0
Para conectar la unidad de cinta:
1 Asegúrese de que la unidad de cinta y el equipo host
estén apagados.
2 Cada dispositivo SCSI conectado al bus SCSI debe tener
un identificador SCSI exclusivo. El identificador SCSI
predeterminado para la unidad de cinta es 3. En caso
necesario, cambie el identificador SCSI utilizando el
selector de identificador SCSI en la parte posterior de la
unidad de cinta. Consulte la
PRECAUCIÓN: No utilice el identificador SCSI 7, éste es
utilizado por la tarjeta SCSI.
figura 2.
5 Verifique que la unidad de cinta se comunique
correctamente con el equipo host antes de agregar más
dispositivos SCSI al bus SCSI (consulte
la instalación).
6 Agregue dispositivos SCSI en una conexión en cadena,
quitando el terminador SCSI y colocando el conector
superior de la unidad de cinta al siguiente dispositivo
SCSI (consulte la
7 Termine el último dispositivo SCSI en la conexión en
cadena, conectando un terminador al siguiente
conector SCSI no utilizado del dispositivo SCSI.
PRECAUCIÓN: Usted debe terminar el bus SCSI
conectando un terminador al último dispositivo SCSI en
la cadena.
figura 4).
Confirmación de
8
Page 9

Unidad de cinta DLT-S4 Manual de referencia
Figura 4 Conexión de los cables
SCSI (conexión en cadena)
Terminador
Confirmación de la instalación 0
Siga estos pasos para confirmar que la instalación se haya
realizado satisfactoriamente:
1 Conecte el cable de alimentación y luego encienda la
unidad de cinta y el equipo host.
2 Confirme que el equipo reconozca la unidad de cinta
mirando la información del BIOS, del sistema operativo
y del controlador SCSI que aparece durante el arranque
del sistema.
3 Deje que la unidad de cinta termine la autoprueba de
encendido.
4 Inicie el software para copias de seguridad.
5 Confirme que el software para copias de seguridad
reconoce la unidad de cinta.
Figura 5 Inserción de un
cartucho de datos
2 Empuje el cartucho parcialmente hacia dentro de la
unidad de cinta hasta que la unidad de cinta cargue el
cartucho automáticamente. El indicador LED del centro
permanece encendido cuando la unidad de cinta está
lista para usarse (consulte la
Figura 6 Ubicación del indicador
LED del centro y del botón de
expulsión
Indicador LED del centro
figura 6).
Botón de
expulsión
Realización de una copia de seguridad de prueba
Para realizar una copia de seguridad de prueba:
1 Inserte un cartucho de datos en la unidad de cinta
(consulte la
de datos DLTtape S4.
figura 5). Asegúrese de utilizar un cartucho
3 Haga una copia de seguridad de un conjunto de
archivos de muestra y luego restaure el conjunto de
archivos.
0
Si la copia de seguridad y la restauración se completan
sin errores, la unidad de cinta se ha instalado
correctamente. Si encuentra errores, asegúrese de
haber instalado la unidad de cinta como se describe en
esta guía. Para obtener información acerca de solución
de problemas, consulte el Manual del producto DLT-S4.
4 Descargue el cartucho oprimiendo el botón de
Expulsión en la parte frontal de la unidad de cinta y
devuelva el cartucho a su estuche protector (consulte la
figura 6).
9
Page 10

Lecteur de bande DLT-S4
Guide de démarrage rapide
Anglais- - - - - - - - - - - 1
Allemand - - - - - - - - - 4
Espagnol - - - - - - - - - 7
Français - - - - - - - - - 10
Japonais - - - - - - - - 13
Coréen - - - - - - - - - - 16
Mise en route 0
Ce guide décrit comment installer le lecteur de bande. Pour la mise en route :
1 Vérifiez si le carton d'emballage et son contenu sont endommagés.
En cas de dommage, signalez-le immédiatement à Quantum ou à la société de
transport.
2 Conservez le carton et tout le matériel d'emballage au cas où vous auriez
besoin de déplacer ou de transporter le lecteur de bande.
3 Vérifiez si le câble fourni est compatible avec le connecteur SCSI sur
l'ordinateur hôte.
Pour de plus amples informations, consultez les documents présents sur le
CD-ROM ou rendez-vous sur
cernant l'installation du lecteur de bande, veuillez contactez l'assistance tech-
nique de Quantum au 1 55 00 50 00.
www.quantum.com. Pour obtenir de l'aide con-
Chinois simplifié - - 19
REMARQUE : Pour plus d'informations concernant la compatibilité,
consultez le Manuel du produit DLT-S4.
4 Vérifiez que la carte du contrôleur SCSI de l'ordinateur hôte correspond à
l'interface Ultra320 du lecteur de bande pour une performance maximale.
5 Vérifiez si le logiciel de sauvegarde et le système d'exploitation sont
compatibles avec le lecteur de bande.
Veuillez visiter www.quantum.com pour des informations supplémentaires sur
la compatibilité.
Contrôle du lecteur de bande 0
Pour vérifier si le lecteur de bande fonctionne et qu'il n'est pas endommagé :
1 Raccordez le cordon d'alimentation au lecteur de bande, puis à une prise de
courant.
2 Allumez le lecteur de bande à l'aide de l'interrupteur situé sur le panneau
arrière. Voir
figure 1.
Page 11

Lecteur de bande DLT-S4 : Guide de démarrage rapide
Figure 1 Contrôle du lecteur de
bande
Interrupteur
de marche/arrêt
Le lecteur de bande effectue un test d'autodiagnostic,
appelé POST, chaque fois que vous l'allumez.
3 Pendant le test d'autodiagnostic, les voyants DEL
s'allument les uns après les autres. Une fois le test
d'autodiagnostic terminé, le voyant DEL du milieu
s'arrête de clignoter et reste allumé et les voyant DEL
gauche et droite restent éteints.
REMARQUE : Le lecteur de bande DLT-S4 est équipé d'un
mécanisme de chargement logiciel qui charge
automatiquement les cartouches de bande dans le
lecteur de bande. Le mécanisme est « parqué » avant le
premier allumage. Une fois le lecteur démarré, le
mécanisme de chargement logiciel n'est «
et est prêt à l'usage. Lorsque vous déplacez ou
transportez l'appareil, vous devez « parquer » le
mécanisme de chargement logiciel. Pour obtenir des
instructions, consultez le Manuel du produit DLT-S4.
plus parqué »
Figure 2 Configuration du
numéro d'identification SCSI
Terminateur
3 Raccordez le connecteur SCSI inférieur du lecteur de
bande à l'ordinateur hôte. Assurez-vous que le
connecteur est correctement positionné.
4 Terminez le bus SCSI en raccordant un terminateur SCSI
au connecteur SCSI supérieur du lecteur de bande. Voir
figure 3.
Figure 3 Raccordement du câble
SCSI (un seul lecteur de bande)
4 Éteignez le lecteur de bande et débranchez le cordon
d'alimentation de la prise de courant.
Connexion du lecteur de bande 0
Pour connecter le lecteur de bande
1 Assurez-vous que le lecteur de bande et l'ordinateur
hôte sont éteints.
2 Chaque périphérique SCSI raccordé au bus SCSI doit
avoir un numéro d'identification SCSI unique. Le
numéro SCSI préprogrammé du lecteur de bande est 3.
Si nécessaire, changez le numéro d'identification SCSI à
l'aide du commutateur de numéros d'identification SCSI
situé à l'arrière du lecteur de bande. Voir
ATTENTION ! N'utilisez pas le numéro d'identification
SCSI 7 ; il est utilisé par la carte SCSI.
figure 2.
5 Vérifiez si le lecteur de bande communique
correctement avec l'ordinateur hôte avant d'ajouter plus
de périphériques SCSI au bus SCSI (voir
l'installation).
6 Ajoutez des périphériques SCSI dans une connexion en
chaîne en retirant le terminateur SCSI et en raccordant
le connecteur supérieur du lecteur de bande au
périphérique SCSI suivant (voir
7 Terminez le dernier périphérique SCSI de la connexion
en chaîne en raccordant un terminateur au connecteur
SCSI inutilisé suivant du périphérique SCSI.
ATTENTION ! Vous devez terminer le bus SCSI en
raccordant un terminateur au dernier périphérique SCSI
de la chaîne.
figure 4).
Validation de
11
Page 12

Lecteur de bande DLT-S4 : Guide de démarrage rapide
Figure 4 Raccordement des
câbles SCSI (connexion en
chaîne)
Terminateur
Validation de l'installation 0
Procédez comme suit pour confirmer que l'installation est
réussie :
1 Branchez le cordon d'alimentation, puis allumez le
lecteur de bande et l'ordinateur hôte.
2 Confirmez que l'ordinateur reconnaît le lecteur de
bande en surveillant les informations sur le BIOS, le
système d'exploitation et le contrôleur SCSI qui
s'affichent au démarrage.
3 Laissez le lecteur de bande finir son test
d'autodiagnostic.
4 Lancez votre logiciel de sauvegarde.
5 Confirmez que le logiciel de sauvegarde reconnaît le
lecteur de bande.
Figure 5 Insertion d'une
cartouche de données
2 Enfoncez la cartouche partiellement dans le lecteur de
bande jusqu'à ce que le lecteur de bande charge le
média automatiquement. Le voyant DEL du milieu
s'allume de façon continue lorsque le lecteur de bande
est prêt (voir
Figure 6 Emplacements du
voyant DEL du milieu et du
bouton d'éjection
figure 6).
Voyant DEL du milieu
Bouton
d'éjection
Exécution d'un essai de sauvegarde 0
Pour exécuter un essai de sauvegarde :
1 Insérez une cartouche de données dans le lecteur de
bande (voir
une cartouche de bandes DLTtape S4.
figure 5). Assurez-vous que vous utilisez
3 Sauvegardez un ensemble de fichiers et restaurez-le.
Si la sauvegarde et la restauration se sont terminées
sans erreur, vous avez installé correctement le lecteur
de bande. Si vous rencontrez des erreurs, assurez-vous
que vous avez installé le lecteur de bande comme décrit
dans ce guide. Pour des informations sur le dépannage,
consultez le Manuel du produit DLT-S4.
4 Éjectez la cartouche en appuyant sur le bouton
d'éjection situé à l'avant du lecteur de bande et
remettez le média dans son boîtier protecteur (voir
figure 6).
12
Page 13

DLT-S4 テープ ドライブ
クイック スタート ガイド
英語 - - - - - - - 1
ドイツ語 - - - - - 4
スペイン語 - - - - 7
フランス語 - - - - 10
日本語 - - - - - - 13
韓国語 - - - - - - 16
はじめに 0
このガイドではテープ ドライブの設置方法を説明します。 まず最初に、次の手順
を実行します。
1 梱包と箱の中身に損傷がないか調べます。
損傷している場合はただちに運送会社に報告するか、または Quantum に連絡
してください。
2 梱包箱および梱包材は、テープ ドライブを移動したり運送するときのために、
保管しておきます。
3 付属のケーブルがホスト コンピュータの SCSI コネクタと互換性があること
を確認します。
詳細は、本製品付属の CD-ROM または、www.quantum.com を参照してくださ
い。テープ ドライブのインストールでご不明な点は、Quantum テクニカル サ
ポート、1-888-827-3378 にお問い合わせください。
簡体字中国語 - - - 19
注: 互換性に関する詳細は、『DLT-S4 製品マニュアル』を参照してくだ
さい。
4 最適なパフォーマンスを実現するために、ホストコンピュータの SCSI コント
ローラ カードがテープ ドライブの Ultra320 インターフェイスと一致してい
ることを確認します。
5 バックアップ ソフトウェアとオペレーティング システムがテープ ドライブ
と互換性があることを確認します。
互換性に関する詳細は、www.quantum.com を参照してください。
テープ ドライブのチェック 0
テープ ドライブが機能し、損傷がないことを確認するには、以下の手順に従い
ます。
1 電源コードをテープ ドライブに接続し、AC コンセントに差し込みます。
2 背面パネルのスイッチを使用してテープ ドライブの電源を入れます。 図 1 を
参照してください。
Page 14

DLT-S4 テープ ドライブ クイック スタート ガイド
図 1 テープ ドライブの
チェック
オン / オフ
スイッチ
電源を入れる度に、テープ ドライブは 電源投入時の自己診
断テスト (POST) を実行します。
3 POST 実行中、各 LED が順に点灯します。 POST が問題
なく完了すると、中央の LED の点滅が止まって点灯し
たままになり、左右の LED はオフのままです。
注: DLT-S4 テープ ドライブには、テープ カートリッ
ジを自動でテープ ドライブに搭載するソフト ローディ
ング機構が搭載されています。初回電源投入前、本機構
はロック状態になっています。本ソフト ローディング機
構は初回電源投入時に解除され、使用可能状態になりま
す。本ユニットを移動または運搬するときは、ソフト
ローディング機構をロックしてください。手順について
は『DLT-S4 製品マニュアル』を参照してください。
図 2 SCSI ID の設定
ターミネータ
3 テープ ドライブの下側の SCSI コネクタをホスト コン
ピュータに接続します。 コネクタがしっかりと固定され
ていることを確認してください。
4 テープ ドライブの上側の SCSI コネクタに SCSI ター
ミネータを取り付け、SCSI バスを終端処理します。
3 を参照してください。
図 3 SCSI ケーブルの接続
( シングル テープ ドライブ )
図
4 テープ ドライブの電源ボタンをオフにし、AC コンセン
トから電源コードを抜きます。
テープ ドライブの接続 0
テープ ドライブを接続するには次の手順を実行します。
1 テープ ドライブとホスト コンピュータの電源がオフに
なっていることを確認します。
2 SCSI バスに接続している SCSI デバイスには、それぞ
れ固有の SCSI ID があります。 テープ ドライブに事前
設定されている SCSI ID は 3 です。必要に応じて、
テープ ドライブ背面にある SCSI ID スイッチを使用し
て SCSI ID を変更します。
注意: SCSI ID 7 は使用しないでください。この ID
は SCSI カードが使用しています。
図 2 を参照してください。
5 テープ ドライブ がホスト コンピュータと正しく通信
していることを確認した後、SCSI デバイスを SCSI バ
スに追加します (
6 SCSI ターミネータを取り外して、テープ ドライブの上
側コネクタを次の SCSI デバイスに接続することで、デ
イジー チェーンに SCSI デバイスを追加します (
参照 ) 。
7 SCSI デバイスの次の未使用 SCSI コネクタにターミ
ネータを取り付け、デイジー チェーンの最後の SCSI
デバイスを終端処理します。
注意: デイジー チェーンの最後の SCSI デバイスに
ターミネータを取り付けて SCSI バスを終端処理する必
要があります。
設置の確認参照 ) 。
図 4
14
Page 15

DLT-S4 テープ ドライブ クイック スタート ガイド
図 4 SCSI ケーブルの接続
( デイジー チェーン )
ターミネータ
設置の確認 0
正しく設置されているかを確認するには、以下の手順に従い
ます。
1 電源コードを接続し、テープ ドライブとホスト コン
ピュータの電源を入れます。
2 起動時に表示される BIOS、OS、および SCSI コント
ローラ情報を見て、コンピュータがテープ ドライブを
認識していることを確認します。
3 テープ ドライブが電源投入時の自己診断テスト (POST)
を終了するのを待ちます。
4 バックアップ ソフトウェアを起動します。
5 バックアップ ソフトウェアがテープ ドライブを認識し
ていることを確認します。
図 5 データ カートリッジの挿
入
2 テープ ドライブにカートリッジを途中まで入れると、
テープ ドライブが自動的にメディアをロードします。
テープ ドライブがレディ状態になると、中央の LED が
点灯します (
図 6 中央の LED とイジェクト
ボタンの配置
図 6 参照 ) 。
中央の LED
イジェクト
ボタン
バックアップ テスト 0
バックアップ テストを実施するには、以下の手順に従いま
す。
1 データ カートリッジ を、テープ ドライブに挿入しま
図 5 参照 ) 。DLTtape S4 II データ カートリッ
す (
ジを使用していることを確認します。
3 サンプル ファイル一式をバックアップしてから、それ
をリストアします。
バックアップとリストアがエラーなく完了した場合は、
テープ ドライブが正しく設置されています。 エラーが
発生した場合は、本ガイドの説明どおりにテープ ドラ
イブが設置されているかどうかを確認してください。 ト
ラブルシューティングに関する詳細は、
ニュアル
4 テープ ドライブ正面の エジェクト ボタンを押して、
カートリッジを取り出し、メディアを保護ケースに戻し
ます (
』を参照してください。
図 6 参照 ) 。
『DLT-S4 製品マ
15
Page 16

DLT-S4 테이프 드라이브
빠른 시작 안내서
영어 - - - - - - - - 1
독일어 - - - - - - - 4
스페인어 - - - - - - 7
프랑스어 - - - - - 10
일본어 - - - - - - 13
한국어 - - - - - - 16
시작하기 0
이 안내서는 테이프 드라이브를 설치하는 방법에 대해 설명합니다 . 시작하려면 :
1 운송용 상자와 상자 내용물에 손상이 없는지 확인합니다 .
손상이 발견된 경우 , 배송 회사에 알리거나 Quantum 에 즉시 연락하십시오 .
2 운송용 상자와 포장물은 테이프 드라이브를 운반하거나 배송할 경우를 대비하
여 보관해 두십시오 .
3 동봉된 케이블이 호스트 컴퓨터의 SCSI 커넥터와 호환되는지 확인하십시오 .
더 자세한 정보는 제품 CD-ROM 상의 문서 자료를 참조하거나
www.quantum.com 을 방문하십시오 . 테이프 드라이브의 설치에 관한 도움이
필요하시면 Quantum 기술 지원 센터 (1-888-827-3378) 로 연락하십시오 .
주: 호환성에 관한 더 자세한 정보는 , DLT-S4 제품 설명서를 참조 하십
시오 .
중국어 ( 간체 )- - - 19
4 최적의 성능을 위해서 호스트 컴퓨터의 SCSI 컨트롤러 카드가 테이프 드라이브
의 Ultra320 인터페이스와 맞는지 확인하십시오 .
5 백업 소프트웨어와 운영 체제가 테이프 드라이브와 호환되는지 확인하십시오 .
호환성에 관한 더 자세한 정보를 원하시면 www.quantum.com 을 방문하십시
오.
테이프 드라이브 확인 0
테이프 드라이브가 작동하고 손상이 없는지 확인하려면 :
1 전원 코드를 테이프 드라이브에 연결하고 전원 콘센트에 플러그를 꽂습니다 .
2 후면 패널에 있는 스위치를 사용하여 테이프 드라이브의 전원을 켭니다 . 그림 1
을 참조하십시오 .
그림 1 테이프 드라이브 확인
켜기 / 끄기 스위치
Page 17

DLT-S4 테이프 드라이브 빠른 시작 안내서
테이프 드라이브는 사용자가 전원을 켤 때마다 전원 공급 자체
테스트 (POST) 라고 하는 자가 진단 테스트를 수행합니다 .
3 POST 도중 각 LED 표시등이 순서대로 켜집니다 . POST
가 성공적으로 완료되면 , 가운데 LED 가 깜박임을 멈추
고 계속 켜진 상태를 유지하며 , 왼쪽 및 오른쪽 LED 는
꺼진 상태를 유지합니다 .
주: DLT-S4 테이프 드라이브는 테이프 카트리지를 테
이프 드라이브 내로 자동 로드시키는 소프트 - 로드 메커
니즘을 갖추고 있습니다 . 이 메커니즘은 처음 전원을 연
결하기 전에는 " 파킹 상태 " 입니다 . 처음 전원을 연결시
킨 후에는 소프트 - 로드 메커니즘이 " 파킹 아닌 상태 " 로
되어 사용할 수 있는 준비 상태가 됩니다 . 장치를 옮기거
나 배송할 때에는 소프트 - 로드 메커니즘을 " 파킹 " 해야
합니다 . 이에 대한 정보는 , DLT-S4 제품 설명서를 참조
하십시오 .
4 테이프 드라이브의 전원을 끄고 전원 콘센트에서 전원
코드를 뺍니다 .
테이프 드라이브 연결 0
테이프 드라이브를 연결하려면 :
1 테이프 드라이브와 호스트 컴퓨터의 전원이 꺼져 있는지
확인하십시오 .
2 SCSI 버스에 부착된 각 SCSI 장치는 고유한 SCSI ID 를
가져야 합니다 . 테이프 드라이브의 사전설정 SCSI ID 는
3 입니다 . 필요한 경우에는 테이프 드라이브 뒷면에 있
는 SCSI ID 스위치를 사용해 SCSI ID 를 설정합니다 .
림 2 를 참조하십시오 .
그
4 SCSI 터미네이터를 테이프 드라이브의 상단 SCSI 커넥
터에 연결하여 SCSI 버스를 종단시킵니다 .
조하십시오 .
그림 3 SCSI 케이블 연결 ( 싱글
테이프 드라이브 )
5 SCSI 버스에 추가로 SCSI 장치를 더하기 전에 테이프 드
라이브가 호스트 컴퓨터와 올바르게 통신하는지 확인합
설치 확인 참조 ).
니다 (
6 SCSI 터미네이터를 제거하고 테이프 드라이브의 상단
커넥터를 다음 SCSI 장치에 연결함으로써 데이지 체인
에 SCSI 장치를 추가합니다 (
7 터미네이터를 SCSI 장치의 다음 사용되지 않은 SCSI 커
넥터에 연결함으로써 데이지 체인의 마지막 SCSI 장치
를 종단시킵니다 .
주의 : 터미네이터를 체인의 마지막 SCSI 장치에 연결함
으로써 SCSI 버스를 종단시켜야 합니다 .
그림 4 SCSI 케이블 연결 ( 데이
지 체인 )
그림 4 참조 ).
터미네이터
그림 3 을 참
주의 : SCSI ID 7 은 사용하지 마십시오 - 이 ID 는 SCSI
카드에서 사용됩니다 .
그림 2 SCSI ID 설정
터미네이터
3 테이프 드라이브의 하단 SCSI 커넥터를 호스트 컴퓨터
에 연결합니다 . 커넥터가 단단히 고정되었는지 확인하
십시오 .
17
Page 18

DLT-S4 테이프 드라이브 빠른 시작 안내서
설치 확인 0
다음 단계들을 따라 설치가 성공적으로 완료되었는지 확인합
니다 .
1 전원 코드를 연결한 다음 , 테이프 드라이브와 호스트 컴
퓨터의 전원을 켭니다 .
2 시동 화면에 표시되는 BIOS, OS 및 SCSI 컨트롤러 정보
를 살펴봄으로써 컴퓨터가 테이프 드라이브를 인식하는
지 확인합니다 .
3 테이프 드라이브가 전원 공급 자체 테스트를 마치도록
합니다 .
4 백업 소프트웨어를 시작합니다 .
5 백업 소프트웨어가 테이프 드라이브를 인식하는지 확인
합니다 .
시험 백업 수행 0
시험 백업을 수행하려면 :
1 데이터 카트리지를 테이프 드라이브에 삽입합니다 ( 그
림 5 참조 ). DLTtape S4 데이터 카트리지를 사용하고
있는지 확인합니다 .
그림 5 데이터 카트리지 삽입
그림 6 가운데 LED 및 배출 버튼
의 위치
가운데 LED
배출 버튼
3 파일의 샘플 세트를 백업한 다음 파일 세트를 복구합니
다.
백업 및 복구가 오류 없이 완료되면 , 테이프 드라이브가
올바르게 설치된 것입니다 . 오류가 발생할 경우 , 이 안
내서에 설명된 대로 테이프 드라이브를 설치했는지 확인
하십시오 . 문제 해결 정보는 , DLT-S4 제품 설명서를 참
조 하십시오 .
4 테이프 드라이브 앞면에 있는 배출 버튼을 눌러 카트리
지를 꺼내고 미디어를 해당 보호 케이스에 다시 넣어 둡
그림 6 참조 ).
니다 (
2 테이프 드라이브가 미디어를 자동으로 로드할 때까지 테
이프 드라이브에 카트리지를 일부만 밀어 넣습니다 . 테
이프 드라이브가 준비 상태가 되면 가운데 LED 가 켜진
상태를 유지합니다 (
그림 6 참조 ).
18
Page 19

DLT-S4 磁带机
快速启动指南
英语 - - - - - - - 1
德语 - - - - - - - 4
西班牙语 - - - - - 7
法语 - - - - - - - 10
日语 - - - - - - - 13
朝鲜语 - - - - - - 16
简体中文 - - - - - 19
入门 0
本指南介绍磁带机安装说明。 开始:
1 检查运输箱和箱中的货物是否损坏。
如果您发现任何损坏情况,请向运输公司报告,或立即联系昆腾。
2 保存运输箱和包装材料,以便在需要的时候用于搬运或运输磁带机。
3 校验随附电缆与主机上的 SCSI 连接器能否兼容。
有关更多信息,请参阅产品 CD- ROM 上的文档,或访问 www.quantum.com。有关
安装磁带机的帮助,请联系昆腾技术支持,电话是 1-888-827-3378。
注: 有关兼容性的更多信息,请参阅 DLT-S4 产品手册。
4 请确认主机的 SCSI 控制器卡与磁带机的 Ultra320 接口兼容以获得最优性能。
5 验证备份软件和操作系统都与磁带机兼容。
。
正在验证磁带机 0
为了验证磁带机正常工作没有被损坏:
1 将电源线连接到磁带机,并将其插入交流插座。
2 使用背面板的开关打开磁带机。 请参阅图1。
图 1 检查磁带机
3
打开 / 关闭开关
每次一打开电源,磁带机就进行自诊断测试,即通电自检。
Page 20

DLT-S4 磁带机 快速启动指南
3 通电自检过程中,顺序点亮每个指示灯。 当通电自检成
功完成后, 中间的 LED 停止闪烁并保持照亮,左右边的
LED 关闭。
注: DLT-S4 磁带机配备了一种可以将磁带盒自动装入磁
带机的软装载机制。该机制在首次加电之前处于 “安
置”状态。在首次加电后,软装载机制将成为 “非安
置”状态,并准备就绪。在搬运或运输装置时,必须
“安置”软装载机制。有关指导,请参阅 DLT-S4 产
品手册。
4 关闭磁带机并断开电源线和交流插座的连接。
连接磁带机 0
要连接磁带机:
1 务必关闭磁带机和主机电源。
2 连在 SCSI 总线上的所有 SCSI 设备必须有唯一的 SCSI
ID。 磁带机预置 SCSI ID 为 3。 如果需要,请用磁带机
背面的 SCSI ID 转换器更改 SCSI ID。请参阅
小心: 不要使用 SCSI ID 7 — 该 ID 正在被 SCSI 卡使
用。
图2。
图 3 连接 SCSI 电缆 (单磁带
机)
5 将更多 SCSI 设备添加到 SCSI 总线之前,请验证磁带机
与主机是否正确通信。(请参阅
6 通过卸载 SCSI 端接器并连接磁带机上面的连接器到下一
个 SCSI 设备,向菊花链中添加 SCSI 设备。(请参阅
图4)。
7 通过连接端接器到 SCSI 设备的下一个未使用的 SCS 连
接器,终止菊花链中的上一个 SCSI 设备。
小心: 用户必须通过连接端接器到菊花链中的上一个
SCSI 设备中断 SCSI 总线。
图 4 连接 SCSI 电缆 (菊花链)
正在确认安装 )。
端接器
图 2 设置 SCSI ID
端接器
3 将磁带机下面的 SCSI 连接器连接到主机。 确保连接器
固定牢固。
4 通过将 SCSI 端接器连接到上面的 SCSI 连接器终止
SCSI 总线。 请参阅
图3。
正在确认安装 0
按照下面的步骤确认安装成功。
1 连接电源线,然后打开磁带机和主机电源。
2 确认计算机能通过启动时显示的 BIOS、OS 和 SCSI 控制
器信息识别磁带机。
3 让磁带机完成通电自检 (Power-On Self-Test)。
4 启动备份软件。
5 确认备份软件识别磁带机。
20
Page 21

DLT-S4 磁带机 快速启动指南
正在执行试用备份软件 0
为了执行试用备份:
1 将数据磁带插入磁带机(请参阅图 5)。确信您正在使用
DLTtape S4 数据盒式磁带。
图 5 插入数据盒式磁带
2 将磁带慢慢推入磁带机,直到磁带机自动装载介质。 磁
带机就绪时,中间的 LED 保持发亮 (请参阅
图 6 中间的 LED 和弹出按钮位
置。
中间的 LED
弹出按钮
3 备份样本文件,然后恢复文件设置。
如果备份和恢复过程中未出现错误,则表示用户正确安装
磁带机。 如果遇到错误,确保按照该指南中的步骤安装
磁带机。 有关故障排除信息,请参阅 DLT-S4 产品手册。
4 按磁带机前面板弹出按钮弹出磁带放入防护盒 (请参阅
图 6)。
图 6)。
21
Page 22

DLT-S4 Tape Drive Quick Start Guide
For more information,
visit quantum.com
©2006 Quantum Corporation. Quantum, DLT, DLTtape, the Quantum logo, and the DLTtape logo are all registered trademarks of Quantum Corporation. SDLT and Super DLTtape are
trademarks of Quantum Corporation. Other trademarks may be mentioned herein which belong to other companies.
United States of America
Quantum Corporation
141 Innovation Drive
Irvine, CA 92617
U.S.A.
phone 949.856.7800
fax 949.856.7799
European Headquarters
Quantum Corporaton
3 Bracknell Beeches
Old Bracknell Lane West
Bracknell
Berkshire RG12 7BW
United Kingdom
phone +44 1344 353500
fax +44 1344 353510
*81-81283-03 A01*
Asia Pacific
Quantum Corporaton
9 Temasek Boulevard, #08-03
Suntec Tower Two
Singapore 038989
phone +65 6334 0660
fax +65 6432 2830
81-81283-03 A01 May 2006
81-81283-03 A01
 Loading...