

Page 1

Scorpion 40
Configuration settings for
Windows NT, Novell,
and UNIX operating systems
Page 2

© 2001 Seagate Removable Storage Solut i ons, LLC. All rights reserved
Publication Number: T011, Rev . A, September 2001
Seagate and the Seagate logo are registered trademarks of Seagate
Technology, LLC. Scorpion and t he S corpion logo are either trademarks or
registered trademarks of S eagat e Removable Storage Solutions LLC.
Other product names are registered t radem arks or trademarks of their
owners.
Seagate makes no Warranty of any kind with regard to this docum ent.
Seagate shall not be liable for any errors contained herein, or indirect ,
special, incidental or c onsequential damages in connecti on wi th the
furnishing, performance, or use of this document.
Seagate reserves the right t o change, without notice, produc t offerings or
specifications. No part of this publicati on m ay be reproduced in any form
without written permiss i on from Seagate Removable Storage Solutions.
Page 3

Contents
Introduction 1
Operating-system configuration dip switches 1
Configurations for Windows NT 2
Configurations for the Novell environment 3
Configurations for the DEC UNIX environment 5
Dip switch settings 5
Digital UNIX Version 4.0 and later 5
Digital UNIX Versions earlier than 4.0. 6
Configurations for the Sun UNIX environment 7
Dip switch settings 7
Sun OS 4.1.x 7
Solaris 2.x 8
Configurations for the SGI environment 9
Dip switch settings 9
Irix V5.x 9
Irix V6.x through V6.5 10
Troubleshooting installations on the SGI platform 11
Configurations for the HP-UX environment 13
Dip switch settings 13
HP-UX Versions 10.2 and 11: 13
Configurations for the IBM AIX environment 14
Dip switch settings 14
AIX Version 3.2 and later 14
Controlling data compression under AIX 15
Configurations for Linux and SCO UNIX environments 16
Page 4
Scorpion 40 configurations for Windows NT, Novell, and UNIX 1
Introduction
This booklet explains how to configure Scorpion 40 drives and
various Windows NT, UNIX and Novell operating systems for
optimum compatibility.
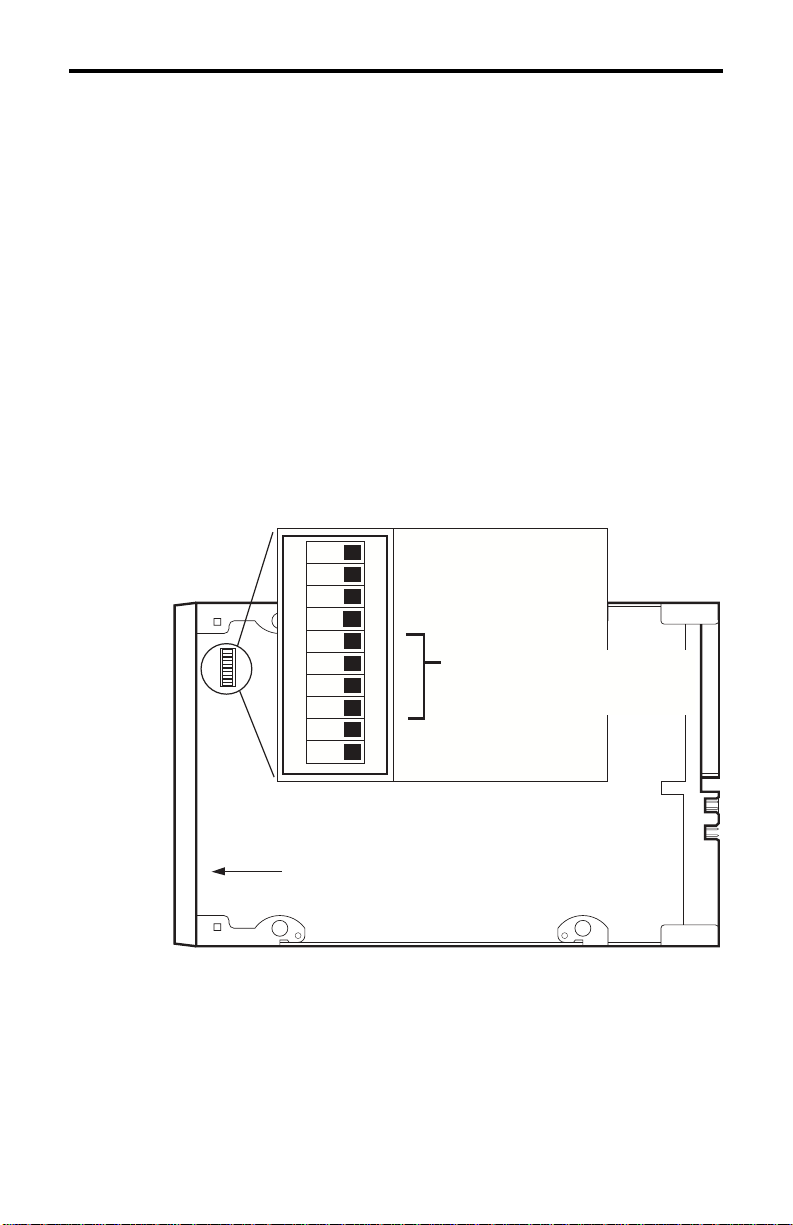
Operating-system configuration dip switches
The figure below shows the location of the operating-system
configuration dip switches on the bottom of the internal Scorpion 40.
If the drive is to be used with an operating system other than
Note:
those described here, these switches should be left in their
default positions.
Operating-system configuration dip switches on underside of
the Scorpion 40
1
2
3
4
5
6
7
8
9
10
Default settings shown
Front of drive
O
Data compressione (DC)
N
SCSI DC control
Media recognition
Self T est
Operating-system
configuration
switches
Wide/Narrow SCSI
Inquiry String support
Page 5

Scorpion 40 configurations for Windows NT, Novell, and UNIX 2
Configurations for Windows NT
If you use Windows NT 4.0 with the 4mmDAT.SYS driver from
Microsoft, you
set Switch 10 (the Inquiry-String switch) to OFF.
must
If you use Windows NT 4.0 with the STDAT4.SYS driver from
Seagate, you can leave the Switch 10 in to ON (the default setting).
In either case, switches 5 through 8, the UNIX configuration switches,
should all be set to ON (the default settings).
Operating System /
tape driver software
Windows NT 4.0
native backup applet
using STDAT4.SYS
driver from Seagate
Windows NT 4.0
native backup applet
using 4mmDAT.SYS
driver from Microsoft
w/
w/
Switch5Switch6Switch7Switch8Switch
10
ON ON ON ON ON
ON ON ON ON OFF
Page 6

Scorpion 40 configurations for Windows NT, Novell, and UNIX 3
Configurations for the Novell environment
Novell 4.11
There are two possible ways to configure the Scorpion 40 to work
with Novell 4.11, depending on which tape driver you use.
Configuration 1:
If you are using the existing Novell TAPEDAI driver
or a version of the NWTAPE driver created before 11/3/99, you must
change the Operating-System Configuration Dip switches so that
switches 5 and 8 are OFF, as shown in the table below. This is
different from their default settings (all switches ON).
Operating System / tape
driver software
Novell 4.11
applet using TAPEDAI driver
NWTAPE.CDM driver dated
before
Configuration 2:
w/ native backup
11/3/99
If you use the
Switch5Switch6Switch7Switch
OFFONONOFF
or
Novell NWTAPE driver
latest
8
(available on the Novell web site), the Operating-System
Configuration Dip switches should be left in their default positions (all
switches ON). From the administrator workstation, place the new
NWTAPE driver in the same directory as the TAPEDAI driver (usually
the system directory). Edit any .ncf files, such as autoexec.ncf, which
call the TAPEDAI driver and replace calls to TAPEDAI with
NWTAPE. Do not delete the TAPEDAI driver, because it may come
in handy in resolving future problems.
Operating System / tape
driver software
Novell 4.11
applet using NWTAPE driver
dated
w/ native backup
11/3/99
after
Switch5Switch6Switch7Switch
8
ON ON ON ON
Page 7

Scorpion 40 configurations for Windows NT, Novell, and UNIX 4
Novell 5.x
There are two possible ways to configure the Scorpion 40 to work
with Novell 5.x, depending on which tape driver you use.
Configuration 1:
If you are still using the original Novell NWTAPE
driver or any version created before 11/3/99, you must change the
Operating-System Configuration Dip switches so that switches 5 and
8 are OFF, as shown in the table on the front of this sheet. This is
different from their default settings (all switches ON).
Operating System / tape
driver software
Novell 5.x
applet using NWTAPE.CDM
driver dated
Configuration 2:
w/ native backup
11/3/99
before
If you use the
Switch5Switch6Switch7Switch
OFFONONOFF
Novell NWTAPE driver
latest
8
(available on the Novell web site), the Operating-System
Configuration Dip switches can be left in their default positions (all
switches ON). Before installing the new NWTAPE driver, first rename
the old NWTAPE driver (usually found in the system directory). Then
copy the new version of NWTAPE into the same directory. Do not
delete the old driver, because it might come in handy in resolving
future problems.
Operating System / tape
driver software
Novell 5.x
applet using NWTAPE.CDM
driver dated
w/ native backup
11/3/99
after
Switch5Switch6Switch7Switch
8
ON ON ON ON
Page 8

Scorpion 40 configurations for Windows NT, Novell, and UNIX 5
Configurations for the DEC UNIX environment
Dip switch settings
Before using the Scorpion 40 in a DEC UNIX environment, set the
operating-system dip switches as shown below:
Operating System / tape
driver software
DEC UNIX
Switch5Switch6Switch7Switch
8
OFFONONON
Digital UNIX Version 4.0 and later
With Version 4.0 of their UNIX operating system, DEC
introduced a new method of configuring the CAM SCSI driver.
Modify the file
/etc/ddr.dbase
as follows:
1. Look through the file and locate the database entry for the DEC
TLZ07 DAT drive
2. Copy this entry and paste it later in the file, taking care to
maintain the file syntax.
3. Modify this new entry as shown below.
SCSIDEVICE
#
Type = tape
Name = "SEAGATE" "DAT"
#
PARAMETERS:
TypeSubClass = rdat
TagQueueDepth = 0
MaxTransferSize = 0x0ffffff # (16MB - 1)
ReadyTimeSeconds = 60 # seconds
DENSITY:
#
DensityNumber = 0,3,4,5,6,7
DensityCode = default
CompressionCode = 0x0
Buffered = 0x1
DENSITY:
#
DensityNumber = 1,2
DensityCode = default
CompressionCode = 0x1
Buffered = 0x1
Page 9

Scorpion 40 configurations for Windows NT, Novell, and UNIX 6
4. Save the database file.
5. Run the following command:
ddr_config -c.
This takes the
default input file, ddr.dbase, and builds a new device database.
The new device database is effective immediately, and there is
no need to rebuild the kernel.
Digital UNIX Versions earlier than 4.0.
Configure the system by modifying the file
is located in either
/usr/sys/data
or
/sys/data
cam_data.c
, depending on
. This
the system configuration. The cam_data.c file should be
modified as shown below:
1. Look through the file to locate the database entry for the “TLZ07 RDAT” drive.
2. Make a copy of this entry and paste it later in the file, taking care
to maintain the syntax of the C source.
3. Modify the new entry as shown below.
/* Seagate DAT Drive Returning "SEAGATE DAT" Inquiry */
{"SEAGATE DAT", 14, DEV_TLZ07,
ALL_DTYPE_SEQUENTIAL << DTYPE_SHFT) | SZ_RDAT_CLASS,
struct pt_info *)ccmn_null_sizes, SZ_NO_BLK, (DEC_MAX_REC - 1),
&tlz07_dens, NO_MODE_TAB, SZ_NO_FLAGS,
NO_OPT_CMDS, SZ_READY_DEF, SZ_NO_QUE,
DD_REQSNS_VAL | DD_INQ_VAL, 36, 64
},
4. Rebuild the kernel using the
doconfig
script. Then reboot the
system.
Page 10

Scorpion 40 configurations for Windows NT, Novell, and UNIX 7
Configurations for the Sun UNIX environment
Dip switch settings
Before using the Scorpion 40 in a Sun UNIX environment, set the
operating-system dip switches as shown below:
Operating System / tape
driver software
Sun UNIX
Switch5Switch6Switch7Switch
8
ON OFF ON ON
Sun OS 4.1.x
To configure SunOS 4.1.x to use the Scorpion 40, you must modify
the
stdef.h
and
st_conf.c
files (in the directory /usr/sys/scsi/
targets), then rebuild the kernel, as described below:
1. Modify the
stdef.h
file by adding a define statement for the
Seagate drive like the one shown below:
#define ST_TYPE_SEAGATE_DAT <value>
This statement should be added after the last ST_TYPE_ define
statement in the file. <value> should be the next unused
hexadecimal value. This value will depend on the release and
number of devices supported by the system. For example, if the
last value for an existing device is 0x2d, then use a value of
0x2e.
2. Modify the
st_conf.c
file by adding the following lines at the end
of the device definition list:
3. Use the
/*Seagate DAT drive support */
{
“SEAGATE DAT”,7,”SEAGATE”,ST_TYPE_SEAGATE_DAT,10240,
(ST_VARIABLE|ST_BSF|ST_BSR|ST_LONG_ERASE|ST_KNOWS_EOD),
5000,5000,
{0x0,0x8c,0x8c,0x8c},
{0,0,0,0}
}
command to rebuild the kernel and include the
config
new device definition. Refer to the
man page for details.
config
Page 11

Scorpion 40 configurations for Windows NT, Novell, and UNIX 8
Solaris 2.x
1. To configure Solaris 2.x for compatibility with the Scorpion 40,
add the following lines to the file
/kernel/drv
tape-config-list=
Drive","SEAGATE_DAT";
SEAGATE_DAT = 1,0x34,0,0xd639,4,0x00,0x8C,0x8C,0x8C,3;
.
"SEAGATE DAT 06240-XXX","Seagate DAT
st.conf
in the directory
Note:
The inquiry string above contains four spaces between the
word
and the value 06240.
DAT
2. After modifying the file
by booting the system using the
st.conf
, you must reconfigure the kernel
command
boot -r
Page 12

Scorpion 40 configurations for Windows NT, Novell, and UNIX 9
Configurations for the SGI environment
Dip switch settings
Before using the Scorpion 40 in a SGI UNIX environment, make sure
the dip switches are all set to ON, as shown in the table below:
Operating System / tape
driver software
SGI UNIX
Switch5Switch6Switch7Switch
8
ON ON ON ON
Note:
The main difference between tape drive support in Irix 5.x and
6.x is the introduction for Data Compression switching via
software in Irix version 6.2. When running Irix 5.x, the drive
will always operate in the compression setting determined by
switch 6 on the bottom of the drive (off=compression enabled
(default), on=compression disabled).
Irix V5.x
To configure Irix 5.x to use the Scorpion 40, you must modify the file
/var/sysgen/master.d/scsi as described below:
1. Edit the file
/var/sysgen/master.d/scsi
and add the following
entry:
{DATTAPE,TPDAT,7,12,"SEAGATE","DAT 06240"/*DAT*/,0,0,{0,0,0,0},
MTCAN_BSF|MTCAN_BSR|MTCAN_APPEND|MTCAN_SETMK|MTCAN_PART|MTCAN_PREV|
MTCAN_SYNC|MTCAN_SPEOD|MTCAN_CHKRDY|MTCAN_VAR|MTCAN_SETSZ|
MTCAN_SILI|MTCAN_SEEK|MTCAN_CHTYPEANY,
/* minimum delay on i/o is 12 minutes, to allow the Drives
* full error recovery sequence to be performed. */
40, 12*60, 12*60, 12*60, 512, 512*512 },
The string above contains four spaces between the word
Note:
and the value
06240
.
DAT
2. Rebuild the kernel using the autoconfig command (see the
autoconfig man page for details ). After the kernel is rebuilt you
will need to reboot the system again to bring the changes into
effect.
Page 13

Scorpion 40 configurations for Windows NT, Novell, and UNIX 10
Note:
Irix 5.3 and later will detect the changes made and
automatically rebuild the kernel the next time the system
boots.
Irix V6.x through V6.5
To configure Irix 6.x-6.5 to use a Scorpion 40, you must modify the
files
/var/sysgen/master.d/scsi
and
/dev/MAKEDEV.d/TPS_base
as described below. After modifying these files you must rebuild the
kernel.
1. Edit the file
/var/sysgen/master.d/scsi
and add one of the
following entries, depending on your version of IRIX:
For IRIX V6.x through V6.4:
{ DATTAPE, TPDAT, 7, 12, "SEAGATE",”DAT 06240”/*DAT*/, 0, 0,
{0},
/* This drive uses mode select page 0xf for compression control;
* most of the other drives supporting compression use page 0x10
*/
MTCAN_BSF|MTCAN_BSR|MTCAN_APPEND|MTCAN_SETMK|MTCAN_PART|MTCAN_PREV|
MTCAN_SYNC|MTCAN_SPEOD|MTCAN_CHKRDY|MTCAN_VAR|MTCAN_SETSZ|
MTCAN_SILI|MTCAN_SEEK|MTCAN_CHTYPEANY|MTCAN_COMPRESS,
/* minimum delay on i/o is 12 minutes, to allow the Drives
* full error recovery sequence to be performed. */
40, 12*60, 12*60, 12*60, 512, 512*512, 0, (u_char *)0 },
For IRIX V6.5:
,
{ DATTAPE, TPDAT, 7, 12, "SEAGATE",”DAT 06240”/*DAT*/, 0, 0,
{0},
/* This drive uses mode select page 0xf for compression control;
* most of the other drives supporting compression use page 0x10
*/
MTCAN_BSF|MTCAN_BSR|MTCAN_APPEND|MTCAN_SETMK|MTCAN_PART|MTCAN_PREV|
MTCAN_SYNC|MTCAN_SPEOD|MTCAN_CHKRDY|MTCAN_VAR|MTCAN_SETSZ|
MTCAN_SILI|MTCAN_SEEK|MTCAN_CHTYPEANY|MTCAN_COMPRESS,
/* minimum delay on i/o is 12 minutes, to allow the Drives
* full error recovery sequence to be performed. */
40, 12*60, 12*60, 12*60, 3*3600, 512, 512*512,
Page 14

Scorpion 40 configurations for Windows NT, Novell, and UNIX 11
tpsc_default_dens_count, tpsc_default_hwg_dens_names,
tpsc_default_alias_dens_names,
{0},0,0,0,
0, (u_char *)0 },
2.Edit the file
/dev/MAKEDEV.d/TPS_base
and make the following
modification (this modification is not required on systems running
IRIX 6.4 or 6.5).
Locate the area of code which deals with DAT drives. This starts
with:
*Drive?type:*DAT*
Then insert the following text before or after the similar entries for
other supported devices:
*Device:*DAT*06240*) # DAT drive with compression
;;
mdev=`expr $mdev + 8`;
mknod ${prf}$1c c ${C_TPS} $mdev;
3.Restart the system. Irix 6.x will detect the changes made and
automatically rebuild the kernel on startup.
Alternatively, you could manually rebuild the kernel using the
autoconfig command (see the autoconfig man page for details ),
then reboot the system again to bring the changes into effect.
Troubleshooting installations on the SGI platform
Checking the drive's inquiry string
It may be useful to confirm the drive’s inquiry string. This is done
using the mt command. The following command line will retrieve the
Inquiry string and other status data from a drive on SCSI bus 1, ID 4.
mt -f /dev/rmt/tps1d4 status
System Interchange Problems
If the following error appears when trying to restore a cpio archive
from another system, it is likely that a mistake was made in the
installation sequence in section 7.1 above:
Byte swapped Data - re-try with correct device
Page 15

Scorpion 40 configurations for Windows NT, Novell, and UNIX 12
If this error is encountered, make sure that the correct modifications
were made to the file /var/sysgen/master.d/scsi.
Switching Hardware Compression
Irix 6.x provides support for software switching of hardware
compression through the use of different device drivers. Drivers
including a “c” in the device name should enable compression. You
may be able to resolve problems with data compression by installing
the latest Irix 6.x patch set.
Page 16

Scorpion 40 configurations for Windows NT, Novell, and UNIX 13
Configurations for the HP-UX environment
Dip switch settings
Before using the Scorpion 40 in an HP UNIX environment, set the
operating-system configuration dip switches as shown below:
Operating System / tape
driver software
HP UNIX
Switch5Switch6Switch7Switch
8
ON ON OFF ON
HP-UX Versions 10.2 and 11:
Follow the steps below to configure these HP-UX systems:
1. Log in as root.
2. Run the SAM utility.
3. Choose the Peripheral Devices option.
4. Choose Tape Drives.
5. From the Actions menu in the Tape Device Manager window,
choose Add.
6. Within the Add a Tape Drive window, read the instructions, then
click on OK
.
7. SAM may dete ct that your HP-UX kernel lacks the drivers
necessary to make use of your new tape drive. If so, within the
“Device Driver Check” window, read the message and choose
the appropriate action. If the chosen option is Build a new kernel
and shut down the system immediately, SAM will create a new
kernel, and automatically reboot the system. Once the system
comes back up, the necessary drivers will be loaded, and the
system will be able to use the tape drive.
8. If you had to shut down the system in order to physically connect
the tape drive, re-enter SAM and repeat steps 3 through 6 above.
9. Choose the new tape drive.
10. From the
Actions
menu, choose
Create Device Files.
11. Press OK and then exit from SAM.
Page 17

Scorpion 40 configurations for Windows NT, Novell, and UNIX 14
Configurations for the IBM AIX envi ronment
Dip switch settings
Before using the Scorpion 40 in an IBM AIX environment, set the
operating-system configuration dip switches as shown below:
Operating System / tape
driver software
IBM UNIX
Switch5Switch6Switch7Switch
8
ON OFF ON OFF
AIX Version 3.2 and later
AIX Versions 3.2 and later can be configured to work with the
Scorpion 40 by using the SMIT “Other SCSI Tape Drive”
option
.
Note:
To use this procedure, you will need to know the SCSI ID
being used by the tape drive.
To configure AIX using the SMIT utility, use the following
procedure:
1. Enter SMIT at the Tape Drive menu by typing “smit tape”
2. Select “Add a tape drive”
3. Select the type of tape drive you will be adding. Use the “Other
SCSI Tape Drive” option.
4. Select the parent SCSI Adapter from the available list
5. The Add a tape Drive entry fields now appear. Some of the
standard options need to be changed to maximize drive
performance and functionality:
Set the “Connection Address” with the tape drive’s Target
•
and LUN (always use 0 for the LUN). In the list, the Target is
the first number and the LUN is the second. For example, if
the drive is ID 5, choose 5,0
Set the Fixed “Blocksize” to 1024
•
Set “Density 1” to 140
•
Page 18

Scorpion 40 configurations for Windows NT, Novell, and UNIX 15
Set the “Maximum delay for the Read/Write command” to
•
900
6. Press the
RETURN
key. The drive will be installed in the system
database and the appropriate devices created
7. Exit SMIT
Controlling data compression under AIX
After you run SMIT, device files will have been created for your new
tape drive. Typical filenames are listed below:
/dev/rmt0 /dev/rmt0.1 /dev/rmt0.2 /dev/rmt0.3
/dev/rmt0.4 /dev/rmt0.5 /dev/rmt0.6 /dev/rmt0.7
If you enter the configuration information specified in step 5 of the
configuration process, devices rmt0, rmt0.1, rmt0.2 and rmt0.3 will
cause the drive to write in compressed mode. Using devices rmt0.4,
rmt0.5, rmt0.6 and rmt0.7 will cause the drive to write with
compression disabled.
Page 19

Scorpion 40 configurations for Windows NT, Novell, and UNIX 16
Configurations for Linux and SCO UNIX environments
The following table summarizes the settings for the operating-system
configuration dip switches that should be used for Linux and SCO
UNIX environments.
Operating System / tape
driver software
Linux
(ODT and Open Server)
SCO
installation using MAKDEV
utility
SCO UnixWare 7.x
Switch5Switch6Switch7Switch
8
ON ON ON ON
OFFONONOFF
ON ON ON ON
 Loading...