

Page 1

The ADIC
Distributed AML Server
DAS V3.12
Administration
Guide
Page 2

Copyright Notice
© Copyright ADIC 2002
The information contained in this document is subject to change without notice.
This document contains proprietary information which is protected by copyright. All rights are
reserved. No part of this document may be photocopied, reproduced, or translated to another
language without prior written consent of ADIC.
ADIC shall not be liable for errors contained herein or for incidental or consequential damages
(including lost profits) in connection with the furnishing, performance or use of this material
whether based on warranty, contract, or other legal theory.
All trademarks within this document are the property of their respective owners.
Copyright Notice (Europe)
© Copyright ADIC Europe 2002
All rights reserved. No part of this document may be copied or reproduced in any form or by any
means, without prior written permission of ADIC Europe, ZAC des Basses Auges, 1 rue Alfred de
Vigny, 78112 Fourqueux, FRANCE.
ADIC Europe assumes no responsibility for any errors that may appear in this document, and
retains the right to make changes to these specifications and descriptions at any time, without
notice.
This publication may describe designs for which patents are pending, or have been granted. By
publishing this information, ADIC Europe conveys no license under any patent or any other right.
ADIC Europe makes no representation or warranty with respect to the contents of this document
and specifically disclaims any implied warranties of merchantability or fitness for any particular
purpose. Further, ADIC Europe reserves the right to revise or change this publication without
obligation on the part of ADIC Europe to notify any person or organization of such revision of
change.
Every effort has been made to acknowledge trademarks and their owners. Trademarked names are
used solely for identification or exemplary purposes, any omission is unintentional.
ADIC and ADIC Europe are trademarks of Advanced Digital Information Corporation.
ADIC ADIC Europe ADIC Germany Beteiligungs GmbH, KG
Tel.: +1 303-705-3900 ZAC des Basses Auges Eschenstraße 3
Fax: +1-303-792-2465 1, rue Alfred de Vigny D-89558 Böhmenkirch, Germany
ATAC: 1-800-827-3822 78112 Fourqueux, France Tel:+00.800.9999.3822
www.adic.com Tel.: +33.1.3087.5300
Fax: +33.1.3087.5301
Document number: 6-00345-01
Published: 26 Jul 2002 Printed in the USA
ADIC CORPORATE • 11431 WILLOWS ROAD, NE • REDMOND, WASHINGTON, USA • 1-800-336-1233
ADIC • 8560 UPLAND DRIVE• ENGLEWOOD, COLORADO, USA • 1-800-827-3822
ADIC • 10 BROWN ROAD • ITHACA, NEW YORK, USA • 1-607-266-4000
Page 3

Contents
Introduction
Overview . . . . . . . . . . . . . . . . . . . . . . . . . . . . . . . . . . . . . . . . . . . . . . . . . . . 1-3
Intended Audience . . . . . . . . . . . . . . . . . . . . . . . . . . . . . . . . . . . . . . . . . . 1-3
Organization . . . . . . . . . . . . . . . . . . . . . . . . . . . . . . . . . . . . . . . . . . . . . . 1-3
Accociated Documents . . . . . . . . . . . . . . . . . . . . . . . . . . . . . . . . . . . . . . . . 1-3
Explanation of Symbols and Notations . . . . . . . . . . . . . . . . . . . . . . . . . . . . . 1-4
Assistance . . . . . . . . . . . . . . . . . . . . . . . . . . . . . . . . . . . . . . . . . . . . . . . . 1-4
1-4
Description
Overview . . . . . . . . . . . . . . . . . . . . . . . . . . . . . . . . . . . . . . . . . . . . . . . . . . . 2-3
DAS Working Environment . . . . . . . . . . . . . . . . . . . . . . . . . . . . . . . . . . . . . . . 2-3
Structure of the DAS Software . . . . . . . . . . . . . . . . . . . . . . . . . . . . . . . . . . . . . 2-3
DAS Client . . . . . . . . . . . . . . . . . . . . . . . . . . . . . . . . . . . . . . . . . . . . . . . 2-4
DAS Server . . . . . . . . . . . . . . . . . . . . . . . . . . . . . . . . . . . . . . . . . . . . . . . 2-4
Command Processing . . . . . . . . . . . . . . . . . . . . . . . . . . . . . . . . . . . . . . . . 2-5
DAS Commands . . . . . . . . . . . . . . . . . . . . . . . . . . . . . . . . . . . . . . . . . . . . . . 2-6
Media Management . . . . . . . . . . . . . . . . . . . . . . . . . . . . . . . . . . . . . . . . . 2-6
DAS Management . . . . . . . . . . . . . . . . . . . . . . . . . . . . . . . . . . . . . . . . . . 2-6
Client Management . . . . . . . . . . . . . . . . . . . . . . . . . . . . . . . . . . . . . . . . . 2-6
Scratch Pool Management . . . . . . . . . . . . . . . . . . . . . . . . . . . . . . . . . . . . . 2-6
DAS Functions . . . . . . . . . . . . . . . . . . . . . . . . . . . . . . . . . . . . . . . . . . . . . . . 2-7
Communication with the ACI . . . . . . . . . . . . . . . . . . . . . . . . . . . . . . . . . . . 2-7
Communication with ACI Client . . . . . . . . . . . . . . . . . . . . . . . . . . . . . . . . . 2-7
Page 4

Configuration Management . . . . . . . . . . . . . . . . . . . . . . . . . . . . . . . . . . . . 2-8
Client Authorization . . . . . . . . . . . . . . . . . . . . . . . . . . . . . . . . . . . . . . . . . 2-8
Command Verification . . . . . . . . . . . . . . . . . . . . . . . . . . . . . . . . . . . . . . . 2-8
Error Handling . . . . . . . . . . . . . . . . . . . . . . . . . . . . . . . . . . . . . . . . . . . . 2-9
Mount and Dismount Media in the AML . . . . . . . . . . . . . . . . . . . . . . . . . . . 2-9
Working with Foreign Media . . . . . . . . . . . . . . . . . . . . . . . . . . . . . . . . . . . 2-9
Inserting Media in the AML . . . . . . . . . . . . . . . . . . . . . . . . . . . . . . . . . . . 2-9
Ejecting Media from the AML . . . . . . . . . . . . . . . . . . . . . . . . . . . . . . . . . . 2-10
Scratch Pool Administration . . . . . . . . . . . . . . . . . . . . . . . . . . . . . . . . . . . . 2-10
HICAP Application . . . . . . . . . . . . . . . . . . . . . . . . . . . . . . . . . . . . . . . . . . 2-10
Dual AMU Support . . . . . . . . . . . . . . . . . . . . . . . . . . . . . . . . . . . . . . . . . 2-10
Safety
Overview . . . . . . . . . . . . . . . . . . . . . . . . . . . . . . . . . . . . . . . . . . . . . . . . . . . 3-3
Hazard Alert Messages . . . . . . . . . . . . . . . . . . . . . . . . . . . . . . . . . . . . . . . . . . 3-3
Validation . . . . . . . . . . . . . . . . . . . . . . . . . . . . . . . . . . . . . . . . . . . . . . . . . . 3-4
Installation and Configuration
Overview . . . . . . . . . . . . . . . . . . . . . . . . . . . . . . . . . . . . . . . . . . . . . . . . . . . 4-3
Installing the DAS Software . . . . . . . . . . . . . . . . . . . . . . . . . . . . . . . . . . . . . . . 4-3
Installation Using Dasinst.cmd . . . . . . . . . . . . . . . . . . . . . . . . . . . . . . . . . . 4-3
Installation Without the Install Program . . . . . . . . . . . . . . . . . . . . . . . . . . . . 4-4
Configuring the Server Software . . . . . . . . . . . . . . . . . . . . . . . . . . . . . . . . . . . . 4-4
Editing the Config.sys File . . . . . . . . . . . . . . . . . . . . . . . . . . . . . . . . . . . . . 4-4
Editing the Startup.cmd File . . . . . . . . . . . . . . . . . . . . . . . . . . . . . . . . . . . 4-5
Editing the Config File . . . . . . . . . . . . . . . . . . . . . . . . . . . . . . . . . . . . . . . 4-5
Configuration File . . . . . . . . . . . . . . . . . . . . . . . . . . . . . . . . . . . . . . . . . . . . . 4-6
Structure and Syntax of Config . . . . . . . . . . . . . . . . . . . . . . . . . . . . . . . . . 4-6
Definition of Ranges . . . . . . . . . . . . . . . . . . . . . . . . . . . . . . . . . . . . . . . . . 4-6
Definition of Volser Ranges . . . . . . . . . . . . . . . . . . . . . . . . . . . . . . . . . 4-7
Options . . . . . . . . . . . . . . . . . . . . . . . . . . . . . . . . . . . . . . . . . . . . . . . . . 4-7
Avoid Volume Contention Option . . . . . . . . . . . . . . . . . . . . . . . . . . . . . 4-7
Dismount Option . . . . . . . . . . . . . . . . . . . . . . . . . . . . . . . . . . . . . . . . 4-7
The Client Statement . . . . . . . . . . . . . . . . . . . . . . . . . . . . . . . . . . . . . . . . 4-8
Syntax . . . . . . . . . . . . . . . . . . . . . . . . . . . . . . . . . . . . . . . . . . . . . . . 4-8
The DriveToVol Statement . . . . . . . . . . . . . . . . . . . . . . . . . . . . . . . . . . . . . 4-10
Syntax . . . . . . . . . . . . . . . . . . . . . . . . . . . . . . . . . . . . . . . . . . . . . . .4-10
The Server Statement . . . . . . . . . . . . . . . . . . . . . . . . . . . . . . . . . . . . . . . . 4-11
Syntax . . . . . . . . . . . . . . . . . . . . . . . . . . . . . . . . . . . . . . . . . . . . . . . 4-11
Configuration File . . . . . . . . . . . . . . . . . . . . . . . . . . . . . . . . . . . . . . . 4-11
iv Contents
6-00345-01
Page 5

DAS Configuration in AMU . . . . . . . . . . . . . . . . . . . . . . . . . . . . . . . . . . . . . . .4-12
Drives . . . . . . . . . . . . . . . . . . . . . . . . . . . . . . . . . . . . . . . . . . . . . . . . . . 4-13
I/O Unit . . . . . . . . . . . . . . . . . . . . . . . . . . . . . . . . . . . . . . . . . . . . . . . . . 4-14
Scratchpools . . . . . . . . . . . . . . . . . . . . . . . . . . . . . . . . . . . . . . . . . . . . . . 4-15
Installing the ACI Software . . . . . . . . . . . . . . . . . . . . . . . . . . . . . . . . . . . . . . .4-15
UNIX-Client . . . . . . . . . . . . . . . . . . . . . . . . . . . . . . . . . . . . . . . . . . . . . . 4-15
Microsoft Windows NT Client Using RPC . . . . . . . . . . . . . . . . . . . . . . . . . . . 4-16
Microsoft Windows NT Client Using RSH . . . . . . . . . . . . . . . . . . . . . . . . . . .4-17
Configuration DAS Client on the OS/2 PC . . . . . . . . . . . . . . . . . . . . . . . 4-17
Configuration Windows for the ACI Client . . . . . . . . . . . . . . . . . . . . . . . . . . 4-17
Configuration of the UNIX-Client Software . . . . . . . . . . . . . . . . . . . . . . . . . . . . . 4-18
Example of the C Shell . . . . . . . . . . . . . . . . . . . . . . . . . . . . . . . . . . . . . . . 4-18
Example of the Korn and Bourne Shell . . . . . . . . . . . . . . . . . . . . . . . . . . . . 4-18
Installation and Configuration . . . . . . . . . . . . . . . . . . . . . . . . . . . . . . . . . . . . . 4-19
DAS Commands
Overview . . . . . . . . . . . . . . . . . . . . . . . . . . . . . . . . . . . . . . . . . . . . . . . . . . . 5-3
DAS Commands . . . . . . . . . . . . . . . . . . . . . . . . . . . . . . . . . . . . . . . . . . . . . . 5-3
Client Management Commands . . . . . . . . . . . . . . . . . . . . . . . . . . . . . . . . . . 5-3
Media Management Commands . . . . . . . . . . . . . . . . . . . . . . . . . . . . . . . . . 5-4
DAS Management Commands . . . . . . . . . . . . . . . . . . . . . . . . . . . . . . . . . . . 5-5
Scratch Management Commands . . . . . . . . . . . . . . . . . . . . . . . . . . . . . . . . . 5-5
Command Description . . . . . . . . . . . . . . . . . . . . . . . . . . . . . . . . . . . . . . . . 5-6
Reserve Drive (allocd) . . . . . . . . . . . . . . . . . . . . . . . . . . . . . . . . . . . . . 5-6
Reserve Volsers (allocv) . . . . . . . . . . . . . . . . . . . . . . . . . . . . . . . . . . . . 5-6
Activate/Deactivate the Barcode Reader (barcode) . . . . . . . . . . . . . . . . . . . 5-7
Cancel Command (cancel) . . . . . . . . . . . . . . . . . . . . . . . . . . . . . . . . . . 5-7
Move a Medium to the Slot (carry) . . . . . . . . . . . . . . . . . . . . . . . . . . . . 5-8
Catalog Foreign Volume (catf) . . . . . . . . . . . . . . . . . . . . . . . . . . . . . . . . 5-9
Get Device Information (cellinfo) . . . . . . . . . . . . . . . . . . . . . . . . . . . . . . 5-9
Drive Cleaning (clean) . . . . . . . . . . . . . . . . . . . . . . . . . . . . . . . . . . . . . 5-10
Retrieve a Medium from the Drive (dismount) . . . . . . . . . . . . . . . . . . . . . 5-11
View the Logical Ranges Configuration (eif_conf) . . . . . . . . . . . . . . . . . . . 5-11
Display Logical Ranges in EIF(eif_info) . . . . . . . . . . . . . . . . . . . . . . . . . . 5-11
Eject Media (eject3) . . . . . . . . . . . . . . . . . . . . . . . . . . . . . . . . . . . . . . . 5-12
Eject Media (eject2) . . . . . . . . . . . . . . . . . . . . . . . . . . . . . . . . . . . . . . . 5-12
Eject Media (eject) . . . . . . . . . . . . . . . . . . . . . . . . . . . . . . . . . . . . . . . 5-13
Eject Cleaning Media (ejectcl) . . . . . . . . . . . . . . . . . . . . . . . . . . . . . . . .5-13
Eject Media Complete (ejectcom) . . . . . . . . . . . . . . . . . . . . . . . . . . . . . . 5-14
Send Email Message (email) . . . . . . . . . . . . . . . . . . . . . . . . . . . . . . . . . 5-14
Flip Optical Disk in the Drive (flip) . . . . . . . . . . . . . . . . . . . . . . . . . . . . 5-15
Display Volsers Assigned to Drive (getvolsertodrive) . . . . . . . . . . . . . . . . . 5-15
Display Volsers of the Optical Disk (getvoltoside) . . . . . . . . . . . . . . . . . . . 5-15
Insert Media (insert2) . . . . . . . . . . . . . . . . . . . . . . . . . . . . . . . . . . . . . 5-16
26 Jul 2002
Contents v
Page 6

Insert Media (insert) . . . . . . . . . . . . . . . . . . . . . . . . . . . . . . . . . . . . . . 5-17
Initialize Library Elements (inventory) . . . . . . . . . . . . . . . . . . . . . . . . . . 5-17
Shut Down the AMU PC (killamu) . . . . . . . . . . . . . . . . . . . . . . . . . . . . 5-18
Display All Active Commands (list2) . . . . . . . . . . . . . . . . . . . . . . . . . . . 5-18
Display All Active Commands (list) . . . . . . . . . . . . . . . . . . . . . . . . . . . .5-20
Display Drive Assignment (listd4) . . . . . . . . . . . . . . . . . . . . . . . . . . . . . 5-21
Display Drive Assignment (listd3) . . . . . . . . . . . . . . . . . . . . . . . . . . . . .5-23
Display Drive Assignment (listd2) . . . . . . . . . . . . . . . . . . . . . . . . . . . . .5-25
Display Drive Assignment (listd) . . . . . . . . . . . . . . . . . . . . . . . . . . . . . .5-26
Display Foreign Volser (listf) . . . . . . . . . . . . . . . . . . . . . . . . . . . . . . . .5-27
Display Volser Reservation (listv) . . . . . . . . . . . . . . . . . . . . . . . . . . . . . .5-28
Load a Medium in Drive (mount) . . . . . . . . . . . . . . . . . . . . . . . . . . . . .5-28
Initialize Element Range (partinventory) . . . . . . . . . . . . . . . . . . . . . . . . .5-29
Pause DAS AMU Communication (pausedas) . . . . . . . . . . . . . . . . . . . . . .5-29
Disable Robot Access to Drive (pausedrive) . . . . . . . . . . . . . . . . . . . . . . .5-30
Query the Software Version (qversion) . . . . . . . . . . . . . . . . . . . . . . . . . .5-30
Query the Volser Ranges in the Library (qvolsrange) . . . . . . . . . . . . . . . . 5-31
Remove a Foreign Medium (rmf) . . . . . . . . . . . . . . . . . . . . . . . . . . . . . .5-32
Deactivate Robotic Controller in the library (robhome) . . . . . . . . . . . . . . . .5-32
Activate Robotic Controller in the Library (robstat) . . . . . . . . . . . . . . . . . .5-33
Set Client Access Privileges (scap) . . . . . . . . . . . . . . . . . . . . . . . . . . . . .5-33
Set Operating Parameters (scop2) . . . . . . . . . . . . . . . . . . . . . . . . . . . . . .5-34
Set Operating Parameters (scop) . . . . . . . . . . . . . . . . . . . . . . . . . . . . . .5-34
Next Scratch Medium (scr_get) . . . . . . . . . . . . . . . . . . . . . . . . . . . . . . .5-35
Scratch Pool Information (scr_info) . . . . . . . . . . . . . . . . . . . . . . . . . . . .5-36
Insert Scratch Media (scr_insert) . . . . . . . . . . . . . . . . . . . . . . . . . . . . . .5-36
Execute Scratch Mount (scr_mount) . . . . . . . . . . . . . . . . . . . . . . . . . . . .5-36
Add Medium to the Scratch Pool (scr_set) . . . . . . . . . . . . . . . . . . . . . . . .5-37
Add Media to the Scratch Pool (scr_set_range) . . . . . . . . . . . . . . . . . . . . .5-37
Remove Medium from Scratch Pool (scr_unset) . . . . . . . . . . . . . . . . . . . . 5-38
Display Client Parameters (show2) . . . . . . . . . . . . . . . . . . . . . . . . . . . . .5-38
Display Client Parameters (show) . . . . . . . . . . . . . . . . . . . . . . . . . . . . .5-39
Shut Down DAS (shutdown) . . . . . . . . . . . . . . . . . . . . . . . . . . . . . . . .5-39
Send SNMP Message (snmp) . . . . . . . . . . . . . . . . . . . . . . . . . . . . . . . . .5-40
Switch to the Passive AMU (switch) . . . . . . . . . . . . . . . . . . . . . . . . . . . .5-40
Display Drives by Media Type (typelist) . . . . . . . . . . . . . . . . . . . . . . . . . 5-41
Operate Drive Buttons (unload) . . . . . . . . . . . . . . . . . . . . . . . . . . . . . . . 5-41
Obtain Information on a Volser Range (view2) . . . . . . . . . . . . . . . . . . . . . 5-41
Obtain Information on a Volser (view) . . . . . . . . . . . . . . . . . . . . . . . . . .5-43
Initialize Volser (volserinventory) . . . . . . . . . . . . . . . . . . . . . . . . . . . . . .5-45
vi Contents
DAS Messages
Overview . . . . . . . . . . . . . . . . . . . . . . . . . . . . . . . . . . . . . . . . . . . . . . . . . . .6-19
DAS Messages . . . . . . . . . . . . . . . . . . . . . . . . . . . . . . . . . . . . . . . . . . . . . . . . 6-19
DAS ACI Messages . . . . . . . . . . . . . . . . . . . . . . . . . . . . . . . . . . . . . . . . . . 6-19
DAS Server Messages to the ACI . . . . . . . . . . . . . . . . . . . . . . . . . . . . . . . . 6-19
6-00345-01
Page 7

Conventions in the Messages . . . . . . . . . . . . . . . . . . . . . . . . . . . . . . . . . . . 6-19
DAS Server Messages . . . . . . . . . . . . . . . . . . . . . . . . . . . . . . . . . . . . . . . . . . . 6-19
DAS0001 . . . . . . . . . . . . . . . . . . . . . . . . . . . . . . . . . . . . . . . . . . . . . . . . .6-20
DAS ACI Message . . . . . . . . . . . . . . . . . . . . . . . . . . . . . . . . . . . . . . .6-20
Explanation . . . . . . . . . . . . . . . . . . . . . . . . . . . . . . . . . . . . . . . . . . . .6-20
User Activities . . . . . . . . . . . . . . . . . . . . . . . . . . . . . . . . . . . . . . . . . .6-20
DAS0002 . . . . . . . . . . . . . . . . . . . . . . . . . . . . . . . . . . . . . . . . . . . . . . . . .6-20
DAS ACI Message . . . . . . . . . . . . . . . . . . . . . . . . . . . . . . . . . . . . . . .6-20
Explanation . . . . . . . . . . . . . . . . . . . . . . . . . . . . . . . . . . . . . . . . . . . .6-20
User Activities . . . . . . . . . . . . . . . . . . . . . . . . . . . . . . . . . . . . . . . . . .6-20
DAS0003 . . . . . . . . . . . . . . . . . . . . . . . . . . . . . . . . . . . . . . . . . . . . . . . . .6-20
DAS ACI Message . . . . . . . . . . . . . . . . . . . . . . . . . . . . . . . . . . . . . . . 6-21
Explanation . . . . . . . . . . . . . . . . . . . . . . . . . . . . . . . . . . . . . . . . . . . . 6-21
User Activities . . . . . . . . . . . . . . . . . . . . . . . . . . . . . . . . . . . . . . . . . . 6-21
DAS0100 . . . . . . . . . . . . . . . . . . . . . . . . . . . . . . . . . . . . . . . . . . . . . . . . . 6-21
DAS ACI Message . . . . . . . . . . . . . . . . . . . . . . . . . . . . . . . . . . . . . . . 6-21
Explanation . . . . . . . . . . . . . . . . . . . . . . . . . . . . . . . . . . . . . . . . . . . . 6-21
User Activities . . . . . . . . . . . . . . . . . . . . . . . . . . . . . . . . . . . . . . . . . . 6-21
DAS3000 . . . . . . . . . . . . . . . . . . . . . . . . . . . . . . . . . . . . . . . . . . . . . . . . . 6-21
DAS ACI Message . . . . . . . . . . . . . . . . . . . . . . . . . . . . . . . . . . . . . . . 6-21
Explanation . . . . . . . . . . . . . . . . . . . . . . . . . . . . . . . . . . . . . . . . . . . . 6-21
User Activities . . . . . . . . . . . . . . . . . . . . . . . . . . . . . . . . . . . . . . . . . . 6-21
DAS3001 . . . . . . . . . . . . . . . . . . . . . . . . . . . . . . . . . . . . . . . . . . . . . . . . .6-22
DAS ACI Message . . . . . . . . . . . . . . . . . . . . . . . . . . . . . . . . . . . . . . .6-22
Explanation . . . . . . . . . . . . . . . . . . . . . . . . . . . . . . . . . . . . . . . . . . . .6-22
User Activities . . . . . . . . . . . . . . . . . . . . . . . . . . . . . . . . . . . . . . . . . .6-22
DAS3002 . . . . . . . . . . . . . . . . . . . . . . . . . . . . . . . . . . . . . . . . . . . . . . . . .6-22
DAS ACI Message . . . . . . . . . . . . . . . . . . . . . . . . . . . . . . . . . . . . . . .6-22
Explanation . . . . . . . . . . . . . . . . . . . . . . . . . . . . . . . . . . . . . . . . . . . .6-22
User Activities . . . . . . . . . . . . . . . . . . . . . . . . . . . . . . . . . . . . . . . . . .6-22
DAS3003 . . . . . . . . . . . . . . . . . . . . . . . . . . . . . . . . . . . . . . . . . . . . . . . . .6-22
DAS ACI Message . . . . . . . . . . . . . . . . . . . . . . . . . . . . . . . . . . . . . . .6-22
Explanation . . . . . . . . . . . . . . . . . . . . . . . . . . . . . . . . . . . . . . . . . . . .6-22
User Activities . . . . . . . . . . . . . . . . . . . . . . . . . . . . . . . . . . . . . . . . . .6-23
DAS3004 . . . . . . . . . . . . . . . . . . . . . . . . . . . . . . . . . . . . . . . . . . . . . . . . .6-23
DAS ACI Message . . . . . . . . . . . . . . . . . . . . . . . . . . . . . . . . . . . . . . .6-23
Explanation . . . . . . . . . . . . . . . . . . . . . . . . . . . . . . . . . . . . . . . . . . . .6-23
User Activities . . . . . . . . . . . . . . . . . . . . . . . . . . . . . . . . . . . . . . . . . .6-23
DAS3020 . . . . . . . . . . . . . . . . . . . . . . . . . . . . . . . . . . . . . . . . . . . . . . . . .6-23
DAS ACI Message . . . . . . . . . . . . . . . . . . . . . . . . . . . . . . . . . . . . . . .6-23
Explanation . . . . . . . . . . . . . . . . . . . . . . . . . . . . . . . . . . . . . . . . . . . .6-23
User Activities . . . . . . . . . . . . . . . . . . . . . . . . . . . . . . . . . . . . . . . . . .6-23
DAS 3021 . . . . . . . . . . . . . . . . . . . . . . . . . . . . . . . . . . . . . . . . . . . . . . . .6-23
DAS ACI Message . . . . . . . . . . . . . . . . . . . . . . . . . . . . . . . . . . . . . . .6-23
Explanation . . . . . . . . . . . . . . . . . . . . . . . . . . . . . . . . . . . . . . . . . . . .6-24
User Activities . . . . . . . . . . . . . . . . . . . . . . . . . . . . . . . . . . . . . . . . . .6-24
DAS3022 . . . . . . . . . . . . . . . . . . . . . . . . . . . . . . . . . . . . . . . . . . . . . . . . .6-24
DAS ACI Message . . . . . . . . . . . . . . . . . . . . . . . . . . . . . . . . . . . . . . .6-24
Explanation . . . . . . . . . . . . . . . . . . . . . . . . . . . . . . . . . . . . . . . . . . . .6-24
26 Jul 2002
Contents vii
Page 8

User Activities . . . . . . . . . . . . . . . . . . . . . . . . . . . . . . . . . . . . . . . . . .6-24
DAS3023 . . . . . . . . . . . . . . . . . . . . . . . . . . . . . . . . . . . . . . . . . . . . . . . . .6-24
DAS ACI Message . . . . . . . . . . . . . . . . . . . . . . . . . . . . . . . . . . . . . . .6-24
Explanation . . . . . . . . . . . . . . . . . . . . . . . . . . . . . . . . . . . . . . . . . . . .6-24
User Activities . . . . . . . . . . . . . . . . . . . . . . . . . . . . . . . . . . . . . . . . . .6-25
DAS3500 . . . . . . . . . . . . . . . . . . . . . . . . . . . . . . . . . . . . . . . . . . . . . . . . .6-25
DAS ACI Message . . . . . . . . . . . . . . . . . . . . . . . . . . . . . . . . . . . . . . .6-25
Explanation . . . . . . . . . . . . . . . . . . . . . . . . . . . . . . . . . . . . . . . . . . . .6-25
User Activities . . . . . . . . . . . . . . . . . . . . . . . . . . . . . . . . . . . . . . . . . .6-25
DAS3501 . . . . . . . . . . . . . . . . . . . . . . . . . . . . . . . . . . . . . . . . . . . . . . . . .6-25
DAS ACI Message . . . . . . . . . . . . . . . . . . . . . . . . . . . . . . . . . . . . . . .6-25
Explanation . . . . . . . . . . . . . . . . . . . . . . . . . . . . . . . . . . . . . . . . . . . .6-25
User Activities . . . . . . . . . . . . . . . . . . . . . . . . . . . . . . . . . . . . . . . . . .6-25
DAS3502 . . . . . . . . . . . . . . . . . . . . . . . . . . . . . . . . . . . . . . . . . . . . . . . . .6-25
DAS ACI Message . . . . . . . . . . . . . . . . . . . . . . . . . . . . . . . . . . . . . . .6-26
Explanation . . . . . . . . . . . . . . . . . . . . . . . . . . . . . . . . . . . . . . . . . . . .6-26
User Activities . . . . . . . . . . . . . . . . . . . . . . . . . . . . . . . . . . . . . . . . . .6-26
DAS3503 . . . . . . . . . . . . . . . . . . . . . . . . . . . . . . . . . . . . . . . . . . . . . . . . .6-26
DAS ACI Message . . . . . . . . . . . . . . . . . . . . . . . . . . . . . . . . . . . . . . .6-26
Explanation . . . . . . . . . . . . . . . . . . . . . . . . . . . . . . . . . . . . . . . . . . . .6-26
User Activities . . . . . . . . . . . . . . . . . . . . . . . . . . . . . . . . . . . . . . . . . .6-26
DAS3504 . . . . . . . . . . . . . . . . . . . . . . . . . . . . . . . . . . . . . . . . . . . . . . . . .6-26
DAS ACI Message . . . . . . . . . . . . . . . . . . . . . . . . . . . . . . . . . . . . . . .6-26
Explanation . . . . . . . . . . . . . . . . . . . . . . . . . . . . . . . . . . . . . . . . . . . .6-26
User Activities . . . . . . . . . . . . . . . . . . . . . . . . . . . . . . . . . . . . . . . . . .6-27
DAS4000 . . . . . . . . . . . . . . . . . . . . . . . . . . . . . . . . . . . . . . . . . . . . . . . . .6-27
DAS ACI Message . . . . . . . . . . . . . . . . . . . . . . . . . . . . . . . . . . . . . . .6-27
Explanation . . . . . . . . . . . . . . . . . . . . . . . . . . . . . . . . . . . . . . . . . . . .6-27
User Activities . . . . . . . . . . . . . . . . . . . . . . . . . . . . . . . . . . . . . . . . . .6-27
DAS4001 . . . . . . . . . . . . . . . . . . . . . . . . . . . . . . . . . . . . . . . . . . . . . . . . .6-27
DAS ACI Message . . . . . . . . . . . . . . . . . . . . . . . . . . . . . . . . . . . . . . .6-27
Explanation . . . . . . . . . . . . . . . . . . . . . . . . . . . . . . . . . . . . . . . . . . . .6-27
User Activities . . . . . . . . . . . . . . . . . . . . . . . . . . . . . . . . . . . . . . . . . .6-28
DAS4002 . . . . . . . . . . . . . . . . . . . . . . . . . . . . . . . . . . . . . . . . . . . . . . . . .6-28
DAS ACI Message . . . . . . . . . . . . . . . . . . . . . . . . . . . . . . . . . . . . . . .6-28
Explanation . . . . . . . . . . . . . . . . . . . . . . . . . . . . . . . . . . . . . . . . . . . .6-28
User Activities . . . . . . . . . . . . . . . . . . . . . . . . . . . . . . . . . . . . . . . . . .6-28
DAS4003 . . . . . . . . . . . . . . . . . . . . . . . . . . . . . . . . . . . . . . . . . . . . . . . . .6-28
DAS ACI Message . . . . . . . . . . . . . . . . . . . . . . . . . . . . . . . . . . . . . . .6-28
Explanation . . . . . . . . . . . . . . . . . . . . . . . . . . . . . . . . . . . . . . . . . . . .6-28
User Activities . . . . . . . . . . . . . . . . . . . . . . . . . . . . . . . . . . . . . . . . . .6-29
DAS4004 . . . . . . . . . . . . . . . . . . . . . . . . . . . . . . . . . . . . . . . . . . . . . . . . .6-29
DAS ACI Message . . . . . . . . . . . . . . . . . . . . . . . . . . . . . . . . . . . . . . .6-29
Explanation . . . . . . . . . . . . . . . . . . . . . . . . . . . . . . . . . . . . . . . . . . . .6-29
User Activities . . . . . . . . . . . . . . . . . . . . . . . . . . . . . . . . . . . . . . . . . .6-29
DAS4005 . . . . . . . . . . . . . . . . . . . . . . . . . . . . . . . . . . . . . . . . . . . . . . . . .6-29
DAS ACI Message . . . . . . . . . . . . . . . . . . . . . . . . . . . . . . . . . . . . . . .6-29
Explanation . . . . . . . . . . . . . . . . . . . . . . . . . . . . . . . . . . . . . . . . . . . .6-29
User Activities . . . . . . . . . . . . . . . . . . . . . . . . . . . . . . . . . . . . . . . . . .6-30
viii Contents
6-00345-01
Page 9

DAS4006 . . . . . . . . . . . . . . . . . . . . . . . . . . . . . . . . . . . . . . . . . . . . . . . . .6-30
DAS ACI Message . . . . . . . . . . . . . . . . . . . . . . . . . . . . . . . . . . . . . . .6-30
Explanation . . . . . . . . . . . . . . . . . . . . . . . . . . . . . . . . . . . . . . . . . . . .6-30
User Activities . . . . . . . . . . . . . . . . . . . . . . . . . . . . . . . . . . . . . . . . . .6-30
DAS4007 . . . . . . . . . . . . . . . . . . . . . . . . . . . . . . . . . . . . . . . . . . . . . . . .6-30
DAS ACI Message . . . . . . . . . . . . . . . . . . . . . . . . . . . . . . . . . . . . . . .6-30
Explanation . . . . . . . . . . . . . . . . . . . . . . . . . . . . . . . . . . . . . . . . . . . .6-30
User Activities . . . . . . . . . . . . . . . . . . . . . . . . . . . . . . . . . . . . . . . . . . 6-31
DAS4010 . . . . . . . . . . . . . . . . . . . . . . . . . . . . . . . . . . . . . . . . . . . . . . . . . 6-31
DAS ACI Message . . . . . . . . . . . . . . . . . . . . . . . . . . . . . . . . . . . . . . . 6-31
Explanation . . . . . . . . . . . . . . . . . . . . . . . . . . . . . . . . . . . . . . . . . . . . 6-31
User Activities . . . . . . . . . . . . . . . . . . . . . . . . . . . . . . . . . . . . . . . . . . 6-31
DAS4011 . . . . . . . . . . . . . . . . . . . . . . . . . . . . . . . . . . . . . . . . . . . . . . . . . 6-31
DAS ACI Message . . . . . . . . . . . . . . . . . . . . . . . . . . . . . . . . . . . . . . . 6-31
Explanation . . . . . . . . . . . . . . . . . . . . . . . . . . . . . . . . . . . . . . . . . . . . 6-31
User Activities . . . . . . . . . . . . . . . . . . . . . . . . . . . . . . . . . . . . . . . . . .6-32
DAS4012 . . . . . . . . . . . . . . . . . . . . . . . . . . . . . . . . . . . . . . . . . . . . . . . . .6-32
DAS ACI Message . . . . . . . . . . . . . . . . . . . . . . . . . . . . . . . . . . . . . . .6-32
Explanation . . . . . . . . . . . . . . . . . . . . . . . . . . . . . . . . . . . . . . . . . . . .6-32
User Activities . . . . . . . . . . . . . . . . . . . . . . . . . . . . . . . . . . . . . . . . . .6-32
DAS4013 . . . . . . . . . . . . . . . . . . . . . . . . . . . . . . . . . . . . . . . . . . . . . . . . .6-32
DAS ACI Message . . . . . . . . . . . . . . . . . . . . . . . . . . . . . . . . . . . . . . .6-32
Explanation . . . . . . . . . . . . . . . . . . . . . . . . . . . . . . . . . . . . . . . . . . . .6-32
User Activities . . . . . . . . . . . . . . . . . . . . . . . . . . . . . . . . . . . . . . . . . .6-33
DAS4020 . . . . . . . . . . . . . . . . . . . . . . . . . . . . . . . . . . . . . . . . . . . . . . . . .6-33
DAS ACI Message . . . . . . . . . . . . . . . . . . . . . . . . . . . . . . . . . . . . . . .6-33
Explanation . . . . . . . . . . . . . . . . . . . . . . . . . . . . . . . . . . . . . . . . . . . .6-33
User Activities . . . . . . . . . . . . . . . . . . . . . . . . . . . . . . . . . . . . . . . . . .6-33
DAS4021 . . . . . . . . . . . . . . . . . . . . . . . . . . . . . . . . . . . . . . . . . . . . . . . . .6-33
DAS ACI Message . . . . . . . . . . . . . . . . . . . . . . . . . . . . . . . . . . . . . . .6-33
Explanation . . . . . . . . . . . . . . . . . . . . . . . . . . . . . . . . . . . . . . . . . . . .6-33
User Activities . . . . . . . . . . . . . . . . . . . . . . . . . . . . . . . . . . . . . . . . . .6-33
DAS4022 . . . . . . . . . . . . . . . . . . . . . . . . . . . . . . . . . . . . . . . . . . . . . . . .6-34
DAS ACI Message . . . . . . . . . . . . . . . . . . . . . . . . . . . . . . . . . . . . . . .6-34
Explanation . . . . . . . . . . . . . . . . . . . . . . . . . . . . . . . . . . . . . . . . . . . .6-34
User Activities . . . . . . . . . . . . . . . . . . . . . . . . . . . . . . . . . . . . . . . . . .6-34
DAS4023 . . . . . . . . . . . . . . . . . . . . . . . . . . . . . . . . . . . . . . . . . . . . . . . . .6-34
DAS ACI Message . . . . . . . . . . . . . . . . . . . . . . . . . . . . . . . . . . . . . . .6-34
Explanation . . . . . . . . . . . . . . . . . . . . . . . . . . . . . . . . . . . . . . . . . . . .6-34
User Activities . . . . . . . . . . . . . . . . . . . . . . . . . . . . . . . . . . . . . . . . . .6-34
DAS4024 . . . . . . . . . . . . . . . . . . . . . . . . . . . . . . . . . . . . . . . . . . . . . . . .6-34
DAS ACI Message . . . . . . . . . . . . . . . . . . . . . . . . . . . . . . . . . . . . . . .6-35
Explanation . . . . . . . . . . . . . . . . . . . . . . . . . . . . . . . . . . . . . . . . . . . .6-35
User Activities . . . . . . . . . . . . . . . . . . . . . . . . . . . . . . . . . . . . . . . . . .6-35
DAS4030 . . . . . . . . . . . . . . . . . . . . . . . . . . . . . . . . . . . . . . . . . . . . . . . . .6-35
DAS ACI Message . . . . . . . . . . . . . . . . . . . . . . . . . . . . . . . . . . . . . . .6-35
Explanation . . . . . . . . . . . . . . . . . . . . . . . . . . . . . . . . . . . . . . . . . . . .6-35
User Activities . . . . . . . . . . . . . . . . . . . . . . . . . . . . . . . . . . . . . . . . . .6-35
DAS4031 . . . . . . . . . . . . . . . . . . . . . . . . . . . . . . . . . . . . . . . . . . . . . . . . .6-35
26 Jul 2002
Contents ix
Page 10

DAS ACI Message . . . . . . . . . . . . . . . . . . . . . . . . . . . . . . . . . . . . . . .6-35
Explanation . . . . . . . . . . . . . . . . . . . . . . . . . . . . . . . . . . . . . . . . . . . .6-36
User Activities . . . . . . . . . . . . . . . . . . . . . . . . . . . . . . . . . . . . . . . . . .6-36
DAS4032 . . . . . . . . . . . . . . . . . . . . . . . . . . . . . . . . . . . . . . . . . . . . . . . . .6-36
DAS ACI Message . . . . . . . . . . . . . . . . . . . . . . . . . . . . . . . . . . . . . . .6-36
Explanation . . . . . . . . . . . . . . . . . . . . . . . . . . . . . . . . . . . . . . . . . . . .6-36
User Activities . . . . . . . . . . . . . . . . . . . . . . . . . . . . . . . . . . . . . . . . . .6-36
DAS4033 . . . . . . . . . . . . . . . . . . . . . . . . . . . . . . . . . . . . . . . . . . . . . . . . .6-36
DAS ACI Message . . . . . . . . . . . . . . . . . . . . . . . . . . . . . . . . . . . . . . .6-36
Explanation . . . . . . . . . . . . . . . . . . . . . . . . . . . . . . . . . . . . . . . . . . . .6-36
User Activities . . . . . . . . . . . . . . . . . . . . . . . . . . . . . . . . . . . . . . . . . .6-37
DAS4040 . . . . . . . . . . . . . . . . . . . . . . . . . . . . . . . . . . . . . . . . . . . . . . . . .6-37
DAS ACI Message . . . . . . . . . . . . . . . . . . . . . . . . . . . . . . . . . . . . . . .6-37
Explanation . . . . . . . . . . . . . . . . . . . . . . . . . . . . . . . . . . . . . . . . . . . .6-37
User Activities . . . . . . . . . . . . . . . . . . . . . . . . . . . . . . . . . . . . . . . . . .6-37
DAS4041 . . . . . . . . . . . . . . . . . . . . . . . . . . . . . . . . . . . . . . . . . . . . . . . . .6-37
DAS ACI Message . . . . . . . . . . . . . . . . . . . . . . . . . . . . . . . . . . . . . . .6-37
Explanation . . . . . . . . . . . . . . . . . . . . . . . . . . . . . . . . . . . . . . . . . . . .6-37
User Activities . . . . . . . . . . . . . . . . . . . . . . . . . . . . . . . . . . . . . . . . . .6-37
DAS4042 . . . . . . . . . . . . . . . . . . . . . . . . . . . . . . . . . . . . . . . . . . . . . . . .6-38
DAS ACI Message . . . . . . . . . . . . . . . . . . . . . . . . . . . . . . . . . . . . . . .6-38
Explanation . . . . . . . . . . . . . . . . . . . . . . . . . . . . . . . . . . . . . . . . . . . .6-38
User Activities . . . . . . . . . . . . . . . . . . . . . . . . . . . . . . . . . . . . . . . . . .6-38
DAS4043 . . . . . . . . . . . . . . . . . . . . . . . . . . . . . . . . . . . . . . . . . . . . . . . . .6-38
DAS ACI Message . . . . . . . . . . . . . . . . . . . . . . . . . . . . . . . . . . . . . . .6-38
Explanation . . . . . . . . . . . . . . . . . . . . . . . . . . . . . . . . . . . . . . . . . . . .6-38
User Activities . . . . . . . . . . . . . . . . . . . . . . . . . . . . . . . . . . . . . . . . . .6-38
DAS4044 . . . . . . . . . . . . . . . . . . . . . . . . . . . . . . . . . . . . . . . . . . . . . . . .6-38
DAS ACI Message . . . . . . . . . . . . . . . . . . . . . . . . . . . . . . . . . . . . . . .6-39
Explanation . . . . . . . . . . . . . . . . . . . . . . . . . . . . . . . . . . . . . . . . . . . .6-39
User Activities . . . . . . . . . . . . . . . . . . . . . . . . . . . . . . . . . . . . . . . . . .6-39
DAS4045 . . . . . . . . . . . . . . . . . . . . . . . . . . . . . . . . . . . . . . . . . . . . . . . . .6-39
DAS ACI Message . . . . . . . . . . . . . . . . . . . . . . . . . . . . . . . . . . . . . . .6-39
Explanation . . . . . . . . . . . . . . . . . . . . . . . . . . . . . . . . . . . . . . . . . . . .6-39
User Activities . . . . . . . . . . . . . . . . . . . . . . . . . . . . . . . . . . . . . . . . . .6-39
DAS4050 . . . . . . . . . . . . . . . . . . . . . . . . . . . . . . . . . . . . . . . . . . . . . . . . .6-39
DAS ACI Message . . . . . . . . . . . . . . . . . . . . . . . . . . . . . . . . . . . . . . .6-40
Explanation . . . . . . . . . . . . . . . . . . . . . . . . . . . . . . . . . . . . . . . . . . . .6-40
User Activities . . . . . . . . . . . . . . . . . . . . . . . . . . . . . . . . . . . . . . . . . .6-40
DAS4051 . . . . . . . . . . . . . . . . . . . . . . . . . . . . . . . . . . . . . . . . . . . . . . . . .6-40
DAS ACI Message . . . . . . . . . . . . . . . . . . . . . . . . . . . . . . . . . . . . . . .6-40
Explanation . . . . . . . . . . . . . . . . . . . . . . . . . . . . . . . . . . . . . . . . . . . .6-40
User Activities . . . . . . . . . . . . . . . . . . . . . . . . . . . . . . . . . . . . . . . . . .6-40
DAS4052 . . . . . . . . . . . . . . . . . . . . . . . . . . . . . . . . . . . . . . . . . . . . . . . . .6-40
DAS ACI Message . . . . . . . . . . . . . . . . . . . . . . . . . . . . . . . . . . . . . . .6-40
Explanation . . . . . . . . . . . . . . . . . . . . . . . . . . . . . . . . . . . . . . . . . . . .6-40
User Activities . . . . . . . . . . . . . . . . . . . . . . . . . . . . . . . . . . . . . . . . . . 6-41
DAS4053 . . . . . . . . . . . . . . . . . . . . . . . . . . . . . . . . . . . . . . . . . . . . . . 6-41
DAS ACI Message . . . . . . . . . . . . . . . . . . . . . . . . . . . . . . . . . . . . . . . 6-41
xContents
6-00345-01
Page 11

Explanation . . . . . . . . . . . . . . . . . . . . . . . . . . . . . . . . . . . . . . . . . . . . 6-41
User Activities . . . . . . . . . . . . . . . . . . . . . . . . . . . . . . . . . . . . . . . . . . 6-41
DAS4054 . . . . . . . . . . . . . . . . . . . . . . . . . . . . . . . . . . . . . . . . . . . . . . . . .6-41
DAS ACI Message . . . . . . . . . . . . . . . . . . . . . . . . . . . . . . . . . . . . . . . 6-41
Explanation . . . . . . . . . . . . . . . . . . . . . . . . . . . . . . . . . . . . . . . . . . . . 6-41
User Activities . . . . . . . . . . . . . . . . . . . . . . . . . . . . . . . . . . . . . . . . . . 6-41
DAS4055 . . . . . . . . . . . . . . . . . . . . . . . . . . . . . . . . . . . . . . . . . . . . . . . . .6-42
DAS ACI Message . . . . . . . . . . . . . . . . . . . . . . . . . . . . . . . . . . . . . . .6-42
Explanation . . . . . . . . . . . . . . . . . . . . . . . . . . . . . . . . . . . . . . . . . . . .6-42
User Activities . . . . . . . . . . . . . . . . . . . . . . . . . . . . . . . . . . . . . . . . . .6-42
DAS4056 . . . . . . . . . . . . . . . . . . . . . . . . . . . . . . . . . . . . . . . . . . . . . . . . .6-42
DAS ACI Message . . . . . . . . . . . . . . . . . . . . . . . . . . . . . . . . . . . . . . .6-42
Explanation . . . . . . . . . . . . . . . . . . . . . . . . . . . . . . . . . . . . . . . . . . . .6-42
User Activities . . . . . . . . . . . . . . . . . . . . . . . . . . . . . . . . . . . . . . . . . .6-42
DAS4057 . . . . . . . . . . . . . . . . . . . . . . . . . . . . . . . . . . . . . . . . . . . . . . . .6-42
DAS ACI Message . . . . . . . . . . . . . . . . . . . . . . . . . . . . . . . . . . . . . . .6-43
Explanation . . . . . . . . . . . . . . . . . . . . . . . . . . . . . . . . . . . . . . . . . . . .6-43
User Activities . . . . . . . . . . . . . . . . . . . . . . . . . . . . . . . . . . . . . . . . . .6-43
DAS4060 . . . . . . . . . . . . . . . . . . . . . . . . . . . . . . . . . . . . . . . . . . . . . . . . .6-43
DAS ACI Message . . . . . . . . . . . . . . . . . . . . . . . . . . . . . . . . . . . . . . .6-43
Explanation . . . . . . . . . . . . . . . . . . . . . . . . . . . . . . . . . . . . . . . . . . . .6-43
User Activities . . . . . . . . . . . . . . . . . . . . . . . . . . . . . . . . . . . . . . . . . .6-43
DAS4061 . . . . . . . . . . . . . . . . . . . . . . . . . . . . . . . . . . . . . . . . . . . . . . . . .6-43
DAS ACI Message . . . . . . . . . . . . . . . . . . . . . . . . . . . . . . . . . . . . . . .6-43
Explanation . . . . . . . . . . . . . . . . . . . . . . . . . . . . . . . . . . . . . . . . . . . .6-44
User Activities . . . . . . . . . . . . . . . . . . . . . . . . . . . . . . . . . . . . . . . . . .6-44
DAS4062 . . . . . . . . . . . . . . . . . . . . . . . . . . . . . . . . . . . . . . . . . . . . . . . . .6-44
DAS ACI Message . . . . . . . . . . . . . . . . . . . . . . . . . . . . . . . . . . . . . . .6-44
Explanation . . . . . . . . . . . . . . . . . . . . . . . . . . . . . . . . . . . . . . . . . . . .6-44
User Activities . . . . . . . . . . . . . . . . . . . . . . . . . . . . . . . . . . . . . . . . . .6-44
DAS4063 . . . . . . . . . . . . . . . . . . . . . . . . . . . . . . . . . . . . . . . . . . . . . . . . .6-44
DAS ACI Message . . . . . . . . . . . . . . . . . . . . . . . . . . . . . . . . . . . . . . .6-44
Explanation . . . . . . . . . . . . . . . . . . . . . . . . . . . . . . . . . . . . . . . . . . . .6-44
User Activities . . . . . . . . . . . . . . . . . . . . . . . . . . . . . . . . . . . . . . . . . .6-45
DAS4064 . . . . . . . . . . . . . . . . . . . . . . . . . . . . . . . . . . . . . . . . . . . . . . . . .6-45
DAS ACI Message . . . . . . . . . . . . . . . . . . . . . . . . . . . . . . . . . . . . . . .6-45
Explanation . . . . . . . . . . . . . . . . . . . . . . . . . . . . . . . . . . . . . . . . . . . .6-45
User Activities . . . . . . . . . . . . . . . . . . . . . . . . . . . . . . . . . . . . . . . . . .6-45
DAS4065 . . . . . . . . . . . . . . . . . . . . . . . . . . . . . . . . . . . . . . . . . . . . . . . . .6-45
DAS ACI Message . . . . . . . . . . . . . . . . . . . . . . . . . . . . . . . . . . . . . . .6-45
Explanation . . . . . . . . . . . . . . . . . . . . . . . . . . . . . . . . . . . . . . . . . . . .6-45
User Activities . . . . . . . . . . . . . . . . . . . . . . . . . . . . . . . . . . . . . . . . . .6-45
DAS4066 . . . . . . . . . . . . . . . . . . . . . . . . . . . . . . . . . . . . . . . . . . . . . . . . .6-46
DAS ACI Message . . . . . . . . . . . . . . . . . . . . . . . . . . . . . . . . . . . . . . .6-46
Explanation . . . . . . . . . . . . . . . . . . . . . . . . . . . . . . . . . . . . . . . . . . . .6-46
User Activities . . . . . . . . . . . . . . . . . . . . . . . . . . . . . . . . . . . . . . . . . .6-46
DAS4070 . . . . . . . . . . . . . . . . . . . . . . . . . . . . . . . . . . . . . . . . . . . . . . . .6-46
DAS ACI Message . . . . . . . . . . . . . . . . . . . . . . . . . . . . . . . . . . . . . . .6-46
Explanation . . . . . . . . . . . . . . . . . . . . . . . . . . . . . . . . . . . . . . . . . . . .6-46
26 Jul 2002
Contents xi
Page 12

User Activities . . . . . . . . . . . . . . . . . . . . . . . . . . . . . . . . . . . . . . . . . .6-46
DAS4071 . . . . . . . . . . . . . . . . . . . . . . . . . . . . . . . . . . . . . . . . . . . . . . . . .6-46
DAS ACI Message . . . . . . . . . . . . . . . . . . . . . . . . . . . . . . . . . . . . . . .6-47
Explanation . . . . . . . . . . . . . . . . . . . . . . . . . . . . . . . . . . . . . . . . . . . .6-47
User Activities . . . . . . . . . . . . . . . . . . . . . . . . . . . . . . . . . . . . . . . . . .6-47
DAS4072 . . . . . . . . . . . . . . . . . . . . . . . . . . . . . . . . . . . . . . . . . . . . . . . .6-47
DAS ACI Message . . . . . . . . . . . . . . . . . . . . . . . . . . . . . . . . . . . . . . .6-47
Explanation . . . . . . . . . . . . . . . . . . . . . . . . . . . . . . . . . . . . . . . . . . . .6-47
User Activities . . . . . . . . . . . . . . . . . . . . . . . . . . . . . . . . . . . . . . . . . .6-47
DAS4080 . . . . . . . . . . . . . . . . . . . . . . . . . . . . . . . . . . . . . . . . . . . . . . . . .6-47
DAS ACI Message . . . . . . . . . . . . . . . . . . . . . . . . . . . . . . . . . . . . . . .6-47
Explanation . . . . . . . . . . . . . . . . . . . . . . . . . . . . . . . . . . . . . . . . . . . .6-48
User Activities . . . . . . . . . . . . . . . . . . . . . . . . . . . . . . . . . . . . . . . . . .6-48
DAS4081 . . . . . . . . . . . . . . . . . . . . . . . . . . . . . . . . . . . . . . . . . . . . . . . . .6-48
DAS ACI Message . . . . . . . . . . . . . . . . . . . . . . . . . . . . . . . . . . . . . . .6-48
Explanation . . . . . . . . . . . . . . . . . . . . . . . . . . . . . . . . . . . . . . . . . . . .6-48
User Activities . . . . . . . . . . . . . . . . . . . . . . . . . . . . . . . . . . . . . . . . . .6-48
DAS4082 . . . . . . . . . . . . . . . . . . . . . . . . . . . . . . . . . . . . . . . . . . . . . . . . .6-48
DAS ACI Message . . . . . . . . . . . . . . . . . . . . . . . . . . . . . . . . . . . . . . .6-48
Explanation . . . . . . . . . . . . . . . . . . . . . . . . . . . . . . . . . . . . . . . . . . . .6-48
User Activities . . . . . . . . . . . . . . . . . . . . . . . . . . . . . . . . . . . . . . . . . .6-48
DAS4090 . . . . . . . . . . . . . . . . . . . . . . . . . . . . . . . . . . . . . . . . . . . . . . . . .6-49
DAS ACI Message . . . . . . . . . . . . . . . . . . . . . . . . . . . . . . . . . . . . . . .6-49
Explanation . . . . . . . . . . . . . . . . . . . . . . . . . . . . . . . . . . . . . . . . . . . .6-49
User Activities . . . . . . . . . . . . . . . . . . . . . . . . . . . . . . . . . . . . . . . . . .6-49
DAS4091 . . . . . . . . . . . . . . . . . . . . . . . . . . . . . . . . . . . . . . . . . . . . . . . . .6-49
DAS ACI Message . . . . . . . . . . . . . . . . . . . . . . . . . . . . . . . . . . . . . . .6-49
Explanation . . . . . . . . . . . . . . . . . . . . . . . . . . . . . . . . . . . . . . . . . . . .6-49
User Activities . . . . . . . . . . . . . . . . . . . . . . . . . . . . . . . . . . . . . . . . . .6-49
DAS4092 . . . . . . . . . . . . . . . . . . . . . . . . . . . . . . . . . . . . . . . . . . . . . . . . .6-49
DAS ACI Message . . . . . . . . . . . . . . . . . . . . . . . . . . . . . . . . . . . . . . .6-49
Explanation . . . . . . . . . . . . . . . . . . . . . . . . . . . . . . . . . . . . . . . . . . . .6-50
User Activities . . . . . . . . . . . . . . . . . . . . . . . . . . . . . . . . . . . . . . . . . .6-50
DAS4093 . . . . . . . . . . . . . . . . . . . . . . . . . . . . . . . . . . . . . . . . . . . . . . . . .6-50
DAS ACI Message . . . . . . . . . . . . . . . . . . . . . . . . . . . . . . . . . . . . . . .6-50
Explanation . . . . . . . . . . . . . . . . . . . . . . . . . . . . . . . . . . . . . . . . . . . .6-50
User Activities . . . . . . . . . . . . . . . . . . . . . . . . . . . . . . . . . . . . . . . . . .6-50
DAS4094 . . . . . . . . . . . . . . . . . . . . . . . . . . . . . . . . . . . . . . . . . . . . . . . . .6-50
DAS ACI Message . . . . . . . . . . . . . . . . . . . . . . . . . . . . . . . . . . . . . . .6-50
Explanation . . . . . . . . . . . . . . . . . . . . . . . . . . . . . . . . . . . . . . . . . . . .6-50
User Activities . . . . . . . . . . . . . . . . . . . . . . . . . . . . . . . . . . . . . . . . . . 6-51
DAS4095 . . . . . . . . . . . . . . . . . . . . . . . . . . . . . . . . . . . . . . . . . . . . . . . . . 6-51
DAS ACI Message . . . . . . . . . . . . . . . . . . . . . . . . . . . . . . . . . . . . . . . 6-51
Explanation . . . . . . . . . . . . . . . . . . . . . . . . . . . . . . . . . . . . . . . . . . . . 6-51
User Activities . . . . . . . . . . . . . . . . . . . . . . . . . . . . . . . . . . . . . . . . . . 6-51
DAS4096 . . . . . . . . . . . . . . . . . . . . . . . . . . . . . . . . . . . . . . . . . . . . . . . . . 6-51
DAS ACI Message . . . . . . . . . . . . . . . . . . . . . . . . . . . . . . . . . . . . . . . 6-51
Explanation . . . . . . . . . . . . . . . . . . . . . . . . . . . . . . . . . . . . . . . . . . . .6-52
User Activities . . . . . . . . . . . . . . . . . . . . . . . . . . . . . . . . . . . . . . . . . .6-52
xii Contents
6-00345-01
Page 13

DAS4100 . . . . . . . . . . . . . . . . . . . . . . . . . . . . . . . . . . . . . . . . . . . . . . . . .6-52
DAS ACI Message . . . . . . . . . . . . . . . . . . . . . . . . . . . . . . . . . . . . . . .6-52
Explanation . . . . . . . . . . . . . . . . . . . . . . . . . . . . . . . . . . . . . . . . . . . .6-52
User Activities . . . . . . . . . . . . . . . . . . . . . . . . . . . . . . . . . . . . . . . . . .6-52
DAS4101 . . . . . . . . . . . . . . . . . . . . . . . . . . . . . . . . . . . . . . . . . . . . . . . . .6-52
DAS ACI Message . . . . . . . . . . . . . . . . . . . . . . . . . . . . . . . . . . . . . . .6-52
Explanation . . . . . . . . . . . . . . . . . . . . . . . . . . . . . . . . . . . . . . . . . . . .6-53
User Activities . . . . . . . . . . . . . . . . . . . . . . . . . . . . . . . . . . . . . . . . . .6-53
DAS4102 . . . . . . . . . . . . . . . . . . . . . . . . . . . . . . . . . . . . . . . . . . . . . . . . .6-53
DAS ACI Message . . . . . . . . . . . . . . . . . . . . . . . . . . . . . . . . . . . . . . .6-53
Explanation . . . . . . . . . . . . . . . . . . . . . . . . . . . . . . . . . . . . . . . . . . . .6-53
User Activities . . . . . . . . . . . . . . . . . . . . . . . . . . . . . . . . . . . . . . . . . .6-53
DAS4110 . . . . . . . . . . . . . . . . . . . . . . . . . . . . . . . . . . . . . . . . . . . . . . . . .6-53
DAS ACI Message . . . . . . . . . . . . . . . . . . . . . . . . . . . . . . . . . . . . . . .6-53
Explanation . . . . . . . . . . . . . . . . . . . . . . . . . . . . . . . . . . . . . . . . . . . .6-53
User Activities . . . . . . . . . . . . . . . . . . . . . . . . . . . . . . . . . . . . . . . . . .6-53
DAS4111 . . . . . . . . . . . . . . . . . . . . . . . . . . . . . . . . . . . . . . . . . . . . . . . . .6-54
DAS ACI Message . . . . . . . . . . . . . . . . . . . . . . . . . . . . . . . . . . . . . . .6-54
Explanation . . . . . . . . . . . . . . . . . . . . . . . . . . . . . . . . . . . . . . . . . . . .6-54
User Activities . . . . . . . . . . . . . . . . . . . . . . . . . . . . . . . . . . . . . . . . . .6-54
DAS4120 . . . . . . . . . . . . . . . . . . . . . . . . . . . . . . . . . . . . . . . . . . . . . . . . .6-54
DAS ACI Message . . . . . . . . . . . . . . . . . . . . . . . . . . . . . . . . . . . . . . .6-54
Explanation . . . . . . . . . . . . . . . . . . . . . . . . . . . . . . . . . . . . . . . . . . . .6-54
User Activities . . . . . . . . . . . . . . . . . . . . . . . . . . . . . . . . . . . . . . . . . .6-54
DAS4121 . . . . . . . . . . . . . . . . . . . . . . . . . . . . . . . . . . . . . . . . . . . . . . . . .6-54
DAS ACI Message . . . . . . . . . . . . . . . . . . . . . . . . . . . . . . . . . . . . . . .6-55
Explanation . . . . . . . . . . . . . . . . . . . . . . . . . . . . . . . . . . . . . . . . . . . .6-55
User Activities . . . . . . . . . . . . . . . . . . . . . . . . . . . . . . . . . . . . . . . . . .6-55
DAS4130 . . . . . . . . . . . . . . . . . . . . . . . . . . . . . . . . . . . . . . . . . . . . . . . . .6-55
DAS ACI Message . . . . . . . . . . . . . . . . . . . . . . . . . . . . . . . . . . . . . . .6-55
Explanation . . . . . . . . . . . . . . . . . . . . . . . . . . . . . . . . . . . . . . . . . . . .6-55
User Activities . . . . . . . . . . . . . . . . . . . . . . . . . . . . . . . . . . . . . . . . . .6-55
DAS4131 . . . . . . . . . . . . . . . . . . . . . . . . . . . . . . . . . . . . . . . . . . . . . . . . .6-55
DAS ACI Message . . . . . . . . . . . . . . . . . . . . . . . . . . . . . . . . . . . . . . .6-55
Explanation . . . . . . . . . . . . . . . . . . . . . . . . . . . . . . . . . . . . . . . . . . . .6-55
User Activities . . . . . . . . . . . . . . . . . . . . . . . . . . . . . . . . . . . . . . . . . .6-56
DAS4140 . . . . . . . . . . . . . . . . . . . . . . . . . . . . . . . . . . . . . . . . . . . . . . . . .6-56
DAS ACI Message . . . . . . . . . . . . . . . . . . . . . . . . . . . . . . . . . . . . . . .6-56
Explanation . . . . . . . . . . . . . . . . . . . . . . . . . . . . . . . . . . . . . . . . . . . .6-56
User Activities . . . . . . . . . . . . . . . . . . . . . . . . . . . . . . . . . . . . . . . . . .6-56
DAS4141 . . . . . . . . . . . . . . . . . . . . . . . . . . . . . . . . . . . . . . . . . . . . . . . . .6-56
DAS ACI Message . . . . . . . . . . . . . . . . . . . . . . . . . . . . . . . . . . . . . . .6-56
Explanation . . . . . . . . . . . . . . . . . . . . . . . . . . . . . . . . . . . . . . . . . . . .6-56
User Activities . . . . . . . . . . . . . . . . . . . . . . . . . . . . . . . . . . . . . . . . . .6-56
DAS4150 . . . . . . . . . . . . . . . . . . . . . . . . . . . . . . . . . . . . . . . . . . . . . . . . .6-56
DAS ACI Message . . . . . . . . . . . . . . . . . . . . . . . . . . . . . . . . . . . . . . .6-57
Explanation . . . . . . . . . . . . . . . . . . . . . . . . . . . . . . . . . . . . . . . . . . . .6-57
User Activities . . . . . . . . . . . . . . . . . . . . . . . . . . . . . . . . . . . . . . . . . .6-57
DAS4151 . . . . . . . . . . . . . . . . . . . . . . . . . . . . . . . . . . . . . . . . . . . . . . . . .6-57
26 Jul 2002
Contents xiii
Page 14

DAS ACI Message . . . . . . . . . . . . . . . . . . . . . . . . . . . . . . . . . . . . . . .6-57
Explanation . . . . . . . . . . . . . . . . . . . . . . . . . . . . . . . . . . . . . . . . . . . .6-57
User Activities . . . . . . . . . . . . . . . . . . . . . . . . . . . . . . . . . . . . . . . . . .6-57
DAS4160 . . . . . . . . . . . . . . . . . . . . . . . . . . . . . . . . . . . . . . . . . . . . . . . . .6-57
DAS ACI Message . . . . . . . . . . . . . . . . . . . . . . . . . . . . . . . . . . . . . . .6-57
Explanation . . . . . . . . . . . . . . . . . . . . . . . . . . . . . . . . . . . . . . . . . . . .6-57
User Activities . . . . . . . . . . . . . . . . . . . . . . . . . . . . . . . . . . . . . . . . . .6-58
DAS4161 . . . . . . . . . . . . . . . . . . . . . . . . . . . . . . . . . . . . . . . . . . . . . . . . .6-58
DAS ACI Message . . . . . . . . . . . . . . . . . . . . . . . . . . . . . . . . . . . . . . .6-58
Explanation . . . . . . . . . . . . . . . . . . . . . . . . . . . . . . . . . . . . . . . . . . . .6-58
User Activities . . . . . . . . . . . . . . . . . . . . . . . . . . . . . . . . . . . . . . . . . .6-58
DAS4170 . . . . . . . . . . . . . . . . . . . . . . . . . . . . . . . . . . . . . . . . . . . . . . . . .6-58
DAS ACI Message . . . . . . . . . . . . . . . . . . . . . . . . . . . . . . . . . . . . . . .6-58
Explanation . . . . . . . . . . . . . . . . . . . . . . . . . . . . . . . . . . . . . . . . . . . .6-58
User Activities . . . . . . . . . . . . . . . . . . . . . . . . . . . . . . . . . . . . . . . . . .6-58
DAS4171 . . . . . . . . . . . . . . . . . . . . . . . . . . . . . . . . . . . . . . . . . . . . . . . . .6-58
DAS ACI Message . . . . . . . . . . . . . . . . . . . . . . . . . . . . . . . . . . . . . . .6-59
Explanation . . . . . . . . . . . . . . . . . . . . . . . . . . . . . . . . . . . . . . . . . . . .6-59
User Activities . . . . . . . . . . . . . . . . . . . . . . . . . . . . . . . . . . . . . . . . . .6-59
DAS4180 . . . . . . . . . . . . . . . . . . . . . . . . . . . . . . . . . . . . . . . . . . . . . . . . .6-59
DAS ACI Message . . . . . . . . . . . . . . . . . . . . . . . . . . . . . . . . . . . . . . .6-59
Explanation . . . . . . . . . . . . . . . . . . . . . . . . . . . . . . . . . . . . . . . . . . . .6-59
User Activities . . . . . . . . . . . . . . . . . . . . . . . . . . . . . . . . . . . . . . . . . .6-59
DAS4181 . . . . . . . . . . . . . . . . . . . . . . . . . . . . . . . . . . . . . . . . . . . . . . . . .6-59
DAS ACI Message . . . . . . . . . . . . . . . . . . . . . . . . . . . . . . . . . . . . . . .6-59
Explanation . . . . . . . . . . . . . . . . . . . . . . . . . . . . . . . . . . . . . . . . . . . .6-59
User Activities . . . . . . . . . . . . . . . . . . . . . . . . . . . . . . . . . . . . . . . . . .6-60
DAS4190 . . . . . . . . . . . . . . . . . . . . . . . . . . . . . . . . . . . . . . . . . . . . . . . . .6-60
DAS ACI Message . . . . . . . . . . . . . . . . . . . . . . . . . . . . . . . . . . . . . . .6-60
Explanation . . . . . . . . . . . . . . . . . . . . . . . . . . . . . . . . . . . . . . . . . . . .6-60
User Activities . . . . . . . . . . . . . . . . . . . . . . . . . . . . . . . . . . . . . . . . . .6-60
DAS4191 . . . . . . . . . . . . . . . . . . . . . . . . . . . . . . . . . . . . . . . . . . . . . . . . .6-60
DAS ACI Message . . . . . . . . . . . . . . . . . . . . . . . . . . . . . . . . . . . . . . .6-60
Explanation . . . . . . . . . . . . . . . . . . . . . . . . . . . . . . . . . . . . . . . . . . . .6-60
User Activities . . . . . . . . . . . . . . . . . . . . . . . . . . . . . . . . . . . . . . . . . .6-60
DAS4195 . . . . . . . . . . . . . . . . . . . . . . . . . . . . . . . . . . . . . . . . . . . . . . . . .6-60
DAS ACI Message . . . . . . . . . . . . . . . . . . . . . . . . . . . . . . . . . . . . . . . 6-61
Explanation . . . . . . . . . . . . . . . . . . . . . . . . . . . . . . . . . . . . . . . . . . . . 6-61
User Activities . . . . . . . . . . . . . . . . . . . . . . . . . . . . . . . . . . . . . . . . . . 6-61
DAS4196 . . . . . . . . . . . . . . . . . . . . . . . . . . . . . . . . . . . . . . . . . . . . . . . . . 6-61
DAS ACI Message . . . . . . . . . . . . . . . . . . . . . . . . . . . . . . . . . . . . . . . 6-61
Explanation . . . . . . . . . . . . . . . . . . . . . . . . . . . . . . . . . . . . . . . . . . . . 6-61
User Activities . . . . . . . . . . . . . . . . . . . . . . . . . . . . . . . . . . . . . . . . . . 6-61
DAS4197 . . . . . . . . . . . . . . . . . . . . . . . . . . . . . . . . . . . . . . . . . . . . . . . . . 6-61
DAS ACI Message . . . . . . . . . . . . . . . . . . . . . . . . . . . . . . . . . . . . . . .6-62
Explanation . . . . . . . . . . . . . . . . . . . . . . . . . . . . . . . . . . . . . . . . . . . .6-62
User Activities . . . . . . . . . . . . . . . . . . . . . . . . . . . . . . . . . . . . . . . . . .6-62
DAS4198 . . . . . . . . . . . . . . . . . . . . . . . . . . . . . . . . . . . . . . . . . . . . . . . . .6-62
DAS ACI Message . . . . . . . . . . . . . . . . . . . . . . . . . . . . . . . . . . . . . . .6-62
xiv Contents
6-00345-01
Page 15

Explanation . . . . . . . . . . . . . . . . . . . . . . . . . . . . . . . . . . . . . . . . . . . .6-62
User Activities . . . . . . . . . . . . . . . . . . . . . . . . . . . . . . . . . . . . . . . . . .6-62
DAS4199 . . . . . . . . . . . . . . . . . . . . . . . . . . . . . . . . . . . . . . . . . . . . . . . . .6-62
DAS ACI Message . . . . . . . . . . . . . . . . . . . . . . . . . . . . . . . . . . . . . . .6-62
Explanation . . . . . . . . . . . . . . . . . . . . . . . . . . . . . . . . . . . . . . . . . . . .6-62
User Activities . . . . . . . . . . . . . . . . . . . . . . . . . . . . . . . . . . . . . . . . . .6-63
DAS4200 . . . . . . . . . . . . . . . . . . . . . . . . . . . . . . . . . . . . . . . . . . . . . . . . .6-63
DAS ACI Message . . . . . . . . . . . . . . . . . . . . . . . . . . . . . . . . . . . . . . .6-63
Explanation . . . . . . . . . . . . . . . . . . . . . . . . . . . . . . . . . . . . . . . . . . . .6-63
User Activities . . . . . . . . . . . . . . . . . . . . . . . . . . . . . . . . . . . . . . . . . .6-63
DAS4201 . . . . . . . . . . . . . . . . . . . . . . . . . . . . . . . . . . . . . . . . . . . . . . . . .6-63
DAS ACI Message . . . . . . . . . . . . . . . . . . . . . . . . . . . . . . . . . . . . . . .6-63
Explanation . . . . . . . . . . . . . . . . . . . . . . . . . . . . . . . . . . . . . . . . . . . .6-63
User Activities . . . . . . . . . . . . . . . . . . . . . . . . . . . . . . . . . . . . . . . . . .6-63
DAS4202 . . . . . . . . . . . . . . . . . . . . . . . . . . . . . . . . . . . . . . . . . . . . . . . .6-63
DAS ACI Message . . . . . . . . . . . . . . . . . . . . . . . . . . . . . . . . . . . . . . .6-64
Explanation . . . . . . . . . . . . . . . . . . . . . . . . . . . . . . . . . . . . . . . . . . . .6-64
User Activities . . . . . . . . . . . . . . . . . . . . . . . . . . . . . . . . . . . . . . . . . .6-64
DAS4203 . . . . . . . . . . . . . . . . . . . . . . . . . . . . . . . . . . . . . . . . . . . . . . . . .6-64
DAS ACI Message . . . . . . . . . . . . . . . . . . . . . . . . . . . . . . . . . . . . . . .6-64
Explanation . . . . . . . . . . . . . . . . . . . . . . . . . . . . . . . . . . . . . . . . . . . .6-64
User Activities . . . . . . . . . . . . . . . . . . . . . . . . . . . . . . . . . . . . . . . . . .6-64
DAS4204 . . . . . . . . . . . . . . . . . . . . . . . . . . . . . . . . . . . . . . . . . . . . . . . .6-64
DAS ACI Message . . . . . . . . . . . . . . . . . . . . . . . . . . . . . . . . . . . . . . .6-64
Explanation . . . . . . . . . . . . . . . . . . . . . . . . . . . . . . . . . . . . . . . . . . . .6-64
User Activities . . . . . . . . . . . . . . . . . . . . . . . . . . . . . . . . . . . . . . . . . .6-64
DAS4205 . . . . . . . . . . . . . . . . . . . . . . . . . . . . . . . . . . . . . . . . . . . . . . . . .6-65
DAS ACI Message . . . . . . . . . . . . . . . . . . . . . . . . . . . . . . . . . . . . . . .6-65
Explanation . . . . . . . . . . . . . . . . . . . . . . . . . . . . . . . . . . . . . . . . . . . .6-65
User Activities . . . . . . . . . . . . . . . . . . . . . . . . . . . . . . . . . . . . . . . . . .6-65
DAS4210 . . . . . . . . . . . . . . . . . . . . . . . . . . . . . . . . . . . . . . . . . . . . . . . . .6-65
DAS ACI Message . . . . . . . . . . . . . . . . . . . . . . . . . . . . . . . . . . . . . . .6-65
Explanation . . . . . . . . . . . . . . . . . . . . . . . . . . . . . . . . . . . . . . . . . . . .6-65
User Activities . . . . . . . . . . . . . . . . . . . . . . . . . . . . . . . . . . . . . . . . . .6-65
DAS4211 . . . . . . . . . . . . . . . . . . . . . . . . . . . . . . . . . . . . . . . . . . . . . . . . .6-65
DAS ACI Message . . . . . . . . . . . . . . . . . . . . . . . . . . . . . . . . . . . . . . .6-66
Explanation . . . . . . . . . . . . . . . . . . . . . . . . . . . . . . . . . . . . . . . . . . . .6-66
User Activities . . . . . . . . . . . . . . . . . . . . . . . . . . . . . . . . . . . . . . . . . .6-66
DAS4220 . . . . . . . . . . . . . . . . . . . . . . . . . . . . . . . . . . . . . . . . . . . . . . . .6-66
DAS ACI Message . . . . . . . . . . . . . . . . . . . . . . . . . . . . . . . . . . . . . . .6-66
Explanation . . . . . . . . . . . . . . . . . . . . . . . . . . . . . . . . . . . . . . . . . . . .6-66
User Activities . . . . . . . . . . . . . . . . . . . . . . . . . . . . . . . . . . . . . . . . . .6-66
DAS4221 . . . . . . . . . . . . . . . . . . . . . . . . . . . . . . . . . . . . . . . . . . . . . . . . .6-66
DAS ACI Message . . . . . . . . . . . . . . . . . . . . . . . . . . . . . . . . . . . . . . .6-66
Explanation . . . . . . . . . . . . . . . . . . . . . . . . . . . . . . . . . . . . . . . . . . . .6-66
User Activities . . . . . . . . . . . . . . . . . . . . . . . . . . . . . . . . . . . . . . . . . .6-67
DAS4230 . . . . . . . . . . . . . . . . . . . . . . . . . . . . . . . . . . . . . . . . . . . . . . . . .6-67
DAS ACI Message . . . . . . . . . . . . . . . . . . . . . . . . . . . . . . . . . . . . . . .6-67
Explanation . . . . . . . . . . . . . . . . . . . . . . . . . . . . . . . . . . . . . . . . . . . .6-67
26 Jul 2002
Contents xv
Page 16

User Activities . . . . . . . . . . . . . . . . . . . . . . . . . . . . . . . . . . . . . . . . . .6-67
DAS4231 . . . . . . . . . . . . . . . . . . . . . . . . . . . . . . . . . . . . . . . . . . . . . . . . .6-67
DAS ACI Message . . . . . . . . . . . . . . . . . . . . . . . . . . . . . . . . . . . . . . .6-67
Explanation . . . . . . . . . . . . . . . . . . . . . . . . . . . . . . . . . . . . . . . . . . . .6-67
User Activities . . . . . . . . . . . . . . . . . . . . . . . . . . . . . . . . . . . . . . . . . .6-67
DAS4232 . . . . . . . . . . . . . . . . . . . . . . . . . . . . . . . . . . . . . . . . . . . . . . . .6-67
DAS ACI Message . . . . . . . . . . . . . . . . . . . . . . . . . . . . . . . . . . . . . . .6-68
Explanation . . . . . . . . . . . . . . . . . . . . . . . . . . . . . . . . . . . . . . . . . . . .6-68
User Activities . . . . . . . . . . . . . . . . . . . . . . . . . . . . . . . . . . . . . . . . . .6-68
DAS4240 . . . . . . . . . . . . . . . . . . . . . . . . . . . . . . . . . . . . . . . . . . . . . . . .6-68
DAS ACI Message . . . . . . . . . . . . . . . . . . . . . . . . . . . . . . . . . . . . . . .6-68
Explanation . . . . . . . . . . . . . . . . . . . . . . . . . . . . . . . . . . . . . . . . . . . .6-68
User Activities . . . . . . . . . . . . . . . . . . . . . . . . . . . . . . . . . . . . . . . . . .6-68
DAS4241 . . . . . . . . . . . . . . . . . . . . . . . . . . . . . . . . . . . . . . . . . . . . . . . . .6-68
DAS ACI Message . . . . . . . . . . . . . . . . . . . . . . . . . . . . . . . . . . . . . . .6-69
Explanation . . . . . . . . . . . . . . . . . . . . . . . . . . . . . . . . . . . . . . . . . . . .6-69
User Activities . . . . . . . . . . . . . . . . . . . . . . . . . . . . . . . . . . . . . . . . . .6-69
DAS4242 . . . . . . . . . . . . . . . . . . . . . . . . . . . . . . . . . . . . . . . . . . . . . . . .6-69
DAS ACI Message . . . . . . . . . . . . . . . . . . . . . . . . . . . . . . . . . . . . . . .6-69
Explanation . . . . . . . . . . . . . . . . . . . . . . . . . . . . . . . . . . . . . . . . . . . .6-69
User Activities . . . . . . . . . . . . . . . . . . . . . . . . . . . . . . . . . . . . . . . . . .6-69
DAS4250 . . . . . . . . . . . . . . . . . . . . . . . . . . . . . . . . . . . . . . . . . . . . . . . . .6-69
DAS ACI Message . . . . . . . . . . . . . . . . . . . . . . . . . . . . . . . . . . . . . . .6-69
Explanation . . . . . . . . . . . . . . . . . . . . . . . . . . . . . . . . . . . . . . . . . . . .6-69
User Activities . . . . . . . . . . . . . . . . . . . . . . . . . . . . . . . . . . . . . . . . . .6-70
DAS4251 . . . . . . . . . . . . . . . . . . . . . . . . . . . . . . . . . . . . . . . . . . . . . . . . .6-70
DAS ACI Message . . . . . . . . . . . . . . . . . . . . . . . . . . . . . . . . . . . . . . .6-70
Explanation . . . . . . . . . . . . . . . . . . . . . . . . . . . . . . . . . . . . . . . . . . . .6-70
User Activities . . . . . . . . . . . . . . . . . . . . . . . . . . . . . . . . . . . . . . . . . .6-70
vDAS4260 . . . . . . . . . . . . . . . . . . . . . . . . . . . . . . . . . . . . . . . . . . . . . . . .6-70
DAS ACI Message . . . . . . . . . . . . . . . . . . . . . . . . . . . . . . . . . . . . . . .6-70
Explanation . . . . . . . . . . . . . . . . . . . . . . . . . . . . . . . . . . . . . . . . . . . .6-70
User Activities . . . . . . . . . . . . . . . . . . . . . . . . . . . . . . . . . . . . . . . . . .6-70
DAS4261 . . . . . . . . . . . . . . . . . . . . . . . . . . . . . . . . . . . . . . . . . . . . . . . . .6-70
DAS ACI Message . . . . . . . . . . . . . . . . . . . . . . . . . . . . . . . . . . . . . . .6-71
Explanation . . . . . . . . . . . . . . . . . . . . . . . . . . . . . . . . . . . . . . . . . . . . 6-71
User Activities . . . . . . . . . . . . . . . . . . . . . . . . . . . . . . . . . . . . . . . . . . 6-71
DAS4270 . . . . . . . . . . . . . . . . . . . . . . . . . . . . . . . . . . . . . . . . . . . . . . . . 6-71
DAS ACI Message . . . . . . . . . . . . . . . . . . . . . . . . . . . . . . . . . . . . . . .6-71
Explanation . . . . . . . . . . . . . . . . . . . . . . . . . . . . . . . . . . . . . . . . . . . . 6-71
User Activities . . . . . . . . . . . . . . . . . . . . . . . . . . . . . . . . . . . . . . . . . . 6-71
DAS4271 . . . . . . . . . . . . . . . . . . . . . . . . . . . . . . . . . . . . . . . . . . . . . . . . .6-71
DAS ACI Message . . . . . . . . . . . . . . . . . . . . . . . . . . . . . . . . . . . . . . .6-71
Explanation . . . . . . . . . . . . . . . . . . . . . . . . . . . . . . . . . . . . . . . . . . . . 6-71
User Activities . . . . . . . . . . . . . . . . . . . . . . . . . . . . . . . . . . . . . . . . . .6-72
DAS4272 . . . . . . . . . . . . . . . . . . . . . . . . . . . . . . . . . . . . . . . . . . . . . . . .6-72
DAS ACI Message . . . . . . . . . . . . . . . . . . . . . . . . . . . . . . . . . . . . . . .6-72
Explanation . . . . . . . . . . . . . . . . . . . . . . . . . . . . . . . . . . . . . . . . . . . .6-72
User Activities . . . . . . . . . . . . . . . . . . . . . . . . . . . . . . . . . . . . . . . . . .6-72
xvi Contents
6-00345-01
Page 17

DAS4280 . . . . . . . . . . . . . . . . . . . . . . . . . . . . . . . . . . . . . . . . . . . . . . . . .6-72
DAS ACI Message . . . . . . . . . . . . . . . . . . . . . . . . . . . . . . . . . . . . . . .6-72
Explanation . . . . . . . . . . . . . . . . . . . . . . . . . . . . . . . . . . . . . . . . . . . .6-72
User Activities . . . . . . . . . . . . . . . . . . . . . . . . . . . . . . . . . . . . . . . . . .6-72
DAS4281 . . . . . . . . . . . . . . . . . . . . . . . . . . . . . . . . . . . . . . . . . . . . . . . . .6-73
DAS ACI Message . . . . . . . . . . . . . . . . . . . . . . . . . . . . . . . . . . . . . . .6-73
Explanation . . . . . . . . . . . . . . . . . . . . . . . . . . . . . . . . . . . . . . . . . . . .6-73
User Activities . . . . . . . . . . . . . . . . . . . . . . . . . . . . . . . . . . . . . . . . . .6-73
DAS4282 . . . . . . . . . . . . . . . . . . . . . . . . . . . . . . . . . . . . . . . . . . . . . . . .6-73
DAS ACI Message . . . . . . . . . . . . . . . . . . . . . . . . . . . . . . . . . . . . . . .6-73
Explanation . . . . . . . . . . . . . . . . . . . . . . . . . . . . . . . . . . . . . . . . . . . .6-73
User Activities . . . . . . . . . . . . . . . . . . . . . . . . . . . . . . . . . . . . . . . . . .6-73
DAS4290 . . . . . . . . . . . . . . . . . . . . . . . . . . . . . . . . . . . . . . . . . . . . . . . . .6-73
DAS ACI Message . . . . . . . . . . . . . . . . . . . . . . . . . . . . . . . . . . . . . . .6-74
Explanation . . . . . . . . . . . . . . . . . . . . . . . . . . . . . . . . . . . . . . . . . . . .6-74
User Activities . . . . . . . . . . . . . . . . . . . . . . . . . . . . . . . . . . . . . . . . . .6-74
DAS4291 . . . . . . . . . . . . . . . . . . . . . . . . . . . . . . . . . . . . . . . . . . . . . . . . .6-74
DAS ACI Message . . . . . . . . . . . . . . . . . . . . . . . . . . . . . . . . . . . . . . .6-74
Explanation . . . . . . . . . . . . . . . . . . . . . . . . . . . . . . . . . . . . . . . . . . . .6-74
User Activities . . . . . . . . . . . . . . . . . . . . . . . . . . . . . . . . . . . . . . . . . .6-74
DAS4292 . . . . . . . . . . . . . . . . . . . . . . . . . . . . . . . . . . . . . . . . . . . . . . . .6-74
DAS ACI Message . . . . . . . . . . . . . . . . . . . . . . . . . . . . . . . . . . . . . . .6-74
Explanation . . . . . . . . . . . . . . . . . . . . . . . . . . . . . . . . . . . . . . . . . . . .6-74
User Activities . . . . . . . . . . . . . . . . . . . . . . . . . . . . . . . . . . . . . . . . . .6-75
DAS4293 . . . . . . . . . . . . . . . . . . . . . . . . . . . . . . . . . . . . . . . . . . . . . . . . .6-75
DAS ACI Message . . . . . . . . . . . . . . . . . . . . . . . . . . . . . . . . . . . . . . .6-75
Explanation . . . . . . . . . . . . . . . . . . . . . . . . . . . . . . . . . . . . . . . . . . . .6-75
User Activities . . . . . . . . . . . . . . . . . . . . . . . . . . . . . . . . . . . . . . . . . .6-75
DAS4295 . . . . . . . . . . . . . . . . . . . . . . . . . . . . . . . . . . . . . . . . . . . . . . . . .6-75
DAS ACI Message . . . . . . . . . . . . . . . . . . . . . . . . . . . . . . . . . . . . . . .6-75
Explanation . . . . . . . . . . . . . . . . . . . . . . . . . . . . . . . . . . . . . . . . . . . .6-75
User Activities . . . . . . . . . . . . . . . . . . . . . . . . . . . . . . . . . . . . . . . . . .6-76
DAS4296 . . . . . . . . . . . . . . . . . . . . . . . . . . . . . . . . . . . . . . . . . . . . . . . . .6-76
DAS ACI Message . . . . . . . . . . . . . . . . . . . . . . . . . . . . . . . . . . . . . . .6-76
Explanation . . . . . . . . . . . . . . . . . . . . . . . . . . . . . . . . . . . . . . . . . . . .6-76
User Activities . . . . . . . . . . . . . . . . . . . . . . . . . . . . . . . . . . . . . . . . . .6-76
DAS4297 . . . . . . . . . . . . . . . . . . . . . . . . . . . . . . . . . . . . . . . . . . . . . . . .6-76
DAS ACI Message . . . . . . . . . . . . . . . . . . . . . . . . . . . . . . . . . . . . . . .6-76
Explanation . . . . . . . . . . . . . . . . . . . . . . . . . . . . . . . . . . . . . . . . . . . .6-76
User Activities . . . . . . . . . . . . . . . . . . . . . . . . . . . . . . . . . . . . . . . . . .6-77
DAS4300 . . . . . . . . . . . . . . . . . . . . . . . . . . . . . . . . . . . . . . . . . . . . . . . . .6-77
Explanation . . . . . . . . . . . . . . . . . . . . . . . . . . . . . . . . . . . . . . . . . . . .6-77
User Activities . . . . . . . . . . . . . . . . . . . . . . . . . . . . . . . . . . . . . . . . . .6-77
DAS4301 . . . . . . . . . . . . . . . . . . . . . . . . . . . . . . . . . . . . . . . . . . . . . . . . .6-77
DAS ACI Message . . . . . . . . . . . . . . . . . . . . . . . . . . . . . . . . . . . . . . .6-77
Explanation . . . . . . . . . . . . . . . . . . . . . . . . . . . . . . . . . . . . . . . . . . . .6-77
User Activities . . . . . . . . . . . . . . . . . . . . . . . . . . . . . . . . . . . . . . . . . .6-77
DAS4302 . . . . . . . . . . . . . . . . . . . . . . . . . . . . . . . . . . . . . . . . . . . . . . . . .6-77
DAS ACI Message . . . . . . . . . . . . . . . . . . . . . . . . . . . . . . . . . . . . . . .6-78
26 Jul 2002
Contents xvii
Page 18

Explanation . . . . . . . . . . . . . . . . . . . . . . . . . . . . . . . . . . . . . . . . . . . .6-78
User Activities . . . . . . . . . . . . . . . . . . . . . . . . . . . . . . . . . . . . . . . . . .6-78
DAS4304 . . . . . . . . . . . . . . . . . . . . . . . . . . . . . . . . . . . . . . . . . . . . . . . . .6-78
Explanation . . . . . . . . . . . . . . . . . . . . . . . . . . . . . . . . . . . . . . . . . . . .6-78
User Activities . . . . . . . . . . . . . . . . . . . . . . . . . . . . . . . . . . . . . . . . . .6-78
DAS4305 . . . . . . . . . . . . . . . . . . . . . . . . . . . . . . . . . . . . . . . . . . . . . . . . .6-78
DAS ACI Message . . . . . . . . . . . . . . . . . . . . . . . . . . . . . . . . . . . . . . .6-78
Explanation . . . . . . . . . . . . . . . . . . . . . . . . . . . . . . . . . . . . . . . . . . . .6-78
DAS4350 . . . . . . . . . . . . . . . . . . . . . . . . . . . . . . . . . . . . . . . . . . . . . . . . .6-79
Explanation . . . . . . . . . . . . . . . . . . . . . . . . . . . . . . . . . . . . . . . . . . . .6-79
User Activities . . . . . . . . . . . . . . . . . . . . . . . . . . . . . . . . . . . . . . . . . .6-79
DAS4351 . . . . . . . . . . . . . . . . . . . . . . . . . . . . . . . . . . . . . . . . . . . . . . . . .6-79
DAS ACI Message . . . . . . . . . . . . . . . . . . . . . . . . . . . . . . . . . . . . . . .6-79
Explanation . . . . . . . . . . . . . . . . . . . . . . . . . . . . . . . . . . . . . . . . . . . .6-79
DAS4360 . . . . . . . . . . . . . . . . . . . . . . . . . . . . . . . . . . . . . . . . . . . . . . . . .6-79
Explanation . . . . . . . . . . . . . . . . . . . . . . . . . . . . . . . . . . . . . . . . . . . .6-79
User Activities . . . . . . . . . . . . . . . . . . . . . . . . . . . . . . . . . . . . . . . . . .6-79
DAS4361 . . . . . . . . . . . . . . . . . . . . . . . . . . . . . . . . . . . . . . . . . . . . . . . . .6-79
DAS ACI Message . . . . . . . . . . . . . . . . . . . . . . . . . . . . . . . . . . . . . . .6-80
Explanation . . . . . . . . . . . . . . . . . . . . . . . . . . . . . . . . . . . . . . . . . . . .6-80
DAS4400 . . . . . . . . . . . . . . . . . . . . . . . . . . . . . . . . . . . . . . . . . . . . . . . . .6-80
Explanation . . . . . . . . . . . . . . . . . . . . . . . . . . . . . . . . . . . . . . . . . . . .6-80
User Activities . . . . . . . . . . . . . . . . . . . . . . . . . . . . . . . . . . . . . . . . . .6-80
DAS4401 . . . . . . . . . . . . . . . . . . . . . . . . . . . . . . . . . . . . . . . . . . . . . . . . .6-80
DAS ACI Message . . . . . . . . . . . . . . . . . . . . . . . . . . . . . . . . . . . . . . .6-80
Explanation . . . . . . . . . . . . . . . . . . . . . . . . . . . . . . . . . . . . . . . . . . . .6-80
User Activities . . . . . . . . . . . . . . . . . . . . . . . . . . . . . . . . . . . . . . . . . .6-80
DAS4402 . . . . . . . . . . . . . . . . . . . . . . . . . . . . . . . . . . . . . . . . . . . . . . . . 6-81
DAS ACI Message . . . . . . . . . . . . . . . . . . . . . . . . . . . . . . . . . . . . . . . 6-81
Explanation . . . . . . . . . . . . . . . . . . . . . . . . . . . . . . . . . . . . . . . . . . . . 6-81
User Activities . . . . . . . . . . . . . . . . . . . . . . . . . . . . . . . . . . . . . . . . . . 6-81
DAS4500 . . . . . . . . . . . . . . . . . . . . . . . . . . . . . . . . . . . . . . . . . . . . . . . . . 6-81
Explanation . . . . . . . . . . . . . . . . . . . . . . . . . . . . . . . . . . . . . . . . . . . . 6-81
User Activities . . . . . . . . . . . . . . . . . . . . . . . . . . . . . . . . . . . . . . . . . . 6-81
DAS4501 . . . . . . . . . . . . . . . . . . . . . . . . . . . . . . . . . . . . . . . . . . . . . . . . . 6-81
DAS ACI Message . . . . . . . . . . . . . . . . . . . . . . . . . . . . . . . . . . . . . . . 6-81
Explanation . . . . . . . . . . . . . . . . . . . . . . . . . . . . . . . . . . . . . . . . . . . . 6-81
DAS4502 . . . . . . . . . . . . . . . . . . . . . . . . . . . . . . . . . . . . . . . . . . . . . . . . .6-82
DAS ACI Message . . . . . . . . . . . . . . . . . . . . . . . . . . . . . . . . . . . . . . .6-82
Explanation . . . . . . . . . . . . . . . . . . . . . . . . . . . . . . . . . . . . . . . . . . . .6-82
DAS4510 . . . . . . . . . . . . . . . . . . . . . . . . . . . . . . . . . . . . . . . . . . . . . . . . .6-82
Explanation . . . . . . . . . . . . . . . . . . . . . . . . . . . . . . . . . . . . . . . . . . . .6-82
User Activities . . . . . . . . . . . . . . . . . . . . . . . . . . . . . . . . . . . . . . . . . .6-82
DAS4511 . . . . . . . . . . . . . . . . . . . . . . . . . . . . . . . . . . . . . . . . . . . . . . . . .6-82
DAS ACI Message . . . . . . . . . . . . . . . . . . . . . . . . . . . . . . . . . . . . . . .6-82
Explanation . . . . . . . . . . . . . . . . . . . . . . . . . . . . . . . . . . . . . . . . . . . .6-82
DAS4512 . . . . . . . . . . . . . . . . . . . . . . . . . . . . . . . . . . . . . . . . . . . . . . . . .6-82
DAS ACI Message . . . . . . . . . . . . . . . . . . . . . . . . . . . . . . . . . . . . . . .6-83
Explanation . . . . . . . . . . . . . . . . . . . . . . . . . . . . . . . . . . . . . . . . . . . .6-83
xviii Contents
6-00345-01
Page 19

DAS4520 . . . . . . . . . . . . . . . . . . . . . . . . . . . . . . . . . . . . . . . . . . . . . . . . .6-83
Explanation . . . . . . . . . . . . . . . . . . . . . . . . . . . . . . . . . . . . . . . . . . . .6-83
User Activities . . . . . . . . . . . . . . . . . . . . . . . . . . . . . . . . . . . . . . . . . .6-83
DAS4521 . . . . . . . . . . . . . . . . . . . . . . . . . . . . . . . . . . . . . . . . . . . . . . . . .6-83
DAS ACI Message . . . . . . . . . . . . . . . . . . . . . . . . . . . . . . . . . . . . . . .6-83
Explanation . . . . . . . . . . . . . . . . . . . . . . . . . . . . . . . . . . . . . . . . . . . .6-83
DAS4530 . . . . . . . . . . . . . . . . . . . . . . . . . . . . . . . . . . . . . . . . . . . . . . . . .6-83
Explanation . . . . . . . . . . . . . . . . . . . . . . . . . . . . . . . . . . . . . . . . . . . .6-84
User Activities . . . . . . . . . . . . . . . . . . . . . . . . . . . . . . . . . . . . . . . . . .6-84
DAS4531 . . . . . . . . . . . . . . . . . . . . . . . . . . . . . . . . . . . . . . . . . . . . . . . . .6-84
DAS ACI Message . . . . . . . . . . . . . . . . . . . . . . . . . . . . . . . . . . . . . . .6-84
Explanation . . . . . . . . . . . . . . . . . . . . . . . . . . . . . . . . . . . . . . . . . . . .6-84
DAS4540 . . . . . . . . . . . . . . . . . . . . . . . . . . . . . . . . . . . . . . . . . . . . . . . . .6-84
Explanation . . . . . . . . . . . . . . . . . . . . . . . . . . . . . . . . . . . . . . . . . . . .6-84
User Activities . . . . . . . . . . . . . . . . . . . . . . . . . . . . . . . . . . . . . . . . . .6-84
DAS4541 . . . . . . . . . . . . . . . . . . . . . . . . . . . . . . . . . . . . . . . . . . . . . . . . .6-84
DAS ACI Message . . . . . . . . . . . . . . . . . . . . . . . . . . . . . . . . . . . . . . .6-84
Explanation . . . . . . . . . . . . . . . . . . . . . . . . . . . . . . . . . . . . . . . . . . . .6-85
DAS ACI Messages . . . . . . . . . . . . . . . . . . . . . . . . . . . . . . . . . . . . . . . . . . . . .6-85
ACI0001 . . . . . . . . . . . . . . . . . . . . . . . . . . . . . . . . . . . . . . . . . . . . . . . . . 6-85
Explanation . . . . . . . . . . . . . . . . . . . . . . . . . . . . . . . . . . . . . . . . . . . .6-85
User Activities . . . . . . . . . . . . . . . . . . . . . . . . . . . . . . . . . . . . . . . . . .6-85
ACI0002 . . . . . . . . . . . . . . . . . . . . . . . . . . . . . . . . . . . . . . . . . . . . . . . . .6-85
Explanation . . . . . . . . . . . . . . . . . . . . . . . . . . . . . . . . . . . . . . . . . . . .6-85
User Activities . . . . . . . . . . . . . . . . . . . . . . . . . . . . . . . . . . . . . . . . . .6-85
ACI0003 . . . . . . . . . . . . . . . . . . . . . . . . . . . . . . . . . . . . . . . . . . . . . . . . .6-85
Explanation . . . . . . . . . . . . . . . . . . . . . . . . . . . . . . . . . . . . . . . . . . . .6-86
User Activities . . . . . . . . . . . . . . . . . . . . . . . . . . . . . . . . . . . . . . . . . .6-86
ACI0004 . . . . . . . . . . . . . . . . . . . . . . . . . . . . . . . . . . . . . . . . . . . . . . . . .6-86
Explanation . . . . . . . . . . . . . . . . . . . . . . . . . . . . . . . . . . . . . . . . . . . .6-86
User Activities . . . . . . . . . . . . . . . . . . . . . . . . . . . . . . . . . . . . . . . . . .6-86
ACI0005 . . . . . . . . . . . . . . . . . . . . . . . . . . . . . . . . . . . . . . . . . . . . . . . . .6-86
Explanation . . . . . . . . . . . . . . . . . . . . . . . . . . . . . . . . . . . . . . . . . . . .6-87
User Activities . . . . . . . . . . . . . . . . . . . . . . . . . . . . . . . . . . . . . . . . . .6-87
ACI0006 . . . . . . . . . . . . . . . . . . . . . . . . . . . . . . . . . . . . . . . . . . . . . . . . .6-87
Explanation . . . . . . . . . . . . . . . . . . . . . . . . . . . . . . . . . . . . . . . . . . . .6-87
User Activities . . . . . . . . . . . . . . . . . . . . . . . . . . . . . . . . . . . . . . . . . .6-87
ACI0007 . . . . . . . . . . . . . . . . . . . . . . . . . . . . . . . . . . . . . . . . . . . . . . . . .6-87
Explanation . . . . . . . . . . . . . . . . . . . . . . . . . . . . . . . . . . . . . . . . . . . .6-87
User Activities . . . . . . . . . . . . . . . . . . . . . . . . . . . . . . . . . . . . . . . . . .6-87
ACI0008 . . . . . . . . . . . . . . . . . . . . . . . . . . . . . . . . . . . . . . . . . . . . . . . . .6-87
Explanation . . . . . . . . . . . . . . . . . . . . . . . . . . . . . . . . . . . . . . . . . . . .6-87
User Activities . . . . . . . . . . . . . . . . . . . . . . . . . . . . . . . . . . . . . . . . . .6-87
ACI0009 . . . . . . . . . . . . . . . . . . . . . . . . . . . . . . . . . . . . . . . . . . . . . . . . .6-87
Explanation . . . . . . . . . . . . . . . . . . . . . . . . . . . . . . . . . . . . . . . . . . . .6-88
User Activities . . . . . . . . . . . . . . . . . . . . . . . . . . . . . . . . . . . . . . . . . .6-88
ACI0010 . . . . . . . . . . . . . . . . . . . . . . . . . . . . . . . . . . . . . . . . . . . . . . . . .6-88
Explanation . . . . . . . . . . . . . . . . . . . . . . . . . . . . . . . . . . . . . . . . . . . .6-88
User Activities . . . . . . . . . . . . . . . . . . . . . . . . . . . . . . . . . . . . . . . . . .6-88
26 Jul 2002
Contents xix
Page 20

ACI0011 . . . . . . . . . . . . . . . . . . . . . . . . . . . . . . . . . . . . . . . . . . . . . . . . .6-88
Explanation . . . . . . . . . . . . . . . . . . . . . . . . . . . . . . . . . . . . . . . . . . . .6-88
User Activities . . . . . . . . . . . . . . . . . . . . . . . . . . . . . . . . . . . . . . . . . .6-88
ACI0012 . . . . . . . . . . . . . . . . . . . . . . . . . . . . . . . . . . . . . . . . . . . . . . . . .6-88
Explanation . . . . . . . . . . . . . . . . . . . . . . . . . . . . . . . . . . . . . . . . . . . .6-88
User Activities . . . . . . . . . . . . . . . . . . . . . . . . . . . . . . . . . . . . . . . . . .6-88
ACI0013 . . . . . . . . . . . . . . . . . . . . . . . . . . . . . . . . . . . . . . . . . . . . . . . . .6-89
Explanation . . . . . . . . . . . . . . . . . . . . . . . . . . . . . . . . . . . . . . . . . . . .6-89
User Activities . . . . . . . . . . . . . . . . . . . . . . . . . . . . . . . . . . . . . . . . . .6-89
ACI0014 . . . . . . . . . . . . . . . . . . . . . . . . . . . . . . . . . . . . . . . . . . . . . . . . .6-89
Explanation . . . . . . . . . . . . . . . . . . . . . . . . . . . . . . . . . . . . . . . . . . . .6-89
User Activities . . . . . . . . . . . . . . . . . . . . . . . . . . . . . . . . . . . . . . . . . .6-89
ACI0015 . . . . . . . . . . . . . . . . . . . . . . . . . . . . . . . . . . . . . . . . . . . . . . . . .6-89
Explanation . . . . . . . . . . . . . . . . . . . . . . . . . . . . . . . . . . . . . . . . . . . .6-89
User Activities . . . . . . . . . . . . . . . . . . . . . . . . . . . . . . . . . . . . . . . . . .6-89
ACI0020 . . . . . . . . . . . . . . . . . . . . . . . . . . . . . . . . . . . . . . . . . . . . . . . . .6-89
Explanation . . . . . . . . . . . . . . . . . . . . . . . . . . . . . . . . . . . . . . . . . . . .6-89
User Activities . . . . . . . . . . . . . . . . . . . . . . . . . . . . . . . . . . . . . . . . . .6-90
ACI0021 . . . . . . . . . . . . . . . . . . . . . . . . . . . . . . . . . . . . . . . . . . . . . . . . .6-90
Explanation . . . . . . . . . . . . . . . . . . . . . . . . . . . . . . . . . . . . . . . . . . . .6-90
User Activities . . . . . . . . . . . . . . . . . . . . . . . . . . . . . . . . . . . . . . . . . .6-90
ACI0022 . . . . . . . . . . . . . . . . . . . . . . . . . . . . . . . . . . . . . . . . . . . . . . . . .6-90
Explanation . . . . . . . . . . . . . . . . . . . . . . . . . . . . . . . . . . . . . . . . . . . .6-90
User Activities . . . . . . . . . . . . . . . . . . . . . . . . . . . . . . . . . . . . . . . . . .6-90
ACI0023 . . . . . . . . . . . . . . . . . . . . . . . . . . . . . . . . . . . . . . . . . . . . . . . . .6-90
Explanation . . . . . . . . . . . . . . . . . . . . . . . . . . . . . . . . . . . . . . . . . . . .6-90
User Activities . . . . . . . . . . . . . . . . . . . . . . . . . . . . . . . . . . . . . . . . . . 6-91
ACI0024 . . . . . . . . . . . . . . . . . . . . . . . . . . . . . . . . . . . . . . . . . . . . . . . . . 6-91
Explanation . . . . . . . . . . . . . . . . . . . . . . . . . . . . . . . . . . . . . . . . . . . . 6-91
User Activities . . . . . . . . . . . . . . . . . . . . . . . . . . . . . . . . . . . . . . . . . . 6-91
ACI0025 . . . . . . . . . . . . . . . . . . . . . . . . . . . . . . . . . . . . . . . . . . . . . . . . . 6-91
Explanation . . . . . . . . . . . . . . . . . . . . . . . . . . . . . . . . . . . . . . . . . . . . 6-91
User Activities . . . . . . . . . . . . . . . . . . . . . . . . . . . . . . . . . . . . . . . . . . 6-91
xx Contents
Derrno Variable . . . . . . . . . . . . . . . . . . . . . . . . . . . . . . . . . . . . . . . . . . . . . . . 6-91
0 - EOK . . . . . . . . . . . . . . . . . . . . . . . . . . . . . . . . . . . . . . . . . . . . . . . . .6-92
Explanation . . . . . . . . . . . . . . . . . . . . . . . . . . . . . . . . . . . . . . . . . . . .6-92
User Activities . . . . . . . . . . . . . . . . . . . . . . . . . . . . . . . . . . . . . . . . . .6-92
1 - ERPC . . . . . . . . . . . . . . . . . . . . . . . . . . . . . . . . . . . . . . . . . . . . . . . .6-92
Explanation . . . . . . . . . . . . . . . . . . . . . . . . . . . . . . . . . . . . . . . . . . . .6-92
User Activities . . . . . . . . . . . . . . . . . . . . . . . . . . . . . . . . . . . . . . . . . .6-92
2 - EINVALID . . . . . . . . . . . . . . . . . . . . . . . . . . . . . . . . . . . . . . . . . . . . .6-92
Explanation . . . . . . . . . . . . . . . . . . . . . . . . . . . . . . . . . . . . . . . . . . . .6-92
User Activities . . . . . . . . . . . . . . . . . . . . . . . . . . . . . . . . . . . . . . . . . .6-92
3 - ENOVOLUME . . . . . . . . . . . . . . . . . . . . . . . . . . . . . . . . . . . . . . . . . . .6-93
Explanation . . . . . . . . . . . . . . . . . . . . . . . . . . . . . . . . . . . . . . . . . . . .6-93
User Activities . . . . . . . . . . . . . . . . . . . . . . . . . . . . . . . . . . . . . . . . . .6-93
4 - ENODRIVE . . . . . . . . . . . . . . . . . . . . . . . . . . . . . . . . . . . . . . . . . . . .6-93
Explanation . . . . . . . . . . . . . . . . . . . . . . . . . . . . . . . . . . . . . . . . . . . .6-93
User Activities . . . . . . . . . . . . . . . . . . . . . . . . . . . . . . . . . . . . . . . . . .6-93
6-00345-01
Page 21

5 - EDRVOCCUPIED . . . . . . . . . . . . . . . . . . . . . . . . . . . . . . . . . . . . . . . . .6-93
Explanation . . . . . . . . . . . . . . . . . . . . . . . . . . . . . . . . . . . . . . . . . . . .6-93
User Activities . . . . . . . . . . . . . . . . . . . . . . . . . . . . . . . . . . . . . . . . . .6-94
6 - EPROBVOL . . . . . . . . . . . . . . . . . . . . . . . . . . . . . . . . . . . . . . . . . . . .6-94
Explanation . . . . . . . . . . . . . . . . . . . . . . . . . . . . . . . . . . . . . . . . . . . .6-94
User Activities . . . . . . . . . . . . . . . . . . . . . . . . . . . . . . . . . . . . . . . . . .6-94
7 - EAMU . . . . . . . . . . . . . . . . . . . . . . . . . . . . . . . . . . . . . . . . . . . . . . .6-94
Explanation . . . . . . . . . . . . . . . . . . . . . . . . . . . . . . . . . . . . . . . . . . . .6-94
User Activities . . . . . . . . . . . . . . . . . . . . . . . . . . . . . . . . . . . . . . . . . .6-94
8 - EAMUCOMM . . . . . . . . . . . . . . . . . . . . . . . . . . . . . . . . . . . . . . . . . . .6-95
Explanation . . . . . . . . . . . . . . . . . . . . . . . . . . . . . . . . . . . . . . . . . . . .6-95
User Activities . . . . . . . . . . . . . . . . . . . . . . . . . . . . . . . . . . . . . . . . . .6-95
9 - EROBOT . . . . . . . . . . . . . . . . . . . . . . . . . . . . . . . . . . . . . . . . . . . . . .6-95
Explanation . . . . . . . . . . . . . . . . . . . . . . . . . . . . . . . . . . . . . . . . . . . .6-95
User Activities . . . . . . . . . . . . . . . . . . . . . . . . . . . . . . . . . . . . . . . . . .6-95
10 - EROBOTCOMM . . . . . . . . . . . . . . . . . . . . . . . . . . . . . . . . . . . . . . . . .6-95
Explanation . . . . . . . . . . . . . . . . . . . . . . . . . . . . . . . . . . . . . . . . . . . .6-95
User Activities . . . . . . . . . . . . . . . . . . . . . . . . . . . . . . . . . . . . . . . . . .6-95
11 - ENODAS . . . . . . . . . . . . . . . . . . . . . . . . . . . . . . . . . . . . . . . . . . . . .6-96
Explanation . . . . . . . . . . . . . . . . . . . . . . . . . . . . . . . . . . . . . . . . . . . .6-96
User Activities . . . . . . . . . . . . . . . . . . . . . . . . . . . . . . . . . . . . . . . . . .6-96
12 - EDEVEMPTY . . . . . . . . . . . . . . . . . . . . . . . . . . . . . . . . . . . . . . . . . . .6-96
Explanation . . . . . . . . . . . . . . . . . . . . . . . . . . . . . . . . . . . . . . . . . . . .6-96
User Activities . . . . . . . . . . . . . . . . . . . . . . . . . . . . . . . . . . . . . . . . . .6-96
13 - ENOTREG . . . . . . . . . . . . . . . . . . . . . . . . . . . . . . . . . . . . . . . . . . . .6-96
Explanation . . . . . . . . . . . . . . . . . . . . . . . . . . . . . . . . . . . . . . . . . . . .6-96
User Activities . . . . . . . . . . . . . . . . . . . . . . . . . . . . . . . . . . . . . . . . . .6-96
14 - EBADHOST . . . . . . . . . . . . . . . . . . . . . . . . . . . . . . . . . . . . . . . . . . .6-97
Explanation . . . . . . . . . . . . . . . . . . . . . . . . . . . . . . . . . . . . . . . . . . . .6-97
User Activities . . . . . . . . . . . . . . . . . . . . . . . . . . . . . . . . . . . . . . . . . .6-97
15 - ENOAREA . . . . . . . . . . . . . . . . . . . . . . . . . . . . . . . . . . . . . . . . . . . .6-97
Explanation . . . . . . . . . . . . . . . . . . . . . . . . . . . . . . . . . . . . . . . . . . . .6-97
User Activities . . . . . . . . . . . . . . . . . . . . . . . . . . . . . . . . . . . . . . . . . .6-97
16 - ENOTAUTH . . . . . . . . . . . . . . . . . . . . . . . . . . . . . . . . . . . . . . . . . . .6-97
Explanation . . . . . . . . . . . . . . . . . . . . . . . . . . . . . . . . . . . . . . . . . . . .6-97
User Activities . . . . . . . . . . . . . . . . . . . . . . . . . . . . . . . . . . . . . . . . . .6-97
17 - EDYNFULL . . . . . . . . . . . . . . . . . . . . . . . . . . . . . . . . . . . . . . . . . . . .6-98
Explanation . . . . . . . . . . . . . . . . . . . . . . . . . . . . . . . . . . . . . . . . . . . .6-98
User Activities . . . . . . . . . . . . . . . . . . . . . . . . . . . . . . . . . . . . . . . . . .6-98
18 - EUPELSE . . . . . . . . . . . . . . . . . . . . . . . . . . . . . . . . . . . . . . . . . . . . .6-98
Explanation . . . . . . . . . . . . . . . . . . . . . . . . . . . . . . . . . . . . . . . . . . . .6-98
User Activities . . . . . . . . . . . . . . . . . . . . . . . . . . . . . . . . . . . . . . . . . .6-98
19 - EBADCLIENT . . . . . . . . . . . . . . . . . . . . . . . . . . . . . . . . . . . . . . . . . .6-98
Explanation . . . . . . . . . . . . . . . . . . . . . . . . . . . . . . . . . . . . . . . . . . . .6-99
User Activities . . . . . . . . . . . . . . . . . . . . . . . . . . . . . . . . . . . . . . . . . .6-99
20 - EBADDYN . . . . . . . . . . . . . . . . . . . . . . . . . . . . . . . . . . . . . . . . . . . .6-99
Explanation . . . . . . . . . . . . . . . . . . . . . . . . . . . . . . . . . . . . . . . . . . . .6-99
User Activities . . . . . . . . . . . . . . . . . . . . . . . . . . . . . . . . . . . . . . . . . .6-99
21- ENOREQ . . . . . . . . . . . . . . . . . . . . . . . . . . . . . . . . . . . . . . . . . . . . . .6-99
26 Jul 2002
Contents xxi
Page 22

Explanation . . . . . . . . . . . . . . . . . . . . . . . . . . . . . . . . . . . . . . . . . . . .6-99
User Activities . . . . . . . . . . . . . . . . . . . . . . . . . . . . . . . . . . . . . . . . . .6-99
22 - ERETRYL . . . . . . . . . . . . . . . . . . . . . . . . . . . . . . . . . . . . . . . . . . . . 6-100
Explanation . . . . . . . . . . . . . . . . . . . . . . . . . . . . . . . . . . . . . . . . . . . 6-100
User Activities . . . . . . . . . . . . . . . . . . . . . . . . . . . . . . . . . . . . . . . . . 6-100
23 - ENOTMOUNTED . . . . . . . . . . . . . . . . . . . . . . . . . . . . . . . . . . . . . . . 6-100
Explanation . . . . . . . . . . . . . . . . . . . . . . . . . . . . . . . . . . . . . . . . . . . 6-100
User Activities . . . . . . . . . . . . . . . . . . . . . . . . . . . . . . . . . . . . . . . . . 6-100
24 - EINUSE . . . . . . . . . . . . . . . . . . . . . . . . . . . . . . . . . . . . . . . . . . . . . 6-100
Explanation . . . . . . . . . . . . . . . . . . . . . . . . . . . . . . . . . . . . . . . . . . . 6-100
User Activities . . . . . . . . . . . . . . . . . . . . . . . . . . . . . . . . . . . . . . . . . 6-100
25 - ENOSPACE . . . . . . . . . . . . . . . . . . . . . . . . . . . . . . . . . . . . . . . . . . . 6-101
Explanation . . . . . . . . . . . . . . . . . . . . . . . . . . . . . . . . . . . . . . . . . . . 6-101
User Activities . . . . . . . . . . . . . . . . . . . . . . . . . . . . . . . . . . . . . . . . . 6-101
26 - ENOTFOUND . . . . . . . . . . . . . . . . . . . . . . . . . . . . . . . . . . . . . . . . . 6-101
Explanation . . . . . . . . . . . . . . . . . . . . . . . . . . . . . . . . . . . . . . . . . . . 6-101
User Activities . . . . . . . . . . . . . . . . . . . . . . . . . . . . . . . . . . . . . . . . . 6-101
27 - ECANCELLED . . . . . . . . . . . . . . . . . . . . . . . . . . . . . . . . . . . . . . . . . 6-101
Explanation . . . . . . . . . . . . . . . . . . . . . . . . . . . . . . . . . . . . . . . . . . . 6-101
User Activities . . . . . . . . . . . . . . . . . . . . . . . . . . . . . . . . . . . . . . . . . 6-102
28 - EDASINT . . . . . . . . . . . . . . . . . . . . . . . . . . . . . . . . . . . . . . . . . . . . 6-102
Explanation . . . . . . . . . . . . . . . . . . . . . . . . . . . . . . . . . . . . . . . . . . . 6-102
User Activities . . . . . . . . . . . . . . . . . . . . . . . . . . . . . . . . . . . . . . . . . 6-102
29 - EACIINT . . . . . . . . . . . . . . . . . . . . . . . . . . . . . . . . . . . . . . . . . . . . 6-102
Explanation . . . . . . . . . . . . . . . . . . . . . . . . . . . . . . . . . . . . . . . . . . . 6-102
User Activities . . . . . . . . . . . . . . . . . . . . . . . . . . . . . . . . . . . . . . . . . 6-102
30 - EMOREDATA . . . . . . . . . . . . . . . . . . . . . . . . . . . . . . . . . . . . . . . . . 6-102
Explanation . . . . . . . . . . . . . . . . . . . . . . . . . . . . . . . . . . . . . . . . . . . 6-102
User Activities . . . . . . . . . . . . . . . . . . . . . . . . . . . . . . . . . . . . . . . . . 6-102
31 - ENOMATCH . . . . . . . . . . . . . . . . . . . . . . . . . . . . . . . . . . . . . . . . . . 6-103
Explanation . . . . . . . . . . . . . . . . . . . . . . . . . . . . . . . . . . . . . . . . . . . 6-103
User Activities . . . . . . . . . . . . . . . . . . . . . . . . . . . . . . . . . . . . . . . . . 6-103
32 - EOTHERPOOL . . . . . . . . . . . . . . . . . . . . . . . . . . . . . . . . . . . . . . . . 6-103
Explanation . . . . . . . . . . . . . . . . . . . . . . . . . . . . . . . . . . . . . . . . . . . 6-103
User Activities . . . . . . . . . . . . . . . . . . . . . . . . . . . . . . . . . . . . . . . . . 6-103
33 - ECLEANING . . . . . . . . . . . . . . . . . . . . . . . . . . . . . . . . . . . . . . . . . . 6-103
Explanation . . . . . . . . . . . . . . . . . . . . . . . . . . . . . . . . . . . . . . . . . . . 6-103
User Activities . . . . . . . . . . . . . . . . . . . . . . . . . . . . . . . . . . . . . . . . . 6-103
34 - ETIMEOUT . . . . . . . . . . . . . . . . . . . . . . . . . . . . . . . . . . . . . . . . . . . 6-103
Explanation . . . . . . . . . . . . . . . . . . . . . . . . . . . . . . . . . . . . . . . . . . . 6-104
User Activities . . . . . . . . . . . . . . . . . . . . . . . . . . . . . . . . . . . . . . . . . 6-104
35 - ESWITCHINPROG . . . . . . . . . . . . . . . . . . . . . . . . . . . . . . . . . . . . . . 6-104
Explanation . . . . . . . . . . . . . . . . . . . . . . . . . . . . . . . . . . . . . . . . . . . 6-104
User Activities . . . . . . . . . . . . . . . . . . . . . . . . . . . . . . . . . . . . . . . . . 6-104
36 - ENOPOOL . . . . . . . . . . . . . . . . . . . . . . . . . . . . . . . . . . . . . . . . . . . 6-104
Explanation . . . . . . . . . . . . . . . . . . . . . . . . . . . . . . . . . . . . . . . . . . . 6-104
User Activities . . . . . . . . . . . . . . . . . . . . . . . . . . . . . . . . . . . . . . . . . 6-104
37 - EAREAFULL . . . . . . . . . . . . . . . . . . . . . . . . . . . . . . . . . . . . . . . . . . 6-105
Explanation . . . . . . . . . . . . . . . . . . . . . . . . . . . . . . . . . . . . . . . . . . . 6-105
xxii Contents
6-00345-01
Page 23

User Activities . . . . . . . . . . . . . . . . . . . . . . . . . . . . . . . . . . . . . . . . . 6-105
38 - EHICAPINUSE . . . . . . . . . . . . . . . . . . . . . . . . . . . . . . . . . . . . . . . . . 6-105
Explanation . . . . . . . . . . . . . . . . . . . . . . . . . . . . . . . . . . . . . . . . . . . 6-105
User Activities . . . . . . . . . . . . . . . . . . . . . . . . . . . . . . . . . . . . . . . . . 6-105
39 - ENODOUBLESIDE . . . . . . . . . . . . . . . . . . . . . . . . . . . . . . . . . . . . . . 6-105
Explanation . . . . . . . . . . . . . . . . . . . . . . . . . . . . . . . . . . . . . . . . . . . 6-105
User Activities . . . . . . . . . . . . . . . . . . . . . . . . . . . . . . . . . . . . . . . . . 6-105
40- EEXUP . . . . . . . . . . . . . . . . . . . . . . . . . . . . . . . . . . . . . . . . . . . . . . 6-105
Explanation . . . . . . . . . . . . . . . . . . . . . . . . . . . . . . . . . . . . . . . . . . . 6-106
User Activities . . . . . . . . . . . . . . . . . . . . . . . . . . . . . . . . . . . . . . . . . 6-106
41- EPROBDEV . . . . . . . . . . . . . . . . . . . . . . . . . . . . . . . . . . . . . . . . . . . 6-106
Explanation . . . . . . . . . . . . . . . . . . . . . . . . . . . . . . . . . . . . . . . . . . . 6-106
User Activities . . . . . . . . . . . . . . . . . . . . . . . . . . . . . . . . . . . . . . . . . 6-106
42- ECOORDINATE . . . . . . . . . . . . . . . . . . . . . . . . . . . . . . . . . . . . . . . . 6-106
Explanation . . . . . . . . . . . . . . . . . . . . . . . . . . . . . . . . . . . . . . . . . . . 6-106
User Activities . . . . . . . . . . . . . . . . . . . . . . . . . . . . . . . . . . . . . . . . . 6-106
43- EAREAEMPTY . . . . . . . . . . . . . . . . . . . . . . . . . . . . . . . . . . . . . . . . . 6-106
Explanation . . . . . . . . . . . . . . . . . . . . . . . . . . . . . . . . . . . . . . . . . . . 6-106
User Activities . . . . . . . . . . . . . . . . . . . . . . . . . . . . . . . . . . . . . . . . . 6-106
44- EBARCODE . . . . . . . . . . . . . . . . . . . . . . . . . . . . . . . . . . . . . . . . . . . 6-106
Explanation . . . . . . . . . . . . . . . . . . . . . . . . . . . . . . . . . . . . . . . . . . . 6-107
User Activities . . . . . . . . . . . . . . . . . . . . . . . . . . . . . . . . . . . . . . . . . 6-107
45 - EUPDOWN . . . . . . . . . . . . . . . . . . . . . . . . . . . . . . . . . . . . . . . . . . . 6-107
Explanation . . . . . . . . . . . . . . . . . . . . . . . . . . . . . . . . . . . . . . . . . . . 6-107
User Activities . . . . . . . . . . . . . . . . . . . . . . . . . . . . . . . . . . . . . . . . . 6-107
46 - ENOTSUPPHCMD . . . . . . . . . . . . . . . . . . . . . . . . . . . . . . . . . . . . . . 6-107
Explanation . . . . . . . . . . . . . . . . . . . . . . . . . . . . . . . . . . . . . . . . . . . 6-107
User Activities . . . . . . . . . . . . . . . . . . . . . . . . . . . . . . . . . . . . . . . . . 6-107
47 - EDATABASE . . . . . . . . . . . . . . . . . . . . . . . . . . . . . . . . . . . . . . . . . . 6-107
Explanation . . . . . . . . . . . . . . . . . . . . . . . . . . . . . . . . . . . . . . . . . . . 6-107
User Activities . . . . . . . . . . . . . . . . . . . . . . . . . . . . . . . . . . . . . . . . . 6-107
48 - ENOROBOT . . . . . . . . . . . . . . . . . . . . . . . . . . . . . . . . . . . . . . . . . . 6-107
Explanation . . . . . . . . . . . . . . . . . . . . . . . . . . . . . . . . . . . . . . . . . . . 6-108
User Activities . . . . . . . . . . . . . . . . . . . . . . . . . . . . . . . . . . . . . . . . . 6-108
49 - EINVALIDDEV . . . . . . . . . . . . . . . . . . . . . . . . . . . . . . . . . . . . . . . . 6-108
Explanation . . . . . . . . . . . . . . . . . . . . . . . . . . . . . . . . . . . . . . . . . . . 6-108
User Activities . . . . . . . . . . . . . . . . . . . . . . . . . . . . . . . . . . . . . . . . . 6-108
50 - NO_ECODES . . . . . . . . . . . . . . . . . . . . . . . . . . . . . . . . . . . . . . . . . 6-108
Explanation . . . . . . . . . . . . . . . . . . . . . . . . . . . . . . . . . . . . . . . . . . . 6-108
User Activities . . . . . . . . . . . . . . . . . . . . . . . . . . . . . . . . . . . . . . . . . 6-108
Utilities
Overview . . . . . . . . . . . . . . . . . . . . . . . . . . . . . . . . . . . . . . . . . . . . . . . . . . . 7-3
RPC Test (TCP/IP Function) . . . . . . . . . . . . . . . . . . . . . . . . . . . . . . . . . . . . . . . 7-3
DAS Wait Program . . . . . . . . . . . . . . . . . . . . . . . . . . . . . . . . . . . . . . . . . . . . 7-3
26 Jul 2002
Contents xxiii
Page 24

RPCPing Utility . . . . . . . . . . . . . . . . . . . . . . . . . . . . . . . . . . . . . . . . . . . . . . . 7-3
Using RpcPing for testing RPC connectivity . . . . . . . . . . . . . . . . . . . . . . . . . 7-3
Server part . . . . . . . . . . . . . . . . . . . . . . . . . . . . . . . . . . . . . . . . . . . . . . . 7-4
Client part . . . . . . . . . . . . . . . . . . . . . . . . . . . . . . . . . . . . . . . . . . . . . . . 7-4
Implementation details . . . . . . . . . . . . . . . . . . . . . . . . . . . . . . . . . . . . . . . 7-4
Error messages . . . . . . . . . . . . . . . . . . . . . . . . . . . . . . . . . . . . . . . . . . . . 7-5
Recommendations for error recovery situations . . . . . . . . . . . . . . . . . . . . . . . 7-5
Startup.smp . . . . . . . . . . . . . . . . . . . . . . . . . . . . . . . . . . . . . . . . . . . . . . . . . 7-5
DB/2 query tools . . . . . . . . . . . . . . . . . . . . . . . . . . . . . . . . . . . . . . . . . . . 7-5
CNT2ZERO.CMD . . . . . . . . . . . . . . . . . . . . . . . . . . . . . . . . . . . . . . . . 7-5
SHOWPOOL.CMD . . . . . . . . . . . . . . . . . . . . . . . . . . . . . . . . . . . . . . . 7-5
SHOWSCRATCH.CMD . . . . . . . . . . . . . . . . . . . . . . . . . . . . . . . . . . . . . 7-5
SHOWVOLSER.CMD . . . . . . . . . . . . . . . . . . . . . . . . . . . . . . . . . . . . . . 7-6
Communication Applications
Overview . . . . . . . . . . . . . . . . . . . . . . . . . . . . . . . . . . . . . . . . . . . . . . . . . . . 8-3
ADSM VirOp . . . . . . . . . . . . . . . . . . . . . . . . . . . . . . . . . . . . . . . . . . . . . . . . 8-3
Installation . . . . . . . . . . . . . . . . . . . . . . . . . . . . . . . . . . . . . . . . . . . . . . . 8-3
Setup . . . . . . . . . . . . . . . . . . . . . . . . . . . . . . . . . . . . . . . . . . . . . . . . . . . 8-4
Install Option . . . . . . . . . . . . . . . . . . . . . . . . . . . . . . . . . . . . . . . . . . 8-4
Configure Drives . . . . . . . . . . . . . . . . . . . . . . . . . . . . . . . . . . . . . . . . 8-4
Configure Libraries . . . . . . . . . . . . . . . . . . . . . . . . . . . . . . . . . . . . . . . 8-5
Update Drive Config . . . . . . . . . . . . . . . . . . . . . . . . . . . . . . . . . . . . . . 8-6
Update Library Config . . . . . . . . . . . . . . . . . . . . . . . . . . . . . . . . . . . . 8-6
ADSM Configuration . . . . . . . . . . . . . . . . . . . . . . . . . . . . . . . . . . . . . . . . 8-6
Scratch Handling . . . . . . . . . . . . . . . . . . . . . . . . . . . . . . . . . . . . . . . . . . . 8-7
Required DAS Configuration . . . . . . . . . . . . . . . . . . . . . . . . . . . . . . . . . . . 8-7
DRM Support . . . . . . . . . . . . . . . . . . . . . . . . . . . . . . . . . . . . . . . . . . . . . 8-7
Shell Scripts . . . . . . . . . . . . . . . . . . . . . . . . . . . . . . . . . . . . . . . . . . . 8-7
Label Script . . . . . . . . . . . . . . . . . . . . . . . . . . . . . . . . . . . . . . . . . . . . . . 8-9
Using EMM commands without ADSM . . . . . . . . . . . . . . . . . . . . . . . . . . . . . 8-10
xxiv Contents
ARCSERVE VirOp for Novell . . . . . . . . . . . . . . . . . . . . . . . . . . . . . . . . . . . . . . 8-10
Concept . . . . . . . . . . . . . . . . . . . . . . . . . . . . . . . . . . . . . . . . . . . . . . . . . 8-10
Schematic Structure of the Work Environment . . . . . . . . . . . . . . . . . . . . . 8-11
Backup . . . . . . . . . . . . . . . . . . . . . . . . . . . . . . . . . . . . . . . . . . . . . . . 8-11
Restore . . . . . . . . . . . . . . . . . . . . . . . . . . . . . . . . . . . . . . . . . . . . . . . 8-12
Design . . . . . . . . . . . . . . . . . . . . . . . . . . . . . . . . . . . . . . . . . . . . . . . . . . 8-12
Object Diagram . . . . . . . . . . . . . . . . . . . . . . . . . . . . . . . . . . . . . . . . . 8-12
ArcVirOp . . . . . . . . . . . . . . . . . . . . . . . . . . . . . . . . . . . . . . . . . . . . .8-13
ConfigMgr . . . . . . . . . . . . . . . . . . . . . . . . . . . . . . . . . . . . . . . . . . . . 8-13
MediaListMgr . . . . . . . . . . . . . . . . . . . . . . . . . . . . . . . . . . . . . . . . . . 8-13
DriveListMgr . . . . . . . . . . . . . . . . . . . . . . . . . . . . . . . . . . . . . . . . . . . 8-13
JobListMgr . . . . . . . . . . . . . . . . . . . . . . . . . . . . . . . . . . . . . . . . . . . . 8-13
ARCObserver . . . . . . . . . . . . . . . . . . . . . . . . . . . . . . . . . . . . . . . . . . . 8-13
6-00345-01
Page 25

DASAdaptor . . . . . . . . . . . . . . . . . . . . . . . . . . . . . . . . . . . . . . . . . . . 8-13
Ctrace . . . . . . . . . . . . . . . . . . . . . . . . . . . . . . . . . . . . . . . . . . . . . . . 8-14
Installation . . . . . . . . . . . . . . . . . . . . . . . . . . . . . . . . . . . . . . . . . . . . . . .8-14
Installation Files . . . . . . . . . . . . . . . . . . . . . . . . . . . . . . . . . . . . . . . . . 8-14
Installation Procedure . . . . . . . . . . . . . . . . . . . . . . . . . . . . . . . . . . . . . 8-14
Configuration . . . . . . . . . . . . . . . . . . . . . . . . . . . . . . . . . . . . . . . . . . . . .8-15
Configuration Parameters . . . . . . . . . . . . . . . . . . . . . . . . . . . . . . . . . . . 8-15
Example File ArcVirOp.cfg . . . . . . . . . . . . . . . . . . . . . . . . . . . . . . . . . . 8-16
Example File Medialist.txt . . . . . . . . . . . . . . . . . . . . . . . . . . . . . . . . . . 8-17
Example File Drivelist.txt . . . . . . . . . . . . . . . . . . . . . . . . . . . . . . . . . . . 8-18
Example File Config of the DAS Server on the AMU Controller (OS/2 Computer)
8-18
Start-up . . . . . . . . . . . . . . . . . . . . . . . . . . . . . . . . . . . . . . . . . . . . . . . . .8-18
Sequence of Operations . . . . . . . . . . . . . . . . . . . . . . . . . . . . . . . . . . . . 8-19
Error, Warnings and Information . . . . . . . . . . . . . . . . . . . . . . . . . . . . . . . . 8-19
Message Construction . . . . . . . . . . . . . . . . . . . . . . . . . . . . . . . . . . . . . 8-19
Message Type . . . . . . . . . . . . . . . . . . . . . . . . . . . . . . . . . . . . . . . . . . 8-19
Messages . . . . . . . . . . . . . . . . . . . . . . . . . . . . . . . . . . . . . . . . . . . . . 8-19
Networker NT . . . . . . . . . . . . . . . . . . . . . . . . . . . . . . . . . . . . . . . . . . . . . . . .8-22
Installation . . . . . . . . . . . . . . . . . . . . . . . . . . . . . . . . . . . . . . . . . . . . . . .8-22
Configuration . . . . . . . . . . . . . . . . . . . . . . . . . . . . . . . . . . . . . . . . . . . . .8-23
ACI Firewall
Overview . . . . . . . . . . . . . . . . . . . . . . . . . . . . . . . . . . . . . . . . . . . . . . . . . . . 9-3
DAS ACI Firewall . . . . . . . . . . . . . . . . . . . . . . . . . . . . . . . . . . . . . . . . . . . . . 9-3
Configuring server (behind firewall) . . . . . . . . . . . . . . . . . . . . . . . . . . . . . . 9-3
Configuring client . . . . . . . . . . . . . . . . . . . . . . . . . . . . . . . . . . . . . . . . . . 9-3
Configuring DAS . . . . . . . . . . . . . . . . . . . . . . . . . . . . . . . . . . . . . . . . . . . 9-4
Simple configuration scenario (TCP port 4500 is used) . . . . . . . . . . . . . . . . . . . 9-4
Application Notes
Overview . . . . . . . . . . . . . . . . . . . . . . . . . . . . . . . . . . . . . . . . . . . . . . . . . . . A-3
Applications . . . . . . . . . . . . . . . . . . . . . . . . . . . . . . . . . . . . . . . . . . . . . . . . . A-3
Omniback . . . . . . . . . . . . . . . . . . . . . . . . . . . . . . . . . . . . . . . . . . . . . . . . A-3
Directory Path and Link . . . . . . . . . . . . . . . . . . . . . . . . . . . . . . . . . . . A-3
Environment Variables . . . . . . . . . . . . . . . . . . . . . . . . . . . . . . . . . . . . . A-3
Drives . . . . . . . . . . . . . . . . . . . . . . . . . . . . . . . . . . . . . . . . . . . . . . . A-4
Logical Ranges of the I/O unit . . . . . . . . . . . . . . . . . . . . . . . . . . . . . . . A-4
Networker . . . . . . . . . . . . . . . . . . . . . . . . . . . . . . . . . . . . . . . . . . . . . . . A-5
ArcServ for Novell . . . . . . . . . . . . . . . . . . . . . . . . . . . . . . . . . . . . . . . . . . A-5
Windows-Clients (Remote Shell) . . . . . . . . . . . . . . . . . . . . . . . . . . . . . . . . . A-6
26 Jul 2002
Contents xxv
Page 26

Media Types . . . . . . . . . . . . . . . . . . . . . . . . . . . . . . . . . . . . . . . . . . . . . . . . . A-6
Index
xxvi Contents
6-00345-01
Page 27

Figures
Figure 2-1 UNIX and MVS with Shared AML. . . . . . . . . . . . . . . . . . . . . . . . 2-3
Figure 2-2 DAS Structure . . . . . . . . . . . . . . . . . . . . . . . . . . . . . . . . . . . . . 2-4
Figure 2-3 Modules in the DAS . . . . . . . . . . . . . . . . . . . . . . . . . . . . . . . . . 2-5
Figure 2-4 Assignment of Symbolic Volsers for Foreign Media . . . . . . . . . . . . . 2-9
Figure 2-5 Structure of Dual AMU Support . . . . . . . . . . . . . . . . . . . . . . . . . 2-11
Figure 4-1 Graphical Configuration Window . . . . . . . . . . . . . . . . . . . . . . . . 4-13
Figure 4-2 AMU-DAS Configuration for Drives . . . . . . . . . . . . . . . . . . . . . . . 4-14
Figure 4-3 EIF-Configuration Window. . . . . . . . . . . . . . . . . . . . . . . . . . . . . 4-14
Figure 4-4 AMU-DAS Configuration for EIF Ranges. . . . . . . . . . . . . . . . . . . . 4-14
Figure 4-5 Scratchpool Configuration . . . . . . . . . . . . . . . . . . . . . . . . . . . . . 4-15
Figure 8-1 Schematic Structure of the Work Environment. . . . . . . . . . . . . . . . 8-11
Figure 8-2 ArcVirOp Objects . . . . . . . . . . . . . . . . . . . . . . . . . . . . . . . . . . . 8-12
Figure A-1 Omniback Jukebox Configuration Window . . . . . . . . . . . . . . . . . . A-4
Figure 1-2 Networker Jukebox Configuration . . . . . . . . . . . . . . . . . . . . . . . . A-5
xxvii
Page 28

xxviii Figures
6-00345-01
Page 29

Tables
Table 3-1 Hazard Alert Messagess. . . . . . . . . . . . . . . . . . . . . . . . . . . . . . . 3-3
Table 4-1 Client Statement . . . . . . . . . . . . . . . . . . . . . . . . . . . . . . . . . . . 4-9
Table 4-2 Drive to Volser Range . . . . . . . . . . . . . . . . . . . . . . . . . . . . . . . 4-10
Table 4-3 Optional Parameters . . . . . . . . . . . . . . . . . . . . . . . . . . . . . . . . . 4-11
Table 4-4 Variables . . . . . . . . . . . . . . . . . . . . . . . . . . . . . . . . . . . . . . . . 4-18
Table 4-5 Environment Variables for DAS. . . . . . . . . . . . . . . . . . . . . . . . . . 4-19
Table 5-1 Client Management Commands. . . . . . . . . . . . . . . . . . . . . . . . . . 5-3
Table 5-2 Media Management Commands. . . . . . . . . . . . . . . . . . . . . . . . . . 5-4
Table 5-3 DAS Management Commands. . . . . . . . . . . . . . . . . . . . . . . . . . . 5-5
Table 5-4 Scratch Management Commands . . . . . . . . . . . . . . . . . . . . . . . . . 5-5
Table 5-5 Parameters for the Allocd Command . . . . . . . . . . . . . . . . . . . . . . 5-6
Table 5-6 Parameters for the Allocv Command . . . . . . . . . . . . . . . . . . . . . . 5-7
Table 5-7 Parameters for the Barcode Command . . . . . . . . . . . . . . . . . . . . . 5-7
Table 5-8 Parameter for the Cancel Command . . . . . . . . . . . . . . . . . . . . . . 5-8
Table 5-9 Parameters for the Carry Command . . . . . . . . . . . . . . . . . . . . . . 5-8
Table 5-10 Details for the Carry Command . . . . . . . . . . . . . . . . . . . . . . . . . 5-8
Table 5-11 Parameters for the Catf Command . . . . . . . . . . . . . . . . . . . . . . . 5-9
Table 5-12 Parameters for the CellInfo Command . . . . . . . . . . . . . . . . . . . . . 5-10
Table 5-13 Parameter for the Clean Command . . . . . . . . . . . . . . . . . . . . . . . 5-10
Table 5-14 Parameters for the Dismount Command . . . . . . . . . . . . . . . . . . . . 5-11
Table 5-15 Parameters for the Eif_info Command . . . . . . . . . . . . . . . . . . . . . 5-11
Table 5-16 Parameters for the Eject3 Command . . . . . . . . . . . . . . . . . . . . . . 5-12
xxix
Page 30

Table 5-17 Parameters for the Eject2 Command . . . . . . . . . . . . . . . . . . . . . . 5-13
Table 5-18 Parameters for the Eject Command . . . . . . . . . . . . . . . . . . . . . . . 5-13
Table 5-19 Parameters for the Ejectcl Command . . . . . . . . . . . . . . . . . . . . . . 5-14
Table 5-20 Parameters for the Ejectcom Command. . . . . . . . . . . . . . . . . . . . . 5-14
Table 5-21 Parameters for the Email Command. . . . . . . . . . . . . . . . . . . . . . . 5-15
Table 5-22 Parameter for the Flip Command . . . . . . . . . . . . . . . . . . . . . . . . 5-15
Table 5-23 Parameters for the Getvolsertodrive Command. . . . . . . . . . . . . . . . 5-15
Table 5-24 Parameters for the Getvoltoside Command . . . . . . . . . . . . . . . . . . 5-16
Table 5-25 Parameters for the Insert2 Command . . . . . . . . . . . . . . . . . . . . . . 5-16
Table 5-26 Parameter for the Insert Command . . . . . . . . . . . . . . . . . . . . . . . 5-17
Table 5-27 Parameters for the List2 Command . . . . . . . . . . . . . . . . . . . . . . . 5-18
Table 5-28 Explanation of Returned Status for List2 Command . . . . . . . . . . . . 5-19
Table 5-29 Parameters for the List Command . . . . . . . . . . . . . . . . . . . . . . . . 5-21
Table 5-30 Explanation of Returned Status for List Command . . . . . . . . . . . . . 5-21
Table 5-31 Parameters for the Listd4 Command . . . . . . . . . . . . . . . . . . . . . .5-22
Table 5-32 Explanation of Returned Status for Listd4 Command . . . . . . . . . . .5-22
Table 5-33 Parameters for the Listd3 Command . . . . . . . . . . . . . . . . . . . . . .5-23
Table 5-34 Explanation of Returned Status for Listd3 Command . . . . . . . . . . .5-24
Table 5-35 Parameters for the Listd2 Command . . . . . . . . . . . . . . . . . . . . . .5-25
Table 5-36 Explanation of Returned Status for Listd2 Command . . . . . . . . . . .5-25
Table 5-37 Parameters for the Listd Command . . . . . . . . . . . . . . . . . . . . . . .5-26
Table 5-38 Explanation of Returned Status for Listd Command . . . . . . . . . . . .5-26
Table 5-39 Parameter for the Listf Command . . . . . . . . . . . . . . . . . . . . . . . .5-27
Table 5-40 Returned Status for Listf Command Explanation . . . . . . . . . . . . . .5-27
Table 5-41 Parameter for the Listv Command. . . . . . . . . . . . . . . . . . . . . . . .5-28
Table 5-42 Parameters for the Mount Command . . . . . . . . . . . . . . . . . . . . . .5-29
Table 5-43 Parameters for the PartInventory Command . . . . . . . . . . . . . . . . .5-29
Table 5-44 Parameters for the Pausedas Command . . . . . . . . . . . . . . . . . . . .5-30
Table 5-45 Parameters for the Pausedrive Command . . . . . . . . . . . . . . . . . . .5-30
Table 5-46 Parameters for the Qvolsrange Command . . . . . . . . . . . . . . . . . . . 5-31
Table 5-47 Returned Status for Qvolsrange Command Explanation . . . . . . . . . . 5-31
Table 5-48 Parameters for the Rmf Command . . . . . . . . . . . . . . . . . . . . . . .5-32
xxx Tables
Table 5-49 Parameter for the Robhome Command . . . . . . . . . . . . . . . . . . . . .5-33
6-00345-01
Page 31

Table 5-50 Parameters for the Robstat Command . . . . . . . . . . . . . . . . . . . . .5-33
Table 5-51 Parameters for the Scap Command . . . . . . . . . . . . . . . . . . . . . . .5-33
Table 5-52 Parameters for the Scop2 Command . . . . . . . . . . . . . . . . . . . . . .5-34
Table 5-53 Parameters for the Scop Command . . . . . . . . . . . . . . . . . . . . . . .5-35
Table 5-54 Parameters for the Scr_get Command . . . . . . . . . . . . . . . . . . . . .5-35
Table 5-55 Parameters for the Scr_info Command . . . . . . . . . . . . . . . . . . . . .5-36
Table 5-56 Parameters for the Scr_insert Command . . . . . . . . . . . . . . . . . . . . 5-36
Table 5-57 Parameters for the Scr_mount Command . . . . . . . . . . . . . . . . . . .5-37
Table 5-58 Parameters for the Scr_set Command. . . . . . . . . . . . . . . . . . . . . .5-37
Table 5-59 Parameters for the Scr_set_range Command . . . . . . . . . . . . . . . . .5-38
Table 5-60 Parameters for the Scr_unset Command . . . . . . . . . . . . . . . . . . . .5-38
Table 5-61 Parameters for the Show2 Command . . . . . . . . . . . . . . . . . . . . . .5-39
Table 5-62 Parameters for the Show Command. . . . . . . . . . . . . . . . . . . . . . .5-39
Table 5-63 Parameter for the Shutdown Command . . . . . . . . . . . . . . . . . . . .5-40
Table 5-64 Parameters for the Snmp Command . . . . . . . . . . . . . . . . . . . . . .5-40
Table 5-65 Parameters for the Switch Command . . . . . . . . . . . . . . . . . . . . . .5-40
Table 5-66 Parameter for the Typelist Command. . . . . . . . . . . . . . . . . . . . . . 5-41
Table 5-67 Parameter for the Unload Command . . . . . . . . . . . . . . . . . . . . . .5-41
Table 5-68 Parameters for the View Command . . . . . . . . . . . . . . . . . . . . . . .5-42
Table 5-69 Returned Status for View2 Command Explanation . . . . . . . . . . . . .5-43
Table 5-70 Parameters for the View Command . . . . . . . . . . . . . . . . . . . . . . .5-44
Table 5-71 Returned Status for View Command Explanation . . . . . . . . . . . . . .5-44
Table 5-72 Parameters for the VolserInventory Command . . . . . . . . . . . . . . . .5-45
Table 8-1 Software Release to Platform Requirements . . . . . . . . . . . . . . . . . . 8-3
Table 8-2 Parameters for the Configuration File . . . . . . . . . . . . . . . . . . . . . 8-15
Table A-1 Links Required for Omniback with DAS. . . . . . . . . . . . . . . . . . . . A-3
Table 1-2 Pathname by OS Version . . . . . . . . . . . . . . . . . . . . . . . . . . . . . . A-3
Table 1-3 Pathname by OS Version . . . . . . . . . . . . . . . . . . . . . . . . . . . . . . A-4
Table 1-4 Supported Media Types. . . . . . . . . . . . . . . . . . . . . . . . . . . . . . . A-6
26 Jul 2002
Tables xxxi
Page 32

xxxii Tables
6-00345-01
Page 33

1
Introduction
Overview . . . . . . . . . . . . . . . . . . . . . . . . . . . . . . . . . . . . . . . . . . . . . . . . . . . 1-3
Intended Audience . . . . . . . . . . . . . . . . . . . . . . . . . . . . . . . . . . . . . . . . . . 1-3
Organization . . . . . . . . . . . . . . . . . . . . . . . . . . . . . . . . . . . . . . . . . . . . . . 1-3
Accociated Documents . . . . . . . . . . . . . . . . . . . . . . . . . . . . . . . . . . . . . . . . 1-3
Explanation of Symbols and Notations . . . . . . . . . . . . . . . . . . . . . . . . . . . . . 1-4
Assistance . . . . . . . . . . . . . . . . . . . . . . . . . . . . . . . . . . . . . . . . . . . . . . . . 1-4
1-4
Page 34

1-2 Introduction
6-00345-01
Page 35

Release Version 3.12
Overview
This document contains the information and instructions necessary to set up and operate the
Distributed AML Server (DAS) software for version 3.0 and higher. The topics discussed in this
chapter are:
• Overview
• Intended Audience
• Organization
• Associated Documents
• Explanation of Symbols and Notes
• Assistance
Intended Audience
This guide is intended for use by system programmers and administrators working with the DAS
software.
1-
Organization
This publication contains the following chapters:
Chapter 1 Introduction - Notes on the use of the manual
Chapter 2 Description - Overview of the functions on the DAS
Chapter 3 Safety - Information on the safe operation of the DAS
Chapter 4 Installation and Configuration - Explanation of the tasks necessary for
installation and configuration
Chapter 5 DAS Commands - Alphabetic list of all administrator commands
Chapter 6 Messages - List of all messages and the relevant actions necessary
Chapter 7 Utilities - Description of further utilities for working with the DAS
Chapter 8 Communication Applications - Description of the communication
applications.
Chapter 9 DAS ACI Firewall - Description of the configuration of the DAS ACI
firewall software.
Appendix A Application Notes - Information on the installation of certain
applications
Index
Accociated Documents
You may wish to reference the following documents:
26 Jul 2002
Overview 1-3
Page 36

Release Version 3.12
• DAS V3.12 Release Notes
• DAS V3.12 Interfacing Guide
Explanation of Symbols and Notations
The following four types of notation identify important information or instructions by using
distinctive font styles.
<1> + <2> Press these keys simultaneously.
Italics
Bold
Courier
Headline, e.g., Chapter 2, Introduction
File name, e.g., PROINST.EXE
Dialog segment, e.g., Media Identifier
Terms appearing on the AMU graphical user interface
Special Term, e.g., Manage Users
Operating element/key on the operating panel or the keyboard of the
AMU software.
Command line appearing in the operating system input window, e.g.,
[C:\]cd SDLC
Directory structure e.g., C:\SDLC
Assistance
If problems cannot be solved with the use of this document or if recommended training is
desired, contact the ADIC Technical Assistance Center (ATAC).
Toll free phone (North America) 1.800.827.3822
Toll free phone (Western Europe & Japan) 00.800.9999.3822
Toll free phone (rest of world)
AT&T Direct Access Code +
1.800.827.3822
1-4 Introduction
Email address (North America) techsup@adic.com
Email Address (outside North America) ATAC@adic.fr
6-00345-01
Page 37

2
Description
Overview . . . . . . . . . . . . . . . . . . . . . . . . . . . . . . . . . . . . . . . . . . . . . . . . . . . 2-3
DAS Working Environment . . . . . . . . . . . . . . . . . . . . . . . . . . . . . . . . . . . . . . . 2-3
Structure of the DAS Software . . . . . . . . . . . . . . . . . . . . . . . . . . . . . . . . . . . . . 2-3
DAS Client . . . . . . . . . . . . . . . . . . . . . . . . . . . . . . . . . . . . . . . . . . . . . . . 2-4
DAS Server . . . . . . . . . . . . . . . . . . . . . . . . . . . . . . . . . . . . . . . . . . . . . . . 2-4
Command Processing . . . . . . . . . . . . . . . . . . . . . . . . . . . . . . . . . . . . . . . . 2-5
DAS Commands . . . . . . . . . . . . . . . . . . . . . . . . . . . . . . . . . . . . . . . . . . . . . . 2-6
Media Management . . . . . . . . . . . . . . . . . . . . . . . . . . . . . . . . . . . . . . . . . 2-6
DAS Management . . . . . . . . . . . . . . . . . . . . . . . . . . . . . . . . . . . . . . . . . . 2-6
Client Management . . . . . . . . . . . . . . . . . . . . . . . . . . . . . . . . . . . . . . . . . 2-6
Scratch Pool Management . . . . . . . . . . . . . . . . . . . . . . . . . . . . . . . . . . . . . 2-6
DAS Functions . . . . . . . . . . . . . . . . . . . . . . . . . . . . . . . . . . . . . . . . . . . . . . . 2-7
Communication with the ACI . . . . . . . . . . . . . . . . . . . . . . . . . . . . . . . . . . . 2-7
Communication with ACI Client . . . . . . . . . . . . . . . . . . . . . . . . . . . . . . . . . 2-7
Configuration Management . . . . . . . . . . . . . . . . . . . . . . . . . . . . . . . . . . . . 2-8
Client Authorization . . . . . . . . . . . . . . . . . . . . . . . . . . . . . . . . . . . . . . . . . 2-8
Command Verification . . . . . . . . . . . . . . . . . . . . . . . . . . . . . . . . . . . . . . . 2-8
Error Handling . . . . . . . . . . . . . . . . . . . . . . . . . . . . . . . . . . . . . . . . . . . . 2-9
Mount and Dismount Media in the AML . . . . . . . . . . . . . . . . . . . . . . . . . . . 2-9
Working with Foreign Media . . . . . . . . . . . . . . . . . . . . . . . . . . . . . . . . . . . 2-9
Inserting Media in the AML . . . . . . . . . . . . . . . . . . . . . . . . . . . . . . . . . . . 2-9
Ejecting Media from the AML . . . . . . . . . . . . . . . . . . . . . . . . . . . . . . . . . . 2-10
Scratch Pool Administration . . . . . . . . . . . . . . . . . . . . . . . . . . . . . . . . . . . . 2-10
HICAP Application . . . . . . . . . . . . . . . . . . . . . . . . . . . . . . . . . . . . . . . . . . 2-10
Dual AMU Support . . . . . . . . . . . . . . . . . . . . . . . . . . . . . . . . . . . . . . . . . 2-10
Page 38

2-2 Description
6-00345-01
Page 39

Release Version 3.12
Overview
The following sections provide an introduction to the DAS environment, structure,
administrative commands, and functions. Refer to
Figure 2-1 .
2-
Figure 2-1 UNIX and MVS with Shared AML
The DAS software is a client/server software product designed to provide shared access to an
ADIC AML system by up to 50 separate clients. This means that the clients can run on entirely
separate platforms while using various media in the AML system. The DAS software makes it
possible for backup, document management or HSM applications to have direct access to the
media in the ADIC AML systems.
DAS Working Environment
The AML system is controlled by the AML Management Unit (control path). The data from the
applications is sent directly to the drives independently of this (data path). The DAS software
supports a wide variety of UNIX systems, and also the BS2000 and Windows NT. Connection
to other operating systems such as MVS, VM or Tandem is made across another interface of the
AMU.
Structure of the DAS Software
The DAS software comprise two main components:
26 Jul 2002
Overview 2-3
Page 40

Release Version 3.12
• Server function
• ACI function (AML client interface)
DAS Client
The client software consists of a library of functions and an administration program (dasadmin).
The software is available for various platforms. A new client simply requires the standard
TCP/IP functions with ONC RPC (Remote Procedure Calls) support and an ANSI C compiler.
The applications access the open interface (ACI). See
Figure 2-2 .
Figure 2-2 DAS Structure
Each client can be assigned specific access privileges to the AML.
• Functions (basic functions, extended or all functions)
• Drives
• Volsers (Volume Serial Number)
• Ranges of the I/O units
• Scratch pools
DAS Server
The server software is installed on the AMU, which is a computer running OS/2. See Figure 23 .
2-4 Description
6-00345-01
Page 41

Release Version 3.12
Figure 2-3 Modules in the DAS
The DAS server software is divided into three parts:
•RPC server
• DAS manager
• Request Manager.
The RPC server is responsible for communicating with the clients on the TCP/IP network and
converts the requests and responses into the appropriate format.
The DAS manager controls access privileges and priorities and sends the authorized requests to
the Request Manager.
The Request Manager sets up the AMU commands and sends these commands to the AML
Management Software (AMU).
The dasdata.ini file is used to save information about drive allocation, volser allocation and
foreign assignment.
Command Processing
The following is a simplified representation of one possible sequence of commands:
• The application reserves a drive in the DAS for a mount.
• The application requests a medium from a daemon for this mount.
• The daemon generates the mount request for the medium and sends it together with
drive, media type and volser through the ACI to the DAS.
• DAS generates a mount command for the AMU.
• The AMU acknowledges the procedure to the DAS on conclusion of the process.
• DAS passes the response on to the calling daemon.
• The application writes data to, or reads data from, the medium.
• The application requests the daemon to unload the drive if this is successful.
• The daemon sends the unload command to the drive, and the dismount command to the
DAS through the ACI.
26 Jul 2002
Structure of the DAS Software 2-5
Page 42

Release Version 3.12
• DAS executes the command through the AMU and sends an acknowledgment to the
daemon.
DAS Commands
DAS administrator commands can be divided into four areas:
• Media management
• DAS management
• Client management
• Scratch pool management
Media Management
• Mount and dismount
• Change sides on the optical disk in the drive
• Insert and eject
•Inventory
• View the available media
• View the media status
• Catalog or remove foreign media
• Clean the drive
• Insert and eject the cleaning cartridge
DAS Management
• Delete command
• View outstanding commands
• Activate and deactivate barcode reading for mount, move and eject from DAS
• Shut down DAS
• Shut down AMU
Client Management
• Reserve/release a drive for a client
• Reserve/release a volser for a client
• Modify access privileges for client
• Modify execution parameters
Scratch Pool Management
• Add volser to the scratch pool
• Remove volser from the scratch pool
2-6 Description
6-00345-01
Page 43

Release Version 3.12
• Get volser from the scratch pool
• View scratch pool information
DAS Functions
The DAS Software passes on all permitted Distributed AML client requests to the AML
Management Software and facilitates AML system administration by means of the dasadmin
program and the configuration file config. In detail, the following individual operations are
executed on DAS:
• Communication with the ACI
• Communication with the AMU
• Configuration Management
• Client Authorization
• Command verification
• Error handling
• Mount and dismount media in the AML
• Work with foreign media
• Insert media in the AML
• Eject media from the AML
• HICAP support
• Scratch pool management
• Support of the dual AMU
• Services for drive cleaning
Communication with the ACI
The AML Client and the DAS software communicate using ONC RPC. Data is interpreted
identically on all platforms through XDR data conversion protocol.
There may be a delay between the command being sent to the AML system and full
acknowledgment (from a few seconds to a few minutes if the drives are busy at the time or if the
AMU command queue is full). For this reason, the RPC calls are setup so that the DAS calls the
relevant client back when the command has been completed. The RPC request is organized by
the TCP/IP Portmapper.
Communication with ACI Client
Communication with the ACI is implemented using the OS/2 Event mechanism. Compliance
with the response time following a command call is monitored by a timer. A command is timed
out or repeated if the command is not executed within the prescribed time.
26 Jul 2002
DAS Functions 2-7
Page 44

Release Version 3.12
The client is notified immediately when a command has been successfully completed. A
decision is made whether it is worth repeating the command or an appropriate error message
should be sent to the client, if an error occurs. The client will be notified if DAS error handling
is unsuccessful. An exception is made for an inventory command which requires a large amount
of time. This command will always be acknowledged immediately and the client will receive no
further feedback following a positive or negative conclusion.
Configuration Management
ADIC AML systems can be configured with a wide variety of storage systems, drives and I/O
units. This information is stored in the AMU in a configuration file (Refer to the AMU Reference
Manual).
The DAS software can access the AMU configuration data to get media and system information.
In addition to this configuration data which is loaded from the file config when the program is
started, DAS requires further parameters of its own. These parameters are:
• Parameters for each client
♠ Operating parameters
♠ Access privileges for
♦ drives
♦ volser
♦ I/O units
♦ scratch pool
• Assignment of drives to volsers
• DAS Server statement
Client Authorization
Each client that has access to the DAS software must be authorized for the command.
Authorization is implemented by:
• Comparison of the client name with the sender's TCP/IP address (assignment in the
config file is by TCP/IP address or host name)
• Granting access privileges (complete or restricted)
• Assignment of privileges for devices (drives, volsers, I/O units, scratch pools)
WARNING The potential to limit access to media, drives and I/O units allows secure use
of different applications on one AML system.
Command Verification
Client requests are checked for:
• Command format and command syntax
• Parameter validity (drive, volser, I/O range etc.)
2-8 Description
6-00345-01
Page 45

Release Version 3.12
Error Handling
All client requests are buffered in DAS so that in the event of a communication error, the
command can be resumed without loss of data, therefore avoiding unnecessary error handling
measures. As soon as a client request is received by the DAS software:
• Command buffered (in RAM; this information is lost if there is a mains outage)
• Command to the dual AMU relayed to the dual DAS (if dual AMU is installed)
• Receipt confirmation sent to the client
• Command written to the AMU log file
• Command passed on to the AMU
• Response from AMU awaited for the preset time
• Client informed about the request status
The status of the drives and the cataloged foreign media are stored in the system file dasdata.ini.
Mount and Dismount Media in the AML
Mount and dismount are the basic AML functions for selecting the media from the archive using
volsers, inserting the medium in the drives and returning it to the archive after use.
Working with Foreign Media
There is no need to mount media which are to be inserted in a drive in the AML only once and
for a short time; instead such media can be introduced directly from the I/O unit into the drive
as foreign media even without a barcode label. This means that media which already have an
existing volser in the archive can be handled.
The areas in the I/O used for foreign media unit must be defined in the AMU configuration.
A symbolic volser can be assigned a coordinate using the catf command (Refer to the AMU
Reference Manual); this can then be used to perform a mount. See
Figure 2-4 Assignment of Symbolic Volsers for Foreign Media
Figure 2-4 .
Inserting Media in the AML
The insert function through the I/O unit of the AML system can be used if new media is required
in the AML (scratch media or for replacing seldom-used media). The DAS server allows clients
with full access privileges (administrator) to insert media.
26 Jul 2002
DAS Functions 2-9
Page 46

Release Version 3.12
Ejecting Media from the AML
The eject function can be used through the I/O unit of the AML system to eject media which is
no longer needed or not needed at present. The slot in the archive is retained for the volser if
ejection is temporary, otherwise “Null volser” is entered and the slot becomes available for other
volsers.
Scratch Pool Administration
DAS supports the creation of scratch pools to administrate media which are released for
rewriting. The administrator can use the scratch pools to assign the media to be used to the
individual applications. DAS supports:
• The addition of volsers to a scratch pool
• The removal of volsers from the scratch pool
• Mounting a scratch medium from a scratch pool
• The output of the volser for the next available scratch medium
• The output of information to the scratch pool
HICAP Application
The large I/O unit of the AML/J system is known as HICAP (High Capacity). This I/O unit has
the unusual feature that the archive is open while media are added and the robotic controller in
the archive is shut down for safety reasons.
The request to open the HICAP is sent from the AMU to the DAS software. DAS reacts to this
as follows:
• All new commands from clients which require the robotic controller are rejected with
the EHICAPINUSE message.
• Commands remain in the queue; the timer sets longer time-outs for these commands.
The commands from the queue are processed when the AML/J system is available. The clients
are not informed of this new status.
Dual AMU Support
Important components can be implemented redundantly to give increased protection against
breakdown of the total ADIC AML system. Including a second PC (dual AMU) brings the dual
function of the DAS into operation. See
Figure 2-5 .
2-10 Description
6-00345-01
Page 47
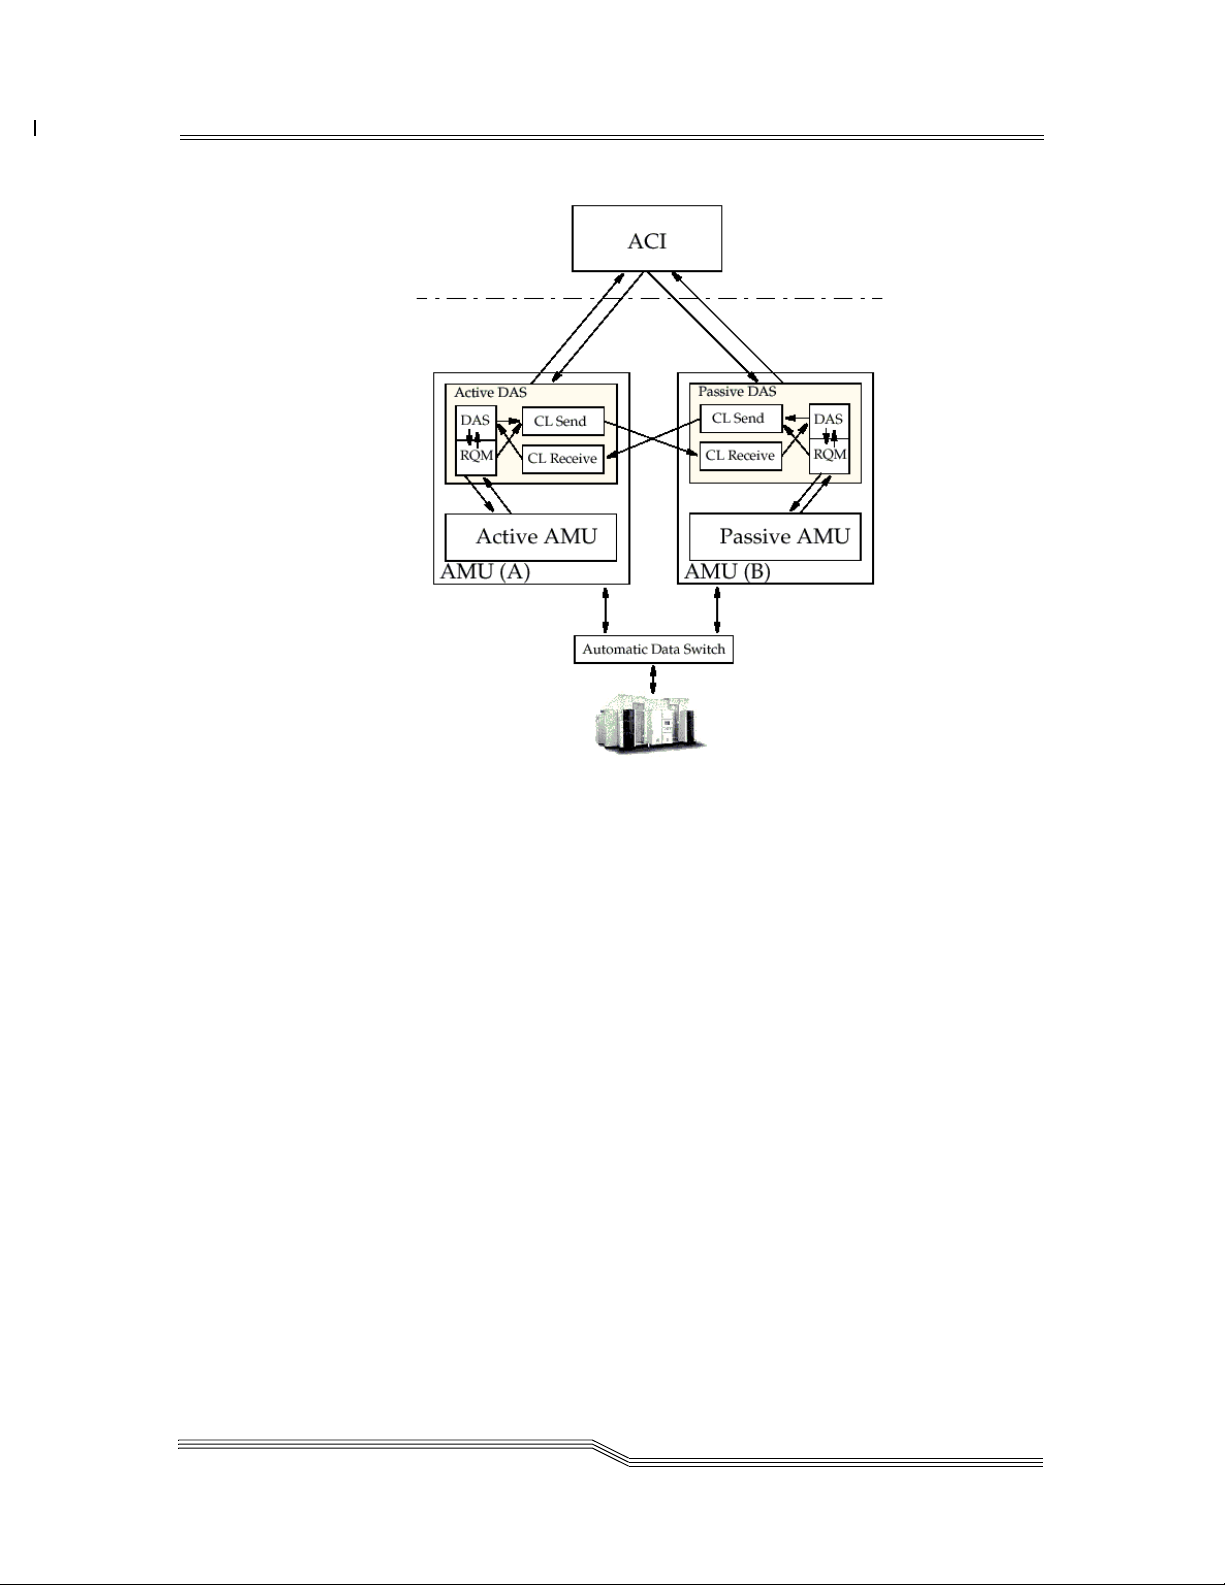
Release Version 3.12
Figure 2-5 Structure of Dual AMU Support
At run time, only one AMU and one DAS are active, while the second AMU is passive. The
active server is detected automatically and the DAS command is sent to that server.
The dasdata.ini is updated automatically on the passive DAS. In case of a switch, the passive
DAS has all actual information about the drive allocation, volser allocation and foreign
assignment. If the passive DAS is down, no updates are made between the dasdata.ini files. If
the ACI cannot find the active DAS, the ACI sends the command to the passive DAS and the
passive DAS sends the command to the passive AMU. This only works if the AMU routing is
working.
The passive AMU can be switched to active by using the switch command. The switch
command can be executed as normal or with the force option. Force means an immediate switch
through the passive server without first synchronizing the AMU database with the previously
active AMU.
The DAS software refuses new client commands by means of ESWITCHINPROG during the
switching process. All commands copied to the previously passive server are checked or
executed, and the clients are sent relevant acknowledgment following successful switching.
26 Jul 2002
DAS Functions 2-11
Page 48

Release Version 3.12
2-12 Description
6-00345-01
Page 49

3
Safety
Overview . . . . . . . . . . . . . . . . . . . . . . . . . . . . . . . . . . . . . . . . . . . . . . . . . . . 3-3
Hazard Alert Messages . . . . . . . . . . . . . . . . . . . . . . . . . . . . . . . . . . . . . . . . . . 3-3
Validation . . . . . . . . . . . . . . . . . . . . . . . . . . . . . . . . . . . . . . . . . . . . . . . . . . 3-4
Page 50

3-2 Safety
6-00345-01
Page 51

Release Version 3.12
Overview
Knowledge and observance of these instructions is imperative for the safe operation of the
ADIC AML systems.
Avoid danger when maintaining and operating the machine by behaving in a safety-conscious
manner and acting judiciously.
NOTE In addition to the safety instructions in this guide, local and professional safety
rules apply.
Hazard Alert Messages
ADIC classifies hazards in several categories. Table 3-1 shows the relationship of the symbols,
signal words, actual hazards, and possible consequences.
Table 3-1 Hazard Alert Messagess
Symbol Damage to Signal Word Definition Consequence
Persons
Danger
Warning
Caution
Imminent
hazardous situation
Potential hazardous
situation
Less hazardous
situation
Death or serious
injury
Possible death or
serious injury
Possible minor or
moderate injury
3-
Persons
Persons Caution
Material Attention
Material Static Sensitive
Note Tips for operators
26 Jul 2002
Imminent
hazardous electrical
situation
Less hazardous
situation
Potential damaging
situation
Potential electronic
damaging situation
Important or useful
information
Death or serious
injury
Possible minor or
moderate injury
Possible damage
to the product or
environment
Possible damage
to the product
No hazardous or
damaging
consequences
No hazardous or
damaging
consequences
Overview 3-3
Page 52

Release Version 3.12
Validation
These instruction are valid for ADIC AML systems.
Supplementary safety provisions for any components used on the machine are not invalidated
by these instructions.
NOTE Any other manufacturer’s documentation forms part of the AML
documentation.
3-4 Safety
6-00345-01
Page 53

4
Installation and
Configuration
Overview . . . . . . . . . . . . . . . . . . . . . . . . . . . . . . . . . . . . . . . . . . . . . . . . . . . 4-3
Installing the DAS Software . . . . . . . . . . . . . . . . . . . . . . . . . . . . . . . . . . . . . . . 4-3
Installation Using Dasinst.cmd . . . . . . . . . . . . . . . . . . . . . . . . . . . . . . . . . . 4-3
Installation Without the Install Program . . . . . . . . . . . . . . . . . . . . . . . . . . . . 4-4
Configuring the Server Software . . . . . . . . . . . . . . . . . . . . . . . . . . . . . . . . . . . . 4-4
Editing the Config.sys File . . . . . . . . . . . . . . . . . . . . . . . . . . . . . . . . . . . . . 4-4
Editing the Startup.cmd File . . . . . . . . . . . . . . . . . . . . . . . . . . . . . . . . . . . 4-5
Editing the Config File . . . . . . . . . . . . . . . . . . . . . . . . . . . . . . . . . . . . . . . 4-5
Configuration File . . . . . . . . . . . . . . . . . . . . . . . . . . . . . . . . . . . . . . . . . . . . . 4-6
Structure and Syntax of Config . . . . . . . . . . . . . . . . . . . . . . . . . . . . . . . . . 4-6
Definition of Ranges . . . . . . . . . . . . . . . . . . . . . . . . . . . . . . . . . . . . . . . . . 4-6
Definition of Volser Ranges . . . . . . . . . . . . . . . . . . . . . . . . . . . . . . . . . 4-7
Options . . . . . . . . . . . . . . . . . . . . . . . . . . . . . . . . . . . . . . . . . . . . . . . . . 4-7
Avoid Volume Contention Option . . . . . . . . . . . . . . . . . . . . . . . . . . . . . 4-7
Dismount Option . . . . . . . . . . . . . . . . . . . . . . . . . . . . . . . . . . . . . . . . 4-7
The Client Statement . . . . . . . . . . . . . . . . . . . . . . . . . . . . . . . . . . . . . . . . 4-8
Syntax . . . . . . . . . . . . . . . . . . . . . . . . . . . . . . . . . . . . . . . . . . . . . . . 4-8
The DriveToVol Statement . . . . . . . . . . . . . . . . . . . . . . . . . . . . . . . . . . . . . 4-10
Syntax . . . . . . . . . . . . . . . . . . . . . . . . . . . . . . . . . . . . . . . . . . . . . . .4-10
The Server Statement . . . . . . . . . . . . . . . . . . . . . . . . . . . . . . . . . . . . . . . . 4-11
Syntax . . . . . . . . . . . . . . . . . . . . . . . . . . . . . . . . . . . . . . . . . . . . . . . 4-11
Configuration File . . . . . . . . . . . . . . . . . . . . . . . . . . . . . . . . . . . . . . . 4-11
DAS Configuration in AMU . . . . . . . . . . . . . . . . . . . . . . . . . . . . . . . . . . . . . . .4-12
Drives . . . . . . . . . . . . . . . . . . . . . . . . . . . . . . . . . . . . . . . . . . . . . . . . . . 4-13
I/O Unit . . . . . . . . . . . . . . . . . . . . . . . . . . . . . . . . . . . . . . . . . . . . . . . . . 4-14
Scratchpools . . . . . . . . . . . . . . . . . . . . . . . . . . . . . . . . . . . . . . . . . . . . . . 4-15
Installing the ACI Software . . . . . . . . . . . . . . . . . . . . . . . . . . . . . . . . . . . . . . .4-15
UNIX-Client . . . . . . . . . . . . . . . . . . . . . . . . . . . . . . . . . . . . . . . . . . . . . . 4-15
Microsoft Windows NT Client Using RPC . . . . . . . . . . . . . . . . . . . . . . . . . . . 4-16
Microsoft Windows NT Client Using RSH . . . . . . . . . . . . . . . . . . . . . . . . . . .4-17
Page 54

Configuration DAS Client on the OS/2 PC . . . . . . . . . . . . . . . . . . . . . . . 4-17
Configuration Windows for the ACI Client . . . . . . . . . . . . . . . . . . . . . . . . . . 4-17
Configuration of the UNIX-Client Software . . . . . . . . . . . . . . . . . . . . . . . . . . . . . 4-18
Example of the C Shell . . . . . . . . . . . . . . . . . . . . . . . . . . . . . . . . . . . . . . . 4-18
Example of the Korn and Bourne Shell . . . . . . . . . . . . . . . . . . . . . . . . . . . . 4-18
Installation and Configuration . . . . . . . . . . . . . . . . . . . . . . . . . . . . . . . . . . . . . 4-19
4-2 Installation and Configuration
6-00345-01
Page 55

Release Version 3.12
Overview
This chapter describes how to:
• Install the DAS software on the AMU PC (OS/2 operating system)
• Configure the server software
• Install the ACI software on a UNIX computer and on Windows NT
• Setting up the working environment for the ACI
Installing the DAS Software
The DAS software for OS/2 is supplied on a diskette with an install program dasinst.cmd, an
install file and the decompression program. The DAS software for OS/2 also contains the ACI
for OS/2 software together with the server and the administrator program dasadmin. ADIC
recommends the use of the install program for the installation, but a manual install is also
possible.
Installation Using Dasinst.cmd
4-
Step 1 If the DAS is running (window DAS/2 in the list task): Stop DAS with
C:> \das\bin\dasadmin shut now.
Step 2 Insert the diskette containing the DAS software in the floppy drive of the AMU PC and
start the install program.
Step 3 Select the install option.
1
2 DAS Software Update from DAS 3.x to 3.x
3 DAS Software Update from DAS 1.30x to 3.x
4 DAS Software Update from DAS 1.20x to 3.0
5 Deinstallation of the last update
6 Deinstallation of complete DAS
7 End
Step 4 Follow the steps of the install program.
Choose option Y, if you have a DUAL-AMU. More parameter for DUALDAS will be
requested afterwards.
NOTE The following step is for DUALDAS only.
New Installation of DAS Server Software
(Installation without backup of an older Version)
26 Jul 2002
Overview 4-3
Page 56

Release Version 3.12
Step 5 Enter the TCP/IP name of the DUAL-AMU. (for the environment variable
DAS_PARTNER).
Enter the TCP/IP address in the form xxx.xxx.xxx.xxx. (assignment host name and IP
address will be written in the file hosts)
Step 6 Copy all the client software into the c:\das\aci directory and follow the
instructions.
Step 7 Remove the diskette from the drive
Installation Without the Install Program
You can skip this section if you have used the install program with success
Step 1 Backup any DAS software (if present), and delete all files from the c:\das directory.
Step 2 Create the directory on your hard disk if it does not exist.
md das
Step 3 Change to the directory.
cd das
Step 4 Insert the diskette containing the DAS software in the floppy drive of the AMU PC and
copy the DAS software into the DAS directory.
C\DAS:> copy a:\*.zip
Step 5 Remove the diskette from the drive.
Step 6 Unzip the DAS software.
C\DAS:> a:\unzip *.zip
Step 7 Copy all the tar files from the second and third floppy to the c:\das\aci directory.
Step 8 After installation is complete, the manual update of the config.sys file is necessary
Refer to Editing the Config.sys File.
Configuring the Server Software
The following sections provide information on editing the server software.
Editing the Config.sys File
ADIC recommends that the following amendments be made in the config.sys file so that the
administrator functions can be accessed on the OS/2 computer. The Libpath and the variables
DAS_SERVER, DAS_CLIENT and DAS_PARTNER will be written by the installation
program.
4-4 Installation and Configuration
6-00345-01
Page 57

Release Version 3.12
Step 1 Open the config.sys file in the editor.
C\:> epm c:\config.sys
Step 2 Append or add the following lines in config.sys.
LIBPATH=...C:\DAS\BIN;
SET DAS_SERVER=AMUA,AMUB
SET DAS_PARTNER=AMUB
SET DAS_CLIENT=AMUADMIN
SET DAS_EJECTAREAFULL=1
Refer to Installation and Configuration.
Step 3 Save config.sys.
Step 4 Restart the OS/2 computer to activate the changes to the configuration.
NOTE This restart is only necessary after a new installation.
Editing the Startup.cmd File
ADIC recommends that the following amendments be made in the startup.cmd file so that the
DAS software is started automatically on the OS/2 computer during startup.
Step 1 Open the startup.cmd file in the editor.
C\:> epm c:\startup.cmd
Step 2 Append or add the following lines in startup.cmd.
call tcpstart
das\tools\os2sleep 20
CD \AMU
call AmuStart
cd \das
tools\os2sleep 20
call DasStart
cd bin
start DAS/2 AmuClient
exit
Step 3 Save startup.cmd.
NOTE This sample file for the startup.cmd is installed under
c:\das\tools\startup.smp. An explanation of the individual points in
the startup.cmd file can be found in the AMU Reference Manual
Editing the Config File
The config file contains all settings for access privileges, drive assignment and command
options. A sample of this file is stored as c:\das\etc\config.smp during installation.
26 Jul 2002
Configuring the Server Software 4-5
Page 58

Release Version 3.12
Step 1 For manual and first time installation, copy the config.smp sample file to config.
C\:> copy \das\etc\config.smp das\etc\config
Step 2 Open the config file in the editor.
C\:> epm \das\etc\config.
Step 3 Append or add to config the required information.
Step 4 Save config.
Configuration File
This section describes editing the config file and editing the statement structure.
Structure and Syntax of Config
Entries in the config file are structured according to the following scheme.
Statement_name Keyword_name1 =
Keyword_parameter1,
Keyword_name2 = ...
There are three types of statements here:
• Client statement
• DriveToVol statement
• Server statement
Any line may contain a maximum of 100 characters. No special characters are permitted for
variables in the file (except for the TCP/IP host names and client names). The special characters
-, _, + and $ may be used in the TCP/IP host name and client name. The layout of the file (order
of statements, blank lines and spaces) is free, although ADIC recommends the structure of the
sample file as giving a clearer overview. Comment lines may be added if they begin with the
“#” character.
Definition of Ranges
Devices are assigned to the individual clients by the definitions in the config file. This
assignment is made in logical ranges in the AML. A logical range can be:
• a list of individual objects
• a continuous range
• an individual object
• keyword ALL
range = item |
item, item, ... |
item-item |ALL # contains all objects
4-6 Installation and Configuration
6-00345-01
Page 59

Release Version 3.12
Definition of Volser Ranges
The definition of the volser ranges is a special form of the definition of logical ranges. The
following rules apply for the volsers:
• A volser can have up to 16 alphanumeric characters
• Lowercase and uppercase letters (no special characters) and the numerals 0 to 9 are
valid characters.
• The number and type of characters at the beginning and end of a range definition must
match (e.g. ABC001 - ABC999, or 0001001 - 5638516, or 00aaAAa - 99zzZZZ).
• “a - Z” ranges also contain the numerals 0 to 9
Options
This section describes the avoid volume contention and dismount options.
Avoid Volume Contention Option
This option defines the error handling for a mount command on a volser which is not located at
the home position or drive on which is loaded with a cleaning cartridge.
avc: The command is immediately acknowledged negatively for a mount
command on a volser which has the attribute Mounted,
Reverse_Side_Mounted, Ejected in the AMU database or if there is a
cleaning cartridge in the drive.
no_avc: For a mount command on a volser which has the attribute Mounted,
Reverse_Side_Mounted, Ejected in the AMU database or if there is a
cleaning cartridge in the drive, the command is placed in the command
queue and suspended until
♠ The volser is shifted to the home position by a dismount
command.
♠ DAS is terminated.
The default (no specification in the config file) is no_avc.
Dismount Option
This option defines the reaction to a mount command on a drive that is already occupied.
dismount: The command is immediately acknowledged negatively for a mount
command on a drive which has the attribute Occupied.
This requires that the client sends a dismount command.
no_dismount: The command is placed in the command queue and a dismount command
is automatically generated on this drive for a mount command on a volser
which has the attribute Occupied in the AMU database.
The default (no specification in the config file) is no_dismount.
26 Jul 2002
Configuration File 4-7
Page 60

Release Version 3.12
The Client Statement
A client statement is required for each client that accesses the server. The maximum possible
number of client statements is 50.
Syntax
Below the syntax of the client statement is shown.
4-8 Installation and Configuration
6-00345-01
Page 61

Release Version 3.12
client client_name = client-name
, hostname = workstation_network_name | ,ip_address = ip
address
[, requests =(basic | extended | complete)]
[, options=([avc|no_avc][,dismount|no_dismount])]
[, volumes = ((volume range),(volume range),...)]
[, drives = ((drive range))]
[, inserts = ((insert area range))]
[, ejects = ((eject area range))]
[, scratchpools = (( scratchpools range ))]
Refer to Table 4-1 for an explanation of the keywords in the client statement
Table 4-1 Client Statement
Keyword Explanation
Name of the client (the name must not be the client's TCP/IP name).
The following rules apply for the client name:
• The client name may consist of up to 64 characters
clientname
• Lowercase and uppercase letters and the numerals 0 to 9 and the special
characters -, _, + and $ are valid characters in the client name.
• The client name is case-sensitive
The client name DAS_SUPERVISOR has the special privilege of
reserving drives and undoing volsers.
The name of the relevant IP address of the client. The name must be
resolved either through the hosts file or through a domain name server.
host_name
The following rules apply for the names:
• The host name may consist of up to 64 characters.
• Lowercase and uppercase letters, the numerals 0 to 9 and up to 6 stops
are valid characters in the host name.
ip_address
The IP address of the client
The IP address has the format xxx.xxx.xxx.xxx.
Access privileges for the client.
requests
• basic: only mount and dismount commands are permitted
• extended: mount, dismount and all status commands are allowed
• complete: all commands are permitted
Flow control option, refer to Options.
options
• dismount or no_dismount: Automatic KEEP command
• avc or no_avc (avoid volume completion) wait for the KEEP command
of a volume which is already in use.
volumes
Assignment of the volser ranges available to the client
Up to 10 volser ranges can be assigned per client
Assignment of drives available to the client in a range, e.g. (DRV_VHS,
drive range
DRV_DLT, DRV_3480), or (DLT1 - DLT4) or (ALL). The name must
match that in the description field of the AMU configuration.
26 Jul 2002
Configuration File 4-9
Page 62
Release Version 3.12
Table 4-1 Client Statement
Keyword Explanation
Assignment of ranges available to the client (Logical Range) in the I/O
insert area
range
eject area
range
scratch
pools range
unit for inserting media, e.g. (I01, I07, I66) or (I01 - I37) or (ALL). The
coordinates are assigned in the AMU configuration. It is possible to
interleave other operators or ejection fields with insertion fields.
Assignment of ranges (Logical Range) in the I/O unit available to the
client for ejecting media, e.g. (E01, E09, E99) or (E05 - E47) or (ALL).
The coordinates are assigned in AMU configuration. It is possible to
overlap with other users or other insertion fields.
Assignment of scratch pools available to the client. Scratch pool
administration is configured in AMU configuration.
Assignment can be by
• media type
• client or client group.
Different media types cannot be managed together in one scratch pool. The
following rules apply for the scratch pool names.
• The pool name may consist of up to 16+1 characters.
• Lowercase and uppercase letters (no special characters) and the numbers
0 to 9 are valid characters in the pool name.
• The keyword ALL gives access to all scratch pools.
• The keyword DEFAULT gives access to all default scratch pools.
• Default scratch pool names are formed from a combination of the word
DEFAULT and the AMU media type, e.g. DEFAULTC0
The DriveToVol Statement
The DriveToVol statement can be used for any drive in the AML system. Volser ranges are
assigned to specified drives by this statement. Media type (AMU) verification is independent of
this statement.
Syntax
Below an example of the DriveToVol statement is shown.
DriveToVol drive = drive-name, volsers
=((volumerange),(volumerange),.)
Each drive needs its own, complete statement. Drive ranges are not possible.
Table 4-2 gives an explanation of the keywords used in the DriveToVol statement.
Table 4-2 Drive to Volser Range
Keyword Explanation
drive-name
volume range Range of volsers to be assigned to the drive
Name of the drive to which volsers are to be assigned. (Drive name
according to configuration in AMU)
4-10 Installation and Configuration
6-00345-01
Page 63

Release Version 3.12
The Server Statement
The server statement can be entered once in the config file. This sets optional parameters for
operating the dual DAS and for error handling. The server statement is required.
Syntax
Below an example of the server statement is shown.
server [ dualdas_port = port_number ]
[, retry_keep = retry_number ]
[, timeout_move = time]
[, timeout_ei = time],
[logging_off = command]
See Table 4-3 for an explanation of the keywords used in the server statement.
Table 4-3 Optional Parameters
Keyword Explanation
TCP/IP port address for communication between the active DAS and
dualdas_port
the passive DAS. (Default: 5000) The default value must be modified
if another application is occupying port 5000.
Number of internal iterations of the dismount command for an AMU
error of type “Cartridge not ejected from drive for.<0420>.
retry_keep
timeout_move
timeout_ei
logging_off
WARNING The dismount manager in the AMU software is equally
capable of executing this error handling. Make sure
that the command is configured so that it is not timed
out as a result of too many iterations.
Time in seconds, between the start of a mount or dismount command
and the response. If the command needs more time, the response is
ETIMEOUT. Default: 1800.
WARNING For higher values, change the timeout values for the
client. Change the environment variables on the client.
Time in seconds, between the start of a insert or eject command and
the respond. If the command need more time is the response
ETIMEOUT. Default: 1800.
WARNING For higher values, change the timeout values for the
client. Change the environment variables on the client.
Used to switch off log messages for DAS commands, use the name of
the DAS ADMIN command.
WARNING Currently, only the listd commands are supported.
Configuration File
An example below shows the combined use of all of the previously defined statements.
client client_name = DAS_SUPERVISOR,
26 Jul 2002
Configuration File 4-11
Page 64

Release Version 3.12
hostname = AMU,
requests = complete,
options = (no_avc,no_dismount),
volumes = ((ALL)),
drives = ((ALL)),
inserts = ((ALL)),
ejects = ((ALL)),
scratchpools = ((ALL))
client client_name = dasadmin,
hostname = unixhost,
requests = extended,
volumes = ((ALL)),
drives = ((ALL)),
inserts = ((ALL)),
ejects = ((ALL)),
scratchpools = ((ALL))
DriveToVol drive = DLT01,
volsers = ((000001),(000004 -
000999))
DriveToVol drive = ODISK01,
volsers = ((000002),(00A - 99B))
DriveToVol drive = Drive2,
volsers = ( (000002),(000007 -
000010) )
server dualdas_port = 5000,
retry_keep = 5,
timeout_move = 1800,
timeout_ei = 1800,
logging_off = listd
DAS Configuration in AMU
The settings must be compatible in order for DAS to function correctly with the AMU. The
settings in AMU with regard to the DAS software are described below. You can find precise
information on the AMU configuration in the AMU Reference Manual.
The settings are made in the Admin - Configuration... menu. See Figure 4-1 .
4-12 Installation and Configuration
6-00345-01
Page 65

Release Version 3.12
Figure 4-1 Graphical Configuration Window
DAS is not shown as the host in AMU configuration.
Drives
Step 1 Open the Drive Configuration window by double-clicking on the drive icon. Refer to
Figure 4-2 .
26 Jul 2002
DAS Configuration in AMU 4-13
Page 66

Release Version 3.12
Figure 4-2 AMU-DAS Configuration for Drives
Step 2 Modify the configuration
Step 3 Finish configuration by clicking OK
I/O Unit
Step 1 Open the EIF-Configuration window by double-clicking on the I/O unit icon. See
Figure 4-3 .
Figure 4-3 EIF-Configuration Window
Step 2 Open the relevant window by clicking on the Logical Ranges field. See Figure 4-4 .
Figure 4-4 AMU-DAS Configuration for EIF Ranges
Step 3 Modify the configuration.
4-14 Installation and Configuration
6-00345-01
Page 67

Release Version 3.12
• Add insertion ranges (Type: AMU Dynamic, Name: Ixx, where xx is 01-99)
• Add ejection ranges (Type: AMU Dynamic, Name: Exx, where xx is 01-99)
• Add foreign mount ranges (Type: Foreign)
WARNING Each name may only be defined once in the list. Ranges of type AMU Dynamic
may interleave. It is not permissible to interleave ranges of type foreign and
HACC Dynamic.
Step 4 Quit the Logical Range window by clicking OK
Step 5 Quit EIF-Configuration window by clicking OK
Step 6 Save the changes by clicking Save
Step 7 Open EIF-Configuration and Logical Ranges window once more
Step 8 Modify the database with Update EIF
Scratchpools
Step 1 Open Admin Scratch Pool.. from the menu. Refer to Figure 4-5
Figure 4-5 Scratchpool Configuration
Installing the ACI Software
This section describes the process for installing the ACI software for a UNIX-client and for a
Windows NT client
UNIX-Client
During the DAS installation, the ACI software is copied into the c:/das/aci directory. The
desired tar file can be copied with a FTP program to the UNIX machine.
26 Jul 2002
Installing the ACI Software 4-15
Page 68

Release Version 3.12
Step 1 Create the directory for the ACI software.
mkdir /usr/local/aci
Step 2 Copy the ACI software to the directory created (ftp from the AMU) or (configuration
of the OS/2 ftp). Refer to the AMU Installation Guide.
$ cd /usr/local/aci
$ ftp amu_hostname
userid> useid
password> password
ftp> bin
ftp> get das/aci/filename
ftp> quit
Step 3 Decompress the files to the /usr/local/aci directory.
tar -xvf /usr/local/aci/filename
Microsoft Windows NT Client Using RPC
Step 1 Create the c:\aci directory.
Step 2 Enter the ACI for and Windows NT disk in the drive a:
Step 3 Unpack the file aci zip-file into the c:\aci directory.
Step 4 Copy the file aci.dll, ezrpc32.dll, winrpc32.dll and dasadmin.exe into your Windows
system directory. (On Windows NT 4.0 it is the: \winnt\system32 directory).
Step 5 Open Control Panel/System/Environment.
• Extend the path environment variable with ACI installation directory c:\aci.
• Define the environment variable DAS_SERVER. The value is the hostname where
DAS-server is running.
• Define the environment variable DAS_CLIENT. The value is the clientname of the NT
client which is defined in the DAS config file on the OS/2 computer.
Step 6 Change to the c:\aci directory.
Step 7 Install the portmapper by typing portinst. The portmapper should be set to start
automatically during the start of NT.
Step 8 Remove the disk from the a: drive.
Step 9 Reboot the NT machine.
4-16 Installation and Configuration
6-00345-01
Page 69

Release Version 3.12
Microsoft Windows NT Client Using RSH
This section describes the process for configuring DAS clients on the OS/2 PC. For further
information refer to
Windows 95/NT.
Step 1 Enter the disk in the AMU-PC
Step 2 Open an OS/2 window and enter.
copy a:aci.cmd c:\os2
Step 3 Edit the C:\DAS\ETC\CONFIG file.
C:> epm c:\das\etc\config
Step 4 Add a new client to the list of DAS clients.
WARNING For Dual AMU operations, it is recommended that both AMU client_names
client_name: alphanumeric name for authorization
ip_address / hostname: TCP/IP identification of OS/2 PC (AMU)
requests: complete
options: (avc, dismount)
volumes: up to 10 ranges of the media names
drives: alphanumeric names similar to the Description in the Graphical
Configuration DAS Client on the OS/2 PC of the DAS Interfacing guide for
Configuration DAS Client on the OS/2 PC
should be added to the configuration file.
Configuration in the AMU
Step 5 Select TCP/IP and TCP/IP Configuration Icon to open the Window TCP/IP
Configuration
Step 6 Configure and Start the RSH daemon on the AMU PC
Step 7 Configure the Security for the RSH (Add the HOST-Name of the Windows-NT
machine to the list “HOST authorized to use RSH”)
Step 8 Configure and Start a Telnet Deamon on the AMU PC (optional for VirOp
Administrator menu)
Step 9 Save the CONFIG file on a floppy for print out.
Step 10 Close all applications on the AMU PC and restart the PC.
Configuration Windows for the ACI Client
Step 1 Set the necessary environment variables:
26 Jul 2002
Installing the ACI Software 4-17
Page 70

Release Version 3.12
WARNING The following configuration is only necessary if you work with the dasadmin
command line.
See Table 4-4 for an explanation of the variables in configuring Windows for ACI.
Table 4-4 Variables
Variable Explanation
DAS_SERVER
DAS_CLIENT
ACI_MEDIA_TYPE Default media type for the commands
WARNING Start the environment variables on the startup with AUTOEXEC.BAT or your
on login script.
TCP/IP Identification of the AMU (OS/2) PC for the
commands
Name for authorization of the command related to the
configuration in file config on the AMU (OS/2) PC
Configuration of the UNIX-Client Software
Configuration of the client is dependent on the platform used and the application which is to
access the AML system. Instructions on certain points can be found in the
For use of the ACI
• the library files must be made accessible to the system (set LIBPATH or create an
association)
• the environment variables must be set.
The two examples of environment variable configuration follow.
Applications.
Example of the C Shell
Alternatively the variables can also be entered in the .cshrc file to make the values universally
valid.
setenv DAS_SERVER AMUA,AMUB
setenv DAS_CLIENT dasadmin
setenv ACI_MEDIA_TYPE DECDLT
setenv ACI_TIMOUT_MOVE 1800
setenv ACI_TIMOUT_EI 1800
Example of the Korn and Bourne Shell
Alternatively the variables can also be entered in the .profile (Korn shell) or .login (Bourne
shell) file to make the values universally valid.
DAS_SERVER=AMUA,AMUB; export DAS_SERVER
DAS_CLIENT=dasadmin; export DAS_CLIENT
ACI_MEDIA_TYPE=DECDLT; export ACI_MEDIA_TYPE
4-18 Installation and Configuration
6-00345-01
Page 71

Release Version 3.12
ACI_TIMOUT_MOVE=1800; export ACI_TIMEOUT_MOVE
ACI_TIMOUT_EI=1800; export ACI_TIMOUT_EI
Installation and Configuration
The environment variables listed must be set for each client. Refer to Table 4-5 .
Table 4-5 Environment Variables for DAS
Parameter Parameter Type Explanation
DAS_SERVER required for ACI
DAS_CLIENT required for ACI
ACI_MEDIA_TYPE optional for ACI
DAS_EJECTAREAFULL optional for DAS
DAS_PARTNER
ACI_TIMEOUT_MOVE optional for ACI
ACI_TIMEOUT_EI optional for ACI
required for DAS if
Dual-AMU installed
TCP/IP Identification of the AMU
(OS/2) PC for the commands
Name for authorization of the
command related to the
configuration in file config on the
AMU (OS/2) PC
Default media type for the
commands
Reaction to the AMU message
<1157>. There is no free eject
position in EIF-device.
1: message to the client (new
command to continue)
2: no message to the client
(automatic continuation once the
range has been opened and cleared)
information for the Server software,
where the Dual-DAS is installed.
Time for the ACI to wait for the
response to the commands mount
and dismount.
Default: 1800 seconds
Time for the ACI to wait for the
response to the commands insert,
insert2, eject, eject2, ejectcl.
Default: 1800 seconds
26 Jul 2002
Installation and Configuration 4-19
Page 72

Release Version 3.12
4-20 Installation and Configuration
6-00345-01
Page 73

5
DAS
Commands
Overview . . . . . . . . . . . . . . . . . . . . . . . . . . . . . . . . . . . . . . . . . . . . . . . . . . . 5-3
DAS Commands . . . . . . . . . . . . . . . . . . . . . . . . . . . . . . . . . . . . . . . . . . . . . . 5-3
Client Management Commands . . . . . . . . . . . . . . . . . . . . . . . . . . . . . . . . . . 5-3
Media Management Commands . . . . . . . . . . . . . . . . . . . . . . . . . . . . . . . . . 5-4
DAS Management Commands . . . . . . . . . . . . . . . . . . . . . . . . . . . . . . . . . . . 5-5
Scratch Management Commands . . . . . . . . . . . . . . . . . . . . . . . . . . . . . . . . . 5-5
Command Description . . . . . . . . . . . . . . . . . . . . . . . . . . . . . . . . . . . . . . . . 5-6
Reserve Drive (allocd) . . . . . . . . . . . . . . . . . . . . . . . . . . . . . . . . . . . . . 5-6
Reserve Volsers (allocv) . . . . . . . . . . . . . . . . . . . . . . . . . . . . . . . . . . . . 5-6
Activate/Deactivate the Barcode Reader (barcode) . . . . . . . . . . . . . . . . . . . 5-7
Cancel Command (cancel) . . . . . . . . . . . . . . . . . . . . . . . . . . . . . . . . . . 5-7
Move a Medium to the Slot (carry) . . . . . . . . . . . . . . . . . . . . . . . . . . . . 5-8
Catalog Foreign Volume (catf) . . . . . . . . . . . . . . . . . . . . . . . . . . . . . . . . 5-9
Get Device Information (cellinfo) . . . . . . . . . . . . . . . . . . . . . . . . . . . . . . 5-9
Drive Cleaning (clean) . . . . . . . . . . . . . . . . . . . . . . . . . . . . . . . . . . . . . 5-10
Retrieve a Medium from the Drive (dismount) . . . . . . . . . . . . . . . . . . . . . 5-11
View the Logical Ranges Configuration (eif_conf) . . . . . . . . . . . . . . . . . . . 5-11
Display Logical Ranges in EIF(eif_info) . . . . . . . . . . . . . . . . . . . . . . . . . . 5-11
Eject Media (eject3) . . . . . . . . . . . . . . . . . . . . . . . . . . . . . . . . . . . . . . . 5-12
Eject Media (eject2) . . . . . . . . . . . . . . . . . . . . . . . . . . . . . . . . . . . . . . . 5-12
Eject Media (eject) . . . . . . . . . . . . . . . . . . . . . . . . . . . . . . . . . . . . . . . 5-13
Eject Cleaning Media (ejectcl) . . . . . . . . . . . . . . . . . . . . . . . . . . . . . . . .5-13
Eject Media Complete (ejectcom) . . . . . . . . . . . . . . . . . . . . . . . . . . . . . . 5-14
Send Email Message (email) . . . . . . . . . . . . . . . . . . . . . . . . . . . . . . . . . 5-14
Flip Optical Disk in the Drive (flip) . . . . . . . . . . . . . . . . . . . . . . . . . . . . 5-15
Display Volsers Assigned to Drive (getvolsertodrive) . . . . . . . . . . . . . . . . . 5-15
Display Volsers of the Optical Disk (getvoltoside) . . . . . . . . . . . . . . . . . . . 5-15
Insert Media (insert2) . . . . . . . . . . . . . . . . . . . . . . . . . . . . . . . . . . . . . 5-16
Insert Media (insert) . . . . . . . . . . . . . . . . . . . . . . . . . . . . . . . . . . . . . . 5-17
Initialize Library Elements (inventory) . . . . . . . . . . . . . . . . . . . . . . . . . . 5-17
Shut Down the AMU PC (killamu) . . . . . . . . . . . . . . . . . . . . . . . . . . . . 5-18
Display All Active Commands (list2) . . . . . . . . . . . . . . . . . . . . . . . . . . . 5-18
Display All Active Commands (list) . . . . . . . . . . . . . . . . . . . . . . . . . . . .5-20
Page 74

Display Drive Assignment (listd4) . . . . . . . . . . . . . . . . . . . . . . . . . . . . . 5-21
Display Drive Assignment (listd3) . . . . . . . . . . . . . . . . . . . . . . . . . . . . .5-23
Display Drive Assignment (listd2) . . . . . . . . . . . . . . . . . . . . . . . . . . . . .5-25
Display Drive Assignment (listd) . . . . . . . . . . . . . . . . . . . . . . . . . . . . . .5-26
Display Foreign Volser (listf) . . . . . . . . . . . . . . . . . . . . . . . . . . . . . . . .5-27
Display Volser Reservation (listv) . . . . . . . . . . . . . . . . . . . . . . . . . . . . . .5-28
Load a Medium in Drive (mount) . . . . . . . . . . . . . . . . . . . . . . . . . . . . .5-28
Initialize Element Range (partinventory) . . . . . . . . . . . . . . . . . . . . . . . . .5-29
Pause DAS AMU Communication (pausedas) . . . . . . . . . . . . . . . . . . . . . .5-29
Disable Robot Access to Drive (pausedrive) . . . . . . . . . . . . . . . . . . . . . . .5-30
Query the Software Version (qversion) . . . . . . . . . . . . . . . . . . . . . . . . . .5-30
Query the Volser Ranges in the Library (qvolsrange) . . . . . . . . . . . . . . . . 5-31
Remove a Foreign Medium (rmf) . . . . . . . . . . . . . . . . . . . . . . . . . . . . . .5-32
Deactivate Robotic Controller in the library (robhome) . . . . . . . . . . . . . . . .5-32
Activate Robotic Controller in the Library (robstat) . . . . . . . . . . . . . . . . . .5-33
Set Client Access Privileges (scap) . . . . . . . . . . . . . . . . . . . . . . . . . . . . .5-33
Set Operating Parameters (scop2) . . . . . . . . . . . . . . . . . . . . . . . . . . . . . .5-34
Set Operating Parameters (scop) . . . . . . . . . . . . . . . . . . . . . . . . . . . . . .5-34
Next Scratch Medium (scr_get) . . . . . . . . . . . . . . . . . . . . . . . . . . . . . . .5-35
Scratch Pool Information (scr_info) . . . . . . . . . . . . . . . . . . . . . . . . . . . .5-36
Insert Scratch Media (scr_insert) . . . . . . . . . . . . . . . . . . . . . . . . . . . . . .5-36
Execute Scratch Mount (scr_mount) . . . . . . . . . . . . . . . . . . . . . . . . . . . .5-36
Add Medium to the Scratch Pool (scr_set) . . . . . . . . . . . . . . . . . . . . . . . .5-37
Add Media to the Scratch Pool (scr_set_range) . . . . . . . . . . . . . . . . . . . . .5-37
Remove Medium from Scratch Pool (scr_unset) . . . . . . . . . . . . . . . . . . . . 5-38
Display Client Parameters (show2) . . . . . . . . . . . . . . . . . . . . . . . . . . . . .5-38
Display Client Parameters (show) . . . . . . . . . . . . . . . . . . . . . . . . . . . . .5-39
Shut Down DAS (shutdown) . . . . . . . . . . . . . . . . . . . . . . . . . . . . . . . .5-39
Send SNMP Message (snmp) . . . . . . . . . . . . . . . . . . . . . . . . . . . . . . . . .5-40
Switch to the Passive AMU (switch) . . . . . . . . . . . . . . . . . . . . . . . . . . . .5-40
Display Drives by Media Type (typelist) . . . . . . . . . . . . . . . . . . . . . . . . . 5-41
Operate Drive Buttons (unload) . . . . . . . . . . . . . . . . . . . . . . . . . . . . . . . 5-41
Obtain Information on a Volser Range (view2) . . . . . . . . . . . . . . . . . . . . . 5-41
Obtain Information on a Volser (view) . . . . . . . . . . . . . . . . . . . . . . . . . .5-43
Initialize Volser (volserinventory) . . . . . . . . . . . . . . . . . . . . . . . . . . . . . .5-45
5-2 DAS Commands
6-00345-01
Page 75

Release Version 3.12
Overview
The DAS administrator can use the commands to set up and monitor the AML system. This
chapter provides full explanation of all commands in alphabetical order. A brief illustration of
the syntax can be obtained online by entering the command using the -h option
DAS Commands
DAS commands are divided into:
• Client management
• Media management
• DAS management
• Scratch management
All these commands are called with dasadmin
• from the C:\DAS\BIN directory on the OS/2 client
• from the /usr/local/aci/admin directory on the UNIX client
• from the system directory \winnt\system32
5-
Client Management Commands
This section provides a list and an explanation of the client management commands. See Table
5-1 .
Table 5-1 Client Management Commands
Command Explanation
allocd changes drive reservation for clients
allocv reserves volsers for a client
listd displays drive assignment for up to 16 drives
listd2 displays drive assignment for up to 250 drives
listd3 displays drive assignment for up to 250 drives
listd4 displays drive assignment for up to 380 drives
listf displays information about foreign volsers
listv displays volser reservations
scop temporarily modifies the working parameters
scop2 temporarily modifies the working parameters
scap temporarily modifies access privileges
show displays current access privileges and operating parameters
show2 displays current access privileges and operating parameters
26 Jul 2002
Overview 5-3
Page 76
Release Version 3.12
Table 5-1 Client Management Commands
Command Explanation
typelist shows all drives or specific drives with matching media type
Media Management Commands
This section provides a list and an explanation of the media management commands. See Table
5-2 .
Table 5-2 Media Management Commands
Command Explanation
catf catalogs foreign media
carry move cartridge from one slot to another
cell_info displays information about devices and cartridges in the system
clean cleans drive
dismount removes a cartridge from a drive and returns it to its original position
eif_conf displays information about logical ranges in the EIF
eif_info displays information about logical ranges in the EIF
eject ejects cartridges from the AML (limited numbers)
eject2 ejects cartridges from the AML
eject3 ejects cartridges from the AML
ejectcl ejects cleaning cartridges from the AML
ejectcom the specified volser will be completly moved to the EIF
flip flips the optical disk in the drive
getvolsertodrive displays the configured assignment of volsers to drives
getvoltoside displays information on the association of volsers to an optical disk.
insert inserts a few cartridges in the AML
insert2 inserts many cartridges, including cleaning cartridges, in the AML
mount load cartridge with a volser into a drive
inventory AMU database of the whole AML system checked and corrected
partinventory AMU database of part of the AML system checked and corrected
qvolsrange displays the volser from the AMU database for a specified range
rmf removes foreign media from the catalog
unload
view displays information from the AMU database relating to a volser
view2 displays current information for the specified volser range
volserinventory for inventory of a single volser
the robotic controller in the AML system operates the buttons on the
drive (e.g. unload button)
5-4 DAS Commands
6-00345-01
Page 77

Release Version 3.12
DAS Management Commands
This section provides a list and an explanation of the DAS management commands. See Table
5-3 .
Table 5-3 DAS Management Commands
Command Explanation
barcode
cancel deletes a command from the command queue
email sends the message via email
killamu terminates AMU software (DAS, AMU and OS/2)
list displays the DAS command queue
list2 provides enhanced information on executing requests
qversion displays the DAS and ACI version
pausedas transfers dasadmin to a passive state
pausedrive logically sets a tape drive into "disable/enable" state
robhome makes the AML system inactive
robstat makes the AML system active or queries status
shutdown shuts down the DAS software
snmp sends the message via SNMP
switch switches between active and passive DAS for dual DAS
deactivates the AML barcode reader for the mount, carry and eject
commands
Scratch Management Commands
This section provides a list and an explanation of the scratch management commands. See Table
5-4 .
Table 5-4 Scratch Management Commands
Command Explanation
scr_get displays the next available scratch volser from the scratch pool
scr_info displays information relating to the scratch pool
scr_insert inserts a cartridge and adds it to the scratch pool
scr_mount places the next available scratch cartridge in the drive
scr_set adds cartridges in the AML system to the scratch pool
scr_set_range adds volser range in the AML system to the scratch pool
scr_unset changes cartridge status from scratch to unscratch
26 Jul 2002
DAS Commands 5-5
Page 78
Release Version 3.12
Command Description
Reserve Drive (allocd)
The allocd command changes the reservation status of a drive for a client.
dasadmin allocd drive UP|EXUP|FUP|DOWN|FDOWN client
dasadmin all drive UP|EXUP|FUP|DOWN|FDOWN client
Refer to Table 5-5 for a list and an explanation of the parameters for the allocd command.
Table 5-5 Parameters for the Allocd Command
Parameter Explanation
drive drive whose status is to be changed
new reservation status
UP normal reservation of empty drive.
reserve a drive even if it is already reserved by
another client or occupied.
exclusive reservation, can only be undone by the
client itself or by DAS_SUPERVISOR.
remove the normal status of a reservation from
empty drive.
remove reservation even if the drive is reserved by
another client or occupied.
UP, FUP,
EXUP,
DOWN,
FDOWN
client
FUP
EXUP
DOWN
FDOWN
name change reservation status for the client.
SHARED_ACCESS change reservation status for all clients.
This function is used in the management of drives with shared usage. Only one client can use a
drive at a time. Mount and dismount commands issued by other clients are rejected. A drive
must be released by its previous user before a client can normally use it.
NOTE The drive can only be put in the DOWN status by FDOWN if the drive is
Also, refer to Display Drive Assignment (listd4).
The allocv command reserves the specified volser(s) for a client.
dasadmin allocv volserrange UP client
dasadmin allocv DOWN client
Refer to Table 5-6 for a list and an explanation of the parameters for the allocv command.
5-6 DAS Commands
occupied.
Reserve Volsers (allocv)
6-00345-01
Page 79

Release Version 3.12
Table 5-6 Parameters for the Allocv Command
Parameter Explanation
volserrange range of volsers to be reserved
new reservation status
UP, DOWN
client name of client under which the reservation is to be made
NOTE The reserved volser can be only released by the client itself or the client
UP reserves the specified volser/volsers
DOWN removes the reservation of all volsers for the client
DAS_SUPERVISOR.
Activate/Deactivate the Barcode Reader (barcode)
The barcode command activates or deactivates the barcode reader of the specified robotic
controller for mount, and eject commands, but only for those commands sent by the DAS to the
AMU.
dasadmin barcode robotnumber ON|OFF
Barcode reading remains active for inventory and insertion even when barcode reading is
deactivated.
Refer to Table 5-7 for a list and an explanation of the parameters for the barcode command.
Table 5-7 Parameters for the Barcode Command
Parameter Explanation
robotnumber
ON, OFF
number (R1 or R2) of the robotic controller whose barcode reader is to be
deactivated
new reader status
ON barcode reader activated
OFF barcode reader deactivated
Cancel Command (cancel)
The cancel command deletes commands from the DAS command queue.
dasadmin cancel request-id
dasadmin can request-id
Refer to Table 5-8 for an explanation of the parameter for the cancel command.
26 Jul 2002
DAS Commands 5-7
Page 80

Release Version 3.12
Table 5-8 Parameter for the Cancel Command
Parameter Explanation
request-id
DAS sequence number (displayed using the list2 and list commands).
Refer to
Display All Active Commands (list2)
Move a Medium to the Slot (carry)
The carry command moves medium from one slot to another and re-assigns the medium home
position in AMU database if necessary.
dasadmin carry sourcecoor targetcoor [volser]
Refer to Table 5-9 for a list and an explanation of the parameters for the carry command.
Table 5-9 Parameters for the Carry Command
Parameter Explanation
sourcecoor
targetcoor
volser
logical coordinate in the library the volser is to be moved from, e.g.
T104320908
logical coordinate in the library the volser is to be moved to, e.g.
T105010310.
the volser that should be moved. If the sourcecoor contain volser other
than specified, the command fails.
In some cases, the carry command works similar to the other media move commands. The
details are described at
Table 5-10 .
Table 5-10 Details for the Carry Command
Source slot Target slot Analog Medium home position Medium state
Storage Storage none Changes to target slot Stored
Storage I/E none Remains unchanged Stored
Storage Drive Mount Remains unchanged Mounted
I/E Storage Insert Changes to target slot Stored
I/E I/E none Remains unchanged Stored
I/E Drive Mount Remains unchanged Mounted
Drive Storage Dismount Changes to target slot Stored
Drive I/E Dismount Remains unchanged Stored
Drive Drive none Remains unchanged Mounted
Also refer to Retrieve a Medium from the Drive (dismount), Eject Media (eject3), Insert Media
(insert2), and Load a Medium in Drive (mount).
5-8 DAS Commands
6-00345-01
Page 81

Release Version 3.12
Catalog Foreign Volume (catf)
The catf command creates the association between the symbolic volser and the slot in the I/O
unit.
dasadmin catf [-t media-type] volser coordinate
Refer to Table 5-11 for a list and an explanation of the parameters for the catf command.
Table 5-11 Parameters for the Catf Command
Parameter Explanation
media-type media type, e.g. 3590. Refer to Media Types.
volser
coordinate
Place the foreign media in the foreign range of the I/O unit. Now set up an assignment to a
symbolic volser using the dasadmin catf command (not required as a barcode on the cartridge
and may already exist as a volser in the database).
Place the cartridge in the drive using the mount command and the symbolic volser. Remove the
cartridge from the I/O unit after use and remove the symbolic volser from the catalog using the
rmf command.
symbolic volser to be assigned to the cartridge in the foreign cartridge
range in the I/O unit. A mount command is now possible for this volser.
10-digit logical coordinate in the I/O unit locating the cartridge, e.g.
E101020310.
Also refer to Remove a Foreign Medium (rmf).
WARNING This version does not have a command to display occupied symbolic volsers.
Make a careful note of this assignment; you will need the symbolic volser
again for the rmf command.
The coordinate in the I/O unit must be defined in the AMU database for the catf command
• Attribute: empty
• Type: foreign
Get Device Information (cellinfo)
The cellinfo command displays information about devices and cartridges in the system.
dasadmin cellinfo device [ mediatype [ attributes ] ]
dasadmin ci device [ mediatype [ attributes ] ]
Refer to Table 5-12 for a list and an explanation of the parameters for the cellinfo command.
26 Jul 2002
DAS Commands 5-9
Page 82

Release Version 3.12
Table 5-12 Parameters for the CellInfo Command
Parameter Explanation
S Storage
ST towers
SL lineardevices
P all problemboxes
D all drives
Device
E all eject areas (logical ranges)
I all insert areas (logical ranges)
Exx the ejectarea "xx" (e.g. "E01")
Ixx the insertarea "xx" (e.g. "I01")
STxx the tower “xx“ (e.g. “T01“)
SLxx the lineardevice “xx”
mediatype Elements media type. Refer to Media Types.
Slot attributes value:
O occupied ("Occupied" or "Temp Here" attribute)
Y marked empty ("Empty" or "Initial" or "Temp Away")
attributes
M mounted ("Mounted" or "In Jukebox")
J ejected
U undefined
E truly empty ("Marked empty" or "Total Ejected")
““ all slots
The clean command triggers a single drive cleaning operation in the specified drive.
dasadmin clean drive
Refer to Table 5-13 for an explanation of the parameter for the clean command.
Table 5-13 Parameter for the Clean Command
The AMU manages the cleaning cartridge and controls the amount of time spent by the cleaning
cartridge in the drive. The AMU clean manager must be configured already.
NOTE Only clean the drives when they need to be cleaned. Unnecessary cleaning
Also, refer to Insert Media (insert2) and Eject Cleaning Media (ejectcl).
5-10 DAS Commands
Drive Cleaning (clean)
Parameter Explanation
drive drive to be cleaned immediately
damages the drives.
6-00345-01
Page 83

Release Version 3.12
Retrieve a Medium from the Drive (dismount)
The dismount command retrieves a medium from the drive and returns it to its original position
(home position) in the library.
dasadmin dismount [-t media-type] volser | -d drive
dasadmin dism [-t media-type] volser | -d drive
Refer to Table 5-14 for a list and an explanation of the parameters for the dismount command.
Table 5-14 Parameters for the Dismount Command
Parameter Explanation
media-type media type, e.g. 3590. Refer to Media Types.
volser volser for the medium to be returned from the drive to the home position
drive
The dismount command will not function if the medium has not been unloaded from the drive.
NOTE Number of retries can be configured in the AMU configuration.
alternative parameter for the drive from which the medium is to be
removed
Also refer to Load a Medium in Drive (mount) and Move a Medium to the Slot (carry).
View the Logical Ranges Configuration (eif_conf)
The eif_conf command shows the currently configured logical ranges in the I/O unit.
dasadmin eif_conf
The command returns all the insert/eject areas that are configured for the client in a logical
library.
Display Logical Ranges in EIF(eif_info)
The eif_info command provides information about logical ranges (in EIFs).
dasadmin eif_info [areaname]
dasadmin ei [areaname]
Refer to Table 5-15 for an explanation of the parameter for the eif_info command.
Table 5-15 Parameters for the Eif_info Command
Parameter Explanation
areaname Specific logical range
dasadmin eif_info E01
26 Jul 2002
DAS Commands 5-11
Page 84

Release Version 3.12
Name E01
MediaType = 3480 TotalSlots 30 FreeSlots 29 UndefSlots 0
MediaType = OD-Thin TotalSlots 48 FreeSlots 48 UndefSlots 0
MediaType = VHS TotalSlots 8 FreeSlots 8 UndefSlots 0
MediaType = BETACAM TotalSlots 16 FreeSlots 16 UndefSlots 0
Eject Media (eject3)
The eject3 command causes the specified volser(s) to be placed in the I/O unit of the library
system.
dasadmin eject3 [-c] [-t media-type] volserrange area
dasadmin ej3 [-c] [-t media-type] volserrange area
Refer to Table 5-16 for a list and an explanation of the parameters for the eject3 command.
Table 5-16 Parameters for the Eject3 Command
Parameter Explanation
-c
media-type media type, e.g. 3590. Refer to Media Types.
volserrange range of volsers to be ejected, e.g. 000001 - 000815 or 00001A, 00002A.
area logical range in the I/O unit for ejection, e.g. E07
complete eject option (the volser lost its home position in the AMU
database and becomes ‘unloaded’)
The appropriate message will be displayed in the AMU log if the I/O unit is full. Ejection will
continue automatically once the I/O unit has been cleared and closed.
With the environment variable DAS_EJECTAREAFULL=1 the command will be canceled
(with the message EAREAFULL), if the eject area is full.
Eject Media (eject2)
The eject2 command causes the specified volser(s) to be placed in the I/O unit of the library
system.
dasadmin eject2 [-c] [-t media-type] volserrange area
dasadmin ej2 [-c] [-t media-type] volserrange area
NOTE The command can only display up to 100 volsers when ejecting. Therefore, use
the eject3 command. For compatibility reasons, the eject2 command continues
to be supported.
Refer to Table 5-17 for a list and an explanation of the parameters for the eject2 command.
5-12 DAS Commands
6-00345-01
Page 85

Release Version 3.12
Table 5-17 Parameters for the Eject2 Command
Parameter Explanation
-c
media-type media type, e.g. 3590. Refer to Media Types.
volserrange range of volsers to be ejected, e.g. 000001 - 000815 or 00001A, 00002A.
area logical range in the I/O unit for ejection, e.g. E07
The appropriate message will be displayed in the AMU log if the I/O unit is full. Ejection will
continue automatically once the I/O unit has been cleared and closed.
With the environment variable DAS_EJECTAREAFULL=1 the command will be canceled
(with the message EAREAFULL), if the eject area is full.
complete eject option (the volser lost its home position in the AMU
database and becomes ‘unloaded’)
Eject Media (eject)
The eject command causes the specified volser to be placed in the I/O unit of the library system.
dasadmin eject [-c] [-t media-type] volserrange area
dasadmin ej [-c] [-t media-type] volserrange area
NOTE The command can display only a small number of volsers when ejecting.
Therefore, use the eject3 command. For compatibility reasons, the eject
command continues to be supported.
Refer to Table 5-18 for a list and an explanation of the parameters for the eject command.
Table 5-18 Parameters for the Eject Command
Parameter Explanation
-c
media-type media type, e.g. 3590. Refer to Media Types.
volserrange range of volsers to be ejected, e.g. 000001 - 000815 or 00001A, 00002A.
area logical range in the I/O unit for ejection, e.g. E07
The appropriate message will be displayed in the AMU log if the I/O unit is full. Ejection will
continue automatically once the I/O unit has been cleared and closed.
With the environment variable DAS_EJECTAREAFULL=1 the command will be canceled
(with the message EAREAFULL), if the eject area is full.
complete eject option (the volser lost its home position in the AMU
database and becomes ‘unloaded’)
Eject Cleaning Media (ejectcl)
The ejectcl command causes the AMU Clean Manager to eject all used cleaning media in the
specified clean pool.
dasadmin ejectcl cleanpool area
26 Jul 2002
DAS Commands 5-13
Page 86

Release Version 3.12
Refer to Table 5-19 for a list and an explanation of the parameters for the ejectcl command.
Table 5-19 Parameters for the Ejectcl Command
Parameter Explanation
cleanpool name for assigning cleaning media for the Clean Manager, e.g. P04
area logical range in the I/O unit for ejection, e.g. E07
The appropriate message will be displayed in the AMU log if the I/O unit is full. Ejection will
continue automatically once the I/O unit has been cleared and closed.
With the environment variable DAS_EJECTAREAFULL=1 the command will be canceled
(with the message EAREAFULL), if the eject area is full.
Eject Media Complete (ejectcom)
The ejectcom command places the specified volser(s) in the I/O unit of the library system and
unload them.
dasadmin ejectcom [-t media-type] volserrange area
NOTE Actually, this command has the same effect as eject3 with the -c option.
Refer to Table 5-20 for a list and an explanation of the parameters for the ejectcom command.
Table 5-20 Parameters for the Ejectcom Command
Parameter Explanation
media-type media type, e.g. 3590. Refer to Media Types.
volserrange range of volsers to be ejected, e.g. 000001 - 000815 or 00001A, 00002A.
area logical range in the I/O unit for ejection, e.g. E07
The appropriate message will be displayed in the AMU log if the I/O unit is full. Ejection will
continue automatically once the I/O unit has been cleared and closed.
With the environment variable DAS_EJECTAREAFULL=1 the command will be canceled
(with the message EAREAFULL), if the eject area is full.
Also refer to Eject Media (eject3).
Send Email Message (email)
The email command sends email message.
dasadmin email address message
dasadmin email address @file_message
Refer to Table 5-21 for a list and an explanation of the parameters for the email command.
5-14 DAS Commands
6-00345-01
Page 87

Release Version 3.12
Table 5-21 Parameters for the Email Command
Parameter Explanation
address email address the message should be sent to.
message the message text
the file that contains a message to sent.
file_message
Also refer to Send SNMP Message (snmp).
If the file is not in the same folder with dasadmin.exe, the filename
among with the complete path should be in double quotes.
Flip Optical Disk in the Drive (flip)
The flip command turns an optical disk over so that the reverse side can be read or written to.
dasadmin flip drive
Refer to Table 5-22 for an explanation of the parameter for the flip command.
Table 5-22 Parameter for the Flip Command
Parameter Explanation
drive drive where the disk must be flipped, e.g. Drive1
Display Volsers Assigned to Drive (getvolsertodrive)
The getvolsertodrive command displays a list of all volsers assigned to the drive.
dasadmin getvolsertodrive [drive]
The assignment is configured in the config file. Refer to.
Refer to Table 5-23 for an explanation of the parameter for the getvolsertodrive command.
Table 5-23 Parameters for the Getvolsertodrive Command
Parameter Explanation
drive drive whose volsers are to be displayed, e.g. Drive1
Display Volsers of the Optical Disk (getvoltoside)
The getvoltoside command displays both volsers for an optical disk.
dasadmin getvoltoside volser
Refer to Table 5-24 for an explanation of the parameter for the getvotoside command.
26 Jul 2002
DAS Commands 5-15
Page 88

Release Version 3.12
Table 5-24 Parameters for the Getvoltoside Command
Parameter Explanation
volser
one of the volsers for the optical disk, the associated sides of which are
to be displayed, e.g. OD001A
Insert Media (insert2)
The insert2 command causes the AMU to place all media in the specified insertion range in slots
in the library. The volsers of the inserted media are displayed.
dasadmin insert2 -n area
dasadmin insert2 -c area cleanpool
Refer to Table 5-25 for a list and an explanation of the parameters for the insert2 command.
Table 5-25 Parameters for the Insert2 Command
Parameter Explanation
-n normal insertion (data media)
-c inserts cleaning media
area logical range in the I/O unit for ejection, e.g. E07
cleanpool name for assigning cleaning media for the Clean Manager, e.g. P04
Place the media in the I/O unit in the logical range for insertion before starting the insert
command (Refer to the AMU Reference Manual). AMU will analyses changes in the I/O unit
automatically once the I/O unit has been closed. The insert command can be used to:
• return a known volser in the AMU database to its home position, independent of the
attributes (ejected, empty, occupied, mounted) of the slot; the barcode reader
recognizes a volser which is already entered in the AMU database.
• place an unknown volser in the next free slot; this depends on the existence in the AMU
database of slots of the relevant media type having the status
Volser 0000000000000000
Attribute empty
Type AMU Dynamic
• place a medium in the problem box if it is not suitable for insertion at present
♠ illegible barcode
♠ AML full
♠ slots in the AML already reserved for other volsers
The output of the insert2 command indicates which volser(s) were successfully inserted and
which, if any, were not.
5-16 DAS Commands
6-00345-01
Page 89

Release Version 3.12
Insert Media (insert)
The insert command causes theAMU to place all media in the specified insertion range at slots
in the library. The volsers of the inserted media are displayed.
dasadmin insert area
dasadmin in area
Refer to Table 5-26 for an explanation of the parameter for the insert command.
Table 5-26 Parameter for the Insert Command
Parameter Explanation
area logical range in the I/O unit for insertion, e.g. E07
Place the media in the I/O unit in the logical range for insertion before starting the insert
command (Refer to the AMU Reference Manual). AMU will analyses changes in the I/O unit
automatically once the I/O unit has been closed. The insert command can be used to:
• return a known volser in the AMU database to its home position, independent of the
attributes (ejected, empty, occupied, mounted) of the slot; the barcode reader
recognizes a volser which is already entered in the AMU database.
• place an unknown volser in the next free slot; this depends on the existence in the AMU
database of slots of the relevant media type having the status
Volser 0000000000000000
Attribute empty
Type AMU Dynamic
• place a medium in the problem box if it is not suitable for insertion at present
♠ illegible barcode
♠ AML full
♠ slots in the AML already reserved for other volsers
NOTE Use the insert2 command instead of this command. This command experiences
difficulties with large I/O units with long volsers (16-digit) since the buffer for
displaying the inserted volser is restricted. For compatibility reasons, the insert
command continues to be supported.
Initialize Library Elements (inventory)
The inventory command causes the library system to compare all slots (towers and racks) with
the entries in the AMU database and to update the database in the event of any variances.
dasadmin inventory
26 Jul 2002
DAS Commands 5-17
Page 90

Release Version 3.12
If the volser found in the occupied slot has a valid home position in the AMU database, the old
home position is saved; if the volser home position is invalid or volser has no home position, the
inventory command assigns to it a new home position in a first free storage slot of the
appropriate type. The volsers with an attribute ‘ejected’ or ‘unloaded’ changes their state to
‘stored’. The volsers not found in the library after inventory changes their state to ‘offline’. The
problem box is not inventoried.
NOTE The inventory function is intended for testing and startup. An error function
will only be displayed in the AMU log during operation which will not returned
to the calling process.
Also refer to Initialize Element Range (partinventory) and Display All Active Commands (list2).
Shut Down the AMU PC (killamu)
The killamu command is used to:
• move the robotic controllers in the AML system to their home position
• shut down all programs on the AMU PC
• shut down the OS/2 operating system
dasadmin killamu
WARNING Inform all administrators using the AML system before starting the
command. The command may cause disruption to their operation.
WARNING DAS sends a positive acknowledgment, before the process is complete. Wait at
least 5 minutes following the positive acknowledgment before switching off
the power supply. Switching off the power supply to the AMU PC too soon can
lead to loss of data.
NOTE Restart the AMU kernel with START KRN/S.
Also refer to Shut Down DAS (shutdown).
Display All Active Commands (list2)
The list2 command displays all commands in the DAS command queue. The list2 command
provides enhanced information about executing requests. The commands for one client only are
shown.
dasadmin list2 client
Refer to Table 5-27 for an explanation of the parameter for the list2 command.
Table 5-27 Parameters for the List2 Command
Parameter Explanation
client client for which the active commands are to be displayed.
dasadmin list2 CLIENT
list2 for client: CLIENT successful
client = CLIENT
5-18 DAS Commands
6-00345-01
Page 91

request = 1
individ_no = 0
type = PINV
StartCoord = LW01010101
EndCoord = LW01020101
client = CLIENT
request = 7
individ_no = 0
type = MONT
volser = 100001
drive = Drive1
client = CLIENT
request = 9
individ_no = 0
type = EJEC
areaname = E01
volserrange = 100002-100005
client = CLIENT
request = 12
individ_no = 0
type = SETS
volser = 100004
poolname = Pool2
Release Version 3.12
Refer to Table 5-28 for an explanation of the return status associated with the list2 command.
Table 5-28 Explanation of Returned Status for List2 Command
Display Explanation
client client for which the active commands are to be displayed.
request sequence number of the DAS commands
individ_no not used
26 Jul 2002
DAS Commands 5-19
Page 92

Release Version 3.12
Table 5-28 Explanation of Returned Status for List2 Command
Display Explanation
MONT mount command
KEEP dismount command
INVT insert command
MOVE eject command
PINV inventory/partinventory command
SHUT AMU shut down (killamu)
INCL Insert Clean
type
EJCL Eject Clean
BACO Barcode on/off
CLDR clean command
EJEC eject2 command
VINV volserinventory command
SETS scratch_set command
GETS scratch_get command
FLIP flip command
volser medium used in the operation (mont, keep, move, ejec, sets, gets)
drive drive used in the operation (mont, keep, cldr, flip)
areaname insert/eject area used in the operation (invt, move, incl, ejcl, ejec)
poolname pool used in the operation (incl, ejcl, sets, gets)
volserrange media used in the operation (invt, move, ejec, vinv)
startcoord start coordinate used in the operation (pinv)
endcoord end coordinate used in the operation (pinv)
NOTE The volser, drive, areaname, poolname, volserrange, startcoord, endcoord
Also refer to Cancel Command (cancel).
The list command displays all commands in the DAS command queue. The commands for one
client only are displayed.
dasadmin list client
NOTE This command is supported for compatibility reasons, it is limited with only a
Refer to Table 5-29 for an explanation of the parameter for the list command.
5-20 DAS Commands
parameters are new in the list2 command.
Display All Active Commands (list)
small number of commands. Use the list2 command instead.
6-00345-01
Page 93

Release Version 3.12
Table 5-29 Parameters for the List Command
Parameter Explanation
client client for which the active commands are to be displayed.
dasadmin list CLIENT
list for client: CLIENT successful
client = CLIENT
request = 1
individ_no = 0
type = PINV
client = CLIENT
request = 7
individ_no = 0
type = MONT
Refer to Table 5-30 for an explanation of the return status associated with the list command.
Table 5-30 Explanation of Returned Status for List Command
Display Explanation
client client for which the active commands are to be displayed.
request sequence number of the DAS commands
individ_no not used
MONT mount command
KEEP dismount command
INVT insert command
MOVE eject command
type
PINV inventory command
SHUT AMU shut down (killamu)
INCL Insert Clean
EJCL Eject Clean
BACO Barcode on/off
Display Drive Assignment (listd4)
The listd4 command displays the current drive assignment and status of reservations by the
clients. If the drive is not specified, all drives assigned for the client will be displayed. All drives
(maximum of 380) will be displayed if a client is not specified.
dasadmin listd4 [clientname] [-d drivename]
dasadmin ld4 [clientname] [-d drivename]
Refer to Table 5-31 for a list and an explanation of the parameters for the listd4 command.
26 Jul 2002
DAS Commands 5-21
Page 94

Release Version 3.12
Table 5-31 Parameters for the Listd4 Command
Parameter Explanation
clientname client for which the reserved drives are to be displayed
drivename drive that should be displayed
dasadmin listd4 Client -d Drive1
listd4 for client: successful
drive: Drive1
amu drive: 01
st: UP
type: 2
sysid:
client: CLIENT
volser:
cleaning 0
clean_count: 0
mount: 0
keep: 0
SerialNumber: CX701M24
Table 5-32 explanes the return status associated with the listd4 command.
Table 5-32 Explanation of Returned Status for Listd4 Command
Display Explanation
drive drive name in DAS (Description from the AMU configuration)
amu drive drive number in DAS (Name from the AMUconfiguration)
st reservation status of the drive
type drive type (Type from the AMU configuration)
sysid not used
client client which has reserved the drive
volser volser, if the drive is currently occupied
if a volser is displayed, and mount=1 and keep=0 then the drive is
mount
logically occupied but the mount is not physically complete
if a volser is displayed, and mount=0 and keep=0, then the drive is
logically occupied and mount is physically complete
if a volser is not displayed, and mount=0 and keep=1, then the drive is
keep
logically empty but the keep may not be physically complete
if a volser is not displayed, and mount=0 and keep=0 then the drive is
logically empty and the keep is physically complete
5-22 DAS Commands
6-00345-01
Page 95

Release Version 3.12
Table 5-32 Explanation of Returned Status for Listd4 Command
Display Explanation
current cleaning activity:
cleaning
0 drive is not being cleaned
1 cleaning medium is located in the drive
clean_count number of mount commands until the next drive clean
serial number drive serial number
NOTE The serial number parameter is new in the listd4 command.
Display Drive Assignment (listd3)
The listd3 command displays the current drive assignment and status of reservations by the
clients. If the drive is not specified, all drives assigned for the client will be displayed. All drives
(maximum of 250) will be displayed if a client is not specified.
dasadmin listd3 [clientname] [-d drivename]
dasadmin ld3 [clientname] [-d drivename]
NOTE Use the listd4 instead of this command. For compatibility reasons, the listd3,
listd2, and listd commands are still supported.
Refer to Table 5-33 for a list and an explanation of the parameters for the listd3 command.
Table 5-33 Parameters for the Listd3 Command
Parameter Explanation
clientname client for which the reserved drives are to be displayed
drivename drive that should be displayed
26 Jul 2002
DAS Commands 5-23
Page 96

Release Version 3.12
dasadmin listd3 Client
listd3 for client: successful
drive: Drive1
amu drive: 01
st: UP
type: 2
sysid:
client: CLIENT
volser:
mount: 0
keep: 0
cleaning 0
clean_count: 0
drive: OD512
amu drive: 02
st: UP
type: H
sysid:
client: CLIENT
volser: OD0001
mount: 0
keep: 0
cleaning 0
clean_count: 6
Table 5-34 explanes the return status associated with the listd3 command.
Table 5-34 Explanation of Returned Status for Listd3 Command
Display Explanation
drive drive name in DAS (Description from the AMU configuration)
amu drive drive number in DAS (Name from the AMU configuration)
st reservation status of the drive
type drive type (Type from the AMU configuration)
sysid not used
client client which has reserved the drive
volser volser, if the drive is currently occupied
if a volser is displayed, and mount=1 and keep=0 then the drive is logically
mount
occupied but the mount is not physically complete
if a volser is displayed, and mount=0 and keep=0, then the drive is
logically occupied and mount is physically complete
if a volser is not displayed, and mount=0 and keep=1, then the drive is
keep
logically empty but the keep may not be physically complete
if a volser is not displayed, and mount=0 and keep=0 then the drive is
logically empty and the keep is physically complete
5-24 DAS Commands
6-00345-01
Page 97

Release Version 3.12
Table 5-34 Explanation of Returned Status for Listd3 Command
Display Explanation
current cleaning activity:
cleaning
0 drive is not being cleaned
1 cleaning medium is located in the drive
clean_count number of mount commands until the next drive clean
NOTE The mount and keep parameters are new in the listd3 command.
Display Drive Assignment (listd2)
The listd2 command displays the current drive assignment and status of reservations by the
clients. If the drive is not specified, all drives assigned for the client will be displayed. All drives
(maximum of 250) will be displayed if a client is not specified.
dasadmin listd2 [clientname] [-d drivename]
dasadmin ld2 [clientname] [-d drivename]
NOTE Use the listd4 instead of this command. For compatibility reasons, the listd3,
listd2, and listd commands are still supported.
Table 5-35 for a list and an explanation of the parameters for the listd2 command.
Table 5-35 Parameters for the Listd2 Command
Parameter Explanation
clientname client for which the reserved drives are to be displayed
drivename drive that should be displayed
dasadmin listd2 Client
listd2 for client: successful
drive dlt01 amu drive: 01 st: DOWN type: E sysid: client: volser:
cleaning 0 clean_count: 0
drive: vhs01 amu drive: 02 st: DOWN type: V sysid: client:
volser: cleaning 0 clean_count: 0
Refer to Table 5-36 explanes the return status associated with the listd2 command.
Table 5-36 Explanation of Returned Status for Listd2 Command
Display Explanation
drive drive name in DAS (Description from the AMU configuration)
amu drive drive number in DAS (Name from the AMU configuration)
st reservation status of the drive
type drive type (Type from the AMU configuration)
sysid not used
26 Jul 2002
DAS Commands 5-25
Page 98

Release Version 3.12
Table 5-36 Explanation of Returned Status for Listd2 Command
Display Explanation
client client which has reserved the drive
volser volser, if the drive is currently occupied
current cleaning activity:
cleaning
0 drive is not being cleaned
1 cleaning medium is located in the drive
clean_count number of mount commands until the next drive clean
Display Drive Assignment (listd)
The listd command displays the current drive assignment and status of reservations by the
clients. If the drive is not specified, all drives assigned for the client will be displayed. All drives
(maximum of 15) will be displayed if a client is not specified.
dasadmin listd [clientname] [-d drivename]
dasadmin ld [clientname] [-d drivename]
Refer to Table 5-37 for a list and an explanation of the parameters for the listd command.
Table 5-37 Parameters for the Listd Command
Parameter Explanation
clientname client for which the reserved drives are to be displayed
drivename drive that should be displayed
listd for client: successful
drive dlt01 amu drive: 01 st: DOWN type: E sysid: client: volser:
cleaning 0 clean_count: 0
drive: vhs01 amu drive: 02 st: DOWN type: V sysid: client:
volser: cleaning 0 clean_count: 0
Table 5-38 explanes the return status associated with the listd command.
Table 5-38 Explanation of Returned Status for Listd Command
Display Explanation
drive drive name in DAS (Description from the AMU configuration)
amu drive drive number in DAS (Name from the AMU configuration)
st reservation status of the drive
type drive type (Type from the AMU configuration)
sysid not used
client client which has reserved the drive
volser volser, if the drive is currently occupied
5-26 DAS Commands
6-00345-01
Page 99

Release Version 3.12
Table 5-38 Explanation of Returned Status for Listd Command
Display Explanation
current cleaning activity:
cleaning
0 drive is not being cleaned
1 cleaning medium is located in the drive
clean_count number of mount commands until the next drive clean
NOTE The maximum number of drives displayed is 15.
Display Foreign Volser (listf)
The listf command displays the information about foreign volser. All foreign volsers are
displayed (up to 300) if no volser specified.
dasadmin listf [volser]
dasadmin lf [volser]
Refer to Table 5-39 for an explanation of the parameter for the listf command.
Table 5-39 Parameter for the Listf Command
Parameter Explanation
volser the foreign volser that should be displayed
dasadmin listf 000026
volser = 000026
coordinate = L801010302
media = 3480
attrib = M
Table 5-40 explanes the return status associated with the listf command.
Table 5-40 Returned Status for Listf Command Explanation
Display Explanation
volser queried volser (search criterion in theAMU database)
coordinate 10-digit logical coordinate specifying the slot.
media volser media type. Refer to Media Types
26 Jul 2002
DAS Commands 5-27
Page 100

Release Version 3.12
Table 5-40 Returned Status for Listf Command Explanation
Display Explanation
current status of the slot (attributes)
O occupied (slot occupied, medium is in its home position)
E ejected (slot empty, medium has been placed in the I/O unit)
M mounted (slot empty, medium has been placed in a drive)
I initial (attribute not used)
attrib
J in jukebox (slot empty, optical disk has been placed in the jukebox)
R reverse mounted (slot empty, optical disk has been placed in a drive)
Y empty (slot empty, no medium defined for the slot)
U undefined (special attribute, used by HACC/MVS)
T temp here (slot occupied, medium in the problem box)
A temp away (medium temporarily not at the specified coordinates)
Display Volser Reservation (listv)
The listv command displays all reserved volsers for the client. All reserved volsers for all clients
will be displayed if no client is specified.
dasadmin listv [client]
Refer to Table 5-41 for an explanation of the parameter for the listv command.
Table 5-41 Parameter for the Listv Command
Parameter Explanation
client client for which the reserved volsers are to be displayed
Load a Medium in Drive (mount)
The mount command places the medium with the specified volser in a drive. The drive can be
specified or will be selected by DAS such that:
• it is suitable for the media type
• it is reserved for the executing client (allocd)
• it is assigned to the volser (getvolsertodrive)
• it has the least number of uses (Use Count AMU database value).
dasadmin mount [-t media-type] volser [drive]
dasadmin mo [-t media-type] volser [drive]
Refer to Table 5-42 for a list and an explanation of the parameters for the mount command.
5-28 DAS Commands
6-00345-01
 Loading...