


Quality Espresso Futurmat Rimini, Ottima Electronic, Ottima Semiautomatic, Ottima XL Installation Manual
|
ATENCIÓN: MAQUINA DE USO |
MANUAL DE INSTRUCCIONES |
ES |
|
|
EXCLUSIVAMENTE PROFESIONAL |
|||
|
ATTENTION: MACHINE FOR |
OPERATING INSTRUCTIONS |
EN |
|
|
PROFESSIONAL USE ONLY |
|||
|
ATTENTION: MACHINE D´UTILISATION |
MODE D’EMPLOI |
FR |
|
|
PROFESSIONELLE SEULEMENT |
|||
-03/2018 |
ATTENZIONE: MACCHINA AD USO |
ISTRUZIONI PER L’USO |
IT |
|
ESCLUSIVAMENTE PROFESSIONALE |
||||
WARNUNG: NUR FÜR PROFESSIONELLE |
BEDIENUNGSANLEITUNG |
DE |
||
ANWENOUNG GEEIGNET |
||||
Ver.16 |
ATENÇÃO: MÁQUINA EXLUSIVAMENTE |
MANUAL DE INSTRUÇÕES |
PT |
|
08276602 |
PARA USO PROFISSIONAL |
|||
|
|
ZH |
||
|
||||
|
|
|||
|
|
|

B
|
|
|
C |
|
A |
|
|
|
|
W |
|
|
|
m/m. |
|
|
|
Kg. |
Lts. |
A |
B |
C |
|
|
|
|
|
|
|||
Standard |
1 |
3.000 W |
42 Kgs. |
8 Lts. |
520 |
420 |
570 |
Standard |
2 |
2.600 W |
50 Kgs. |
13 Lts. |
520 |
420 |
740 |
Compact |
2 |
3.000 W |
46 Kgs. |
8 Lts. |
520 |
420 |
570 |
Compact XL |
2 |
3.000 W |
50 Kgs. |
8 Lts. |
520 |
465 |
570 |
Ottima |
1 |
2.500 W |
36 Kgs. |
5 Lts. |
519 |
529 |
446 |
Ottima |
2 |
2.600 W |
50 Kgs. |
11,5 Lts. |
520 |
420 |
710 |
Ottima |
3 |
3.700 W |
62 Kgs. |
18 Lts. |
520 |
420 |
880 |
OFF
ON
Solo para uso de emergencia (Según modelo) Use only in an emergency (See model)
Utiliser seulement en cas d´urgence (Selon modéle) Usare solo in caso di emergenza (Secondo modello) Nur im notfiall zu benutzen (Je nach modell)
Só usar em caso de emergencia (Segundo modelo)
2
2m
|
|
2j 2e 2c 2b/i |
2d 2e 2g 2k 2f 2j |
2h |
|
|
|
|
2g |
|
1a |
2n |
|
2l |
1 |
1b |
|
|
|
1c |
|
|
2n |
|
|
1d |
|
|
|
|
1e |
|
|
|
|
|
|
|
2p |
|
|
|
|
2o |
|
|
B |
F |
|
|
|
|
|
C |
|
6a |
|
6b 6
6c
1

ES |
|
|
GB |
|
|
FR |
|
|||
1.- |
MOLINO CAFE |
1.- |
COFFEE GRINDER. |
1.- |
MOULIN CAFÉ |
|||||
1a. |
Tolva café 2 Kg. |
1a. |
Coffee hopper 2 kg. |
1a. |
Trémie café 2 kg |
|||||
1b. |
Regulación moltura |
1b. |
Grinding control |
1b. |
Réglage mouture |
|||||
1c. |
Prensa café |
1c. |
Coffee press |
1c. |
Presse café |
|||||
1d. |
Regulación dosis |
1d. |
Dose adjustment |
1d. |
Réglage doses |
|||||
1e. |
Interruptor molino |
1e. |
Grinder switch |
1e. |
Interrupteur moulin |
|||||
2. |
MAQUINA CAFE |
2.- |
COFFEE MACHINE |
2.- |
MACHINE CAFE |
|||||
2b. |
Manómetro presión red |
2b. |
Water pressure gauge |
2b. |
Manomètre pression réseau |
|||||
2c. |
Mandos erogación |
2c. |
Dispenser controls |
2c. |
Commandes distribution |
|||||
2d. |
Grupo erogación |
2d. |
Dispenser head |
2d. |
Groupe distribution |
|||||
2e. |
Piloto nivel agua caldera |
2e. |
Boiler water level indicator |
2e. |
Voyant niveau d'eau chaudière |
|||||
2f. |
Mando agua caliente |
2f. |
Hot water control |
2f. |
Commande eau chaude |
|||||
2g. |
Piloto funcionamiento |
2g. |
Pilot light |
2g. |
Voyant fonctionnement |
|||||
2h. |
Salida agua caliente |
2h. |
Hot water outlet |
2h. |
Sortie eau chaude |
|||||
2i. |
Manómetro presión caldera |
2i. |
Boiler pressure gauge |
2i. |
Manomètre pression chaudière |
|||||
2j. |
Mando vapor |
2j. |
Steam control |
2j. |
Commande vapeur |
|||||
2k. |
Portafiltros |
2k. |
Filter holder |
2k. |
Porte-filtres |
|||||
2l. |
Interruptor general |
2l. |
Main switch |
2l. |
Interrupteur général |
|||||
2m. |
Mando entrada agua |
2m. |
Water inlet control |
2m. |
Commande entrée eau |
|||||
2n. |
Salida vapor |
2n. |
Steam outlet |
2n. |
Sortie vapeur |
|||||
2o. |
Entrada agua |
2o. |
Water inlet |
2o. |
Entrée eau |
|||||
2p. |
Cubeta desagüe |
2p. |
Drainage tray |
2p. |
Bac écoulement |
|||||
3.- |
INTERRUPTOR |
3.- |
SWITCH |
3.- |
INTERRUPTEUR |
|||||
4.- |
TUBO DESAGÜE |
4.- |
DRAINAGE PIPE |
4.- |
TUYAU D'ECOULEMENT |
|||||
5.- |
GRIFO GENERAL |
5.- |
MAIN TAP |
5.- |
ROBINET GENERAL |
|||||
6.- |
DESCALCIFICADOR |
6.- |
WATER PURIFIER |
6.- |
DETARTREUR |
|||||
6a. |
Tapa descalcificador |
6a. |
Purifier cover |
6a. |
Couvercle détartreur |
|||||
6b. |
Grifo superior |
6b. |
Upper tap |
6b. |
Robinet supérieur |
|||||
6c. |
Grifo inferior |
6c. |
Lower tap |
6c. |
Robinet inférieur |
|||||
7.- |
MUEBLE |
7.- |
BODY |
7.- |
MEUBLE |
|||||
8.- |
BARRA CON FUNDA |
8.- |
BAR WITH COVER |
8.- |
BARRE PROTEGEE |
|||||
9.- |
CAJON MARRO |
9.- |
GROUNDS BIN |
9.- |
TIROIR MARRON |
|||||
|
|
|
|
|
|
|
|
||||
|
IT |
|
|
DE |
|
PT |
|
|
|||
1.- |
MACINACAFFÈ |
1.- |
KAFFEEMÜHLE |
1.- |
MOINHO DE CAFÉ |
||||||
1a. |
Tramoggia caffè 2 kg |
1a |
Mühltrichter 2 kg |
1a. |
Tremonha de café 2 kg. |
||||||
1b. |
Regolazione macinatura |
1b |
Regulierung der Mahlstärke |
1b. |
Regulação da moedura |
||||||
1c. |
Pressino per il caffè |
1c |
Kaffeepresse |
1c. |
Prensa de café |
||||||
1d. |
Regolazione dose |
1d |
Regulierhebel Kaffeemenge |
1d. |
Regulação das doses |
||||||
1e. |
Interruttore macinacaffè |
1e |
Ein- /Ausschalter |
1e. |
Interruptor do moinho |
||||||
2.- |
MACCHINA PER CAFFÈ |
2.- |
KAFFEEMASCHINE |
2.- |
MÁQUINA DE CAFÉ |
||||||
2b. |
Manometro pressione di rete |
2b |
Druckanzeiger Netz |
2b |
Manómetro de pressão da rede |
||||||
2c. |
Comandi erogazione |
2c |
Schaltknöpfe Kaffeeausgabe |
2c |
Comandos de distribuição |
||||||
2d. |
Gruppo erogazione |
2d |
Kaffeeausgabe |
2d |
Grupo de distribuição |
||||||
2e. |
Spia luminosa livello acqua |
2e |
Wasserstandanzeiger im Kessel |
2e |
Piloto do nível de água da caldeira |
||||||
|
|
caldaia |
2f |
Schaltknopf für heiβes Wasser |
2f |
Comando da água quente |
|||||
2f. |
Comando acqua calda |
2g |
Anzeiger Betrieb |
2g |
Piloto do funcionamento |
||||||
2g. |
Spia luminosa funzionamento |
2h |
Heiβwasserhahn |
2h |
Saída da água quente |
||||||
2h. |
Uscita acqua calda |
2i |
Druckanzeiger Kessel |
2i |
Manómetro da pressão da caldeira |
||||||
2i. |
Manometro pressione caldaia |
2j |
Dampfschalter |
2j |
Comando do vapor |
||||||
2j. |
Comando vapore |
2k |
Filterhalter |
2k |
Porta-filtros |
||||||
2k. |
Portafiltri |
2l |
Hauptschalter |
2l |
Interruptor geral |
||||||
2l. |
Interruttore generale |
2m |
Schalter für Wassereinlauf |
2m |
Comando entrada de água |
||||||
2m. |
Comando entrata acqua |
2n |
Dampfaustritt |
2n |
Saída de vapor |
||||||
2n. |
Uscita vapore |
2o |
Wasserabfluβ |
2o |
Entrada de água |
||||||
2o. |
Entrata acqua |
2p |
Auffangschale für Wasserabfluβ |
2p |
Tina de desague |
||||||
2p. |
Vaschetta raccogligocce |
3.- |
SCHALTER |
3.- |
INTERRUPTOR |
||||||
3.- |
INTERRUTTORE |
4.- |
WASSERABFLUSSROHR |
4.- |
TUBO DE DESAGUE |
||||||
4.- |
TUBO SCARICO |
5.- |
HAUPTWASSERHAHN |
5.- |
TORNEIRA GERAL |
||||||
5.- |
RUBINETTO GENERALE |
6.- |
ENTHÄRTER |
6.- |
DESCALCIFICADOR |
||||||
6.- |
DECALCIFICATORE |
6a |
Deckel Enthärter |
6a |
Tampa do descalcificador |
||||||
6a. |
Coperchio decalcificatore |
6b |
Oberer Ablaβhahn |
6b |
Torneira superior |
||||||
6b. |
Rubinetto superiore |
6c |
Unterer Ablaβhahn |
6c |
Torneira inferior |
||||||
6c. |
Rubinetto inferiore |
7.- |
SCHRANK |
7.- |
MÓVEL |
||||||
7.- |
CARROZZERIA |
8.- |
BEZOGENE SCHIENE |
8.- |
BARRA COM ESTOJO |
||||||
8.- |
IMPUGNATURA CON GUAINA |
9,- |
SCHBFACH FÜR |
9.- |
GAVETA BORRAS |
||||||
9.- |
CASSETTO PER I FONDI |
|
|
KAFFEERESTE |
|
|
|
|
|||
|
|
DI CAFFÈ |
|
|
|
|
|
|
|
|
|
|
|
|
|
|
|
|
|
|
|
|
|
|
|
|
|
|
|
2 |
|
08515300 |
|||
|
|
|
|
|
|
|
|
|
|
||

ZH
1.-
1a 2
1b
1c
1d
1e
2.-
2b
2c
2d
2e
2f
2g
2h
2i
2j
2k
2l
2m
2n
2o
2p
3.-
4.-
5.-
6.-
6a
6b
6c
7.-
8.-
9.-
2B

ES |
ENHORABUENA: |
Vd. ha adquirido una máquina para la obtención de la mejor crema de café expresso. Su máquina ha sido producida con las más avanzadas tecnologías en cuanto a seguridad, fiabilidad y diseño. Lo que le confieren una gran durabilidad y bajo mantenimiento.
Vd. solo deberá seguir los sencillos consejos que le describimos en este manual para sacarle el máximo rendimiento a su máquina.
Solo los Servicios Técnicos autorizados, pueden darle la máxima garantia en cuanto a servicio y recambios originales. Exija la Instalación y Mantenimiento al Servicio Oficial.
El Servicio de Asistencia Técnica Post-Venta está siempre dispuesto a escuchar sus observaciones y sugerencias, en el objetivo de una mejora constante de la calidad del producto y satisfacción al cliente.
¡ATENCION! La máquina incorpora una caldera a presión y alta temperatura. Sólo puede ser intervenida por profesionales cualificados.
FR |
FÉLICITATIONS |
Vous avez acquis une machine pour obtenir le meilleur café express. Votre machine a été construite avec les technologies les plus avancées en sécurité, fiabilité et dessin, lui conférant ainsi une longue durée et un faible entretien.
Vous n'aurez qu'à suivre les simples conseils que nous décrivons dans le présent manuel pour un rendement maximal de votre machine.
Seuls les Services Techniques agréés peuvent vous donner la garantie maximale en ce qui concerne le service et les pièces de rechange d'origine. Exigez l'installation et l'entretien du Service Officiel.
Le Service d'Assistance Technique Après Vente est toujours prêt à écouter vos observations et suggestions, dans le but d'améliorer constamment la qualité du produit et de satisfaire le client.
ATTENTION ! La machine incorpore une chaudière sous pression et à haute température. Seuls des professionnels qualifiés peuvent la manipuler.
DE HERZLICHEN GLÜCKWUNSCH!
Sie haben eine Kaffeemaschine zur Bereitung einer köstlichen Expresso - Creme erworben. Ihr Gerät wurde mit den fortschrittlichsten technologischen Mitteln in Bezug auf Sicherheit, Verläβlichkeit und Design hergestellt. Dadurch ist eine lange Lebensdauer gewährleistet und nur eine geringe Wartung und Pflege notwendig.
Sie haben nichts anderes zu tun als den einfachen Hinweisen zu folgen, die wir Ihnen in der vorliegenden Gebrauchsanweisung geben, um den gröβtmöglichen Nutzen aus ihrem Gerät zu ziehen.
Nur ein zugelassener Wartungsdienst garantiert Ihnen einen bestmöglichen Service sowie den Ersatz von Originalteilen. Verlangen Sie die Installation und Wartung durch einen zugelassenen Wartungsdienst.
Stets bemüht, unsere werten Kunden zufriedenzustellen sowie die Qualität unseres Produktes ständig zu verbessern, ist unser Kundendienst gern bereit, auf Ihre Beobachtungen und Anregungen einzugehen.
WARNUNG! Die Kaffeemaschine beinhaltet einen hochtemperierten Druckkessel, der nur durch erfahrenes technisches Personal gehandhabt werden darf.
GB CONGRATULATIONS
You have acquired a machine that will provide you with the best espresso cream coffee. This machine has been manufactured using the most advanced technology for safety, reliability and design. It is extremely robust and requires very little maintenance.
You only have to follow the simple advice described in this handbook to obtain maximum performance from the machine.
Only authorized Service Technicians can give you maximum service guarantees and original spare parts. Demand installation and maintenance by Official Service Agents.
The Customer Technical Service Department is always willing to listen to your comments and suggestions to constantly improve the quality of the product and customer satisfaction.
ATTENTION. The machine contains a boiler at high temperature and pressure. It should only be manipulated by qualified professionals.
IT CONGRATULAZIONI!
Ha acquistato la macchina perfetta per ottener la migliore crema di caffè. Questo apparecchio è stato fabbricato avvalendosi delle più avanzate tecnologie in quanto a sicurezza, affidabilità e design, il che gli garantisce una lunga vita utile e una bassa manutenzione.
Per trarre il massimo profitto da questa macchina, dovrà solo seguire i semplici consigli che Le diamo in questo manuale.
Solo i Centri di Assistenza Tecnica autorizzati Le possono offrire le massime garanzie di servizio e fornirLe i ricambi originali. Si rivolga sempre a un Centro di Assistenza Tecnica Ufficiale.
Il Servizio di Assistenza Tecnica Postvendita è sempre disposto ad ascoltare le Sue osservazioni ed i Suoi suggerimenti, per migliorare costantemente la qualità del prodotto e accrescere così la soddisfazione del cliente.
ATTENZIONE! L'apparecchio incorpora una caldaia a pressione e ad alta temperatura. Per qualsiasi intervento rivolgersi solo a tecnici specializzati.
PT PARABÉNS
Acaba de adquirir uma máquina para a obtenção do melhor creme de café expresso. A sua máquina foi produzida com as mais avançadas tecnologias quanto a segurança, fiabilidade e design, que lhe conferem uma grande durabilidade e baixa manutenção.
Deverá apenas seguir os simples conselhos que lhe descrevemos neste manual para tirar o máximo rendimento à sua máquina.
Só os Serviços Técnicos autorizados lhe podem dar a máxima garantia quanto a serviço e sobresselentes originais. Exija a Instalação e Manutenção ao Serviço Oficial.
O Serviço de Assistência Técnicas Pós-Venda está sempre pronto a escutar as suas observações e sugestões, com o objectivo de uma melhoria constante da qualidade do produto e satisfação ao cliente.
ATENÇÃO! A máquina incorpora uma caldeira a pressão e alta temperatura. Só pode ser manipulada por profissionais qualificados.
ZH
装备件。安装维护须由官方服务代表完成。
度。
3
ANTES DE SU INSTALACIÓN, CONTROLAR
*Que las características de tensión, sección del cable y potencia del interruptor magnetotérmico (3) (20A) sean las correctas para cada modelo. el cual debe estar en un lugar accesible y que debe ser omnipolar y con una separación de contacto de más de 3mm. Es aconsejable la instalación de un interruptor diferencial (RCD) que tenga una corriente residual asignada de funcionamiento que no exceda de 30mA.
*Que el tubo desagüe (4), tenga un diámetro mínimo de 35mm.
*Que el grifo general (5), tenga un paso de rosca de 3/8 Gas.
NOTA: Tanto la instalación eléctrica como la instalación de agua deberán estar de acuerdo con cualquier normativa vigente en el lugar de instalación
INSTALACIÓN
1º.- Nivelar la máquina mediante los pies de apoyo.
NOTA: Por razones de seguridad, la inclinación máxima no debe superar 1º respecto a la horizontal. 2º.- Colocar los productos según dibujo.
NOTA: El molino puede instalarse indistintamente en ambos lados de la máquina.
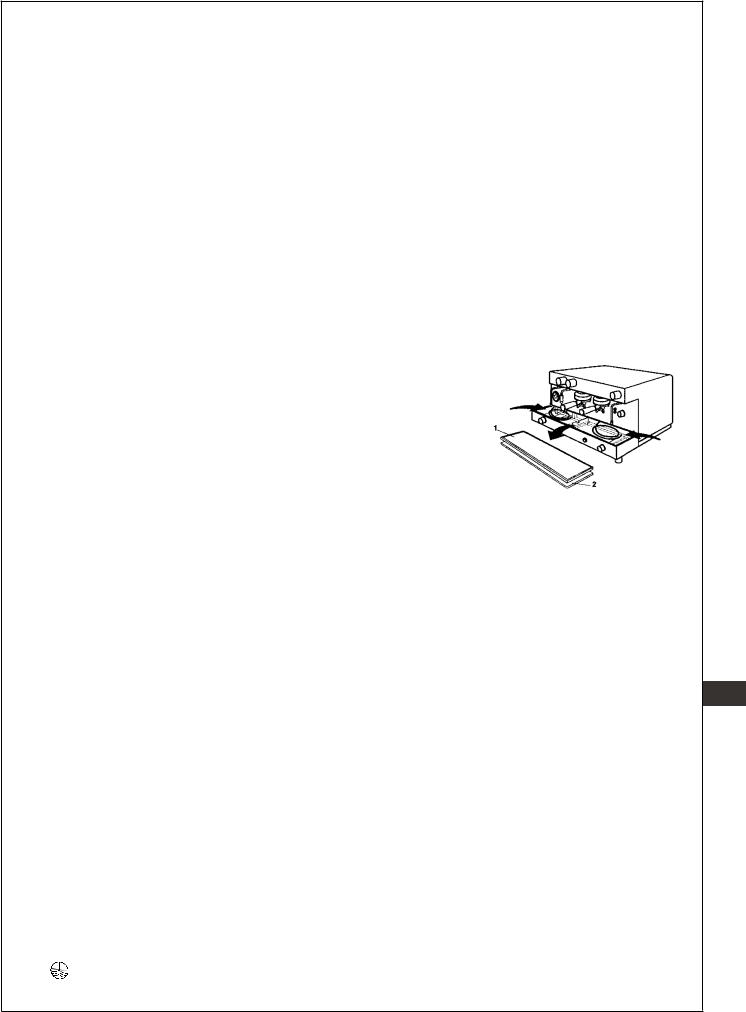
ATENCIÓN: El cable conexión red está situado en la zona inferior delantera de la máquina.
Para extraer los cables para su conexión a la red se deberá proceder de la siguiente manera: Sacar la sobrebandeja (1) y la bandeja inferior (2), cortar las bridas que sujetan el cable al chasis. Una vez realizada esta operación, volver a poner la sobrebandeja (1) y la bandeja inferior (2) en su lugar de origen.
3º.- Conectar el tubo desagüe (B) en el embudo (2p) de la máquina y en el tubo desagüe (4).
4º.- Conectar el tubo (flexo corto) (C) (No incluido en la dotación) entre el grifo general (5) y el grifo superior del descalcificador (6b)
5º.- NOTA: Antes de conectar a la entrada bomba (2o), abrir el grifo (5) y hacer circular agua durante 2 minutos a través del descalcificador (6), se trata de eliminar posibles restos de suciedad depositados en el circuito.
6º.- Conectar el tubo (flexo) (A) entre el grifo inferior del descalcificador (6c) y la entrada de la bomba 2o 7º.- Abrir el grifo general (5) y comprobar que no haya fugas de agua en el circuito.
8º.- Conectar el cable (F) al magnetotérmico (3) (20A). Según el orden siguiente: 1º el cable de masa, después los cables de parte activa; y en el caso de tener que desconectarlos alguna vez se efectúa la operación a la inversa, ó sea 1º los cables de la parte activa y después el cable de masa.
9º.- NOTA: Asegúrese de que la conexión de tierra esté realizada correctamente y de acuerdo con la normativa vigente.
MUY IMPORTANTE.- Antes de accionar el interruptor magnetotérmico (3), posicionar el interruptor general (2l) en el "2” ("OFF" 


 )
)
10º.- Accionar el interruptor magnetotérmico (3), posicionándolo en "ON".
11º.- MAQUINAS SIN NIVEL AUTOMATICO: Cargar de agua pulsando sobre el mando del grifo de carga (2m) hasta que el nivel se encuentre sobre 3/4 partes de su altura.
MAQUINAS CON NIVEL AUTOMATICO: Accionar el interruptor general (2l) posicionándolo en el "2" (“OFF”


 ) La máquina empezará a cargar automáticamente de agua hasta el nivel adecuado. En las máquinas que incorporan nivel luminoso dibujo (2e) Led superior (verde) indica nivel correcto, led inferior (rojo) carga de agua. En los modelos con el indicador de nivel situado en la parte superior izquierdo (2e)
el símbolo se ilumina cuando la máquina está cargando agua.
ES
4

ES
NOTA: Las máquinas con nivel automático incorporan un sistema de seguridad de nivel. Si durante la carga de agua los leds de las botoneras (2c) o del nivel luminoso (2e) comienzan a parpadear, indica que la máquina ha entrado en SEGURIDAD DE NIVEL (ver pag. 6)
12º Con la máquina a su nivel (3/4 partes). Accionar sobre el interruptor general (2I) posicionándolo en "1" (ON) (Esperar 30 minutos a que alcance temperatura).
ATENCION.- No accionar nunca el interruptor general (2I) sin estar la máquina a su nivel (¾ partes)
13º MIENTRAS LA MAQUINA SE CALIENTA:
1º Llenar la tolva de café (1a).
2º Accionar el interruptor (1e) para moler una pequeña cantidad de café.
3º Comprobar que la molturación no sea ni excesivamente fina ni muy gruesa.
4º Llenar el filtro de 2 cafés (2k) y alisarlo en el prensa café (1c).
5º Controlar que el manómetro de caldera (2i), se encuentra a su presión de trabajo (zona verde).
6º Introducir el portafiltros (2k) en el grupo de la maquina de café (2d).
7º Accionar el grupo mediante los pulsadores o mandos leva (si es mecánico). (ver Fig.1,2,3,4) ( pag.7).
8º Comprobar la salida de café de la siguiente manera:
*Para cafés de 50 - 60 cl. debe salir entre 20 segundos mínimo y 35 segundos máximo.
*Si los tiempos son muy distantes a los dados, actuar sobre la regulación molino (1b).
a)girando en sentido horario 2 ó 3 puntos si ha salido demasiado rápido.
b)girando en sentido contrario al horario 2 ó 3 puntos si ha salido demasiado lento.
14º MAQUINAS CON SISTEMA DE DOSIFICACION AUTOMATICA
Su máquina puede venir equipada con "interruptor de programación" ó "programación dinámica" (sin interruptor de programa). En este último caso, lea atentamente las presentes instrucciones para sacarle el máximo rendimiento a las prestaciones de la máquina.
La máquina viene regulada de fábrica con las siguientes dosis:
1 corto= 70cc, 1 largo= 85cc, 2 cortos= 115cc, 2 largos= 130cc,
COMO REGULAR O MODIFICAR LAS DOSIS DE CAFE:
a ).- ENTRADA A PROGRAMACION: (Ver dibujo en manual instrucciones)
a1). - Poner el interruptor general (2I) en posición "0" (apagado)
a2).- Pulsar sobre el botón de continuo (botonera 2c) y sin soltarlo, girar el interruptor general (2I) posicionandolo en "1" (encendido). Esperar que los luminosos de la botonera se apaguen. (5 segundos aproximadamente)
b ). - PROGRAMACION :
b1). - Poner café en el filtro de 1 café, e introducirlo en el grupo erogación.
b2).- Pulsar sobre el botón de 1 café corto (botonera izquierda) y esperar a que se active la electroválvula, soltar.
b3). - Controlar la salida de café hasta que llegue al nivel de la taza deseada y volver a pulsar para parar la erogación.
NOTA: para la regulación de las restantes selecciones, realizar lo mismo que en el punto "b1", actuando sobre 1 largo, 2 cortos y 2 largos respectivamente.
C ) .- SALIR DE PROGRAMACION:
c1). - Posicionar el interruptor general (2I) en "0" y volverlo a poner en su posición de trabajo "1". (apagar y encender)
5

ACTIVAR O DESACTIVAR EL MODO ILUMINACIÓN
Para desactivar o activar el modo iluminación zona de trabajo, seguir las siguientes instrucciones:
a.Apagar la máquina a través del interruptor general.
b.Pulsar el botón de un café corto en el grupo izquierdo y sin soltarlo, poner en marcha la máquina, manteniendo el botón pulsado hasta que el led del mismo se ilumine y se apague. Una vez finalizada la activación o desactivación de dicho modo, la máquina se reiniciará automáticamente.
SEGURIDAD NIVEL:
¡ATENCIÓN¡ Esta maquina dispone de un sistema de alarma que actúa cuando por cualquier causa no le entra agua o el nivel de agua en la caldera es incorrecto.
SEÑALIZACIÓN DE LA ALARMA: a.- Los leds de todas las botoneras lucen de forma intermitente y solo se puede hacer café con la opción de “continuo”.
b,- Los leds del indicador luminoso de nivel parpadean y se bloquea la electrobomba y electroválvula de nivel, se puede continuar haciendo café normalmente con los interruptores,
ELIMINACIÓN DE ALARMA: Por medio del interruptor general (2l), colocar este en el “0” y volverlo a poner en el “1”
Si persiste la alarma, asegúrese de que hay agua en la red, si es así, avise al servicio técnico.
Si no hay agua en la red, espere a que se restablezca el suministro y entonces proceda a eliminar la alarma.
15º MODELOS CON CONTADOR DE CAFES. (KIT opcional para máquinas electrónicas).
15a Comprobar que el contador cuenta en todos los pulsadores (1 café = 1 salto, 2 cafés = 2 saltos).
16º MODELOS CON DISPLAY (AUTOMATICAS, ELECTRONICAS). Ver manual adjunto.
17º MODELOS CON CAPPUCCINATORE AUTOMATICO. Ver manual adjunto 18º MODELOS CON GAS INCORPORADO. Ver manual adjunto
ES
6
ES
FUNCIONAMIENTO DE LA MAQUINA:
PROCEDIMIENTO PARA LA OBTENCIÓN DE CREMA DE CAFÉ EXPRESO.- Llenar el filtro (2k) de 1 ó 2 cafés y alisarlo con él prensa café (1c) del molino.
Controlar que la máquina se encuentra en su disposición de trabajo (zona verde) comprobando el manómetro (2i).
Accionar el grupo erogación de café mediante los pulsadores o mandos según modelos. (Ver pag. 7). Comprobar la salida del café de la siguiente manera:
*Para cafés de 50-60 cl. debe salir entre 20 segundos mínimo y 35 segundos máximos.
*Si los tiempos son muy distantes a los dados, actuar sobre la regulación del molino.
*Es aconsejable que las tazas con las que se va a servir el café estén a una cierta temperatura, con el fin de garantizar la conservación de la temperatura del café y evitar así el enfriamiento prematuro.
MAQUINAS CON DOSIFICACIÓN AUTOMÁTICA DE
AGUA CALIENTE: (Fig. 1).
a)Para programar las dosis, entrar en programación según (apartado a) pag. 5
b)Actuar sobre el pulsador de agua caliente “INFUSIONES” y dejar fluir el agua hasta el nivel deseado, pulsando de nuevo para parar.
c)Salir de programación según apartado C) pag. 5
d)Comprobar la dosis actuando sobre el pulsador “INFUSIONES” agua caliente de la botonera.
MODELO SEMIAUTOMÁTICO (Grupo mecánico) (Fig. 2).
Accionar la palanca hasta obtener la cantidad necesaria de café, volver a accionar inversamente para parar la erogación.
MODELO SEMIAUTOMÁTICO (Grupo eléctrico) (Fig. 3).
Pulsar sobre el interruptor hasta obtener la cantidad necesaria de café, volver a pulsar inversamente para parar la erogación.
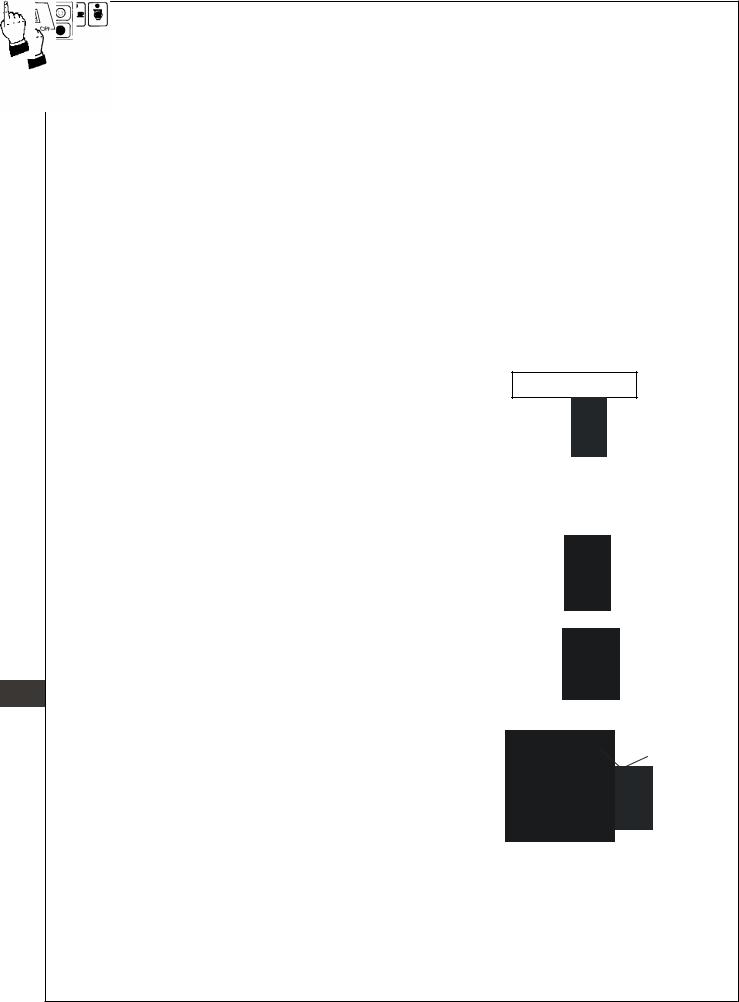
MODELO AUTOMÁTICO ELECTRÓNICA (Fig. 4).
Los pulsadores 1, 2, 3, 4, corresponden a las selecciones de cuatro posibles dosis de agua, el pulsador 5, es para la erogación continua. Para interrumpir la erogación, pulsar cualquiera de los pulsadores 1, 2, 3, 4, 5
ILUMINACIÓN LEDS BOTONERAS
INFUSIONES
Figura 1
Pulsador agua caliente
Figura 2
Figura 3
1 |
2 |
3 |
4 |
5 |
1 |
3 |
|
|
|
|
|||||
|
|
|
|
|
|
|
|
|
|
|
|
|
2 |
4 |
5 |
Figura 4
Existen tres posibilidades:
a.- Botones apagados; y cuando se pulse cualquiera de ellos, éste, se enciende mientras se realiza la erogación y los demás permanecen apagados.
b,- Botones encendidos; y cuando se pulse cualquiera de ellos, éste, se queda encendidos mientras se realiza la erogación y el resto se apagan.
c,- Botones encendidos; y cuando se pulse cualquiera de ellos, éste, se apagan mientras se realiza la erogación y el resto permanecen encendidos.
7
FORMA DE SELECCIÓN:
1º Interruptor general posicionarlo en el “0”
2º Pulsar al mismo tiempo (al unísono) 1 corto y el continuo (jarra) de la botonera izquierda y sin soltarlo, posicionar el interruptor general en el “1”, (Quedaran en intermitencia los tres botones que selecciona los modos “a”, “b”, y “c”)
3º Pulsar la opción deseada. (a = 1 corto, b = 1 largo, y c = 2 cortos)
Una vez pulsado el botón seleccionado la máquina queda operativa, (hay que esperar unos segundos antes de hacer café) si desea programar la selección, hay que hacerlo desde el punto “1º,-“.
MAQUINAS CON VACIADO AUTOMATICO DE LA CALDERA
En los modelos que se incorpora un pulsador para la obtención de agua caliente “INFUSIONES”, puede vaciarse la caldera de una forma sencilla y cómoda.
Para el vaciado de la parcial caldera debemos de actuar sobre el |
|
|
|
|
|
|
|
|
|
INFUSIONES |
|
||||||||||||||
|
|
|
|
|
|
|
|
|
|
|
|
|
|
|
|
|
|
|
|
|
|
||||
pulsador de “INFUSIONES”, (Ver figura 5) hasta que el led |
|
Figura 5 |
|
||||||||||||||||||||||
(indicador luminoso) del botón empiece a parpadear. |
|
|
|||||||||||||||||||||||
El agua fluirá sin interrupción hasta el nivel mínimo indicado en la |
|
|
|
|
|
|
Pulsador agua caliente |
|
|||||||||||||||||
figura 6. |
|
|
|
|
|
|
|
||||||||||||||||||
Cuando se alcance dicho nivel, la máquina volverá a cargar agua |
|
|
|
|
|
|
|
|
|
|
|
|
|
|
|
|
|
|
|
|
|
|
|||
automáticamente. |
|
|
|
|
|
|
|
|
|
|
|
|
|
|
|
|
|
|
|
|
|
|
|||
NOTA: Para detener el vaciado de la caldera en cualquier |
|
|
|
|
|
|
|
|
|
|
|
|
|
|
|
|
|
|
|
|
|
|
|||
|
|
|
|
|
|
|
|
|
|
|
|
|
|
|
|
|
|
|
|
|
|
||||
|
|
|
|
|
|
|
|
|
|
|
|
|
|
|
|
|
|
|
|
|
|
||||
momento antes de llegar al nivel mínimo, basta con pulsar |
|
|
|
|
|
|
|
|
|
|
|
|
|
|
|
|
|
|
|
|
|
|
|
||
|
|
|
|
|
|
|
|
|
|
|
|
|
|
|
|
|
|
|
|
|
|
|
|||
el botón de “INFUSIONES”. La máquina volverá a cargar |
|
|
|
|
|
|
|
|
|
|
|
|
|
|
|
|
|
|
|
|
|
|
|||
agua automáticamente |
|
|
|
|
|
|
|
|
|
|
|
|
|
|
|
|
|
|
|
|
|
|
|||
|
|
|
|
|
|
|
|
|
|
|
|
|
|
|
|
|
|
|
|
|
|
||||
|
|
|
|
|
|
|
|
|
|
|
|
|
|
|
|
|
|
|
|
|
|
||||
Nivel de trabajo |
|
|
|
|
|
|
|
|
|
|
|
|
|
|
|
|
|
|
|
|
|
|
|||
|
|
|
|
|
|
|
|
|
|
|
|
|
|
|
|
|
|
|
|
|
|
||||
|
|
|
|
|
|
|
|
|
|
|
|
|
|
|
|
|
|
|
|
|
|
||||
Nivel de referencia del tubo de pesca para la |
|
|
|
|
|
|
|
|
|
|
|
|
|
|
|
|
|
|
|
Figura 6 |
|
||||
|
|
|
|
|
|
|
|
|
|
|
|
|
|
|
|
|
|
|
|||||||
|
|
|
|
|
|
|
|
|
|
|
|
|
|
|
|
|
|
|
|
|
|||||
salida de agua caliente “INFUSIONES” |
|
|
|
|
|
|
|
|
|
|
|
|
|
|
|
|
|
|
|||||||
|
|
|
|
|
|
|
|
|
|
|
|
|
|
|
|
|
|
||||||||
CONSEJO DE SEGURIDAD |
|
|
|
|
|
|
|
|
|
|
|
|
|
|
|
|
|
|
|
|
|
|
|||
Si el cable de alimentación está dañado, debe ser sustituido por un cable ó conjunto especial a suministrar |
|
||||||||||||||||||||||||
por el fabricante ó por su servicio postventa y debe ser instalado por personal autorizado, con el fin de evitar |
|
||||||||||||||||||||||||
un peligro. |
|
|
|
|
|
|
|
|
|
|
|
|
|
|
|
|
|
|
|
|
|
|
|||
Cualquier ajuste en el sistema hidráulico, deberá ser realizado por el personal autorizado. |
|
||||||||||||||||||||||||
|
|
|
|
|
|
|
|
|
|
|
|
|
|
|
|
|
|
|
|
|
|
|
|
|
|
Este aparato no es adecuado para su uso en el exterior, salvo que este protegido de la intemperie (lluvia, |
ES |
||||||||||||||||||||||||
viento, etc.) |
|
|
|
|
|
|
|
|
|
|
|
|
|
|
|
|
|
|
|
|
|
|
|||
Este aparato no puede ser expuesto ni limpiado con chorros de agua ni de vapor. |
|
||||||||||||||||||||||||
Este aparato no debe tocarse con los pies descalzos o manos húmedas. |
|
|
|
|
|
|
|
|
|
|
|
|
|
|
|
|
|
|
|
|
|
|
|||
Este aparato solo puede ser instalado y usado por personal cualificado. |
|
|
|
|
|
|
|
|
|
|
|
|
|
|
|
|
|
|
|
|
|
|
|||
Este aparato debe funcionar a temperaturas ambiente por encima de 1º C y por debajo de las soportables |
|
||||||||||||||||||||||||
para las personas. |
|
|
|
|
|
|
|
|
|
|
|
|
|
|
|
|
|
|
|
|
|
|
|||
Para evitar congelaciones del aparato en caso de almacenamiento a temperaturas iguales o inferiores a los |
|
||||||||||||||||||||||||
0º C, vaciar el circuito hidráulico de agua antes de su almacenamiento. Caso de haberse producido |
|
||||||||||||||||||||||||
congelación del aparato, ubicarlo en lugar con temperatura superior a los 10º C y esperar a su |
|
||||||||||||||||||||||||
descongelación. En ningún caso conectar el circuito de calefacción de la máquina hasta que la |
|
||||||||||||||||||||||||
descongelación se haya producido. |
|
|
|
|
|
|
|
|
|
|
|
|
|
|
|
|
|
|
|
|
|
|
|||
Este aparato no debe ser usado para otro fin distinto para el cual ha sido diseñado (dispensar café |
|
||||||||||||||||||||||||
espresso, agua caliente para infusiones y suministro de vapor para calentar líquidos no inflamables. |
|
||||||||||||||||||||||||
Este aparato no supera los 70 dB de presión acústica. |
|
|
|
|
|
|
|
|
|
|
|
|
|
|
|
|
|
|
|
|
|
|
|||
|
|
|
|
|
|
|
|
|
|
|
|
|
|
|
|
|
|
|
|
|
|
|
|
|
|
7b

Esta máquina no tiene componentes que pueda reparar el usuario. Solo debe ser manipulada por personal del Servicio Técnico Autorizado,
Antes de proceder a cualquier operación de mantenimiento, dejar la máquina sin energía eléctrica ya sea a través del interruptor general de la instalación o desconectando el cable alimentación.
Los niños no reconocen los peligros ligados a las máquinas, por lo que deben de mantenerse alejados de ellas e impedir que las puedan manipular.
Las personas con las capacidades físicas, sensoriales o mentales disminuidas, o el personal sin experiencias, no deben utilizar esta máquina sin la supervisión de personal cualificado para tal fin.
Para las operaciones de limpieza, atenerse exclusivamente a las instrucciones del presente manual
Para asegurar un mejor funcionamiento de la máquina, exigir la utilización solo Recambios Originales, que puede suministrar el Servicio Técnico autorizado o el fabricante.
El fabricante declina toda responsabilidad, caso de incumplimiento de la lesgilación vigente en el lugar de instalación de la máquina.
MANTENIMIENTO DIARIO.
Vaciar y limpiar los filtros de café.
Colocar el filtro ciego (excepto modelo palanca) en un portafiltro y poner una tableta de detergente especial para máquinas.
Introducir el portafiltros en el grupo de erogación de café, accionándolo durante 40 segundos aproximadamente. Realizar varias veces esta operación hasta que el agua de la descarga salga limpia.
Limpiar con un paño húmedo el tubo de vapor y purgarlo repetidas veces.
Dejar fluir el agua caliente y limpiar la bandeja de desagüe de los restos de café que se van depositando en el fondo, para evitar fermentaciones que pudieran originar olores desagradables.
Las partes exteriores de la máquina deben de limpiarse con un trapo o bayeta humedecida en agua limpia. No utilizar NUNCA detergentes o sustancias abrasivas.
NOTA: Es aconsejable que los portafiltros estén posicionados en los grupos, con el fin de mantenerlos a una temperatura estable.
AVERIAS Y CAUSAS POSIBLES
|
|
|
|
|
|
|
|
|
|
|
|
|
|
|
AVERIAS |
|
CAUSAS POSIBLES |
|
|
OBSERVACIONES |
|
||||
|
|
Bomba ruidosa |
|
Bomba agarrotada. |
|
Si el agua tiene partículas en |
||||||
|
|
|
|
|
Falta de agua en la red. |
|
suspensión o es demasiado dura, |
|||||
|
|
|
|
|
|
debe |
instalarse |
un |
filtro |
|||
|
|
|
|
|
Obstrucción en la alimentación |
descalcificador. |
|
|
||||
|
|
|
|
|
de agua. |
|
|
|
|
|
|
|
ES |
|
|
|
|
|
|
|
|
|
|
|
|
|
Erogación |
lenta, |
café |
Tarado de la bomba incorrecto. |
Comprobar |
la |
presión |
del |
||||
|
|
|||||||||||
|
|
quemado |
|
|
Bomba con tiro reducido. |
|
manómetro. |
|
|
|
||
|
|
|
|
|
|
|
|
|
|
|
||
|
|
|
|
|
|
|
||||||
|
|
Erogación lenta. |
|
Moltura muy fina. |
|
En caso del parpadeo y para saber |
||||||
|
|
Café quemado y frío. |
|
Baja presión de la bomba. |
|
si es del café, por falta de agua o |
||||||
|
|
|
|
por el contador, sacar el porta y |
||||||||
|
|
Crema muy oscura, |
con |
Filtro sobre el inyector sucio, |
actuar sobre el pulsador de la |
|||||||
|
|
parcialmente obstruido. |
|
botonera. Si el parpadeo continua y |
||||||||
|
|
tendencia a formar poros. |
Contador |
electrónico |
no |
ha salido agua, puede deberse al |
||||||
|
|
Botonera parpadeante. |
contador. |
|
|
|
||||||
|
|
funciona correctamente. |
|
|
|
|
|
|
||||
|
|
|
|
|
Café excesivamente fino o falta |
|
|
|
|
|
||
|
|
|
|
|
agua. |
|
|
|
|
|
|
|
|
|
Parpadeo |
en todas |
las |
Seguridad nivel ha actuado. |
|
Comprobar que el grifo general esta |
|||||
|
|
botoneras. |
|
|
|
|
|
abierto. |
|
|
|
|
|
|
|
|
|
|
|
|
Colocar el interruptor en posición |
||||
|
|
|
|
|
|
|
|
programación y actuar sobre los |
||||
|
|
|
|
|
|
|
|
pulsadores 1º y 3º de la botonera |
||||
|
|
|
|
|
|
|
|
del grupo izquierdo. |
|
|
||
|
|
|
|
|
|
|
|
|
|
|
|
|
8

BEFORE INSTALLATION, CHECK THE FOLLOWING:
*That the voltage, cable section and rating of the magnetothermal circuit breaker (3) (20A) are correct for each model, and is accessible, omni polar, and with a contact separation of more than 3mm.It is advisable that the installation have a differential switch (RCD) with a rated residual operating current that does not exceed 30 mA.
*That the drainage pipe (4) has a minimum diameter of 35mm.
*That the main tap (5) has a 3/8 Gas thread.
NOTE: Both the electrical installation and the water installation must be in accordance with current legislation in the place of installation.
INSTALLATION
1.- To make level the machine by means of the support feet
NOTE: For security reasons the maximum inclination does not have to exceed 1º with respect the horizontal.
2.- Place the products as shown in the drawing.
NOTE: The grinder may be installed on either side of the machine.
ATTENTION: The cable for connection to the mains is in the lower front part of the machine.
To pull out the cables to connect to the mains, proceed as follows: remove the cover (1) and the lower tray (2), cut the ties securing the cables to the chassis, then replace the cover (1) and the lower tray (2) in their place.
3.- Connect the drainage pipe (B) to the funnel (2p) on the machine and the drainage pipe (4).
4.- Connect the pipe (short flexible tube not supplied with the machine) (C) between the main tap (5) and the upper tap of the water purifier (6b).
5.- NOTE: Before connection to the pump inlet (2o), open tap (5) and allow water to circulate through the purifier system (6) for 2 minutes to eliminate any possible dirt remaining in the circuit.
6.- Connect the pipe (flexible tube supplied with the machine) (A) between the lower tap of the purifier (6c) and the inlet to the pump (2o).
7.- Open the main tap (5) and check that there are no leaks in the circuit.
8.- Connect the cable (F) to the thermo-magnetic switch (3) (20A), in the following order: First the mass cable, then the cables of the active part; and in the case of having to disconnect at any time, effect the inverse operation, that is, first the cables of the active part and then the mass cable
9.- NOTE: Make sure that the earth connection is correctly installed and in accordance with current legislation.
VERY IMPORTANT.- Before arming the magnetothermal circuit breaker (3), position switch (2l) on the |
GB |
|
machine in "2" (OFF |
). |
|
10.-Arm the magnetothermal circuit breaker (3), positioning it in the "ON" position.
11.-MACHINES WITHOUT AUTOMATIC LEVEL: Fill the machine with water by pressing the control of the fill tap (2m) until the level reaches 3/4 of the height.
MACHINES WITH AUTOMATIC LEVEL: Place the switch (2l) in the "2" (OFF 


 ) position. The machine will automatically begin to fill with water until reaching the ideal level. On the machines equipped with the boiler level indicator lights (2e), the upper green light indicates the level is correct, the lower red light indicates boiler refill. On the models equipped with the level indicator lights located on the left upper part (2e)
  the symbol lights up when the machine is refilling.
9

GB
NOTE: The machines with automatic level are equipped with a safety level system. If the boiler is filling, and the keypad lights (2c) or the boiler level indicator lights (2e) begin to blink, this indicates that the water level alarm has been activated. Proceed as indicated on page 11.
12.- With the machine filled to level (3/4 parts).Place the switch (2i) in "1" (ON) (Wait 30 minutes for the machine to come up to temperature)
N.B. Never operate the switch (21) without the machine being at the proper level (3/4 full).
13.- WHILE THE MACHINE IS HEATING:
1.Fill the coffee hopper (1a).
2.Press switch (1e) to grind a small amount of coffee.
3.Check that the grinding is neither excessively fine nor very coarse.
4.Fill the 2 coffee filter (2k) and press the coffee in the coffee press (1c).
5.Check that the boiler pressure gauge (2i) is at working pressure (green zone).
6.Insert the filter holder (2k) in the head of the coffee machine (2d).
7.Operate the head using the buttons or lever controls (if the machine is mechanical). (See Figs. 1, 2, 3, 4) (page 12).
8.Check the coffee production as follows:
*For coffees of 50 - 60 cl. it should take a minimum of 20 seconds and a maximum of 35 seconds.
*If the times vary considerably from the above, adjust the grinder control (1b).
a)turning clockwise 2 or 3 points if the coffee was produced too quickly.
b)turning anticlockwise 2 or 3 points if the coffee was produced too slowly.
14.- MACHINEES FITTED WITH AUTOMATIC DOSING SYSTEM
Your coffee machine may be equipped with either "switched programming" or "dynamic programming" (Without a programme switch). In the second of these cases, please read these instructions carefully to get maximum performance from the special features of the machine.
The machine is factory adjusted to the following doses:
1 short black = 70 cc, 1 long black = 85 cc, 2 short blacks = 115 cc, 2 long blacks = 130 cc.
HOW TO ADJUST OR CHANGE THE COFFEE DOSE;
a) ENTER PROGRAMME MODE: ( see diagram in the instruction manual) a1) Turn the main switch (2I) to the "0" position.
a2) Press the "continue" button (keypad 2c) and hold it down while turning the main switch (2I) to the"1" position. Wait for the keypad lights to go out.(approximately 5 sec).
b)PROGRAMMING:
b1) Put coffee in the 1 coffee filter and insert it in the dosing unit.
b2) Press the button for 1 short coffee (left keypad) and wait for the electrically operated valve is activated, release the button.
b3) Wait until the amount of coffee reaches the desired level in the cup and press the button again to stop.
NOTE: Adjust the other selections by following the same steps for 1 long black, 2 short blacks, and 2 long blacks, respectively.
c)EXIT FROM PROGRAMME MODE:
c1) Turn the main switch (2I) "0" and then "1" again.
10

ACTIVATING OR DEACTIVATING THE ILLUMINATION MODE
To activate or deactivate the work area illumination mode, follow the instructions below.
a.Turn off the machine with the main switch.
b.Press the half cup button of the left group head and, without releasing it, start the machine, keeping the button pressed until its LED turns on and off. After you have completed the activation or deactivation of that mode, the machine will restart automatically.
PLEASE NOTE! This machine is equipped with an alarm system which is no water entering, or the level of water in the boiler is incorrect.
ALARM SIGNAL: a. - The LED´S of all touch pads will blink. The only touch pad that will function is the one for “Continuous brew “.
b.- The boiler level indicator lights will blink and the boiler refill will cease. The only touch pad that will function is the one for “Continuous Brew”.
DEACTIVATING THE ALARM: Turn the general switch (2l) to the position “0”, off, and then turn it back to position “1”, on.
If the alarm signal persists, check that there is water in the mains system that supplies the machine. If this is the case, call your service agent.
If there is no water in the mains system that supplies the machine, wait until the supply is re-established and deactivate the alarm.
15. - MODELS WITH COFFEE COUNTER. (Optional KIT for electronic machines).
15a Check that the counter counts all the buttons (1 coffee = 1 jump, 2 coffees = 2 jumps).
16.- MODELS WITH DISPLAY (AUTOMATIC, ELECTRONIC). See enclosed handbook.
17.- MODELS WITH AUTOMATIC CAPPUCCINO MAKER. See enclosed handbook.
18.- MODELS EQUIPPED FOR GAS. See enclosed handbook
GB
11

GB
OPERATION OF THE MACHINE:
PROCEDURE FOR OBTAINING ESPRESSO CREAM COFFEE.- Fill the filter (2k) with 1 or 2 coffees and smooth it in the coffee press (1 c) on the grinder.
Check that the machine is in operational condition (green zone) as shown on the gauge (2l).
Activate the coffee dispensing head using the buttons or controls depending on the model. (See page12).
Check the coffee output as follows:
*For coffees of 50 - 60 cl. it should take a minimum of 20 seconds and a maximum of 35 seconds.
*If the times vary considerably from the above, adjust the grinder control.
*It is advisable that the cups used to serve the coffee are warmed to guarantee that the coffee maintains its temperature and to prevent premature cooling.
MACHINES WITH AUTOMATIC HOT WATER
DISPENSERS: (Fig. 1).
a)To programme the amount of hot water enter in programming as part a) page 10
b)Press the hot water button “INFUSIONS” and allow the water to be dispensed to the desired level. Press the button again to stop.
c)Go out from programming as per part C) page 10
INFUSIONS
Figure 1
Hot water button
d)Check correct dosage by pressing button “INFUSIONS” on the keypad.
SEMIAUTOMATIC MODEL (Mechanical head) (Fig. 2)
Figure 2
Turn the lever until the required amount of coffee is obtained. Then back to the original position to stop dispensing coffee.
SEMIAUTOMATIC MODEL (Electrical head) (Fig. 3)
Figure 3
Press the switch until the required amount of coffee is obtained. Press again to stop dispensing coffee.
AUTOMATIC ELECTRONIC MODEL (Fig 4) |
1 |
2 |
3 |
4 |
5 |
1 |
3 |
|
|||
The button 1, 2, 3, 4 correspond to |
the |
four possible |
|
|
|
|
|
|
|
|
|
selected amounts of water, button 5 |
is |
for |
continuous |
|
|
|
|
|
2 |
4 |
5 |
dispensing. Stop dispensing by pressing |
any of the |
|
|
|
|
|
|
|
|
||
buttons 1, 2, 3, 4, 5. |
|
|
|
|
|
|
|
|
|
Figure 4 |
|
ILLUMINATION OF PUSH BUTTON LEDS
Three possible modes
MODE 1 – The LED’s corresponding to the coffee and hot water push buttons are switched off. When any one of the buttons for coffee or hot water is pressed, the LED on that button lights up.
MODE 2 – The LED’s on the push buttons for coffee and hot water remain on. When one of the coffee push buttons is pressed, the LED for that button remains on, whilst the LED’s of the other push buttons for the same group switch off. In the case of the hot water button, when this is pressed, its LED switches off whilst hot water is being dispensed.
MODE 3 – The LED’s of the push buttons for coffee and hot water remain on. When one of the coffee push buttons is pressed, the LED for that button switches off, whilst the LED’s of the other push buttons for the same group remain on. In the case of hot water, when the button is pressed, its LED switches off whilst hot water is being dispensed. This mode is the inverse of MODE 1
12

SELECTING THE CHOSEN MODE
1.Turn the main switch to the “off” position – 0;
2.On the push buttons for the left hand group, press and hold down together the buttons for 1 short coffee and continuous coffee whilst turning the main switch back to position 1 – “on”. Three push button lights on the left group will start flashing: 1 short coffee =MODE 1, 1 long coffee =MODE 2, and 2 short coffees =MODE 3;
3.Select the chosen mode by pressing the corresponding button: 1 short coffee =MODE 1, 1 long coffee =MODE 2, or 2 short coffees =MODE 3;
Once the button for the chosen mode has been pressed, the machine will become operative after a few seconds. If the Mode needs to be changed, start again at step 1 above.
MACHINES WITH DRAINED AUTOMATIC OF THE BOILER
In the models that incorporate a button for hot water “INFUSIONS”, the boiler can be emptied simply and easily,
To empty the boiler partially, press the “INFUSIONS” button |
INFUSIONS |
|
|
|
|
(See figure 5) until the LED (luminous indicator) on the button |
|
|
starts flashing. |
|
Figure 5 |
|
|
|
Hot water will be released until the minimum level is reached as |
|
|
|
|
|
in figure 6. |
Hot water button |
Once this level is reached, the machine will start to refill |
|
automatically. |
|
NOTE: To interrupt the boiler emptying cycle before it |
|
reaches the minimum level, just press the hot water |
|
button again. The machine will start to refill |
|
automatically. |
|
Work level |
|
Reference level of the outflow pipe for the |
Figure 6 |
“INFUSIONS” hot water outlet |
|
SAFETY ADVICE |
|
If the power supply cable is damaged it must be replaced by a cable or special assembly to be supplied by the manufacturer, or by the after-sales service, and must be installed by authorised personnel, so as to avoid any possible risk of danger
Any adjustment in the hydraulic system will have to be done only by authorized personnel.
This device is not suited for use outdoors unless it is protected from weather conditions (rain, wind, etc.).
GB
This device cannot be exposed to or cleaned with jets of water or steam.
This device must not be touched with wet hands or when not wearing footwear.
This device can only be installed and used by qualified personnel.
This device must operate at ambient temperatures above 1º C and below temperatures withstood by people.
To prevent the device from freezing if it is stored at temperatures that are equal to or less than 0º C, drain the water hydraulic circuit before being stored. If the device does freeze, put it in a place with a temperature exceeding 10º C and wait for it to thaw. Never turn on the machine’s heating circuit until it has thawed.
This device must not be used for any purpose other than that for which it has been designed (dispensing espresso coffee or hot water for infusions and supplying steam to heat non-flammable liquids).
This device does not exceed 70 dB of acoustic pressure.
12b
 Loading...