

Page 1

DISPLAY
04.2008
OPERATING INSTRUCTIONS
Page 2

COFFEE MACHINE DISPLAY
Contents
1. Main functions of display
2. User screens:
2.1 Main (Standby mode)
2.2 System temperatures
2.3 Coffee counter
2.4 Water softener regeneration
2.5 Clock programming
3. Warning screens
4. Screens for authorised personnel
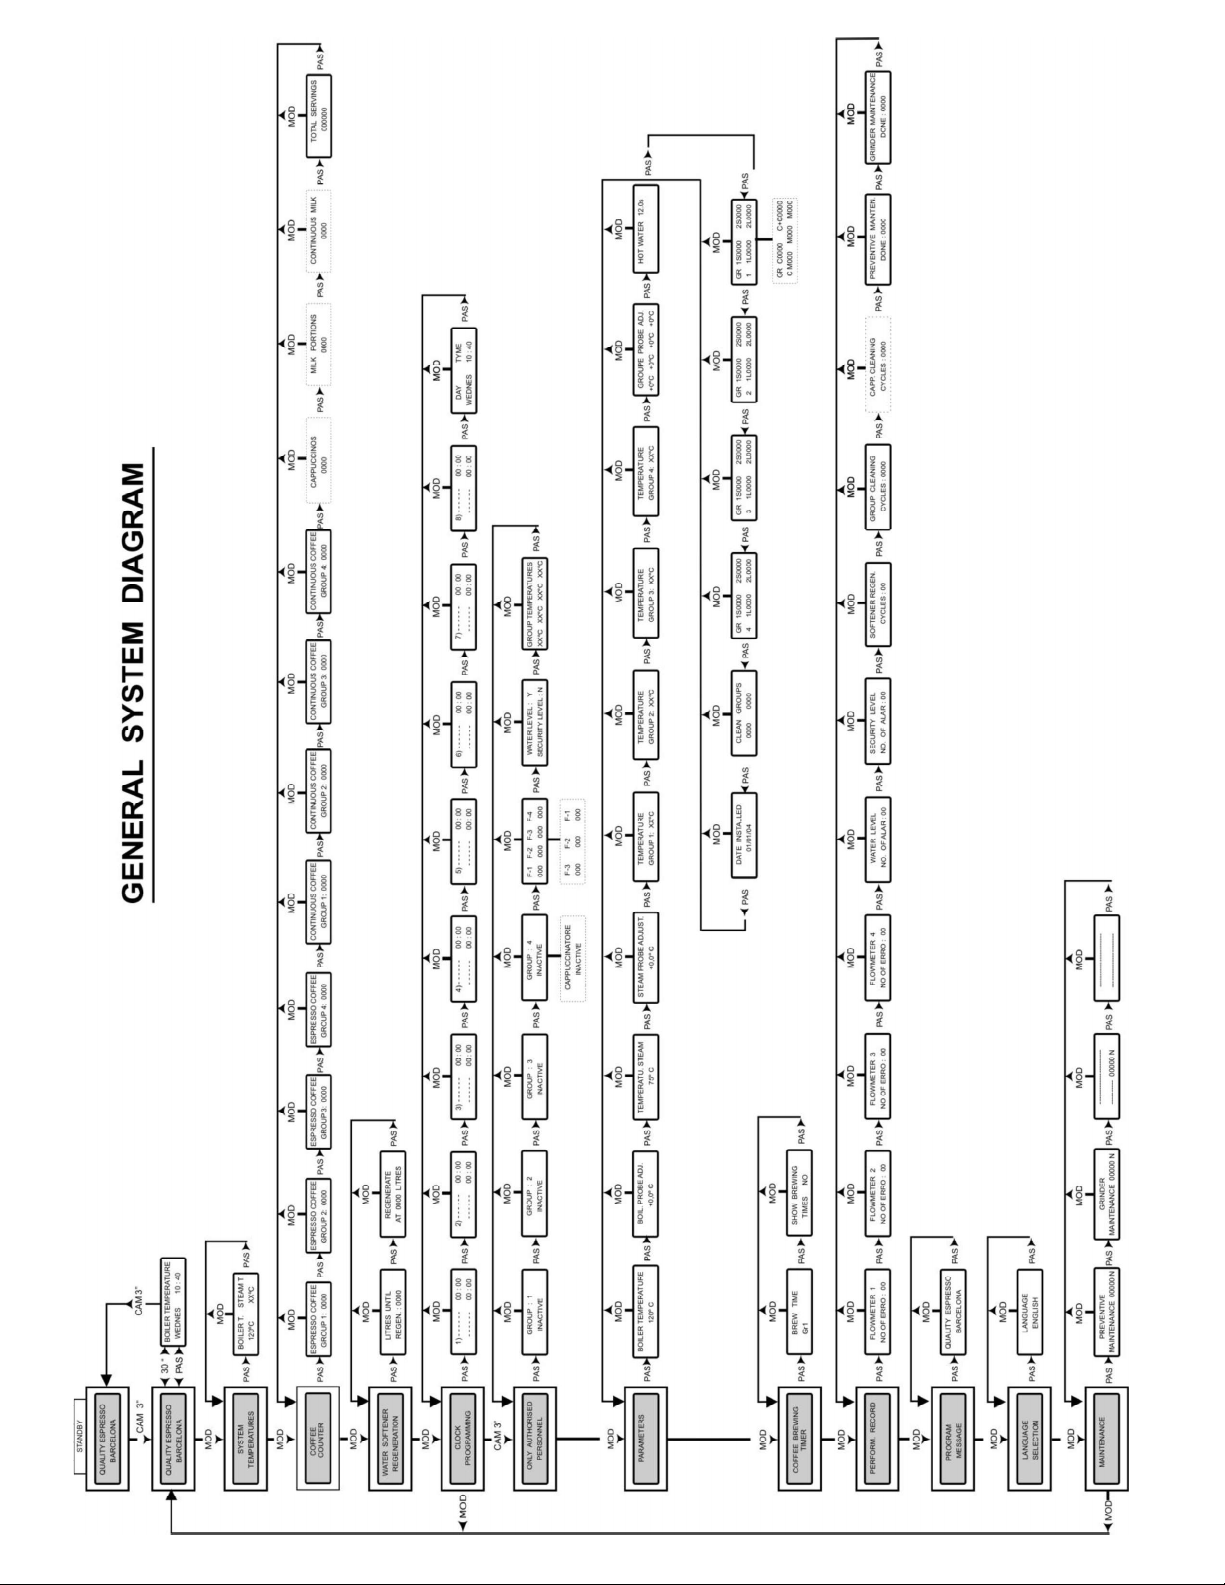
5. General diagram of the system
1. MAIN FUNCTIONS OF THE DISPLAY
The system is made up of a group of twelve screens, which in turn are divided into a specific
number of sub-screens, where the data is displayed and modified.
Depending on the model, the text in the displays, can be abbreviated or not.
The MOD key enables movement through the group of screens.
Pressing the PAS key leads to the sub-screens. Pressing the MOD key from any sub-screen
returns the user to the group of screens (see General Diagram of the System).
1
Page 3

2. USER SCREENS
2.1 Main
It automatically alternates between two screens every 30 seconds (Screen- A, publicity and
Screen- B, timer and temperature), the user being able to see either of them when desired, by
pressing PAS.
Standby mode: (Screen unlit, general switch in position - 1)
The machine remains in off position until put into use (normal mode)
Activate Standby:
From the timer screen (Screen-B), keep the CAM key pressed down (4 sec.) until
seeing the display, the publicity screen unlit (Screen-A).
De-activate Standby: (Pass to normal mode)
Keep the CAM key pressed down (4 sec.) until seeing the publicity screen lit up (Screen-A)
2.2 System temperatures
Shows the temperature of the boiler and the steam nozzle (according to the version of the
machine)
element is working.
When, instead of the temperature, it shows XXX, it means that no probe is connected (or it has
broken down).
Consult temperatures:
1. Press the MOD (Screen-C)
2. Press the PAS key to see the sub-screen with the required information. (Sub-screen C1)
a in bold indicates when the heat ing
2
Page 4

2.3 Coffee counter
Consult coffees made:
1. Press the MOD ke (Screen- D)
2. Press the PAS key as many times as required to see the sub-screen with the desired
information.
IMPORTANT NOTE
.- Screens with broken lines above only appear in models with automatic
cappuccino maker incorporated
Setting the coffee counter to zero:
1. Press the MOD (Screen- D)
2. Press the PAS key positioning it on the required sub-screen to be set to zero
3 Press the CAM key (the display digits flash)
4 Press the SET key (the counter goes to zero)
5 Press the CAM key (the display digits stop flashing)
6 Press the PAS key to confirm
It is not possible to set the total servings to zero (Sub-screen - D6)
2.4 Regeneration of water softener.
It shows the litres remaining to be consumed before carrying out the regeneration of the water
softener and the quantity of litres of water programmed that must be consumed before the
regeneration is carried out.
To consult remaining litres and programmed litres:
1. Press the MOD (Screen - E).
2. Press the PAS key the number of times necessary until the desired sub-screen is displayed.
.
3
Page 5

Programming the number of litres of water at which the regeneration of the water softener must be carried
out:
1. Press the MOD
(Screen - E).
2. Press the PAS
(Sub-screen - E2).
3. Press the CAM key (the blinking cursor appears), press again the CAM key to move the cursor
from units to thousands.
4. Press the SET key to change the value of the digit occupied by the cursor. Repeat steps 3 and 4
to set the number of litres of water required.
5. Pressing the PAS key, go to sub- (Sub-screen - E1)
6. Press the CAM key (the digits on the display flash)
7. Press the SET key (the programmed quantity is established on the Sub-screen - E2)
8. Press the CAM key (the digits on the display stop flashing)
9. Press the PAS key to confirm
4
Page 6

2.5 Programming the clock
1. Setting the time: Press the MOD
(Screen - F)
1.1 Press the PAS key the times necessary until displaying the Sub-screen - F9.
1.2 Press the CAM key (the position corresponding to the day of the week flashes).
1.3 Press the SET key until selecting the correct day of the week.
1.4 Press the CAM key (the digits of hours blink), press the key again to move the cursor to
the minute positions, the SET key changes the digits of the blinking cursor.
1.5 Press the PAS key to confirm.
-
Press the MOD (Screen - F).
1. Press the PAS key until seeing the sub-screen corresponding to the desired program
(Sub-screens F1 to F8) for example Sub-screen F1.
2. Press the CAM key (the day of the week blinks) press the key again to go to start hour
and minute; and stop day, hour and minute.
3. To change the values shown by the cursor, press the SET key.
5
Page 7

4. Press the PAS key to confirm the changes made in the sub-screen. (On pressing the PAS
key, as well as confirming the changed data, the next sub-screen will appear).
5. Successively repeat points 2,3 and 4 for each start up / close down that you wish to
program.
NOTE.- In each sub-screen corresponding to each of the eight possible programmes for
automatic start up and close down, the upper line shows the start up condition and the
lower line the close down condition.
6. Examples of programming:
a) Starting and stopping every day.
b) Starting on Monday and stopping on Tuesday.
c) Starting on Monday and stopping on Friday.
d) If the premises close for one or more days each week, the simplest way of programming
is to create an automatic on and off program for each day of activity during the week.
e)
To do this put the machine in Standby Mode (2.1) at the end of the day.
NOTE: The machine always obeys any on-off programme there is on the sub-screens (from F1 to
F8). To cancel any programming carried out, go through points 1 to 4 of this section,
selecting in the position corresponding to the day for starting and stopping the following
symbol: ------- (do not forget to confirm the change made as described in point 4 of this
section).
If the machine is on standby waiting for an automatic start, the power supply is cut and
returns after the programmed start time, the machine will remain on standby and will have
to be started according to point 2.1
Standby Mode (2.1)
In the case of making a coffee (in programmed portions) when there are less than 5
minutes remaining before an OFF programming, 5 minutes will be added from the minute
that the coffee is made: this function does not apply in the case of CONTINUOUS coffee
supply.
6
Page 8
3. WARNING
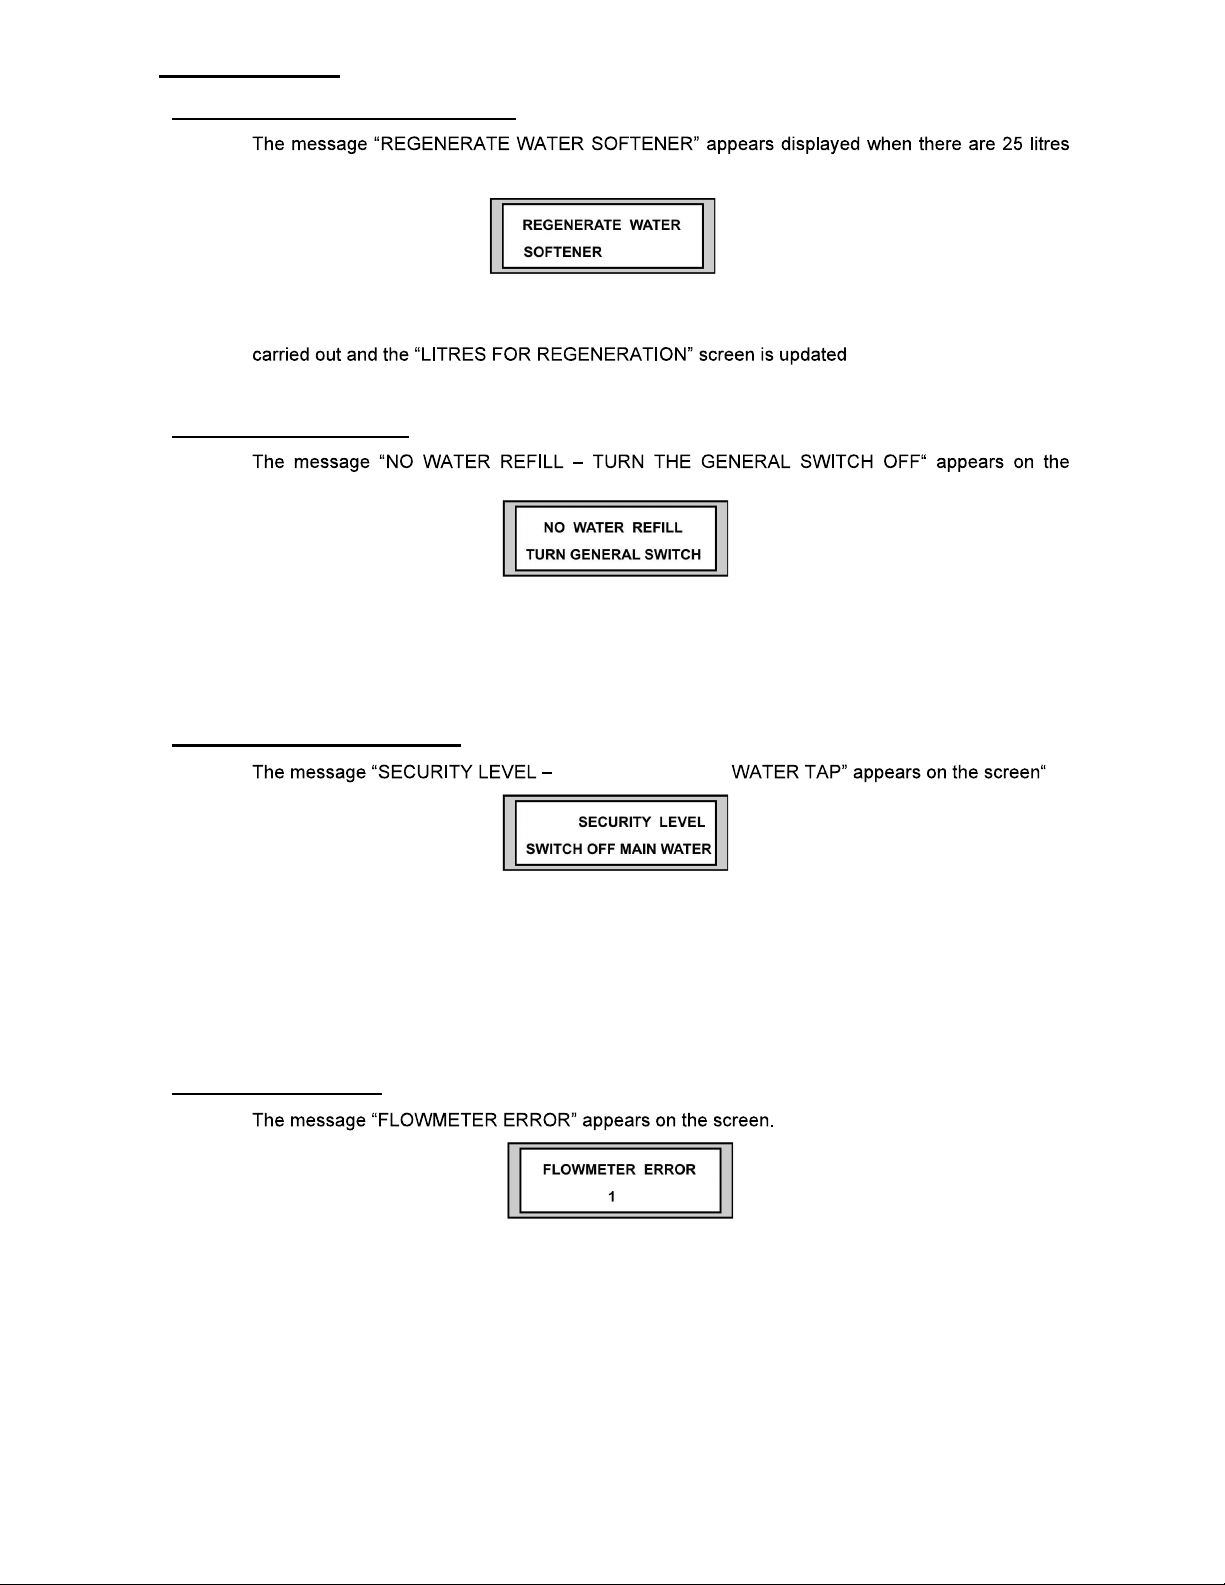
3.1 Regeneration of water softener
remaining of the programmed quantity.
To erase this message, press the PAS key.
This message will reappear every time a new litre of water is consumed until regeneration is
(Sub-screen - E1).
3.2 Boiler safety level .
screen.
This message appears when the boiler is not at its normal working level (CALL YOUR
AUTHORISED SERVICE TECHNICIAN).
Once the problem is solved, to eliminate the alarm and erase the message from the screen, turn
the general switch to 0 position.
3.3 Maximum security level .
This message appears when there is too much water in the boiler (CALL YOUR AUTHORISED
SERVICE TECHNICIAN). The system also starts up a safety cycle, which opens up the hot water
outlet in order to avoid any possible flooding in the boiler (Intermittently to begin with in order to
advise the machine operator).
Once the problem has been solved, to eliminate the alarm and erase the screen message, turn
the general switch to the 0 position.
3.4 Flowmeter error
This message appears when a dosage error is detected in the corresponding meter (showing the
flowmeter number on the screen).
NOTE: it is possible for this message to appear if the coffee grinding is excessively fine, and the
water does not pass through the coffee at the suitable speed.
This message will disappear on ordering another coffee from the same group.
If the warning continues and this is not the cause, CALL YOUR AUTHORISED SERVICE
TECHNICIAN.
SWITCH OFF MAIN
7
Page 9

3.5 Pressure compensation
When the machine is turne
up a pressure compensation cycle, as shown on the screen, with the aim of avoiding possible
suction of liquids by depression inside the boiler.
Once this cycle has finished, th
can also be eliminated by pressing the PAS or MOD keys.
3.6 Boiler emptying cycle
The user can undertake a partial emptying of the boiler, which will be shown on the screen,
maintaining pressed the hot water outlet button for approximately 6 seconds.
The system will force the hot water out for 25 seconds. After this time, the hot water coming out
will stop, and the cycle can be repeated by maintaining the button pressed within 10 seconds.
NOTE: the boiler emptying cycle can be interrupted by either pressing the hot water outlet button
again when it is emptying or when it has completed a 25-second cycle and the button has not
been pressed again. The warning screen disappears when the emptying cycle has been
completed.
3.7 Clean cappuccino unit (according to model)
This warning screen shows when approximately an hour has passed between a cappuccino or
milk service and the next service.
A cleaning cycle must be carried out by pressing
screen).
on the screen.
To eliminate the display screen, press the PAS key.
NOTE: Remove the tube from the milk container before starting the cleaning cycle.
8
Page 10
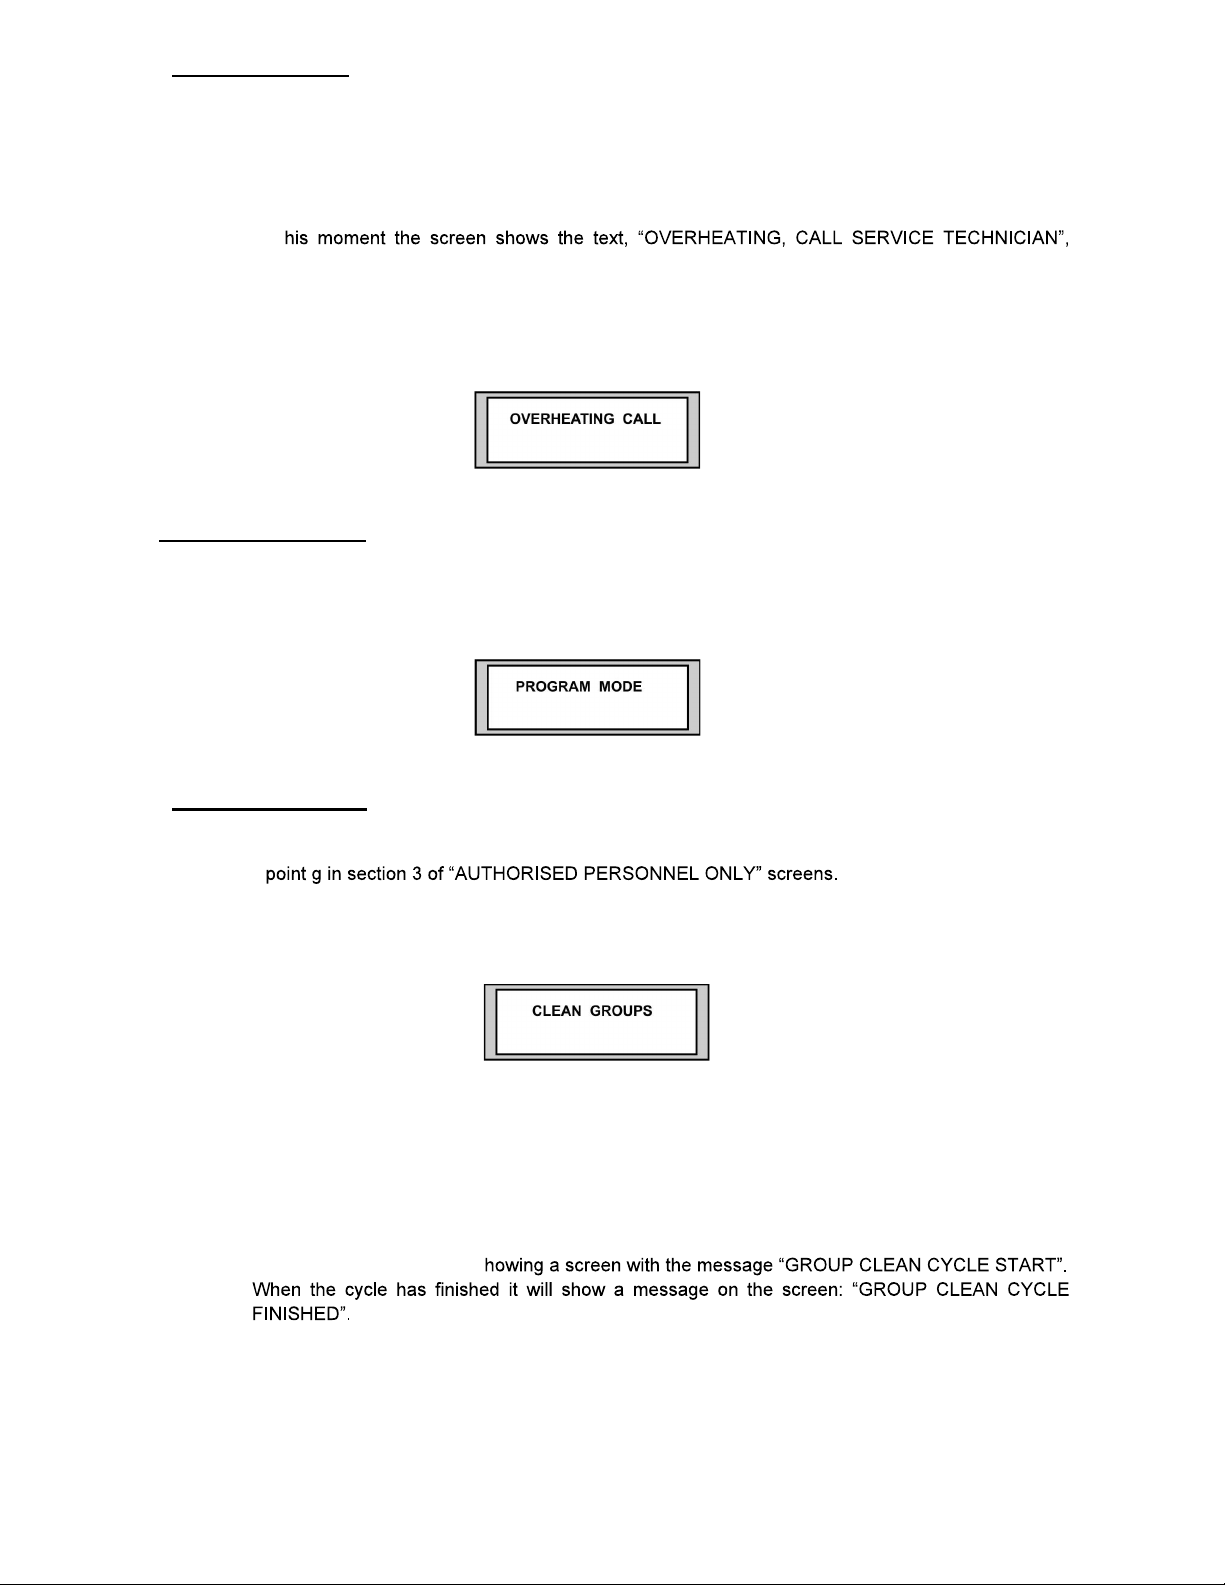
3.8 Overheating
The system has a safety mechanism in case of failure in the temperature control that may cause
the pressure to increase in the boiler.
This safety mechanism is activated when, for whatever reason, the temperature of the boiler
surpasses the maximum temperature by more than two degrees, or when the programmed
temperature is lowered by more than two degrees.
At t
although the machine can continue working, since the system has a parallel control, which will
maintain the machine in controlled working order until the Technical Service carries out the repair.
The screen disappears when the temperature drops to the maximum level and appears again
when the temperature surpasses the maximum temperature by two degrees again.
3.9 Programming
This screen is shown whenever in the portion programming cycle and disappears when leaving
this cycle.
3.10 Clean Groups
This screen appears when the quantity of coffees made reaches the programmed amount (see
This screen will only cease to appear when a cleaning cycle has been carried out and will never
appear if this function has not been authorised.
EQUIPMENT CLEANING CYCLE PROCEDURE
1.- Turn the general switch to the ZERO position
2.- Place a filter holder with a blind filter in each group.
3.- Keeping the key pressed for 2 LARGE coffees of any group, turn on the general switch to position
ONE. The indicator of the above-mentioned key will light up and after about 4 seconds the
cleaning cycle will start up s
4.- To leave the group cleaning cycle and erase the message displayed on the screen, turn the
general switch to the ZERO position.
9
Page 11
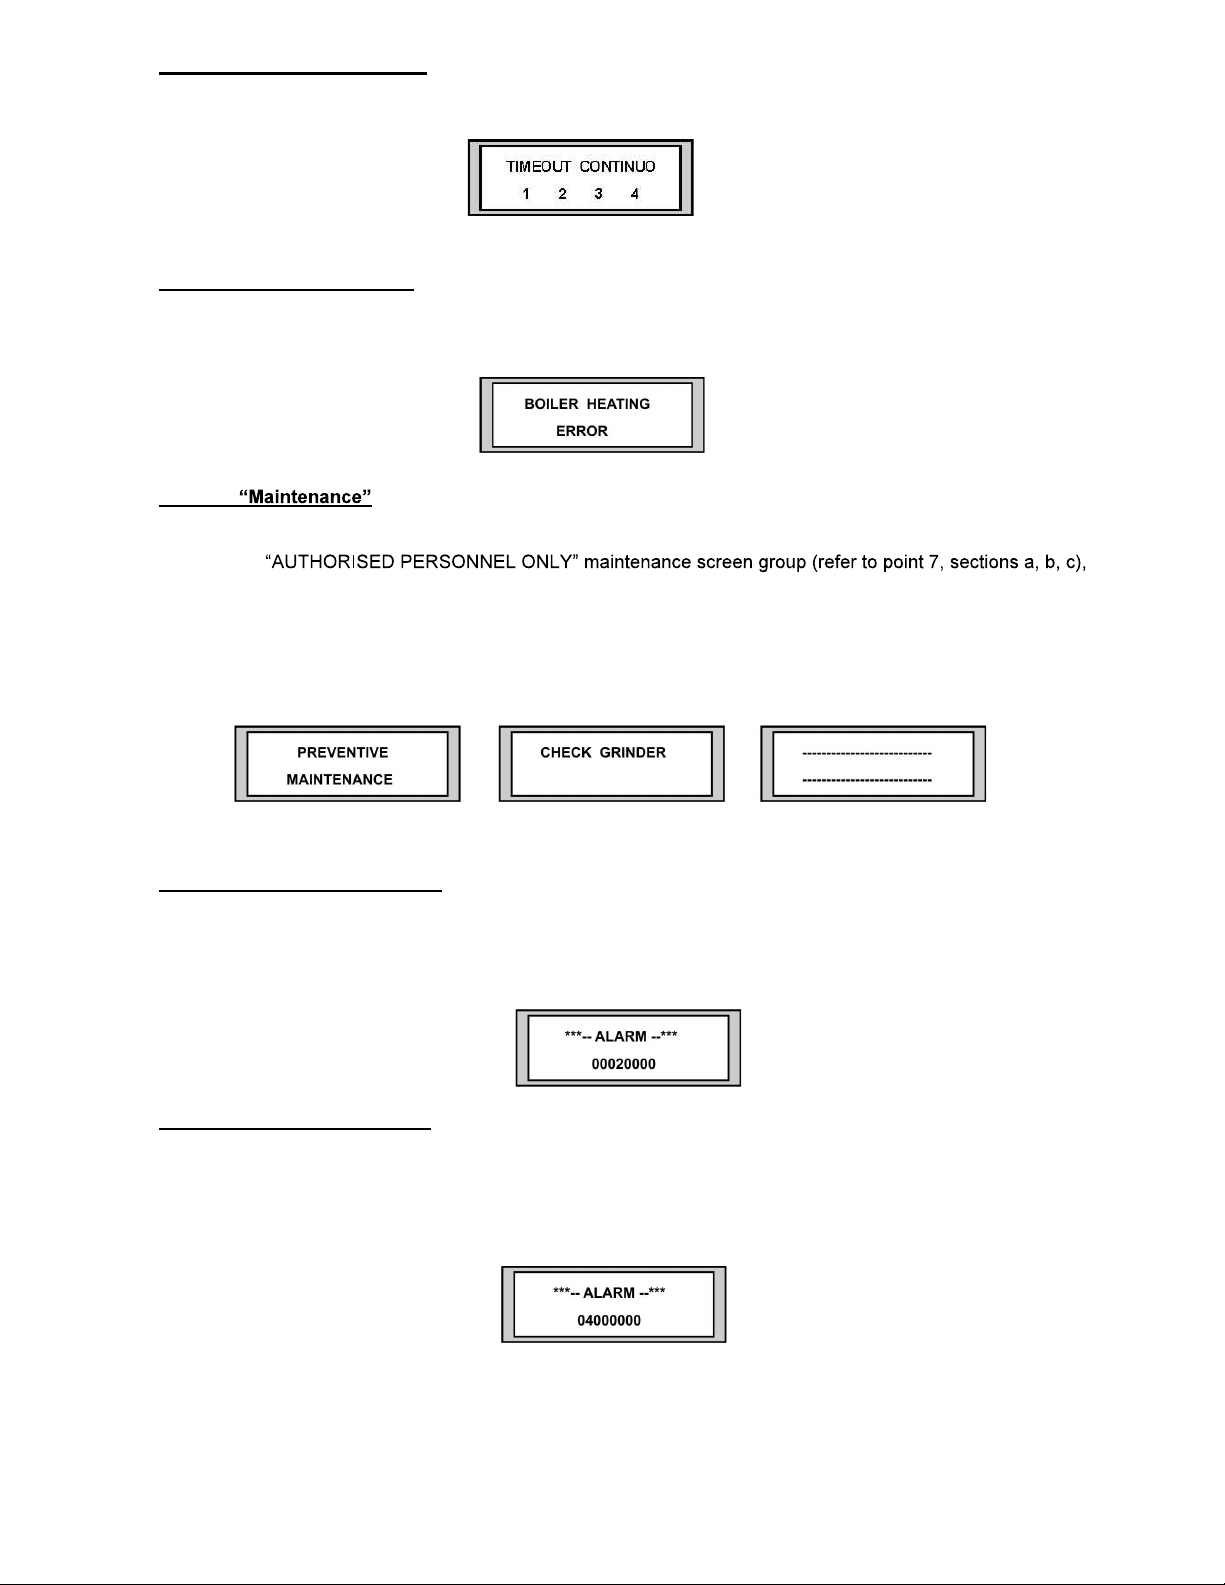
3.11 Continuous Timeout
This screen appears when there exists a continuous coffee preparation of for more than 5 minutes
NOTE: The display shows the number of the group which has caused the message to appear.
3.12 Boiler heating error
This screen appears when for any reason the machine detects that the boiler temperature should
increase but it does not happen.
3.13
When the number of coffees prepared is greater than the number of coffees entered in the
the following screens appear.
This happens every time a coffee is made, unless the quantities are reprogrammed or the counters
were disabled.
3.14 Last configuration lost
This screen appears when the last configuration has not been successfully entered and the previous
configuration is used without the latest modifications. The lost of the configuration can be due to
dosing or parameter values changed by the display.
3.15 Relay activation error
This screen appears when there exists an error in the system that activates the relays in the
electronic control of the machine.
(PROGRAMMABLE TEXT)
10
Page 12
11
Page 13
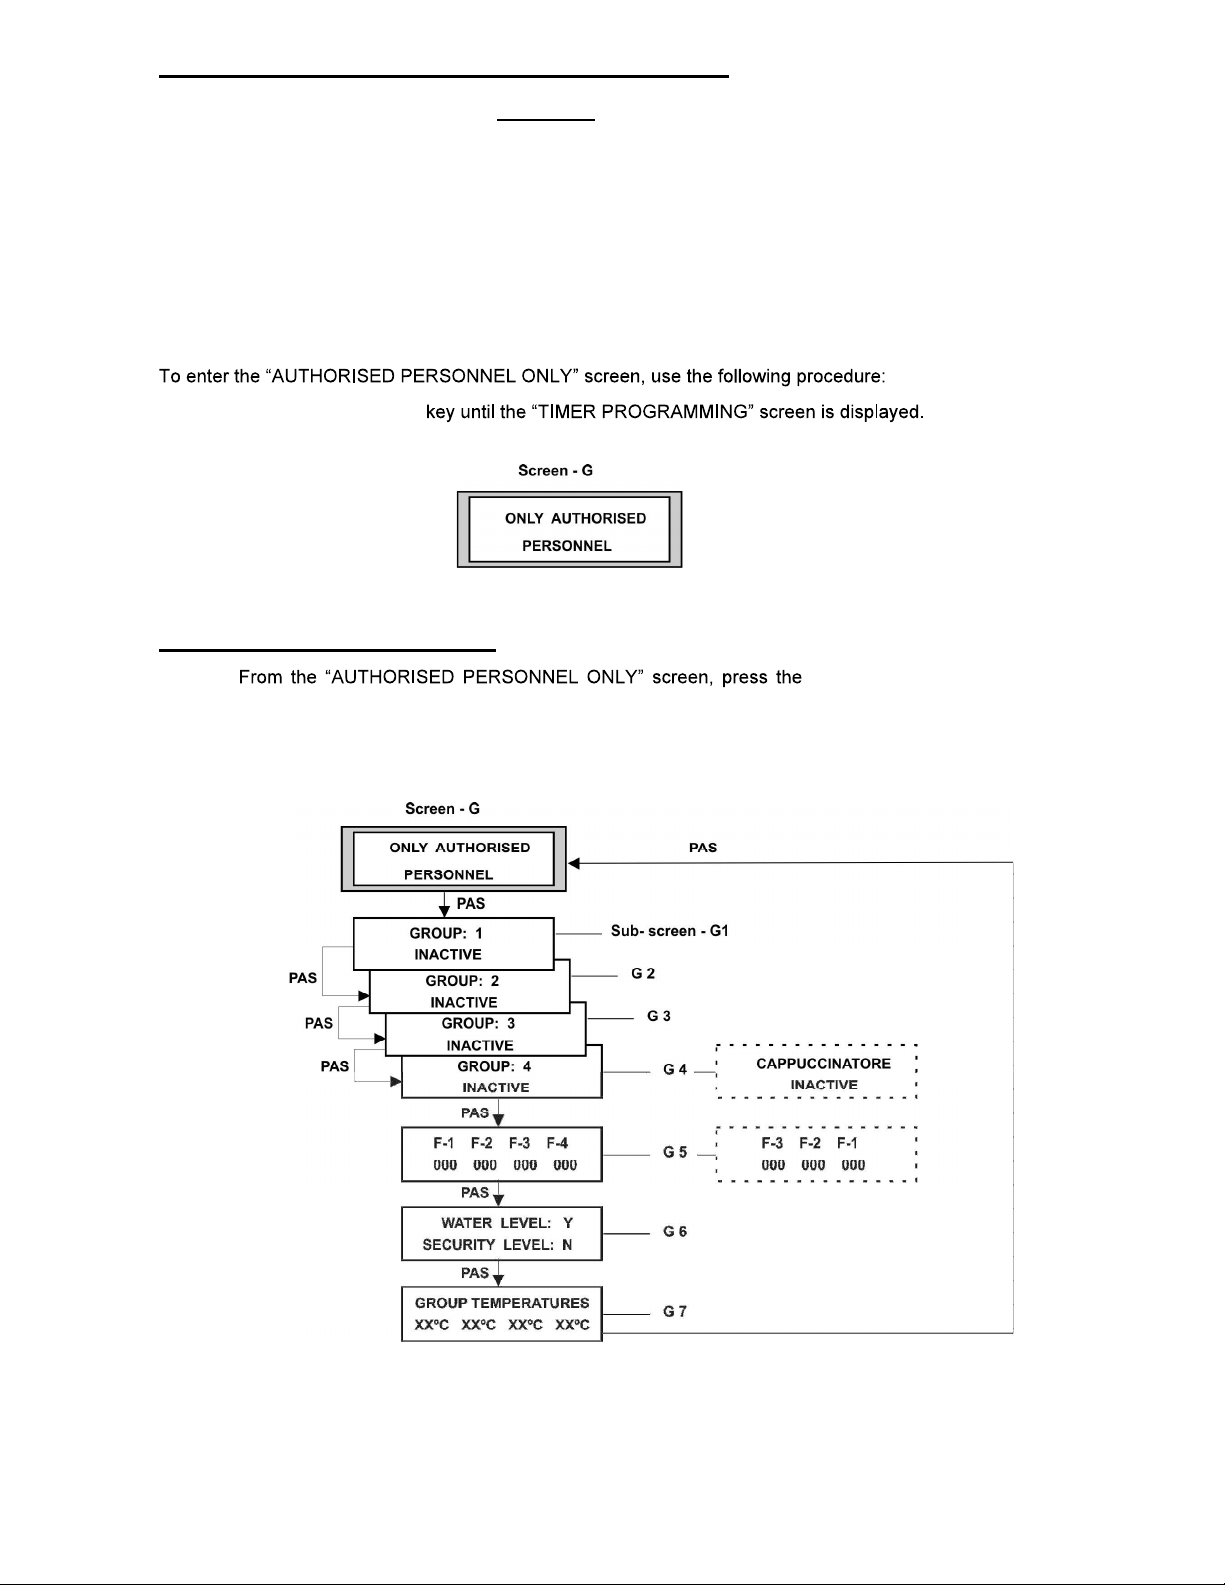
4. SCREENS FOR AUTHORISED PERSONNEL ONLY
Contents
1 Consult state of machine
2 Set up
3 Distribution time
4 Performance record
5 Program publicity
6 Select language
7 Maintenance
1 Press the MOD
2 Keep the CAM key pressed (4 sec.) (Screen -G).
1. Consult state of the machine
necessary until the information required is displayed.
PAS key the number of times
13
Page 14

Sub-screens G1 to G4 show the functioning of the panel buttons corresponding to the group
selected (Sub-screen - G1 corresponds to group 1 and so on).
Sub-screen G5 shows the total number of pulses of each volumetric meter every time a dosage of
coffee is made.
Sub-screen G7 shows the temperature of each one of the distribution groups (depending on the
model).
NOTE: Sub-screen G4 shows the state of the panel corresponding to distribution group 4 in the
conventional machines (fourth position counting from the left) and the state of the panel
corresponding to the cappuccino maker in the machines with automatic cappuccino included.
2. Parameters
1 Pulse = approx. 0.50 cm3
This setup screen (Screen H) leads to a group of sub-screens (from H1 to H11) in which the
operating parameters of the machine are memorised, these being:
a) Boiler temperature (Sub-screen H1)
b) Boiler probe adjustment (Sub-screen H2) adjustable between +/- 9.9
c) Steam temperature (Sub-screen H3) adjust
with adjustable temperature steam nozzle.
d) Steam probe adjustment (Sub-screen H4) adjustable between +/- 9.9
14
Page 15
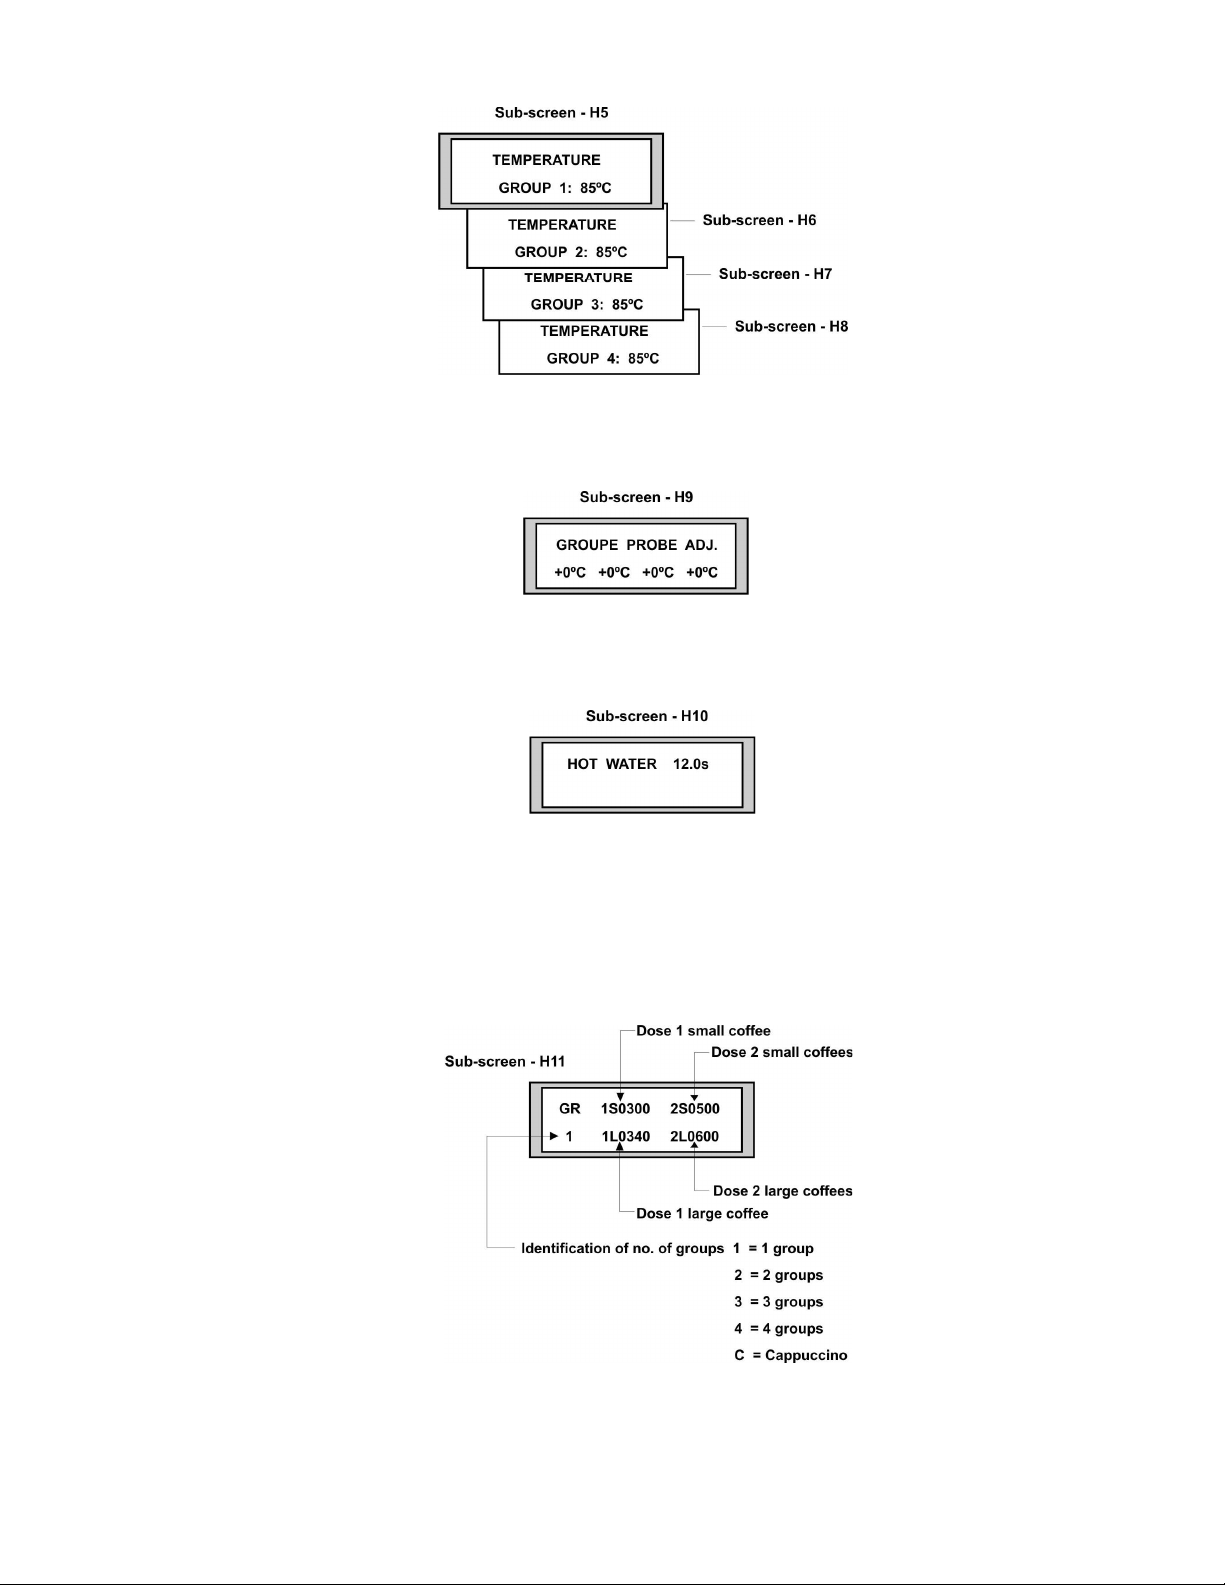
e) Temperature adjustment for each one of the groups can be made on H5, H6, H7, H8 sub-
screens
f) Groups probe adjustment (sub-screen H9) adjusted between -/+ 1 to -/+ 9
g) Hot water dosage time (Sub-screen H10) adjustable from 0 to 30 seconds
h) Flowmeter pulses for coffee dosage (Sub-screens H11, H12, H13 and H14). On each of
these the pulses programmed for each of the dosages in each group is displayed. These
dosages are adjustable from the display to between 1 and 8000 pulses.
15
Page 16

NOTE: In the machines with automatic cappuccino maker, Screen H12 corresponds to
the cappuccino maker panel, and on it is shown the pulses for the doses of coffee and the
dosage time for the milk, as well as the dosage time of milk only.
The pulses for coffee dosage are adjustable between 1 and 4,000 impulses and the milk
dosage times are adjustable between 0 and 180 seconds.
i) Number of coffees before carrying out cleaning of groups (Sub-screen H13) shows the
number of coffees programmed to carry out the cleaning of the groups and the number of
coffees made since the last cleaning process. If the quantity programmed is ZERO the
associated message will never appear.
j) Date of installation of the machine (Sub-screen H14) shows the date of installation of the
machine, according to the data recorded.
MODIFICATION OF THE DATA
information (see example).
1- Press the CAM key. The digits to change blink.
Pressing the CAM key repeatedly the cursor moves around the screen over the positions that
can be modified.
2- The SET key is used to change the blinking data.
Example:
PAS key the number of times necessary to display the required
3- Once the data has been modified on a screen, press the PAS key to confirm the changes
made.
16
Page 17

3 Brewing timer
This screen (Screen I) enables the brewing timer of group 1 to be displayed when programming the
dosage and displays the brew timer of each one of the groups.
3.1 Display of brew time of group one
1.-- From Screen I PAS key. Sub-screen I1 will be shown,
2.- Press the button for the dosage required of group 1 (1S, 1L, 2S, 2L) and the memorised
brew time when the initial programming of the machine was carried out and the brew time
at that moment will be shown.
NOTE: If t
memorised time is 000.
3.2 Displaying the brewing times
1- From Screen I PAS key until Sub-screen I2
BRE
2- Press the CAM key, the word NO will flash intermittently
3- Press the SET key, the word YES will appear
4- Press the PAS key to confirm the change.
From this moment on every time a coffee is made a screen will appear showing the brew time.
NOTE: To stop displaying the brew times, carry out the same procedure as for displaying it.
17
Page 18

4. Performance record
Shows the incidents that have occurred in the machine (errors in flowmeters, level alarm, etc.).
4.1 Consult statistical record.
1. Press the MOD (Screen - J).
2. Press the PAS key the number of times necessary until displaying the required sub-screen.
(Screen - G).
Sub-screens J1 to J4 show the number of incidents detected by the flowmeters.
Sub-screen J5 shows the incidents detected in the normal working level.
Sub-screen J6 shows the incidents due to excess of water in the boiler.
Sub-screen J7 shows the number of regenerations undertaken of the water softener.
Sub-screen J8 shows the group cleaning cycles undertaken.
Sub-screen J9 shows the number of cappuccino maker cleaning cycles undertaken.
Sub-screen J10 shows the number of preventive maintenance operations performed.
Sub-screen J11 shows the number of grinder maintenance operations performed.
18
Page 19

4.2 Setting the incidents to zero
screen required for setting to zero.
1. Press the CAM key (the digits on the display flash).
2. Press the SET key (the meter goes to zero)
3. Press the CAM key (the digits on the display stop flashing)
5. Program message
This screen is programmed at origin according to Screen A.
To program a new text carry out the following procedure:
1. Press the MOD key (Screen-K)
2. Press the PAS key, sub-screen K1 appears with the current text
3. Press the CAM key, the cursor appears, to move the cursor press the CAM key again.
4. Press the SET key to modify the value of the space occupied by the cursor.
5. Repeat steps 1 and 2 until programming the desired text.
6. Press the PAS key to confirm.
screen (Screen - J) press the PAS key until reaching the sub-
(Screen - G)
. Select language
6
Select the display communication language.
1. Press the MOD (Screen- L).
2. Press the PAS key (Sub-screen L1 appears with the language of origin selected).
3. Press the CAM key (the language currently set flashes).
4. Press the SET key to select the language required (Spanish, English, French, Italian,
Portuguese, German, Catalan, Basque and Galician).
5. Press the PAS to confirm.
6. Press the MOD key to return to the main screen.
(Screen - G).
19
Page 20

7. Maintenance
The maintenance screens are those which tell us when the machine needs a maintenance.
The maintenance screen leads us to a group of screens (from M1 to M4).
a) The sub-screen M1 allows us to set a number of coffees. When this number is exceeded, the
NOTE: To enable this function, change the N letter next to the number of coffees to an S letter. To
disable the feature, replace the S with an N.
b) The sub-screen M2 operates like the M1 sub-
NOTE: To enable or disable this feature, act like in the M1 sub-screen.
c) The sub-screen M3 works like the M1 and M2 sub-screens, but the text can be programmed by the user.
NOTE: To enable or disable this feature, act like in the M1 sub-screen.
d) The sub-screen M4 allows programming the M3 sub-screen warning text
20
Page 21

Data Modification.
as many times as needed to view the desired information
(see the example.)
1. Press the CAM key (the unit digit blinks.) By pressing the CAM key we go through the screen fields that
can be changed.
2. Press the SET key to change the blinking data
Example:
3. Once the screen data is modified, press the PAS key to confirm the changes.
21
 Loading...