

Page 1
7600 Precision LCR Meter
Model B
Instruction Manual
Form 150261/A4
©QuadTech, Inc., 1997
5 Clock Tower Place, 210 East
Maynard, Massachusetts, U.S.A. 01754-2530
October, 2002
Tel. 978-461-2100
800-253-1230
Fax. 978-461-4295
http://www.quadtech.com
The material in this manual is for informational purposes only and is subject to change,
without notice. QuadTech assumes no responsibility for any error or for consequential
damages that may result from the misinterpretation of any procedures in this publication.
!
Product will be marked with this symbol (ISO#3684) when it is necessary for the user to
refer to the instruction manual in order to prevent injury or equipment damage.
Product marked with this symbol (IEC417) indicates presence of direct current.
Page 2

ii
Page 3

Contents
Warranty ............................................................................................................vii
Specifications ............................................................................................................ix
Introduction - Section 1
1.1 Unpacking and Inspection .............................................................................1-1
1.2 Product Overview ..........................................................................................1-1
1.3 Controls and Indicators..................................................................................1-2
1.4 Accessories Included .....................................................................................1-5
1.5 Accessories/Options Available......................................................................1-5
1.6 Installation .....................................................................................................1-6
1.6.1 Instrument Positioning.......................................................................1-6
1.6.2 Power Requirements..........................................................................1-6
1.6.3 Safety Inspection................................................................................1-7
Operation - Section 2
2.1 General...........................................................................................................2-1
2.2 Startup ............................................................................................................2-1
2.3 Connection to Device Under Test..................................................................2-1
2.4 Zeroing...........................................................................................................2-2
2.5 Measurement Procedure ................................................................................2-3
2.5.1 General...............................................................................................2-3
2.5.2 Default Measurement Conditions......................................................2-3
2.6 Menu Functions .............................................................................................2-5
2.6.1 General...............................................................................................2-5
2.6.2 Setup Menu........................................................................................2-5
2.6.2.1 Primary Parameter ................................................................2-6
2.6.2.2 Secondary Parameter ............................................................2-9
2.6.2.3 Frequency..............................................................................2-10
2.6.2.4 AC Test Signal......................................................................2-10
2.6.2.5 DC Bias Voltage...................................................................2-11
2.6.2.6 Range Hold ...........................................................................2-14
2.6.2.7 Range Locked .......................................................................2-15
2.6.2.8 Measurement Accuracy ........................................................2-20
2.6.2.9 Measurement Delay..............................................................2-20
2.6.2.10 # to Average........................................................................2-21
2.6.2.11 Contact Check.....................................................................2-21
iii
Page 4

Contents (continued)
2.6.3 I/O Menu............................................................................................2-22
2.6.3.1 Display Type.........................................................................2-23
2.6.3.2 Nominal Value......................................................................2-26
2.6.3.3 Result Format........................................................................2-26
2.6.3.4 Trigger ..................................................................................2-27
2.6.3.5 Handler Interface ..................................................................2-27
2.6.3.6 RS-232 Interface...................................................................2-27
2.6.3.7 IEEE-488.2 Interface ............................................................2-28
2.6.3.8 Print Results..........................................................................2-28
2.6.3.9 Results to Floppy ..................................................................2-29
2.6.4 Analysis Menu...................................................................................2-35
2.6.4.1 Binning..................................................................................2-36
2.6.4.2 Test Sequencing....................................................................2-41
2.6.4.3 Parameter Sweep...................................................................2-44
2.6.4.4 Median ..................................................................................2-46
2.6.4.5 Distortion Detection..............................................................2-46
2.6.4.6 Load Correction....................................................................2-46
2.6.5 Utilities Menu....................................................................................2-48
2.6.5.1 Save Setup.............................................................................2-49
2.6.5.2 Recall Setup..........................................................................2-50
2.6.5.3 Setup Accuracy.....................................................................2-51
2.6.5.4 Open / Short..........................................................................2-54
2.6.5.5 Lock Out ...............................................................................2-55
2.6.5.6 Calibration ............................................................................2-56
2.6.5.7 Set Time/Date .......................................................................2-56
2.6.5.8 Usage/Cal Date .....................................................................2-57
2.6.5.9 Set Contrast...........................................................................2-57
2.6.5.10 Self Test..............................................................................2-58
2.6.5.11 LCD Backlite......................................................................2-58
2.7 Input/Output Interface....................................................................................2-59
2.7.1 I/O Interface.......................................................................................2-59
2.7.2 Parallel Interface................................................................................2-63
2.7.3 IEEE-488.2 Interface .........................................................................2-64
2.7.3.1 Formats .................................................................................2-74
2.7.3.2 Sample Program for National Instruments GPIB card .........2-76
2.7.4 RS232 Interface .................................................................................2-77
2.7.5 Results to Printer................................................................................2-78
iv
Page 5

Contents (continued)
2.8 Operation with Accessories...........................................................................2-79
2.8.1 General...............................................................................................2-79
2.8.2 Rack Mount Kit (7000-00) ................................................................2-79
2.8.3 BNC Cable Set, 1 Meter (7000-01), 2 Meter (7000-02)....................2-79
2.8.4 Kelvin Clip Leads (7000-03).............................................................2-80
2.8.5 Alligator Clip Leads (7000-04)..........................................................2-82
2.8.6 Chip Component Tweezers (7000-05)...............................................2-83
2.8.7 Low V, Axial/Radial Lead Component Test Fixture (7000-06)........2-84
2.8.8 Low V, Chip component Test Fixture (7000-07) ..............................2-85
2.8.9 High Voltage Test Fixture (7000-08) ................................................2-87
2.8.10 Calibration Kit (7000-09) ..................................................................2-88
2.8.11 Connections to 874 Type Adapters....................................................2-89
2.9 Error Messages ..............................................................................................2-90
Theory Section 3
3.1 General...........................................................................................................3-1
3.2 Instrument Description ..................................................................................3-1
3.2.1 Basic I2000 Instrument Architecture.................................................3-1
3.2.2 7600 Instrument Module....................................................................3-2
3.2.3 I2000 Instrument Options..................................................................3-3
Maintenance/Calibration - Section 4
4.1 General...........................................................................................................4-1
4.2 Instrument Return ..........................................................................................4-1
4.3 Routine Maintenance.....................................................................................4-1
4.3.1 Battery Replacement..........................................................................4-1
4.3.2 Bias Voltage Fuse Replacement ........................................................4-2
4.3.3 Resetting of Time and Date ...............................................................4-2
4.3.4 Loss of Display Contrast....................................................................4-3
4.3.5 Preventive Maintenance/Cleaning.....................................................4-4
4.4 Calibration .....................................................................................................4-4
4.4.1 General...............................................................................................4-4
4.4.2 Calibration Procedure........................................................................4-4
v
Page 6

vi
Page 7

Warranty
QuadTech warrants that Products are free from defects in material and workmanship and,
when properly used, will perform in accordance with QuadTech's applicable published
specifications. If within one (1) year after original shipment it is found not to meet this
standard, it will be repaired, or at the option of QuadTech, replaced at no charge when
returned to a QuadTech service facility.
Changes in the Product not approved by QuadTech shall void this warranty.
QuadTech shall not be liable for any indirect, special or consequential damages,
even if notice has been given of the possibility of such damages.
This warranty is in lieu of all other warranties, expressed or implied, including, but
not limited to any implied warranty or merchantability or fitness for a particular
purpose.
SERVICE POLICY
QuadTech policy is to maintain product repair capability for a period of at least five (5)
years after original shipment and to make this capability available at the then prevailing
schedule of charges.
vii
Page 8

viii
Page 9

Specifications
Measurement Capacitance (Cs/Cp), Inductance (Ls/Lp), Resistance (Rs/Rp),
Parameters: Dissipation (DF) and Quality (Q) Factors, Impedance (|Z|),
Admittance |Y|, Phase Angle (θ), Equivalent Series Resistance
(|ESR|), Conductance (Gp), Reactance (Xs), Susceptance (Bp)
Any two parameters measured and displayed simultaneously
Measurement |Z|, R, X: 000.0001 mohm to 99.99999 Mohm
Ranges: |Y|, G, B: 00000.01 µS to 9.999999 MS
C: 00000.01 fF to 9.999999 F
L: 0000.001 nH to 99.99999 H
D: .0000001 to 99.99999
Q: .0000000 to 999999.9
Phase Angle: -180.0000 to +179.9999 degrees
Delta %: -99.9999 % to +99.9999 %
Measurement Fast Medium Slow
Accuracy: LCR: +/- 0.5%* +/- 0.25%* +/- 0.05%*
DF: +/- 0.005 +/- 0.0025 +/- 0.0005
* At optimum test signal levels, optimum DUT value and without calibration
uncertainty error. Instrument accuracy can be reduced from nominal specifications
when using some 7000 accessory fixtures and cables. Best accuracy requires geometric
consistency between that utilized during open/short zeroing and that utilized on fixtures
and cables during the actual measurement process. This consistency may be especially
difficult to achieve when using unshielded Kelvin clip and tweezer type connections.
0.25 x (normal accuracy) with Load Correction implemented and
compared to user supplied standard.
In a range of 3Ω ≤ Z ≤ 80kΩ, 100mV ≤ programmed V ≤ 1V or
100mV ≤ (programmed I) x (Z) ≤ 1V
Test Frequency: 10 Hz to 2 MHz
Resolution: 0.1 Hz from 10 Hz to 10 kHz
5 digits > 10 kHz, 4 digits > 100 kHz
Accuracy: +/- (0.25% + 0.02 Hz)
Measurement Speed: Fast Accuracy: 40 msec*/measurement
Medium Accuracy: 125 msec*/measurement
Slow Accuracy: 1 sec*/measurement
* may be longer, depending on test conditions & frequency
Ranging: Automatic or Range Hold
Note: s = series, p = parallel, ESR equivalent to Rs
ix
Page 10

Specifications (continued)
Source Impedance: 25Ω, 400Ω, 6.4 kΩ or 100 kΩ, measurement range dependent
Trigger: Internal (automatic) and External (via handler, RS-232 or IEEE-
488.2 interfaces)
AC Test Signal 20 mV to 5.0 V (open circuit) in 5 mV steps, ≤500kHz
Voltage: 20 mV to 1.0 V (open circuit) in 5 mV steps, >500kHz to≤1MHz
20 mV to 0.5 V (open circuit) in 5 mV steps, >1MHz
Accuracy: +/- (5% + 1 mV) < 100kHz
+/- (10% + 1 mV) 100kHz to 500kHz
+/- (20% + 1 mV) 500kHz to 1MHz
+/- (35% + 1 mV) > 1MHz
AC Test Signal 250 µA to 100 mA (short circuit) in 50 µA steps
Current: Max Compliance: 3V < 500kHz, 1V from 500kHz - 1MHz
0.5V > 1MHz
Accuracy: +/- (5% +50 µA) < 100kHz
+/- (10% +50 µA) 100kHz to 500kHz
+/- (20% +50 µA) 500kHz to 1MHz
+/- (35% +50 µA) > 1MHz
Bias Voltage: Internal: 2.0 V External: 0 to +/-200 V
Display: LCD Graphics with adjustable contrast and back light
- Results of Dual Measurement Parameters in engineering
(7 digits) or scientific (5 digits) notation
- Deviation from Nominal of Primary Parameter
- % Deviation from Nominal of Primary Parameter
- Instrument Setting and Test Conditions
- Bin Limits and Pass/Fail Results
- Plot of Primary Measurement Parameter vs. Test Conditions
- Table of Measurement Parameters vs. Test Conditions
- Sequenced Test Results Summary
Limit Detection: 15 bins total (10 pass, 4 fail, 1 no contact)
Interfaces: IEEE-488.2, RS-232, Handler, Printer Port and 3.5" Floppy Dr.
Front Panel Four terminal (BNC) with Guard
Test Terminals:
Environmental: MIL-T-28800E, Type 3, Class 5, Style E & F.
Operating: 0 to + 50o C. Storage: - 40 to + 71o C.
Humidity: < 75% for < 40o C operating
Altitude <2000m, Installation Category 1, Pollution Degree 1
x
Page 11

Specifications (continued)
Mechanical: Bench mount with tilt bail
Dimensions: (w x h x d): 16 x 6 x 14in
(410 x 150 x 360mm)
Weight: 17 lbs (8kg) net, 23 lbs (10.5kg) shipping
Power Requirements: 90 to 250Vac 47 - 63 Hz 40W maximum
Other Features: Charged Capacitor Protection: 8/C for Vmax ≤ 250 V
2/C for Vmax ≤ 1000V
C = Capacitance in farads of the device under test
Measurement Delay programmable from 0-1000 ms in 1 ms steps
Measurement Averaging programmable from 1-1000
Median value Mode
Open and Short Circuit Zeroing at Multiple Frequencies
Power Fail Protection (setting, results, & calibration data stored)
Storage and Recall of 25 Setups, 125/disk w/Floppy Option
Self-Test Routines at Power-up
Stored Results up to 40,000 measurements/disk w/Floppy Option
Self Accuracy Calibration and Display
Contact Check
Supplied: Instruction Manual Power Cable Calibration Certificate
Ordering Description Catalog No.
Information:
7600 Precision LCR Meter, Model B 7600
7600-CE Precision LCR Meter, Model B 7600-CE
7600A Precision LCR Meter, Model B,+/-500V ext bias 7600A
7600A-CE Precision LCR Meter, Model B 7600A-CE
+/-500V ext bias
Options & Accessories:
Rack Mount Kit 7000-00
BNC Cable Set, 1 meter 7000-01
BNC Cable Set, 2 meters 7000-02
Kelvin Clip Leads 7000-03
Alligator Clip Leads 7000-04
Chip Component Tweezers 7000-05
Low Voltage Axial/Radial Lead Component Test Fixture 7000-06
Low Voltage Chip Component Test Fixture 7000-07
High Voltage Test Fixture 7000-08
Calibration Kit 700009
xi
Page 12

xii
Page 13
Section 1 Introduction
1.1 Unpacking and Inspection
Inspect the shipping carton before opening, if damaged contact the carriers agent
immediately. Inspect the instrument for any damage. If the instrument appears damaged
or fails to meet specifications notify QuadTech (refer to instruction manual front cover)
or its local representative. Retain the shipping carton and packing material for future use
such as returning for re calibration or service.
1.2 Product Overview
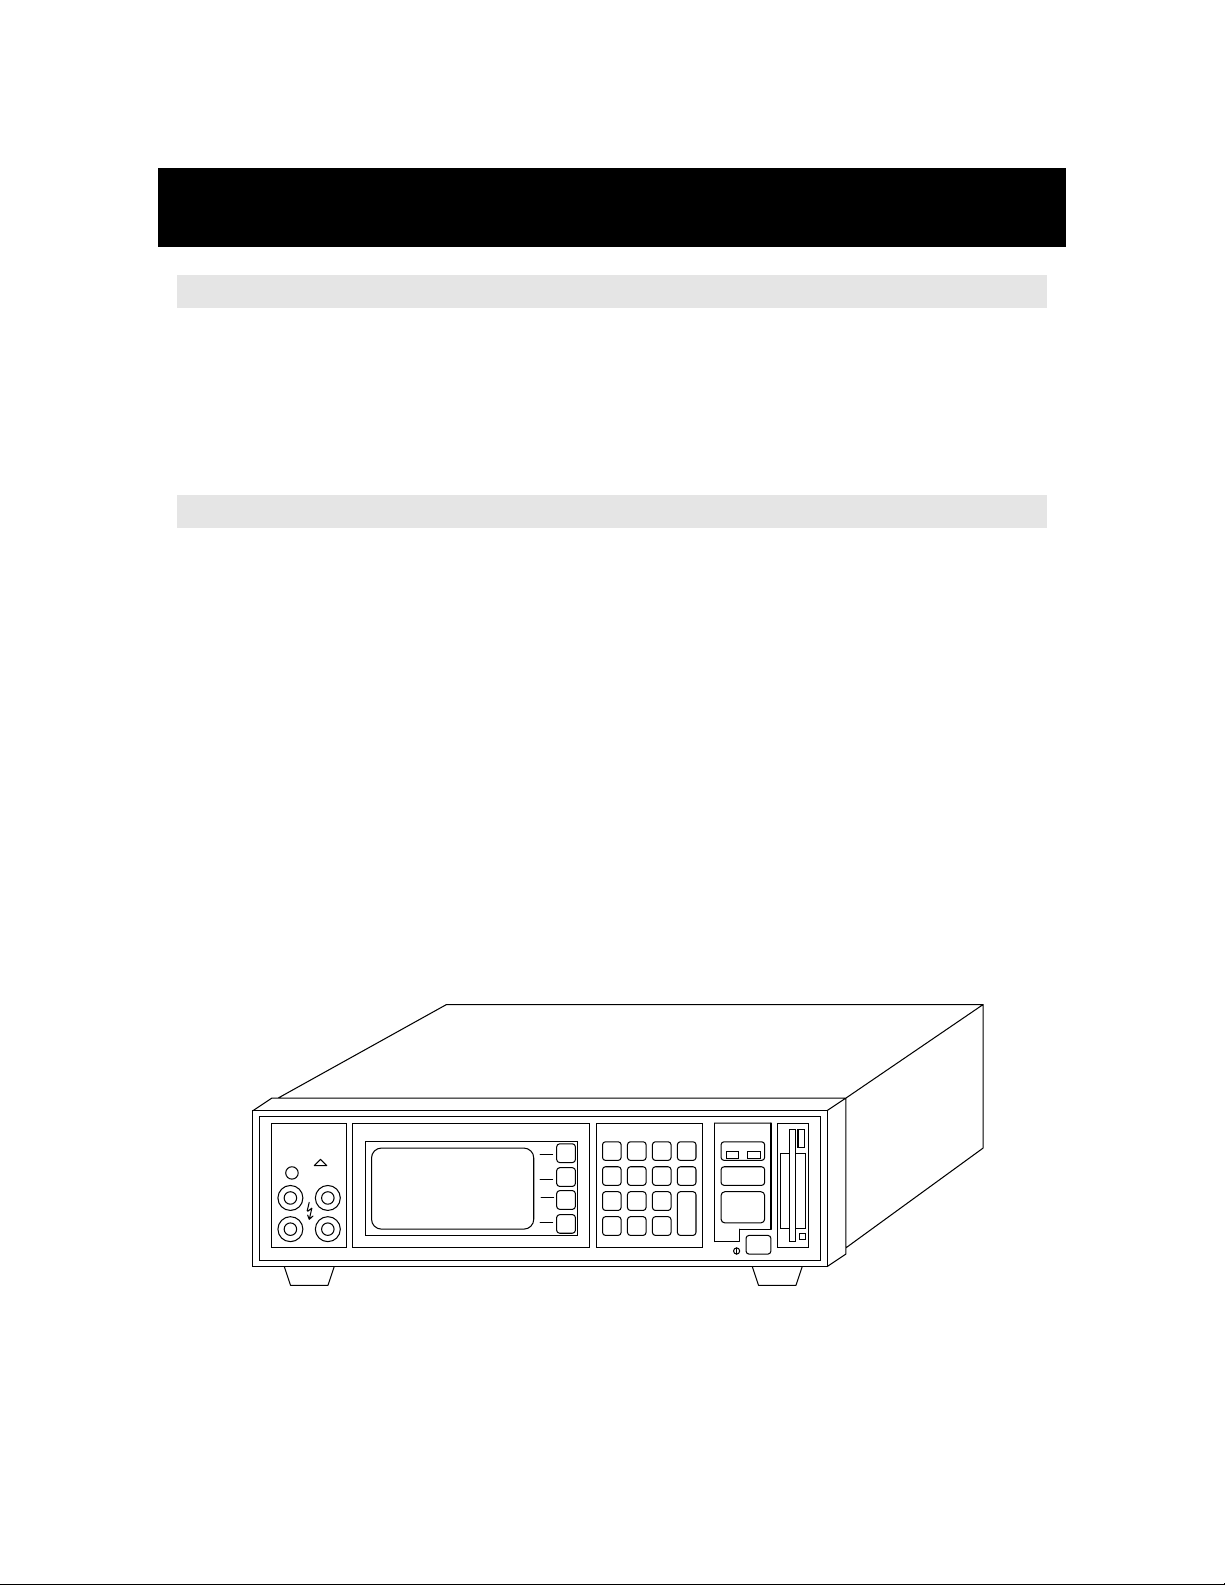
The 7600 Precision LCR Meter is an automatic, user programmable instrument for
measuring a wide variety of impedance parameters. The 7600 covers a frequency range
from 10 Hz to 2 MHz with a basic measurement accuracy of 0.05%. The instruments
high resolution graphics display and keypad makes for easy menu programming. Test
conditions are stored and recalled from internal memory, eliminating wasted
measurement setup time. Extensive pass/fail binning capability and measurements
speeds up to 25/sec makes the unit well suited for production applications.
The instruments unique measurement sequencing allows up to six parameters to be
measured on a single pass. Additionally, a parameter can be plotted against a test
condition variable, an invaluable technique for component design and product evaluation.
The 7600 comes with IEEE-488.2, RS-232, I/O port (handler), and parallel interfaces, all
standard, for remote control operation and communication with other instrumentation. A
3 1/2" floppy drive is also included for program/data storage of test conditions and
measurement results.
Precision
7600
LCR Meter
!
CAUTION
HIGH VOLTAGE
DISPLAY SELECT ENTRY TESTQuadTech
17.52520 pF
C
.0000100
DF
Freq
1.0000kHz
Range
0 ms
Delay
AC Signal
AverageAuto
Bias
1.0000V
1
Off
12
4
5
8
7
-
0
FAIL PASS
MENU
3
CNCL
ENTER
STOP
START
6
9
.
Figure 1-1
7600 Precision LCR Meter
Introduction 1-1
Page 14
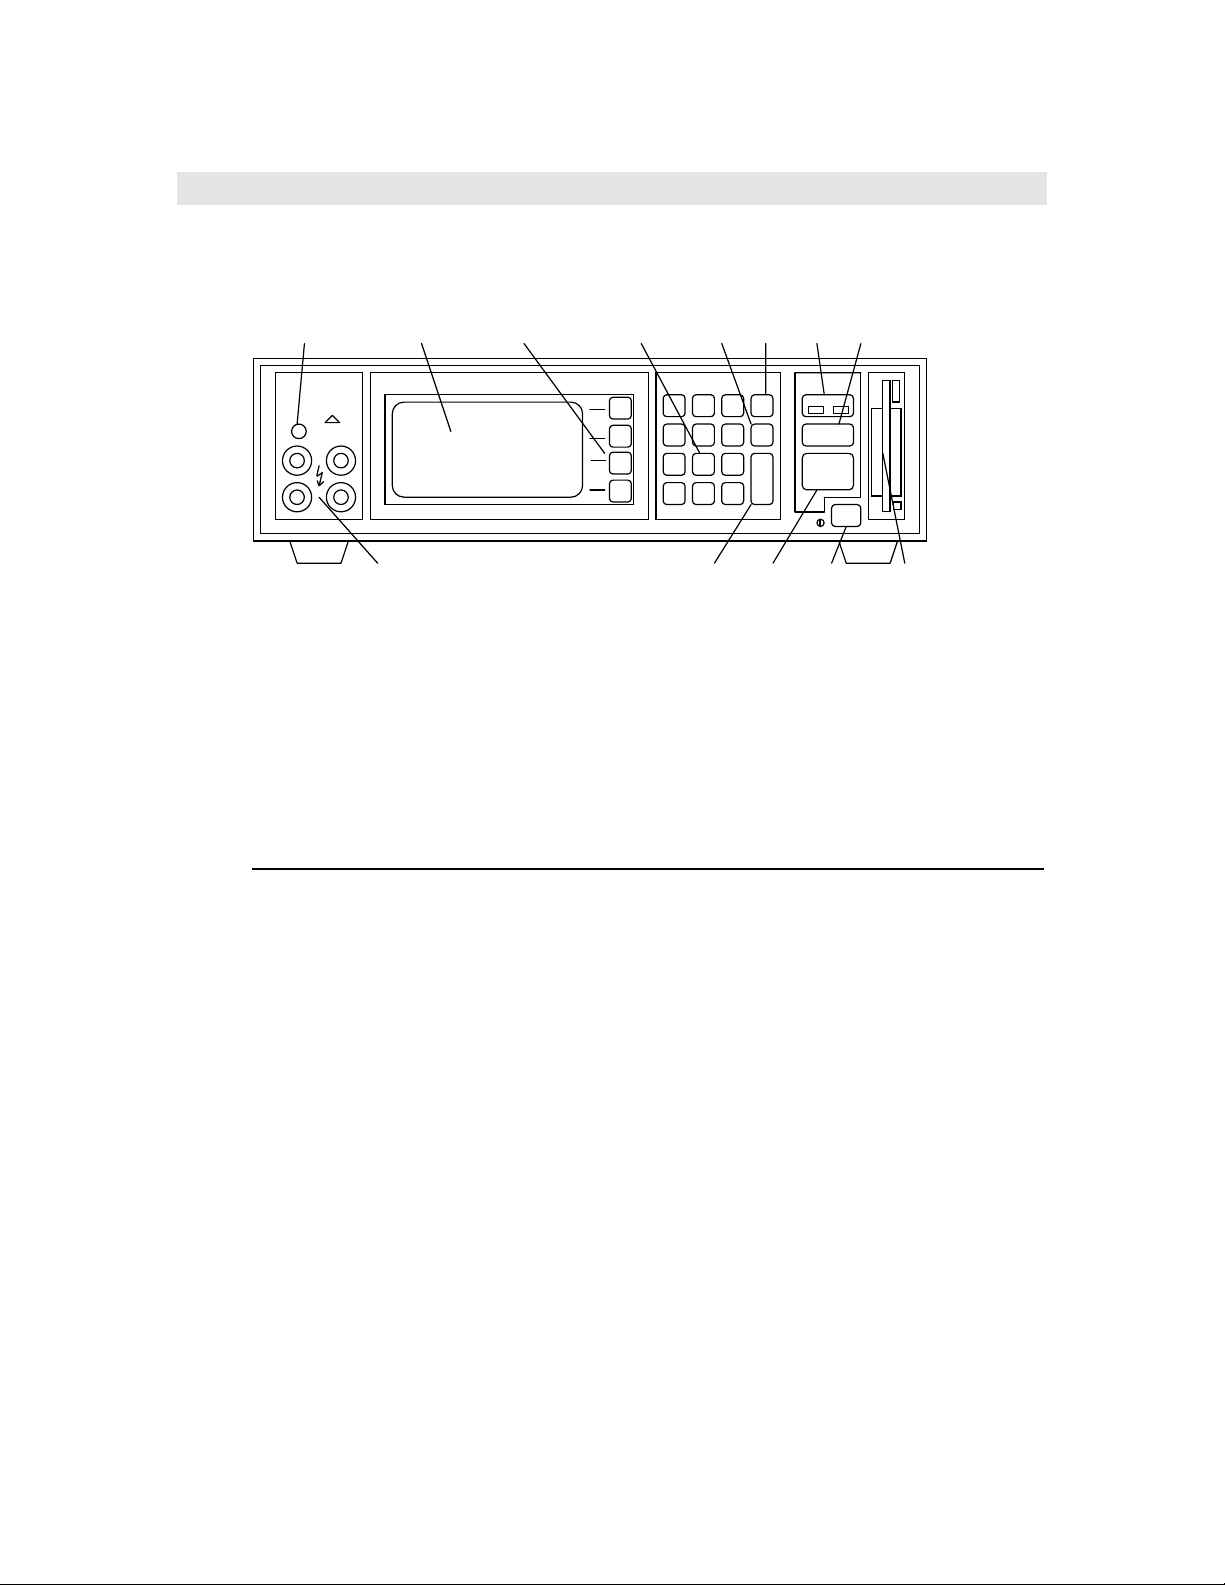
1.3 Controls and Indicators
Figure 1-2 shows the controls and indicators on the front panel of the 7600. Table 1-1
identifies them with descriptions and functions.
234567
910
Precision
7600
LCR Meter
!
CAUTION
HIGH VOLTAGE
DISPLAY SELECT ENTRY TESTQuadTech
C
17.52520 pF
DF
.0000100
Freq
1.0000kHz
Range
Delay
AC Signal
AverageAuto
Bias0 ms
1.0 V
1
Off
12
4
5
8
7
-
0
8
FAIL PASS
MENU
3
CNCL
ENTER
11 12 131
STOP
START
6
9
.
Figure 1-2
Front Panel Controls & Indicators
Table 1-1
Front Panel Controls and Indicators
Figure 1-2
Ref. No. Item Function
1 Input Panel BNC connectors, for connection to device
under test (DUT). 7/8 inch spacing.
IL Current, low connection to DUT
PL Potential, low connection to DUT
PH Potential, high connection to DUT
IH Current, high connection to DUT
2 Voltage indicator Indicates when dc bias voltage is called for
or applied to rear panel connectors, from
external source
3 Graphics display Displays test conditions, measured results,
instrument status and user interface menus.
Introduction 1-2
Page 15

Table 1-1 (continued)
Front Panel Controls and Indicators
Figure 1-2
Ref. No. Item Function
4 Select keys (4) Soft key functions as indicated on the
adjacent LCD display.
- from top to bottom, functions such as up,
down, right or left arrow during menu
selection.
- other functions such as measurement
units, exponent, Y or N (yes or no) and del
(delete).
5 Keypad (12) For making numerical entries as labeled,
0 through 9, minus sign and decimal.
6 CNCL key Exits an active field in vertical or
horizontal selections, clears entry on #
fields when pressed once and exits # fields
when pressed twice.
7 MENU key Enters menu display mode or exits sub
menu back to main menu.
8 ENTER key Switches user to entry mode or accepts
menu entry as entered.
9 Pass/Fail indicator Indicates measurement results based on
entered test limits.
10 STOP key Stops the measurement process.
11 START key Starts the measurement process.
12 Power switch Turns main power to instrument on or off.
13 Floppy drive For storing measurement setup conditions
and measurement results. A high density
(1.44M) or low density (720K) DOS
compatible floppy drive. Floppies should
be double sided, formatted for DOS
compatibility.
Introduction 1-3
Page 16
1 2
4
6 7
BIAS VO LT AG E
200V M AX
+
BAT TERY
-
90 - 250 V
47 - 63 Hz
40 WATTS M AX
IEEE- 488 INT ERF ACE
PARALL EL POR T RS-232 I NT ERF ACE
I/O PO R T
3
5
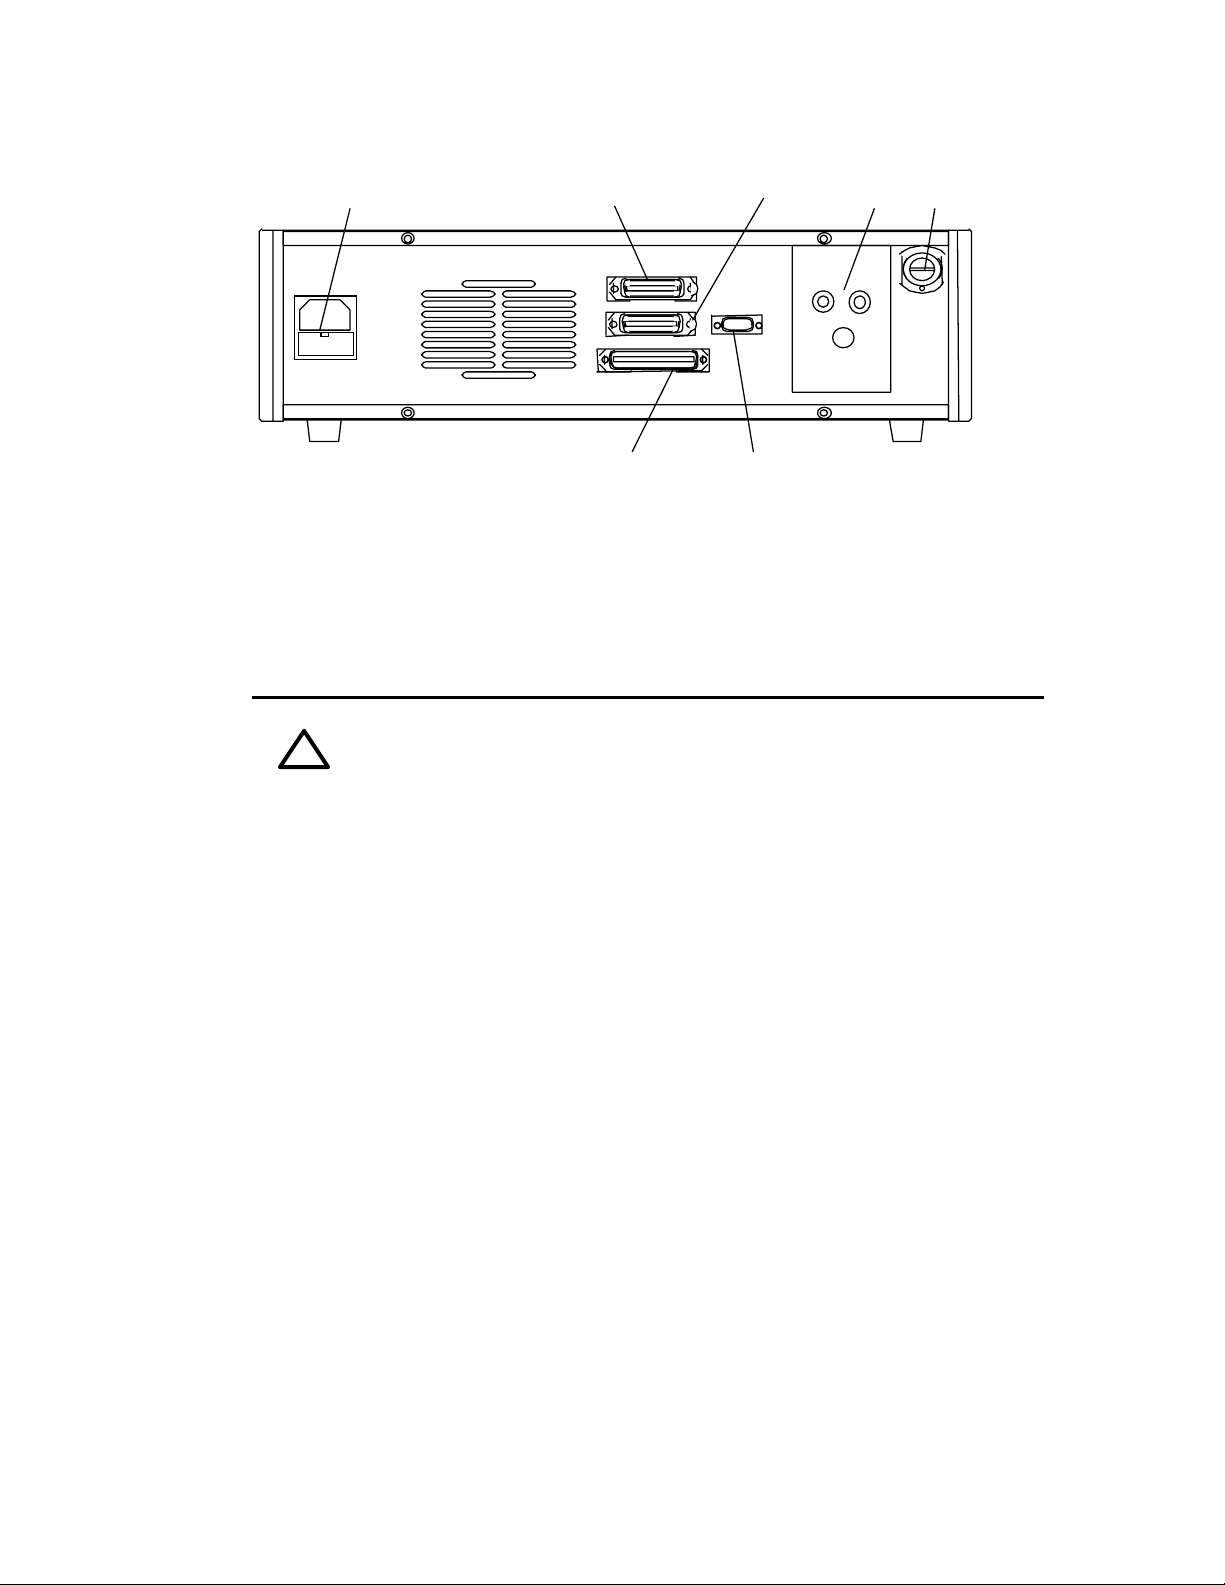
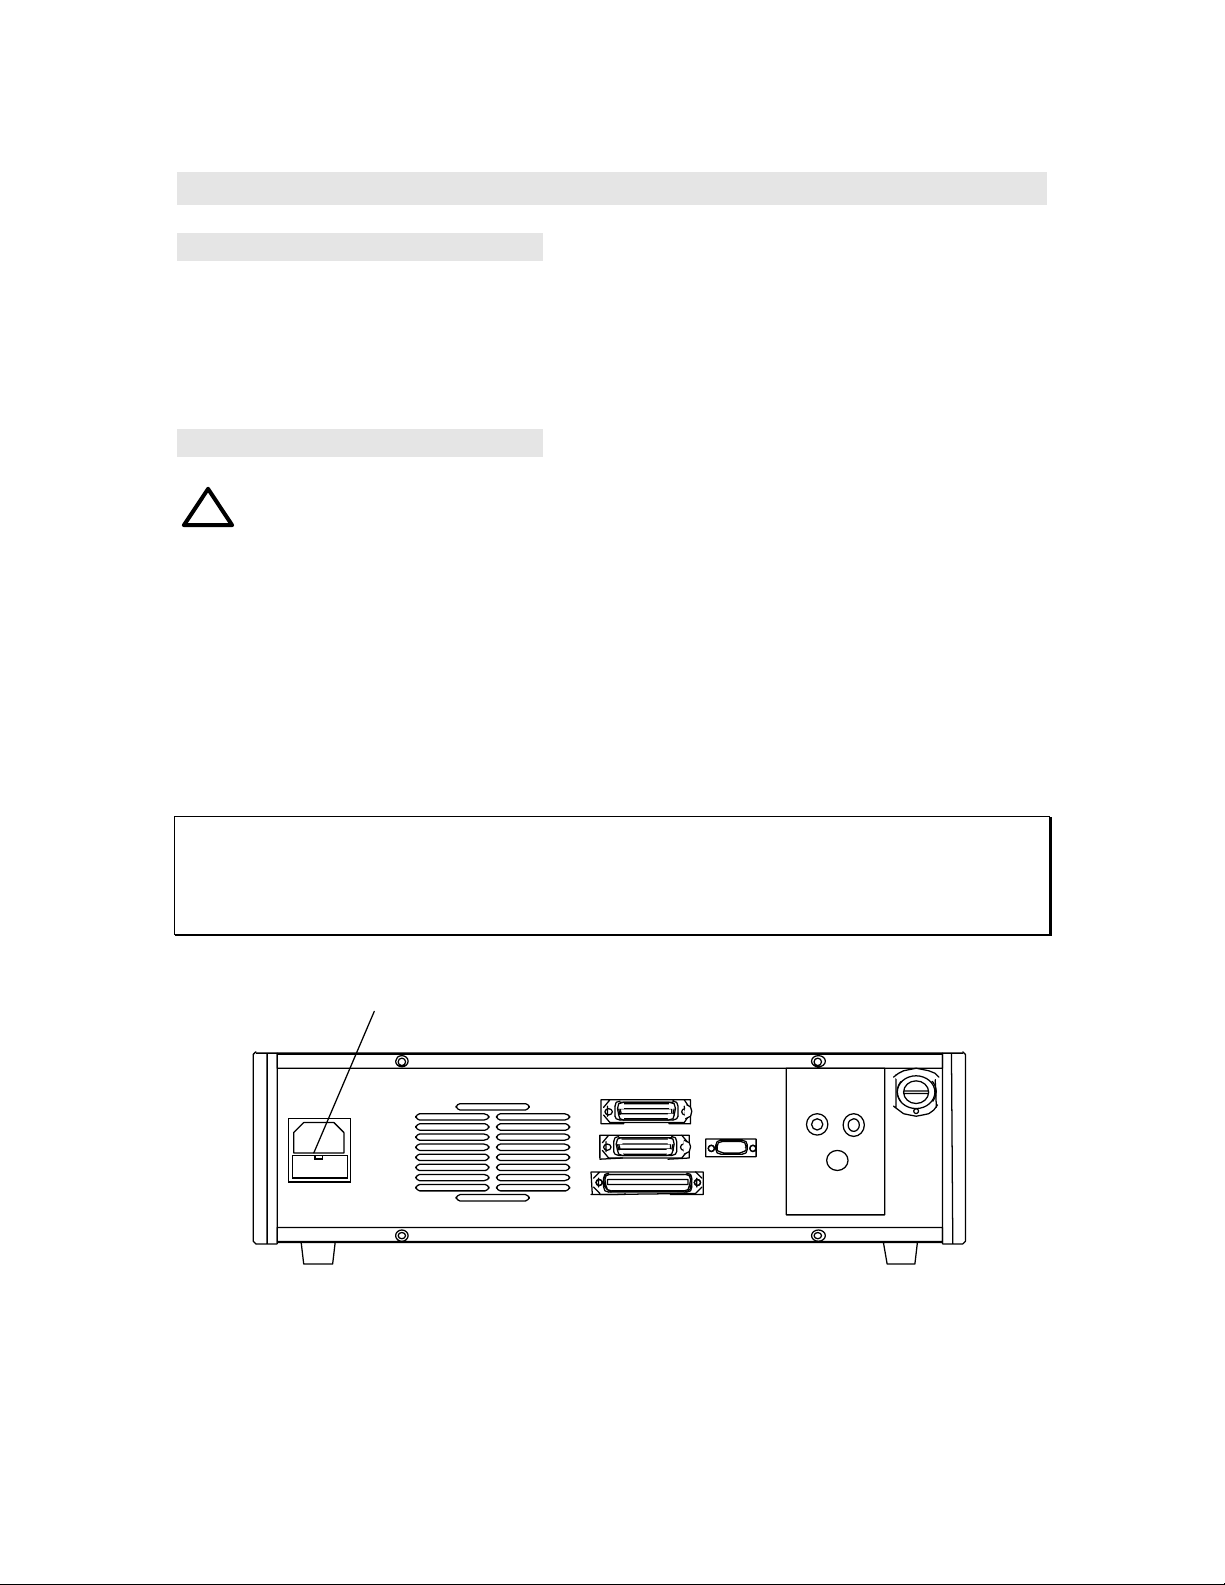
Figure 1-3
Rear Panel View
Table 1-2
Rear Panel Connectors and Controls
Figure 1-3
Ref. No. Item Function
1 ! AC Inlet Module AC power input, filtering, fusing and
switching. Use with Belden SPH386 socket or equivalent. Contains
T2.5A,
250V, 5x20mm time delay fuse for 115 or
220V operation. Replace only with the
same type and rating. Also refer to
paragraph 1.6.2.
2 IEEE-488.2 Input/output connections according to IEEE
STD-488.2. 24 pin socket for standard
IEEE-488 cable. Refer to paragraph 2.7.3.
3 I/O Connector Connection to component handler. 36 pin
Amp connector, mates with Amp 552302-1
plug and 552073-5 strain relief cover or
ribbon cable clamp connector 553600-1 or
equivalents. Refer to paragraph 2.7.1.
4 Parallel Port Connection to parallel printer. Type
DB25 (25 pin) female connector. Refer to
paragraph 2.7.2.
5 RS232 Connector Connection according to RS232 std
interface. Type DB9 (9 pin) male
connector. Refer to paragraph 2.7.4.
Introduction 1-4
Page 17

Table 1-2 (continued)
Rear Panel Connectors and Controls
Figure 1-3
Ref. No. Item Function
6 ! Bias Voltage External bias input, maximum of
+/-200Vdc. Contains F0.25A, 250V,
5x20mm fast blow fuse. Replace only with
the same type and rating. Also refer to
paragraph 2.6.2.5.
7 Battery DC source for backup of system memory,
3 standard alkaline AA batteries which
should be replaced annually (Refer to
paragraph 4.3.1)
1.4 Accessories Included
Table 1-3
Item Quantity
Instruction Manual 1
Calibration Certificate 1
Power Cord (CE units with international cord set) 1
Fuse (T2.5A, 250V, 5x20mm, for 115/220V operation) 1
1.5 Accessories/Options Available
Table 1-4
Item Part Number
Rack Mount Kit 7000-00
BNC Cable Set, 1 meter 7000-01
BNC Cable Set, 2 meters 7000-02
Kelvin Clip Leads 7000-03
Alligator Clip Leads 7000-04
Clip Component Tweezers 7000-05
Low Voltage Axial/Radial Lead Component Test Fixture 7000-06
Low Voltage Chip Component Test Fixture 7000-07
High Voltage Test Fixture 7000-08
Calibration Kit 7000-09
Introduction 1-5
Page 18
1.6 Installation
1.6.1 Instrument Positioning
The 7600 contains a high resolution back lit LCD for convenient viewing. The optimum
angle for viewing is straight onto the display. This means that for bench operation the
front bail should sometimes be used to angle the instrument up and for rack installation it
should be mounted somewhat at eye level.
1.6.2 Power Requirements
!
The 7600 Precision LCR Meter can be operated from a power source between 90
and 250Vac at a power line frequency of 47 to 63Hz, no line voltage switching is
necessary. Power connection to the rear panel is through an ac inlet module comprised of
an ac connector and fuse drawer. Before connecting the 3-wire power cord between the
unit and AC power the fuse should be in accordance with the power source, T2.5A,
250V, 5x20mm (QuadTech PN 520049) for 115 or 220V source. Always use an outlet
that has a properly connected protection ground. The 7600 is factory shipped with the
2.5A fuse in place. The instrument can be damaged if the wrong fuse is installed.
To change the fuse proceed as follows:
WARNING
MAKE SURE THE UNIT HAS BEEN DISCONNECTED FROM ITS AC POWER
SOURCE FOR AT LEAST FIVE MINUTES BEFORE PROCEEDING.
Fuse drawer wi t h release tab
Introduction 1-6
90 - 250 V
47 - 63 Hz
40 WATTS M AX
IEEE- 488 INT ERF ACE
PARALL EL POR T RS-232 I NT ERF ACE
I/O PO R T
Figure 1-4
Fuse Drawer
BIAS VO LT AG E
200V M AX
+
BAT TERY
-
Page 19
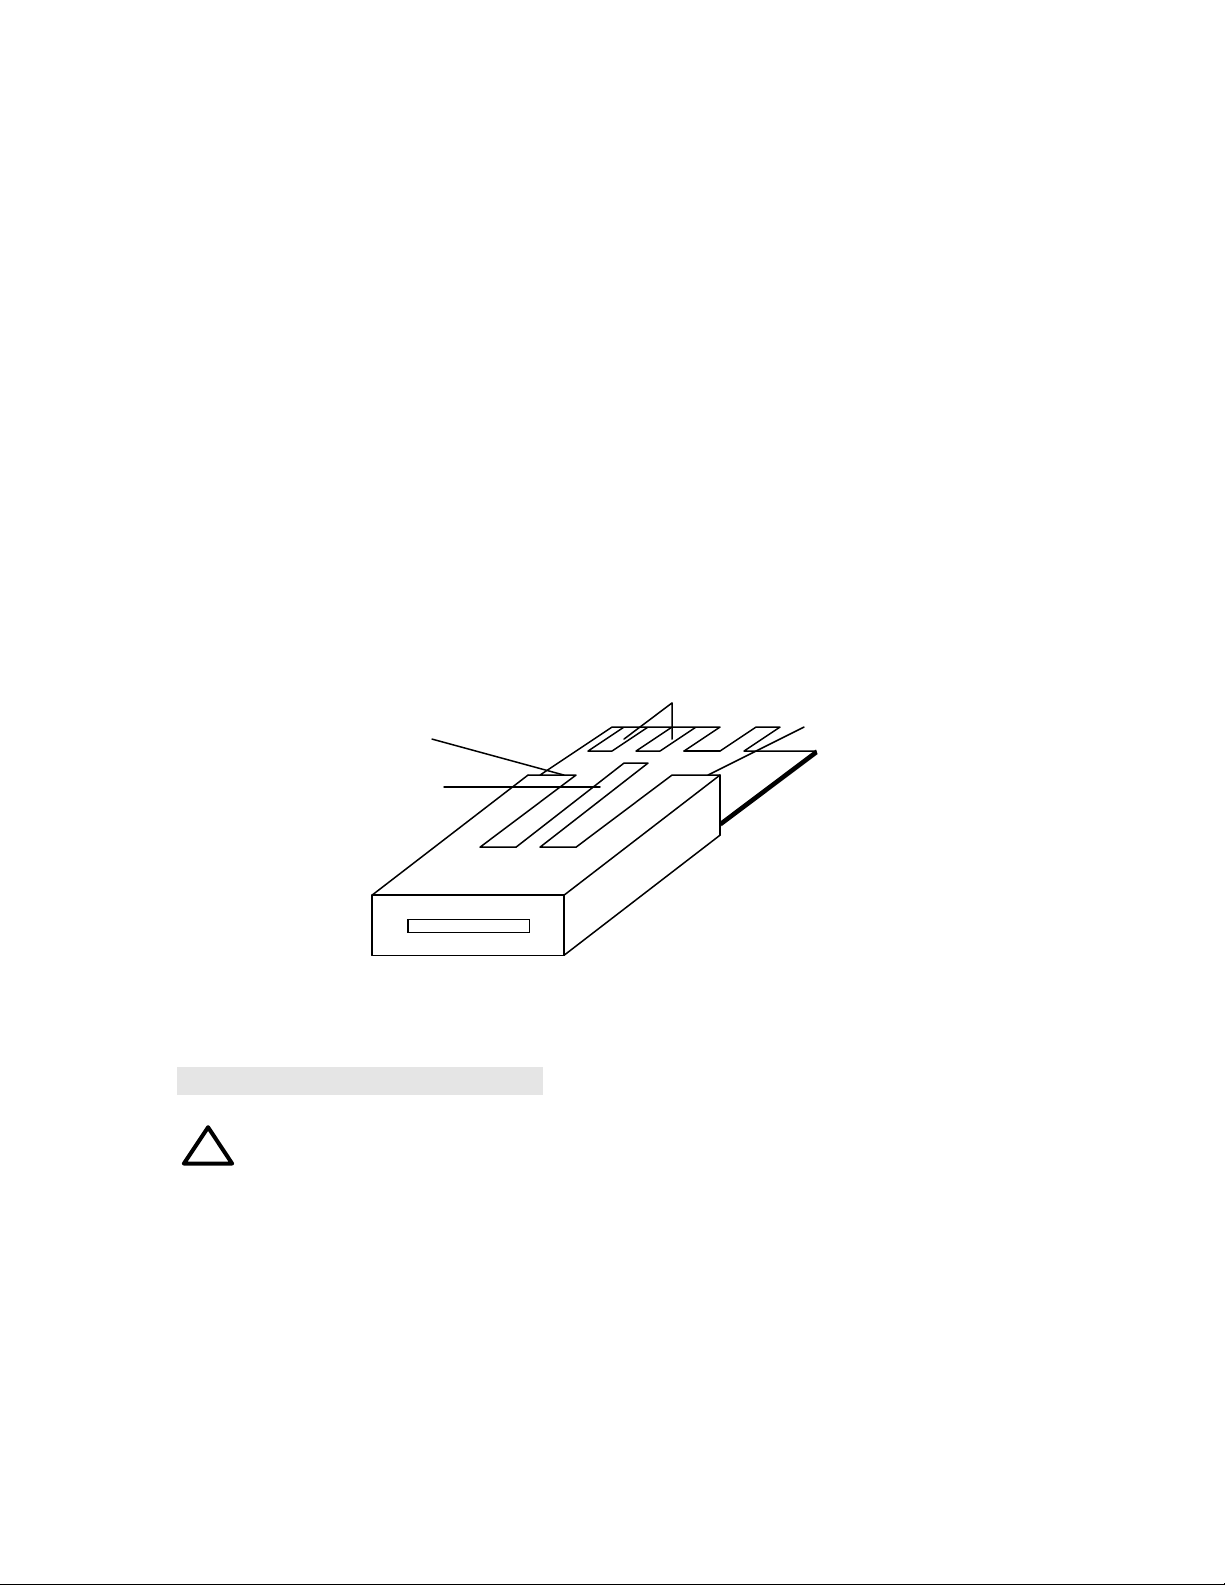
• Remove the fuse drawer by inserting a small flat head screwdriver behind the small
tab to force the draw outward. Refer to Figure 1-4.
• Once the fuse drawer has been completely removed from the instrument remove the
clear fuse tray from the drawer by lifting upward slightly on the long narrow black
locking tab. This will allow the fuse tray to be removed from the fuse drawer. This
tray contains the active fuse, left side (secured by holder) and spare fuse on the right
side (if present). Refer to Figure 1-5.
• Remove the active fuse from the holder by prying upward using a small flat head
screwdriver. Insert the replacement fuse into the fuse holder.
• Once the fuse has been installed in the holder and spare fuse (if desired) installed in
the right side of the tray insert the tray back into the fuse drawer, push in and lock.
The two silver contacts on the fuse tray should be positioned towards the outside.
• Once the fuse tray has been installed in the draw, reinstall the fuse drawer back into
the instrument ac inlet module, push in and lock.
Active fuse in holder
this side
Contacts
Spare
fuse
Locking
tab
this
side
Figure 1-5
Fuse Drawer
1.6.3 Safety Inspection
!
Before operating the instrument inspect the power inlet module on the rear of the
7600 to ensure that the properly rated fuse is in place, otherwise damage to unit is
possible. Refer to paragraph 1.6.2.
The 7600 is shipped with a standard U.S. power cord, QuadTech PN 4200-0300 (with
Belden SPH-386 socket or equivalent, and 3 wire plug conforming to IEC 320) and CE
units with an approved international cord set. Make sure the instrument is only used with
these cables (or other approved international cord set) that ensures the instrument is
provided with connection to protective earth ground.
Introduction 1-7
Page 20

When the 7600 is used in a rack installation (using the QuadTech 7000-00 Rack Mount
Kit) make sure the unit is secured using the cabinet mounting rails and not secured
solely by the front panel angle brackets.
In bench or rack mount applications the instrument should be positioned with
consideration for ample airflow to the rear panel fan ventilation holes. An open space of
at least 3 inches (75mm) is recommend behind the rear panel. The surrounding
environment should be free from excessive dust to prevent contamination of electronic
circuits.
WARNING
If this instrument is used in a manner not specified in this manual protection to the
operator and equipment may be impaired.
Introduction 1-8
Page 21

Section 2 Operation
2.1 General
Once the 7600 is powered up it is ready immediately for testing, at default test
conditions, by pressing the START button. Power-up default conditions are discussed
in paragraph 2.5.2. Any of these conditions and all other instrument operations can be
changed by easy-to-use menu functions, for simplicity of understanding, descriptions and
uses of all these functions refer to menu discussions in paragraph 2.6. The Contents list
in the front of this manual should be used for quickly locating specify subjects of interest.
NOTE:
For optimum measurement results at specified accuracy a 30 minute instrument
warm-up period is highly recommended.
2.2 Startup
Connect the instrument power cord to the source of proper voltage. The instrument is
to be used only with three-wire grounded outlets. The proper fuse must be installed
as described in paragraph 1.6.2.
Power is applied to the 7600 by pressing the POWER button on the front panel. The
instrument runs a self test and any error messages are displayed accordingly.
2.3 Connection to Device Under Test
The 7600 unit employs a four terminal measurement configuration that permits easy,
accurate and stable measurements and avoids mutual inductance, interference from
measurement signals, noise and other factors inherent with other types of connections.
To help maintain measurement integrity QuadTech makes available a number of
accessory cable sets and fixtures for connection directly to the front panel BNC
connectors. Refer to paragraph 1.5 for a list of available accessories.
Operation 2-1
Page 22
51 ohms 7600
IH PH PL ILGround
7600
Precision
LCR Meter
!
CAUTION
HIGH VOLTAGE
IL IH
PL PH
+-
DUT
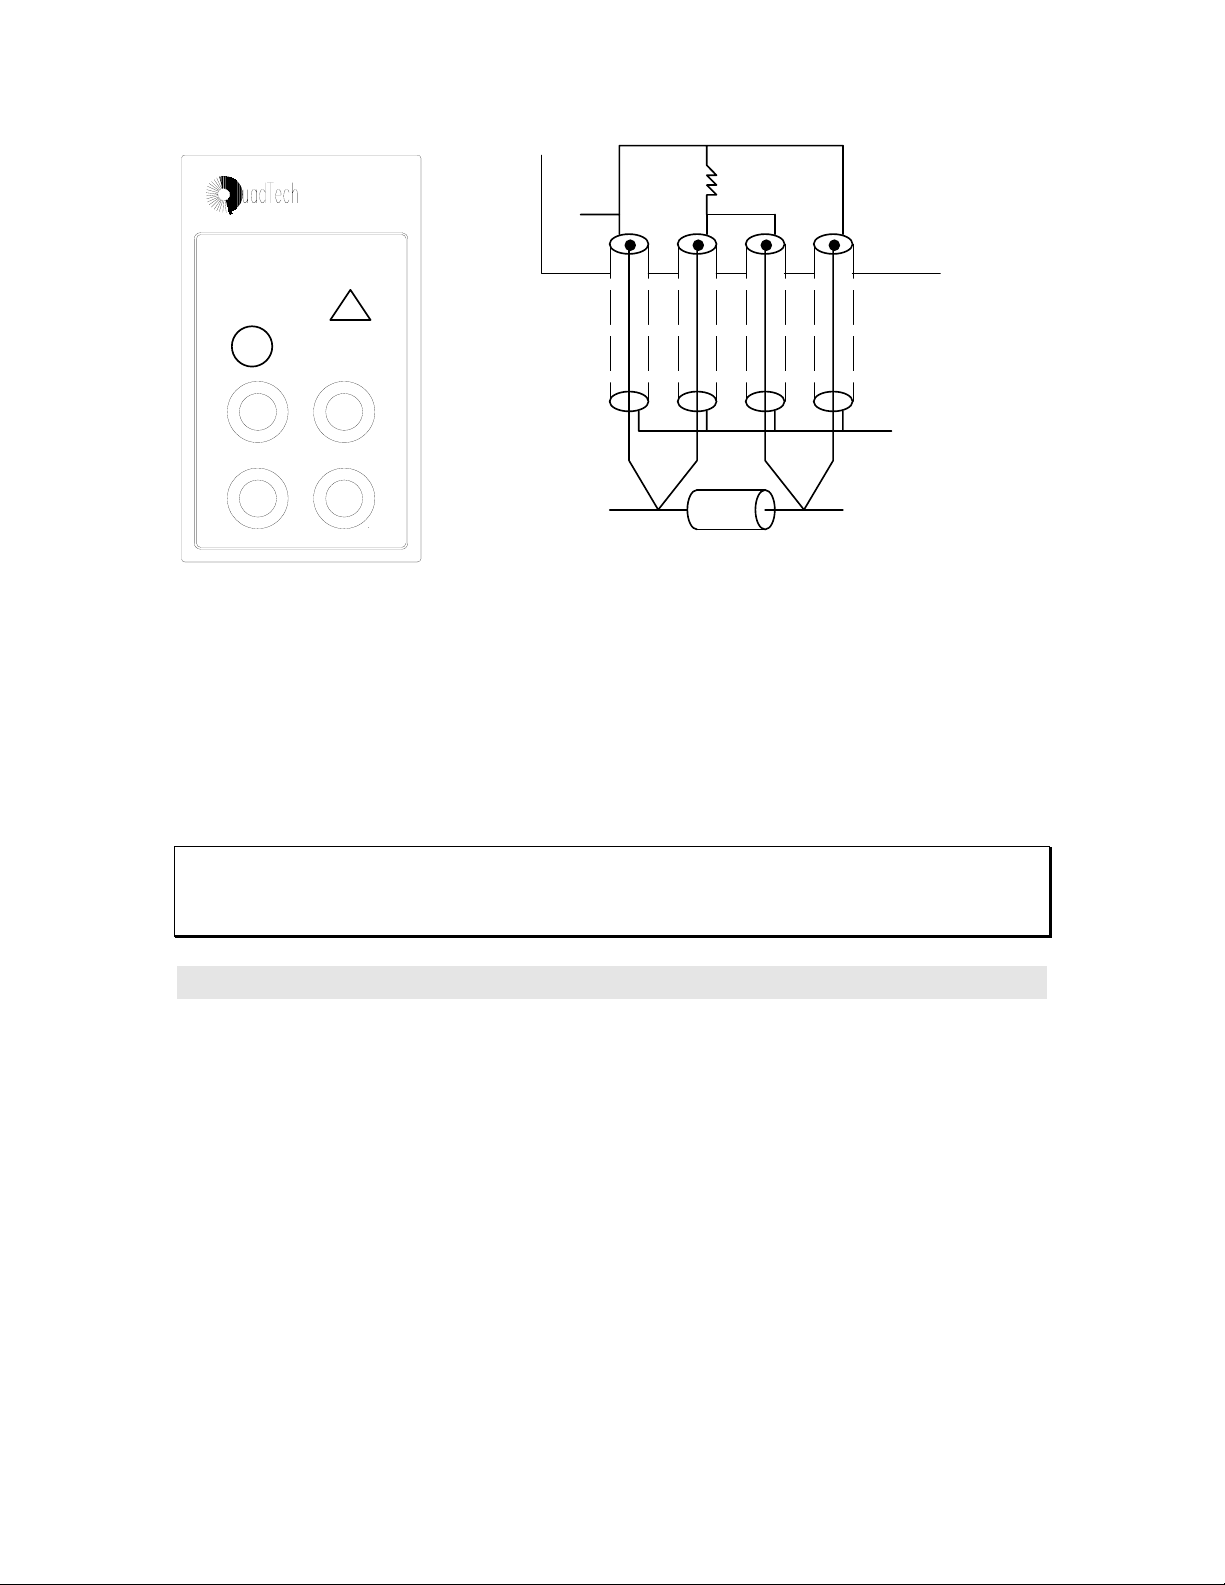
Figure 2-1 Figure 2-2
Panel Layout Test Lead Configuration
Figures 2-1 and 2-2 show the 7600 connector configuration and a typical four terminal
connection to the device under test. H and L on the 7600 denote polarity of AC test
signal at the measurement terminals as well as + and - polarity of DC bias voltage
when applied to the DUT. Refer to paragraph 2.8 for information on operation and
connection of QuadTech accessory cables and fixtures.
WARNING
When DC bias is applied, the PH connection carries a positive DC voltage with
respect to ground.
2.4 Zeroing
Before making measurements, the 7600 should be zeroed to correct for test lead and/or
fixture errors. During the zeroing process corrections are calculated and stored in
instrument memory and applied to ongoing measurements. Measurement accuracy is
specified at the end of the QuadTech one meter cable (7000-01). Open and short circuit
zeroing should be done at the end of this cable. In order to maintain instrument accuracy
with other cable lengths the instrument should be re calibrated using the QuadTech 700009 Calibration Kit and the alternate cable. Generally the unit should be zeroed at least
once per day and each time test leads or fixture is changed. It is not necessary to re-
zero if the test frequency is changed. The zeroing routine is accessed through the
Utilities Menu as follows:
• Press MENU key
• Press LEFT/RIGHT ARROW to select Utilities menu
• Press UP/DOWN ARROW key for Open / Short
• Press ENTER
For guarded measurements
connect to DUT shield
Operation 2-2
Page 23

Follow the instructions shown on the LCD display for open and short circuit zeroing of
test leads and/or fixture. During the Open Test the leads or fixture should be open with
no component connected. During the Short Test leads should be connected or fixture
shorted (using a clean copper wire, as short as possible). Refer to paragraph 2.6.5.4 as
necessary for more detail. When zeroing, Contact Check should be OFF, # to Average
to 1 and Median OFF.
2.5 Measurement Procedure
2.5.1 General
Whenever the 7600 is powered up it is ready immediately to begin measuring at
default test conditions. Initially, these conditions will be set to factory default but can
be changed by the user and stored to overwrite factory default. To initiate a test once a
device is connected press START, the LCD display shows the measured results and test
conditions similar to the illustration of Figure 2-3. For information on changing test
conditions refer to paragraph 2-6 on Menu Functions.
NOTE:
For optimum measurement results at specified accuracy a 30 minute instrument
warm-up period is highly recommended.
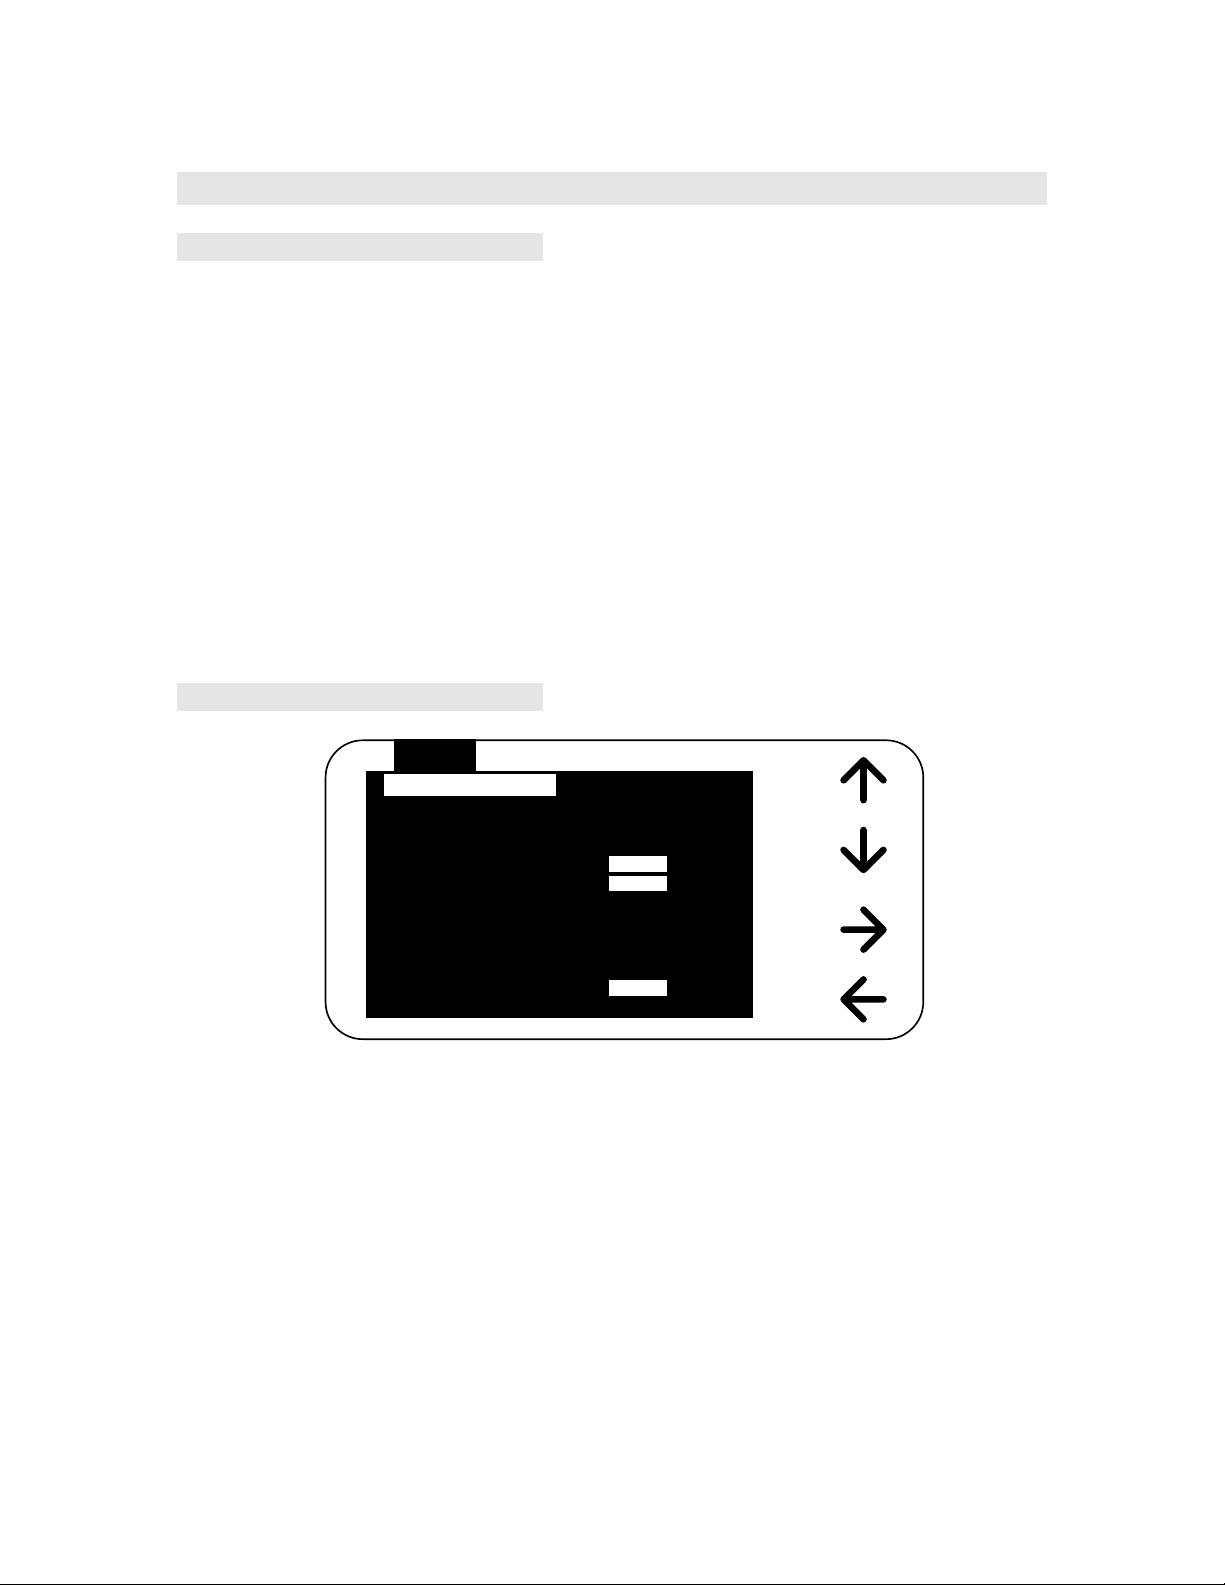
Measured Parameters
Voltage
RETST
pFCs 17.52510
DF
Freq
Range
Delay
2.5.2 Default Measurement Conditions
A set of default measurement conditions are initially established at the factory and stored
in instrument memory. Default conditions are those that determine the instruments status
on power up, thus the instrument is always set to a known state before any testing begins.
These conditions can be changed by the user for tailoring to a specific application. Refer
to paragraph 2.6.5.1 under Save Setup on the Utilities menu.
0.0000500
1.0000kHz
Auto
Figure 2-3
Measured Results Display
AC Signal
Average
Bias
1.000V
1
Off0 ms
Operation 2-3
Page 24

Factory default measurement conditions are:
Under Setup Menu
Primary Parameter - Auto
Secondary Parameter - None
Frequency - 1 kHz
AC Test Signal - 1V
DC Bias Voltage - Off
Range Hold - Off
Range Locked - 0
Measurement Accuracy - Medium
Delay Time - 0
# to Average - 1
Contact Check - Off
Under I/O Menu
Display Type - Measured Parameters
Nominal Value - None
Result Format - Engineering
Trigger - External
Handler - On
RS-232 - Disable
IEEE - Disable
Print Results - Off
Results to Floppy - Off
Under Analysis Menu
Binning - None
Test Sequencing - Off
Parameter Sweep - Off
Median - Off
Distort Detect - On
Load Correction - Off
Under Utilities Menu
Lockout - Off
Backlite - On
Operation 2-4
Page 25
2.6 Menu Functions
2.6.1 General
All programmable functions of the Model 7600 are controlled by easy to use menu
displays. The user enters the menu mode by selecting the MENU key which calls up four
top level menus, Setup, I/O, Analysis and Utilities. Each one of these is comprised of a
sub menu list whose functions are described in detail below. Finding ones way around
the menu listing is accomplished in a fashion similar to an Automatic Teller Machine
(ATM) using the UP, DOWN, RIGHT and LEFT arrow keys as indicated on the
adjacent LCD display. A highlighted menu function can be controlled by selecting
the ENTER key, making the desired entry or selection and pressing ENTER again
to implement.
2.6.2 Setup Menu
Setup
Primary Parameter
Secondary Parameter
Frequency
AC Test Signal
DC Bias Voltage
Range Hold Off On
Range Locked = 0
Measurement Accuracy
Measurement Delay
# to Average
Contact Check
I/0 Utilities
(ms)
Analysis
= 1.0000 kHz
Off
= 0
= 1
Off
Int
On
>>
>>
>>
Ext
>>
Figure 2-4
Setup Menu
The first of the four main menus is Setup, shown above. Each function controls a 7600
measurement condition and is described in detail below.
Operation 2-5
Page 26
Setup I/O Analysis Utilities
Primary Parameter
Secondary Parameter
Frequency - (numeric entry)
AC Test Signal
- Voltage
- Current
- Value - (numeric entry)
DC Bias Voltage
- Off
- Int
- Ext
- OffRange Hold
- On
Range Locked - (numeric entry)
Measurement Accuracy
- Fast
- Medium
- Slow
Measurement Delay - (numeric entry)
# to Average - (numeric entry)
None
DF
Q
|ESR|
θ
Rs
Rp
Gp
Cs
Cp
Ls
Lp
|Z|
|Y|
Xs
Bp
Auto
Cs
Cp
Ls
Lp
Rs
Rp
DF
Q
|Z|
|Y|
θ
|ESR|
Gp
Xs
Bp
Contact Check - Off
- On
2.6.2.1 Primary Parameter
Analysis
Pri Param
I/0 UtilitiesSetup
Auto
Cs
Cp
Ls
Lp
Rs
Rp
DF
Q
|Z|
|Y|
(more)
HIT MENU TO RETURN TO MAIN MENU
Figure 2-5
Primary Parameters
Additional Parameters not shown and selected by UP/DOWN arrow keys include: θ,
|ESR|, Gp, Xs, Bp
Operation 2-6
Page 27

Any combination of two parameters can be measured and displayed simultaneously on
the 7600, one referred to as the Primary (displayed first) and the other the Secondary.
The instrument as powered up provides a default primary parameter selection of Auto, a
feature which enables any passive component to be measured without knowing what type
of component it is. Depending on the component type the primary and secondary default
could be Cs & DF, Rs & Q, or Ls & Q. The parameter selection can be chosen by the
operator through menu selection as shown in Figure 2-5 above. Besides Auto the
following selections are possible and discussed in more detail below.
Cs - Capacitance in farads |Z| - Impedance in ohms
Cp - Capacitance in farads |Y| - Admittance in siemens
Ls - Inductance in henries θ - Angle in degrees
Lp - Inductance in henries |ESR|-Equivalent series resistance in ohms
Rs - Resistance in ohms Gp - Conductance in siemens
Rp - Resistance in ohms Xs - Reactance in ohms
DF- Dissipation Factor (no units) Bp - Susceptance in siemens
Q - Quality Factor (no units)
s = series equivalent circuit
p = parallel equivalent circuit
An impedance that is neither a pure resistance nor a pure reactance can be represented at
any specific frequency by either a series or a parallel combination of resistance and
reactance. Such a representation is called an equivalent circuit. The value of the primary
measurement of a device depends on which equivalent circuit, series or parallel, is
chosen to represent it. The manufacturer or user of a device specifies how a device is to
be measured (usually series) and at what frequency. If this is not known, be sure to
specify if the results were series or parallel and what the measurement frequency was.
Series and parallel equivalent circuits for a lossy inductor and lossy capacitor are shown
in Figure 2-6.
Operation 2-7
Page 28
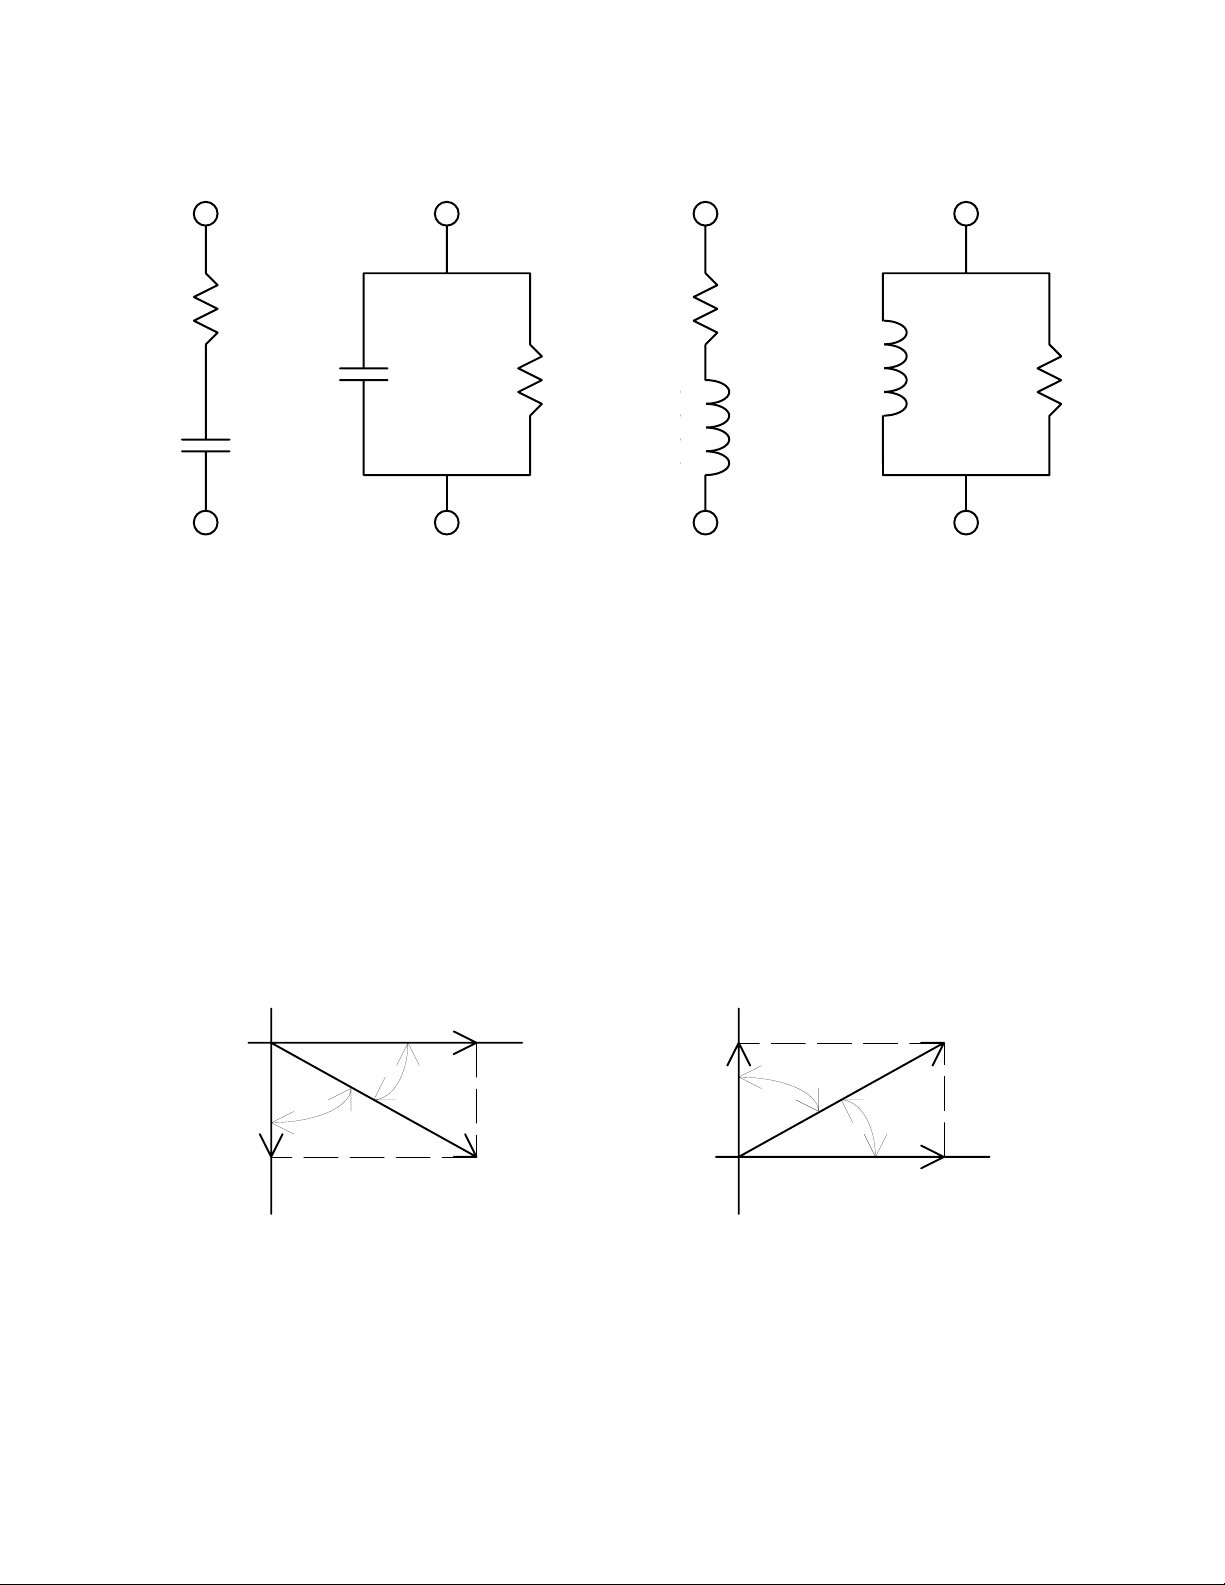
Rs
Cs
Cp
Rp or
Gp
Rs
Lp
Ls
Figure 2-6
Series and Parallel Circuits for both Capacitive and Inductive Impedances
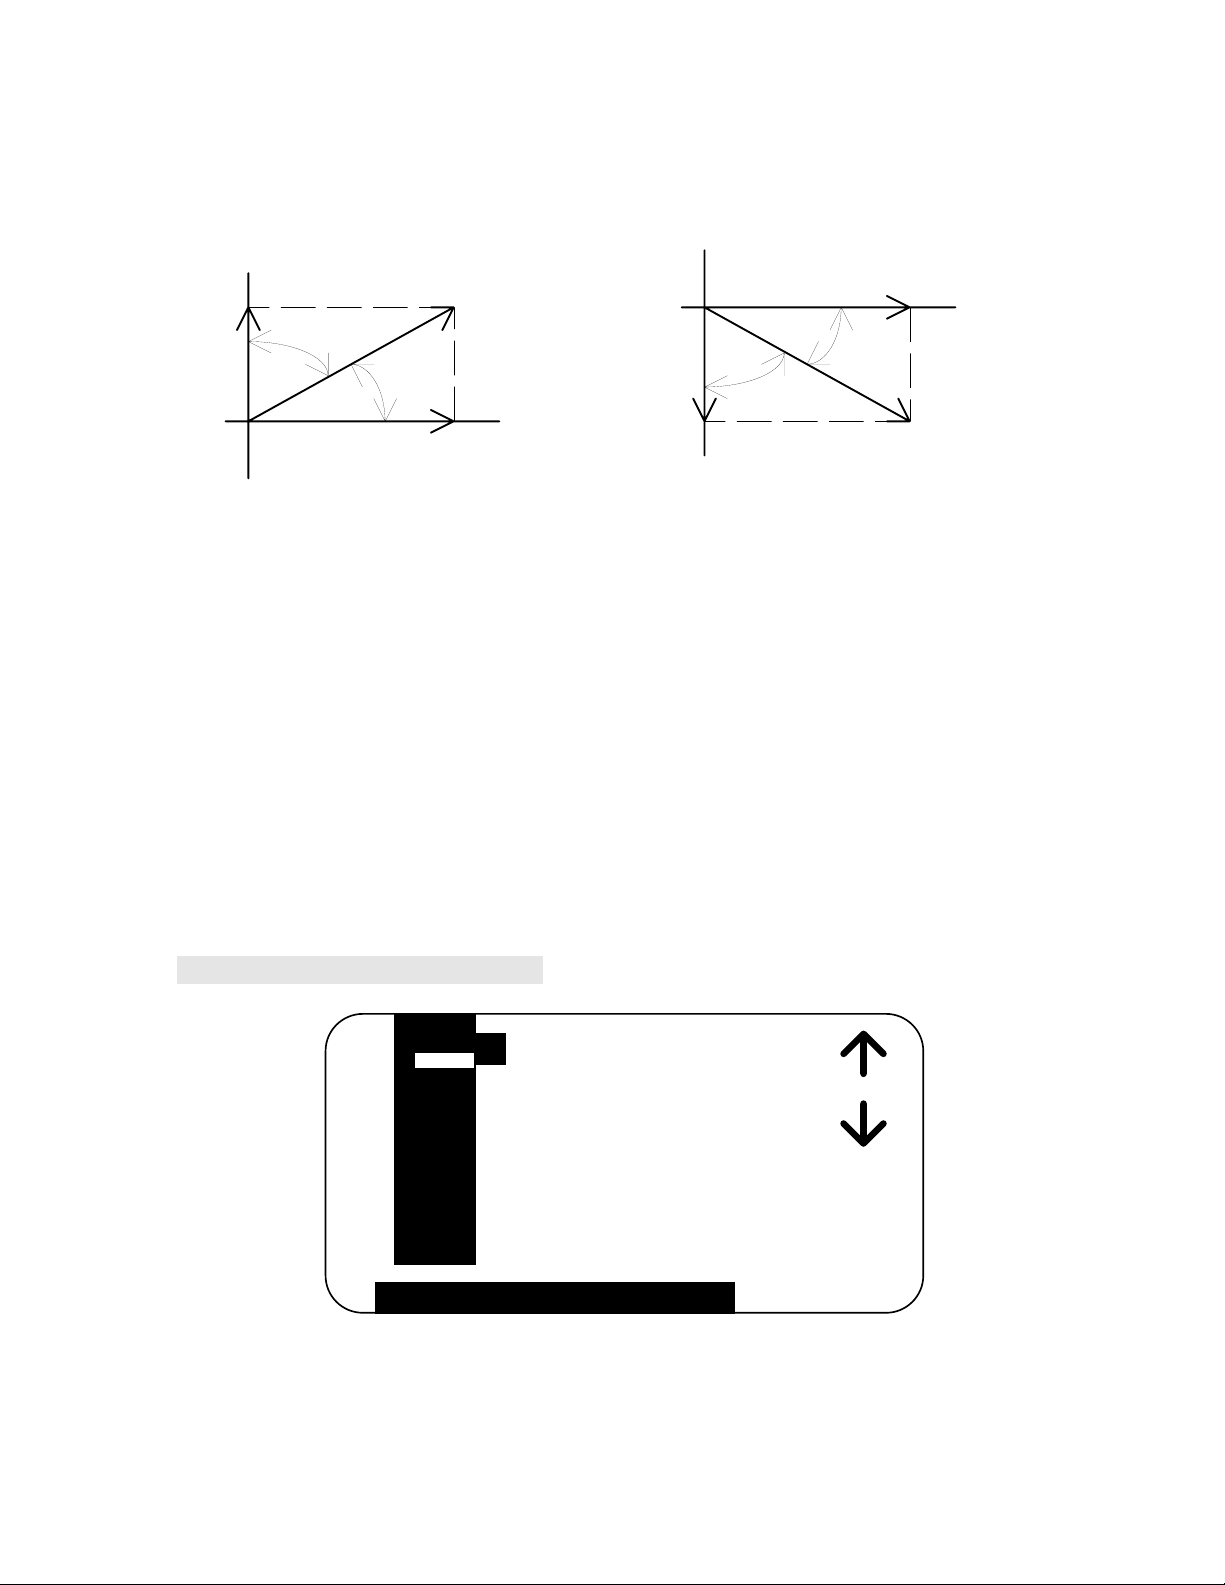
Impedance is the parameter used to characterize electronic components, materials and
circuits. Impedance |Z| is defined as the opposition a device or circuit offers to the flow
of ac current at a particular frequency and generally represented as a complex quantity
consisting of a real part (resistance, R) and imaginary part (reactance, jX). Impedance
can be expressed using the rectangular coordinate form (R + jX) or polar form as
magnitude and phase angle (|Z| ∠θ). Figure 2-7 shows the mathematical relationship
between R, X, |Z|, and θ for both inductive and capacitive devices. In some cases it
becomes mathematically practical to represent impedance using the reciprocal where
1/|Z| = |Y| = G + jB, where |Y| represents admittance, G conductance, and B susceptance.
This mathematical relationship is shown in Figure 2-8 for inductive and capacitive
devices.
+jX
Rs
+R
θ
δ
+j Lsω
δ
Z
Rp or
Gp
ω-j/ Cs
-jX
Operation 2-8
Z
Impedance
-jXRs
Figure 2-7
Phase Diagrams of Impedance
θ
InductanceCapacitance
+R
Page 29
j
InductanceCapacitance
+jB
+jB
Gp
Cpω
Y
φ
+G
δ
δ
φ
+G
-j/ Lpω
Y
Gp
-jB
-jB
Admittance
Figure 2-8
Phase Diagrams of Admittance
Quality factor (Q) is used as a measure of a reactance's purity (how close it is to being a
pure reactance, i.e. no resistance) and defined as the ratio of the energy stored in a device
to the energy dissipated by the device. Q is dimensionless and is expressed as Q = X/R =
B/G. From Figure 2-8 one can see that Q is the tangent of the angle θ. Q is commonly
applied to inductors and for capacitors the term generally used to express purity is
Dissipation Factor (D), which is the reciprocal of Q.
Any parameter, primary or secondary, can be chosen as the default parameter at power
up, refer to paragraph 2.6.5.1, changing default conditions.
2.6.2.2 Secondary Parameter
Sec Param
I/0 UtilitiesSetup
None
DF
Q
ESR
θ
Rs
Rp
Gp
Cs
Cp
Ls
(more)
HIT MENU TO RETURN TO MAIN MENU
Analysis
Figure 2-9
Secondary Parameter
Operation 2-9
Page 30

Additional Parameters not shown and selected by UP/DOWN arrow keys include: Lp,
|Z|, |Y|, Xs, Bp
As in the primary parameter selection, any one parameter can be chosen by the operator
for display. The instrument as powered up provides a default secondary parameter.
When the default primary parameter is Auto the secondary parameter is dependent and
determined by it. If the primary default is Cs the secondary defaults to D. If the primary
default is Ls or Rs the secondary defaults to Q. The parameter selection can be chosen by
the operator through menu selection as shown in Figure 2-9.
2.6.2.3 Frequency
Numerical entry accepts up to five digits with decimal, of the desired test frequency
between 10 Hz and 2 MHz. Resolution of setting is 0.1 Hz from 10 Hz to 10 kHz, 5
digits above 10 kHz and 4 digits above 100 kHz. The accuracy of the frequency
programmed is +/- (0.25% + 0.02 Hz).
Units of frequency, Hz, kHz, or MHz are selected by the UP/DOWN arrow keys.
NOTE:
In order for the instrument to perform high frequency measurements (i.e. above 50 kHz),
frequencies are grouped into ranges. The size of these ranges is dependent upon many
factors: including the DDS clock frequency, the frequency programmed, and the
frequency accuracy resolution specified for the unit. Thus when a user programs a "test
frequency" the actual frequency may be +/- (0.25% + 0.02 Hz).
Operation 2-10
Page 31

2.6.2.4 AC Test Signal
Signal Type
Signal Value
Setup
AC Signal
I/0 Utilities
Analysis
Voltage Current
= 1.000 V
HIT MENU TO RETURN TO MAIN MENU
Figure 2-10
AC Test Signal
Allows selection of the AC Signal Type as a Voltage source or Current source,
RIGHT/LEFT arrow keys.
With Signal Type selected as Voltage, Signal Value accepts entry of a value between
.020 and 5 volts* (open circuit) in 0.005 V steps.
With Signal Type selected as Current, Signal Value accepts entry of a value between
.00025 and .1 amp (short circuit) in .00005 amp steps.
Numerical values can be entered directly with units. Units for voltage value, mV or V
and units of current value, µA, mA or A are selected by the UP/DOWN arrow keys. Any
numerical entries with resolution greater than .005 (5 mV) for voltage or .00005 (50
µA) for current will be truncated or ignored.
In voltage mode the selected voltage is maintained at the instrument test terminals with
the terminals open, but not necessarily at the device under test. In current mode the
selected current is maintained at the device under test, independent of changes in the
device's impedance. It should be noted that even though the maximum programmable
current is 100 mA the instrument is limited to a compliance voltage of 3 volts* in
current mode, i.e. (I) times (Z) must be less than 3 volts otherwise erratic measurement
results could occur.
The current required to test a device may exceed 100 mA if the source voltage is
programmed to greater than 2.5 V. To determine the current required use the following
formula:
22
dut dut
I Vprog R X
=++25
()()
if the current is greater than 100 mA reduce the program voltage, otherwise unpredictable
measurement results may occur.
* 1 volt above 500 kHz, 0.5 volts above 1 MHz
Operation 2-11
Page 32

1.0E+6
100.0E+3
10.0E+3
Maximim Reccomended Test Frequency in Current Mode
vs.
I nductance
400 k Hz
Testing in current
mode may give Q
errors for indu ctors
Current Testing OK
below this line
above thi s line
35 kHz
_________
sqrt(L(mH))
1.0E+3
1.00E-06 1.00E-05 1.00E-04 1.00E-03 1.00E-02 1.00E-01 1.00E+00
Maximum Test Frequency vs. Measured Inductance
(In Current Mode)
2.6.2.5 DC Bias Voltage
Allows selection of a dc Bias Voltage of Off, Internal or External.
• Off - When selected no dc bias voltage is applied to the device under test.
• Int - When selected an internal bias voltage of 2 volts is applied to the device under
test. Internal bias can not be programmed if the AC Test Signal is programmed for >
4V at 500kHz.
• Ext - When selected an external bias voltage between 0 and +/-200 volts can be
applied to the device under test by way of the rear panel external bias connection.
Operation 2-12
Page 33

WARNING
Make sure the AC test Signal is selected for VOLTAGE and not Current before
switching to INT (internal) or EXT (external) bias. This also applies to the instrument's
Default setup at power-up or any setups recalled from memory, they MUST be set to
VOLTAGE before applying bias. If programmed to CURRENT the instrument can
sustain damage from any external source or from a charge stored on the device under test.
WARNING
When using external bias, unit must be programmed for EXT bias before the
external bias supply is connected to the 7600.
External bias supply must be returned to zero volts and turned off before switching
back to the OFF or INT mode.
The BIAS ON indicator, adjacent to the BNC measurement terminals, serves to indicate
if external bias has been called for. It indicates that external bias connections have been
switched in, but not necessarily the presence of external bias.
When dc bias is to be applied to a device observe the correct polarity when connecting
the bridge or inserting the device in a test fixture. Bias POSITIVE polarity is applied
to the high terminals (PH, IH), and bias NEGATIVE polarity applied to the low
terminals (PL, IL). It is good practice to wait approximately 1 second after initiating a
measurement before taking a reading, this allows the device to stabilize after bias is
applied. When the instrument is triggered remotely, a programmed delay is advisable to
ensure that the device has stabilized.
If bias is required at voltages other than the internal 2 volts, an external bias can be used
as discussed below.
• Be sure that the voltage does not exceed +/-200 volts.
• A current limiting voltage supply is recommended, with a limit set at 200 mA.
• The bias supply must be floating, DO NOT connect either side to ground. When
using a single polarity supply for positive or negative biasing, observe proper polarity
when connecting to the 7600. For positive bias the positive output of the supply must
be connected to Bias Voltage + and the negative to Bias Voltage -. The opposite is
true for negative bias, the negative output of the supply must be connected to the Bias
Voltage + and the positive to Bias Voltage -.
• Generally the external circuit must provide switching for both application of bias
after the device is connected and discharge before it is removed.
• A well-filtered supply is recommended. Hum can affect some measurements,
particularly at power line frequencies.
Operation 2-13
Page 34

When applying a bias voltage there are effects to be aware of in watching for
stabilization of the DUT: voltage and capacitance. Besides charging to a final voltage,
there is also the stabilization of capacitance value itself. For example, some electrolytic
capacitors respond slowly to a change in applied voltage, therefore the capacitance can be
changing well after the voltage is stable. In general DC bias should only be applied to
capacitors, unreliable measurement results can occur if DC bias is applied to low
impedance devices. When applying external bias on capacitors below 200pF with an
AC signal level below 100mV the instrument can exhibit excessive noise.
2.6.2.6 Range Hold
Allows selection of Range Hold Off or On. To eliminate operator errors in range
setting and ensure specified instrument accuracy the 7600 Range Hold should
generally be left Off. There may be exceptions to this when repetitive measurements are
to be made over a concentrated range of values and there is a desire to reduce test time by
eliminating range switching.
• Off - When selected the instrument automatically selects the optimum range for the
test voltage and test frequency selected and the impedance being measured.
• On - When selected the range is held based on the one currently selected, 1 through
59 in voltage mode or 33 through 159 in current mode. The one currently selected is
best determined by measuring the device with Range Hold to Off. Measured results
outside the bounds of a selected range will be indicated by an OVER RANGE or
UNDER RANGE display message.
NOTE:
The 7600 unit provides an extensive array of range switching based on the user test
conditions selected and impedance being measured. Refer to paragraph 2.6.2.7.
One of the most important uses of the range holding capability is to avoid range changes
when the component is removed from a fixture when repetitive internal triggering is
selected. With no component connected the instrument can go into a range search and
time is lost when the next component is connected. Another use of range hold occurs
when measuring components of the same nominal value whose actual values spread
across the boundary of two ranges. If allowed to auto range, the units and decimal point
can change with the range and confuse the operator. It is important to note that when a
range is held which is not the range the instrument auto ranging would have
selected, some accuracy may be sacrificed.
Under certain circumstances high Q inductors can cause extraneous overload conditions
if they are tested at frequencies where the inductor resonates with the test leads. This
situation can be avoided by one or more of the following: test at a voltage substantially
below full scale voltage for a given range; use low capacitance cables; or test at a
frequency below the resonant frequency of the inductor with the test leads.
Operation 2-14
Page 35

2.6.2.7 Range Locked
Accepts entry of selected measurement ranges between 0 and 59 (as listed below), 0 for
no range locked and others for the selected range. Measurement ranges are a function of
the impedance being measured (Z), selected test frequency (F) and ac test voltage (V).
For best measurement results the instrument is generally recommended to operate with
Range Hold to Off and Range Locked to 0. It is possible to calculate a range, based on
Z, F and V, as detailed below.
AC Signal Voltage Mode
Measurement Range #'s
1
2
3
5
6
7
9
10
11
17
18
19
21
22
23
25
26
27
33
34
35
37
38
39
41
42
43
49
50
51
53
54
55
57
58
59
Determine Range where R# = R1 + R2 + R3
where R1 = 1 and K* = 10 µA if F < 25 kHz and I < 10 µA
= 17 and K* = 160 µA if F < 200 kHz and I < 160 µA
= 33 and K* = 2.56 mA if I < 2.56 mA
= 49 and K* = 40 mA if I ≥ 2.56 mA
* value for K required in calculation of R3 below
Vi
I
=
Z25
+
Vi = 10V if V ≤ 0.1V
= V if V > 0.1 and < 1.01
= V/5 if ≥ 1.01
V = programmed ac test voltage
Z = impedance value Z in ohms of the device
under test (refer to Figures 2-11 and 2-12
to help determine Z in terms of capacitive
and inductive reactance).
Operation 2-15
Page 36

where R2 = 0 if (I)(Z) > 0.25
= 1 if (I)(Z) > 0.1
= 2 if (I)(Z) > 0.025
where R3 = 0 if I / K > 0.25
= 4 if I / K > 0.1
= 8 if I / K > 0.025
Note: above 1.5 MHz R2 and R3 are always 0 (zero)
Operation 2-16
Page 37

AC Signal Current Mode
Measurement Range #'s
33
34
35
37
38
39
41
42
43
49
50
51
53
54
55
57
58
59
133
134
135
137
138
139
141
142
143
149
150
151
153
154
155
157
158
159
Determine Range where R# = R + R1 + R2 + R3
where R = 33 and Rs = 400Ω if I ≤ 2.2mA
= 49 and Rs = 25Ω if I > 2.2mA
I = programmed ac test current
where R1 = 0 and Vs = 1.0 if E
= 100 and Vs = 5.0 if E
DUT
or E
DUT
DET
or E
≤ 1.0
> 1.0
DET
E
2.6.2.4 AC Test Signal
E
= (I) (Z) this value must be less than 3.0, reference paragraph
DUT
= (I) (Rs)
DET
Z = impedance value Z in ohms of the device
under test (refer to Figures 2-11 and 2-12
to help determine Z in terms of capacitive
and inductive reactance).
where R2 = 0 if E
= 1 if E
= 2 if E
/Vs > 0.25
DUT
/Vs ≤ 0.25
DUT
/Vs ≤ 0.1
DUT
where R3 = 0 if E
= 4 if E
= 8 if E
/Vs > 0.25
DET
/Vs ≤ 0.25
DET
/Vs ≤ 0.1
DET
Operation 2-17
Page 38

Capacit ive Reactance (Xc=1/(2pifC))
1000000000
100000000
10000000
1000000
0.1pF
1.0pF
10pF
100pF
1.0nF
10nF
100nF
1.0uF10uF100uF1.0m F10mF
Ohms
100000
10000
1000
100
10
1
0.1
0.01
10 100 1000 10000 100000 1000000 10000000
Freque ncy
Figure 2-11
Capacitive Reactance vs. Frequency
Operation 2-18
Page 39

Inductive Reactance (Xl=2pifL)
1000000000
100000000
10000000
1000000
100000
10000
Ohms
1000
100
10
0.1
0.01
1kH 100H 10H
1H
100mH
10mH
1mH
100uH
10uH
1uH
100nH
1
10nH
10 100 1000 10000 100000 1000000 10000000
Frequency
Figure 2-12
Inductive Reactance vs. Frequency
Operation 2-19
Page 40

2.6.2.8 Measurement Accuracy
Setup
Accuracy
Fast
Medium
Slow
I/0 Utilities
.5%
Voltage
.25%
.05%
Analysis
25 meas/sec
8 meas / sec
1 meas / sec
HIT MENU TO RETURN TO MAIN MENU
Figure 2-13
Measurement Accuracy
Allows selection of Measurement Accuracy of
Fast, Medium or Slow.
There is a tradeoff of measurement speed vs. accuracy. The meter will make a more
precise and accurate measurement at a slower rate. The speed/accuracy tradeoff is as
follows:
• Fast - Measurement time of 40 ms (or one frequency cycle, whichever is longer),
nominal accuracy of
0.5%.
• Medium - Measurement time is 125 ms, nominal accuracy of 0.25%.
• Slow - Measurement time is 1 sec, nominal accuracy of 0.05%.
NOTE:
Measurement times may be longer depending on frequency and other test conditions.
One complete cycle of stimulus voltage is required for measurement.
For example: at 10 Hz, 100 ms (1 cycle) is required just to collect data.
2.6.2.9 Measurement Delay
Accepts entry of a delay time between 0 and 1000 in 1 ms steps. This is a programmable
delay time from the internal or external trigger command to the start of the measurement.
In many cases it is helpful to have a time delay before actually starting to take data. Such
a delay allows time for switching transients or mechanical handling to settle.
Operation 2-20
Page 41

2.6.2.10 # to Average
Accepts entry of the number of measurements to Average between 1 and 1000. If the
entered value is 1, averaging is disabled and the display is updated with each individual
measurement. If the average is 2 to 1000 the final average value is displayed at the end
of the measurement cycle and held until the end of the next measurement cycle.
Measurement accuracy can be improved as noted below and will be indicated on the
AutoAcc display (but never less than 0.05% for primary parameter or 0.0005 for
secondary parameter).
If the number to average is greater than 1:
Divide the primary accuracy by the square root of the number to average.
Divide the secondary accuracy by the square root of the number to average.
2.6.2.11 Contact Check
Allows selection of Contact Check Off or On. When on, any detection of contact failure
or open circuit to the device under test will be indicated prior to the measurement. A
contact failure is considered to be an open circuit greater than the open circuit calibration
of the instrument.
handler/production type applications with the 7600. For Contact Check operation
the Range Hold must
Contact Check is generally recommended in automatic
be selected ON, paragraph 2.6.2.6.
NOTE:
A contact check is possible on three of the four Kelvin connections by a loss of voltage
detecting technique, a failure on the PL connection can't be detected since it is at virtual
ground potential, internal to the instrument. The contact check is likely to be unreliable
when measuring devices of less than 100 mΩ of impedance.
Operation 2-21
Page 42

2.6.3 I/O Menu
I/0
Display Type >>
Nominal Value = 1.0000
Result Format
Trigger
Handler
RS-232
IEEE >>
Print Results
Results to Floppy
Analysis
UtilitiesSetup
EngSci
Int Ext
Off
Off
Off
On
On
On
>>
Figure 2-14
I/O Menu
The second of the four main menus is I/O, shown above. Each function controls
measurement results or instrument I/O interface and is described in detail below.
Setup I/O Analysis Utilities
Display Type
Measured Parmeters
Deviation from Nominal
Nominal Value - (numeric entry)
% Deviation from Nominal
Pass/Fail
Result Format - Sci
- Eng
Trigger - Int
Bin Summary
Bin Number
No Display
- Ext
Handler - Off
- On
RS-232
Stop Bits - 1
Mode - Talk
Parity - None
Data Bits - 7
- 8
- 2
- Odd
- Even
Baud - 12
- 24
- 48
- 96
- Talk/Listen
IEEE
Print Results
Print Results to Floppy
Operation 2-22
State - Disable
- Enable
- Off
- On
- Off
- On
Address - (numeric entry)
Mode
- Talk
- Talk/Listen
- DisableState
- Enable
Page 43

2.6.3.1 Display Type
I/0
Display
Measured Paramters
Deviation from Nominal
% Deviation from Nominal
Pass / Fail
Bin Summary
Bin Number
No Display
Analysis
UtilitiesSetup
>>
HIT MENU TO RETURN TO MAIN MENU
Figure 2-15
Display Type
Allows selection from seven different modes of measurement display, these being:
• Measured Parameters - Display is the measured values of both the primary and
secondary parameter, displayed along with decimal point and units. Each value is
shown with
7 digits of resolution (6 digits if the result is negative). The message
Measuring is shown when a measurement is in process, with the exception of short
measuring times.
Shown only when
Load Correction is on
COMP
ON
Measured Parameters
Voltage
RETST
pFCs 17.52510
DF
Freq
Range
Delay
0
.0006500
Measuring
1.0000kHz
Auto
33
AC Signal
Average
Bias
Figure 2-16
Measured Parameters Display
1.000V
1
Off0 ms
Operation 2-23
Page 44

• Deviation from Nominal - Display is the difference in value above or below a stored
nominal value for the primary parameter (also refer to paragraph 2.6.3.2). It should
be noted that the nominal value is only shown in this display and the % Deviation
display (Figure 2-18).
Deviation from Nominal
Voltage
2.8804
pF
0.0006500
1.0000kHz
Auto
82.00000 p
33
AC Signal
Average
Bias
1.000V
1
Off0 ms
DF
Freq
Range
Delay
Nominal
Figure 2-17
Deviation from Nominal Display
• % Deviation from Nominal - Display is the measurement in terms of a percent
difference above or below (-) a stored nominal value (also refer to paragraph 2.6.3.2).
It should be noted that the nominal value is only shown in this display and the
Deviation from Nominal display (Figure 2-17).
% Deviation from Nominal
Voltage
%
DF
2.59417
0.0006500
Operation 2-24
Freq
Range
Delay
Nominal
1.0000kHz
Auto
82.00000 p
33
AC Signal
Average
Bias
Figure 2-18
% Deviation from Nominal Display
1.000V
1
Off0 ms
Page 45

• Pass/Fail - Display is measured results as a pass or fail only based on entered binning
limits.
Pass / Fail
Rs 2.894050 M
Voltage
Ω
Q 1.565000
PASS
AC Signal
Average
Bias
1.000V
1
Off0 ms
Freq
Range
Delay
1.0000kHz
Auto
33
Figure 2-19
PASS/FAIL
• Bin Summary - Display is a summary of the entered bin limits and the total number
of measurements made which meet the requirements of that bin since the bin counter
was last reset.
Bin Low LIMIT High LIMIT
1
2
3
4
5
11 PRI Pass SEC Fail LOW
12
13
14
15
100.00 k 120.00 k
110.00 k 130.00 k
120.00 k 140.00 k
130.00 k Ω
PRI Pass SEC Fail HI
PRI Fail SEC Pass
PRI Fail SEC Fail
NO CONTACT
Ω
Ω
Ω
Ω
110.00 k
150.00 k
Ω90.00 k
Ω
Ω
Ω
Ω
Total
250
100
90
80
75
60
55
50
20
5
Totals:
Figure 2-20
Bin Summary Display
785Fail 190Pass 595
Operation 2-25
Page 46

• Bin Number - Display is a bin assignment, along with the currently programmed test
conditions, for the most recent measurement result.
Bin Number
Voltage
10
Freq
Range
Delay
1.0000kHz
Auto
33
AC Signal
Average
Bias
1.000V
1
Off0 ms
Figure 2-21
Bin Number Display
• No Display - Instrument display is inhibited from indicating any measurement
results. This is sometimes used for security reasons or for the purpose of reducing
test time during remote operation.
2.6.3.2 Nominal Value
Allows entry of a Nominal Value for the primary parameter, which is the
measurement result in Deviation or % Deviation.
Accepts numerical entry up to
basis for the
seven digits with decimal. Units are selected by the UP/DOWN arrow keys and
determined by the primary parameter selection, i.e. in Farads, Ohms, Henries, etc.
NOTE:
The nominal value has no relationship to nominal values entered during binning
setup.
2.6.3.3 Result Format
Allows selection from two different measurement result formats SCI and ENG, for
scientific or engineering units. Scientific units are expressed as an exponent and
engineering units are expressed in ohms for resistance, farads for capacitance, henries for
inductance, etc. For example e3 in scientific units can be expressed as kohms in
engineering units or e
-3
in scientific units can be expressed as mohms in engineering
units, this is strictly user preference and convenience.
When scientific units are selected the results will always be displayed as some number of
digits with decimal, exponent and units. When engineering units is selected the results
will be displayed as some number of digits with decimal and units.
Operation 2-26
Page 47

2.6.3.4 Trigger
Allows selection of two trigger modes, Internal or External.
• Internal - Measurement trigger is automatic and continuous once initiated with a
START. If the STOP key is pressed in the middle of a measurement (with Range
Hold set to OFF) any measurement range indication or displayed results is invalid.
• External - Measurement trigger is under remote control via front panel, handler, RS
232 or IEEE-488 interface.
2.6.3.5 Handler Interface
Allows user to turn Handler Interface function On or Off. When On is selected the input
and output lines on the rear panel I/O interface connector are acknowledged, if Off is
selected they are ignored.
2.6.3.6 RS-232 Interface
I/0
RS-232
Baud
Parity
Data Bits
Stop Bits
Mode
State Enable
Analysis
12 24 48
None
7
8
1
2
Talk
Disable
UtilitiesSetup
>>
96
Odd Even
Talk/Listen
HIT MENU TO RETURN TO MAIN MENU
Figure 2-22
RS-232 Setup Format
Allows user setup of standard RS-232 interface formats. Choices include:
Baud Rate - 12, 24, 48 or 96 (for 1200, 2400, 4800, and 9600 respectively)
Parity - None, Even or Odd
Data Bits - 7 or 8
Stop Bits - 1 or 2
Mode - Talk or Talk/Listen
UP/DOWN arrow and Enter selects the desired format and then LEFT/RIGHT arrow
and
ENTER allows for selection of choices within each format.
Operation 2-27
Page 48

2.6.3.7 IEEE-488.2 Interface
Address
Mode
State
I/0
IEEE
= 4
Talk
Disable
Analysis
Talk/Listen
Enable
UtilitiesSetup
>>
HIT MENU TO RETURN TO MAIN MENU
Figure 2-23
IEEE Setup Format
Allows user setup of IEEE-488 interface format. Choices include:
Address - 1 through 16
Mode - Talk or Talk/Listen
State - Disable or Enable
UP/DOWN arrow and ENTER selects the desired format and then LEFT/RIGHT arrow
and
ENTER allows for selection of choices within each format.
The instrument will function as either a Talk or a Talk/Listen device in a system
depending on the choice made by the operator under Mode. Talk is generally suited to a
simple system with no controller or other talkers, for example a printer. Talk/Listen
denotes full programmability and is suited for use in a system that has a controller or
computer to manage data flow. The "handshake" routine assures that the active talker
proceeds slowly enough for the slowest listener.
2.6.3.8 Print Results
Allows user to output results to the parallel port by selection of Off or On.
CAUTION
Before selecting On make sure the printer is connected and on-line.
File format for printing is the same as shown in the next paragraph under
Floppy
. Lines not printed are indicated.
Results to
Operation 2-28
Page 49

2.6.3.9 Results to Floppy
Allows user to store measurement results on floppy disk (unless drive is not present).
When selected, if a results file is not open, the user is prompted for the filename (up to 8
characters) and the file is opened.
To close a results file that is currently open, select Results to Floppy and close.
If a results file is open when a setup is saved, when the setup is later recalled the user will
be prompted for a results file name.
When multiple tests are being conducted the results are stored to floppy periodically
(every 10 measurements) from an internal buffer.
before power is shut down the file needs to be closed
To be sure of storing all results
as discussed earlier. It is also
important to note that a file should be closed before changing or recalling a new set of
test conditions, otherwise the stored measurement results would not be consistent with
the setup conditions stored in the file.
NOTE:
3 1/2" floppy disks must be formatted for DOS compatibility on a PC or purchased
formatted from the manufacturer, 1.44M High Density or 720K Low Density. The
floppy drive does not support subdirectories.
The measurement results are stored as a DOS text file under its assigned identifying
number (up to 8 characters) with an extension of .b6r. The test setup conditions are
saved as a header at the beginning of a results file. A sample file format is shown below.
Note that the results can be stored in either engineering or scientific terms dependent on
what the user has selected for setup conditions. The format of the result string is as
follows:
Label<TAB>Primary result<TAB>Units<TAB>Label<TAB>Secondary
result<TAB>Units<TAB>Bin#<CR><LF>
Operation 2-29
Page 50

Sample file format as follows. Lines listed as not printed are not saved as results to
floppy but only as Save Setup, refer to paragraph 2.6.5.1.
Copyright QuadTech Inc. 1997 not printed
ENDHEADER not printed
2000000.000000 ;frequency
5.000000 ;primary parameter
2.000000 ;secondary parameter
0.000000 ;ac signal type
0.100000 ;ac signal value
0.000000 ;bias
0.000000 ;range
1.000000 ;rangelocked
68.000000 ;range relay not printed
205.000000 ;relay 2 |
69.000000 ;relay 3 |
66.000000 ;va not printed
2.000000 ;measurment speed
0.000000 ;delay time
1.000000 ;# to average
0.000000 ;contact check
0.000000 ;display type
0.00000000009989577000 ;nominal value
0.000000 ;result format
1.000000 ;trigger
1.000000 ;handler
3.000000 ;baud
0.000000 ;parity
1.000000 ;data bits
0.000000 ;stop bits
1.000000 ;rs232 mode
1.000000 ;rs232 state
4.000000 ;IEEE address
1.000000 ;IEEE mode
0.000000 ;IEEE state
0.000000 ;print results
0.000000 ;result to floppy
0.00000000000000000000 ;low limit bin 0 not printed
0.00000000000000000000 ;high limit bin 0 |
0.00000000000000000000 ;nominal value bin 0 |
0.000000 ;limit format bin 0 |
0.00000000000000000000 ;low limit bin 1 |
0.00000000000000000000 ;high limit bin 1 |
0.00000000000000000000 ;nominal value bin 1 |
0.000000 ;limit format bin 1 |
0.00000000000000000000 ;low limit bin 2 |
0.00000000000000000000 ;high limit bin 2 |
0.00000000000000000000 ;nominal value bin 2 |
Operation 2-30
Page 51

0.000000 ;limit format bin 2 |
0.00000000000000000000 ;low limit bin 3 |
0.00000000000000000000 ;high limit bin 3 |
0.00000000000000000000 ;nominal value bin 3 |
0.000000 ;limit format bin 3 |
0.00000000000000000000 ;low limit bin 4 |
0.00000000000000000000 ;high limit bin 4 |
0.00000000000000000000 ;nominal value bin 4 |
0.000000 ;limit format bin 4 |
0.00000000000000000000 ;low limit bin 5 |
0.00000000000000000000 ;high limit bin 5 |
0.00000000000000000000 ;nominal value bin 5 |
0.000000 ;limit format bin 5 |
0.00000000000000000000 ;low limit bin 6 |
0.00000000000000000000 ;high limit bin 6 |
0.00000000000000000000 ;nominal value bin 6 |
0.000000 ;limit format bin 6 |
0.00000000000000000000 ;low limit bin 7 |
0.00000000000000000000 ;high limit bin 7 |
0.00000000000000000000 ;nominal value bin 7 |
0.000000 ;limit format bin 7 |
0.00000000000000000000 ;low limit bin 8 |
0.00000000000000000000 ;high limit bin 8 |
0.00000000000000000000 ;nominal value bin 8 |
0.000000 ;limit format bin 8 |
0.00000000000000000000 ;low limit bin 9 |
0.00000000000000000000 ;high limit bin 9 |
0.00000000000000000000 ;nominal value bin 9 |
0.000000 ;limit format bin 9 |
0.00000000000000000000 ;low limit bin 10 |
0.00000000000000000000 ;high limit bin 10 |
0.00000000000000000000 ;nominal value bin 10 |
0.000000 ;limit format bin 10 |
0.00000000000000000000 ;low limit bin 11 |
0.00000000000000000000 ;high limit bin 11 |
0.00000000000000000000 ;nominal value bin 11 |
0.000000 ;limit format bin 11 |
0.00000000000000000000 ;low limit bin 12 |
0.00000000000000000000 ;high limit bin 12 |
0.00000000000000000000 ;nominal value bin 12 |
0.000000 ;limit format bin 12 |
0.00000000000000000000 ;low limit bin 13 |
0.00000000000000000000 ;high limit bin 13 |
0.00000000000000000000 ;nominal value bin 13 |
0.000000 ;limit format bin 13 |
0.00000000000000000000 ;low limit bin 14 |
0.00000000000000000000 ;high limit bin 14 |
0.00000000000000000000 ;nominal value bin 14 |
0.000000 ;limit format bin 14 not printed
Operation 2-31
Page 52

0.000000 ;secondary low
0.000000 ;secondary high
0.000000 ;sequence
0.000000 ;sequence status printed only if sequence enabled
1000.000000 ;sequence frequency |
0.000000 ;sequence pri param |
0.000000 ;sequence sec param |
0.000000 ;sequence bias |
0.000000 ;sequence ac signal type |
1.000000 ;sequence ac signal value |
0.000000 ;sequence delay |
0.000000 ;sequence range |
0.000000 ;sequence range relay |
0.000000 ;sequence relay 2 |
0.000000 ;sequence relay 3 |
0.000000 ;sequence var relay |
1.000000 ;sequence stop on fail |
0.000000 ;sequence status |
1000.000000 ;sequence frequency |
0.000000 ;sequence pri param |
0.000000 ;sequence sec param |
Operation 2-32
Page 53

0.000000 ;sequence bias |
0.000000 ;sequence ac signal type |
1.000000 ;sequence ac signal value |
0.000000 ;sequence delay |
0.000000 ;sequence range |
0.000000 ;sequence range relay |
0.000000 ;sequence relay 2 |
0.000000 ;sequence relay 3 |
0.000000 ;sequence var relay |
1.000000 ;sequence stop on fail |
0.000000 ;sequence status |
1000.000000 ;sequence frequency |
0.000000 ;sequence pri param |
0.000000 ;sequence sec param |
0.000000 ;sequence bias |
0.000000 ;sequence ac signal type |
1.000000 ;sequence ac signal value |
0.000000 ;sequence delay |
0.000000 ;sequence range |
0.000000 ;sequence range relay |
0.000000 ;sequence relay 2 |
0.000000 ;sequence relay 3 |
0.000000 ;sequence var relay |
1.000000 ;sequence stop on fail |
0.000000 ;sweep printed only if sequence enabled
0.000000 ;sweep parameter
10.000000 ;sweep begin
1000.000000 ;sweep end
0.000000 ;sweep step
0.000000 ;sweep result format
0.000000 ;median
1.000000 ;correction
25.000000 ;correction primary nominal
50.000000 ;correction secondary nominal
1.000000 ;correction status
Operation 2-33
Page 54

1000.000000 ;correction frequency
49.000000 ;correction range
5.000000 ;correction primary parameter
4.000000 ;correction secondary parameter
25.17072 ohms ;correction measured primary
-.1947500 ;correction measured secondary
-0.170725 ;correction primary correction
50.194742 ;correction secondary correction
0.000000 ;enhanced distortion
0.000000 ;lockout
1.000000 ;backlite
ENDHEADER
Cs 9.69573e-09 F DF 0.0052921 Bin 1
Cs 9.69645e-09 F DF 0.0052307 Bin 1
Cs 9.69575e-09 F DF 0.0052404 Bin 1
Cs 9.69583e-09 F DF 0.0052983 Bin 1
Cs 9.69698e-09 F DF 0.0053328 Bin 1
The number of measurement results that can be stored is dependent on available disk
space and length of the data string. For example; if no limit is set the measurement string
contains no bin results, thus the string is fewer characters. The same is true with header
information, multiple headers (different test conditions) will consume more memory.
Whatever the case, a blank disk is capable of storing thousands of measurements.
Operation 2-34
Page 55

2.6.4 Analysis Menu
I/0Setup UtilitiesAnalysis
Binning
Test Sequencing
Parameter Sweep
Median
Distort Detect
Load Correction Edit
On
Off
Off On
On
Off
On
Off
On
Off
Edit
Edit
>>
Figure 2-24
Analysis Menu
The third of the four main menus is
Analysis, shown above. Each function controls the
analysis of measurement results and is described in detail below.
Setup I/O Analysis Utilities
Binning - Bin #
Absolute Limit
Tolerance %
Secondary Low - (numeric entry)
Secondary High - (numeric entry)
View Bin Totals
Zero Bin Totals
Test Sequencing - Off
- On
- Edit
- Bin #
- Nominal
- % Below
- % Above
- Low Limit
- High Limit
Parameter Sweep - Off
- On
- Edit
Median
- Off
- On
Distort Detect
- Off
- On
Load Correction
- Off
- On
- Edit
Operation 2-35
Page 56

2.6.4.1 Binning
I/0 Analysis
Absolute Limit
Tolerance %
Secondary Low
Secondary High
View Bin Totals
Zero Bin Totals
Binning
= 0.000000
= 0.000000
UtilitiesSetup
>>
>>
>>
>>
>>
HIT MENU TO RETURN TO MAIN MENU
Figure 2-25
Binning
The 7600 provides sorting capability into
15 bins (10 pass, 4 fail and 1 for no contact).
For the binning function to be enabled, one or both of the two conditions must be met:
1. Bin 1 limits must be set (non-zero)
.
2. Secondary parameter must be set (not NONE, Figure 2-9) and secondary
low/high limits must be set (non-zero).
These are assigned as follows:
Bins 1 through 10 -
Pass bins for the primary parameter (Pass for secondary
parameter if limit is entered)
Bin 11 - Primary parameter
Bin 12 - Primary parameter
Bin 13 - Primary parameter
Bin 14 - Primary parameter
Bin 15 -
No contact
pass and secondary parameter fail low
pass and secondary parameter fail high
fail and secondary parameter pass
fail and secondary parameter fail
Note:
If no limit is entered for primary parameter but one is for the secondary
parameter, bin assignment will be to Bin 1 for a
or Bin 12 for a
fail high.
pass and Bin 11 for a fail low
Bin assignment during the test sequencing mode of operation is entirely different and
discussed in paragraph 2.6.4.2.
Bin limits for the primary parameter can be entered in terms of absolute value or as a
percent tolerance about a defined nominal. Two of the most common methods sorting is
nested limits and sequential limits. Nested limits are a natural choice for sorting by %
tolerance around a single nominal value with the lower number bins narrower than the
higher numbered ones. Nested limits for three bins is illustrated below, note that limits
do not have to be symmetrical as shown for bin 3.
Operation 2-36
Page 57

Bin 3
Bin 2
Bin 1
Measured
Value
Axis
N
-1% +1%
-5% +5%
-7% +10%
Nominal Value
100.00 kΩ
Tolerance Percent
Bin Nominal % BELOW % ABOVE
1
2
3
100.00 k
100.00 k
100.00 k
1.00
5.00
7.00
1.00
5.00
10.00
Sequential limits are a natural choice for sorting by absolute value. Sequential limits for
three bins are illustrated below. It should be noted that the bins do not necessarily have
to be adjacent. Depending on the specified limits for each they can be overlapping,
adjacent or even isolated (gaps) from each other. Any overlap is assigned to the lower
numbered bin and a gap would be assigned to the overall fail bin.
Bin 1 Bin 2 Bin 3
Absolute Limit
Bin Low LIMIT High LIMIT
1
2
3
90.00 k
100.00 k 120.00 k
90.00 k85.00 k
100.00 k
Measured
Value
Axis
120.00 kΩΩΩ Ω100.00 k90.00 k85.00 k
Operation 2-37
Page 58

• Absolute Limit
Absolute limit selection allows for entry of both
absolute value. Valid range for each is -108 to 109.
upper and lower limit for each bin in
If zero is entered for Low or
High, the previous value is cleared and that bin disabled. When limits are entered in
terms of absolute value the same limits will automatically be shown in terms of percent
on the Tolerance Percent Display. This automatic calculation should be used cautiously,
imprecise displays and missed bin assignments are possible at the range extremes. Arrow
up, down, left to right to select the limit of interest in either the low or high limit column
as shown below (low limit for bin 5 is chosen in this example)
Absolute Limit
Bin Low LIMIT High LIMIT
1
2
3
4
5
6
7
8
9
10
100.00 k 120.00 k
110.00 k 130.00 k
120.00 k 140.00 k
130.00 k
140.00 k 160.00 k
150.00 k
160.00 k 180.00 k
170.00 k
180.00 k
110.00 k90.00 k
150.00 k
170.00 k
190.00 k
120.00 k
Figure 2-26
Absolute Limit
Once the limit of choice is selected by
UP/DOWN, LEFT/RIGHT arrow and ENTER
the numerical value can be entered directly as shown below (entry is 130 in this
example).
Absolute Limit
Operation 2-38
Bin Low LIMIT High LIMIT
1
2
3
4
5
6
7
8
9
10
100.00 k 120.00 k
110.00 k 130.00 k
120.00 k 140.00 k
130
140.00 k 160.00 k
150.00 k
160.00 k 180.00 k
170.00 k
180.00 k
110.00 k90.00 k
150.00 k
170.00 k
190.00 k
200.00 k
Figure 2-27
Absolute Limit (Numeric Entry)
Page 59

Then arrow up or down to select units from those available (
Absolute Limit
Bin Low LIMIT High LIMIT
110.00 k90.00 k
150.00 k
170.00 k
190.00 k
120.00 k
1
2
3
4
5
6
7
8
9
10
100.00 k 120.00 k
110.00 k 130.00 k
120.00 k 140.00 k
130 k
140.00 k 160.00 k
150.00 k
160.00 k 180.00 k
170.00 k
180.00 k
k is chosen in this example).
Figure 2-28
Absolute Limit (Engineering Units)
Press ENTER to finalize the entry, the UP/DOWN, LEFT/RIGHT arrow to choose the
next limit to be entered or changed.
• Tolerance Percent
Tolerance Percent selection allows for entry of both upper and lower limit in terms of
percent below or above an entered nominal (both must be entered).
When limits are
entered in terms of percent the same limits will automatically be shown in terms of
absolute value on the Absolute Value Display. Arrow up, down, left to right to select the
nominal value or % limit of interest as shown below. The nominal value can be entered
in the same fashion as the absolute limit is entered above, numerical value, then arrow Up
or Down to select units.
Valid range is -108 to 109. If zero is entered for Nominal, the
entire row is cleared and that bin disabled. The % tolerance can be entered directly in
increments of .01%, any increments smaller than this are rounded to the closest .01%.
Valid range for each is 0 to 100. If zero is entered for %Below or %Above, the
previous value is cleared and that bin disabled.
Tolerance Percent
Bin Nominal % BELOW % ABOVE
1
2
3
4
5
6
7
8
9
10
100.00 k
110.00 k
120.00 k
130.00 k
140.00 k
150.00 k
160.00 k
170.00 k
180.00 k
190.00 k
10.00
10.00
10.00
10.00
10.00
10.00
10.00
10.00
10.00
10.00
10.00
10.00
10.00
10.00
10.00
10.00
10.00
10.00
10.00
10.00
Figure 2-29
Tolerance Percent
Operation 2-39
Page 60
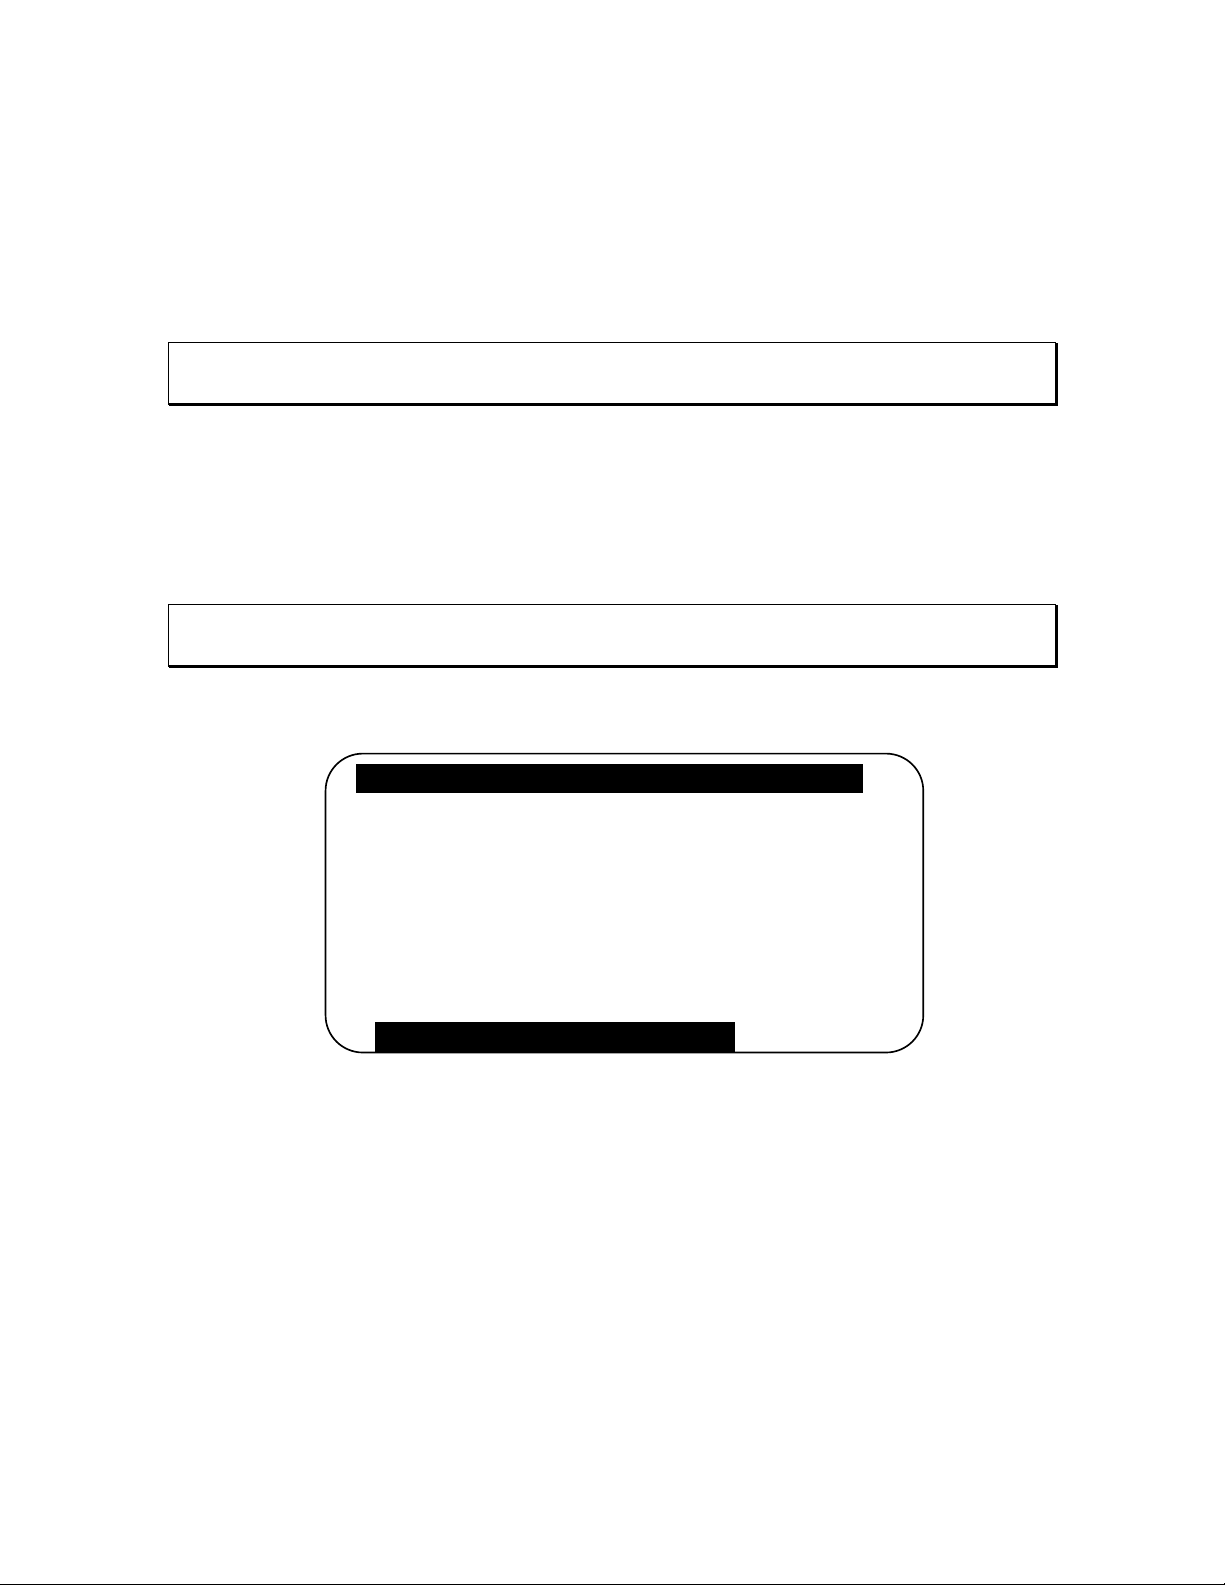
• Secondary Low
Accepts entry of numerical value for the low limit of the secondary parameter. Units are
determined by the secondary parameter selection, i.e. in Farads, Ohms, Henries, etc. and
selected by the UP/DOWN arrow keys.
Valid range is -103 to 104.
NOTE:
Low limit must be less than the High limit
• Secondary High
Accepts entry of numerical value for the high limit of the secondary parameter. Units are
determined by the secondary parameter selection, i.e. in Farads, Ohms, Henries, etc. and
selected by the UP/DOWN arrow keys.
Valid range is -103 to 104.
NOTE:
High limit must be greater than the Low limit
• View Bin Totals
Bin Low LIMIT High LIMIT
1
2
3
4
5
11 PRI Pass SEC Fail LOW
12
13
14
15
Totals:
HIT MENU TO RETURN TO MAIN MENU
100.00 k 120.00 k
110.00 k 130.00 k
120.00 k 140.00 k
130.00 k
PRI Pass SEC Fail HI
PRI Fail SEC Pass
PRI Fail SEC Fail
NO CONTACT
110.00 k90.00 k
150.00 k
Fail 190Pass 595
Total
250
100
90
80
75
60
55
50
20
5
785
Figure 2-30
Bin Totals
The total count for each bin is tracked from 0 to 999,999.
• Zero Bin Totals
Bin count totals are all reset to zero when selected and returned to the Menu screen.
Operation 2-40
Page 61

2.6.4.2 Test Sequencing
The 7600 is capable of performing a sequence measurement containing up to
different test steps
. Different measurement parameters and conditions can be defined
six
for each test in the sequence.
Test sequencing can be selected as Off, On or Edit. Edit allows measurement
parameters and test conditions to be changed for all six tests. It is important to note that
tests can only be enabled in sequence, for example, one can enable tests 1 through 3
but not tests 1 and 3 only, i.e. it is not possible to skip a test. For optimum measure speed
performance, whenever possible, set test conditions of test 1 to be the same as default
conditions, paragraph 2.5.2.
Sequence Setup Test 1
Test 1 Status
Primary Parameter
Secondary Parameter
Frequency
DC Bias Voltage
AC Signal Type
AC Signal Value
Measurement Delay
Range Hold Off On
Stop on Fail OnOff
Binning >>
HIT MENU TO RETURN TO MAIN MENU
(ms)
Disable Enable
= 1.0000kHz
Off
Int Ext
Voltage Current
= 1.000 V
= 0
>>
>>
Prev
Test
Next
Test
Figure 2-31
Sequence Setup (Test Conditions)
If Range Hold is turned ON and this is the "first" sequence measurement, for each test the
7600 automatically finds the correct range and completes a measurement (this range is
saved for all future measurements) for that sequence only. It is important that the first
part be "good" for the range hold to select the correct range. To repeat an auto range
selection, turn sequences off and then back on again (making the next measurement taken
the "first" sequence measurement).
Test conditions for each setup are selected as shown above except for the primary
parameter, secondary parameter and binning, these are selected on individual menus as
shown below. To change test conditions on any or all six tests select
Test
to access test conditions for that test.
Prev Test or Next
Operation 2-41
Page 62

Sequence Setup Test 1
Pri Param
Auto
Cs
Cp
Ls
Lp
Rs
Rp
DF
Q
|Z|
|Y|
HIT MENU TO RETURN TO MAIN MENU
Figure 2-32
Sequence Setup (Parameter Selection)
Bin assignment in the test sequence mode is defined as follows:
Bin # Assigned
Bin 1 Test 1 (Primary parameter, fail)
Bin 2 Test 1 (Secondary parameter, fail)
Bin 3 Test 2 (Primary parameter, fail)
Bin 4 Test 2 (Secondary parameter, fail)
Bin 5 Test 3 (Primary parameter, fail)
Bin 6 Test 3 (Secondary parameter, fail)
Bin 7 Test 4 (Primary parameter, fail)
Bin 8 Test 4 (Secondary parameter, fail)
Bin 9 Test 5 (Primary parameter, fail)
Bin 10 Test 5 (Secondary parameter, fail)
Bin 11 Test 6 (Primary parameter, fail)
Bin 12 Test 6 (Secondary parameter, fail)
Bin 13 Unused
Bin 14 Pass Bin
Bin 15 Contact Check, fail
For the binning function to be enabled, Bin 1 limits must be set (non-zero). If zero is
entered for Low or High, the previous value is cleared and that bin disabled.
range for primary or secondary is -108 to 109.
entered on the display shown below and NOT
All sequence binning limits must be
the standard binning displays, paragraph
Valid
2.6.4.1.
Operation 2-42
Page 63

Sequence Setup Test 1
Bin Low LIMIT High LIMIT
1
Pri
2
Sec
100.00 k 120.00 k
110.00 k90.00 k
Figure 2-33
Sequence Binning
Test conditions of measurement sequences can be stored and/or recalled as part of test
setups, refer to paragraphs 2.6.5.1 and 2.6.5.2 for storing or recalling setups. If a test
sequence is
if the test sequence is
stored as On, the sequence will be executed once the Start button is pressed,
stored as Off, the sequence will be inactive until turned on.
Note that a sequence (of up to six tests) can be terminated on any test of the sequence if
the user has specified
Stop on Fail for that test. If Stop on Fail is not selected the
sequence continues until a failure occurs in a test where Stop on Fail has been enabled or
until the whole sequence has been completed. Once a sequence is complete, it will be
binned to the first fail bin (1 thru 12) or if all tests pass, binned into the overall pass bin
(14).
When a test sequence is turned on the results of the sequence are shown on the summary
screen shown below. Measured values outside of specified limits are highlighted.
Sequence Results
BIN
DF 0.0078950
DF 0.0067994
Test 1
Test 2
Test 3
FAIL 5
Cs 1.561062 uF DF 0.0089290
Cs 1.498650 uF
Cs 1.278650 uF FAIL
Figure 2-34
Sequence Results
Operation 2-43
Page 64

2.6.4.3 Parameter Sweep
The 7600 is capable of displaying a
table or plot of measured results vs. a variable of
frequency, voltage or current.
Sweep can be selected as Off, On or Edit. Edit allows sweep test conditions to be
changed.
I/0 Analysis
Parameter
Sweep Begin
Sweep End
Sweep Step
Sweep Format
Sweep
Freq
= 10.0
= 1.0000 kHz
Table
Voltage Current
Hz
25
50 100 200
UtilitiesSetup
>>
Plot
HIT MENU TO RETURN TO MAIN MENU
Figure 2-35
Parameter Sweep
Parameter is the variable test condition of Frequency, Voltage or Current.
Sweep Begin is the lower boundary of the sweep table or plot in units of Hz, Volts or
Amps.
The numerical value is entered directly and units selected by UP/DOWN arrow
keys.
Sweep End
is the upper boundary of the sweep in units of Hz, Volts or Amps and
entered the same as Sweep Begin.
Sweep Step is the chosen number of increments in a sweep of 25, 50 100 or 200 where
values are automatically selected, logarithmically over the specified begin to end range.
Sweep Format is selected to be Table as shown in Figure 2-36 or Plot as shown in
Figure 2-37.
Operation 2-44
Page 65

Plot Table
Frequency Cs DF
1.0000kHz
1.2915kHz
1.6681kHz
2.1544kHz
2.7825kHz
3.5938kHz
4.6415kHz
5.9948kHz
7.7426kHz
10.000kHz
471.4576nF
470.4563nF
469.8878nF
468.9983nF
466.4532nF
462.6634nF
460.6645nF
459.7892nF
458.7845nF
456.5454nF
0.003135
0.003675
0.003867
0.010035
0.010078
0.011045
0.012895
0.014786
0.016782
0.018544
Prev
Page
Next
Page
Figure 2-36: Sweep Table
The sweep table lists the measurement results for primary and secondary parameter
(unless none is selected) along with the test condition variable of frequency, voltage or
current. A table can be comprised of 25, 50, 100 or 200 entries and the UP/DOWN
arrow keys or Prev or Next Page used to scroll through the display.
NOTE:
Scroll is not functional when RS-232 or IEEE-488 is enabled
200.0
180.0
160.0
140.0
120.0
100.0
|Z|Ω
50.000k 62.000k
51.000k 54.000k
Frequency Hz
Figure 2-37: Sweep Plot
The sweep plot shows the measurement results of the primary parameter (vertical axis)
vs. the variable test condition of frequency, voltage or current (horizontal axis). It should
be noted that space available on the display
resolution of axis labeling.
Sweep End
values as selected by the user with two additional labels in between (chosen
The horizontal axis is labeled from the Sweep Begin to the
logarithmically). The vertical axis is labeled from the
limits the number of graduations and
lowest measured value to the
highest measured value with four additional labels in between (chosen linearly).
Operation 2-45
Page 66

2.6.4.4 Median
Allows for the selection of Median measurement mode to be On or Off. When selected
each measurement will actually be three individual measurements, the
lowest and
highest values discarded and the median value displayed.
Measurement accuracy can be improved as noted below and will be indicated on the
AutoAcc display (but never less than 0.05% for primary parameter or 0.0005 for
secondary parameter).
With Median set to
On:
Divide the primary accuracy by the square root of three.
Divide the secondary accuracy by the square root of three.
2.6.4.5 Distortion Detection
Allows for the selection of Distortion Detection mode to be
On or Off. When set to On,
the unit will detect distortion during a measurement and indicates the message
"DISTORTION" if this condition occurs. When set to Off, distortion will not be detected
during a measurement.
Distortion is dependent on programmed test conditions, connection to the device, device
impedance and so indicated when the signal + noise + distortion divided by the signal
exceeds 1.2. Distortion set to On is the recommended test condition and is particularly
important for high precision measurements where test leads could resonate with the
device under test. Distortion may want to be turned to Off in a "noisy" environment.
To ensure that stored setups are backward compatible Distortion On or Off is not saved
in setups stored (internally or on floppy). On instrument power down the Distort Detect
will be restored to its last previous state.
2.6.4.6 Load Correction
Load correction allows the user to specify the value of the component under test (user
supplied standard) and apply a correction to subsequent measurements of similar
components under the same test conditions. This feature corrects for instrument nonlinearity and for fixture effects which can be dependent on the test frequency, test voltage
level or impedance range.
Measurement accuracy is 0.25 x (normal accuracy) with Load Correction implemented
and compared to user supplied standard and for the same measurement conditions. Same
measurement conditions being test voltage, test frequency and 7600 measurement range.
Operation 2-46
Page 67

This increased accuracy applies in a range of:
DUT's with impedance (Z) between 3Ω and 800kΩ, with
programmed voltage from 100mV to 1V, or from 100mV
to (programmed current) x (Z) ≤1V.
Load correction can be selected as
Off, On or Edit. Edit allows the primary and
secondary values to be entered, the parameter for these values is defined by the Primary
and Secondary Parameter in the main Setup menu. After the nominal values have been
entered, if
measurement. While the measurement is being made,
displayed. After the correction measurement the actual
Measure is selected for ON the user presses START to initiate the correction
Measuring Correction will be
Measured Primary and
Secondary value will be displayed along with the selected Freq, Range, Primary and
Secondary parameter. During the load correction measurement the instrument is
automatically placed in the Slow Measurement Accuracy mode.
Load Correction
Measure
Primary Nominal
Secondary Nominal
Measuring Correction
Measured Primary
Measured Secondary
Freq 1.0000MHz Primary Cs
Range 49
HIT <START> TO MEASURE CORRECTION
HIT <ENTER> TO CHANGE VALUES
HIT <MENU> TO RETURN TO MAIN MENU
On
Off
60.00000 pF
4.000000 m
60.25518 pF
.0042580
Secondary DF
Figure 2-38
Load Correction
The Load Correction will only be made for the Frequency, Range, Primary and
Secondary Parameter that was selected when the correction was determined. For
example; if the correction measurement is made under the conditions of Cs, DF, at 1
MHz and range 49, these are the only conditions under which it will be applied.
Operation 2-47
Page 68

2.6.5 Utilities Menu
I/0Setup Utilities
Analysis
Save Setup >>
Recall Setup
AutoAcc
Open / Short
Lock Out
Calibration
Set Time / Date
Usage / Cal Date
Set Contrast
Self Test
LCD Backlite
Save
>>
>>
>>
>>
>>
>>
>>
>>
>>
On
Figure 2-39
Utilities Menu
The last of the four main menus is Utilities, shown above. Each function is described in
detail below.
Setup I/O Analysis Utilities
Save Setup
Recall Setup
AutoAcc
tm
Open/Short
- delete
- delete
- Short
- Open
Lock Out
- Lock Out with Setup Recall
- Quick Open & Short
- Lock Out Only
Calibration
Set Time/Date
See para. 4.4
- T
- D
Usage/Cal Date
Set Contrast
Self Test
LCD Backlite
Operation 2-48
Messages
- Save
- On
Page 69

2.6.5.1 Save Setup
Analysis
Save
NEW
DEFAULT
FLOPPY
12345
1234
123
d
e
l
I/0Setup Utilities
HIT MENU TO RETURN TO MAIN MENU
Figure 2-40
Save Setup
Allows a set of test conditions to be stored in instrument memory or on floppy disk for
later recall. Test conditions are those that are user programmable in the Setup and I/O
menus, as discussed in paragraphs 2.6.2 and 2.6.3.
Setups stored on non-Model B
7600's are not compatible with the 7600 Model B.
Stored setup conditions should always be backed up on disk using the floppy drive.
The number of setups saved to floppy is limited to 125.
To store the current set of test conditions as a new set in unit memory one needs to select
NEW in the Save Setup menu and enter the identifying name up to 8 characters under
which these conditions will be stored (allowable characters from the keypad include 0
through 9 and minus, characters can also include A through Z when operating from
remote control ). To save the setup under the name selected or to overwrite if the name
already exists one needs to answer Yes or No, Figure 2-41.
I/0Setup UtilitiesAnalysis
Y
SAVE AS 1234?
N
Figure 2-41
Yes or No
Operation 2-49
Page 70

To make the current set of test conditions the default (at power up) one needs to select
DEFAULT in the Save Setup menu and overwrite the conditions currently stored. To
prevent overwriting the default setup by mistake an additional level of safety exists
where the operator is required to respond with Yes or No, similar to Figure 2-41 above.
Selecting del will delete a set of test conditions and requires a Yes or No response.
When there are more setups than can fit on the display the page down key is active. If
there is less than a whole page below, the display wraps around to the previous display.
Continuing to page down will eventually return to the first display of setups. The page
down key is only shown when there are more setups than what is visible.
There are two ways to make the current set of test conditions overwrite an existing setup,
one is to select that setup in the menu and answer Yes to overwrite and the other way is
to enter the same name under New and answer Yes to overwrite.
File format for storing test conditions is the same as shown under Results to Floppy,
paragraph 2.6.3.9, all lines shown are saved as setup. The extension of files saved to
floppy is .b6s.
2.6.5.2 Recall Setup
I/0Setup Utilities
Analysis
Recall
DEFAULT
FLOPPY
12345
1234
123
d
e
l
HIT MENU TO RETURN TO MAIN MENU
Figure 2-42
Recall Setup
Allows a previously stored set of test conditions to be recalled from instrument memory.
Test conditions are those that are user programmable in the Setup and I/O menus as
discussed in paragraphs 2.6.2 and 2.6.3.
compatible with the 7600 Model B.
down or up to the desired set.
DEFAULT is always one of the set of test conditions that
can be recalled as discussed in the previous paragraph. Selecting
to be recalled from disk (unless drive is not present). Selecting
test conditions and requires a Yes or No response.
Setups stored on non-Model B 7600's are not
To recall a set of test conditions one needs to arrow
FLOPPY allows setups
del will delete a set of
Operation 2-50
Page 71

When there are more setups than can fit on the display the page down key is active. If
+
+
there is less than a whole page below, the display wraps around to the previous display.
Continuing to page down will eventually return to the first display of setups.
2.6.5.3 Setup Accuracy
Allows user to access the measurement calculation. Calculated accuracy is displayed for
the instruments currently selected test conditions, as shown in the example below and
accordance with the formulas for fast, medium or slow accuracy.
Factors affecting
in
this calculation include frequency, ac test signal level, measurement accuracy and # to
average, all test conditions under operator control on the Setup Menu. The selection of
Median, on the Analysis Menu, also has an affect on the accuracy calculation.
The Accuracy, Average and Median can be changed on this screen as instructed for the
purpose of evaluating their effect on the instrument accuracy calculation and the changes
implemented if the operator so chooses. The frequency, AC signal or parameter selection
can only be changed on the Setup menu.
In summary, this display shows instrument
accuracy for currently selected test conditions or as a tool so the operator can see
what the accuracy would be
if certain conditions were selected.
tm
AutoAcc
Accuracy Freq
Average
Median
Slow
1
OnOff
Arrow keys to select parameters
ENTER key to change the values
START key to calculate accuracy
Accuracy as Configured
AC Signal 1.000 V
1.0000kHz
.075%
.0005000
Cs
DF
Figure 2-43
Setup Accuracy
The basis for the AutoAcc calculation is based on the formulas below where A% =
calculated primary accuracy for C, X, B with D < 0.1 and R, L, G with Q < 0.1 for
optimum signal levels and test conditions.
For C, X, and B, with D > 0.1, multiply A% by
For R and G, with Q > 0.1, multiply A% by
1+
For L, with Q < 10, multiply A% by
Multipliers do n ot apply to 1 MHz Special Case Accuracy
1
Q
1Q
2
2
1D
2
Operation 2-51
Page 72

For Fast Mode, R, L, C, X, G, B, |Z|, and |Y|
⎡
A *
⎢
⎢
⎣
⎛
⎛
⎜
⎜
⎜
⎜
⎝
⎝
125.
()
25.025.0%
Z
Z
+++±=
m
m
⎞
⎛
−
6
2.0
⎟
⎜
*10*
⎜
⎟
V
s
⎝
⎠
V
fs
++
*8.0
V
s
2
⎞
()
−
4
⎛
1
⎟
⎜
⎜
⎟
⎝
⎠
FV
ms
4.0*
10
++
4
400
F
⎤
⎞
⎞
⎟
⎟
⎥
⎟
⎟
⎥
m
⎠
⎠
⎦
For Medium Mode, R, L, C, X, G, B, |Z|, and |Y|
⎡
A *
⎢
⎢
⎣
⎛
⎛
⎜
⎜
⎜
⎜
⎝
⎝
05.
()
+++±=
125.0125.0%
Z
Z
m
m
⎞
⎛
6
−
2.0
⎟
⎜
*10*
⎜
⎟
V
s
⎝
⎠
V
fs
++
*8.0
V
s
2
⎞
−
()
4
⎛
1
⎟
⎜
⎜
⎟
⎝
⎠
⎤
⎞
FV
ms
4.0*
4
10*3
⎞
300
⎟
⎟
++
⎥
⎟
⎟
F
⎥
m
⎠
⎠
⎦
For Slow Mode, R, L, C, X, G, B, |Z|, and |Y|
⎡
A *
⎢
⎢
⎣
⎛
⎛
⎜
⎜
⎜
⎜
⎝
⎝
05.
()
+++±=
025.0025.0%
Z
Z
m
m
⎞
⎛
7
−
2.0
⎟
⎜
*10*
⎜
⎟
V
s
⎝
⎠
V
fs
++
*8.0
V
s
2
⎞
−
()
4
⎛
1
⎟
⎜
⎜
⎟
⎝
⎠
⎤
⎞
FV
ms
7.0*
5
10
⎞
300
⎟
⎟
++
⎥
⎟
⎟
F
⎥
m
⎠
⎠
⎦
Vs = Test voltage in voltage mode, I * Zm in current mode*
Zm = Impedance of DUT Fm = Test frequency
Kt = 1 for 18o to 28oC, 2 for 8o to 38oC, and for 4 for 5o to 45oC
* For I * Zm > 3, accuracy is not specified
VFS = 5.0 for 1.000V < Vs ≤ 5.000V
1.0 for 0.100V < Vs ≤ 1.000V
0.1 for 0.020V ≤ Vs ≤ 0.100V
For Zm > 4* Z
For Zm > 16* Z
For Zm > 64* Z
RANGE multiply A% by 2
RANGE multiply A% by 4
RANGE multiply A% by 8
In Voltage Mode In Current Mode
where 100kΩ for Zm ≥ 25kΩ 400Ω for i < 2.5mA
Z
RANGE = 6kΩ for 1.6kΩ ≤ Zm < 25kΩ 25Ω for i > 2.5mA
6kΩ for Zm > 25kΩ and Fm > 25kHz
400Ω for 100Ω ≤ Zm < 1.6kΩ
400Ω for Zm > 1.6kΩ and Fm > 250kHz
25Ω for Zm < 100Ω
NOTE: Calculated Rs accuracy applies only when device under test is primarily reactive
Calculated ESR accuracy applies only when device under test is primarily capacitive
The unit is unspecified for Fm > 1.0 MHz and Vs > 0.5V and for Fm > 500 kHz and
Vs > 1.0V
K
t
K
t
K
t
Operation 2-52
Page 73

D Accuracy Q Accuracy
(
⎡
A%
=+
⎢
100D50
⎤
*1
⎥
⎡
+
⎢
5*10
⎤
F
m
⎥
4
A%
=+ +
100A%100
⎡
⎢
⎣
1
50
⎤
⎥
⎦
A
⎡
2
++
*Q Q
n
⎢
100A%500
⎣
⎤
⎥
⎦
Accuracy ESR Accuracy
θ
A%
=
20
180
⎛
*
⎞
⎜
⎟
⎝
⎠
π
%
A
⎛
⎜
⎝
100
⎞
⎟
⎠
*Z
m
=
D = DF of unknown
Q = Q of unknown
A% = calculated primary accuracy for all cases
1 MHz Special Case Accuracy
(1 MHz, C = 100pF to 1000 pF, Zm 158 to 1.6kΩ, D or Q < 0.01, voltage mode, Vs ≤
1V)
Fast Mode Accuracy
2
⎞
⎛
VV
*
⎞
V
s
⎟
4
s
⎠
2
⎟
*
⎜
⎝
⎠
FS s
V
FS
⎞
−
)
AK
+−
⎟
()
⎠
nt
.*=± + +
05
⎤
⎥
⎥
⎦
A
%
A
= nominal accuracy 0.5.
n
⎡
⎢
005
⎢
⎣
A
.
⎛
n
⎜
*. *
067 1
⎝
⎛
.
2
⎜
V
⎝
Medium Mode Accuracy
%
A *05.
A
= nominal accuracy 0.25.
n
⎡
⎢
⎢
⎣
⎛
A
n
⎜
⎜
05.0
⎝
⎛
⎜
⎜
⎝
2.
8.0*067.*
V
2
⎞
⎞
⎛
()
⎟
⎟
++±=
⎟
⎟
4
s
⎠
⎠
*2
⎜
*
⎜
V
⎝
FS
⎞
VVV
−
sFSs
⎟
()
⎟
⎠
⎤
−+
KA
⎥
tn
⎥
⎦
Slow Mode Accuracy
A *05.
%
A
= nominal accuracy 0.05.
n
⎡
⎢
⎢
⎣
⎛
A
n
⎜
⎜
05.0
⎝
⎛
⎜
⎜
⎝
2.
55.0*067.*
V
2
⎞
⎞
⎛
()
⎟
⎟
++±=
⎟
⎟
4
s
⎠
⎠
*2
⎜
*
⎜
V
⎝
FS
⎞
VVV
−
sFSs
⎟
()
⎟
⎠
⎤
−+
KA
⎥
tn
⎥
⎦
NOTE:
Accuracy given by the equations is the measurement accuracy relative to calibration
standards. Total accuracy equals the relative measurement accuracy plus the calibration
uncertainty of the calibration standards.
Operation 2-53
Page 74

2.6.5.4 Open / Short
The zeroing process automatically measures stray parameters and retains the data, which
is used to correct measurements so that results represent parameters of the DUT alone
without test lead or fixture capacitance. Measurement accuracy is specified at the end of
the QuadTech one meter cable (7000-01). Open and short circuit zeroing should be done
at the end of this cable. In order to maintain instrument accuracy with other cable lengths
the instrument should be re calibrated using the QuadTech 7000-09 Calibration Kit and
the alternate cable. Zeroing is recommended at the start of each work day or more often
if leads, fixture or test configuration to the DUT is changed.
zero if the test frequency is changed.
It is important to note, that anytime the
It is not necessary to re-
instrument is zeroed it is done at a test voltage of 1 volt and frequencies of 10, 50,
100Hz, 1, 5, 10, 25, 50, 100, 250, 500, 750kHz, 1, 1.25, 1.5, 1.75 and 2MHz. Once
Open/Short is selected in the menu and Enter key pressed the operator is prompted by
instructions on the display for short or open zeroing as shown in Figure 2-43 below.
When zeroing, Contact Check should be OFF, # to Average to 1 and Median OFF.
When the instrument measurement accuracy is selected for
its Open/Short in this mode. When the instrument accuracy is selected for
SLOW the unit will perform
MEDIUM or
FAST the unit will perform its Open/Short in the Medium mode. The Open/Short
performed in the Slow mode is necessary only for measurements with extreme accuracy
requirements at very high or low impedance. Open/Short takes about 5 minutes in the
Medium mode versus about 15 minutes in the Slow mode.
When
the display, in much less time and
Quick Open & Short is selected the zeroing process is performed as prompted on
only at the frequency currently selected on the
instrument. It is important to note that the quick open and short data is no longer valid if
frequency is changed, if sweep or sequence is selected or instrument powered down.
Operation 2-54
Connect an Open or a
Short to the instrument
Press the function key
for the connection desired.
HIT MENU TO RETURN TO MAIN MENU
Figure 2-44
Open / Short
Short
Open
Quick
Open &
Short
Page 75

2.6.5.5 Lock Out
LOCKOUT WITH
SETUP RECALL
SELECT THE LOCK OUT TYPE
HIT <CNCL> TO EXIT
LOCKOUT
ONLY
Figure 2-45
Lockout
Allows user to turn keypad lock feature on or off. There are two choices that can be
selected,
lockout only and lockout with setup recall. In both modes only the START,
STOP and MENU on the instrument front panel are active, all other keys disabled. The
difference is that in
lockout with setup recall the menu key also allows setups to be
recalled from instrument memory.
When either is selected the operator must enter a password number up to 8 characters.
CAUTION
FOR SECURITY REASONS THE PASSWORD IS NOT DISPLAYED WHEN IT
IS ENTERED, SO THE PASSWORD SHOULD BE KEYED IN DISTINCTLY
AND REMEMBERED. FAILURE TO REMEMBER AN ENTERED PASSWORD
REQUIRES CALLING THE FACTORY FOR OVERRIDE INFORMATION.
ENTER PASSWORD
(8 CHARACTERS MAXIMUM)
* * * * * * * *
Once the password is entered and entered again for verification, testing can begin by
pressing START or the password cleared or changed by selecting MENU.
HIT <MENU> KEY TO ENTER PASSWORD
AND TO RETURN TO THE MENU
OR
HIT THE <START> KEY TO
START A MEASUREMENT
Operation 2-55
Page 76

Once activated, only the START, STOP and MENU on the instrument front panel are
active, all other keys are disabled. To turn the lockout feature off and reactivate menus
select MENU (select Exit Lockout in Lockout with Setup Recall mode) and enter the
previous password from the keypad, the instrument will again function as normal.
If Recall Setups is chosen in the Lockout with Setup Recall mode, the instrument
functions as described in paragraph 2.6.5.2 under Recall Setup.
2.6.5.6 Calibration
Refer to Calibration in Paragraph 4.4. INSTRUMENT CALIBRATION SHOULD
ONLY BE PERFORMED BY QUALIFIED SERVICE PERSONNEL.
2.6.5.7 Set Time/Date
Wed Oct 19 10:30:10 1994
TO CHANGE TIME PRESS T KEY
TO CHANGE TIME PRESS D KEY
TO RETURN PRESS <MENU>
D
T
Figure 2-46
Set Time / Date
Allows resetting of time and date into unit memory. This is used as the basis for the
elapsed time counter and stored calibration date.
T (time) is entered in
HOURS (up to 2 digits, 0 through 23)
MINUTES (up to 2 digits, 0 through 59)
SECONDS (up to 2 digits, 0 through 59)
D (date) is entered in
MONTHS (up to 2 digits, 1 through 12)
DAYS (up to 2 digits, 1 through 31)
YEARS (4 digits, 1992 through 2037)
Operation 2-56
Page 77

2.6.5.8 Usage/Cal Date
QuadTech 7600 Model B Version 4.0
THE TOTAL OPERATING TIME FOR
THIS INSTRUMENT IS
1205.50 hours
THIS INSTRUMENT WAS CALIBRATED ON
10/15/97
AT 11:25:10
HIT <MENU> KEY TO CONTINUE
cal
data
Figure 2-47
Usage / Cal Date
When selected, indicates the total elapsed time in hours that the unit has been powered up
and the date of last calibration. The elapsed time is from the moment of initial use and
may show some time when shipped from the factory. The calibration date is retained in
instrument memory unit the unit is re calibrated and then it is updated. When
cal data is
selected, the calibrated values are shown as entered from the Report of Calibration
provided with the 7000-09 Calibration Kit previously used. Refer to paragraph 4.4.
2.6.5.9 Set Contrast
HIT ARROW KEYS TO
CHANGE THE DISPLAY CONTRAST
HIT <ENTER> TO ACCEPT
THE CONTRAST SETTING
Figure 2-48
Set Contrast
Allows adjustment of contrast on the LCD display. Use Up arrow to increase contrast or
Down arrow to decrease. When the instrument is powered up it returns to the last set
contrast, not some nominal level.
Operation 2-57
Page 78

2.6.5.10 Self Test
When selected, runs a group of internal self tests to verify that calibration and open/short
data are not corrupt.
2.6.5.11 LCD Backlite
Allows the backlite on the LCD display to be Save or On. When set to Save the backlite
turns off automatically if no keypad has been hit for 5 minutes and turns back on with the
touch of START, MENU or ENTER keys. When set to On the backlite is constantly on.
The Save mode will prolong the life of the display.
Operation 2-58
Page 79

2.7 Input/Output Interface
2.7.1 I/O Interface
The 7600 comes standard with an automatic component handler I/O interface port
available through a 36 pin Centronics type connector located on the rear panel of the
instrument. This port outputs signals to indicate measurement in process, measurement
completed, and bin sorting judgments. The Handler Interface also has inputs for an
external trigger signal and a safety interlock signal. All output lines are negative true,
optically isolated, open collector. Pull-up resistors to allow operation from +5V to +24V
logic must be implemented externally. Inputs are optically isolated, and can be current
driven from either positive or negative true logic. Current limiting resistors to allow
operation from +5V to +24V logic must be implemented externally.
Refer to Table 2-1 for signal names, pin numbers and functions as necessary for cable
connections.
Table 2-1
I/O Interface Connections
Signal Name Pin Number Function
-Bin1 1 Bin Sorting Results (Bin1-Bin10)
-Bin2 19 All signals active low, open collector
-Bin3 2
-Bin4 20
-Bin5 3
-Bin6 21
-Bin7 4
-Bin8 22
-Bin9 6
-Bin10 24
-Bin11 7 Primary parameter pass, secondary fail low
-Bin12 25 Primary parameter pass, secondary fail high
-Bin13 8 Primary parameter fail, secondary pass
-Bin14 26 Primary parameter fail, secondary fail
-Bin15 9 No Contact
-Bin16 27 Unused
-EOT 29 End of Test, test completed and bin and
measurement data valid.
Operation 2-59
Page 80

Table 2-1: I/O Interface Connections (continued)
Signal Name Pin Number Function
-BUSY 30 Measurement/comparison in progress
TRIG+ 14 Trigger high input
TRIG- 16 Trigger low input
START+ 34 Isolated Trigger high input
START- 35 Isolated Trigger low input source
GND 11, 15, 33 System common
IGND 5, 10, 23, 28 Isolated common
+5V 12, 32 System +5V through 100 ohms
INT+ 13 Interlock high input from external source
HTC 31 Handler timing control
118
1936
Pin Configuration (Viewed from Rear Panel)
Operation
WARNING
Do not apply an external source in excess of 5 volts with jumpers JP2, JP3 or JP4 in
place, otherwise the instrument can be damaged. The instrument is shipped with
these jumpers in place and must be removed for optical isolation. These jumpers
are discussed below and physically located on the I/O board, and depending on the
I/O board version may be located under the stack.
The operation of START and TRIG circuits is identical. Both inputs are active low, for
optical isolation they require a positive +5 to +24V external source and current limiting
resistor to operate. START is always optically isolated. TRIG can be converted to a
isolated active low input
by removing jumper JP3 on the I/O PCB. Both signals are open
collector OR'ed on the I/O pcb; current flowing through the isolator input on either signal
causes a single Start line to be pulled low.
The INTerlock signal can be optically isolated, and also requires a positive +5 to +24V
external source and current limiting resistor to operate. This signal can be converted to a
isolated active low input by removing jumper JP4 on the I/O PCB. Current flowing
through the isolator input causes the internal Interlock line to be driven low.
All bin and control outputs can be active low optically isolated open - collector drivers
that pull each signal line to IGND (isolated common) when asserted. All outputs require
Operation 2-60
Page 81
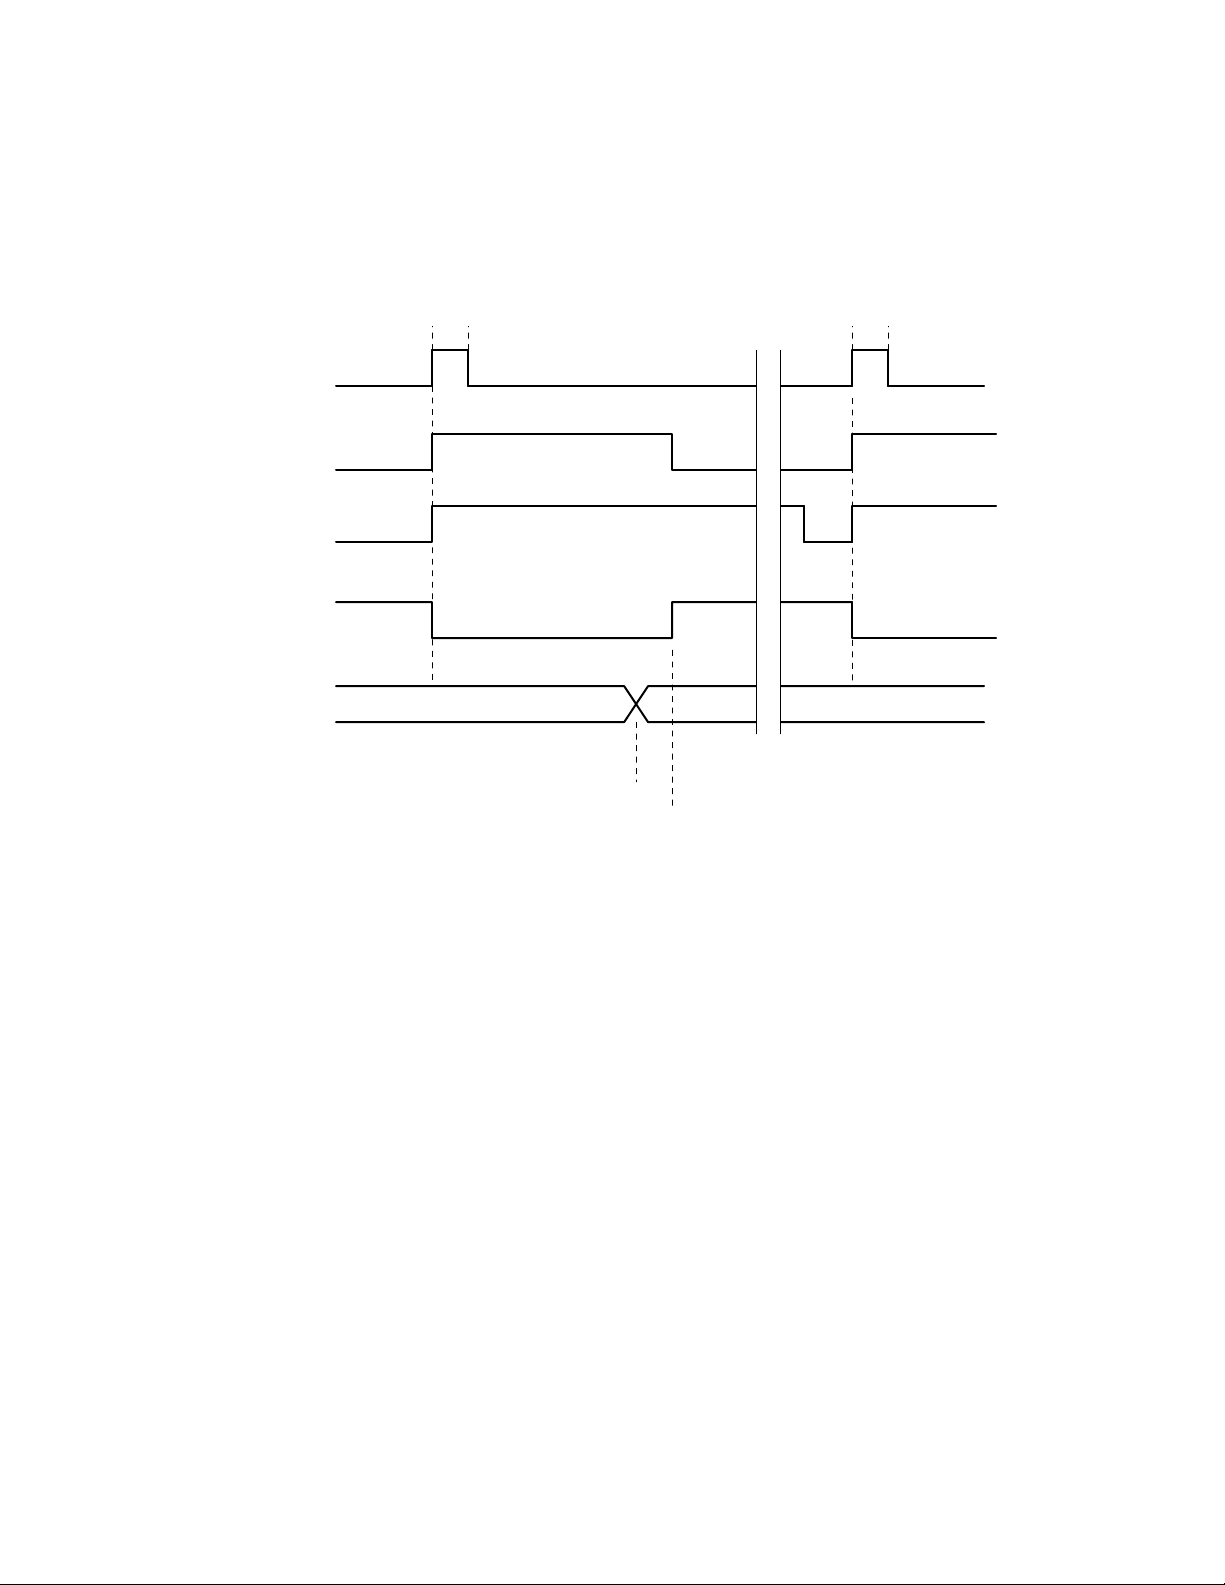
a positive +5 to +24V external source (referenced to IGND) and pull-up resistor to
operate as fully isolated signals. IGND can be isolated from system GND by removing
jumper JP2 on the I/O PCB. With jumper JP2 in place optical isolation is defeated
allowing the outputs to be pulled up to the system +5V with external resistors.
10 us min
Active
START
EOT
(pin 31 floating)
EOT
(pin 31 grounded)
BUSY
Bin Data
Previous Data Valid Data Valid 2nd Test
10 us min
End of Measurement
Figure 2-49
I/O Interface Timing
Test Initiation
• A test is initiated by activating either the START+/- or TRIG+/- inputs.
• The BUSY line is asserted low to indicate that a measurement is in progress.
• The EOT line is de-activated (asserted high) to indicate that the end of the test
had not been reached
• Binning data from the previous test is still valid.
During a Test
• The START+/- or TRIG+/- inputs are released and return to their inactive state.
Operation 2-61
Page 82

• The BUSY line is held low to indicate that the 7600 is making a measurement.
• The EOT line is held high (inactive) until the 7600 is done making a
measurement and bin data is valid.
End of Test
• The BUSY line is returned to high impedance (de-activated) to indicate that the
7600 is done making a measurement. This condition may be used to signal the
automatic component handler to advance the DUT to the binning station and
insert the next DUT.
• Simultaneously, the EOT line is asserted low to indicate that the test is
completed, bin data lines and measurement data are valid and can be read from
the IEEE or RS-232 ports. Data must be valid a minimum of 10us before the
trailing edge of BUSY and EOT.
• All data for the current test is valid, and will remain valid until the end of the
next test. This includes comparator bins 1-10, primary and secondary
parameter bins 11-15, and analog measurement data.
Electrical Characteristics
Inputs: START+/-, TRIG+/-
Condition
Input Current Input Voltage
Active High
Signal+ current driven, Signal- @ IGND 5 - 60 mA 5 - 24V
Active Low
Signal- current driven, Signal+ @ V+(ext) 5 - 60 mA 5 - 24V
Outputs: -Bin1 : -Bin16, -EOT, -BUSY
Condition
Sink Current Output Voltage
Low High
-Binning signals 80 mA max < 0.5V 5 - 24V
-Control signals 80 mA max <
0.5V 5 - 24V
Operation 2-62
Page 83

-Bin0 -Bin15
-EOT
Port x.x
-BUSY
IGND
START+, TRIG+
INT+
Port x.x
8255
START-, TRIGINT-
Figure 2-50
I/O Interface Isolation
All handler I/O is conducted through a single 8255. The outputs from the 8255 are
optically isolated for added interfacing flexibility and to increase reliability by reducing
noise pickup and ground loop interference. The isolators utilize open collector
darlington outputs, and can sink up to 80mA of current provided by an external source at
up to 24V. No provisions for pull-up resistors are provided on - board. The isolated
ground return can be floated, or connected to the 7600 system ground for use with
isolated handlers. The isolators are driven by inverting high current buffers. All outputs
are asserted active low by writing a logic 1 to the desired bit in the appropriate 8255 port.
All inputs are also optically isolated. Both anode and cathode of the input opto isolators
are available in the handler interface connector. Active high inputs can be achieved by
grounding the cathode ( "-" signal ) and driving the anode ( "+" signal ), while connecting
the anode to the external supply and sinking current through the cathode will result in
active low drive. No provisions for current limiting resistors are provided on - board.
All inputs are reverse bias protected. The isolator outputs are connected directly to the
8255 Port C inputs. Asserting the input to the isolators drives the outputs low; reading a
logic 0 from the 8255 input port indicates that the input line has been activated. The
START and TRIG isolator outputs are open collector OR'ed to the same 8255 Port C
input line; the 7600 cannot tell which of the devices generated the external trigger
command.
2.7.2 Parallel Interface
The 7600 comes standard with a parallel printer port available through a connector (25
pin) on the rear panel of the instrument. This is a standard PC compatible interface for
connection to a printer. Refer to Table 2-2 for signal names, pin numbers as necessary
for cable connections.
Operation 2-63
Page 84

Table 2-2
Parallel Interface Connections
Signal Name Pin Number Function
Outputs:
-STROBE 1 Indicates that data is ready to read
D0 2 Data bit 1
D1 3 Data bit 2
D2 4 Data bit 3
D3 5 Data bit 4
D4 6 Data bit 5
D5 7 Data bit 6
D6 8 Data bit 7
D7 9 Data bit 8
-AUTOFD 14 Auto paper feed
-INIT 16 Initializes printer
-SLCT IN 17 Selects printer
GROUND 18 - 25 Signal ground
Inputs:
-ACK 10 Indicates that data has been received and printer is
ready to accept more data
BUSY 11 Indicates that printer can not receive data
PE 12 Indicates that printer is out of paper
SLCT 13 Indicates that printer is ready to receive data
-ERROR 15 Indicates printer error
113
25 14
Pin Configuration (Viewed from Rear Panel)
2.7.3 IEEE-488.2 Interface
The 7600 comes standard with IEEE-488 interface with connection through a connector
(24 pin) on the rear panel. This interface can be used to connect to a system containing a
number of instruments and a controller in which each meets IEEE Standard 488.2
(Standard Digital Interface for Programmable Instrumentation). Refer to Table 2-3 below
for a full tabulation of connections and Table 2-4 for the command set.
The following functions have been implemented. Refer to the standard for an
explanation of the function subsets, represented by the identifications below.
Operation 2-64
Page 85

SH1 Source Handshake PP1 Parallel Poll
AH1 Acceptor Handshake DC1 Device Clear
T5 Talker DT1 Device Trigger
L3 Listener C0 Controller
SR1 Service Request E2 Electrical Interface
RL1 Remote Local
Table 2-3
IEEE-488 Interface Connections
Signal Name Pin Number Function
DAV 6 Low state: "Data is Available" and valid on DI01
through DI08
NRFD 7 Low state: At least one listener on the bus is "Not
ready for Data".
NDAC 8 Low state: At least one listener on the bus is "Not
Accepting Data".
ATN 11 "Attention" specifies 1 of 2 uses for the DI01
through DI08 lines
Low state - Controller command messages
High state - Data bytes from the talker device
IFC 9 "Interface Clear"
Low state - Returns portions of interface system to
a known quiescent state.
SRQ 10 "Service Request"
Low state - a talker or listener signals (to the
controller) need for attention in the midst of the
current sequence of events
REN 17 "Remote Enable"
Low state - enables each device to enter remote
mode when addressed to listen
High state - all devices revert to local control
EOI 5 "End of Identify" if ATN is in high state, then low
state of EOI indicates end of a multiple-byte data
transfer sequence. If ATN is in low state, then
low state of EOI activates a parallel poll.
DI01 1 The 8-line data bus, which conveys interface
DI02 2 messages (ATN low state) or device-dependent
DI03 3 messages (ATN high state), such as remote-control
DI04 4 commands from the controller or from a talker
DI05 13 device
DI06 14
DI07 15
DI08 16
Operation 2-65
Page 86

Table 2-4
IEEE & RS-232 Commands
Command Function Parameter(s)
CONFigure:
FREQuency Set the frequency from 10 to 2000000 Hz 0000000.00
PPARameter Set the primary parameter A(auto) CS CP LS
LP RP RS DF Q Z Y
P(phase angle) ESR
GP XS BP
SPARameter Set the secondary parameter N(none) CS CP LS
LP RP RS DF Q Z Y
P(phase angle) ESR
GP XS BP
ACTYpe Set the AC test signal type to V I
This command should be set prior to setting the ACValue.
ACValue Set the AC signal to value 0.0
BIAS Set the bias to INT EXT or OFF
RANGe Set the range AUTO or HOLD or
#(1-59)
MACcuracy Set the measurement accuracy SLOw MEDium
FASt
TDELay Set the measurement delay #####
AVERage Set # to average ###
MEDian Set the median function to ON or OFF ON OFF
DISTortion Set distortion detection to ON or OFF ON OFF
CCHeck Set the contact check to ON or OFF ON OFF
DISPlay type Set display type to M (Measured
Parameter)
D (Deviation from
Nominal)
% (% Deviation from
Nominal)
B (Bin Number)
S (Bin Summary)
P (Pass/Fail)
N (No Display)
TRIGger Set the trigger to INTernal EXTernal
NOMinal Set the nominal value floating point #
(for deviation or % deviation)
Operation 2-66
Page 87

Table 2-4
IEEE & RS-232 Commands (continued)
Command Function Parameter(s)
CONFigure:
BINNing:
bin#
ABS* Set the low & high limit for the bin low high (floating
point #'s)
TOL Set the % below, % above and nominal % below % above
value nominal (3 floating
point #'s w/space
between)
SECondary Set the secondary low & high limit low high (floating
point #'s)
TRESet Reset the bin totals to zero
SUMMary? Retrieve the bin summary data
FRESult Set the result format to SCIentific
ENGineering
HANDler (state) Turn handler port OFF or ON ON OFF
RPRint Turn print results ON or OFF ON OFF
RFLoppy: Results to floppy
DUPLicate Save results as duplicate filename on floppy xxxxxxxx
NEW Save results as new filename on floppy xxxxxxxx
APPend Append results to existing filename xxxxxxxx
CLOSe Close results of filename xxxxxxxx
SWEep:
PARameter The parameter to sweep F (frequency)
V (voltage)
I (current)
BEGin The beginning value floating point number
END The ending value floating point number
STEP The step to increment during the sweep 10 25 50 100 200
RDISplay The result display for the sweep T (table) P (plot)
SWEep Set the sweep function to ON or OFF ON OFF
VALid? Is filename valid to save to battery backed xxxxxxxx
up RAM?
* Example CONF: BINN: BIN1: ABS 100 300
Operation 2-67
Page 88

Table 2-4
IEEE & RS-232 Commands (continued)
Command Function Parameter(s)
CONFigure:
SAVe:
DUPLicate Save setup as duplicate filename in battery
backed up RAM xxxxxxxx
NEW Save setup as new filename in battery
backed up RAM xxxxxxxx
RECall filename Recall setup filename from battery xxxxxxxx
backed up RAM
FVALid? Is filename valid to save to floppy? xxxxxxxx
FSAVe:
DUPLicate Save setup as duplicate filename on floppy xxxxxxxx
NEW Save setup as new filename on floppy xxxxxxxx
FRECall filename Recall setup filename from floppy drive xxxxxxxx
RVALid? Is results filename valid? xxxxxxxx
SEQuence:
SEQuence Set the sequence function to ON or OFF ON OFF
TEST Enable or Disable a test test #(1-6) and
ENAble DISable
FREQuency Set the frequency from 10 to 2000000 HZ test # and ######.##
PPARameter Set the primary parameter test # and A(auto) RS
RP LS LP CS CP DF
Q Z Y P(phase angle)
ESR GP XS BP
SPARameter Set the secondary parameter test # and N(none)
RS RP LS LP CS CP
DF Q Z Y
P(phase angle)ESR
GP XS BP
ACTYpe Set the AC test signal type to test # and V I
(This command should be set prior to setting the ACValue)
ACValue Set the AC signal to value test # and 0.0
BIAS Set the bias to test # and INT EXT
or OFF
RANGe Set the range test # and ON OFF
TDELay Set the measurement delay test # and ####
STOP Stop on fail test # and ON OFF
Operation 2-68
Page 89

Table 2-4
IEEE & RS-232 Commands (continued)
Command Function Parameter(s)
LOAd correction:
NOMinals Set primary & secondary nominal values primary secondary
(floating point #'s)
MEAsure Perform the Correction Measurement and
set Load Correction to On
ON Set Load Correction to ON (valid only if a
Correction Measurement has previously been made
OFF Set Load Correction to Off
SYSTem:
TIME Set the time to hours, minutes hh:mm
DATE Set the date to month, day, year mm/dd/yyyy
LOCKout state Set the front panel lockout off or on ON OFF
ELAPsed? Query the elapsed time the machine has run
DCALibration? Query the calibration date
BLCD Turn lcd backlite ON or set to screen save ON SAVE
Caution: Setting the remote LOCKout state with certain screens displayed on
the unit can prevent one from entering or exiting lockout.
CALibrate:
DATA? Returns the calibration data to the user
QUIckos Perform quick open calibration
IEEE wait for SRQ OPC to indicate continue
Send Any command if desired to implement
Send Fetch? This will continue calibration
Receive Connect the Open Circuit. Ensure that the
open is connected to the instrument
Send CONTINUE
Wait for SRQ OPC (operation complete, IEEE only)
Perform quick short calibration
Send Any command if desired to implement
Send Fetch? This will continue calibration
Receive Connect the Short Circuit. Ensure that the
short is connected to the instrument
Send CONTINUE
Receive Complete (for RS232 only)
Wait for SRQ OPC (operation complete, IEEE only)
Operation 2-69
Page 90

Table 2-4
IEEE & RS-232 Commands (continued)
Command Function Parameter(s)
SHORt Perform short circuit calibration
The procedure for performing a remote short is as follows:
IEEE wait for SRQ OPC to indicate continue
Send Any command if desired to implement
Send Fetch? This will continue calibration
Receive Connect the Short Circuit. Ensure that the
short is connected to the instrument
Send CONTINUE
Receive Complete (for RS232 only)
Wait for SRQ OPC (operation complete, IEEE only)
OPEN Perform open circuit calibration
The procedure for performing a remote open is as follows:
IEEE wait for SRQ OPC to indicate continue
Send Any command if desired to implement
Send Fetch? This will continue calibration
Receive Connect the Open Circuit. Ensure that the
open is connected to the instrument
Send CONTINUE
Receive Complete (for RS232 only)
Wait for SRQ OPC (operation complete, IEEE only)
FULL Perform full calibration
The procedure for performing full calibration is as follows:
IEEE wait for SRQ OPC to indicate continue
Send Any command if desired to implement
Send Fetch? This will continue calibration
Receive Connect the 374 Ω Standard. Ensure that
the standard is connected to the instrument
Send CONTINUE
IEEE wait for SRQ OPC to indicate gain cal is done
Send Any command if desired to implement
Send Fetch? This will continue calibration
Receive Connect the open circuit. Ensure that
the open is connected to the instrument
Send CONTINUE
Operation 2-70
Page 91

IEEE & RS-232 Commands (continued)
Command Function Parameter(s)
Table 2-4
IEEE wait for SRQ OPC to indicate open circuit cal is done
Send Any command if desired to implement
Send Fetch? This will continue calibration
Receive Connect the short circuit. Ensure that
the standard is connected to the instrument
Send CONTINUE
IEEE wait for SRQ OPC to indicate short circuit cal is done
Send Any command if desired to implement
Send Fetch? This will continue calibration
for the next 4 standards
Receive Connect the standard. Ensure that
the standard is connected to the instrument
Send CONTINUE
Send Any command if desired to implement
Send Fetch? This will continue calibration
Receive Get prompt for Rnom and Qnom values at
1 kHz
IEEE wait for SRQ OPC to indicate current standard cal is done
Send Any command if desired to implement
Send Fetch?
Receive Get prompt for Rnom and Qnom values at
1 MHz or 50 kHz
IEEE wait for SRQ OPC to indicate range cal is done
Send Any command if desired to implement
Send Fetch?
after last standard
IEEE wait for SRQ OPC
RS232 wait for Complete
MEASure
Triggers a measurement of the selected type. If sequence or sweep is enabled this
command will trigger those type of measurements also. The result type is set by the
display type parameter.
Operation 2-71
Page 92

Table 2-4
IEEE & RS-232 Commands (continued)
Command Function Parameter(s)
FETCh?
Fetches the most recent measurement results. The character sequence formats are as
follows:
Normal Measurements:
<primary result name> <tab> <primary result> <tab> <units> <secondary result name>
<secondary result> <tab> <units> <tab> <bin or tab> <tab> <#> <tab> <pass string or
fail string or tab> <tab> <retest or tab> terminated by a linefeed.
The secondary parameter will be blank when the parameter is set to NONE.
Sweep Measurement:
If sweep is enabled, fetch will give all of the results based on the number of steps
selected with the normal measurement format.
FETCh?
Sequence Measurement:
If sequence is enabled, results will be sent for each test enabled.
1st line: <pass/fail bin> <tab> <#>,
additional lines for tests enabled: <test> <tab> <#> <tab> <primary result> <tab>
<units> <tab> <secondary results> <tab> <units> <tab> <fail or tab>,
.
.
last line for tests enabled: <test> <tab> <#> <tab> <primary result> <tab> <units> <tab>
<secondary results> <tab> <units> <tab> <fail or tab> terminated by a linefeed.
Bin Summary Measurement:
Bins 1 - 10
<bin> <tab> <#> <tab> <low limit> <tab> <# or tab> <tab> <high limit> <tab> <# or
tab> <tab> <total> <tab> <#> terminated by a linefeed.
Bins 11 - 15
<bin> <tab> <#> <tab> <bin description> <tab> <total> <tab> <#> terminated by a
linefeed.
Last Line
<totals:> <tab> <pass> <tab> <#> <tab> <fail> <tab> <#> <tab> <#> <tab> <total>
terminated by a linefeed.
Operation 2-72
Page 93

Table 2-4
IEEE & RS-232 Commands (continued)
Command Function Parameter(s)
LOADFEtch?
Returns load correction status Valid, measured primary & secondary values
or
Invalid
IDN?
Returns instrument identification "QuadTech,7600modelb,xx...xx,software version".
ESR? x denotes serial number up to 10 digits
Returns the read of the event status register.
STB?
Returns the read of the status byte register.
ESE?
Returns the read of the event status enable register.
SRE?
Returns the read of the service request enable register.
ESE
Set the event status enable register. value
SRE
Set the service request enable register. value
RST
Reset the buffer
TST?
Self test query
CLS
Clear standard event status register
Note: Any remote command can start with * symbol for IEEE 488.2 compatibility.
Operation 2-73
Page 94

2.7.3.1 Formats
IEEE 488.2 enable remote programming of all instrument functions, measurement
conditions and comparator settings etc. Outputs include measurement conditions,
open/short corrections, and measured values.
Data Formats
Data will be transmitted in ASCII NR3 format per IEEE488.2 sec. 8.7.4 and reproduced
below. Note that there is always precisely one digit before the decimal point, and
precisely three digits in the exponent.
Multiple results
For the case where a measurement produces multiple results (e.g. MEASure Cs, and DF),
the individual numbers will be separated by commas per IEEE488.2 para. 8.4.2.2.
Sequences of Test (Sequence Mode) will be treated as a single Message Unit, with results
separated by commas. If a particular test has “None” selected as a secondary parameter,
no place will be reserved for the null result. As an example, a sequence of three tests
asking for C/D, ESR, and Z/φ would appear as follows:
<data>
,<data>,<data>,<data>,<data><NL>
All response messages will be terminated by the NL character together with the EOI line
asserted.
Status Byte Register
Decimal
Bit
Value Use
7 128 None
6 64 SRQ, SPOL Resets
5 32 Summary of Standard Event
Status Register*
4 16 Message Available
3 8 None
2 4 None
1 2 None
0 1 None
Operation 2-74
Page 95

*The Status Byte Regester is readable via the standard STB? as defined in para. 11.2.2.2
of the IEEE spec. The 7600 will also implement an SRE register to enable each bit of the
Status Byte Register per para 11.3.2 of the IEEE spec. This register shall be readable by
a SRE? command and writeable by a SRE <#> command.
Standard Event Status Register
Decimal
Bit
Value Use
7 128 Power Up Since Last Query
6 64 None
5 32 Command Error (Syntax)
4 16 Execution Error (Over Range, etc.)
3 8 No Contact
2 4 Query Error
1 2 None
0 1 Operation Complete
This register is read by executing an “ESR?” command per para. 11.5.1.2.2 (except no *).
Note that this is a destructive read. Reading the register clears it. Each bit of the Event
register must be enabled in order to cause the ESB bit of the Status Register to be set.
This enabling is done in the Standard Event Status Enable Register by issuing an ESE
command per para 11.5.1.3.
Operation 2-75
Page 96

2.7.3.2 Sample Program for National Instruments GPIB card
260 '*SAMPLE 7600 BASIC PROGRAM FOR NATIONAL INSTRUMENTS IEEE **
' Merge National DECL.BAS here
270 ADAP$="GPIB0" : DEV4$="Dev4": R$ = SPACE$(60)
280 CALL IBFIND (DEV4$,DEV4%)
290 CLS '***** SET CONDITIONS, MEASURE, AND DISPLAY DATA
************
300 SET$="CONF:REC DEFAULT" : CALL IBWRT (DEV4%,SET$)
310 SET$="CONF:FREQ 1000.00" : CALL IBWRT (DEV4%,SET$)
320 SET$="CONF:PPAR CS" : CALL IBWRT (DEV4%,SET$)
330 SET$="CONF:SPAR DF" : CALL IBWRT (DEV4%,SET$)
340 SET$="CONF:MAC ENH" : CALL IBWRT (DEV4%,SET$)
350 SET$="CONF:NOM 0" : CALL IBWRT (DEV4%,SET$)
360 SET$="CONF:DISP M" : CALL IBWRT (DEV4%,SET$)
370 SET$="MEAS:" : CALL IBWRT (DEV4%,SET$)
380 FOR I = 1 TO 5000 : NEXT I
390 SET$="FETC?" : CALL IBWRT (DEV4%,SET$)
400 CALL IBRD (DEV4%,R$) : PRINT R$
410 CALL IBLOC (DEV4%)
420 END
Operation 2-76
Page 97

2.7.4 RS232 Interface
The 7600 comes standard with an RS232 serial port interface, available through a
connector (9 pin) on the rear panel of the instrument, for connecting to a PC. The RS232
standard defines electrical specifications for the transmission of bit serial information.
The use of the RS232 port requires five lines, receive data, transmit data, data terminal
ready, data set ready and signal ground. With some controllers additional signals maybe
required and are listed in Table 2-5 below. Refer to Figure 2-51 for null modem cable
configuration to the standard db9 or db25 connector. Refer to Table 2-4 for the
command set which also applies to the RS232 interface.
Table 2-5
RS232 Interface Connections
Signal Name Pin Number Function
Inputs:
DCD 1 Data Carrier Detect
DSR 6 Data Set Ready
RXD 2 Receive Data
CTS 8 Clear to Send
RI 9 Ring Indicator
Outputs:
RTS 7 Request to Send
TXD 3 Transmit Data
DTR 4 Data Terminal Ready
GND 5 Signal Ground
Operation 2-77
Page 98

7600 Controller
Pin # Function Pin # Function
2
3
4
5
6
Receive data
Transmit data
Data terminal ready
Signal ground
Data set ready
Connect
to
3
2
6
5
4
Transmit data
Receive data
Data set ready
Signal ground
Data terminal ready
db9 to db9 Cable Configuration
7600 Controller
Pin # Function Pin # Function
2
3
4
5
6
Receive data
Transmit data
Data terminal ready
Signal ground
Data set ready
Connect
to
2
3
6
7
20
Transmit data
Receive data
Data set ready
Signal ground
Data terminal ready
db9 to db25 Cable Configuration
Figure 2-51
RS-232 Cable Configurations
2.7.5 Results to Printer
The 7600 can be setup to output to an RS-232 or IEEE printer. Results format is the
same as results to floppy, refer to paragraph 2.6.3.8.
RS-232 RS-232 must be selected on I/O Menus and format set IEEE must also
be selected for Talk mode and Disable state.
IEEE IEEE must be selected on I/O Menus and set for Address, Talk mode
and Enable state.
Operation 2-78
Page 99

2.8 Operation with Accessories
2.8.1 General
A wide selection of accessories such as test leads, cables and fixtures are available from
QuadTech to enhance the operation of the 7600 Precision LCR Meter. A full list of
accessories is given in paragraph 1.5 of this instruction manual and each is discussed in
more detail below. Some accessories may include information and or installation
instructions that are not repeated here.
NOTE:
Instrument accuracy can be reduced from nominal specifications when using some 7000
accessory fixtures and cables. Best accuracy requires geometric consistency between that
utilized during open/short zeroing and that utilized on fixtures and cables during the actual
measurement process. This consistency may be especially difficult to achieve when using
unshielded Kelvin clip and tweezer type connections.
2.8.2 Rack Mount Kit (7000-00)
The 7000-00 Rack Mount Kit is used to install the 7600 in a rack mount configuration.
The main components of the kit include front handles, front angle brackets, rear vertical
trim pieces and rear support brackets. Assembly instructions (QuadTech Form # 150077)
are provided with the kit.
2.8.3 BNC Cable Set, 1 Meter (7000-01), 2 Meter (7000-02)
The 7000-01 and 7000-02 are BNC to BNC cable sets used for connecting fixtures,
component handlers or other measurement devices to the measurement terminals of the
7600. The only difference between the two is that the 7000-01 cable is 1 meter in length
and the 7000-02 is 2 meters in length.
Rd/Wh
Rd/Wh
PH
Rd
Bk/Wh
PL
Bk
IL
Figure 2-52: BNC Cable Sets
PH
Rd
IHIH
Bk/Wh
PL
Bk
IL
Operation 2-79
Page 100

Connection to 7600:
Connect to 7600
Cable Marking/Color Connection to DUT
PH (potential, high) PH (Red/white) Positive (+) terminal of DUT
IH (current, high) IH (Red) Positive (+) terminal of DUT
PL (potential, low PL (Black/white) Negative (-) terminal of DUT
IL (current , low) IL (Black) Negative (-) terminal of DUT
Note: H and L denote polarity of AC test signal at 7600 measurement terminals as well
as the + and - polarity of DC bias voltage when applied.
2.8.4 Kelvin Clip Leads (7000-03)
The 7000-03 Kelvin Clip Leads provide a means for easily making four-terminal
connections to passive components when they are tested by the 7600. This cable is
especially useful for testing low-impedance devices that have large or non-standard
terminations, devices such as electrolytic capacitors and inductors.
Rd/Wh
PH
Rd/Wh
PH
+
Rd
IH
Bk/Wh
PL
Bk
IL
Rd
IH
Bk/Wh
PL
Bk
IL
+ and - denote polarity
of DC bias voltage
Figure 2-53
Kelvin Clip Leads
For this accessory an additional accuracy (for parameters listed) must be added to the
standard instrument accuracy as defined by AutoAcc.
C: +/- 1.5 pF R: +/- 10 mohms L: +/- 100 nH
-6
-12
ppm
ppm
Q: for R > 100 ohms, +/- 9 * Freq * R * 10
for R < 100 ohms, +/-(R/Freq) * 10
Measurement accuracy is very sensitive to connection geometry. The same connection
geometry must be used for open/short compensation as for connection to the device under
test.
-
Operation 2-80
 Loading...