

Page 1
1865 Megohmmeter/IR Tester
Instruction Manual
Form 150073/D4
QuadTech, Inc., 1992
5 Clock Tower Place, 210 East
Maynard, Massachusetts, U.S.A. 01754
September, 2003
Telephone 978-461-2100
Sales 800-253-1230
Facsimile 978-461-4295
Website www.quadtech.com
The material in this manual is for informational purposes only and is subject to change, without
notice. QuadTech assumes no responsibility for any error or for consequential damages that may
result from the misinterpretation of any procedures in this publication.
WARNING
Potentially dangerous voltages may be present on front and rear panel terminals. Follow all
warnings in this manual when operating or servicing this instrument. Dangerous energy levels
may be stored in capacitors tested by this unit. Always make sure the high voltage indicator is
not on when connecting or disconnecting the unknown.
!
Product will be marked with this symbol (ISO#3684) when it is necessary for the user to
refer to the instruction manual in order to prevent injury or equipment damage.
Product marked with this symbol (IEC417) indicates presence of direct current.
Product will be marked with this symbol (ISO#3684) when voltages in excess of 1000V
are present.
Page 2

Page 2 of 87
Page 3

Contents
Warranty ............................................................................................................7
Specifications ............................................................................................................9
Accessories ............................................................................................................11
Safety Precautions ...................................................................................................13
Condensed Operating Instructions ........................................................................15
Introduction - Section 1
1.1 Unpacking and Inspection..............................................................................21
1.2 Product Overview ..........................................................................................21
1.3 Controls and Indicators..................................................................................22
1.3.1 Front Panel Controls and Indicators ..................................................22
1.3.2 Rear Panel Controls and Connectors ................................................24
1.4 Installation......................................................................................................25
1.4.1 Dimensions ........................................................................................25
1.4.2 Instrument Positioning.......................................................................25
1.4.3 Power Requirements..........................................................................25
1.4.4 Safety Inspection................................................................................27
Operation - Section 2
2.1 Terms and Conventions .................................................................................29
2.2 Startup ............................................................................................................29
2.3 Zeroing...........................................................................................................30
2.4 Connection to Device Under Test..................................................................30
2.5 Measurement Procedure.................................................................................32
2.5.1 General...............................................................................................32
2.5.2 Default Measurement Conditions......................................................33
2.5.3 Automatic Measurement Mode..........................................................34
2.5.4 Manual Measurement Mode ..............................................................36
2.6 Menu Functions .............................................................................................36
2.6.1 General...............................................................................................36
2.6.2 Setup Menu........................................................................................37
2.6.2.1 Voltage..................................................................................37
2.6.2.2 Charge Time..........................................................................38
2.6.2.3 Dwell Time ...........................................................................38
2.6.2.4 Measure Time .......................................................................38
2.6.2.5 Discharge Time.....................................................................39
2.6.2.6 Mode.....................................................................................39
2.6.2.7 Range ....................................................................................40
2.6.2.8 Limit......................................................................................43
2.6.2.9 Stop on Pass..........................................................................44
2.6.2.10 # to Average........................................................................44
Page 3 of 87
Page 4

Contents (Continued)
Operation - Section 2 (Continued)
2.6.3 I/O Menu............................................................................................45
2.6.3.1 Display Type.........................................................................45
2.6.3.2 Result Format........................................................................46
2.6.3.3 RS-232 ..................................................................................47
2.6.3.4 IEEE-488...............................................................................48
2.6.3.5 Handler..................................................................................48
2.6.3.6 Results to Floppy ..................................................................48
2.6.4 Utilities Menu ....................................................................................50
2.6.4.1 Save Setup.............................................................................51
2.6.4.2 Recall Setup..........................................................................53
2.6.4.3 Zero.......................................................................................54
2.6.4.4 Lock Out ...............................................................................55
2.6.4.5 Calibration.............................................................................55
2.6.4.6 Set Time/Date .......................................................................56
2.6.4.7 Elapsed Time ........................................................................57
2.6.4.8 Calibration Date....................................................................57
2.6.4.9 Set Contrast...........................................................................58
2.6.4.10 LCD Backlite......................................................................58
2.7 Input/Output Interface....................................................................................58
2.7.1 I/O Interface.......................................................................................58
2.7.2 IEEE-488 Interface.............................................................................60
2.7.3 Sample Program for National Instruments GPIB Card......................65
2.7.4 Sample Program for IO Tech GPIB Card ..........................................66
2.7.5 RS232 Interface..................................................................................67
2.7.6 Sample Program for RS232...............................................................68
2.7.7 Results to Printer................................................................................69
2.8 Error Messages...............................................................................................70
Applications - Section 3
3.1 Insulation Resistance Testing.........................................................................73
3.2 Test Sample Resistivity Measurements.........................................................74
3.3 Capacitor Insulation Resistance.....................................................................74
3.3.1 General...............................................................................................74
3.3.2 Charge Time Constant .......................................................................75
3.3.3 Discharge Time..................................................................................76
3.4 Resistance Measurements..............................................................................76
3.5 Measurement of Voltage Coefficient.............................................................76
3.6 Guarded, 3 Terminal Measurements..............................................................77
Page 4 of 87
Page 5

Contents (Continued)
Theory Section 4
4.1 General...........................................................................................................79
4.2 Instrument Description...................................................................................79
4.2.1 Basic I2000 Instrument Architecture .................................................79
4.2.2 1865 Instrument Modules..................................................................80
4.2.3 I2000 Instrument Options..................................................................81
Maintenance/Calibration - Section 5
5.1 General...........................................................................................................83
5.2 Instrument Return ..........................................................................................83
5.3 Routine Maintenance.....................................................................................83
5.3.1 Battery Replacement..........................................................................84
5.3.2 Resetting of Time and Date ...............................................................85
5.3.3 Loss of Display Contrast....................................................................85
5.3.4 Preventive Maintenance/Cleaning .....................................................86
5.4 Calibration......................................................................................................86
5.4.1 General...............................................................................................86
5.4.2 Calibration Procedure ........................................................................86
Page 5 of 87
Page 6

Page 6 of 87
Page 7
Warranty
echuad
!
QuadTech warrants that Products are free from defects in material and workmanship and,
when properly used, will perform in accordance with QuadTech's applicable published
specifications. If within one (1) year after original shipment it is found not to meet this
standard, it will be repaired, or at the option of QuadTech, replaced at no charge when
returned to a QuadTech service facility.
Changes in the Product not approved by QuadTech shall void this warranty.
QuadTech shall not be liable for any indirect, special or consequential damages,
even if notice has been given of the possibility of such damages.
This warranty is in lieu of all other warranties, expressed or implied, including, but
not limited to any implied warranty or merchantability or fitness for a particular
purpose.
SERVICE POLICY
QuadTech’s service policy is to maintain product repair capability for a period of at least
five (5) years after original shipment and to make this capability available at the then
prevailing schedule of charges.
Page 7 of 87
Page 8

Page 8 of 87
Page 9

Specifications
Resistance Range: 1 x10³ to > 1x10¹⁴ Ω(dependent on test voltage)
1x10⁶ - >1x10
1x10⁵ - 1x10¹³ Ω at 100VDC
1x10⁴ - 1x10¹² Ω at 10VDC
1x10³ - 1x10¹¹ Ω at 1VDC
(7 ranges or auto ranging)
Resistance Accuracy:* ±[0.45% +{(Rx/Vx)(0.0005 FS + 2pA) + 30Ω/Rx}100%]
Rx: Measured resistance in ohms
Vx: Programmed voltage in volts
FS: Full scale current range in amperes
Voltage Range: 1 to 1000, Volts programmable in two ranges
Voltage Accuracy:* 1 - 100V: 1% of setting +1V
25mV resolution
100 - 1000V: 1% of setting +2V
250mV resolution
Output Voltage
Impedance: 1 kΩ ± 5%
Current Limited: < 2mA
Current Measure: 1x10
-13
Current Accuracy:* 1nA to 1mA: ±[0.5% + (0.0005FS + 2pA)]
100pA to 1nA: ±[1% + (0.0005FS + 2pA)]
1pA to 100pA: ±[10% + (0.0005FS + 2pA)]
Input Impedance: 5 kΩ ± 5%
Measure Limits: Pass/Fail (1 limit)
Display: LCD graphic display
Voltage warning indicator
Pass/Fail indicator
* specified at front panel connectors
14 Ω
to 1x10
at 1000VDC
-3
amps
Page 9 of 87
Page 10

Specifications (Continued)
Test Cycle: Manual: Charge, Measure, Discharge
Automatic: Charge time: 0 -300 sec Dwell time: 0 - 300 sec Measure time: 0 - 300 sec (0 – 999 on later units) Discharge time: 0 - 300 sec
I/O Interface: Standard -RS232
I/O Port (w/safety interlock)
Optional -1865-01 - IEEE-488, factory installed at unit purchase
1865-02 - Floppy Drive, 3.5", factory installed only
1865-03 - Rear panel input terminals, factory installed at purchase
1865-70 - IEEE-488, field retrofit
Input Terminals: Four sheathed banana plugs, front or rear mount (optional)
+ unknown (red) - unknown (black)
guard (blue) ground (green)
Dimensions: Bench with tilt back bail
(133.4mm high x 444.5mm wide x 406.4mm deep)
(5 1/4" x 17 1/2" x 16")
Weight: Approximately 8.2 kg (18 lbs) - Net
Approximately 11.8 kg (26 lbs) - Shipping
Environmental: MIL-T-28800D, Type 3, Class 5, Style E & F
Operating: 0°C to 50°C, stated accuracy <45% RH
Storage: -40°C to 71°C
Altitude: <2000m, Installation Category 1, Pollution Degree 1
Power: • 90 - 250V • 47 - 63Hz • 40W max
General: • Fully programmable via menu
• Zeroing
• Stored test conditions and results
• Selected measurement units (engineering or scientific)
Accessories • Instruction Manual • AC Power Cable
Supplied: • Calibration Certificate • 1 MΩ and 100 kΩ Capacitor Adapters
• Interlock Connector
Accessories • 1865-50 Rack Mount Kit • 1865-51 Shielded Lead Set
Available: • 1865-52 Component Test Fixture
Page 10 of 87
Page 11

Accessories
Accessories Included
Item Quantity QuadTech P/N
U.S. AC Power Cable (3-prong) 1 4200-0300
T2.5A 250V 5X20mm Line Fuse 1 520049
1MΩ Capacitor Adaptor 1 800015
100kΩ Capacitor Adaptor 1 800014
Interlock Connector 1 630019
Instruction Manual 1 150073
Calibration Certificate 1 N/A
Accessories/Options Available
Item Quantity QuadTech P/N
IEEE-488 Interface (factory installed) 1 1865-01
3.5” Floppy Drive Option (factory installed) 1 1865-02
Rear Panel Input Option (factory installed) 1 1865-03
Rack Mount Kit 1 1865-50
Shielded Lead Set 1 1865-51
Component Test Fixture 1 1865-52
IEEE-488 Interface (Field Retro-Fit Option) 1 1865-70
Page 11 of 87
Page 12

Page 12 of 87
Page 13

Safety Precautions
The 1865 Megohmmeter/IR Tester can provide an output voltage as high as 1000VDC to the external
device under test (DUT).
Although the 1865 unit is designed with full attention to operator safety, serious hazards could occur
if the instrument is used improperly and these safety instructions are not followed.
1. The 1865 unit is designed to be operated with its chassis connected to earth
ground. The 1865 instrument is shipped with a three-prong power cord to provide
this connection to ground. The power cord should only be plugged in to a
receptacle that provides earth ground. Serious injury can result if the Sentry unit
is not connected to earth ground.
2. Tightly connect cable(s) to the (green) GND terminal. If this is not done, the
DUT’s casing can be charged to the high voltage test level and serious injury or
electrical shock hazards could result if the DUT is touched.
3. Never touch the metal of the High Voltage probe directly. Touch only the
insulated parts of the lead(s).
4. Never touch the test leads, test fixture or DUT in any manner (this includes
insulation on all wires and clips) when the high voltage is applied and the red
CAUTION HIGH VOLTAGE LED is lit.
5. Before turning on the 1865 unit, make sure the AC power cord is plugged into
the proper voltage source and that there is no device (DUT) or fixture connected
to the test leads.
6. After each test, press the [STOP] (red) button for safety. This terminates the high
voltage being applied to the output terminals.
7. When the CAUTION HIGH VOLTAGE LED is lit NEVER touch the device
under test, the lead wires or the output terminals.
8. Before touching the test lead wires or output terminals make sure:
a) The red [STOP] button has been pressed.
b) The CAUTION HIGH VOLTAGE LED is OFF.
c) The output voltage display is 0 (zero).
9. In the case of an emergency, turn OFF the [POWER] switch using a“hot stick”
and disconnect the AC power cord from the wall. DO NOT TOUCH THE 1865
INSTRUMENT.
10. If the CAUTION HIGH VOLTAGE LED does not go off when the [STOP]
button is pressed, immediately stop using the tester. It is possible that the output
voltage is still being delivered regardless of the TEST ON/OFF control signal.
11. When the 1865 instrument is used in remote control mode, be extremely careful.
The High Voltage Output is being turned on and off with an external signal.
Page 13 of 87
Page 14

Page 14 of 87
Page 15

Condensed Operating Instructions
WARNING
High voltage is applied to the measurement terminals of the 1865 any time the
CAUTION HIGH VOLTAGE LED is ON. While the current from the instrument is
limited, the energy stored in a capacitive device connected to the terminals may be lethal.
Always make sure the high voltage indicator is OFF when connecting or disconnecting
the unknown. A flashing CAUTION HIGH VOLTAGE light and/or DANGER on the
display indicates a defective unit with dangerously high voltages possible at the input
terminals. Power the unit down and do not use.
General Information
The 1865 Megohmmeter/IR Tester is a computer controlled measuring instrument for
direct readout of resistance and current. The voltage applied to the device under test
(DUT) is programmable from 1 to 1000 volts. A pass/fail indicator provides a visual
display of test results based on a preset limit. A set of power-up default test conditions
are stored in the unit and are as set by the factory (1V, test times zero) until
reprogrammed by the user.
Start-up
The 1865 can be operated from a power source between 90V and 250V AC at a power
line frequency of 47 to 63 Hz. The standard 1865 is shipped from the factory with a 2.5A
fuse in place for 115V or 220V operation. To change the fuse refer to paragraph 1.4.3.
Connect the instrument power cord to the source of proper voltage.
IMPORTANT
The interlock connector (included with the unit) needs to be installed on the rear
panel I/O Port connector if the interlock function is not being used. When the
3.5" Floppy Drive Option is present ALWAYS MAKE SURE NO DISKS ARE
INSTALLED WHEN THE UNIT IS POWERED UP, otherwise information stored
on the disks could be lost.
Press the [POWER] button on the front panel to apply power. To switch power off press
the [POWER] but ton again or if measurements are to be made proceed with Zeroing the
instrument, discussed in the next paragraph.
Page 15 of 87
Page 16

Condensed Operating Instructions
Zeroing
Before measuring, zero out test lead or fixture measurement errors as follows.
1. If test leads are to be used connect them to the 1865 input terminals, red to +
unknown, black to - unknown, with probes open and spaced some distance apart (or
fixture open).
2. Press [MENU] key to select menu display.
3. Press Right or Left Arrow key to select Utilities menu.
4. Press Up or Down Arrow key to select Zero in the sub menu.
5. Press [ENTER] key to activate the Zero routine and follow instructions on the
instrument display.
Auto Measurement Mode
In automatic mode, once the [START] button is depressed the instrument sequences
automatically through the test cycle phases, charge, dwell, measure and discharge and a
pre-stored set of test conditions are executed. These test conditions can be DEFAULT
(those at power up), set using menus or the operator can recall a previously stored setup.
1. Connect the device under test to the 1865 test leads or other fixture being used.
2. If the desired setup conditions are anything other than DEFAULT, set using menus
or proceed to Recalling Setups below before continuing with step 3.
3. Initiate the auto measurement mode by pressing [START]. The High Voltage
Indicator will remain on as the unit sequences automatically through all four phases
(charge, dwell, measure, discharge) of the test cycle.
4. The measurement can be aborted at any time during the test cycle by pressing
[STOP].
5. Once the High Voltage Indicator goes off the measurement is complete, the final
result remains displayed and the device can be removed.
Page 16 of 87
Page 17

Condensed Operating Instructions
Manual Measurement Mode
In manual measurement mode each phase of a test cycle, charge, measure and discharge is
initiated manually at the users discretion. These test conditions can be DEFAULT (those
at power up), set using menus or the operator can recall a previously stored setup.
1. Connect the device under test to the 1865 test leads or other fixture being used.
2. Press [MENU] key to select menu display.
3. Press Right or Left Arrow key to select Setup menu.
4. Press Up or Down Arrow key to select Mode in the sub menu.
5. Press [ENTER] to activate the selection field.
6. Press Right or Left Arrow key to select Manual and press [ENTER].
7. If the desired setup conditions are anything other than DEFAULT, set using menus
or proceed to Recalling Setups below before continuing with step 8. (Setup
measurement times are ignored in manual mode).
8. Initiate the charge phase by pressing [START] to apply high voltage to the
device. The High Voltage Indicator will remain on as long as a voltage is applied.
The measurement can be aborted at any time during the test cycle by pressing
[STOP].
9. Initiate a single measurement by pressing [START] again, The measured result
will be displayed on the LCD and will be updated each time [START] is pressed.
10. To discharge the device press [STOP].
11. Before removing the device press [STOP] again to end the discharge phase and turn
the High Voltage Indicator off.
Recalling Setups
1. To recall a set of test conditions previously stored:
Press [MENU] key to select menu display.
Press Right or Left Arrow key to select Utilities menu.
Press Up or Down Arrow key to select Recall Setup.
Press [ENTER] key to activate the recall entry field.
Press Up or Down Arrow key to select the desired setup. choices are:
- DEFAULT, if conditions are power up which can be changed by the
user.
- FLOPPY, if setup is to be recalled from the optional floppy drive.
- Setup Name stored in the instrument internal memory or floppy.
Once the desired setup is located press [ENTER] key to finalize recall of the
setup conditions.
Page 17 of 87
Page 18

Condensed Operating Instructions
Saving Setups
1. To save the current set of test conditions as entered (conditions include, voltage, test
times, measurement range, limit, and display modes):
Press [MENU] key to select menu display.
Press Right or Left Arrow key to select Utilities menu.
Press Up or Down Arrow key to select Save Setup.
Press [ENTER] key to activate setup entry field.
Press UP or Down Arrow key to select the desired setup, choices are:
- NEW, if a setup is to be saved in instruments internal memory.
- DEFAULT, if conditions at power up are to be changed and restored.
- FLOPPY, if a new setup is to be stored or existing one changed on the
floppy.
- Setup Name if an existing set of conditions are to be changed in the
instrument internal memory or floppy.
Press [ENTER] key to activate the Save entry field selected above.
If NEW is selected (internal memory or floppy) enter the desired identifying
name, up to 8 characters, under which these set of test conditions will be
stored.
Press [ENTER] key to finalize storage of the setup conditions or if DEFAULT
is selected one must answer Y or N to overwrite.
Changing Test Voltage
1. Set the desired test voltage:
Press [MENU] key to select menu display.
Press Right or Left Arrow key to select Setup menu.
Press Up or Down Arrow key to select Voltage.
Press [ENTER] key to activate the voltage entry field.
Enter desired test voltage (up to 5 digits with decimal) between 1 and 1000V.
Press [ENTER] key to finalize the voltage entry.
Changing Measurement Times
1. To set the desired measurement cycle times, charge, dwell, measure and discharge:
Press [MENU] key to select menu display.
Press Right or Left Arrow key to select Setup Menu.
Press Up or Down Arrow key to select desired time: charge, dwell, measure or
discharge.
Press [ENTER] key to activate the corresponding time entry field.
Enter the desired time between 0 and 300 seconds(measure, 0 – 999 on later units)
Press [ENTER] key to finalize the time entry.
2. Continue to set the other times as desired by repeating step 1.
Page 18 of 87
Page 19

Condensed Operating Instructions
Setting Pass/Fail Limit
1. To enter a single measurement limit for resistance or current (depending on results
display selected):
Press [MENU] key to select menu display.
Press Right or Left Arrow to select Setup menu.
Press Up or Down Arrow key to select Limit in sub menu.
Press [ENTER] key to activate the limit entry field.
Enter the numerical value (up to 4 digits plus decimal point) of the limit
desired, then enter the exponential value after first pressing the e select key
(use minus exponential value for current).
Press [ENTER] key to finalize the limit entry.
Changing Display Type and Units
1. To change displayed measurement results between Resistance, Current or Pass/Fail:
Press [MENU] key to select menu display.
Press Right or Left Arrow key to select I/O Menu.
Press Up or Down Arrow key to select Display.
Press [ENTER] key to activate the selection field.
Press Up or Down Arrow key to select desired measurement results,
Resistance, Current or Pass/Fail if a limit is to be used.
Press [ENTER] key to finalize the entry.
2. To change the measurement results format between Scientific or Engineering units:
Press [MENU] key to select menu display.
Press Right or Left Arrow key to select I/O Menu.
Press Up or Down Arrow key to select Result Format.
Press [ENTER] key to activate the selection field.
Press Right or Left Arrow to select desired results format, Sci for Scientific or
Eng for Engineering.
Press [ENTER] key to finalize the entry.
Page 19 of 87
Page 20

Page 21

Section 1: Introduction
WARNING
High voltage is applied to the measurement terminals of the 1865 anytime the CAUTION HIGH
VOLTAGE LED is ON. While the current from the instrument is limited to a value that is not dangerous
under most conditions, the energy stored in a capacitor connected to the terminals may be lethal. Always
make sure the CAUTION HIGH VOLTAGE LED is OFF when connect i ng or disconnecting the
unknown.
1.1 Unpacking and Inspection
Inspect the shipping carton before opening. If the carton is damaged, contact the carrier
agent immediately. Inspect the 1865 instrument for any damage. If the instrument
appears damaged or fails to meet specifications notify QuadTech (refer to instruction
manual front cover) or its local representative. Retain the shipping carton and packing
materials for future use such as returning for recalibration or service.
1.2 Product Overview
The 1865 Megohmmeter/IR Tester is a general purpose high voltage instrument for
resistance measurements on insulating materials and components. It is designed for easy,
accurate and direct readings of high resistance typically found in synthetic resins,
porcelains, insulating oils, plastics and other similar materials. It is also used for
measurements on capacitors, transformers, switches, cables and connectors. The 1865
provides a direct readout of resistance from 1000Ω to 1000TΩ with fully automatic
ranging. The voltage applied to the unknown is programmable from 1V to 1000V.
The 1865 includes a high resolution graphics display and keypad for ease of use. The test
cycle is fully automatic with programmable charge, dwell, measure and discharge times.
These times, along with other test conditions can be stored in instrument memory and
recalled for later use. A pass/fail indicator provides the operator with a visual indication
based on a preset resistance limit. The unit also contains automatic zeroing at the test
leads as well as built-in self-test routines. Safety features include current limiting to less
than 2mA and a front panel indication when voltage is applied to the test terminals, thus
permitting connections to be made safely.
The 1865 comes standard with I/O Port (handler) and RS232 interface. An IEEE-488
interface is optional for communication with other instrumentation and remote control
operation. A 3 1/2" floppy drive option is also available for storing test conditions and
results. There is a direct reading current measurement mode from 1mA to 1pA.
The unit is available with front or rear panel input connections with guard and ground
terminals to permit measurements of grounded or ungrounded devices.
Introduction Page 21 of 87
Page 22
1.3 Controls and Indicators
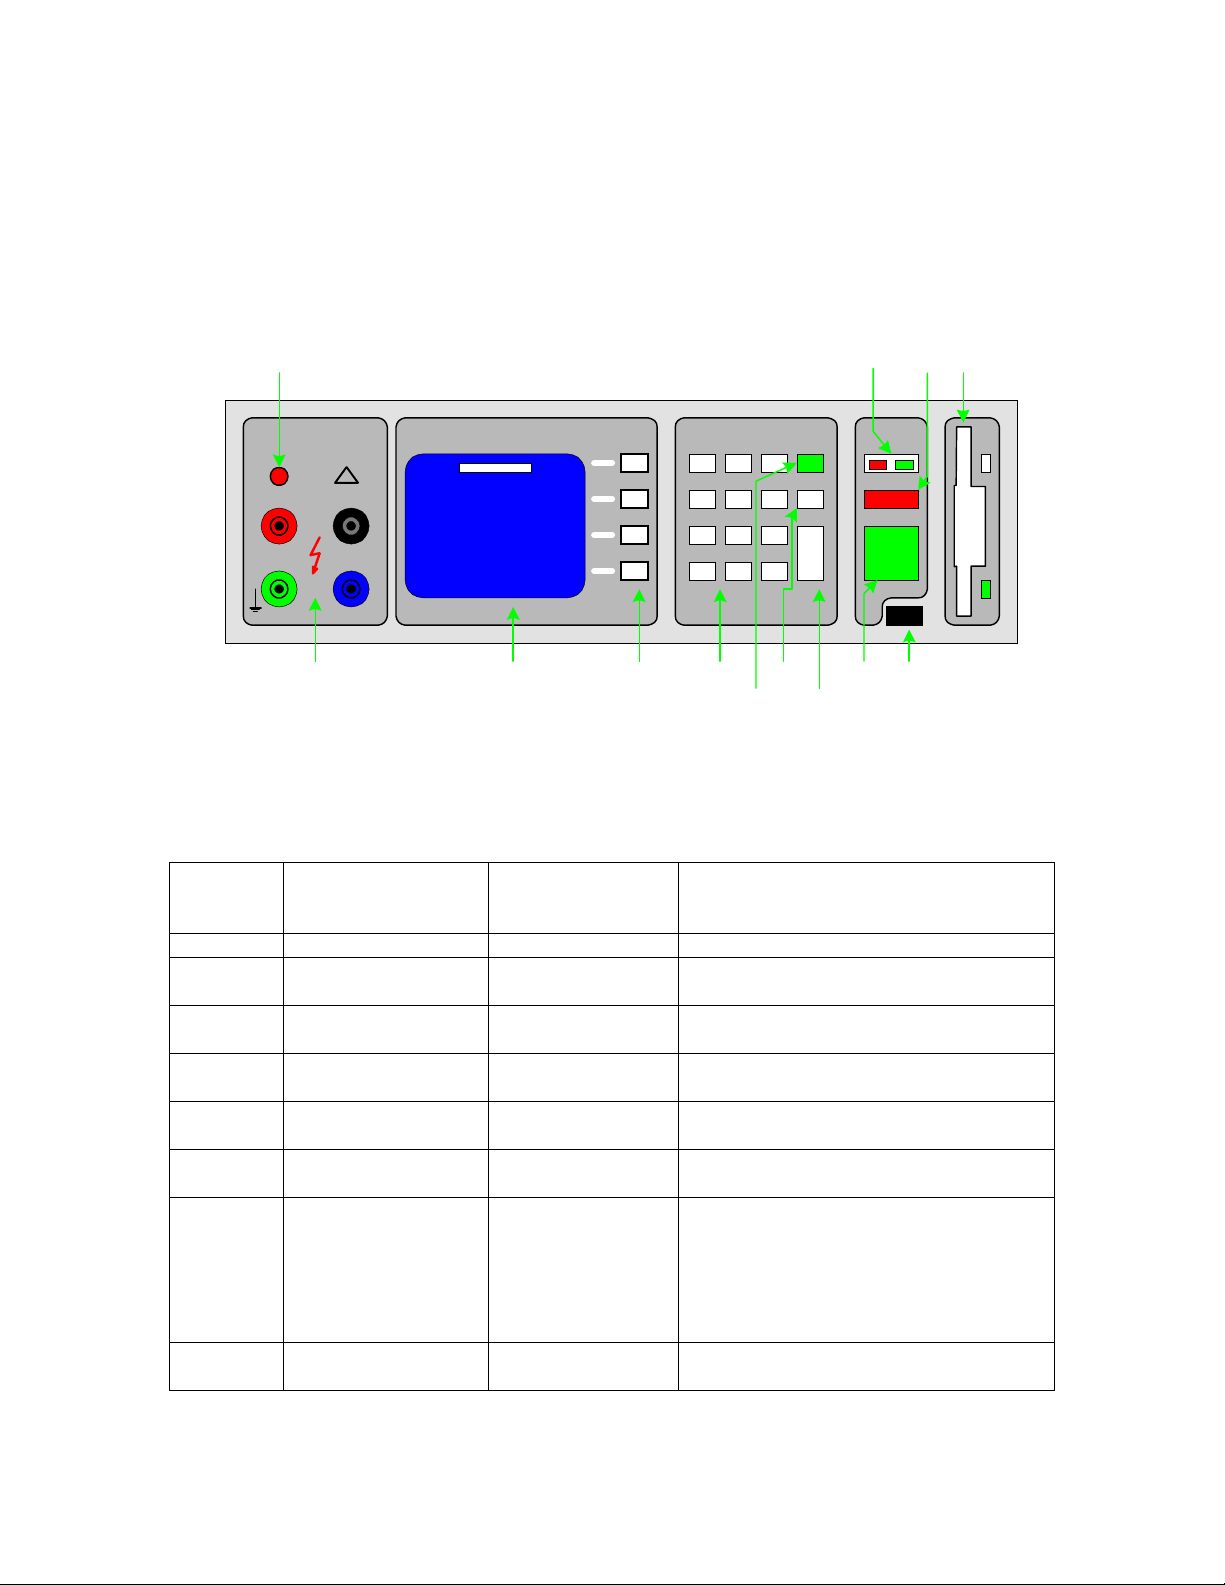
1.3.1 Front Panel Controls and Indicators
Figure 1-1 shows the controls and indicators on the front of the 1865 unit. Table 1-1
identifies them with description and function.
13 12 11 10
QQQQ
uadTech
1865
+
Megohmmeter
IR Tester
!
CAUTION
HIGH VOLTAGE
-
DISPLAY ENTRYSELECT TEST
MENU
RESISTANCE
133.620M
Voltage = 100
Mode = AUTO
Ω
Range = 1uA <A>
321
CNCL
654
987
0
ENTER
.-
STOP
START
GUARD
16
432
10
98
75
Figure 1-1: Front Panel Controls & Indicators
Table 1-1: Front Panel Controls and Indicators
Reference
Number
Figure 1-1
1 Input Panel Connection for device under t est (DUT)
1a GROUND Green Sheathed
1b + Red Sheathed
1c - Black Sheathed
1d GUARD Blue Sheathed
2 Display LCD Graphic Displays measurement results, instrument
3 SELECT 4 Gray Push Buttons Function as indicated on adjacent display
4 Keypad White Push Buttons 12 keys for making numerical entries: 0-9,
Name Type Function
Ground Terminal for jumper of (+) Input
Banana Plug
Terminal or Guard Input to Chassis GND
High Voltage Terminal for connection to
Banana Plug
DUT
Low Voltage Terminal for connection to
Banana Plug
DUT
Guard Terminal for 3-Lead Guarded
Banana Plug
Measurements
status and user interface menus.
From top to bottom: functions as: Up (↑↑↑↑),
Down (↓↓↓↓), Right (→→→→) or Left (←←←←) during
Menu Selection. Other functions include:
measurement units, exponent, Yes or No
and del (delete).
decimal point and minus sign.
Page 22 of 87 Introduction
Page 23
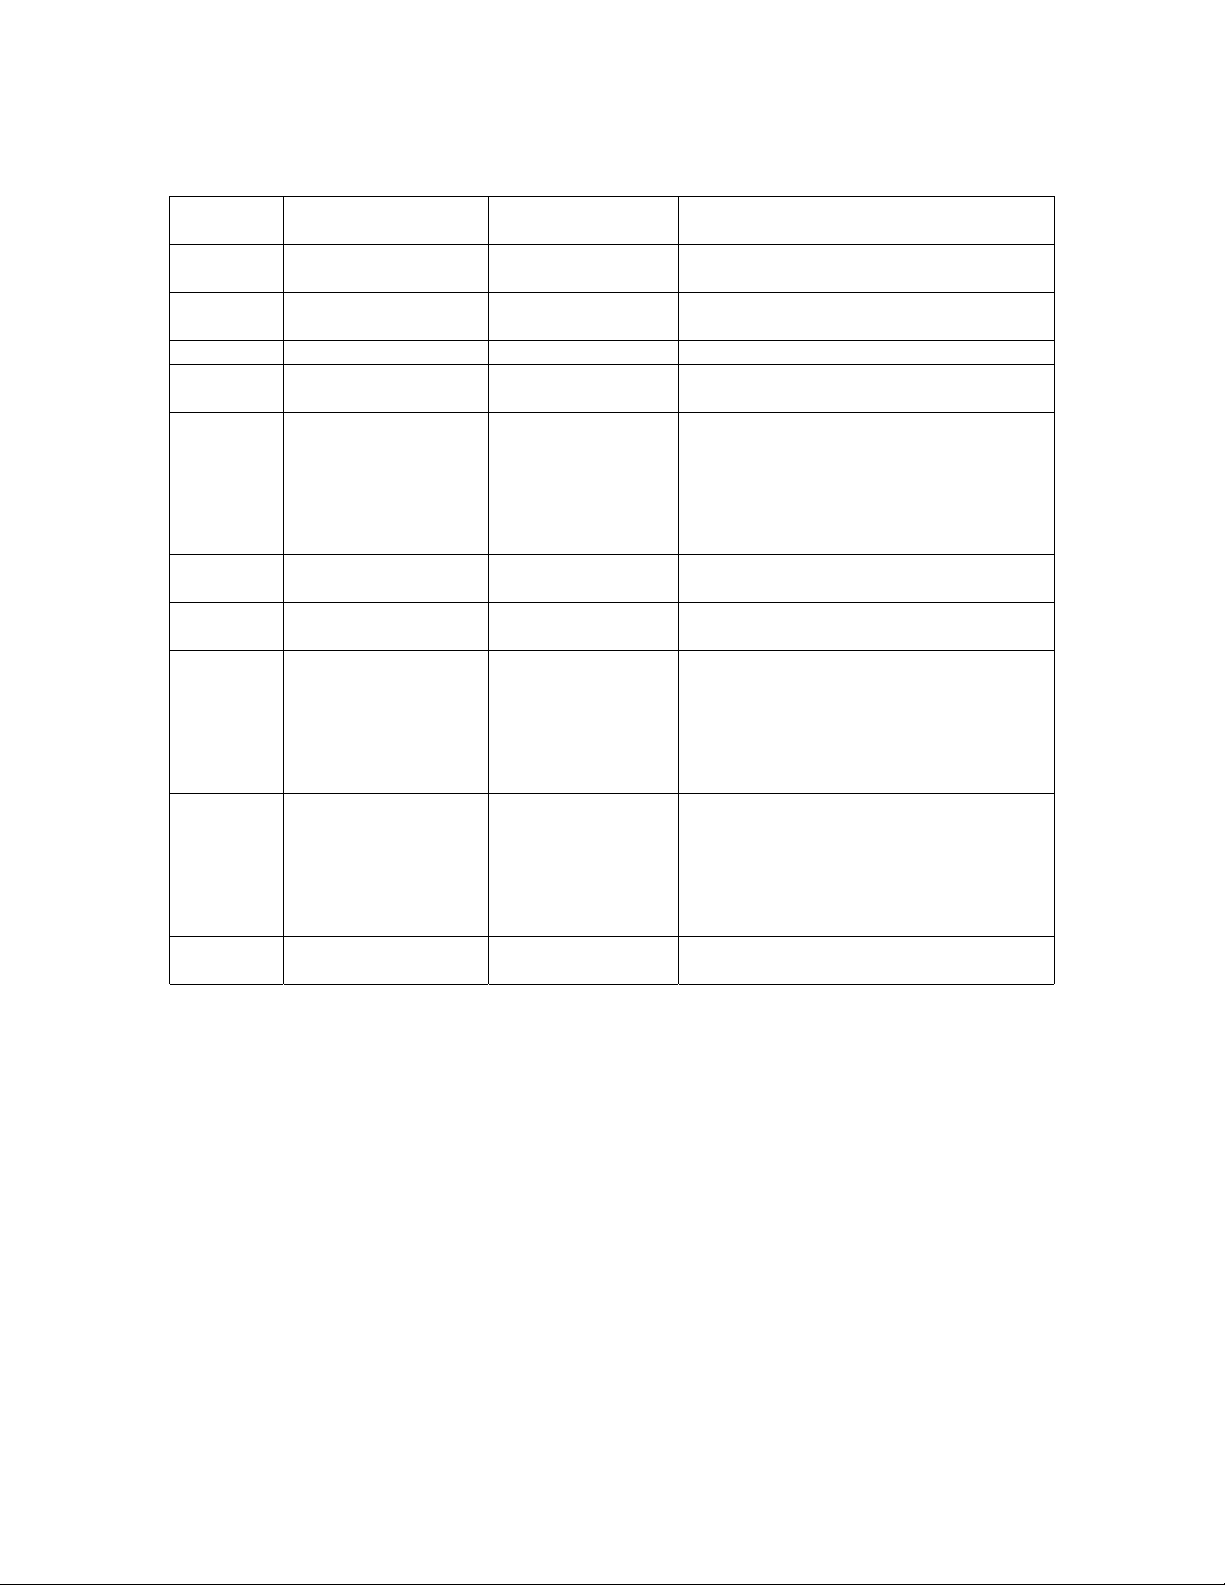
Table 1-1: Front Panel Controls and Indicators (Continued)
5 MENU Green Push Button Press to enter menu display mode or press
to exit sub menu & return to main menu.
6 CNCL Gray Push Button To exit menu mode with no parameter
changes made or to exit current field
7 ENTER Gray Push Button To switch user to entry mode or to accept
menu entry as entered.
8 START Green Push Button To initiate the measurement
9 POWER Black Toggle Switch To apply power to the instrument:
1 = ON, 0 = OFF
10 OPTION 3 ½ “ Floppy Drive To store test setup conditions and
measurement results. High Density (HD:
1.44M) or Low Density (LD: 720k)
compatible floppy drive. Floppies should be
double sided and formatted for DOS
compatibility.
11 STOP Red Push Button To stop the measurement (terminate high
voltage at the output terminals)
12 TEST Indicate P/F Measurement Result based on
preset limit
12a FAIL Red LED
12b PASS Green LED
13 Caution High Voltage Red LED When lit, indicates presence of High
When lit in Resistance Mode, the measured
value is below the set minimum value
(resistance limit).
When lit in Current Mode, the measured
value is above the set maximum value
(current limit).
When lit, in Resistance Mode, the
measured value is above the set minimum
value (resistance limit).
When lit in Current Mode, the measured
value is below the set maximum value
(current limit).
Voltage at the output terminals.
Introduction Page 23 of 87
Page 24

1.3.2 Rear Panel Controls and Connectors
Figure 1-2 illustrates the controls and connectors on the rear panel of the 1865
Megohmmeter/IR Tester. Table 1-2 identifies them with description and function.
8
76
NO USER SERVICEABLE PARTS INSIDE
TO PREVENT ELECTRICAL SHOCK
!
DO NOT OPEN COVERS
REFER TO QUALIFIED PERSON
RS 232 INTERFACEIEEE-488 INTERFACE BATTERY
I/O PORT
PARALLEL PORT
REPLACE WITH
THREE SIZE AA
POSITIVE
TERMINAL OUT
MADE IN USA
543
FUSE 250V
90-250V T2.5A 5x20mm
12
CAUTION: FOR CONTINUED
PROTECTION AGAINST FIRE
HAZARD REPLACE ONLY
WITH SAME TYPE AND
RATING OF FUSE
90-250V
47-63Hz
40 WATTS MAX
Figure 1-2: Rear Panel Controls and Connectors
Table 1-2: Rear Panel Connectors and Controls
Reference
Number
Figure 1-2
1 AC Inlet Module Black 3-Prong
2 Vent Rear Panel Portion Instrument ventilation
3 I/O Port 36-pin Male
4 Parallel Port Not Available Not Available
5 Option 1865-03 Rear Panel Input Terminals: Ground, (+), (-
6 Battery 3, AA Size Batteries DC source for System Memory back-up.
7 RS232 Interface 9-pin DB9 Male 9-pin connector for RS232 I/O transfers
8 IEEE-488 Interface 24-pin Male 24-pin connector for IEEE-488 I/O
Name Type Function
3-wire connection for AC power source.
Receptacle & Fuse
90-250V AC: T2.5A 250V 5x20mm Fuse
Drawer
36-Pin Connector for Component Handler.
Amp 552302-1
compatible
Use with Amp 552302-1 plug & 552073-5
strain relief cover or ribbon cable clamp
connector 553600-1 or equivalent(s).
) and Guard for connection to DUT with
High Voltage I ndicator
3 AA batteries need to be replaced yearly.
transfers
Page 24 of 87 Introduction
Page 25
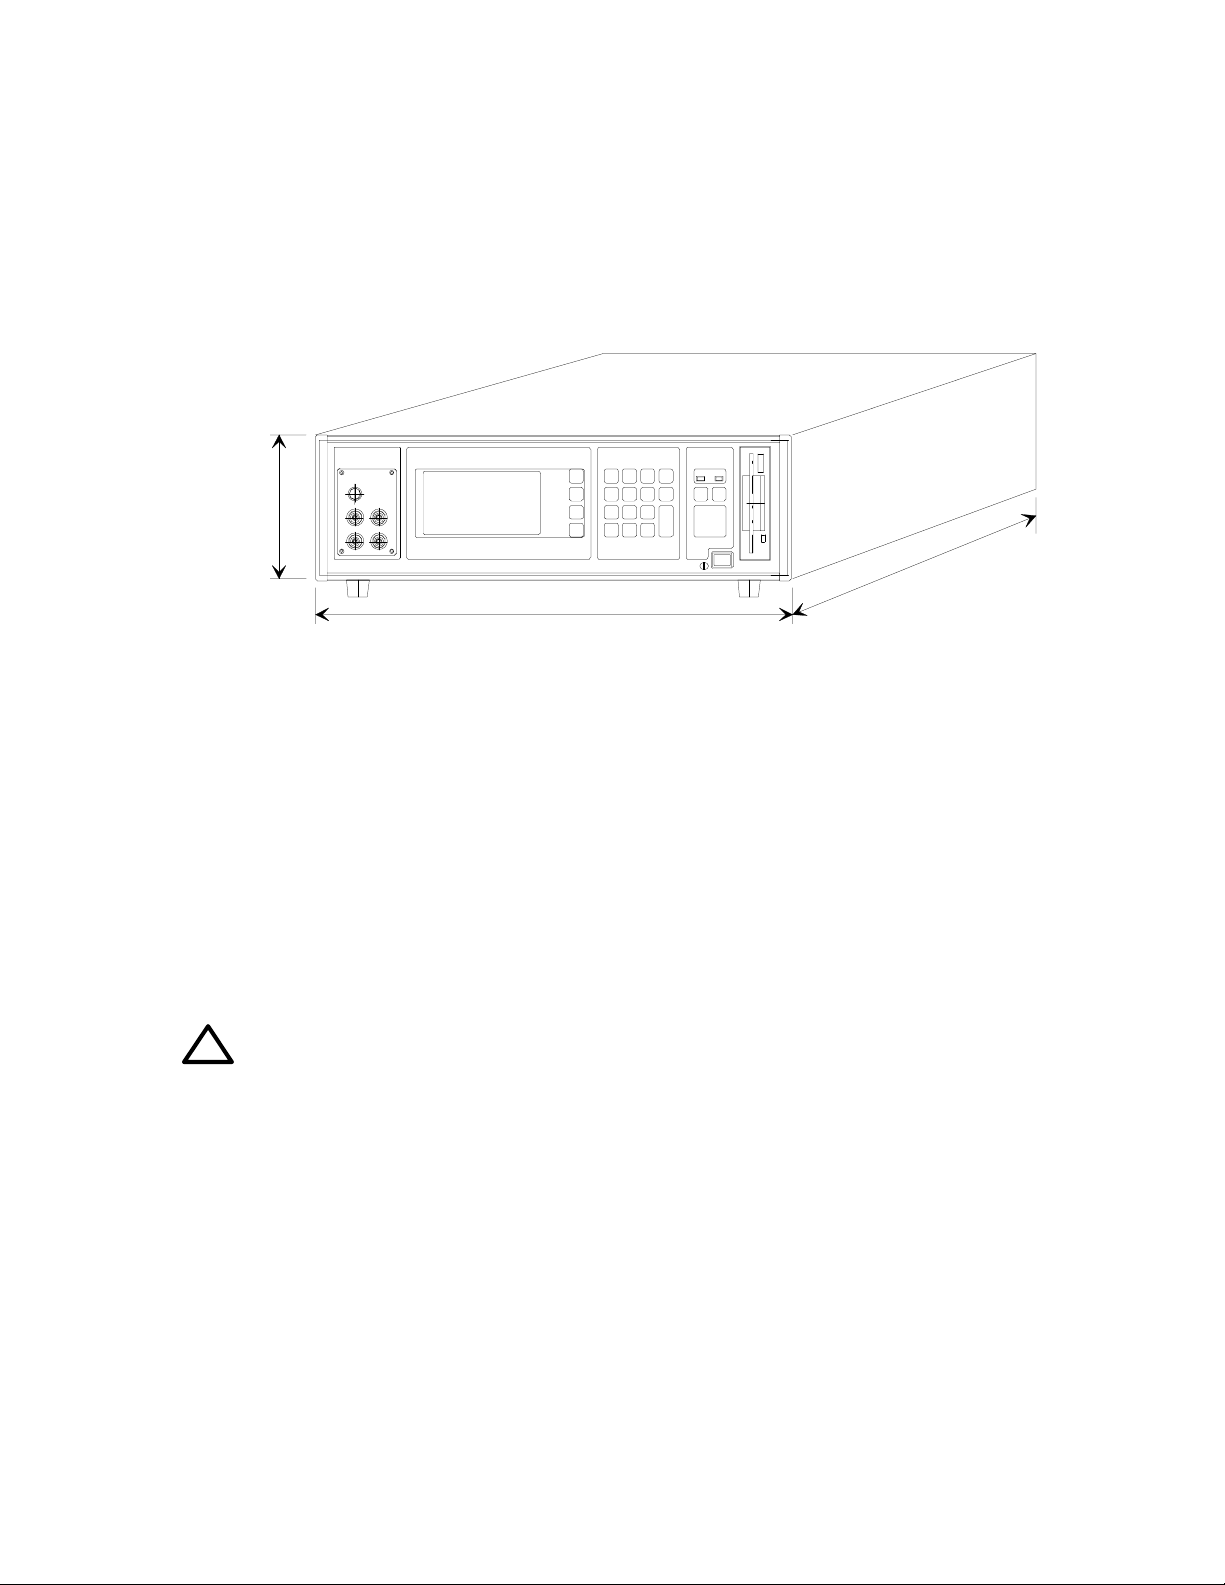
1.4 Installation
1.4.1 Dimensions
The instrument is supplied in a bench configuration, i.e., in a cabinet with resilient feet
for placement on a table. A bail is provided under the front edge so that the instrument
can be tilted back for convenient operator viewing.
QuadTech
133.4mm
5 1/4"
406.4mm
444.5mm
17.5"
16"
Figure 1-3: 1865 Instrument Dimensions
1.4.2 Instrument Positioning
The 1865 instrument contains a high resolution back lit LCD for convenient viewing.
The optimum angle for viewing is slightly down and about 30° either side of center. This
means that for bench operation the front bail should always be used to angle the
instrument up and for rack installation it should be mounted at eye level or higher.
1.4.3 Power Requirements
!
The 1865 Megohmmeter/IR Tester can be operated from a power source between
90 and 250Vac at a power line frequency of 47 to 63Hz. Power connection to the rear
panel is through an AC inlet module comprised of an AC connector and fuse drawer.
Before connecting the 3-wire power cord between the unit and AC power the fuse should
be in accordance with the power source, T2.5A, 250V, 5x20mm (QuadTech PN 520049)
for 115V or 220V source. Always use an outlet which has a properly connected
protection ground. The standard 1865 is factory shipped with the 2.5A fuse in place.
The instrument can be damaged if the wrong fuse is installed. To change the fuse
proceed as follows:
Introduction Page 25 of 87
Page 26

PROCEDURE FOR CHANGING A FUSE
WARNING
Make sure the unit has been disconnected from its AC power source for at least five
minutes before proceeding.
Fuse drawer with release tab
I/O PORT
RS-232 INTERFACE
BATTERY
90 - 250 V
47 - 63 Hz
40 WATTS MAX
IEEE-488 INTERFACE
PARALLEL PORT
Figure 1-4: 1865 Instrument Fuse Drawer
• Remove the fuse drawer by inserting a small flat head screwdriver behind the small
tab to force the draw outward.
• Once the fuse draw has been completely removed from the instrument now remove
the clear fuse tray from the drawer by lifting upward slightly on the long narrow
locking tab. This will allow the fuse tray to be removed from the fuse draw. This tray
contains the active fuse (secured by holder).
• Remove the fuse from the holder by prying upward using a small flat head
screwdriver. Insert the replacement fuse into the fuse holder.
• Once the fuse has been installed in the holder and spare fuse (if desired) installed in
the right side of the tray insert the tray back into the fuse drawer, push in and lock.
The two silver contacts on the fuse tray should be positioned towards the outside.
• Once the fuse tray has be installed in the draw, reinstall the fuse draw back into the
instrument ac inlet module, push in and lock.
Page 26 of 87 Introduction
Page 27
1.4.4 Safety Inspection
!
Before operating the instrument inspect the AC power inlet module on the rear of
the 1865 instrument to ensure that the properly rated fuse is in place, otherwise damage
to unit is possible. Refer to paragraph 1.4.3.
The 1865 instrument is shipped with a standard U.S. power cord, QuadTech PN 42000300 (with Belden SPH-386 socket or equivalent, and 3 wire plug conforming to IEC
320) and CE units with an approved international cord set. Make sure the instrument is
only used with these cables (or other approved international cord set) which ensures the
instrument is provided with connection to protective earth ground.
When the 1865 instrument is used in a rack installation (using the QuadTech 1865-50
Rack Mount Kit) make sure the unit is secured using the cabinet mounting rai ls and
not securely solely by the front panel angle brackets.
In bench or rack mount applications the instrument should be positioned with
consideration for ample air flow to the rear panel fan ventilation holes. An open space
of at least 3 inches (75mm) is recommend behind the rear panel. The surrounding
environment should be free from excessive dust to prevent contaminati on of electronic
circuits.
WARNING
If this instrument is used in a manner not specified in this manual protection to the
operator and equipment may be impaired.
Read this instruction manual in full before operating this instrument.
Introduction Page 27 of 87
Page 28

Page 29

Section 2 : Operation
2.1 Terms and Conventions
The names of keys in the manual will generally appear in CAPITAL LETTERS.
The MENU key calls up the main menu display and returns to the line previously
selected.
The ">>" symbol on a menu indicates a lower level menu exists.
The select keys generally function as UP, DOWN, LEFT and RIGHT arrow and allow
you to move through a menu or field of choices to make the desired selection or turn a
function ON or OFF.
The ENTER key switches the unit to entry mode and when pressed again initiates the
entry or choice selected on the current screen.
The CNCL key will return the system to main menu display with no changes made.
(From a numeric data field CNCL must be hit twice).
2.2 Startup
Check to make sure the line voltage indicator on the rear panel AC inlet module agrees
with the AC power source available, if not refer to paragraph 1.5.3.
Connect the instrument power cord to the source of proper voltage. The instrument is to
be used only with three wire grounded outlets.
WARNING
A flashing CAUTION HIGH VOLTAGE light and/or DANGER on the display
indicates a defective unit with dangerously high voltages possible at the input terminals.
Power the unit down and do not use.
IMPORTANT
The interlock connector (included with the unit) needs to be installed on the rear panel
I/O Port connector if the interlock function is not being used.
When the 3.5" Floppy Drive Option is present ALWAYS MAKE SURE NO DISKS ARE
INSTALLED WHEN THE UNIT IS POWERED UP, otherwise information stored on the
disks could be lost.
Switching [POWER] OFF and ON quickly may result in error messages. Power should be
off for at least 10 seconds to assure proper power-up.
Operation Page 29 of 87
Page 30

Power is applied to the 1865 by pressing the [POWER] button on the front panel. The
instrument runs a self test and any error messages are displayed accordingly (refer to
paragraph 2.8).
2.3 Zeroing
Before making measurements, the 1865 instrument should be zeroed to correct for test
lead or fixture errors. During the zeroing process corrections are calculated and stored in
instrument memory and applied to ongoing measurements. Generally the unit should be
zeroed at least once per day and each time test leads or fixtures are changed. The zeroing
routine is accessed through the Utilities Menu by selecting [ZERO], instructions are given
on the LCD display. Refer to paragraph 2.6.4.3.
2.4 Connection to Device Under Test
Figure 2-1 illustrates the front panel input terminals and a basic block diagram of their
function.
Range
5k
Select
Zin
Ω
-
+
QQQQ
uadTech
1865
+
Megohmmeter
IR Tester
!
CAUTION
HIGH VOLTAGE
+-
-
GUARD
(Earth)
GUARDGND
Figure 2-1: Input Panel and Block Diagram
An optional shielded lead set is available for use with the 1865 unit, QuadTech part
number 1865-51. How the connection to the DUT is made depends on the device being
measured: if it is a grounded, ungrounded or guarded device. The 1865 instrument is
supplied with two resistor adapters which are recommended for use only when measuring
high value, low leakage capacitors. These are to be added in series with the (-) terminal
lead to eliminate fluctuating test results when measuring this type of device. Refer to
paragraph 3.3.
CAUTION
DO NOT GROUND THE - (negative) UNKNOWN TERMINAL, invalid
measurements will result.
Page 30 of 87 Operation
Page 31

Figures 2-2 through 2-4 illustrate various methods of connection to the device under test
(DUT). Figure 2-2 illustrates the two-wire connection to DUT. The two-wire
ungrounded connection is the recommended connection of ungrounded components or
components that can be connected very close to the 1865 input terminals rather than
through the lead set provided.
High Low
Unknown Unknown
+
GND
+
Unknown and - Unknown are connected to DUT
GUARD
shorted to
DUT
GND
(optional)
-
GRD
Figure 2-2: Two-Wire Ungrounded Connection
The two-wire grounded measurement is a common type of connection to be used on the
1865. This is the recommended connection on grounded components or components that
are some physical distance from the input terminals of the unit. A grounded component
is one in which one of its connections goes to an earth ground, whereas on an ungrounded
component neither connection goes to earth ground. A component being measured with a
lead set is considered to be a physical distance away from the terminals and thus the twowire grounded connection is often recommended.
DUT
+
GND
+
Unknown and - Unknown are connected to DUT
+
Unknown connected to
GND
-
GRD
Figure 2-3: Two-Wire Grounded Connection
Operation Page 31 of 87
Page 32

A three-wire guarded connection is necessary to measure resistance between two points in
the presence of resistance from each of these points to a third point. Refer to paragraph
3.6 for a discussion of guarded measurements. The guarded measurement may require
different grounding techniques depending on the expected impedance of the DUT.
+
GND
DUT
-
GRD
+ -
GND GRD
DUT
DUT UNGROUNDEDDUT GROUNDED
+
Unknown and - Unknown are connected to DUT
GUARD
+
Unknown shorted to
to DUT Guard Point
GND
OR
GUARD
shorted to
GND
Figure 2-4: Three-Wire Guarded Connection (Grounded or Ungrounded)
2.5 Measurement Procedure
2.5.1 General
There are two basic measurement modes of operation, auto and manual. In the automatic
mode the test cycle is sequenced automatically through four phases, charge, dwell,
measure and discharge in accordance with user programmable times. This is the
preferred measurement mode, especially when the approximate resistance value is
unknown, since the 1865 instrument employs an auto ranging technique. The automatic
mode would generally be used in a production environment where measurements are
repetitive and setup conditions have been previously established. For the sake of
reducing measurement time, when making repetitive measurements, a particular range
may be locked in, in place of auto ranging.
Page 32 of 87 Operation
Page 33

In the manual mode the test cycle timing is totally at the users discretion where each of
the three phases, charge, measure or discharge is initiated directly by the user. This mode
would typically be used in an engineering environment or component evaluation where
the measurement results can be observed as test cycle and measurement conditions are
altered.
Whenever the 1865 unit is powered up it is ready to begin measuring at default test
conditions. Initially, these conditions will be set to a factory default (1V, 0 times,
Resistance Display, Auto ranging and Automatic Mode), but can be changed by the user
and stored to overwrite factory default.
2.5.2 Default Measurement Conditions
A set of default measurement conditions are initially established at the factory and stored
in instrument memory. Default conditions are those that determine the instruments status
on power up, thus the instrument is always set to a known state before any testing begins.
These conditions can be changed by the user for tailoring to a specific application. Refer
to paragraph 2.6.4.1 under Save Setup on the Utilities menu.
Factory default measurement conditions are:
Under Setup Menu
Voltage - 1V
Charge, Dwell, Measure and Discharge times – 0
Mode - Auto
Range - Auto (Selected on lower level menu)
Limit - None
Stop on Pass - No
# to Average - None
Under I/O Menu
Display Type - Resistance (selected on lower level menu)
Result Format - Engineering Units
RS-232 - Enable
Handler - On
Under Utilities Menu
Lockout - Off
Backlite - On
Operation Page 33 of 87
Page 34

2.5.3 Automatic Measurement Mode
Measurements in the automatic mode can be initiated after connecting the DUT by simply
pressing [START]. Test conditions are determined by either the power up default
conditions or recalling a previously stored setup from instrument memory. In either case
a test cycle is sequenced automatically (Figure 2-5) once [START] is pressed and results
displayed (Figure 2-6). When a test limit is entered a PASS/FAIL can be displayed in
place of the actual measured value (Figure 2-7).
AUTOMATIC MEASU REMENT
MODE
Charge
Vo ltage
applied
to UUT
Charge t
(0 - 300s)
START
(
High Voltage
Indicator On)
Dwell t
(0 - 300s)
Test Cycle Time (P rogra mmable)
Measure t
(0 - 300s)
or (0 - 999)*
Discharge t
(0 - 300s)
(High Voltage
Indicator Off)
Figure 2-5: Test Cycle Sequence (Automatic)
* on later units
Page 34 of 87 Operation
Page 35

Measurement Value
Measurement Parameter
(Resistance or Current)
RESISTANCE
Measurement Units
(Engineering or Scientific)
Test Cycle Status
(Charge, Dwell,
Measure or Discharge)
1.000M
MEASURE
Charge
Voltage
Measure Mode
(Auto or Manual)
Figure 2-6: Measurement Results Display with Value
VOLTAGE = 1000 LIMIT = 9.0 e +005
MODE = AUTO RANGE = 10 uA (A)
REMOTE
Keypad Disabled
(can indicate REMOTE
or LOCKOUT)
Results Displayed in the "Result Format"
(Scientific or Engineering)
Fullscale Measurement Range
(A) denotes autorange
Pass/Fail Limit
9.0 e +005 ohms
PASS/FAIL
MEASURE
VOLTAGE 1000 LIMIT 9.0 e +005
Operation Page 35 of 87
MODE AUTO RANGE 10uA
REMOTE
Figure 2-7: PASS/FAIL Results Display
Page 36

p
2.5.4 Manual Measurement Mode
The primary difference between automatic and manual mode is that in manual mode the
phases of the test cycle must be initiated manually by the user. Here there are three
phases rather than the four in automatic, the dwell function would be part of the charge
phase. The results would still be displayed in a manner indicated above, the mode would
indicate manual rather than automatic. Default and other stored setups can still be
recalled, the only difference being that the test cycle times are not applicable.
MANUAL MEASUREMENT MODE
Charge
Voltage
applied to
UUT
Charge t Measure t
Test Cycle Time
START
(High Voltage
Indicator On)
Note:
A single measurement will be made in
the measure
START STOP
hase each time START is pressed
(Manually Controlled)
Discharge t
STOP
(High Voltage
Indicator Off)
Figure 2-8: Test Cycle Sequence (Manual)
2.6 Menu Functions
2.6.1 General
All programmable functions of the 1865 are controlled by easy to use menu displays. The
user enters the menu mode by selecting the [MENU] key which calls up three top level
menus, Setup, I/O and Utilities. Each one of these is comprised of a sub menu list whose
functions are described in detail below. Finding ones way around the menu listing is
accomplished in a fashion similar to an Automatic Teller Machine (ATM) using the up,
down, right and left arrow keys as indicated on the adjacent LCD display. A highlighted
menu function can be controlled by selecting the [ENTER] key, making the desired entry
or selection and pressing [ENTER] again to implement.
Page 36 of 87 Operation
Page 37

2.6.2 Setup Menus
Setup I/O Utilities
Voltage
Charge Time
Dwell Time
Measure Time
Discharge Time
Mode Auto Manual
Range > >
Limit
Stop on Pass = 0
#
to Average = 0
= 1000
= 0
= 0
= 0
= 0
= 100 e+ 9
Figure 2-9: Setup Menu
The first of the three main menus is Setup, shown in Figure 2-9. Each function controls a
measurement condition and is described in detail below.
2.6.2.1 Voltage
Setup
Voltage
Charge Time = 10
Dwell Time
Measur e Time
Dis c h a r ge Ti me
Mode Auto Manual
Range > >
Limit
Stop on Pass = 0
#
to Average = 0
I/O Utilities
1000
=
= 10
= 10
= 10
= 100 e+ 9
e
Figure 2-10: Test Voltage Entry
Accepts entry (up to 6 digits and decimal) of a test voltage between 1 and
1000 volts. This is the voltage applied to the unit under test during the test cycle and
present at the DUT connection anytime that the CAUTION HIGH VOLTAGE lamp is
ON. As in the case of many of the menu entries on the 1865 instrument, an "error
message" will be displayed for an invalid entry.
Operation Page 37 of 87
Page 38

2.6.2.2 Charge Time
Setup
I/O Utilities
Voltage = 1000
Charge Time =
Dwell Time
Measure Time
Discharge Time
Mode Auto Manual
Range > >
Limit
Stop on Pass = 0
#
to Average = 0
10
= 10
= 10
= 10
= 100 e+ 9
Figure 2-11: Charge Time Entry
Accepts entry of a charge time between 0 and 300 seconds in 1 second intervals (up to 3
digits). If the selection is out of range an error message will be displayed. This marks the
time when the test voltage is first applied and the unit under test is allowed to charge up
to this voltage. Even if the charge time is entered as zero there is still a small delay
during the charge phase. In this case or even with much longer charge times the
possibility exists that full charge voltage may not be reached at the start of the
measurement phase if the DUT has a long time constant.
NOTE
For low voltage measurements (<5V), a minimum charge time of 2 seconds is
recommended to meet the instruments stated accuracy.
2.6.2.3 Dwell Time
Accepts entry of a dwell time (or electrification time) between 0 and 300 seconds in 1
second intervals. This is a time during which the test voltage is applied to the device
under test and prior to any measurement.
2.6.2.4 Measure Time
Accepts entry of a measure time between 0 and 300 seconds in 1 second intervals (0 –
999 seconds on later units). This is the time during which repeated measurements are
made and results displayed as resistance, current, Pass/Fail or no display depending on
the results format selected. The display is updated each time a measurement is made
during this time phase.
Page 38 of 87 Operation
Page 39

2.6.2.5 Discharge Time
Accepts entry of a discharge time between 0 and 300 seconds in 1 second intervals. This
is the time when the test voltage is removed and the device under test discharged. The
CAUTION HIGH VOLTAGE lamp goes OFF at the end of the programmed interval and
the last measurement result is retained on the display (unless no display is selected).
2.6.2.6 Mode
Setup
I/O Utilities
Voltage = 1000
Charge Time
Dwell Time
Measure Time
Discharge Time
Mode Auto
Range > >
Limit = 100 e+ 9
Stop on Pass =
#
to Average = 0
= 10
= 10
= 10
= 10
Manual
0
Figure 2-12: Measurement Mode Selection
Allows selection from two different modes of operation, Auto or Manual measurement.
In Auto the user presses [START] to initiate the entire test cycle automatically. The first
phase of the cycle is charge time, during which the device initially charges up to the
applied test voltage. The second phase is dwell, or time of electrification, during which
the device is fully charged but prior to a measurement. The third phase is measure time
during which measured results are displayed. The fourth and last phase is discharge time
during which the voltage is removed and the device allowed to discharge.
In Manual, test cycle timing is under complete user control, [START] must be pressed to
initiate the charge and measure phase and [STOP] pressed to discharge the device.
Operation Page 39 of 87
Page 40

2.6.2.7 Range
Setup
Range
Auto
1 mA
100 uA
10 uA
1 uA
100 nA
10 nA
1 nA
I/O Utilities
Figure 2-13: Range Selection
Through a lower level menu (by pressing [ENTER]) allows for selection of Auto or one
of seven different measurement ranges (1mA through 1nA), which is the maximum
current for the selected range. In auto mode the 1865 instrument will automatically select
the optimum range depending on the programmed test voltage and current drawn by the
test device. Any choice other than Auto (1mA through 1nA range) is at the user's
discretion. Determination of the range is governed by the maximum current available to
the DUT for that measurement range and is listed in Table 2-1. To eliminate operator
errors in range setting and ensure specified instrument accuracy the 1865 unit
should generally be left in AUTO. There may be an exception to this when repetitive
measurements are to be made on a known range and there is a desire to reduce test time
by eliminating range switching. When auto ranging is selected the 1865 instrument will
always begin the measurement phase on the highest current range, 1mA and progress
down depending on the current to the device under test. If the current reaches 10% or less
of the maximum for a given range the next lowest range will be switched in.
If a range has been selected and the current exceeds 115% of the maximum for that range
the unit will indicate OVER RANGE on the display. One needs to keep in mind that an
over range does not necessarily mean the incorrect range has been selected, the device
under test could also be defective. Over range should not be confused with an
OVERLOAD display. Overload occurs anytime current to a device attempts to exceed
2mA, this would generally mean a shorted or very low resistance device.
Page 40 of 87 Operation
Page 41

Table 2-1: Range Current
Range Maximum Current
1 1mA
2 100uA
3 10uA
4 1uA
5 100nA
6 10nA
7 1nA
Example:
When measuring an unknown of 200MΩ at 100V, Ohms Law tells us that the device
under test would draw 0.5uA ( I = 100V/200MΩ). Based on the above one would expect
the 1865 instrument to auto range from the 1mA to 1uA range (50% of maximum
current) or the user to select the 1uA range if prior knowledge of the expected results is
known.
NOTE
When measuring in the current mode, in order to calculate the unknown resistance, the
input resistance of the instrument (5kΩ) must be taken into consideration. For further
discussion of this refer to Display Type in ¶ 2.6.3.1
The measurement range capability is represented graphically in Figure 2-14. By locating
the charge voltage on the vertical axis and the measured resi stance, or expect ed measured
resistance, on the horizontal axis one can determine the optimum range. When Auto
range is selected the range switching is done automatically and the specified instrument
accuracy always applies. If a range is selected other than auto and the resistance value for
the given voltage does not fall in the range band shown measurement accuracy as
specified does not necessarily apply.
Operation Page 41 of 87
Page 42

"
)
Measurement Ranges at Specified Voltage
!""./0 !"./0 !./0 !"".10 !".10 !.10!.20
!"""
#
$
!""
%
&
'
(
*
+
!"
,
$
&
'
!
!#""$% "& !#""$% "' !#""$% "( !#""$% ") !#""$% "* !#""$% "+ !#""$% ", !#""$% !" !#""$% !! !#""$% !- !#""$% !& !#""$% !'
1kΩ 1MΩ 1GΩ 1TΩ
Resistance in Ohms
Figure 2-14: Measurement Range Capability
Page 42 of 87 Operation
Page 43

2.6.2.8 Limit
Setup
I/O Utilities
Voltage
Charge Time =
Dwell Time
Measur e Time
Dis c h a r ge Ti me
Mode Auto Manual
Range > >
Limit
Stop on Pass = 0
#
to Average = 0
= 1000
10
= 10
= 10
=
10
=
1 e + 006
e
than R (resistance), the exponent would be
entered as a negative number.
In the case where I (current) is selected rather
Figure 2-15: Limit Value (Resistance or Current)
Allows entry of a single measurement limit in scientific units (up to 4 digits with decimal
and exponent) for resistance or current depending on the results parameter selected. The
exponent must be 3 through 14 for resistance or -3 through -13 for current. This limit
determines the status of the Pass/Fail indicator and Pass/Fail display, when enabled.
When the 1865 instrument is in the resistance mode the limit is a minimum value i.e. any
value above the limit will result in a Pass, whereas a value below the limit will result in a
Fail. The opposite is true when the unit is in the current mode, the limit is a maximum
value, any value below the limit will result in a Pass and a value above the limit will
result in a Fail.
If the display parameter on the I/O Menu is selected as resistance the value entered will
be an R limit, if the display is selected as current the value entered will be an I limit. The
1865's processor will check for consistency between the parameter display selected and
limit entered.
An example of the sequence for entering 1MΩ as a limit would be:
Press [ENTER] or Press [ENTER]
Press [1] Press [1]
Press [e] select key Press [0] (zero), three times
Press [6](exponent multiplier) Press [e] select key
Press [ENTER] Press [3]
Press [ENTER]
Operation Page 43 of 87
Page 44

2.6.2.9 Stop on Pass
Accepts entry of a value between 0 and 300 which is the number of consecutive passing
measurements that must occur to exit the measure loop before the measure time has
passed. This is only active when there is a measure time and limit specified. An entry of
0 disables the stop on pass function.
2.6.2.10 # to Average
Accepts entry of a value between 0 and 400 which is the number of measurements to be
averaged and displayed. If the value is 0 or 1 averaging is disabled and the display is
updated with each measurement, if the value is n (between 2 and 400) the average is
displayed after n measurements. If the measure time has not elapsed after the first
averaged display then a running average of measurements is made until the measure time
is up. For example, if n is 5, the first five measurements are made, averaged and then
displayed. The sixth measurement is averaged with the last four and the first ignored, this
continues until the user specified measurement time is complete.
When Stop on Pass is in effect n measurements are made and averaged.
If the Stop on Pass requirement is met the cycle stops with a Pass even though
the measure time has not passed.
If the measure time has passed and the Stop on Pass requirement not met the
cycle stops with a Fail.
If the Stop on Pass requirement is not met and measure time has not passed
additional measurements are made and averaged. The Stop on Pass and
measure time requirement are tested after each measurement until one or the
other results in an exit from the test cycle.
When the instrument is selected for Manual mode of operation the averaging works very
similar. When the [START] button is pressed to exit charge and start measure, n
measurements are averaged. For each consecutive press of the [START] button one more
measurement is made, the last five averaged and result displayed. The [STOP] button
exits measure to discharge as normal.
Page 44 of 87 Operation
Page 45

2.6.3 I/O Menus
Setup
Display Type
Result Format Sci Eng
RS-232 >>
IEEE >>
Handler Off On
Results to Floppy >>
I/O
Utilities
>>
Figure 2-16: I/O Menu
The second of the three main menus is I/O, shown in Figure 2-16. Each function controls
measurement results or instrument I/O interface and is described in detail in paragraphs
2.6.3.1 through 2.6.3.6.
2.6.3.1 Display Type
Utilities
Setup
I/O
Display
Resistance
Current
Pass / Fail
No Display
Figure 2-17: Measurement Display
Allows selection from four different modes of measurement display, Resistance,
Current, Pass/Fail or No Display. In resistance mode the 1865 instrument will display
the measured value of resistance of the device under test. In current mode the 1865
displays the current to the device under test. In Pass/Fail mode the actual measured value
is displayed in small font along with a pass or fail based on the measurement limit
entered, which could apply to either resistance or current.
Operation Page 45 of 87
Page 46

In No Display only the voltage, mode and range are displayed, with no measured value.
This might be used for security reasons or for the purpose of reducing test time during
remote operation.
When the display is selected as current one needs to keep in mind that the 5kΩ input
impedance and the 1kΩ output volt age source impedance of t he unit are in seri es wit h the
unknown. For low values of resistance (<20MΩ) the measured current would be the
Charge Voltage/(Zin + Z
out
+ R
unknown).
2.6.3.2 Result Format
Setup
I/O
Utilities
Display Type
Result Format
RS-232 >>
IEEE >>
Handler Off On
Results to Floppy >>
Sci
>>
Eng
Figure 2-18: Measurement Results Format
Allows selection from two different measurement result formats SCI and ENG, for
scientific or engineering units. Scientific units are expressed as an exponent and
engineering units are expressed in ohms for resistance and amps for current. For example
e6 in scientific units can be expressed as MΩ in engineering units or e
-6
in scientific units
can be expressed as µA in engineering units, this is strictly user preference and
convenience.
When scientific units is selected the results will always be displayed as 5 digits and an
exponent. The 5 digits will be configured as 1 to the left and 4 to the right of the decimal
point. When engineering units is selected the results will be displayed with a minimum
of 4 and maximum of 6 digits, there is always 3 to the right of the decimal point but to the
left there could be 1, 2, or 3 digits depending on value. For ex ample; when the units is
MΩ and depending on the device being measured the display might show 1.123MΩ,
10.123MΩ or even 100.123MΩ.
Page 46 of 87 Operation
Page 47

A summary of measurement units (scientific and engineering) and their symbols is given
in Table 2-2.
Table 2-2: Measurement Unit Prefixes
Multiple Scientific Engineering Symbol
1000000000000000 1015 Peta P
1000000000000 1012 Tera T
1000000000 109 Giga G
1000000 106 Mega M
1000 103 Kilo k
.001 10-3 milli m
.000001 10-6 micro µ
.000000001 10-9 nano n
.000000000001 10
.000000000000001 10
-12
pico p
-15
femto f
2.6.3.3 RS-232
Setup
Baud
Parity None Even Odd
Data Bits 7 8
Stop Bits 1 2
I/O
RS-232
12 24 48 96
Utilities
Figure 2-19: RS-232 Interface Setup
Allows user setup of standard RS-232 interface formats. Selections include:
Baud Rate: 12, 24, 48 or 96
Parity: None, Even or Odd
Data Bits: 7 or 8
Stop Bits: 1 or 2
When using the RS-232 interface with a printer the IEEE-488 Mode must be set to Talk
and the State to Disable.
Operation Page 47 of 87
Page 48

2.6.3.4 IEEE-488
Setup
Address
Mode Talk Talk/Listen
I/O
Disable EnableState
IEEE
= 4
Utilities
Figure 2-20: IEEE-488 Interface Setup
Allows user setup of IEEE-488 interface operation. Selections include:
Address: 1 through 16
Mode: Talk or Talk/Listen
State: Disable or Enable
The instrument will function as either a Talk or a Talk/Listen device in a system
depending on the choice made by the operator under Mode. Talk is generally suited to a
simple system with no controller or other talkers, for example a printer. Talk/Listen
denotes full programmability and is suited for use in a system that has a controller or
computer to manage data flow. The "handshake" routine assures that the active talker
proceeds slowly enough for the slowest listener.
2.6.3.5 Handler
Allows user to turn Handler Interface function On or Off. When off is selected, input
and output lines on the rear panel I/O interface connector are ignored
2.6.3.6 Results to Floppy
Allows user to store measurement results on floppy disk (if optional drive is present).
When selected, if a results file is not open, the user is prompted for the filename (up to 8
characters) and the file is opened.
To close a results file that is currently open, select Results to Floppy and press [ENTER]
to close. Display indicates “Closing the Results File”.
If a results file is open when a setup is saved, when the setup is later recalled the user will
be prompted for a results file name.
Page 48 of 87 Operation
Page 49

When multiple tests are being conducted the results are stored to floppy periodically
(every 10 measurements) from an internal buffer. To be sure of storing all results
before power is shu t down the file needs to be closed as discussed earlier. It is also
important to note that a file should be closed before changing or recalling a new set of test
conditions, otherwise the stored measurement results would not be consistent with the
setup conditions stored in the file.
NOTE
3 1/2" floppy disks must be formatted for DOS compatibility on a PC or purchased
formatted from the manufacturer, 1.44M high density or 720K low density.
Turning the instrument on with a floppy disk in the drive may cause a loss of data.
The measurement results (one for each complete measurement cycle) are stored as a DOS
text file under its assigned identifying number (up to 8 characters) with an extension of
.65R. The test setup conditions are saved as a header at the beginning of a results file. A
sample file format is shown below. Notice that the results can be stored in either
engineering or scientific terms dependent on what the user has selected for setup
conditions.
100.000000 ;voltage
0.000000 ;charge time
0.000000 ;dwell time
0.000000 ;measure time
0.000000 ;discharge time
0.000000 ;mode (0 = auto, 1 = manual)
0.000000 ;range
1000000.000000 ;limit
0.000000 ;stop on pass
1 ;# to average
0.000000 ;display type
.000000 ;result format
3.000000 ;baud rate (0 = 1200, 1 = 2400, 2 = 4800, 3 = 9600)
0.000000 ;parity
1.000000 ;data bits
0.000000 ;stop bits
4.000000 ;IEEE address
1.000000 ;IEEE mode
0.000000 ;IEEE state
1.000000 ;handler
0.000000 ;result to floppy
1.000000 ;backlite (0 = off, 1 = on)
ENDHEADER
Operation Page 49 of 87
Page 50

1.020 M ohm PASS
1.020 M ohm PASS
1.020 M ohm PASS
1.020 M ohm PASS
1.020 M ohm PASS
1.020 M ohm PASS
or
1.020015E+006 PASS
1.020015E+006 PASS
1.020015E+006 PASS
1.020015E+006 PASS
1.020015E+006 PASS
The number of measurement results that can be stored is dependent on available disk
space and length of the data string. For example; if no limit is set the measurement string
contains no pass/fail result, thus the string is fewer characters. The same is true with
header information, multiple headers (different test conditions) will consume more
memory. Whatever the case, a blank disk is capable of storing thousands of
measurements.
2.6.4 Utilities Menus
Setup
Save Setup
Recall Setup
Zero >>
Lock Out
Calibration
Set Time / Date
Elapsed Time
Calibration Date
Set Contrast
LCD Backlite
I/O
Utilities
Off On
>>
>>
>>
>>
>>
>>
>>
>>
Figure 2-21: Utilities Menu
The last of the three main menus is Utilities, shown in Figure 2-21. Each function is
described in detail in paragraphs 2.6.4.1 through 2.6.4.10.
Page 50 of 87 Operation
Page 51

2.6.4.1 Save Setup
Setup
I/O Utilities
Save
NEW
DEFAULT
FLOPPY
1865-1
1865-2
1865-3
1865-4
page
down
d
e
l
Figure 2-22: Save Setup Test Conditions
Allows a set of test conditions to be stored in instrument memory or on floppy disk (if
optional drive is installed) for later recall. Test conditions are those that are user
programmable in the Setup and I/O menus, refer to paragraphs 2.6.2 and 2.6.3 above.
Stored setup conditions should always be backed up on disk when the floppy drive
option is present or recorded on paper when this option is not present.
NOTE
Setup conditions stored internally or on floppy disk using earlier software are not
compatible with version 2.0 or later.
To store the current set of test conditions as a new set in unit memory one needs to select
[NEW] in the Save Setup menu and enter the identifying name up to 8 characters under
which these conditions will be stored (allowable characters from the keypad include 0
through 9 and minus, characters can also include A through Z when operating from
remote control ). To save the setup under the name selected or to overwrite if the name
already exists one needs to answer Yes or No, Figure 2-23.
Operation Page 51 of 87
Page 52

Setup
I/O
Utilities
>>
Y
SAVE AS XXXXX?
N
Figure 2-23: Save/Overwriting Setup
To make the current set of test conditions the default (at power up) one needs to select
[DEFAULT] in the Save Setup menu and overwrite the conditions currently stored. To
prevent overwriting the default setup by mistake an additional level of safety ex ists where
the operator is required to respond with Yes or No, similar to Figure 2-23.
Selecting [del] will delete a set of test conditions and requires a Yes or No response.
When there are more setups than can fit on th e display the page down key is active. If
there is less than a whole page below, the display wraps around to the previous display.
Continuing to page down will eventually return to the first display of setups. The page
down key is only shown when there are more setups than what is visible.
There are two ways to make the current set of test conditions overwrite an existing setup,
one is to select that setup in the menu and answer Yes to overwrite and the other way is to
enter the same name under New and answer Yes to overwrite.
Setup
I/O Utilities
Save
NEW
1865-100
1865-102
1865-103
1865-104
Cable-2
Cap-1
Cap-2
Rstr-1
Rstr-2
d
e
l
Figure 2-24: Saving Setups on Floppy
Page 52 of 87 Operation
Page 53

It is possible to store about 25 sets of test conditions in unit memory and many more can
be stored on 3 1/2" disks when the 1865 includes the floppy drive option.
NOTE
3 1/2" floppy disks must be formatted for DOS compatibility on a PC or purchased
formatted from the manufacturer, 1.44M high density or 720K low density. Setups are
saved in DOS format, refer to paragraph 2.6.3.6.
Turning the instrument on with a floppy disk in the drive may cause a loss of data.
With this option, to save a set of test conditions on disk one needs to select [FLOPPY].
From the menu in Figure 2-24, one can save a new setup or overwrite an existing one on
the disk in a manner previously described in internal instrument memory. Pressing
[CNCL] reverts the menu back to those stored in internal memory, Figure 2-22.
The number of setups saved to floppy must be limited to no more than 40. Saving more
than 40 setups can result in memory overwriting, false error messages or instrument
lockup.
2.6.4.2 Recall Setup
Setup
I/O Utilities
Recall
DEFAULT
FLOPPY
1865-1
1865-2
1865-3
1865-4
1865-5
1865-6
1865-7
1865-8
1865-9
page
down
d
e
l
Figure 2-25: Recall Setup Test Conditions
Allows a previously stored set of test conditions to be recalled from instrument memory.
Test conditions are those that are user programmable in the Setup and I/O menus and
saved as discussed above. To recall a set of test conditions one needs to arrow down or
up to the desired set. DEFAULT is always one of the set of test conditions that can be
recalled as discussed in the previous paragraph. Selecting [FLOPPY] allows setups to be
recalled from disk when the 3 1/2" optional drive is present. Selecting [del] will delete a
set of test conditions and requires a Yes or No response.
Operation Page 53 of 87
Page 54

When there are more setups than can fit on th e display the page down key is active. If
there is less than a whole page below, the display wraps around to the previous display.
Continuing to page down will eventually return to the first display of setups.
NOTE
Setups saved using version 1.6 (or earlier) operating software can not be recalled with
software 2.0 or later. The software version is shown on the display at power up.
2.6.4.3 Zero
The zeroing process automatically measures stray parameters and retains the data, which
is used to correct measurements so that results represent parameters of the DUT alone
without test lead or fixture capacitance. Zeroing is recommended at the start of each
work day or more often if leads, fixture or test configuration to the DUT is changed.
Zeroing should also be performed anytime the test voltage is changed, which also
includes recalling a set of test conditions from memory with a different test voltage. It is
important to note, that anytime the instrument is zeroed it is done at the test voltage
currently specified. Once [Zero] is selected in the menu and [Enter] key pressed the
operator is prompted by instructions on the display, the first is shown in Figure 2-26.
ZERO AT 500 VOLTS
REMOVE ALL COMPONENTS
FROM THE TEST FIXTURE
HIT <START> WHEN READY
HIT <CNCL> TO EXIT
Figure 2-26: Zeroing Procedure
Once the zeroing is initiated by pressing [START] the next message displayed is:
ZERO CAL IN PROGRESS
Once complete, typically a minute or slightly longer, the next message displayed is:
COMPLETE
HIT <MENU> KEY TO CONTINUE
Page 54 of 87 Operation
Page 55

2.6.4.4 Lock Out
Allows user to turn keypad lock feature ON or OFF. There are two choices which can be
selected, lockout only and lockou t with setu p recall. In both modes only the [START],
[STOP] and [MENU] on the instrument front panel are active, all other keys disabled.
The difference is that in lockout w ith setup recall the menu key also allows setups to be
recalled from instrument memory.
When either is selected the operator must enter a password number up to 8 characters.
CAUTION
For security reasons the password is not displayed when it is entered, so the password
should be keyed in distinctly and remembered.
ENTER PASSWORD
(8 CHARACTERS MAXIMUM)
Once the password is entered and entered again for verification, testing can begin by
pressing [START] or the password cleared or changed by selecting [MENU].
HIT <MENU> KEY TO ENTER PASSWORD
AND TO RETURN TO THE MENU
OR
HIT THE <START> KEY TO
START A MEASUREMENT
Once activated, only the [START], [STOP] and [MENU] on the instrument front panel
are active, all other keys are disabled. To turn the lockout feature off and reactivate
menus select [MENU] (select Exit Lockout in Lockout with Setup Recall mode) and
enter the previous password from the keypad, the instrument will again function as
normal. Failure to remember an entered password requires an override password
(186501).
If [Recall Setup] is chosen in the Lockout with Setup Recall mode, the instrument
functions as described in paragraph 2.6.4.2 under Recall Setup.
2.6.4.5 Calibration
Refer to Calibration in Paragraph 5.4. INSTRUMENT CALIBRATION SHOULD
ONLY BE PERFORMED BY QUALIFIED SERVICE PERSONNEL.
* * * * * * * *
Operation Page 55 of 87
Page 56

2.6.4.6 Set Time/Date
T
Tue Jan 14 10: 37: 10 1992
TO CHANGE TIME PRESS T KEY
TO CHANGE DATE PRESS D KEY
TO RETURN PRESS <MENU>
D
Figure 2-28: Set Current Date and Time
Allows resetting of time and date into unit memory. This is used as the basis for the
elapsed time counter and stored calibration date.
T (time) is entered in
HOURS (up to 2 digits, 0 through 23)
MINUTES (up to 2 digits, 0 through 59)
SECONDS (up to 2 digits, 0 through 59)
D (date) is entered in
MONTHS (up to 2 digits, 1 through 12)
DAYS (up to 2 digits, 1 through 31)
YEARS (4 digits, 1991 through 2100)
Page 56 of 87 Operation
Page 57

2.6.4.7 Elapsed Time
When selected, indicates the total elapsed time in hours that the unit has been powered
up. This is from the moment of initial use and will show some time when shipped from
the factory.
THE TOTAL OPERATING TIME FOR
THIS INSTRUMENT IS
1205.50 hours
HIT<MENU> KEY TO CONTINUE
Figure 2-29: Display of Elapsed Time
2.6.4.8 Calibration Date
When selected indicates date the unit was last calibrated. This date is retained in
instrument memory until the unit is re calibrated and then it is updated.
THIS INSTRUMENT WAS CALIBRATED ON
01/14/1992
AT 11:25:45
HIT <MENU> KEY TO CONTINUE
Figure 2-30: Display of Calibration Date
Operation Page 57 of 87
Page 58

2.6.4.9 Set Contrast
Allows adjustment of contrast on the LCD display. Use Up arrow to increase contrast or
Down arrow to decrease. When the instrument is powered up it returns to the last set
contrast, not some nominal level.
HIT ARROW KEYS TO
CHANGE THE DISPLAY CONTRAST
HIT <ENTER> KEY TO ACCEPT
THE CONTRAST SETTING
Figure 2-31: Display Contrast Adjustment
2.6.4.10 LCD Backlite
Allows the backlite on the LCD display to be turned ON or OFF. Turning the backlite
off when it is not necessary or if the display is not in use will prolong the life of the
display.
2.7 Input/Output Interface
2.7.1 I/O Interface
The 1865 instrument comes standard with an I/O interface port available through a
connector (36 pin) on the rear panel of the instrument. This is generally used for
interfacing to an automatic component handler. Refer to Table 2-3 for signal names, pin
numbers and functions as necessary for cable connections.
Page 58 of 87 Operation
Page 59

Table 2-3: I/O Interface Connections
Signal Name Pin Number Function
Input*
START 16 Initiates Measurement Cycle
Outputs**
Bin 0 1 Fail, Measured Value below preset limit
Bin 1 19 Pass, Measured Value above preset limit
GND 11, 15, 33 System Ground
IGND 5, 10, 23, 28 Isolated Ground
EOT 29 End of Test, Bin signal outputs valid
TEST ACTIVE 30 Measurement in process
VCC 12, 32
+5V (Source Z: 100Ω pin12, 10Ω pin 32)
Isolated Connections***
START HI (isolated) 34 High Input from external source
START LO (isolated) 35 Low Input from external source
Interlock
INTERLOCK 31 Operator Safety feature primarily for use
with external fixtures (i.e. operation of the
1865 instrument can be disabled until the
cover of the fixture is closed).
To enable the interlock function, pin 31
must be connected to ground or controlled
electrically with a logic low. This can be
converted to an isolated active low input by
removing jumper JP4 on the I/O PCB. The
interlock connector supplied with the unit
makes this connection (pin 31 to 28) when
plugged into the rear panel I/O connector
(Figure 2-32).
18 1
36 19
Figure 2-32: Rear Panel I/O Connector
WARNING
Do not apply an external source in excess of 5 volts with jumpers JP2, JP3 or JP4 in
place, otherwise the instrument can be damaged. These jumpers are discussed below and
on some instruments physically located under the stack on the I/O board.
Operation Page 59 of 87
Page 60

Table 2-3 NOTES
* The input signal is active low and requires a positive-voltage external circuit, which
must pull the signal line down below 0.4V, but not less than 0.0V, i.e. not negative. The
logic-low current is 0.4mA (max). For the inactive state (logic high), the external circuit
must pull the signal line above +2.5V, but not above +5V. This can be converted to a
isolated active low input by removing jumper JP3 on the I/O PCB.
** Outputs can be active low optically isolated open - collector drivers that pull each
signal line to IGND (isolated common) when asserted. All outputs require a positive +5V
to +24V external source (referenced to IGND) and pull-up resistor to operate as fully
isolated signals. IGND can be isolated from system GND by removing jumper JP2 on the
I/O PCB. With jumper JP2 in place optical isolati on is defeated allowing the outputs to
be pulled up to the system +5V with external resistors. The outputs can sink up to 80mA
of current. Greater currents can damage the instrument.
*** Pin 34 is connected to the + input of the optical isolator through a 620Ω current
limiting resistor. Pin 35 is connected to the - side of the optical isolator. Recommended
force current through this circuit should be between 1 and 5mA nominal (10mA max).
+
pin
34
start
620
ohms
35
pin
-
Figure 2-33: Isolated Connection
2.7.2 IEEE-488 Interface
The IEEE-488 interface is available as an option to the 1865. When this option is present
connection is made through a connector (24 pin) on the rear panel. This interface can be
used to connect to a system containing a number of instruments and a controller in which
each meets IEEE Standard 488.2-1987 (Standard Digital Interface for Programmable
Instrumentation) Refer to Table 2.4 below for a full tabulation of connections and Table
2.5 for the command set.
The following functions have been implemented. Refer to the standard for an explanation
of the function subsets, represented by the identifications below.
SH1 Source Handshake PP1 Parallel Poll AH1 Acceptor Handshake
DC1 Device Clear DT1 Device Trigger SR1 Service Request
RL1 Remote Local L3 Listener C0 Controller
E2 Electrical Interface T5 Talker
Page 60 of 87 Operation
Page 61

Table 2-4: IEEE-488 Interface Connections
Signal Name Pin Number Function
DAV 6 Low state: "Data is Available" and valid on
DI01 through DI08
NRFD 7 Low state: At least one listener on the bus
is "Not ready for Data".
NDAC 8 Low state: At least one listener on the bus
is "Not Accepting Data".
ATN 11 "Attention" specifies 1 of 2 uses for the
DI01 through DI08 lines
Low state - Controller command messages
High state - Data bytes from the talker
device
IFC 9 "Interface Clear"
Low state - Returns portions of interface
system to a known quiescent state.
SRQ 10 "Service Request"
Low state - a talker or listener signals (to
the controller) need for attention in the
midst of the current sequence of events
REN 17 "Remote Enable"
Low state - enables each device to enter
remote mode when addressed to listen
High state - all devices revert to local
control
EOI 5 "End of Identify" if ATN is in high state,
then low state of EOI indicates end of a
multiple-byte data transfer sequence. If
ATN is in low state, then low state of EOI
activates a parallel poll.
DI01 1 The 8-line data bus, that conveys interface
DI02 2 messages (ATN low state) or device dependent
DI03 3 messages (ATN high state), such as
remote-control
DI04 4 commands from the controller or from a
talker
DI05 13 device
DI06 14
DI07 15
DI08 16
Operation Page 61 of 87
Page 62

Table 2-5: IEEE and RS-232 Commands
Command Function Parameter(s)
CONFigure:
VALid? Is filename valid to save? xxxxxxxx
SAVe:
DUPLicate Save setup as duplicate filename in battery
backed up RAM xxxxxxxx
NEW Save setup as new filename in battery
backed up RAM xxxxxxxx
RECall filename Recall setup filename from battery xxxxxxxx
backed up RAM
FVALid? Is filename valid to save? xxxxxxxx
FSAVe:
DUPLicate Save setup as duplicate filename on floppy xxxxxxxx
NEW Save setup as new filename on floppy xxxxxxxx
FRECall filename Recall setup filename from floppy drive xxxxxxxx
HANDler (state) Turn handler port OFF or ON 0 (OFF) 1 (ON)
VOLTage value Set the voltage to value 0000.000
TCHarge value Set the charge time to value 000
TDWell value Set the dwell time to value 000
TMEasure value Set the measure time to value 000
TDIScharge value Set the discharge time to value 000
MODE Set the mode to A (Auto) M (Manual)
RANGe Set the range to Auto 1mA 100uA
10uA 1uA 100nA
10nA 1nA
AVERage Set # to average 000
LIMit value Set the limit to value floating point number
FRESult Set the result format to S (Scientific)
E (Engineering)
DISPlay type Set display type to R (Resistance)
I (Current)
P (Pass/Fail)
N (No Display)
SONPass Stop on pass 000
RVALid? Is results filename valid? xxxxxxxx
RTOFloppy: Results to floppy
DUPLicate Save results as duplicate filename on floppy xxxxxxxx
NEW Save results as new filename on floppy xxxxxxxx
APPend Append results to existing filename xxxxxxxx
CLOSe Close results of filename xxxxxxxx
Page 62 of 87 Operation
Page 63

Table 2-5: IEEE and RS-232 Commands (Continued)
Command Function Parameter(s)
SYSTem:
TIME Set the time to hours, minutes hh:mm
DATE Set the date to month, day, year mm/dd/yyyy
LOCKout state Set the front panel lockout off or on 0 (Off) 1 (On)
ELAPsed? Query the elapsed time the machine has run
DCALibration? Query the calibration date
MEASure:
RESistance Measure the resistance value
CURRent Measure the current value
FETCh?
Fetches the most recent measurement value (with pass/fail if limit selected) for the
selected parameter, resistance or current. The character sequence is as follows,
terminated with a line feed: N.NNNNE+NNN (2 spaces) PASS. The plus (+) sign will
be negative (-) when the parameter is selected as current. Pass can also be Fail or neither
if no limit is entered.
IDN?
Returns instrument identification "QuadTech,1865,0,software version"
START
Initiates a measurement in Auto mode, in Manual mode it initiates charge, if sent again it
takes one measurement, each time sent thereafter one additional measurement is taken.
STOP
Stops a measurement in process in Auto mode, in Manual mode it exits the measurement
loop to discharge , if sent again it exits discharge.
CALibrate:
DATA? Returns the calibration data to the user (21 values)*
ZERO Instrument zero
* Refer to Note on next page for 21 values
Operation Page 63 of 87
Page 64

Table 2-5: IEEE and RS-232 Commands (Continued)
* Note
Description of the 21 values returned by the remote “CAL: DATA?”
1 The value of the internal voltage standard
2 The 100 volt full scale value
3 The 1000 volt full scale value
4 The gain of the 500:1 voltage attenuator (.002)
5 The gain of the 50:1 voltage attenuator (.02)
6 The gain of the 5:1 voltage attenuator (.2)
7 The input resistance
8 The value of the range 1 standard (2KΩ)
9 The value of the range 2 standard (20KΩ)
10 The value of the range 3 standard (200KΩ)
11 The value of the range 4 standard (2MΩ)
12 The value of the range 5 standard (20MΩ)
13 The value of the range 6 standard (200MΩ)
14 The value of the range 7 standard (2GΩ)
15 The open circuit correction for range 1
16 The open circuit correction for range 2
17 The open circuit correction for range 3
18 The open circuit correction for range 4
19 The open circuit correction for range 5
20 The open circuit correction for range 6
21 The open circuit correction for range 7
Command Function Parameters
RST
(Reset) This command performs a device reset
(Clear Status) This command clears status data structures
CLS
(Event Status Register) Sends the event status register information.
ESR?
This is a destructive read.
STB?
(Status Byte Register) Sends user the status byte register information
(Event Status Enable Register) Sends the user event status enable register info.
ESE?
(Service Request Enable Register) Sends the user service request enable register info.
SRE?
(Event Status Enable Register) Writes the event status enable register info. value
ESE
(Service Request Enable Register) Writes the service request enable register info. value
SRE
Status Byte Register Event Status Register
Bit Decimal
Value
7 128 None 7 128 Power Up since last Query
6 64 SRQ, SPOL Resets 6 64 None
5 32 Summary Standard Event
4 16 Message Available 4 16 Execution Error (Over Range, etc.)
3 8 None 3 8 No Contact
2 4 None 2 4 None
1 2 None 1 2 None
0 1 None
Use Bit Decimal
Status Register
Use
Value
5 32 Command Error (Syntax)
0 1 Operation Complete
Page 64 of 87 Operation
Page 65

2.7.3 Sample Program for National Instruments GPIB card
REM start with qb filena me /l qbib4 ***** this is manda tory ****
REM $INCLUDE: 'qbdecl4.bas'
'******************** INITIALIZE 1865********************************
start:
ADAP$ = "GPIB0": qt1865$ = "Dev4" 'address 4
stalp:
CALL IBFIND(qt1865$, qt1865%)
CLS '***************** M EASURE AND DISPLAY DATA*******************
'get the identification of the unit
SET$ = "IDN?" '1865 setup string
CALL IBWRT(qt1865%, SET$) 'send string to 1865
c$ = SPACE$(25)
CALL IBRD(qt1865%, c$) 'get data
PRINT "unit ID is "; c$ 'print result
SET$ = "CONF:VOLT 100" '1865 setup string
CALL IBWRT(qt1865%, SET$) 'send string to 1865
SET$ = "CONF:tme 0" '1865 setup string
CALL IBWRT(qt1865%, SET$) 'send string to 1865
SET$ = "CONF:tdw 0" '1865 setup string
CALL IBWRT(qt1865%, SET$) 'send string to 1865
SET$ = "CONF:tch 0" '1865 setup string
CALL IBWRT(qt1865%, SET$) 'send string to 1865
SET$ = "CONF:tdis 0" '1865 setup string
CALL IBWRT(qt1865%, SET$) 'send string to 1865
SET$ = "CONF:fres e" '1865 setup string
CALL IBWRT(qt1865%, SET$) 'send string to 1865
SET$ = "CONF:LIM 997000" '1865 setup string
CALL IBWRT(qt1865%, SET$) 'send string to 1865
'make measurement
c$ = SPACE$(18)
SET$ = "MEAS:res" '1865 setup string
CALL IBWRT(qt1865%, SET$) 'send string to 1865
' wait for completion of measurement
mask% = &H0800
CALL ibwait(qt1865%, mask%)
IF (ibsta% AND &HC000) <> 0 THEN PRINT "ibsta% = "; ibsta%
'get result
SET$ = "FETC?" '1865 setup string
CALL IBWRT(qt1865%, SET$) 'send string to 1865
CALL IBRD(qt1865%, c$)
PRINT "result is "; c$
'enable front panel
SET$ = "SYSTEM:LOCK 0" '1865 setup string
CALL IBWRT(qt1865%, SET$) 'send string to 1865
CALL IBLOC(qt1865%): CALL IBGTS(gpib0%, V%) 'return to local control
END
Operation Page 65 of 87
Page 66

2.7.4 Sample Program for IO Tech GPIB card
OPEN "\dev\ieeeout" FOR OUTPUT AS #1
IOCTL #1, "BREAK"
PRINT #1, "RESET"
OPEN "\dev\ieeein" FOR INPUT AS #2
PRINT #1, "fill error"
PRINT #1, "remote 04"
PRINT #1, "local lockout"
id$ = space$(30) : c$=space$(15)
PRINT #1, "output 04;idn?"
PRINT #1, "enter 04"
FOR i = 1 TO 3000: NEXT i
INPUT #2, id$
PRINT "Company identification is "; id$
INPUT #2, id$
PRINT "Instrument identification is "; id$
INPUT #2, id$
PRINT "Serial number is "; id$
INPUT #2, id$
PRINT "Software revision is "; id$
PRINT #1, "output 04;syst:Dcal?"
PRINT #1, "enter 04"
INPUT #2, c$
PRINT "This unit was calibrated on "; c$
PRINT #1, "output 04;conf:volt 100"
PRINT #1, "output 04;conf:lim 9.97e5"
PRINT #1, "output 04;conf:disp r"
PRINT #1, "spoll" ' an error will produce a SRQ
INPUT #2, y
IF y THEN
PRINT #1, "spoll 04"
INPUT #2, x : PRINT "spoll 04 = "; x
END IF
PRINT #1, "output 04;MEAS:RES"
y = 0
WHILE y = 0 'SRQ at end of measurement
PRINT #1, "spoll"
Page 66 of 87 Operation
Page 67

INPUT #2, y
IF y THEN
PRINT #1, "spoll 04"
INPUT #2, x
END IF
WEND
PRINT #1, "output 04;fetc?" 'request data
PRINT #1, "enter 04" 'get data
INPUT #2, c$
PRINT c$
PRINT #1, "output 04;system:lock 0" 'enable front panel
PRINT #1, "local"
END
2.7.5 RS232 Interface
The 1865 instrument comes standard with an RS232 serial port interface, available
through a connector (9 pin) on the rear panel of the instrument, for connecting to a PC.
The RS232 standard defines electrical specifications for the transmission of bit serial
information. The use of the RS232 port requires five lines: receive data, transmit data,
data terminal ready, data set ready and signal ground. With some controllers additional
signals maybe required and are listed in Table 2-6. Refer to Figure 2-34 for null modem
cable configuration to the standard db9 or db25 connector. Refer to Table 2.5 for the
command set which also applies to the RS232 interface. When using the RS-232
interface with a printer the IEEE-488 Mode must be set to Talk and the State to Disable.
Table 2-6: RS232 Interface Connections
Signal Name Pin Number Function
Input:
DCD 1 Data Carrier Detect
DSR 6 Data Set Ready
RXD 2 Receive Data
CTS 8 Clear to Send
RI 9 Ring Indicator
Outputs:
RTS 7 Request to Send
TXD 3 Transmit Data
DTR 4 Data Terminal Ready
GND 5 Signal Ground
Operation Page 67 of 87
Page 68

db9 to db9 Cable Configuration
1865 Controller
Pin # Function Pin # Function
2
3
4
5
6
Receive data
Transmit data
Data terminal ready
Signal ground
Data set ready
Connect
to
3
2
6
5
4
Transmit data
Receive data
Data set ready
Signal ground
Data terminal ready
db9 to db25 Cable Configuration
1865 Controller
Pin # Function Pin # Function
2
3
4
5
6
Receive data
Transmit data
Data terminal ready
Signal ground
Data set ready
Connect
to
2
3
6
7
20
Transmit data
Receive data
Data set ready
Signal ground
Data terminal ready
Figure 2-34: RS-232 Cable Configurations
2.7.6 Sample Program for RS-232
OPEN "com1:9600,n,8,1,rs" FOR RANDOM AS #2
'some com ports require this ie ,rs
'OPEN "com2:9600,n,8,1" FOR RANDOM AS #2
'others run best without ,rs
PRINT #2, "system:lock 1"
PRINT #2, "idn?" 'get unit identification
GOSUB cget 'read serial data subroutine
r$ = INPUT$(x, #2): PRINT "idn = "; r$;
PRINT #2, "syst:dcal?" 'get calibration date
GOSUB cget
r$ = INPUT$(x, #2): PRINT "calibration date is "; r$;
PRINT #2, "conf:fres s" 'configure unit
PRINT #2, "conf:tch 0"
PRINT #2, "conf:tme 0"
PRINT #2, "conf:volt 100"
FOR i = 1 TO 30000: NEXT i 'delay
gg:
PRINT #2, "meas:res"
Page 68 of 87 Operation
Page 69

FOR i = 1 TO 30000: NEXT i
PRINT #2, "fetc?"
GOSUB cget
s$ = INPUT$(x, #2)
PRINT "res at 100 volts is "; s$;
PRINT #2, "system:lock 0"
END
cget:
' subroutine to get serial input loop
' until first character is received
DO WHILE (LOC(2) = 0)
LOOP ' then get the rest of the string
y = x + LOC(2)
DO WHILE (x <> y)
y = x
FOR j = 1 TO 300: NEXT j
x = LOC(2)
LOOP
RETURN
2.7.7 Results to Printer
The 1865 can be setup to output to an RS-232 or IEEE printer. Results format is the
same as results to floppy, refer to paragraph 2.6.3.6.
RS-232 RS-232 must be selected on I/O Menus and format set IEEE must also
be selected for Talk mode and Disable state.
IEEE IEEE must be selected on I/O Menus and set for Address, Talk mode
and Enable state.
Operation Page 69 of 87
Page 70

2.8 Error Messages
"BAD DRIVE-REQUEST STRUCTURE" Floppy option not present, defective or disk
not inserted
"BAD VOLTAGE SENT TO FUNCTION" Improper voltage entered during calibration
procedure
"BAD ZERO CALIBRATION" Zeroing error, repeat and/or remove
component from input terminals/fixture
"CALIBRATION STANDARD OUT OF Entered value > than 1% of 1 Megohm
RANGE"
"CORRUPT SETUP DATA" Stored setups lost or corrupt (battery for
non-volatile memory may be defective or
has been disconnected)
"CRC ERROR ON FLOPPY" Stored setup lost or corrupt (cyclic-
redundancy-check)
"DISK WRITE PROTECT ERROR" Floppy disk is write protected
"ELAPSED TIME ERROR, SET TO 0" Elapsed time is incorrect and has been set
to zero (battery for non-volatile memory
may be defective or has been disconnected)
"FAILURE # SEE DOCUMENTATION" Hardware or software failure, 1 - 99
(# list not included in this manual)
"FILE ACCESS VIOLATION" File selected from floppy is Read Only
"FILE EXISTS" File already exists under the chosen name
"FLOPPY DRIVE NOT READY" Floppy option not present, defective or disk
not inserted
"FLOPPY MEDIA DEFECT" Disk defective, format or replace
"FLOPPY READ FAULT" Floppy option not present, defective or disk
not inserted
"FLOPPY SECTOR UNFORMATTED" Floppy disk is not formatted
Page 70 of 87 Operation
Page 71

"FLOPPY SEEK ERROR" Floppy option not present, defective or disk
not inserted
"FLOPPY WRITE FAULT" Floppy option not present, defective or disk
not inserted
"GENERAL FAILURE, FLOPPY" Floppy option not present, defective or disk
not inserted
"HANDLER PORT FAILURE" I/O port malfunction during power up
"HARDWARE TIMER FAILURE, REBOOT" Hardware malfunction during power up
"INVALID CALIBRATION CODE" Entered calibration code is invalid
"INVALID LIMIT" Entered limit is invalid
"INTERNAL HARDWARE FAILURE, Hardware malfunction during power up
REBOOT"
"LIMIT INVALID, SET TO NONE" No limit is accepted (out of range or
invalid)
"LOW BATTERY VOLTAGE" Memory backup battery, low voltage
(setups and instrument zero could be lost)
"MAXIMUM # OF SETUPS REACHED" Maximum number of files have been stored
"NO CALIBRATION DATA FOUND" Calibration required (refer to ¶ 5.4)
"NO IEEE 488 INTERFACE" Unit does not include IEEE 488 Option
"NO INTERLOCK SIGNAL" Open interlock connection at rear panel I/O
Port
"NO PASSWORD ENTERED" Password entry canceled, re-enter
"NO SETUP DATA FOUND" Memory backup battery has been
disconnected, reset time and date
"NO ZERO DATA FOUND" Unit requires zeroing (Refer to Utilities
Menu, ¶ 2.6.4.3)
"PASSWORD DID NOT MATCH" Incorrect password entered
Operation Page 71 of 87
Page 72

"PASSWORD NOT SAVED IN RAM" Error trying to save password, repeat
"PASSWORD VERIFICATION FAILURE" Wrong password entry for verification
"RANGE RESISTOR VALUE OUT OF RANGE" Malfunction of internal calibration resistors
"REMOTE COMMAND INVALID" IEEE or RS232 command is incorrect (for
example: to set voltage use VOLTage)
"REMOTE COMMAND PARAMETER IEEE or RS232 parameter is incorrect (for
INVALID" example: voltage parameter can be
XXXX.XXX)
"REMOTE COMMAND PREFIX INVALID" IEEE or RS232 command prefix is
incorrect (for example: to configure unit
use CONFigure)
"SHUT THE POWER OFF" Malfunction of high voltage source
"TIME / DATE ERROR, PLEASE SET" Reset time and date
"UNABLE TO READ FROM FLOPPY" Floppy option not present, defective or disk
not inserted
"UNABLE TO READ THAT FILENAME" Selected file unreadable, improper format
"UNABLE TO SAVE CALIBRATION DATA" Repeat calibration, data not stored
"UNABLE TO WRITE TO FLOPPY" Floppy option not present, defective or disk
not inserted
"UNABLE TO WRITE TO REMOTE" IEEE or RS232 not setup correctly or IEEE
option not present
"UNKNOWN UNIT" Floppy drive is not recognized (option not
present or defective)
"VALID RANGE = low value - hi value" Entry invalid, should be between specified
values
"VOLTAGE PROGRAM FAILURE" Malfunction of instrument power supplies
Page 72 of 87 Operation
Page 73

Section 3 : Applications
3.1 Insulation Resistance Testing
Insulation resistance of materials is one of several parameters that may indicate the
condition of insulation. An insulation test is to measure the resistance offered by the
insulating members of a component part to an impressed direct voltage tending to
produce a leakage of current through or on the surface of these members. There are times
when knowledge of insulation resistance can be very important, for example; when
resistance is high it may be the limiting factor in design of a high-impedance circuit,
when resistance is low it can disturb the operation of circuits intended to be isolated.
Insulation resistance measurements should not be considered the equivalent of a voltage
breakdown test. Material with high insulation resistance could possess a mechanical fault
that might fail during a voltage test and conversely material with low insulation resistance
might not breakdown during a voltage test.
Factors that affect insulation resistance measurement s include such things as temperature,
humidity, previous conditioning, test voltage, charging current and duration of the test
voltage (electrification time). It is characteristic of certain components (for example,
capacitors or capacitive components or materials) for the current to fall from an
instantaneous high value to a steady lower value, consequently the measured insulation
resistance will increase from an appreciable time as test voltage is applied. Because of
this it may take minutes to approach maximum insulation resistance readings, thus
specifications usually require that readings be taken after a specified time, again
electrification time. A routine test that has been widely adopted for insulation testing
calls for the measurem ent of the apparent leakage resistance after a test voltage has been
applied for 1 to 2 minutes.
For discussion on insulation resistance measurement methods and procedures refer to
MIL-STD-202 and ASTM (American Society for Testing and Materials) Standard D257.
Applications Page 73 of 87
Page 74

3.2 Test Sample Resistivity Measurements
Guard Ring
Sample
Top Electrode
Top View
Side View
Terminal 2
Bottom Electrode
Guard Ring
Sample
Terminal 3
Top Electrode
Terminal 1
Guard Ring
Terminal 2
Figure 3-1: Test Sample Cell
The 1865 can be used for measuring the resistivity of test samples as described by ASTM
Standard D 257, which describes in detail the techniques for both surface and volume
resistivity measurements. The most common electrode arrangement is shown in Figure 3-
1. In this configuration surface resistivity is measured with terminal 1 tied to the UNKNOWN terminal, terminal 2 tied to the +UNKNOWN terminal and terminal 3 tied
to GUARD. For volume resistivity measurements, terminal 1 is tied to the -UNKNOWN
terminal, terminal 2 to the GUARD and terminal 3 to the +UNKNOW N terminal. The
formulas required to convert from measured resistance to resistivity are given in the
ASTM Standard.
3.3 Capacitor Insulation Resistance
3.3.1 General
The insulation resistance measurements of capacitors is different from that of resistors by
the fact that some consideration must be given to the charge and discharge currents.
Consideration should also be given to high value, low leakage capacitive devices relative
to dc resistance measurements. Inherent to some degree in all high resistance
measurement instrumentation is the inability to provide stable leakage measurements on
high value capacitors. This is due to the fact that a capacitive element is very ac sensitive
and the dc voltage applied to the device always contains a small percentage of low
frequency noise ripple. Measurements on pure resistive elements will tolerate a
Page 74 of 87 Applications
Page 75

high degree of ripple due to the voltage ratio measurements whereas a capacitor easily
passes the noise ripple. When this is amplified by the current amplifier of the measuring
instrument results can fluctuate and vary widely. To eliminate this in the 1865 two
resistance adapters are supplied which can be placed in series with the (-) unknown
(black) when measurements are made on the low current ranges (the 1MΩ, Hi Range
Adapter is recommended for ranges 1nA & 10nA and the 100kΩ, Lo Range Adapter for
ranges 100nA, 1nA & 10uA). This added resistance has negligible effect on the dc
measurement since its value is very small compared to the leakage resistance of the
unknown however it increases the ac input resistance to the current amplifier, reducing
the ac gain and thus minimizing the wide fluctuations. This added resistance will have an
effect on the charge time constant and is discussed briefly in paragraph 3.3.2 below.
WARNING
Capacitors being measured may be charged and contain lethal energy. Always make sure
the CAUTION HIGH VOLTAGE Indicator is OFF when connecting or disconnecting
the capacitor under test.
3.3.2 Charge Time Constant
The time constant for charging a capacitor in the charge phase is determined by the value
of the capacitor times the effective source impedance of the supply. The supply
resistance is approximately,
E E E
Ro =
----- ohms = ----- ohms = ------ kohms
I max 0.002 A 2
where E is the user specified test voltage in volts and I max is the current limit of the
1865 instrument, which is approximately 2mA. Therefore, the time constant is
E Cx
T = Ro Cx = --------- seconds
2000
where Cx is in µF. As an example, for a 500V test voltage Ro is approximately 250k Ω
so that the time constant for charging of a 1µF capacitor is 0.25 seconds. The charge time
should be set for a minimum of 10 time constants.
When the resistance adapters (discussed in paragraph 3.3.1 above) are used the time
constant will be increased. In the example above if the 100kΩ or 1MΩ adapter is placed
in series with the effective source impedance of 250kΩ the charge time will be increased
by a factor of 0.4 and 4 respectively.
Applications Page 75 of 87
Page 76

3.3.3 Discharge Time
The time constant for discharging a capacitor in the discharge phase is determined by the
value of the capacitor times the resistance of the 1865 discharge circuit. The discharge
resistance is approximately 66kΩ. The CAUTION HIGH VOLTAGE lamp is turned off
after the user specified discharge time. If the discharge time is set to zero or a very short
time a capacitor could remain with a charge after the indicator is extinguished. However,
the discharge time is so short this is not a practical consideration except for capacitors
greater than 10µF or so.
Capacitors with high dielectric absorption can have a residual charge even after they are
shunted and must be repeatedly shunted to completely discharge. Usually a "voltage
recovery" of this type would be a very small percentage of the original applied voltage
and generally not dangerous to the operator. This risk is further minimized by the fact
that the 1865 circuitry remains in a discharge mode until the operator initiates another
charge and measure cycle.
3.4 Resistance Measurements
The recommended test voltage is typically 100V for fixed composition resistors, film
resistors or wire wound resistors above 100kΩ. Refer to EIA (Electrical Industry
Association) Standards. These resistors (values greater than 1000 ohms) can easily be
measured on the 1865 where the instrument basic accuracy of 0.5% is adequate. For
single component resistors a two terminal connection, +UNKNOWN and -UNKNOWN
is recommended.
3.5 Measurement of Voltage Coefficient
The 1865 instrument may be used to measure voltage coefficient which is defined as :
R1 - R2
----------------- x 100%
R2 (V1 - V2)
where V1 > V2
R1 is the resistance at V1, the higher voltage
R2 is the resistance at V2
For example, if V1 = 500 V and V2 = 100 V,
R
500V
- R
100V
Voltage Coefficient = --------------------- x 100%
R
100V
(400)
Page 76 of 87 Applications
Page 77

1 ∆ R
= --- ------- %
4 R
100V
This voltage coefficient is usually negative.
3.6 Guarded, 3-Terminal Measurements
In many cases it is necessary to measure the resistance between two points in the presence
of resistance from each of these points to a third point. This third point can often be
guarded to avoid error caused by the extraneous resistance. This can best be illustrated as
shown in Figure 3-2 below. Here RX is the quantity to be measured in the presence of
RA and RB. If the junction of RA and RB is tied to guard, RA is placed across the
voltage source and has no effect if it is greater than 1.25MΩ. As long as RB is greater
than RS (standard range resistor) the error caused by RB is minimized, thus if there is a
choice its better to have the higher of the two stray resistances connected to RB.
A
R
R
X
E
B
R
S
R
--
+
V
Figure 3-2: Guarded Measurement Configuration
The guard terminal can be used whether GUARD or the +UNKNOWN terminal is
grounded, but it's important to note that if the +UNKNOWN terminal is grounded the
GUARD terminal will be at a high negative voltage level. When the GUARD terminal is
connected to a true ground of a device, such as chassis, it is the one that must be
grounded, not the +UNKNOWN.
GUA RD
Applications Page 77 of 87
Page 78

Page 79

Section 4 : Theory
4.1 General
The 1865 Megohmmeter/IR Tester is built on QuadTech's I2000 standard instrument
architecture which consists of a standard mechanical package, LCD display/keypad,
microprocessor unit, digital I/O interface and power supply. The I2000 further
incorporates the circuitry unique to the 1865, an analog instrument module and power
supply. In addition there are two basic I2000 options, the IEEE-488 card and floppy
drive/controller card. Each of these modules is discussed briefly below.
4.2 Instrument Description
4.2.1 Basic I2000 Instrument Architecture
Processor Board
The processor board provides the basic control for the 1865 and mimics the IBM-PC
architecture. Besides the central processing unit and memory modules it includes DOS,
keypad and RS232 ports and instrument software stored in EPROM. The RS232 port is
connected to its rear panel connector by a cable. The processor board is stacked on the
Digital I/O Board which is mounted on the Analog Instrument board. The processor
board can have the IEEE-488 and/or floppy drive controller option boards stacked on it if
either or both options are present.
Power Supply Module
The standard I2000 power supply provides +5V which supplies power to most of the
instruments basic boards/modules, including the processor board, digital I/O board, LCD
display, IEEE-488 board, floppy drive and floppy drive controller board. It also provides
power for the digital logic on the analog instrument board, however most power for this
board is supplied by the 1865 instrument power supply module. The I2000 power supply
module is located towards the rear of the instrument and the 1865 instrument power
supply module towards the front.
Digital I/O Board
The digital I/O board provides interface to the LCD display, the keypad and provides
handler interface functions through a cable to the rear panel connection. It also contains
the circuitry for the instrument's many timing functions as well as a non-volatile memory
used for storing test setup conditions and corrections for instrument zeroing. A battery
backup for the RAM on this board is provided by 3-AA alkaline batteries which should
be changed once a year. This board is mounted on the analog instrument board in the
instruments main compartment. The 3 batteries are installed in the long round tube
towards the rear left of the unit.
Theory Page 79 of 87
Page 80

LCD Display/Keypad Panel
The front panel user interface is comprised of a molded silicon rubber keypad that
actuates a membrane switch assembly. The keypad is environmentally sealed, designed
for long life and all keys with tactile feedback to the operator. The 2 1/2" x 4 3/4" LCD is
a high resolution graphic display with on/off backlite for visual clarity. Both keypad and
display are connected to the instrument I/O board via ribbon cables.
4.2.2 1865 Instrument Modules
Analog Instrument Board
The analog instrument board is the heart of the 1865, it includes the measurement
detector, high voltage source, and bus interface to the processor. This board also contains
a non-volatile memory in EEPROM (electrically erasable programmable read only
memory) for retaining vital calibration information. This is the main board in the
instrument compartment to the left of the power supply modules, all other boards are
mounted to it. A brief description on the operation of the measurement detector is as
follows.
Figure 4-1 shows the basic block diagram for the measurement module. A programmable
high voltage (0 - 1000V) is applied to the unknown component (Rx). The current flowing
through the unknown is measured by the current to voltage converter whose output (E1)
is applied to the A/D for processing by the instruments CPU. The measured results can
be expressed as E1 = -(Rs/Rx )Ex. This technique is dependent upon the accuracy of the
applied voltage source, so to improve measurement accuracy and eliminate applied
voltage dependency an extra current measurement based on another set of reference
standards (Rb/Ra) is made. This measurement results can be expressed as E2 = (Rb/Ra)Ex. The ratio of the E2/E1 results in the expression for the unknown Rx =
(Ra/Rb)(Rs)(E2/E1).
R
S
R
E
X
X
R
B
R
A
E
X
E1
E2
A/D
Figure 4-1: Detector Block Diagram
Page 80 of 87 Theory
Page 81

Power Supply Module
The 1865 instrument power supply module provides +5V, +24V, and -12V. It supplies
most of the power for the analog instrument board including the power source for the
high voltage supply. This module is located towards the front of the unit and the standard
I2000 power supply towards the rear.
4.2.3 I2000 Instrument Options
IEEE-488 Board & Cable
The IEEE-488 board is offered as an option to the 1865 and allows complete control over
all aspects of the instrument. Any user control available through the keyboard or any
information available for display can be accessed over this interface. This board is
mounted towards the right rear of the unit stacked above the processor board and above or
below the floppy drive controller board (order of these two is not important but dependent
on which option was installed last). Connection to the IEEE-488 connector on the rear
panel is made by an interconnecting cable.
Floppy Drive
The 3.5" floppy drive is offered as an option to the 1865, for storing multiple setup
conditions beyond what can be retained in the internal RAM of the unit and for storing
test results. The drive will handle standard 3.5" floppies, offering 1.44Mbits of memory
in DOS compatible file format, thus the setup conditions and results are readable on an
IBM-PC or equivalent.
Floppy Drive Controller Board
A floppy drive controller card, included with the floppy drive option, provides the
interface between the instrument processor and the 3.5" drive unit. This is mounted
towards the right rear of the unit stacked above the processor board and above or below
the IEEE-488 board (order of these two is not important). Connection to the drive unit
itself is made by an interconnecting cable.
Theory Page 81 of 87
Page 82

Page 83

Section 5 : Service & Calibration
5.1 General
Our warranty (at the front of the manual) attests the quality of materials and workmanship
in our products. If malfunction should be suspected, or other information be desired
applications engineers are available for technical assistance. Application assistance is
available in the U.S. by calling 978-461-2100 and asking for Applications Support. For
support outside of the United States please contact your local QuadTech distributor.
5.2 Instrument Return
Before returning an instrument to QuadTech for service please call our Customer Care
Center (CCC) at 800-253-1230 for return material authorization (RMA). It will be
necessary to include a Purchase Order Number to insure expedient processing, although
units found to be in warranty will be repaired at no-charge. For any questions on repair
costs or shipment instructions please contact our CCC Department at the above number.
To safeguard an instrument during storage and shipping please use packaging that is
adequate to protect it from damage, i.e., equivalent to the original packaging and mark the
box "Delicate Electronic Instrument". Return material should be sent freight prepaid, to:
QuadTech, Inc.
5 Clock Tower Place, 210 East
Maynard, MA 01754
Attention: RMA #
Shipments sent collect can not be accepted.
5.3 Routine Maintenance
Routine maintenance of the 1865 instrument includes battery replacement, time & date
resetting, display contrast monitoring, preventative cleaning and calibration.
Service & Calibration Page 83 of 87
Page 84

5.3.1 Battery Replacement
Backup power for the instruments non-volatile memory is supplied by 3 standard AA
batteries. These should be replaced annually with alkaline batteries, otherwise damage
to the unit is possible as a result of battery leakage. QuadTech will assume no
responsibility for instrument damage resulting from the batteries not being changed as
recommended. To replace the batteries proceed as follows:
1. Instrument power needs to be on but not in the measurement mode. If the batteries
are removed with the power off there would be no power to the non-volatile memory
and important data such as stored test conditions would be lost.
2. Place a flat head screwdriver in the groove of the battery compartment end cap and
rotate counterclockwise (CCW) about 1/4 turn to remove.
3. Lift the front of the instrument up slightly so that the batteries slide out of the
compartment.
4. Install three new batteries, positive side out.
CAUTION
Do not install the batteries backwards
5. Reinstall the end cap and rotate clockwise (CW) to secure.
Battery Compartment
I/O PORT
RS-232 INTERFACE
BATTERY
90 - 250 V
47 - 63 Hz
40 WATTS MAX
IEEE-488 INTERFACE
PARALLEL PORT
Figure 5-1: Battery Compartment
Page 84 of 87 Service & Calibration
Page 85

5.3.2 Resetting of Time and Date
If for some reason the backup power supplied by the 3 AA batteries should fail during
shipment of the instrument (due to shock, vibration or extreme temperature) the unit will
lose its zero, time and date, elapsed time and stored setup conditions. An indication of
such an occurrence would be the display of the error message "ELAPSED TIME
ERROR, SET TO 0" when the unit is first powered up. The most likely cause would be
an intermittent connection to the battery due to shock or vibration. It is very important
that the time and date be reset and the instrument zeroed before proceeding with
any measurements. Proceed as follows:
1. Press [MENU] key to select menu display.
2. Press Right or Left Arrow key to select Utilities menu.
3. Press Up or Down Arrow key to select Set Time/Date.
4. Press [ENTER] key to activate the entry field.
5. Set the current time and date as instructed on the display, refer to paragraph 2.6.4.6 if
necessary. After the time and date have been reset press [MENU] to return to the
menu display.
6. Press Up or Down Arrow key to select Zero.
7. Press [ENTER] key to activate the Zero routine and follow instructions on the
instrument display.
8. Once the Time and Date have been reset and the instrument zeroed the 1865 is ready
for routine measurements. It's important to note that the elapsed time will have been
reset back to zero during this process.
5.3.3 Loss of Display Contrast
If for some reason the instrument should loose its display contrast it is possible to reset it
easily using the procedure below. Loss of contrast would exhibit no display at all
when the instrument is powered up.
Procedure for restoring loss of contrast:
1. Consider the SELECT buttons as labeled 1, 2, 3, and 4 from top to bottom.
2. Turn the instrument on and wait 20 seconds (or after High Voltage light flashes)
3. Press [MENU] key twice.
4. Press [SELECT "4"] one time.
5. Press [SELECT "1"] two times.
6. Press [ENTER].
7. Press [SELECT "1"] many times till contrast returns to normal.
8. Press [ENTER].
9. Arrow up to [SAVE SETUP] and save as [DEFAULT].
If the above procedure fails to restore the contrast try repeating again. Failing restoration
of the contrast may be indication of another instrument problem.
Service & Calibration Page 85 of 87
Page 86

5.3.4 Preventive Maintenance/Cleaning
In addition to the annual battery replacement and calibration discussed below periodic
cleaning of dust from the 3 1/3" disk drive (when this option is present) is recommended
depending on the environmental conditions. Vacuuming of the drive by qualified service
personnel should be done in accordance with common procedures used in computer
maintenance.
5.4 Calibration
5.4.1 General
Calibration of the 1865 Megohmmeter is recommended on an annual basis. If the unit is
to be returned to QuadTech for factory calibration refer to paragraph 5.2 for instructions.
Using the procedure below the instrument can also be calibrated by a qualified
service person if traceable calibration equipment and standards are available.
Requirements for Re calibration
Temperature stabilized room at 23 degrees C (73.4 F)
Precision Digital Voltmeter (0.01% accuracy) with calibration traceable
to NIST
1 Megohm standard resistor of known value (within 0.01%) at 100V for
direct connection to 1865 input terminals and traceable to NIST
5.4.2 Calibration Procedure
The step by step instructions for this procedure are shown on the instrument display and
discussed below.
1. First set time and date by selecting [SET TIME/DATE] on the Utilities menu.
2. Select CALIBRATION on the Utilities menu. Once [ENTER] is selected the
calibration code of [1][8][6][5 ][2][2][5] must be entered to continue. This code is to
prevent unauthorized personnel from effecting the instrument calibration. The code
might want to be blanked out in this manual. After the calibration code is entered the
stored reference voltage is displayed and can either be accepted or measured and reentered as instructed.
Page 86 of 87 Service & Calibration
Page 87

If the selection is N (no), measure the reference voltage as instructed between TP6
and TP8 (ground) on the analog instrument board and enter the measured value. To
access these points it is necessary to remove the top cover, refer to Figure 5-1. Once
this voltage value is entered and [ENTER] pressed the High Voltage (100V) will be
turned on immediately.
If Y (yes) is selected the High Voltage (100V) will be turned on immediately.
3. Proceed to measure the voltages in each case as instructed, ent er the values and press
[ENTER] to continue each time. Two measurements will be made at levels of 100
and 1000V and one at 10V.
4. Short the input + and - terminals to the instrument as instructed and press [START].
5. Enter the precise known value of the 1 Mohm standard and again press [ENTER].
6. Remove the short and connect the standard between the + and - terminals.
7. When [START] is pressed a calibration measurement is made on the standard which
takes approximately 25 seconds.
8. Once the standard is removed and [START] pressed again a RANGE CALIBRATION
is performed which takes approximately 45 seconds.
9. Press [START], HIGH VOLTAGE IS STILL APPLIED, to initiate the ZERO
CALIBRATION which takes approximately 75 seconds.
10. Once zero calibration is complete if the time and date are correct as displayed answer
Y (yes) to store the calibration data. If they are not correct press N (no) to change
date and time as instructed. To prevent the calibration from being changed by
mistake the instrument requests final confirmation before the data is saved. Once this
is complete and [MENU] selected the calibration is COMPLETE.
Service & Calibration Page 87 of 87
 Loading...