


EN
FR
IT
ES
DE
EL
ZH
RU
NL
PL
SE
www.Qacoustics.co.uk

EN
User Manual and Product Specifications

Contents
 Contents
06 |
Safety Information |
07 |
Package Contents |
07 |
Introduction |
07 |
Package Contents |
08 |
Features |
08 |
Feature Summary |
08 |
Product Description |
09 |
Instructions |
09Wall Mount & Feet Fixing
10Features
14Remote Control
15Operation
20Specification
21Warranty
EC DECLARATION OF CONFORMITY
Q Acoustics conforms with the following EEC Directives, their supporting Statutory Instruments and relevant Standards, where applicable as follows:
EC Council Directive on electromagnetic compatibility 2004/108/EC,
Applicable standards with amendments: EN5013:2001 + A1:2003 + A2:2006
EN55020:2007
EN61000-3-2:2006 + A1:2009 + A2:2009
EN61000-3-3:2008
EC Low Voltage Directive 2006/95/EEC, |
|
Applicable standard with amendments: |
EN60065:2002 + A1:2006 + A11:2008 + A2:2012 |
Stage 1 of annex II of Commission regulation (ErP) EC no. 1275/2008
5

Safety Information
 Safety Information
IMPORTANT INFORMATION - PLEASE READ CAREFULLY
This symbol indicates that there are important operating and maintenance instructions in the literature accompanying this unit.
This symbol indicates that dangerous voltage constituting a risk of electric shock is present within this unit.
Warning: The AC Input connector is used as a safety disconnect device. It must be easily accessible after installation.
This equipment is a Class II or double insulated electrical appliance. It has been designed in such a way that it does not require a safety connection to electrical earth.
Correct disposal of this product:
This marking indicates that this product should not be disposed of with other household wastes throughout the EU. To prevent possible harm to the environment or human health from uncontrolled waste disposal, recycle it responsibly to promote the sustainable reuse of material resources. To return your used device, please use the return and collection systems or contact the retailer where the product was purchased. They can take this product for environmentally safe recycling.
Read and keep these instructions.
Heed all warnings and follow all instructions.
Do not use this apparatus near water. Clean only with a dry soft cloth.
Do not block any ventilation openings.
Install in accordance with the manufacturer’s instructions.
Warnings:
To avoid the danger of suffocation, keep all polythene bags and packaging away from babies and children.
To reduce the risk of fire or electrical shock, do not expose this product to rain or moisture. This product must not be exposed to dripping and splashing and no object filled with liquids such as a vase of flowers should be placed on the unit.
Do not install near any heat sources such as radiators, heat registers, stoves, or other apparatus (including amplifiers) that produce heat.
Do not defeat the safety purpose of the polarized or grounding type plug. A polarized plug has two blades with one wider than the other. A grounding type plug has two blades and a third grounding prong. The wider blade or the third prong are provided for your safety. If the provided plug does not fit into your outlet, consult an electrician for replacement of the obsolete outlet.
Take note of all warnings on the appliance, under no circumstances disassemble the unit or remove covers to prevent the risk of fire or electrical shock.
Protect the mains power cord from being walked on or pinched, particularly at plugs, convenience receptacles, and the point where they exit from the apparatus.
Use only attachments/accessories specified by the manufacturer.
Unplug this unit during lightning storms or when unused for long periods of time.
No naked flame sources such as candles should be placed on the product.
Caution:
Changes or modifications not expressly approved by the manufacturer could void the user’s authority to operate this device.
Third parties: In the unlikely event that you pass this product on to a third party, include these operating instructions with the product.
Service:
Refer all servicing to qualified service personnel. Servicing is required when the unit has been damaged in any way, such as the power supply cord or plug is damaged, liquid has been spilled on or objects have fallen into the unit, the apparatus has been exposed to rain or moisture, it does not operate normally or it has been dropped.
Equipment for servicing should be returned to the supplying dealer, or to the service agent for your area. The address of the main Service Agent for the UK is listed at the back of this manual.
Important notice for UK users:
The UK mains lead is terminated with a UK approved mains plug fitted with a 3A fuse. If the fuse needs to be replaced, an ASTA or BSI approved BS1362 fuse rated at 3A must be used.
6

Package Contents
 Introduction
Thank you for purchasing Q Acoustics.
This manual is intended to take you through the setup and installation of the unit and will help provide a trouble free setup and optimum performance from the product.
Please read the instructions, important safety information and warnings carefully before installation and use, to ensure the safe and satisfactory operation of this product.
We hope you enjoy the Q Acoustics experience.
 Package Contents
1 x Q M4 Hi-Fi Soundbar |
1 x Remote Control |
1 x Lithium |
|
|
Battery |
|
|
(3V, CR2025) |
1 x RCA |
1 x 3.5mm |
1 x Optical |
3 x Anti-vibration |
1 x Wall Mounting |
Phono Lead |
Jack Lead |
Lead |
Feet with 6 x Screws |
Plate |
(2 metres) |
(2 metres) |
(2 metres) |
|
|
1 x UK AC |
1 x EU AC |
or |
1 x AS/NZS AC |
1 x User Manual |
Mains Cable |
Mains Cable |
Mains Cable |
|
|
|
|
7

Features
 Feature Summary
•100W (2 x 25W + 50W) 2.1 amplification
•Built-in twin coil 100mm x 150mm subwoofer
•Wide dispersion 65mm x 65mm BMR drivers
•aptX® Bluetooth input – up to 8 paired devices
•Digital optical audio input
•RCA stereo line level audio input
•3.5mm stereo headphone level audio input
•RCA subwoofer line level audio output
•5 button infrared remote control
 Product Description
The Q Acoustics Q M4 is a high performance soundbar designed to deliver high fidelity reproduction of music, and high quality audio from a TV or set top box, tablets and smartphones. Designed in the UK by Q Acoustics, is a result of careful development and our award winning heritage.
Q Acoustics provides true audio with no added effects or digital signal processing to colour audio reproduction. You have peace of mind that you are listening to pure audio as the original mix engineer intended.
Designed for simplicity, this product will blend into your home environment with minimal fuss yet extraordinary improvement to your listening experience.
With both analogue and optical inputs the unit can be used with a variety of entertainment sources such as TVs, CD players, portable music players, computers and internet radio.
The unit is also Bluetooth compatible using aptX Lossless for audio streaming. This wireless connection can sync to almost any Bluetooth compatible audio device. It can remember up to eight pairings, so when friends or family come over, a ‘guest’ music player can get connected in just seconds.
Please read and follow the instructions in this manual to get the most enjoyment out of your Q Acoustics.
8

Instructions
 Wall Mount
1.
2x
4 x 3mm Countersunk Screws and Wall Fixing not included
2. |
3. |
4. |
5. |
 Feet Fixing
6 x 3 x
Use pre-drilled holes
9

Instructions
 Features
TOP PANEL
2 |
1 |
4 |
3 |
5 |
1. Standby / Source Select |
3. Volume Up |
5. NFC Pairing Position |
|
Long press / short press |
Single press / press and hold |
|
|
2. Volume Down |
4. Status LED |
|
|
Single press / press and hold |
See LED indications below |
|
|
No Light = Off |
|
Quick Blue Flash = On |
|
Power cord is connected but AC switch is turned OFF, |
Bluetooth input is the active source and is currently |
||
or power cord is disconnected. |
|
searching for a Bluetooth device to PAIR with. |
|
Solid Red= Off (Standby) |
|
Solid Blue = On |
|
Power cord is connected and AC switch is turned ON, |
Bluetooth input is the active source and is PAIRED with |
||
but the unit is OFF. |
|
a Bluetooth device. |
|
Solid Green = On |
|
Any Colour Slow Flash = On |
|
Analogue input (Line in 1 or Line in 2) is the active |
Currently active source is MUTED. |
||
source. |
|
|
|
Solid White = On
Optical input is the active source.
FRONT VIEW
1
1.IR Sensor
The IR sensor is hidden behind the speaker grill in the centre towards the top of the unit.
This sensor MUST be unobstructed for direct line-of-sight to the remote, or the remote will not be able to control the unit.
10
Instructions
REAR PANEL
1 |
2 |
4 |
6 |
|
|
POWER |
OPTICAL IN |
LINE IN 2 |
|
|
ON |
OFF |
|
|
T1.6AL 250V |
|
|
RISK OF FIRE |
|
|
REPLACE FUSE |
|
|
AS MARKED |
PAIR |
|
|
100 - 240V~, 50/60Hz 100 WATTS
R L
LINE IN 1 |
SUB OUT |
CAUTION:
TO REDUCE THE RISK OF ELECTRIC SHOCK, DO NOT REMOVE COVER (OR BACK). NO USER-SERVICABLE PARTS INSIDE REFER SERVICING TO QUALIFIED SERVICE PERSONNEL.
RISK OF ELECTRIAL SHOCK
DO NO OPEN
WARNING: SHOCK HAZARD - DO NOT OPEN.
AVIS: RISQUE DE CHOC ELECTRIQUE-NE PAS OUVRIR.
NOT SUITABLE FOR IN-WALL MOUNTING
Bluetooth Device:
Q14698-SK
Q M4-101
DESIGNED IN THE UNITED KINGDOM. MADE IN P.R.C
3 5 7 8
www.qacoustics.co.uk
Q ACOUSTICS
MEDIA 4 HI-FI SOUNDBAR
1. Bluetooth Pair Button |
5. Subwoofer Out |
2. Digital Optical Input |
6. Power Switch |
3. Analogue Line In 1 |
7. AC Input |
4. Analogue Line In 2 |
8. Bluetooth Name Label |
11

Instructions
1.Digital Optical Input
TOSLINK connector for connection to the Digital Optical output on a TV or other source. If there is a choice between Digital or Analogue connection to the unit choose Digital for superior audio quality. The Digital input is selected automatically if no Bluetooth device is connected and playing. When the Digital Source is active the status LED will be WHITE.
|
|
POWER |
OPTICAL IN |
LINE IN 2 |
|
|
ON |
OFF |
|
|
100 - 240V~, 50/60Hz |
|
|
100 WATTS |
|
L |
|
IN 1 |
SUB OUT |
|
T1.6AL 250V
RISK OF FIRE REPLACE FUS AS MARKED
DESIGNED IN THE UNITED KINGDO
(included)
Important Note:
Audio output of a TV, Blu-ray disc player, games console, or DVD player connected to the unit via Optical Digital, must be set to PCM (two channel stereo) in the source’s setup. Please see the device’s Owner’s Manual for details. Digital connection to a CD player does not require a special setting.
2 & 3. Analogue Inputs Line In 1 & Line In 2
The unit has two options for Analogue Audio connection:
Line In 1
Connect the RCA L&R audio output from a TV or other source to the LINE IN 1 sockets using the 2m cable provided:
ANALOGUE
|
|
POWER |
OPTICAL IN |
LINE IN 2 |
|
|
ON |
OFF |
PAIR


100 - 240V~, 50/60Hz 100 WATTS
R L
LINE IN 1 |
SUB OUT |
T1.6AL 250V
RISK OF FIRE REPLACE FUS AS MARKED
DESIGNED IN THE UNITED KINGDO
RCA Phono Lead (included)
12
Instructions
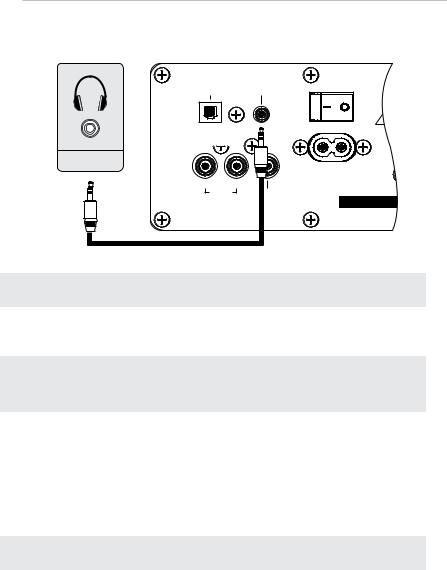
Line In 2
The 3.5mm input jack is ideal for connecting to the headphone output of an external audio source using the 2m cable provided:
OPTICAL IN |
LINE IN 2 |
PAIR


HEADPHONES |
|
R |
L |
LINE IN 1 |
SUB OUT |
3.5mm Jack Lead (included)
|
POWER |
ON |
OFF |
|
T1.6AL 250V |
|
RISK OF FIRE |
|
REPLACE FUS |
|
AS MARKED |
100 - 240V~, 50/60Hz
100 WATTS
DESIGNED IN THE UNITED KINGDO
Important Note:
With a jack plugged into LINE IN 2, LINE IN 1 is switched-off and no audio will be heard from this source.
The ANALOGUE INPUTS are automatically selected when no Bluetooth device is connected and playing, and no Optical Digital Input signal is present. The Status LED will be GREEN when an analogue input is in use.
Please Note:
When connecting to a variable level source, such as a headphone output, better audio quality will be achieved by having the source set at a higher volume level and the unit at a lower level than the other way around.
4.Subwoofer Out
Single RCA phono jack. Connect the‘Sub Out’to a Subwoofer Line Level Input if extended bass response is desired.
5.Bluetooth Pair Button
The unit has been designed to automatically search for, and PAIR with a device should no other devices currently be PAIRED and in range. This Bluetooth Pair button is used to manually drop the current connection and pair with a new device.
6.Power Switch
Turns the power to the unit ON/OFF.
Important Note:
Always turn the power OFF when making connections to the Rear Panel.
7.AC Input
Universal power connector. Automatically selects AC voltage for a given region. Connect to the included AV Power Cord for your country.
13

Instructions
 Remote Control
1.Power
Press this button to turn the unit Standby ON/OFF. (POWER SWITCH on the rear panel must be switched to ON)
2.Source Select
Press this button to manually select the audio input source. The status LED will change colour accordingly.
Important Note:
When the Source button is used, the unit will stay on the selected source and stop auto-source selection. Auto-source selection will be resumed after the unit has been put in standby.
3.Volume Up / Down
Press VOL + to increase the volume. Press VOL – to reduce the volume.
4.Mute
Press this button once to MUTE the unit (no audio output from the speakers). Status LED will SLOW FLASH to indicate MUTE. Press this button again to un-mute the unit (audio output from the speakers).
Please Note:
Long press of Mute will also put the unit into standby.
REMOTE CONTROL BATTERY REPLACEMENT
1
2
 3
3
4
Caution:
When replacing the lithium battery in the remote, make sure that the replacement battery is inserted in correct polarity. Place the battery so that its positive (+) side faces up with the tray held so the surface with the dot and (+) is facing up.
1. Push small tab toward |
2. Pull battery drawer out. |
battery slot. |
|
Caution:
Danger of explosion if battery is incorrectly replaced.
Replace only with the same or equivalent battery type (CR2025)
Warning:
Do not expose batteries to excessive heat such as direct sunlight, fire or the like. Dispose of dead batteries in accordance with local regulations.
3.Insert battery with “+” side up and slide drawer back into remote.
14

Instructions
 Operating Q M4
POWER AND STANDBY
Power on the unit at the AC SWITCH once all rear panel audio connections are made. The speakers will enter STANDBY, with a RED status LED.
Exit STANDBY by pressing the STANDBY button on either the top panel or the IR remote. The LED will initially turn Green but may then change according to the Auto-Source Selection rules.
If NO input signals are detected, the unit will automatically enter STANDBY after 20 minutes.
AUTO-ON FUNCTION
When connected to an optical source, the unit has an AUTO-ON function and will come out of standby when it detects that an optical signal is present. This allows easy integration of the unit with your television, automatically turning on when you bring your TV out of standby.
Please Note:
If you place the unit in standby while an optical source is still present, the auto-on function will be disabled until the optical source is turned off. This will prevent the unit from unwanted auto-on.
Please Note:
Some televisions continue their optical output when the TV is in standby. The unit will not auto-standby under these circumstances and the standby control must be used.
AUTO-SOURCE SELECTION
In normal operation the unit will automatically select the audio source. A connected Bluetooth source that starts to play has the highest priority, followed by Digital and finally Analogue:
NFC Bluetooth* |
|
|
|
|
|
|
|
||||
|
|
|
|
|
|
||||||
Bluetooth |
|
|
|
|
|
|
|
|
|
||
|
|
|
|
|
|
|
|
|
|||
Optical input |
|
|
|
|
|
INPUT |
|||||
|
|
|
|
|
|||||||
Line in 2 |
|
|
|
|
|
||||||
|
|
|
|||||||||
|
|
|
|
|
|
|
|
|
|
|
PRIORITY |
Line in 1 |
|
|
|
|
|
|
|||||
|
|
|
|
|
|
||||||
Standby |
|
|
|
|
|
*A Bluetooth device connected via NFC |
|||||
|
|
|
|
|
|||||||
|
|
|
|
|
|
|
|
|
|
|
will take priority over all other sources. |
The Auto-Source Selection can be manually overridden at any time using SOURCE SELECT on the IR remote or by a short press of the  button on the unit.
Important Note:
The unit will stop using Auto-Source Selection when the source is manually selected using the Source Select button on the remote, or a short press of the Standby Button on the unit. Auto-Source Select will resume once the unit has been put into and out of Standby.
15
Instructions
SOURCE VOLUME CONTROL
Audio sources will initially be set at a DEFAULT volume level. The volume can be adjusted separately for each source using the VOL + and VOL – buttons on the top panel or IR remote. Once adjusted, the unit will remember the new volume level for the currently selected source, and will return to that level each time that source is re-selected.
PAIRING A BLUETOOTH DEVICE
The unit is designed to automatically go into pairing mode if there is no Bluetooth device connected. To Pair your Bluetooth source:
1.Turn the unit and the Bluetooth device ON.
2.Make sure Bluetooth is enabled on the device to be Paired. The Bluetooth controls are typically found in the device’s ‘Settings’ or ‘Connections’ menu.
3.On your device’s list of discoverable devices, you should now see ‘Q M4-XXX’ where XXX is a pre-defined three digit number. (Refer to Rear Panel section for the Bluetooth name label.)
4.Select ‘Q M4-XXX’ and your device will now be Paired via Bluetooth and Connected.
5.From within the music player on your device, select‘Q M4-XXX’as the audio output and press Play. Unless the remote has been used to manually select another source and override Auto-Source Selection, the unit will switch to Bluetooth input and the LED will turn Blue.
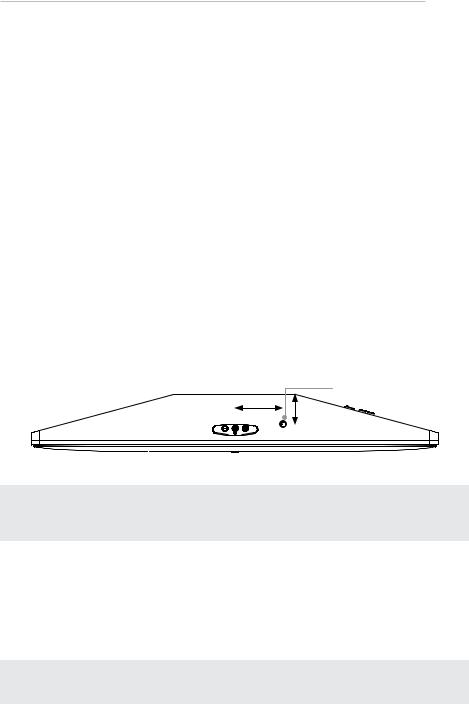
PAIRING A BLUETOOTH DEVICE WITH NFC
1.Turn the unit and the Bluetooth NFC device ON.
2.Make sure Bluetooth and NFC are enabled in the device settings.
NFC Pairing Position
120 mm
75 mm
3. Place NFC device on the top surface of the unit, in the location indicated.
Please Note:
You may need to rotate your device for NFC to connect, as NFC coil is in different locations within different devices. Please see your device instruction manual for correct NFC operation.
The distance for NFC pairing occurs vary from device to device.
4.The NFC device will automatically register on screen when an NFC connection has been made.
5.Follow on-screen instructions to complete NFC pairing. This usually involves selecting to allow NFC pairing.
6.Your device will now be paired, and connected via Bluetooth, and will function as any other Bluetooth source when pressing play from within the device music player.
Please Note:
Although starting to Play a track on the connected source will cause the unit to switch to Bluetooth, the unit will stay on Bluetooth until the source is disconnected. It will not switch to another source whilst the player is paused.
16

Instructions
Please Note:
Auto-Source Selection will switch to Bluetooth the first time a connected device sends any audio signal including message received alerts and key press effects.
Please Note:
When connected, the device’s volume and mute controls control the device itself, not the unit. Better audio quality will be achieved by having the device set at a higher volume level and the unit at a lower level.
GOING OUT OF RANGE
When a connected device goes out of range, the unit will remain on the Bluetooth channel. When the device returns in range it will automatically re-connect to the unit. In many cases PLAY must be pressed on the device to resume audio playback. Whilst out of range, source can still be changed using the SOURCE SELECT button.
Please Note:
If the source does not come back into range for 20 minutes the unit will automatically go into standby.
PAIRING MORE THAN ONE BLUETOOTH DEVICE
The unit can have up to eight Bluetooth devices in its pairing list. When you pair with the 9th device the details of the first device will be lost.
Once the unit is connected with a device, it will stop automatically searching for other devices to pair with or connect to. To connect to another device, either disconnect the currently connected source on the device itself or press the Bluetooth Pair button on the rear panel of the unit.
COMING OUT OF STANDBY
If there is a paired device in proximity to the unit when it comes out of standby it will automatically initiate a connection to the device. It will not switch to Bluetooth input until play is pressed on the device.
17
Instructions
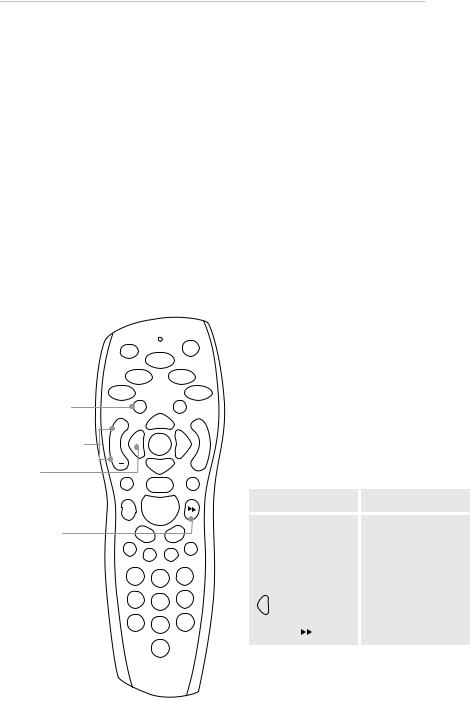
CABLE/SATELLITE REMOTE CONTROL
The Q Acoustics system has been designed for easy integration into your home entertainment system as it has the ability to be controlled by many types of PROGRAMMABLE REMOTE CONTROL. This may include the remote control for your SATELLITE and CABLE system if it has PUNCH THROUGH capability. Punch through is the common term for being able to programme your remote control to send IR codes to both a TV and an AV Preamplifier/Processor. To use punch through you normally select the TV you wish to support first, and then the AV Preamplifier/Processor.
The unit uses the PHILIPS RC5 protocol for AV Preamplifiers/Processors. Programming your remote with PHILIPS AV codes should allow you to control volume and mute of your unit. In some cases you may also be able to control standby and source select with buttons such as 

 and
and  .
.
Manufacturers often offer several PHILIPS code options for their remote controls. We recommend that you work through the PHILIPS code list for your remote and experiment with each one until you find one that works well with the unit. It is easiest to recognise when one is working by pressing the volume up/down buttons.
We cannot guarantee that the unit will work with your particular remote as the IR codes it sends are outside our control, however by supporting the commonly used Philips standard we hope to have made it as easy as possible to gain control of your device with the remote control of your choice.
Below we show how two typical programmable remote controls can be set up.
TYPE 1 (SATELLITE)
|
|
TV |
Mute / Standby |
|
MUTE |
|
|
+ |
Volume up / down |
VOL |
SELECT |
Standby |
|
|
Source select
1 2 3
4 5 6
7 8 9
0
•Press the “TV” button (top left of remote).
•Point remote away from receiver,
press and hold “Select + 0”.
•The remote’s LED will flash red twice.
•Enter “1217”. The remote’s LED will flash red twice to confirm correct code.
•Press and hold “Select + 1”.
•The remote’s LED will flash red twice.
•Press TV and your remote controls will now work as below:
Button |
Function |
Vol + |
Volume up |
Vol - |
Volume down |
Mute (short press) |
Mute |
or Mute (long press) |
Standby |
|
Source select |
18

TYPE 2 (CABLE)
Mute / Standby
Volume up / down 
Instructions
•Press the “TV” button (top right of remote).
•Point remote away from receiver,
TV |
press and hold “Clear + Vol ”. |
•The remote’s LED will flash green twice.
•Enter “1247”. The remote’s LED will flash
MUTE |
green twice to confirm correct code. |
|
VOL |
• Press TV and your remote controls will now work |
|
as below: |
|
|
|
|
|
|
Button |
Function |
|
Vol |
Volume up |
|
Vol |
Volume down |
|
Mute (short press) |
Mute |
|
Mute (long press) |
Standby |
1 2 3
4 5 6
7 8 9
CLEAR 0
19

Specification |
|
|
|
Specification |
|
Audio performance |
|
Power output: |
100W (2 x 25W + 50W) total amplification |
THD (at rated power): |
<1.00% |
Frequency response: |
±0.5dB 20Hz to 20kHz |
S/N ratio (A-Wtd): |
-85dB |
Line in 1 (RCA phono) input sensitivity: |
2.0Vrms |
Line in 1 (RCA phono) input overload: |
2.2Vrms |
Line in 2 (3.5mm jack) input sensitivity: |
1.0Vrms |
Line in 2 (3.5mm jack) input overload: |
1.2Vrms |
Speakers |
|
LR drivers: |
BMR 65mm x 65mm |
Subwoofer: |
Twin coil 100mm x 150mm |
Power consumption |
|
Standby: |
<0.5 Watts |
No signal (idle): |
14 Watts |
Rear panel marked line ratings: |
100~240V - 50~60Hz 100W |
Bluetooth® |
|
Bluetooth specification: |
V4.0 class 2 device |
Latency: |
6ms |
Internal stereo CODEC: |
16-bit |
Stereo audio sample rate: |
up to 48kHz |
Music enhancements: |
aptX®, SBC, MP3 |
Support for: |
A2DP, 802.11 co-existence |
Dimensions |
|
(W x H x D): |
1000mm x 90mm x 142mm |
Height including feet: |
105mm |
Weight |
|
Total weight: |
4.9 kg |
20
Warranty
 Q Acoustics Warranty
Q Acoustics products are warranted free of defects in materials and workmanship for a period of 2 years from the date of purchase. During the warranty period Q Acoustics will, at its option, repair or replace any product found to be faulty after inspection by the company or its appointed distributor or agent.
Misuse and fair wear and tear are not covered by warranty.
Goods for repair should in the first instance be returned to the supplying dealer. If this is not possible contact Q Acoustics or their appointed distributor for your area to determine the correct warranty procedure. If possible the original packaging should be used to return the product as damage sustained during transit to the repair centre is not covered by the warranty. The warranty does not in any way affect your legal rights.
For service information In other countries contact: info@qacoustics.co.uk
Q ACOUSTICS
Armour Home Electronics Ltd.
Stortford Hall Industrial Park
Bishops Stortford, Herts, UK
CM23 5GZ
The N-Mark logo is a registered trademarks of the NFC Forum Inc.
The Bluetooth word mark and logos are registered trademarks owned by Bluetooth SIG, Inc. and any use of such marks by Armour Home Electronics Ltd. is under license. The aptX® mark and the aptX logo are trade marks of CSR plc or one of its group companies and may be registered in one or more jurisdictions. Other trademarks and trade names are those of their respective owners.
21

FR
Mode d’emploi et caractéristiques techniques du produit

Sommaire
 Sommaire
26Consignes de sécurité
27Contenu de l’emballage
27 Introduction
27Contenu de l’emballage
28Caractéristiques
28 |
Résumé des caractéristiques |
28Description du produit
29Instructions
29Montage mural et fixation des pieds
30Caractéristiques
34Télécommande
35Fonctionnement
40Spécifications
41Garantie
DÉCLARATION DE CONFORMITÉ CE
Ce produit Q Acoustics est conforme aux directives européennes suivantes, à leur description des instruments réglementaires et aux normes pertinentes, le cas échéant, comme suit :
Directive européenne 2004/108/CE « Compatibilité électromagnétique »,
Normes applicables avec modifications : |
EN5013:2001 + A1:2003 + A2:2006 |
|
EN55020:2007 |
|
EN61000-3-2:2006 + A1:2009 + A2:2009 |
|
EN61000-3-3:2008 |
Directive européenne 2006/95/CEE « Basse tension », |
|
Norme applicable avec modifications : |
EN60065:2002 + A1:2006 + A11:2008 + A2:2012 |
Étape 1 de l’annexe II du règlement de la Commission (ErP) CE no. 1275/2008
25

Consignes de sécurité
 Consignes de sécurité
INFORMATIONS IMPORTANTES - VEUILLEZ LIRE ATTENTIVEMENT
ATTENTION!
RISQUEDEDÉCHARGEÉLECTRIQUE
NE PAS OUVRIR
POUR RÉDUIRE LE RISQUE D’ÉLECTROCUTION, NE PAS
ÔTER LE COUVERCLE (OU LA FACE ARRIÈRE)
AUCUNE PIÈCE AMOVIBLE À L’INTÉRIEUR
L’ENTRETIEN DOIT ÊTRE RÉALISÉ PAR DU PERSONNEL QUALIFIÉ
Cesymboleindiquequeladocumentationaccompagnant leproduitcontientdesinstructionsimportantesrelativesà sonfonctionnementetsonentretien.
Ce symbole indique qu’une tension dangereuse constituant un risque d’électrocution existe au sein de ce produit.
Avertissement : Le connecteur d’alimentation CA est utilisé en tant que dispositif de déconnexion de sécurité. Il doit rester facilement accessible après l’installation.
Ce produit est un appareil électrique à double isolation de classe II. Il a été conçu de telle sorte qu’il ne nécessite pas de connexion de sécurité à la terre.
Élimination correcte de ce produit :
Ce marquage indique que, dans l’UE, ce produit ne doit pas être jeté avec les autres déchets ménagers. Afin de prévenir tout dommage possible à l’environnement ou à la santé humaine provoqué par une élimination incontrôlée des déchets, recyclez ce produit de manière responsable pour promouvoir la réutilisation durable des ressources matérielles. Pour renvoyer le produit usagé, veuillez contacter les organismes de recyclage et de collecte ou le revendeur chez lequel vous l’avez acheté. Ils pourront prendre en charge ce produit dans le cadre d’un recyclage respectueux de l’environnement.
Lireetconservercesinstructions.
Tenircomptedetouteslesmisesengardeetsuivretoutesles instructions.
Nepasutiliserceproduitàproximitéd’eau.
Lenettoyeruniquementavecunchiffondouxetsec.
Nepasbloquerlesouverturesd’aération.
Suivrelesinstructionsdufabricantpourl’installation.
Avertissements:
Afin d’éviter tout risque d’étouffement, conserver tous les sacs et les emballages en polythène hors de portée des bébés et des enfants.
Afin de réduire les risques d’incendie ou d’électrocution, ne pas exposer ce produit à la pluie ou à l’humidité. Ce produit ne doit pasêtreexposéauxgouttesouauxéclaboussuresetaucunobjet remplideliquide,telqu’unvasedefleurs,nedoitêtreposédessus.
Ne pas installer le produit près de sources de chaleur telles que des radiateurs, des bouches de chaleur, des poêles ou d’autres appareils (notamment des amplificateurs) produisant de la chaleur.
Ne pas interférer avec l’objectif sécuritaire de la fiche polarisée ou de mise à la terre. Une fiche polarisée comporte deux lames, dont l’une est plus large que l’autre. Une prise de mise à la terre possède également deux lames ainsi qu’une troisième broche. La lame la plus large ou la troisième broche sont présentes à des fins de sécurité. Si la fiche fournie n’est pas adaptée à votre prise de courant murale, prendre contact avec un électricien afin de remplacerlapriseobsolète.
Prendreencomptetouslesavertissementsfigurantsurleproduit. Nedémonterleproduitouneretirersescouverclesenaucuncas, afind’évitertoutrisqued’incendieoudedéchargeélectrique.
Protéger le cordon d’alimentation secteur afin qu’il ne soit ni
piétiné ni pincé, en particulier au niveau des fiches, des prises de courantetdupointdesortiedumatériel.
Utiliser uniquement les équipements et accessoires spécifiés par lefabricant.
Débrancher le système lors des orages ou lorsqu’il reste inutilisé pendantdelonguespériodes.
Neplaceraucunesourcedeflammenue,parexempleunebougie, surleproduit.
Attention:
Leschangementsoumodificationsquin’ontpasétéexpressément approuvésparlefabricantpeuventrévoquerledroitd’usagedece produit.
Tierces parties : Dans le cas peu probable où ce produit serait transmis à un tiers, ces instructions devront également lui être remises.
Serviceaprès-vente:
Confier toute réparation à un technicien qualifié. Des réparations sont nécessaires si le produit a été endommagé d’une façon ou d’une autre, par exemple si le cordon ou la fiche d’alimentation sontendommagés,siduliquideaétérenversésurleproduitousi desobjetssonttombésdessus,sileproduitaétéexposéàlapluie ouàl’humidité,oubiens’ilnefonctionnepasnormalementous’il esttombé.
Lematérielàréparerdoitêtrerenvoyéaurevendeurouauservice après-vente de votre région. L’adresse du service après-vente centralduRoyaume-Unifigureaudosdecemanuel.
Remarque importante concernant les utilisateurs du Royaume-Uni:
Le cordon d’alimentation Royaume-Uni (RU) se termine par une fiche homologuée pour le secteur RU équipée d’un fusible de 3 A. Si ce fusible a besoin d’être remplacé, un fusible ASTA ou BSI conformeBS1362d’unevaleurnominalede3Adevraêtreutilisé.
26

Contenu de l’emballage
 Introduction
Merci d’avoir acheté un produit Q Acoustics.
Ce manuel est destiné à vous guider au cours de la configuration et de l’installation du système, à vous aider à réaliser une installation sans problème et à obtenir une performance optimale du produit.
Veuillez lire attentivement les instructions, les consignes de sécurité importantes et les mises en garde avant d’installer et d’utiliser le produit, afin d’en garantir un fonctionnement sûr et satisfaisant.
Nous espérons que vous apprécierez l’expérience proposée par Q Acoustics.
 Contenu de l’emballage
1 x Barre de son Q M4 |
1 x Télécommande |
1 x Pile au lithium |
|
|
(3V, CR2025) |
1 x Câble |
1 x Câble |
1 x Câble |
3 x pieds anti- |
1 x Plaque pour |
phono RCA |
jack 3,5 mm |
optique |
vibrations avec 6 vis |
montage mural |
(2 mètres) |
(2 mètres) |
(2 mètres) |
|
|
1 x Câble |
1 x Câble |
ou |
1 x Câble |
1 x Mode d’emploi |
d’alimentation |
d’alimentation |
d’alimentation |
|
|
secteur CA |
secteur CA (UE) |
|
secteur CA |
|
(Royaume-Uni) |
|
|
(AS/NZS) |
|
27

Caractéristiques
 Résumédescaracteristiques
•Amplification 2.1 de 100 W (2 x 25 W + 50 W)
•Caisson de graves intégré de 100 mm x 150 mm
•Pilotes BMR 65 mm x 65 mm à large dispersion
•Entrée Bluetooth aptX® – jusqu’à 8 appareils appariés
•Entrée audio optique numérique
•Entrée audio ligne stéréo RCA
•Entrées audio casque stéréo RCA 3,5 mm
•Sortie audio ligne caisson de graves RCA
•Télécommande infrarouge à 5 touches
 Description du produit
Le Q-M4 de Q Acoustics est une barre de son haute performance conçue pour offrir une reproduction haute fidélité de la musique et un son haute qualité pour un téléviseur ou un décodeur, une tablette ou un smartphone. Ce système, conçu au Royaume-Uni par Q Acoustics, est le résultat d’un développement minutieux et fait partie de notre patrimoine, primé à plusieurs reprises.
Q Acoustics offre un son authentique, sans ajout d’effets ou de traitement du signal numérique qui modifient le rendu sonore. Vous pouvez vous détendre en sachant que vous écoutez le son pur conçu par l’ingé nieur son à l’origine.
Conçu dans un objectif de simplicité, ce produit s’intégrera aisément dans votre intérieur pour vous faire vivre une expérience d’écoute extraordinaire. Grâce à ses entrées analogiques et optiques, le système peut s’utiliser avec une grande variété de sources de divertissement, comme les téléviseurs, les lecteurs CD, les lecteurs de musique portables, les ordinateurs et les webradios.
Le système est également compatible Bluetooth grâce à la technologie aptX Lossless utilisée pour le streaming audio. Cette liaison sans fil peut être synchronisée avec tout appareil audio compatible Bluetooth. Il est possible de mémoriser jusqu’à huit jumelages, alors si des amis ou de la famille vous rendent visite, vous pourrez connecter un lecteur de musique « invité » en quelques secondes.
Veuillez lire et suivre les instructions de ce manuel pour profiter au maximum de votre achat.
28

Instructions
 Montage mural 1.
2x
4 x vis à tête fraisée de 3 mm et fixations murales non fournies
2. |
3. |
4. |
5. |
 Montage des pieds
6 x 3 x
Utiliser les trous pré-percés
29

Instructions
 Caractéristiques
PANNEAU SUPÉRIEUR
2 |
1 |
4 |
3 |
5 |
1. Veille / Sélection de la source |
3. Augmenter le volume |
5. Position du capteur |
Appui long / appui court |
Appui simple / appuyer |
en mode d’jumelage NFC |
2. Baisser le volume |
et maintenir enfoncé |
|
Appui simple / appuyer |
4. LED d’état |
|
et maintenir enfoncé |
Voir les indications de |
|
|
la LED ci-dessous |
|
LED éteinte = Éteint
Le cordon d’alimentation est branché mais l’interrupteur CA est fermé,
ou bien le cordon d’alimentation est débranché.
Rouge fixe = Éteint (veille)
Le cordon d’alimentation est branché et l’interrupteur CA est allumé, mais le système est éteint.
Vert fixe = Sous tension
L’entrée analogique (ligne In 1 ou ligne In 2) est la source active.
Blanc fixe = Sous tension
L’entrée optique est la source active.
Clignotement bleu rapide = Sous tension
L’entrée Bluetooth est la source active et est actuellement à la recherche d’un appareil Bluetooth avec lequel s’APPARIER.
Bleu fixe = Sous tension
L’entrée de Bluetooth est la source active et est APPARIÉE à un appareil Bluetooth.
Clignotement lent (n’importe quelle couleur) = Sous tension
La source active est actuellement DÉSACTIVÉE (MUETTE).
VUE DE FACE
1
1.Capteur IR
Le capteur IR est masqué derrière la grille de l’enceinte au centre en haut du système. Ce capteur DOIT être dégagé pour être dans la ligne de mire directe de la télécommande, sans quoi cette dernière ne sera pas en mesure de contrôler le système.
30
 Loading...