

Q Acoustics Media 3, M3 Owner's Manual

M3 Soundbar
OWNER’S MANUAL
1

2

Contents
1. Introduction
2. Package Contents
3. Wall Mount
4. Controls
Top Panel
Front
5. LED Flash Pattern
6. Connections
Bluetooth
HDMI (ARC)
Optical Input
Analogue Input Line In 1
Analogue Input LIne In 2
AC Mains Input
USB (for service only)
7. Remote control
8. Operation
On / In / Wall EQ
Power and Standby
Deep Standby
Auto On / Off
Auto On / Off Times
Auto Source Select
Low Source Volume (LSV™)
Source Volume Control
Bluetooth
MoviEQ
Lip Sync
9. Cable / satellite remote control
10. Specication
11. Warranty
12. Glossary
®
®
™
4
5
6
7
8
9
13
14
19
21
22
23
3

1. Introduction
Thank you for purchasing Q Acoustics.
This manual is intended to take you through the setup and installation of the M3. It will help provide a
trouble free setup and optimum performance from the product.
Please read the instructions, important safety information and warnings carefully before installation and
use, to ensure the safe and satisfactory operation of this product.
The M3 is simplicity redened; where beautifully engineered sound meets beautiful design.
This is an elegantly compact soundbar with a big heart to ll your living room without the clutter of a full
Hi-Fi system or even a soundbar with a large external subwoofer.
Q Acoustic’s Auto Source Selection (ASS) is designed to seamlessly integrate into your home setup.
The M3 is a true plug and play soundbar. Connect it to your television using the ARC HDMI input and
forget about it. The M3 becomes one with your TV, leaving you to discover both sides of this unique
product, Music and Movies.
Our built in aptX® Bluetooth® wireless input frees the world of music at your ngertips to ll your home
with superbly detailed and dynamic audio reproduction. Discover subtle layers in your music that have
been left previously unheard and enjoy music as was intended!
Switch on the TV and the M3 brings clarity of speech and a depth of soundscape that transforms
your TV sound… and when you engage the MoviEQ™ your home will rumble with powerful bass and
dynamics for that full blooded movie experience!
Wall-mounted or shelf-mounted the elegant and compact M3 will form an audio centrepiece for your
home entertainment.
We hope you enjoy the Q Acoustics experience.
4

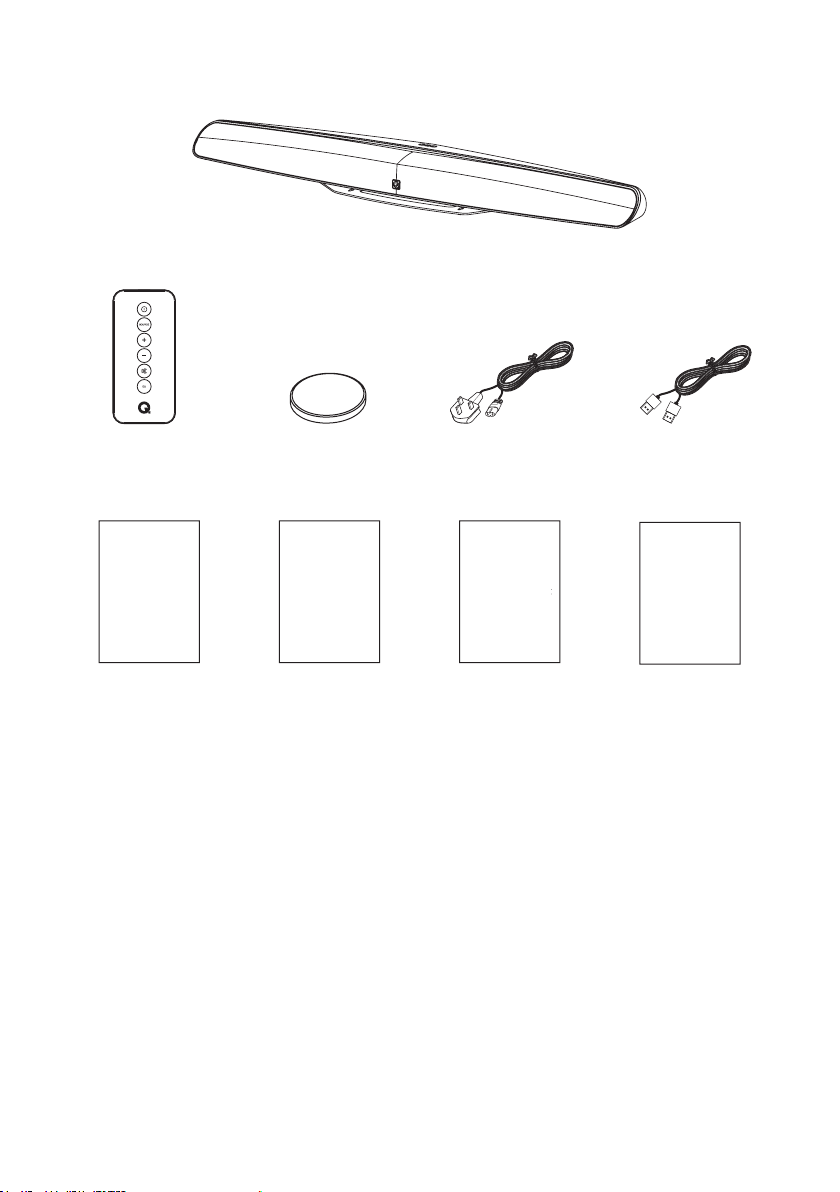
2. Package Contents
1 x M3 Soundbar
1 x Remote Control
Quick Start
Guide
1 x Quick Start Guide 1 x Safety
1 x Lithium Battery
(3V, CR2025)
Safety
Information
Information
1 x Mains Cable
(Regional mains cable)
Wall
Mounting
Template
1 x Wall Mounting
Template
1 x HDMI Cable
Warranty
Card
1 x Warranty Card
5
3. Wall Mount
Q Acoustics accepts no liability for damages caused by incorrect assembly, installation or improper
use.
Ensure that the wall is of sufcient strength to hold the weight of the Soundbar and mounting bracket
If there is any doubt regarding the condition or the load bearing of the wall, please consult a specialist
from the building trade.
The wall xings used must be suitable for the type of wall (materials, thickness, condition), so that the
maximum load bearing of the wall can be guaranteed.
Ensure that no electrical cables, water pipes or gas pipes are located within the wall.
Before mounting, check the location of the nearest mains socket. Use a spirit level when attaching the
wall bracket.
Wear safety goggles when drilling.
Keep small parts out of reach from children.
1.
3.
2.
2x
Screws and Wall
Fixing not included
4mm
6

4. Controls
4.1. Top Panel
d
a. Volume Up
b. Standby Button / Status LED
c. Volume Down
4.2. Front
a
a. IR Sensor
The IR sensor is hidden behind the speaker grille in the centre towards the top of the Unit.
This sensor MUST be unobstructed for direct line-of-sight to the remote, or the remote will not be
able to control the Unit.
c b a
d. NFC Pairing Location
(Removable sticker)
7

5. LED Flash Patterns
No Light = Off
Power is disconnected.
Dim Red = Off (DEEP STANDBY)
Power cord is connected and the Unit is in DEEP STANDBY.
Solid Red = Off (STANDBY)
Power cord is connected and the Unit is in STANDBY.
Solid Purple
HDMI input is the active source.
Solid White
Optical input is the active source.
Solid Blue
Bluetooth input is the active source and is Paired with a Bluetooth device.
Solid Green
Analogue input (Line in 1 or Line in 2) is the active source.
Quick Blue Flash
Bluetooth input is the active source and is currently searching for a Bluetooth device to Pair with.
Yellow
MovieEQ setting is toggled between On / Off.
Any Colour Slow Flash
Currently active source is MUTED.
8

6. Connections
af bcd e
g
a. Bluetooth Pair Button
b. HDMI (ARC) Input
c. Digital Optical Input
e. Analogue Line In 2
f. AC Mains Input
g.
USB for Service Only
d. Analogue Line In 1
a. Bluetooth Pair Button
(see section 8.9.)
b. HDMI (ARC)
HDMI (ARC) is for connection to the Audio Return Channel (ARC) socket on a TV or other source. If
there is a choice between HDMI or Optical connection to the Unit choose HDMI to enable Consumer
Electronic Control (CEC). When the HDMI source is active the status LED will be PURPLE.
Note:
Audio output of a TV, Blu-ray disc player, games console, or DVD player connected to the Unit via
HDMI, must be set to PCM (two channel stereo) in the source setup.
HDMI
Audio Return Channel
(ARC)
9

c. Optical Input
Optical In is for connection to the Digital Optical output on a TV or other source. If there is a choice
between Optical or Analogue connection to the Unit choose Optical for superior audio quality. When
the Optical Source is active the status LED will be WHITE.
Note:
Audio output of a TV, Blu-ray disc player, games console, or DVD player connected to the Unit via
Optical Digital, must be set to PCM (two-channel stereo) in the source’s setup. Optical connection to
a CD player does not require a special setting.
AUDIO OUT
Digital - Optical
d. Analogue Inputs Line In 1
The Unit has two options for Analogue audio connection. The Status LED will be GREEN when an
Analogue input is in use.
AUDIO OUT
Headphones
10
e. Analogue Inputs Line In 2
Connect the RCA L&R audio output from a TV or other source to the LINE IN 2 sockets using a Phono
RCA cable.
AUDIO OUT
Analogue
Note:
With a jack plugged into LINE IN 1, LINE IN 2 is switched-off and no audio will be heard from this
source.
When connecting to a variable level source, such as a headphone output, better audio quality will be
achieved by having the source set at a higher volume level and the Unit at a lower level.
f. AC Mains Input
Universal power connector automatically selects AC voltage for a given region. Connect to the
included AC Mains Cable for your country.
Note:
Always remove the AC Mains Cable when making connections to the Rear Panel.
AC MAINS
Regional mains cable
11

g. USB for Service Only
Universal Serial Bus (USB) for service only. This USB port will not provide 5V power, and cannot be
used for anything other than Service Updates.
12
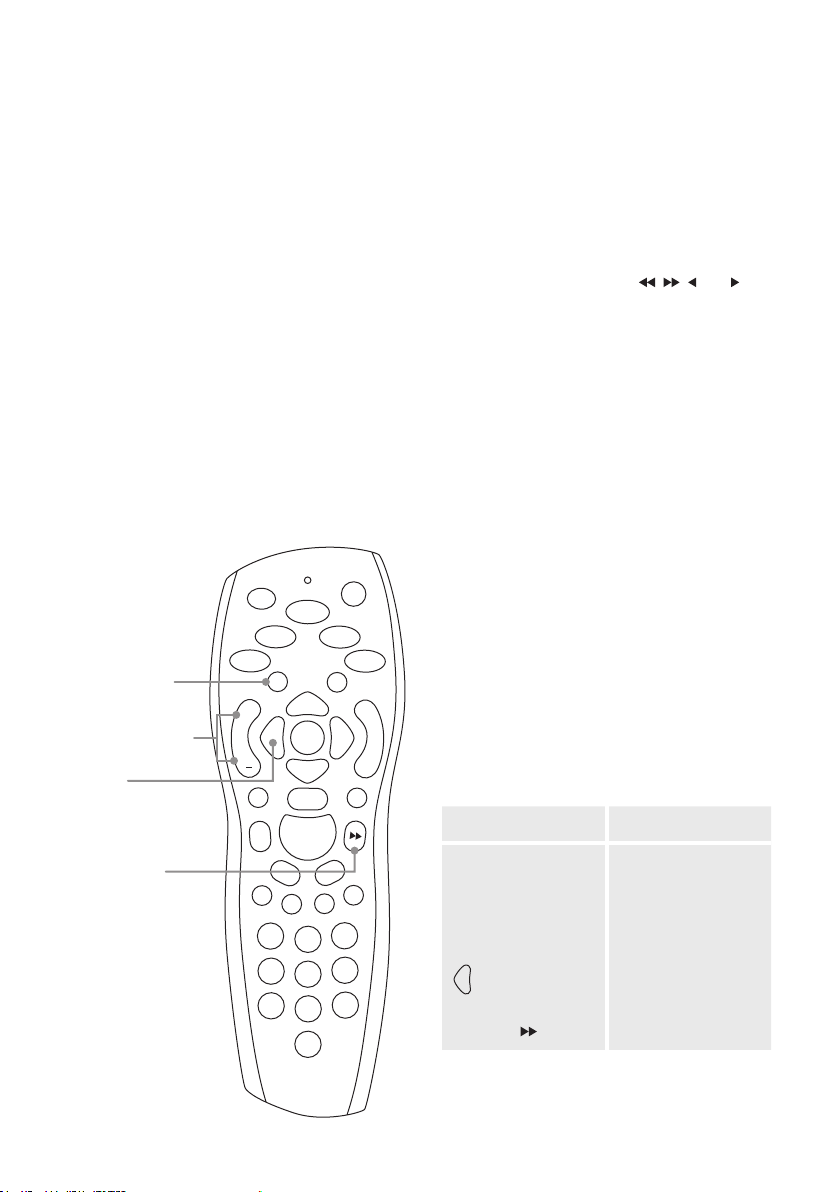
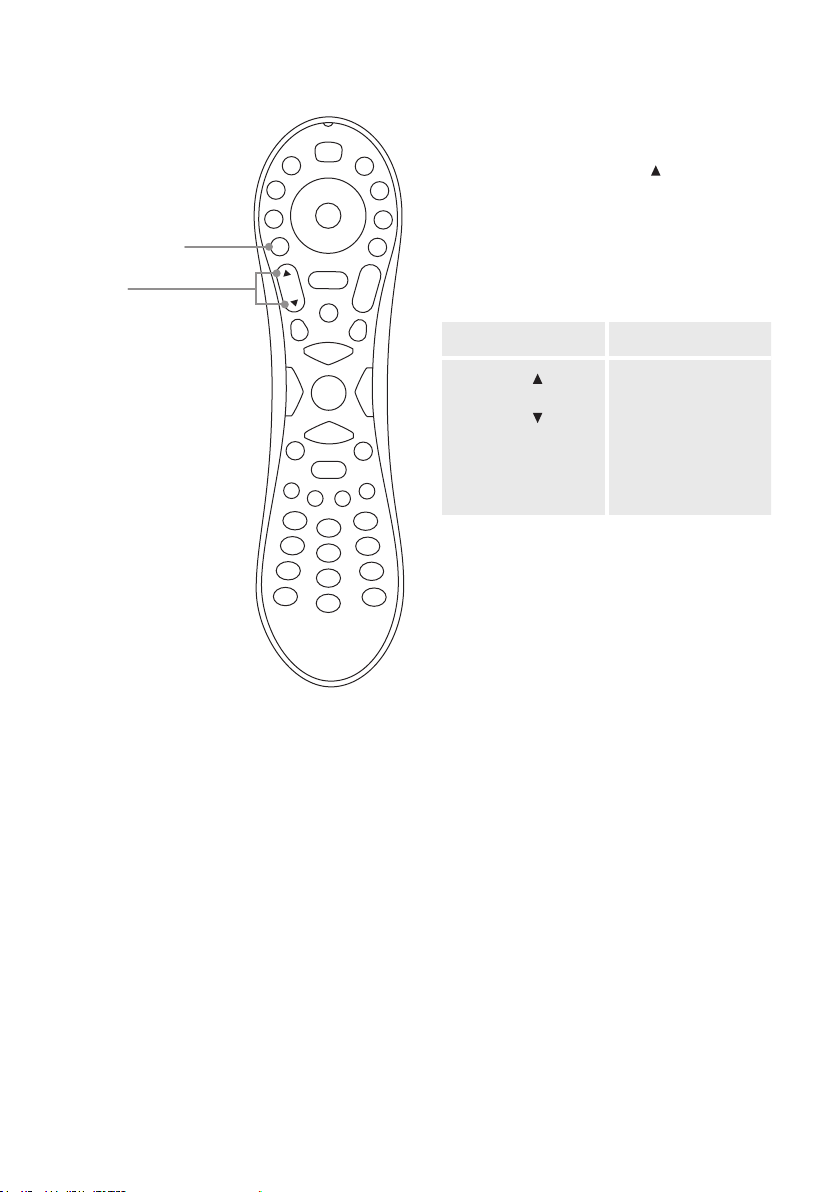
7. Remote Control
a. Power
Press this button to turn the Unit STANDBY ON / OFF.
b. Source select
Press this button to manually select the audio input source.
The status LED will change colour accordingly.
Note:
When the Source button is used, the Unit will stay on the
selected source and disable the automatic source selection.
ASS functions will be reactivated after the Unit has been put
in STANDBY.
c. Volume Up / Down
Press VOL + to increase the volume. Press VOL – to reduce
the volume.
d. Mute
Press this button once to MUTE the Unit. Status LED will SLOW
FLASH to indicate MUTE. Press this button again to un-mute
the Unit.
Note:
Long press of Mute will also put the Unit into STANDBY.
e. EQ
Short press the EQ button to toggle MoviEQ On and Off.
(see section 9.10.)
Remote Control battery replacement
Caution:
When replacing the lithium battery in the remote, make sure that the replacement battery is
inserted with the correct polarity. Place the battery so that the positive (+) side faces up with
the tray held so the surface with the dot and (+) is facing up.
a
b
c
d
e
a. Push small tab
toward battery slot.
Caution:
Danger of explosion if battery is incorrectly replaced.
Replace only with the same or equivalent battery type (CR2025)
Do not expose batteries to excessive heat such as direct sunlight, re or the like.
Dispose of dead batteries in accordance with local regulations.
b. Pull battery
drawer out.
c. Insert battery
with “+” side up
and slide drawer
back into remote.
13
d. Slide drawer
back into remote.

8. Operation
8.1. On / In / Wall EQ
This EQ switch should be the rst thing you set on your Unit. The Unit has been voiced by our
acoustic experts to get the best audio performance possible for the three most common placements
within a room. The On/In/Wall switch can be found on the Rear Panel, and has three settings.
ON = On a cabinet
IN = In a cabinet
WALL = Wall-mounted
ON / IN: Q Acoustics recommend you to select IN when your unit is placed in a cabinet and ON
when it is placed on a cabinet. However you may want to experiment to get the sound you prefer.
WALL: When wall mounted the unit is upside down so the Left and Right speakers are reversed.
8.2. Power and Standby
With the AC Mains turned off, plug in the AC Mains Cable and then make all Rear Panel audio
connections. The speaker will enter STANDBY, and show a RED status LED.
Exit STANDBY by turning a connected source ON, or by pressing the STANDBY button on either
the Top Panel or the IR remote. The LED will then change colour according to the AUTO SOURCE
SELECT rules.
If no input signals are detected, the Unit will select the Analogue input and then automatically enter
STANDBY after 20 minutes.
8.3. Deep Standby
The M3 has a Deep Standby Mode where it uses the minimum amount of power. Press and hold
the Standby button for 5s to enter deep standby. In deep standby the RED LED dims, AUTO ON /
OFF is disabled and the unit will only respond to the standby button.
8.4. Auto On / Off
When connected to an audio source, the Unit has an AUTO ON function and will come out of
STANDBY when it detects an active audio signal is connected.
When the audio signal is stopped for a pre-dened period of time, the Unit has an AUTO OFF
function and will go into STANDBY.
This, for example, allows easy integration of the Unit with your TV, automatically turning ON and
OFF in synchronisation with your TV STANDBY control.
14
8.5. Auto On / Off Times
a. HDMI
• ON time is determined by the CEC response time of your TV; it can take between 0-10s.
• OFF time is determined by the CEC response time of your TV; it can take between 0-5s.
b. Optical
• ON time is immediate once the red Optical light from your source comes on.
• OFF time is immediate once the red Optical light from your source turns off.
Note:
Some televisions continue their optical output when the TV is in STANDBY. The Unit will not AUTO
OFF under these circumstances and the STANDBY control must be used.
c. Bluetooth
• ON time is determined by the AVRCP response time of your Bluetooth device; once your device
is connected, and you press Play it can take between 1-5s.
• OFF time is determined by the AVRCP response time of your Bluetooth device. Once you turn
Bluetooth off, or disconnect your device it can take between 1-3s.
d. Line In 1 / 2
• ON time commences when the signal level becomes audible. It can take between 1-3s.
• OFF time commences when the signal level is not audible and will take 20 minutes.
Note:
If the user places the Unit in STANDBY while a source is still playing, the AUTO ON function will be
disabled until the source is stopped. This will prevent the Unit from unwanted AUTO ON.
For Line In 1 / 2 the signal must be at a not audible level for 20 minutes before the Unit AUTO ON
will function.
8.6. Auto Source Select
HDMI
Optical
Bluetooth
Line in 1
INPUT
PRIORITY
Line in 2
Standby
The ASS follows a priority list for connected audio sources. A connected HDMI source that starts
to play has the highest priority, followed by Optical, then Bluetooth and nally Analogue 1 and 2.
Note:
The ASS can be overridden at any time by a simple manual SOURCE SELECTION from the user.
15
Simply press the SOURCE SELECT button on the remote, or a short press of the STANDBY Button
on the Unit. The ASS will reactivate once the Unit has been put into STANDBY.
8.7. Low Source Volume (LSV)
During our extensive testing we found that on a number of manufacturer’s products the digital
signal output level is lower than the expected Full Scale (FS). To allow our users to get the best
audio experience from the Q Acoustics Unit we have included a LSV switch.
The LSV switch can be found on the Rear Panel, and has two settings.
1 = Normal gain
2 = Increased 6dB of gain for Optical and HDMI sources
You should rst listen to your setup with LSV = 1
If you nd your signal level to be quite low from your TV/DVD player, please select LSV = 2.
Note:
You will not require the LSV if you are using a Streamer/CD player Optical output. Hi-Fi audio
equipment will output FS digital audio. Audio will be highly distorted if you have LSV = 2 in this
scenario.
8.8. Source volume control
Audio sources will initially be set at a DEFAULT volume level. The volume can be adjusted separately
for each source using the VOL + and VOL – buttons on the Top Panel or IR remote. Once adjusted,
the unit will remember the volume level, and will return to that level the next time that source is
selected.
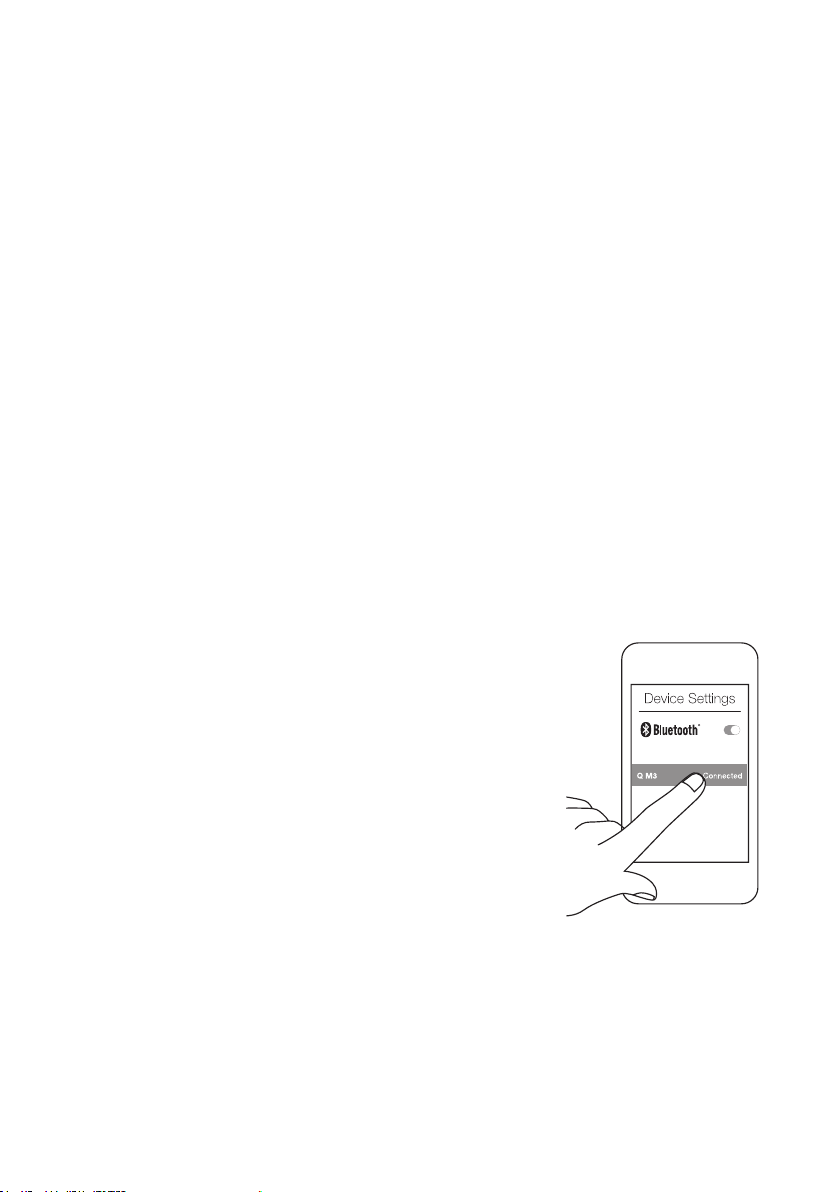
8.9. Bluetooth
Pairing a Bluetooth device
The Unit is designed to be Discoverable when in STANDBY, to
allow AUTO ON. It is also designed to automatically go into
Pairing mode if there is no Bluetooth device connected. To Pair
your Bluetooth source:
1. Make sure Bluetooth is enabled on the device to be Paired.
The Bluetooth controls are typically found in the device’s
‘Settings’ or ‘Connections’ menu.
2. On your device’s list of discoverable devices, you should now
see ‘Q M3’.
3. Select ‘Q M3’ and your device will now be Paired via Bluetooth
and Connected.
4. From within the music player on your device, select ‘Q M3’ as
the audio output and press Play. Unless the remote has been
used to manually select another source and override the ASS, or
a higher priority source is active, the Unit will switch to Bluetooth input and the LED will turn Blue.
Pairing a Bluetooth device with NFC
1. Make sure Bluetooth and NFC are enabled in the device settings.
2. Place NFC device on the top surface of the Unit, in the location indicated.
Note:
You may need to rotate your device for NFC to connect, as NFC coils are in different locations
within different devices.
Please see your device instruction manual for correct NFC operation.
16

The distance needed for successful NFC Pairing can vary from device to device.
3. The NFC device will automatically register on screen when an NFC connection has been made.
4. Follow on-screen instructions to complete NFC Pairing. This usually involves selecting to allow
NFC Pairing.
5. Your device will now be Paired, and Connected via Bluetooth, and will function as any other
Bluetooth source when pressing Play from within the device music player.
Note:
Although starting to Play a track on the connected source will cause the Unit to switch to Bluetooth,
the Unit will stay on Bluetooth until the source is Disconnected. It will not switch to a lower priority
source whilst the player is Paused.
The ASS will switch to Bluetooth the rst time a connected device sends any audio signal, including
message alerts, notication and key press effects.
When connected to a compatible AVRCP device, the device’s volume and mute buttons will control
the Unit using AVRCP. You will also notice that if you switch away from the Bluetooth source, your
currently playing track will PAUSE for you.
*Not all Bluetooth devices are AVRCP compatible.
Going out of range
When a Connected device goes out of range, the Unit will remain on the Bluetooth channel. When
the device returns in range it will automatically re-connect to the Unit. In many cases Play must be
pressed on the device to resume audio playback. Whilst out of range, the Unit source can still be
changed using the SOURCE SELECT button or by turning on a higher priority source.
Note:
If the Bluetooth source does not come back into range for 20 minutes the Unit will automatically
go into STANDBY.
Pairing more than one Bluetooth device
The Unit can have up to eight Bluetooth devices in its Pairing list. When you Pair with the 9th device
the details of the rst device will be lost.
Once the Unit is connected with a device, it will stop automatically searching for other devices to
Pair with or Connect to. To Connect to another device, either Disconnect the currently connected
source on the device itself or press the Bluetooth Pair button on the Rear Panel of the Unit.
Coming out of standby
If there is a Paired device in proximity to the Unit when it comes out of STANDBY it will automatically
initiate a connection to the device. It will not switch to Bluetooth input until Play is pressed on the
device.
8.10. MoviEQ
MoviEQ is Q Acoustics’ preferred balance to maximize the excitement and drama from your TV
and Movie viewing.
MoviEQ is simply toggled On or Off by pressing the Remote Control EQ button. The LED will
indicate whether MoviEQ is turned on by a ash pattern shown below:
Yellow ash x 2 + Yellow = MoviEQ On
Yellow ash x 2 + Red = MoviEQ Off
before reverting to its original colour indicating the selected source.
17

8.11. Lip Sync
The Unit has a lip sync feature for its HDMI and Optical inputs. This allows up to 50ms of delay to
be added to the audio for synchronisation with a screen. When in Lip Sync mode, the lip sync is
adjustable in 10ms steps using the Vol + and – buttons.
To enter Lip Sync mode simply double tap the Bluetooth Pair button on the Rear Panel of the Unit.
The lip sync time is then adjusted and displayed by the following ash pattern, the LED will
maintain the colour of the currently selected source:
0ms = 2 ash
10ms = 4 ash
20ms = 6 ash
30ms = 8 ash
40ms = 10 ash
50ms = 12 ash
After 30 seconds of no other button presses the Unit will exit Lip Sync mode and return to normal
operation. You will only have to set Lip Sync once for each of HDMI and optical, as the unit
remembers delay times for each separately.
18
9. Cable / satellite remote control
The Q Acoustics system has been designed for easy integration into your home entertainment system
as it has the ability to be controlled by many types of PROGRAMMABLE REMOTE CONTROL. This
may include the remote control for your SATELLITE and CABLE system if it has PUNCH THROUGH
capability. Punch through is the common term for being able to program your remote control to send IR
codes to both a TV and an AV Preamplier/Processor. To use punch through you normally select the TV
you wish to support rst, and then the AV Preamplier/Processor.
The Unit uses the PHILIPS RC5 protocol for AV Preampliers / Processors. Programming your remote
with PHILIPS AV codes should allow you to control volume and mute of your Unit. In some cases you
may also be able to control STANDBY and SOURCE SELECT with buttons such as and .
Manufacturers often offer several PHILIPS code options for their remote controls. We recommend that
you work through the PHILIPS code list for your remote and experiment with each one until you nd one
that works well with the Unit. It is easiest to recognise when one is working by pressing the volume up
/ down buttons.
We cannot guarantee that the Unit will work with your particular remote as the IR codes it sends are
outside our control, however by supporting the commonly used Philips standard we hope to have made
it as easy as possible to gain control of your device with the remote control of your choice.
Below we show how two typical programmable remote controls can be set up.
TYPE 1 (SATELLITE)
• Press the “TV” button (top left of remote).
• Point remote away from receiver,
press and hold “Select + 0”.
• The remote’s LED will ash red twice.
• Enter “1217”. The remote’s LED will ash
red twice to conrm correct code.
• Press and hold “Select + 1”.
• The remote’s LED will ash red twice.
• Press TV and your remote controls will now
work as below:
Mute / Standby
Volume up / down
Standby
TV
MUTE
+
SELECT
VOL
Source select
Button Function
Vol + Volume up
Vol - Volume down
1
4
7
3
2
6
5
9
8
0
Mute (short press) Mute
or Mute
(long press)
Source select
19
Standby
TYPE 2 (CABLE)
Mute / Standby
Volume
up / down
• Press the “TV” button (top right of remote).
TV
• Point remote away from receiver,
press and hold “Clear + Vol ”.
• The remote’s LED will ash green twice.
• Enter “1247”. The remote’s LED will ash
MUTE
VOL
green twice to conrm correct code.
• Press TV and your remote controls will now
work as below:
Button Function
Vol Volume up
Vol Volume down
Mute (short press) Mute
Mute (long press) Standby
1
4
7
CLEAR
3
2
6
5
9
8
0
20

10. Specication
Product M3
Type Streamlined Bluetooth Soundbar
Amplier
RMS Output Power 80W (2 x 20W + 40W)
THD (at rated power) <1.00%
Frequency Response ±0.5dB 20Hz – 20kHz
S/N ratio (A Weighting) -85dB
Mains Power 100~240V – 50~60Hz – 100W
Acoustics
Mid-High 2 x BMR 58mm x 58mm
Bass DVC 100mm x 150mm
Crossover 340Hz
Power
Deep Standby <0.5W
Standby (Network Connected) <2.0W
Idle 11.0W
Connections
Optical DAC 1 x 24-bit 48kHz Toslink
Bluetooth V4.1 Class II
Bluetooth Frequency Range 2402MHz - 2480MHz
RF Output Power (Max.) 4.85dBm
CODEC aptX, AAC, MP3, SBC
RCA Phono Maximum Sensitivity 2.10Vrms
3.5mm Maximum Sensitivity 1.10Vrms
Weight and Dimensions
Height 90mm
Width 1000mm
Depth 127mm
Un-boxed Weight 4.0kg
Key Features
ASS
MoviEQ
LSV
Lip Sync
NFC
HDMI ARC
CEC
Bluetooth
AptX
AVRCP
BMR
DVC
a
a
a
a
a
a
a
a
a
a
a
a
21

11. Warranty
Q Acoustics Media products are warranted free of defects in materials and workmanship for a period
of 1 year from the date of purchase. During the warranty period Q Acoustics will, at its option, repair or
replace any product found to be faulty after inspection by the company or its appointed distributor or
agent.
Misuse and fair wear and tear are not covered by warranty.
Goods for repair should in the rst instance be returned to the supplying dealer. If this is not possible
contact Q Acoustics or their appointed distributor for your area to determine the correct warranty
procedure. If possible the original packaging should be used to return the product as damage sustained
during transit to the repair centre is not covered by the warranty. The warranty does not in any way affect
your legal rights.
Warranty can be extended to 2 years by registering your product at qacoustics.co.uk/register.
For service information in other countries contact: info@qacoustics.co.uk
Q ACOUSTICS
Stortford Hall Industrial Park
Bishops Stortford, Herts, UK
CM23 5GZ
The Bluetooth word mark and logo are registered trademarks owned by Bluetooth SIG, Inc. and use of such marks by Armour Home
Electronics Limited is under license. Other trademarks and trade names are those of their respective owners.
Qualcomm aptX is a product of Qualcomm Technologies International, Ltd.
Qualcomm is a trademark of Qualcomm Incorporated, registered in the United States and other countries, used with permission. aptX
is a trademark of Qualcomm Technologies International, Ltd., registered in the United States and other countries, used with permission.
The term HDMI and HDMI High-Denition Multimedia Interface, and the HDMI Logo are trademarks or registered trademarks of HDMI
Licensing LLC in the United States and other countries.
The N-Mark logo is a registered trademarks of the NFC Forum Inc.
Our policy is one of continuous product improvement.
We reserve the right to change the designs and specications without notice.
This document contains information that is subject to change without notice.
22

10. Glossary
Feature Summary
ASS – Q Acoustic’s intelligent pre-amplier removes the need for a remote control
through a signal sensing matrix to enable Automatic Source Selection and auto on
/ off.
MoviEQ – Q Acoustic’s Movie EQ helps to maximise the drama and excitement of a
movie soundtrack.
NFC – Near Field Connection allows simple connection of Bluetooth devices by
tapping the NFC location on the Q Acoustics speaker.
HDMI ARC – High Denition Multimedia Interface Audio Return Channel removes the
need for additional Optical or Analogue audio cables between source and speaker.
CEC – Consumer Electronics Control synchronises TV remote control of Volume, Mute
and Standby for easy integration of our Q Acoustics speaker.
Bluetooth – An international wireless connection used for streaming audio from all
compatible devices.
aptX – A high denition audio CODEC used for Bluetooth streaming.
AVRCP – A Bluetooth control protocol that synchronises your device control of Volume
and Mute for easy integration with our Q Acoustics speaker.
BMR – Balanced Mode Radiators are the preferred choice for evenly lling an entire
room with sound.
DVC – The Dual Voice Coil subwoofer is Q Acoustics’ subwoofer driver of choice. It
has two voice coils in one driver for greater exibility of design and improved bass
control.
Location EQ – User control of EQ setting for best acoustic performance. This can be
changed dependent upon speaker position, mounting, or user preference.
LSV – Q Acoustic’s Low Source Volume switch increases the incoming signal level to
get maximum performance from your system when connected to low output signal
equipment via HDMI or Optical.
Lip Sync – Adjustable delay for lip synchronisation between TV / screen and Q
Acoustics speaker.
23
QACOUSTICS.CO.UK
Q16137-IS-EN_r1
24

M3 Soundbar
BENUTZER HANDBUCH
1

2

Inhaltsverzeichnis
1. Einführung
2. Verpackungsinhalt
3. Wandhalterung
4. Bedienelemente
Oberseite
Vorderseite
5. LED Blinkmuster
6. Anschlüsse
Bluetooth
HDMI (ARC)
Optischer Eingang
Analogeingang Line In 1
Analogeingang Line In 2
AC-Netzeingang
USB (nur für Servicezwecke)
7. Fernbedienung
8. Betrieb
On / In / Wall (Wand) EQ
Betrieb und Standby
Deep Standby
Auto An / Aus
Auto An / Aus Zeiten
Automatische Quellenauswahl
Geringe Lautstärke in der Quelle (Low Source Volume
(LSV™))
Lautstärkeregelung der Quelle
Bluetooth
MoviEQ
Lip Sync
9. Kabel-/Satellitenfernbedienung
10. Spezikation
11. Garantie
12. Begriffserklärung
®
®
™
4
5
6
7
8
9
13
14
19
21
22
23
3

1. Einführung
Vielen Dank, dass Sie sich für Q Acoustics entschieden haben.
Dieses Handbuch soll Sie durch die Einrichtung und Installation der M3 führen. Es wird Ihnen bei der
problemlosen Einrichtung helfen und für eine optimale Leistung des Produkts sorgen.
Bitte lesen Sie diese Anweisungen, die wichtigen Sicherheitshinweise und Warnungen sorgfältig vor
der Einrichtung und Verwendung durch, um einen sicheren und zufriedenstellenden Betrieb dieses
Produkts zu gewährleisten.
Mit der M3 wurde Einfachheit neu deniert. Hier trifft wunderbar komponierter Sound auf wunderbares
Design.
Die elegante und kompakte Soundbar mit ihrem beachtlichen Innenleben füllt Ihr ganzes Wohnzimmer
aus, ohne dabei ein Durcheinander an Kabeln zu produzieren, das eine komplette Hi-Fi-Anlage, aber
auch eine Soundbar mit großem externen Subwoofer mit sich bringen.
Q Acoustics Auto Source Selection (ASS) (Automatische Quellenauswahl) wurde für eine nahtlose
Integration in Ihre Einrichtung in Ihrem Zuhause entworfen. Die M3 ist eine echte Plug-and-PlaySoundbar. Verbinden Sie sie über den HDMI-ARC-Eingang mit Ihrem Fernsehgerät und machen Sie
sich anschließend keine Sorgen mehr. Die M3 wird eins mit Ihrem Fernsehgerät und lässt Sie beide
Seiten dieses einzigartigen Produkts erleben: Musik und Filme.
Unser eingebauter drahtloser aptX® Bluetooth®-Eingang befreit die Welt der Musik von ihren Fesseln und
legt sie in Ihre Hände. Mit Ihren bloßen Fingern können Sie Ihr Zuhause mit wunderbar detailgetreuen
und dynamischen Audioklängen erfüllen. Entdecken Sie in Ihrer Musik feinste Nuancen, die Sie bisher
nie herausgehört haben und durch die Sie Musik so erleben können, wie sie sein soll!
Bereits beim Einschalten des Fernsehgerätes sorgt die M3 automatisch für eine klare Sprache und
bildet die Klangwelt in einer Tiefe ab, die den Sound Ihres Fernsehgerätes verändern wird. Durch
die Aktivierung von MoviEQ™ werden ein kräftiger Bass und eine kraftvolle Dynamik Ihr Zuhause
vereinnahmen und Ihnen eine uneingeschränkte Kinoerfahrung bieten.
Ob an der Wand oder im Regal angebracht – die elegante und kompakte M3 wird zum klanglichen
Herzstück Ihres Home-Entertainment-Systems werden.
Wir hoffen, dass Sie die Q Acoustics Erfahrung genießen.
4
2. Verpackungsinhalt
1 x M3 Soundbar
1 x Fernbedienung
Quick Start
Anleitung
1 x Quick Start
Anleitung
1 x Lithium Batterie
(3V, CR2025)
Sicherheit
Informationen
1 x Sicherheit
Informationen
1 x Netzkabel
(Regionales Netzkabel)
Wand
Halterungs
schablone
1 x Wandhalterungs
schablone
1 x HDMI Kabel
Garantie
Karte
1 x Garantieschein
5

3. Wandhalterung
Q Acoustics übernimmt keine Verantwortung für Schäden die durch fehlerhaften Zusammenbau,
Einrichtung oder unsachgemäße Bedienung entstehen.
Stellen Sie sicher, dass die Wand stark genug ist, das Gewicht des Soundbars und der Halterung zu
tragen.
Falls es Zweifel in Bezug auf den Zustand oder die Tragfähigkeit der Wand geben sollte, lassen Sie sich
bitte von einem Spezialisten aus dem Baugewerbe beraten.
Die benutzten Wandbefestigungen müssen zur Art der Wand passen (Material, Stärke, Zustand), so die
maximale Tragfähigkeit der Wand garantiert werden kann.
Stellen Sie sicher, dass sich keine elektrischen Kabel, Wasser- oder Gasrohre in der Wand benden.
Vor der Montage, beachten Sie die am nächsten liegende Steckdose. Benutzen Sie eine Wasserwaage
wenn Sie die Wandhalterung anbringen.
Tragen Sie beim Bohren eine Schutzbrille.
Halten Sie Kleinteile außerhalb der Reichweite von Kindern.
1.
3.
2.
2x
Schrauben und
Wandbefestigung nicht im
Lieferumfang enthalten
4 mm
6
 Loading...