

Q Acoustics 3060 S, 3010i, 3090Ci, 3020i, 3050i Owner's Manual

1
3060S
OWNER’S MANUAL

2
Designed and engineered in the United Kingdom.
EN ENGLISH 03
DE GERMAN 20
FR FRENCH 36
IT ITALIAN 52

3
ENGLISH (EN)
Important Safety Information and Warnings
IMPORTANT INFORMATION - PLEASE READ CAREFULLY
This symbol indicates that there are important
operating and maintenance instructions in the
literature accompanying this unit.
This symbol indicates that dangerous voltage
constituting a risk of electric shock is present
within this unit.
RISK OF ELECTRIC SHOCK
DO NOT OPEN
CAUTION
TO REDUCE THE RISK OF ELECTRIC SHOCK DO NOT REMOVE COVER (OR BACK)
NO USER-REMOVABLE PARTS INSIDE
REFER SERVICING TO QUALIFIED PERSONNEL
Read these instructions.
Keep these instructions.
Heed all warnings.
Follow all instructions.
Do not use this apparatus near water.
Clean only with dry cloth.
Do not block any ventilation openings.
Install in accordance with the manufacturer’s
instructions.
Do not install near any heat sources such as radiators,
heat registers, stoves, or other apparatus (including
ampliers) that produce heat.
Do not defeat the safety purpose of the polarized or
grounding type plug. A polarized plug has two blades
with one wider than the other. A grounding type plug
has two blades and a third grounding prong. The wider
blade or the third prong are provided for your safety. If
the provided plug does not t into your outlet, consult an
electrician for replacement of the obsolete outlet.
Protect the power cord from being walked on or
pinched, particularly at plugs, convenience receptacles,
and the point where they exit from the apparatus.
Use only attachments/accessories specied by the
manufacturer. Use only with a cart, stand, tripod,
bracket, or table specied by the manufacturer, or sold
with the apparatus.
When a cart is used, use caution when moving the cart/
apparatus combination to avoid injury from tip-over.
Unplug this apparatus during lightning
storms or when unused for long periods of
time.
Refer all servicing to qualied service personnel.
Servicing is required when the apparatus has been
damaged in any way, such as power supply cord or
plug is damaged, liquid has been spilled or objects
have fallen into the apparatus, the apparatus has been
exposed to rain or moisture, does not operate normally,
or has been dropped.
Warning: To reduce the risk of re or electrical shock, do
not expose this product to rain or moisture. The product
must not be exposed to dripping and splashing and
no object lled with liquids such as a vase of owers
should be placed on the product.
No naked ame sources such as candles should be
placed on the product.
Warning: The mains power switch for the subwoofer is
the device used to disconnect the unit from the mains
supply. This switch is located on the rear panel. To
permit free access to this switch, the apparatus must be
located in an open area without any obstructions, and
the switch must be freely operable.
Caution: Changes or modications not expressly
approved by the manufacturer could void the user’s
authority to operate this device.
Service: Equipment for servicing should be returned
to the supplying dealer, or to the service agent for your
area. The addresses of the main Service Agents for the
UK are listed in this manual.
Third parties: In the unlikely event that you pass this
product on to a third party, include these operating
instructions with the product.
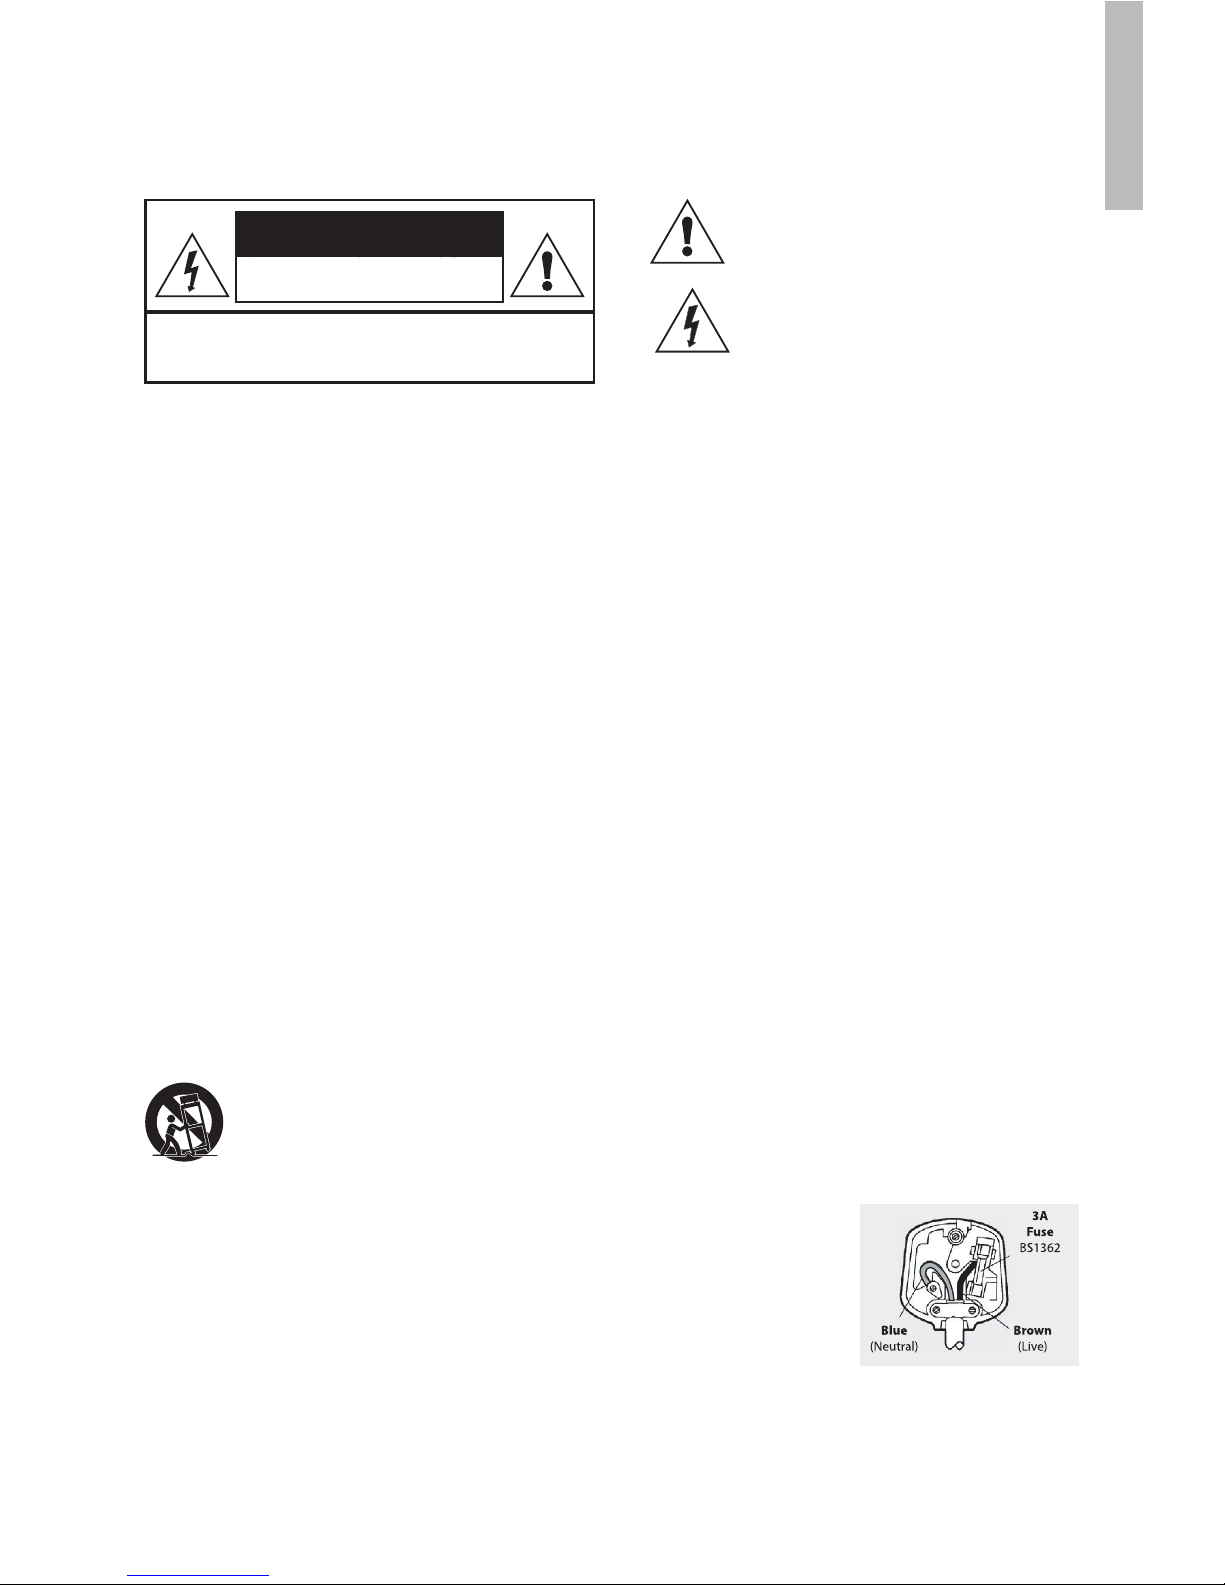
Important notice to UK users
The appliance cord is terminated with a UK approved
mains plug tted with a 3A fuse. If the fuse needs to be
replaced, an ASTA or BSI approved BS1362 fuse rated
at 3A must be used. If you need to change the mains
plug, remove the fuse and dispose of this plug safely
immediately after cutting it from the cord.
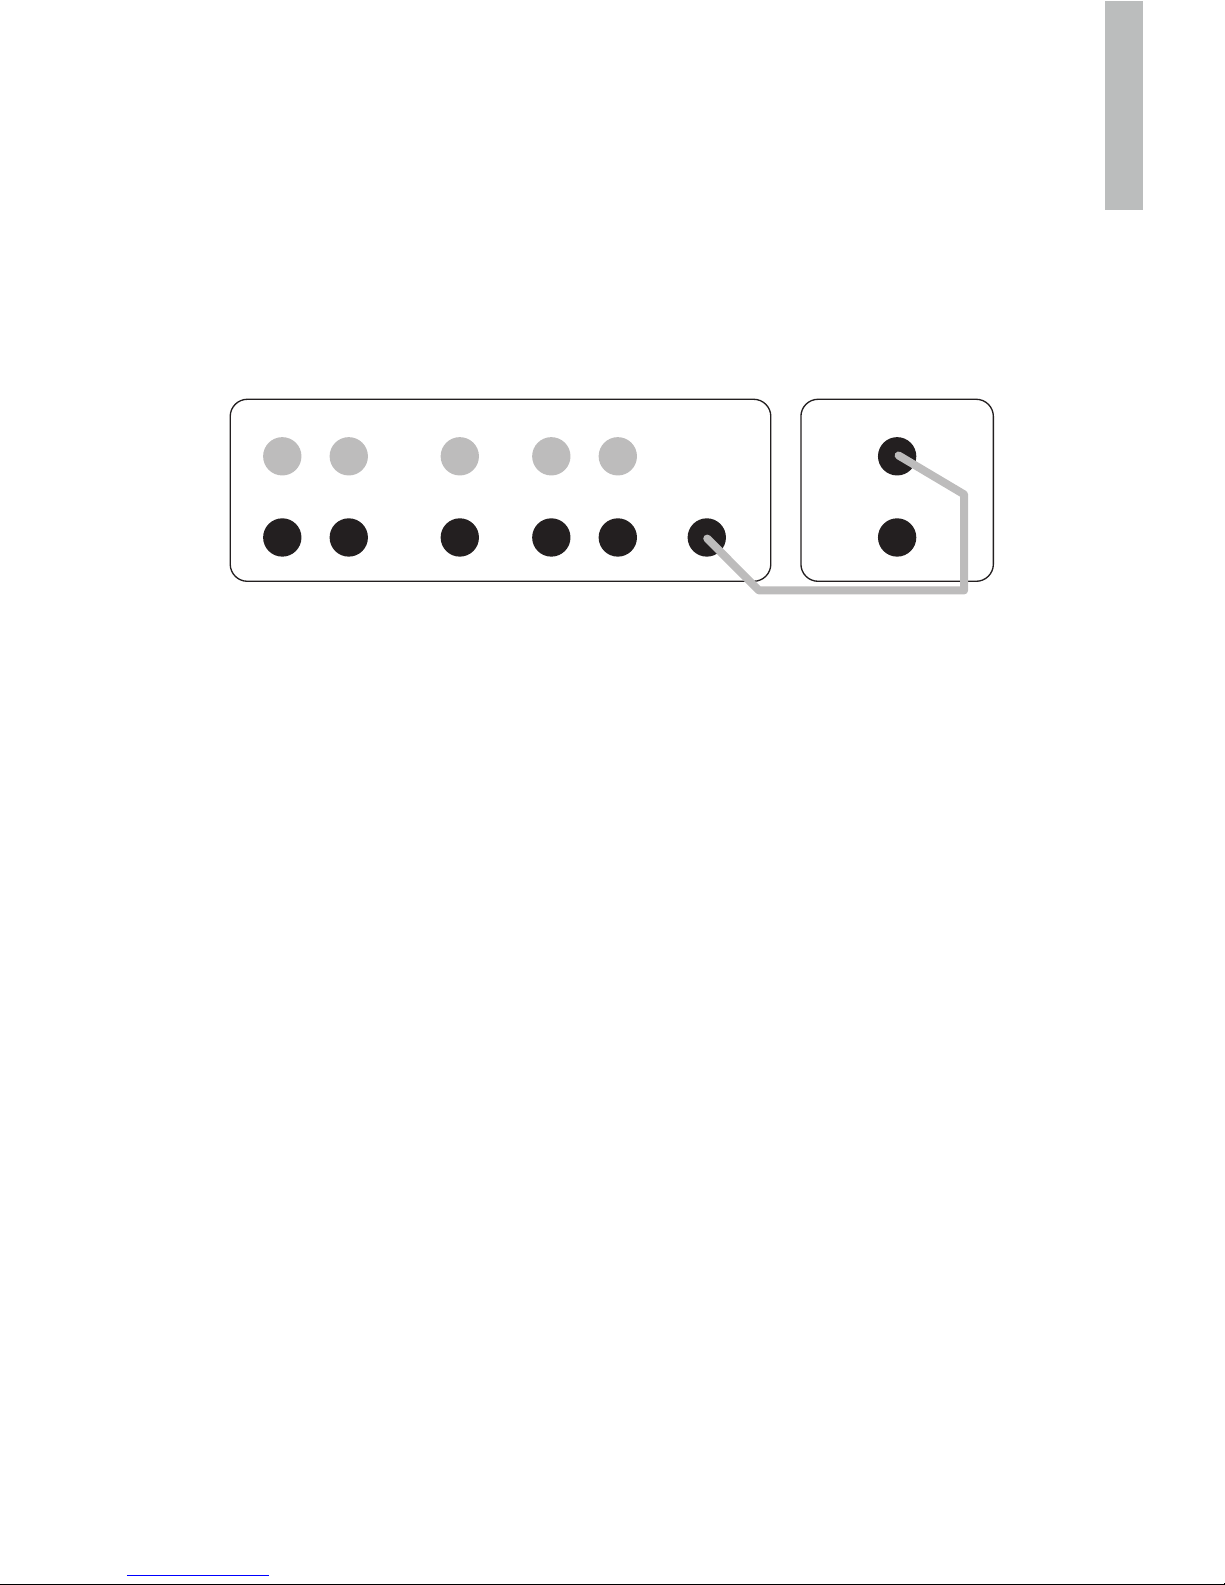
Connecting a mains plug
The wires in the mains lead are coloured in accordance
with the code: Blue: NEUTRAL; Brown: LIVE.
As these colours may not correspond to the coloured
markings identifying the terminals in your plug, proceed
as follows:
The BLUE wire must be connected to the terminal
marked with the letter N or coloured BLUE or BLACK.
The BROWN wire must be connected to the terminal
marked with the letter L
or coloured BROWN or
RED.
To completely
disconnect this
apparatus from the AC
Mains, disconnect the
power supply cord plug
from the AC receptacle.
Where the MAINS plug or an appliance coupler is used
as the disconnect device, the disconnect device shall
remain readily operable.

4
Introduction
Thank you for purchasing Q Acoustics.
This manual is intended to take you through setup and installation and will help provide optimum
performance from the product.
Please read the instructions, important safety information and warnings carefully before installation
and use, to ensure the safe and satisfactory operation of this product.
The Q Acoustics 3000i series is a range of loudspeakers designed to meet the highest expectations
of dedicated 2-channel audiophiles and discerning movie enthusiasts.
The range comprises:
3010i: Compact bookshelf speaker with a 100 mm (4.0 inches) bass driver.
3020i: Bookshelf speaker with a 125 mm (5.0 inches) bass driver.
3050i: Floorstander with 2 x 165 mm (6.5 inches) bass drivers.
3060S: 150 Watt active subwoofer with a 200 mm (8.0 inches) driver.
3090Ci: Centre channel with 2 x 100 mm (4.0 inches) bass drivers.
In the carton you will nd: The loudspeaker/s and this product manual.
In addition the packing for the following models contains:
3050i: Rear stabiliser, spikes and spike covers for each speaker. An Allen key to adjust the spikes
once tted.
3060S: A mains power cord or cords, spikes and spike covers.
Check the product carefully. If any items are damaged or missing, report this to your dealer as soon
as possible.
We hope you enjoy the Q Acoustics experience.
ENGLISH (EN)
5
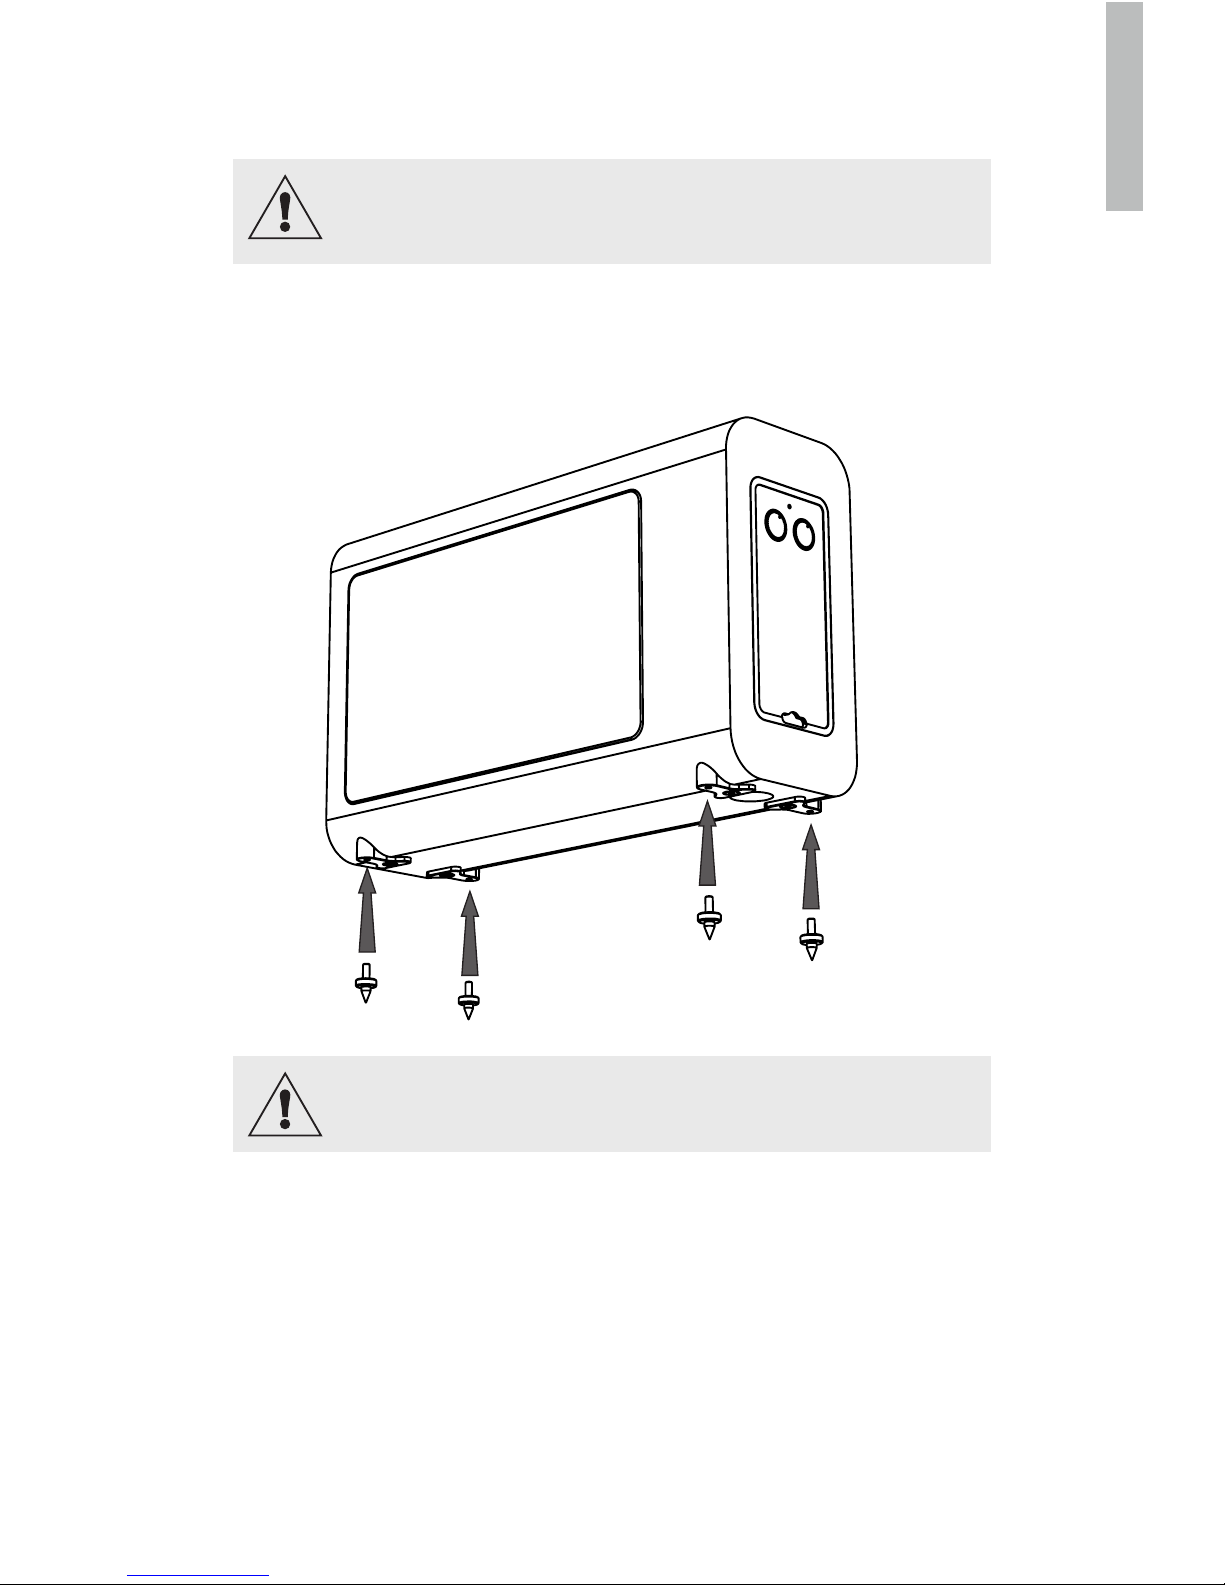
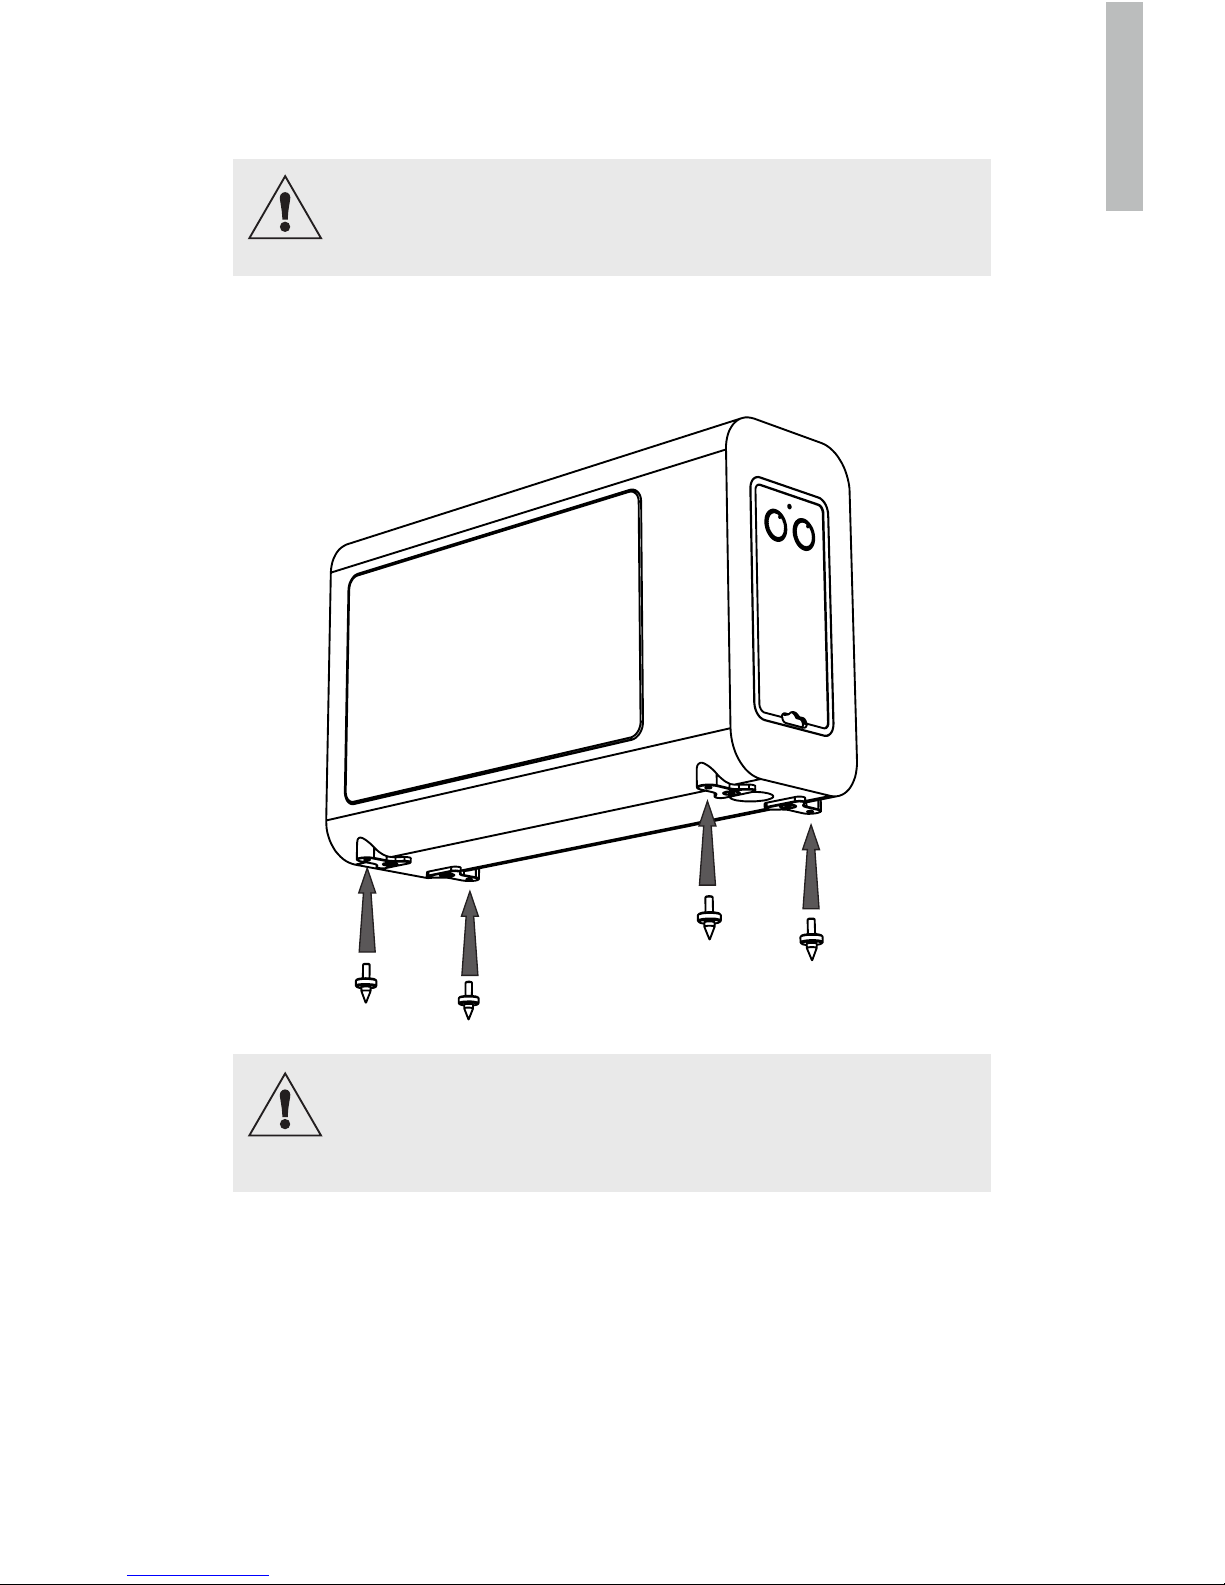
Thread the locking nut onto the spike and screw all four spikes into the feet on the subwoofer. If
you have a wood or stone oor push a spike protector over each spike before turning the speaker
upright. When the speaker is the right way up adjust all the spikes until the loudspeaker is level
and stable.
ENGLISH (EN)
Preparation
Lift the speakers from the cartons by holding the cabinets. Do not touch
the driver units or use the protective bags to lift them. The 3050i and
3060S are heavy - get assistance to lift them if necessary.
Spikes are sharp. Exercise care!
Never place a spiked loudspeaker where it can cause damage!
Always move your loudspeakers by lifting them - never drag them!
6
Positioning
ENGLISH (EN)
Bass frequencies are substantially omni directional. Although this means that you can position
the subwoofer almost anywhere, the stereo image will still benet by positioning the subwoofer
level with the front loudspeakers and as central to the listening position as possible. This may not
be feasible in a multichannel system. If you place the subwoofer close to a wall the bass will be
re-enforced therefore in some locations the bass may be boomy and indistinct.
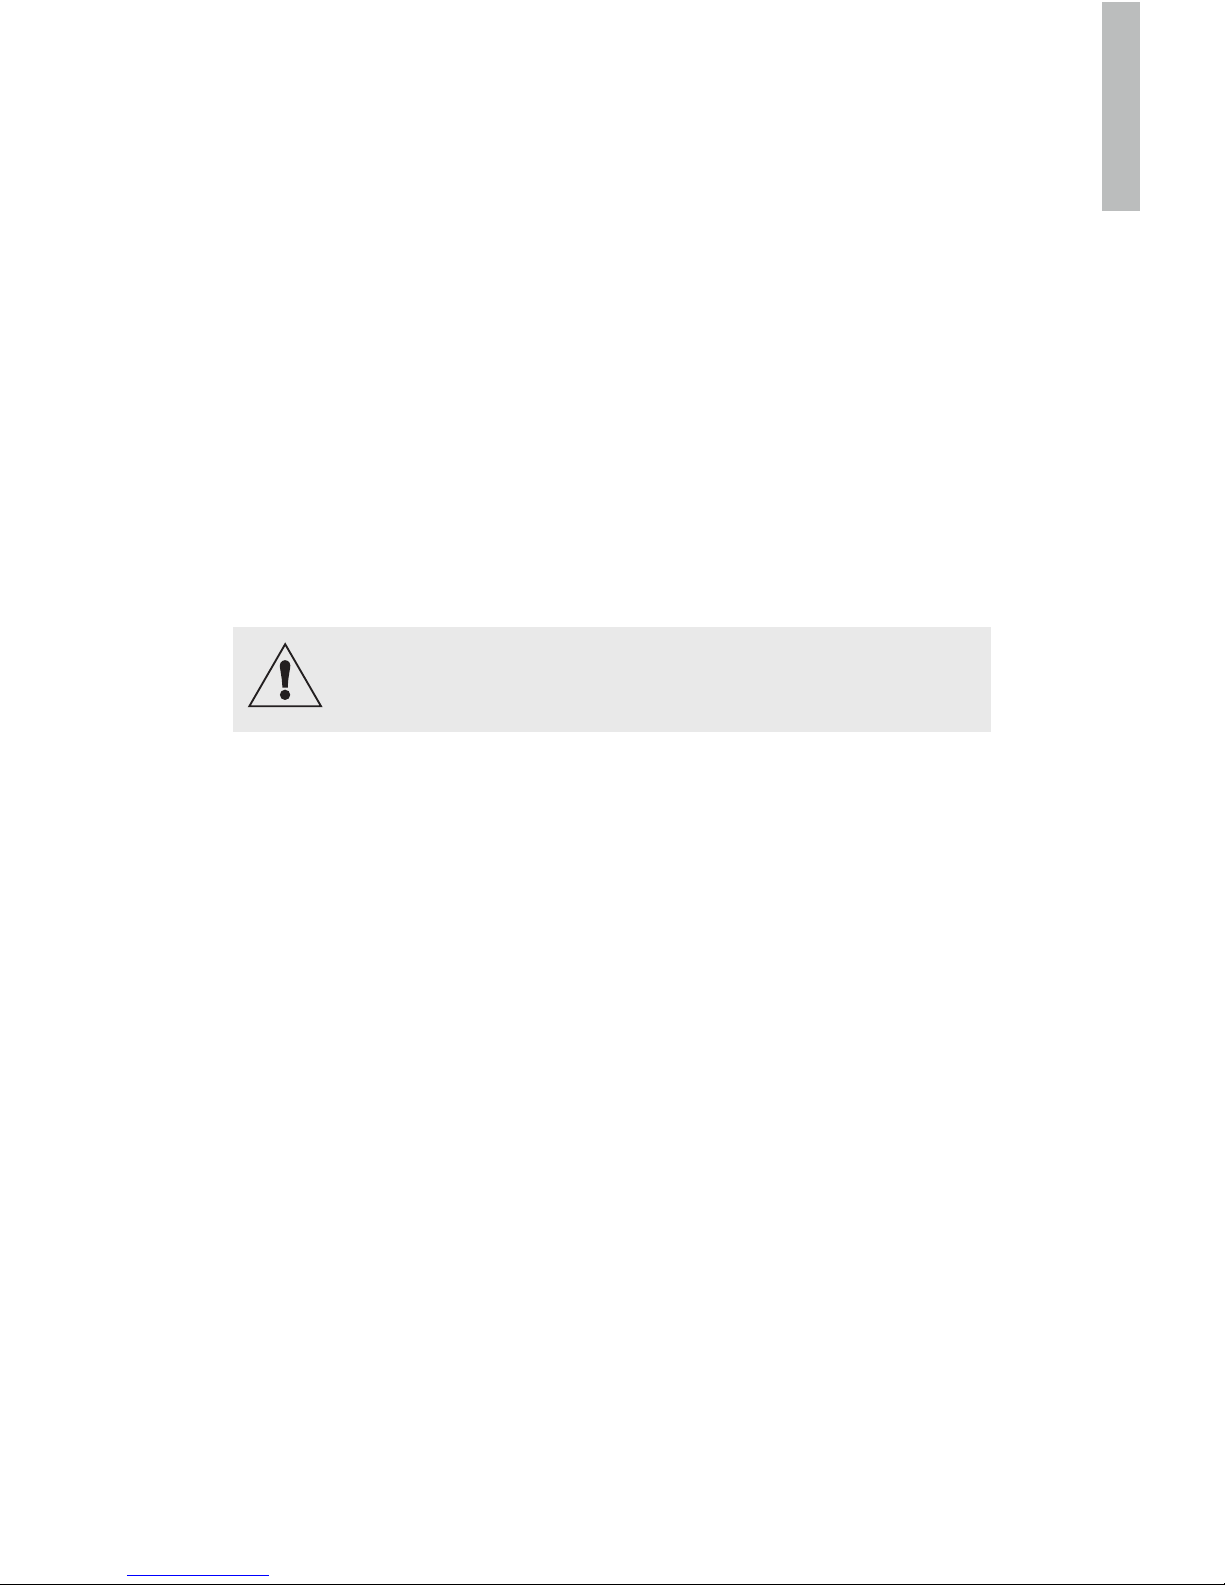
The subwoofer should be positioned close to a mains power source. Do not use extension cables.
Purchase a longer power cord if necessary.
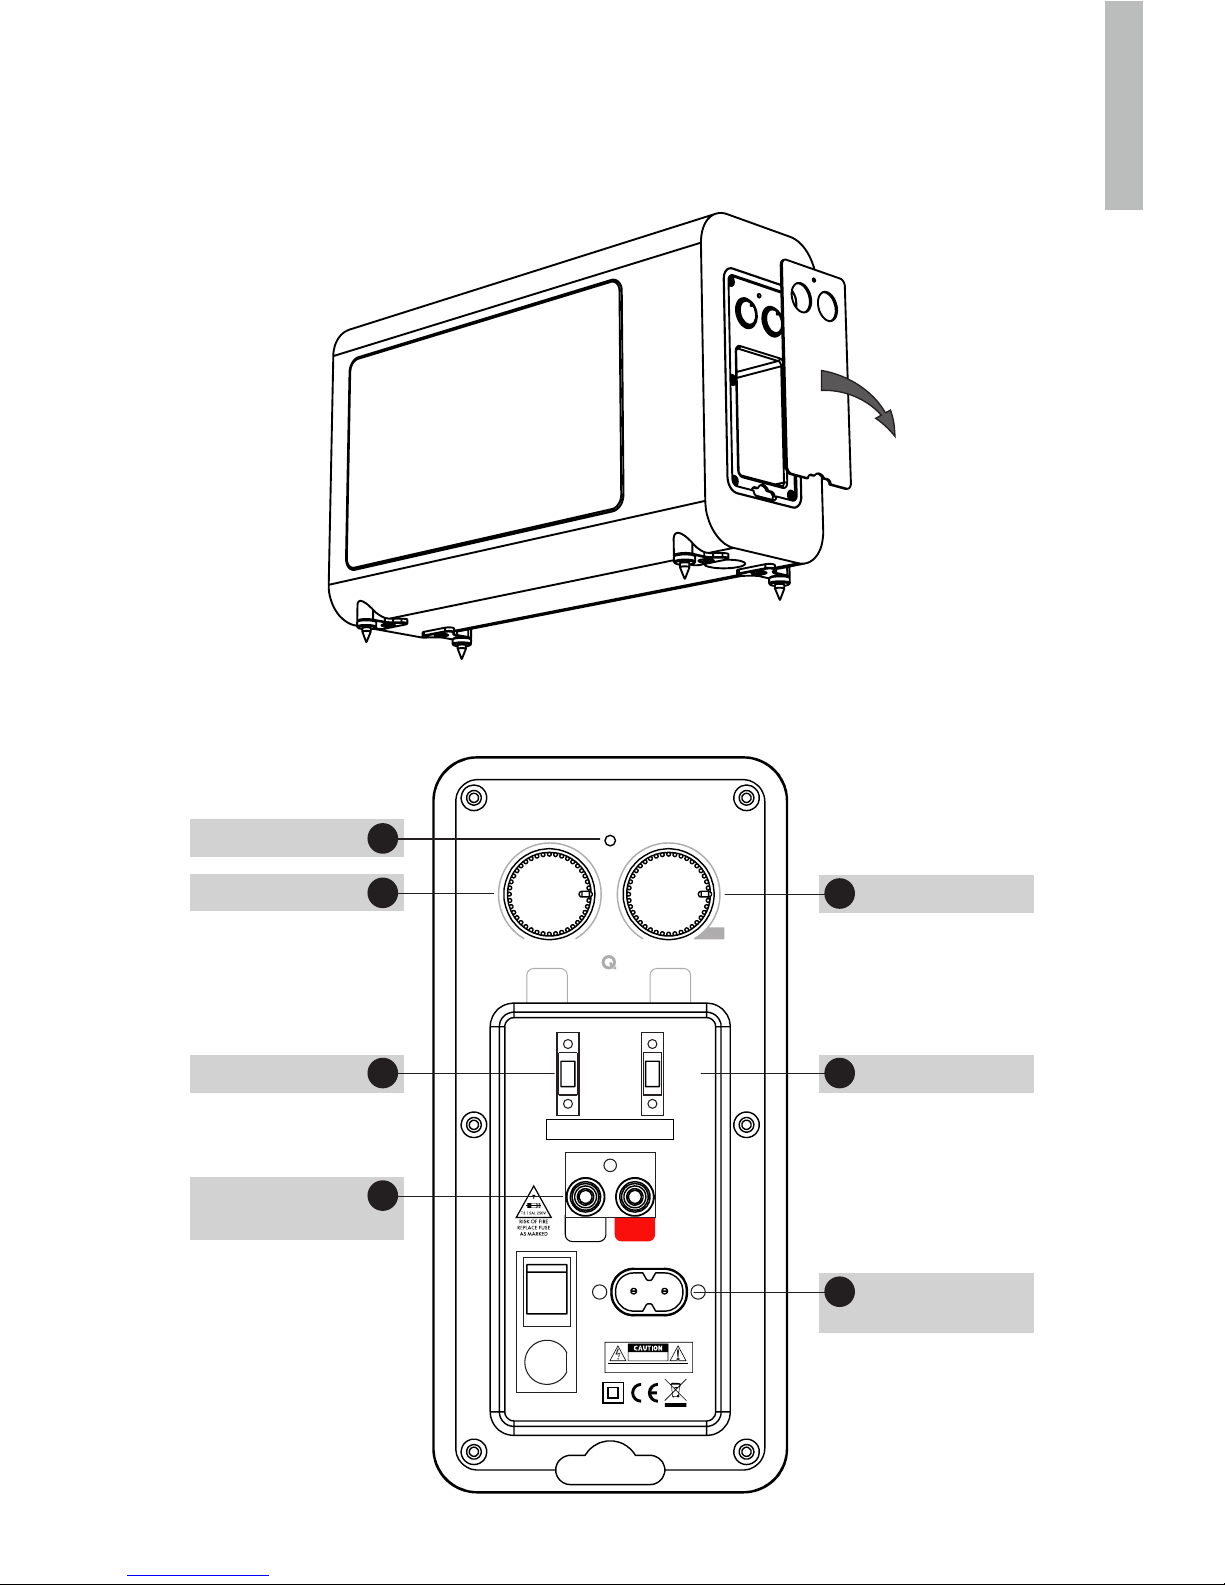
The Power Switch is the means of disconnecting this apparatus from the mains and is mounted
on the control panel.
When positioning the subwoofer ensure the oor is sound with no loose oorboards etc. The
air movement from the subwoofer at high volumes is substantial - do not place it close to soft
furnishings or objects that may rattle. Do not place objects of any kind on the unit.
All the loudspeakers may be operated close to TV monitors with no illeffects with the exception of the 3060S which should not be operated
within 500mm of TV screens monitors or other magnetically sensitive
equipment. Plasma and LCD screens are unaffected.
7
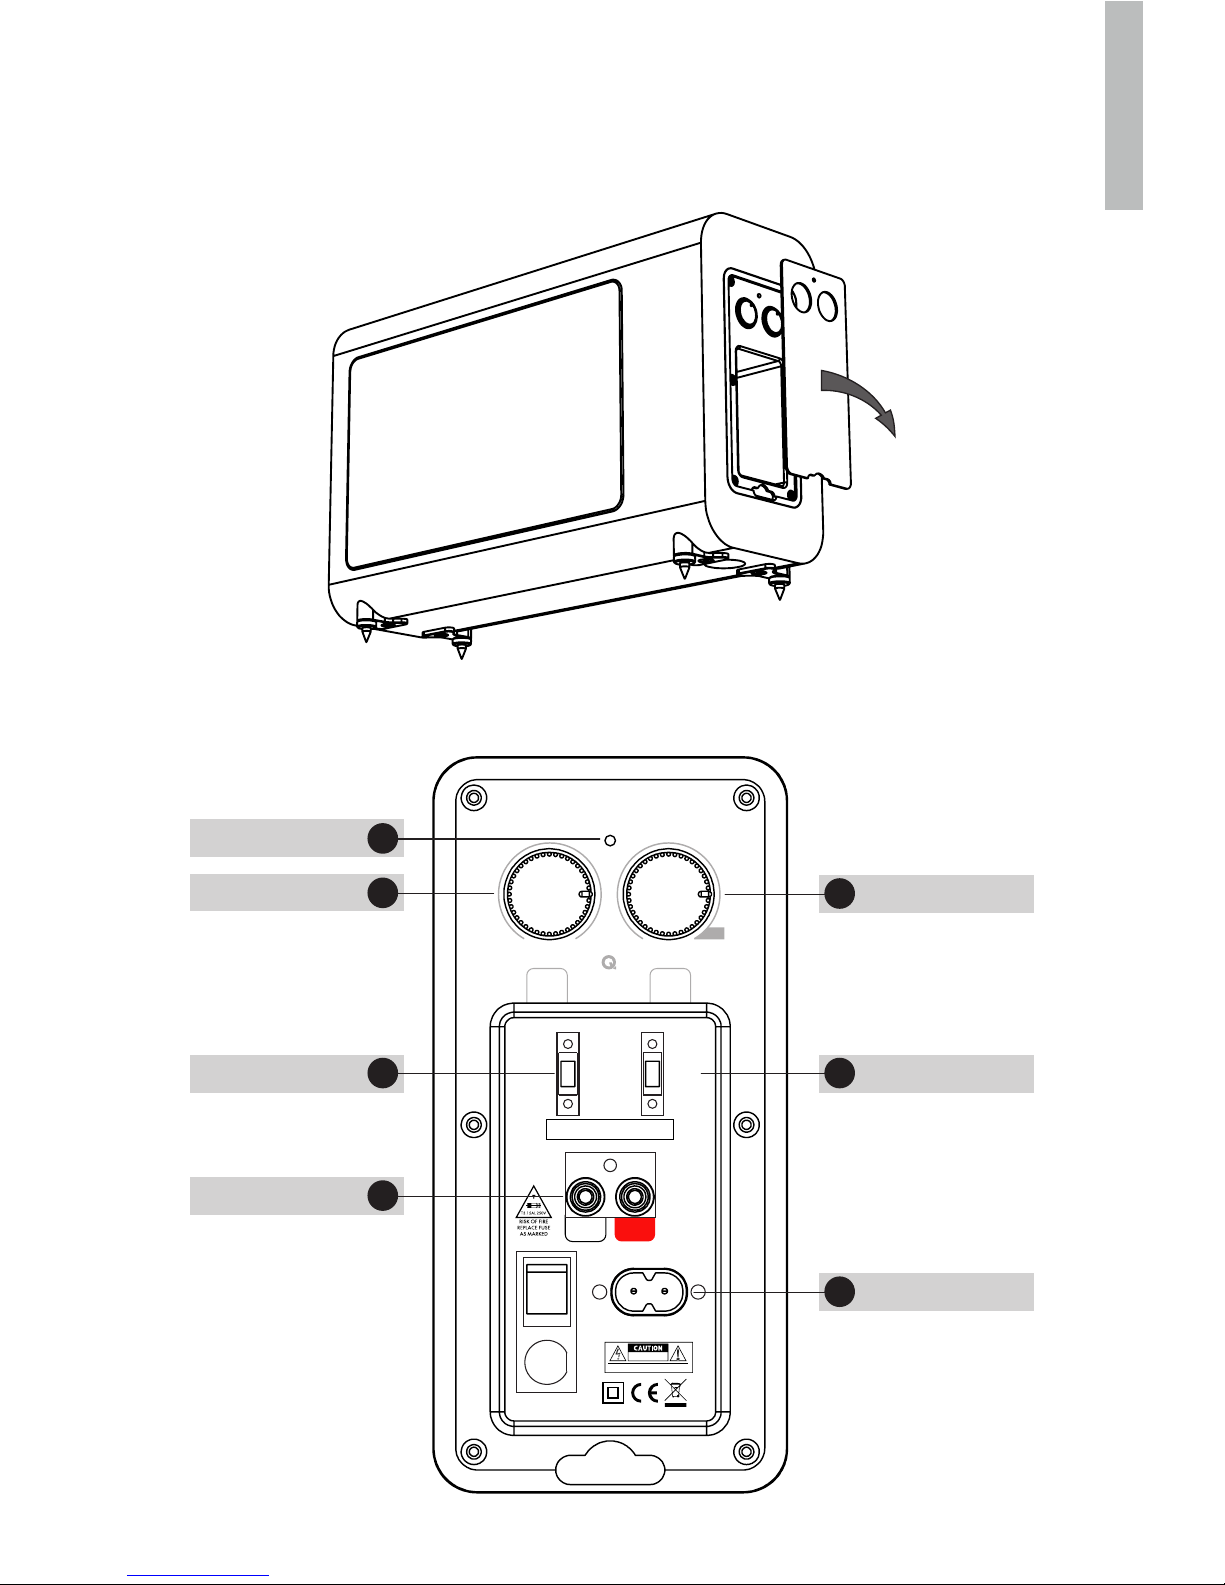
Controls and Connections
ENGLISH (EN)
LEVEL CROSSOVER
15060
01 0
AV
Q3060S
SUBWOOFER
• 0
o
PHASE
• 180
o
• AUTO
• ON
MADE IN CHINA
DESIGNED IN THE UNITED KINGDOM
• 0
o
PHASE
• 180
o
ON •
AUTO •
RIGHT
LEFT /
MONO
POWER
ON
OFF
SERIAL NUMBER
CAUTION:
TO REDUCE THE RISK OF ELECTRIC SHOCK, DO NOT REMOVE
COVER (OR BACK). NO USER-SERVICABLE PARTS INSIDE
REFER SERVICING TO QUALIFIED SERVICE PERSONNEL.
RISK OF ELECTRIAL SHOCK
WARNING: SHOCK HAZARD - DO NOT OPEN.
AVIS: RISQUE DE CHOC ELECTRIQUE-NE PAS OUVRIR.
DO NO OPEN
1
2
3
4
5
6
7
Status
Crossover
Phase
AC Power Input
Level
AUTO/ON
Line Level Input

8
Controls and Connections
ENGLISH (EN)
LEVEL
CROSSOVER
15060
AV
• 0
o
PHASE
• 180
o
• ON
• AUTO
RIGHT
LEFT /
MONO
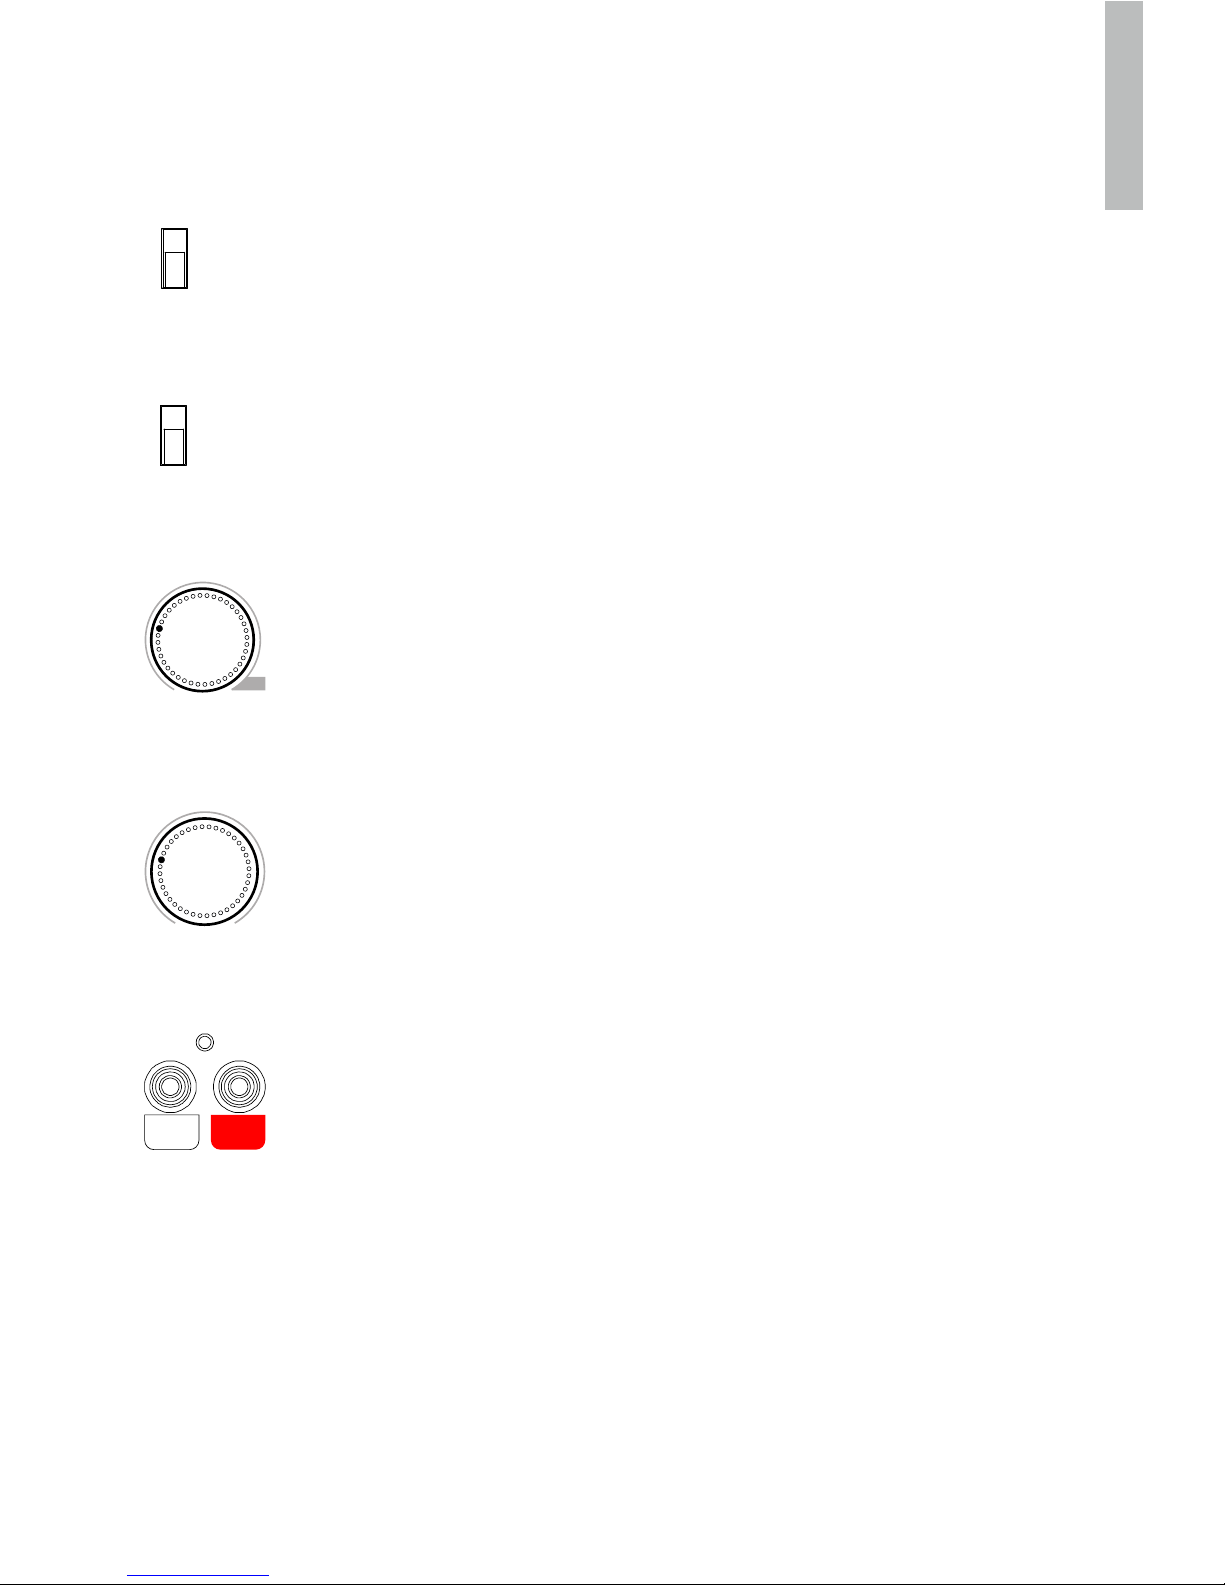
With this switch set to AUTO, when not in use the subwoofer shuts down to
save power and switches on when it senses a signal. This can be over-ridden
by switching ON.
The Phase Switch (2) changes the phase of the subwoofer so that it works in
phase with the rest of the speakers in the system. Place the subwoofer more
than 1 metre away from the front speakers and switch the phase between 0°
and 180°. When the subwoofer sounds louder and fuller then it is in phase.
The Crossover Control (3) changes the pitch at which the subwoofer starts to
work. It is recommended that the crossover point is set to the ‘AV’ setting on
the dial when used with the 3000 System. If you are using the subwoofer with a
non Q Acoustics system then you can change the crossover point to suit your
system.
The Level Control (4) increases or decreases the volume of your subwoofer in
relation to the other speakers in the system. Start with the volume at 0 on the
dial then turn it up slowly until you can hear it. The subwoofer should be heard
as part of the overall sound and not overpower the rest of the system. There is
no rule for setting the volume on your subwoofer so experiment with different
music and lms to set it to your tastes.
The Line Level Input-LFE (6) is Q Acoustics preferred AV connection to the
amplier.
Connect the subwoofer to the output on your AV amplier or DVD player. Use R
and L if your amplier output is split left and right.
1 10
AV

9
Multi-Channel AV System
ENGLISH (EN)
For Stereo System connection, see next section.
Connections
Standard Connection is via the Line level RCA phono Inputs. For a typical AV system set-up you
will need a single RCA phono interconnect. As this cable is likely to be quite long, make sure you
get a good quality fully screened cable. Your Q Acoustics dealer will be happy to supply you with
a suitable interconnect.
Connect the SUBWOOFER OUTPUT on the AV amplier to the L/Mono Line input on the
subwoofer, pushing the plugs rmly home to ensure a good contact.
Setting Up
Check that all system connections are properly and securely made. Ensure that the subwoofer
is switched off.
Set the controls to the following default settings:
Level Approximately half
Crossover Fully clockwise (AV setting)
Phase invert 0°
Auto on AUTO or ON
Plug the supplied power cord into the subwoofer and then into the AC supply socket. Switch on
the power at the supply socket and then switch the power switch on the subwoofer to ‘ON’. The
POWER light on the subwoofer amplier panel will glow and the subwoofer is operational.
Check the settings on your AV amplier to make sure that the subwoofer is set to ‘ON ‘or YES. The
subwoofer level on the AV amplier should be set at its default position or 0dB. You should already
have set the speaker sizes and positions for all the other speakers in your system. If you have the
option to set the crossover frequency on the other channels make sure this is set appropriately to
your speakers: the 3010i, 3020i and 3090Ci should have the foam bung inside the port tube and
set to “small” and a crossover of 80Hz on the AV amplier. Whereas, the 3050i should be set to
“large” without a foam bung and does not require a crossover setting. Finally, set the distance (or
delay) setting that is correct for the subwoofer position you have chosen.
REAR LS
RIGHT LEFT
FRONT LS
RIGHT LEFT
CENTRE LS
AV AMPLIFIER
+
-
+
-
SUB OUT
+
-
SUBWOOFER
LINE IN
LEFT /
MONO
RIGHT

10
ENGLISH (EN)
Play some stereo music you are familiar with and experiment with the Phase invert setting and
level control until you hear a seamless blend between the front speakers and the subwoofer. If you
can hear the subwoofer standing out it’s too loud!
Always bear in mind that the human ear sensitivity to bass varies enormously with the volume
level, hence the need for a wide range of programme material and sound levels.
Many Home Theatre ampliers have distance settings which build in a time delay depending on
the distance of the speaker from the optimum listening position; the sweet spot. The location of
the subwoofer is one of the most important aspects of any Home Theatre system therefore getting
these settings correct will give a signicant improvement to the system’s overall performance.
Do not adjust to more than +/-0.5m from the original measured distance. If it has not been
possible to discern any improvement in the tone, try swapping the phase invert switch position on
the 3060S Subwoofer and repeat the exercise. Then re-check the sound with some stereo music
again to make sure an improvement has been noticed.
If the 3060S Subwoofer is subsequently moved relative to the other speakers reset the amplier
subwoofer distance setting to the new value and repeat the exercise. Once you are happy the
optimum setting has been achieved. The sound should be full and warm and integrated with no
individual speaker being dominant.
Dolby Atmos
The dimension of height and hearing sounds coming from above is key to the multi-dimensional
Dolby Atmos experience. We don’t support the concept of upward ring speakers for Dolby
Atmos, but have an excellent range of in-ceiling speakers for this. Many home cinema installations
currently have speaker systems with a subwoofer and either ve or seven speakers positioned
at about ear level. Overhead speakers should complement the frequency response, output, and
power-handling capabilities of the ear level speakers. You should choose overhead speakers that
are timbre matched as closely as possible to the listener-level speakers. Overhead speakers with
a wide dispersion pattern are desirable for use in a Dolby Atmos system to ensure the closest
replication of the cinematic environment.
The high power handling, wide bandwidth and swivel tweeters make the Q Acoustics Install range
particularly suitable for overhead in-ceiling use.
Multi-Channel AV System

11
When running loudspeaker cables be especially careful not to run them across open oor areas
where they could be a source of danger. Run loudspeaker cables around room boundaries
whenever possible. Line level signal cables should be run away from mains cables. Never run line
level signal cables parallel to power cables especially on long runs.
If the subwoofer is triggered on by appliances switching on and off, re-route the input signal cable
before taking further measures.
FRONT RIGHT CENTRE FRONT LEFT
SURROUND RIGHT SURROUND LEFT
Multi-Channel AV System
ENGLISH (EN)
REAR LS
RIGHT LEFT
FRONT LS
RIGHT LEFT
AV AMPLIFIER
+
-
+
-
SUB OUT
+
-
S
UBWOOFER
LINE IN
LEFT /
MONO
RIGHT
CENTRE LS
12
ENGLISH (EN)
Placement: The Front and
Centre speakers should be
in line. If this is not possible,
consult your processor
manual for guidance on
adjusting relative centre /
front delay times. If you have
a 5.1 system, the listening
seat can be closer to the rear
wall. As always, be prepared
to experiment.
Bass Management:
AV processors offer the
choice of ‘Large’ or ‘Small’
for the speakers. If you
choose ‘Large’ the speaker
receives the full frequency.
Choose ‘Small’ and the bass
is sent to the Subwoofer. We
recommend you choose
’Small’ for the 3090Ci and
the 3010i and 3020i wherever
they are used in the system.
The 3050i should be set to
‘Large’. The subwoofer option
should be enabled (set to ‘ON’
or ‘YES’)
Levels: When the basic system parameters have been established, put your processor into the
‘setup’ routine. Set up each individual speaker so that the level is the same at the listening position
as all the others. If your processor enables you to adjust the delay times, follow the instructions
closely as this will profoundly affect the nal result. When you play a movie you may think the rear
channels are too soft - they aren’t! You may however have to adjust the subwoofer level both at
the processor and at the subwoofer. Once set, do not re-adjust these levels.
LFE: The LFE channel sends all the bass sound effects to the subwoofer. If speakers are set to
‘Small’ , system bass from those channels is also sent to the subwoofer. If you play the system at
extreme levels and / or have the subwoofer level set too high you may overdrive the subwoofer
with unpleasant sonic results. If this occurs, reduce the level immediately.
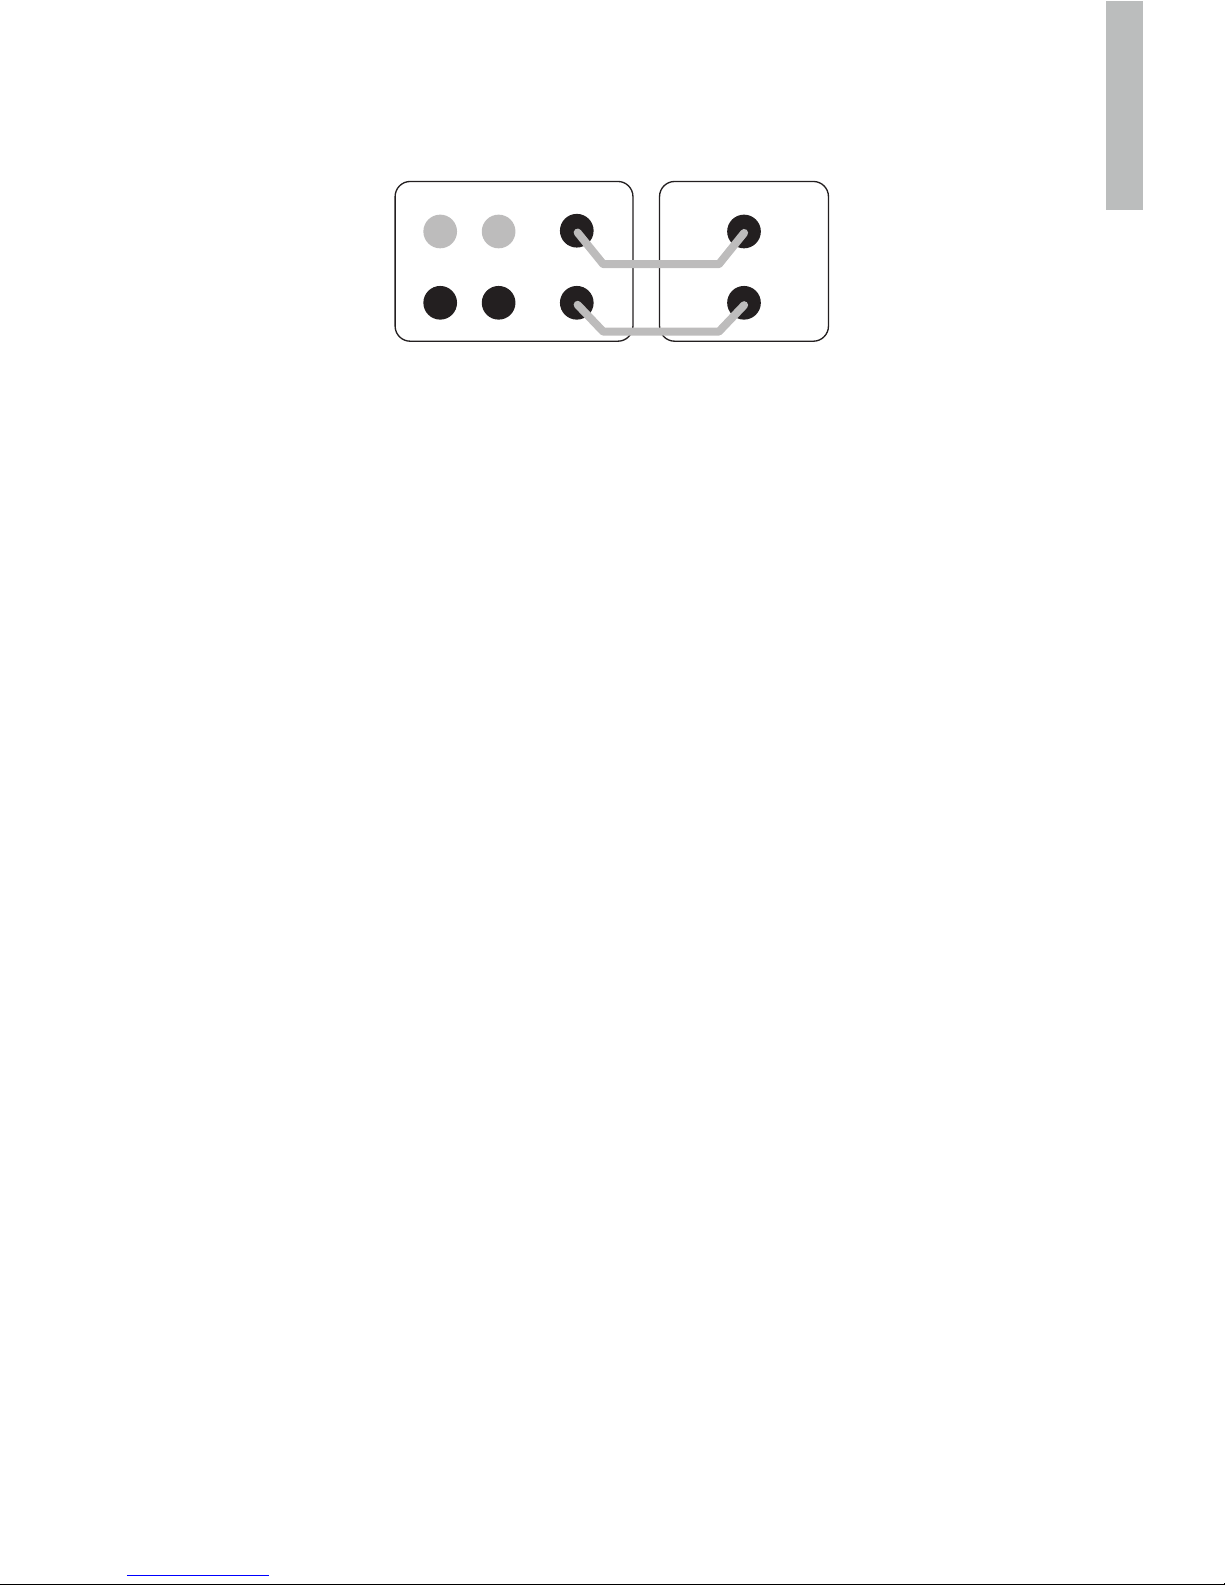
Phase: If your speakers are incorrectly wired the bass will be blurred and thin. In this case, check
the wiring carefully. If your speaker wire has a tracer along one core, consistently use the striped
core to connect all the positive (RED) terminals. In this way the system will always be in phase.
Always follow the instructions in your AV processor manual!
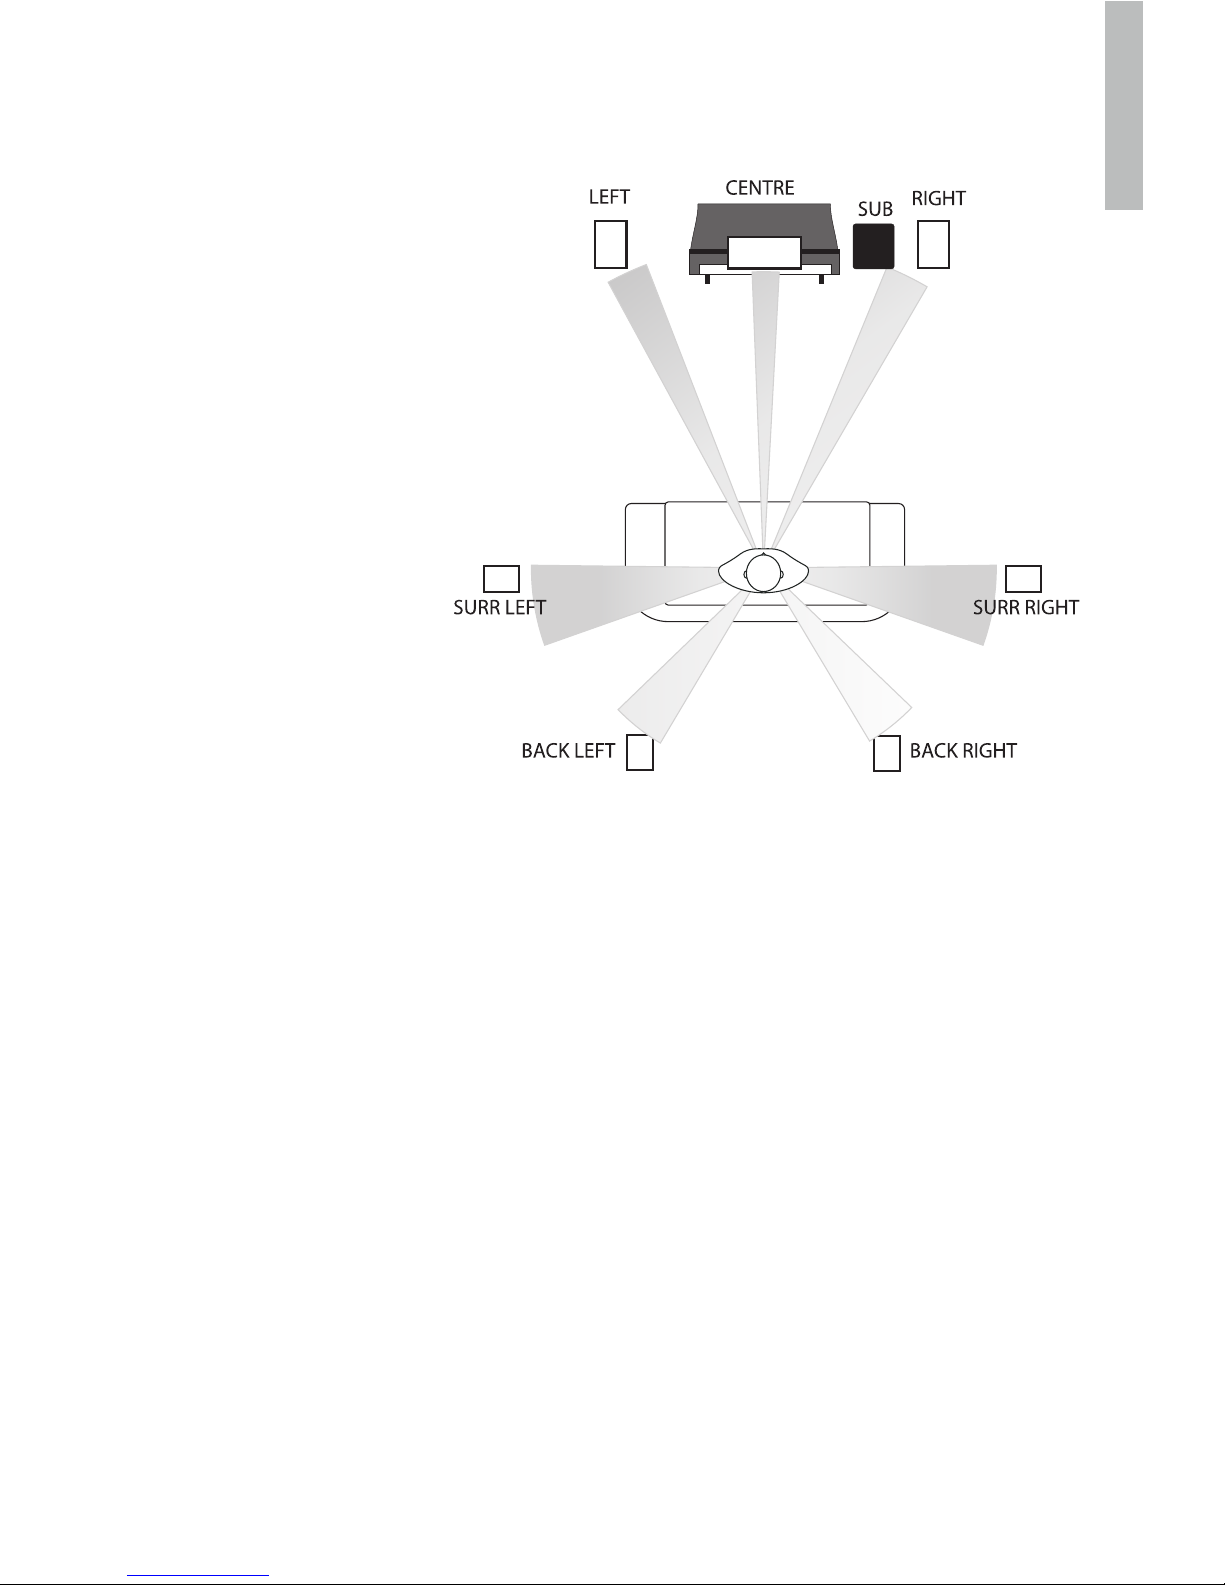
Above is the Dolby Labs recommended layout for 7.1systems. The 6.1 layout
is the same except a single central speaker replaces the two back units. The
5.1 layout has no back speakers
0º
-
3
0
2
º
º
2
9
0
º
-
1
1
0
º
1
5
0
º
-
1
3
5
º
13
ENGLISH (EN)
Connect a good quality stereo RCA phono lead to the L and R inputs on the 3060S and connect
the other end to the PRE OUT sockets on the rear of the amplier.
The subwoofer will automatically add the L and R signals together so that no information is
missed. If you wish to use two subwoofers then you can run a single RCA phono cable to each
subwoofer and thus have a stereo subwoofer system.
Ensure that the L output on the amplier goes to the left hand side subwoofer and R to the right
hand side to preserve the stereo image of the main speakers. The subwoofers will need to be
placed close to their respective main speakers and the set-up will need to be done separately for
each subwoofer.
Stereo System
FRONT LS
RIGHT LEFT
STEREO AMPLIFIER
L
R
PRE OUT
+
-
SUBWOOFER
LINE IN
LEFT /
MONO
RIGHT

14
ENGLISH (EN)
Setting Up
Check that all system connections are properly and securely made. Ensure that the subwoofer is
switched off. Set the controls to the following default settings:
Level Approximately half
Crossover Minimum (50Hz) for large oorstanders and halfway (100Hz) for
bookshelf or small speakers
Phase invert 0°
Auto on AUTO or ON
Plug the supplied power cord into the subwoofer and then into the AC supply socket. Switch on
the power at the supply socket and then switch the power switch on the subwoofer to ‘ON’. The
POWER light on the subwoofer amplier panel will glow and the subwoofer is operational.
Play some music you are familiar with and experiment with the Phase invert setting and level
control until you hear a good blend between the front speakers and the subwoofer. If you can hear
the subwoofer standing out it’s too loud!
Always bear in mind that the human ear’s sensitivity to bass varies enormously with the volume
level, hence the need for a wide range of programme material and sound levels. Once you are
happy with the sound you can then ne tune the performance by using the remaining controls.
Crossover: The crossover control determines at what frequency your subwoofer output begins to
rapidly diminish. This should be set so that it corresponds with the frequency your main speakers
begin to produce a strong output by themselves. The adjustment allows for a smooth handing
over between subwoofer and main speaker output. If this setting is too low there will be a ‘hole’
in the sound where certain frequencies are weak, conversely if it is too high there will be an
exaggeration of certain frequencies producing an overpowering bass. You can get an idea of
the correct setting from your main speakers specication sheet, look for the lowest frequency
that the speaker produces (the “-3dB point”) under the “Frequency response” heading. Room
positioning has a dramatic effect on low frequency reproduction of both the subwoofer and your
main speakers so don’t be worried if you nd you require a setting which does not correlate with
the specied low frequency point of your main speakers.
Stereo System

15
Aftercare
Cabinet Care
Clean cabinets only with a lightly dampened cloth. Do not use solvent based cleaning
materials. Never use abrasives of any kind.
The cabinet surfaces will usually only require light dusting. Should an aerosol or other cleaner be used,
apply the cleaner onto the cloth rst and not directly onto the product. Test a small area rst, as some
cleaning products may damage the nish. Avoid products that are abrasive, or contain acid or alkaline
agents. Do not use any cleaning materials on the drive units and avoid touching them as damage may
result.
Grilles
Grilles should only be cleaned using a soft brush when necessary.
If using the Q Acoustics speaker with the grilles removed, remember to replace them if pets
or children are present.
Drive Units
Do not touch the drive units as they are easily damaged when exposed.
ENGLISH (EN)

16
Warranty
Q Acoustics passive loudspeaker products are warranted free of defects in materials and workmanship
for a period of 4 years (1 year for subwoofer) from the date of purchase. During the warranty period
Q Acoustics will, at its option, repair or replace any product found to be faulty after inspection by the
company or its appointed distributor or agent.
Misuse and fair wear and tear are not covered by warranty.
Goods for repair should in the rst instance be returned to the supplying dealer. If this is not possible
contact Q Acoustics or their appointed distributor for your area to determine the correct warranty
procedure. If possible the original packaging should be used to return the product as damage sustained
during transit to the repair centre is not covered by the warranty. The warranty does not in any way affect
your legal rights.
Warranty can be extended to 5 years (2 years for subwoofer) by registering your product at
www.qacoustics.co.uk/register.
For service information contact: info@qacoustics.co.uk
Q Acoustics
Stortford Hall Industrial Park
Bishops Stortford, Herts, UK
CM23 5GZ
ENGLISH (EN)
17
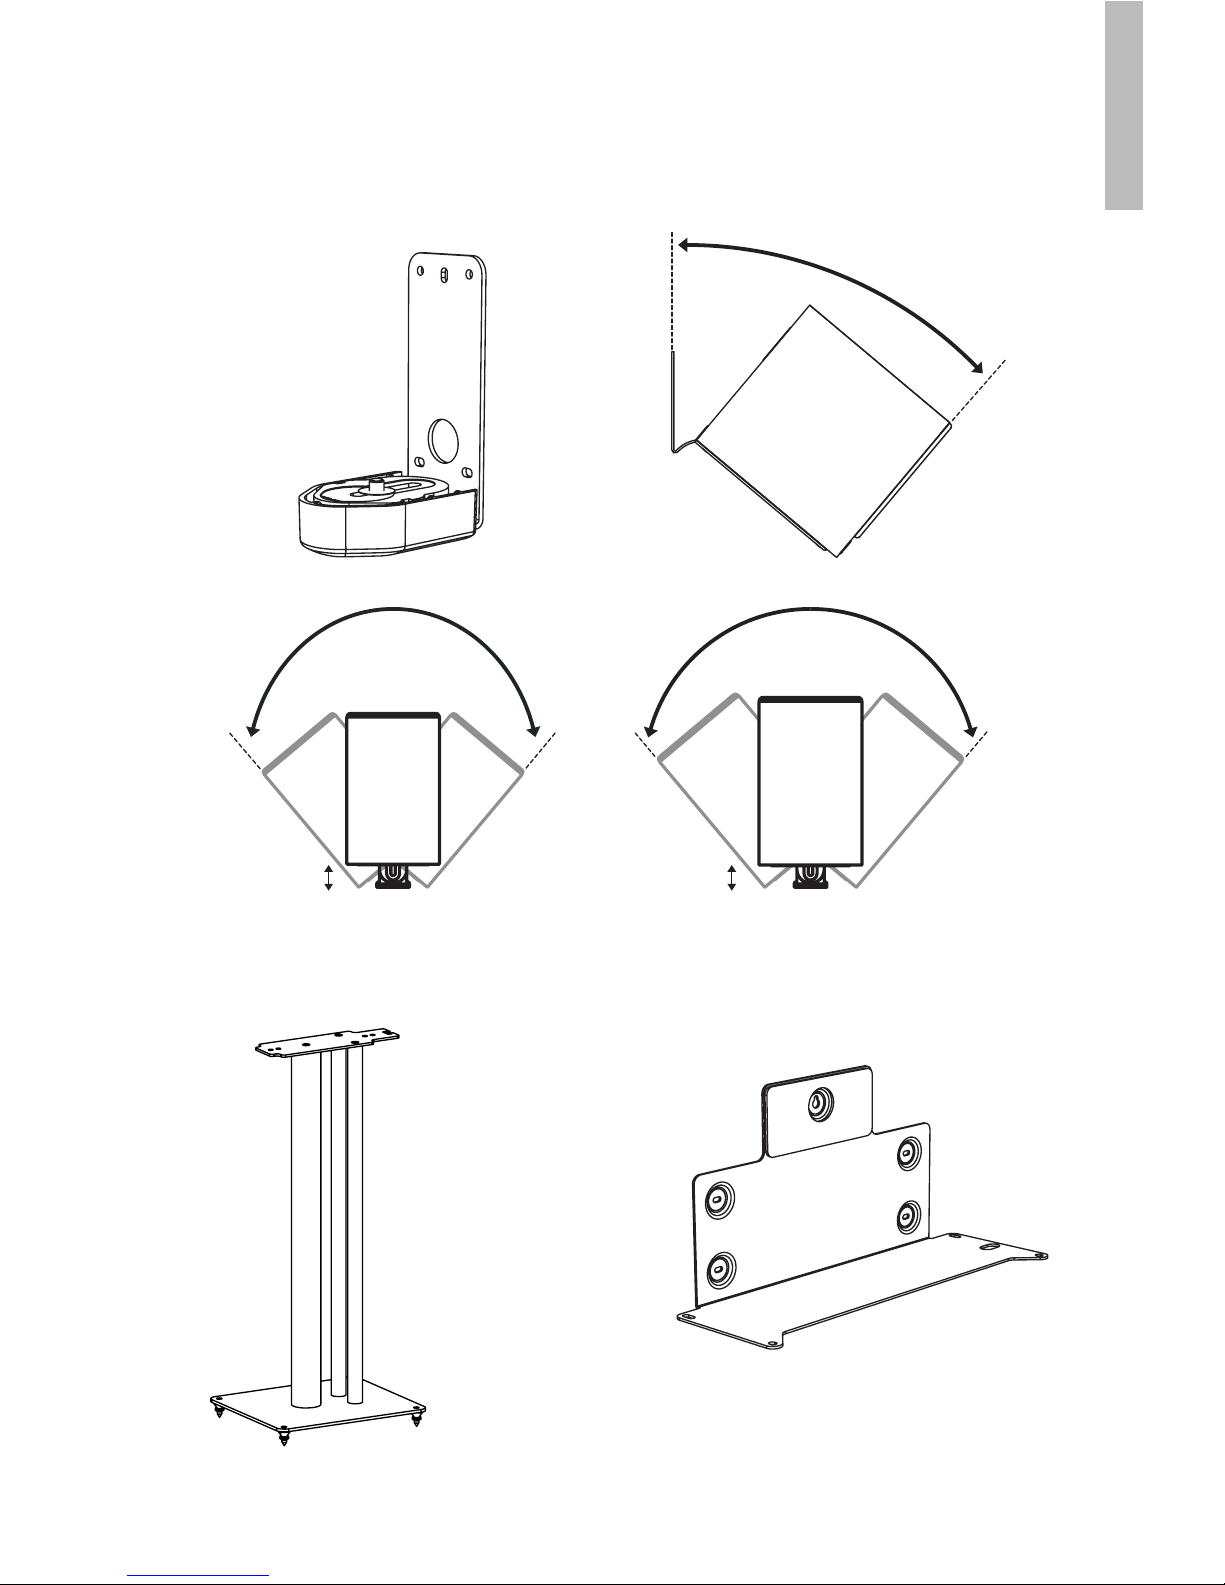
Wall Bracket (Single)
3010i / 3020i / 3090Ci
Black and White
Accessories
ENGLISH (EN)
Subwoofer Wall Bracket
3060S
Black
Speaker Stand (Pair)
3010i / 3020i
Black and White
Dimensions (WxHxD): 250 x 682 x 290 mm Dimensions (WxHxD): 422 x 222 x 163 mm
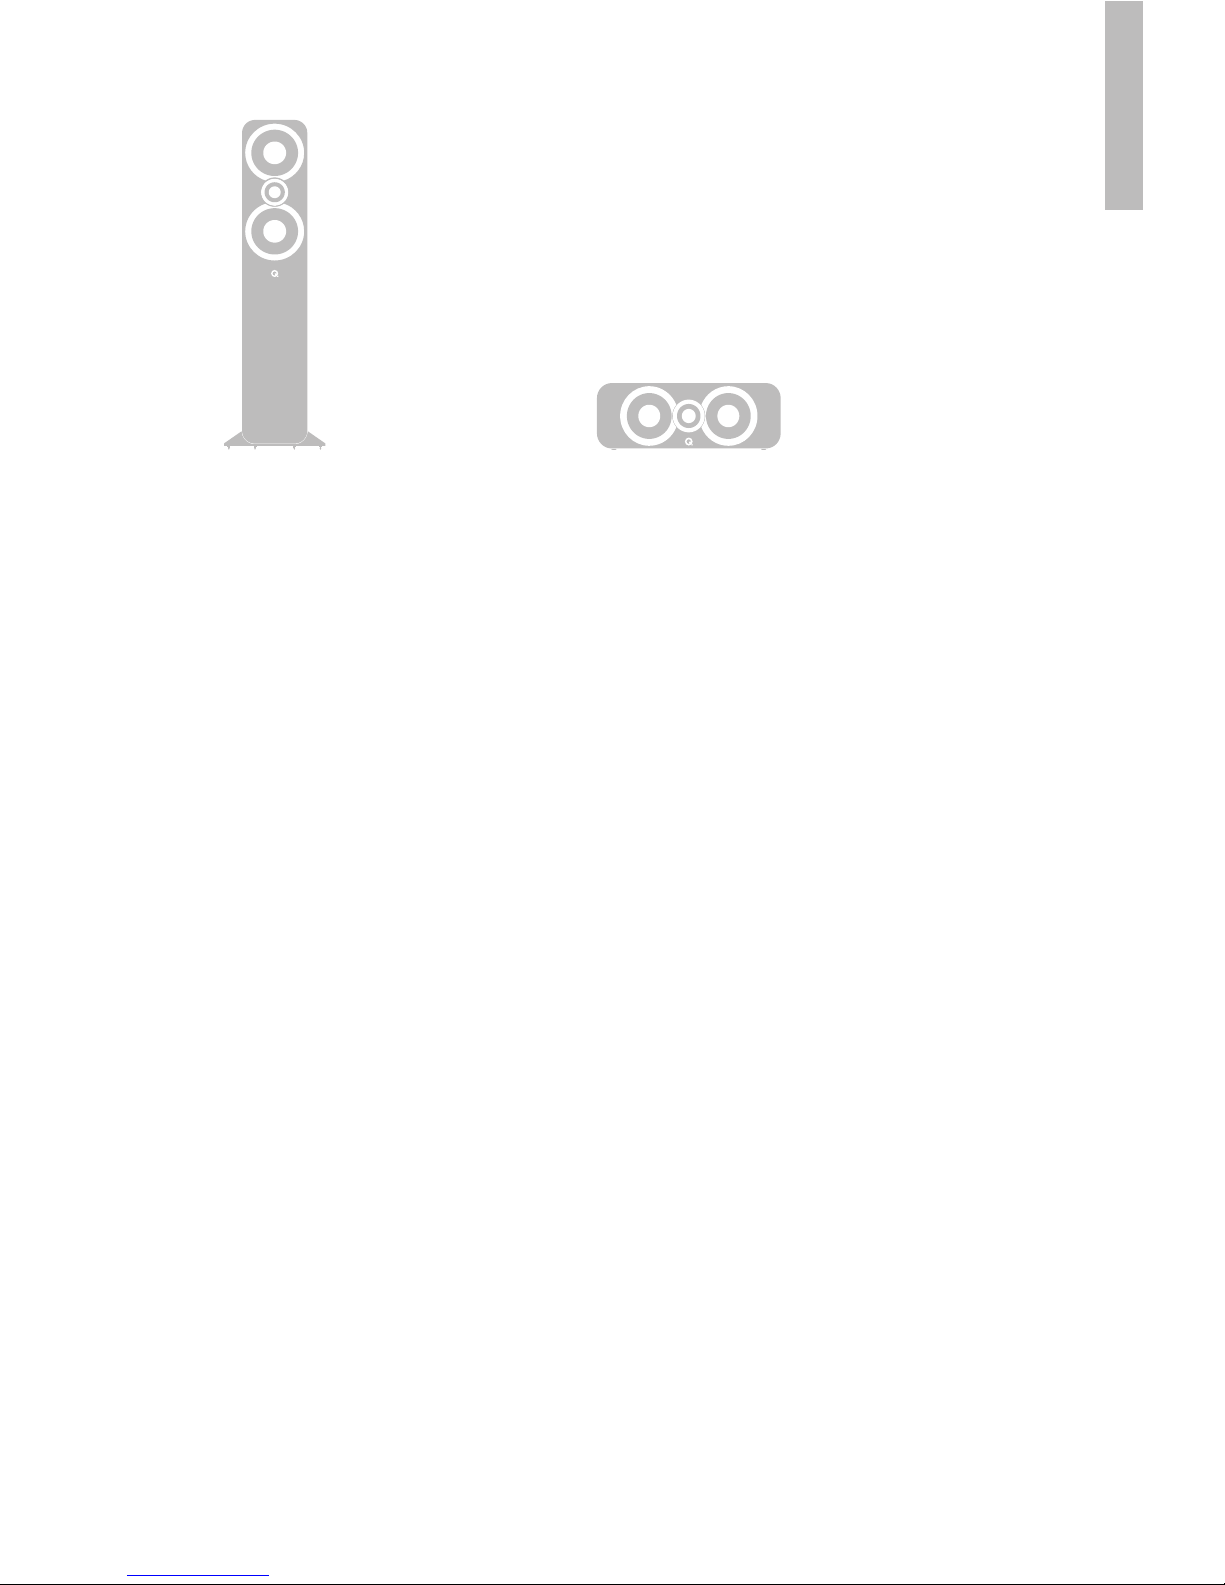
3010i
3020i
45
°
40
°
35
°
40
°
35
°
5 - 45 mm5 - 45 mm
Dimensions (WxHxD): 70 x 159 x 99 mm

18
Specications
ENGLISH (EN)
Passive Loudspeakers
Enclosure type:
Bass unit:
Treble unit:
Frequency response (+3 dB, -6 dB):
Average impedance:
Minimum impedance:
Sensitivity (2.83v@1m):
Stereo amplier power:
AV receiver power (2 ch. driven):
Crossover frequency:
Effective volume:
Enclosure dimensions (WxHxD):
(inc. grille, terminal and feet)
Enclosure width:
Weight (per speaker):
Active Subwoofer
Enclosure type:
Bass unit:
Amplier power:
Frequency response (+3 dB, -6 dB):
Crossover frequency:
Effective volume:
Enclosure dimensions (WxHxD):
Weight:
3010i
2-way reex
100 mm (4.0 in)
22 mm (0.9 in)
65 Hz - 30 kHz
6 Ω
4 Ω
86 dB
15 - 75 W
50 - 125 W
2.6 kHz
4.0 L (244 cu in)
150 x 253 x 252 mm
(5.9 x 10.0 x 10.0 in)
4.1 kg (9.0 lbs)
3060S
Innite bafe
200 mm (8.0 in)
150 W Class-D
35 Hz - 250 Hz
35 Hz - 250 Hz (var.)
10.6 L (647 cu in)
480 x 300 x 150 mm (18.9 x 11.8 x 5.9 in)
324 mm (12.7 in) inc. spikes
8.5 kg (18.7 lbs)
3020i
2-way reex
125 mm (5.0 in)
22 mm (0.9 in)
64 Hz - 30 kHz
6 Ω
4 Ω
88 dB
25 - 75 W
50 - 125 W
2.4 kHz
6.1 L (372 cu in)
170 x 278 x 282 mm
(6.7 x 11.0 x 11.1 in)
5.5 kg (12.1 lbs)
19
ENGLISH (EN)
3050i
2-way reex
2 x 165 mm (6.5 in)
22 mm (0.9 in)
44 Hz - 30 kHz
6 Ω
4 Ω
91 dB
25 - 180 W
50 - 165 W
2.5 kHz
32.4 L (1977 cu in)
310 x 1020 x 310 mm
(12.2 x 40.1 x 12.2 in)
200 mm (7.9 in)
17.8 kg (39.2 lbs)
3090Ci
2-way reex
2 x 100 mm (4.0 in)
22 mm (0.9 in)
75 Hz - 30 kHz
6 Ω
4 Ω
89 dB
25 - 100 W
50 - 165 W
2.7 kHz
6.6 L (403 cu in)
430 x 152 x 216 mm
(16.9 x 6.0 x 8.5 in)
6.0 kg (13.2 lbs)
20
DEUTSCH (DE)
Wichtige Sicherheits- und Warnhinweise
WICHTIGE INFORMATIONEN – BITTE AUFMERKSAM LESEN.
Dieses Symbol weist darauf hin, dass
die zu diesem Produkt gehörigen
Dokumente wichtige Anweisungen zur
Bedienung und Wartung enthalten.
Dieses Symbol weist auf eine gefährliche
Spannung hin, die eine Gefahr von
elektrischem Schlag mit sich bringt.
GEFAHR EINES ELEKTRISCHEN
SCHLAGS
NICHT ÖFFNEN
VORSICHT:
UM DIE GEFAHR EINES ELEKTRISCHEN SCHLAGS ZU MINIMIEREN, DARF
DIE ABDECKUNG (ODER RÜCKSEITE) NICHT ABGENOMMEN WERDEN.
KEINE VOM BENUTZER ZU WARTENDEN TEILE IM INNEREN.
WARTUNGSARBEITEN NUR VON QUALIFIZIERTEM
FACHPERSONAL DURCHFÜHREN LASSEN.
Lesen Sie diese Anleitung durch.
Bewahren Sie diese Anleitung auf.
Beachten Sie alle Sicherheitshinweise.
Befolgen Sie alle Anweisungen.
Verwenden Sie dieses Gerät nicht in der Nähe von Wasser.
Reinigen Sie das Gerät nur mit einem trockenen Tuch.
Blockieren Sie keine Belüftungsöffnungen.
Gemäß den Anweisungen des Herstellers installieren.
Installieren Sie das Gerät nicht in der Nähe von Wärmequellen
wie Heizkörpern, Heizregistern, Öfen oder anderen
wärmeerzeugenden Geräten (einschließlich Verstärkern).
Umgehen Sie auf keinen Fall die durch einen verpolungssicheren
oder geerdeten Stecker gebotene Sicherheit. Ein polarisierter
Stecker hat zwei Kontakte unterschiedlicher Breite. Ein geerdeter
Stecker hat zwei Kontakte und einen dritten Erdungskontakt.
Der breitere Stromkontakt bzw. der Erdungskontakt dient Ihrer
Sicherheit. Falls der mitgelieferte Schutzkontaktstecker nicht in
Ihre Steckdose passt, lassen Sie diese von einem qualizierten
Elektriker austauschen.
Nicht auf das Netzkabel treten und Netzkabel nicht einklemmen,
insbesondere an der Steckerbuchse, Steckdose und am
Austrittspunkt des Kabels aus dem Gerät.
Verwenden Sie ausschließlich das vom Hersteller angegebene
Zubehör. Verwenden Sie zum Aufstellen oder Aufhängen der
Lautsprecher ausschließlich die vom Hersteller angegebenen
oder mitgelieferten Gerätewagen, Ständer, Stative, Halterungen
oder Tische.
Achten Sie beim Verwenden eines Gerätewagens darauf, dass
der Wagen mit dem Gerät beim Transport nicht
umkippt.
Trennen Sie das Gerät bei einem Gewitter oder bei
längerer Nichtverwendung vom Netz.
Wartungsarbeiten nur von qualiziertem Fachpersonal
durchführen lassen. Eine Wartung ist dann erforderlich, wenn das
Gerät in irgendeiner Weise beschädigt wurde, d. h. das Netzkabel
oder der Netzstecker beschädigt wurde, Flüssigkeit auf oder
in das Gerät gelangt ist, das Gerät Regen oder Feuchtigkeit
ausgesetzt war, nicht normal funktioniert oder heruntergefallen ist.
Achtung: Um die Gefahr eines Brandes oder elektrischen
Schlags zu verringern, schützen Sie dieses Gerät vor Regen
und Feuchtigkeit. Das Produkt muss vor Tropf- und Spritzwasser
geschützt werden und es dürfen keine mit Flüssigkeit gefüllten
Gegenstände (z. B. Blumenvase) auf dem Gerät abgestellt
werden.
Stellen Sie kein offenes Licht, wie z. B. brennende Kerzen, auf
das Gerät.
Achtung: Der Netzschalter des Subwoofers wird zur Trennung
des Geräts von der Stromversorgung verwendet. Der Schalter
bendet sich auf der Geräterückseite. Um ungehinderten Zugang
zum Schalter zu gewährleisten, muss das Gerät in einem offenen
Bereich aufgestellt werden, in dem der Schalter frei betätigt
werden kann.
Vorsicht: Änderungen oder Modikationen, die nicht ausdrücklich
vom Hersteller genehmigt wurden, können zum Erlöschen der
Betriebsgenehmigung führen.
Wartung: Für Wartungsarbeiten sollte das Gerät an den
ursprünglichen Händler oder den Kundendienst für Ihre Region
zurückgegeben werden. Die wichtigsten Kundendienstadressen
sind in diesem Benutzerhandbuch aufgelistet.
Dritte: In dem unwahrscheinlichen Fall, dass Sie dieses
Produkt an einen Dritten weitergeben, geben Sie auch diese
Betriebsanleitung weiter.
Wichtiger Hinweis für Nutzer in Großbritannien
Das Gerätekabel ist mit einem zugelassenen Netzstecker mit
einer 3-A-Sicherung ausgestattet. Wenn die Sicherung ersetzt
werden muss, muss eine ASTA- oder BSI-zugelassene, auf 3 A
ausgelegte BS1362-Sicherung verwendet werden. Falls Sie den
Netzstecker auswechseln müssen, entfernen Sie die Sicherung
und entsorgen Sie den Netzstecker sofort, nachdem Sie diesen
vom Kabel abgetrennt haben.
Anschließen des Netzsteckers
Die Drähte im Netzkabel sind wie folgt farblich codiert: blau:
NEUTRAL; braun: STROMFÜHREND.
Da diese Farben unter Umständen nicht mit der Farbcodierung
der Anschlussklemmen in Ihrem Netzstecker übereinstimmen,
gehen Sie wie folgt vor:
Der BLAUE Draht muss mit der Klemme verbunden werden,
die mit dem Buchstaben N
markiert oder BLAU bzw.
SCHWARZ farbcodiert ist. Der
BRAUNE Draht muss mit der
Klemme verbunden werden,
die mit dem Buchstaben L
markiert oder BRAUN bzw.
ROT farbcodiert ist.
Um das Gerät komplett vom
AC-Stromnetz zu trennen, ziehen Sie das Netzkabel aus der ACNetzsteckdose.
Werden der Netzstecker oder ein Gerätekoppler zum Trennen des
Geräts vom Stromnetz verwendet, so müssen diese immer gut
zugänglich sein.

21
Einführung
Vielen Dank, dass Sie sich für Q Acoustics entschieden haben.
Dieses Handbuch soll Sie durch die Einrichtung und Installation des Geräts führen und hilft Ihnen
dabei, die optimale Leistung Ihrer Lautsprecher zu erreichen.
Bitte lesen Sie vor der Einrichtung und Verwendung diese Anleitung sowie die wichtigen
Sicherheits- und Warnhinweise aufmerksam durch, um einen sicheren und zufriedenstellenden
Betrieb dieses Produkts zu gewährleisten.
Q Acoustics 3000i ist eine Lautsprecherserie, die speziell für die hohen Anforderungen
passionierter Zweikanalton-Musikliebhaber und anspruchsvoller Filmenthusiasten entwickelt
wurde.
Die Serie umfasst die folgenden Modelle:
3010i: Kompakte Regallautsprecher mit einem 100-mm-Tieftöner (4,0 Zoll)
3020i: Regallautsprecher mit einem 125-mm-Tieftöner (5,0 Zoll)
3050i: Standlautsprecher mit zwei 165-mm-Tieftönern (6,5 Zoll)
3060S: Aktiv-Subwoofer mit 150 Watt und einem 200-mm-Schallwandler (8,0 Zoll)
3090Ci: Centerlautsprecher mit zwei 100-mm-Tieftönern (4,0 Zoll)
Der Lieferumfang umfasst: den/die Lautsprecher und dieses Produkthandbuch.
Darüber hinaus umfasst der Lieferumfang für die folgenden Modelle:
3050i: für jeden der Lautsprecher Rückstabilisator, Stifte und Schutzkappen für die Stifte, InbusSchlüssel zum Einstellen der Stifte
3060S: Netzkabel, Stifte und Schutzkappen für die Stifte
Kontrollieren Sie das Produkt sorgfältig. Teilen Sie es Ihrem Händler unverzüglich mit, wenn Teile
beschädigt sind oder fehlen.
Wir wünschen Ihnen viel Freude mit Q Acoustics.
DEUTSCH (DE)
22
Stecken Sie die Sicherungsmuttern auf die Stifte und schrauben Sie die vier Stifte in die Füße des
Subwoofers. Falls Sie einen Holz- oder Steinfußboden haben, stecken Sie vor dem Aufrichten des
Lautsprechers die Schutzkappen auf die Stifte. Stellen Sie bei aufrecht stehendem Lautsprecher
die Stifte so ein, dass er eben und stabil steht.
DEUTSCH (DE)
Vorbereitung
Heben Sie die Lautsprecher aus den Kartons. Halten Sie sie dabei am
Gehäuse fest, berühren Sie nicht die Schallwandler und heben Sie die
Lautsprecher nicht an den Schutzhüllen an. Die Modelle 3050i und
3060S sind schwer. Holen Sie sich erforderlichenfalls Hilfe.
Die Stifte sind spitz. Gehen Sie mit Vorsicht vor.
Stellen Sie einen Lautsprecher mit Stiften niemals dort auf, wo er
Beschädigungen verursachen kann.
Heben Sie die Lautsprecher beim Transport immer an, schleifen Sie sie
niemals über den Boden.
23
Aufstellung
DEUTSCH (DE)
Bassfrequenzen sind im Grunde omnidirektional. Sie können daher den Subwoofer zwar praktisch
überall aufstellen, jedoch erreichen Sie die beste Stereowiedergabe bei einem möglichst zentralen
Standort in einer Linie mit den Frontlautsprechern. Bei einem Mehrkanalsystem ist dies unter
Umständen nicht umsetzbar. Bei der Aufstellung dicht vor einer Wand wird der Bass verstärkt und
klingt deshalb an einigen Standorten dröhnend und undeutlich.
Der Subwoofer sollte in der Nähe einer Netzsteckdose aufgestellt werden. Verwenden Sie keine
Verlängerungskabel. Falls nötig, kaufen Sie ein längeres Netzkabel.
Der Netzschalter trennt das Gerät vom Strom und bendet sich auf dem Bedienfeld des Geräts.
Vergewissern Sie sich vor dem Aufstellen des Subwoofers, dass der Boden fest ist, keine
Bodendielen lose sind usw.Die durch den Subwoofer bei hoher Lautstärke verursachten
Luftbewegungen sind erheblich. Stellen Sie das Gerät daher nicht neben Raumtextilien oder
Gegenständen, die klappern könnten, auf. Stellen Sie keine Gegenstände auf das Gerät.
Alle Lautsprecher mit Ausnahme des 3060S können ohne nachteilige
Auswirkungen in der Nähe von TV-Bildschirmen betrieben werden. Der
3060S sollte nur in einem Abstand von mindestens 500 mm von TV-
Bildschirmen oder anderen magnetempndlichen Geräten betrieben
werden. Es kommt zu keinen Auswirkungen auf Plasma- und LCDBildschirme.
24
Bedienelemente und Anschlüsse
DEUTSCH (DE)
LEVEL CROSSOVER
15060
01 0
AV
Q3060S
SUBWOOFER
• 0
o
PHASE
• 180
o
• AUTO
• ON
MADE IN CHINA
DESIGNED IN THE UNITED KINGDOM
• 0
o
PHASE
• 180
o
ON •
AUTO •
RIGHT
LEFT /
MONO
POWER
ON
OFF
SERIAL NUMBER
CAUTION:
TO REDUCE THE RISK OF ELECTRIC SHOCK, DO NOT REMOVE
COVER (OR BACK). NO USER-SERVICABLE PARTS INSIDE
REFER SERVICING TO QUALIFIED SERVICE PERSONNEL.
RISK OF ELECTRIAL SHOCK
WARNING: SHOCK HAZARD - DO NOT OPEN.
AVIS: RISQUE DE CHOC ELECTRIQUE-NE PAS OUVRIR.
DO NO OPEN
1
2
3
4
5
6
7
Status
Crossover
Phase
AC-
Anschlussbuchse
Lautstärke
AUTO/ON
Line-LevelEingang
25
Bedienelemente und Anschlüsse
DEUTSCH (DE)
LEVEL
CROSSOVER
15060
AV
• 0
o
PHASE
• 180
o
• ON
• AUTO
RIGHT
LEFT /
MONO
Wenn dieser Schalter auf AUTO steht, schaltet sich der Subwoofer selbst ab,
wenn er nicht genutzt wird, um Strom zu sparen, und schaltet sich wieder ein,
wenn er ein Signal empfängt. Mit der Einstellung ON kann dies verhindert werden.
Der Phasenschalter (2) ändert die Phase des Subwoofers, sodass sie mit der
Phase der restlichen Lautsprecher des Systems übereinstimmt. Stellen Sie den
Subwoofer in mehr als 1 Meter Entfernung von den Frontlautsprechern auf und
schalten Sie die Phase zwischen 0° und 180° hin und her. Wenn der Subwoofer
lauter und voller klingt, ist er in Phase.
Mit dem Crossover-Regler (3) können Sie die Tonhöhe verändern, bei der der
Subwoofer einsetzt. Bei Verwendung mit dem System 3000 wird empfohlen,
den Crossover-Regler auf „AV“ einzustellen. Wenn Sie den Subwoofer mit
einem System eines anderen Anbieters verwenden, können Sie den Crossover-Punkt an Ihr System anpassen.
Mit dem Lautstärkeregler (4) können Sie die Lautstärke Ihres Subwoofer im
Verhältnis zu den anderen Lautsprechern Ihres Systems einstellen. Beginnen
Sie mit der Einstellung 0 und erhöhen Sie die Lautstärke dann langsam, bis Sie
den Subwoofer hören können. Der Subwoofer sollte ein Teil des Gesamtklangs
sein und nicht das übrige System übertönen. Es gibt keine Regel für die Lautstärkeeinstellung Ihres Subwoofers, experimentieren Sie also am besten mit
den Einstellungen bei unterschiedlicher Musik und verschiedenen Filmen, bis
sie Ihrem persönlichen Geschmack entsprechen.
Der Line-Level-Eingang/LFE (6) ist die von Q Acoustics bevorzugte AV-Verbindung mit dem Verstärker.
Schließen Sie den Subwoofer an den Ausgang Ihres AV-Verstärkers oder
DVD-Geräts an. Achten Sie auf R und L, wenn der Verstärkerausgang einen
linken und einen rechten Kanal hat.
1 10
AV
26
Mehrkanal-AV-System
DEUTSCH (DE)
Eine Anleitung für den Anschluss von Stereosystemen finden Sie im nächsten Abschnitt.
Anschlüsse
Standardmäßig erfolgt der Anschluss über die Line-Level-RCA-Phonoeingänge. Für die
Einrichtung eines typischen AV-Systems benötigen Sie ein RCA-Verbindungskabel. Dieses Kabel
ist für gewöhnlich sehr lang, stellen Sie deshalb sicher, dass es hochwertig und vollständig
abgeschirmt ist. Passende Verbindungskabel sind bei Ihrem Q-Acoustics-Händler erhältlich.
Schließen Sie den SUBWOOFER OUTPUT an den L/Mono-Kanaleingang des AV-Verstärkers an.
Schieben Sie die Stecker fest in die Buchsen, um einen guten Kontakt zu gewährleisten.
Einrichtung
Überprüfen Sie, ob alle Systemanschlüsse sachgemäß und sicher durchgeführt worden sind.
Vergewissern Sie sich, dass der Subwoofer ausgeschaltet ist.
Nehmen Sie die folgenden Standardeinstellungen vor:
Lautstärke ca. bis zur Hälfte
Crossover ganze Umdrehung im Uhrzeigersinn (AV-Einstellung)
Phasenumkehr 0°
Auto on AUTO oder ON
Stecken Sie das mitgelieferte Netzkabel in den Subwoofer und schließen Sie das Gerät an das
Netz an. Schalten Sie den Netzschalter des Subwoofers auf „ON“. Die POWER-Leuchte auf der
Verstärkerkonsole des Subwoofers leuchtet auf und das Gerät ist betriebsbereit.
Überprüfen Sie die Einstellungen des AV-Verstärkers und vergewissern Sie sich, dass am
Subwoofer „ON“ oder „YES“ eingestellt ist. Der Subwooferpegel am AV-Verstärker sollte
auf die Standardposition oder 0 dB eingestellt sein. Die Größen und Positionen der übrigen
Lautsprecher des Systems sollten bereits eingestellt worden sein. Falls Sie die CrossoverFrequenz der anderen Kanäle einstellen können, vergewissern Sie sich, dass die Einstellungen
Ihren Lautsprechern entsprechen: Bei den Modellen 3010i, 3020i und 3090Ci sollte der
Bassreexkanal mit dem Schaumstoffstöpsel verschlossen und am AV-Verstärker „klein“ und
ein Crossover von 80 Hz eingestellt sein. Beim Modell 3050i sollte hingegen „groß“ eingestellt
sein. Ein Schaumstoffstöpsel und eine Crossover-Einstellung sind nicht erforderlich. Stellen Sie
schließlich noch die entsprechende Entfernung (oder Verzögerung) für die von Ihnen gewählte
Position des Subwoofers ein.
REAR LS
RIGHT LEFT
FRONT LS
RIGHT LEFT
CENTRE LS
AV AMPLIFIER
+
-
+
-
SUB OUT
+
-
SUBWOOFER
LINE IN
LEFT /
MONO
RIGHT

27
DEUTSCH (DE)
Mehrkanal-AV-System
Spielen Sie ein Ihnen bekanntes Musikstück und experimentieren Sie mit der
Phasenumkehreinstellung und der Pegelsteuerung, bis Sie einen nahtlosen Übergang zwischen
Frontlautsprechern und Subwoofer erreicht haben. Wenn der Subwoofer aus dem Klangbild
heraussticht, dann ist er zu laut.
Bedenken Sie, dass die akustische Wahrnehmung von Bassklängen je nach Lautstärke enorm
variiert, aus diesem Grund werden vielfältige Klangebenen und Programmmaterialien benötigt.
Viele Heimkinoverstärker verfügen über Entfernungseinstellungen, die je nach der Entfernung
zwischen dem Lautsprecher und der optimalen Hörposition eine Zeitverzögerung einbauen. Die
Position des Subwoofers ist ein entscheidender Faktor bei der Einrichtung eines Heimkinosystems,
deshalb verbessern korrekte Einstellungen die Gesamtwirkung des Systems erheblich.
Weichen Sie bei der Einrichtung nicht mehr als ±0,5 m von der ursprünglich gemessenen
Entfernung ab. Sollten Sie keine nennenswerte Verbesserung des Klangbildes feststellen,
wechseln Sie die Position des Phasenumkehrschalters am Subwoofer 3060S und wiederholen
Sie den Vorgang noch einmal. Spielen Sie anschließend erneut Musik, um festzustellen, ob eine
Verbesserung erreicht worden ist.
Falls der Subwoofer 3060S anschließend im Verhältnis zu den anderen Lautsprechern verschoben
wird, müssen Sie die Entfernungseinstellungen am Verstärker auf den neuen Wert einstellen und
den Vorgang erneut wiederholen. Verändern Sie die Einstellungen, bis Sie mit dem Ergebnis
zufrieden sind. Der Klang sollte nun voll, warm und rund sein. Einzelne Lautsprecher sollten nicht
herauszuhören sein.
Dolby Atmos
Die Dimension Höhe und das Hören von Klängen, die von oben kommen, ist ein zentraler
Aspekt beim mehrdimensionalen Klangerlebnis mit Dolby Atmos. Wir unterstützen nicht das
Konzept nach oben abstrahlender Lautsprecher für Dolby Atmos, sondern haben dafür ein
ausgezeichnetes Sortiment an Deckenlautsprechern. Viele Heimkinoanlagen haben derzeit
Lautsprechersysteme mit einem Subwoofer und entweder fünf oder sieben Lautsprechern,
die sich ungefähr auf Ohrhöhe benden. Überkopautsprecher sollten den Frequenzgang,
den Ausgang und die Belastbarkeit der Lautsprecher auf Ohrhöhe ergänzen. Wählen Sie am
besten Überkopautsprecher, deren Klangbild dem der Lautsprecher auf Höhe des Hörers
möglichst nahe kommt. Überkopautsprecher mit einer weiten Klangverteilung werden für die
Verwendung in einem Dolby-Atmos-System empfohlen, um eine möglichst getreue Nachbildung
der Kinoumgebung zu erreichen.
Die hohe Belastbarkeit, große Bandbreite und die schwenkbaren Hochtöner machen die Reihe
Q Acoustics Install besonders geeignet für die Verwendung als Deckenlautsprecher.

28
Achten Sie beim Verlegen von Lautsprecherkabeln darauf, diese nicht über offene Bodenbereiche
zu verlegen, wo sie eine Gefahr darstellen könnten. Verlegen Sie die Kabel nach Möglichkeit
entlang der Raumwände. Line-Level-Signalkabel sollten nicht in der Nähe von Netzkabeln verlegt
werden. Verlegen Sie Line-Level-Signalkabel niemals parallel zu Stromkabeln, insbesondere über
längere Strecken.
Falls der Subwoofer durch das Einschalten von Haushaltsgeräten aktiviert wird, verändern Sie die
Führung des Eingangssignalkabels, bevor Sie weitere Schritte unternehmen.
FRONT
RECHTS
CENTER FRONT LINKS
SURROUND
RECHTS
SURROUND LINKS
Mehrkanal-AV-System
DEUTSCH (DE)
REAR LS
RIGHT LEFT
FRONT LS
RIGHT LEFT
AV AMPLIFIER
+
-
+
-
SUB OUT
+
-
S
UBWOOFER
LINE IN
LEFT /
MONO
RIGHT
CENTRE LS

29
DEUTSCH (DE)
Aufstellung: Die Front- und
Centerlautsprecher sollten
in einer Linie aufgestellt
werden. Wenn dies nicht
möglich ist, ziehen Sie das
Prozessorhandbuch zurate für
eine Anleitung zur Anpassung
relativer Center-/FrontVerzögerungszeiten. Wenn Sie
ein 5.1-System besitzen, kann
die Hörposition näher an der
hinteren Wand liegen. Wie immer
sollten Sie auch hier mit den
Einstellungen experimentieren.
Bassmanagement:
AV-Prozessoren bieten für die
Lautsprecher die Wahl zwischen
„klein“ und „groß“ an. Wenn
Sie sich für „groß“ entscheiden,
empfängt der Lautsprecher den
gesamten Frequenzbereich. Bei
„klein“ wird der Bass an den
Subwoofer gesendet. Für die
Modelle 3090Ci, 3010i und 3020i
empfehlen wir die Einstellung
„klein“, wenn sie innerhalb
eines Systems gebraucht
werden. Für das Modell 3050i
sollte „groß“ eingestellt sein. Die
Subwooferoption sollte aktiviert
sein (Einstellung „ON“ oder
„YES“).
Lautstärken: Schalten Sie nach der Festlegung der grundlegenden Systemeinstellungen Ihren Prozessor
in den Einstellungsmodus. Stellen Sie jeden einzelnen Lautsprecher so ein, dass die Lautstärke an der
Hörposition bei allen Lautsprechern gleich ist. Falls Sie an Ihrem Prozessor Zeitverzögerungseinstellungen
vornehmen können, befolgen Sie die Anweisungen dafür genau, da dies das Endergebnis entscheidend
beeinussen kann. Beim Abspielen eines Films kann der Eindruck entstehen, dass die hinteren Lautsprecher
zu leise sind. Aber dieser Eindruck täuscht. Sie müssen jedoch unter Umständen den Subwooferpegel
sowohl am Subwoofer selbst als auch am Prozessor anpassen. Verändern Sie diese Lautstärken danach
nicht mehr.
LFE: Der LFE-Kanal sendet alle Bass-Klangeffekte an den Subwoofer. Wenn die Lautsprecher auf „klein“
gesetzt wurden, wird der Systembass dieser Kanäle ebenfalls an den Subwoofer gesendet. Falls Sie das
System bei extremer Lautstärke nutzen und/oder der Subwooferpegel zu hoch eingestellt ist, kann das zu
einer Übersteuerung des Subwoofers mit unangenehmen Geräuschen führen. Reduzieren Sie in diesem Fall
sofort die Lautstärke.
Phase: Fehlerhaft verkabelte Lautsprecher produzieren unscharfe und dünne Bassklänge. Überprüfen Sie
in diesem Fall sorgfältig die Verkabelung. Sollte Ihr Lautsprecherkabel einen Kennfaden an einer Kabelseele
aufweisen, verwenden Sie die markierte Seele konsequent zur Verkabelung der positiven (ROTEN)
Anschlussklemmen. Auf diese Weise bleibt das System immer koordiniert.
Folgen Sie immer den Anweisungen in Ihrem AV-Prozessorhandbuch.
Darstellung der von Dolby Laboratories empfohlenen Aufstellung für ein
7.1-System. Die Aufstellung für das 6.1-System ist die gleiche, allerdings
werden die zwei hinteren Einheiten durch einen Centerlautsprecher ersetzt.
Bei der 5.1-Aufstellung gibt es keine hinteren Lautsprecher.
0º
-
3
0
2
º
º
2
9
0
º
-
1
1
0
º
1
5
0
º
-
1
3
5
º

30
DEUTSCH (DE)
Schließen Sie ein hochwertiges Stereo-RCA-Phonokabel mit einem Ende an die L- und R-Eingänge
des 3060S und mit dem anderen Ende an die PRE OUT-Buchsen auf der Verstärkerrückseite an.
Der Subwoofer addiert die L- und R-Signale automatisch, sodass kein Informationsverlust
entsteht. Wenn Sie zwei Subwoofer verwenden möchten, können Sie jeden Subwoofer mit einem
einzelnen RCA-Phonokabel anschließen und erhalten so ein Stereo-Subwoofersystem.
Stellen Sie sicher, dass der L-Ausgang am Verstärker zum linken Subwoofer führt und der
R-Ausgang zum rechten. Dadurch wird das Stereobild der Hauptlautsprecher aufrechterhalten.
Die Subwoofer müssen nahe bei ihrem entsprechenden Hauptlautsprecher aufgestellt werden
und die Einstellungen müssen für jeden Subwoofer einzeln vorgenommen werden.
Stereosystem
FRONT LS
RIGHT LEFT
STEREO AMPLIFIER
L
R
PRE OUT
+
-
SUBWOOFER
LINE IN
LEFT /
MONO
RIGHT
 Loading...