

Q Acoustics 2000i serues User Manual And Product Specifications

User Manual and
Product Specifications
EN
FR
IT
ES
DE
EL
NL
ZH
PL
RU
SE
2000i Series


User Manual and
Product Specifications
EN
2000i Series


Read these instructions. Unplug this apparatus during lightning storms or when
unused for long periods of time.
Keep these instructions.
Heed all warnings.
Refer all servicing to qualified service personnel. Servicing
Follow all instructions.
is required when the apparatus has been damaged in any Important notice to UK users
Do not use this apparatus near water.
way, such as power supply cord or plug is damaged, liquid
The appliance cord is terminated with a UK approved mains
Clean only with dry cloth.
has been spilled or objects have fallen into the apparatus,
plug fitted with a 3A fuse. If
Do not block any ventilation openings.
the apparatus has been exposed to rain or moisture, does
not operate normally, or has been dropped.
Install in accordance with the manufacturer's instructions.
Warning: To reduce the risk of fire or electrical shock, do
Do not install near any heat sources such as radiators, heat
not expose this product to rain or moisture. The product
registers, stoves, or other apparatus (including amplifiers)
must not be exposed to dripping and splashing and no
that produce heat.
object filled with liquids such as a vase of flowers should
be placed on the product.
Do not defeat the safety purpose of the polarized or
grounding type plug. A polarized plug has two blades with
No naked flame sources such as candles should be
one wider than the other. A grounding type plug has two
placed on the product.
blades and a third grounding prong. The wider blade or the
third prong are provided for your safety. If the provided plug
Warning: The mains power switch for the subwoofer is the
does not fit into your outlet, consult an electrician for
device used to disconnect the unit from the mains supply.
replacement of the obsolete outlet.
This switch is located on the rear panel. To permit free
access to this switch, the apparatus must be located in an
Protect the power cord from being walked on or pinched,
open area without any obstructions, and the switch must be
particularly at plugs, convenience receptacles, and the
freely operable.
point where they exit from the apparatus.
Caution: Changes or modifications not expressly
Use only attachments/accessories specified by the
approved by the manufacturer could void the user's
manufacturer. Use only with a cart, stand, tripod, bracket, or
authority to operate this device.
table specified by the manufacturer, or sold with the
apparatus.
When a cart is used, use caution when moving
the cart/ apparatus combination to avoid injury
from tip-over.
Third parties: In the unlikely event that you pass this product
on to a third party, include these operating instructions with
the product.
Service: Equipment for servicing should be returned to the
supplying dealer, or to the service agent for your area. The
addresses of the main Service Agents for the UK are listed
in this manual.
the fuse needs to be replaced,
an ASTA or BSI approved BS1362 fuse rated at 3A must be
used. If you need to change the mains plug, remove the
fuse and dispose of this plug safely immediately after
cutting it from the cord.
Connecting a mains plug
The wires in the mains lead are coloured in accordance with
the code: Blue: NEUTRAL; Brown: LIVE:
As these colours may not correspond to the coloured
markings identifying the terminals in your plug, proceed as
follows:
The BLUE wire must be connected to the terminal marked
with the letter N or coloured BLUE or BLACK. The BROWN
wire must be connected to the terminal marked with the
letter L or coloured BROWN or RED.
To completely disconnect
this apparatus from the
AC Mains, disconnect the
power supply cord plug
from the AC receptacle.
Where the MAINS plug or
an appliance coupler is
used as the disconnect
device, the disconnect
de vic e shal l rema in
readily operable.
RISK OF ELECTRIC SHOCK
DO NOT OPEN
TO REDUCE THE RISK OF ELECTRIC SHOCK DO NOT REMOVE COVER (OR BACK)
NO USER-REMOVEABLE PARTS INSIDE
REFER SERVICING TO QUALIFIED PERSONNEL
This symbol indicates that there are important operating and
maintenance instructions in the literature accompanying this unit.
This symbol indicates that dangerous voltage constituting
a risk of electric shock is present within this unit.
3A FUSE
BS 1362
BROWN
(Live)
BLUE
(Neutral)
Important Information - Please Read Carefully
CAUTION!

DO NOT expose your loudspeakers to excessive cold, heat, humidity or
Introduction
sunlight.
The Q Acoustics 2000i series is a range of loudspeakers designed to meet
If you play your loudspeakers without their grilles on, be careful to protect
the highest expectations of dedicated 2-channel audiophiles and
the drive units from damage.
discerning movie enthusiasts. The range comprises:
DO NOT use makeshift stands. Fit the Q-Acoustics dedicated stand
2010i: Compact Bookshelf speaker with a 100 mm bass driver.
according to the instructions and using any fixings provided. Your dealer
2020i: Bookshelf speaker with a 125 mm bass driver.
will advise you.
2050i: Floorstander with two 165 mm bass drivers
DO NOT dismantle the loudspeaker. You will invalidate the warranty.
2000Ci: Centre channel with 2 x 100 mm bass drivers, which can be wall
mounted if required.
Unpacking your loudspeakers
2070Si: 140 Watt active subwoofer with a 2 x 170 mm driver and signal
Unpack the speakers fully. Lift the speakers from the cartons by holding
sensing for automatic power on/off.
the cabinets. Do not use the protective bags to lift them. The 2050i and
2070Si are heavy - get assistance to lift them if necessary.
The 2020i and 2050i speakers are both bi-wireable. All the loudspeakers
may be operated close to TV monitors with no ill-effects with the exception
When manoeuvring loudspeakers, do not drag them across the floor as
of the 2070Si, which should not be operated within 500mm of TV screens
this may cause damage - lift them before moving them.
monitors or other magnetically sensitive equipment. Plasma and LCD
In the carton you will find: The loudspeaker/s and this product manual.
screens are unaffected.
In addition the packing for the following models contains:
Before making any connections to your loudspeakers make sure that all
2050i: A set of floor spikes and spike covers for each speaker. An Allen
active units in your system are switched off at the mains.
key to adjust the spikes once fitted.
When switching on your sound system or changing input sources, set the
2070Si: A power cord suitable for the mains supply in your area,
main volume control at a low level. Turn up the level gradually.
2 x Right angled RCA / Phono cables and an AV Setup CD.
NEVER play your sound system at full volume. The position of the
Check the product carefully. If any items are damaged or missing, report
volume control is deceptive and does not indicate the power level of the
this to your dealer as soon as possible.
system. Using very high volume settings may damage your hearing.
Retain the packing for future transport. If you dispose of the packing,
DO NOT connect your loudspeaker terminals to the mains supply.
please do so following all recycling regulations in your area.
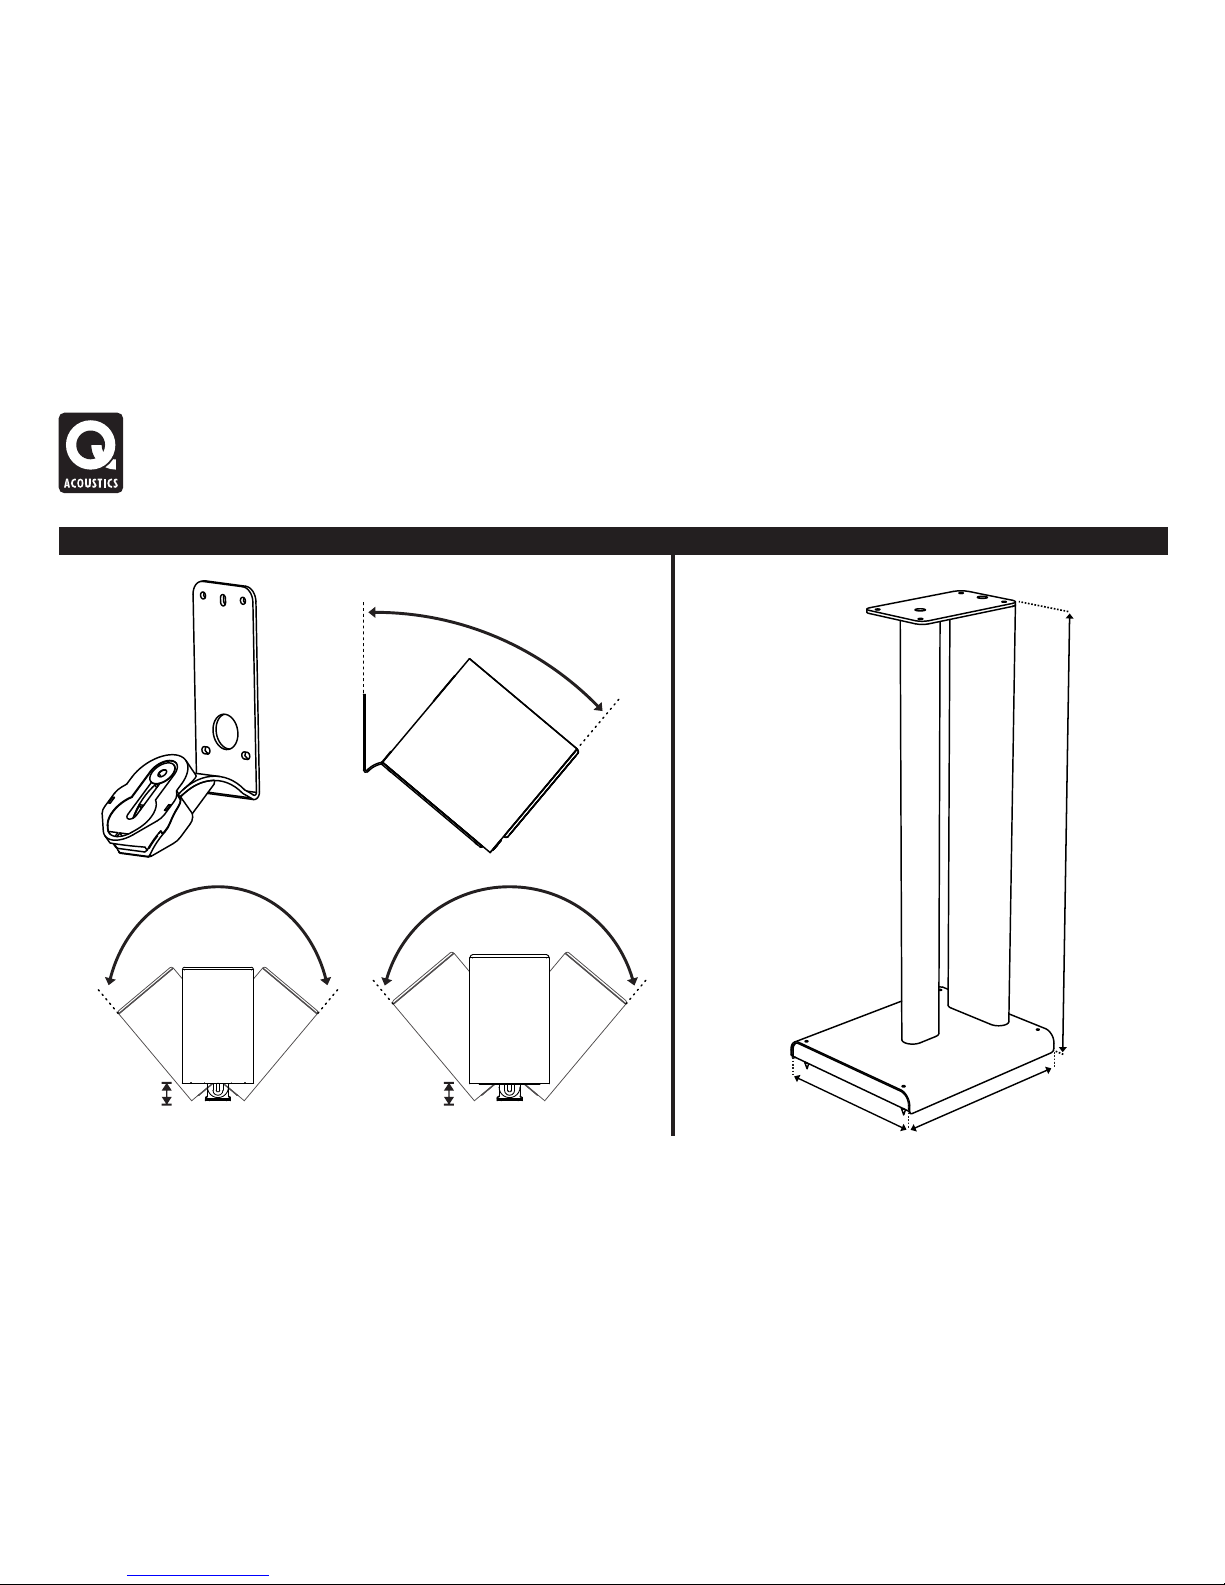
Q Acoustics 2000i Series
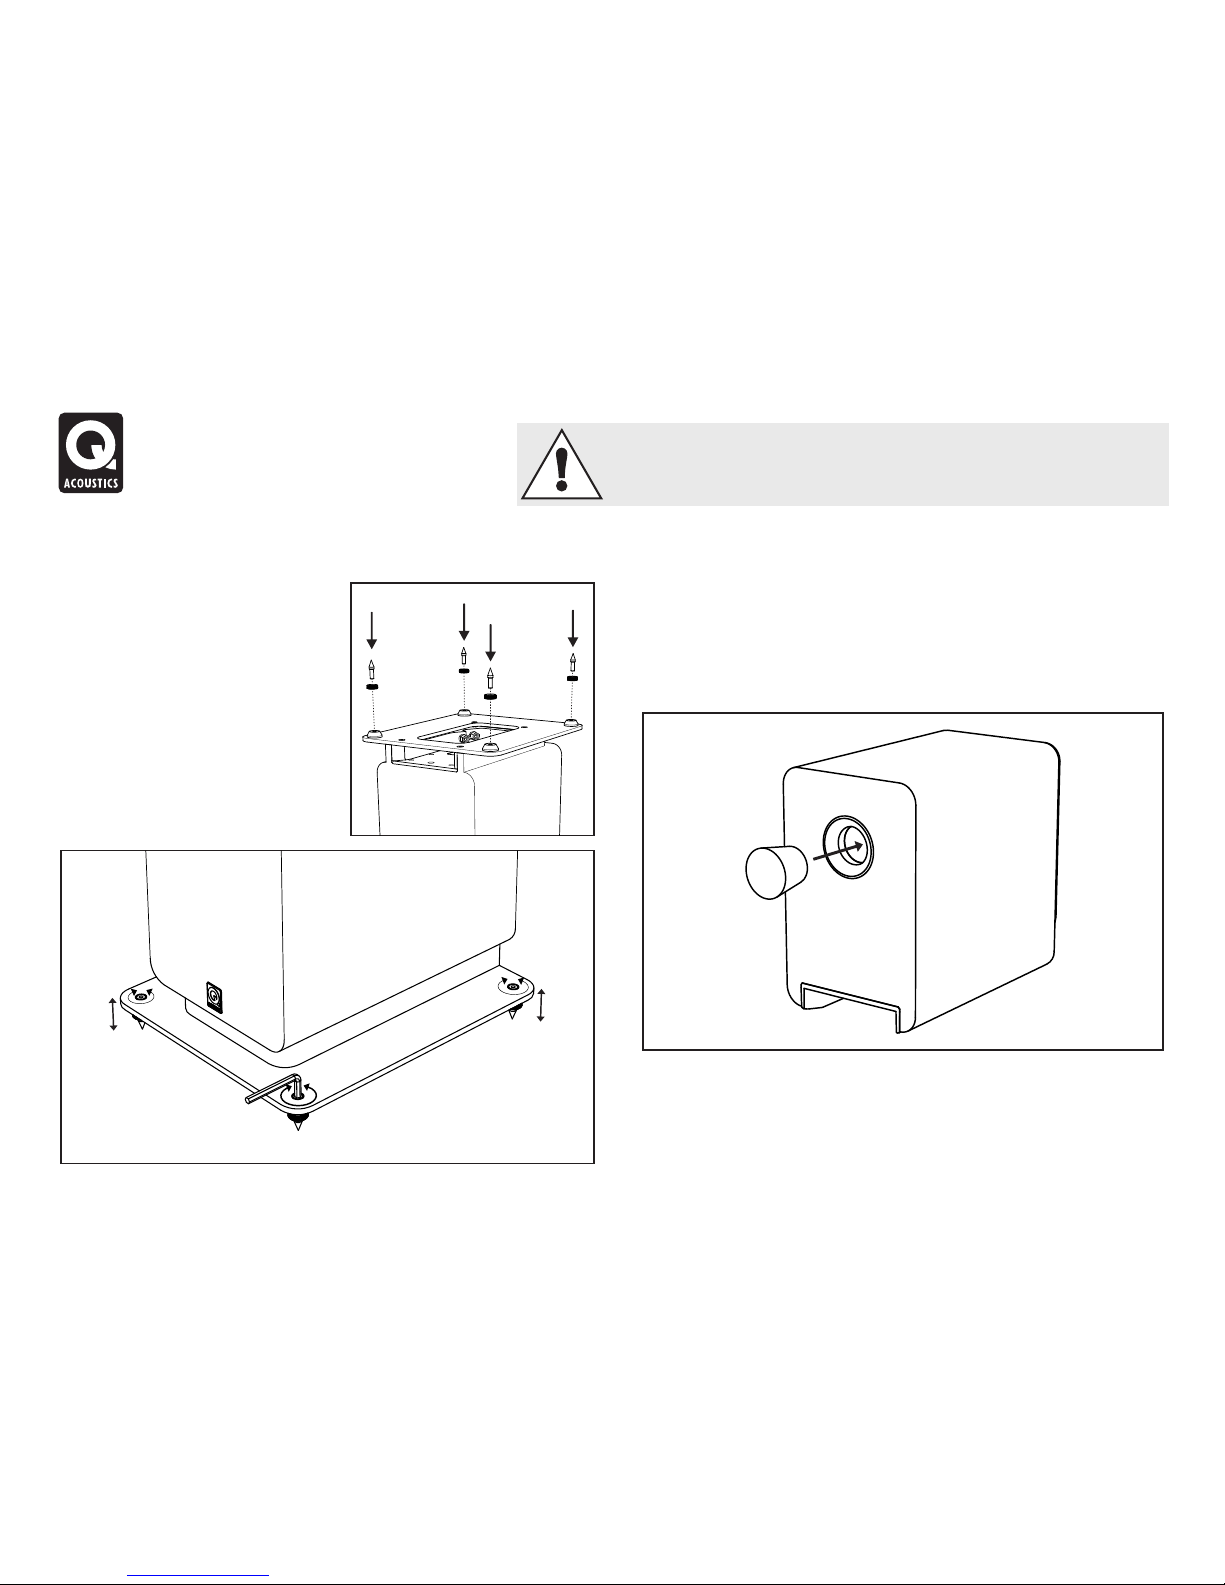
Fitting the Floorstand Spikes - 2050i Foam Bung
Thread the spikes fitted with locking The 2000i series speakers are rear ported and designed to work best with
nuts half way into the base and return some space behind them i.e. 200mm or so away from a wall. If you
the loudspeaker to the upright position your speakers close to a wall/ corner then the foam bungs
position. (If you have a wood or stone should be inserted into the rear ports or there could be too much bass.
floor push a spike protector over each
The 2070Si subwoofer bass is adjusted using the level controls.
spike before turning the speaker
upright) When the speaker is the right
way up, insert the Allen key into each
spike from the top and adjust all the
spik es in and out un t il the
loudspeaker is level and stable.
Ensure the bungs are fitted snugly into the port without inserting them too
far. You will find the level of bass is reduced but definition and bass
extension is increased. Experiment to see what you prefer and try making
small changes to the position of the speaker to optimise the final result.
Spikes are sharp. Exercise care!
Never place a spiked loudspeaker where it can cause damage!
Always move your loudspeakers by lifting them - never drag them!
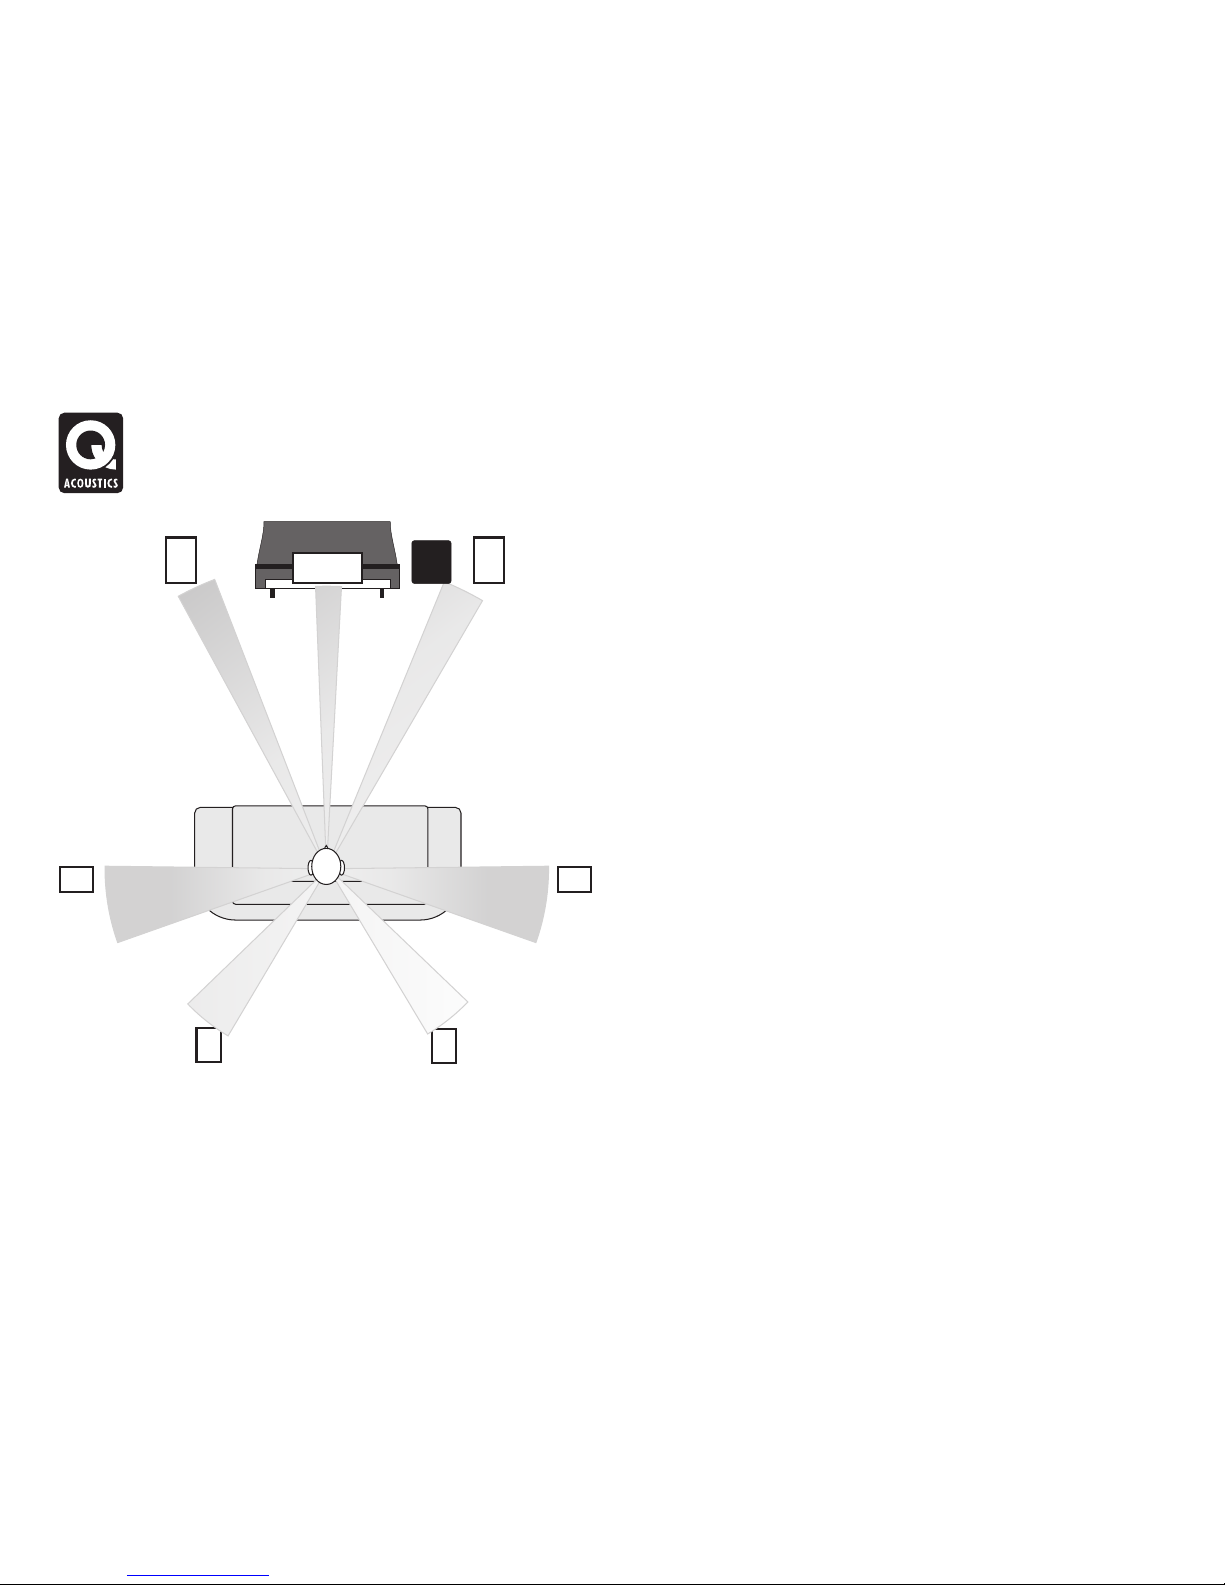
Preparation
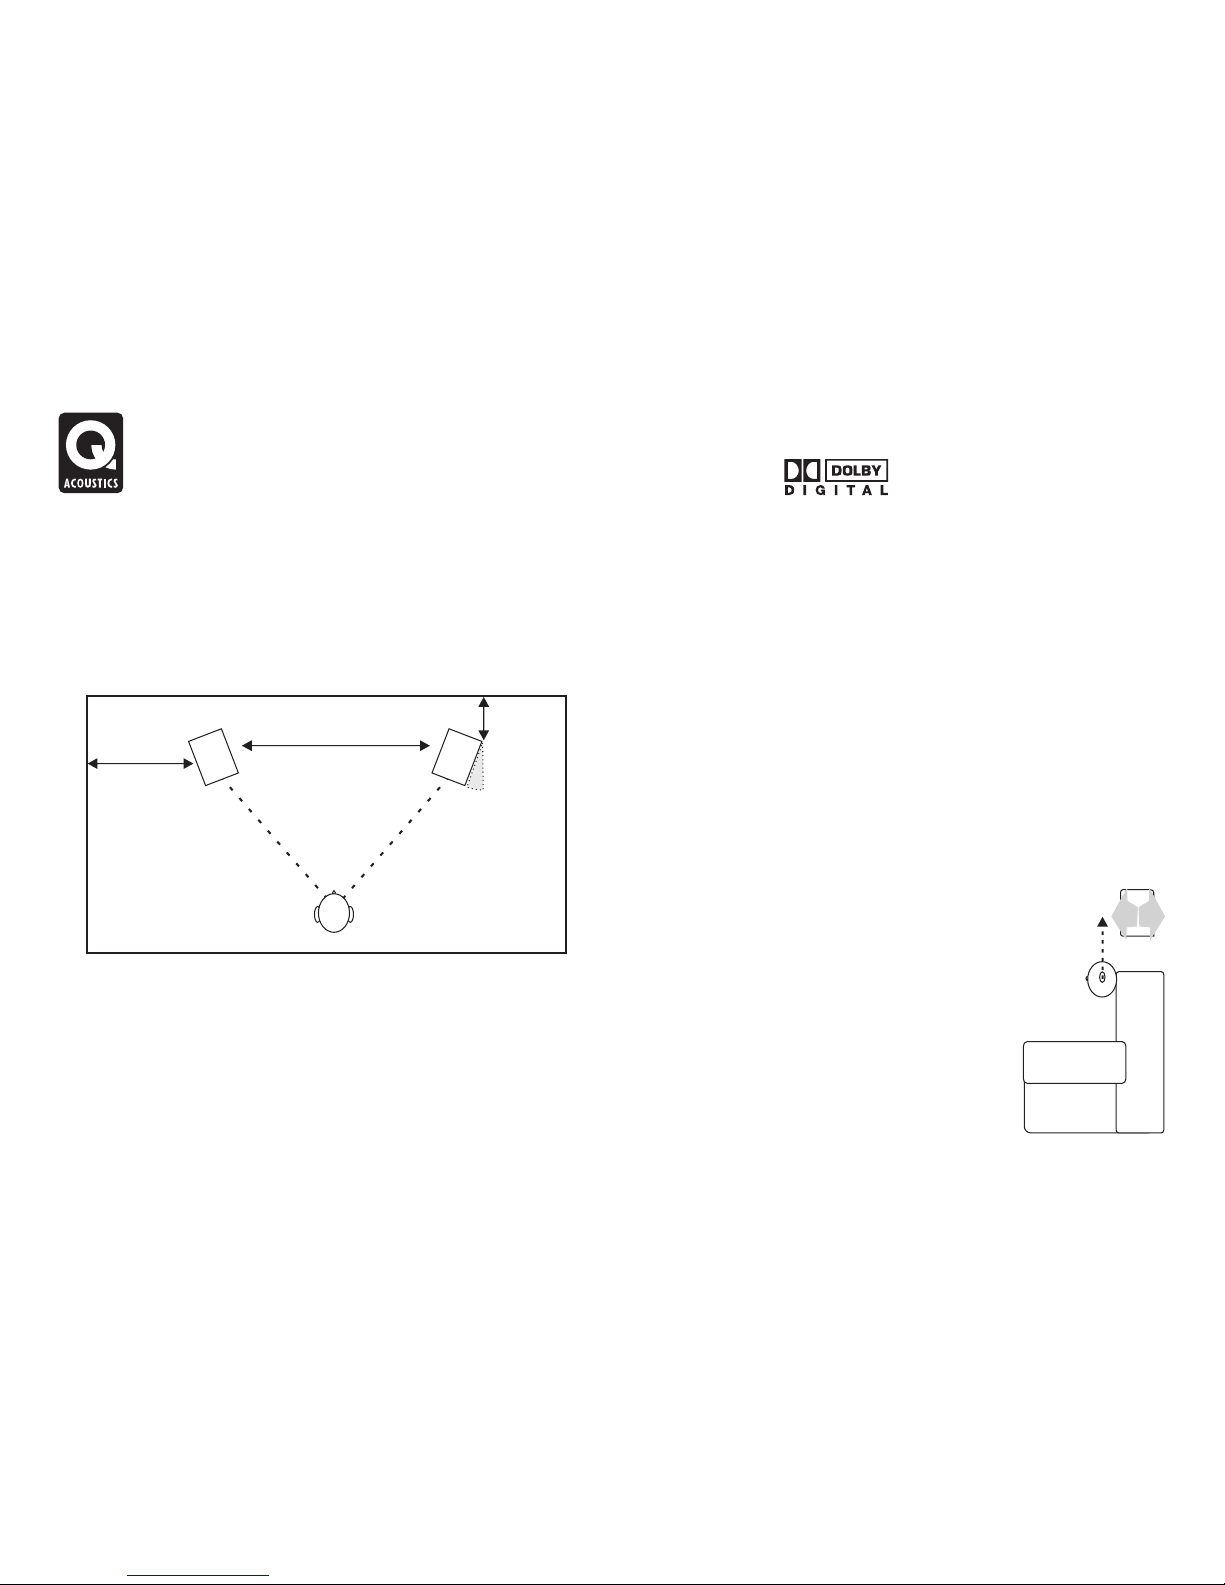
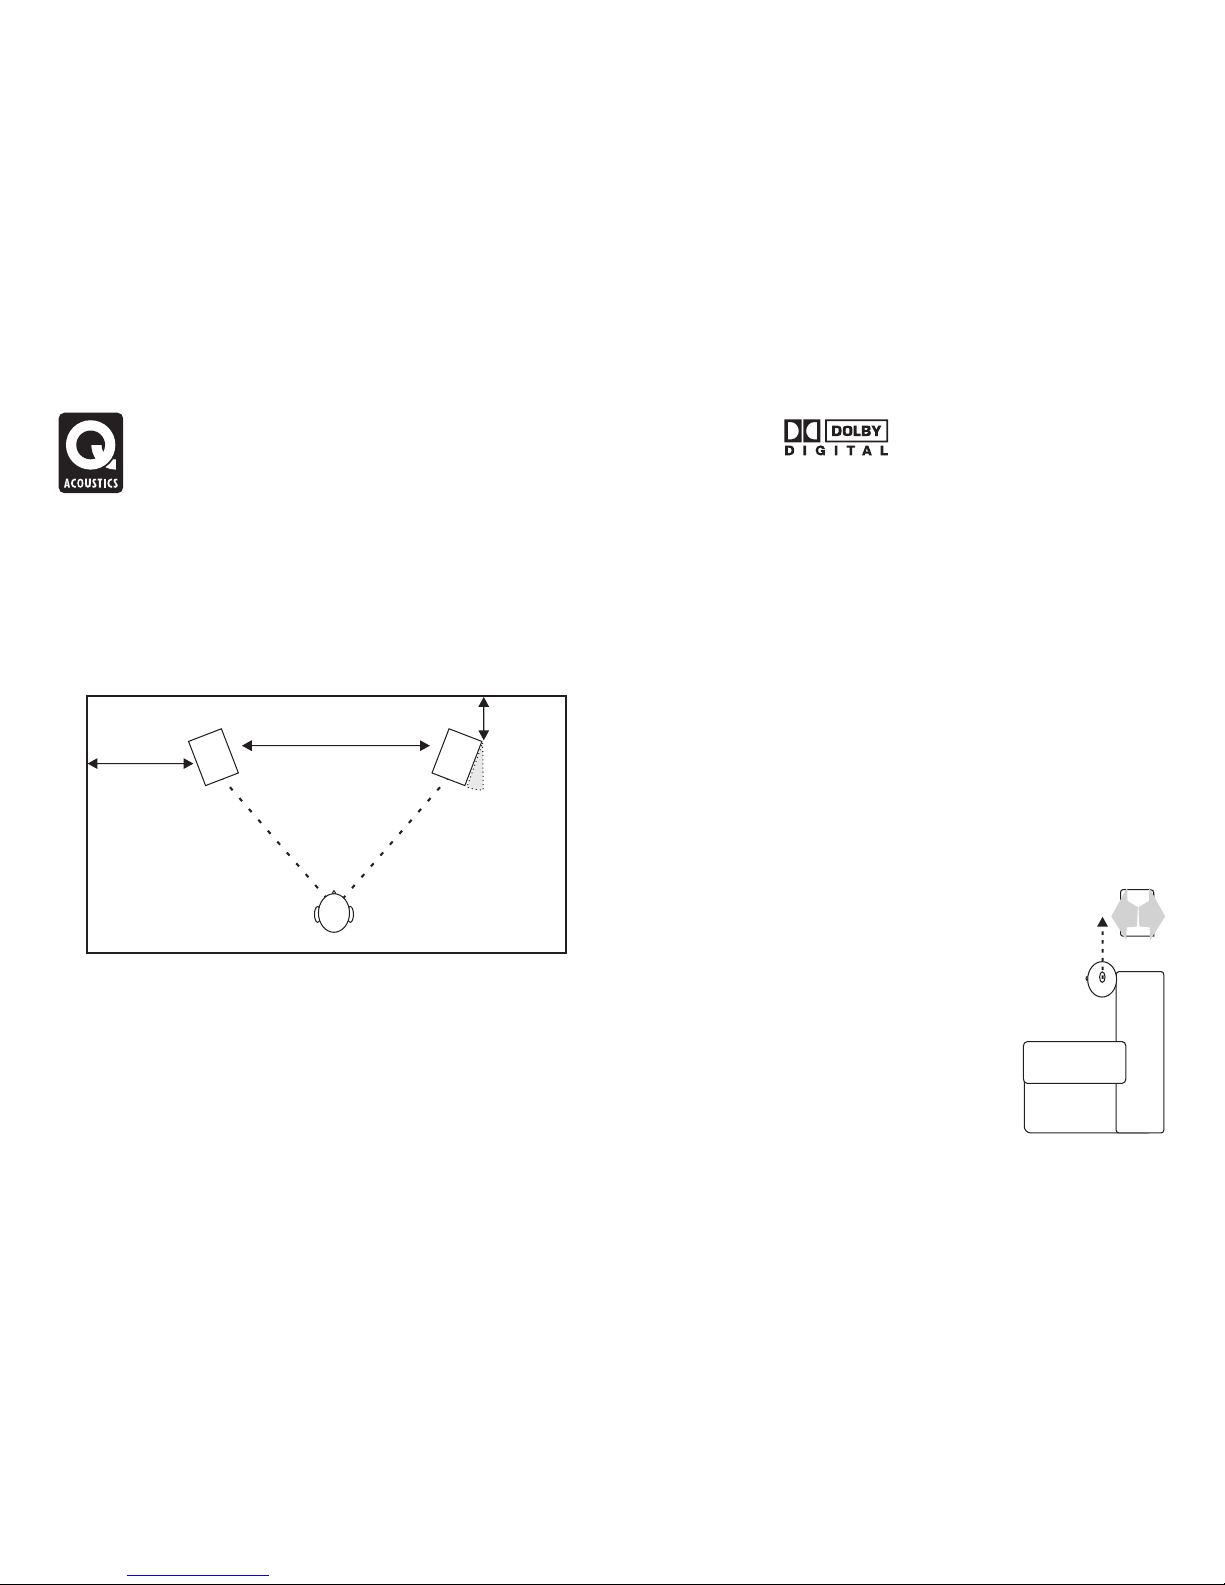
2050i
An optional bracket designed specifically to wall mount the Q Acoustics
The 2050i loudspeakers should be positioned at least 200mm from a
2010i, 2020i and 2000Ci is available from your dealer. Floor stands for the
back wall and 500mm from the side walls. Placing the speakers closer to
2010i and 2020i are also available.
the wall will increase bass but could cause the sound to boom and lack
precision and detail. The speakers should be 2m - 4m apart and central
Be prepared to experiment to find the best setup for your taste in your
to the seated listener. Turning the speakers slightly inwards will sharpen a
particular listening room.
stereo image but may cause narrowing of the sound source.
Effects loudspeakers
2000Ci
The 2000Ci is designed to be operated close to a TV screen and central
to it. It should be placed immediately above or below the screen. If you
are using a regular TV set, make sure that the TV is capable of adequately
supporting the speaker and has a level top. If not, consider placing the TV
on a cabinet with the 2000Ci on a secure shelf immediately below the TV.
If you have a Plasma or LCD monitor, mount the 2000Ci to the wall or
other suitable surface immediately above or below
the screen using the Q-Acoustics Wall Bracket.
Surround Speakers
There are recommendations from Dolby labs for
2010i and 2020i
5.1 effects speakers.
The 2010i and 2020i are ideally mounted on Q-Acoustics floor stands or
Surround speakers should be mounted on either
wall mounted. If you are stand mounting, a simple guide is that the treble
side of the listener, slightly behind the listening
unit should be at ear level to a seated listener. Wall mounted speakers
position. The speakers should be sited facing
may be mounted slighter higher with the speaker angled down. Stand
inward either mounted on the side walls of the
mounted speakers should be treated as floorstanding speakers except
room or if the room is large, on high stands and
that the speaker may be placed a little closer to the back wall. Shelf
with their centres above ear level to a seated
mounting is also possible.
listener.
Positioning Passive Loudspeakers
400mm
Dolby and the double-D symbol are
trade marks of Dolby Laboratories.
2m-4m
2m-4m
>500mm
>200mm
0-30°

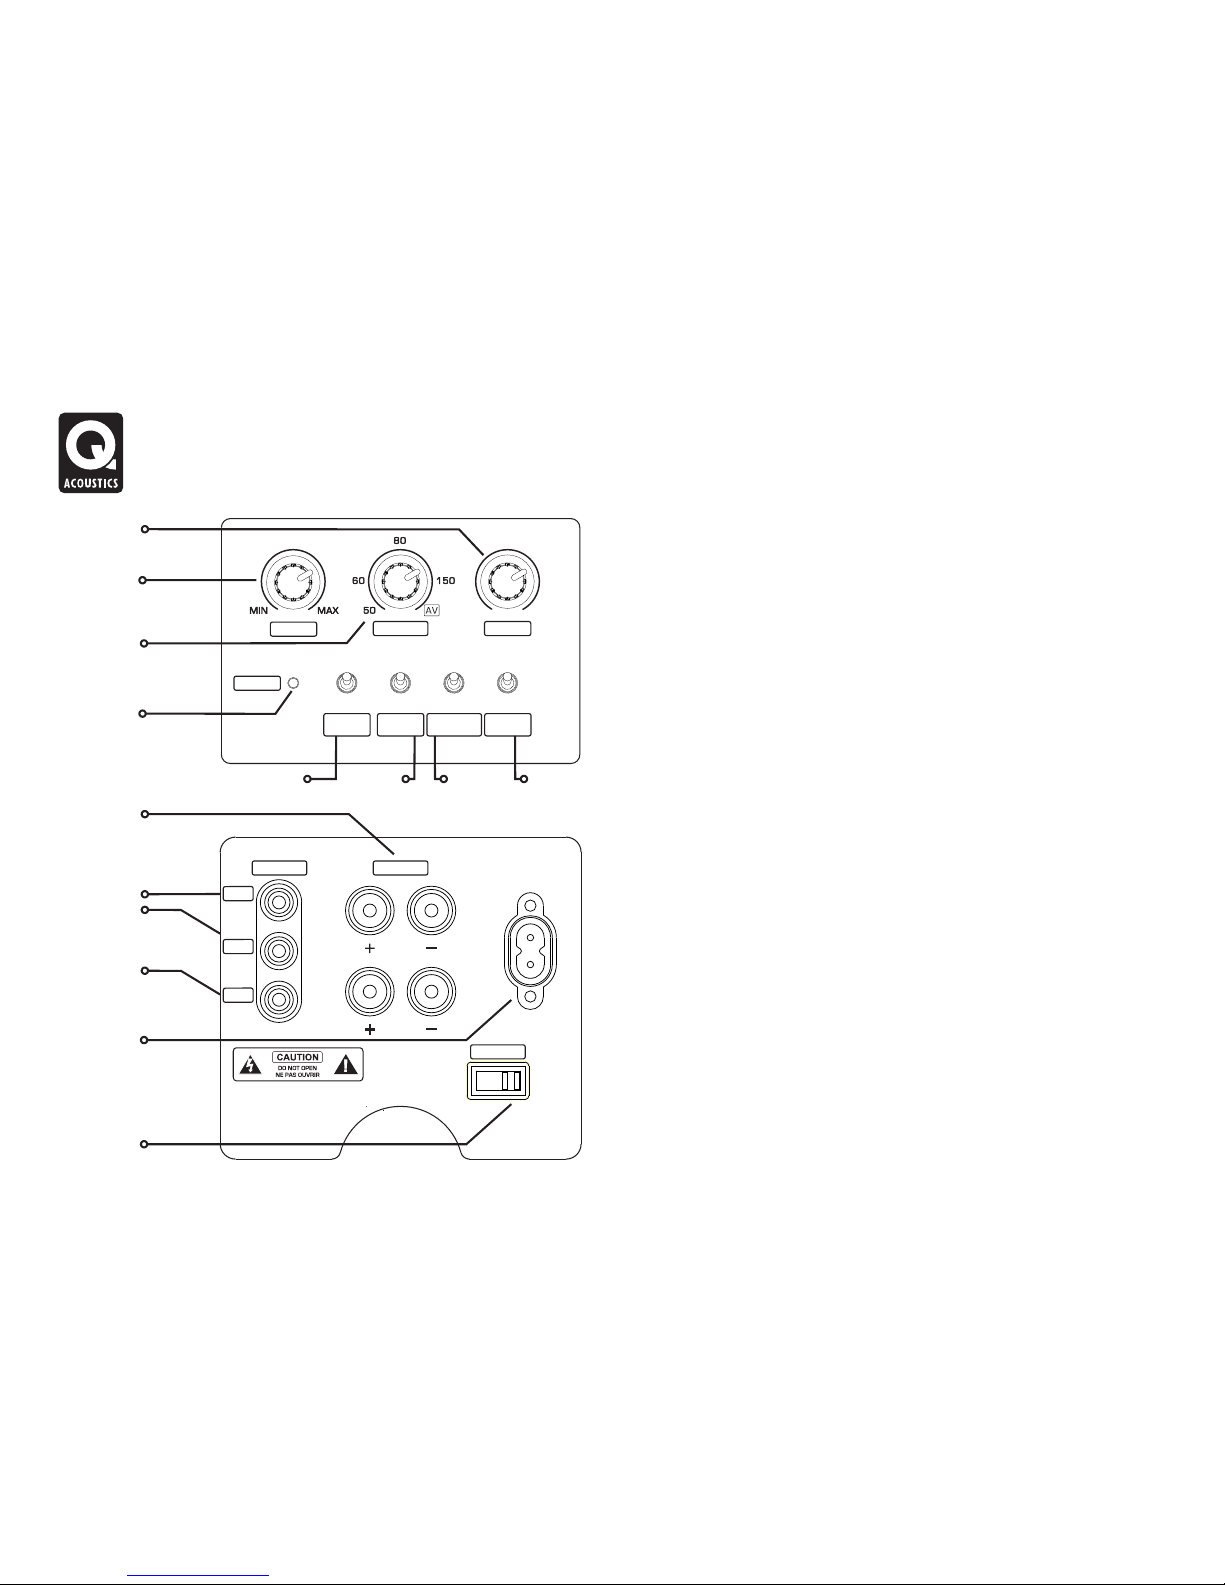
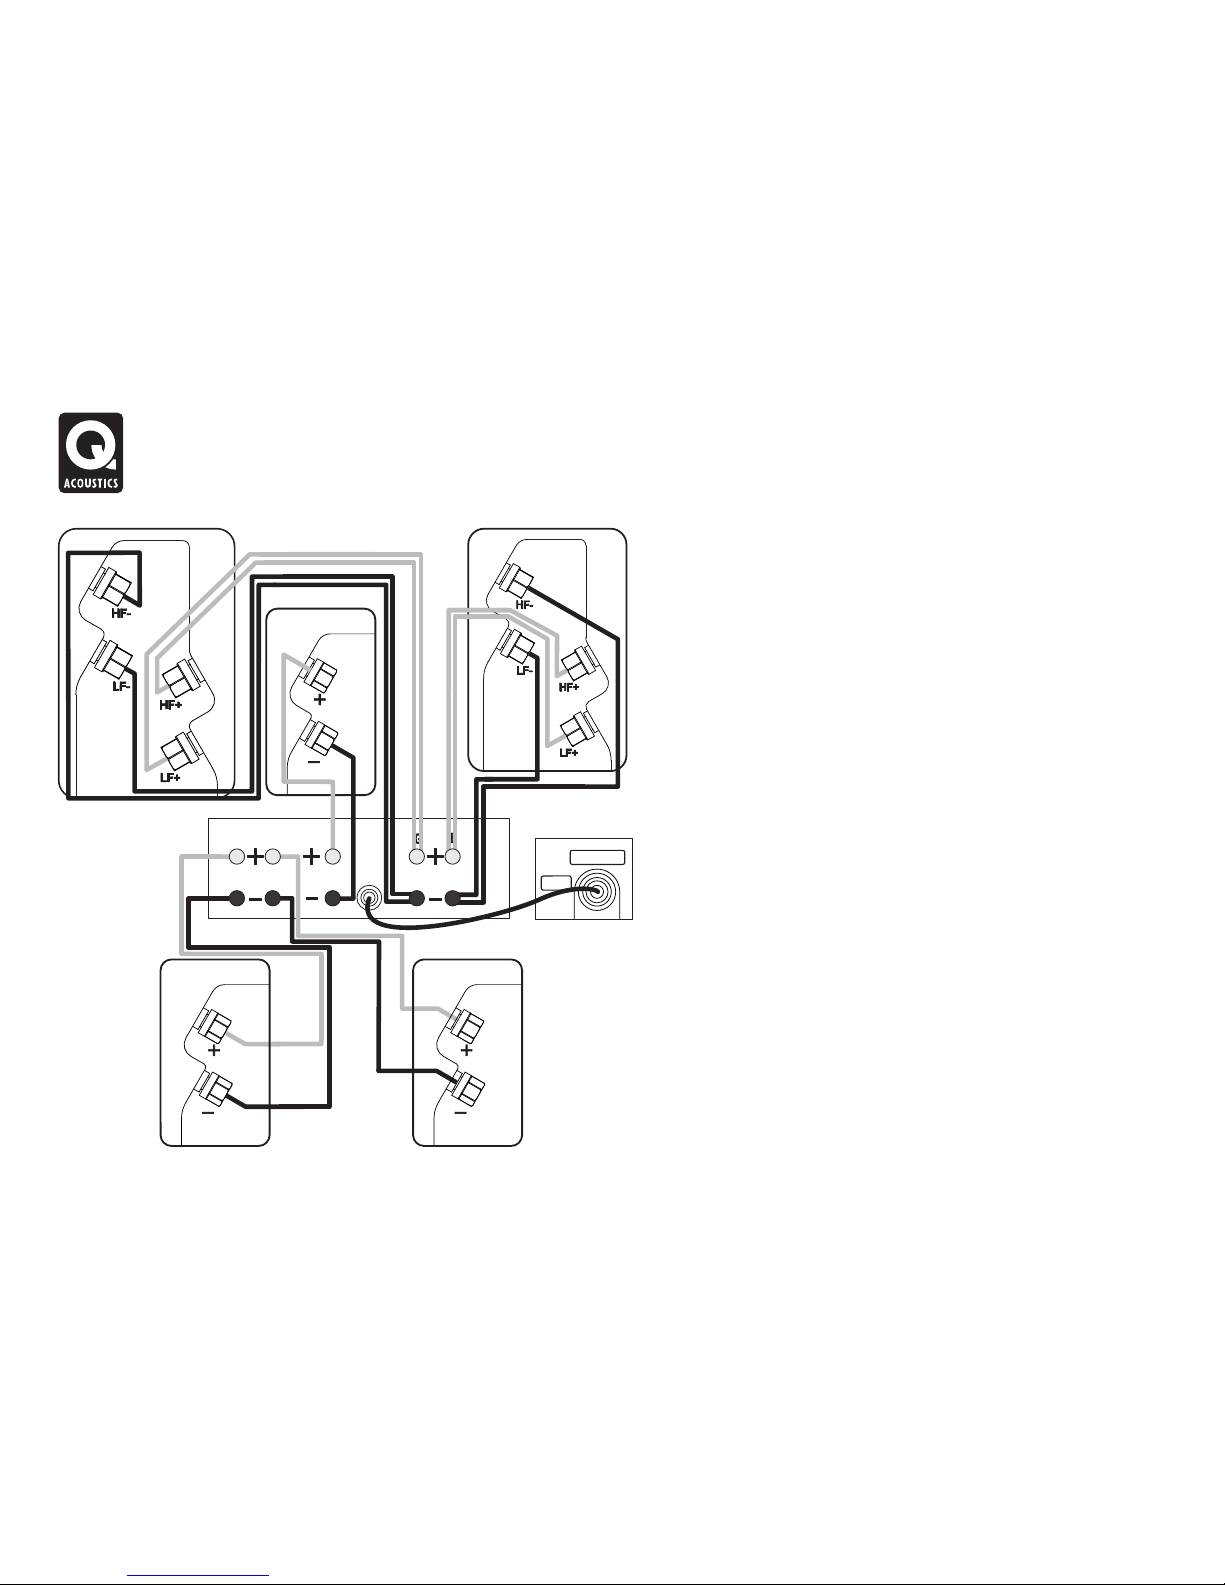
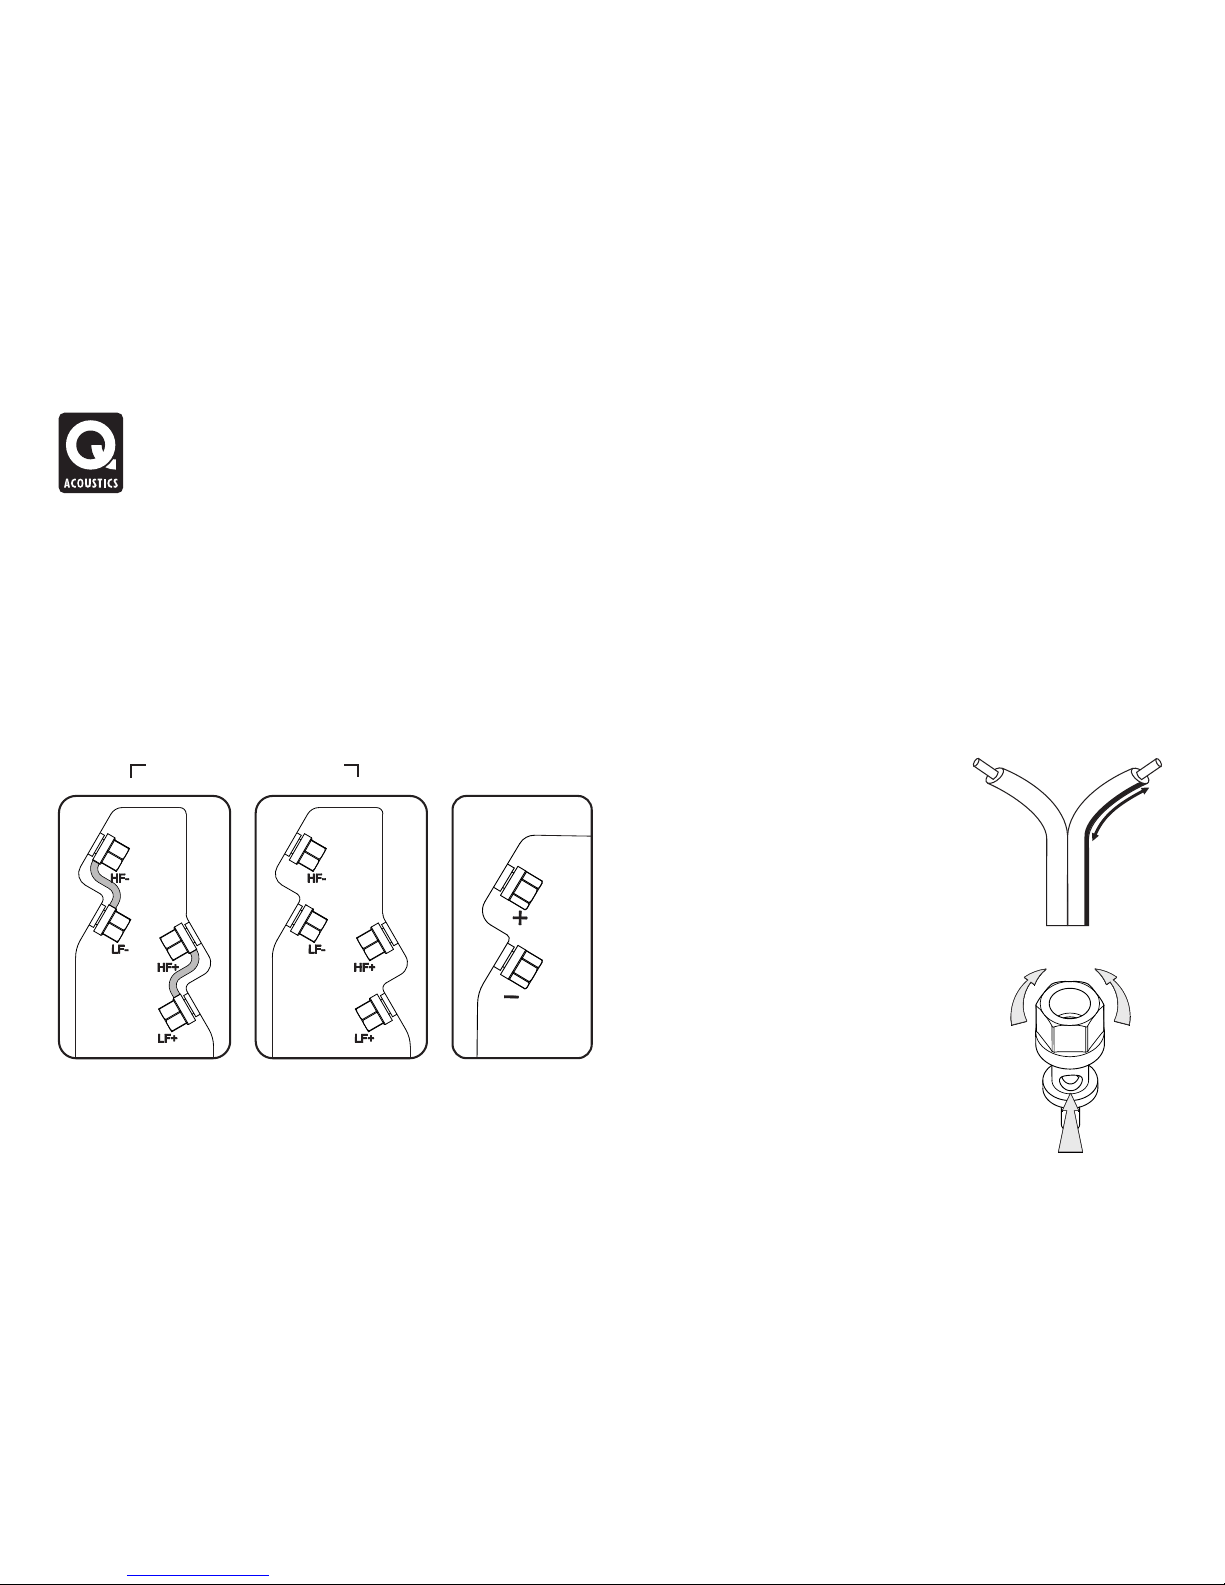
Terminals and Connectors Loudspeaker Cables
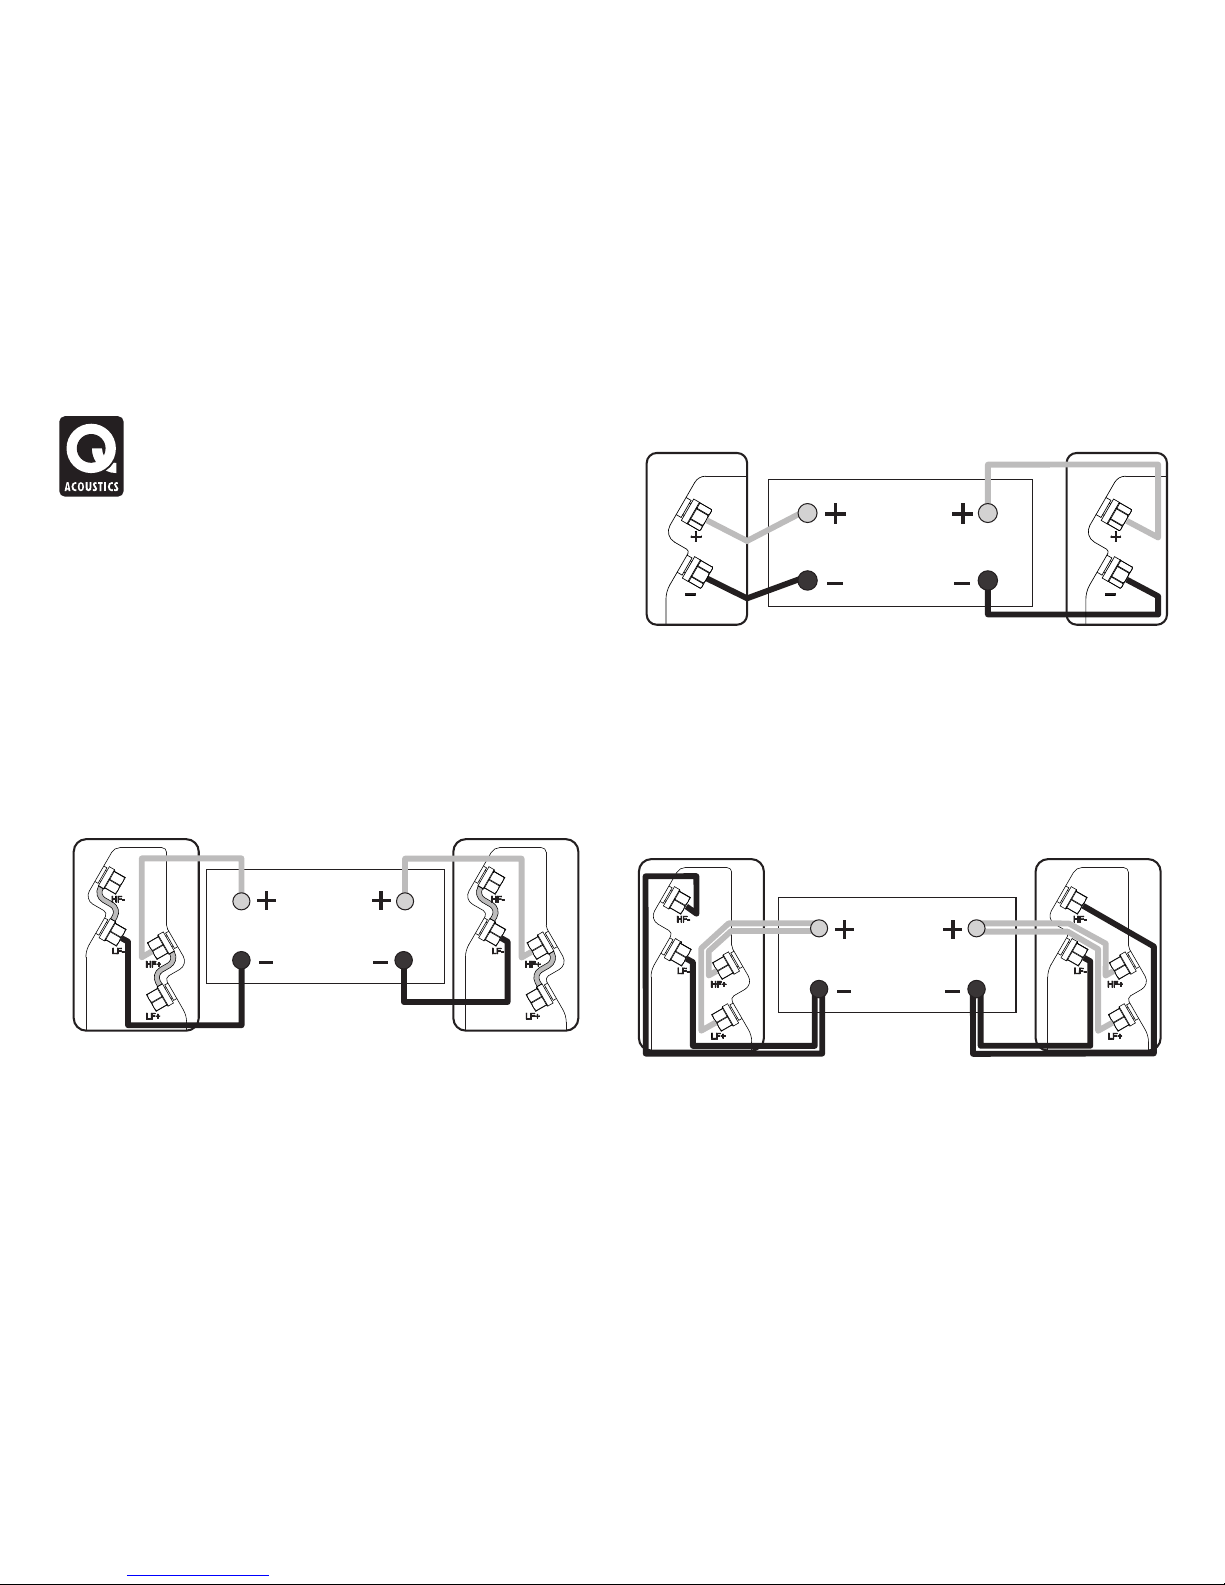
The 2020i and 2050i are bi-wireable. A bi-wireable crossover has four Specialist loudspeaker cables will offer a higher standard of
terminals. The upper pair of terminals connects to the treble (HF) reproduction than general purpose ‘bell’ or ‘zip’ wire. Use cable with
speaker and the lower pair to the bass (LF) speaker/s. As supplied the generous amounts of copper for the front and centre channels. Thin
crossovers are fitted with removable links to connect the terminal pairs. cables reduce the bass and restrict the dynamic range. Surround (rear)
This permits you to connect the loudspeaker conventionally using one channels are less critical.
pair of cables or in bi-wired mode with two pairs.
Speaker cable has a stripe or tracer along one core. By convention this is
The 2010i and 2000Ci have standard two terminal crossovers. connected to the positive terminals. The cables connecting the amplifier
to the front loudspeakers should ideally be the same length. Never join
cables - use complete lengths.
Preparing Cables
Split the cable to a depth of about 40 mm.
Bare the wire to a depth of 10mm and twist
the ends to gather any stray wires. Crop the
cable leaving 7mm of bare wire exposed.
Connecting a Terminal
Unscrew the terminal anticlockwise to
expose the mounting hole in the base of the
terminal column.
Insert the bare end of the cable into the hole.
Re-tighten the terminal fully hand tight. Make
sure there are no stray wires which could
touch adjacent terminals.
In the EU it is against safety regulations to
use 4mm loudspeaker plugs.
.
Connecting Passive Loudspeakers
30mm
7mm
2020i, 2050i
Standard
Connection
Standard
Connection
Bi-Wired
Connection
2010i, 2000Ci
Tight
Loose
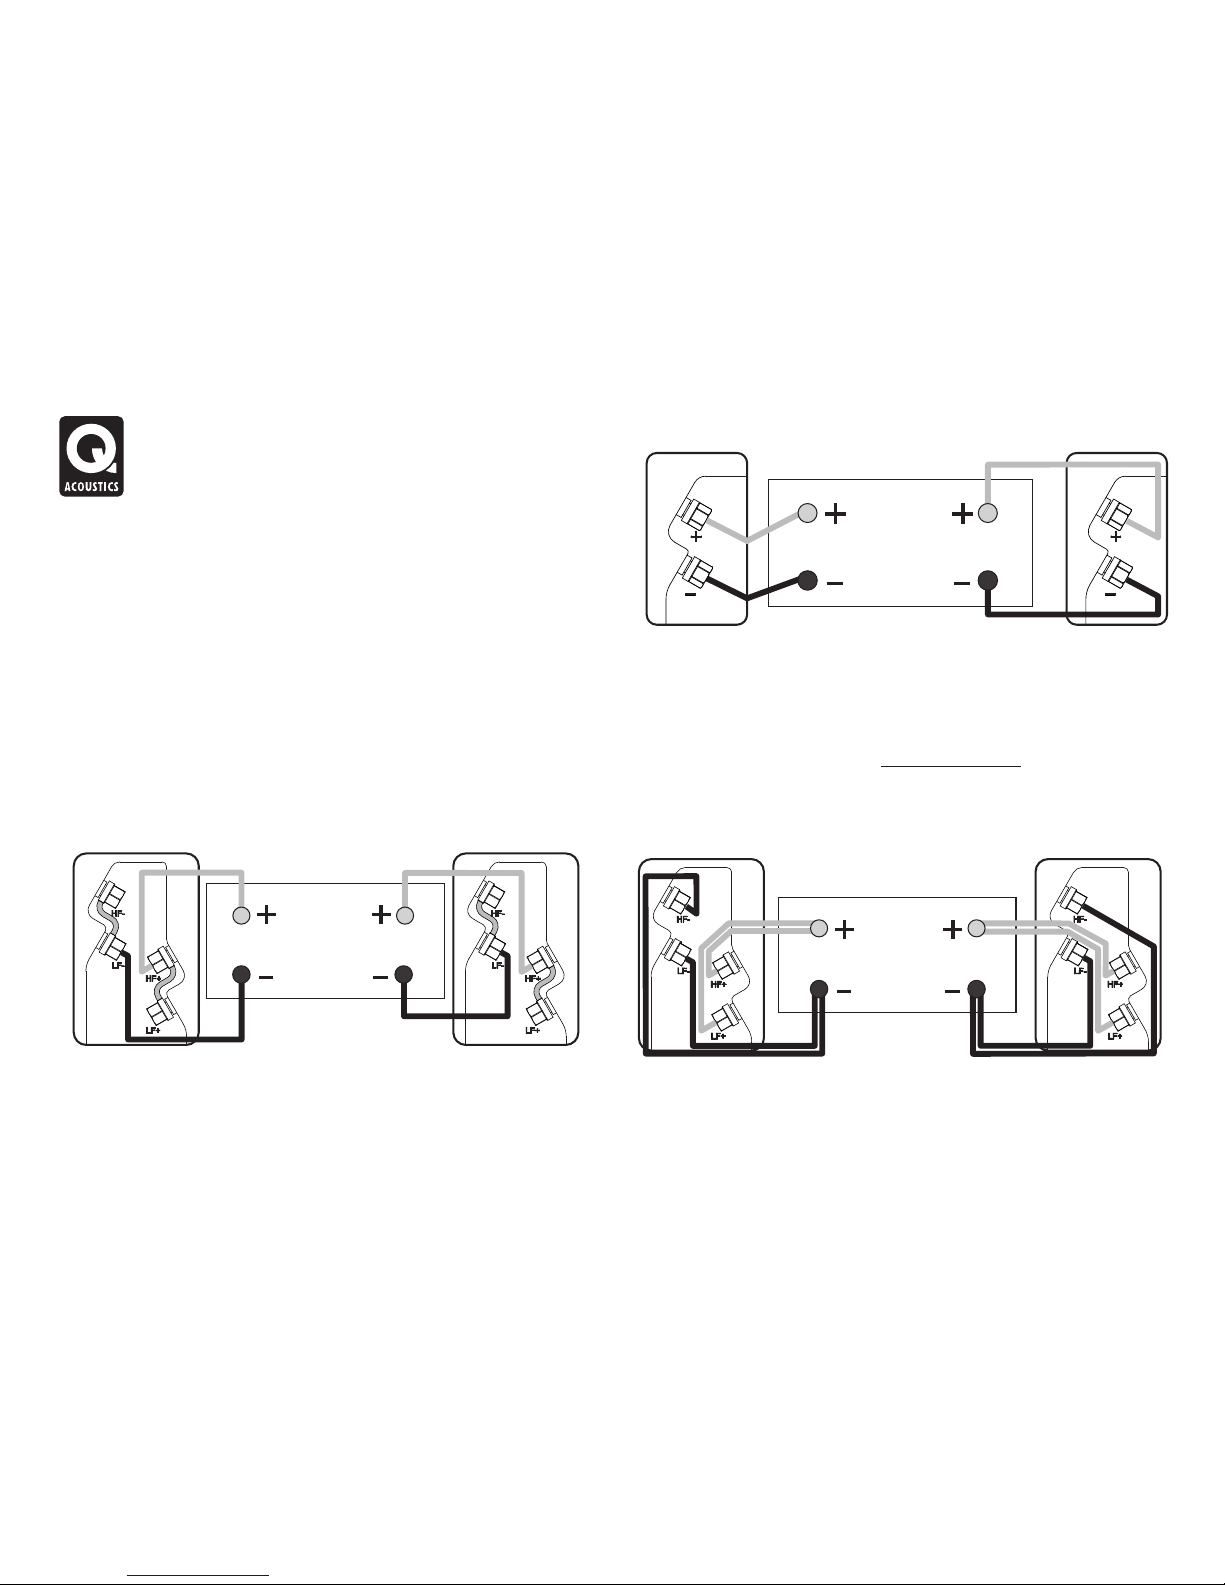
Stereo Connections
Standard Connections
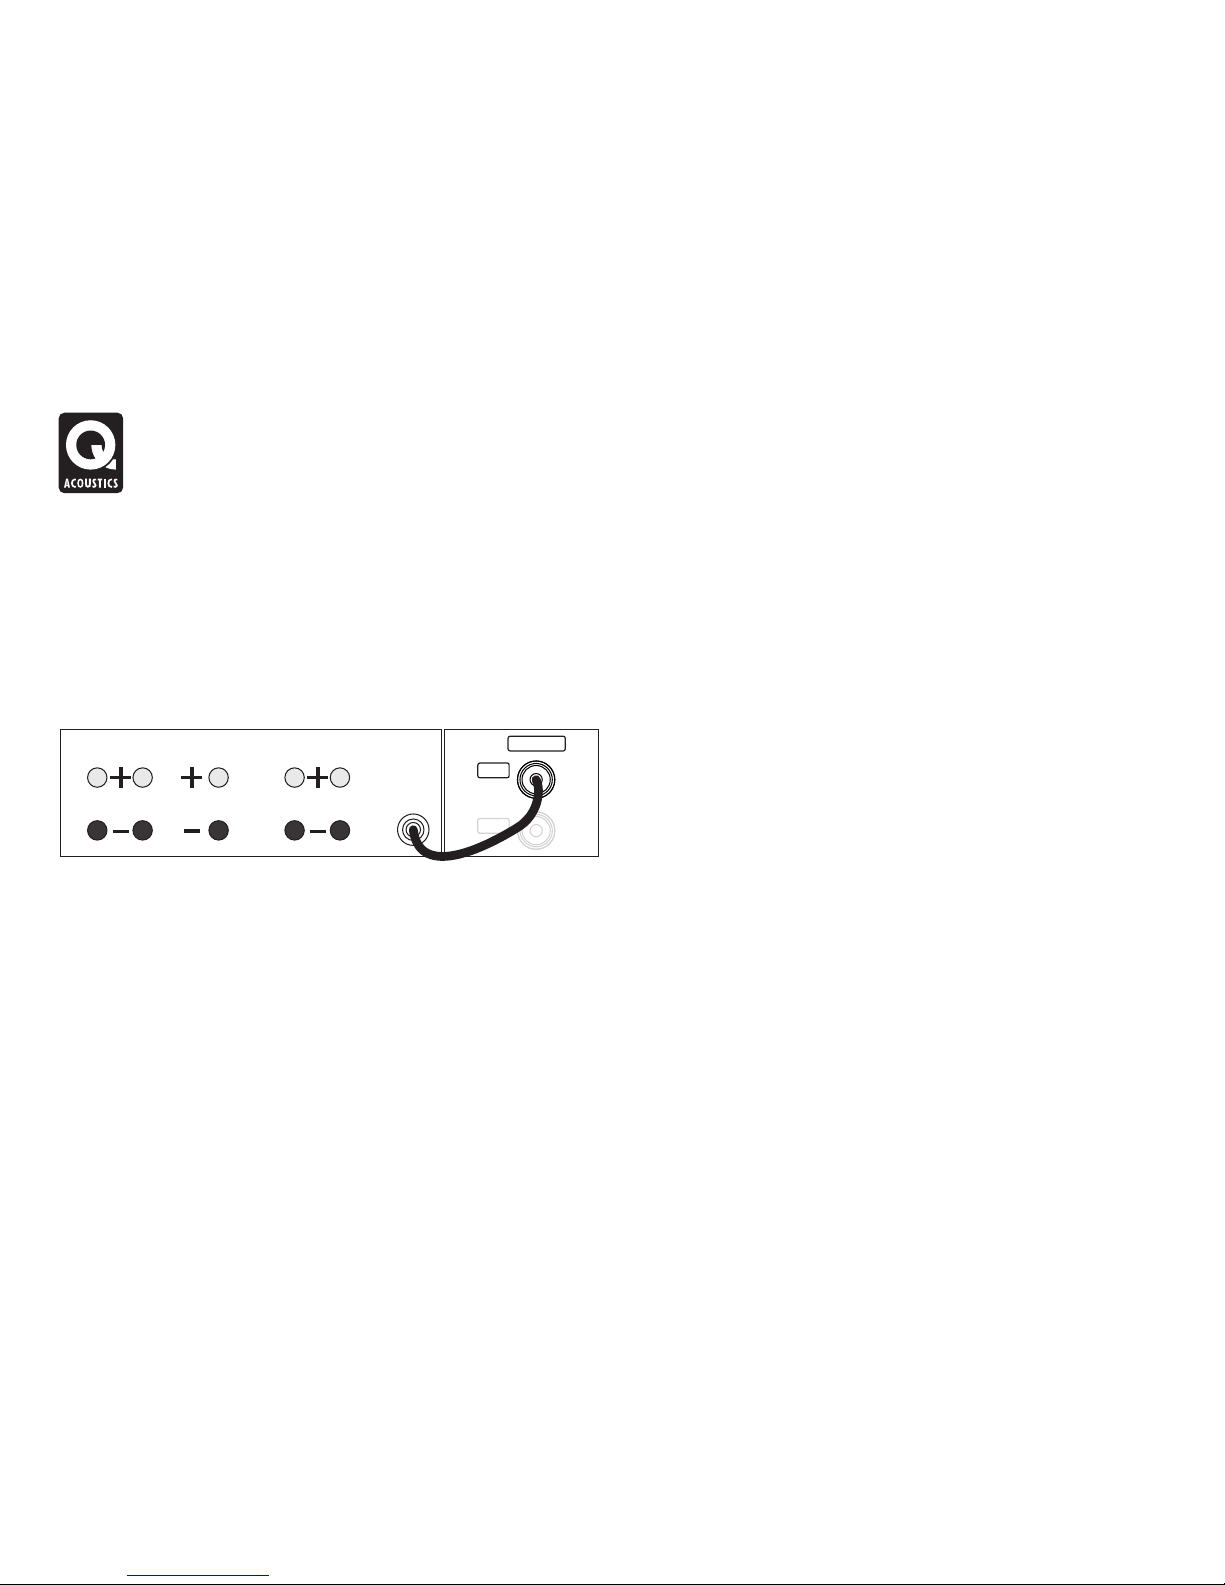
Connect the RED (+) terminal of the RIGHT loudspeaker to the RED,
Positive (+) terminal on the RIGHT channel of the amplifier. Connect the
BLACK (–) terminal of the loudspeaker to the matching BLACK,
Negative (–) terminal of the amplifier.
Bi-Wiring
Repeat this procedure for the LEFT channel.
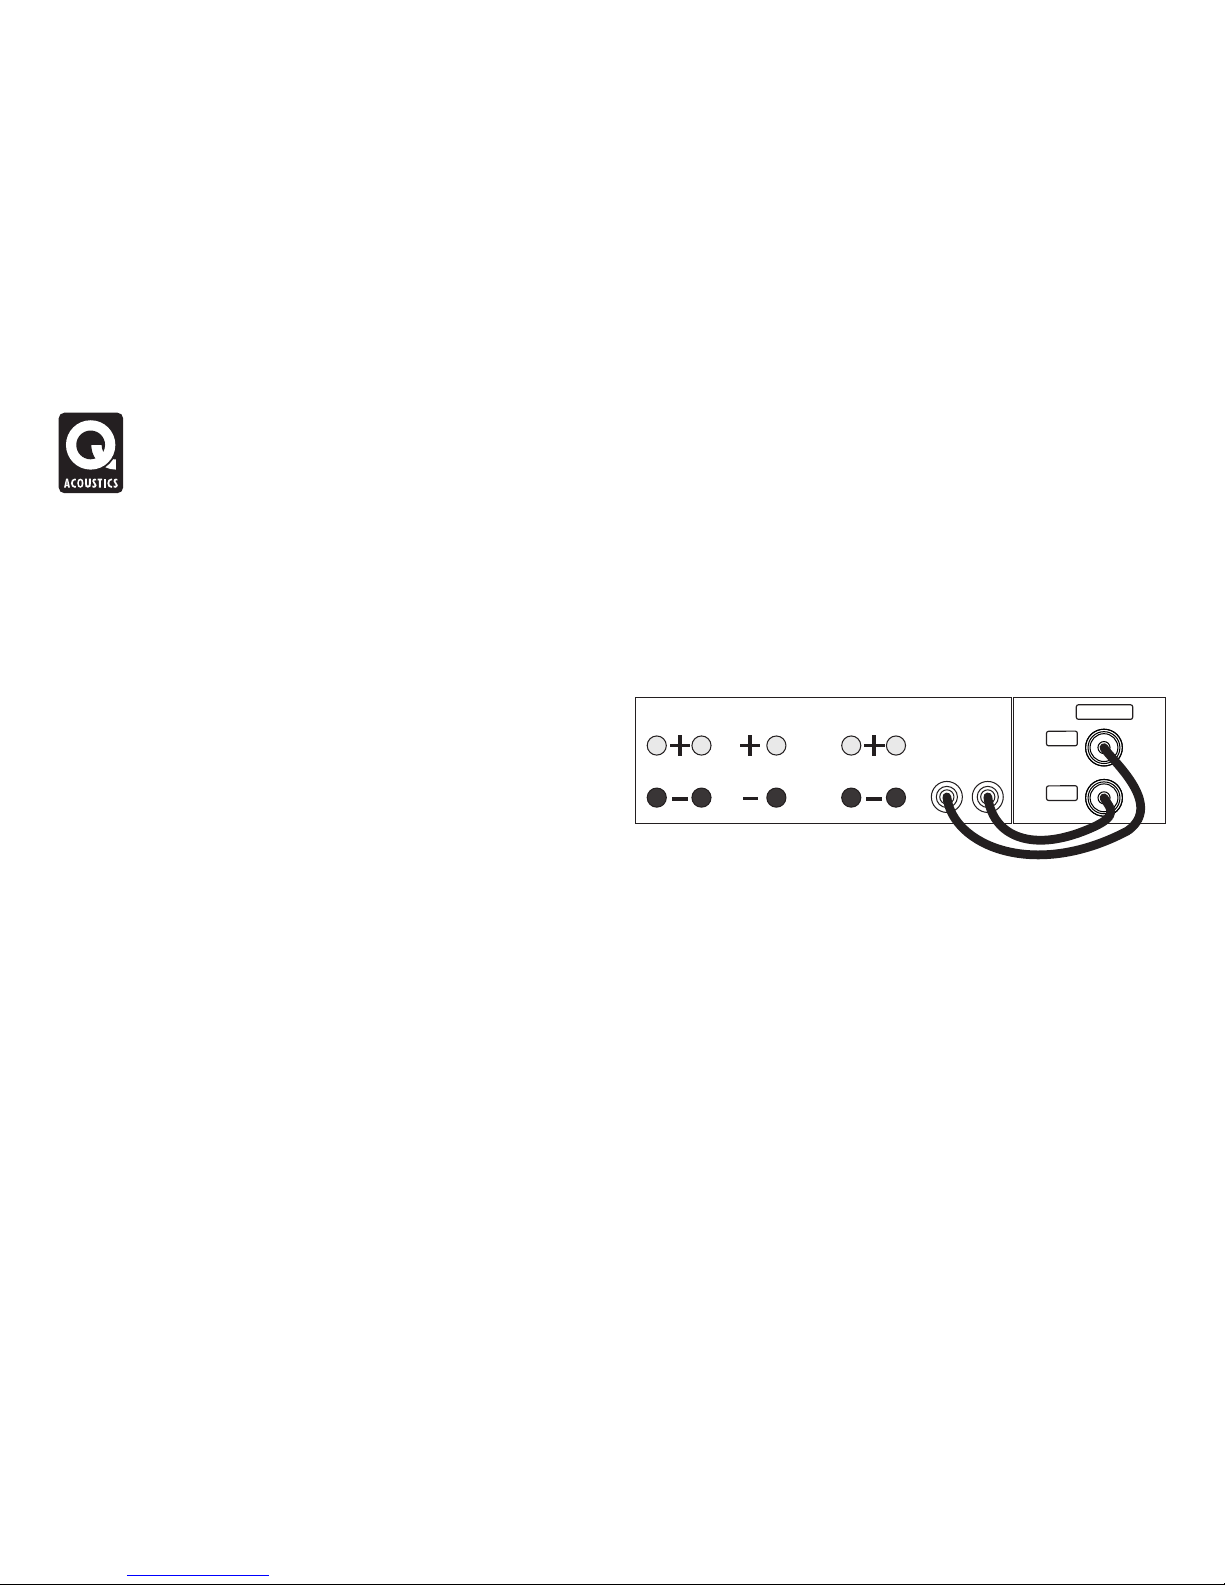
Directly connecting the treble and bass networks of a loudspeaker to an
amplifier improves both bass performance and dynamic range.
To bi-wire: Prepare two twin cables for each loudspeaker. Unscrew all
In the case of the 2020i and 2050i you may use any convenient
the loudspeaker terminals and remove both links. Now connect the
Positive(+) or Negative (–) terminal. Refer to the illustration below.
treble terminals and the bass terminals to the amplifier following the
procedure described in Standard Wiring. Refer to the illustration below.
When your speakers are connected: Switch on the system and play
some music at moderate level. Fine tune the speaker placement to suit.
Connecting Passive Loudspeakers
Bi-Wiring: 2020i and 2050i
Connecting the 2010i and 2000Ci
RIGHT SPEAKER LEFT SPEAKER
AMPLIFIER
RIGHT
SPEAKER
LEFT
SPEAKER
RIGHT
SPEAKER
LEFT
SPEAKER
RIGHT SPEAKER LEFT SPEAKER
AMPLIFIER
Standard Wiring: 2020i and 2050i
RIGHT SPEAKER
LEFT SPEAKER
AMPLIFIER
RIGHT
SPEAKER
LEFT
SPEAKER
2070Si Subwoofer
Preliminaries
Unpack the subwoofer following the guidelines given earlier. Before
connecting the subwoofer please make sure that all the electronics in
your system are switched off at the mains.
The subwoofer is set to the voltage in your area. If you move to an area
with a different voltage, be sure to set the voltage selector to the right
setting before connection to the mains supply!
Positioning the Subwoofer
Bass frequencies are substantially omni directional. Although this means
that you can position the subwoofer almost anywhere, the stereo image
will still benefit by positioning the subwoofer level with the front
loudspeakers and as central to the listening position as possible. This
may not be feasible in a multichannel system. If you place the subwoofer
close to a wall the bass will be re-enforced therefore in some locations
the bass may be boomy and indistinct.
The subwoofer should be positioned close to a mains power source. Do
not use extension cables. Purchase a longer power cord if necessary.
The MAINS ON/OFF switch is the means of disconnecting this apparatus
from the mains and is mounted on the rear panel. There should be ample
free space between the rear of the cabinet and any wall or other object to
allow free unrestricted access to this switch.
When positioning the subwoofer ensure the floor is sound with no loose
floorboards etc. The air movement from the subwoofer at high volumes is
substantial - do not place it close to soft furnishings or objects that may
rattle. Do not place objects of any kind on the unit.
VOLTA GE
LIN E
RIG HT
LEF T
OUT
CHA IN
IN
RIG HT
IN
LEF T /
MON O
HIG H LEVEL
110 V-120 V 60H z
~
220 V-240 V 50H z
~
100 WAT TS
Q-A COUST ICS 207 0S
PHA SE
CRO SSOVE R
SPE AKER
TYP E
AUT O ON
SEN SITIV ITY
LOW
HIG H
MED
SEA LED
VEN TED180 °
0°
AV
MUS IC
PHA SE
INV ERT
SOU ND
MOD E
STATU S
LEV EL
180 °
0°
90°
WARNING: TO REDUCE RISK OF FIRE OR ELECTRIC
SHOCK, DO NOT EXPOSE THIS PRODUCT TO RAIN OR
MOISTURE. WHEN SERVICING, USE ONLY IDENTICAL
PARTS.
AVERTISSEMENT : POUR DIMINUER LE
RISQUE D’INCENDIE OU DE CHOC
ÉLECTRIQUE, NE PAS EXPOSER CE
PRODUIT À LA PLUIE OU À
L’HUMIDITÉ
Phase
Control
Line
Input
Line
Output
Mains
Input
Voltage
Selector
Level
Control
Crossover
Control
Speaker
Inputs
Power
Indicator
Sound
Mode
Phase
Invert
Auto on
Sensitivity
Speaker
Type

Setting Up and Use
Auto Power On: This feature enables you to switch the main system on
the problem cannot be easily remedied we recommend trying the LOW
and off without having to remember to switch the subwoofer on and off as
setting of the sensitivity switch to see if that allows the sub-woofer to enter
well.
standby.
If there is no signal input, after a few minutes the subwoofer will
Although the subwoofer can be safely left in standby mode indefinitely, if
automatically power down into Standby mode. This is indicated by the
you are going to be absent from home for a long period, we advise that
POWER light on the rear panel changing to red. As soon as the
the unit is switched off at the ON/OFF switch.
subwoofer senses an input it will automatically switch into operational
The 2070Si Subwoofer also has a fail safe heat protection system. If the
mode and the power light will again glow green. Some types of music
amplifier overheats it will shut down momentarily and then resume
and some TV channels have very little low frequency information in the
operation. If this occurs check that the ventilation holes on the control
audio signal in which case the subwoofer may not automatically switch
panel are not covered and that the sub-woofer is not placed too close to a
out of standby even though sound is coming from the other speakers in
source of heat such as a radiator.
the system. If this happens then the threshold can be adjusted to make
Using Multiple Subwoofers: Your 2070Si sub-woofer includes a Line
the unit more sensitive by setting the auto-on sensitivity to HIGH. Under
output connection called “Chain out”. In systems where more than one
some circumstances however this setting may make the sub-woofer stay
sub-woofer is used this allows the signal to be daisy chained to another
on at all times, this is due to the small amount of noise which will normally
one or more sub-woofers. This is just a convenience feature which is an
be present from the main system amplifier. This noise should disappear
alternative to using a “Y-Adaptor” at the amplifier output. Please note that
when the amplifier is set to standby, thus allowing the subwoofer to turn
the signal is a straight pass-through and so all sub-woofers must be set-
off again. If the sub-woofer remains on even when the main amplifier is
up independently using their controls as normal.
turned off then we recommend you leave the sensitivity switch at MED,
the loss of bass will be almost undetectable due to the characteristic
The following section is divided between home cinema installation and
response of human ears.
standard stereo installation. Please refer to the relevant section for your
system.
If the level of noise produced by the amplifier is higher than normal, or the
connection cables are picking up hum from nearby power cables, the
sub-woofer may remain on even when no sound is playing. If hum is
noticeable from the subwoofer then you should try moving the cables to
reduce the hum pick-up or try a different cable/s. In circumstances where
2070Si Subwoofer - Operation
Multi-Channel AV System
Connections
Set the controls to the following default settings:
Standard Connection is via the Line level RCA phono Inputs. For a typical
AV system set-up you will need a single RCA phono interconnect. As this
Level Approximately half
cable is likely to be quite long, make sure you get a good quality fully
Crossover Fully clockwise (AV setting)
screened cable. Your Q Acoustics dealer will be happy to supply you with
Phase Fully anti-clockwise (0° setting)
a suitable interconnect.
Sound Mode AV
Phase invert 0°
Auto on sensitivity Med
Speaker type No effect when crossover set to AV so
either position
Plug the supplied power cord into the subwoofer and then into the AC
supply socket. Switch on the power at the supply socket and then switch
Connect the SUBWOOFER OUTPUT on the AV amplifier to the L/Mono
the power switch on the subwoofer to 'ON'. The POWER light on the
Line input on the subwoofer, pushing the plugs firmly home to ensure a
subwoofer amplifier panel will glow and the subwoofer is operational.
good contact.
Check the settings on your AV amplifier to make sure that the sub-woofer
Setting Up
is set to 'ON ‘or YES. The sub-woofer level on the AV amplifier should be
Check that all system connections are properly and securely made.
set at its default position or 0dB. You should already have set the speaker
Ensure that the subwoofer is switched off.
sizes and positions for all the other speakers in your system. If you have
the option to set the crossover frequency on the other channels make
sure this is set appropriately to your speakers. Set the distance (or delay)
setting that is correct for the sub-woofer position you have chosen.
SUB
OUT
RIGHT
LEFT
REAR LS FRONT LS
CENTRE LS
RIGHT
LEFT
AV AMPLIFIER
SUBWOOFER
Connecting the 2070Si
LIN E
IN
RIG HT
IN
LEF T /
MON O

Multi-Channel AV System
Setting Up
Set-Up Disc: The disc contains six tracks, each one plays pink noise (20
Play some stereo music you are familiar with and experiment with the
Hz to 1000Hz) through a combination of one speaker and the subwoofer.
Phase invert setting and level control until you hear a seamless blend
between the front speakers and the subwoofer. If you can hear the
subwoofer standing out it's too loud!
Track one: Subwoofer and Front Left speaker
Track two: Subwoofer and Front Centre speaker
Always bear in mind that the human ear's sensitivity to bass varies
Track three: Subwoofer and Front Right speaker
enormously with the volume level, hence the need for a wide range of
Track four: Subwoofer and Rear Right speaker
programme material and sound levels. Once you are happy with the
Track Five: Subwoofer and Rear Left speaker
sound you can then fine tune the performance by using the included CD.
Track six: Subwoofer and all speakers
Many Home Theatre amplifiers have distance settings which build in a
Choose whichever front speaker is closest to the subwoofer and play the
time delay depending on the distance of the speaker from the optimum
corresponding track. For instance if it is the front right speaker then play
listening position; the sweet spot. The location of the subwoofer is one of
track three. Adjust the amplifier distance/time delay settings for the
the most important aspects of any Home Theatre system therefore
subwoofer by the smallest amount possible. This can be increased or
getting these settings correct will give a significant improvement to the
decreased, it's not important which. For instance if the distance is set to
system's overall performance. Included with the 2070Si Subwoofer is a
4m then change it to 4.1m or 3.9m. Listen to see if the pink noise
CD designed to assist in the setup of the AV amplifiers distance/time
becomes warmer and fuller or thinner in tone.
delay settings.
If you chose 4.1m and the sound became fuller in tone then change the
setting again to 4.2m and so on until the sound starts to become thinner
again. If however when you changed to 4.1m and the sound became
thinner try reducing the setting to 3.9m. In this way it should be possible
to find the optimum (warmest) setting.
Connecting the 2070Si
Multi-Channel AV System Stereo System
Setting Up Connections
Do not adjust to more than +/-0.5m from the original measure distance There are two connection options for stereo system operation. The
(for this example it would be from 3.5m to 4.5m). If it has not been preferred option is to use a stereo RCA phono cable from your amplifiers
possible to discern any improvement in the tone, try swapping the phase PRE-OUT sockets but if your amplifier does not have then you can use
invert switch position on the 2070Si Subwoofer and repeat the exercise. the HIGH LEVEL inputs of your 2070Si.
Then re-check the sound with some stereo music again to make sure an
improvement has been noticed.
If the 2070Si Subwoofer is subsequently moved relative to the other
speakers reset the amplifier subwoofer distance setting to the new value
and repeat the exercise. Once you are happy the optimum setting has
been achieved play track six to check the overall result. The sound
should be full and warm and integrated with no individual speaker been
dominant.
Connect a good quality stereo RCA phono lead to the L and R inputs on
the 2070Si and connect the other end to the PRE OUT sockets on the rear
of the amplifier.
The subwoofer will automatically add the L and R signals together so that
no information is missed. If you wish to use two subwoofers then you can
run a single RCA phono cable to each subwoofer and thus have a stereo
sub-woofer system.
Ensure that the L output on the amplifier goes to the left hand side subwoofer and R to the right hand side to preserve the stereo image of the
main speakers. The subwoofers will need to be placed close to their
respective main speakers and the set-up will need to be done separately
for each sub-woofer.
Connecting the 2070Si
PRE OUT
RIGHT
LEFT
REAR LS FRONT LS
CENTRE LS
RIGHT
LEFT
L
R
AV AMPLIFIER
SUBWOOFER
LIN E
IN
RIG HT
IN
LEF T /
MON O

Setting Up
Stereo System
Check that all system connections are properly and securely made.
Connections
Ensure that the subwoofer is switched off. Set the controls to the
If no PRE OUT is available then you can use the HIGH LEVEL inputs. You
following default settings:
will need two lengths of speaker cable that are long enough to go from
Level Approximately half
the 2070Si to the speaker terminals of your amplifier. Connect the two
together ensuring that you keep the L and R channels correct and make
Crossover Minimum (50Hz) for large floorstanders
sure that the plus and minus connections are consistent at both ends.
and halfway (100Hz) for bookshelf or
small speakers
Phase Fully anti-clockwise (0° setting)
Sound Mode Music
Phase invert 0°
Auto on sensitivity Med
Speaker type Select 'Sealed' if your main speakers are
of the sealed or closed-box type. Select '
Po r te d ' i f y o ur m ai n sp e a ke r s
have a port or vent in them.
Plug the supplied power cord into the subwoofer and then into the AC
supply socket. Switch on the power at the supply socket and then switch
the power switch on the subwoofer to 'ON'. The POWER light on the
subwoofer amplifier panel will glow and the subwoofer is operational.
Play some music you are familiar with and experiment with the Phase
invert setting and level control until you hear a good blend between the
front speakers and the subwoofer. If you can hear the subwoofer
standing out it's too loud!
Connecting the 2070Si
RIGHT
LEFT
REAR LS
CENTRE LS
RIGHT
LEFT
FRONT LS
AV AMPLIFIER
RIGHT SPEAKER LEFT SPEAKER
SUB
RIGH T
LEFT
HIGH L EVEL

Stereo System
Setting Up
Setting up can take many hours of listening because all of the controls on
Always bear in mind that the human ear's sensitivity to bass varies
your subwoofer will interact; there is no easy route to success. The best
enormously with the volume level, hence the need for a wide range of
phase invert switch position is strongly affected by the chosen crossover
programme material and sound levels. Once you are happy with the
frequency so as you fine tune the controls you may wish to keep trying
sound you can then fine tune the performance by using the remaining
the alternative setting to see which you prefer.
controls.
Once you feel you are close with the settings you can now perfect the
integration between sub-woofer and main speakers by adjusting the
Crossover: The crossover control determines at what frequency your
phase control. This control is unique in that it uses a pure delay, made
sub-woofer output begins to rapidly diminish. This should be set so that it
possible by the integrated Digital Signal Processor, and so does not add
corresponds with the frequency your main speakers begin to produce a
sound damaging “group delay” as with most sub-woofers. The DSP
strong output by themselves. The adjustment allows for a smooth
scales the available delay so that this control always provides a 0 – 180°
handing over between sub-woofer and main speaker output. If this
phase shift at the chosen crossover frequency. This control affects the
setting is too low there will be a 'hole' in the sound where certain
level of bass produced at the crossover frequency and also how
frequencies are weak, conversely if it is too high there will be an
smoothly the transition occurs. Again this will interact with the crossover
exaggeration of certain frequencies producing an overpowering bass.
control so fine adjustments of the crossover frequency may be
You can get an idea of the correct setting from your main speakers
necessary to produce the best results. Also you may find you can get to a
specification sheet, look for the lowest frequency that the speaker
better end result by flipping the phase invert switch and trying to optimise
produces (the “-3dB point”) under the “Frequency response” heading.
the crossover and phase controls again. Experimentation is the key to
Room positioning has a dramatic effect on low frequency reproduction
getting perfect integration; once this is achieved you should never be
of both the sub-woofer and your main speakers so don't be worried if you
aware of any sound coming from the direction of the sub-woofer itself.
find you require a setting which does not correlate with the specified low
The end result will be a system with powerful, extended bass response
frequency point of your main speakers.
which appears to be coming from the soundstage between the main
speakers.
Connecting the 2070Si
5.1 Home Theatre Connections
Home Theatre Connections
The Front Speakers are bi-wired. This is the preferred mode
of connection provided the crossover network supports biwiring.
The Centre and Surround channel speakers are
conventionally wired.
6.1 and 7.1 connections are the same as 5.1 connections
with the addition of the extra effects channel/s.
When running loudspeaker cables be especially careful not
to run them across open floor areas where they could be a
source of danger. Run loudspeaker cables around room
boundaries whenever possible.
Line level signal cables should be run away from mains
cables. Never run line level signal cables parallel to power
cables especially on long runs.
If the subwoofer is triggered on by appliances switching on
and off, re-route the input signal cable before taking further
measures.
SUB
OUT
RIGHT
LEFT
FRONT LS
CENTRE
RIGHT
LEFT
SUBWOOFER
AV AMPLIFIER
REAR LS
RIGHT SURROUND LEFT SURROUND
CENTRE
RIGHT FRONT LEFT FRONT
LIN E
IN
LEF T /
MON O
Home Theatre Topics
0º
-
3
0
2
º
º
2
9
0
º
-
1
1
0
º
1
5
0
º
-
1
3
5
º
LEFT
CENTRE
RIGHT
SURR
LEFT
SURR
RIGHT
BACK RIGHT
BACK LEFT
SUB
Above is the Dolby Labs recommended layout for 7.1systems.
The 6.1 layout is the same except a single central speaker replaces
the two back units. The 5.1 layout has no back speakers
Placement: The Front and Centre speakers should be in line. If this is not
possible, consult your processor manual for guidance on adjusting
relative centre/front delay times. If you have a 5.1 system, the listening
seat can be closer to the rear wall. As always, be prepared to experiment.
Bass Management: AV processors offer the choice of ‘Large’ or ‘Small’
for the speakers. If you choose ‘Large’ the speaker receives the full
frequency. Choose ‘Small’ and the bass is sent to the Subwoofer. We
recommend you choose ’Small’ for the 2000Ci and the 2010i and 2020i
wherever they are used in the system. The 2050i should be set to ‘Large’.
The subwoofer option should be enabled (set to ‘ON’ or ‘YES’)
Levels: When the basic system parameters have been established, put
your processor into the ‘setup’ routine. Set up each individual speaker so
that the level is the same at the listening position as all the others. If your
processor enables you to adjust the delay times, follow the instructions
closely as this will profoundly affect the final result. When you play a
movie you may think the rear channels are too soft - they aren’t! You may
however have to adjust the subwoofer level both at the processor and at
the subwoofer. Once set, do not re-adjust these levels.
LFE: The LFE channel sends all the bass sound effects to the subwoofer.
If speakers are set to ‘Small’ , system bass from those channels is also
sent to the subwoofer. If you play the system at extreme levels and/or
have the subwoofer level set too high you may overdrive the subwoofer
with unpleasant sonic results. If this occurs, reduce the level
immediately.
Phase: If your speakers are incorrectly wired the bass will be blurred and
thin. In this case, check the wiring carefully. If your speaker wire has a
tracer along one core, consistently use the striped core to connect all the
positive (RED) terminals. In this way the system will always be in phase.
Always follow the instructions in your AV processor manual!

Cabinet Care
Q Acoustics loudspeakers are warranted free of defects in materials and
workmanship as follows:
Clean cabinets with a barely damp cloth. Do not use solvent based
cleaning materials. If the cabinets become stained, remove the stain with
Passive Loudspeakers: 5 years from the date of purchase
a cloth lightly moistened with water, white spirit or isopropyl alcohol
Active Loudspeakers & Subwoofers: 2 years from the date of purchase
depending on the stain. Then lightly buff with a cloth to remove any
During the warranty period Q Acoustics will, at its option, repair or
residue of the cleaning agent. Never use abrasives of any kind.
replace any product found to be faulty after inspection by the company
Grilles
or its appointed distributor or agent.
Lightly brush out grilles with a soft brush. Do not remove the speaker
Misuse and fair wear and tear are not covered by warranty.
grilles unless absolutely necessary.
Goods for repair should in the first instance be returned to the supplying
Drive Units.
dealer. If this is not possible the item/s should be sent carriage paid
preferably in the original packing, to Q Acoustics or their appointed
Drive units are best left untouched as they are easily damaged when
distributor for your area and accompanied by proof of purchase.
exposed.
Damage sustained by goods in transit to the repair centre is not covered
by warranty. Return carriage will be paid by Q Acoustics or their
distributor as appropriate.
This warranty does not in any way affect your legal rights.
Appointed Distributor in the UK:
Armour Home Electronics Ltd
Units 7 & 8, Stortford Hall Industrial Park
Bishops Stortford, Herts, UK
CM23 5GZ
For s e r vice i n f orma t i o n In o t her c o u ntri e s c onta c t
info@qacoustics.co.uk
Care and Cleaning Warranty
40° 40°
2010i 2020i
35° 35°
5 - 45mm5 - 45mm
45°
Q Acoustics 2000i Series Accessories
2000Ci /2010i / 2020i Wall Bracket (Single)
2010i / 2020i Speaker Stand (Pair)
Black Black
White
646mm
270mm
240mm

Q Acoustics 2000i Series Specifications
Enclosure type:
Bass Unit (mm):
Treble Unit (mm):
Frequency response: (±3dB):
Nominal Impedance:
Minimum Impedance:
Sensitivity (2.83v@1m):
Recommended amplifier power:
Crossover frequency:
Effective volume:
Cabinet dimensions (HxDxW mm):
Weight (per cabinet):
2-way reflex
100 mm
25 mm
68Hz - 22 kHz
6Ω
4Ω
86dB
15 - 75W
2.8 kHz
3.3 litres
H234.5 x D203 x W150
3.5 Kg
2-way reflex
125 mm
25 mm
64Hz - 22 kHz
6Ω
4Ω
88dB
25 - 75W
2.9 kHz
6.4 litres
H264.5 x D278x W170
5.0 Kg
2-way reflex
2 x 165 mm
25 mm
44Hz - 22 kHz
6Ω
4Ω
92dB
25 - 150W
2.6 kHz
34.9 litres
H1006 x D321 x W270
21 Kg
2-way reflex
2 x 100mm
25 mm
75Hz - 22 kHz
6Ω
4Ω
89dB
25 - 100W
2.7 kHz
7.58 litres
H160 x D203 x W430
6 Kg
2010i 2020i 2050i 2000Ci
Passive Loudspeakers
Enclosure type:
Bass Unit (mm):
Amplifier power:
Crossover frequency:
Cabinet dimensions (HxDxW mm):
Weight :
2070Si Active Subwoofer
Ported
2x170 mm long throw
140 W rms
50Hz - 150Hz (var.)
H425 x D560 x W195
14.6Kg

Mode d’emploi et
caractéristiques
techniques du produit
FR
Serie 2000i

Veuillez lire ces instructions.
recommandés par le fabricant ou vendus avec l’appareil. au fournisseur, ou au réparateur de votre région; La liste
des adresses des réparateurs au RU figure dans ce
Veuillez conserver ces instructions.
Si vous utilisez un chariot, faites très attention lors du
manuel.
transport de l’appareil et évitez de le faire tomber pour ne
Veuillez prendre connaissance de tous les
pas vous blesser. Tiers : Au cas improbable ou vous revendiez ce produit a
avertissements.
un tiers, veuillez fournir ce mode d’emploi avec le produit.
Débranchez cet appareil en cas d’orage ou lorsque vous
Veuillez suivre toutes les instructions.
ne vous en servez pas pendant une période prolongée. Remarque importante pour les utilisateurs au Royaume-
N’utilisez pas cet appareil à proximité de l’eau.
Uni
Pour toute réparation, adressez-vous à un
Nettoyez uniquement avec un chiffon sec.
professionnel. Faites réparer cet appareil pour des Le cordon d’alimentation possède une prise anglaise
N’obstruez pas les grilles de ventilation.
dommages de n’importe quelle nature : cordon contenant un fusible de 3A. Si le fusible doit être
Suivez attentivement les instructions du fabricant lors de
d’alimentation abîmé, liquide ou objet introduit dans remplacé, utilisez un fusible de 3A de type ASTA ou BSI à
l’installation.
l’appareil, exposition à la pluie ou à l’humidité, la norme BS1362. Si vous devez changer la prise elle-
N’installez pas cet appareil à proximité d’une source de
fonctionnement inhabituel, même, ôtez le fusible avant de jeter la prise
chaleur telle que des radiateurs, des bouches d’air
immédiatement après avoir coupé le cordon
chutes diverses.
chaud, des fours, ou tout autre appareil (y compris des
d’alimentation.
Avertissement : Afin de diminuer les risques d’incendie
amplificateurs) produisant de la chaleur.
Branchement sur secteur
ou de choc électrique, conservez cet appareil à l’abri de
Ne supprimez pas la sécurité apportée par la prise
la pluie et de l’humidité. Evitez toute éclaboussure et ne Les couleurs des fils du cordon d’alimentation sont en
polarisée ou de
posez pas d’objets contenant des liquides, comme des conformité avec le code suivant : Bleu : NEUTRE;
type B. Une prise polarisée possède deux broches, dont
vases, sur cet appareil. Marron : PHASE.
une plus large que l’autre. Une prise de type B possède
Tenir à l’écart des flammes et ne pas poser de bougie sur Ces couleurs ne correspondant peut être pas à celles
deux broches et une fiche terre. La broche la plus large
cet appareil. des fiches de votre prise, procédez comme suit :
ou la fiche terre sont là pour votre sécurité. Si la prise
Avertissement : L’interrupteur de mise en marche du Connectez le fil BLEU à la borne affichant la lettre N ou de
fournie ne convient pas, adressez-vous à un électricien
subwoofer sert à mettre cette unité hors tension. Cet couleur BLEUE ou
pour une mise aux normes de votre installation
interrupteur est situé sur le panneau arrière. Afin de NOIRE. Connectez
électrique.
pouvoir accéder librement à cet interrupteur, l’appareil le fil MARRON à la
Evitez de marcher sur le cordon d’alimentation ou de le
doit être placé dans un endroit ouvert sans aucun borne affichant la
pincer, en particulier, à l’extrémité du cordon, de la prise
obstacle. L’interrupteur doit lui aussi être libre d’accès. lettre L ou de
et à la sortie de l’appareil.
couleur MARRON
Attention : Tout changement, ou modification, non
Utilisez uniquement des accessoires
ou ROUGE.
expressément autorisé par le fabricant annule la
spécifiés par le fabricant.
garantie.
Utilisez uniquement les chariots, pieds,
Réparation : Pour toute réparation, renvoyez l’appareil
tripodes, supports ou les tables
Ce symbole indique des instructions d’utilisation et d’entretien
essentielles dans la documentation qui accompagne cet appareil.
Ce symbole indique la présence dans cet appareil d’un voltage
dangereux, qui peut poser un risque de choc électrique.
5A FUSE
BS 1362
BROWN
(Live)
Informations importantes – Lire attentivement
ATTENTION!
BS 1362
MARRON
(Phase)
BLEU
(Neutre)
FUSIBLE 3A
RISQUE DE CHOCS ELECTRIQUES
NE PAS OUVRIR
POUR DIMMINUER LE RISQUE DE CHOCS ELECTRIQUES NE PAS ENLEVER LE
BOITIER (NI LE PANNEAU ARRIERE)
AVUCUNE PIECE NE PEUT ETRE ENLEVEE PAR L’UTILISATEUR À L’INTERIEUR
CONSULTER UN PROFESSIONEL QUALIFIE POUR TIUTE REPARATION

Introduction
Ne laissez PAS vos enceintes dans des endroits trop froids, trop chauds, trop
humides ou au soleil.
La gamme d’enceintes de série Q Acoustics 2000i est conçue pour répondre
aux besoins des cinéphiles et des amateurs de musique. Notre gamme
Si vous utilisez vos enceintes sans les grilles de protection, faites bien
comprend :
attention à ne pas endommager les haut-parleurs.
2010i : Une enceinte d’étagère compacte avec un caisson de basses de
N’utilisez PAS des pieds de fortune. Installez vos enceintes sur des pieds
100mm.
recommandés par Q-Acoustics selon les instructions, en utilisant les pointes
de fixation fournies. Votre revendeur pourra vous conseiller.
2020i : Une enceinte d’étagère avec un caisson de basses de 125 mm.
NE démontez PAS vos enceintes car vous annuleriez la garantie.
2050i : Une enceinte colonne avec deux caissons de basses de 165 mm
Déballer vos enceintes
2000Ci : Une enceinte centrale avec deux caissons de basses de 100 mm,
pouvant être fixée au mur, si nécessaire.
Déballez complètement vos enceintes. Sortez les enceintes du carton en
soulevant les enceintes elles-mêmes. Ne vous servez pas de sacs en pour les
2070Si : Un subwoofer actif de 140 Watt avec un haut-parleur de 2 X170 mm
soulever. Les enceintes 2050i et 2070Si sont assez lourdes; demandez de
et un détecteur de signal pour allumage/arrêt automatique.
l’aide pour les soulever, si nécessaire.
Vous pouvez effectuer un bi-câblage sur toutes les enceintes passives sauf la
Lorsque vous déplacez les enceintes, ne les traînez pas par terre car vous
2010i et la 2000Ci.
risquez de les endommager. Soulevez-les avant de les déplacer.
Toutes les enceintes fonctionnent à proximité des écrans de télévision sans
Vous trouverez dans le carton : Le(s) enceinte(s) et ce mode d’emploi.
aucun problème à l’exception des enceintes de la gamme 2000Si, qui ne
Pour les modèles suivants, le carton d’emballage contient également :
doivent pas être placées à moins de 500 mm d’écrans de télévision ou de tout
autre matériel pouvant être perturbé par un champ magnétique. Cela
2050i : Un jeu de clous de plancher et de capuchons de clou pour chaque
n’affecte pas les écrans à plasma ni les écrans à affichage à cristaux liquides.
haut-parleur. Une clé Allen pour régler les clous une fois installés.
Avant de brancher vos enceintes, assurez-vous que toutes les parties actives
2070Si : Un cordon d'alimentation adapté à l'alimentation secteur dans votre
de votre système audio sont éteintes ou hors tension.
région, 2 câbles RCA/Phono à angle droit, Un disque CD d'installation AV.
Lorsque vous allumez votre système audio ou lorsque vous changez les
Vérifiez bien le produit. Si l’un des articles est manquant ou endommagé,
sources d’entrée, baissez le volume jusqu’à un bas niveau. Montez
contactez votre revendeur dès que possible.
graduellement le son.
Conservez l’emballage pour transporter le matériel ultérieurement. Si vous
Ne montez JAMAIS le son au maximum. Le bouton de contrôle du volume est
décidez de jeter l’emballage, respectez la réglementation de votre pays en
trompeur et n’indique pas la puissance du système audio. L’utilisation du
matière de recyclage.
volume au maximum peut endommager votre capacité auditive.
Ne raccordez PAS les bornes de votre enceinte au secteur.
Série Q Acoustics 2000i

Fitting the Floorstand Spikes- 2050i Bondes alvéolaires
Vissez à moitié les fixations sur le Les haut-parleurs série 2000i comportent des orifices à l'arrière et
socle et remettez l’enceinte à fonctionneront de manière optimale s'il y a un espace libre derrière eux, par
l’endroit. (Si vous possédez un sol en exemple 200 mm par rapport à un mur. Si vous placez vos haut-parleurs près
bois ou en pierre enfoncez les d'un mur/coin, alors vous devrez insérer des bondes alvéolaires dans les
protège-pointes sur chaque fixation orifices arrière, sinon il y aura trop de graves. La basse subwoofer 2070Si est
avant de remettre l’enceinte à ajustée en utilisant les contrôles de niveau.
l’endroit).
Une fois l’enceinte à l’endroit,
resserrez chaque fixation avec la clef
hexagonale en partant du haut et
ajustez plus ou moins les fixations
jusqu’à ce que l’enceinte soit à
niveau et parfaitement stable.
Vérifiez que les bondes sont bien enfoncées dans l'orifice sans aller trop loin.
Vous constaterez que le niveau des graves diminue, mais que la définition et
l'extension des graves augmentent. Testez pour voir la solution que vous
préférez et changez la position du haut-parleur, par petits intervalles, de
manière à optimiser le résultat final.
Fixations au sol très pointues. Faites très attention !
Ne placez jamais une enceinte avec des pointes de fixation dans des endroits
pouvant être endommagés !
Soulevez toujours vos enceintes pour les déplacer; ne les tirez jamais !
Installation
2050i
Un support conçu spécialement pour fixer les enceintes Q Acoustics 2010i,
2020i et 2000Ci au mur, est en vente chez votre revendeur. Des pieds pour les
Les enceintes 2050i doivent être positionnées à 200 mm minimum du mur
enceintes 2010i et 2020i sont également disponibles.
arrière et à 500 mm des murs latéraux. En plaçant vos enceintes plus près du
mur, vous augmenterez les graves, mais cela peut résonner et manquer de
Soyez prêt à expérimenter afin de trouver le meilleur agencement possible,
précision et de qualité. Les enceintes doivent être bien placées, tournées vers
adapté à votre goût, dans la pièce que vous avez choisie.
l’auditeur et situées de 2 m à 4 m de distance les unes des autres. Tourner
légèrement les enceintes vers l’intérieur améliore la qualité stéréo mais réduit
Enceintes à effets
la source sonore.
2000Ci
Le modèle 2000Ci a été conçu pour être utilisé à proximité d’un écran de
télévision. Il doit être placé directement au-dessus ou au-dessous de l’écran.
Si vous possédez un téléviseur traditionnel, assurez-vous qu’il puisse
soutenir les enceintes et qu’il offre une surface égale. Dans le cas contraire,
placez le téléviseur dans un meuble télé et l’enceinte 2000Ci sur une étagère
solide directement en-dessous du téléviseur.
Si vous possédez un écran à plasma ou à affichage à cristaux liquide, fixez
l’enceinte 2000Ci au mur ou sur toute autre surface adéquate directement audessus ou au-dessous
de l’écran.
Enceintes Surround
2010i et 2020i
Il y a des recommandations de Dolby labs pour les
enceintes à effets 5.1.
Les enceintes 2010i et 2020i doivent si possible être montées sur des pieds
Q-Acoustics ou fixées au mur. Si vous choisissez de les mettre sur des pieds,
Montez les enceintes surround de chaque côté de
l’unité des aigus doit être à la hauteur des oreilles de l’auditeur. Les enceintes
l’auditeur, légèrement en retrait par rapport à la
montées au mur peuvent être placées être un peu plus haut et inclinées vers
position d’écoute. Les enceintes doivent être
le bas. Les enceintes sur pieds doivent être traitées comme des enceintes
tournées vers l’intérieur et montées sur les murs
colonnes mais peuvent être placées un peu plus près du mur arrière. Ces
latéraux ou bien, si la pièce est large, montées sur des
enceintes peuvent également être placées sur des étagères.
pieds hauts, le centre des enceintes se trouvant audessus du niveau de l’oreille de l’auditeur.
Positionner les enceintes passives
400mm
Dolby et le symbole du double-D sont
des marques déposées de Dolby
Laboratories.
2m-4m
2m-4m
>500mm
>200mm
0-30°
Borniers et Connecteurs
Les enceintes 2020i et 2050i peuvent être installées avec un bi-câblage. Le
Câble des enceintes
principe du bi-câblage requiert quatre bornes. Les deux bornes supérieures
Des câbles d’enceintes spécialisés vous permettront d’atteindre une
sont reliées à l’enceinte des aigus (HF) et les deux bornes inférieures sont
meilleure qualité de reproduction des sons que les câbles multi-usages
reliées à/aux enceinte(s) des graves (LF). Ces bornes sont livrées avec des
traditionnels, comme les fils de sonnerie. Utilisez des câbles avec une
liaisons amovibles servant à relier les bornes entre elles. Cela vous permet de
quantité assez importante de cuivre pour les enceintes centrales et avant.
brancher les enceintes de manière traditionnelle avec une paire de câbles ou
Les câbles fins diminuent les graves et limitent la gamme dynamique. Les
en « bi-câblage » avec les double-borniers.
enceintes surround (arrières) sont moins importantes.
Les enceintes 2010i et 2000Ci ont des bornes standard.
Les câbles d’enceinte possèdent une rayure ou un tracé en leur centre. Ils
sont traditionnellement reliés aux bornes
positives. Les câbles reliant l’amplificateur
aux enceintes avant doivent être de la même
longueur. Ne raccordez jamais deux câbles –
utilisez la longueur entière.
Préparer les câbles
Dédoublez les câbles sur 40 mm. Dénudez
les fils de 10 mm et tournez les fils pour tous
les rassembler. Sectionnez le câble en en
laissant 7 mm à nu.
Branchement
Dévissez la borne dans le sens contraire des
aiguilles d’une montre pour faire apparaître le
trou de montage prévu à la base de la borne.
Insérez la partie dénudée du câble dans le
trou. Resserrez complètement la borne à
la main. Assurez-vous qu'aucun fil ne
dépasse qui pourrait entrer en contact avec
les bornes adjacentes.
Les règles européennes de sécurité
interdisent l’utilisation de fiches de 4 mm.
Brancher les enceintes passives
30mm
7mm
2020i, 2050i
Bi-cablage
2010i, 2000Ci
Standard
Branchement
Standard
Branchement
Resserrer
Desserrer
Raccordements stéréo
Raccordements standard
Faites passer le câble par le range-câble avant de brancher l’enceinte.
Reliez la borne ROUGE (+) de l’enceinte de DROITE à la borne ROUGE,
Positive (+) sur l’enceinte de DROITE de l’ampli. Reliez la borne NOIRE (–) de
Bi-câblage
l’enceinte à la borne Négative, NOIRE, (–) correspondante de l’amplificateur.
Brancher directement les aigus et les graves d’une enceinte sur un
Répétez cette opération pour l’enceinte de GAUCHE.
amplificateur améliore à la fois la qualité des graves et la gamme dynamique.
Pour les modèles 2020i et 2050i vous pouvez utiliser les bornes Positives (+)
Pour le bi-câblage : Préparez deux câbles doubles pour chaque enceinte.
ou Négatives (–) à votre gré. Veuillez vous référer au schéma ci-dessous.
Dévissez toutes les bornes des enceintes et ôtez les deux liaisons. Reliez
ensuite les bornes des aigus et des graves à l’amplificateur selon le procédé
de branchement standard préalablement décrit. Veuillez vous référer au
schéma ci-dessous.
Lorsque vos enceintes sont raccordées : Allumez le système et mettez de
la musique à un volume modéré. Ajustez l’emplacement des enceintes à
votre goût.
Brancher des enceintes passives
Bi-câblage: 2020i and 2050i
Connecting the 2010i and 2000Ci
ENCENITE DROITE
ENCENITE DROITE
ENCENITE GAUCHE
ENCENITE GAUCHE
ENCENITE
DROITE
ENCENITE
GAUCHE
AMPLIFICATEUR
ENCENITE
DROITE
ENCENITE
GAUCHE
AMPLIFICATEUR
Branchement Standard : 2020i and 2050i
ENCENITE DROITE
ENCENITE
DROITE
ENCENITE GAUCHE
ENCENITE
GAUCHE
AMPLIFICATEUR
 Loading...