

Q Acoustics 1000i, 1000i SERIES User Manual

User Manual and
Product Specifications
01 00i Series
EN
FR
IT
ES
DE
EL
ZH
RU

Read these instructions. When a cart is used, use caution when moving the cart/ apparatus
combination to avoid injury from tip-over.
Keep these instructions.
Unplug this apparatus during lightning storms or when unused for
Heed all warnings.
long periods of time.
Important notice to UK users
Follow all instructions.
Refer all servicing to qualified service personnel. Servicing is required
The appliance cord is terminated with a UK approved mains plug
Do not use this apparatus near water.
when the apparatus has been damaged in any way, such as power
fitted with a 5A fuse. If
Clean only with dry cloth.
supply cord or plug is damaged, liquid has been spilled or objects
Do not block any ventilation openings.
have fallen into the apparatus, the apparatus has been exposed to
Install in accordance with the manufacturer's instructions.
rain or moisture, does not operate normally, or has been dropped.
Do not install near any heat sources such as radiators, heat registers,
Warning: To reduce the risk of fire or electrical shock, do not expose
stoves, or other apparatus (including amplifiers) that produce heat.
this product to rain or moisture. The product must not be exposed to
Do not defeat the safety purpose of the polarized or grounding type
dripping and splashing and no object filled with liquids such as a
plug. A polarized plug has two blades with one wider than the other.
vase of flowers should be placed on the product.
A grounding type plug has two blades and a third grounding prong.
No naked flame sources such as candles should be placed on the
The wider blade or the third prong are provided for your safety. If the
product.
provided plug does not fit into your outlet, consult an electrician for
Warning: The mains power switch for the subwoofer is the device
replacement of the obsolete outlet.
used to disconnect the unit from the mains supply. This switch is
Protect the power cord from being walked on or pinched, particularly
located on the rear panel. To permit free access to this switch, the
at plugs, convenience receptacles, and the point where they exit
apparatus must be located in an open area without any obstructions,
from the apparatus.
and the switch must be freely operable.
Use only attachments/accessories specified by the manufacturer.
Caution: Changes or modifications not expressly approved by the
Use only with a cart, stand, tripod, bracket, or table
manufacturer could void the user's authority to operate this device.
specified by the manufacturer, or sold with the
apparatus.
main Service Agents for the UK are listed in this manual.
Third parties: In the unlikely event that you pass this product on to
a third party, include these operating instructions with the product.
Service: Equipment for sevicing should be returned to the supplying
dealer, or to the service agent for your area. The addresses of the
the fuse needs to be replaced, an ASTA or BSI
approved BS1362 fuse rated at 5A must be used. If you need to
change the mains plug, remove the fuse and dispose of this plug
safely immediately after cutting it from the cord.
Connecting a mains plug
The wires in the mains lead are coloured in accordance with the
code: Blue: NEUTRAL; Brown: LIVE:
As these colours may not correspond to the coloured markings
identifying the terminals in your plug, proceed as follows:
The BLUE wire must be
con ne ct ed to the
terminal marked with
the letter N or coloured
BLUE or BLACK. The
BROWN wire must be
con ne ct ed to the
terminal marked with
the letter L or coloured BROWN or RED.
CAUTION!
RISK OF ELECTRIC SHOCK
DO NOT OPEN
TO REDUCE THE RISK OF ELECTRIC SHOCK DO NOT REMOVE COVER (OR BACK)
NO USER-REMOVEABLE PARTS INSIDE
REFER SERVICING TO QUALIFIED PERSONNEL
This symbol indicates that there are important operating and
maintenance instructions in the literature accompanying this unit.
This symbol indicates that dangerous voltage constituting a risk of
electric shock is present within this unit.
5A FUSE
BS 1362
BROWN
(Live)
BLUE
(Neutral)
Important Information- Please Read Carefully

DO NOT connect your loudspeaker terminals to the mains supply.
Introduction
DO NOT expose your loudspeakers to excessive cold, heat, humidity or
The Q Acoustics 1000i series is a range of loudspeakers designed to meet
sunlight.
the highest expectations of dedicated 2-channel audiophiles and
discerning movie enthusiasts. The range comprises:
If you play your loudspeakers without their grilles on, be careful to protect
the drive units from damage.
1010i: Compact Bookshelf speaker with a 100 mm bass driver.
DO NOT use makeshift stands. Fit the Q-Acoustics approved stand
1020i: Bookshelf speaker with a 125 mm bass driver.
according to the instructions and using any fixings provided. Your dealer
1030i: Compact Floorstander with a 165 mm bass driver
will advise you.
1050i: Floorstander with two 165 mm bass drivers
DO NOT dismantle the loudspeaker. You will invalidate the warranty.
1000Ci: Centre channel with two 100 mm bass drivers, which can be wall
mounted if required.
Unpacking your loudspeakers
1000Si: 100 Watt active subwoofer with a 200 mm driver and signal
Unpack the speakers fully. Lift the speakers from the cartons by holding
sensing for automatic power on/off.
the cabinets. Do not use the polythene bags to lift them. The 1030i, 1050i,
and 1000Si are heavy - get assistance to lift them if necessary.
All the passive speakers are bi-wireable with the exception of the 1010i
and 1000Ci.
When manoeuvring loudspeakers, do not drag them across the floor as
this may cause damage - lift them before moving them.
All the loudspeakers may be operated close to TV monitors with no illeffects with the exception of the 1000Si, which should not be operated
In the carton you will find: The loudspeaker/s and this product manual.
within 500mm of TV screens monitors or other magnetically sensitive
In addition the packing for the following models contains:
equipment. Plasma and LCD screens are unaffected.
1030i and 1050i: A plinth for each speaker, screws, an Allen key to
Before making any connections to your loudspeakers make sure that all
attach the stand and a set of floor spikes and spike covers.
active units in your system are switched off at the mains.
1010i, 1020i, 1000Ci: A set of four adhesive feet.
When switching on your sound system or changing input sources, set the
1000Si: An IEC power cord suitable for the mains supply in your area.
main volume control at a low level. Turn up the level gradually.
Check the product carefully. If any items are damaged or missing, report
NEVER play your sound system at full volume. The position of the
this to your dealer as soon as possible.
volume control is deceptive and does not indicate the power level of the
Retain the packing for future transport. If you dispose of the packing,
system. Using very high volume settings may damage your hearing.
please do so following all recycling regulations in your area.
Q Acoustics 1000i Series
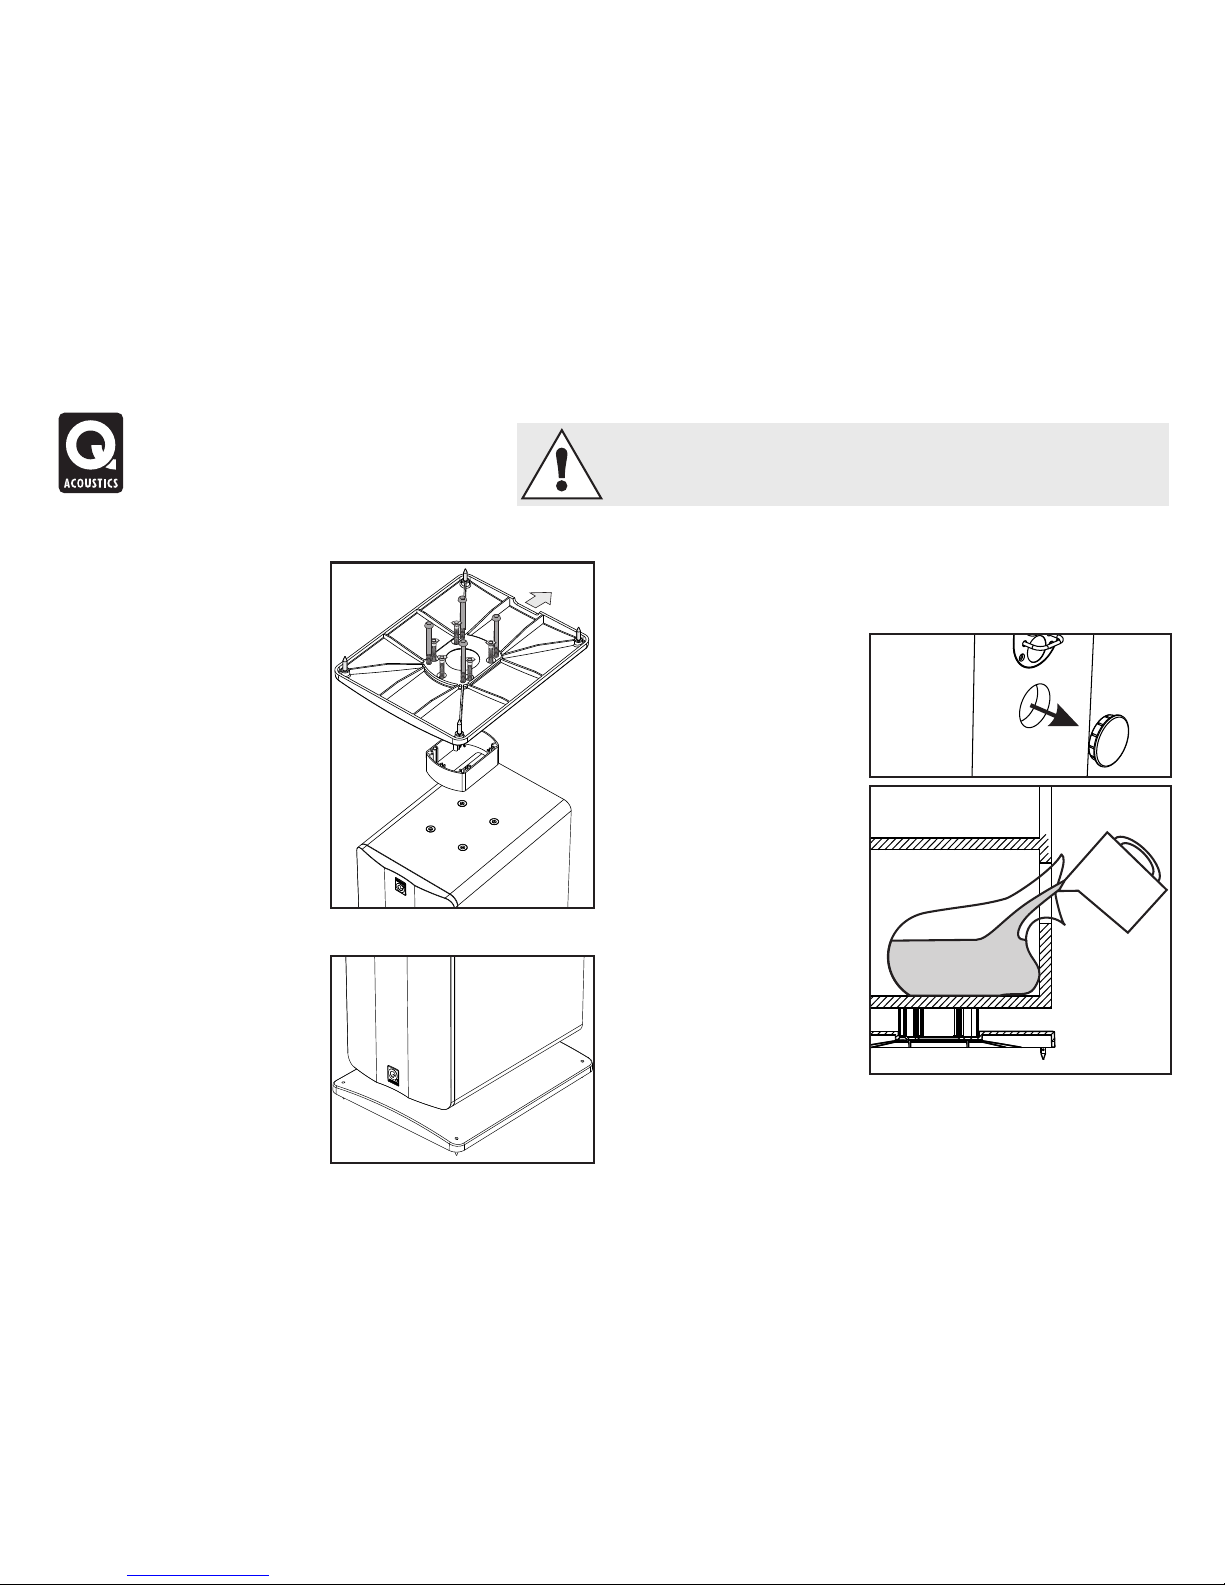
Fitting the Floor Stand and Spikes- 1030i and 1050i Sand Filling the 1030i
Place a soft cloth or towel on the The lower chamber of the 1030i can be filled with sand to aid stability and
floor. Invert the loudspeaker and to dampen acoustic vibration. This is entirely at your option. No harm is
place it on the cloth. caused if you omit this procedure.
You will need:
The stand consists of a base and a
pillar. Attach the base to the pillar
l5kg of dry sand - play sand
with the five short screws. An Allen is ideal. Do not use
key is provided so you can tighten building sand.
the screws properly.
lA large, strong polythene
bag.
Invert the stand and thread the four
long bolts through the base and
lA dry pouring jug.
the pillar; line up the bolts with the
Remove the bung in the rear
mounting holes in the bottom of
panel. Push the bag into the
the speaker and tighten securely.
chamber with the mouth of
the bag protruding at least
Make sure the recess in the stand
100 mm. Carefully pour (or
faces the rear of the loudspeaker.
spoon) the sand into the bag.
Thread the spikes half way into the
When all the sand is in the
base and return the loudspeaker to
bag tie the mouth securely
the upright position. (If you have a
and push the bag into the
wood or stone floor push a spike
chamber. Replace the bung.
protector over each spike before
turning the speaker upright)
1010i, 1020i,1000Ci
When the speaker is the right way
E a c h l o u d s p eaker i s
up, insert the Allen key into each
provided with four adhesive feet. If you are not wall mounting the
spike from the top and adjust all
speakers, peel the backing off each foot and press a foot into place at
the spikes in and out until the
each corner of the bottom panel 15 mm in from each edge.
loudspeaker is level and stable.
Spikes are sharp. Exercise care!
Never place a spiked loudspeaker where it can cause damage!
Always move your loudspeakers by lifting them - never drag them!
Preparation
mounting is also possible.
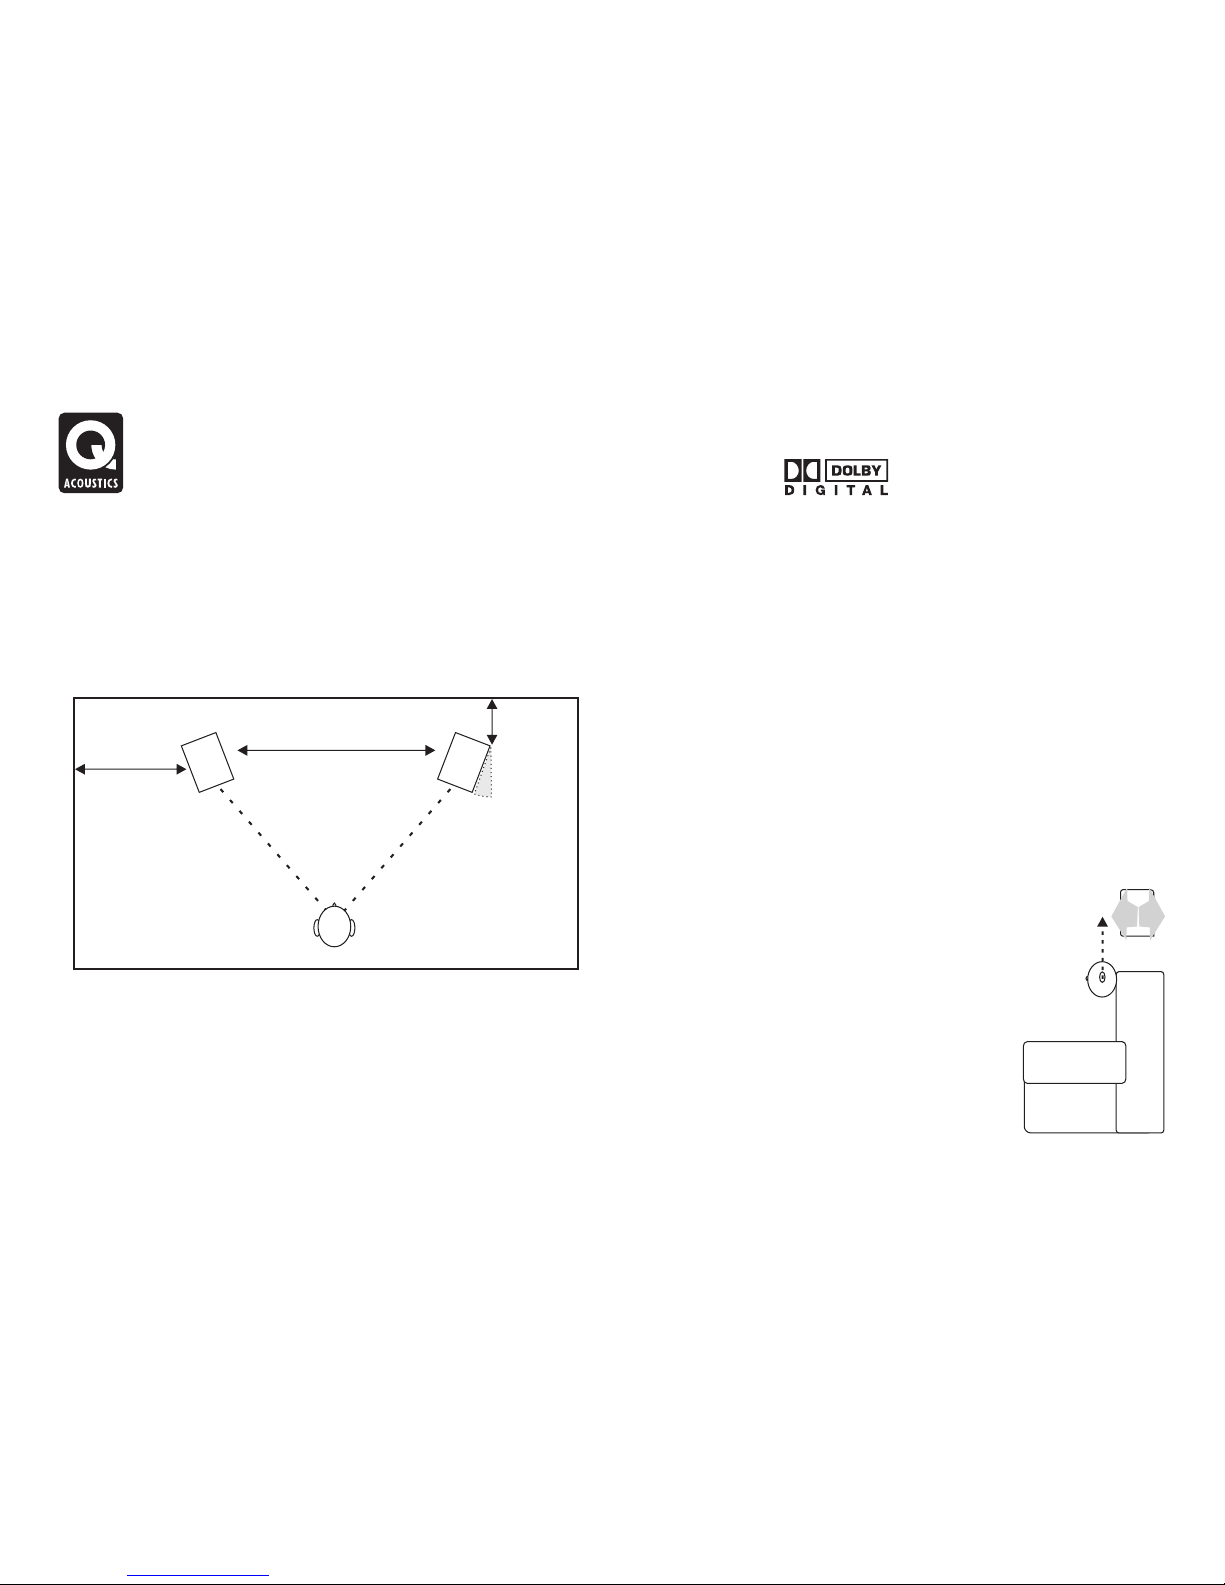
1030i and 1050i
An optional bracket designed specifically to wall mount the Q Acoustics
The 1030i and 1050i loudspeakers should be positioned at least 200mm
1010i, 1020i and 1000Ci is available from your dealer. Floor stands for the
from a back wall and 500mm from the side walls. Placing the speakers
1010i and 1020i are also available.
closer to the wall will increase bass but could cause the sound to boom
and lack precision and detail. The speakers should be 2m - 4m apart and
Be prepared to experiment to find the best setup for your taste in your
central to the seated listener. Turning the speakers slightly inwards will
particular listening room.
sharpen a stereo image but may cause narrowing of the sound source.
Effects loudspeakers
1000Ci
The 1000Ci is designed to be operated close to a TV screen and central
to it. It should be placed immediately above or below the screen. If you
are using a regular TV set, make sure that the TV is capable of adequately
supporting the speaker and has a level top. If not, consider placing the TV
on a cabinet with the 1000Ci on a secure shelf immediately below the TV.
If you have a Plasma or LCD monitor, mount the 1000Ci to the wall or
other suitable surface immediate ly above or below
the screen.
Surround Speakers
There are recommendations from Dolby labs for
5.1 effects speakers.
1010i and 1020i
Surround speakers should be mounted on either
The 1010i and 1020i are ideally mounted on Q-Acoustics floor stands or
side of the listener, slightly behind the listening
wall mounted. If you are stand mounting, a simple guide is that the treble
position. The speakers should be sited facing
unit should be at ear level to a seated listener. Wall mounted speakers
inward either mounted on the side walls of the
may be mounted slighter higher with the speaker angled down. Stand
room or if the room is large, on high stands and
mounted speakers should be treated as floorstanding speakers except
with their centres above ear level to a seated
that the speaker may be placed a little closer to the back wall. Shelf
listener.
Positioning Passive Loudspeakers
2m-4m
2m-
4m
>500mm
>200mm
0-30°
400mm
Dolby and the double-D symbol are
trade marks of Dolby Laboratories.
 Loading...