

Page 1
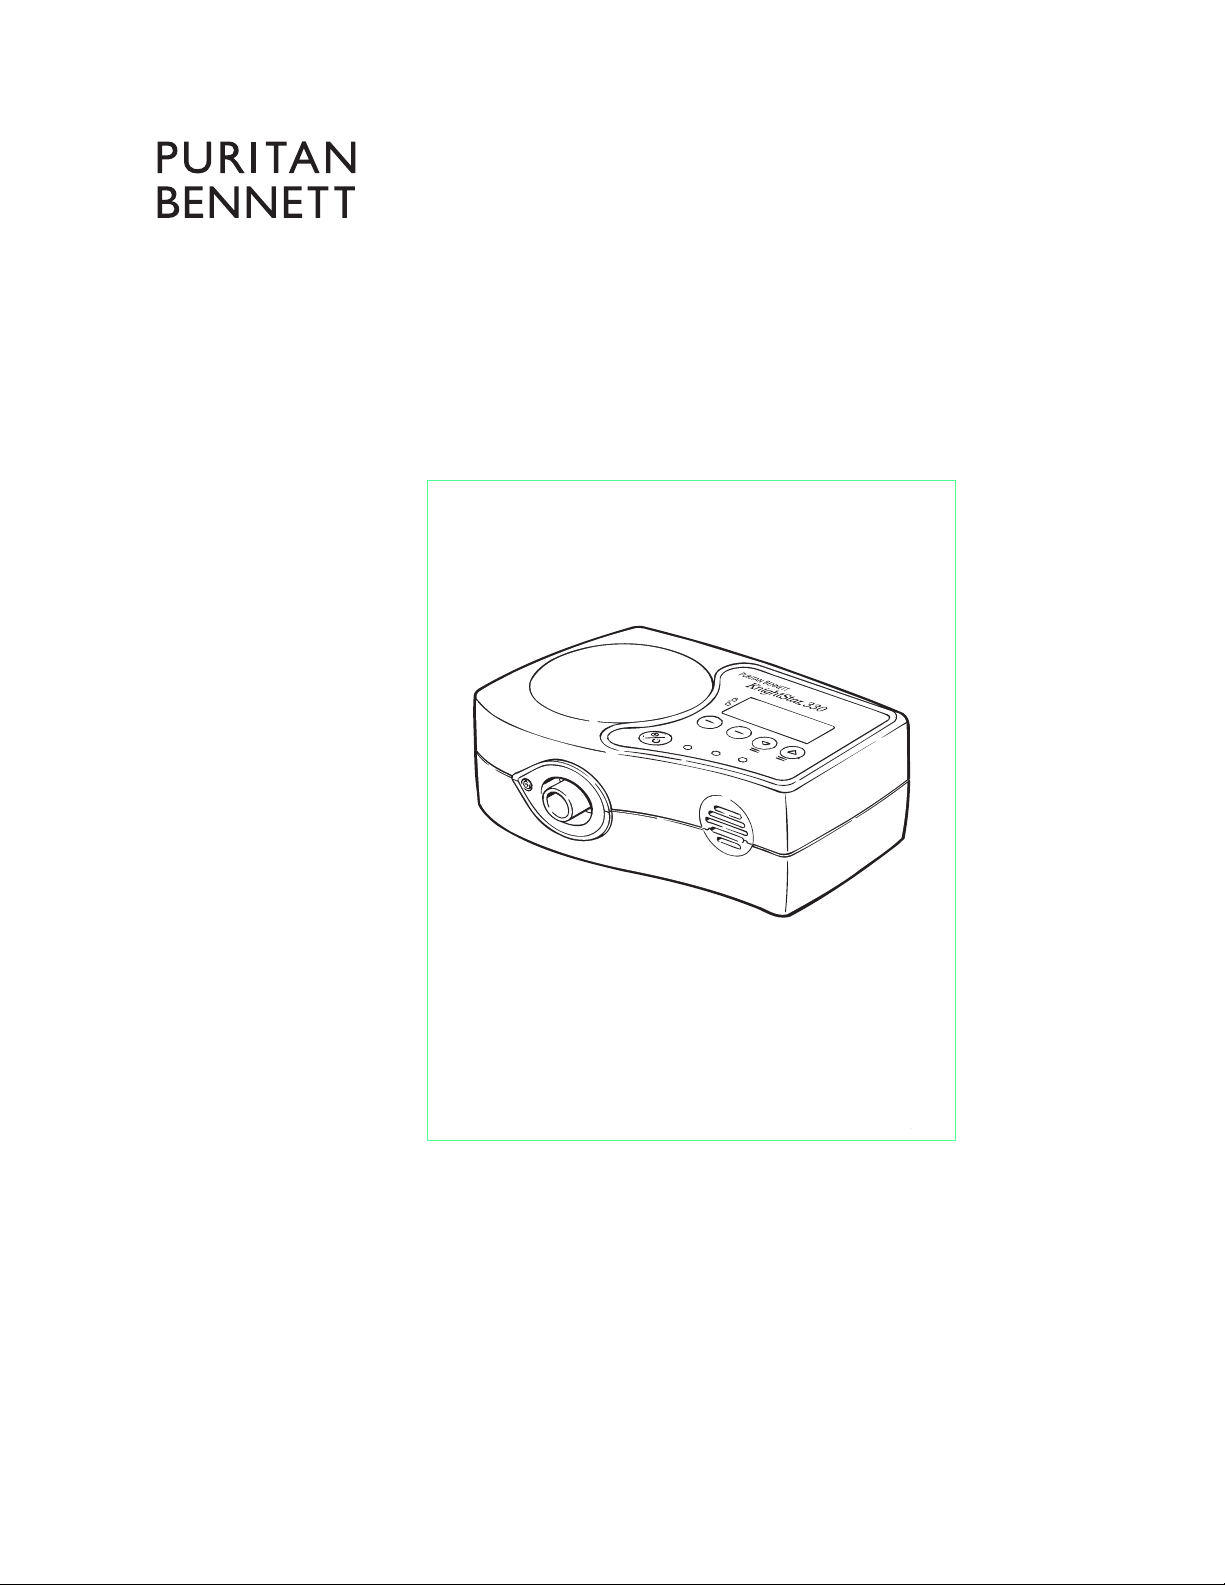
KnightStar ® 330
®
Bi-Level
Ventilator
Y-500008-00 Rev. H
Clinician’s Manual
Page 2

© Copyright 2000, 2003 Puritan-Bennett Corporation, 4280 Hacienda Drive, Pleasanton, CA
94588 U.S.A. All rights reserved.
KnightStar®, Bi-Level®, Companion®, and SoftFit® are registered trademarks of Puritan-Bennett Corporation. Sullivan® is a registered trademark of ResMed, Inc. ADAM™ and Breeze™
are trademarks of Puritan-Bennett Corporation. For more information, contact your Puritan
Bennett representative.
iiii
ii
Page 3

Contents
Contents. . . . . . . . . . . . . . . . . . . . . . . . . . . . . . . . . . . . . . . . . . . . . . . . .i
Introduction . . . . . . . . . . . . . . . . . . . . . . . . . . . . . . . . . . . . . . . . . . . . . 1
Patient and Clinician Access Levels. . . . . . . . . . . . . . . . . . . . . . . . . . . . . . . . . . . . . . 3
Warnings, Cautions, and Notes . . . . . . . . . . . . . . . . . . . . . . . . . . . . . . 6
Symbols . . . . . . . . . . . . . . . . . . . . . . . . . . . . . . . . . . . . . . . . . . . . . . . 11
System Description . . . . . . . . . . . . . . . . . . . . . . . . . . . . . . . . . . . . . . 13
Control Panel Display. . . . . . . . . . . . . . . . . . . . . . . . . . . . . . . . . . . . . . . . . . . . . . . . 13
Control Panel Buttons . . . . . . . . . . . . . . . . . . . . . . . . . . . . . . . . . . . . . . . . . . . . . . . 13
Control Panel Indicators. . . . . . . . . . . . . . . . . . . . . . . . . . . . . . . . . . . . . . . . . . . . . . 15
Air Outlet Assembly . . . . . . . . . . . . . . . . . . . . . . . . . . . . . . . . . . . . . . . . . . . . . . . . . 17
Inlet Air Filter . . . . . . . . . . . . . . . . . . . . . . . . . . . . . . . . . . . . . . . . . . . . . . . . . . . . . . 17
Connectors. . . . . . . . . . . . . . . . . . . . . . . . . . . . . . . . . . . . . . . . . . . . . . . . . . . . . . . . 18
System Setup. . . . . . . . . . . . . . . . . . . . . . . . . . . . . . . . . . . . . . . . . . . 20
Unpacking . . . . . . . . . . . . . . . . . . . . . . . . . . . . . . . . . . . . . . . . . . . . . . . . . . . . . . . . 20
Power On Self-Test . . . . . . . . . . . . . . . . . . . . . . . . . . . . . . . . . . . . . . . . . . . . . . . . . 21
Operating Modes . . . . . . . . . . . . . . . . . . . . . . . . . . . . . . . . . . . . . . . . 22
Modes/Settings. . . . . . . . . . . . . . . . . . . . . . . . . . . . . . . . . . . . . . . . . . . . . . . . . . . . . 23
Display Symbols. . . . . . . . . . . . . . . . . . . . . . . . . . . . . . . . . . . . . . . . . . . . . . . . . . . . 24
Display Preferences. . . . . . . . . . . . . . . . . . . . . . . . . . . . . . . . . . . . . . . . . . . . . . . . . 25
Changing Device Settings . . . . . . . . . . . . . . . . . . . . . . . . . . . . . . . . . 26
Alarm Tests . . . . . . . . . . . . . . . . . . . . . . . . . . . . . . . . . . . . . . . . . . . . . . . . . . . . . . . 28
Setting Prescription Parameters . . . . . . . . . . . . . . . . . . . . . . . . . . . . 29
Sensitivity Adjustment . . . . . . . . . . . . . . . . . . . . . . . . . . . . . . . . . . . . . . . . . . . . . . . 30
Inspiratory Sensitivity . . . . . . . . . . . . . . . . . . . . . . . . . . . . . . . . . . . . . . . . . . . . . . . . 30
Expiratory Sensitivity . . . . . . . . . . . . . . . . . . . . . . . . . . . . . . . . . . . . . . . . . . . . . . . . 31
Rise Time. . . . . . . . . . . . . . . . . . . . . . . . . . . . . . . . . . . . . . . . . . . . . . . . . . . . . . . . . 32
Clinical Application and Use. . . . . . . . . . . . . . . . . . . . . . . . . . . . . . . . 33
Connecting the Device to the Patient. . . . . . . . . . . . . . . . . . . . . . . . . . . . . . . . . . . . 34
Titrating Therapy . . . . . . . . . . . . . . . . . . . . . . . . . . . . . . . . . . . . . . . . 36
Using the Optional Humidifier . . . . . . . . . . . . . . . . . . . . . . . . . . . . . . 37
Using Supplemental Oxygen . . . . . . . . . . . . . . . . . . . . . . . . . . . . . . . 39
Connecting Oxygen to the Device . . . . . . . . . . . . . . . . . . . . . . . . . . . . . . . . . . . . . . 39
i
Page 4

Rebreathing of Carbon Dioxide . . . . . . . . . . . . . . . . . . . . . . . . . . . . .41
Cleaning Instructions . . . . . . . . . . . . . . . . . . . . . . . . . . . . . . . . . . . . .43
Cleaning the Exterior . . . . . . . . . . . . . . . . . . . . . . . . . . . . . . . . . . . . . . . . . . . . . . . . 43
Cleaning the Inlet Filter . . . . . . . . . . . . . . . . . . . . . . . . . . . . . . . . . . . . . . . . . . . . . . 43
Replacing the Optional Air Outlet Filter . . . . . . . . . . . . . . . . . . . . . . . . . . . . . . . . . . 44
Troubleshooting . . . . . . . . . . . . . . . . . . . . . . . . . . . . . . . . . . . . . . . . . 45
Appendix A: KnightStar 330 Setup Checklist. . . . . . . . . . . . . . . . . . .49
Appendix B: KnightStar 330 Specifications . . . . . . . . . . . . . . . . . . . .52
Appendix C: What the Patient and Caregiver Must Know . . . . . . . . .53
Appendix D: Service Information . . . . . . . . . . . . . . . . . . . . . . . . . . . .56
Appendix E: Limited Warranty . . . . . . . . . . . . . . . . . . . . . . . . . . . . . .57
Index. . . . . . . . . . . . . . . . . . . . . . . . . . . . . . . . . . . . . . . . . . . . . . . . . .59
ii
Page 5

Introduction The Puritan Bennett KnightStar 330 is a continuous bi-level ventilator
that provides noninvasive ventilation for the treatment of respiratory
insufficiency and obstructive sleep apnea that may occur in the home.
The KnightStar 330 is also indicated for the treatment of respiratory
failure in institutional environments, and is intended to assist the
ventilation of spontaneously breathing patients who are over 30 kg
(66 lbs) in weight.
CAUTION:
Read this manual and the KnightStar
330 User’s Manual thoroughly before
operating the device. The manuals provide clinical as well as technical information concerning the operation and
performance of the Puritan Bennett
KnightStar 330 bi-level ventilator.
The KnightStar 330 is a microprocessor-controlled pressure generator
capable of monitoring the air flow and controlling the pressure
delivered to the patient. The KnightStar 330 possesses the following
features:
• Provides three operation modes: CPAP, I/E PAP, and Assist
Control (A/C).
• Monitors pressure, tidal volume, respiratory rate, air leaks, peak
flow, and the I:E ratio.
• Provides adjustable inspiratory and expiratory trigger sensitivity.
• Provides precise respiratory support and patient comfort.
• Provides audible and visual indicators to alert users to power
failure, system leaks, device performance.
• Allows a maximum pressure setting of 30 cmH2O; with a pressure limitation of 40 cmH
O for a single-fault condition.
2
• Compensates for delivered pressure within specification for altitudes from 0 to 8,000 feet (2438 meters), at 4 to 30 cmH
O; and
2
compensates for leaks up to 60 liters per minute.
1
Page 6

There are certain limitations and instructions that must be understood
by the clinician and patient before using the KnightStar 330. Refer to
Appendix C: What the Patient and Caregiver Must Know.
2
Page 7

Patient and
The KnightStar 330 features two access levels:
Clinician Access
Levels
• Patient access (Lockout mode “Active”)
• Clinician access
The patient access level enables the patient to turn the device on and
off, and to adjust comfort settings.
The clinician access level enables the caregiver to access all of the
prescription settings and device controls, as well as the patient access
features.
In the sleep lab, the KnightStar 330 can be operated with either the
optional remote control, or the control panel on the device. The
device’s controls enable the user to input the patient’s prescription
settings and review the estimated tidal volume, estimated peak flow,
estimated leak, respiratory rate, I:E ratio, IPAP, and EPAP settings.
For home care applications, the home care provider can set the
patient’s prescribed parameters. All prescription parameters
programmed by the home care provider are stored in the
KnightStar 330’s memory.
If the prescription settings are corrupted, the KnightStar 330 will not
operate. Instead, an alarm symbol and error number appear on the
display, and the audible alarm will sound.
3
Page 8
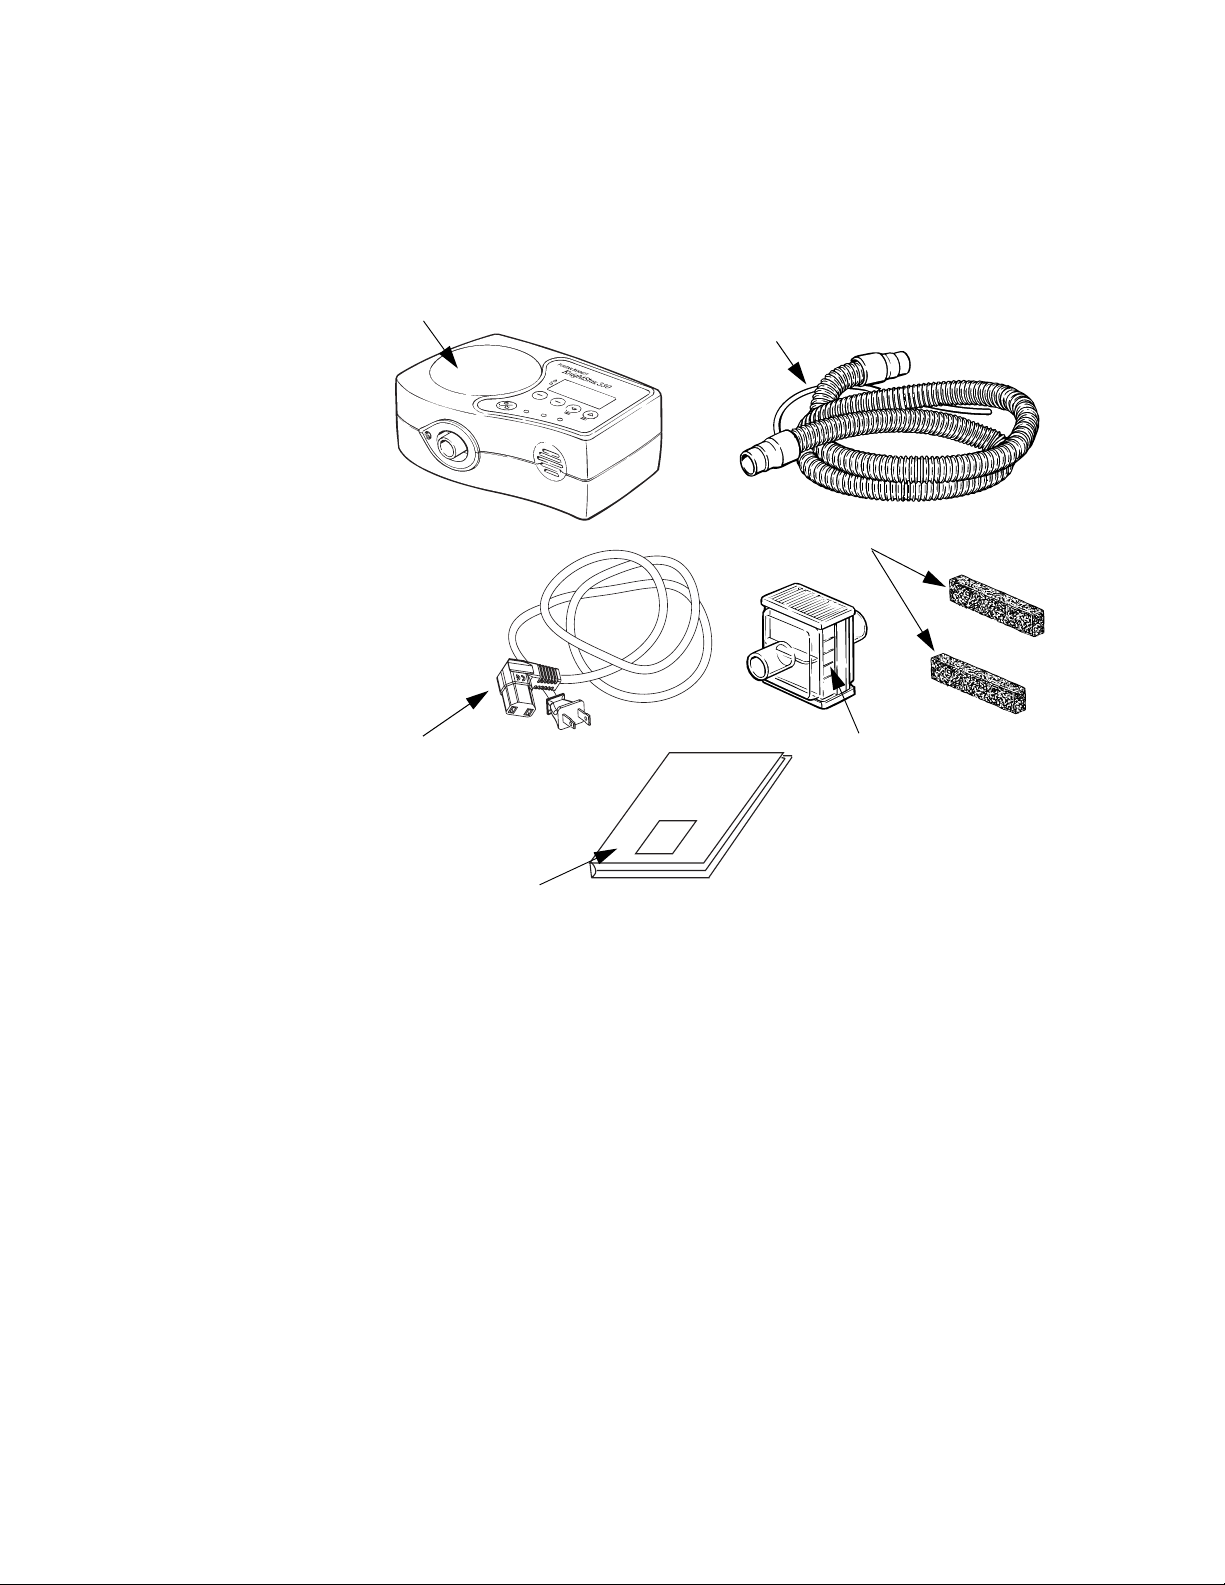
Figure 1 shows the components that make up the KnightStar 330
system.
KnightStar 330 bi-level ventilator
Power cord
Tubing and proximal
pressure line
Puritan
Bennett
KnightStar 330
Bi-level Ventilator
Inlet air filter (with spare)
Optional outlet air filter
Clinician’s Manual
Figure 1. KnightStar 330 Components
It is recommended to use the KnightStar 330 with 6-ft (1.8 m) or 8-ft
(2.4 m) tubing and Puritan Bennett nasal interfaces, and Breeze™ or
ADAM™ circuits.
Three modes of operation are available:
• CPAP (continuous positive airway pressure)
• I/E PAP (inspiratory and expiratory positive airway pressure)
• A/C (Assist Control)
In the CPAP mode, the system delivers a continuous positive
regulated airway pressure throughout the breath cycle (normal
operating range is from 3 cmH2O to 20 cmH2O).
4
Page 9

In the I/E PAP mode, the system tracks patient breathing effort and
provides two levels of pressure—a higher level of pressure for
inspiration (normal operating range from 3 to 30 cmH
pressure for expiration (normal operating range from 3 to 20 cmH
O) and a lower
2
O).
2
In the A/C mode, the system delivers the same two levels of pressure
as described for the I/E PAP mode with the addition of a backup
breath rate (normal operating range from 3 to 30 breaths per minute)
and an I:E ratio (normal operating range from 1:1.0 to 1:4.0).
When Lockout mode is active, the settings available to the patient are:
•Delay Time
•Ramp Time
• Ramp Starting Pressure
CAUTION:
Before using the Knightstar 330, read
all warnings and cautions in the next
section.
5
Page 10

Warnings,
Cautions, and
Information about specific hazards or special significance are
presented in the following formats:
Notes
WARNING: Indicates a condition that can endanger the patient
or the device operator.
CAUTION: Indicates a condition that can damage the device
and/or other property.
NOTE:
Indicates information of particular interest for more efficient
and convenient device operation.
WARNINGS:
Clinical research indicates that CPAP therapy may be
CONTRAINDICATED for patients with the following preexisting conditions:
• Bullous lung disease
• Pneumothorax
• Severe cardiac rhythm disturbances
• Extremely low blood pressure
• Pneumocephalus or pre-existing CSF leaks or head
trauma (Chest 1989; 96: 1425 - 1426)
• Acute sinus or middle ear infection (may be an indication
to suspend CPAP therapy temporarily)
• Unstable airway
• Acute facial trauma
The physician’s prescription should be based upon the
appropriate diagnostic testing. The prescribed nasal pressure should only be adjusted by trained, authorized personnel in accordance with the physician’s prescription.
Use only interfaces and accessories that are approved by
Puritan Bennett.
6
Page 11

WARNINGS (continued):
The physician’s prescription should be followed in accordance with established medical protocols.
An alternate means of ventilation must be available when
patients are being treated for respiratory failure.
Alarms should never be disabled for patients who could be
injured due to ineffective or interrupted ventilation. The physician should determine secondary or independent alarms.
Alarm volume should be set in accordance with ambient
noise level. Respond immediately to all alarm conditions.
Patients receiving supplemental oxygen should be advised of
the hazards of combustible materials and flames or sparks in
the presence of oxygen. Do not smoke in the presence of
oxygen.
To prevent oxygen from accumulating in the device and tubing, turn on the device before turning on the oxygen supply;
shut off the oxygen before turning off the device.
Patients receiving supplemental oxygen and nasal pressure
therapy should be monitored for arterial blood oxygen saturation.
Configure the KnightStar 330 system as shown in this manual for safe and effective operation.
Always place the KnightStar 330 upright on a firm, flat surface. Setting KnightStar 330 on uneven surfaces or in a position that is not upright may result in damage to the unit.
Do not use the KnightStar 330 with antistatic or electrically
conductive tubing.
The KnightStar 330 should never be operated in the presence
of anaesthetic gases. The equipment is not suitable for use in
the presence of a flammable anaesthetic mixture with air, or
with oxygen or nitrous oxide. Placing the unit in such an area
may result in an explosion.
7
Page 12

WARNINGS (continued):
The KnightStar 330 device should never be operated where
the air intake might draw in hazardous gases from external
sources such as gas stoves, engine exhaust, or anesthesia
machines. Placing the unit in such an area may result in
asphyxiation of the patient.
Do not set the device on or within 3 feet (1 m) of electric or
electronic appliances, such as space heaters, electric blankets, or televisions. Do not operate cordless phones near the
device. Doing so may result in device malfunction.
The KnightStar 330 should be used with care to avoid overheating the patient when the room temperature exceeds 90 °F
(32.2 °C), since under certain conditions the patient outlet
gas flow can be as much as 6.7 °F (3.7 °C) degrees warmer
than room temperature.
The KnightStar 330 should be used only with interfaces recommended by the device’s manufacturer. An interface
should not be used unless the device is turned on and operating properly. The purge hole(s) associated with the interface should never be blocked. The purge hole(s) allow a
continuous flow of air out of the interface. When the device is
turned on and operating properly, fresh air from the device
flushes most of the expired air out through the interface
purge hole(s). However, when the device is not operating, a
substantial proportion of expired air and carbon dioxide may
be rebreathed. Rebreathing of carbon dioxide can increase
levels of CO
to become somnolent and may even result in death.
, and in some circumstances cause the patient
2
This device must never be operated with an obstructed airway circuit. Prevent foreign matter from entering the airway
circuit. Failure to do so could result in asphyxiation of the
patient.
Should the patient experience excessive nasal or airway dryness, skin sensitivity, runny nose, ear pain, sinus discomfort,
daytime sleepiness, mood change, disorientation, or memory
lapse when using this device, discontinue use and call the
physician.
8
Page 13

WARNINGS (continued):
Do not block or restrict airflow around the device. Unimpeded
airflow is necessary to maintain proper pressure and flow to
the patient.
For patient health and comfort, it is important to clean the
patient interface regularly. Follow the cleaning instructions
that came with your patient interface.
Contact the home care company if the equipment malfunctions in any way. Do not attempt to open the device case.
Only qualified personnel may service this equipment.
To reduce the risk of strangulation, ensure that the patient
tubing is routed away from the patient’s head.
The KnightStar 330 equipment has been tested and found to
comply with the limits for medical devices to IEC 601-12:1993 (or EN 60601-1-2:1994 or Medical Device Directive 93/
42/EEC). This testing shows the device provides reasonable
protection against harmful interference in a typical medical
installation. However, there is no guarantee that interference
will not occur in a particular installation. If this equipment
does cause harmful interference to other devices or is negatively impacted by other devices, the user is encouraged to
try to correct the interference by one or more of the following
measures:
• Reorient or relocate the devices
• Increase the separation between the devices
• Connect the equipment to an outlet on a different circuit
• Consult the manufacturer or your local representative
for help
The factory default setting for Lockout mode is inactive. The
clinician is responsible for activating Lockout mode.
Under certain conditions, some alarms may not occur. For
example: (1) The leak alarm may not occur if patient breath
efforts are not detected, as in the case of excessively large
leaks; and (2) The low pressure alarm may not occur under
conditions such as an incorrect alarm threshold setting, or
air pathway resistance. Check all alarms and settings for
correct alarm operation prior to use.
9
Page 14

WARNINGS (continued):
Be careful when handling the KnightStar 330 during or immediately after use. Under specified operating conditions, some
surfaces of the unit may become hot to the touch. This is a
normal occurrence and is typical of this type of device.
CAUTIONS:
Federal (USA) Law restricts this device to sale by or on the
order of a physician.
The KnightStar 330 will discontinue operation upon loss of
A/C power. The optional, external 12 V battery may be used
as an alternate power source, but it is not intended for emergency backup power. Either A/C or external battery power
may be connected to the KnightStar 330, but not both simultaneously. Refer to the battery instruction sheet.
Inspect the inlet air filter often. Remove the foam filter from
the rear panel and clean it at least once per week.
NOTES:
At the end of the KnightStar 330’s useful life, return the
device to the manufacturer for proper disposal.
10
Page 15
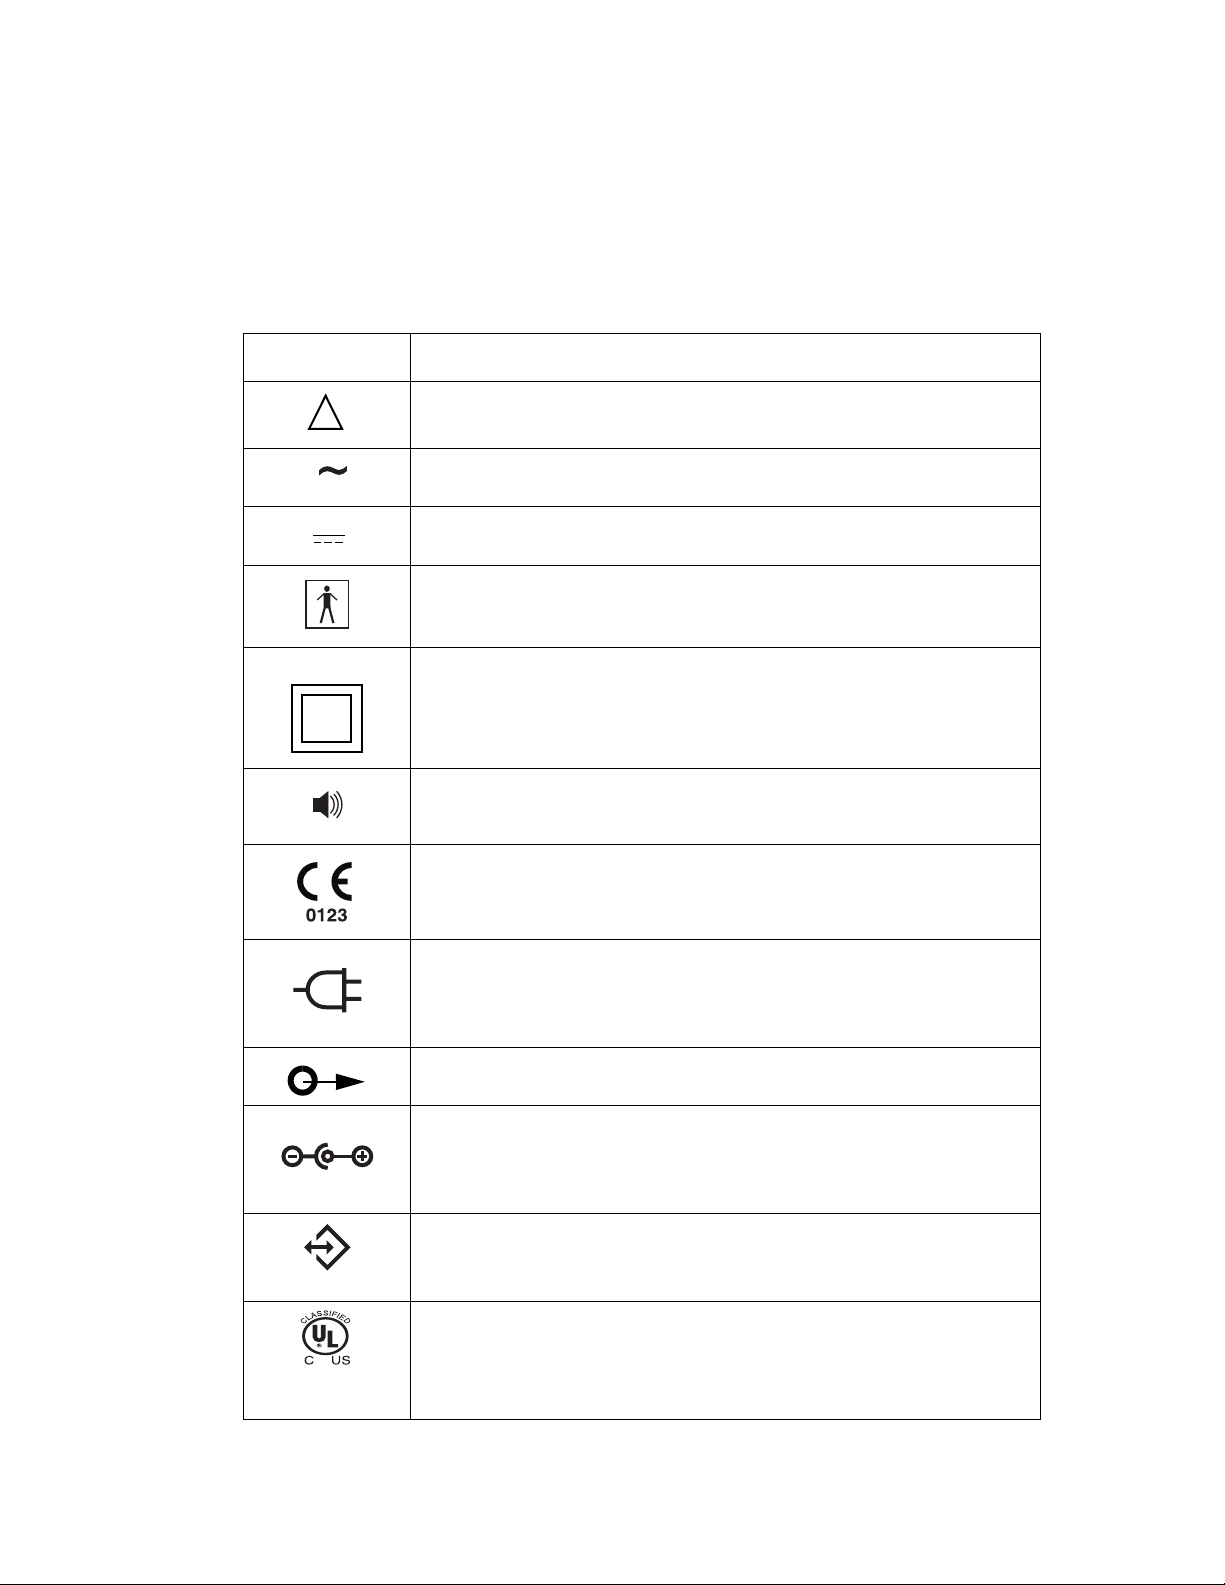
Symbols Table 1 lists descriptions for the various symbols that appear on the
KnightStar 330.
Table 1. Symbols
Symbol Description
!
Attention, consult accompanying manual
Alternating current (AC power from wall outlet)
Direct current (battery power)
Type BF equipment, degree of protection against electrical shock
Class 2 equipment, double insulation design
Alarm condition
CE Mark: This device complies with the requirements of Medical
Device Directive 93/42/EEC concerning medical devices
A/C power cord connection
Air outlet connector (blower connector)
External Battery/DC power connector
RS-232 communications connector
UL mark, classified by Underwriters Laboratories Inc. with respect to
electric shock, fire, and mechanical hazards only in accordance with
standards UL2601-1 and CAN/CSA C22.2 No. 601.1-M90.
11
Page 16
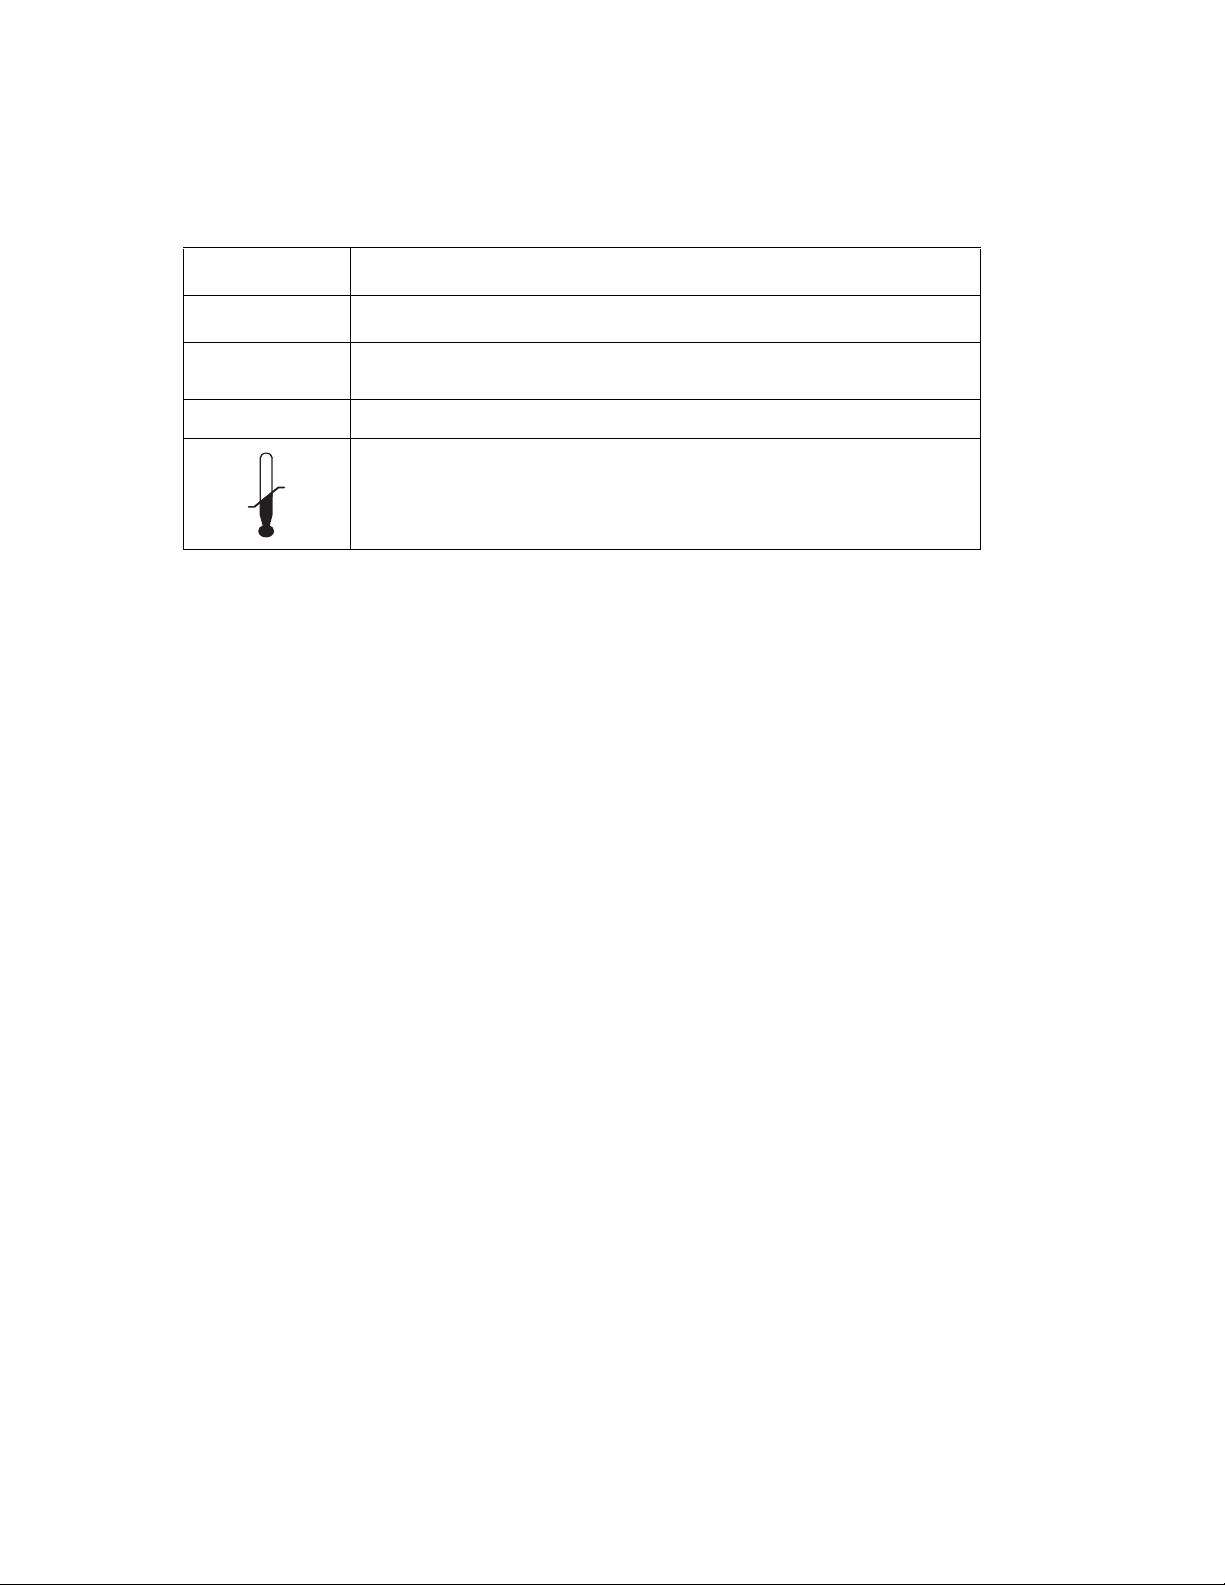
Table 1. Symbols (continued)
Symbol Description
IPX1 Drip proof
SN Serial Number
REF Product model number
Max
Min
Storage temperature range
12
Page 17
System Description
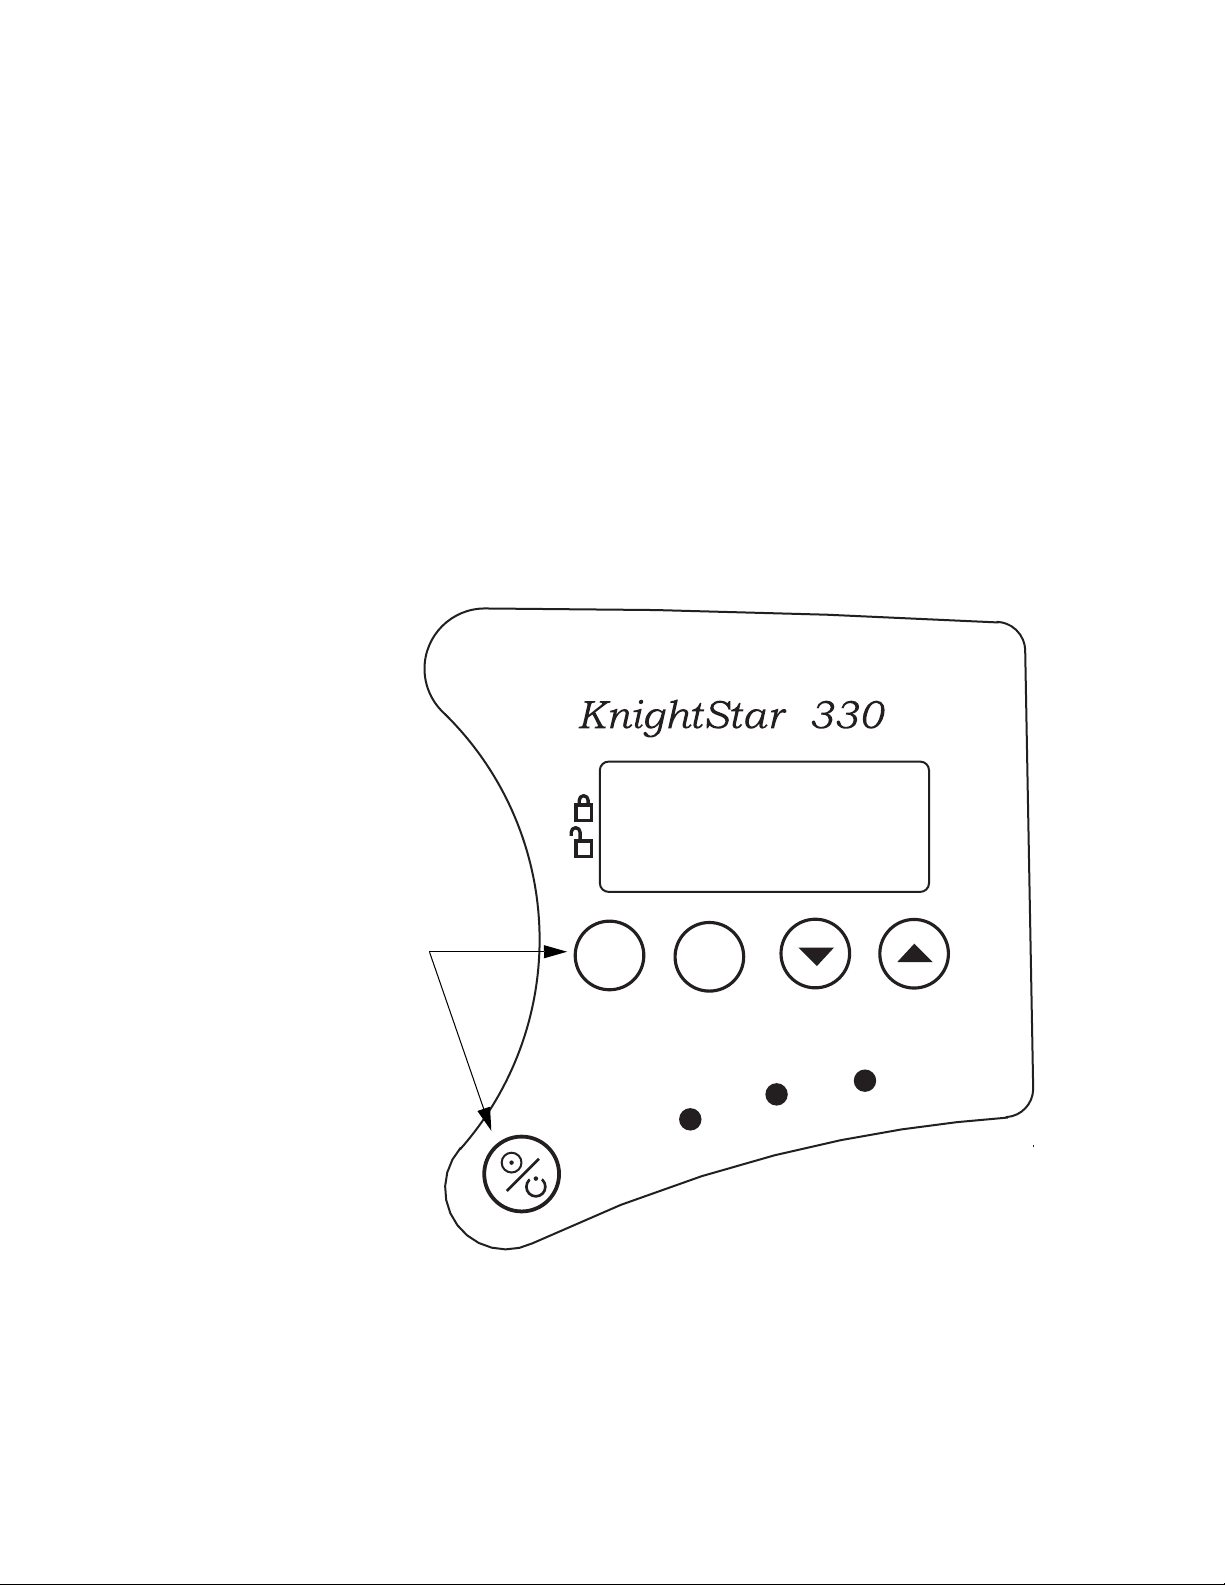
Control Panel Display
Control Panel Buttons
The Liquid Crystal Display (LCD) shown in Figure 2 provides an
easy-to-read format for mode, settings, and patient parameters. A
backlight illuminates the display when the Mode or Set button is
pressed. The display remains illuminated for approximately
60 seconds after the last button is pressed.
The control panel buttons are shown in Figure 2 and listed in Table 2.
PURITAN BENNETT
TM
Control panel buttons
Mode
Figure 2. KnightStar 330 Control Panel
Set
13
Delay
Ramp
Alarm
Silence
Page 18
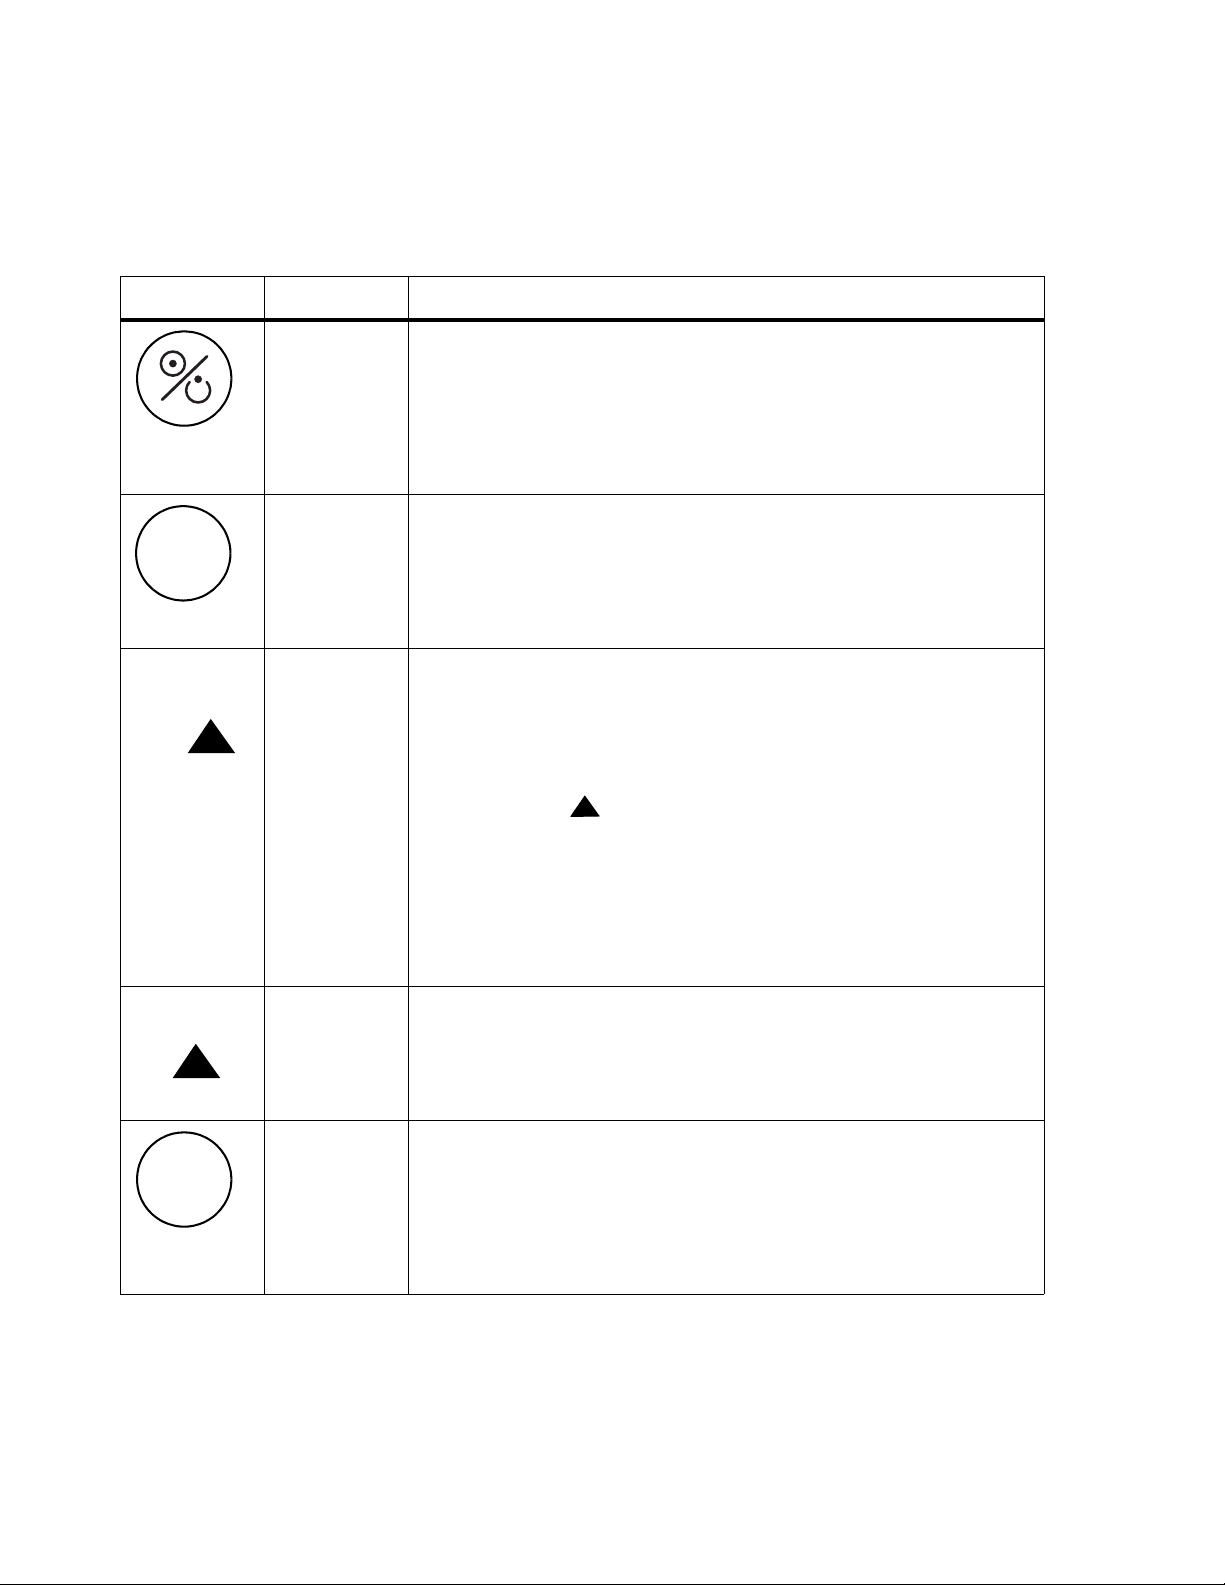
Table 2. Control Panel Buttons
Symbol Name Function
On/Off Turns the KnightStar 330 on or off.
Turn the KnightStar 330 on with a quick press and release of the
On/Off button. The device retains the prescription settings last
entered.
To turn the device off, press and hold the On/Off button for 3
seconds.
Mode
Scrolls through various device modes.
Mode
On +
Mode +
Mode +
Set
Leave
Settings
Mode
Autoclear
three-button
combination
Lockout
Mode and
Toggle
Set Scrolls through the available parameters. Press Set once to sh ow the
Press the Mode button to scroll through various modes, as follows:
CPAP, I/EPAP, A/C.
Note: If the Lockout function is active, the Mode button will not
operate.
Performs a device Autoclear.
When the KnightStar 330 is in the Stand-by mode (plugged in to AC
power but not operating), perform an Autoclear by pressing and
holding the following three buttons simultaneously for approximately
20 seconds:
On, Mode, and (Up Arrow)
Pressing this three-button combination clears the updatable “flash”
memory and restores the device’s defaul t values.
Within approximately 20 seconds after simultaneously releasing the
buttons, you will recognize that this process is occurring by the “Xs”
that appear on the display (in place of the patient ID) during Power
On Self Test (POST).
Changes the Lock or Unlock position. If the Lockout mode is active,
the patient may only change the delay, start pressure, and ramp
duration functions.
To change the Lock or Unlock position, hold the Mode button and the
▲ (Up Arrow) button simultaneously for approximately two seconds.
patient-settable parameters (delay, start pressure, ramp duration).
Press Set again to scroll through the remaining parameters.
If the
Lockout mode is inactive, you may scroll through all of the
available parameter settings. If the Lockout mode is active, you may
only scroll through the patient-settable parameters (delay, start
pressure, ramp duration).
14
Page 19
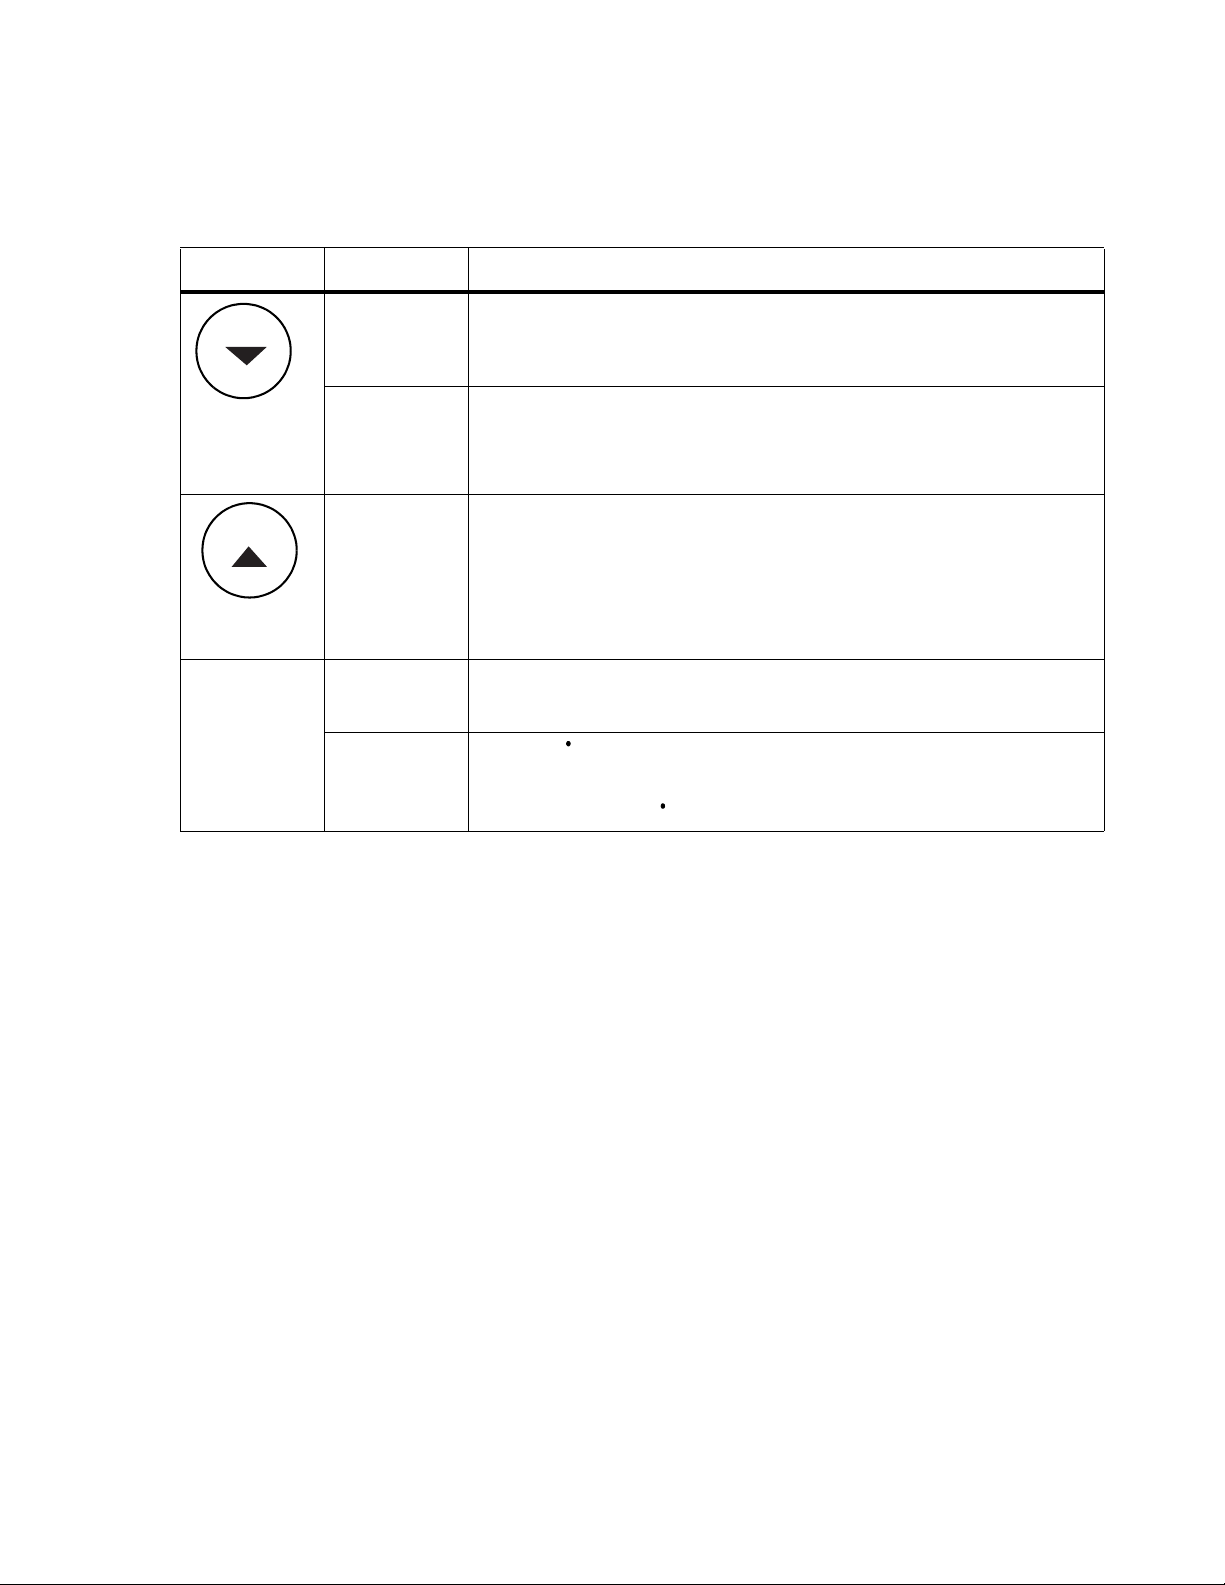
Table 2. Control Panel Buttons (continued)
Symbol Name Function
Delay/Ramp Starts or stops the Delay/Ramp function. Press the ▼/Delay/Ramp
(Down Arrow/Delay/Ramp) button to start the Delay/Ramp function, if
inactive; press the ▼/Delay/Ramp button to stop this function, if
active.
Delay
Ramp
Down Arrow Decreases a selected setting value when in Settings mode. Press the
▼/Delay/Ramp (Down Arrow/Delay/Ramp) button once to decrease
a setting value by one decrement.
Alarm
Silence
Alarm
Silence
Up Arrow Increases a selected setting value when in Settings mode. Press the
Display
Secondary
Screen
Mutes an active alarm. Press the
Silence) button once to silence an active alarm for one minute.
▲/Alarm Silence (Up Arrow/Alarm Silence) button once to increase a
setting value by one increment.
Displays and I:E ratio.
In AC or I/E mode, when the main display screen is shown, pressing
this button displays and I:E ratio if there are no active alarms.
V
V
▲/Alarm Silence (Up Arrow/Alarm
▼/Delay/Ramp Button. This button is used to activate the Delay
feature. When Delay is activated, both inspiratory and expiratory
pressures will decrease to the Ramp Start pressure. The time of delay
can be set from 0 (no delay) to 30 minutes. After the delay time has
elapsed, pressure will slowly ramp up to the prescription pressures.
The Delay mode can be cancelled by again pressing the ▼/Delay/
Ramp button. Once activated, Delay can be restarted by again
pressing the ▼/Delay/Ramp button.
Control Panel Indicators
The KnightStar 330 control panel features visual indicators (shown in
Figure 3) that illuminate in the presence of power and in response to
specific device or tubing circuit problems.
The presence of power, whether from A/C or external battery, is
indicated by an illuminated green LED.
15
Page 20
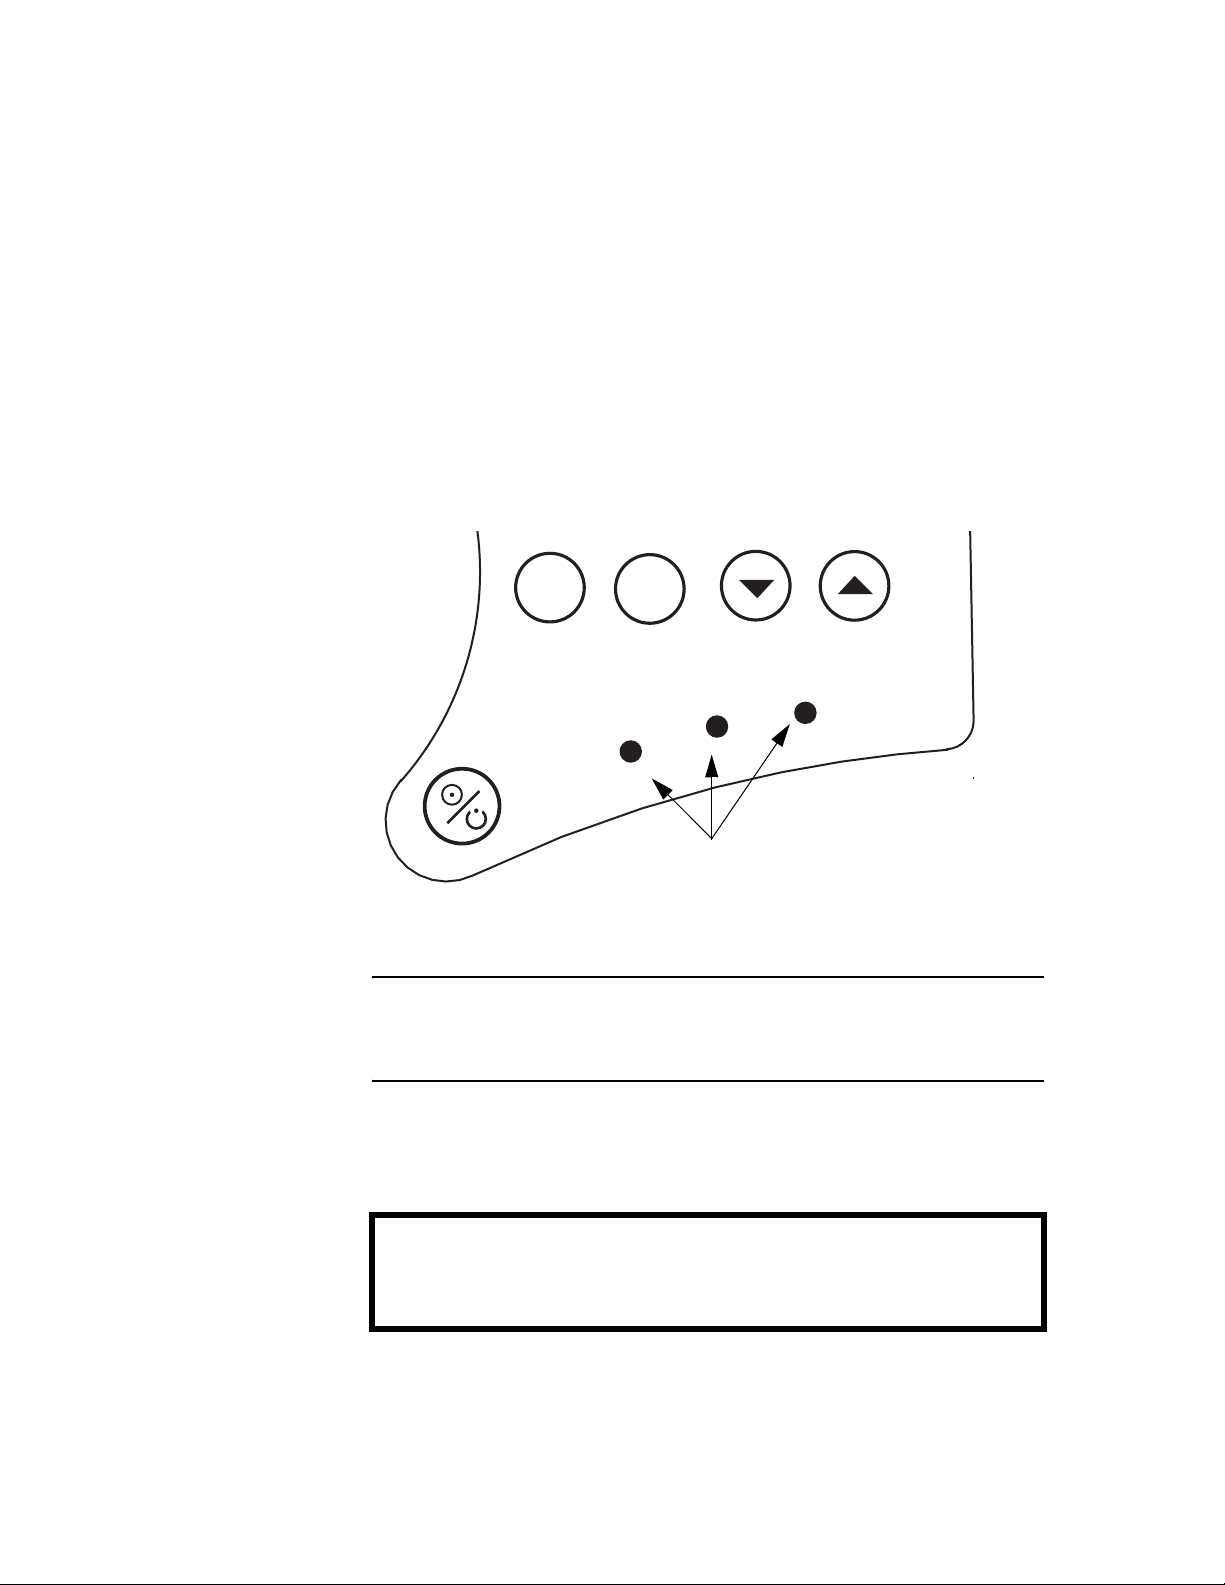
A low priority condition is indicated by a steadily illuminated
yellow LED (without an audible alarm).
A medium priority condition is indicated by a flashing yellow LED,
along with an audible alarm that beeps three times at intervals of
25 seconds.
A high priority alarm is indicated by a flashing red LED, along with
an audible alarm that beeps five times at intervals of 10 seconds.
Mode
Green
Figure 3. Control Panel Indicators
Set
Delay
Ramp
Yellow
Control Indicators (LEDs)
Red
Alarm
Silence
NOTE:
An audible alarm will sound under both medium and high
priority alarm conditions.
Refer to the Troubleshooting section on page 45 for possible causes
and corrective actions for visual and audible indicators.
WARNING:
The KnightStar 330 does not have an audible alarm to indicate that the patient has stopped breathing.
16
Page 21
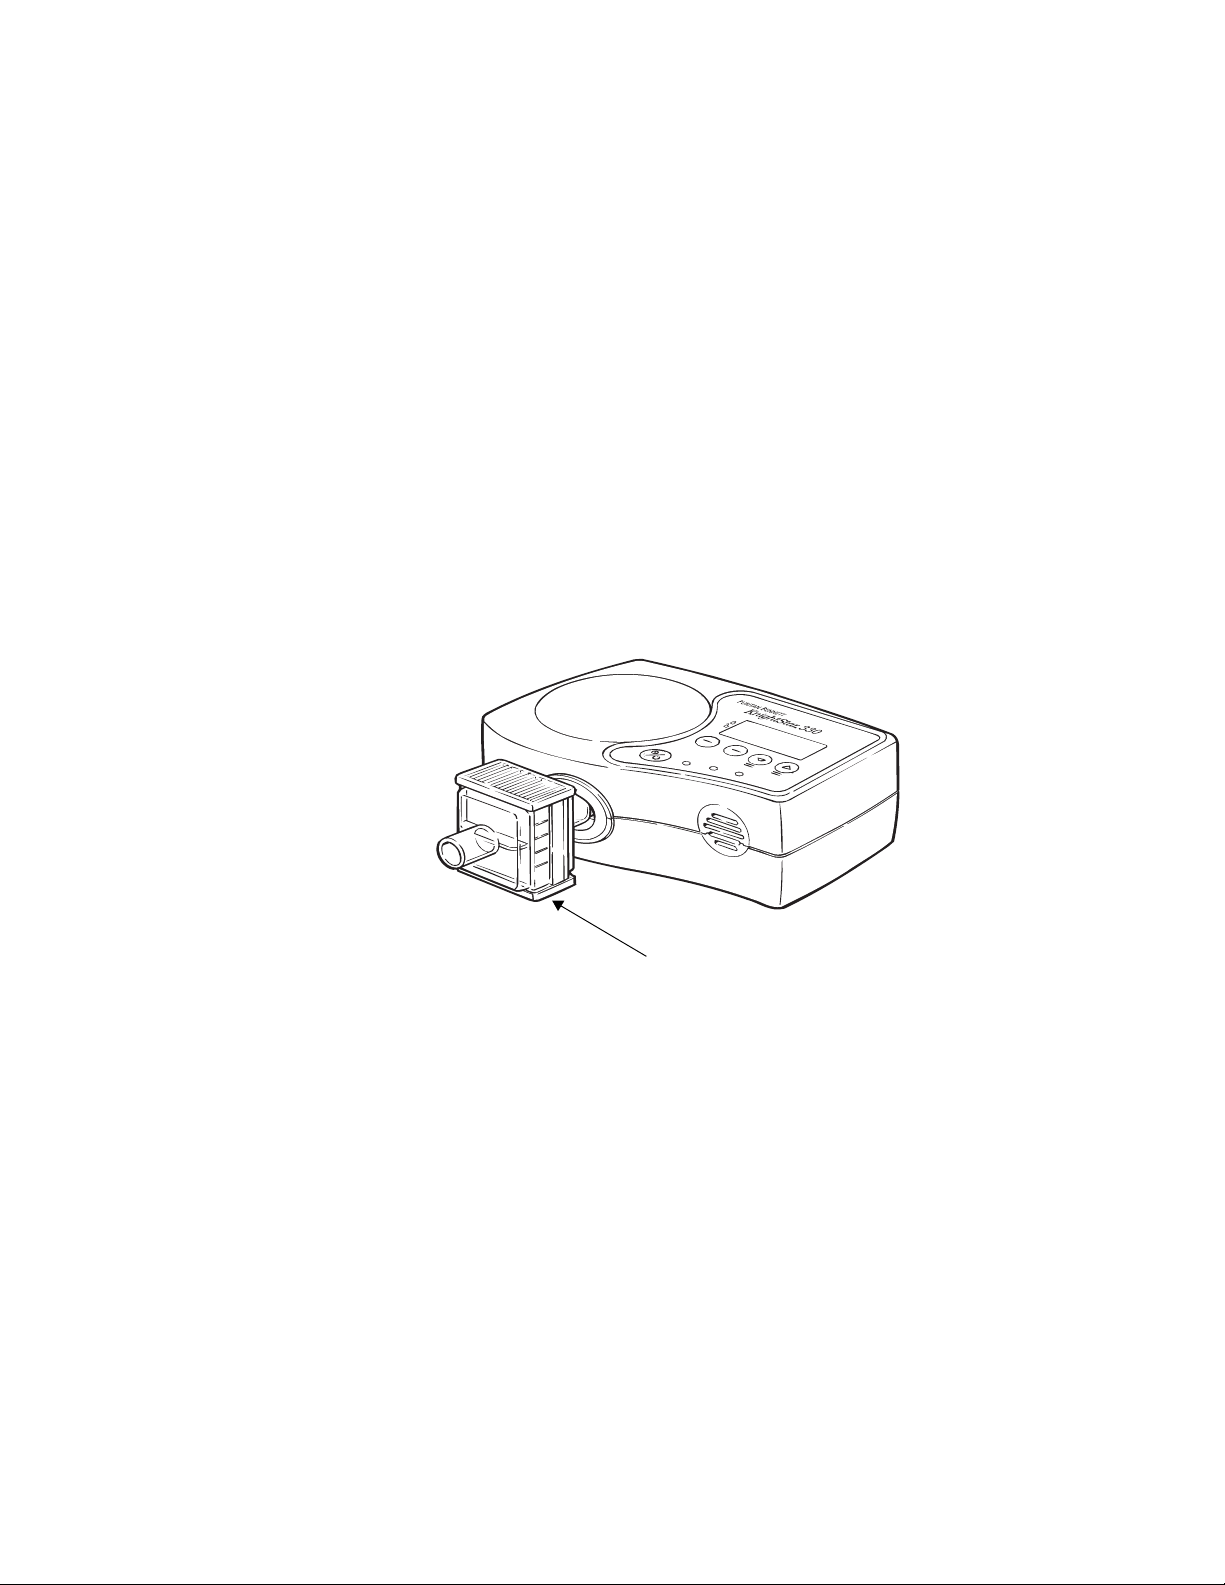
Air Outlet Assembly
The KnightStar 330’s air outlet assembly consists of the air outlet and
the optional outlet air filter.
Air Outlet. 22-mm conical port where the optional outlet air filter and
tubing circuit are connected.
Optional Outlet Air Filter. This optional, single-patient filter
removes contaminants and microbes as small as 0.2 microns from the
outlet air. It is disposable, and must be replaced between patients. Be
sure to inspect the filter regularly and replace it when noticeably dirty
or discolored. Refer to “Replacing the Optional Air Outlet Filter” on
page 44. Frequency of replacement can vary, depending on usage and
environmental conditions. Contact your home care provider for
replacement filters.
Optional outlet air filter
Figure 4. Optional Outlet Air Filter
Inlet Air Filter The Inlet Air Filter prevents large contaminants (dust and lint) in the
incoming air from entering the device. This filter has an efficiency of
90% or greater at 20 microns. It is reusable, and a spare filter is also
provided. Refer to “Cleaning Instructions” on page 43.
17
Page 22

Air inlet
Baffle
A removable plastic baffle is installed over the inlet filter to reduce
the sound level. Figure 5 shows the air inlet, filter, and baffle.
Back-Left View
Inlet air filter
Figure 5. KnightStar 330’s Air Inlet, Filter, and Baffle
Connectors The connectors on the back of the KnightStar 330 are shown in
Figure 6.
RS-232
A/C
power connector
Figure 6. KnightStar 330 Connectors
port
Battery
power connector
18
Page 23

A/C Power Cord Connector. Electrical input connection.
The device operates on 100 V to 240 V ~ at 50 Hz or 60 Hz.
RS-232 Port. This port is used for remote communication.
External Battery Connector. Used for connecting an optional
external 12V battery, or for use in a car (using the optional
cigarette lighter adapter), when A/C power is not available.
19
Page 24

System Setup This section describes how to prepare the KnightStar 330 system for
use.
The KnightStar 330 system is intended for use in various
environments. Patient parameters and data are entered and displayed
on the control panel on the top of the device.
In the sleep lab, remote operation and monitoring is enabled using the
optional remote control. The remote control and the KnightStar 330
unit are connected by a cable that attaches to the rear of the unit.
Unpacking Save all original packing materials and always ship the ventilator in
the original box. If you need replacements for your packaging, contact
Puritan Bennett. The components used in the setup procedure are
identified in Figure 7.
Note: You may obtain
KnightStar 330
accessories by contacting
your Puritan Bennett
Customer Service
Representative.
KnightStar 330 bi-level ventilator Tubing and proximal
pressure line
Power cord
Optional outlet
air filter
Inlet air filter with spare
Figure 7. KnightStar 330 Components Used in Setup Procedure
20
Page 25

Power On Self-Test
To ensure proper operation of the KnightStar 330, a power on self-test
(POST) automatically runs each time you turn on the device. Because
the POST takes about 9 seconds, you may notice a delay after pressing
the device’s On/Off button as the self-test runs. After the self-test
completes, you can operate the KnightStar 330.
When you turn the unit on, certain events occur: the front panel
displays the copyright notice, the manufacturer’s name, and the
firmware version; then, the device beeps and flashes its LEDs. If this
sequence does not run as described, call for service.
WARNING:
If the audible indicators on the unit are inoperative, the unit
must be checked by qualified personnel.
21
Page 26

Operating
The KnightStar 330 operates in one of three modes:
Modes
•A/C
•I/E PAP
•CPAP
These modes are described in Table 3.
Table 3. Operating Modes
Mode Description
A/C I/E PAP with an adjustable respiratory rate and I:E ratio. If the device is unable to track
breathing efforts, or the patient’s spontaneous respiratory rate falls to or below the
prescribed backup rate, the device will cycle at the prescribed levels of pressure and I:E
ratio.
If the backup rate cycles for five continuous breaths, the symb ol will appear on the
lower left corner of the display, and the yellow LED will illuminate. The symbol and the
yellow LED will remain lit, until the patient breathes on his or her own. When the backup
rate is cycling, the patient data for the “f” and “I:E” will be the prescription parameter values.
I/E PAP Inspiratory/Expiratory Positive Airway Pressure with default to EPAP. This occurs when no
inspiration is detected for the average inspiration period plus five seconds. Upon reaching
this condition the device will default to the selected EPAP setting (setting range is 3 -20 cm
H
O).
2
When the device is at EPAP pressure for the average exhalation time plus 5 seconds, the
patient data will also default to the given values. When an inspiration event is detected, the
device will resume normal operation. During the default condition, the patient data will be as
follows:
f
f
f = 0 bpm
P = EPAP setting
Vt = 0 liters
Leak = 0 L/min
= 0 L/min
V
I:E = 1:0.0 ratio
CPAP Continuous Positive Airway Pressure: Pressure is continuously delivered at the set level.
22
Page 27

Modes/Settings
Each mode enables a different group of system settings, as shown in
Table 4.
Table 4. Modes/Settings
CPAP I/E A/C
CPAP IPAP IPAP
Alarm volume EPAP EPAP
Leak alarm IPAP sensitivity Respiratory rate and Backup
respiratory setting ( f )
Delay before
ramp
Ramp duration Rise time IPAP sensitivity
Start pressure Alarm volume EPAP sensitivity
Leak setting Leak alarm Rise time
EPAP sensitivity I:E ratio
Low Pressure alarm Alarm volume
High Pressure alarm Leak alarm
Delay before ramp Low Pressure alarm setting
Ramp duration High Pressure alarm setting
Start pressure Delay before ramp
Leak setting Ramp duration
Start pressure
Leak setting
23
Page 28

Display Symbols
The symbols shown in Table 5 appear on the KnightStar 330 display
during operation of the device.
Table 5. Display Symbols
Symbol Name Symbol Name
Start-up Display Symbols Settings (cont’d)
ON TIME Total hours of operation RISE Rise time setting
USAGE Total compliance time (usage in
hours)
SN Serial number
ID Patient identification number
(12 digits)
Modes
A/C Assist Control mode DELAY Delay time prior to start of ramp
VOL
LEAK
LO P
HI P
Alarm volume level
Leak alarm setting
Low pressure alarm setting
High pressure alarm setting
CPAP Continuous Positive Airway
I/E Inspiratory/Expiratory PAP mode STRT P Ramp Start Pressure
Measured Parameters
f Respiratory rate
P Current pressure High pressure alarm condition
Vt Tidal volume Low pressure alarm condition
L Leak rate Malfunction (one or two digit
V
I:E Ratio of inspiration time to
Settings Status Messages
IPAP Inspiratory pressure
EPAP Expiratory pressure
BACKUP f Backup respiratory rate setting in
Pressure mode or pressure setting
Peak inhalation flow Leak alarm condition
expiration time (also a setting in
A/C mode)
A/C mode Lockout mode active
RAMP Ramp duration
Mask L Interface (Mask) leak/type (1–6)
Alarms
P
P
#
#
L
f
error code, ##, denotes alarm
type
Backup respiratory rate active
Ramp delay active
Lockout mode inactive
ISENS Inspiratory sensitivity
ESENS Expiratory sensitivity
Alarm is muted
24
Page 29

Display Preferences
Table 6 lists the six numeric indicators on the control panel display,
along with an explanation of how they are generated. Patient data is
updated for each breath.
Table 6. Measured Parameters
Display Description
f Respiratory Rate – This value reflects the inspiration and expiration trigger points of the
system based on the patient’s respiratory efforts. The value displayed is a four-breath
moving average of the sum of inspiration and expiration.
Normal operating range: 0 bpm to 60 bpmUnit of Measure: breaths p er minute
P Current pressure
Normal operating range: 3 cmH
Note: 1 cmH
Vt Estimated Tidal Volume – This value is computed for every detected breath and is
displayed as a four-breath moving average. The system flow is integrated during the
inspiratory part of the breath cycle, from which the computed leak is subtracted.
Normal operating range: 1 mL to 2000 mL Unit of Measure: milliliter
L Estimated Leak – Using the device’s internal flow sensor signal, an average is determined
for the flow signal. This average value in a system free of leaks would represent the vent
flow; and this value minus the standard purge hole leak rate (depending on the leak
setting) is the leak value displayed. Values greater than “0” would indicate an ill-fitting
interface. The value is displayed as a four-breath moving average.
Normal operating range: 1 L/min to 100 L/minUnit of Measure: liters per minute (L/min)
V
I:E Inspiration:Expiration Ratio – This value reflects the inspiration and expiration trigger
Estimated Peak Inhalation Flow – This value is computed by detecting the maximum
internal flow sensor signal for each inspiration. From this maximum value the estimated
leak is subtracted. The value is computed for every breath and is displayed as a fourbreath moving average. This measurement is displayed on the secondary screen by
pressing the ▲ (Up Arrow) button when in normal operation.
Normal operating range: 1 L/min to 100 L/minUnit of Measure: liters per minute (L/min)
points of the system based on the patient’s respiratory efforts. The value displayed is a
four-breath moving average. This measurement is displayed on the secondary screen by
pressing the ▲ (Up Arrow) button when in normal operation.
Normal operating range: 1:0.0 to 1:9.9 Unit of Measure: Not applicable
O = 0.98 hPa
2
O – 35 cmH2O Unit of Measure: cmH2O
2
NOTES:
(1) The specified ranges were obtained under dry, ambient
temperature and pressure conditions (ATPD).
(2) The maximum value of peak flow (up to 100 liters per
minute) will be limited as leaks from interfaces (masks)
increase.
25
Page 30

Changing Device Settings
Patient prescription parameters may be programmed using the control
panel located on the top of the KnightStar 330, or by using the
optional remote control. The device settings are listed in Table 7; note
that the patient-accessible settings are shaded.
NOTE:
To toggle between the clinician access mode (the default)
and the patient access mode (Lockout mode),
simultaneously press the Mode button and the
▲ (Up Arrow) button for two seconds.
To change the clinician-accessible settings, complete these steps:
1. Press the Mode button to select the desired mode of operation
(CPAP, I/E, or A/C).
2. Press the Set button to select the setting that you wish to change.
3. Use the ▲ (Up Arrow) and ▼ (Down Arrow) buttons to change
the value of the selected setting.
4. To change settings, repeat steps 2 and 3.
When the four settings screens have been displayed, or when no
button has been pressed for 60 seconds, or when the Mode but-
ton is pressed: the Settings mode is exited and the main screen
appears.
26
Page 31

Table 7. KnightStar 330 Settings
Setting
1
Description Value Accessibility Mode
CPAP Level of CPAP pressure 3 cmH2O – 20 cmH2O
(increments of 1 cmH
IPAP Pressure during inspiration 3 cmH
O – 30 cmH2O
2
(increments of 1 cmH
EPAP Pressure during expi ration 3 cmH
O – 20 cmH2O
2
(increments of 1 cmH
Backup
respiratory
Rate of machine-initiated
breaths
3 bpm –30 bpm
(increments of 1 bpm)
rate
I:E ratio Ratio of inhalation time to
exhalation times for
1:1.0 to 1:4.0 (increments
of 0.5)
backup breath rate
Inspiration
sensitivity
Sensitivity at which
devices switches from
1 – 5 (1 most sensitive;
5 least sensitive)
EPAP to IPAP
Expiration
sensitivity
Sensitivity at which
devices switches from
1 – 5 (1 most sensitive;
5 least sensitive)
IPAP to EPAP
Rise-time Rate of pressure increase 1 – 5 (1 is the fastest
setting; 5 is the slowest)
Top panel,
O)
2
remote control,
PC, modem
Top panel,
O)
2
remote control,
PC, modem
Top panel,
O)
2
remote control,
PC, modem
Top panel,
Only CPAP
Only I/E or A/C
Only I/E or A/C
Only A/C
remote control,
PC, modem
Top panel,
Only A/C
remote control,
PC, modem
Top panel,
Only I/E or A/C
remote control,
PC, modem
Top panel,
Only I/E or A/C
remote control,
PC, modem
Top panel,
Only I/E or A/C
remote control,
PC, modem
Alarm volume Loudness 0 – 3 (0 = Off, 3 = loudest) Top panel,
remote control,
PC, modem
Leak alarm Rate of air leaking before
alarm sounds
Low pressure
alarm
Pressure below the
prescribed IPAP setting at
which an alarm will sound
50 – 100 liters per minute
(increments of 1 L/min);
0 = Off
1 cmH
O below the IPAP
2
setting to 1 cmH
O above
2
EPAP (in increments of 1
Top panel,
remote control,
PC, modem
Top panel,
remote control,
PC, modem
cmH2O); 0 = Off.
High pressure
alarm
Delay time* Time delay before
Pressure above the
prescribed IPAP setting at
which an alarm will sound
automatic device start
1 cmH
O above the IPAP
2
setting to 35 (in increments
of 1 cmH2O); 0 = Off.
0 minutes – 30 minutes (in
increments of 5 minutes)
Top panel,
remote control,
PC, modem
Top panel,
remote control,
PC, modem
Ramp
duration*
Start
Pressure*
Time from device start to
prescribed operating
pressure
Pressure at which the unit
starts delay ramp
sequence
0 minutes – 30 minutes
(increments of 5 minutes)
O –20 cmH2O
3 cmH
2
(increments of 1 cmH
O)
2
Top panel,
remote control,
PC, modem
Top panel,
remote control,
PC, modem
All
All
Only I/E or A/C
Only I/E or A/C
All
All
All
27
Page 32

Table 7. KnightStar 330 Settings (continued)
Setting
Interface
(Mask) leak/
type
Patient ID Unique patient identifier 12 digits PC, modem All
Time for dial-
out
Device dialout telephone
number
Internal Clock Clock used by device 24-hour clock PC, modem All
1. Settings marked with an asterisk (*) are accessible by the patient.
1
Alarm Tests
Description Value Accessibility Mode
Patient interface purge
hole leak rate (intended)
Clock day/time device
phones home health care
dealer
Phone number for device
to call home health care
dealer
1 – 6 (1 is the lowest leak
value, and 6 is the highest)
7 days/week, 24 hours/day PC, modem All
Not applicable PC, modem All
Top panel,
remote control,
PC, modem
Before operating the KnightStar 330, you may test the low pressure
alarm, the high pressure alarm, and the leak alarm as described below:
Low pressure alarm. In the I/E mode, set the low pressure alarm to
1 cmH2O above the EPAP pressure. Remove the tubing from the
outlet. The low pressure alarm should sound within approximately
10 seconds.
All
High pressure alarm. In the I/E mode, set the high pressure alarm to
1 cmH2O above the IPAP pressure. Use an external source of
pressure, and pressurize the circuit for 10 seconds. The high pressure
alarm should sound.
Leak alarm. In the I/E mode, with a leak alarm threshold setting of
50 liters per minute, remove the interface from the tubing and set the
low pressure alarm to “0”. If the system is operating correctly, an
alarm will signal an air leak after approximately 60 seconds.
28
Page 33

Setting Prescription Parameters
All prescription settings for the KnightStar 330 must be programmed.
Before programming prescription settings, review the physician’s
prescription. Then, proceed as follows:
1. Choose the appropriate interface.
2. Explain the intended therapy to the patient, and offer reassurance
about the procedure.
NOTE:
For correct use, start the KnightStar 330 system before
putting on the mask or interface.
3. Set the mode according to the physician’s prescription (CPAP,
I/E PAP, or A/C). If there is no prescription (such as in a sleep
lab setting), begin with low IPAP pressures in the range of
5 cm H2O to 10 cm H2O, and an EPAP pressure of 3 cm H2O.
NOTE:
When changing from I/E PAP or A/C to CPAP, the CPAP
value will default to the set IPAP value. Press the Set
button and use the ▲ (Up Arrow) or the ▼ (Down Arrow)
button to change the CPAP setting.
4. Set the respiratory rate to the minimum value required to
maintain the patient. Start with a setting of 12 bpm (A/C only).
5. In A/C mode, set the I:E ratio as ordered by the physician.
WARNING:
Some CO2 rebreathing is possible during normal operation of
the KnightStar 330, especially at low airway pressures. When
using A/C mode, an I:E ratio of 1:2 or greater is recommended to reduce the possibility of CO
rebreathing.
2
29
Page 34

6. Set IPAP sensitivity (ISENS) to a value of 2 or 3 to start.
7. Set EPAP sensitivity (ESENS) to a value of 2 or 3 to start.
NOTE:
Refer to the following sections for more information about
Inspiratory and Expiratory Sensitivity and Rise Time.
8. Set rise time, alarm volume, leak alarm, low and high pressure
alarms, delay time prior to ramp, ramp duration, ramp start
pressure, and mask leak settings as required.
9. Initiate noninvasive positive pressure ventilation (NPPV), while
gently holding the interface in place.
10. Once the patient is comfortable, secure the interface in place (use
headstraps, as applicable). Avoid an excessively tight fit.
Sensitivity Adjustment
Inspiratory Sensitivity
The KnightStar 330 features adjustable triggering sensitivity for both
inspiration and expiration. Clinicians should adjust the sensitivity, as
needed, so that the KnightStar 330 cycles with the patient’s breathing
effort.
A setting of 1 is the most sensitive setting on the KnightStar 330; a
setting of 5 is the least sensitive setting.
Inspiratory sensitivity should be adjusted for patient comfort to
improve compliance. An inspiratory setting that is too sensitive causes
autocycling, which may be uncomfortable for the patient.
NOTE:
Autocycling refers to an automatically delivered breath that
was not initiated by the patient.
30
Page 35

Expiratory Sensitivity
Figure 8 illustrates the effects of changing the expiratory sensitivity
on the KnightStar 330.
Figure 8. Effects of changing the expiratory sensitivity on the
KnightStar 330
As shown in Figure 8, a setting of 1 is the most sensitive setting, and
causes the KnightStar 330 to quickly cycle into the expiratory phase.
A setting of 5 is the least sensitive, and inspiratory flow needs to
diminish significantly before the KnightStar 330 cycles into the
expiratory phase. The longer it takes for the device to cycle into the
expiratory phase, the greater the potential tidal volume delivered to
the patient.
Expiratory sensitivity can be adjusted by patient assessment. If
inspiratory times appear to exceed the inspiratory efforts of the
patient, a lower expiratory sensitivity can be set and the patient
observed for signs of increasing comfort. If the breath appears to be
terminating prematurely, a higher expiratory sensitivity can be set and
patient comfort as well as its effect on tidal volume re-evaluated.
31
Page 36

Rise Time
The following graph (Figure 9) depicts the “Rise-time” for settings 1,
3, and 5.
Figure 9. Breath waveform pressures for rise-time settings of 1, 3,
and 5
A setting of 1 causes the pressure to rise more rapidly than a setting of
5. Patients with aggressive inspiratory demands may be more
comfortable on a setting of 1 or 2.
Some patients are more comfortable with a gentler rise to pressure;
for these patients, a setting of 4 or 5 may be better suited to their
needs. A setting of 3 represents an intermediate rate of pressure
change.
The dotted lines in Figure 9 show the relative amount of time required
for pressures to reach their peak values at various rise-time settings.
32
Page 37

Clinical Application and Use
Figure 10 shows the KnightStar 330 system configured for use.
Before each use, ensure that the system has been connected as
described in the section entitled “System Setup” on page 20.
Figure 10. Typical Configuration for Patient Care with the
KnightStar 330
The device should be set up in the patient’s room on a level stable
surface.
33
Page 38

WARNING:
When the KnightStar 330 is powered off, it saves its most
recent settings. To avoid exposing the patient to inappropriate settings, review all settings before connecting th e system
to the patient.
Connecting the Device to the Patient
When connecting the KnightStar 330 for the first time, complete these
steps:
1. Turn the unit on.
2. Explain to the patient that you will be helping them apply the
mask to their nose, and hold the mask in place until they are
comfortable. The Delay/Ramp feature may also be used to
provide additional comfort when first using the KnightStar 330.
3. Observe the patient and check the mask for fit and leaks.
4. Note the estimated leak rate. (The leak value is automatically
displayed.) Use this number as a baseline reference during the
evaluation period.
WARNING:
Check the estimated leak rate periodically to ensure that the
value has not increased significantly due to leaks. Leaks may
be caused by ill-fitting, dislodged, or faulty tubing or interfaces.
34
Page 39

Proximal pressure line
Air outlet
Optional outlet air filter
Figure 11. Connecting Device Components
WARNING:
Use only Puritan Bennett-approved accessories in conjunction with the KnightStar 330 bi-level ventilator. The use of
other accessories may damage the unit and endanger the
patient.
35
Page 40

Titrating Therapy
To assist patient therapy by titrating pressures, the clinician should
follow these steps:
1. Titrate inspiratory pressure (IPAP) in 2 cmH2O increments until
the desired patient outcome (such as decreased use of accessory
muscles, decreased respiratory rate, etc.) is achieved.
2. Titrate the EPAP or PEEP as needed to improve oxygenation or
to overcome auto-PEEP, and to facilitate patient-triggering.
(EPAP and PEEP are synonymous in regard to the amount of
pressure left in the breathing pathway at the end of the expiratory
cycle.)
3. Add up to 15 liters per minute of supplemental oxygen, if
needed.
4. Continue to coach and reassure the patient, making adjustments
to improve the patient’s acceptance of the procedure.
5. Adjust the delay and ramp, according to the patient comfort
level.
NOTE:
You may want to deactivate the delay once the interface is
in place if the patient is in respiratory distress and/or
hypoxic.
36
Page 41

Using the Optional Humidifier
A humidifier may be used with the KnightStar 330 if the patient is
experiencing nasal discomfort due to low moisture content in the
input air. To use the humidifier, follow these steps:
1. Place the KnightStar 330 on top of the humidifier housing.
KnightStar 330
Humidifier
housing
Reservoir
2. Remove the reservoir from the housing and fill it to the FILL
LINE with distilled or sterile water. The reservoir is designed to
hold water for only one night’s use.
Fill line
Optional outlet air filter
3. Slide the reservoir gently back into the housing.
37
Page 42

4. Connect the short humidifier tubing between the KnightStar 330
and the inlet of the reservoir.
WARNING:
Do not allow water to come into contact with the KnightStar
330 or other electrical apparatus. To prevent electrical hazard, remove the source of power if water is suspected of
entering the KnightStar 330.
Do not fill the reservoir when it is in the housing.
Use only distilled or sterile water to fill the reservoir.
NOTE:
For information regarding operation, connection, and
cleaning, refer to the instructions included with the
humidifier.
38
Page 43

Using Supplemental Oxygen
If the physician orders supplemental oxygen for the patient, the
adequacy of the prescribed flow rate should be determined by pulse
oximetry. Oxygen may be titrated either directly at the patient
interface or by using a supplemental O2 adapter.
To administer oxygen with the KnightStar 330 system, oxygen may
be titrated as follows:
• Using an O2 adapter between the optional outlet filter
and the patient circuit
• At the outlet of the blower
• At the interface
Connecting Oxygen to the Device
Connect the oxygen adapter to the air outlet; or, if it is present, to the
optional outlet air filter. Connect the oxygen supply tubing to the
small port on the oxygen adapter, as shown in Figure 12 on page 40.
The oxygen supply tubing may also be connected directly to the
patient interface if it is equipped with a small port.
WARNING:
At a fixed flow of supplemental oxygen, the FiO2 will vary
depending on the pressure settings, patient breathing pat-
tern, interface selection, and leak characteristics of the
patient interface.
WARNING:
Always observe all fire and safety rules associated with the
use of oxygen. Oxygen vigorously accelerates combustion.
Do not smoke or have an open flame in any room where oxygen is in use.
39
Page 44

WARNING:
Always power on the system before starting oxygen flow.
Stop oxygen flow before powering the system off. Oxygen
delivered into the ventilator tubing may accumulate within
the device, creating the risk of fire. Do not use supplemental
oxygen at flows above 15 L/min.
Air outlet
Port
Oxygen adapter
Figure 12. Connecting the Oxygen Adapter to the Air Outlet
Optional outlet air filter
40
Page 45

Rebreathing of
Carbon
All CPAP and bi-level devices may increase the quantity of CO2
rebreathed because the expired air is forced back into the supply
tubing. The expired air is purged through the purge hole(s) in the
Dioxide
interface. The quantity of CO2 rebreathed will vary depending on the
pressure settings, patient breathing pattern, interface selection, and the
leak characteristics of the patient interface.
WARNING:
Some CO2 rebreathing is possible during normal operation of
the KnightStar 330—especially at low airway pressures.
When using A/C mode, an I:E ratio of 1:2 or greater is recommended to reduce the possibility of CO
Testing for rebreathing was performed using a CO2 monitor sampling
at the nose, while a healthy adult breathed through an ADAM™ or
Breeze™ interface. The test results are shown in Table 8.
Table 8. C02 Rebreathing Test Results
rebreathing.
2
IPAP EPAP Vt BPM I:E Result
15 3 1.2 14 1:2.2 CO2 was not completely cleared before inspiration
began.
15 5 0.8 15 1:2.3 CO
15 7 0.9 15 1:2.5 CO
15 9 0.8 15 1:2.4 CO
was rapidly dropping at the beginning of inspiration.
2
was completely cleared at the beginning of
2
inspiration.
was cleared 1.4 seconds before beginning of
2
inspiration.
Note:
The KnightStar 330 is designed to show “0” leaks based o n
a leak setting appropriate to a given interface. Interfaces
other than the ADAM or Breeze may show a positive leak
value, unless the leak setting is adjusted for that device.
41
Page 46

Under the test conditions listed in Table 7 on page 27, CO2
rebreathing was minimal when the EPAP pressure was greater than 5
O. Rebreathing will vary depending on respiratory rate, tidal
cmH
2
volume, I:E ratio, and EPAP pressure. IPAP pressure will, to a lesser
degree, affect rebreathing.
Purge hole flow is an important factor in clearing CO
circuit. In general, for any specific set of conditions, interfaces with
higher purge hole flows are expected to reduce the quantity of CO2
remaining in the circuit. Puritan Bennett interfaces with higher purge
hole flows than the ADAM interface are available. Table 9 lists the
purge flows for Puritan Bennett interfaces.
It is important to properly fit the patient with an interface that will
provide comfort and proper treatment. Each interface listed has
different characteristics of fit and dead space. These are important
factors in interface selection.
Table 9. Purge Flows for Various Interfaces
Interface Model
ADAM™ 12 25 2
Breeze™ 13 30 3
Purge Hole
Flow (L/min)
at
3 cmH
O
2
Purge Hole
Flow (L/min)
at 15 cmH
O
2
from the
2
Leak Setting
Companion
®
SoftFit
Sullivan
and SoftFit Ultra
®
Modular
Table 10 on page 43 shows the purge hole leak values associated with
different leak settings. It is important to select the correct leak setting
for a given interface so that the device will display the correct tidal
volume and leak.
For interfaces produced by manufacturers other than Puritan Bennett,
you may contact them for instructions and use Table 10 to select the
correct leak setting.
®
14 34 5
16 35 5
19 40 6
42
Page 47

Table 10. Purge Flow at 15 cmH2O
Cleaning Instructions
Cleaning the Exterior
Leak Setting
123
227
331
433
535
642
Purge Hole Flow
(L/min) at 15 cmH
O
2
To increase the life of your equipment, it is important to clean all
components regularly. Cleaning methods other than those indicated
here are discouraged. The KnightStar 330 requires little maintenance
other than regular cleaning.
WARNING:
Always unplug the unit from all electrical power sources
before cleaning. Do not let water drip into any opening on the
unit.
Cleaning the Inlet Filter
Clean the surfaces of the KnightStar 330 by wiping them with a cloth
dampened with warm soapy water, then wiping them dry.
Inspect the inlet filter often by removing the inlet baffle.
1. Wash the inlet filter in warm soapy water. Inspect it often and
clean it at least once a week.
2. Rinse the filter thoroughly to remove all soap.
3. Pat the filter dry with a towel.
43
Page 48

4. Allow the filter to air dry completely before reinstalling; or,
install the spare filter.
5. Replace the filter if it is torn or soiled.
6. Reinstall the filter on the rear of the unit.
7. Reattach the baffle.
Replacing the Optional Air Outlet Filter
The optional outlet filter is disposable, and should be inspected
regularly and replaced when noticeably dirty or discolored. Frequency
of replacement can vary, depending on usage and environmental
conditions. Contact your home care provider for replacement filters.
In addition, air outlet filters are intended for single-patient use and
must be changed between patients. Your Puritan Bennett Customer
Service representative can assist you in selecting the proper optional
air outlet filter, and advise you on an appropriate replacement
schedule.
For optimal performance, use only Puritan Bennett-approved filters
with the KnightStar 330.
44
Page 49

Troubleshooting Any unusual system event results in one or all of the following:
• Displayed error code(s)
• Illuminated yellow or red LED(s)
• Audible alarm
To mute an alarm for one minute, press the ▲/Alarm Silence button.
Alarms are classified as follows: high priority, medium priority, or
low priority.
•A high priority alarm is indicated by a flashing red LED, along
with an audible alarm that beeps five times at intervals of 10 seconds.
•A medium priority alarm is indicated by a flashing yellow LED,
along with an audible alarm that beeps three times at intervals of
25 seconds.
•A low priority condition is indicated by an illuminated yellow
LED (without an audible alarm). An illuminated green LED
indicates the presence of power, whether from A/C or external
battery.
Alarm conditions are shown in Table 11 on page 46.
WARNINGS:
Respond immediately to all alarm conditions.
Under certain conditions, some alarms may not occur. For
example: (1) The leak alarm may not occur if patient breath
efforts are not detected, as in the case of excessively large
leaks; and (2) The low pressure alarm may not occur under
conditions such as these: an incorrect alarm threshold setting, or air pathway resistance.
45
Page 50

Table 11. Alarm Conditions
Type Priority Description Display
High
pressure
Low pressure High Pressure at interface falls
Leak High Estimated leak rate rises
Internal
malfunction
Apnea Low Patient’s spontaneous
Medium Pressure at interface
rises above setting for 10
seconds; flashing yellow
LED.
below setting for 10
seconds; flashing red
LED.
above setting for 60
seconds; flashing red
LED.
High Internally detected
failure; flashing red LED.
respiratory rate remains
at or below the
prescribed respiratory
rate for 5 breaths in A/C
mode. Yellow LED is on.
Alarm
Volume
P
P
L
#
#
f
Adjustable
0–3:
0=Off;
3=Loudest
Adjustable
0–3:
0=Off;
3=Loudest
Adjustable
0–3:
0=Off;
3=Loudest
Always
enabled;
Loudness
=3
Not
applicable
Reset
Conditions
Pressure
decreases to less
than the alarm limit.
Pressure rises
above the alarm
limit.
Leak flow rate
decreases to less
than alarm limit.
Unplug from power
source, wait 30
seconds, then
reconnect to power
source. Verify
correct settings if
device functions
normally.
Breath detected.
Power Loss H i gh Loss of A/C and exte rn al
battery power. Flashing
red LED.
Overpressure High Pressure > 40 cmH
Flashing red LED.
2
O.
In the event of a system malfunction, use Table 12 to identify possible
causes and solutions.
46
Display is
blank
55
Always
enabled;
Loudness
=3
Always
enabled;
Loudness
=3
Restore A/C or
external battery
power.
Unplug from power
source, wait 30
seconds, then
reconnect to power
source. Verify
correct settings if
device functions
normally.
Page 51

Table 12. Troubleshooting Checklist
Problem Indicators Possible Cause Corrective Action
No airflow out
of device
Low airflow
out of device
Power loss Blank display.
Internal
malfunction
No alarm or
displayed
symbol.
No alarm or
displayed
symbol.
LED
flashes and
alarm sounds
No green
LED.
Alarm and
flashing
LED.
Displayed
symbol
with ## being
the 2-digit
error code.
##
1. Internal electronic
failure.
2. Corrupted
prescription
settings.
1. Delay activated.
2. Internal electronic
problem.
3. Blocked device air
inlet.
1. Faulty power cord
connection.
2. Wall outlet power
failure.
Internal electronic
problem.
1. Contact the home care provider for
repair.
2. Contact the home care provider.
1. Stop the delay.
2. Contact the home care provider for
repair.
3. Move rear of device away from the
wall and all objects.
1. Check power cord connections at
back of device and wall outlet.
2. Verify Mains A/C power is
available at wall outlet. If not,
connect external battery. Ensure
green LED on top of device is
illuminated. LED stops
flashing upon resuming operation
from standby mode.
Disconnect power, then reapply power.
If condition persists, contact the home
care provider for repair.
Overpressure Alarm and
flashing
LED.
Displayed
symbol is
.
55
High pressure Alarm and
flashing
yellow LED.
Displayed
symbol is
P
.
Internal electronic
problem.
Kinked or blocked
tubing.
47
Disconnect power, then reapply power.
If condition persists, contact the home
care provider for repair.
Verify that the tubing has not collapsed,
and that there are no sharp bends.
Reposition the device, tubing, or
accessories, as applicable.
Page 52

Table 12. Troubleshooting Checklist (continued)
Problem Indicators Possible Cause Corrective Action
Low pressure Alarm and
flashing
LED.
Displayed
symbol is
P
.
Circuit leak Alarm and
Low breath
rate
flashing
LED.
Displayed
symbol is
L
.
No alarm.
Steady yellow
LED.
Displayed
symbol is
f
.
1. Tubing circuit leak,
or tubing is
disconnected.
2. Small, proximal
pressure tubing is
not connected to
port next to device
air outlet.
Tubing circuit leak, or
tubing is disconnected.
The patient’s breath rate
is lower than the
prescribed setting.
1. Reposition interface pillows or
mask. Check tubing connections
at device air outlet and patient
interface. If tubing is punctured or
disconnected, replace it or
reconnect it, as applicable.
2. Verify proper tubing connection.
Disconnect tubing and reinstall, as
applicable.
Reposition interface pillows or mask.
Check tubing connections at device air
outlet and patient interface. If tubing is
punctured or disconnected, replace it or
reconnect it, as applicable.
If the patient experiences signs of
distress, contact physician.
48
Page 53

Appendix A: KnightSt ar 330 Setup Checklist
Table 13. KnightStar 330 Setup Checklist
Procedure
General Exterior Appearance
Any dents, scratches, or loose parts that may indicate dropping or other abuse?
Inlet baffle missing?
Check the condition of A/C power cord.
Check for fluid residue in and around KnightStar 330 openings and housing joints.
Ensure that the inlet filter is clean and in place.
Ensure that a new optional outlet air filter is used.
KnightStar 330 Setup
Ensure that the KnightStar 330 is placed in such a manner that there is at least
one inch of clearance at the back of the device.
Connect one end of the A/C power cord into the rear panel of the KnightStar 330,
and the other end into an A/C wall outlet.
Turn the on/off button on. Both the yellow and indicators should flash for
approximately one second; the green indicator remains lit.
CAUTION: If an error code appears on the display, or an alarm stays activated following system power-up, turn the on/off button off. Then turn the on/off button on; if the
system fails again, the KnightStar 330 must be serviced before installation can continue.
Pass ✔Fail
✔
❑❑
❑❑
❑❑
❑❑
❑❑
❑❑
❑❑
Functional Test
With the unit turned on, select the CPAP mode and set an alarm volume of 0.
Set the CPAP prescription pressure to 3 cmH
20 cmH
speed increase.
Set the alarm volume to 1.
Turn the KnightStar 330 off and wait for the motor to stop rotating.
O. As the pressure increases, you should be able to hear the moto r blower
2
O, then increase the pressure to
2
49
❑❑
Page 54

Table 13. KnightStar 330 Setup Checklist (continued)
Procedure
Turn the KnightStar 330 on and let it run for approximately three minutes. Verify
that the LEAK alarm indicator is illuminated, and that the audible alarm
activates. See the lower left corner of the display.
Turn off the KnightStar 330.
Sensitivity and Pressure Test
1. Attach patient circuit and bacteria filter to air outlet.
2. Attach proximal pressure line to pr es su re out let.
3. Attach calibration shell to end of patient circuit; connect circuit to manometer.
4. Turn on the KnightStar 330.
Set the Following Parameters:
Mode: I/E PAP; IPAP: 20 cmH
After a short time, the KnightStar 330 should begin to cycle between IPAP
(20 cmH
Increase ESENS to 5. The KnightStar 330 should begin to cycle at a slower rate.
Make a note of the IPAP and EPAP pressure at these settings.
O) and EPAP (10 cmH2O).
2
L
O; EPAP:10 cmH2O; ISENS:1; ESENS:1
2
Pass ✔Fail
✔
❑❑
❑❑
❑❑
❑❑
❑❑
Decrease IPAP and EPAP pressure settings in 3 cmH
set pressure is 14 cmH
both IPAP and EPAP output pressure at each interval.
Output pressure should be within 1 cmH
NOTE: Accuracy of measured output pressure is dependent on the specified/actual
accuracy of the manometer. For proper re ad in gs , ens ur e th at the ma n om e te r
has recently been calibrated in accordance with the manufacturer’s
recommendation.
Reset IPAP and EPAP pressure back to 20 cmH
Increase ISENS to 5. The KnightStar 330 should not cycle to IPAP and should
remain at EPAP pressure (10 cmH
Delay Test
Set the delay time for 5 minutes. Set the START pressure to 4.0; and press the
Mode button.
Press the Delay/Ramp button and, using the manometer, verify that the pressure
has dropped to 4.0 cmH
Verify that the delay symbol appears on the KnightStar 330 display.
O, and EPAP set pressure is at 4 cmH2O. Make a note of
2
O in any of the pressure settings.
2
O).
2
O.
2
O intervals until the IPAP
2
O and 10 cmH2O, respectively.
2
❑❑
❑❑
❑❑
❑❑
50
Page 55

Table 13. KnightStar 330 Setup Checklist (continued)
Procedure
Power Failure Indicator Verification
While KnightStar 330 is turned on and running, disconnect the A/C power cord.
Verify that the audible alarm activates. To mute the al arm, press the Alarm Silence
button.
Pass ✔Fail
✔
❑❑
51
Page 56

Appendix B:
KnightSt ar 330
Specifications
Table 14. KnightStar 330 Specifications
Electrical
Characteristics
External Battery
Time
Performance Working Pressure: 3 cmH
Displayed
Patient
Parameters
Rated A/C Input Voltage: 100 – 240 V~
Rated Input Frequency: 50 Hz – 60Hz
Rated Input Power: 140 VA
The KnightStar 330 is designed for continuous operation.
The equipment is not suitable for use in the presence of a flammable
anaesthetic mixture with air, or with oxygen or nitrous oxide.
Direct current power from a 12-volt external battery pack can operate the
KnightStar 330. The 32 ampere-hour external battery provides power for at
least 8 hours. The 7 ampere-hour external battery provides power for 3
hours. If needed, cables are available for connectin g the KnightStar 330 to a
car or truck cigarette lighter outlet.
Rated Input Voltage: 12 V
Rated Input Current: 6.0 A
Rated Input Power: 140 W
Pressure Limit: 40 cmH
Static Pressure Regulation:
4 cmH
CPAP +
Bi-Level +
Vt: 20 mL + 20% of reading (between 50mL and 2000 mL)
Peak Flow: 5 LPM + 20% of reading (between 1 LPM and 100 LPM)
Leak: 5 LPM + 20% of reading (between 1 LPM and 100 LPM)
Respiratory Rate: 1 BPM (between 1 BPM and 50 BPM)
I:E Ratio: 15% of reading (between 1:1 and 1:9.9)
Pressure: 1 cmH
O to 30 cmH2O
2
0.5 cmH2O
1.0 cmH2O
2
O + 10% of reading (between 3 cmH2O and 35 cmH2O)
2
O to 30 cmH2O (1 cmH2O = 0.98 hPa)
2
O
Noise 30 dBA for IPAP/EPAP = 10 cmH
Circuit
Resistance
Physical
Characteristics
Environmental
Requirements
Inspiratory:
0.9 cmH
0.2 cmH
Device Size: 3.75 in. x 8.25 in. x 5.62 in. (9.52 cm x 20.95 cm x 14.27 cm)
Device Weight: 2.7 lb (1.21 kg)
Device Airway Volume: 65 mL
Tube Airway Volume: 695 mL (6 ft/1.8 m) 927 mL (8 ft/2.4 m)
Operating Temperature: +41
Humidity: 15% to 95% noncondensing
Altitude: 0 to 8000 ft (0 to 2438 m)
Storage Temperature: -40
Humidity: 10% to 95% noncondensing
O at 60 L/m
2
O at 30 L/m
2
o
F to +104oF (+5oC to +40oC)
o
F to 158oF (-40oC to +70oC)
52
O (measured 1 m in front of device)
2
Expiratory:
5.0 cmH
4.1 cmH
O at 60 L/m
2
O at 30 L/m
2
Page 57

Appendix C: What the Patient and Caregiver Must Know
The checklist in Table 15 presents a summary of the topics that
patients and caregivers must understand in order to use this device
successfully. Some topics do not apply to some patients; some
patients may require additional information. It is the responsibility of
the clinician or clinical educator to ensure that the patient and
caregiver understand the appropriate topics fully.
For a detailed list of learning objectives for patients and caregivers,
see Learning Objectives for Positive Pressure Ventilation in the Home
(National Center for Home Mechanical Ventilation, Denver, CO.,
July 1993). This publication is available from Puritan Bennett.
53
Page 58

Table 15. Patient/Caregiver Checklist
The need for bi-level ventilation.
❑
The schedule for ventilation.
❑
The supplies required for ventilation, and the sources of each.
❑
Whom to contact for medical emergencies, equipment emergencies, or
❑
power emergencies.
How to contact other resources for assistance (health aides, attendants,
❑
therapists, and so on).
The principles of operation for the bi-level ventilator.
❑
Power sources for the ventilator, and how to connect each.
❑
The settings for the bi-level ventilator parameters, and the importance of
❑
each.
How to perform a user self-test of the bi-level ventilator, and how to respond
❑
if the self-test fails.
The ventilator alarm settings, with the purpose and function of each.
❑
.
The patient and caregiver must understand:
How to respond to bi-level ventilator alarms.
❑
What to do if the bi-level ventilator alarms inappropriately.
❑
The parts and purpose of the patient circuit.
❑
How and when to clean and replace the patient circuit.
❑
How to recognize and respond to problems with the patient circuit.
❑
The parts and purpose of the nasal interface or mask.
❑
Care of the nasal interface or mask.
❑
How to recognize and respond to problems with the nasal interface or mask.
❑
The oxygen setting, and why it is required.
❑
How to connect the oxygen source to the bi-level ventilator.
❑
How to determine the quantity of oxygen being delivered, and how to adjust
❑
the quantity.
Safety rules for the use of oxygen.
❑
How and why to monitor the patient’s condition.
❑
54
Page 59

Table 15. Patient/Caregiver Checklist (continued)
The patient and caregiver must understand:
❑
❑
❑
❑
❑
❑
❑
❑
❑
❑
❑
❑
❑
How to check the patient’s vital signs.
The significance of the patient’s ease of breathing.
What to note about the patient’s skin, mucous membranes, and secretions,
with their significance.
How to recognize the signs of infection, and how to respond.
The importance of routine medical appointments and medical testing.
Equipment and phone numbers to have available in cases of emergency.
How to respond to dyspnea.
How to recognize and respond to problems with the bi-level ventilator.
How to recognize and respond to problems with the oxygen supply.
Techniques to prevent aspiration of vomit.
The importance of coordinating care for the patient.
Resources for respite care.
Choices about future ca re.
❑
❑
The purpose of advanced directives.
Optional outlet air filters should be replaced in accordance with the filter
manufacturer’s instructions.
55
Page 60

Appendix D: Service Information
KnightStar 330 ventilators are warranted against defects in
workmanship and materials. The full text of the warranty provides the
details. Do not make any service repairs on this equipment during the
stated warranty period. Any unauthorized work immediately voids the
warranty.
If you need information or assistance, or if the information in this
manual is insufficient, contact Puritan Bennett at:
• 800.255.6774 (North America)
• 760.603.5300
Nellcor Puritan Bennett Incorporated does not recognize the owner of
a ventilator as an authorized trained service representative. Puritan
Bennett will not be liable for any repairs attempted by the owner. Any
such attempted repairs other than specified non-warranty repairs void
the warranty. Parts and labor costs incurred by the owner will not be
reimbursed by Puritan Bennett.
Puritan Bennett will make available on request: diagrams, component
parts lists, descriptions, calibration procedures and instructions to
assist in the repair of parts classified by Puritan Bennett as repairable.
Before returning any device to Puritan Bennett, you must get a Return
Goods Authorization (RGA) number by calling Puritan Bennett at one
of the phone numbers listed above.
56
Page 61

Appendix E: Limited Warranty
Puritan Bennett warrants to the owner that the KnightStar 330
ventilator, exclusive of expendable parts and other accessories, shall
be free from defects in material and workmanship for twelve months
from the original date of sale. Puritan Bennett’s sole obligation, with
respect to any such defect, is limited to the repair or, at Puritan
Bennett’s option, replacement of the ventilator. Purchaser pays return
freight charges.
This warranty is made on the condition that prompt notification of a
defect is given to Puritan Bennett within the warranty period, and that
Puritan Bennett has the sole right to determine whether a defect exists.
The warranty does not apply to ventilators that have been partially or
completely disassembled; altered; subjected to misuse, negligence, or
accident; or operated other than in accordance with the instructions
provided by Puritan Bennett. This includes repair by unauthorized
personnel.
This warranty represents the exclusive obligation of Puritan Bennett
and the exclusive remedy of the purchaser regarding defects in the
ventilator.
THIS WARRANTY IS GIVEN IN LIEU OF ANY EXPRESS OR
IMPLIED WARRANTIES, INCLUDING ANY WARRANTY OF
MERCHANTABILITY OR FITNESS FOR A PARTICULAR
PURPOSE.
No person is authorized to modify, in any manner, Puritan Bennett’s
obligation as described above.
57
Page 62

58
Page 63

Index
A
A/C mode 5
Access Levels 3
Adjustment 30
Air Inlet 17
Filter 17
Air Outlet
Filter 16, 44
Alarms 46
High Priority 15, 45
Low Priority 15, 45
Medium Priority 15, 45
Autoclear 14
B
Battery Connector 18
C
Carbon Dioxide 41
Cautions 6
Cleaning 43
Clock 28
Configuration 33
Connectors 18
RS-232 18
A
A/C mode 5
Access Levels 3
Adjustment 30
Air Inlet 17
Filter 17
Air Outlet
Filter 17, 44
Alarms 46
High Priority 16, 45
Low Priority 16, 45
Medium Priority 16, 45
Autoclear 14
B
Battery Connector 19
C
Carbon Dioxide 41
Cautions 6
Cleaning 43
Clock 28
Configuration 33
Connectors 18
RS-232 19
Control Panel
Buttons 13
Alarm Silence 15
Delay/Ramp 15
Down Arrow 15
On/Off 14
Settings 14
Up Arrow 15
Indicators 15
CPAP mode 4
D
Delay 27, 50
Dial Out 28
Display 24
Preferences 25
E
Electrical Characteristics 52
F
Filter 17
Cleaning 43
H
High Pressure 27
hPa 25
Humidifier 37
I
Inhalation/Exhalation Ratio 25
Initial 29
59
Page 64

L
Leak 25, 27
Lockout 14
Low Pressure 27
M
Masks 42, 43
Measured Parameters 25
Mode 14
Modes 22
A/C 5, 22
CPAP 4, 22
I/E PAP 22
Settings 23
O
Operating Modes 22
Oxygen 39
P
Patient ID 28
Power Cord 19
Purge Flows 41, 42, 43
R
Ramp 28
Rebreathing Carbon Dioxide 41
Remote Control 20
Respiratory Rate 24, 25
RS-232 19
S
Self-Test 21
Sensitivity 27, 30
Settings 29
Setup 20
Checklist 49
Start Pressure 15
Supplemental Oxygen 39
Symbols 11, 23
T
Titrating Therapy 36
U
Unpacking 20
V
Volume 24
W
Warnings 6
Warranty 57
D
Delay 27, 50
Dial Out 28
Display 23
Preferences 24
E
Electrical Characteristics 51, 52
F
Filter 16, 17
Cleaning 43
H
High Pressure 27
hPa 24
Humidifier 37
I
Inhalation/Exhalation Ratio 24
Initial 29
L
Leak 24, 27
Lockout 14
Low Pressure 27
M
Masks 42, 43
Measured Parameters 24
Mode 14
60
Page 65

Modes 21
A/C 5, 21
CPAP 4, 21
I/E PAP 21
Settings 22
O
Operating Modes 21
Oxygen 39
P
Patient ID 28
Power Cord 18
Purge Flows 41, 42, 43
R
Ramp 27
Rebreathing Carbon Dioxide 41
Remote Control 19
U
Unpacking 19
V
Volume 23
W
Warnings 6
Warranty 56
Respiratory Rate 23, 24
RS-232 18
S
Self-Test 20
Sensitivity 27, 30
Settings 29
Setup 19
Checklist 49
Start Pressure 15
Supplemental Oxygen 39
Symbols 11, 22
T
Titrating Therapy 36
61
Page 66

62
Page 67

Page 68

Note:
Digits of the device serial number refer to the date of manufacture. For example, May 21, 2001 would
be represented as 010521 (Y-50201052122).
This device complies with the requirements of Medical Device Directive 93/42/EEC.
Y-500008-00 Rev. H
Puritan-Bennett Corporation
4280 Hacienda Drive
Pleasanton, CA 94588 USA
Toll Free: 1.800.635.5267
Authorized Representative
Tyco Healthcare UK Limited
154 Fareham Road
Gosport PO13 0AS, U.K.
 Loading...