

Page 1
2000 PSI Pressure Washer
Table Of Contents
Topic Page #
Important Safety
Tips, Precautions, Warnings,
and Usage Instructions
Assembly Instructions 6-8
Operating Instructions 8-11
Detergents 11-13
Clean-up and Storage 13-15
Cleaning Tips 15-16
2-5
Technical Data 16
Troubleshooting Tips 17
Limited Warranty 18- 19
Parts 20- 26
1
Page 2
2000 PSI Pressure Washer
2000 PSI Pressure Washer
IMPORTANT SAFETY PRECAUTIONS
GROUND FAULT CIRCUIT INTERRUPTER
(GFCI)
This pressure washer is provided with a ground fault circuit interrupter (GFCI) built into
the plug of the power supply cord. This device provides additional protection from the
risk of electric shock. Should replacement of the plug or cord become necessary, use
only identical replacement parts that include GFCI protection.
This unit is equipped with a Ground Fault Circuit Interrupter (GFCI). When connecting
the GFCI to the receptacle, the indicator should appear red. If the indicator is not red,
depress the RESET button on the GFCI until the indicator appears red. If the indicator
does not appear red, please see Section titled “Troubleshooting” for more information.
IMPORTANT SAFETY TIPS
Neverpoint the high-pressure nozzle at people or animals.
Neverdrink alcobol or use drugs while operating the pressure washer.
WARNING: When using this product, basic
precautions should always be followed,
including the following:
1. Read all instructions before using the product. Save all
safety instructions.
2. Do not operate the pressure washer when fatigued or under
the influence of alcohol or drugs.
3. Risk of infection or injury – do not direct the high pressure
water stream at any people or animals.
4. Do not allow children to operate the pressure washer at any
time.
5. To redu ce the risk of injury, close supe rvision is ne ce ssa ry
when the pressure washer is used near children.
6. Know how to stop the unit and reduce pressure immediately.
Be completely familiar with the controls.
7. Stay alert – always be aware of where you are directing the
high pressure spray
8. Keep cleaning area clear of all people.
9. Maintain safe footing and balance at all times – do not
overreach or stand on an unstable support.
10. The work area should have adequate drainage to reduce the
possibility of a fall due to slippery surfa ces.
11. Follow the maintenance instructions specified in the manual.
12. To reduce the risk of electrocution, ke ep all connections dry
and off the ground. Do not touch the plug with wet hands.
Neveroperate thepressurewasher whilestanding in water.
Nevertouchthe electrical plug with wet hands.
Never let the electrical connections rest in water.
Neveroperate the pressure washerwithout the water turned on.
Neveruse hot water with this pressure washer.
2
GENERAL SAFETY PRECAUTIONS
1. Intended for outdoor household use only.
2. High-pressure hose can develop leaks from wear, abuse,
kinking etc. Do not use a damaged hose.
3. Do not use the pressure washer in areas near combustible
mate rials, combustible fumes, or dust.
4. Some chemicals or detergents may be harmful if inhaled or
ingested causing severe injury. Use a respirator or mask
whenever there is a chance that vapors may be inhaled.
3
Page 3
2000 PSI Pressure Washer
2000 PSI Pressure Washer
Read all instructions included with the mask so you are certain
the mask will provide the necessary protection against inhaling
harmful vapors.
5. Before starting the pressure washer in cold weather, check all
of the parts of the equipment and be sure that ice has not
formed. Do not store the unit anywhere that the temperature
will fall below 0
6. DO NOT MAKE ANY MODIFICATIONS TO ANY OF THE
COMPONENTS! Units with broken or missing parts, or without
the protective housing or covers should NEVER be operated
7. Keep the high-pressure hose connected to the pressure
washer and the spray gun while the system is pressurized.
Disconnecting the hose while the unit is pressurized is
dangerous, and may cause injury.
8. Do not leave the pressure washer unattended while the power
switch is ON.
9. Keep the water spray away from electrical wiring or fatal electric
shock may result.
°C(32° F).
SERVICING OF A DOUBLE-INSULATED
APPLIANCE
In a double-insulated product, two systems of insulation are provided instead of
grounding. No means of grounding is provided on a double-insulated product, nor
should a means for grounding be added to the product. Servicing a double-insulated
product requires extreme care and knowledge of the system, and should be done
only by qualified service personnel. Replacement parts for a double-insulated product
must be identical to the parts they replace. A double-insulated product is marked with
the words “DOUBLE INSULATION” or “DOUBLE INSULATED”. This symbol may
also be marked on the product.
USE OF EXTENSION CORDS
Use of an extension cord with this product is NOT RECOMMENDED. If you must use an
extension cord, use only extension cords that are intended for outdoor use. These cords
are identified by a mark ing “ACCEPTABLE FOR USE WITH OUTDOOR APPLIANCES, STORE
INDOORS WHILE NOT IN USE.” Use only extension cords having an
electrical rating not less than the rating of theproduct.Examine the extension cord before
use. Do not use damaged extension cords! Do not pull on cord to disconnect from the
receptacle. Always disconnect by pulling on plug. Keep the cord away from heat and
esharp dges. Always disconnect the extension cord from the receptacle before
tdisconnecting he product from the extension cord.
WARNING
– To reduce the risk of electrocution, keep all connections dry and off
the ground. Do not touch the plug with wet hands.
PROPER USE OF THE PRESSURE WASHER
THIS UNIT IS INTENDED FOR USE WITH COLD WATER ONLY!
DO NOT USE HOT WATER IN THIS PRESSURE WASHER.
Operate the pressure washer at no more than the fluid pressure
1.
rated for the pressure washer. Never run the pressure washer
without a water supply. Running the unit without a water supply
will cause irreparable damage to the unit.
2. Make sure that the water supply you use for the pressure
washer is not dirty, sandy, and does not hold any corrosive
chemical products. Using a dirty water supply will compromise
the life of the pressure washer.
3. CAUTION - The pressure washer can be used for a variety of
applications including washing cars, boats, patios, decks,
garages etc. where high pressure is necessary to remove dirt
and debris.
High-pressure water flow can damage the work surface if not
used properly! See the section titled “Operating Instructions” for
more details. Always test the spray in an open area first.
4. NEVERmove the unit by pulling on the high pressure hose. Use
the handle provided on the top of the unit.
5. Always hold the high pressure gun and wand with two hands.
Keep one hand on the gun/trigger, while supporting the wand
with the other hand (see diagram).
6. When dispensing detergent, the pressure washer applies
detergent tothe cleaning area at low pressure only. Once the
detergent has been applied, spray the detergent off of the work
area by using the adjustable nozzle.
4
5
Page 4
2000 PSI Pressure Washer
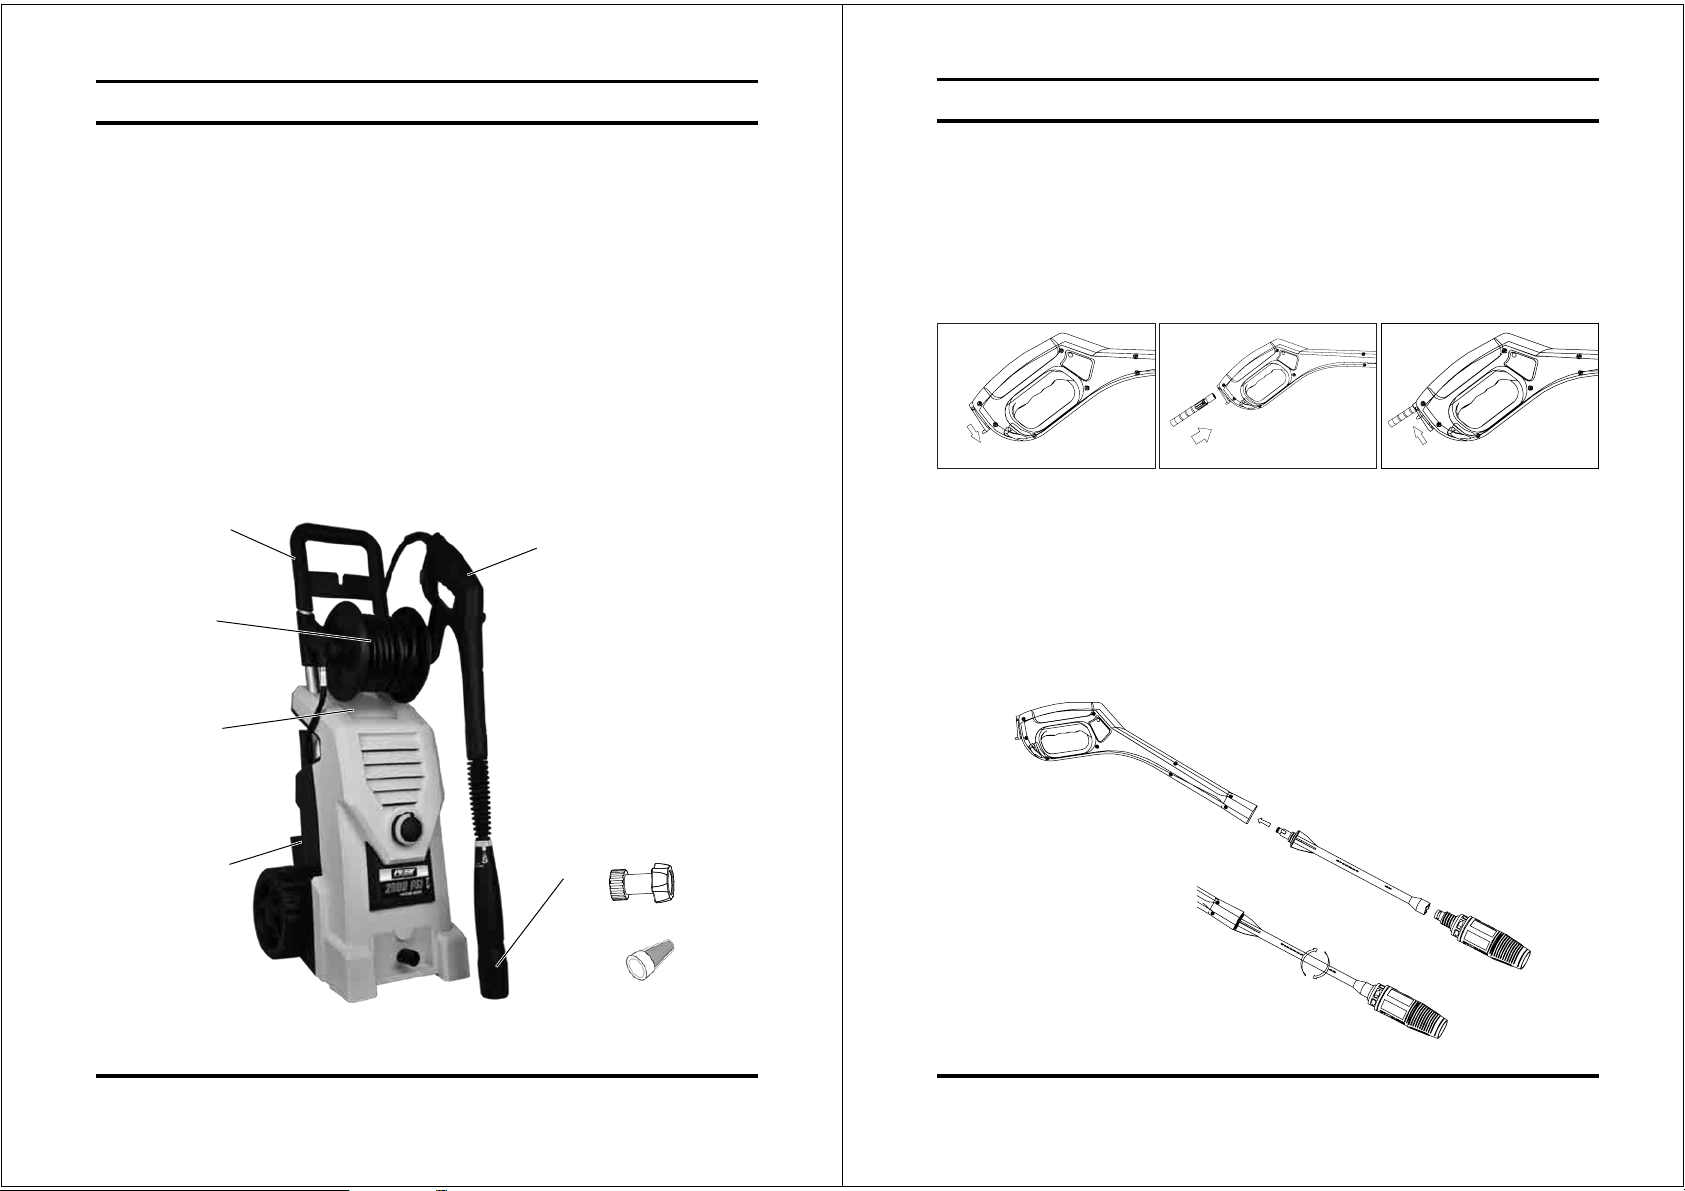
ASSEMBLY INSTRUCTIONS
Unpacking The Carton
After opening the carton, please remove all parts and che ck them against the following
list of components that are included:
2000 PSI Pressure Washer
Step 1
Take the hose lock to position A to unlock. Attach the high pressure hose to the gun.
Then push the hose lock to postion B to lock the fitting.
A. High Pressure Washer
B. Gun
C. High Pressure Hose
D. 4 IN 1 Lance Adjustable Nozzle
A
C
G
H
E. Two-wayConnector
F. Water Intake Filter (Pre-Installed)
G. Detergent Bottle
H. Accessories Holder
B
D
E
F
B
A
B
A
Step 2
Insert the adjustable spray nozzle into the gun. Push and turn the adjustable nozzle
clockwise onto the gun until it is hand tight and to lock it in place. When the pieces are
pjoined roperly, you cannot separate the two components by pulling out on the
adjustable nozzle. All attachments must be inserted intothe gun for proper use.
B
D
To assemble the enclosed parts, please refer to the steps that follow:
6
7
Page 5

2000 PSI Pressure Washer
2000 PSI Pressure Washer
Step 3
Attach the hose connector to pressure washer. Before attaching the connector to the male
fitting, remove the plastic cap, which is inserted onto the male fitting on the pressure washer
before shipping. This plastic cap can be discarded once removed. After both components have
been installed, attach the garden hose with connector screw on the pressure washer. Connect
the garden hose to the waterspout.
OPERATING INSTRUCTIONS
THIS UNIT IS INTENDED TO BE USED WITH COLD WATER ONLY!
DO NOT USE HOT WATER IN THIS PRESSURE WASHER!
Starting Up
After connecting the pressure washer to your cold
water supply, proceed as follows:
Make sure that the on/off switch is
-
in the off position.
- Connect the garden hose with a quick
connect to the inlet fitting.
- Attach the hose to the gun as per
assembly instruction step #1.
- Insert the adjustable spray nozzle
into the gun as per assembly step
#2.
- Connect the high pressure hose to
thehighpressureoutletfittingas
per assembly step #3.
- Open the water supply valve completely.
- Before turning the unit on, press the gun trigger to bleed all the
remaining air out of the pump and hose.
- Start the pressure washer by turning the on/off switch to the
on position and squeeze the trigger.
REMIN DER: mThe otor does not run continuously,only when the trigger is sque e zed.
WARNING – Risk injury the unit will start spraying
when trigger is squeezed. When turning the unit off after
use, high pressure still exists inside the hose and unit. Point
the gun in a safe direction and discharge the excess
pressure. NEVER direct the high pressure water stream at
people or animals.
Automatic On / Off
The pressure washer is equipped with an automatic on/off switch.The pressure washer
will only run when the power switch is in the ON position and the trigger on the gun is
squeezed. When you release the trigger to stop spraying water through the gun, the
motor on the pressure washer will automatically shut off. Simply squeeze the trigger
again to resume using the washer. To stop using the pressure washer, release the
trigger and switch the unit to the OFF position. The unit should be turned completely
OFF while not in use or while unattended.
Bleeding The Gun
It is very important to bleed all the air out of the pressure washer before using it.To do this
1. Release trigger lock.
2. Squeeze the trigger before turning the electrical supply on.This removes any air trapped
inside the pressure washer and lance before using the units.
3. Continue holding trigger for approximately one minute to allow any excess air out of the
unit.Water will flow through the gun at low pressure during this procedure.
4. Lock the trigger.
5. Plug the power cord into the electrical outlet.
6. Release the trigger lock.
7. Turn the ON/OFF switch clockwise to the I/ON position.
The pressure washer is ready for operation.
8
9
Page 6

2000 PSI Pressure Washer
2000 PSI Pressure Washer
Gun Safety Lock
This pressure washer is equipped with a gun trigger safety lock. When not using the
pressure washer, use the safety lock to protect from accidentally engaging the high
pressure spray.
Adjustable Spray Nozzle
The 4 IN 1 adjustable nozzle will allow you to use a variety of spray patterns from a
full fan spray to other spray. When using the pressure washer to clean wood decks,
siding, vehicles etc., always start using the fan spray and begin spraying from a
a minimum 36” away to avoid damaging the surface of the material you are cleaning.
Always begin by spraying in a test area free and clear of people and objects.
HIGH
HIGH
HIGH
PRESSURE
JET
STREAM
PRESSURE
OSCILLATING
FANNED TURBO
PRESSURE
WIDE
FAN SPRAY
LOW
PRESSURE
SOAP
Dispensing Detergent
FIGURE A
Low Pressure Setting
High Pressure Setting
FIGURE B
ADJUSTING THE PRESSURE
To adjust the pressure,proceed as follows:
1. Hold the shaft of the lance in one hand.
2. Turn the grey part of the nozzle clockwise
to obtain the high pressure.
3. Turn the grey part of the nozzle anticlockwise
to obtain the low pressure.
Low Pressure Setting
High Pressure Setting
AUTO STOP SYSTEM
The pressure washer is fitted with an automatic stop system to protect the motor when
in use.
W
hen the trigger is released the motor will stop.
When the trigger is squeezed the motor will start up again.
The built-in detergent dispenser will allow you to apply liquid detergent onto the work
surface. Detergent application happens at low-pressure only. Insert the adjustable
nozzle onto the gun, and turn it to “LOW PRESSUER SOAP” so that the pressure washer is
in low-pressure mode (see Figure A below). Remove the cap on the detergent reservoir
and fill with liquid detergent only (see Figure B below). Do not put any water into the
reservoir. The pressure washer will mix water and detergent automatically. When
finished applying the detergent to the work surface, turn it to “HIGH PRESSURE” of the
adjustable nozzle and spray off the detergent by using the high-pressure spray (see
Figure A below). In high-pressure mode, the pressure washer will not dispense detergent.
10
USING DETERGENTS
The pressure washer will dispense detergent only at low pressure.
Use the adjustable spray nozzle to apply detergents and to rinse clean.
Biodegradable detergents are specifically formulated to protect the environment and
your pressure washer. These Detergents will not clog the filter and will protect the
internal parts of the pressure washer for a longer life.
11
Page 7

2000 PSI Pressure Washer
Step 1
Open the cover of the detergent reservoir by twisting it off.
2000 PSI Pressure Washer
Step 2
Fill the detergent reservoir with any approved liguid detergent.
Close the cover.
Step 3
Turn the adjustable nozzle to end of “LOW PRESSURE
SOAP”, put the pressure into
Low Pressure Setting
low-pressure mode.
Step 4
To apply the detergent to your work area. Turn the pressure washer switch
to the ON position. Pull the trigger to operate the unit. The pressure washer will mix
the detergent with water. Do not allow the detergent to dry on the object that you are
cleaning.
WARNING: NEVER USE PRODUCTS WITH BLEACH OR CHLORINE
OR ANY OTHER CORROSIVE MATERIALS, INCL
CONTAINING SOLVENTS (I.E. GAS, OILS ETC), TRI-SODIUM
PHOSPHATE PRODUCTS, AMMONIA, OR ACID-BASED CLEANERS.
THESE CHEMICALS WILL HARM THE UNIT AND CAUSE DAMAGE
TO THE SURFACE BEING CLEANED. ALWAYS READ THE LABEL.
UDING LIQUIDS
High Pressure Setting
CLEAN-UP AND STORAGE
Shutting Down the Pressure Washer
WHEN FINISHED USING THE PRESSURE WASHER,FOLLOW THESE
STEP S TO SHUT DOWN THE UNIT:
Ь Turn the pressure washer to the OFF position.
Ь Turn off the water supply.
Ь Before discon ne cting high-pressure hose conne ction, point the gun in a
safe direction and discharge the high-pressure water.
Ь Disconnect high-pressure hose from the pressure washer and gun.
Ь Disconnect garden hose from the pressure washer.
Ь Remove excess water from the pump by tipping the unit on both sides to
drain any remaining water from the inlet and outlet fittings.
Ь Remove the Water Intake Filter and flush with water to remove dirt or
debris. Return the filter once it is cleaned.
Step 5
To clean the working srea, turn the adjustable nozzle to end of “HIGH PRESSURE”,
return it to high-pressure mode. Spray high-pressure water onto the work area to rinse
off the work area and any remaining detergent.
12
13
Page 8

2000 PSI Pressure Washer
Ь Drain the detergent reservoir and flush with running water.
Ь Wipe away any remaining water on all parts and fittings.
Ь Engage the gun safety lock.
Ь Store the pressure washer, parts, and accessories in an
area with a temperature above 0°C (32°F).
Winterizing and Long-Term Storage
FOLLOW ALL OF THE ABOVE SHUT-DOWN PROCEDURES,ADDING
THE FOLLOWING STEPS….
After disconnecting the water supply, and before disconnecting the
Ь
high-pressure hose, turn the pressure washer on for 2-3 seconds, until any
remaining water in the pump exits. Turn the unit off immediately.
CONTINUED USE OF THE PRESSURE WASHER WITHOUT THE
WATER SUPPLY ATTACHED WILL CAUSE SEVERE DAMAGE TO
THE UNIT!
Always store the pressure washer, parts, and accessories in an area with a
Ь
temperature above 0° C (32° F).
WARNING: FAILURE TO COMPLY WITH THESE STORAGE
INSTRUCTIONS WILL RESULT IN DAMAGE TO THE PUMP
ASSEMBLY
.
Maintenance
Ь This pressure washer is supplied with a closed lubrication system, so no
addition of oil is ne eded.
Ь Check all hoses and accessories for damage prior to use.
Ь Check the water intake filter periodicallyfor deposits. Clean thisfilter
regula rly for maximum pe rformance.
2000 PSI Pressure Washer
CLEANING TIPS
WARNING: ALWAYS TEST THE SPRAY IN AN AREA FREE AND
CLEAR OF PEOPLE AND OBJECTS BEFORE YOU AIMING AT THE
INTENDED CLEANING SURFACE.
Wood and Vinyl Decks
Rinse deck and surrounding area with fresh water. If using detergent, fill the detergent
reservoir and apply to the area being cleaned at low pressure. For optimal results,
reduce your work area to smaller sections and clean each section one at a time. Allow
the detergent to rest on the surface for a few minutes and then rinse at high pressure.
Do not let the cleanser dry. Always clean from left to right and top to bottom for best
results. Rinse at high pressure using the fan spray keeping the tip of the spray nozzle
at least 6-9 inches from the cleaning surface. Maintain a further distance from the
cleaning area when using a direct spray.
Caution: For softer woods, increase the distance from the cleaning area.
Cement Patios, Stone, and Brick
14
Rinse the area with fresh water.If using detergent, fill the detergent reservoir and apply
to the area being cleaned at low pressure. Rinse at high pressure using the fan spray
in a sweeping motion keeping the tip of the spray nozzle at least 3-6 inches from the
cleaning surface. Maintain a further distance from the cleaning area when using a
dire ct spra y.
15
Page 9

2000 PSI Pressure Washer
Cars, Boats, and Motorcycles
Rinse the area with fresh water. If using detergent, fill the detergent reservoir and apply
to the area being cleaned at low pressure. To achieve the best results, clean one side
at a time. Allow the detergent to remain on the surface for a few minutes, but do not
let the detergent dry. Rinse at high pressure using the fan spray in a sweeping motion
keeping the tip of the spray nozzle at least 8 inches from the cleaning surface. Maintain
a greater distance from the cleaning area when using a direct spray.Wipe the surface
dry for a polished finish.
2000 PSI Pressure Washer
TROUBLESHOOTING TIPS
WHEN THE SWITCH IS IN THE “I” POSITION THE MACHINE WILL NOT START
PROBABLE CAUSE
Electrical socket is faulty Check plug, socket, and fuses
Voltage is inadequate Check that the voltage is adequate
GFCI trips Reset / Try another outlet
Powercordisnotpluggedin Pluginpowercord
SOLUTION
Barbecue Grills, Power Equipment, and Garden Tools
Rinse the area with fresh water. If using detergent, fill the detergent reservoir and apply
to the area being cleaned at low pressure. Allow the detergent to remain on the surface
for a few minutes, but do not let the detergent dry. Rinse at high pressure using the fan
spray keeping the tip of the spray nozzle at least 1-3 inches from the cleaning surface.
Maintain a greater distance from the cleaning area when using a direct spray.
TECHNICAL DATA
Main voltage 120 V
Main frequency 60 Hz
Max. operating pressure 2000PSI
Water consumption 1.6 GPM
Max. pressure water supply 40-80PSI
Max. water temperature 40-140F(5-60°C)
Weight 26LBS
WARRANTY
R
efer to the enclosed warranty regarding conditionsfor the terms and conditions of
guarantte.
THE PUMP DOES NOT REACH ADEQUATE PRESSURE OR FLUCTUATES
PROBABLE CAUSE SOLUTION
Water Intake Filter is clogged Remove and clean filter
Pump is drawing air Tighten connections/bleed system
Suction valves are clogged/worn Clean or replace valves
Diameter of garden hose too small Replace to 1” inch garden hose
Water supply is restricted Check hose for kinks or leaks
Insufficient water supply Fully open the water source
THE PRESSURE WASHER HAS OR WILL NOT MAINTAIN PRESSURE
PROBABLE CAUSE SOLUTION
Excessive air in waterline and pump T
THE PRESSURE WASHER MAKES EXCESSIVE NOISE
PROBABLE CAUSE SOLUTION
Intake is blocked Check the intake valves
Valves are worn, dirty, or clogged Check, clean or replace valves
Water Intake Filter is dirty Check, clean, or replace filter
THE MOTOR STOPS RUNNING WHILE IN USE
urn unit and water supply off / and
bleed lines
ENVIRONMENT
Should your machine need replacement after extended use, please do not dispose with
regular wash but dispose of it in an environmentally safe way.
16
PROBABLE CAUSE SOLUTION
Net voltage lower than suggested C
heck to determine that the voltage is
adequate
17
Page 10

2000 PSI Pressure Washer
2000 PSI Pressure Washer
LIMITED WARRANTY
Pulsar Products, Inc.
application (personal, residential or household usage) that all products covered under this
warranty are free from defects in material and workmanship for one year from the date of
purchase. All products covered by this limited warranty which are used in commercial
applications (i.e. income producing) are warranted to be free of defects in material and
workmanship for 90 days from the date of original purchase. Products covered under this
warranty include air compressors, air tools, serivce parts, pressure washers and generators.
Pulsar Products, Inc.
components which have failed within the warranty period. Service will be scheduled
according to the normal work flow and business hours at the service center location, and
the availability of replacement parts. All decisions of Pulsar Products, Inc.with regard to this
limited warranty shall be final.
This warranty gives you specific legal rights, and you may also have other rights which vary
from state to state.
RESPONSIBILITY OF ORIGINAL PURCHASER(initial User):
To process a warranty claim on this product, DO NOT return item to the retailer. The
product must be evaluated by an Authorized Warranty Service Center.For the location of the
nearest Authorized Warranty Service Center contact the retailer or place purchase.
Retain your original cash sales receipt as proof of purcgase for all warranty work.
Use reasonable care in the operation and maintenance of the product as described in the
Owner’s Manual(s).
warrants to the original purchaser who uses the product in aconsumer
will repair or replace, at Pulsar Products, Inc.’s sole option, products or
LIMITED WARRANTY (cont’d)
THIS WARRANTY DOES NOT COVER:
Merchandise sold as reconditioned, used as rental equipment, or floor or display models.
Merchandise that has become damaged or inoperative because of ordinary wear, misuse,
cold, heat, rain, excessive humidity, freeze damage, use of improper chemicals, negligence,
accident, failure to operate the product in accordance with the instrctions provided in the
Owner’s Manual(s) supplied with the product, improper maintenance, the use of
or attachments not recommended by Pulsar Products, Inc.,or unauthorized
alterations.
Repair and transportation costs of merchandise determined not to be defective.
Costs associated with assembly, required oil, adjustments or other installation and start-up
costs.
Expendable parts or accessories supplied with the product which are expected to become
inoperative or unusable after a resonable period of use.
Merchandise sold by Pulsar Products, Inc. which has been manufactured by and
the product of another company, such as gasonline engines. The product
as
warranty, if any, will apply.
ANY INCIDENTAL, INDIRECT OR CONSEQUENTIAL LOSS, DAMAGE, OR EXPENSE THAT
MAY RESULT FROM ANY DEFECTS, FAILURE OR MALFU
NOT COVERED BY THIS WARRANTY. Some states do not allow this exclusion, so it may
not apply to you.
NCTION OF THE PRODUCT IS
accessories
repair or
identified
manufacturer’s
Deliver or ship the product to the Authorized Warranty Service Center. Freight costs, if any
must be paid by the purchaser.
If the purchaser does not receive satisfactory results from the Authorized Warranty Service
Center, the purchaser should contact
Pulsar Products, Inc.
.
18
IMPLIED WARRANTIES, INCLUDING THOSE OF MERCHANTABLITY OR FITNESS FOR A
PARTICULAR PURPOSE, ARE LIMITED TO ONE YEAR FROM THE DATE OF ORIGINAL
PURCHASE. Some states do not allow limitations on how long an implied warranty lasts,
so the above limitations may not apply to you.
19
Page 11

2000 PSI Pressure Washer
21
20
2000 PSI Pressure Washer
MPG Assy
Parts No. DESCRIPTION QTY.
Moto Assy
PWE2000-1
PWE2000-2
PWE2000-3
PWE2000-4
Pump Pedestal Assy
PWE2000-5
PWE2000-6
PWE2000-7
PWE2000-8 1
PWE2000-9 Oil Seal
PWE2000-10
PWE2000-11 1
PWE2000-12 1
Thrust Bearing Assy
PWE2000-13 1
PWE2000-14
PWE2000-15
Pistion Body Assy
PWE2000-16
PWE2000-17
PWE2000-18
PWE2000-19
PWE2000-20 1
PWE2000-21
Pilot Sheath Assy
PWE2000-22
PWE2000-23
Pump Body Assy
PWE2000-24
PWE2000-25
PWE2000-26
PWE2000-27 1
PWE2000-28
One-Way Valve Assy
Moto
Hexagon Socket Head Cap Screw
Plain Washer
Deep Groove Ball Bearing
Big Gear
O-Ring 64.77x2.62
Gear Shaft
Pump Pedestal
Deep Groove Ball Bearing
Wobble Plate 11
Wobble Plate Screw ( Left )
Thrust Bearing Thin Board
Thrust Bearing Roller
Thrust Bearing Thick Board
Spring Base
Pistion
Pistion Spring
Shaped-Ring 64.77x2.62
Pistion Body
Oil Seal
Pilot Sheath
Water Seal
Small O-Ring 17x2.0
Big O-Ring 23x2.62
One Way Valve Cover
Pump Body
Hexagon Socket Head Cap Screw M6x55
O
1
4
4
1
1
1
1
1
1
1
1
3
3
3
1
3
3
3
3
3
3
4
2000 PSI Pressure Washer
EXPLODER VIEW
22
Page 12

2000 PSI Pressure Washer
2000 PSI Pressure Washer
MPG Assy
Parts No. DESCRIPTION QTY.
PWE2000-29 6
PWE2000-30
PWE2000-31
PWE2000-32
PWE2000-33
Inlet Assy
PWE2000-34
PWE2000-35
PWE2000-36
PWE2000-37 4
Mainifold Assy
PWE2000-38
PWE2000-39 1
PWE2000-40 4Hexagon Socket Head Cap Screw M5x35
PWE2000-41 4O-Ring 12x2.0
PWE2000-42 1
PWE2000-43
PWE2000-44
PWE2000-45
PWE2000-46
PWE2000-47
PWE2000-48
PWE2000-49
PWE2000-50 1
PWE2000-51
Self-Priming Assy
PWE2000-52
PWE2000-53
PWE2000-54
PWE2000-55
PWE2000-56
PWE2000-57
PWE2000-58 1
PWE2000-59
PWE2000-60 1
One-Way Valve Seat
One-Way Valve Spring
One-Way Valve Door
One-Way Valve Cover
One-Way Valve Cover O-Ring 9x1.8
O-Ring
Inlet Tube
Plain Washer
Hexagon Socket Head Cap Screw M5x16
Slotted Cheese Head Screws
Small O-Ring
Manifold
O-Ring 5x2.0
One-Way Valve Core
One-Way Valve Core Spring
O-Ring 11.4x2.1
Bend Joint
TSS Switch Socket Cover
TSS Switch Cover Sealing Gasket
TSS Switch Socket
Cross Pan Head Self-Tapping Screw SJ3x12
Joint Sleeve
Small O-Ring 5x1.5
Soap Joint
Small O-Ring 3.68x1.78
Steel Ball Ø4.7625
Taper Spring
Big O-Ring 7.65x1.78
Self-Priming Outlet Pipe
O-Ring 11.4x2.1
6
6
6
6
1
1
4
1
1
1
1
1
1
1
1
4
1
1
1
1
1
1
1
MPG Assy
Parts No. DESCRIPTION QTY.
PWE2000-61 1
PWE2000-62 2
TSS Assy
PWE2000-63
PWE2000-64
PWE2000-65
PWE2000-66
PWE2000-67
PWE2000-68
PWE2000-69 1
PWE2000-70
PWE2000-71
Spill Valve Assy
PWE2000-72 1Steel Ball Cover
PWE2000-73 1Steel Ball
PWE2000-75 1
PWE2000-76
PWE2000-77
PWE2000-78
PWE2000-79
PWE2000-80
PWE2000-81
PWE2000-82
PWE2000-83 1
PWE2000-84
PWE2000-85 1Valve Sheath Baffle Ring
PWE2000-86
PWE2000-87
PWE2000-88
PWE2000-89
PWE2000-90
PWE2000-91
Venturi Nozzle Ø1.5
U-Pin
TSS Switch
TSS Round Jacket
Cable Jacket
TSS Lead Wire
Plastic Jacket ( Soft )
Plastic Square Jacket ( Soft )
Plate ( Line )
Receptacle
Lever Sheath
O-Ring 8.75x1.8
Spill Valve Sheel
Valve Core Big Baffle Ring
O-Ring 8.75x1.8
Spill Valve Core
O-Ring 5x1.5
Valve Core Little Baffle Ring
O-Ring 12.42x1.7
Spill Valve Cover
O-Ring 14x1.78
Spill Valve Spring
Lever
Lever Nut
Link Lever
Link Lever Nut
U-Pin
1
1
1
1
1
1
1
1
1
1
1
1
2
1
1
4
1
1
1
1
1
1
23
24
Page 13

2000 PSI Pressure Washer
2000 PSI Pressure Washer
Complete Machine
Parts No. DESCRIPTION QTY.
Back Housing Assy
PWE2000-92
PWE2000-93
PWE2000-94
PWE2000-95
PWE2000-96
PWE2000-97
PWE2000-98
Motor Cover Assy
PWE2000-99 1
PWE2000-100
PWE2000-101
PWE2000-102 1
PWE2000-103 1Cap Of Motor Cover
PWE2000-104 2Cross Pan Head Tapping Screw 4x16
Front Housing Assy
PWE2000-105
PWE2000-106
PWE2000-107
PWE2000-108
PWE2000-109 4
Wheel Assy
PWE2000-110
PWE2000-111 2
Hose-Reel Assy
PWE2000-112 1Hexagon Socket Head Cap Screw
PWE2000-113 1
PWE2000-114
PWE2000-115
PWE2000-116
PWE2000-117
PWE2000-118
PWE2000-119 1
PWE2000-120
PWE2000-121 1
Back Housing
Cross Pan Head Tapping Screw ST4.8x19
Back Cover Accessory
Water Gun Rack
Cross Pan Head Tapping Screw 4x16
Hexagon Socket Head Cap Screw 5x30
Cross Pan Head Tapping Screw 4x16
Motor Cover
Main Switch With Shiled
Switch Joint Lever
Switch Cover
Front Palet
Front Housing
Knob Cover
Knob
Cross Pan Head Tapping Screw ST4x12 F
Wheel
Wheel Cover
Hose Reel Holder
Hose Reel Bolt 6x30
Hose Reel Accessory ΙΙ
Hose Reel Big Stents ( Left )
Hose Reel Accessory Ι
Hose Reel
Nut
Cross Pan Head Tapping Screw ST4.8x19
Hose Reel Big Stents ( Right )
1
14
1
1
9
2
2
1
1
1
1
1
1
2
1
1
1
1
2
1
Complete Machine
Parts No. DESCRIPTION QTY.
PWE2000-122 1
PWE2000-123
PWE2000-124
PWE2000-125
PWE2000-126
PWE2000-127
PWE2000-128
Handle Assy
PWE2000-129 6
PWE2000-130 2
PWE2000-131
PWE2000-132
PWE2000-133 2
Cable Assy
PWE2000-134 1Plastic Jacket
PWE2000-135 1
PWE2000-136
PWE2000-137
PWE2000-138
PWE2000-139
PWE2000-140 1
Acc.
PWE2000-142 14 In 1 Lance
PWE2000-143 1P2006 Gun
PWE2000-144 1Nozzle Cleaner
PWE2000-145 1
PWE2000-146
PWE2000-147
PWE2000-148
PWE2000-149
PWE2000-150
PWE2000-151 1
Hose Reel Small Stents ( Right )
Hose Reel Small Stents ( Left )
Cross Pan Head Tapping Screw ST4x16 F
Cross Pan Head Tapping Screw ST4x10 F
High Pressure Joint
U-Pin
Cross Pan Head Tapping Screw ST4x16 C
Cross Pan Head Tapping Screw ST4x16 F
Cross Pan Head Tapping Screw ST4x10 F
Handle ( Front )
Handle ( Back )
Iron Pipe
Plastic Jacket ( Soft )
Cable
Cable Jacket
Plastic Jacket ( Soft )
Receptacle
Cable With GFCI
Cross Pan Head Tapping Screw ST4x12 FPWE2000-141
25’ HP With Long Ring Nut ( Black )
Nipple
O-Ring 5.3x1.6
HP Hose Snap Ring Ø2
Soap Bottle
Soap Bottle Cap
Short HP Hose Assy
1
6
4
1
2
2
1
1
1
1
2
2
2
1
3
1
1
1
25
26
 Loading...