

Page 1
W W W . P U L S A R - N V . C O M
LRF 8x40
I N S T R U C T I O N S
Page 2
Page 3
Page 4
SPECIFICATIONS
Characteristics of the binocular:
Model
Objective lens diameter, mm
Magnification, x
Eye relief, mm
Exit pupil diameter, mm
Field of view, angular degree
Field of view at 1000 m distance, m
Close-up distance, m
Twilight factor
Resolution, sec
Eyepiece adjustment, diopter
Operating temperature
Degree of protection, IP code IEC60529
Dimensions, mm / inch
Weight (without battery), kg / oz
Characteristics of the rangefinder:
Measurement range, m / yd
Accuracy of range measurement, m
Min. measurement range, m
Battery life
Power supply/Battery
Laser wavelength, nm
Auto power off
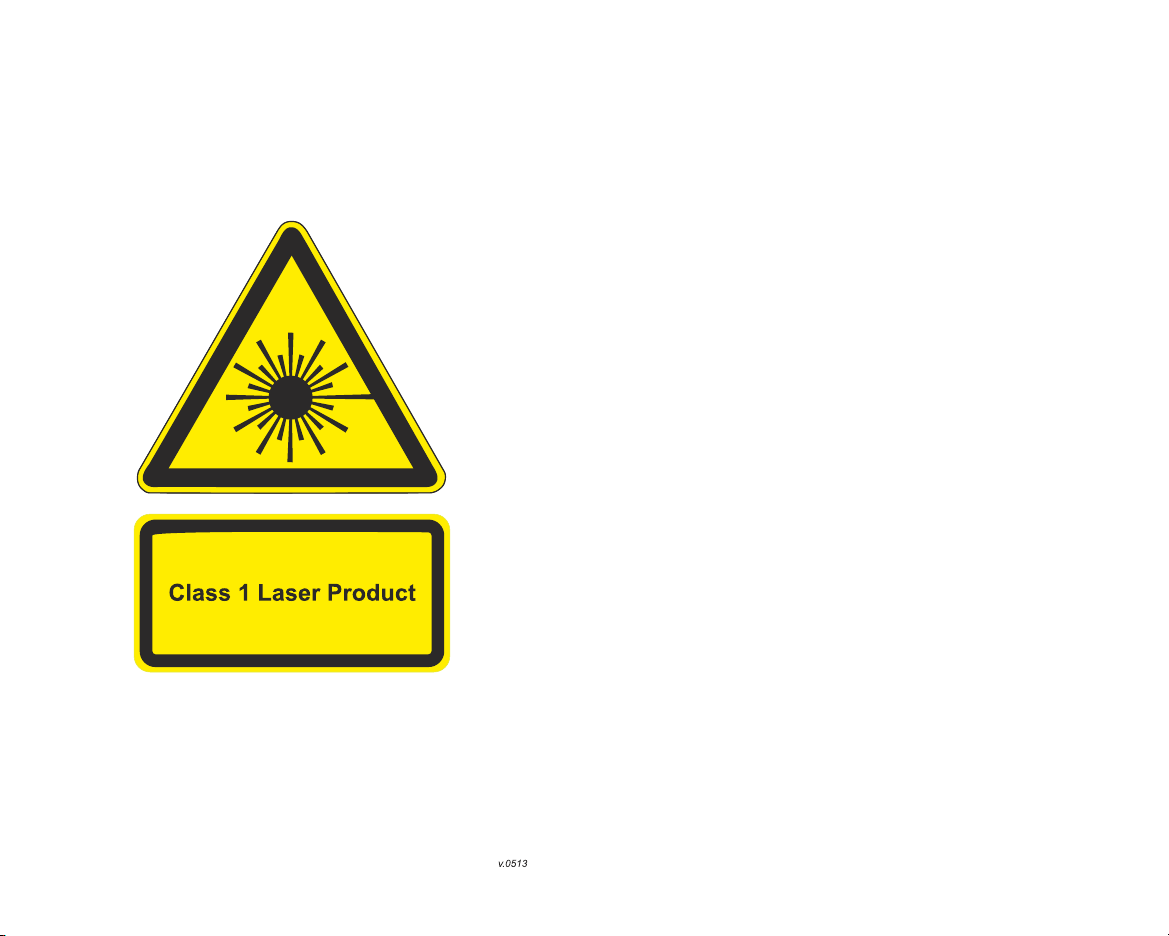
( )
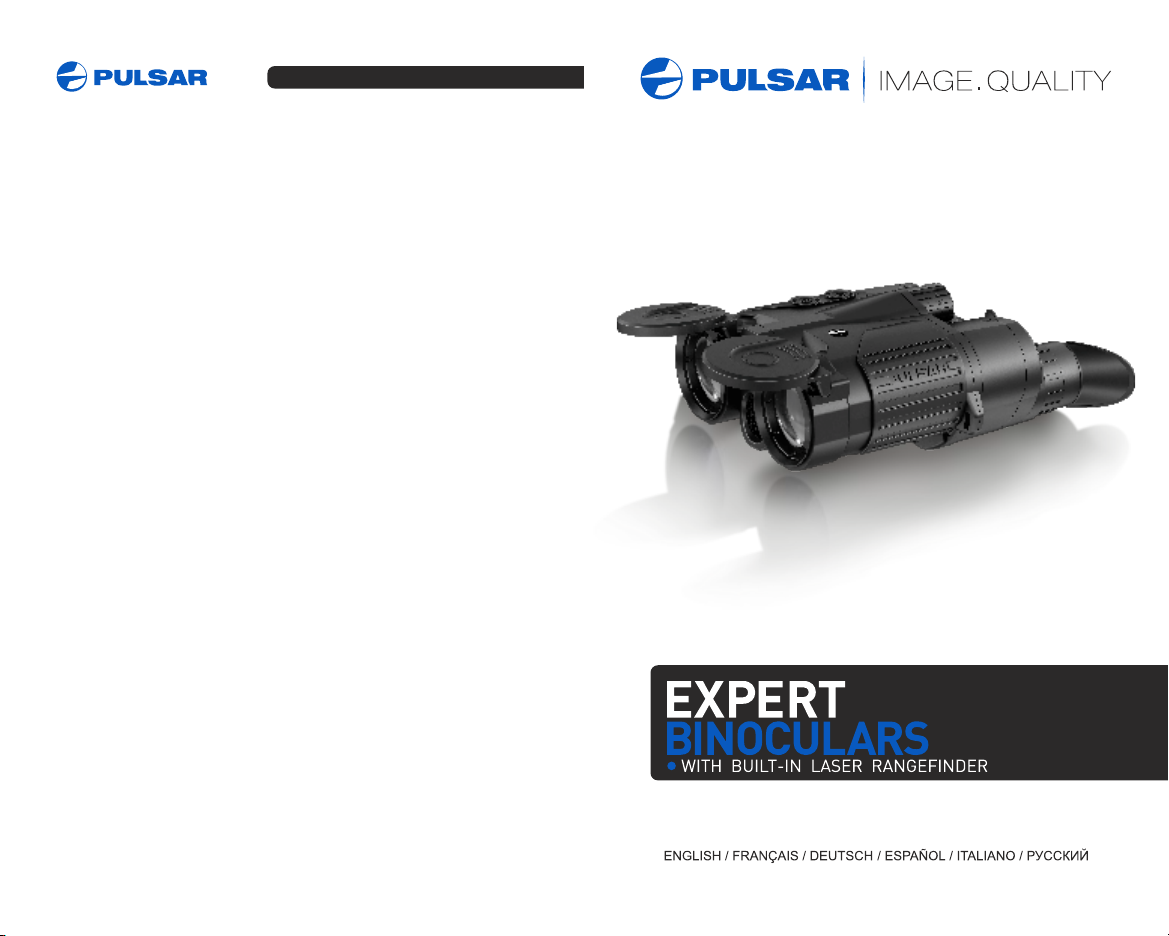
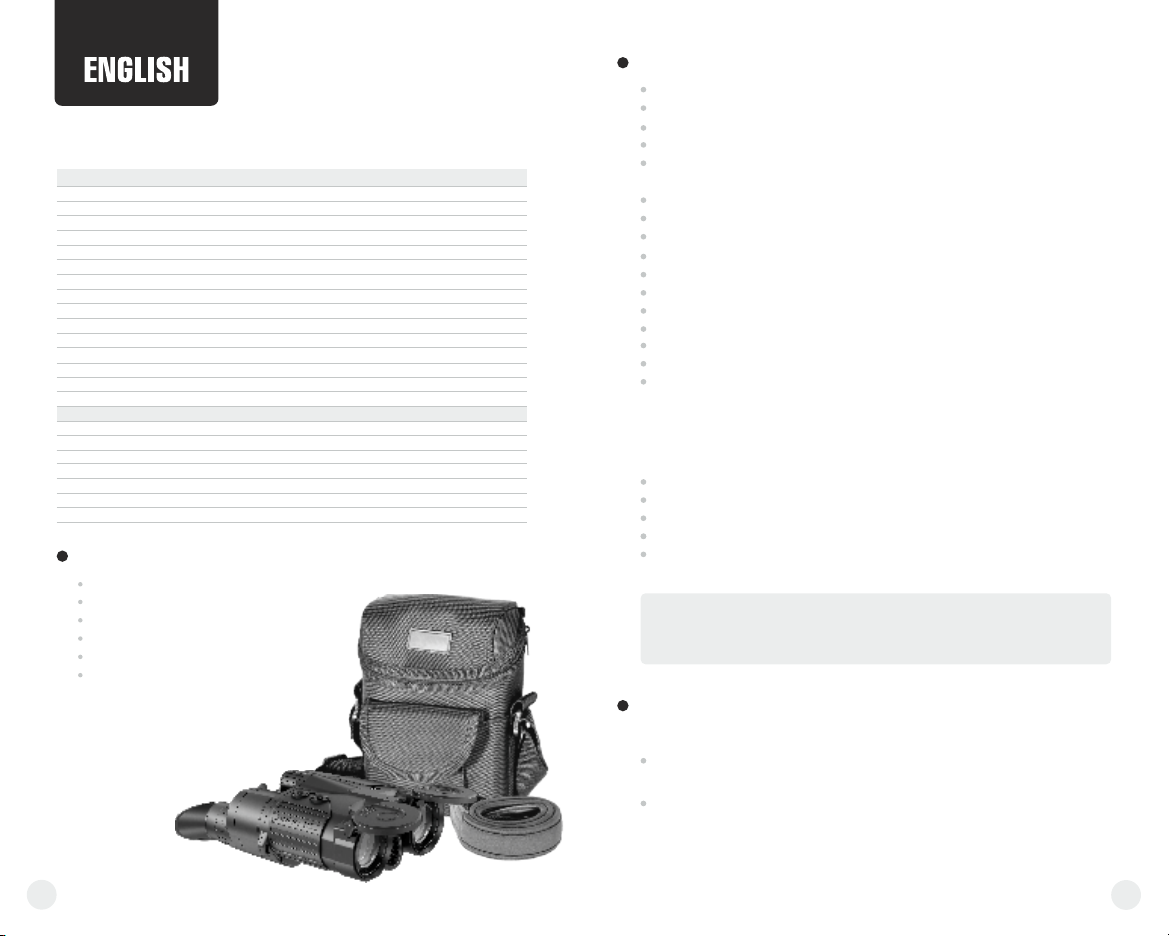
PACKAGE CONTENTS
Binocular Expert LRF 8x40
Neck Strap
Carrying Case
User Manual
Lens Cloth
Warranty Card
For improvement purposes,
design of this product is
subject to change.
77071
40
8
18
5
6.5
114
8
17.8
7.5
±5
-30 °C…+45 °C
IPX4
200х144х80 / 7.8x5.6x3.1
0.94 / 33.1
1000
±1
5
3000 activations
3V/ CR123A
905
after 20 seconds
FEATURES
Built-in laser rangefinder
Single measurement and scanning modes
Quality OLED display
Bright and sharp on-screen symbols in any observation conditions
Progressive optical system based on the Porro prisms of the
2nd type
Degree of protection IPX4
Exterior flat protective lenses shield the optics from the elements
and possible damage
Ergonomic oblique eyecups maximize comfort and cut out
extraneous light
ECLIPSE-M™ protective lens caps
Durable glass-fibre plastic body
Stylish design
High quality image
TRUE COLOR™ fully multi-coated optics
Stylish and durable carrying case
The Binocular Expert LRF 8x40 is a new development featuring
enhanced optical and constructive specifications. The Expert is a
multitask device that can be employed for:
Measuring distance to remote objects
Marine, mountainside and wide open observation
Observation in harsh conditions
Hunting, shooting, sporting events
Search and rescue
Before using your binocular for the first time, please review
all of the instructions contained within the instruction
manual.
USING YOUR BINOCULAR
Setting the interpuppilary distance
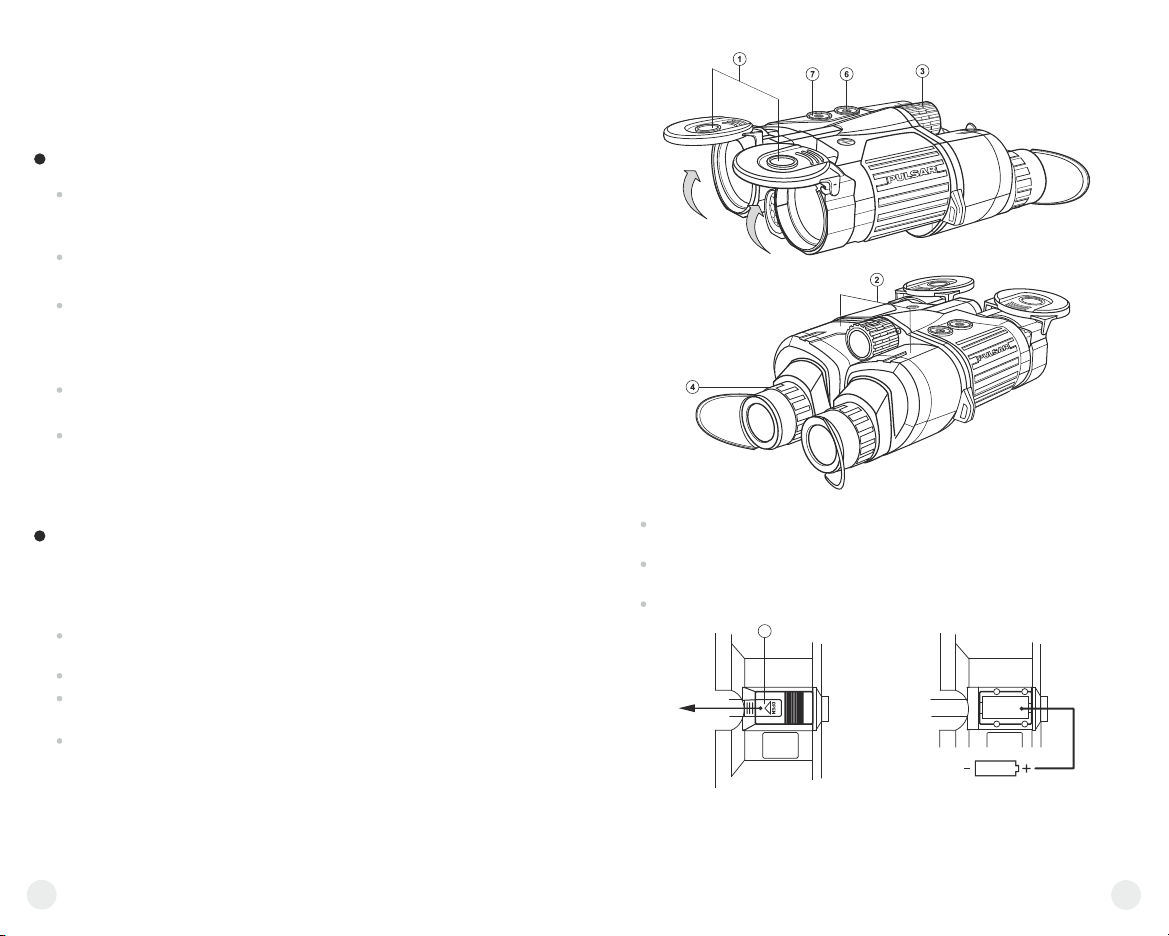
Remove the binocular from its case and flip open caps on objective
lenses (1). The caps can be removed from the body, if necessary.
Pick an object off in the distance and folding or unfolding the blocks of
the eyepieces (2) while observing through the eyepieces, choose
such a position when you see only one image of the object and two
fields of view merge in one.
2
3
Page 5
ATTENTION!
Always protect your eyes and never look directly at the sun or any
other source of bright light through the binoculars!
FOCUSING THE BINOCULAR AND DIOPTRIC ADJUSTMENT
Start the rangefinder pushing the button (6). A red cross will appear in
the field of view of the right eyepiece. Rotate the diopter adjustment
knob of the right eyepiece to achieve a crisp image of the cross.
Aiming the binocular at any distant object, turn the large center focus
wheel (3), until you see a sharp image through the right eyepiece.
Rotate the diopter adjustment knob of the left eyepiece (4) to achieve
a crisp image of the same object in the left eyepiece. This will address
the natural differences between the right and the left eyes and reduce
eyestrain from prolonged use.
Turn the central focusing wheel (3) until you get a sharp image
through both barrels
As you continue viewing, you may find that you need to refocus the
image. This should be done only using the central focusing wheel (3)
as you have already tuned the binoculars to your individual needs.
RANGEFINDER
Safety rules
The rangefinder employs an eye-safe laser. Nevertheless it is important to
remember the following safety rules:
Do not switch the unit on while aiming at a human eye or while looking
into the lens.
Keep the rangefinder out of reach of children
Do not disassemble the unit. If you have problems with the unit,
contact the manufacturer.
Do not use any power source other than a CR123A Lithium battery.
Battery installation
Slide the battery compartment cover (5) as shown. Remove the
cover.
Insert a CR123A battery observing polarity shown in the battery
compartment (see Pic.2)
Slide back the cover.
5
CR123A
Pic.2
Note: if the cross starts flickering, the battery is empty and needs to be
replaced.
Remove the battery if the unit will not be used for a long time.
4
5
Page 6
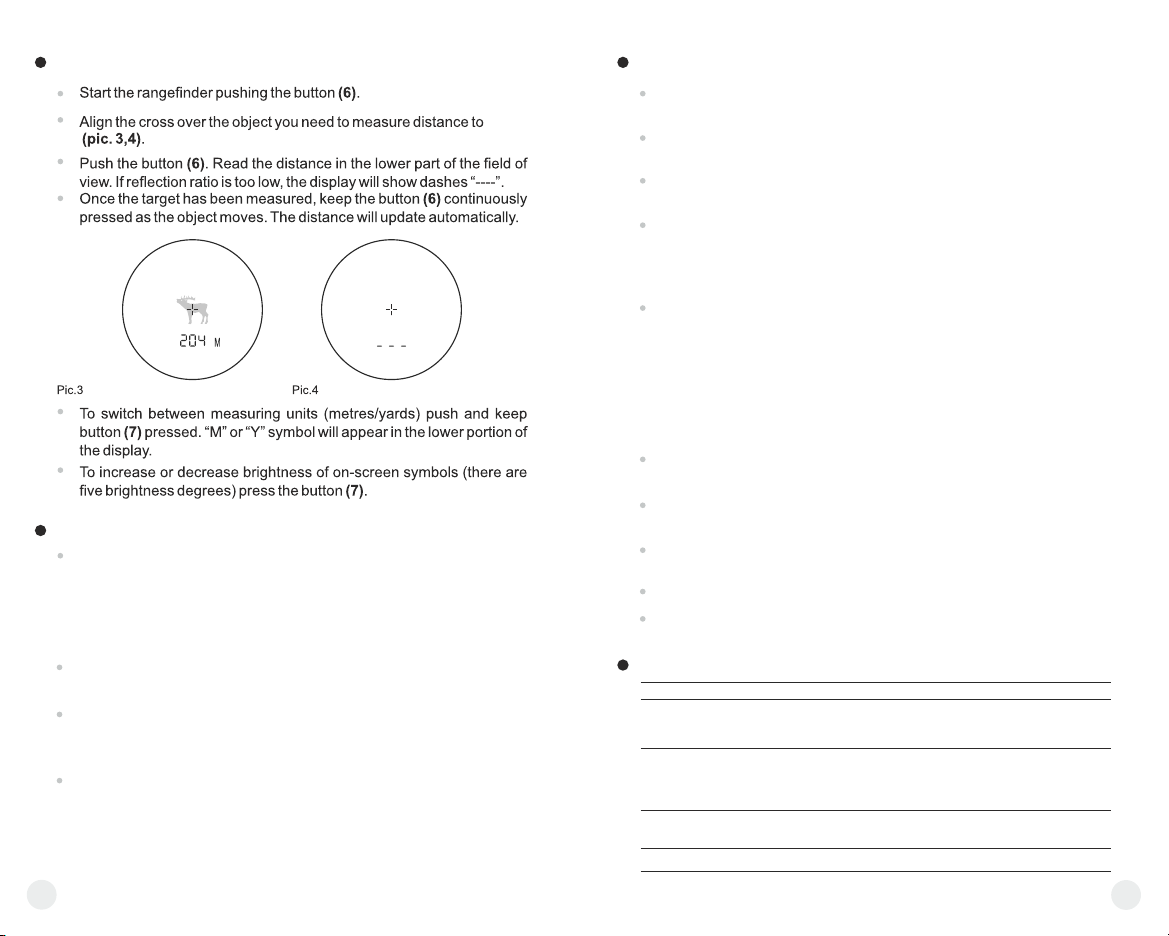
USING THE RANGEFINDER
PECULIARITIES OF OPERATION
Accuracy of measurement and maximum range depend on the
reflection ratio of the target surface, the angle at which the emitting
beam falls on the target surface and environmental conditions.
Reflectivity is also affected by surface texture, colour, size and shape
of the target. A shiny or brightly coloured surface is normally more
reflective than a dark surface.
Measuring range to a small sized target is more difficult than to a large
sized target.
Accuracy of measurement can also be affected by light conditions,
fog, haze, rain, snow etc. Ranging performance can degrade in bright
conditions or when ranging towards the sun.
When measuring range to a small-sized target located more than 400
meters away, it is recommended that you put your elbow against a
solid surface. This is due to possible hand tremors and difficulty in
hitting the target with the beam at a longer distance.
CARE AND MAINTENANCE
Avoid lens contamination. When you are finished using your
binocular, shut the objective protective caps.
Aim to keep the lenses free of any dirt accumulation, as much as the
conditions allow.
Before cleaning the lenses, blow on them to remove sizable particles
of sand and dust.
When wiping optical surfaces, please use the lens cloth which comes
standard with the set. If a lens cloth cannot be found, you can use any
soft, clean fabric (soft cotton cloth, flannel, silk, or a cotton swab are
best).
Any grease should be removed with a tissue soaked in rubbing
alcohol. In field conditions or if you do not have rubbing alcohol,
breathe right onto the surface of the lens and dry the condensation off
with a soft, clean cloth.
CAUTION!
In order to avoid damaging the lens' coatings, never use paper (dry or
wet) to clean the lens nor apply rubbing alcohol directly onto the lens.
To clean the binocular's exterior, please use a dry tissue. For sheen,
apply a few drops of synthetic cleaning means to the tissue.
The binocular is a sensitive optical instrument; do not drop it.
Safeguard it from any other physical damage.
Do not subject the binocular to prolonged exposure to direct sunlight
or high temperatures.
Do not leave near a heater or heating appliances.
When not in use, keep your binocular in the included carrying case in
a warm, dry, and well-ventilated area.
TROUBLESHOOTING
PROBLEM POSSIBLE CAUSE SOLUTION
Rangefinder
does not provide
range.
Make sure that the “ON”
button has been pressed.
In front of the receiver lens or
objective lens there is an
object that prevents signal
transmission.
The unit is not held steadily
when measuring.
The battery has expired.
Press the “ON”
button.
Make sure that the lenses
are not blocked by your
hand or fingers.
Do not stress the unit when
measuring.
Insert a new CR123A battery.
6
7
Page 7
Carte de garantie
Le design de ce produit
pourrait-être amené à changer,
afin d'améliorer son utilisation.
CARACTÉRISTIQUES DIFFERENCIATRICES
Télémètre à laser intégré
Le mode Scan (balayage) automatique
L’écran OLED de bonne qualité
S ymboles de l'écran claires et nettes dans toutes les conditions
d'observation
Système optique progressif basé sur des prismes Porro
2ème génération
Indice de protection IPX4 (IEC60529)
Des œilletons protecteurs extérieurs plats protègent les lentilles
des éléments (eau, air, poussières… etc.) et d'éventuel dégât
Des œilletons ergonomiques obliques améliorent le confort et
coupent la lumière extérieure
Les protéges objectifs du Système exclusif ECLIPSE-M™
Corps anti-chocs en plastique verre-résine
Haute qualité d'image
Lentilles traitées multicouches TRUE COLOR™ fournissant des
images lumineuses et une reproduction des couleurs naturelles
Ètui housse durable
Les jumelles Expert LRF 8x40 sont issue d'un nouveau
développement, comportant des spécificités au niveau des optiques
améliorées et de la construction.
Les jumelles Expert LRF 8x40 sont appareils multifonctions, peuvent
être utilisées pour:
Mesure de la distance aux objets distants
La marine, en montagne et l'observation sur un large champ
L'observation dans des conditions difficiles
La chasse, le tir, les événements sportifs
L es services de secours et de recherché
Avant d'utiliser vos jumelles pour la première fois, veuillez
relire toutes les instructions prévues dans ce manuel.
UTILISATION
Réglage de la distance inter pupillaire
Enlevez les jumelles de leur housse et ôtez les protéges objectif (1).
En cas de nécessité les protéges objectif peuvent être enlevés.
Sélectionnez un objet à distance et les bloques des oculaires (2)
repliées ou dépliées, lorsque vous observez à travers les oculaires,
choisissez une position où vous ne voyez qu'une seule image du
objet et où vous trouvez qu'ils sont éloignés à égale distance.
8
9
Page 8

ATTENTION!
Veillez à protéger vos yeux et à ne jamais regarder directement le
soleil ou toute autre source de lumière puissante à travers les
jumelles!
MISE AU POINT DES JUMELLES ET AJUSTEMENT DIOPTRIQUE
Démarrer le télémètre en appuyant sur le bouton (6). Une croix rouge
apparaît dans le champ de vision de l'oculaire droit. Tournez la
molette de réglage dioptrique de l'oculaire droit d'obtenir une image
nette de la croix.
En dirigeant les jumelles vers un objet à distance tournez la molette
centrale de mise au point (3), jusqu'à ce que vous obteniez une image
nette à travers l'oculaire droite.
Faîtes tourner la molette de réglage dioptrique de l'oculaire gauche
pour achever une image nette du même objet dans l'oculaire gauche.
Cela permet de traiter les différences naturelles entre l'œil gauche et
l'œil droit et cela réduit la fatigue des yeux lors d'une utilisation
prolongée.
Tournez avec attention la molette centrale de réglage (3) jusqu'à ce
que vous obteniez une image précise à travers les deux cylindres.
En continuant votre observation, il se peut que vous ayez à refaire
une mise au point de l'image. Cela devrait être effectué en utilisant
seulement la molette centrale (3) de mise au point, étant donné que
vous avez déjà réglé les jumelles selon vos besoins.
TÉLÉMÈTRE À LASER
Mesures de precaution
Le télémètre fonctionne avec le laser, non dangereux pour les yeux.
Toutefois, certaines mesures de précaution sont à prévoir:
Ne pas mettre en marche le télémètre lorsqu'il est orienté vers les
yeux de l'homme ou lorsque vous regardez dans l'objectif de
l'appareil.
Stocker l'appareil hors de la portée des enfants.
Ne pas démonter l'appareil, en cas de problèmes adressez-vous au
fabricant.
N'utiliser que des piles CR123A, destinées à l'alimentation de
l'appareil.
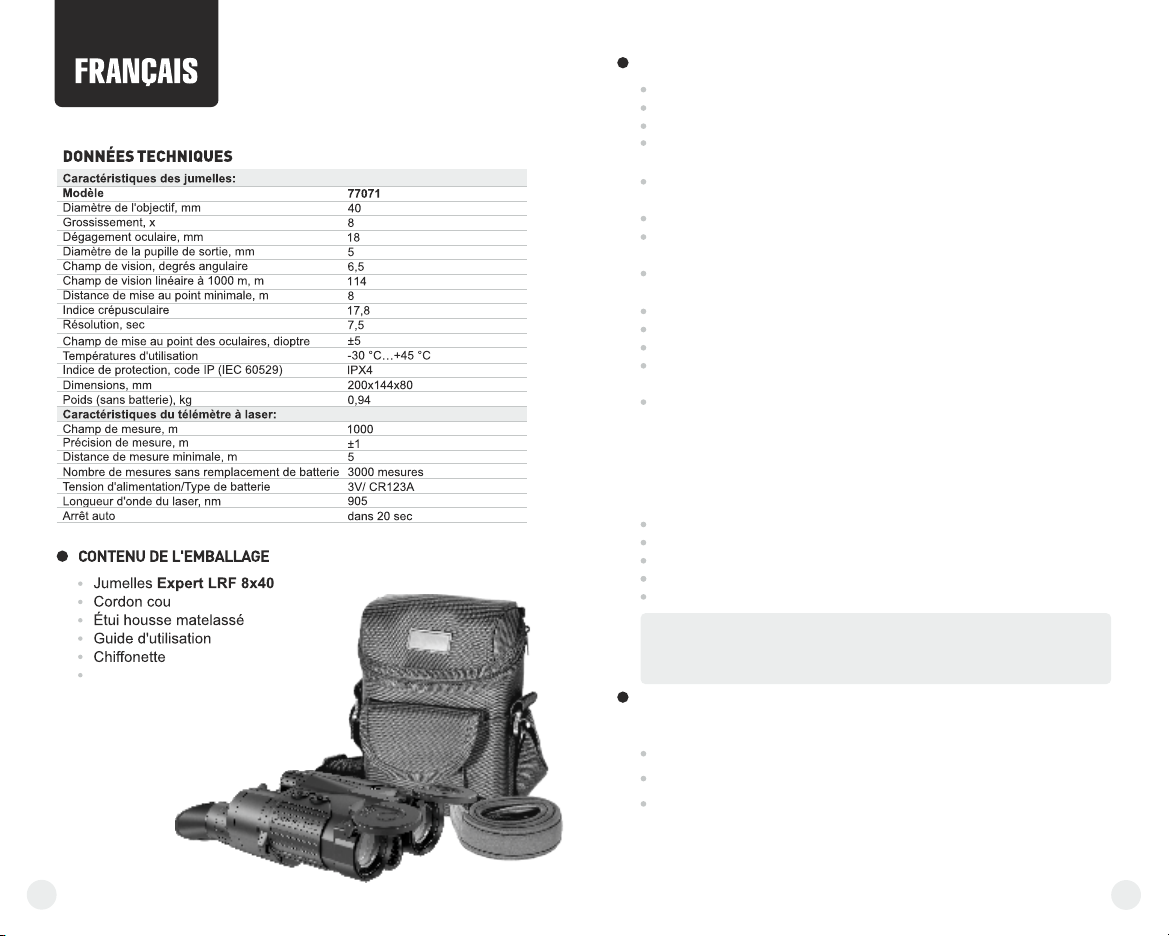
Mise en place de la batterie
Faites glisser le couvercle du compartiment batterie (5) comme
indiqué. Retirez le couvercle.
Mettez en place la batterie CR123A, en respectant la polarité,
indiquée dans le container de batteries (voir la fig.2).
Faire glisser le couvercle dans sa position initiale.
5
CR123A
Fig.2
Note: si la croix commence vacillante, la batterie est vide et doit être
remplacé. Si l'appareil est hors de service pendant une longue durée,
retirez la batterie.
10
11
Page 9

MODE D'EMPLOI
Démarrez le télémètre appuyant sur le bouton (6).
Pointez l'indicateur, sous forme d'un rectangle, sur l'objet, jusqu'à
lequel vous souhaitez mesurer la distance (fig. 3,4).
Appuyez un moment sur le bouton (6). Une valeur s'affiche en bas de
l'afficheur. Si, au cours de la mesure de la distance, le facteur de
réflexion est trop faible, le symbole “----” s'affiche sur l'afficheur.
Si vous retenez le bouton (6) appuyé, la mesure de la distance
jusqu'aux objets observés se fait en mode , c'est-à-Scan (balayage)
dire en mode continu.
Fig.3 Fig.4
Afin de permuter les unités de mesure de la distance au cours de la
mesure de celle-ci, appuyez pendant deux secondes sur le bouton
(7). “M” ou “Y” s'affiche en bas de l'afficheur.
Pour augmenter ou diminuer la luminosité des symboles de l'écran (il
ya cinq degrés de luminosité) a sur le bouton (7). ppuyez
PARTICULARITES D'UTILISATION
La précision de mesure et la distance pouvant être mesurée
dépendent du facteur de réflexion de la surface de l'objet observé et
des conditions atmosphériques. Le facteur de réflexion est fonction
des facteurs tels que texture, couleur, dimensions et forme de l'objet
observé. En règle générale, les objets de couleurs plus claires ou
présentant une surface brillante ont un facteur de réflexion plus
élevé.
Mesurer la distance jusqu'aux objets menus est plus difficile par
rapport aux objets encombrants.
La précision de mesure est influencée par les facteurs tels que
conditions d'éclairage, brouillard, brume légère, pluie, neige. Les
résultats de la mesure peuvent être moins précis pendant le travail
sous le soleil ou lorsque le télémètre est orienté vers le soleil.
S'il faut mesurer un objet éloigné plus de 400 m, dont l'encombrement
n'est pas important, il convient de réaliser la mesure en appuyant les
coudes contre une surface quelconque, afin d'éviter le tremblement
des mains. Ces mesures sont à prendre, compte tenant du fait qu'il
est difficile de pointer le rayon sur l'objet lorsque la distance est
importante.
12
STOCKAGE ET ENTRETIEN
Evitez la contamination des lentilles. Lorsque vous avez terminé
d'utiliser les jumelles, fermez les protégés objectifs.
Avant de nettoyer les lentilles, soufflez les pour enlever les particules
de sable et de poussière.
Lorsque vous essuyez les optiques, veuillez utiliser la chiffonnette
fournie. Si vous ne disposez pas d'une chiffonnette, utilisez un tissu
doux (tissu en coton doux, en soie, en flanelle).
Toute tâche grasse doit être enlevée à l'aide d'un tissu imbibé d'alcool
à 90°. Lorsque vous vous trouvez sur le terrain et que vous ne
disposez pas d'alcool à 90°, embuez directement la surface des
lentilles et séchez la condensation avec un tissu doux).
CAUTION!
Afin d'éviter d'endommager le traitement des lentilles, ne jamais utiliser
de papier (sec ou humide) ou d'alcool à 90° directement sur les lentilles
lors du nettoyage des lentilles.
Pour nettoyer l'extérieur des jumelles, veuillez utiliser un tissu sec.
Pour le polissage, appliquez quelques gouttes de Vaseline ou une
substance similaire sur un chiffon.
Les jumelles sont des instruments optiques fragiles, ne pas les laisser
tomber. Garder les en sécurité hors de danger.
Ne pas exposer les jumelles à la lumière du soleil directe ou à des
températures trop hautes. Ne jamais les laisser à côté d'un chauffage
ou d'appareils de chauffage.
Lorsqu'elles sont hors fonction, conservez vos jumelles dans leur étui
housse, dans un endroit sec, suffisamment chaud et ventilé.
Il est fortement interdit de réparer ou de désassembler les jumelles!
Le non-respect de cette consigne rendra caduque la garantie.
RECHERCHE DES PANNES
PROBLÈME ÉVENTUEL CAUSE PROBABLE SOLUTION
Le télémètre ne fait
pas de mesure
Le bouton “ON”
n'était pas appuyé.
Devant les lentilles du
récepteur ou de l'objectif il y
a un objet étranger, qui
cause un obstacle pour
l'émission du signal.
L'appareil subit des vibrations
au cours de la mesure.
La batterie est déchargée.
Appuyez sur le
bouton “ON”.
Rassurez-vous que les
lentilles ne soient pas
couvertes avec la main ou
avec les doigts.
Tenez l'appareil juste droit
pendant la mesure
Remplacez la batterie.
13
Page 10

TECHNISCHE DATEN
Fernglas:
Modell
Objektiv-Durchmesser, mm
Vergrößerung, x
Austrittspupillenabstand, mm
Austrittspupille, mm
Sehfeld, Winkelgrad
Sehfeld auf 1000 m, m
Naheinstellung ab, m
Dämmerungszahl
Auflösungsvermögen, sec
Okular-Dioptrieausgleich, Dioptrien
Betriebstemperatur
Schutzgrad, IP Code (IEC 60529)
Abmessungen, mm
Gewicht (ohne Batterie), kg
Entfernungsmesser:
Messweite, m
Messgenauigkeit, m
Minimale Messweite, m
Messungszahl ohne Batterieersetzen
Energieversorgung / Batterietyp
Laserwellenlänge, nm
Autoabschaltung
Fernglas Expert LRF 8x40
Trageriemen
Aufbewahrungstasche
Bedienungsanleitung
Putztuch
Garantieschein
Änderungen des Designs
aufgrund von verbesserten
Gebrauchseigenschaften
vorbehalten.
MERKMALE
Eingebauter Laser-Entfernungsmesser
SCAN Funktion
OLED Qualitätsbildschirm
Hellen und scharfe symbole auf dem Bildschirm in beliebigen
Beobachtungsbedingungen
77071
40
8
18
5
6,5
114
8
17,8
7,5
±5
-30 °C…+45 °C
IPX4
200х144х80
0,94
1000
±1
5
3000
3V/ CR123A
905
in 20 sec
Innovatives optisches System auf Porroprismen-Basis zweiter
Klasse
Schutzgrad IPX4
Zusätzliches Schutzglas vor den Objektivlinsen zur Vermeidung
von mechanischen Beschädigungen
Ergonomisch geformte Augenmuscheln zur Abdeckung von
Seiten- und Streulicht
ECLIPSE-M™ - aufklappbare Objektivschutzdeckel
Robustes Fiberglasgehäuse
Stilvolles attraktives Design
Hohe Abbildungsqualität
Mehrschichtvergütete Optik, Vakuumtechnologie TRUE COLOR™
Stilvolle und strapazierfähige Aufbewahrungstasche
Das Expert LRF 8x40 ist eine Neuentwicklung, die verbesserte und
konstruktive Charakteristiken vereinigt. Es lassen sich eine Vielzahl von
Einsatzgebieten für das Expert LRF 8x40 finden. Optimal geeignet sind
es für:
Die Distanzmessung zu den Objekten
Beobachtungen am Wasser, im Gebirge und im freien Gelände
Beobachtungen unter erschwerten Wetter-Bedingungen
Beobachtungen bei der Jagd, Schießen und Sportveranstaltungen
W ild- und Naturbeobachtung
Bitte lesen Sie aufmerksam diese Bedienungsanleitung,
bevor Sie das Fernglas einsetzen.
BETRIEB
Einstellen des Pupillenabstandes
Nehmen Sie das Fernglas aus der Aufbewahrungstasche und öffnen
Sie die Objektivdeckel (1). Bei Bedarf können die Objektivdeckel
entfernt werden.
Richten Sie das Fernglas auf ein Objekt in größerer Distanz.
Stellen Sie durch Drehen der beiden Okularkörper (2) das Fernglas
so ein, dass die beiden Sehfelder in einem Bild zusammenfließen.
Das Fernglas ist nun optimal für Ihren Augenabstand eingestellt.
14
15
Page 11

Schaden Sie Ihre Augen. Schauen Sie niemals mit dem Fernglas in die
Sonne oder andere Lichtquellen!
Schalten Sie den Entfernungsmesser ein, indem Sie die Taste (6)
drücken. Dabei erscheint im Sichtfeld des rechten Okulars ein rotes
Haarkreuz. Den Ring der dioptrischen Einstellung des rechten
Okulars drehend, erreichen sie eine scharfe Haarkreuzabbildung.
Richten Sie das Fernglas auf das gewünschte Objekt und drehen Sie
am Fokussierrad (3) bis ein scharfes Bild im rechten Okular
erreichen.
Drehen Sie das linke Okular (4) bis ein scharfes Bild desselben
Objektes im linken Okular erreichen. Diese Einstellung wird extra für
den Ausgleich des natürlichen Sehkraftunterschiedes zwischen dem
rechten und linken Auge des Beobachters gewählt und wirkt der
Ermüdung der Augen bei dauerhafter Nutzung entgegen.
Drehen Sie am Fokussierrad (3) bis Sie ein scharfes Bild in beide
Kanäle sehen.
Das Fernglas ist nun für Ihre Augen eingestellt und ermöglicht so ein
ermüdungsfreies Beobachten. Weiteres Fokussieren sollte nun nur
noch über des Fokussierrad vorgenommen werden.
Im Entfernungsmesser wird ein für die Augen sicherer Laser verwendet.
Dennoch gibt es ein paar wichtige Vorsichtsmaßnahmen, die man
bedenken sollte:
Schalten Sie den Entfernungsmesser nicht ein, wenn er auf ein
menschliches Auge gezielt ist oder wenn Sie von der Objektivseite in
die Optik sehen.
Bewahren Sie und verwenden Sie das Gerät nicht innerhalb der
Reichweite von Kleinkindern.
Nehmen Sie den Entfernungsmesser nicht auseinander, falls
Probleme mit dem Gerät entstehen, wenden Sie sich an den
Hersteller.
Verwenden Sie als Stromquelle nur Batterie CR123A, die für das
Gerät geeignet ist.
Schieben Sie den Batteriefachdeckel (5) gemäß der Markierung zur
Seite. Nehmen Sie den Deckel ab.
Legen Sie die Batterie CR123A, beachten Sie Polarität, die am
Batteriebehälter geschildert ist (siehe Abb. 2)
Schieben Sie den Batteriefachdeckel zu.
5
CR123A
Abb.2
Anmerkung: wenn das Haarkreuz zu blinken anfängt, heißt es, dass die
Batterie entladen ist und gewechselt werden muss. Wenn das Gerät eine
lange Zeit nicht benutzt wird, ist die Batterie herauszunehmen.
16
17
Page 12

BEDIENUNG
Schalten Sie den Entfernungsmesser ein, indem Sie die Taste (6)
drücken.
Richten Sie den rechtwikligen Anzeiger auf das Objekt, dessen
Entfernung Sie messen möchten (Abb. 3,4).
Drücken Sie kurz die Taste (6) - im unteren Teil des Displays soll der
Wert erscheinen. Wenn das Reflexionsniveau bei der Distanzmessung zu niedrig ist, erscheint auf dem Display das Zeichen “----”.
Wenn Si e di e Tas t e ( 6 ) g ed r ü c k t h a l ten, er folg t die
Entfernungsmessung im Scanmodus, d.h. ununterbrochen.
Abb.3 Abb.4
Um die Entfernungsmesseinheiten während der Distanzmessung
umzuschalten, halten Sie die Taste (7) zwei Sekunden lang gedrückt.
Symbole “M” oder “Y” erscheinen im unteren Teil des Displays soll der
Wert.
Um das Helligkeitsniveau der Symbole auf dem Bildschirm zu
vergrößern oder zu mindern (es gibt fünf Helligkeitsstufen), drücken
Sie die Taste (7).
BESONDERHEITEN DER BEDIENUNG
Messgenauigkeit und maximale Entfernung hängen vom
Reflektionsvermögen der Zielfläche, vom Winkelgrad, unter dem der
Strahl auf die Zielfläche landet, und von den Wetterbedingungen ab.
Oberflächenbeschaffenheit, Farbe, Größe, Gestalt des Zieles
beeinflussen das Reflektions-vermögen. In der Regel werden helle
Ziele stärker als dunkle Ziele reflektiert.
Es ist schwieriger, die Entfernung zu kleineren Zielen zumessen, als
zu größeren Zielen.
Lichtverhältnisse, Dunst, Nebel, Regen können die Distanzmessung
beeinflussen. Die Messergebnisse können bei sonnigem Wetter
weniger genau sein. Wenn der Entfernungsmesser gegen die Sonne
gerichtet ist, kann es negativ die Messleistung beeinträchtigen.
Wenn sich das nicht große anzumessende Objekt in der Entfernung
von mehr als 400 Metern befindet, sollen Sie die Stützposition bei
Messung annehmen. Es ist mit Händezittern verbunden und mit
Schwierigkeiten ins Objekt mit dem Strahl auf großen Entfernungen
zu geraten.
18
WARTUNG UND AUFBEWAHRUNG
Vermeiden Sie generell Verschmutzungen der optischen
Oberflächen. Nach Gebrauch des Fernglases schließen Sie die
Okulare und Objektive mit den mitgelieferten Staubschutzkappen.
Staub- und Sandkörner sollten zunächst abgeschüttelt bzw.
abgeblasen werden. Anschließend können Verschmutzungen der
Linsen mit einem weichen fusselfreien Tuch entfernt werden.
Stärkere Verschmutzungen oder Fettflecke können mit einem in
Alkohol (Spiritus) getränkten Tuch entfernt werden niemals den
Alkohol direkt auf die Linsen gießen.
Die Reinigung des Gehäuses kann ebenfalls mit einem trockenen
Tuch erfolgen. Um der Gummiarmierung neuen Glanz zu verleihen,
tragen Sie wenige Tropfen Pflegeöl oder Vaseline auf ein Tuch und
verreiben Sie es auf dem Gehäuse.
Um Beschädigungen der Mehrschichtvergütung (Entspiegelung) und
Kratzer auf den Linsen zu vermeiden, verwenden Sie niemals härtere
Gegenstände zur Reinigung.
Um Beschädigungen der Mehrschichtvergütung (Entspiegelung) und
Kratzer auf den Linsen zu vermeiden, verwenden Sie niemals härtere
Gegenstände zur Reinigung.
Das Fernglas sollte über längere Zeit hohen Temperaturen und
direkter Sonneneinstrahlung nicht ausgesetzt werden. Das Gerät
darf nicht in der Nähe von Luftungsschächten oder Heizgeräten
aufbewahrt werden!
Bewahren Sie das Gerät im mitgelieferten Etui an einem trockenen
und gut belüfteten Platz auf.
Es ist untersagt das Fernglas eigenmächtig zu reparieren oder
zerlegen! Wenden Sie sich an Ihr en Fachhändler. Bei
Nichteinhaltung erlischt der Garantieanspruch.
FEHLERBESEITIGUNG
Problem Mögliche Ursache Lösung
Es erfolgt
keine Messung.
Die Taste “ON” ist
nicht gedrückt.
Vor den Linsen des
Strahlempfängers oder
Objektivs befindet sich ein
fremder Gegenstand,
Bei der Messung ist das
Gerät der Vibration
ausgesetzt.
Die der Batterieressource
ist alle.
Drücken Sie die
Taste “ON”.
Prüfen Sie, ob die
Linsen mit der Hand oder mit
den Figern nicht bedeckt sind.
Bei der Messung halten Sie
das Gerät gerade.
Legen Sie eine neue Batterie
ein.
19
Page 13

ESPECIFICACIONES
Prismàtico:
Modelo
Diámetro de la lente, mm
Aumentos, x
Alivio pupilar, mm
Diámetro de salida de pupila, mm
Ángulo de visión, grado angular
Campo de visión a 1000 m de distancia, m
Distancia de enfoque mínima, m
Factor crepuscular
Resolución, sec
Corrector de los oculares, dioptrías
Temperaturas de funcionamiento
Grado de protección, código IP (IEC 60529)
Dimensiones, mm
Peso (sin batería), kg
Telémetro láser:
Alcance de medida, m
Precisión de medición, m
Distancia mínima de medición, m
Cantidad de mediciones sin cambiar batería
Tensión de alimentación/Tipo de batería
Longitud de onda láser, nm
Desconexión auto
77071
40
8
18
5
6,5
114
8
17,8
7,5
±5
-30 °C…+45 °C
IPX4
200х144х80
0,94
1000
±1
5
3000
3V/ CR123A
905
dentro de 20 seg
CARACTERÍSTICAS DISTINTIVAS
Telémetro laser integrado
Modalidad SCAN automático Modalidad SCAN automático
Pantalla OLED de alta calidad Pantalla OLED de alta calidad
Símbolos de la pantalla vivos y claros en todas las condiciones
Símbolos de la pantalla vivos y claros en todas las condiciones
de observación
de observación
Sistema óptico de innovación sobre la base de prismas de porro
de segundo tipo
Grado de protección IPX4
Lentes protectoras que aseguran contra daño mecánico
Anteojeras oblicuos que protegen de luz parásita lateral
Tapas de objetivos ECLIPSE-M™
Cuerpo duradero de vidrio-resina
Diseño de estilo
Alta calidad de imagen
TRUE COLOR™ Lentes multitratados que proveen imagines
brillantes y una reproducción de color natural
Estuche duradero de diseño
El prismàtico Expert LRF 8x40 es un producto nuevo que reúne
caracteristicas opticas y constructivas mejoradas. El prismàtico es un
dispositivo de destino multiuso, es ideal para:
Medición de la distancia a los objetos lejanos
Observaciones de montaña, marinas y grandes espacios abiertos
Observacion en condiciones dificiles
Caza, tiro, eventos deportivos
B úsqueda y rescata
Prismàtico Expert LRF 8x40
Cinta para el cuello
Bolsa acolchada
Manual de instrucciones
Paño para las lentes
Tarjeta de garantía
Con el fin de mejorar el diseño
del producto,este puede estar
sujeto a cambios.
20
Antes de utilizar el prismàtico por la primera vez, por favor lea
todas las instrucciones que contiene el manual de
instrucciones.
EXPLOTACIÓN
Ajuste de la distancia interpupilar
Saque el prismàtico de su estuche y abra las tapas de los objetivos
(1). En caso necesario se puede quitar las tapas de objetivos.
Elija una grupa de objetos en una distancia y moviendo los bloques
de oculares (2) elija una posición hasta ver una imagen de los objetos
y un solo campo circular.
21
Page 14

ATENCIÓN!
¡Siempre proteja sus ojos y nunca observe directamente al sol o a
ningún otro objeto brillante con el prismàtico!
Active el telémetro pulsando el botón (6). Una cruz roja aparecerá en
el campo de visión del ocular derecho. Gire el anillo de dioptrías del
ocular derecho para lograr una imagen nítida de la cruz.
Apunte el prismàtico a un objeto distante, gire el anillo de enfoque
central (3) hasta que usted observe una nítida imagen a través del
ocular derecho.
Gire el anillo de dioptrías del ocular izquierdo (4) hasta que usted
observe una imagen clara en el mismo ocular. Esto le reduce la
diferencia natural entre el ojo derecho y el izquierdo y reducirá el
cansancio visual en un prolongado uso.
Gire el anillo de enfoque central (3) hasta que obtenga una imagen
nítida a través de los dos tubos.
Para el enfoque subsiguiente utilize solamente el anillo de enfoque
central (3), el binocular ya fue ajustado para su necesidad individual.
Medidas de precaución
El telémetro se utiliza un láser seguro para los ojos. Sin embargo, hace
falta recordar sobre algunas medidas de precaución:
olocación de batería
Deslice la tapa del compartimento de la batería (5) como se muestra.
Quite la tapa.
Introduzca la batería CR123A de acuerdo con la polaridad indicada
en el contenedor de baterías (ver fig. 2).
Deslice la tapa a su posición initicial.
5
No enciendan el telémetro cuando está dirigido hacia los ojos
humanos o cuando Usted mira al objetivo del dispositivo.
Mantengan el telémetro fuera del alcance de los niños.
No abran el dispositivo, en caso de problemas diríjase al productor.
Utilicen sólo elemento de alimentación CR123A que está destinado
para el dispositivo.
22
CR123A
Fig.2
Nota: si la cruz comienza a parpadear, la batería está vacía y necesita
ser reemplazado. Si el dispositivo no se utiliza durante un período de
tiempo largo, hace falta que saque la batería.
23
Page 15

USO DEL TELÉMETRO LÁSER
Active el telémetro pulsando el botón (6).
Apunte el indicador en forma rectangular sobre el objeto hacia el cual
quiere medir la distancia (fig. 3,4).
Apriete brevemente el botón (6). En la parte inferior de la pantalla
aparecerá el resultado. Si durante la medición de distancia el nivel de
reflejo es demasiado bajo, en la pantalla aparecerá la indicación “----”.
Si mantiene apretado el botón (6) la medición de distancia hacia los
obje tos s e realiza en el régimen de SCAN, es dec ir
ininterrumpidamente.
Para cambiar unidades de medición de distancia durante el proceso
de medición de distancia apriete el botón (7) durante dos segundos.
Los símbolos “M” o “Y” aparecerán en la parte inferior de la pantalla.
Para aumentar o disminuir la vivacidad de los símbolos de la pantalla
(hay cinco grados de la vivacidad) a el botón (7).priete
PARTICULARIDADES DE USO
La precisión y la distancia de medición depende del coeficiente de
reflejo de la superficie del objetivo y de las condiciones
climatológicas. El coeficiente de reflejo depende de tales factores,
como textura, color, dimensión y forma del objetivo. Por regla
general, el coeficiente de reflejo es mayor en objetos de tintas claras
o con superficie brillante.
La medición de distancia hacia objetivos pequeños se lleva a cabo
con más dificultad que hacia los grandes.
En la precisión de medición influyen tales factores, como condiciones
de iluminación, bruma, neblina, lluvia, nieve, etc. Los resultados de
medición pueden ser menos precisos durante el trabajo con tiempo
soleado o en casos si el telémetro está dirigido hacia el sol.
Si la medición se lleva a cabo respecto a un objeto alejado a más de
400 metros, y éste tiene unas dimensiones pequeñas, la medición se
debe efectuarla apoyando los codos sobre alguna superficie. Esto
está relacionado con el temblor de manos y la dificultad de
acertamiento de rayo en el objeto a grandes distancias.
24
CUIDADOS Y LIMPIEZA
Mantener las lentes libres de toda acumulación de suciedad, tanto
como las condiciones lo permitan.
Antes de limpiar las lentes, soplar sobre ellos para remover cualquier
partícula de arena y suciedad. Cuando limpie la superficie óptica, por
favor utilice el paño que viene con el set de accesorios. Si no puede
encontrar el paño usted puede utilizar cualquier paño suave,
limpiadores de fabrica (telas de algodón, franela, seda, o un hisopo
de algodón, serían ideales).
Cualquier grasa puede ser removida con un pañuelo empapado en
alcohol. De no poseer alcohol en el campo, eche vaho sobre la
superficie de las lentes y remueva la condensación con un paño
suave.
ATENCIÓN!
Para evitar daños en las capas de las lentes, nunca utilice papel (seco o
mojado) para limpiar las lentes ni aplique directamente alcohol sobre las
lentes.
Para limpiar el exterior del prismàtico, utilice un pañuelo seco. Para el
brillo, aplique al pañuelo un poco de sustancia de limpieza.
El prismàtico es un sensible instrumento óptico, no deberá golpearse.
Cuídelo de cualquier otro daño físico.
No deberá exponer prolongadamente el prismàtico a altas
temperaturas o directamente a la luz del sol.
No deberá de dejarlo cerca calentadores o elementos calientes.
Cuando no lo utilice, tenga su prismàtico en el estuche que viene
incluido, en un lugar a temperatura media, seco, y bien ventilado.
¡Se terminantemente prohibe reparar o desmontar el prismàtico!
Inobservancia de estas demandas lleva a la cancelación de la
garantía.
DETECCIÓN DE FALLOS
Problema Causa posible Resolución
El telémetro no realiza
la medición.
El botón “ON” está sin
apretar.
Delante de las lentes del
receptor o del objetivo se
encuentra un objeto extraño
que dificulta el paso de
la señal.
Durante la medición el
dispositivo está expuesto a la
vibración.
La batería está descargada.
Apriete el botón “ON”.
Asegúrese de que las lentes
no están tapadas con la
mano o con los dedos.
Durante la medición
mantenga el dispositivo en
línea recta.
Introduzca una batería nueva.
25
Page 16

CARATTERISTICHE TECNICHE
Binocolo:
Modello
Diametro obiettivo, mm
Ingrandimento, x
Estrazione pupillare, mm
Estensione del campo visivo posteriore dell'oculare, mm
Campo visivo, gradi
Campo visivo lineare alla distanza di 1000 m, m
Minima distanza di messa a fuoco, m
Valore crepuscolare
Risoluzione, sec
Scala di regolazione degli oculari, diottrie
Temperatura di funzionamento
Grado di protezione, codice IP (IEC 60529)
Dimensioni, mm
Peso (senza ), kg
Telemetro a laser:
Campo di misurazione, m
Precisione di misurazione, m
Portata di misurazione minima, m
Numero di misurazioni senza cambio di pila
Tensione di alimentazione/tipo di pila
Lunghezza d'onda di laser, nm
Spegnimento auto
CONTENUTO DELLA CONFEZIONE
Binocolo Expert LRF 8x40
Custodia
Cinturino
Manuale d'uso
Panno per la pulizia
delle lenti
Certificato di garanzia
Caratteristiche e specifiche sono
soggette a migliorie e
cambiamenti.
77071
40
8
18
5
6,5
114
8
17,8
7,5
±5
-30 °C…+45 °C
IPX4
200х144х80
0,94
1000
±1
5
3000 misurazioni
3V/ CR123A
905
tra 20 sec
CARATTERISTICHE DISTINTIVI
Telemetro a laser integrato
Funzione automatic SCAN
Display OLED di alta qualità
Simboli vivi y chiari in qualsiasi condizionesul display
di osservazione
Sistema ottico a porro di secondo tipo
Grado di protezione - IP67 (IEC 60529)
Lenti esterne con protezione contro agenti esterni
Oculari avvolgenti ergonomici massimizzano il comfort e
annullano il disturbo della luce laterale
Tappi protettivi delle lenti ECLIPSE-M™
Corpo in materiale ad alta resistenza
Design elegante
Qualità dell'immagine elevata
Trattamento delle lenti multistrato TRUE COLOR™ che fornisce
immagini luminose con una riproduzione fedele dei colori
Corpo robusto ed elegante
Il binocolo Expert LRF 8x40 è caratterizzata da una costruzione ottica e
da specifiche tecniche potenziate. Il binocolo Expert LRF 8x40 e
strumento polivalente e possono essere utilizzate per:
Misurazione distanze di oggetti lontani
Osservazione in mare ed in spazi aperti
Osservazioni in condizioni proibitive
Caccia, tiro, eventi sportivi
R icerca o soccorso
Prima di utilizzare il vostro binocolo per la prima volta, si
consiglia di dedicare qualche minuto alla lettura di tutte le
istruzioni del presente manuale.
UTILIZZO
Impostazione della distanza interpupillare
Estrarre il binocolo dalla borsa e rimuovere i tappi dagli obiettivi (1). In
caso di necessità è possibile rimuovere i tappi obiettvi.
Scegliere un oggetto a distanza e aprire/chiudere i tubi del binocolo
mentre si guarda attraverso gli oculari (2) e scegliere l'apertura che
consenta di vedere solo un'immagine dell'oggetto e i due campi visivi
uniti.
26
27
Page 17

ATTENZIONE!
Proteggete sempre i vostri occhi e non osservate mai direttamente il
sole o qualsiasi sorgente luminosa con il binocolo!
MESSA A FUOCO E REGOLAZIONE DIOTTRICA
Inizia ad utilizzare il Rangefinder schiacciando il bottone (6).
Comparira' una croce rossa sul campo visivo dell'oculare destro.
Ruota la diottra dell'oculare destro per avere un'immagine nitida della
croce.
Puntare il binocolo verso un oggetto posto a qualsiasi distanza e
ruotare la grande rotella centrale di messa a fuoco (3) fino a vedere un
immagine nitida attraverso l'oculare destro.
Ruotare la ghiera di regolazione diottrica dell' oculare sinistro (4) fino
ad ottenere un'immagine nitida dello stesso oggetto inquadrato nell'
ocular sinistro. Ciò compensa la differenza visiva naturale tra l'occhio
destro e sinistro e riduce l'affaticamento degli occhi nell'utilizzo
prolungato.
Ruotare accuratamente la rotella di messa a fuoco centrale (3) fino ad
ottenere un'immagine nitida su entrambe gli oculari.
Ciò può essere fatto utilizzando solamente la rotella di messa a fuoco
centrale (3) in quanto la regolazione diottrica del binocolo è già stata
eseguita in funzione delle necessità personali.
MODE D'EMPLOI
Precauzioni
In telemetro si usa laser non pericoloso per gli occhi. Tuttavia ricodate di
certe precauzioni:
Non inserire il telemetro direzionato negli occhi d'uomo o se quardate
nell'obiettivo dello strumento.
Conservare il telemetro nel luogo lontano dalla portata dei bambini.
Non smontare lo strumento, nel caso di quai rivolgersi al produttore.
Usare solo pile CR123A destinate per lo strumento.
Inserimento di pila:
Far slittare il coperchio del compartimento delle batterie (5) come da
figura.
Inserire la pila CR123A, ricordare della polarita' indicata nel
contenitore di pila (veda fig. 2).
Rimettere il coperchio facendolo scorrere in avanti.
5
CR123A
Fig.2
N.B.: se la croce iniziasse a lampeggiare, bisogna cambiare le batterie
perche' scariche. Se lo strumento non e' usato da tempo, togliere la pila.
28
29
Page 18

USO
Parti schiacciando il bottone (6).
Mettere l'indicatore in forma del rettangolo sull'oggetto qui distanza
desiderate a misurare (fig. 3,4).
Premere brevemente il bottone (6). Sul display nella parte inferiore
viene visualizzato il valore. Se durante la misurazione della distanza il
livello di riflessione e' troppo basso, sul display viene visualizzato il
segno “----”.
Premendo il bottone (6), la misurazione della distanza agli oggetti viene
eseguita nel modo SCAN.
Fig.3 Fig.4
Per cambiare unita' di misura della distanza premere il bottone (7)
entro due secondi. Simbo ngono visualizzati sul display li “M” o “Y” ve
nella parte inferiore.
Per incrementare o diminuire la luminosita' dei simboli p il remere
bottone (7), ci sono 5 livelli di luminosita'.
CONDIZIONI D'USO SPECIALI
La precisione e la distznaza di misurazione dipende da coefficiente di
riflessione della superficie di bersaglio e dale condizioni
meteorologiche. Coefficiente di riflessione dipende dai fattori quail:
testura, colore, dimensione e forma di bersaglio. Di solito coefficiente
di riflessione e' piu' alto deglo oggetti di colori chiari o di superficie
lucidata.
La misurazione della distanza a bersaglio fine e' piu' difficile che
bersagio grande.
La precisione di misurazione e' funzione di fattori quail: copndizioni di
illuminazione, nebbia, velo, pioggia, neve ecc. I risultati di
misurazione possono essere meno precisi nel tempo pieno del sole o
nel caso del telemetro direzionato al sole.
Se la misurazione viene effettuata sull'oggetto allontanato a piu' di
400 m, ed esso non e' di grande misura, misurare appoggiando I
gomiti su qualsiasi superficie. E' necessario per tremito di mani e
difficolta' di mettere il raggio sull'oggetto alla distanza grande.
CONSERVAZIONE E TRASPORTO DEL BINOCOLO
Avere cura delle lenti. Dopo l'uso del binocolo, chiudere sempre i
tappi di protezione delle lenti.
Prima di pulire le lenti, rimuovere con delicatezza le particelle di
polvere o sabbia più grosse spazzolando molto delicatamente o
soffiando per evitare graffi.
Nel pulire le parti ottiche, utilizzare il panno in dotazione al binocolo. In
alternativa è possibile utilizzare qualsiasi tessuto pulito e morbido
(cotone morbido, flanella, seta sono preferibili).
Qualsiasi macchia di grasso dovrebbe essere rimossa con uno
straccetto imbevuto di liquido specifico per lenti.
In mancanza di tale liquido, alitare sulla superficie delle lenti e
asciugare la condensa con un panno morbido e pulito.
ATTENZIONE!
Per evitare danneggiamenti al trattamento delle lenti, non utilizzare mai
carta (asciutta o bagnata) per pulire le lenti o applicare solventi
direttamente sulle lenti.
Per pulire le parti esterne del binocolo utilizzare un panno asciutto.
Per lucidarle, applicare una piccola quantità di vaselina e similare nel
panno.
Il binocolo è uno strumento delicato, evitare cadute e proteggerlo da
qualsiasi altro urto.
Non esporre per lungo tempo ad alte temperature o alla luce diretta
del sole. Non lasciarlo in prossimità di fonti di calore.
Quando non utilizzato, conservare il binocolo all'interno della borsa
da trasporto in luogo asciutto e ben ventilato.
E' assolutamente vietato riparare o smontare il binocolo!
L'inosservanza di questa regola invalida la garanzia.
INDIVIDUAZIONE DEI QUASTI
Problema Causa possibile Eliminazione
Telemetro non misura. Bottone “ON” non e' ressato.
Davanti a lenti o obiettivo c'e'
un oggetto estraneo
che ostacola il passaggio del
segnale.
La vibrazione dello strumento
in misurazione.
Pila scaricata.
Premere bottone “ON”.
Assicurarsi che lenti non
siano coperti con la mano o
le dita.
Tenere piano lo strumento
durante misurazione.
Inserire una pila CR123A
nuova.
30
31
Page 19

Бинокль Expert LRF 8x40
Шейный ремень
Чехол
Инструкция по эксплуатации
Салфетка для протирки
линз
Гарантийный талон
Для улучшения потребительских
свойств изделия в его
конструкцию могут вноситься
усовершенствования.
Встроенный дальномер
Р ежим одиночного измерения и режим сканирования
К ачественный OLED дисплей
Я ркие и четкие символы на дисплее в любых условиях
наблюдения
Инновационная оптическая система на базе призм
Порро 2-го рода
Степень защиты IPX4
Защитные стекла, предотвращающие механическое
повреждение объективов
Эргономичные косые наглазники, защищающие от боковых
засветок
Крышки объективов системы Eclipse-M
Прочный корпус из стеклопластика
Стильный дизайн
Высокое качество изображения
Многослойное просветляющее покрытие линз, выполненное
по вакуумной технологии TRUE COLOR™
Стильный и прочный чехол
Бинокль Expert LRF 8x40 – это новая разработка, сочетающая в
себе улучшенные оптические и конструктивные характеристики.
Бинокль Expert LRF 8x40 – прибор многоцелевого назначения,
который может использоваться для:
И змерение расстояния до удаленных объектов
Наблюдения на воде, в горах и открытых пространствах
Наблюдения в сложных условиях
Охоты, стрельбы, спортивных состязаний
Проведения поисково-спасательных операций
Пожалуйста, прочтите инс трукцию, прежде ч ем
приступить к эксплуатации бинокля.
Извлеките бинокль из чехла, откройте крышки объективов (1).
В случае необходимости крышки объективов можно снять.
Направьте бинокль на удаленный объект и, сдвигая или
раздвигая блоки окуляров (2), выберите такое положение, при
котором Вы будете видеть только одно изображение предметов,
и два круга поля зрения совместятся в один.
32
33
Page 20

ВНИМАНИЕ!
Берегите глаза. Не смотрите через бинокль на солнце и иные
яркие источники света!
Включите дальномер, нажав кнопку (6). При этом в поле зрения
правого окуляра появится красное перекрестие. Вращением
кольца диоптрийной регулировки правого окуляра добейтесь
четкого изображения перекрестия.
Направьте бинокль на любой удалённый объект и, вращая
барабан механизма центральной фокусировки (3), добейтесь
чёткого изображения в правом окуляре.
Вращая кольцо диоптрийной регулировки левого окуляра (4),
добейтесь четкого изображения этого же объекта и в этом
окуляре. Данная настройка проводится с целью компенсации
естественной разницы зрения между правым и левым глазом
наблюдателя и снижения утомляемости глаз при длительном
наблюдении.
Вращая барабан (3), подстройте бинокль до получения четкого
изображения одновременно в обоих оптических каналах.
Далее фокусировк у изображения производите только с
помощью барабана (3) – бинокль уже был индивидуально
настроен.
В дальномере используется безопасный для глаз лазер. Тем не менее,
следует помнить о некоторых мерах предосторожности:
Сдвиньте крышку контейнера батарей (5) в сторону согласно
маркировке. Снимите крышку.
Вставьте батарею CR123A соблюдая полярность, указанную в
контейнере батарей (см. рис.2).
Задвиньте крышку контейнера батарей.
5
Не включайте дальномер, когда он направлен в глаза человека
или когда Вы смотрите в объектив прибора.
Храните дальномер в месте, недоступном для детей.
Не разбирайте прибор, в случае возникновения проблем
обратитесь к производителю.
Используйте только те элементы питания CR123A, которые
предназначены для прибора.
34
CR123A
Рис.2
Примечание: если перекрестие начинает мигать, значит, батарея
разряжена и требует замены. Если прибор не используется в
течение продолжительного времени, батарею необходимо извлечь.
35
Page 21

Включите дальномер нажатием кнопки (6).
Наведите указатель в виде перекрестия (см. рисунки 3,4) на
объект, до которого вы хотите измерить расстояние.
Нажмите кнопку (6). В нижней части дисплея появится значение.
В случае невозможности произвести замер, в нижней части
экрана появятся прочерки.
При удержании кнопки (6) измерение расстояния до объектов
осуществляется в режиме сканирования, т.е. непрерывно.
Рис.3 Рис.4
Для переключения единиц измерения расстояния (метры/ярды)
нажмите и удерживайте кнопку (7). В правой нижней части
дисплея появится соответствующий символ - “M” или “Y”.
Для увеличения или уменьшения яркости символов (имеется
пять степени яркости) на дисплее нажимайте кнопку (7).
Точность и дистанция измерения зависит от коэффициента
отражения поверхности цели и погодных условий. Коэффициент
отражения зависит от таких факторов, как текстура, цвет, размер
и форма цели. Как правило, коэффициент отражения выше у
объектов светлых оттенков или с блестящей поверхностью.
Измерение дистанции до мелких целей проводить сложнее, чем
до крупных.
На точность замера влияют такие факторы, как условия
освещенности, туман, дымка, дождь, снег и пр. Результаты
замера могут быть менее точными при работе в солнечную
погоду или в том случае, если дальномер направлен в сторону
солнца.
Если измерение проводится по объекту, удаленному более чем
на 400 м, и он имеет небольшие размеры, то измерение
необх одимо произ водить, упе ре в локти в к акую- ли бо
поверхность. Это связано с дрожанием рук и сложностью
попадания лучом в объект на больших дистанциях.
36
Чистку наружных поверхностей корпуса проводите сухой
салфеткой. При необходимости придать блеск, можете нанести
несколько к апель синтетическ ого чистящего средства и
растереть.
Оберегайте бинокль от падения с высоты и других механических
повреждений.
Храните бино кл ь в ч ехле, в сухом, отапливаемом и
проветриваемом помещении.
ВНИМАНИЕ!
При попадании прибора с холода в помещение на оптических
поверхностях может образоваться конденсат. Это обычное явление,
и в течение часа конденсат должен исчезнуть.
Разбирать прибор не разрешается. В случае возникновения
неисправности отправьте прибор производителю, не пытайтесь
отремонтировать его самостоятельно. Нарушение данного
требования может привести к аннулированию гарантии на
бинокль.
Не подвергайте прибор ударам или другим механическим
повреждениям. Храните прибор вдали от огня и воды.
Храните прибор в сухом, прохладном и вентилируемом месте.
Не допускайте попадания пыли, прямых солнечных лучей,
берегите прибор от резкого перепада температур.
ПРОБЛЕМА ВОЗМОЖНАЯ ПРИЧИНА РЕШЕНИЕ
Дальномер
не производит
замер.
Не нажата кнопка “ON”.
Перед линзами приемника
или объектива находится
посторонний предмет,
который препятствует
прохождению сигнала.
Во время замера прибор
подвержен вибрации.
Разряжена батарея.
Нажмите кнопку “ON”.
Убедитесь в том, что
линзы не закрыты
рукой или пальцами.
Во время измерения
держите прибор ровно.
Вставьте свежую
батарею.
37
 Loading...