

Page 1

NETBOOK PRO
Quick Start Guide
April 4, 2005 P/N 8100010.D
Page 2

Return-To-Factory Warranty
Psion Teklogix provides a return-to-factory warranty on this product
for a period of twelve (12) months in accordance with the Statement
of Limited Warranty and Limitation of Liability provided at the following website: www.psionteklogix.com/warranty.
Note: If you are not already a member of Teknet and you attempt
to view this warranty, you will be asked to register. As a
member of Teknet, you'll have access to helpful information
about your Psion Teklogix products at no charge to you.
In some regions, this warranty may exceed this period - please contact your local Psion Teklogix office for details. For a list of offices,
refer to “Worldwide Offices” on page A-2 of this guide. For a copy
of the NETBOOK PRO User Manual, log on to our Teknet website.
Important: For North American Customers Only
To ensure prompt warranty service in North America, please register
the serial number of this device to activate its warranty coverage by
contacting Psion Teklogix at 1-800-835-5644 ext.209, or via weblink americascontracts@teklogix.com. Failure to do so could affect
Psion Teklogix' ability to effectively service, repair, or support this
device.
Service
When requesting service, please provide information concerning the
nature of the failure and the manner in which the equipment was
used when the failure occurred. Type, model, and serial number
should also be provided. Before returning any products to Psion Teklogix, please call the Customer Services Group for a Return Authorization number.
Support Services
Psion Teklogix provides a complete range of product support services to its customers. For detailed information, please refer to
“Product Support Services” on page 14.
Disclaimer
Every effort has been made to make this material complete, accurate,
and up-to-date. Psion Teklogix Inc. reserves the right to make
changes without notice and shall not be responsible for any damages,
including but not limited to consequential damages, caused by reliance on the material presented, including but not limited to typographical errors.
© Copyright 2005 by Psion Teklogix Inc., Mississauga, Ontario, Canada
Page 3

Table Of Contents
Approvals And Safety Summary . . . . . . . . . . . . . . . . . 2
1. Introduction. . . . . . . . . . . . . . . . . . . . . . . . . . . . . . . . 3
2. Getting Started . . . . . . . . . . . . . . . . . . . . . . . . . . . . . 3
2.1 Unpacking The Box: Item Checklist . . . . . . . . 3
2.2 Main Features. . . . . . . . . . . . . . . . . . . . . . . . . . 4
2.3 Applications . . . . . . . . . . . . . . . . . . . . . . . . . . . 4
2.4 Software . . . . . . . . . . . . . . . . . . . . . . . . . . . . . . 4
2.4.1 Windows® CE .NET . . . . . . . . . . . . . . . 4
2.4.2 About ActiveSync . . . . . . . . . . . . . . . . . 4
2.5 Identifying Product Features . . . . . . . . . . . . . . 5
2.6 Installing The Main Battery . . . . . . . . . . . . . . . 6
2.7 Installing Backup Batteries. . . . . . . . . . . . . . . . 7
2.8 Turning The NETBOOK PRO On And Off. . . 7
2.9 First Steps . . . . . . . . . . . . . . . . . . . . . . . . . . . . . 8
2.10 Power Management . . . . . . . . . . . . . . . . . . . . 8
2.10.1 Battery Calibration . . . . . . . . . . . . . . . . 8
2.10.2 Charging The Battery Pack . . . . . . . . . 9
2.10.3 How Do I Check The Battery Power? . 9
2.11 Using The Stylus . . . . . . . . . . . . . . . . . . . . . . 9
2.12 Multimedia And Secure Digital Cards. . . . . . 10
2.13 Compact Flash Cards . . . . . . . . . . . . . . . . . . . 10
2.14 PC Cards. . . . . . . . . . . . . . . . . . . . . . . . . . . . . 11
2.15 Caring For The NETBOOK PRO. . . . . . . . . . 11
3.1 Technical Support . . . . . . . . . . . . . . . . . . . . . . 14
3.2 Product Repairs . . . . . . . . . . . . . . . . . . . . . . . . 14
Appendix A
A.1 Technical Support . . . . . . . . . . . . . . . . . . . . . A-1
A.2 Product Repairs. . . . . . . . . . . . . . . . . . . . . . . A-1
A.3 Worldwide Offices . . . . . . . . . . . . . . . . . . . . A-2
Page 4

Approvals And Safety Summary
IMPORTANT SAFETY INSTRUCTIONS
When using this product, basic safety precautions should
always be followed to reduce the risk of fire, electric shock
and injury to persons, including the following:
1. Do not use this product near water, for example,
near a bath tub, wash bowl, kitchen sink or laundry
tub, in a wet basement or near a swimming pool.
2. Avoid connecting to a telephone network during an
electrical storm. There may be a remote risk of
electric shock from lightning.
3. Do not use this product to report a gas leak in the
vicinity of the leak.
Important: Save these instructions.
FCC Information For The USA
Radio And Television Interference
This equipment radiates radio frequency energy and if not
used properly—that is, in strict accordance with the instructions in this manual—may cause interference to radio communications and television reception. It has been tested and
found to comply with the limits for a Class B digital device
pursuant to part 15 of the FCC Rules. Operation is subject to
These limits are designed to provide reasonable protection
against harmful interference in a residential installation.
However, there is no guarantee that interference will not
occur in a particular installation. If this equipment does cause
harmful interference to radio or television reception, which
can be determined by turning the equipment off and on, the
user is encouraged to try to correct the interference by one or
more of the following measures:
• Reorient or relocate the receiving antenna.
• Increase the separation distance between the equipment and the receiver.
• If you are using the equipment with a mains adaptor,
plug it into an outlet which is on a different circuit
from that to which the receiver is connected.
• Consult an experienced radio/TV technician for help.
For customers in the USA, the following booklet prepared by
the Federal Communications Commission may be of help:
“How to Identify and Resolve Radio-TV Interference Problems”. This booklet is available from the US Government
Printing Office, Washington, DC 20402 - Stock No 004-00000345-4.
Radio Frequency Emissions
Some equipment in hospitals and aircraft is not shielded from
radio frequency emissions. Do not use the NETBOOK PRO on
Page 5

between it and the peripherals. It is important that you use
shielded cable and connectors to reduce the possibility of
causing radio and television interference. Shielded cables,
suitable for the NETBOOK PRO, can be obtained from an
authorised Psion Teklogix dealer.
If the user modifies the equipment or its peripherals in any
way, and these modifications are not approved by Psion Teklogix, the FCC may withdraw the user’s right to operate the
equipment.
Infrared Device Safety
Class 1 LED Product
This product includes an Infrared device for transmitting and
receiving files from devices supporting the IrDA format.
Although this invisible beam is not considered harmful, and
complies with EN60825-1 (IEC825-1), we recommend the following precautions when the Infrared device is transmitting:
• Do not stare into the Infrared beam.
• Do not view directly with optical instruments.
No parts in the device may be serviced by the user.
Caution
Use only 26 AWG or larger telecommunication line cords. Contact your authorized Psion Teklogix dealer for a suitable cord.
1. Introduction
This guide provides information on the operation and features of the Psion Teklogix NETBOOK PRO. For additional
information, refer to the NETBOOK PRO User Manual, the
online help, or the documentation supplied with the application you are using.
2. Getting Started
2.1 Unpacking The Box: Item Checklist
Your NETBOOK PRO was shipped with a number of accessories. Please ensure that you have all of the following items
and that they are in good condition. For missing items or damaged contents please contact your local Psion Teklogix office.
• NETBOOK PRO (a stylus ships in the holder in the
computer - see “Using The Stylus” on page 9).
• Rechargeable 12.6 V 2200 mAH Lithium-Ion battery
(main battery).
• Two AAA replaceable alkaline batteries (for back-up).
• NETBOOK PRO USB or RS-232 ActiveSync cable.
• ‘Mini to full-size USB host port’ adaptor cable.
•Power Supply.
Page 6

2.2 Main Features
The NETBOOK PRO is a Windows® CE .NET OS-based
mobile touchscreen computer with an SVGA touch-sensitive
screen. It has the following features:
•Intel
®
PXA 255 XScale® processor (400Mhz).
• Windows CE .NET.
• 32MB Flash and 128MB SDRAM.
• High quality 800 x 600 SVGA TFT transmissive LCD.
• USB master connectivity.
• RS232 serial connector.
• IrDA interface.
•CF Card slot.
• MMC/SDCard/SDIO slot.
• PCMCIA Card slot.
2.3 Applications
The NETBOOK PRO is capable of running a wide variety of
applications. A number of standard applications exist and
custom programs can be installed easily.
The following standard programs are available:
• Wordpad, a word processor for writing letters and
other documents.
•Microsoft
®
File Viewer, software for viewing files.
• JEM-CE, Java ‘virtual machine’ software.
• Windows Explorer, a file browser.
• Windows Media Player, software for viewing multimedia files.
2.4 Software
2.4.1 Windows® CE .NET
Windows CE .NET is an operating system with ease of application integration, comprehensive application development
tools and a growing set of connected capabilities. Windows
CE .NET supports advanced networking protocols and native
support for Bluetooth, improved browser functionality, simplified WLAN configuration, and a shortened response time
specifically designed to reduce latency in industrial devices.
2.4.2 About ActiveSync
The Microsoft PC connectivity software, ActiveSync, can be
used to connect the NETBOOK PRO to PCs running Windows 95/98/ME/2000/XP or NT 4.0. By connecting the
NETBOOK PRO to a PC with a cable and running ActiveSync on the PC, you can:
• View your NETBOOK PRO files from Windows
Explorer by using the Mobile Device icon in the PC’s
Page 7
• Synchronize e-mail and your address book on the
NETBOOK PRO with the PC to keep them in step
with each other.
• Back up your NETBOOK PRO files to the PC, then
restore them from the PC to the NETBOOK PRO
again, if needed.
For detailed information, please refer to the documentation
supplied with Microsoft Active Sync or the NETBOOK PRO
User Manual.
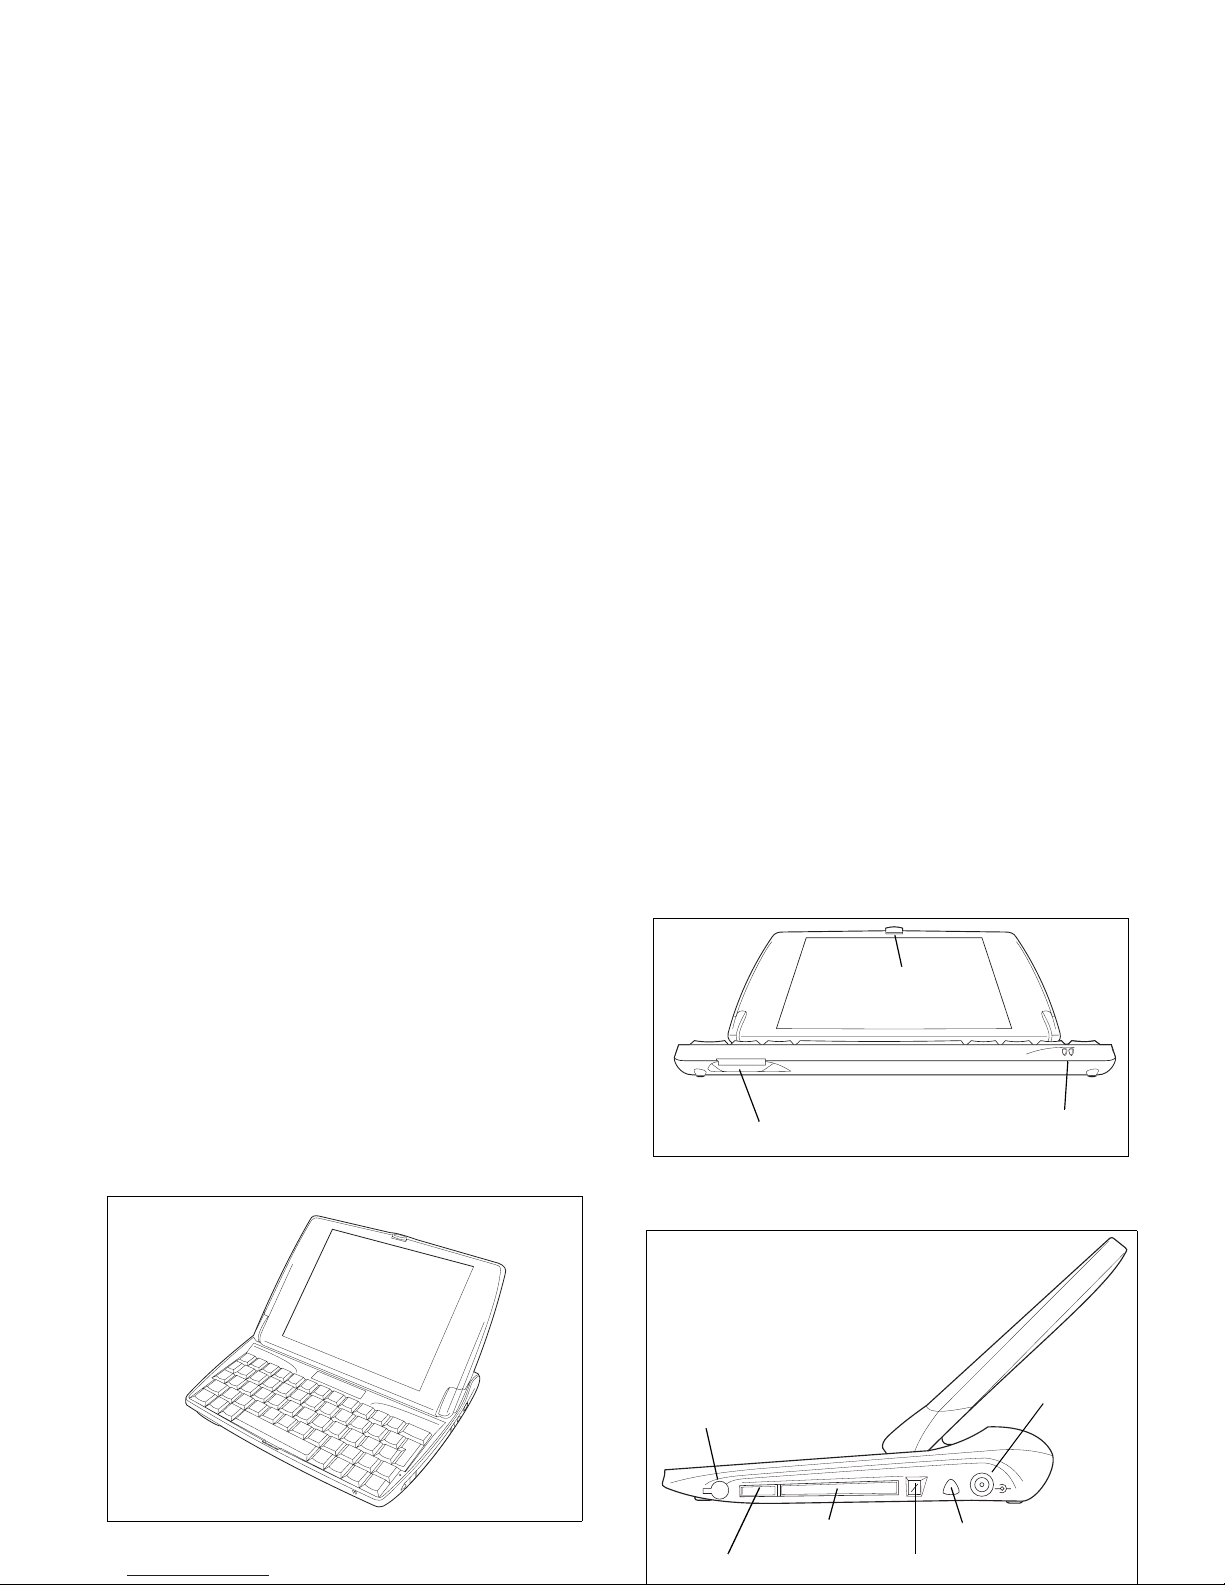
2.5 Identifying Product Features
Figure 2.1 NETBOOK PRO Open
Figure 2.2 Lower Front Of NETBOOK PRO
MMC/SDCard/SDIO Slot
Power Indicator
Latch
Power Connector
Stylus Release Button
PCMCIA Slot
PCMCIA Release Button
Headphone Jack
Stylus
Page 8

Figure 2.4 Rear Of NETBOOK PRO
2.6 Installing The Main Battery
Fitting The Battery
Before you can use the NETBOOK PRO you must fit the battery. Slide it into place until it clicks, as shown in Figure 2.6.
Important: The NETBOOK PRO will warn you when its
main battery is getting low. The backup
battery is designed to maintain the memory for
several hours.
Changing Battery Packs
If you are using your NETBOOK PRO away from the
charger and a spare battery pack is available, you can change
batteries when the battery warning is displayed. To do this:
1. Switch the NETBOOK PRO off.
2. Slide the battery pack latch towards the rear of the
NETBOOK PRO.
3. Pull the battery away from the NETBOOK PRO to
remove it.
4. Push in the replacement battery pack.
Infrared Port
Main Battery Cover
CF Card Slot
USB Connector
Page 9
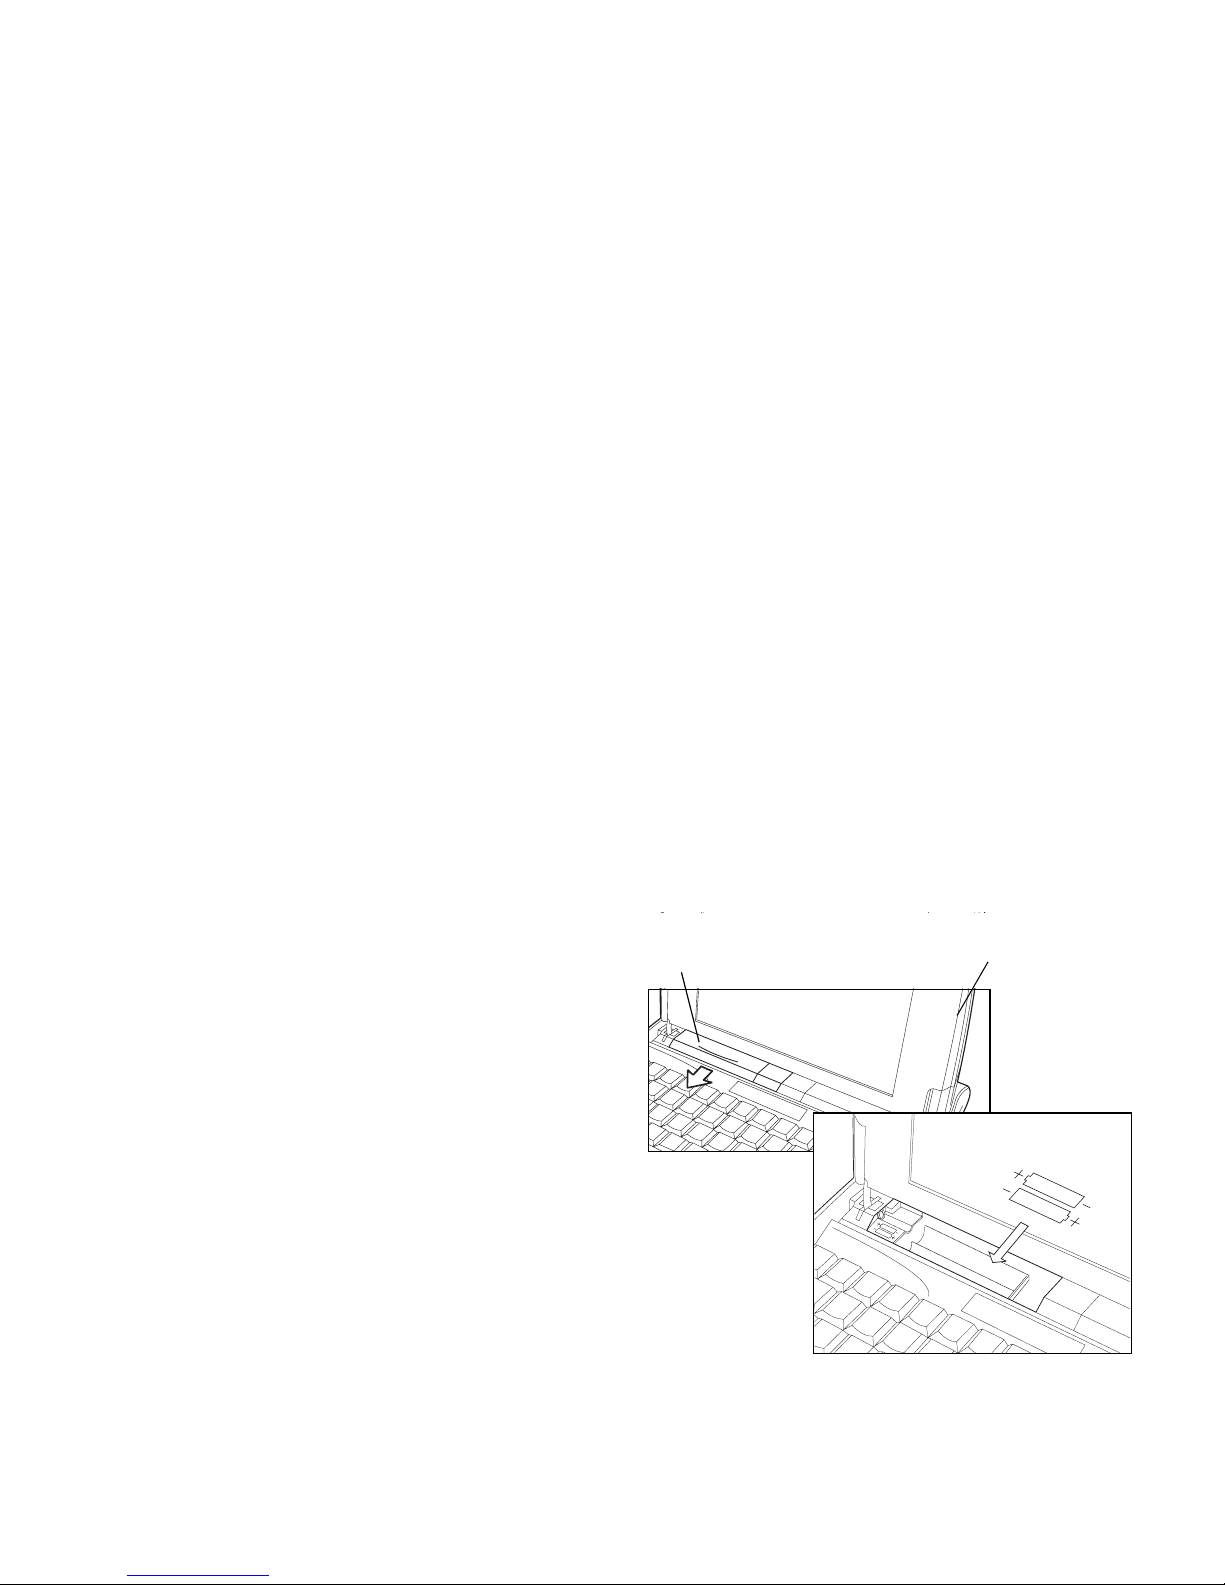
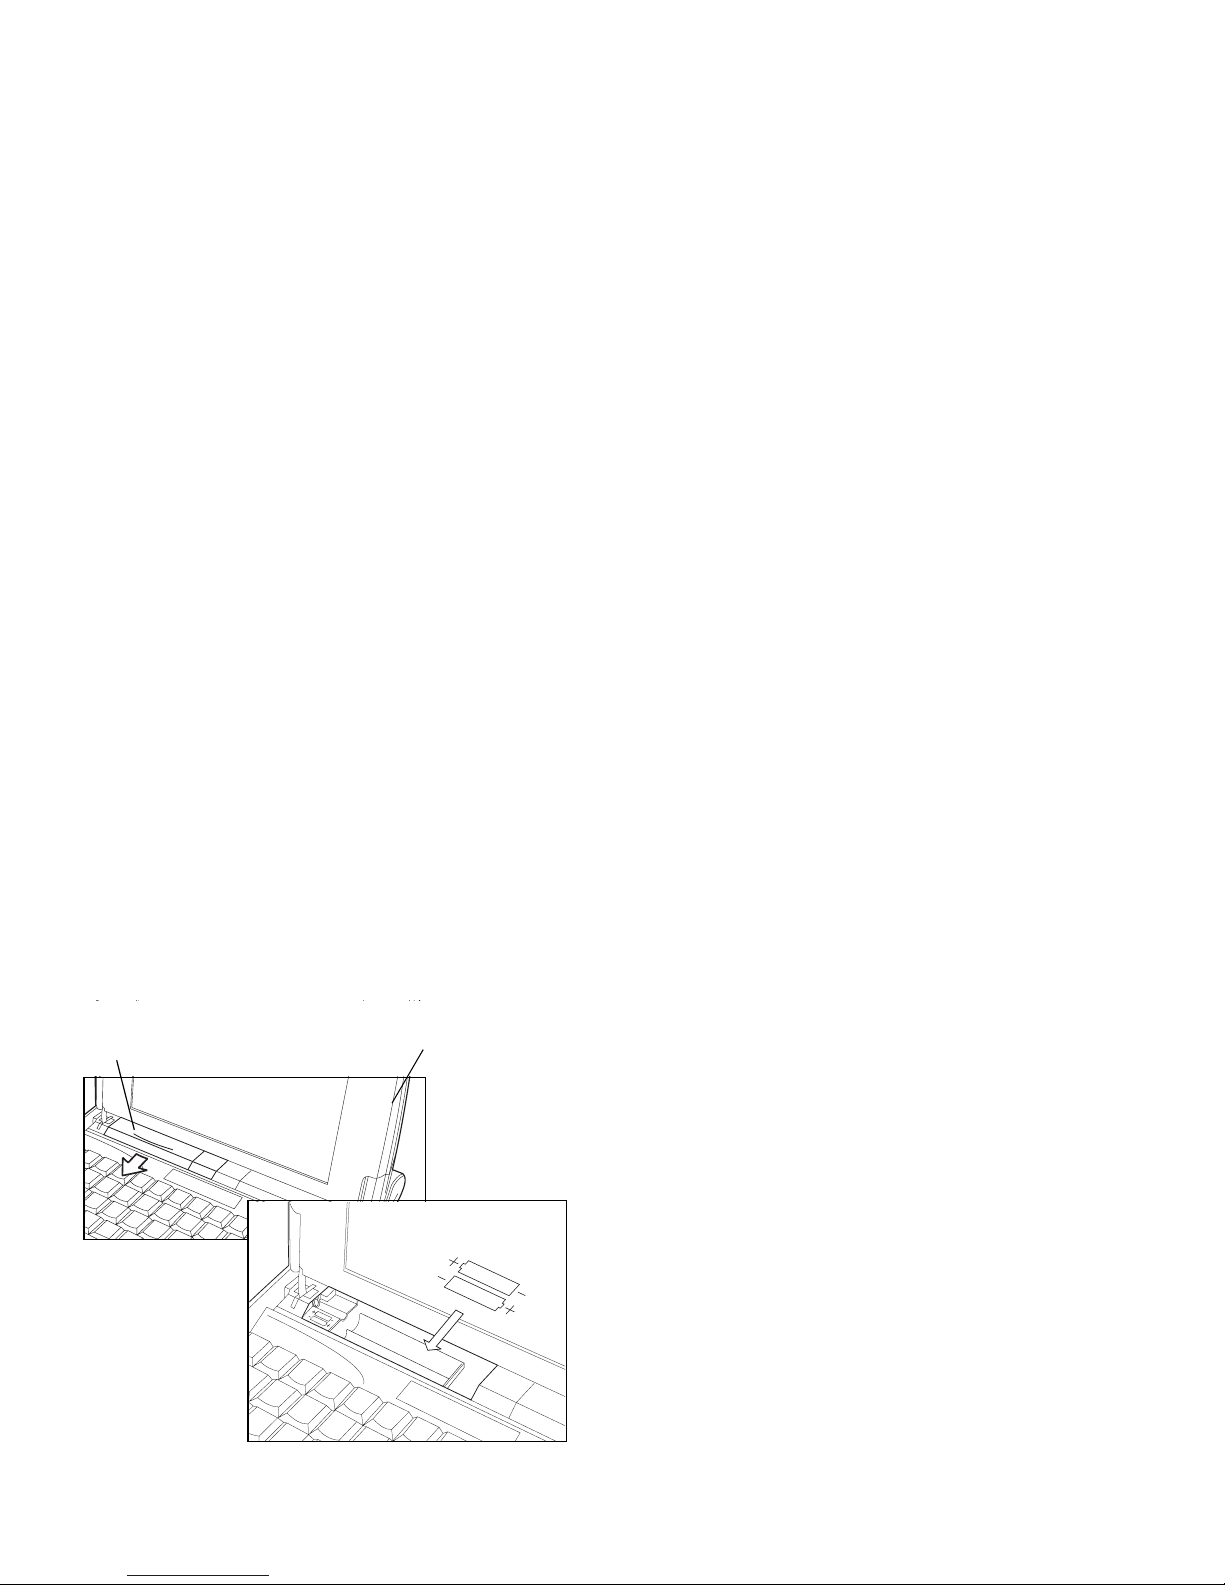
2.7 Installing Backup Batteries
Internal Backup Battery
The NETBOOK PRO has a replaceable backup battery
designed to retain data while the main battery pack is charging or changed over. The backup battery is a pair of AAA
cells accessible from the front of the open NETBOOK PRO.
Important: If both the main battery pack and the backup
battery are allowed to fully discharge, all user
data held in RAM will be lost.
The backup battery is user-replaceable. To replace it:
1. Switch the NETBOOK PRO off.
2. Position the display at a slight angle forward to access
the backup-battery cover, which is located on the left
above the computer keyboard (see Figure 2.7).
3. Apply downward pressure to the center of the
backup-battery cover and slide it towards the front
of the NETBOOK PRO.
4. Remove the AAA cells.
5. Insert replacement alkaline AAA cells, observing
the polarity indication.
6. To close the compartment, slide the cover back
over the batteries while again applying downward
pressure to the center of the cover.
Figure 2.7 Backup Battery Removal
2.8 Turning The NETBOOK PRO On And Off
To s w it c h o n :
open the NETBOOK PRO (by default it turns on when
the cover is opened).
The following options to power on are available through the
Backup-Battery Cover
Angle display slightly
forward to access cover
Page 10

The computer will turn on if the Esc/On key is pressed,
regardless of the options enabled.
To s wi t ch o ff :
press and hold the Fn key, then press the Esc/On key. Or,
tap the Suspend icon in the Start menu. You can switch
off at any time, but first save any open files.
Note: If you do not use the NETBOOK PRO, it will automati-
cally switch off after a few minutes to save battery
power. To continue using the NETBOOK PRO where
you left off, switch the NETBOOK PRO on again using
the Esc/On key. Power saving options are available
via the Control Panel/Power Properties/Power
Schemes menu. The automatic switch-off time may
have different settings, depending on whether the NETBOOK PRO is connected to an external electrical supply.
The NETBOOK PRO can be configured to turn off when the
case is closed. This is the default setting. See the Advanced
menu in Control Panel/Power Properties to disable the fea-
ture.
2.9 First Steps
When you first switch on the NETBOOK PRO, you will see
the Windows CE .NET desktop. At this time it is a good idea
to set the date and time. To do this, go to Start/Settings/Con-
3. Click the OK button in Time/ Date Properties
menu to close and save your changes.
2.10 Power Management
The NETBOOK PRO is powered by a lithium-ion rechargeable battery pack. The NETBOOK PRO will warn you when
the main battery charge is low.
Note: How long your batteries last will depend upon how
you use your NETBOOK PRO. The NETBOOK PRO
will use considerably more battery power when you
have the brightness turned up, are using files stored
on a memory card, or are using infrared or a
communications card.
You can take steps to help prolong your battery’s life:
• Turn the screen brightness down.
• Set automatic switch-off in the Power menu.
• Use files on the internal storage instead of a
memory card, as the NETBOOK PRO requires
more power to write to the memory card.
The NETBOOK PRO can be powered from AC when connected to the AC adaptor. When the NETBOOK PRO is
powered from AC, it will also charge the battery pack.
2.10.1 Battery Calibration
Page 11

Until this is done, the battery information control panel will
indicate ‘Not calibrated’, and the reported capacity will not
be very accurate.
Psion Teklogix recommends that the battery be fully charged
when the unit is first received, then fully discharged before
being charged again, thus calibrating the battery gauge.
Please refer to the NETBOOK PRO User Manual for more
information.
2.10.2 Charging The Battery Pack
To charge the battery, attach the battery pack to the NETBOOK PRO and connect the supplied AC adaptor. The
standard (2200 mAH) NETBOOK PRO battery will normally be fully charged within 3 to 4 hours.
2.10.3 How Do I Check The Battery Power?
To check the battery power:
1. Press the Start button. The Start menu appears.
2. Select Settings, Control Panel.
3. Select the Power icon from the Control Panel. The
Battery tab gives a brief description of the state of
the main battery.
Note: When your NETBOOK PRO is switched off, it is on
“Suspend” and will continue to use a small amount of
battery power. If you are going to leave your NETBOOK PRO switched off for a long period of time,
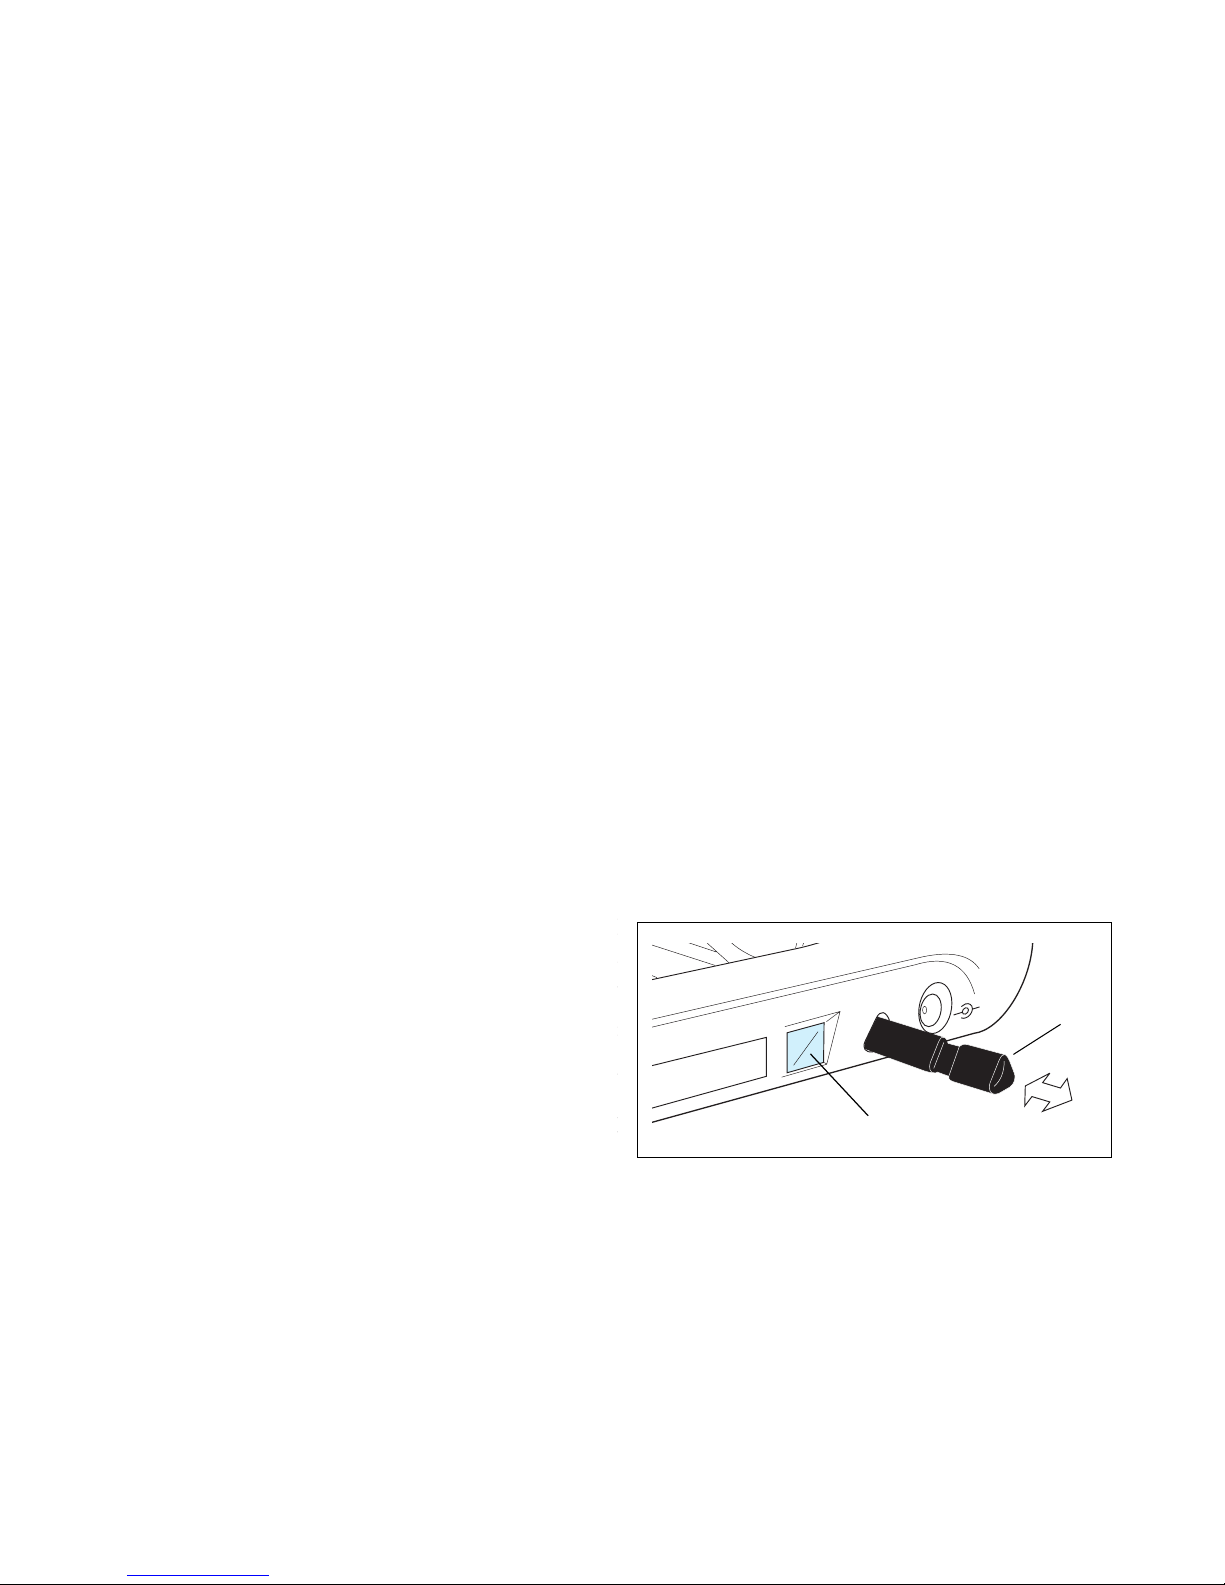
and the stylus will pop out. To store it, push the stylus back
into the recess (see Figure 2.8).
Figure 2.8 Stylus Location And Removal
Tap lightly on the screen using the stylus. You can use your
fingers to tap on the screen, though it is best to use the stylus
to avoid fingerprints or smudges on the screen. Do not tap the
screen with any object that has a sharp tip or you may damage the screen. Don’t use any type of ink pen, as the ink may
be impossible to remove. See “Caring For The NETBOOK
PRO” on page 11 for instructions on how to clean the screen.
You can usually tap on (“click on”) an item with the stylus to
select or change it. For example, you can:
• Double-tap (or click) a program icon, to open a program.
•Press the Alt key, then tap, to right-click.
Stylus Release Button
Stylus
Page 12

2.12 Multimedia And Secure Digital Cards
Multimedia cards (MMCs) and Secure Digital cards (SDs),
which fit into a dedicated slot in the NETBOOK PRO, can be
non-volatile memory cards (used to store application software and/or data). They can also be communications or interface cards.
The MMC slot is located on the front of the NETBOOK PRO.
Inserting And Removing An MMC Or SD Card
• Push the card into the card slot until it clicks.
• To remove a card, push the card inwards. It ‘bounces’
and pops outwards, and can then be pulled out.
Store your MMC or SD card safely.
2.13 Compact Flash Cards
Compact Flash (CF) cards, which fit into a dedicated slot in
the NETBOOK PRO, can be non-volatile memory cards
(used to store application software and/or data). They can
also be communications or interface cards.
The CF slot is located on the left side of the NETBOOK PRO.
Inserting And Removing A CF Card
• Push the card into the card slot.
• To remove a card, press the eject button next to the
slot. The eject button will pop out, then press the button again to eject the card.
Store your CF card safely.
MMC/SD Slot
Page 13

2.14 PC Cards
PC Cards, which fit into a dedicated slot in the NETBOOK
PRO, can be non-volatile memory cards (used to store application software and/or data). PC Cards can also be communications or interface cards.
The PC Card slot is located on the right side of the
NETBOOK PRO.
Inserting And Removing A PC Card
• Push the card into the card slot. The eject button next
to the card slot will pop out. The eject button may be
folded into the computer while the card is in the slot.
• To remove a card, press the eject button (unfold first if
it’s tucked away). The card will pop loose, and may be
pulled outwards.
Store your PC Card safely.
2.15 Caring For The NETBOOK PRO
2.15.1 Screen
When used with the approved stylus, the NETBOOK PRO
screen is very resistant to wear and impact and should last for
a considerable time. Use of any object, other than the
approved stylus, may result in damage to the NETBOOK
PRO screen.
To maintain the life of the NETBOOK PRO screen, keep the
screen clean. To clean the screen: switch off the NETBOOK
PRO and use a soft, clean, dry cloth to gently wipe the screen.
(If the NETBOOK PRO is set to turn on automatically when
the screen is tapped, you should turn this preference off
before cleaning the screen.)
Warning: Under no circumstances use chemical solvents
to clean the screen.
2.15.2 Battery Care
CAUTION!
Danger of explosion if a NETBOOK PRO battery is incorrectly handled, charged, disposed of or replaced. Replace
only with the same or equivalent type recommended by Psion
Teklogix. Dispose of used batteries according to the instruc-
Page 14

Lithium-Ion Battery Safety Precautions
Do not store batteries at temperatures in excess of +60°C; the
optimum storage temperature for maximum battery life is
+10°C to +35°C.
Important: It is critical that this safety information be
reviewed and that all warnings be strictly
followed.
Warnings:
TO PREVENT the battery from leaking acid, generating
heat or exploding, adhere to the following precautions.
• Use only with the authorized Psion Teklogix power adaptor.
• To reduce the risk of fire, do not replace the backup batteries with rechargeable batteries.
• Do not dispose of in fire.
• Do not incinerate or subject battery cells to temperatures
in excess of 100°C (212°F). Such treatment can vaporize
the liquid electrolyte causing cell rupture. Incineration
may result in harmful emissions or explosion.
• Do not charge, use or store batteries below -30º C (-22°
F). Batteries must be handled in accordance with all
applicable state and federal laws and regulations.
• The battery incorporates built-in safety devices. To ensure
their proper function, do not disassemble or alter any parts
of the battery.
• Do not short-circuit the battery by directly connecting any
• When charging, use the battery charger specifically
designed for the battery.
• Do not crush, puncture, open, dismantle, or otherwise
mechanically interfere with batteries.
• Do not directly solder the battery.
• Do not connect the battery to an electrical outlet, vehicle
cigarette lighter, etc.
• Do not put battery into a microwave oven or pressurized
container.
• Do not use rechargeable batteries in combination with
non-rechargeable batteries (such as dry-cell batteries) or
batteries of different capacities or brands.
• Immediately remove the battery from the device or battery
charger and stop use if the battery gives off an odour,
generates heat, becomes discoloured or deformed, or in
any way appears abnormal during use.
• Do not continue charging the battery if it does not
recharge within the specified charge time.
• The battery may burst or ignite if the battery leaks.
Always ensure that it is away from any exposed flames.
• If a battery should leak, do not allow the contents to come
into contact with your skin or your eyes. If it does, wash
immediately with plenty of cold water and seek medical
advice.
• Do not store the battery in extremely high temperatures
(e.g., a vehicle, strong direct sunlight, etc.). This may
Page 15
2.15.3 Operating And Storage Temperatures
Operating:
0°C to +50°C (32°F to 120°F). The power adaptor must
be used in the temperature range: 0°C to +40°C (+32°F
to +104°F).
Storage:
-10°C to +60°C (14°F to 140°F). To prolong the life of
the NETBOOK PRO (and the battery pack) store
between +10°C and +35°C (+50°F and +95°F).
Important: Avoid exposing the NETBOOK PRO to
extreme changes in temperature and humidity,
since such exposure may result in damage.
Charging the NETBOOK PRO battery should
be limited to the temperature range: 0°C to
+40°C (32°F to 104°F).
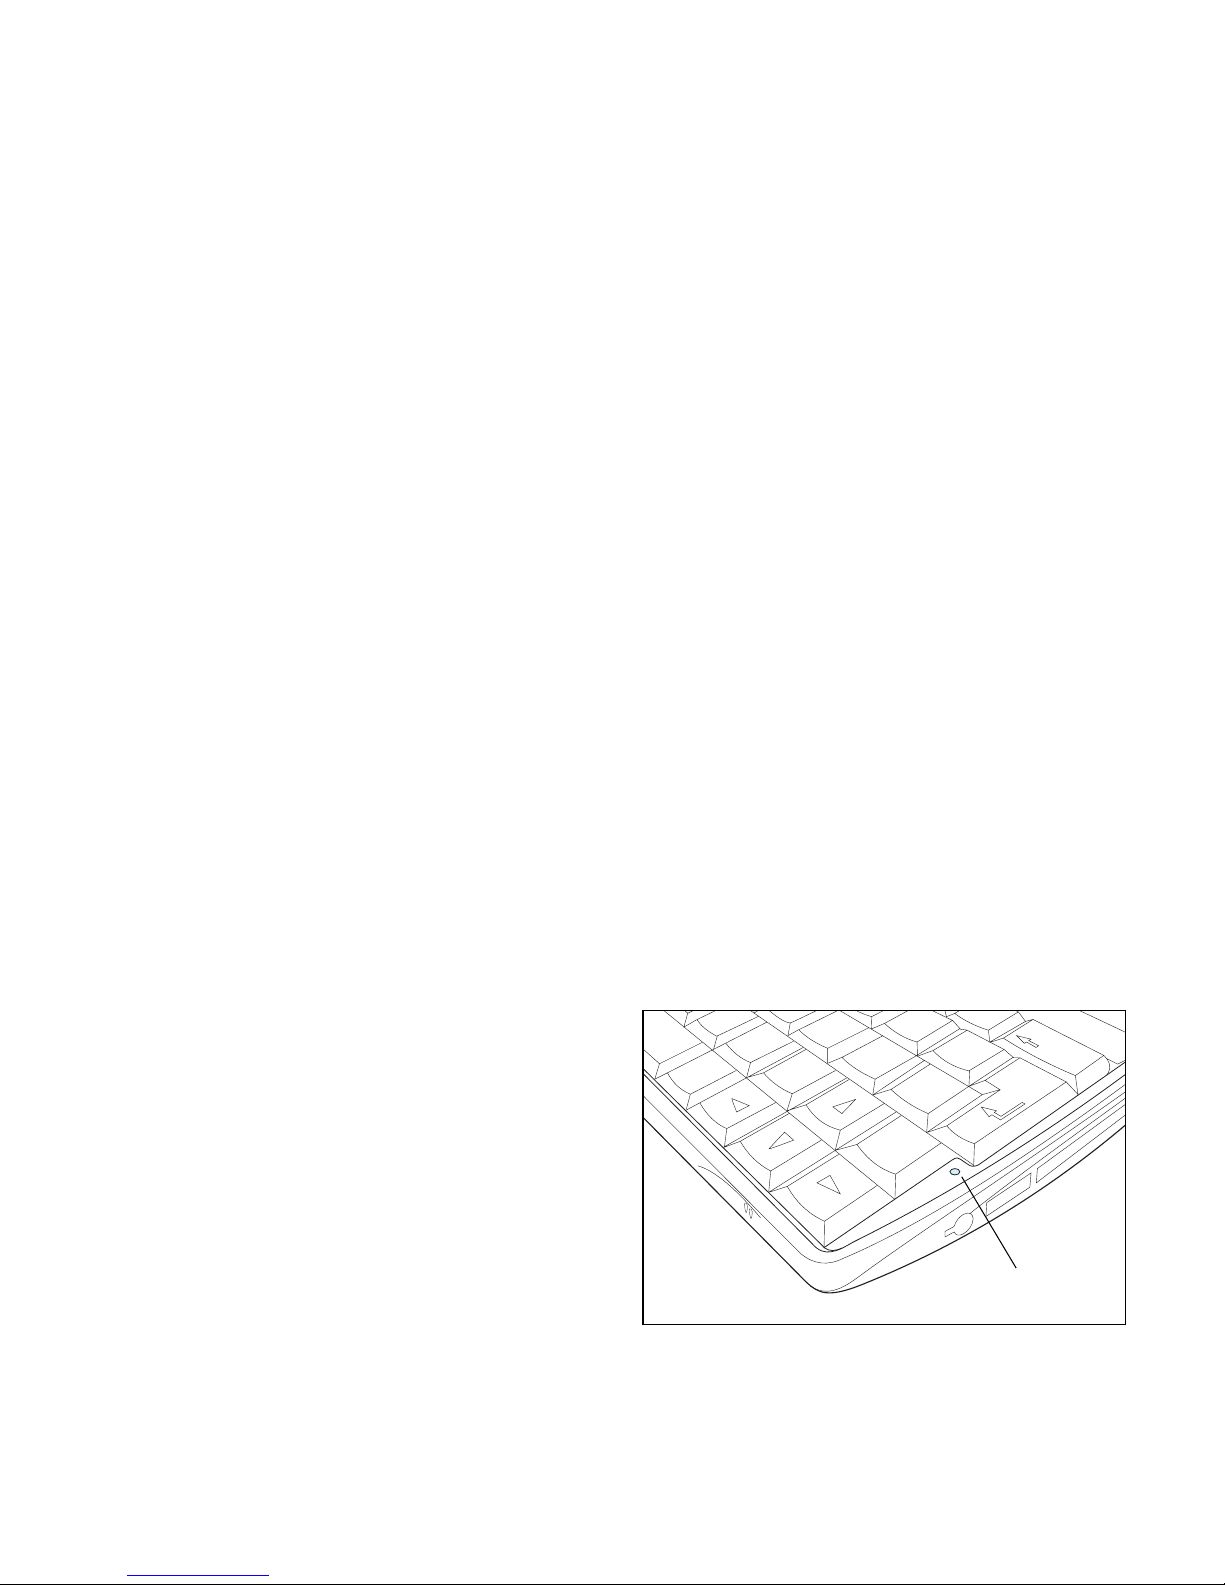
2.16 How To Reset The NETBOOK PRO
Periodically your NETBOOK PRO may need to be reset if
the following occurs:
• You cannot exit a program normally.
• The operating system stops responding.
• You are unable to power on using the Power button.
NETBOOK PRO is equipped with a reset switch that allows
you to restart the operating system and preserve saved data.
NETBOOK PRO’s Reset switch. Then restart the computer
by pressing the Esc/On key. It is also possible to perform a
soft reset by holding down the Ctrl, Alt, and Delete keys for
three seconds. The computer will restart automatically.
Figure 2.12 Location Of Soft Reset Switch
To perform a hard reset:
Note: When performing a hard reset ensure that the backup
batteries are removed first and replaced last in order
to prevent discharging them unnecessarily.
Remove all batteries and AC power. Once the main battery or
AC power is applied, the NETBOOK PRO will reboot.
Note: Hard resetting the NETBOOK PRO may delete the
Reset Switch
Page 16

3. Product Support Services
Psion Teklogix provides a complete range of product support
services to its customers worldwide. These services include
technical support and product repairs.
3.1 Technical Support
Technical Support for the NETBOOK PRO is provided via email through the Partner Program website. To reach the website, go to www.psionteklogix.com and click on the Partner
Program link, which takes you to the Partner Program page.
Then click on the “Log-in” button or the “Register” button,
depending on whether you have previously registered for
Teknet or the Partner Program. (Your UserID and password
are the same for TekNet and the Partner Program.)
3.2 Product Repairs
International
For product repairs, please contact your local Psion Teklogix
office (see “Worldwide Offices” on page A-2).
Canada/U.S.A
Canadian and U.S. customers can receive access to repair
services, by calling the toll-free number below, or via our
secure website.
Note: Customers calling the toll-free number should have
their Psion Teklogix customer number or trouble
ticket number available.
Voice: 1 800 387-8898 (press option “2”)
Fax: 1 905 812-6304
Web Site: http://service.psionteklogix.com
Page 17
NETBOOK PRO
Guía de inicio rápido
4 de abril de 2005 N.º/Ref. 8100010.D
Page 18

Garantía de devolución a fábrica
Psion Teklogix proporciona una garantía de devolución a fábrica
para su producto válida durante un periodo de doce (12) meses de
acuerdo con la Declaración de Limitación de la Garantía y Limitación de Responsabilidad disponible en el siguiente sitio web:
www.psionteklogix.com/warranty.
Nota: Si todavía no es socio de Teknet e intenta ver esta garantía,
se le pedirá que se registre. Como socio de Teknet, tendrá
acceso a información útil sobre sus productos de Psion Teklogix sin cargo alguno.
En algunas regiones, el periodo de la garantía puede ser más largo. Por
favor póngase en contacto con su oficina local de Psion Teklogix para
más detalles. Si desea ver la lista de oficinas, consulte el apartado
“Worldwide Offices” on page A-2 del guía de inicio rápido. Si desea
obtener una copia del manual de usuario de NETBOOK PRO, haga
clic aquí para entrar en el sitio web de Teknet.
Importante: sólo para clientes norteamericanos
Para garantizar un servicio de garantía puntual en Norteamérica, por
favor registre el número de serie de este dispositivo para activar la
cobertura de la garantía poniéndose en contacto con Psion Teklogix
en el teléfono 1-800-835-5644 ext. 209, o por correo electrónico en
la dirección americascontracts@teklogix.com. El no hacer esto
podría afectar a la capacidad de Psion Teklogix para revisar, reparar
o prestar soporte a este dispositivo eficientemente.
Asistencia
Al solicitar asistencia, facilite información relativa a la naturaleza del
fallo y a las acciones que estaba realizando cuando se produjo el
fallo. También es necesario que indique el tipo, modelo y número de
serie del equipo. Antes de devolver ningún producto a Psion Teklogix, llame al Grupo de servicio al cliente para que le proporcionen
un número de autorización de devolución.
Servicios de soporte técnico
Psion Teklogix ofrece a sus clientes una completa gama de servicios
de soporte a los productos. Para obtener más información, consulte
el apartado “Servicios de soporte” on page 16.
Descargo de responsabilidad
Se han realizado todos los esfuerzos posibles para que el presente
material sea completo, preciso y se mantenga actualizado. Psion Teklogix Inc. se reserva el derecho de realizar modificaciones sin previo
aviso y declina toda responsabilidad por cualquier daño, incluidos,
pero sin limitarse a ellos, los daños derivados causados por la confianza depositada en el presente material, incluidos, pero sin limitarse
a ellos, los errores tipográficos.
© Copyright 2005 Psion Teklogix Inc., Mississauga, Ontario (Canadá)
Page 19

Índice
Resumen de homologaciones y seguridad . . . . . . . . . . 2
1. Introducción . . . . . . . . . . . . . . . . . . . . . . . . . . . . . . . 3
2. Primeros pasos . . . . . . . . . . . . . . . . . . . . . . . . . . . . . 3
2.1 Desembalaje: lista de artículos incluidos . . . . . 3
2.2 Características principales . . . . . . . . . . . . . . . . 4
2.3 Aplicaciones . . . . . . . . . . . . . . . . . . . . . . . . . . . 4
2.4 Software . . . . . . . . . . . . . . . . . . . . . . . . . . . . . . 5
2.4.1 Windows® CE .NET . . . . . . . . . . . . . . . 5
2.4.2 Información sobre ActiveSync. . . . . . . . 5
2.5 Identificación de las características del producto5
2.6 Instalación de la batería principal. . . . . . . . . . . 7
2.7 Instalación de la batería de reserva. . . . . . . . . . 7
2.8 Encender y apagar el NETBOOK PRO . . . . . . 8
2.9 Primeros pasos . . . . . . . . . . . . . . . . . . . . . . . . . 9
2.10 Administración de energía . . . . . . . . . . . . . . . 9
2.10.1 Calibración de la batería. . . . . . . . . . . . 9
2.10.2 Carga de la batería . . . . . . . . . . . . . . . . 9
2.10.3 ¿Cómo se comprueba el estado de carga
de la batería?. . . . . . . . . . . . . . . . . . . . 10
2.11 Uso del lápiz. . . . . . . . . . . . . . . . . . . . . . . . . . 10
2.12 Tarjetas multimedia y Secure Digital . . . . . . . 11
2.13 Tarjetas Compact Flash . . . . . . . . . . . . . . . . . 11
2.14 Tarjetas PC Card. . . . . . . . . . . . . . . . . . . . . . . 12
2.16 Cómo restablecer el NETBOOK PRO. . . . . . 14
3. Servicios de soporte . . . . . . . . . . . . . . . . . . . . . . . . . .16
3.1 Soporte técnico . . . . . . . . . . . . . . . . . . . . . . . . 16
3.2 Reparaciones del producto. . . . . . . . . . . . . . . . 16
Appendix A
A.1 Technical Support . . . . . . . . . . . . . . . . . . . . . A-1
A.2 Product Repairs. . . . . . . . . . . . . . . . . . . . . . . A-1
A.3 Worldwide Offices . . . . . . . . . . . . . . . . . . . . A-2
Page 20

Resumen de homologaciones y seguridad
INSTRUCCIONES DE SEGURIDAD IMPORTANTES
Al utilizar este producto, siempre deben seguirse las precauciones básicas de seguridad para reducir el riesgo de incendio, descarga eléctrica y lesiones a las personas, incluidas las
siguientes indicaciones:
1. No utilizar este producto cerca del agua, por ejemplo, en las proximidades de una bañera, lavabo,
fregadero o pila de lavadero, en sótanos húmedos o
cerca de piscinas.
2. Debe evitarse conectarlo a una red telefónica
durante tormentas eléctricas. Existe riesgo remoto
de descarga eléctrica causada por rayos.
3. No utilizar este producto para informar de un
escape de gas en las proximidades del escape.
Importante: Guarde estas instrucciones.
Información de la FCC para Estados Unidos
Interferencias de radio y televisión
Este equipo es fuente de radiación de energía de radiofrecuencia y, si no se utiliza adecuadamente (es decir, siguiendo
estrictamente las instrucciones contenidas en este manual),
puede causar interferencias en las comunicaciones por radio
1. Este dispositivo no puede ser fuente de interferencias perjudiciales, y
2. Este dispositivo debe poder aceptar cualquier interferencia recibida, incluidas las interferencias que
pueden ser motivo de funcionamiento no deseado.
Estos límites están diseñados para ofrecer una protección
razonable contra interferencias perjudiciales en caso de instalación en zonas residenciales. Sin embargo, no existen
garantías de que en una instalación concreta no vayan a producirse interferencias. Si el equipo es fuente de interferencias
perjudiciales en la recepción de radio o televisión, lo cual
puede determinarse apagando y volviendo a encender el
equipo, el usuario debe intentar corregir las interferencias
probando las siguientes medidas:
• Reoriente o coloque la antena de recepción en otro
lugar.
• Aumente la distancia existente entre el equipo y el
receptor.
• Si está utilizando el equipo con un adaptador de conexión a la red eléctrica, enchúfelo a una toma que
pertenezca a un circuito distinto de aquel al que está
conectado el receptor.
• Solicite ayuda a un técnico experimentado en radio o
televisión.
Para los clientes residentes en los EE.UU. puede resultar de
ayuda seguir las instrucciones contenidas en el siguiente fol-
Page 21

Emisiones de radiofrecuencia
Algunos equipos instalados en hospitales y aeronaves no están
apantallados contra emisiones de radiofrecuencia. No utilice el
NETBOOK PRO a bordo de una aeronave ni en hospitales sin
que se le conceda permiso previamente.
Instrucciones de seguridad importantes
Las pruebas de cumplimiento de las normas de la FCC realizadas con este equipo se llevaron a cabo en unas condiciones
que incluían el uso de cables y conectores apantallados entre
el mismo y otros dispositivos periféricos. Es importante utilizar cables y conectores apantallados para reducir la posibilidad de provocar interferencias de radio y televisión. Los
distribuidores autorizados de Psion Teklogix tienen a su disposición cables apantallados para NETBOOK PRO.
Si el usuario realiza alguna modificación en el equipo o en
sus periféricos y dichas modificaciones no son aprobadas por
Psion Teklogix, la FCC puede denegar al usuario el derecho a
utilizar el equipo.
Seguridad del dispositivo de infrarrojos
Producto LED de Clase 1
Este producto incluye un dispositivo de infrarrojos para la
transmisión y recepción de archivos desde dispositivos que
admitan el formato de comunicación IrDA. Aunque este haz
• No fije la vista en el haz de rayos infrarrojos.
• No lo mire directamente con instrumentos ópticos.
El dispositivo no contiene ninguna pieza reparable por el
usuario.
Precaución
Utilice sólo cables de línea de telecomunicaciones con un grosor
de 26 AWG o superior. Póngase en contacto con su distribuidor
autorizado de Psion Teklogix para obtener un cable adecuado.
Precauciones sobre seguridad de la batería
Consulte el apartado “Cuidados de la batería” on page 13.
1. Introducción
Esta guía ofrece información sobre el funcionamiento y las
características del equipo Psion Teklogix NETBOOK PRO.
Para obtener más información, consulte el Manual del
usuario de NETBOOK PRO, la ayuda en pantalla o la documentación de la aplicación que esté utilizando.
2. Primeros pasos
2.1 Desembalaje: lista de artículos incluidos
Su NETBOOK PRO sale de fábrica con una serie de acceso-
Page 22

• NETBOOK PRO (incluye un lápiz colocado en el
soporte del equipo; consulte el apartado “Uso del
lápiz” on page 10).
• Batería recargable de ión-litio de 12,6 V y 2.200 mAH
(batería principal).
• Dos pilas alcalinas de tipo AAA reemplazables (como
alimentación de reserva).
• Cable USB o RS-232 ActiveSync para NETBOOK
PRO.
• Cable adaptador "puerto host USB mini a tamaño
completo".
• Fuente de alimentación.
• Adaptador de CA para NETBOOK PRO.
Otras fuentes de información:
• Guía de inicio rápido de NETBOOK PRO.
• NETBOOK PRO CD (incluye el Manual del usuario).
2.2 Características principales
NETBOOK PRO es un equipo con pantalla táctil basado en
el sistema operativo Windows
®
CE .NET dotado de pantalla
SVGA sensible al tacto. Posee las siguientes características:
• Procesador Intel
®
PXA 255 XScale® (400 MHz).
• Windows CE .NET.
• 32 MB de memoria flash y 128 MB de SDRAM.
• Interfaz IrDA.
• Ranura para tarjetas CF (Compact Flash).
• Ranura para tarjetas MMC/SDCard/SDIO.
• Ranura para tarjetas PCMCIA.
2.3 Aplicaciones
NETBOOK PRO tiene capacidad para ejecutar una amplia
variedad de aplicaciones. Existe toda una serie de aplicaciones estándar y programas personalizados que pueden
instalarse con facilidad.
Incluye los siguientes programas estándar:
• Wordpa d, un procesador de textos para redactar cartas y otros documentos.
• Bandeja de entrada, para el envío y la recepción de
correo electrónico.
• Internet Explorer, para navegar por Internet.
• Windows Messenger para CE, programa de mensajería instantánea.
• Pocket On-Schedule, administrador de información
personal.
•Microsoft
®
File Viewer, software para ver el con-
tenido de archivos.
• JEM-CE, software de la "máquina virtual" de Java.
• Explorador de Windows, un examinador de archi-
Page 23

2.4 Software
2.4.1 Windows® CE .NET
Windows CE .NET es un sistema operativo que combina
facilidad de integración de aplicaciones, completas herramientas de desarrollo de aplicaciones y una serie cada vez
mayor de capacidades asociadas. Windows CE .NET es compatible con avanzados protocolos de conexión en red y compatibilidad Bluetooth integrada, funcionalidad de exploración
mejorada, configuración de redes inalámbricas (WLAN) simplificada y reducido tiempo de respuesta especialmente diseñado para reducir los períodos de latencia en dispositivos
industriales.
2.4.2 Información sobre ActiveSync
ActiveSync, el software de conectividad para PC de
Microsoft, puede utilizarse para conectar NETBOOK PRO a
otros equipos que utilicen Windows 95/98/ME/2000/XP o
NT 4.0. Conectando su NETBOOK PRO a un PC con un
cable y ejecutando ActiveSync en el PC, podrá:
• Ver los archivos contenidos en su NETBOOK PRO
desde el Explorador de Windows usando el icono Dis-
positivo móvil de la ventana Mi PC del equipo principal.
• Arrastrar y colocar archivos entre NETBOOK PRO
• Sincronizar el correo electrónico y la libreta de
direcciones del NETBOOK PRO con el PC para que
puedan estar siempre actualizados.
• Realizar copias de seguridad en el PC de los archi-
vos almacenados en su NETBOOK PRO y restaurarlos desde el PC al NETBOOK PRO si fuera necesario.
Para obtener información detallada, consulte la documentación suministrada con Microsoft ActiveSync o el Manual
del usuario de NETBOOK PRO.
2.5 Identificación de las características del producto
Figure 2.1 NETBOOK PRO abierto
Page 24
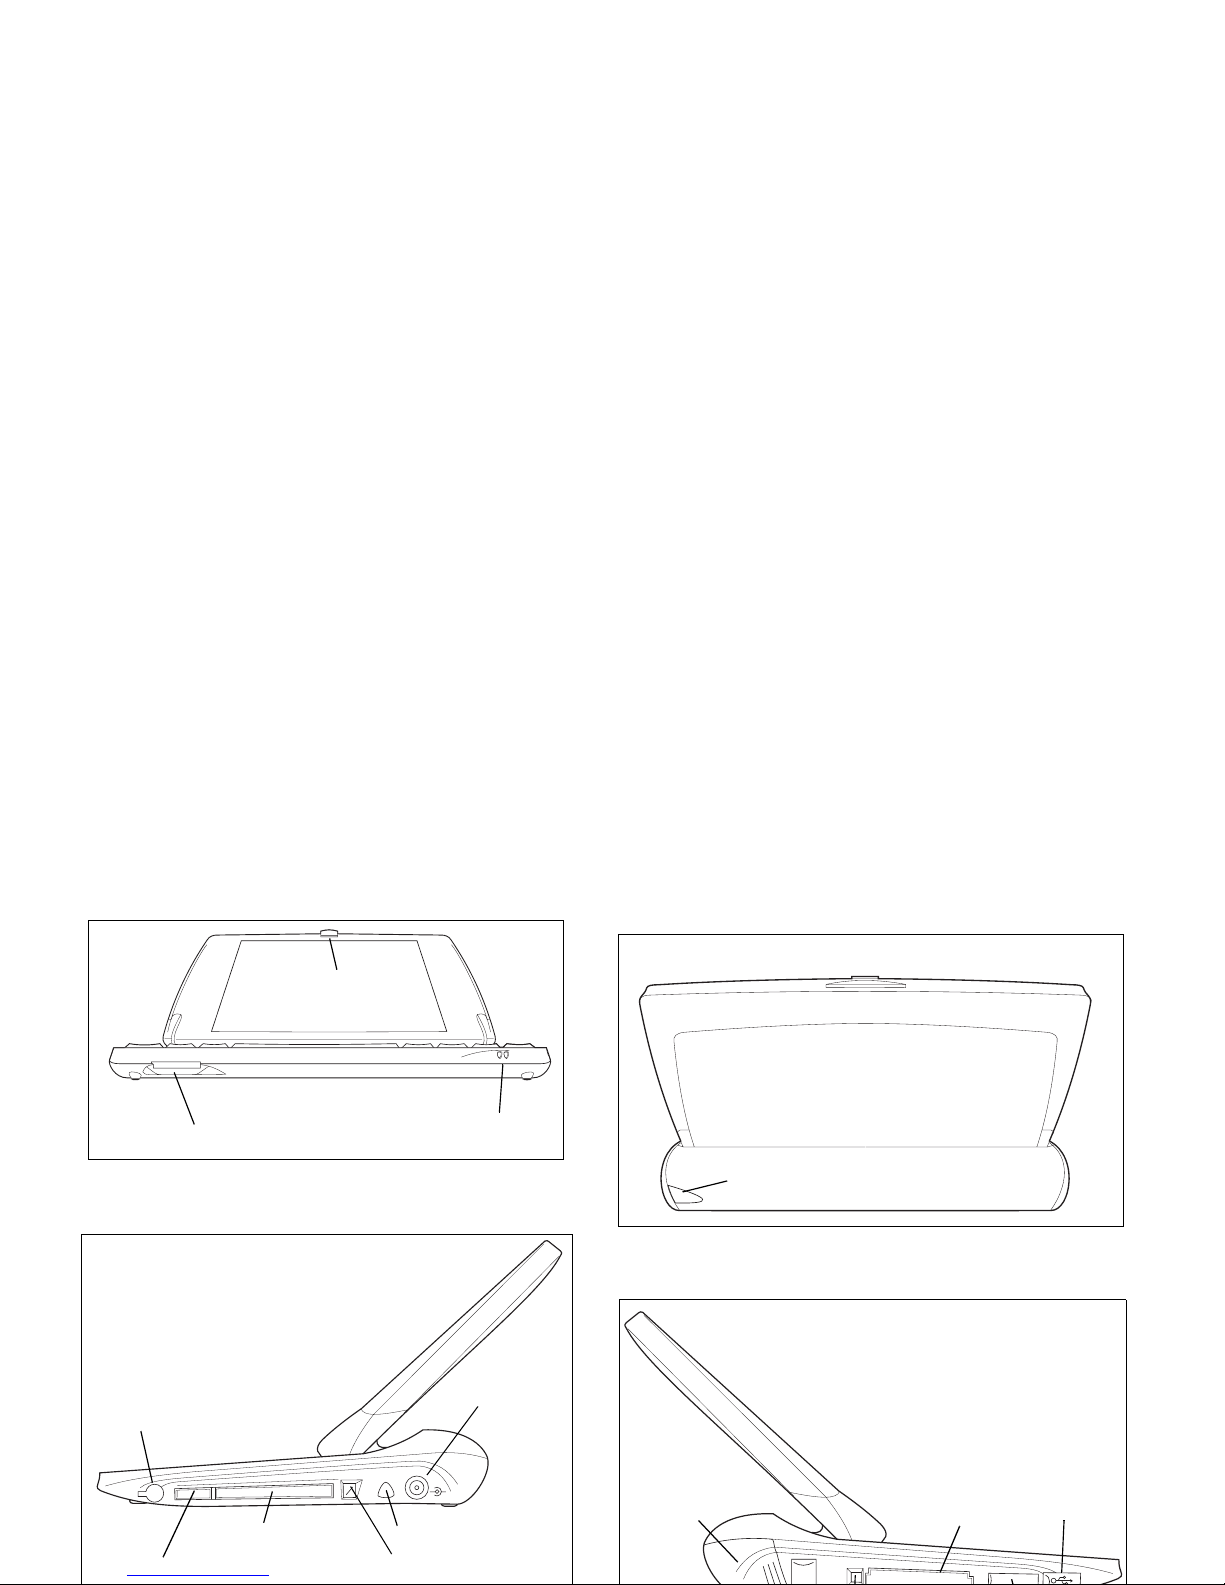
Figure 2.2 Vista frontal inferior de NETBOOK PRO
Figure 2.4 Vista posterior de NETBOOK PRO
Ranura para tarjetas MMC/SDCard/SDIO
Indicador de alimentación
Cierre
Conector de
Botón de expulsión del lápiz
Ranura PCMCIA
Botón de expulsión de las tarjetas PCMCIA
Toma para auriculares
Lápiz
alimentación
Puerto de infrarrojos
RS232
USB-
Tapa de la
Ranura para
Conector USB
batería principal
tarjetas CF
Page 25

2.6 Instalación de la batería principal
Colocación de la batería
Para poder utilizar el NETBOOK PRO, deberá instalar primero la batería. Deslícela hacia el interior del equipo hasta que
perciba un ligero chasquido, como se indica en la Figure 2.6.
Importante: NETBOOK PRO le avisará cuando vaya a
agotarse la batería principal. La batería de
reserva está diseñada para conservar los datos
de la memoria durante varias horas.
Cambio de las baterías
Si está usando su NETBOOK PRO a distancia del cargador y
dispone de otra batería, podrá intercambiar las baterías
cuando aparezca el aviso de batería casi agotada. Para ello:
1. Apague el NETBOOK PRO.
2. Deslice el cierre de la batería hacia la parte posterior del NETBOOK PRO.
3. Tire hacia fuera de la batería para sacarla del
NETBOOK PRO.
4. Introduzca la batería de repuesto en su lugar.
Importante: Apague siempre el NETBOOK PRO antes de
quitar la batería principal.
2.7 Instalación de la batería de reserva
Batería de reserva interna
El NETBOOK PRO dispone de una batería de reserva sustituible que está diseñada para conservar los datos mientras se
está cargando o cambiando la batería principal. La batería de
reserva consta de dos pilas tipo AAA a las que se puede
acceder desde la parte delantera del NETBOOK PRO cuando
está abierto.
Importante: Si se deja que se agoten por completo tanto la
batería principal como la batería de reserva, se
perderán todos los datos guardados en la
memoria RAM.
La batería de reserva puede ser sustituida por el usuario. Para
ello:
1. Apague el NETBOOK PRO.
2. Coloque la pantalla en un ángulo ligeramente inclinado hacia delante para poder acceder a la tapa de la
batería de reserva, que está situada en el lado
izquierdo, por encima del teclado del equipo (consulte
la Figure 2.7).
3. Presione hacia abajo en la parte central de la tapa
Page 26
6. Para cerrar el compartimento, deslice la tapa hacia
atrás por encima de las baterías mientras vuelve a
presionar hacia abajo en la parte central de la tapa.
Figure 2.7 Extracción de la batería de reserva
2.8 Encender y apagar el NETBOOK PRO
Para encender el equipo:
ante Inicio/Configuración/Panel de control/Propiedades de
energía, y pueden activarse en cualquier combinación:
• Cuando se abra la tapa.
• Cuando se puntee en la pantalla.
• Cuando se conecte el cable serie.
El equipo se apagará si se pulsa la teclaEsc/On, independientemente de las opciones que estén seleccionadas.
Para apagar el equipo:
mantenga pulsada la tecla Fn y, a continuación, pulse la
tecla Esc/On. O bien, puntee en el icono Suspender del
menú Inicio. Puede apagar el equipo en cualquier
momento, pero guarde antes cualquier documento que
esté abierto.
Nota: Si no utiliza el NETBOOK PRO, se apagará automáti-
camente pasados unos minutos para ahorrar baterías.
Para continuar usando el NETBOOK PRO en el punto
en que lo dejó antes de que se apagara, enciéndalo de
nuevo pulsando la tecla Esc/On. Las opciones de
ahorro de energía pueden modificarse mediante el
menú Panel de control/Propiedades de energía/Combi-
naciones de energía. El tiempo de inactividad para el
apagado automático puede tener distintos valores,
dependiendo de si el NETBOOK PRO está conectado
a una fuente de alimentación eléctrica externa.
Tapa de la batería de reserva
Pantalla ligeramente inclinada
hacia delante para acceder a la tapa
Page 27

2.9 Primeros pasos
Cuando encienda por primera vez su NETBOOK PRO, verá
el escritorio de Windows CE .NET. En ese momento es acon-
sejable ajustar la fecha y la hora. Para ello, vaya a Inicio/Con-
figuración/Panel de control/ Propiedades de fecha y hora.
Aparecerá el cuadro de diálogo Propiedades de fecha y hora.
1. Ajuste la Zona horaria y haga clic en el botón
Aplicar antes de cambiar cualquier otro valor.
2. Ajuste los valores deseados de fecha y hora.
3. Haga clic en el botón Aceptar del menú
Propiedades de fecha y hora para cerrar el cuadro
de diálogo y guardar los cambios efectuados.
2.10 Administración de energía
El NETBOOK PRO recibe la alimentación de una batería
recargable de ión-litio. NETBOOK PRO le avisará cuando
vaya a agotarse la batería principal.
Nota: La duración de las baterías dependerá de cómo
utilice su NETBOOK PRO. El equipo utilizará
bastante más energía de la batería cuando el brillo de
la pantalla esté ajustado a valor elevado, cuando
utilice archivos almacenados en una tarjeta de
memoria o cuando utilice la conexión por infrarrojos
o una tarjeta de comunicaciones.
• Active la función de apagado automático en el
menú de administración de la energía.
• Utilice el almacenamiento interno de archivos en
lugar de una tarjeta de memoria, ya que NETBOOK PRO necesita más energía para escribir en
la tarjeta de memoria.
El NETBOOK PRO puede recibir alimentación de la red
eléctrica de CA cuando esté conectado al adaptador de CA.
Cuando el NETBOOK PRO reciba energía de CA, también
se cargará la batería.
2.10.1 Calibración de la batería
Para ofrecer una estimación precisa de la capacidad de la batería que quede disponible, el NETBOOK PRO debe realizar
un ciclo completo de carga/descarga o descarga/carga para
poder detectar las características de la batería y calibrar el
indicador.
Hasta que ello haya ocurrido, el panel de control de información del estado de la batería indicará "Sin calibrar" y la
capacidad mostrada no será muy precisa.
Psion Teklogix recomienda cargar por completo la batería
cuando se reciba el equipo y descargarla totalmente antes de
volver a cargarla, para poder calibrar el indicador de estado.
Consulte el Manual del usuario de NETBOOK PRO para
obtener más información.
2.10.2 Carga de la batería
Page 28
2.10.3 ¿Cómo se comprueba el estado de carga
de la batería?
Para comprobar la carga de la batería:
1. Pulse el botón Inicio. Aparecerá el menú Inicio.
2. Seleccione Configuración, Panel de control.
3. Haga doble clic en el icono Energía del Panel de
control. La ficha Batería ofrecerá una breve
descripción del estado de carga de la batería principal.
Nota: Cuando apague su NETBOOK PRO, entrará en un
modo de “Suspender” y seguirá consumiendo una
pequeña cantidad de energía de la batería. Si va a
dejar apagado el NETBOOK PRO durante un
período de tiempo prolongado, es aconsejable que
realice antes una copia de seguridad de sus datos, ya
que las baterías terminarán por agotarse.
2.11 Uso del lápiz
El lápiz va colocado en un hueco del lado derecho del
equipo. Para sacarlo, pulse el botón cuadrado que hay junto a
él y éste saldrá de su ubicación. Para guardarlo, empuje el
lápiz hacia el interior del hueco (consulte la Figure 2.8).
Figure 2.8 Ubicación y extracción del lápiz
Puntee ligeramente en la pantalla con la punta del lápiz.
Puede usar también los dedos para puntear en la pantalla,
aunque lo mejor es utilizar el lápiz para evitar dejar huellas y
manchas en la misma. No puntee en la pantalla con ningún
objeto que tenga punta afilada, pues podría dañar la pantalla.
No utilice ningún tipo de bolígrafo, ya que podría resultar
imposible retirar la tinta. Consulte el apartado “Cuidados del
NETBOOK PRO” on page 12 para obtener instrucciones
sobre cómo limpiar la pantalla.
Para seleccionar o cambiar un elemento, normalmente puede
usar el lápiz para puntear (“hacer clic”) en él. Por ejemplo,
puede:
• Puntear dos veces (o hacer doble clic) en el icono de un
Botón de expulsión del lápiz
Lápiz
Page 29

recalibración en el menú Panel de control/Propiedades
de lápiz/Calibración.
2.12 Tarjetas multimedia y Secure Digital
Las tarjetas multimedia (MMC) y las tarjetas Secure Digital
(SD), que se colocan en una ranura dedicada de que dispone
el NETBOOK PRO, pueden ser tarjetas de memoria no
volátil (utilizadas para almacenar software de aplicación o
datos). También pueden ser tarjetas de comunicaciones o de
interfaz.
La ranura para tarjetas MMC se encuentra en la parte
delantera del NETBOOK PRO.
Instalación y extracción de tarjetas MMC o SD
• Empuje la tarjeta hacia el interior de la ranura hasta
que oiga un ligero chasquido.
• Para retirar la tarjeta, empújela hacia el interior.
Cuando llegue al final, "rebotará", saldrá hacia fuera y
podrá extraerse.
Guarde las tarjetas MMC o SD en un lugar seguro.
2.13 Tarjetas Compact Flash
Las tarjetas Compact Flash (CF),que se colocan en una
ranura dedicada de que dispone el NETBOOK PRO, pueden
ser tarjetas de memoria no volátil (utilizadas para almacenar
software de aplicación o datos). Asimismo, pueden ser tarjetas de comunicaciones o de interfaz.
La ranura para tarjetas CF se encuentra en el lado izquierdo
del NETBOOK PRO.
Instalación y extracción de tarjetas CF
• Introduzca la tarjeta en la ranura empujándola hacia el
interior.
• Para extraer la tarjeta, pulse el botón de expulsión
situado junto a la ranura. El botón de expulsión saldrá
hacia fuera; a continuación, vuelva a pulsar el botón
para expulsar la tarjeta.
Guarde las tarjetas CF en un lugar seguro.
Page 30

Figure 2.10 Ubicación de la ranura para tarjetas CF
2.14 Tarjetas PC Card
Las tarjetas PC Card, que se colocan en una ranura dedicada
de que dispone el NETBOOK PRO, pueden ser tarjetas de
memoria no volátil (utilizadas para almacenar software de
aplicación o datos). También pueden ser tarjetas de comunicaciones o de interfaz.
La ranura para tarjetas PC Card se encuentra en el lado derecho del NETBOOK PRO.
ranura, el botón de expulsión puede plegarse hacia el
interior del equipo.
• Para extraer la tarjeta, pulse el botón de expulsión
(hágalo salir primero si estaba plegado). La tarjeta
saldrá hacia fuera y quedará suelta para que pueda
extraerla.
Guarde las tarjetas PC Card en un lugar seguro.
Figure 2.11 Ubicación de la ranura para tarjetas PC Card
2.15 Cuidados del NETBOOK PRO
2.15.1 Pantalla
RS232USB-
Botón de expulsión
Ranura para tarjetas CF
Ranura para tarjetas PC Card
Botón de expulsión
Page 31

Para prolongar la vida útil de la pantalla del NETBOOK
PRO, manténgala limpia. Para limpiar la pantalla: apague el
NETBOOK PRO y utilice un paño suave, limpio y seco para
retirar la suciedad. (Si el NETBOOK PRO está configurado
para encenderse automáticamente cuando se toque la pantalla, desactive esta preferencia antes de proceder a la limpieza.)
Advertencia: No utilice en ningún caso disolventes quími-
cos para limpiar la pantalla.
2.15.2 Cuidados de la batería
¡PRECAUCIÓN!
Hay peligro de explosión si se manipula, carga, elimina o sustituye la batería del NETBOOK PRO. Sustituya la batería
sólo por otra idéntica o de tipo equivalente recomendada por
Psion Teklogix. Deshágase de las baterías usadas siguiendo
las instrucciones expuestas en el apartado “Precauciones de
seguridad de la batería de ión-litio” on page 13. Revise con
cuidado todos los aspectos relacionados con la seguridad de
la batería indicados en dicho apartado.
Para evitar el riesgo de incendio, no sustituya las baterías de
reserva por baterías recargables.
Precauciones de seguridad de la batería de ión-litio
Importante: Es fundamental revisar esta información de
seguridad y seguir estrictamente todas las
advertencias señaladas.
Advertencias:
PARA EVITAR que la batería tenga escapes de ácido,
genere calor o explote, tenga en cuenta las siguientes precauciones.
• Utilice exclusivamente el adaptador de alimentación aprobado por Psion Teklogix.
• Para reducir el riesgo de incendio, no sustituya las baterías de reserva por baterías recargables.
• No las arroje al fuego.
• No incinere las pilas de la batería ni las someta a temperaturas superiores a 100 °C (212 °F). Podría vaporizarse
el electrolito líquido y provocar la ruptura de la pila. La
incineración puede producir emisiones nocivas o provocar la explosión.
• No cargue, utilice ni almacene las baterías a menos de
-30 ºC (-22 °F). Las baterías deben tratarse de acuerdo
con todas las normas y leyes nacionales o locales aplicables.
• La batería lleva incorporados dispositivos de seguridad.
Para garantizar su correcto funcionamiento, no desmonte ni
modifique ninguna pieza de la batería.
• No cortocircuite la batería poniendo en contacto directo
ninguno de los terminales visibles con objetos metálicos,
Page 32

• Para la carga, utilice el cargador diseñado específicamente para la batería.
• No aplaste, perfore, abra, desmonte ni manipule mecánicamente las baterías.
• No suelde directamente la batería.
• No conecte la batería a tomas eléctricas, encendedores de
coche, o similares.
• No ponga la batería en hornos microondas ni en contenedores sometidos a presión.
• No utilice baterías recargables en combinación con baterías no recargables (como las pilas convencionales) ni
baterías de distintas capacidades o marcas.
• Extraiga inmediatamente la batería del dispositivo o del
cargador y deje de usarla si emite olores, genera calor,
pierde color o se deforma, o si presenta cualquier signo
de anormalidad.
• No continúe cargando la batería si no se recarga en el
período de tiempo de carga especificado.
• La batería podría reventar o incendiarse si presenta
fugas. Asegúrese de que siempre está alejada de cualquier llama.
• Si la batería presenta fugas, no deje que su contenido
entre en contacto con su piel o sus ojos. Si esto ocurriera,
lávelos inmediatamente con abundante agua fría y solicite atención médica.
• No guarde la batería en lugares con temperaturas muy
• No utilice la batería en zonas donde la electricidad
estática sea superior a la garantizada como no perjudicial por el fabricante.
• Mantenga las baterías fuera del alcance de los niños.
2.15.3 Temperaturas de funcionamiento y almacenamiento
Funcionamiento:
0 °C a +50 °C (32 °F a 120 °F). El adaptador de corriente debe utilizarse en el intervalo de temperaturas siguiente: 0 °C a +40 °C (+32 °F a +104 °F).
Almacenamiento:
-10 °C a +60 °C (14 °F a 140 °F). Para prolongar la vida
útil de su NETBOOK PRO (y de la batería) almacénelo
entre +10 °C y +35 °C (+50 °F y +95 °F).
Importante: Evite exponer el NETBOOK PRO a grandes
cambios de temperatura y humedad, ya que
podría resultar dañado.
La carga de la batería del NETBOOK PRO
sólo debería realizarse en el siguiente intervalo de temperaturas: 0 °C a +40 °C (32 °F a
104 °F).
2.16 Cómo restablecer el NETBOOK PRO
De forma periódica, es posible que sea necesario restablecer
su NETBOOK PRO si ocurre lo siguiente:
• No se pueden cerrar normalmente los programas.
Page 33

NETBOOK PRO está equipado con un interruptor de reinicio
que permite reiniciar el sistema operativo y conservar los
datos guardados.
Para efectuar un reinicio por software:
Nota: Si es posible, asegúrese de que todos los archivos y
aplicaciones están cerrados.
Introduzca un alambre corto, como un clip desdoblado, en el
orificio situado a la derecha de la tecla Mayús del lado derecho. Presione hacia abajo para pulsar el interruptor Reset del
NETBOOK PRO. A continuación, reinicie el equipo pulsando la tecla Esc/On.
También puede realizarse un reinicio por software manteniendo pulsadas las teclas Ctrl, Alt y Supr durante tres
segundos. El equipo se reiniciará automáticamente.
Para realizar un reinicio por hardware:
Nota: Al realizar un reinicio por hardware, asegúrese de
retirar primero las baterías de reserva y de que las
coloca sólo al final del procedimiento para evitar
descargarlas innecesariamente.
Retire todas las baterías y la alimentación de CA. Una vez
que el equipo vuelva a recibir alimentación de la batería o de
CA, éste se reiniciará.
Nota: El proceso de reinicio por hardware del NETBOOK
PRO puede provocar la eliminación de la asociación
ActiveSync del NETBOOK PRO. Si esto ocurre,
puede eliminar y volver a crear la asociación en el
PC, o crear otra asociación con un nombre distinto.
Consulte la ayuda en pantalla de ActiveSync para
obtener más detalles sobre esta operación.
Page 34

3. Servicios de soporte
Psion Teklogix ofrece a sus clientes una completa gama de
servicios de soporte a sus productos en todo el mundo. Estos
servicios incluyen el soporte técnico y la reparación de productos.
3.1 Soporte técnico
El Soporte técnico de NETBOOK PRO se presta mediante
correo electrónico a través del sitio Web del programa de
partners (Partner Program). Para entrar en el sitio Web, vaya
a www.psionteklogix.com y haga clic en el vínculo Partner
Program, que le llevará hasta la página Partner Program. A
continuación, haga clic en el botón “Entrar” o “Regístrese
aquí”, dependiendo de si ya está registrado en TekNet o en el
programa Partner Program. (Su identificador de usuario y su
contraseña son los mismos para TekNet y para el programa
Partner Program.)
3.2 Reparaciones del producto
Internacional
Para reparaciones del producto, póngase en contacto con su
oficina local de Psion Teklogix (consulte el apartado “Worldwide Offices” on page A-2).
Nota: Al llamar al número gratuito, los clientes deben tener
a mano su número de cliente de Psion Teklogix o la
nota de avería correspondiente.
Voz: 1 800 387-8898 (elija la opción “2”)
Page 35

NETBOOK PRO
Guida di apprendimento rapido
4 aprile 2005 N/P 8100010.D
Page 36

Garanzia con restituzione al fabbricante
Per questo prodotto Psion Teklogix fornisce una garanzia del tipo
"riconsegna all'azienda" per un periodo di dodici (12) mesi, in
conformità con la Dichiarazione di garanzia limitata e di limitazione
di responsabilità disponibile sul sito: www.psionteklogix.com/
warranty.
Nota: a chi desidera visionare la garanzia non essendo ancora
membro di Teknet verrà chiesto di registrarsi. I membri di
Teknet hanno accesso gratuito a informazioni utili sui
prodotti Psion Teklogix.
In alcune zone la garanzia può durare più a lungo; per i particolari
rivolgersi a una delle sedi locali di Psion Teklogix. Per un elenco
degli indirizzi, consultare “Worldwide Offices” a pagina A-2 del
guida di apprendimento rapido. Per ottenere una copia del manuale
per l'utente del NETBOOK PRO fare clic qui per accedere al sito
Teknet.
Importante: solo per i clienti del Nord America.
Per assicurarsi un tempestivo servizio di garanzia nel Nord America,
registrare il numero di serie del dispositivo per attivare la copertura
di garanzia contattando Psion Teklogix al numero 1-800-835-5644
int. 209, o per e-mail all'indirizzo americascontracts@teklogix.com.
In caso contrario Psion Teklogix potrebbe non essere in grado di
fornire l'assistenza, effettuare le riparazioni o garantire il supporto
per il dispositivo.
Assistenza
In caso di richiesta di assistenza, si prega di fornire informazioni
relative alla natura del guasto e alla modalità di utilizzo
dell'apparecchio quando si è verificato tale guasto. Andranno anche
indicati tipo, modello e numero di serie dell'unità. Prima di restituire
un prodotto a Psion Teklogix, rivolgersi al servizio di assistenza
(Customer Services Group) per ottenere il numero di autorizzazione
per la restituzione.
Servizi di assistenza
Psion Teklogix offre alla propria clientela una gamma completa di
servizi di assistenza per i prodotti. Per ulteriori informazioni
consultare la sezione “Servizi di assistenza” a pagina 16.
Limitazione di responsabilità
È stato fatto tutto il possibile per garantire completezza, precisione e
aggiornamento di questo materiale. Psion Teklogix Inc. si riserva il
diritto di apportare modifiche senza preavviso e non sarà
responsabile di eventuali danni, compresi, in via esemplificativa,
danni consequenziali provocati dall'affidabilità del materiale
presentato, inclusi, in via esemplificativa, gli errori tipografici.
© Copyright 2005 Psion Teklogix Inc., Mississauga, Ontario, Canada
Page 37

Indice
Certificazioni e riepilogo delle norme di sicurezza . . . 2
1. Introduzione. . . . . . . . . . . . . . . . . . . . . . . . . . . . . . . . 3
2. Per iniziare. . . . . . . . . . . . . . . . . . . . . . . . . . . . . . . . . 3
2.1 Disimballaggio della confezione: elenco di controllo
degli articoli . . . . . . . . . . . . . . . . . . . . . . . . . . . . . 3
2.2 Caratteristiche principali . . . . . . . . . . . . . . . . . . . 4
2.3 Applicazioni. . . . . . . . . . . . . . . . . . . . . . . . . . . . . 4
2.4 Software. . . . . . . . . . . . . . . . . . . . . . . . . . . . . . . . 5
2.4.1 Windows® CE .NET . . . . . . . . . . . . . . . . . . 5
2.4.2 Informazioni su ActiveSync . . . . . . . . . . . . . 5
2.5 Identificazione delle caratteristiche del prodotto. 5
2.6 Installazione della batteria principale . . . . . . . . . 7
2.7 Installazione delle batterie di riserva . . . . . . . . . . 7
2.8 Accensione e spegnimento del NETBOOK PRO 8
2.9 Fasi iniziali. . . . . . . . . . . . . . . . . . . . . . . . . . . . . . 9
2.10 Risparmio energetico . . . . . . . . . . . . . . . . . . . . . 9
2.10.1 Calibrazione della batteria . . . . . . . . . . . . . 9
2.10.2 Ricarica del pacco batterie . . . . . . . . . . . . . 10
2.10.3 Controllo del livello di carica della batteria 10
2.11 Uso del puntatore tipo stilo . . . . . . . . . . . . . . . . 10
2.12 Schede MMC (MultiMedia Card) ed SD (Secure
Digital). . . . . . . . . . . . . . . . . . . . . . . . . . . . . . . . 11
2.13 Schede CF (Compact Flash) . . . . . . . . . . . . . . . 11
2.16 Reimpostazione del NETBOOK PRO . . . . . . . 14
3. Servizi di assistenza . . . . . . . . . . . . . . . . . . . . . . . . . .16
3.1 Assistenza tecnica . . . . . . . . . . . . . . . . . . . . . . . . 16
3.2 Servizio riparazioni . . . . . . . . . . . . . . . . . . . . . . . 16
Appendix A
A.1 Technical Support . . . . . . . . . . . . . . . . . . . . . A-1
A.2 Product Repairs. . . . . . . . . . . . . . . . . . . . . . . A-1
A.3 Worldwide Offices . . . . . . . . . . . . . . . . . . . . A-2
Page 38

Certificazioni e riepilogo delle norme di
sicurezza
IMPORTANTI ISTRUZIONI SULLA SICUREZZA
Quando si utilizza il prodotto, adottare sempre le normali
precauzioni di sicurezza per ridurre il rischio di incendio,
folgorazioni e lesioni personali. Attenersi alle istruzioni
riportate di seguito.
1. Non utilizzare il prodotto in prossimità dell'acqua,
per esempio vicino a vasche, bacinelle, lavelli,
lavatoi o piscine, né in scantinati umidi.
2. In caso di temporali evitare di collegarsi alla rete
telefonica, in quanto sussiste il rischio remoto di
folgorazione provocata da fulmini.
3. Non utilizzare il prodotto per comunicare una
perdita di gas senza essersi prima allontanati dal
luogo della perdita.
Importante: Conservare le istruzioni.
Informazioni sulla normativa FCC per gli Stati Uniti
d'America
Interferenze alla ricezione radiotelevisiva
Questo apparecchio trasmette energia a radiofrequenza e, se
Classe B. Il funzionamento dell'unità è soggetto alle
condizioni riportate di seguito:
1. il dispositivo non deve generare interferenze
dannose e
2. il dispositivo deve accettare qualsiasi interferenza,
incluse le interferenze che possono provocarne il
funzionamento non corretto.
Obiettivo di tali disposizioni è fornire una ragionevole
protezione da interferenze nocive in caso di installazione in
aree residenziali. Non esiste tuttavia alcuna garanzia che non
si verifichino interferenze in installazioni particolari. Nel
caso in cui l'apparecchio provochi interferenze dannose alla
ricezione radiotelevisiva, cosa che può essere determinata
spegnendo e accendendo l'unità, si invita l'utente a
correggere l'interferenza adottando una o più delle seguenti
misure:
• riorientare o riposizionare l'antenna ricevente;
• aumentare la distanza fra l'apparecchio e la ricevente;
• nel caso in cui si utilizzi l'apparecchio con adattatore
per alimentazione a corrente, collegarlo a una presa su
un circuito diverso da quello a cui è collegata la
ricevente;
• rivolgersi a un tecnico radiotelevisivo esperto.
Agli utenti che risiedono negli Stati Uniti può risultare utile il
Page 39

richiesto all'US Government Printing Office, Washington,
DC 20402, numero di catalogo 004-000-00345-4.
Emissioni in radiofrequenza
Alcune apparecchiature presenti in ospedali e aerei non sono
schermate contro le emissioni in radiofrequenza. Non utilizzare
l'apparecchio NETBOOK PRO a bordo di aerei o all'interno di
ospedali senza aver prima ottenuto l'apposita autorizzazione.
Importanti istruzioni sulla sicurezza
Il presente apparecchio è stato collaudato e riscontrato
conforme alla normativa FCC in condizioni che prevedono
l'uso di cavi e connettori schermati per i collegamenti fra
l'apparecchio e le periferiche. Per ridurre la possibilità di
provocare interferenze radiotelevisive, è importante utilizzare
cavi e connettori schermati. Per acquistare cavi schermati
adatti per gli apparecchi NETBOOK PRO, rivolgersi a un
rivenditore Psion Teklogix autorizzato.
Nel caso in cui l'utente apporti qualsiasi tipo di modifica
all'apparecchio o alle periferiche senza che tali modifiche
siano state approvate da Psion Teklogix, l'FCC potrebbe
revocare l'autorizzazione al funzionamento dell'apparecchio.
Sicurezza dei dispositivi a infrarossi
Prodotto con LED di Classe 1
seguenti precauzioni durante la trasmissione con dispositivo a
infrarossi:
• non guardare il fascio a infrarossi;
• non guardare direttamente con strumenti ottici.
Il dispositivo non contiene parti riparabili dall'utente.
Attenzione
Utilizzare esclusivamente cavi per linee di telecomunicazioni da
26 AWG o di dimensioni superiori. Per acquistare il cavo adatto,
rivolgersi al rivenditore Psion Teklogix autorizzato di fiducia.
Precauzioni di sicurezza per l'uso della batteria
Consultare la sezione “Manutenzione della batteria” a
pagina 13.
1. Introduzione
Questa guida illustra il funzionamento e le caratteristiche del
palmare Psion Teklogix NETBOOK PRO. Per ulteriori
informazioni, consultare il manuale NETBOOK PRO User
Manual, la guida in linea o la documentazione di
accompagnamento dell'applicazione utilizzata.
2. Per iniziare
Page 40

di seguito e che essi siano integri. In caso di articoli mancanti
o danneggiati, rivolgersi alla sede Psion Teklogix più vicina.
• NETBOOK PRO (compreso un puntatore tipo stilo
inserito nell'apposito vano del computer; vedere “Uso
del puntatore tipo stilo” a pagina 10).
• Batteria agli ioni di litio da 12,6 V 2200 mAH
ricaricabile (batteria principale).
• Due batterie alcaline sostituibili del tipo AAA (di
riserva).
• Cavo USB o RS-232 ActiveSync del NETBOOK PRO.
• Cavo adattatore per porta host USB da mini a
standard.
• Alimentatore.
• Adattatore CA per il NETBOOK PRO.
Altre informazioni:
• Guida di apprendimento rapido per il NETBOOK
PRO.
• CD NETBOOK PRO (contenente il manuale d'uso).
2.2 Caratteristiche principali
Il NETBOOK PRO è un computer touchscreen palmare
basato sul sistema operativo Windows® CE .NET e dotato di
uno schermo tattile del tipo SVGA. L'apparecchio presenta le
seguenti caratteristiche:
®
®
• connettività master USB;
• connettore seriale RS232;
• interfaccia IrDA;
• slot per scheda Compact Flash;
• slot per scheda MMC/SD/SDIO;
• slot per scheda PCMCIA.
2.3 Applicazioni
Il NETBOOK PRO è in grado di eseguire una vasta gamma
di applicazioni. Sono state installate in fabbrica diverse
applicazioni standard ed è inoltre possibile installare in modo
agevole programmi personalizzati.
Sono disponibili i seguenti programmi standard:
• Wordpa d, un programma di elaborazione testo per la
creazione di lettere e altri documenti:.
• Inbox, per l'invio e la ricezione di e-mail;
• Internet Explorer, per la consultazione del World
Wide Web.
• Windows Messenger per CE, un programma di
messaggistica istantanea.
• Pocket On-Schedule, un programma per la gestione
delle informazioni personali.
•Microsoft
®
File Viewer, un software per la
visualizzazione dei file.
Page 41

2.4 Software
2.4.1 Windows® CE .NET
Windows CE .NET è un sistema operativo con integrazione
semplificata delle applicazioni, una gamma di strumenti
completi per lo sviluppo di applicativi e una serie in continuo
aumento di funzioni di connettività. Windows CE .NET è
compatibile con i protocolli di collegamento in rete di tipo
avanzato e con il supporto nativo per la tecnologia Bluetooth,
oltre ad offrire funzionalità di browsing potenziate,
configurazione WLAN semplificata e tempo di risposta
ridotto, appositamente progettato per ridurre la latenza nei
dispositivi di tipo industriale.
2.4.2 Informazioni su ActiveSync
ActiveSync, il software Microsoft per la connettività con PC,
può essere utilizzato per collegare il NETBOOK PRO a un
PC dotato di sistema operativo Windows 95/98/ME/2000/XP
oppure NT 4.0. Dopo aver collegato il NETBOOK PRO a un
PC tramite cavo e aver lanciato ActiveSync nel PC, è
possibile eseguire le operazioni elencate di seguito.
• Visualizzare i file NETBOOK PRO da Esplora
risorse utilizzando l'icona del dispositivo mobile nella
finestra Risorse del computer del PC.
• Trasci n ar e i file da NETBOOK PRO al PC (e
• Sincronizzare la posta elettronica e la rubrica tra il
NETBOOK PRO e il PC per mantenere i due
apparecchi sempre aggiornati.
• Eseguire il backup dei file dal NETBOOK PRO al
PC, per poterli poi ripristinare dal PC al NETBOOK
PRO in caso di necessità.
Per maggiori informazioni consultare la documentazione
fornita con Microsoft Active Sync oppure il manuale
NETBOOK PRO User Manual.
2.5 Identificazione delle caratteristiche del prodotto
Figura 2.1 Il NETBOOK PRO aperto
Page 42

Figura 2.2 Vista anteriore dal basso del NETBOOK PRO
Figura 2.4 Vista posteriore del NETBOOK PRO
Slot per schede MMC/SD/SDIO
Indicatore di accensione
Chiusura
Connettore
Pulsante sgancio puntatore
Slot per schede PCMCIA
Pulsante sgancio scheda PCMCIA
Attacco cuffia
Puntatore tipo stilo
di alimentazione
Porta a infrarossi
Coperchio batteria
Slot scheda CF
Connettore USB
principale
Page 43

2.6 Installazione della batteria principale
Inserimento della batteria
Per poter usare il NETBOOK PRO è necessario aver prima
inserito la batteria. Far scorrere la batteria fino allo scatto di
inserimento, come illustrato nella Figura 2.6.
Importante: Quando la batteria principale è prossima
all'esaurimento, il NETBOOK PRO emette un
segnale di avviso. La batteria di riserva serve
per conservare la memoria per alcune ore.
Sostituzione del pacco batterie
Se si utilizza il NETBOOK PRO avendo a disposizione un
pacco batterie di riserva anziché il caricabatterie, è possibile
sostituire le batterie quando viene visualizzato l'apposito
avviso. Eseguire le operazioni descritte di seguito.
1. Spegnere il NETBOOK PRO.
2. Far scorrere il fermo del pacco batterie verso il
retro del NETBOOK PRO.
3. Tirare la batteria per estrarla dal NETBOOK PRO.
4. Inserire il nuovo pacco batterie.
Importante: Spegnere sempre il NETBOOK PRO prima di
estrarre la batteria principale.
2.7 Installazione delle batterie di riserva
Batteria di riserva interna
Il NETBOOK PRO è dotato di una batteria di riserva
sostituibile la cui funzione è di conservare i dati durante la
ricarica o la sostituzione del pacco batterie principale. Alla
batteria di riserva, costituita da una coppia di pile AAA, è
possibile accedere dalla parte anteriore del NETBOOK PRO
aperto.
Importante: Se si lasciano scaricare sia il pacco batterie
principale sia la batteria di riserva, tutti i dati
utente contenuti nella RAM andranno
perduti.
La batteria di riserva può essere sostituita dall'utente. Per
sostituire la batteria, eseguire le operazioni descritte di
seguito.
1. Spegnere il NETBOOK PRO.
2. Per accedere al coperchio della batteria di riserva,
situata a sinistra sopra la tastiera del computer
(Figura 2.7), collocare il display con una leggera
angolazione in avanti.
3. Esercitare pressione verso il basso in direzione del
Page 44

5. Inserire le nuove pile alcaline AAA, rispettando
l'indicazione delle polarità.
6. Per chiudere lo scomparto, far scorrere di nuovo il
coperchio sopra le batterie esercitando nuovamente
pressione verso il basso in direzione del centro del
coperchio.
Figura 2.7 Rimozione della batteria di riserva
2.8 Accensione e spegnimento del NETBOOK PRO
Per accendere il palmare:
aprire il NETBOOK PRO (per impostazione
predefinita, il palmare si accende quando si apre il
coperchio).
Le opzioni di accensione elencate di seguito sono disponibili
dal menu Avanzate accessibile da Start/Impostazioni/
Pannello di controllo/Proprietà alimentazione. Tali opzioni
possono essere attivate in qualsiasi combinazione:
• quando si apre il coperchio di protezione
dell'apparecchio;
• quando si tocca lo schermo;
• quando si collega il cavo seriale.
Indipendentemente dalle opzioni attivate, il computer si
accende se si preme il tasto Esc/On.
Per spegnere il palmare:
premere e tenere premuto il tasto Fn, quindi premere il
tasto Esc/On. In alternativa, sfiorare l'icona Sospendi nel
menu Start. Il palmare può essere spento in qualsiasi
momento, ma prima sarà necessario salvare i file aperti.
Nota: Se non si utilizza il NETBOOK PRO, dopo alcuni
minuti il palmare entra automaticamente in modalità
di sospensione per evitare di scaricare la batteria. Per
ricominciare ad utilizzare il NETBOOK PRO dal
Coperchio della batteria di riserva
Collocare il display con una leggera angolazione
in avanti per accedere al coperchio
Page 45

può essere impostato in diversi modi, a seconda che il
NETBOOK PRO sia collegato o meno
all'alimentazione esterna.
È possibile configurare il NETBOOK PRO in modo che si
spenga quando si chiude il coperchio di protezione
dell'apparecchio (impostazione predefinita). Per disattivare
questa opzione, vedere il menu Avanzate in Pannello di
controllo/Proprietà alimentazione.
2.9 Fasi iniziali
Quando si accende il NETBOOK PRO per la prima volta,
viene visualizzato il desktop di Windows CE .NET. In questa
fase è opportuno impostare data e ora. A questo scopo,
selezionare Start/Impostazioni/Pannello di controllo/
Proprietà - Data e ora. Viene visualizzata la finestra di
dialogo Proprietà - Data e ora.
1. Impostare il Fuso orario, quindi fare clic su
Applica prima di modificare altre impostazioni.
2. Impostare la data e l'ora desiderate.
3. Per chiudere la finestra e salvare le modifiche, fare
clic sul pulsante OK nel menu Proprietà - Data e
ora.
2.10 Risparmio energetico
Il NETBOOK PRO è alimentato da un pacco batterie agli ioni
Nota: La durata delle batterie dipende dall'utilizzo del
NETBOOK PRO. Il NETBOOK PRO consuma le
batterie in maniera decisamente superiore quando si
aumenta la luminosità, si utilizzano file contenuti in
una scheda di memoria oppure si usa l'interfaccia a
infrarossi o una scheda di
comunicazione.
È possibile adottare diversi accorgimenti per
prolungare la durata della batteria:
• ridurre la luminosità dello schermo;
• attivare la modalità di sospensione automatica
nel menu Alimentazione;
• utilizzare i file archiviati all'interno
dell'apparecchio anziché in una scheda di
memoria, dato che il NETBOOK PRO richiede
una maggiore quantità di energia per scrivere
nella scheda di memoria.
Quando collegato all'apposito adattatore, il NETBOOK PRO
può essere alimentato a corrente alternata. In caso di
alimentazione a corrente alternata del NETBOOK PRO,
anche il pacco batterie verrà ricaricato.
2.10.1 Calibrazione della batteria
Per poter fornire una stima accurata della rimanente capacità
della batteria, il NETBOOK PRO deve essere sottoposto a un
Page 46

l'indicazione "Non calibrata" e la capacità indicata non sarà
sufficientemente precisa.
Psion Teklogix consiglia di eseguire le seguenti operazioni:
caricare completamente la batteria al momento del
ricevimento dell'unità, quindi scaricarla completamente
prima di provvedere alla ricarica; procedere infine alla
calibrazione del misuratore. Per ulteriori informazioni,
consultare il manuale NETBOOK PRO User Manual.
2.10.2 Ricarica del pacco batterie
Per ricaricare la batteria, collegare il pacco batterie al
NETBOOK PRO e collegare l'adattatore CA in dotazione. La
ricarica completa di una batteria NETBOOK PRO standard
(2200 mAH) richiede normalmente da 3 a 4 ore.
2.10.3 Controllo del livello di carica della batteria
Per controllare il livello di carica della batteria, eseguire le
operazioni descritte di seguito.
1. Premere il pulsante Start . Viene visualizzato il
menu Start.
2. Selezionare Impostazioni, Pannello di controllo.
3. Selezionare l'icona Alimentazione nel pannello di
controllo. La scheda Batteria riporta una breve
descrizione dello stato della batteria principale.
Nota: Quando si spegne il NETBOOK PRO, l'unità rimane
in stato di “Sospendi” e continua a consumare la
2.11 Uso del puntatore tipo stilo
Il puntatore tipo stilo si trova in un vano situato sul lato
destro del computer. Per estrarre il puntatore, premere il
pulsante quadrato accanto ad esso. Il puntatore fuoriesce dal
computer. Per inserire nuovamente il puntatore, spingerlo di
nuovo nel vano (Figura 2.8).
Figura 2.8 Ubicazione ed estrazione del puntatore tipo stilo
Sfiorare leggermente lo schermo con il puntatore tipo stilo.
Anche se è possibile sfiorare lo schermo con le dita, si
consiglia di usare lo stilo per evitare di lasciare impronte o
macchie. Per evitare di provocare danni, non toccare lo
schermo con oggetti appuntiti. Non utilizzare alcun tipo di
penna ad inchiostro, in quanto eventuali macchie potrebbero
risultare indelebili. Per istruzioni relative alla pulizia dello
Pulsante sgancio puntatore
Puntatore
tipo stilo
Page 47

• aprire un programma sfiorando due volte (facendovi
sopra clic) l'icona corrispondente;
• premere il tasto Alt, quindi sfiorare lo schermo per
emulare il clic con il pulsante destro del mouse.
Nota: Se lo schermo non risponde alla pressione esercitata,
potrebbe essere necessario ricalibrarlo. Per le relative
istruzioni, andare nel Pannello di controllo/Proprietà
stilo/menu Calibrazione.
2.12 Schede MMC (MultiMedia Card) ed SD (Secure
Digital)
Le schede MMC (MultiMedia Card) ed SD (Secure Digital),
da inserire in uno slot dedicato del NETBOOK PRO,
possono essere utilizzate come schede di memoria non
volatile (per archiviare software applicativi e/o dati). Esse
possono inoltre essere usate come schede di comunicazione o
di interfaccia.
Lo slot MMC è situato nella parte anteriore del NETBOOK
PRO.
Inserimento e rimozione di una scheda MMC o SD
• Spingere la scheda nell'apposito slot fino a sentire lo
scatto di inserimento.
• Per rimuovere la scheda, spingerla in avanti. La
Conservare la scheda MMC o SD in un luogo sicuro.
Figura 2.9 Posizione dello slot per le schede MMC/SD
2.13 Schede CF (Compact Flash)
Le schede CF (Compact Flash), da inserire in uno slot
dedicato del NETBOOK PRO, possono essere utilizzate
come schede di memoria non volatile (per archiviare
software applicativi e/o dati). Esse possono inoltre essere
usate come schede di comunicazione o di interfaccia.
Lo slot CF è situato sul lato sinistro del NETBOOK PRO.
Inserimento e rimozione di una scheda CF
• Spingere la scheda nell'apposito slot.
• Per rimuovere la scheda, premere il pulsante di
espulsione situato accanto allo slot. Il pulsante di
Slot MMC/SD
Page 48

Figura 2.10 Posizione dello slot per le schede CF
2.14 Schede PC
Le schede PC, da inserire in uno slot dedicato del
NETBOOK PRO, possono essere utilizzate come schede di
memoria non volatile (per archiviare software applicativi e/o
dati). Esse possono inoltre essere usate come schede di
comunicazione o di interfaccia.
Lo slot per la scheda PC è situato sul lato destro del
NETBOOK PRO.
• Per rimuovere una scheda, premere il pulsante di
espulsione (dopo averlo estratto nel caso in cui sia
all'interno dell'apparecchio). La scheda si allenta e
può essere quindi tirata verso l'esterno.
Conservare la scheda PC in un luogo sicuro.
Figura 2.11 Posizione dello slot per le schede PC
2.15 Manutenzione del NETBOOK PRO
2.15.1 Schermo
Se utilizzato con lo stilo omologato, lo schermo del
NETBOOK PRO è estremamente resistente all'usura e ai
RS232USB-
Pulsante di espulsione
Slot CF
Slot scheda PC
Pulsante di espulsione
Page 49

dopo aver spento il NETBOOK PRO, pulire delicatamente lo
schermo utilizzando un panno morbido pulito e asciutto. (Se
il NETBOOK PRO è stato configurato per accendersi
automaticamente quando si sfiora lo schermo, disattivare la
relativa opzione prima di pulire lo schermo.)
Avvertenza: Per la pulizia dello schermo non utilizzare in
nessun caso solventi chimici.
2.15.2 Manutenzione della batteria
ATTENZIONE!
Nel caso in cui la batteria del NETBOOK PRO venga
maneggiata, ricaricata, smaltita o sostituita in modo non
corretto, sussiste il rischio di esplosioni. Per la sostituzione,
utilizzare esclusivamente lo stesso tipo di batteria oppure un
modello equivalente indicato da Psion Teklogix. Smaltire le
batterie usate attenendosi alle istruzioni riportate nella
sezione “Precauzioni di sicurezza relative all'uso delle
batterie” a pagina 13. Leggere attentamente tutte le istruzioni
relative alla sicurezza delle batterie riportate in tale sezione.
Per evitare il rischio di incendi, non sostituire le batterie di
riserva con batterie del tipo ricaricabile.
Precauzioni di sicurezza relative all'uso delle batterie
Non conservare le batterie a temperature superiori a +60°C; per
Avvertenze:
PER EVITARE perdite di acido dalla batteria, nonché
generazione di calore o rischi di esplosioni, attenersi alle
istruzioni riportate di seguito.
• Utilizzare esclusivamente adattatori di alimentazione
approvati da Psion Teklogix.
• Per ridurre il rischio di incendi, non sostituire le batterie
di riserva con batterie del tipo ricaricabile.
• Non smaltire le batterie gettandole nel fuoco.
• Non incenerire e non sottoporre le batterie a temperature
superiori a 100°C (212° F). Questo tipo di trattamenti
possono provocare l'evaporazione dell'elettrolita liquido,
con conseguente rottura delle pile. L'incenerimento può
provocare esalazioni nocive o esplosioni.
• Non ricaricare né utilizzare o conservare le batterie a
temperature inferiori a -30º C. Smaltire le batterie
rispettando tutte le norme e regolamentazioni locali e
nazionali vigenti.
• La batteria contiene dispositivi di sicurezza incorporati.
Per garantire il corretto funzionamento di tali dispositivi,
non smontare né alterare alcun componente della batteria.
• Non provocare corto circuiti nella batteria collegando
direttamente i terminali esposti a oggetti o fili metallici.
Non trasportare né conservare la batteria insieme a
oggetti metallici come collane, forcine per capelli ecc.
• Non utilizzare né lasciare la batteria in prossimità di fonti
Page 50

• Non saldare direttamente la batteria.
• Non collegare la batteria a prese elettriche, accendisigari
da automobili ecc.
• Non introdurre la batteria in un forno a microonde o in
contenitori pressurizzati.
• Non utilizzare contemporaneamente batterie ricaricabili
e non ricaricabili (come quelle a celle secche). Non
mescolare batterie di capacità o marca diversa.
• Nel caso in cui la batteria emani odore, generi calore,
risulti scolorita, deformata o presenti una qualunque
anomalia durante l'utilizzo, rimuoverla immediatamente
dal dispositivo o dal caricabatterie e smettere di usarla.
• Superati i limiti di tempo previsti per la ricarica, non
continuare a ricaricare la batteria.
• In caso di perdite, la batteria può esplodere o prendere
fuoco. Verificare sempre che la batteria sia al riparo da
fiamme.
• In caso di perdite dalla batteria, evitare che tali sostanze
vengano a contatto con la pelle o gli occhi. Nel caso in
cui ciò dovesse avvenire, risciacquare abbondantemente
con acqua fredda e consultare un medico.
• Non conservare la batteria a temperature estremamente
elevate (all'interno di un veicolo, sotto la luce solare
diretta ecc.). La mancata osservanza di tale norma può
provocare il surriscaldamento o l'ignizione della batteria,
nonché ridurne prestazioni e durata.
2.15.3 Temperature di esercizio e di stoccaggio
Temperatura di esercizio:
da 0°C a +50°C (da 32°F a 120°F). L'adattatore di
alimentazione deve essere usato a temperature
comprese nel seguente intervallo: da 0°C a +40°C (da
+32°F a +104°F).
Stoccaggio:
da -10°C a +60°C (da 14°F a 140°F). Per una maggiore
durata del NETBOOK PRO (e del pacco batterie),
conservare a una temperatura compresa fra +10°C e
+35°C (da +50°F a +95°F).
Importante: Per evitare danni, non esporre il NETBOOK
PRO a sbalzi eccessivi di temperatura e
umidità.
La ricarica della batteria del NETBOOK PRO
deve avvenire a una temperatura compresa
fra 0°C e +40°C (da 32°F a 104°F).
2.16 Reimpostazione del NETBOOK PRO
Può essere necessario reimpostare occasionalmente il
NETBOOK PRO se si verifica quanto segue:
• non è possibile uscire normalmente da un programma;
• il sistema operativo non risponde;
• non si riesce ad accendere il palmare per mezzo del
Page 51

Per eseguire una reimpostazione a caldo, eseguire le
operazioni descritte di seguito.
Nota: Controllare che, se possibile, tutti i file e le
applicazioni siano chiusi.
Inserire un filo corto (ad esempio una graffetta aperta) nel
foro situato a destra del tasto Shift (Maiuscole). Premere per
attivare l'interruttore Reset del NETBOOK PRO. Riavviare
quindi il computer premendo il tasto Esc/On.
È inoltre possibile eseguire una reimpostazione a caldo
tenendo premuti i tasti Ctrl, Alt e Delete (Canc) per tre
secondi. Il computer verrà riavviato automaticamente.
Per eseguire una reimpostazione a freddo, eseguire le
operazioni descritte di seguito:
Nota: Quando si esegue una reimpostazione a freddo,
verificare che le batterie di riserva siano state prima
estratte e quindi reinserite alla fine per evitare di
scaricarle inutilmente.
Rimuovere tutte le batterie e l'alimentazione CA. Dopo aver
collegato la batteria principale o l'alimentazione CA, il
NETBOOK PRO viene riavviato.
Nota: La reimpostazione a freddo può provocare la
cancellazione della partnership con ActiveSync
memorizzata nel NETBOOK PRO. Se ciò dovesse
avvenire, è possibile cancellare e ricreare la
partnership nel PC, oppure creare una nuova
partnership con un altro nome. Per ulteriori
informazioni su questa operazione, consultare la
guida in linea di ActiveSync.
Interruttore Reset
Page 52

3. Servizi di assistenza
Psion Teklogix offre alla propria clientela una gamma
completa di servizi di assistenza disponibili in diversi paesi.
Tali servizi comprendono l'assistenza tecnica e le riparazioni
dei prodotti.
3.1 Assistenza tecnica
L'assistenza tecnica per il NETBOOK PRO viene fornita per
posta elettronica tramite il sito Web dedicato al Partner
Program. Per raggiungere il sito Web, visitare l'indirizzo
www.psionteklogix.com, quindi fare clic sul collegamento
"Partner Program" per aprire la pagina corrispondente. Se si è
già effettuata la registrazione per TekNet oppure per il
Partner Program, selezionare il pulsante “Log-in”. In caso
contrario selezionare “Register” (UserID e password sono
identiche per TekNet e il Partner Program).
3.2 Servizio riparazioni
Sedi internazionali
Per il servizio riparazioni, rivolgersi alla sede Psion Teklogix
più vicina (vedere “Worldwide Offices” a pagina A-2).
Canada e Stati Uniti
In Canada e negli Stati Uniti, i clienti possono accedere al
Nota: Quando si chiama il numero verde, tenere a portata
di mano il codice cliente Psion Teklogix o il numero
della pratica di richiesta di assistenza (il cosiddetto
"trouble ticket").
Tel.: 1 800 387-8898 (selezionare l'opzione “2”)
Page 53

NETBOOK PRO
Guide de démarrage rapide
4 avril 2005 N/P 8100010.D
Page 54

Garantie de retour en usine
Psion Teklogix offre une garantie de retour à l'usine, qui couvre ce
produit pour une période de douze (12) mois, conformément à
l'Énoncé de garantie et de limite de la responsabilité qui est affiché
sur le site Web suivant : www.psionteklogix.com/warranty.
Remarque :Si vous n'êtes pas membre de Teknet et essayez de
consulter cette garantie, on vous demandera de vous
inscrire. À titre de membre de Teknet, vous aurez accès
à de l'information utile sur les produits de Psion
Teklogix, sans aucun frais.
Dans certaines régions, cette garantie peut s'appliquer au-delà de
cette période, nous vous prions donc de contacter le bureau de Psion
Teklogix de votre région pour de plus amples détails. Pour obtenir
une liste des bureaux, consultez la rubrique “Worldwide Offices” à la
page A-2 du guide de démarrage rapide. Pour vous procurer un
exemplaire du document NETBOOK PRO User Manual, cliquez ici
pour accéder à notre site Web Teknet.
Important : À l'intention des utilisateurs nord-américains
seulement
Afin d'avoir rapidement accès au service de garantie en Amérique du
Nord, veuillez enregistrer le numéro de série de ce dispositif afin
d'activer la garantie, en contactant Psion Teklogix au 1-800-835-5644,
poste 209, ou par lien Web à americascontracts@teklogix.com.
Autrement, Psion Teklogix pourrait ne pas être en mesure d'effectuer
le service, l'entretien ou la réparation de ce dispositif.
Service
Pour faire une demande de service, veuillez donner la nature de la
panne et les conditions dans lesquelles celle-ci s’est produite.
Indiquez également le type, le modèle et le numéro de série de
l'appareil. Avant de renvoyer un produit à Psion Teklogix, appelez le
service à la clientèle pour obtenir un numéro de retour.
Services de support
Psion Teklogix propose à ses clients une gamme complète de
services de support. Pour obtenir des informations détaillées,
reportez-vous au paragraphe « Services de support » à la page 15.
Clause de limitation
Le plus grand soin a été apporté à ce document, afin que les
informations qu’il contient soient complètes, exactes et à jour. Psion
Teklogix Inc. se réserve le droit d’y apporter des modifications sans
préavis et ne saurait être tenue responsable d’éventuels dommages, y
compris indirects, résultant d’un manque de fiabilité de ce document,
y compris mais sans s’y limiter, les éventuelles erreurs
typographiques.
© Copyright 2005 par Psion Teklogix Inc., Mississauga, Ontario, Canada
Page 55

Table des matières
Approbations et résumé des mesures de sécurité . . . . . 2
1. Introduction . . . . . . . . . . . . . . . . . . . . . . . . . . . . . . . . 3
2. Mise en route . . . . . . . . . . . . . . . . . . . . . . . . . . . . . . . 3
2.1 Déballage : liste de contrôle. . . . . . . . . . . . . . . 3
2.2 Principales caractéristiques . . . . . . . . . . . . . . . 4
2.3 Applications . . . . . . . . . . . . . . . . . . . . . . . . . . . 4
2.4 Logiciels. . . . . . . . . . . . . . . . . . . . . . . . . . . . . . 5
2.4.1 Windows® CE .NET . . . . . . . . . . . . . . . 5
2.4.2 À propos d’ActiveSync . . . . . . . . . . . . . 5
2.5 Identification des composants de l’appareil. . . 5
2.6 Installation de la batterie principale . . . . . . . . . 7
2.7 Installation des batteries de secours. . . . . . . . . 7
2.8 Mise sous tension et hors tension du
NETBOOK PRO . . . . . . . . . . . . . . . . . . . . . . . 8
2.9 Pour commencer. . . . . . . . . . . . . . . . . . . . . . . . 9
2.10 Gestion de l’alimentation. . . . . . . . . . . . . . . . 9
2.10.1 Évaluation de la charge de la batterie. . 9
2.10.2 Charge du bloc-batterie . . . . . . . . . . . . 10
2.10.3 Comment vérifier l'alimentation par
batterie? . . . . . . . . . . . . . . . . . . . . . . . . 10
2.11 Utilisation du stylet . . . . . . . . . . . . . . . . . . . . 10
2.12 Cartes numériques sécurisées et cartes
multimédia. . . . . . . . . . . . . . . . . . . . . . . . . . . 11
2.13 Cartes Compact Flash . . . . . . . . . . . . . . . . . . 11
2.16 Comment réinitialiser le NETBOOK PRO . . 14
3. Services de support . . . . . . . . . . . . . . . . . . . . . . . . . . .15
3.1 Support technique . . . . . . . . . . . . . . . . . . . . . . 15
3.2 Réparation des équipements . . . . . . . . . . . . . . 15
Appendix A
A.1 Technical Support . . . . . . . . . . . . . . . . . . . . . A-1
A.2 Product Repairs. . . . . . . . . . . . . . . . . . . . . . . A-1
A.3 Worldwide Offices . . . . . . . . . . . . . . . . . . . . A-2
Page 56

Approbations et résumé des mesures de
sécurité
CONSIGNES DE SÉCURITÉ IMPORTANTES
Certaines précautions élémentaires doivent être prises en
cours d’utilisation de cet appareil pour réduire le risque
d’incendie, de décharge électrique et de blessure :
1. N’utilisez pas l’appareil à proximité de l’eau (par
exemple, près d’une baignoire, d’un lavabo, d’un
évier ou d’une cuve, dans un sous-sol humide ou
près d’une piscine).
2. Évitez de connecter l'appareil à un réseau
téléphonique pendant un orage électrique. La
foudre peut provoquer une décharge électrique à
distance.
3. N’utilisez pas l’appareil pour signaler une fuite de
gaz à proximité de la fuite.
Important : Conservez ces consignes.
Information de la FCC pour les États-Unis
Brouillage nuisible aux communications radio et à la réception
télévision
Cet appareil émet de l'énergie radiofréquence et, s'il n'est pas
classe B. Son fonctionnement est soumis aux deux
conditions suivantes :
1. L’appareil ne doit pas provoquer de brouillage
nuisible.
2. L’appareil doit accepter tout brouillage reçu, y
compris un brouillage susceptible de compromettre
son fonctionnement.
Ces limites visent à fournir une protection raisonnable contre
le brouillage préjudiciable dans le cadre d'une installation à
usage domestique. Ceci étant, il n’existe aucune garantie qu'il
ne se produira pas de brouillage dans une installation donnée.
Si cet appareil cause un brouillage nuisible à la réception
télévision ou radio, ce qui peut être déterminé en allumant
puis en éteignant l’appareil, l’utilisateur doit essayer
d'éliminer le brouillage à l'aide de l'une des mesures
suivantes :
• Réorientez ou déplacez l’antenne de réception.
• Augmentez la distance entre l’appareil et le récepteur.
• Si vous utilisez l’appareil avec un adaptateur secteur,
branchez-le sur une prise située sur un circuit différent
du circuit du récepteur.
• Demandez conseil à un technicien radio/TV
expérimenté.
Les clients résidant aux États-Unis peuvent se procurer le
Page 57

Émissions de fréquences radio
Certains équipements situés dans des hôpitaux ou des avions ne
sont pas protégés contre les émissions de fréquences radio.
N’utilisez pas le NETBOOK PRO à bord d’un avion ou dans un
hôpital sans en avoir obtenu l’autorisation au préalable.
Consignes de sécurité importantes
Cet appareil a été testé aux fins de conformité FCC avec des
connecteurs et des câbles blindés reliés aux périphériques. Il
est important d’utiliser des connecteurs et des câbles blindés
pour réduire le risque de brouillage nuisible aux
communications radio et à la réception télévision. Vous
pouvez vous procurer des câbles blindés pour le NETBOOK
PRO auprès d’un revendeur agréé par Psion Teklogix.
Si l’utilisateur modifie l’appareil ou ses périphériques, de
quelque manière que ce soit, et si les modifications ne sont
pas approuvées par Psion Teklogix, la FCC peut retirer à
l’utilisateur son droit d’exploiter l’appareil.
Sécurité relative aux dispositifs infrarouges
Produit DEL de classe 1
Cet appareil est muni d’un dispositif infrarouge pour
transmettre et recevoir des fichiers à partir de dispositifs qui
prennent en charge le format IrDA. Bien que ce faisceau
• Ne l’observez pas directement avec des instruments
optiques.
Ne réparez vous-même aucune des pièces de l’appareil.
Attention
N’utilisez que des cordons de télécommunications de calibre
0,1288 mm
2
(26 AWG) ou plus. Communiquez avec votre
revendeur agréé Psion Teklogix pour trouver un cordon
approprié.
Précautions d’utilisation de la batterie
Reportez-vous au paragraphe « Entretien de la batterie » à la
page 12.
1. Introduction
Le présent guide contient des informations sur le
fonctionnement et les caractéristiques du NETBOOK PRO
de Psion Teklogix. Pour de plus amples informations,
reportez-vous au Guide d’utilisateur du NETBOOK PRO, à
l’aide en ligne ou à la documentation fournie avec
l’application que vous utilisez.
2. Mise en route
Page 58

votre agence Psion Teklogix s'il manque des éléments ou si
des éléments sont endommagés.
• NETBOOK PRO (stylet livré dans la base de
l’ordinateur, reportez-vous au paragraphe « Utilisation
du stylet » à la page 10).
• Batterie ion-lithium rechargeable 12,6 V 2200 mAH
(batterie principale).
• Deux piles alcalines amovibles AAA (batterie de
secours).
• Câble USB ou RS-232 ActiveSync pour NETBOOK
PRO.
• Câble adaptateur pour miniport hôte USB et port hôte
USB standard.
• Bloc d’alimentation.
• Adaptateur secteur du NETBOOK PRO.
Autres informations :
• Guide de démarrage rapide du NETBOOK PRO
• CD-ROM du NETBOOK PRO (inclut le manuel de
l’utilisateur).
2.2 Principales caractéristiques
L’ordinateur mobile NETBOOK PRO fonctionne avec le
système d’exploitation Windows
®
CE .NET. Il est équipé
d’un écran SVGA tactile. Principales caractéristiques :
• Écran LCD transmissif à matrice active SVGA 800 x
600 haute qualité.
• Connectivité principale USB.
• Connecteur série RS232.
• Interface IrDA.
• Emplacement pour carte CF.
• Emplacement pour carte MMC/SD/SDIO.
• Emplacement pour carte PCMCIA.
2.3 Applications
Le NETBOOK PRO est capable d’exécuter une gamme
étendue d’applications. Il existe un certain nombre
d’applications standard auxquelles peuvent facilement
s’ajouter des programmes personnalisés. Les programmes
standard suivants sont disponibles :
• Wordpa d, un traitement de texte permettant de
rédiger des lettres et d’autres documents.
• Inbox, pour envoyer et recevoir des courriers
électroniques.
• Internet Explorer, pour naviguer sur le Web.
• Windows Messenger pour CE, un programme de
messagerie instantanée.
• Pocket On-Schedule, un gestionnaire d’informations
personnelles.
•Microsoft
®
File Viewer, un logiciel de visualisation
Page 59

2.4 Logiciels
2.4.1 Windows® CE .NET
Windows CE .NET est un système d’exploitation facilitant
l’intégration d’applications, doté d’outils de développement
d’applications complets et de fonctions de connexion
toujours plus nombreuses. Windows CE .NET prend en
charge des protocoles réseau sophistiqués et la technologie
Bluetooth, une fonctionnalité de navigateur enrichie, une
configuration simplifiée de réseau local sans fil et un temps
de réponse réduit destiné à diminuer le temps d’attente dans
les périphériques industriels.
2.4.2 À propos d’ActiveSync
Le logiciel de connectivité PC de Microsoft, ActiveSync,
peut servir à connecter le NETBOOK PRO aux PC
fonctionnant avec le système d’exploitation Windows 95/98/
ME/2000/XP ou NT 4.0. Après avoir connecté le NETBOOK
PRO à un PC par l’intermédiaire d’un câble, vous pouvez, en
exécutant ActiveSync sur le PC :
• visualiser vos fichiers sur le NETBOOK PRO à
partir de l’Explorateur Windows en cliquant sur
l’icône Unité mobile dans la fenêtre Poste de travail du
PC;
• faire glisser et déplacer des fichiers entre le
• synchroniser vos courriers électroniques et votre
carnet d’adresses entre le NETBOOK PRO et le PC
pour qu’ils restent en phase;
• sauvegarder les fichiers du NETBOOK PRO sur le
PC, pour les restaurer ultérieurement en cas de besoin.
Pour obtenir de plus amples informations, reportez-vous à la
documentation fournie avec Microsoft Active Sync ou au
Guide d’utilisateur de NETBOOK PRO.
2.5 Identification des composants de l’appareil
Figure 2.1 NETBOOK PRO ouvert
Page 60

Figure 2.2 Vue inférieure avant du NETBOOK PRO
Figure 2.4 Arrière du NETBOOK PRO
Emplacement pour carte MMC/SD/SDIO
Voyant de mise sous tension
Loquet
Connecteur
Bouton de dégagement du stylet
Emplacement PCMCIA
Bouton de dégagement de carte PCMCIA
Prise de casque
Stylet
d’alimentation
Port infrarouge
RS232
USB-
Couvercle de la
Emplacement
Connecteur USB
batterie principale
pour carte CF
Page 61

2.6 Installation de la batterie principale
Insertion de la batterie
Avant de pouvoir utiliser le NETBOOK PRO, vous devez
insérer la batterie. Faites-la glisser dans son logement jusqu’à
ce que vous entendiez un déclic, comme l'illustre la figure 2.6.
Important : Le NETBOOK PRO vous avertit lorsque la
batterie est faible. La batterie de secours
permet de conserver les données en mémoire
pendant plusieurs heures.
Changement du bloc-batterie
Si vous utilisez le NETBOOK PRO sans chargeur et que
vous disposez d'un bloc-batterie de rechange, vous pouvez
intervertir les blocs lorsque l'avertissement du faible niveau
des batteries est affiché. Procédure à suivre :
1. Éteignez le NETBOOK PRO.
2. Faites glisser le loquet du bloc-batterie vers
l’arrière du NETBOOK PRO.
3. Tirez la batterie du NETBOOK PRO vers vous
pour la sortir.
4. Insérez l'autre bloc-batterie.
Important : Avant de retirer la batterie principale, éteignez
toujours le NETBOOK PRO.
2.7 Installation des batteries de secours
Batterie de secours interne
Le NETBOOK PRO est équipé d’une batterie de secours
amovible destinée à conserver les données en mémoire
lorsque le bloc-batterie principal est en cours de chargement
ou en cours de remplacement. La batterie de secours est
constituée de deux piles AAA accessibles à partir de l’avant
du NETBOOK PRO ouvert.
Important : Si le bloc-batterie principal et la batterie de
secours se déchargent en même temps, toutes
les données présentes en mémoire vive sont
perdues.
La batterie de secours peut être remplacée par l’utilisateur.
Procédure à suivre :
1. Éteignez le NETBOOK PRO.
2. Positionnez l'écran pour former un léger angle vers
l'avant pour pouvoir accéder au couvercle de la
batterie de secours, qui se trouve à gauche au-dessus
du clavier (reportez-vous à la figure 2.7).
3. Appuyez vers le bas au centre du couvercle de la
batterie de secours et faites-le glisser vers l’avant
Page 62

6. Pour fermer le logement, remettez le couvercle en
le faisant glisser sur les piles et appuyez de
nouveau vers le bas au centre du couvercle.
Figure 2.7 Retrait de la batterie de secours
2.8 Mise sous tension et hors tension du
NETBOOK PRO
Les options de mise sous tension suivantes sont disponibles
par le biais du menu Avancé en sélectionnant Démarrer/
Paramètres/Panneau de configuration/Propriétés
d’alimentation. Diverses combinaisons de ces options peuvent
être activées :
• lorsque le couvercle est ouvert;
• lorsque vous toquez sur l’écran;
• lorsque le câble série est raccordé.
L’ordinateur est mis sous tension si vous appuyez sur la
touche Esc/On, quelles que soient les options activées.
Pour mettre l'ordinateur hors tension :
Tout en maintenant la touche Fn enfoncée, appuyez sur
Esc/On. Vous pouvez aussi toquer sur l’icône Arrêter du
menu Démarrer. Bien qu'il soit possible de mettre
l’ordinateur hors tension à tout moment, pensez à
sauvegarder d’abord les fichiers ouverts.
Remarque : Si vous n’utilisez pas le NETBOOK PRO, il se
met hors tension automatiquement au bout de
quelques minutes pour économiser
l’alimentation par batterie. Pour reprendre
l’utilisation du NETBOOK PRO après une
pause, remettez-le sous tension en appuyant sur
la touche Esc/On. Les options d’économie
d’énergie se trouvent dans le menu Panneau de
configuration/Propriétés d’alimentation/Modes
Couvercle de la batterie de secours
É
cran penché un peu vers l'avant
pour accéder au couvercle
Page 63

Le NETBOOK PRO peut être configuré de manière à se
mettre hors tension lorsque le couvercle se referme. (Ce qui
est le cas par défaut.) Consultez le menu Avancé dans
Panneau de configuration/Propriétés d’alimentation pour
désactiver la fonction.
2.9 Pour commencer
Lorsque vous mettez sous tension le NETBOOK PRO pour
la première fois, le bureau Windows CE .NET s'affiche. À ce
stade, il est opportun de définir la date et l’heure. Pour ce
faire, sélectionnez Démarrer/Paramètres/Panneau de
configuration/Propriétés de la date/heure. La boîte de
dialogue Propriétés de la date/heure s’affiche.
1. Définissez le Fuseau horaire et cliquez sur
Appliquer avant de modifier d’autres paramètres.
2. Indiquez les valeurs souhaitées pour la date et
l’heure.
3. Cliquez sur le bouton OK du menu Propriétés de
la date/heure pour fermer la boîte de dialogue et
enregistrer vos modifications.
2.10 Gestion de l’alimentation
Le NETBOOK PRO est alimenté par un bloc-batterie ionlithium rechargeable. Le NETBOOK PRO vous averti lorsque
la batterie principale est faible.
Remarque : La longévité de vos batteries dépend de la
Mesures à prendre pour prolonger la durée de
vie de la batterie :
• Diminuez la luminosité de l’écran.
• Dans le menu Alimentation, configurez la mise
hors tension automatique.
• Préférez la mémoire interne pour stocker les
fichiers plutôt qu’une carte mémoire, car le
NETBOOK PRO consomme davantage d’énergie
pour écrire sur la carte mémoire.
Le NETBOOK PRO peut être branché sur secteur par le biais
d’un adaptateur approprié, ce qui permet également de
charger le bloc-batterie.
2.10.1 Évaluation de la charge de la batterie
Afin d’estimer précisément la capacité restante
de la batterie, le NETBOOK PRO doit expérimenter un cycle
complet de charge/décharge (ou décharge/charge) afin
d’apprendre les caractéristiques de la batterie et étalonner
l'indicateur de charge.
Jusqu’à ce que cette opération soit effectuée, le panneau de
contrôle contenant les informations sur la batterie indique
« Non étalonné » et la capacité affichée n’est pas très précise.
Psion Teklogix recommande de charger complètement la
batterie à la réception de l’appareil, puis de la décharger
complètement, ce qui permet d’étalonner l'indicateur. Pour en
savoir davantage, reportez-vous au Guide de l’utilisateur du
Page 64

2.10.2 Charge du bloc-batterie
Pour charger la batterie, insérez le bloc-batterie dans le
NETBOOK PRO et branchez l’adaptateur secteur fourni. La
batterie (2 200 mAH) standard du NETBOOK PRO se
charge normalement en 3 à 4 heures.
2.10.3 Comment vérifier l'alimentation par batterie?
Procédure de vérification de l'alimentation par batterie :
1. Appuyez sur le bouton Démarrer. Le menu
Démarrer apparaît.
2. Sélectionnez Paramètres, Panneau de
configuration.
3. Sélectionnez l’icône Alimentation dans le
panneau de contrôle. L’onglet Batterie donne une
brève description de l’état de la batterie principale.
Remarque : Lorsque le NETBOOK PRO est mis hors
tension, il est en Arrêter et continue à
consommer une faible quantité d’énergie. Si
vous prévoyez laisser votre NETBOOK PRO
hors tension longtemps, il est conseillé de
sauvegarder vos données avant-coup car les
batteries s'épuiseront tôt ou tard.
2.11 Utilisation du stylet
Le stylet se trouve dans un logement sur le côté droit de
l’ordinateur. Pour le libérer, appuyez sur le bouton carré à
Figure 2.8 Emplacement et retrait du stylet
Appuyez légèrement sur l’écran à l’aide du stylet. Vous
pouvez toquer sur l'écran avec les doigts, mais il est
préférable d’utiliser le stylet pour éviter de laisser des
empreintes ou des traces sur l'écran. Ne toquez pas sur
l’écran avec un objet pointu pour ne pas endommager
l’écran. N’utilisez pas de stylo à encre, car l’encre peut être
difficile, voire impossible à effacer. Reportez-vous au
paragraphe « Entretien du NETBOOK PRO » à la page 12
pour savoir comment nettoyer l’écran.
Vous pouvez généralement toquez (cliquez) sur un élément à
l’aide du stylet pour le sélectionner ou le modifier. Vous
pouvez, par exemple :
• toquer deux fois (ou double-cliquer) sur une icône de
programme pour ouvrir ce programme;
Bouton de dégagement du stylet
Stylet
Page 65

2.12 Cartes numériques sécurisées et cartes
multimédia
Les cartes multimédia (MMC) et les cartes numériques
sécurisées (SD), qui s’insèrent dans un emplacement dédié du
NETBOOK PRO, peuvent être des cartes mémoire non
volatile (elles servent à stocker des logiciels et/ou des
données d’application). Elles peuvent aussi servir de cartes
d’interface ou de communication.
L'emplacement pour carte MMC est situé à l’avant du
NETBOOK PRO.
Insertion et retrait d’une carte MMC ou SD
• Enfoncez la carte dans l'enfoncement prévu à cet effet
jusqu’à ce que vous entendiez un déclic.
• Pour retirer une carte, enfoncez-la. Elle est alors
éjectée et vous pouvez ainsi la retirer.
Rangez la carte MMC ou SD dans un endroit sûr.
2.13 Cartes Compact Flash
Les cartes Compact Flash (CF), qui s’insèrent dans un
emplacement dédié du NETBOOK PRO, peuvent être des
cartes mémoire non volatile (elles servent à stocker des
logiciels et/ou des données d'application). Elles peuvent aussi
servir de cartes d’interface ou de communication.
L'emplacement pour carte CF est situé sur le côté gauche du
NETBOOK PRO.
Insertion et retrait d’une carte CF
• Enfoncez la carte dans l'emplacement.
• Pour retirer une carte, appuyez sur le bouton
d’éjection à côté de l'emplacement. Le bouton
d’éjection sort. Appuyez de nouveau pour éjecter la
carte.
Rangez la carte CF dans un endroit sûr.
Page 66

2.14 Cartes PC
Les cartes PC, qui s’insèrent dans un emplacement dédié du
NETBOOK PRO, peuvent être des cartes mémoire non
volatile (elles servent à stocker des logiciels et/ou des
données d'application). Elles peuvent également servir de
carte d’interface ou de communication.
L'emplacement pour carte PC est situé le côté droit du
NETBOOK PRO.
Insertion et retrait d’une carte PC
• Enfoncez la carte dans l'emplacement. Le bouton
d’éjection à côté de l'emplacement sort. Pendant que
la carte est dans son emplacement, il est possible de
rentrer le bouton d’éjection dans l'ordinateur.
• Pour retirer une carte, appuyez sur le bouton
d’éjection (le ressortir d’abord). La carte sortira. Elle
peut alors être retirée.
Rangez la carte PC dans un endroit sûr.
2.15 Entretien du NETBOOK PRO
2.15.1 Écran
Lorsqu’il est utilisé avec un stylet adéquat, l’écran du
NETBOOK PRO est très résistant à l’usure et aux impacts et
peut durer très longtemps. L’utilisation d’autres objets à la
place du stylet peut endommager l’écran du NETBOOK
PRO.
Pour prolonger la durée de vie de votre écran NETBOOK
PRO, gardez-le toujours propre. Pour nettoyer l’écran :
mettez hors tension le NETBOOK PRO et nettoyez
doucement l’écran à l’aide d’un chiffon doux, propre et sec.
(Si le NETBOOK PRO est configuré de telle sorte qu’il se
met automatiquement sous tension lorsque vous toquez sur
l’écran, désactivez cette option avant de nettoyer l'écran.)
Avertissement : En aucun cas n'utiliser des solvants pour
nettoyer l’écran.
2.15.2 Entretien de la batterie
ATTENTION!
Risque d’explosion si la batterie du NETBOOK PRO est mal
manipulée, mal chargée, incorrectement mise au rebut ou
remplacée. Remplacez la batterie par un modèle identique ou
Page 67

Pour éviter tout risque d’incendie, ne remplacez pas les
batteries de secours par des batteries rechargeables.
Mesures de sécurité concernant la batterie ion-lithium
N'entreposez pas les batteries à des températures supérieures à
60 °C. La plage de températures optimales pour garantir la
longévité de la batterie est de +10 °C à +35 °C.
Important : Il est essentiel de connaître et de respecter tous
ces avertissements.
Avertissements :
POUR EMPÊCHER les fuites d’acide, l’échauffement ou
l’explosion de la batterie, respectez les précautions
suivantes.
• N'utilisez qu'un adaptateur agréé par Psion Teklogix.
• Pour réduire le risque d’incendie, ne remplacez pas les
batteries de secours par des batteries rechargeables.
• Ne brûlez pas les batteries.
• N’incinérez pas d’éléments de batterie et ne les soumettez
pas à des températures supérieures à 100 °C (212 °F). Un
tel traitement peut entraîner la vaporisation de
l’électrolyte liquide et provoquer la rupture de l’élément.
L’incinération peut entraîner des émissions dangereuses
ou une explosion.
• Ne chargez pas les batteries, ne les utilisez pas et ne les
entreposez pas à des températures inférieures à -30 °C.
Les batteries doivent être manipulées conformément aux
• Ne court-circuitez pas la batterie en connectant
directement l'une des bornes exposées à des objets
métalliques (fils, par exemple). Ne transportez pas ou
n'entreposez pas la batterie avec des objets métalliques
tels que des colliers, des épingles à cheveux, etc.
• N’utilisez pas ou ne laissez pas la batterie à proximité
d’une source de chaleur (feu ou radiateur).
• N’immergez pas la batterie dans l’eau.
• Utilisez le chargeur de batterie expressément conçu pour
la batterie.
• N’écrasez pas, ne crevez pas, n’ouvrez pas, ne démontez
pas ou n’intervenez pas d’une manière mécanique
quelconque sur les batteries.
• Ne soudez pas directement la batterie.
• Ne branchez pas la batterie sur une prise électrique, un
allume-cigare, etc.
• Ne placez pas la batterie dans un micro-onde ou un
récipient sous pression.
• Ne mélangez pas des piles rechargeables et des piles non
rechargeables (comme des piles sèches) ou des piles de
différentes capacités ou marques.
• Retirez immédiatement la batterie de l’appareil ou du
chargeur et arrêtez l’utilisation de l'appareil si la batterie
dégage des odeurs ou de la chaleur, ou si la batterie se
déforme ou se décolore, ou encore si son apparence
semble anormale en cours d’utilisation.
Page 68

• En cas de fuite, évitez le contact avec la peau ou les yeux.
Si cela se produit, rincez immédiatement à l’eau froide
courante et consultez un médecin.
• Ne conservez pas la batterie dans des conditions de
température extrême (dans un véhicule, directement sous
le soleil, etc.). La batterie peut alors surchauffer ou
s’enflammer, ce qui peut réduire son rendement et sa
durée de vie.
• N’utilisez pas la batterie dans des endroits où l’électricité
statique est supérieure aux recommandations du
fabricant.
• Conservez les batteries hors de portée des enfants.
2.15.3 Températures d'entreposage et de service
Service :
0 °C à +50 °C (32 °F à 120 °F). Plage de température
dans laquelle peut fonctionner l’adaptateur électrique :
0 °C à +40 °C (+32 °F à +104 °F).
Entreposage :
-10 °C à +60 °C (14 °F à 140 °F). Pour prolonger la vie
du NETBOOK PRO (et du bloc-batterie), entreposez-le
à une température qui varie de +10 °C à +35 °C (+50 °F
à +95 °F).
Important : Évitez d’exposer le NETBOOK PRO à des
changements de température et d’humidité
extrêmes, ce qui pourrait l’endommager.
2.16 Comment réinitialiser le NETBOOK PRO
Périodiquement, il peut être nécessaire de réinitialiser le
NETBOOK PRO dans les cas suivants :
• Vous ne pouvez pas quitter un programme
normalement.
• Le système d’exploitation ne répond plus.
• Impossible de mettre sous tension l'appareil à l'aide du
bouton d'alimentation.
NETBOOK PRO est équipé d’un interrupteur de
réinitialisation qui permet de redémarrer le système
d’exploitation tout en préservant les données sauvegardées.
Pour effectuer un redémarrage à chaud :
Remarque : Dans la mesure du possible, assurez-vous que
tous les fichiers et toutes les applications
sont fermés.
Insérez une tige courte, tel qu’un trombone déplié, dans
l’orifice à droite de la touche Maj de droite. Appuyez sur
l’interrupteur de réinitialisation du NETBOOK PRO.
Redémarrez ensuite l’ordinateur en appuyant sur la touche
Esc/On.
Il est possible également d’effectuer un redémarrage à chaud
en appuyant simultanément sur les touches Ctrl, Alt et
Delete pendant trois secondes. L’ordinateur redémarre
automatiquement.
Page 69

Figure 2.12 Emplacement de l’interrupteur de redémarrage à chaud
Pour effectuer un redémarrage à froid :
Remarque : Avant d’effectuer un redémarrage à froid,
assurez-vous que les batteries de secours sont
retirées en premier puis remises en place en
dernier pour éviter de les décharger
inutilement.
Retirez toutes les batteries et coupez l’alimentation secteur.
Le NETBOOK PRO se réamorce lorsque la batterie
principale ou l’alimentation secteur est rétablie.
Remarque : Le redémarrage à froid du NETBOOK PRO
peut annuler le partenariat établi entre le
3. Services de support
Psion Teklogix propose à ses clients du monde entier une
gamme complète de services de support. Ces services
comprennent le support technique et la réparation des
équipements.
3.1 Support technique
Le support technique du NETBOOK PRO est assuré par
courrier électronique par le biais du site Web Partner Program
(Programme de partenariat). Visitez le site
www.psionteklogix.com et cliquez sur le lien Partner
Program, qui vous emmène sur la page Partner Program.
Cliquez ensuite sur le bouton « Log-in » ou sur le bouton
« Register », selon que vous êtes inscrit au programme
Teknet ou Partner Program. (Votre nom d’utilisateur et mot
de passe sont identiques pour TekNet et Partner Program.)
3.2 Réparation des équipements
Dans le monde
Pour les réparations d’équipements, veuillez communiquer
avec votre agence Psion Teklogix locale (reportez-vous à la
liste “Worldwide Offices” à la page A-2).
Au Canada et aux États-Unis
Les clients canadiens et américains peuvent demander la
Interrupteur de réinitialisation
Page 70

Remarque : Avant d’appeler le numéro vert (numéro sans
frais), les clients doivent avoir leur numéro de
client Psion Teklogix ou le numéro de fiche de
dérangement à portée de la main.
Boîte vocale : 1 800 387-8898 (appuyez sur l’option 2)
Télécopieur : 1 905 812-6304
Site Web : http://service.psionteklogix.com
Page 71

NETBOOK PRO
Kurzanleitung
4. April 2005 Artikelnr. 8100010.D
Page 72

Werksgarantie
Psion Teklogix leistet für dieses Produkt für die Dauer von zwölf
(12) Monaten eine Werksgarantie gemäß der auf folgender Website
befindlichen Erklärung zur eingeschränkten Garantie und
Haftungsbeschränkung: www.psionteklogix.com/warranty.
Hinweis: Wenn Sie nicht bereits Mitglied von Teknet sind und
versuchen, diese Garantie anzuzeigen, werden Sie
aufgefordert, sich anzumelden. Als Mitglied von Teknet
erhalten Sie Zugriff auf nützliche, kostenlose
Informationen über Ihre Psion Teklogix Produkte.
In einigen Gebieten gilt möglicherweise ein längerer
Garantiezeitraum. Einzelheiten hierzu erfragen Sie bitte bei der
nächstgelegenen Psion Teklogix Niederlassung. Ein Verzeichnis
aller Niederlassungen finden Sie in diesem Kurzanleitung unter
“Worldwide Offices” auf Seite A-2. Wenn Sie ein Exemplar des
NETBOOK PRO Benutzerhandbuchs benötigen, klicken Sie bitte
hier, um sich auf unserer Teknet Website anzumelden.
Wichtig: Nur für Kunden in Nordamerika
Damit Ihnen bei Garantiefällen in Nordamerika schnell geholfen
werden kann, lassen Sie bitte die Seriennummer dieses Geräts
registrieren, um die Garantie zu aktivieren. Wenden Sie sich dazu
unter der Telefonnummer 1-800-835-5644 App. 209 an Psion
Teklogix oder nutzen Sie unseren Web-Link unter
americascontracts@teklogix.com. Wenn Sie die Aktivierung der
Garantie unterlassen, ist es Psion Teklogix nicht ohne weiteres
möglich, für dieses Gerät Service, Reparaturen oder technischen
Support zu leisten.
Kundendienst
Wenn Sie den Kundendienst in Anspruch nehmen möchten, machen
Sie bitte Angaben zur Art des Versagens und der Verwendungsweise
des Geräts beim Auftreten des Versagens. Typ, Modell, und
Seriennummer sollten ebenfalls angegeben werden. Bevor Sie
Produkte an Psion Teklogix zurücksenden, setzen Sie sich bitte mit
der Customer Services Group in Verbindung, um eine
Rücksendeberechtigungsnummer (Return Authorization Number) zu
erhalten.
Support-Dienstleistungen
Psion Teklogix bietet seinen Kunden ein komplettes Spektrum an
Produktsupportleistungen. Nähere Einzelheiten dazu finden Sie
unter „Produktsupportleistungen“ auf Seite 17.
Haftungsauschluss
Wir haben uns bemüht, sicherzustellen, dass das vorliegende
Material vollständig, genau, und auf dem neuesten Stand ist. Psion
Teklogix Inc. behält sich das Recht vor, ohne Vorankündigung
Änderungen vorzunehmen, und haftet nicht für Schäden,
einschließlich aber nicht beschränkt auf Folgeschäden, die durch die
Verwendung des vorliegenden Materials verursacht werden,
einschließlich aber nicht beschränkt auf Druckfehler.
© Copyright 2005 Psion Teklogix Inc., Mississauga, Ontario (Kanada)
Page 73

Inhaltsverzeichnis
Zusammenfassung der Bewilligungen und
Vorsichtsmaßnahmen . . . . . . . . . . . . . . . . . . . . . . . . . . 2
1. Einführung. . . . . . . . . . . . . . . . . . . . . . . . . . . . . . . . . 4
2. Erste Schritte . . . . . . . . . . . . . . . . . . . . . . . . . . . . . . . 4
2.1 Auspacken der Schachtel: Bestandteilliste. . . . 4
2.2 Hauptmerkmale . . . . . . . . . . . . . . . . . . . . . . . . 4
2.3 Anwendungen. . . . . . . . . . . . . . . . . . . . . . . . . . 4
2.4 Software . . . . . . . . . . . . . . . . . . . . . . . . . . . . . . 5
2.4.1 Windows® CE .NET . . . . . . . . . . . . . . . 5
2.4.2 Informationen über ActiveSync . . . . . . . 5
2.5 Produktmerkmale . . . . . . . . . . . . . . . . . . . . . . . 6
2.6 Installieren der Hauptbatterie. . . . . . . . . . . . . . 7
2.7 Installieren der Sicherungsbatterien . . . . . . . . . 7
2.8 Ein- und Ausschalten des NETBOOK PRO . . 8
2.9 Erste Schritte . . . . . . . . . . . . . . . . . . . . . . . . . . 9
2.10 Stromversorgungsverwaltung. . . . . . . . . . . . . 9
2.10.1 Kalibrieren der Batterie . . . . . . . . . . . . 10
2.10.2 Aufladen des Batteriesatzes . . . . . . . . . 10
2.10.3 Wie prüfe ich die Batterieleistung? . . . 10
2.11 Verwenden des Stifts. . . . . . . . . . . . . . . . . . . . 10
2.12 Multimedia- und Secure Digital-Karten. . . . . 11
2.13 Compact Flash-Karten . . . . . . . . . . . . . . . . . . 12
2.14 PC-Karten. . . . . . . . . . . . . . . . . . . . . . . . . . . . 12
3. Produktsupportleistungen. . . . . . . . . . . . . . . . . . . . . .17
3.1 Technischer Support . . . . . . . . . . . . . . . . . . . . 17
3.2 Produktreparaturen. . . . . . . . . . . . . . . . . . . . . . 17
Appendix A
A.1 Technical Support . . . . . . . . . . . . . . . . . . . . . A-1
A.2 Product Repairs. . . . . . . . . . . . . . . . . . . . . . . A-1
A.3 Worldwide Offices . . . . . . . . . . . . . . . . . . . . A-2
Page 74

Zusammenfassung der Bewilligungen und
Vorsichtsmaßnahmen
WICHTIGE SICHERHEITSVORKEHRUNGEN
Bei der Verwendung dieses Produkts sollten stets
grundlegende Vorsichtsmaßnahmen getroffen werden, um
das Risiko eines Feuers oder elektrischen Schocks sowie von
Personenschäden zu reduzieren. Zu diesen Maßnahmen
zählen:
1. Verwenden Sie das Produkt nicht in der Nähe von
Wasser, zum Beispiel in der Nähe einer
Badewanne, Waschmuschel, eines
Abwaschbeckens, Wäschekessels, in einem
feuchten Keller oder in der Nähe eines
Schwimmbeckens.
2. Vermeiden Sie Verbindungen mit einem
Telefonnetzwerk während eines Gewitters. Die
Gefahr eines durch Blitz verursachten elektrischen
Schocks kann nicht völlig ausgeschlossen werden.
3. Verwenden Sie dieses Produkt nicht zur Meldung
eines Erdgaslecks, während Sie sich in der Nähe
des Lecks befinden.
Wichtig: Bewahren Sie diese Anweisungen an einem
sicheren Ort auf.
strenger Befolgung der Anweisungen in diesem Handbuch –
Radiokommunikations- und Fernsehempfangsstörungen
verursachen. Tests an dem Gerät haben ergeben, dass es die
Beschränkungen für digitale Geräte der Klasse B gemäß Teil
15 der FCC-Regeln erfüllt. Der Betrieb unterliegt den
folgenden zwei Bedingungen:
1. Das Gerät darf keine gefährlichen Störungen
verursachen.
2. Das Gerät muss Empfangsstörungen,
einschließlich von Störungen, die unerwünschtes
Betriebsverhalten hervorrufen können, tolerieren.
Diese Beschränkungen sollen angemessenen Schutz vor
gefährlichen Störungen bei der Verwendung durch private
Benutzer bieten. Allerdings besteht keine Garantie, dass in
Einzelfällen keine Störungen erlebt werden. Falls das Gerät
Radio- oder Fernsehempfangsstörungen hervorruft – was
durch Aus- und Einschalten des Geräts feststellbar ist – wird
dem Benutzer empfohlen, derartige Störungen durch eine
oder mehrere der folgenden Maßnahmen zu beheben:
• Orientieren Sie die Empfangsantenne in eine andere
Richtung oder verlegen Sie sie an einen anderen Ort.
• Vergrößern Sie die Entfernung zwischen dem Gerät
und dem Empfänger.
• Falls das Gerät mit einem Netzteil verwendet wird,
stecken Sie es in eine Steckdose ein, die sich in einem
Page 75

sein: „How to Identify and Resolve Radio-TV Interference
Problems“. Sie ist unter folgender Adresse erhältlich: US
Government Printing Office, Washington, DC 20402 - Stock
No 004-000-00345-4.
Radiofrequenzemissionen
Manche Geräte in Krankenhäusern und Flugzeugen sind nicht
gegenüber Radiofrequenzemissionen abgeschirmt. Verwenden
Sie daher den NETBOOK PRO nicht an Bord eines Flugzeugs
oder in einem Krankenhaus, ohne zuvor Erlaubnis eingeholt zu
haben.
Wichtige Sicherheitsvorkehrungen
Dieses Gerät wurde unter Bedingungen, zu denen die
Verwendung abgeschirmter Kabel und abgeschirmter
Verbindungen zwischen dem Gerät selbst und den
Peripheriegeräten zählte, auf die Erfüllung der FCC-Regeln
getestet. Es ist wichtig, dass abgeschirmte Kabel und
Verbindungen verwendet werden, um die mögliche
Verursachung von Radio- und Fernsehstörungen zu
reduzieren. Abgeschirmte Kabel, die für den NETBOOK
PRO geeignet sind, können von autorisierten Psion
Teklogix-Händlern erworben werden.
Falls der Benutzer das Gerät oder die Peripheriegeräte auf
jegliche Art verändert, und diese Änderungen nicht von Psion
Teklogix bewilligt worden sind, kann die FCC dem Benutzer
Sicherheit von Infrarotgeräten
LED-Produkt der Klasse 1
Dieses Produkt enthält ein Infrarotgerät zum Senden und
Empfangen von Dateien von Geräten, die das IrDA-Format
unterstützen. Obwohl dieser unsichtbare Strahl als
ungefährlich gilt und EN60825-1-Normen (IEC825-1)
entspricht, empfehlen wir die Einhaltung der folgenden
Vorsichtsmaßnahmen während der Übertragung über das
Infrarotgerät:
• Blicken Sie nicht in den Infrarotstrahl.
• Betrachten Sie den Strahl nicht direkt mit optischen
Instrumenten.
Das Gerät enthält keine Teile, die vom Benutzer gewartet
werden können.
Vorsicht
Verwenden Sie ausschließlich
Telekommunikationsleitungskabel vom Typ 26 AWG (oder
größer). Wenden Sie sich wegen eines geeigneten Kabels an
Ihren autorisierten Psion Teklogix-Händler.
Vorsichtsmaßnahmen bei Batterien
Bitte sehen Sie „Pflege der Batterien“ auf Seite 13.
Page 76

1. Einführung
Diese Anleitung bietet Informationen zum Betrieb und den
Funktionen des NETBOOK PRO von Psion Teklogix.
Weitere Informationen finden Sie im NETBOOK PRO User
Manual, in der Online-Hilfe, oder der mit der verwendeten
Anwendung mitgelieferten Dokumentation.
2. Erste Schritte
2.1 Auspacken der Schachtel: Bestandteilliste
Der NETBOOK PRO wurde mit einer Reihe von Zubehör
geliefert. Vergewissern Sie sich bitte, dass alle folgenden
Bestandteile vorhanden und in gutem Zustand sind. Im Falle
von fehlenden oder beschädigten Bestandteilen wenden Sie
sich bitte an die nächstgelegene Psion TeklogixNiederlassung.
• NETBOOK PRO (ein Stift wird im Halter am
Computer geliefert - siehe „Verwenden des Stifts“ auf
Seite 10).
• Wiederaufladbare 12,6 V 2200 mAH Lithium-IonenBatterie (Hauptbatterie).
• Zwei austauschbare AAA-Alkalibatterien
(Sicherungsbatterien).
• NETBOOK PRO-Netzteil.
Andere Informationen:
• NETBOOK PRO-Kurzanleitung.
• NETBOOK PRO-CD (einschließlich
Benutzerhandbuch).
2.2 Hauptmerkmale
Der NETBOOK PRO ist ein Windows® CE .NET
OS-basierter mobiler Touchscreen-Computer mit einem
berührungsempfindlichen SVGA-Bildschirm. Er hat
folgende Merkmale:
•Intel
®
PXA 255 XScale®-Prozessor (400Mhz).
• Windows CE .NET.
• 32MB Flash- und 128MB SDRAM-Speicher.
• Hochwertiger 800 x 600 SVGA TFT transmissiver
LCD-Bildschirm.
• USB-Master-Connectivity.
• Serielle Verbindung RS232.
• IrDA-Schnittstelle.
• CF-Kartensteckplatz.
• MMC/SDCard/SDIO-Steckplatz.
• PCMCIA-Kartensteckplatz.
Page 77

Die folgenden Standardprogramme sind verfügbar:
• Wordpad, ein Textverarbeitungsprogramm zum
Verfassen von Briefen und anderen Dokumenten.
• Posteingang, zum Senden und Empfangen von
E-Mail.
• Internet Explorer, zum Surfen im Internet.
• Windows Messenger für CE, ein Instant-MessagingProgramm.
• Pocket On-Schedule, ein persönlicher
Informationsmanager.
•Microsoft
®
File Viewer, eine Software zum
Anzeigen von Dateien.
• JEM-CE, die „Virtual Machine“-Software von Java.
• Windows Explorer, ein Dateibrowser.
• Windows Media Player, eine Software zum
Anzeigen von Multimediadateien.
2.4 Software
2.4.1 Windows® CE .NET
Windows CE .NET ist ein Betriebssystem, das sich durch
seine einfache Anwendungsintegration, umfassende
Anwendungsentwicklungsprogramme und eine ständig
wachsende Palette weiterer Fähigkeiten auszeichnet.
Windows CE .NET unterstützt erweiterte
2.4.2 Informationen über ActiveSync
Die Microsoft PC-Connectivity-Software ActiveSync kann
zum Anschluss des NETBOOK PRO an einen PC verwendet
werden, der unter Windows 95/98/ME/2000/XP oder NT 4.0
läuft. Wenn Sie den NETBOOK PRO mit einem Kabel an
einen PC anschließen und ActiveSync auf dem PC ausführen,
ist Folgendes möglich:
• Anzeigen der NETBOOK PRO-Dateien in
Windows Explorer, indem Sie das Symbol Mobile
Geräte im Fenster „Arbeitsplatz“ des PCs verwenden.
• Ziehen und Ablegen von Dateien zwischen dem
NETBOOK PRO und dem PC auf die gleiche Weise
wie zwischen PC-Laufwerken; gleichzeitig werden sie
automatisch in das entsprechende Dateiformat
konvertiert.
• Synchronisieren der E-Mail und des Adressbuchs
des NETBOOK PRO mit dem PC, damit beide auf
dem neuesten Stand sind.
• Erstellen von Sicherungskopien der NETBOOK
PRO-Dateien auf dem PC, die dann bei Bedarf vom
PC auf dem NETBOOK PRO wiederhergestellt
werden können.
Ausführliche Informationen finden Sie in der mit Microsoft
Active Sync gelieferten Dokumentation oder im NETBOOK
PRO User Manual.
Page 78

2.5 Produktmerkmale
Abbildung 2.1 NETBOOK PRO geöffnet
Abbildung 2.3 Rechte Seite des NETBOOK PRO
MMC/SDCard/SDIO-Steckplatz
Stromanzeiger
Riegel
Stromanschluss
Stift-Freigabetaste
PCMCIA-Steckplatz
PCMCIA-Freigabetaste
Kopfhöreranschluss
Stift
Page 79

Abbildung 2.5 Linke Seite des NETBOOK PRO
2.6 Installieren der Hauptbatterie
Einlegen der Batterie
Bevor Sie den NETBOOK PRO verwenden können, müssen
Sie die Batterie einlegen. Schieben Sie die Batterie hinein, bis
sie einrastet (siehe Abbildung 2.6).
Wichtig: Der NETBOOK PRO warnt Sie rechtzeitig,
wenn die Hauptbatterie schwach wird. Die
Sicherungsbatterie kann den Arbeitsspeicher
mehrere Stunden lang aufrechterhalten.
1. Schalten Sie den NETBOOK PRO aus.
2. Schieben Sie den Batteriesatz-Riegel des
NETBOOK PRO nach hinten.
3. Nehmen Sie die Batterie heraus, indem Sie sie vom
NETBOOK PRO wegziehen.
4. Schieben Sie den Ersatz-Batteriesatz hinein.
Abbildung 2.6 Installieren des Batteriesatzes
Wichtig: Schalten Sie den NETBOOK PRO immer aus,
bevor Sie die Hauptbatterie entfernen.
2.7 Installieren der Sicherungsbatterien
Interne Sicherungsbatterie
Der NETBOOK PRO verfügt über eine auswechselbare
Sicherungsbatterie, die zur Speicherung der Daten dient,
während der Hauptbatteriesatz aufgeladen oder
ausgewechselt wird. Die Sicherungsbatterie umfasst zwei
RS232
USB-
Hauptbatterieabdeckung
CF-Kartensteckplatz
CF-Auswurftaste
USB-RS232-Anschluss
USB-Anschluss
Page 80

Wichtig: Wenn sowohl der Hauptbatteriesatz als auch die
Sicherungsbatterien vollständig entladen
werden, gehen alle im RAM gespeicherten
Benutzerdaten verloren.
Die Sicherungsbatterie kann vom Benutzer ausgewechselt
werden. Dazu gehen Sie folgendermaßen vor:
1. Schalten Sie den NETBOOK PRO aus.
2. Neigen Sie die Anzeige leicht nach vorne, um sich
Zugriff auf die Abdeckung der Sicherungsbatterie,
die sich links über der Tastatur befindet (siehe
Abbildung 2.7), zu verschaffen.
3. Drücken Sie nach unten auf die Mitte der
Abdeckung der Sicherungsbatterie des
NETBOOK PRO und schieben Sie sie nach vorne.
4. Nehmen Sie die AAA-Batterien heraus.
5. Legen Sie die AAA-Ersatzbatterien ein. Achten
Sie darauf, dass die Pole in der richtigen Position
sind.
6. Schieben Sie die Abdeckung wieder über die
Batterien, indem Sie nach unten auf die Mitte der
Abdeckung drücken, um das Batteriefach wieder
zu schließen.
Abbildung 2.7 Herausnehmen der Sicherungsbatterie
2.8 Ein- und Ausschalten des NETBOOK PRO
Einschalten:
Öffnen Sie den NETBOOK PRO (er schaltet sich
automatisch ein, wenn das Gehäuse geöffnet wird).
Folgende Optionen zum Einschalten sind über das Menü
Erweitert über Start/Einstellungen/Systemsteuerung/
Sicherungsbatterie-Abdeckung
Neigen Sie die Anzeige zum Zugriff auf die
Abdeckung leicht nach vorne
Page 81

Der Computer schaltet sich ein, wenn Sie die ESC/EIN-
Taste drücken, egal welche Optionen aktiviert sind.
Ausschalten:
Drücken Sie die FN-Taste und halten Sie diese gedrückt,
und drücken Sie dann die ESC/EIN-Taste. Oder tippen
Sie auf das Symbol Abschalten im Menü Start. Sie
können das Gerät jederzeit ausschalten. Speichern Sie
zuvor aber alle offenen Dateien.
Hinweis: Wenn Sie den NETBOOK PRO nicht verwenden,
schaltet er sich nach ein paar Minuten automatisch
aus, um die Batterien zu schonen. Wenn Sie an der
gleichen Stelle fortfahren wollen, an der Sie
aufgehört haben, schalten Sie den NETBOOK PRO
mit der ESC/EIN-Taste wieder ein.
Energiesparoptionen stehen über
Systemsteuerung/Eigenschaften für
Stromversorgung/Stromversorgungsschemas zur
Verfügung. Bei der automatischen Ausschaltzeit
kann es verschiedene Einstellungen geben, je
nachdem ob der NETBOOK PRO an eine externe
Stromquelle angeschlossen ist oder nicht.
Der NETBOOK PRO kann so konfiguriert werden, dass er
sich ausschaltet, wenn das Gehäuse geschlossen wird. Dabei
handelt es sich um die Standardeinstellung. Siehe das Menü
Erweitert in Systemsteuerung/Eigenschaften für
an dieser Stelle das Datum und die Uhrzeit einzustellen. Dazu
gehen Sie zu Start/Einstellungen/Systemsteuerung/Datum/
Uhrzeit - Eigenschaften. Das Dialogfeld „Datum/Uhrzeit Eigenschaften“ wird angezeigt.
1. Stellen Sie die Zeitzone ein und klicken Sie auf
Anwenden bevor Sie andere Einstellungen
ändern.
2. Stellen Sie die gewünschten Datum- und
Uhrzeitwerte ein.
3. Klicken Sie auf die Schaltfläche OK im Dialogfeld
Datum/Uhrzeit - Eigenschaften, um dieses zu
schließen und Ihre Änderungen zu speichern.
2.10 Stromversorgungsverwaltung
Der NETBOOK PRO wird von einem wiederaufladbaren
Lithium-Ionen-Batteriesatz mit Strom versorgt. Der
NETBOOK PRO gibt eine Warnung aus, wenn die
Hauptbatterieladung niedrig ist.
Hinweis: Die Lebensdauer der Batterien hängt davon ab,
wie Sie den NETBOOK PRO verwenden. Der
NETBOOK PRO verbraucht bedeutend mehr
Batteriestrom, wenn Sie die Helligkeit hoch
eingestellt haben, auf einer Speicherkarte
gespeicherte Dateien, Infrarot bzw. eine
Kommunikationskarte verwenden. Sie können
Page 82

• Stellen Sie das automatische Ausschalten im
Menü „Stromversorgung“ ein.
• Verwenden Sie Dateien im internen Speicher
anstatt auf einer Speicherkarte, da der
NETBOOK PRO zum Schreiben auf die
Speicherkarte mehr Strom benötigt.
Der NETBOOK PRO kann bei Anschluss des Netzteils mit
Wechselstrom versorgt werden. Wenn der NETBOOK PRO
mit Wechselstrom versorgt wird, wird auch der Batteriesatz
aufgeladen.
2.10.1 Kalibrieren der Batterie
Um eine genaue Schätzung der verbleibenden
Batterieleistung abgeben zu können, muss der NETBOOK
PRO einen vollständigen Aufladen/Entladen- bzw. Entladen/
Aufladen-Zyklus durchlaufen, damit er sich mit den
Eigenschaften der Batterie anvertrauen und die Kalibrierung
des Batterie-Anzeigers ‚erlernen‘ kann.
Bis dahin werden die Batteriedaten in der Systemsteuerung
als „Nicht kalibriert“ angegeben, und die angegebene
Kapazität ist nicht sehr genau.
Psion Teklogix empfiehlt, die Batterie bei Erhalt des Geräts
vollständig aufzuladen, und dann vollständig zu entladen,
bevor sie neu aufgeladen wird. Auf diese Weise wird der
Batterie-Anzeiger kalibriert. Bitte sehen Sie das NETBOOK
PRO User Manual für weitere Informationen.
ist normalerweise innerhalb von drei bis vier Stunden
vollständig aufgeladen.
2.10.3 Wie prüfe ich die Batterieleistung?
Um die Batterieleistung zu prüfen, gehen Sie
folgendermaßen vor:
1. Drücken Sie die Schaltfläche Start . Das
Start-Menü wird angezeigt.
2. Wählen Sie Einstellungen, Systemsteuerung.
3. Wählen Sie das Symbol Stromversorgung in der
Systemsteuerung. Auf der Registerkarte „Batterie“
sehen Sie eine kurze Beschreibung des Status der
Hauptbatterie.
Hinweis: Wenn der NETBOOK PRO ausgeschaltet ist,
befindet er sich in „Abschalten-Modus“ und
verbraucht weiterhin eine geringe Menge an
Batteriestrom. Wenn Sie den NETBOOK PRO
längere Zeit ausgeschaltet lassen, empfiehlt es
sich, vorher Sicherungskopien der Dateien
anzufertigen, da sich die Batterien schließlich
entleeren werden.
2.11 Verwenden des Stifts
Der Stift befindet sich rechts in einem Halter (einer
Vertiefung des Computers). Um den Stift herauszunehmen,
drücken Sie auf die quadratische Taste neben dem Stift. Der
Page 83

Abbildung 2.8 Aufbewahren und Herausnehmen des Stifts
Tippen Sie mit dem Stift leicht auf den Bildschirm. Sie
können auch mit dem Finger auf den Bildschirm tippen,
obwohl es besser ist, den Stift zu benutzen, um
Fingerabdrücke und Verschmutzungen zu vermeiden.
Berühren Sie den Bildschirm nie mit einem scharfen oder
spitzen Gegenstand, um Beschädigungen zu vermeiden.
Verwenden Sie auch keinen Tintenschreiber, da die Tinte
möglicherweise nicht entfernt werden kann. Für Hinweise
zur Reinigung des Bildschirms siehe „Pflege des NETBOOK
PRO“ auf Seite 13.
Normalerweise können Sie ein Element mit dem Stift
antippen („darauf klicken“), um es auszuwählen oder zu
ändern. So können Sie z. B.:
Hinweis: Falls der Bildschirm nicht auf Antippen reagiert,
müssen Sie ihn unter Umständen neu kalibrieren.
Anweisungen zur Neukalibrierung finden Sie unter
„Systemsteuerung/Stifteigenschaften/
Kalibrierung“.
2.12 Multimedia- und Secure Digital-Karten
Multimedia-Karten (MMC) und Secure Digital-Karten (SD),
die in einen speziellen Steckplatz des NETBOOK PRO
passen, können nicht temporäre Speicherkarten (zur
Speicherung von Anwendungssoftware und/oder Daten) oder
auch Kommunikations- oder Schnittstellenkarten sein.
Der MMC-Steckplatz befindet sich vorne am NETBOOK
PRO.
Einlegen und Herausnehmen einer MMC- oder SD-Karte
• Schieben Sie die Karte in den Steckplatz, bis sie
einrastet.
• Um eine Karte herauszunehmen, drücken Sie sie
hinein. Sie ‚springt‘ heraus und kann dann vollständig
herausgezogen werden.
Stift-Freigabetaste
Stift
Page 84

Bewahren Sie die MMC- oder SD-Karte sicher auf.
Abbildung 2.9 Position des MMC/SD-Kartensteckplatzes
2.13 Compact Flash-Karten
Compact Flash-Karten (CF-Karten), die in einen speziellen
Steckplatz des NETBOOK PRO passen, können nicht
temporäre Speicherkarten (zur Speicherung von
Anwendungssoftware und/oder Daten) oder auch
Kommunikations- oder Schnittstellenkarten sein.
Der CF-Steckplatz befindet sich auf der linken Seite des
NETBOOK PRO.
Einlegen und Herausnehmen einer CF-Karte
• Schieben Sie die Karte in den Steckplatz.
Bewahren Sie die CF-Karte sicher auf.
Abbildung 2.10 Position des CF-Kartensteckplatzes
2.14 PC-Karten
PC-Karten, die in einen speziellen Steckplatz des
NETBOOK PRO passen, können nicht temporäre
Speicherkarten (zur Speicherung von Anwendungssoftware
und/oder Daten) oder auch Kommunikations- oder
Schnittstellenkarten sein.
MMC/SD-Kartensteckplatz
RS232USB-
Auswurftaste
CF-Kartensteckplatz
Page 85

Einlegen und Herausnehmen einer PC-Karte
• Schieben Sie die PC-Karte in den Steckplatz, bis sie
einrastet. Die Auswurftaste neben dem
Kartensteckplatz wird freigegeben. Während sich die
Karte im Steckplatz befindet, ist die Auswurftaste
möglicherweise in den Computer hineingeklappt.
• Um eine Karte herauszunehmen, drücken Sie auf die
Auswurftaste (entklappen Sie diese zuerst, falls sie
verstaut ist). Die Karte ‚springt‘ heraus und kann
vollständig herausgezogen werden.
Bewahren Sie die PC-Karte sicher auf.
Abbildung 2.11 Position des PC-Kartensteckplatzes
2.15 Pflege des NETBOOK PRO
2.15.1 Bildschirm
Bei Verwendung mit dem zugelassenen Stift ist der
Bildschirm des NETBOOK PRO sehr verschleiß- und
stoßfest und weist eine lange Lebensdauer auf. Die
Verwendung eines anderen Gegenstands als dem
zugelassenen Stift kann zu einer Beschädigung des
Bildschirms des NETBOOK PRO führen.
Halten Sie den Bildschirm des NETBOOK PRO sauber, um
seine Lebensdauer zu verlängern. So wird der Bildschirm
gereinigt: schalten Sie den NETBOOK PRO aus, und
wischen Sie den Bildschirm vorsichtig mit einem weichen,
sauberen, trockenen Tuch ab. (Falls Sie den NETBOOK PRO
so eingerichtet haben, dass er sich automatisch einschaltet,
wenn Sie auf den Bildschirm tippen, sollten Sie diese
Einstellung vor der Reinigung des Bildschirms deaktivieren.)
Warnung: Verwenden Sie niemals chemische
Lösungsmittel zur Reinigung des Bildschirms.
2.15.2 Pflege der Batterien
VORSICHT!
Es besteht Explosionsgefahr, wenn eine Batterie des
PC-Kartensteckplatz
Auswurftaste
Page 86

Lithium-Ionen-Batterien“ auf Seite 14 aufgeführten
Anweisungen. Lesen Sie alle in diesem Abschnitt
aufgeführten Sicherheitshinweise sorgfältig durch.
Um die Gefahr eines Feuers zu vermeiden, dürfen die
Sicherungsbatterien nicht durch wiederaufladbare Batterien
ersetzt werden.
Vorsichtsmaßnahmen bei Lithium-Ionen-Batterien
Lagern Sie Batterien nie bei Temperaturen über +60° C; die
maximale Lebensdauer einer Batterie wird bei einer optimalen
Lagertemperatur von +10° C bis +35° C erzielt.
Wichtig: Es ist äußerst wichtig, dass Sie sich diese
Sicherheitsinformationen ansehen und alle
Warnungen genau befolgen.
Warnungen:
UM ZU VERHINDERN, dass aus der Batterie Säure
entweicht, dass sie Hitze erzeugt oder explodiert, befolgen
Sie bitte die unten stehenden Vorsichtsmaßnahmen.
• Verwenden Sie nur das zugelassene Psion Teklogix-Netzteil.
• Um die Gefahr eines Feuers zu verringern, ersetzen Sie
die Sicherungsbatterien nicht durch wiederaufladbare
Batterien.
• Entsorgen Sie die Batterien nicht während eines Feuers.
• Verbrennen Sie die Batteriezellen nicht und setzen Sie sie
nicht Temperaturen über 100° C (212° F) aus. Durch eine
• Batterien dürfen nicht bei Temperaturen unter -30º C
(-22° F) aufgeladen, verwendet oder aufbewahrt werden.
Batterien müssen unter Einhaltung aller örtlichen,
regionalen und nationalen Gesetze und Vorschriften
gehandhabt werden.
• Die Batterie verfügt über eingebaute
Sicherheitsvorrichtungen. Um deren ordnungsgemäße
Funktion sicherzustellen, ist das Zerlegen der Batterie oder
Ändern von Teilen der Batterie nicht zulässig.
• Verursachen Sie keinen Kurzschluss der Batterie durch
den direkten Anschluss von Metallgegenständen wie
Drähten an die freiliegenden Klemmen. Transportieren
oder bewahren Sie die Batterie nicht zusammen mit
Metallgegenständen, wie Halsketten, Haarnadeln, usw.,
auf.
• Verwenden oder bewahren Sie die Batterie nicht in der
Nähe von Wärmequellen, wie z. B. einem Feuer oder
Heizgerät, auf.
• Tauchen Sie die Batterie nicht in Wasser ein.
• Verwenden Sie das speziell für die Batterie vorgesehene
Batterieladegerät zum Aufladen der Batterie.
• Batterien dürfen nicht zerdrückt, durchbohrt, geöffnet,
zerlegt oder anderweitig mechanisch gehandhabt werden.
• Nehmen Sie keine direkten Lötarbeiten an der Batterie
vor.
• Schließen Sie die Batterie nicht an eine Steckdose, einen
Auto-Zigarettenanzünder, usw., an.
Page 87

• Nehmen Sie die Batterie sofort aus dem Gerät oder
Batterieladegerät heraus, wenn sie einen Geruch abgibt,
Wärme erzeugt, sich verfärbt oder verformt oder bei der
Verwendung in irgendeiner Weise unnormal erscheint.
• Fahren Sie nicht mit dem Laden der Batterie fort, wenn
sie sich nicht innerhalb der angegebenen Ladezeit
auflädt.
• Die Batterie kann bersten oder sich entzünden, wenn sie
ein Leck hat. Halten Sie sie immer von offenen Flammen
fern.
• Falls eine Batterie ein Leck haben sollte, müssen Sie
darauf achten, dass ihr Inhalt nicht mit der Haut oder den
Augen in Berührung kommt. Sollte dies dennoch
geschehen, müssen Sie die Kontaktstellen sofort mit viel
kaltem Wasser spülen und einen Arzt zu Rate ziehen.
• Lagern Sie die Batterien nicht bei extrem hohen
Temperaturen (z. B. in einem Fahrzeug, starkem direkten
Sonnenlicht ausgesetzt, usw.). Das kann eine Überhitzung
oder Entzündung der Batterie verursachen, und es kann
auch die Leistung und Lebensdauer der Batterie
verringern.
• Verwenden Sie die Batterie nicht in Gebieten, in denen die
statische Elektrizität die vom Hersteller garantierten
Werte übersteigt.
• Halten Sie Batterien von Kindern fern.
2.15.3 Betriebs- und Lagertemperatur
Lagerung:
-10° C bis +60° C (14° F bis 140° F). Um die
Lebensdauer des NETBOOK PRO (und des
Batteriesatzes) zu verlängern, lagern Sie ihn bei
Temperaturen zwischen +10° C und +35° C (+50° F bis
+95° F).
Wichtig: Setzen Sie den NETBOOK PRO keinen
extremen Temperaturänderungen und
Änderungen in der Luftfeuchtigkeit aus, da
diese Schäden verursachen können.
Die Batterie des NETBOOK PRO sollte nur in
folgendem Temperaturbereich aufgeladen
werden: 0° C bis +40° C (32° F bis 104° F).
2.16 Zurücksetzen des NETBOOK PRO
Es ist möglich, dass der NETBOOK PRO von Zeit zu Zeit
zurückgesetzt werden muss, und zwar wenn:
• Sie ein Programm nicht normal beenden können;
• das Betriebssystem nicht mehr reagiert;
• Sie das Gerät nicht mit der Einschalttaste einschalten
können.
Der NETBOOK PRO verfügt über einen Knopf, mit dem er
zurückgesetzt und das Betriebssystem neu gestartet werden
kann. Gespeicherte Daten bleiben erhalten.
Um ein Soft-Reset durchzuführen, gehen Sie
folgendermaßen vor:
Page 88

Taste ein. Drücken Sie damit den Reset-Knopf des
NETBOOK PRO nach unten. Starten Sie den Computer dann
durch Drücken der ESC/EIN-Taste neu.
Außerdem können Sie ein Soft-Reset durchführen, indem Sie
die STRG-, ALT-, und ENTF-Tasten drei Sekunden lang
gedrückt halten. Der Computer wird automatisch neu
gestartet.
Abbildung 2.12 Position des Soft-Reset-Knopfs
Um ein Hard-Reset durchzuführen, gehen Sie
folgendermaßen vor:
Hinweis: Stellen Sie bei Durchführen eines Hard-Reset
sicher, dass die Sicherungsbatterien zuerst
herausgenommen und zuletzt wieder eingelegt
werden, um zu vermeiden, dass sie unnötigerweise
entladen werden.
Nehmen Sie alle Batterien heraus und trennen Sie den
Netzstrom ab.
Der NETBOOK PRO wird neu gestartet, sobald die
Stromversorgung mittels Hauptbatterien oder Netzstrom
wiederhergestellt wird.
Hinweis: Durch ein Hard-Reset des NETBOOK PRO wird
die ActiveSync-Partnerschaft des NETBOOK PRO
möglicherweise gelöscht. In diesem Fall können
Sie die Partnerschaft auf dem PC löschen und neu
erstellen, oder eine andere Partnerschaft mit
neuem Namen erstellen. Näheres zu diesem
Vorgang finden Sie in der Online-Hilfe von
ActiveSync.
Reset-Knopf
Page 89

3. Produktsupportleistungen
Psion Teklogix stellt seinen Kunden weltweit ein komplettes
Angebot an Produktsupportleistungen zur Verfügung. Diese
Leistungen umfassen den technischen Support und
Produktreparaturen.
3.1 Technischer Support
Der technische Support für den NETBOOK PRO erfolgt per
E-Mail über die Partnerprogramm-Website. Hierzu gehen Sie
zur Website www.psionteklogix.com und klicken auf den
Partnerprogramm-Link, wodurch die Partnerprogramm-Seite
angezeigt wird. Klicken Sie dann auf die Schaltfläche „Login“ (Anmelden) oder „Register“ (Registrieren), je nachdem,
ob Sie sich bereits bei TekNet oder dem Partnerprogramm
registriert haben. (Benutzername und Kennwort sind bei
TekNet und dem Partnerprogramm gleich.)
3.2 Produktreparaturen
International
Wenden Sie sich für Produktreparaturen an Ihre örtliche
Psion Teklogix-Niederlassung (siehe “Worldwide Offices”
auf Seite A-2).
Kanada/USA
Kunden in Kanada und den USA haben über die unten
Hinweis: Bei Anruf der gebührenfreien Telefonnummer
bitten wir Sie, Ihre Psion Teklogix-Kundennummer
oder Störfallnummer zur Hand zu haben.
Telefon: 1 800 387-8898 (Option „2“ drücken)
Fax: 1 905 812-6304
Page 90

Page 91

APPENDIX A
S
UPPORT SERVICES & WORLDWIDE OFFICES
Psion Teklogix provides a complete range of product support services to its customers worldwide. These services include technical support and product repairs.
A.1 Technical Support
Technical Support for Mobile Computing Products is provided via e-mail through the Psion Teklogix customer and partner
extranets. To reach the website, go to www.psionteklogix.com and click on the appropriate Teknet link on the home page. Then
click on the “Log-in” button or the “Register” button, depending on whether you have previously registered for Teknet. Once you
have logged in, search for the “Support Request Form”.
A.2 Product Repairs
International
For technical support outside of Canada or the U.S.A., please contact your local Psion Teklogix office listed on our worldwide
website:
http://www.psionteklogix.com
Click on the heading labelled “Contacts” to choose a Psion Teklogix technical support representative closest to you.
Canada/U.S.A
Canadian and U.S. customers can receive access to repair services, by calling the toll-free number below, or via our secure
website (see Technical Support, above).
Note: Customers calling the toll-free number should have their Psion Teklogix customer number or trouble ticket number
available.
Page 92

A.3 Worldwide Offices
COMPANY HEADQUARTERS AND CANADIAN SERVICE CENTRE
Psion Teklogix Inc.
2100 Meadowvale Blvd.
Mississauga, Ontario
Canada L5N 7J9
Tel: +1 905 813 9900
Fax: +1 905 812 6300
E-mail: salescdn@psion.com
NORTH AMERICAN HEADQUARTERS AND U.S. SERVICE CENTRE
Psion Teklogix Corp.
1810 Airport Exchange Boulevard
Suite 500
Erlanger, Kentucky
USA 41018
Tel: +1 859 371 6006
Fax: +1 859 371 6422
E-mail: salesusa@psion.com
INTERNATIONAL SUBSIDIARIES
(see also www.psionteklogix.com)
Psion Teklogix S.A.
La Duranne
135 Rue Rene Descartes
 Loading...