

Page 1

netBook
USER GUIDEUSER GUIDE
USER GUIDE
USER GUIDEUSER GUIDE
Page 2

© Copyright Psion PLC 1999.
All rights reserved. This manual and the programs referred to herein are
copyrighted works of Psion PLC, London, England. Reproduction in whole or in
part, including utilisation in machines capable of reproduction or retrieval,
without the express written permission of the copyright holders is prohibited.
Reverse engineering is also prohibited. The information in this document is
subject to change without notice. Psion and the Psion logo are registered
trademarks, and Psion netBook, Series 7, Series 5mx, Series 5, Series 3mx,
Series 3c, Series 3a, Series 3, Siena and PsiWin are trademarks of Psion
Computers PLC. Some names referred to are registered trademarks.
Copyright Symbian Ltd 1999.
All rights reserved. The EPOC machine contains the EPOC operating system
and software, and PsiWin 2 contains the EPOC CONNECT software that is the
copyrighted work of Symbian Ltd, London, England. EPOC and the EPOC logo
are registered trademarks of Symbian Ltd.
The IrDA Feature Trademark is owned by the Infrared Data Association and is
used under license therefrom.
Sun, Sun Microsystems, Java and Java-based marks are trademarks or registered
trademarks of Sun Microsystems, Inc. in the United States and other countries.
Psion Computers Plc is independent of Sun Microsystems, Inc.
Copyright Monotype Typography Ltd 1997.
All rights reserved. EPOC contains the fonts Arial, Times New Roman and
Courier New, products of Monotype Typography Ltd, Surrey, England.
Arial. Arial is a trademark of the Monotype Corporation registered in U.S.
Patent and Trademark Office and certain other jurisdictions.
Times New Roman. Times New Roman is a trademark of the Monotype
Corporation registered in U.S. Patent and Trademark Office and certain other
jurisdictions. Monotype. Monotype is a trademark of Monotype Typography
Limited registered in U.S. Patent and Trademark Office and certain other
jurisdictions.
© Lernout & Hauspie Speech Products N.V. 1995.
All rights reserved. International CorrectSpellEnglish spelling correction
system © 1995 by Lernout & Hauspie Speech Products N.V. All rights reserved.
Reproduction or disassembly of embodied algorithms or database prohibited.
UK English Concise International Electronic Thesaurus Copyright © 1995 by
Lernout & Hauspie Speech Products N.V. All rights reserved. Reproduction or
disassembly of embodied programs and databases prohibited.
Part of the software in this product is © Copyright ANT Ltd. 1998. All rights
reserved.
Incorporates MPPC compression from Hi/fn.
Stac , LZS , 1996, Stac, Inc., 1994-1996 Microsoft Corporation. Includes
one or more U.S. Patents: No. 4701745, 5016009, 5126739, 5146221, and
5414425. Other patents pending.
Incorporates LZS compression from Hi/fn. Hi/fn , LZS ,1988-98, Hi/fn.
Includes one or more U.S. Patents: No. 4701745, 5016009, 5126739, 5146221,
and 5414425. Other patents pending. All notices of Hi/fn’s patents shall be
made in accordance with 35 U.S.C Sec. 287(a).
Version 1.0, September 1999
English
Page 3

FCC Information for the USA
RR
adio and Tadio and T
R
adio and T
RR
adio and Tadio and T
This equipment radiates radio frequency energy and if not used properly
- that is, in strict accordance with the instructions in this manual - may
cause interference to radio communications and television reception.
It has been tested and found to comply with the limits for a Class B
digital device pursuant to part 15 of the FCC Rules. These are designed
to provide reasonable protection against harmful interference in a
residential installation. However, there is no guarantee that interference
will not occur in a particular installation. If this equipment does cause
harmful interference to radio or television reception, which can be
determined by turning the equipment off and on, the user is encouraged
to try to correct the interference by one or more of the following
measures:
• Reorient or relocate the receiving antenna.
• Increase the separation distance between the equipment and the
• If you are using the equipment with a mains adaptor, plug it into an
• Consult an experienced radio/TV technician for help.
elevision Interferenceelevision Interference
elevision Interference
elevision Interferenceelevision Interference
receiver.
outlet which is on a different circuit from that to which the
receiver is connected.
ImportantImportant
Important
ImportantImportant
This equipment was tested for FCC compliance under conditions that
included the use of shielded cables and connectors between it and the
peripherals. It is important that you use shielded cable and connectors to
reduce the possibility of causing radio and television interference.
Shielded cables, suitable for the netBook, can be obtained from an
authorised Psion dealer.
If the user modifies the equipment or its peripherals in any way, and
these modifications are not approved by Psion, the FCC may withdraw
the user’s right to operate the equipment.
In the USAIn the USA
In the USA
In the USAIn the USA
For customers in the USA, the following booklet prepared by the
Federal Communications Commission may be of help: “How to Identify
and Resolve Radio-TV Interference Problems”. This booklet is available
from the US Government Printing Office, Washington,
DC 20402 - Stock No 004-000-00345-4.
Emissions information for CanadaEmissions information for Canada
Emissions information for Canada
Emissions information for CanadaEmissions information for Canada
This Class B digital apparatus meets all requirements of the Canadian
Interference-Causing Equipment Regulations.
Cet appareil numérique de la classe B respecte toutes les exigences du
Règlement sur le matériel brouilleur du Canada.
Page 4

FCC Declaration of Conformity
Infrared device safety
Product: netBook
Models: 32M/64M
This device complies with part 15 of the FCC rules. Operation is
subject to the following two conditions:
1. This device may not cause harmful interference.
2. This device must accept any interference received, including
interference that may cause undesired operation.
The Product is for home or office use.
Responsible party:
Psion Inc.
150 Baker Avenue,
Concord,
MA 01742, USA.
Tel: +1 978 371 0310
Fax: +1 978 371 9611
CLASS 1 LED PRODUCT
This product includes an Infrared device for transmitting and receiving
files from devices supporting the IrDA format. Although this invisible
beam is not considered harmful, and complies with EN60825-1
(IEC825-1), we recommend the following precautions when the
Infrared device is transmitting:
• do not stare into the Infrared beam
• do not view directly with optical instruments
No parts in the device may be serviced by the user.
CE marking
When used in a residential, commercial or light industrial environment
the product and its approved UK and European peripherals fulfil all
requirements for CE marking.
Page 5

CONTENTSCONTENTS
CONTENTS
CONTENTSCONTENTS
Getting startedGetting started
Getting started
Getting startedGetting started
About the netBook.................................................................. 1
Where things are ..................................................................... 2
About PsiWin 2........................................................................ 5
Using this manual .................................................................... 5
Switching on ............................................................................ 6
Turning on & off ....................................................................... 6
The screen ............................................................................... 7
Finding & using the pen ........................................................... 7
First steps ................................................................................ 7
Things to do first! ..................................................................15
Things to do next! ................................................................. 18
Files, folders & programsFiles, folders & programs
Files, folders & programs
Files, folders & programsFiles, folders & programs
Moving around ...................................................................... 21
Opening files, folders & programs ........................................ 23
Closing programs/files ........................................................... 23
Creating new folders ............................................................. 24
Creating new files.................................................................. 25
Browsing folders ................................................................... 27
Finding files and folders......................................................... 28
Using passwords.................................................................... 29
Changing file attributes ......................................................... 29
Managing folders ................................................................... 30
Checking memory use .......................................................... 31
Additional disks & programs .................................................32
................................................................................................................
........................................................
................................................................................................................
............................................................................
......................................
............................................................................
2121
21
2121
11
1
11
WW
ordord
............................................................................................................................................
W
ord
......................................................................
WW
ordord
............................................................................................................................................
Entering text .......................................................................... 33
Finding & replacing text ........................................................ 34
Changing the appearance of text .......................................... 34
Formatting paragraphs .......................................................... 35
Using styles ............................................................................ 37
Document outlines ................................................................ 38
Information from other programs ........................................40
Spell checking ........................................................................ 41
Creating a new file ................................................................ 41
File templates ........................................................................ 41
Saving Word files ................................................................... 43
How the page looks .............................................................. 43
Printing .................................................................................. 44
SheetSheet
..........................................................................................................................................
Sheet
.....................................................................
SheetSheet
..........................................................................................................................................
Moving around ...................................................................... 46
Entering information ............................................................. 46
Performing calculations ......................................................... 47
Using ranges .......................................................................... 49
Changing how information is displayed ................................ 50
Sorting information ............................................................... 50
Changing the number format ............................................... 51
Graphs ................................................................................... 52
Printing from Sheet ............................................................... 54
3333
33
3333
4545
45
4545
Contents
Page 6

Contents
ContactsContacts
Contacts
ContactsContacts
Adding a contact .................................................................... 55
Looking at your contacts....................................................... 55
Editing & deleting contacts.................................................... 57
Contact labels ........................................................................ 57
Exchanging contacts .............................................................. 59
Printing contacts.................................................................... 59
AgendaAgenda
Agenda
AgendaAgenda
Moving around ...................................................................... 62
Adding appointments & events ............................................. 62
Viewing entries ...................................................................... 64
Entry symbols ........................................................................65
Birthdays and anniversaries ................................................... 65
Reminders for entries - alarms ............................................. 65
Finding entries and dates ...................................................... 67
Changing and deleting entries............................................... 68
Repeating entries................................................................... 69
Lists and things to do ............................................................ 69
Information from other programs ........................................72
Customising Agenda .............................................................. 74
Agenda files............................................................................ 74
Printing Agenda entries ......................................................... 75
Synchronising with a PC Scheduler ...................................... 76
..................................................................................................................................
.................................................................
..................................................................................................................................
....................................................................................................................................
..................................................................
....................................................................................................................................
5555
55
5555
6161
61
6161
Setting up WSetting up W
Setting up W
Setting up WSetting up W
Where to find out more........................................................ 77
Before you start… ................................................................ 77
Setting up your netBook ....................................................... 79
Setting up Email on your netBook ........................................ 83
WW
ebeb
..............................................................................................................................................
W
eb
.......................................................................
WW
ebeb
..............................................................................................................................................
Read this first ......................................................................... 92
Navigating the Web ...............................................................92
Saving pages ........................................................................... 94
Customising ...........................................................................95
Using bookmarks .................................................................. 96
Using forms ........................................................................... 97
Loading images ...................................................................... 98
Downloading files .................................................................. 99
Cache & memory usage ...................................................... 100
Using proxy servers ............................................................ 100
Customising the display ...................................................... 101
Keypresses ........................................................................... 101
Status information ............................................................... 102
Fonts .................................................................................... 103
Sending mail from a Web page ........................................... 104
Finding text on a Web page ................................................ 104
Plain text authentication ..................................................... 105
Cookies ................................................................................ 105
Viewing HTML source ........................................................ 106
Using plug-ins ...................................................................... 106
eb and Emaileb and Email
eb and Email
eb and Emaileb and Email
..........................................................................
.....................................
..........................................................................
7777
77
7777
9292
92
9292
Page 7

EmailEmail
......................................................................................................................................
Email
...................................................................
EmailEmail
......................................................................................................................................
Read this first ....................................................................... 107
Managing emails .................................................................. 107
Local folders ........................................................................ 108
Writing an email .................................................................. 109
Sending email ....................................................................... 111
Receiving email .................................................................... 112
Viewing an email.................................................................. 113
Replying to & forwarding emails ......................................... 113
Attaching files to messages ................................................. 115
Disconnecting ...................................................................... 116
CalcCalc
............................................................................................................................................
Calc
......................................................................
CalcCalc
............................................................................................................................................
General calculations ............................................................ 118
Scientific calculations ........................................................... 119
Displaying numbers .............................................................124
JotterJotter
......................................................................................................................................
Jotter
...................................................................
JotterJotter
......................................................................................................................................
Adding a note ...................................................................... 125
Formatting the text .............................................................126
Inserting other information ................................................. 127
Finding a note ......................................................................128
Deleting entries ................................................................... 128
Customising Jotter............................................................... 129
Jotter files ............................................................................ 130
Printing Jotter entries .......................................................... 130
107107
107
107107
117117
117
117117
125125
125
125125
TT
imeime
..........................................................................................................................................
T
ime
.....................................................................
TT
imeime
..........................................................................................................................................
Using alarms ........................................................................ 131
Using the map ..................................................................... 136
Customising Time ............................................................... 138
Setting summer time ...........................................................139
DataData
........................................................................................................................................
Data
....................................................................
DataData
........................................................................................................................................
Adding an entry ................................................................... 142
Looking at entries................................................................ 143
Sorting entries ..................................................................... 144
Customising Data ................................................................144
Finding an entry ................................................................... 144
Changing or deleting entries ............................................... 144
Customising the database ................................................... 145
Printing Data entries ........................................................... 146
SkSk
etchetch
....................................................................................................................................
Sk
etch
..................................................................
SkSk
etchetch
....................................................................................................................................
Drawing sketches ................................................................ 148
Changing a sketch ............................................................... 149
Adding text .......................................................................... 150
Inserting “clipart” ................................................................ 151
Printing sketches ................................................................. 151
Sketch files ........................................................................... 152
131131
131
131131
141141
141
141141
147147
147
147147
Contents
Page 8

SpellSpell
........................................................................................................................................
Spell
....................................................................
SpellSpell
........................................................................................................................................
Spell-checking and correction............................................. 153
Using the thesaurus ............................................................. 154
Solving anagrams ................................................................. 154
Finding missing letters - Xword.......................................... 155
Adding words to Spell ......................................................... 156
RR
ecordecord
R
RR
Recording a sound ............................................................... 157
Playing sounds ..................................................................... 158
BombsBombs
Bombs
BombsBombs
PP
P
PP
Creating & running OPL programs..................................... 163
PP
P
PP
Installing PsiWin................................................................... 165
Where can I find PsiWin? .................................................... 165
Getting help ......................................................................... 166
Getting connected ............................................................... 167
Working with your files ....................................................... 169
Backing up your netBook .................................................... 171
Synchronizing your netBook ............................................... 172
..................................................................................................................................
ecord
.................................................................
ecordecord
..................................................................................................................................
- the netBook game- the netBook game
- the netBook game
- the netBook game- the netBook game
rogrammingrogramming
rogramming
rogrammingrogramming
siWinsiWin
siWin
siWinsiWin
............................................................................................................
......................................................
............................................................................................................
..................................................................................................................................
.................................................................
..................................................................................................................................
....................................................................
..................................
....................................................................
153153
153
153153
157157
157
157157
161161
161
161161
163163
163
163163
165165
165
165165
Contents
PP
rintingrinting
P
rinting
PP
rintingrinting
Setting up the printer .......................................................... 173
Selecting the printer model................................................. 176
Page setup ........................................................................... 176
Previewing a document....................................................... 177
Printing a document ............................................................178
InfraredInfrared
Infrared
InfraredInfrared
Selecting data to transfer .................................................... 180
Transferring the information ............................................... 180
DiallingDialling
Dialling
DiallingDialling
Setting up ............................................................................. 184
Entering phone numbers .................................................... 184
Dialling phone numbers ...................................................... 185
Customising your netBookCustomising your netBook
Customising your netBook
Customising your netBookCustomising your netBook
Creating your own wallpaper .............................................187
Recording your own alarms ................................................ 187
Customising the System screen .......................................... 187
Expanding your netBookExpanding your netBook
Expanding your netBook
Expanding your netBookExpanding your netBook
CF Card ...............................................................................189
PC Card ............................................................................... 190
RAM cards ........................................................................... 191
Docking Station ................................................................... 192
..............................................................................................................................
...............................................................
..............................................................................................................................
..............................................................................................................................
...............................................................
..............................................................................................................................
......................................................................
...................................
......................................................................
..........................................................................
.....................................
..........................................................................
173173
173
173173
179179
179
179179
183183
183
183183
187187
187
187187
189189
189
189189
Page 9

Care & safetyCare & safety
Care & safety
Care & safetyCare & safety
Powering the netBook ........................................................194
Changing the batteries ........................................................ 195
Battery safety....................................................................... 196
Prolonging battery life ......................................................... 196
..............................................................................................................
.......................................................
..............................................................................................................
193193
193
193193
Security & backupsSecurity & backups
Security & backups
Security & backupsSecurity & backups
TT
roubleshootingroubleshooting
T
roubleshooting
TT
roubleshootingroubleshooting
AppendicesAppendices
Appendices
AppendicesAppendices
Character set ....................................................................... 203
Specification ......................................................................... 205
IndeInde
xx
......................................................................................................................................
Inde
x
...................................................................
IndeInde
xx
......................................................................................................................................
..............................................................................................
...............................................
..............................................................................................
......................................................................................................
...................................................
......................................................................................................
....................................................................................................................
..........................................................
....................................................................................................................
197197
197
197197
199199
199
199199
203203
203
203203
207207
207
207207
Contents
Page 10

Getting started 1
GETTING STGETTING ST
GETTING ST
GETTING STGETTING ST
This manual contains information about the netBook and the PC
connectivity software PsiWin 2.
About the netBookAbout the netBook
About the netBook
About the netBookAbout the netBook
The programs on the netBook include:
• Word, a word processor for writing letters and other
documents.
• Sheet, for spreadsheets, tables, and graphs.
• Contacts, an address book.
• Agenda, a diary program for appointments and lists of
things to do.
• Email, for sending and receiving email, SMS and fax
messages.
• Web, for browsing the World Wide Web.
• Calc, a calculator with general and scientific features.
• Jotter, a notebook for jotting down ideas quickly.
• System, the netBook’s control centre. You can tap the
System icon at any time to move to the System screen.
ARTEDARTED
ARTED
ARTEDARTED
• Time, for alarms and a world map with international times
and dialling codes.
• Data, a customisable database program.
• Sketch, for drawing pictures.
• Bombs, a game of logical thinking.
• Record, for recording and editing voice memos and sounds.
• Program, the editor in which you can create programs
using the built-in programming language.
• Spell, for checking spelling, thesaurus, solving anagrams and
crossword clues.
••
• Comms, for terminal emulation and file transfer.
••
Page 11
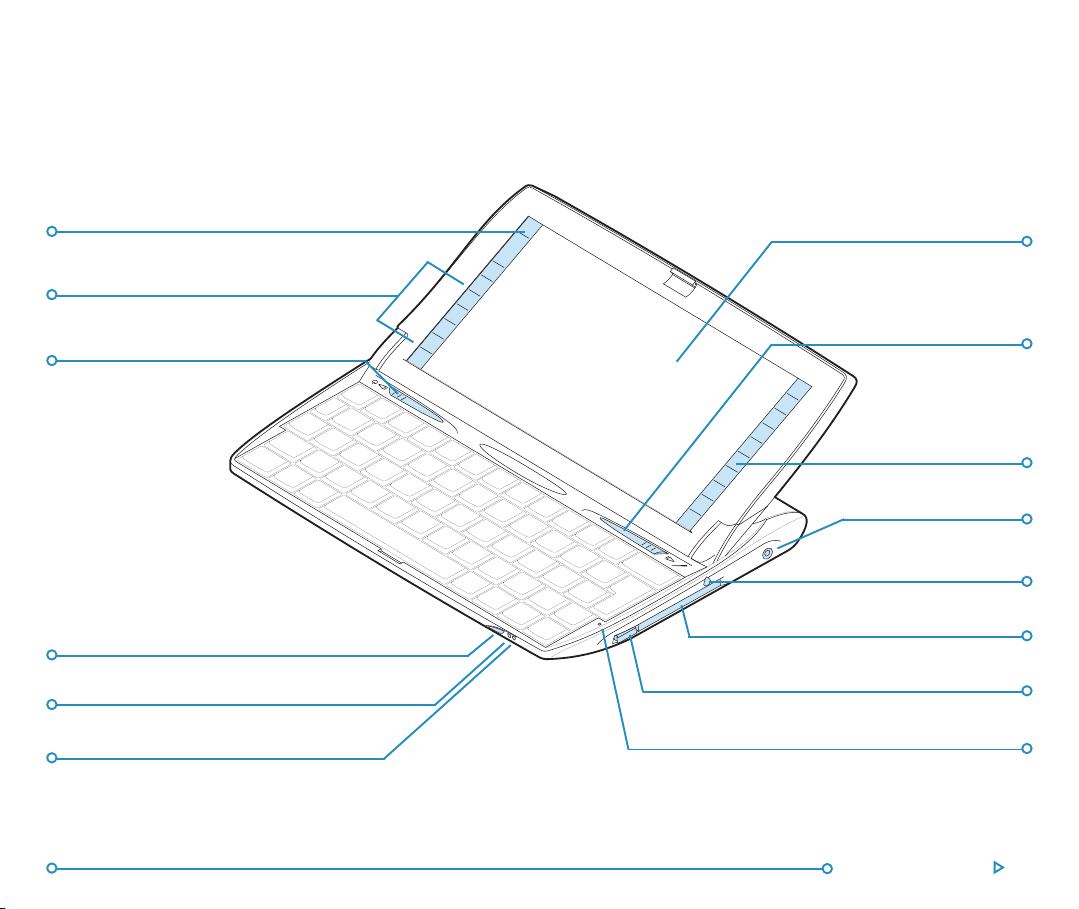
Command iconsCommand icons
Command icons
Command iconsCommand icons
Additional application iconsAdditional application icons
Additional application icons
Additional application iconsAdditional application icons
On/Off switchOn/Off switch
On/Off switch
On/Off switchOn/Off switch
Where things areWhere things are
Where things are
Where things areWhere things are
TT
ouch-ouch-
sensitive screensensitive screen
T
ouch-
sensitive screen
TT
ouch-ouch-
sensitive screensensitive screen
PP
P
PP
en eject buttonen eject button
en eject button
en eject buttonen eject button
PP
rogram iconsrogram icons
P
rogram icons
PP
rogram iconsrogram icons
Notify buttonNotify button
Notify button
Notify buttonNotify button
Notify indicatorNotify indicator
Notify indicator
Notify indicatorNotify indicator
Charge indicatorCharge indicator
Charge indicator
Charge indicatorCharge indicator
DC power sockDC power sock
DC power sock
DC power sockDC power sock
PC card slotPC card slot
PC card slot
PC card slotPC card slot
PC card eject buttonPC card eject button
PC card eject button
PC card eject buttonPC card eject button
MicrophoneMicrophone
Microphone
MicrophoneMicrophone
etet
et
etet
PP
enen
P
en
PP
enen
Getting started 2
Page 12
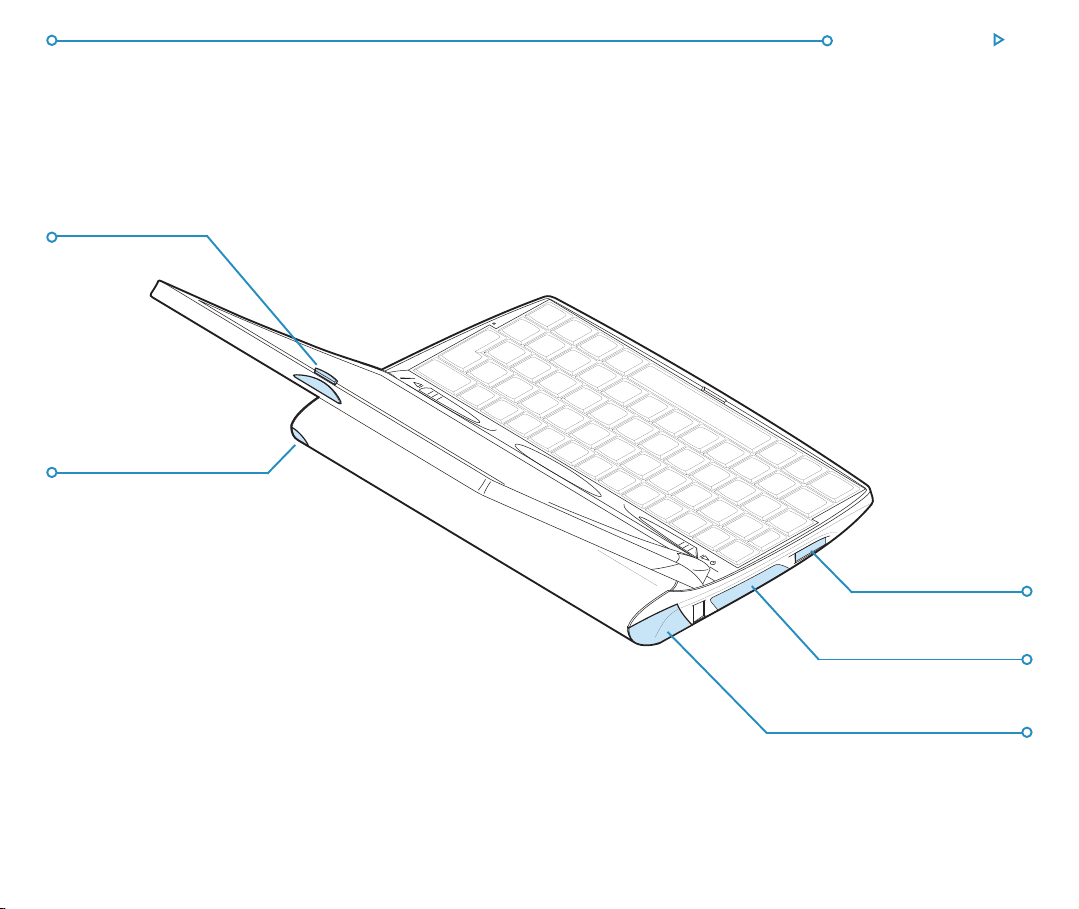
CatchCatch
Catch
CatchCatch
IR windowIR window
IR window
IR windowIR window
Getting started 3
RS232 serial portRS232 serial port
RS232 serial port
RS232 serial portRS232 serial port
CF Card trayCF Card tray
CF Card tray
CF Card trayCF Card tray
BatteryBattery
Battery
BatteryBattery
Page 13

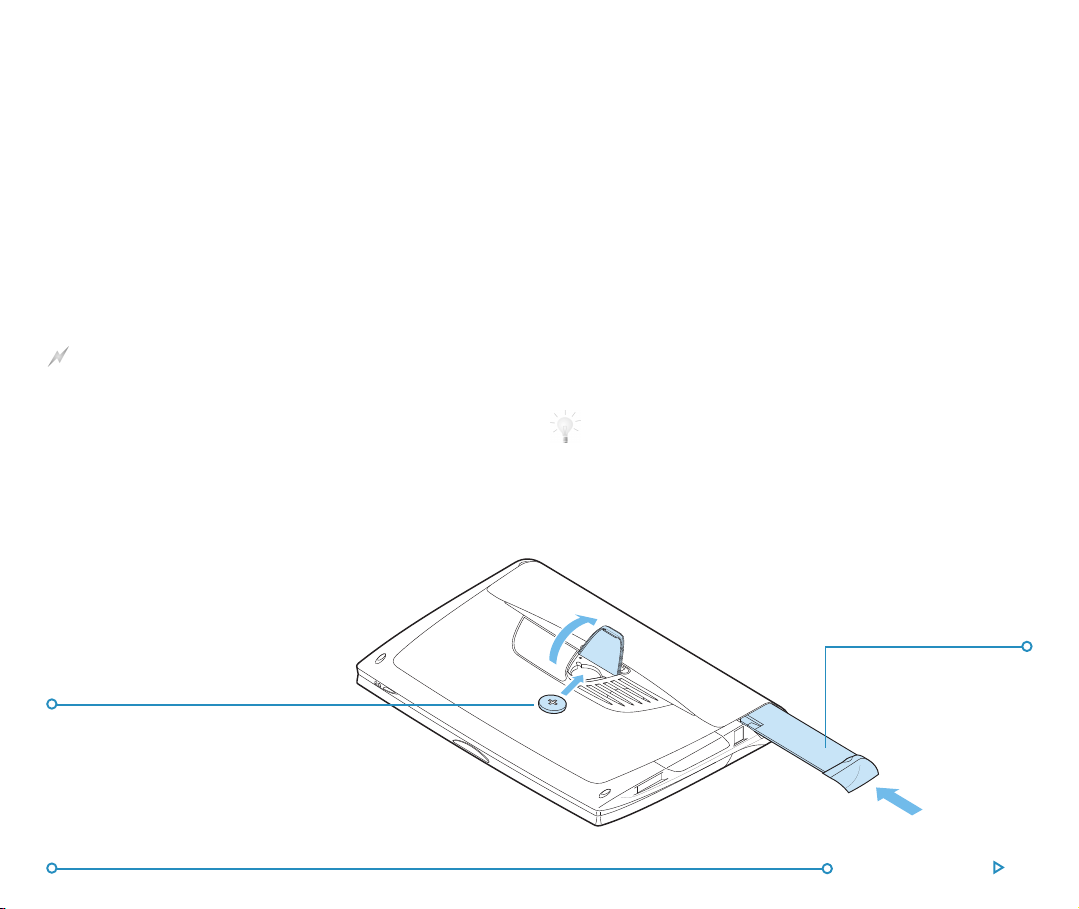
RR
eset buttoneset button
R
eset button
RR
eset buttoneset button
Lithium backup battery doorLithium backup battery door
Lithium backup battery door
Lithium backup battery doorLithium backup battery door
Docking connectorDocking connector
Docking connector
Docking connectorDocking connector
LoudspeakLoudspeak
Loudspeak
LoudspeakLoudspeak
erer
er
erer
Getting started 4
Page 14

Getting started 5
About PAbout P
About P
About PAbout P
You can use the PC connectivity software PsiWin 2 to integrate
the netBook with PCs running Windows 95/98 or NT 4.0. By
connecting the netBook to a PC with a Docking cable and
running PsiWin, you can:
• View your netBook files from Windows Explorer by using
• Upgrade from an earlier model of Psion handheld
• Drag and drop files between the netBook and the PC in
• Synchronize Agenda files and your address book on
• Back up your netBook files to the PC, then restore them
• Print files on your netBook to a printer connected directly
siWin 2siWin 2
siWin 2
siWin 2siWin 2
the ‘My Psion’ icon which is added to the PC’s Desktop.
The ‘My Psion’ icon gives you access to all of PsiWin’s
powerful file management facilities for your netBook files.
computer to a netBook as a one-stop process. All your
files will be copied from your old Psion (Series 3/3a/3c/3mx
or Siena), converted to the netBook file formats on the PC,
then copied to your netBook.
the same way that you would between PC drives, and they
will be automatically converted to the appropriate file
format at the same time.
the netBook with PC agendas (applications) and contact
managers to keep them in step with each other.
from the PC to the netBook again should you ever need to.
to your PC, or available to your PC via a network.
Using this manualUsing this manual
Using this manual
Using this manualUsing this manual
This manual gives an overview of all the netBook functions and
features to give you an idea of what you can do; for more
detailed information than is given here, refer to the netBook and
PsiWin on-line help.
• Read the first part of this chapter to find out how to get the
netBook ready for use: fit the batteries, switch on, adjust
the screen, find and practice with the pen and start using
the software.
• Read ‘Things to do first!’ to find out the essential things to
do when you first get your netBook - this covers setting the
time and date, setting your “home city” (so that the time
differences from your home are calculated correctly) and
setting owner information and a machine password.
• Move on to ‘ Things to do next!’ for a list of the programs
and a brief overview of what else you may want to do when
you first use your netBook - instructions for using PsiWin to
connect to your PC and perform backups and more ideas
for customising your netBook.
• Read the ‘Files, folders and programs’ chapter for more
information about how to enter and manage the information
on your netBook.
• Refer to the ‘Troubleshooting’ chapter if you have any
problems using the netBook.
Page 15
Switching onSwitching on
Switching on
Switching onSwitching on
FF
itting the batteriesitting the batteries
F
itting the batteries
FF
itting the batteriesitting the batteries
Before you can use the netBook you must fit both batteries, as
shown below.
The netBook is powered by:
• a powerful Lithium Ion rechargeable battery pack.
• a Lithium CR2032 backup battery (supplied). This preserves
your information should you need to change the main
battery.
Take care when replacing batteries!
You will lose information if you remove both batteries at the same
time, or allow both batteries to become completely run down. The
netBook will warn you when its batteries are getting low, in plenty
of time to change/charge them. See the ‘Care & safety ’ chapter for
more about battery safety, and details of how to change the
batteries.
You can also power the netBook from the mains. You should
ONLY use Psion approved mains adaptors. Contact your Psion
distributor or local Psion retailer for more information.
PP
rise open backup batteryrise open backup battery
P
rise open backup battery
PP
rise open backup batteryrise open backup battery
door and fit backup batterydoor and fit backup battery
door and fit backup battery
door and fit backup batterydoor and fit backup battery
ee
xactly as shownxactly as shown
e
xactly as shown
ee
xactly as shownxactly as shown
TT
urning on & offurning on & off
T
urning on & off
TT
urning on & offurning on & off
• To switch on: slide the on/off switch to the left or press the
Esc key. When you first do this, you’ll see the System
screen.
Note: The netBook will automatically switch on when an alarm
rings.
• To switch off: slide the on/off switch to the left or hold
down the Fn key and press the Esc key.You can switch off
at any time. You do not have to save your information first,
as it is automatically saved for you.
Note: If you do not press a key, the netBook will automatically
switch off after 3 minutes to save battery power. Switch it on
again, and you can continue from where you left off.
Can I switch on the netBook by tapping the screen?
Yes. You can set up your netBook to switch on when you tap the
touch-sensitive screen. To do this, open the Switch on/off icon
from the Control Panel in the System screen.
Slide main battery intoSlide main battery into
Slide main battery into
Slide main battery intoSlide main battery into
housing until doorhousing until door
housing until door
housing until doorhousing until door
clicks into placeclicks into place
clicks into place
clicks into placeclicks into place
Getting started 6
Page 16
Getting started 7
The screenThe screen
The screen
The screenThe screen
Adjust the screen contrast by holding down the Fn key and
pressing the ‘,’ (
Change the size of the text on the screen using the Zoom in and
Zoom out commands.
Adjust the screen brightness by holding down the Fn key and
pressing the Spacebar. Each press of the Spacebar increases
brightness by one ‘step’.
Important: Note that battery life is considerably reduced when
the brightness is increased.
Finding & using the penFinding & using the pen
Finding & using the pen
Finding & using the penFinding & using the pen
The pen is located in a holder at the right, just behind the
keyboard. To remove it, slide the pen eject button to the right.
To replace it, push it back in and it will click into place.
Tap lightly on the screen using the pen. It’s OK to use your
fingers to tap on the screen, though it is best to use the pen to
avoid fingerprints or smudges on the screen. Do not tap the
screen with any object that has a sharp tip or you may damage
the screen. Don’t use any type of ink pen, as the ink may be
impossible to remove. See the ‘Care & safety’ chapter for
instructions on how to clean the screen.
You can usually tap on an item with the pen to select or change
it. For example, you can tap on:
• the program icons, to open a program.
• the command icons, for “shortcuts” to System functions,
e.g. the menu bar, cutting and pasting, Infrared, zooming in
and out.
Note: If the screen doesn’t respond to your taps, you may need
to re-calibrate it. You can do this by opening the Screen icon
from the Control panel.
)or‘.’( ) key.
Most of the things you can do with the pen have an equivalent
keyboard combination, so you can use the pen, the keyboard, or
a combination of both methods.
First stepsFirst steps
First steps
First stepsFirst steps
When you first switch on the netBook, you will see the System
screen. This is the “desktop” where you can view your files and
folders, and change settings that control how the netBook
works.
• All the information you enter into the netBook is contained
in files; their names are displayed in the System screen,
beside icons that represent the programs that created them.
• All your files are stored in folders. When you start using the
netBook, the contents of the ‘Documents’ folder is
displayed.
• The System screen’s “Title bar” shows you which folder is
currently displayed on the screen. When you start you are in
the ‘Documents’ folder on the “C (Internal) drive”.
You can have as many folders as you wish, and create folders
within other folders. Folders can contain files created in a variety
of programs; they are not restricted to files from a single
program. See ‘Files, folders & programs’ for details of managing
files and folders.
Navigating between files & foldersNavigating between files & folders
Navigating between files & folders
Navigating between files & foldersNavigating between files & folders
• Tap on a folder icon to move to that folder, tap on the Close
folder icon to close it and move back up a level.
• Tap on a file to select it, tap again to open it. If the filename
is displayed in bold, the file is open, and tapping it will move
straight to the file.
See ‘Files, folders & programs’ for more information about
manipulating files and folders.
Page 17
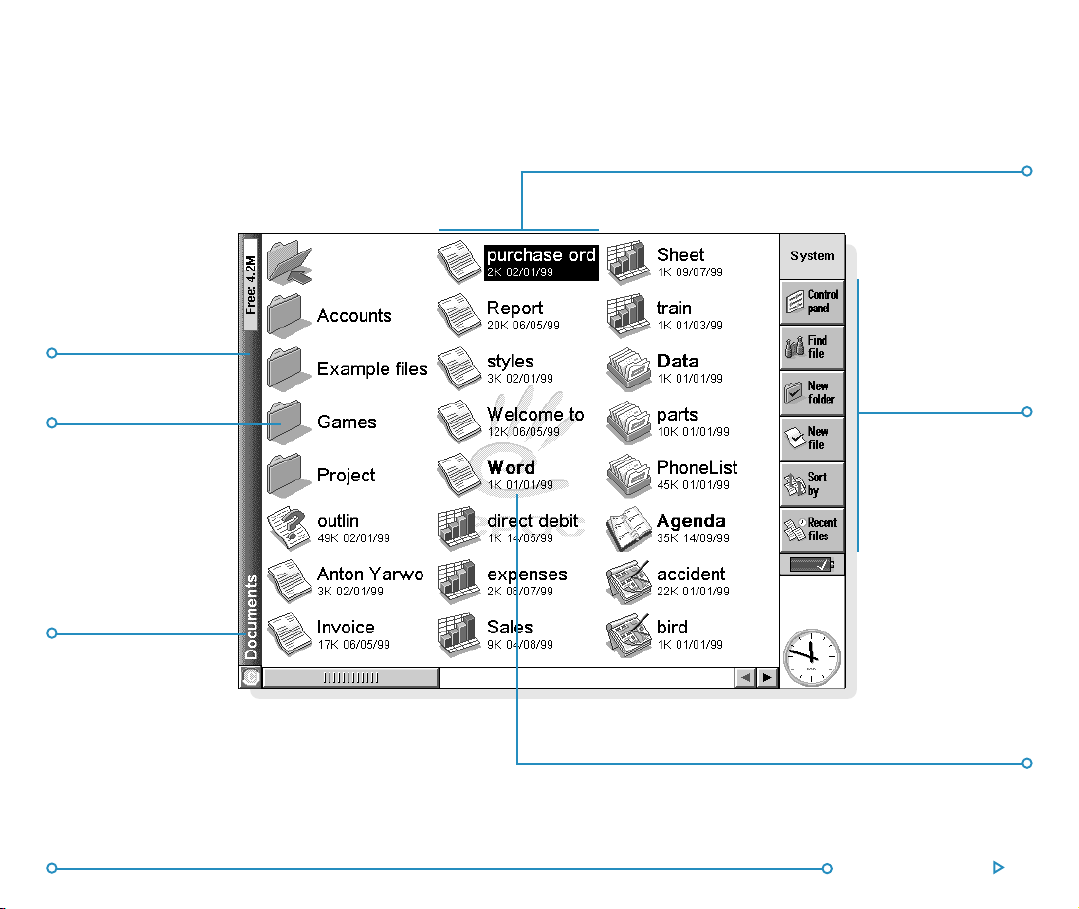
TT
itle baritle bar
T
itle bar
TT
itle baritle bar
FolderFolder
Folder
FolderFolder
Current folderCurrent folder
Current folder
Current folderCurrent folder
Icon & filenameIcon & filename
Icon & filename
Icon & filenameIcon & filename
TT
oolbaroolbar
T
oolbar
TT
oolbaroolbar
Open file (bold)Open file (bold)
Open file (bold)
Open file (bold)Open file (bold)
Getting started 8
Page 18

Getting started 9
Starting programsStarting programs
Starting programs
Starting programsStarting programs
When you open or move to a file, the correct program for this
file is started automatically.You can also start programs by
tapping on the appropriate “program icon” (the icon in the row
of pictures at the side of the screen).
• Tap the System icon
screen.
• Tap on Extras
contains more program icons.
You don’t have to close one program before opening another,
just tap on another program icon, and that program will open
too.
You can see what files and programs are open from the System
screen by using the List open files command from the File
menu, or by tapping on the name in the top right corner of the
screen.
at any time to move to the System
to display the “Extras bar”, which
PP
rograms & filesrograms & files
P
rograms & files
PP
rograms & filesrograms & files
When you run a program, it will usually display the currently
open file, or the file that you last looked at. If you want to write a
new letter, draw a new picture, create a new database and so
on, you’ll need to create a new file for the particular program
involved.
• To create a new file: select the command on the File
menu. The file will now be created, and the current file will
be closed and saved at the same time. You can start entering
your information.
• You can also use this command in the System screen to
create a new file. Usually, this creates a file using the
standard settings; creating a file from within a program
creates a file which already has any settings or preferences
you have set up in the program.
• It is a good idea to keep related files together in a folder,to
make the files easier to find later. See ‘Files, folders &
programs’ for details of how to manage your files and
folders.
See the ‘Which program to use?’ section for more about using
the programs.
Page 19

Entering informationEntering information
Entering information
Entering informationEntering information
You can enter information and complete tasks using the pen or
the keyboard. You can usually select a menu command to
perform each task.
• Press the Menu key or tap on the
the available commands on the “Menu bar”.
• Tap on the menu names and commands, or use the arrow
keys to move around the menus. Tap on commands marked
with a
commands.
Note: You can press the shortcut key combinations shown next
to the commands as a quick way of selecting them, e.g. Ctrl+M,
means hold down the Ctrl key and press the M key at the same
time.
• A menu command with three dots at the end means that
selecting the command will display a “dialog” where you
enter more information.
• If a menu command is grey, it means that it’s not currently
available; e.g. you cannot “Copy” unless you have first
selected something to copy.
• To toggle Caps Lock mode, so that characters appear in
uppercase, press Fn + Tab.
• To toggle Num Lock mode, so that you can use the
embedded orange numeric keys, press Shift + Menu.
or press the right arrow key to see further
command icon to see
Using dialogsUsing dialogs
Using dialogs
Using dialogsUsing dialogs
A “dialog” appears when you need to make selections and enter
further information. You can move between dialog items by
tapping on them, or using the up and down arrow keys. Dialogs
contain one or more of the following elements:
Text box: where you just type in your information.
List box: where you select from a number of options. You will
see left and right arrows around the current selection; you can
change the selection by tapping on the arrows, by pressing the
left and right arrow keys, or by typing the first letter of the
option you want. You can usually tap in the box or press the Tab
key to see a list of the available options.
Check box: where you make a choice between selecting an
option or not selecting it. Just tap on the check box, or press the
left and right arrow keys to add or remove a tick.
Radio buttons: where you make one choice from a number of
options. Just tap on an option, or use the left and right arrow
keys to make a selection.
• If a dialog line is grey, it is currently not available, usually
because you have to select something else first. For
example, if you have not ticked the box to set an alarm for
an Agenda entry, the lines to set the alarm time and date are
grey. Some dialog lines only appear when another option has
been chosen.
Some dialogs comprise a number of “pages”, each page has a
“tab” at the top. Tap on the tab or move the highlight to the tab
name, to go to that page. You can also move a dialog around the
screen by holding the pen on the dialog title bar and dragging it
across the screen.
Getting started 10
Page 20
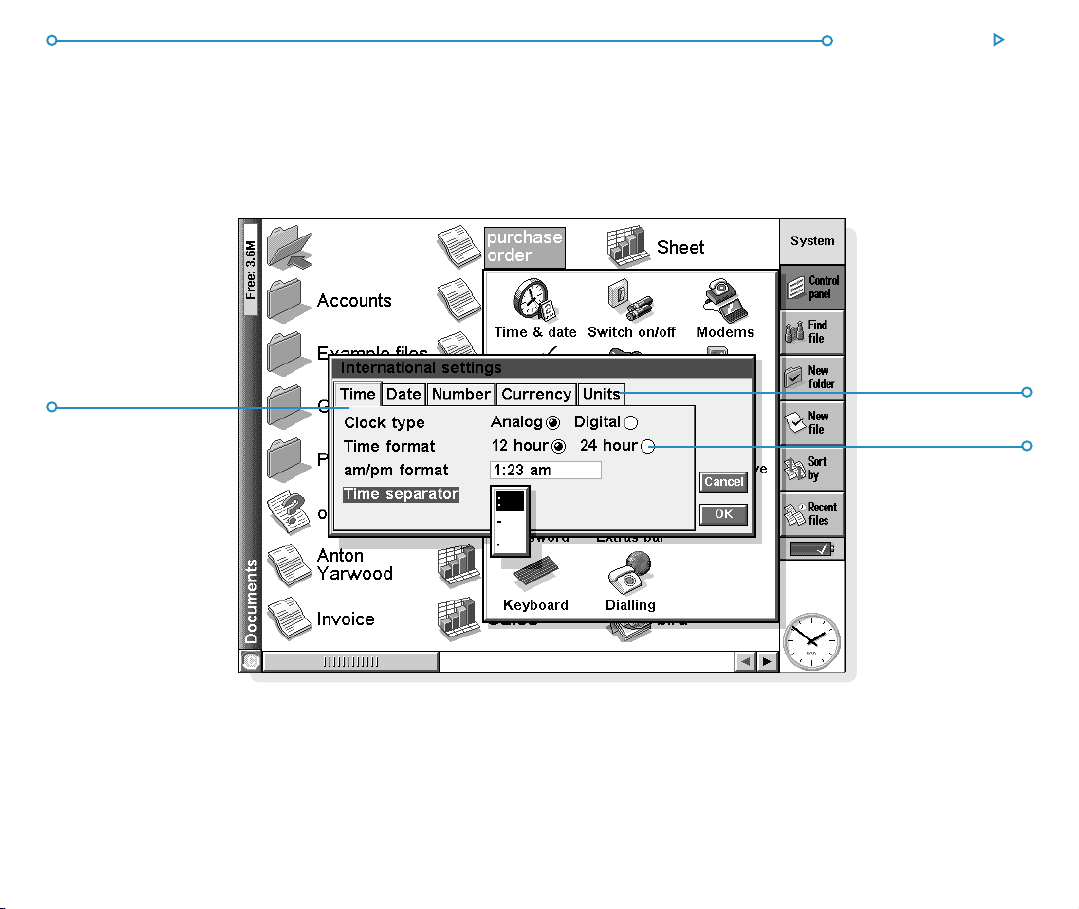
Dialog pageDialog page
Dialog page
Dialog pageDialog page
Getting started 11
TT
abs for otherabs for other
T
abs for other
TT
abs for otherabs for other
dialog pagesdialog pages
dialog pages
dialog pagesdialog pages
Radio buttonRadio button
Radio button
Radio buttonRadio button
Page 21

How do I display a calendar?
In most dialogs in which you can type a date, move to the date line
then tap again or press Tab to display a calendar.
Today’s date is circled, and the date currently displayed in the
dialog is highlighted. To select another date, move to the date you
want and press Enter. Use the buttons on the top line, or further
presses of the Tab key, to display a three month or twelve month
calendar. Use the “dog ears” to move between the pages of the
calendar.
You can also display a calendar from the Agenda program. See the
‘Agenda’ chapter for more details.
Dialog buttonsDialog buttons
Dialog buttons
Dialog buttonsDialog buttons
Dialogs may have on-screen buttons. Tap on the button or use
the keypress combination under it. Some buttons have a
standard keypress equivalent:
• Usually, you can tap the OK button or press the Enter key if
you want to save information and remove the dialog.
• Tap the Cancel button or press the Esc key if you want to
remove the dialog without saving the information.
• For dialogs that ask a question, you can tap the Yes button
or press the ‘Y’ key for ‘yes’; tap the No button, press the
‘N’ key or press the Esc key for ‘no’.
Copying information between programsCopying information between programs
Copying information between programs
Copying information between programsCopying information between programs
You can insert information created in one program into a
different program. This is known as “inserting” an “object”.
For example, you may want to add a picture to a letter you are
writing. To do this, write the letter as normal using the Word
program. Then while in Word, tap the Insert sketch button on
the Toolbar or select the command from the Insert menu. This
will start the Sketch program, where you can create the picture.
Close Sketch when you have finished and the picture will be
inserted in your letter.
Sometimes the object you insert can be displayed as an icon,
perhaps if you insert a large amount of Word text in an Agenda
entry. Alternatively, you may prefer to see the actual information
added, e.g. a map to view in the Word file.
For example, you may wish to:
• insert tables of figures and graphs from Sheet into a Word
file. You can add labels and titles to the graph in Sheet
before inserting it in the Word file.
• keep a map of how to find a restaurant as a sketch, perhaps
attached to an Agenda entry for the day that you’re going
there.
• create a Sketch file of your signature, and insert the
signature when you write letters in the Word processor.
• keep handwritten notes and ideas in Sketch. You can then
insert them into Jotter or a Word file if necessary.
Getting started 12
Page 22

Displaying HelpDisplaying Help
Displaying Help
Displaying HelpDisplaying Help
You can display help at any time, and from any program. Help
information is contained on a series of “help cards” in one large
database that looks similar to the databases that you create in
the Data program. Help is not specific to the program that you
are using; wherever you are, you can just type a “clue” to search
for the information you need.
Note: The on-line help contains more detailed information than
is included in this manual.
• To display help: Hold down Fn and press ‘/’ ; the key has
“Help” printed on it.
• To search for help about something: simply type your
clue into the Find: box, and press Enter.IftheQuickfind
button is selected the display will show a list of Help cards
with the clue in the title or initial description. Alternatively,
if the Find in all button is selected, the display will list all
cards with the clue in the text. To move between cards, tap
on the Prev or Next buttons, press Enter, or use the left
and right arrow keys.
• To show help for a particular program: type the
program name followed by an exclamation mark, e.g. type
‘Agenda!’ or ‘Contacts!’ to only show help for these
programs.
••
• To look through the help text: drag the scroll bar on the
••
side of the Help card, or use the up and down arrow keys.
Getting started 13
••
• To print the current Help card: tap the Print button on
••
the Toolbar or select Print from the File menu.
••
• To type in another search word: press Esc, and then type
••
in the word to search for as before. To use one of the last
five search words again, tap on the button next to the Find:
box, or press Tab and select the word you want to use.
••
• To return to the program you were using: tap the Go
••
back button on the Toolbar, or tap the program’s icon. You
can return to the Help card you were viewing by simply
pressing Fn and ‘/’ again.
Note: You can highlight text in a Help card using the pen or
keyboard, and copy it to use in a file of your own. Copy the text
by selecting the Copy command from the Edit menu. Then go
to your own file, and paste it in.
Page 23
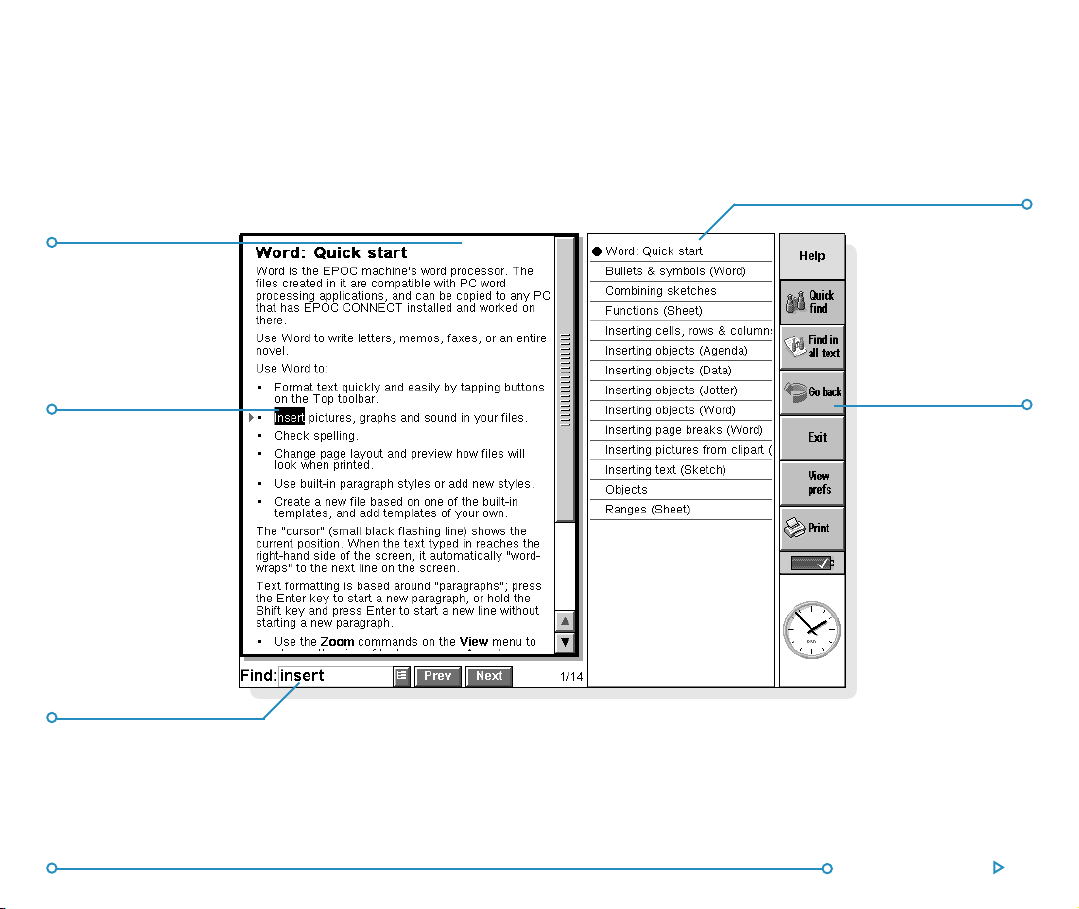
Help topic cardHelp topic card
Help topic card
Help topic cardHelp topic card
TT
ee
xt foundxt found
T
e
xt found
TT
ee
xt foundxt found
by searchby search
by search
by searchby search
Search clueSearch clue
Search clue
Search clueSearch clue
Help topic titlesHelp topic titles
Help topic titles
Help topic titlesHelp topic titles
in card bowserin card bowser
in card bowser
in card bowserin card bowser
Go back withoutGo back without
Go back without
Go back withoutGo back without
closing helpclosing help
closing help
closing helpclosing help
Getting started 14
Page 24

Things to do first!Things to do first!
Things to do first!
Things to do first!Things to do first!
This section describes what you need to do to set up your
netBook. You should:
• set the current time and date, so that you can use the
Agenda programs and set alarms.
• set your “Home city”, so that the netBook can display the
correct time differences and dialling codes for other places
in the World.
It is also a good idea to:
• enter owner information, so that your netBook can be
returned if you lose it.
• set a password for your machine, so that other people
cannot access your information.
Getting started 15
Setting the time, date & the Home citySetting the time, date & the Home city
Setting the time, date & the Home city
Setting the time, date & the Home citySetting the time, date & the Home city
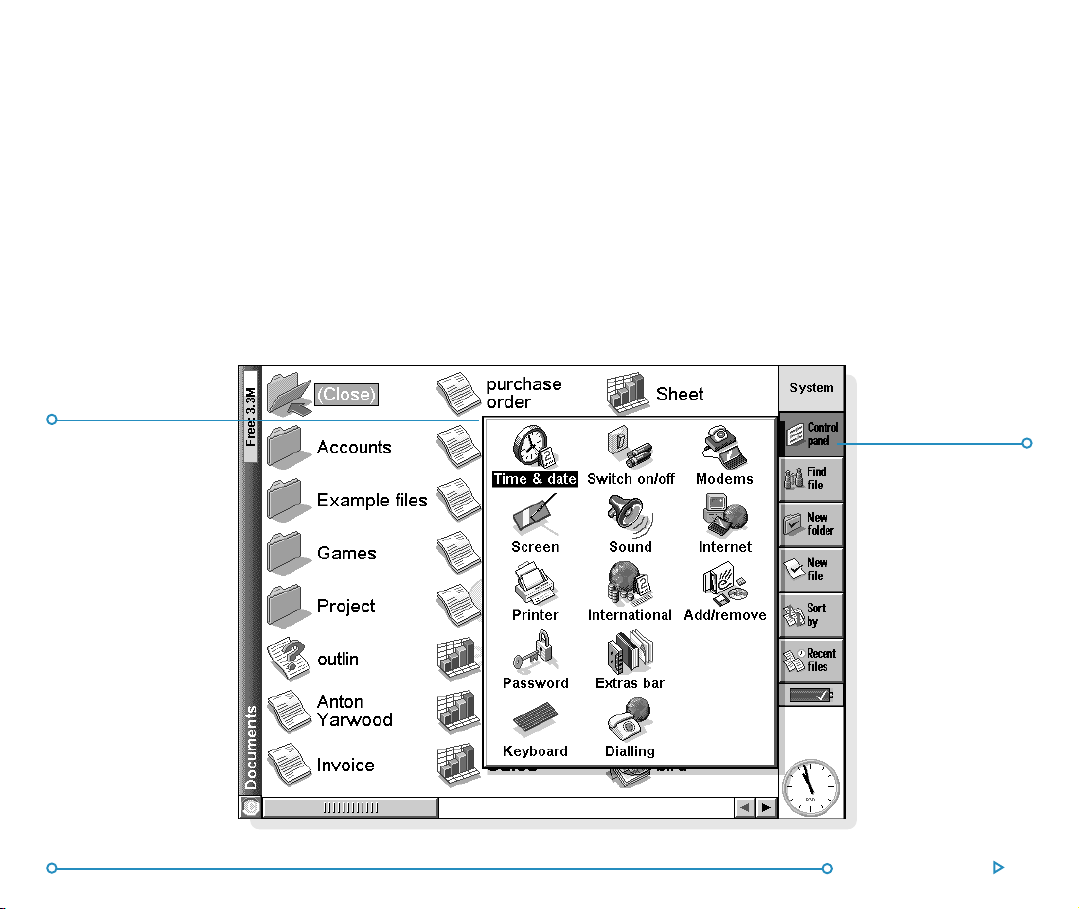
1. In the System screen, tap on the Control panel button on
the Toolbar, or select the command from the Tools menu.
2. Tap the Time & date icon, or move the highlight to it using
the arrow keys and press Enter.
3. You will see a “dialog” in which you can set the time and
date, your home city and summer times around the world.
Tap the Time & date button. Move the highlight in the
Time and Date lines by tapping on the part you want to
change, or by using the arrow keys. Type the date or time,
press ‘P’ for p.m. or ‘A’ for a.m.
4. Tap on the OK button or press the Enter key, and the time
and date are saved.
5. Tap the Home button.
6. Select your Home city and country.To do this:
• Start typing in the name of your home city, or tap on the
arrow symbols or press the left and right arrow keys until
you find the city you want.
• If your home city is not listed, select a city that is nearby for
now (adding a city is described in the ‘Time’ chapter).
7. Tap on the OK button or press the Enter key, and your
home city is saved. Tap Close or press Enter to remove the
dialog and return to the Control panel. Press Esc to return
to the System screen.
Note: The netBook can use a 12 hour clock (midnight is
12:00:00 a.m.) or a 24 hour clock. Refer to the ‘Time’ chapter
for details of how to change these settings, and how to adjust the
clock for summer time.
Page 25
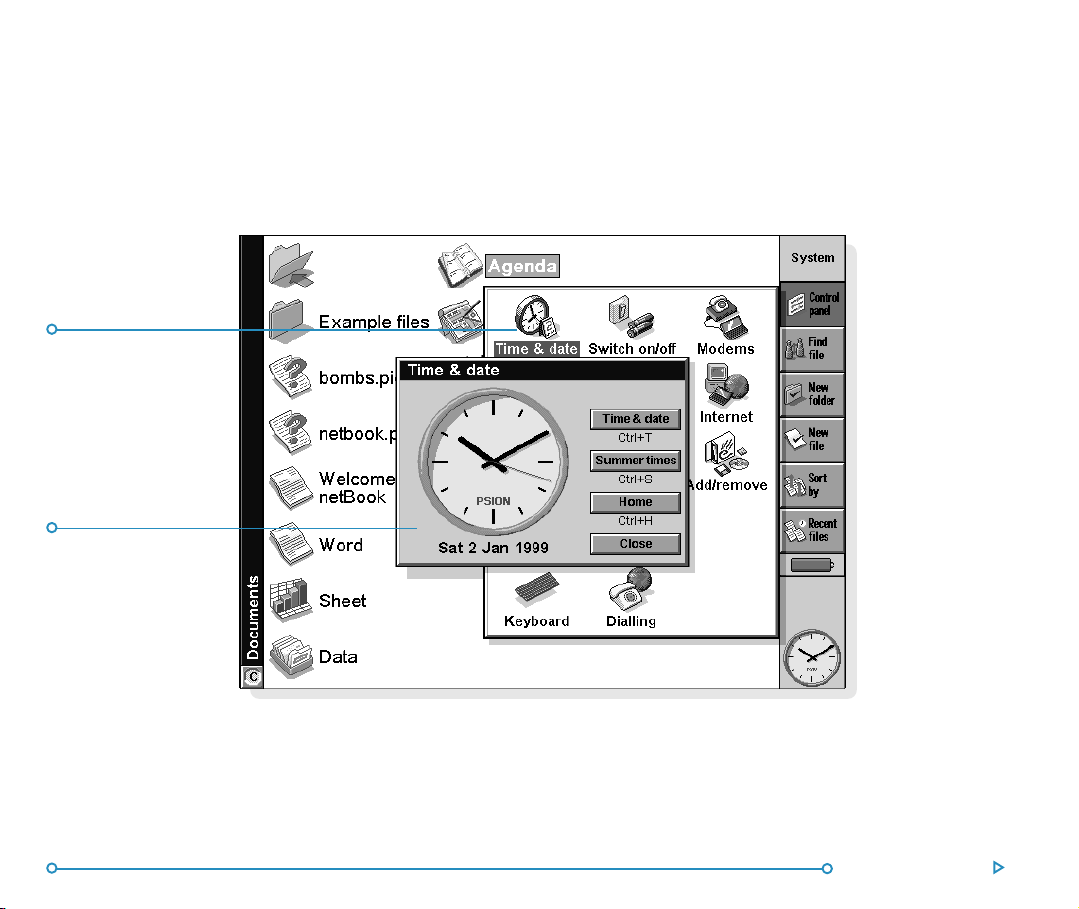
TT
ime & date iconime & date icon
T
ime & date icon
TT
ime & date iconime & date icon
TT
ime & dateime & date
T
ime & date
TT
ime & dateime & date
dialogdialog
dialog
dialogdialog
Getting started 16
Page 26

Getting started 17
Entering owner informationEntering owner information
Entering owner information
Entering owner informationEntering owner information
It is a good idea to type your contact information as “owner
information”, so that if you lose your netBook, it can be returned
when found:
1. Select the Password icon from the Control panel in the
System screen, and tap the Owner info button in the
dialog.
2. Type in your details. The labels provided are suggestions
only, you can change them if you want to. It’s best not to
put your home address, in case your house keys are lost at
the same time.
3. Set how you wish the owner information screen to be
displayed, i.e.:
• ‘At switch on’, if you always want to display the screen when
switching the machine on.
• ‘Once per day’, if you only want to see the screen once a
day, the first time you switch your machine on each day.
• ‘Never’, if you never want to display the screen when you
switch on.
You can display the owner information at any other time using
the Owner command on the Information menu in the System
screen.
Setting a system passwordSetting a system password
Setting a system password
Setting a system passwordSetting a system password
To prevent anyone looking at the files on the Internal disk of the
netBook, set a system password which you must type in before
you can use the machine.
To do this:
1. Select the Password icon from the Control panel in the
System screen.
2. Tick the ‘Ask for password’ box so that your netBook
requests the password when you switch the machine on.
3. Type the password twice for confirmation. Choose a
password that you won’t easily forget, but one that won’t be
easy for someone else to guess. DON’T FORGET your
password! You will need to enter the password again if you
want to change the password settings on your netBook.
The password is now set. The next time you switch your
machine on, you will have to type in the password to access your
files.
If you want to switch the password off temporarily, remove the
tick from the ‘Ask for password’ box.
Note: The system password does not protect files stored on
Memory disks or files copied to other machines.
Important: don’t forget your password!
If you have forgotten the system password then you will have to
reset the machine. All the files stored on the internal disk will then
be lost.
Page 27

Things to do neThings to do ne
Things to do ne
Things to do neThings to do ne
This section gives a brief overview of what else you may want to
do when you first use your netBook, including:
• Ideas for how you can use the programs.
• Instructions for using PsiWin to connect to your PC and
perform backups to your PC.
• Ideas for customising your netBook.
Which programs to use?Which programs to use?
Which programs to use?
Which programs to use?Which programs to use?
The first things you wish to do may include:
• entering appointments, reminders, birthdays and lists
of things to do from your old diary or time planner into
the Agenda program. If you use a PC scheduler such as
Microsoft Outlook or Lotus Organizer, you can use PsiWin
to synchronize the information in your Psion and PC
schedules to keep them both up to date.
• entering names and addresses from your old address
book into the netBook’s Contacts address book. If you also
keep names and addresses in a PC scheduler, you can use
PsiWin to synchronize your Psion and PC address books so
that they are both kept up to date.
xt!xt!
xt!
xt!xt!
• setting a morning alarm in the Time program. The Time
program also includes a map of the world, and information
about cities, world times, and national and international
dialling codes.
• entering a ‘work to do list’. This is best entered as a
To-do list in Agenda. You will be able to see outstanding
tasks in the Day view, set alarms to remind you to do them
and cross out items when you’ve completed them.
You may also wish to:
• keep a meeting agenda or minutes as a memo or voice note
attached to the meeting’s entry in Agenda. You can then
retrieve the notes by finding the meeting entry.
• keep a record of expenses in the Sheet program. Here you
can search for items, add columns of numbers, or calculate
totals and tax.
• keep a Data file as a “knowledgebase” of notes about a
particular subject. You can keep track of references or
products as you find them, and include additional
information as attached “voice notes” or sketches.
Getting started 18
Page 28

Getting started 19
Connecting the netBook to the PCConnecting the netBook to the PC
Connecting the netBook to the PC
Connecting the netBook to the PCConnecting the netBook to the PC
• Connect the smaller end of the Docking cable to the serial
port on the netBook, and the other end to a serial port at
the back of the PC.
Using PsiWinUsing PsiWin
Using PsiWin
Using PsiWinUsing PsiWin
••
• Please see the PsiWin chapter for installation instructions.
••
For a floppy disk version of this software, please contact
your nearest Psion distributor.
• When you have installed PsiWin on the PC, the ‘My Psion’
icon will appear on the Windows Desktop. Just click the
right mouse button on this icon to see menu options for the
things that you can do. PsiWin also adds a number of
commands and icons to Windows Explorer for working on
netBook files. See the PsiWin on-line help for details of how
to use PsiWin with the netBook.
Note: The Comms program that is built into the netBook
provides terminal emulation and file transfer to other computers.
You can use it to connect the netBook directly to another
computer, or via a modem to access electronic mail systems and
bulletin boards.
A detailed User Guide for Comms is included on the PsiWin
CD ROM, along with other literature that may be of interest to
you.
Backing up to a PCBacking up to a PC
Backing up to a PC
Backing up to a PCBacking up to a PC
You can use PsiWin to back up individual files, folders, or all of
the netBook’s disk to the PC.
Making regular backups.
It is a good idea to set up an “automatic backup” in PsiWin so that
you can make sure your machine is backed up regularly.
Backing up to Memory DisksBacking up to Memory Disks
Backing up to Memory Disks
Backing up to Memory DisksBacking up to Memory Disks
You can back up individual files, individual folders or groups of
files and folders to a Memory Disk. To back up the files and
folders, copy them from the internal disk to a Memory Disk using
the Copy and Paste commands in the System screen.
1. Select the files and folders you want to back up, then select
the Copy command from the Edit menu.
2. Set the current disk to be D (i.e. the Memory disk), and
select the folder you want to use for the backup on disk D.
3. Select the Paste command from the Edit menu.
Exploring the Control panelExploring the Control panel
Exploring the Control panel
Exploring the Control panelExploring the Control panel
• To display the Control panel: move to the System screen
and tap on the Control panel button on the Toolbar,or
select the command from the Tools menu. Initially, you
should set up the Time & date, Screen, Switch on/off,
and Printer if you intend to use one. You might also like to
set up owner information and a password. You may wish to
change other settings later.
Page 29
When you first use your netBook, you may wish to:
• Use the International icon to change settings which may
vary from country to country, e.g. the currency and date
formats.
• Use the Switch on/off icon to control how and when the
netBook switches on and off. For example, you might like it
to switch on when you tap the screen, and off when you
close the case.
• Use the Sound icon to control the sounds that the netBook
makes when you press keys, tap the screen and perform
other actions.
Control panelControl panel
Control panel
Control panelControl panel
• Use the Screen icon to change the screen contrast and
brightness, or re-calibrate the touch sensitive screen if the
netBook stops responding to your pen taps.
• Use the Keyboard icon to control how long you have to
hold a key down before a repeat keypress occurs.
• Use the Password icon to set a password on your machine
or enter owner information.
Control panelControl panel
Control panel
Control panelControl panel
TT
oolbar buttonoolbar button
T
oolbar button
TT
oolbar buttonoolbar button
Getting started 20
Page 30

FILESFILES
, FOLDERS & PROGRAMS, FOLDERS & PROGRAMS
FILES
, FOLDERS & PROGRAMS
FILESFILES
, FOLDERS & PROGRAMS, FOLDERS & PROGRAMS
The System screen is the netBook’s file manager.You will see the
System screen the first time you switch the netBook on; at other
times, just tap the System program icon to move to it.
When you first turn the netBook on, the name of the current
folder is displayed in the Title at the left of the screen. Files are
listed in columns across the screen; the icons beside their names
represent the programs which are used to open them.
Moving aroundMoving around
Moving around
Moving aroundMoving around
• To move the highlight between the files and folders on
the screen: tap on the names, or use the arrow keys. If
there are more files in the folder than can be displayed on
screen, scroll the screen using the left and right arrow keys,
or the scroll bar at the bottom of the screen.
You can use a “bookmark” to tag and move to a folder that you
often use. Move to the folder and select Set bookmark from
the Edit menu to insert the bookmark. Later you can select Go
to bookmark from the Edit menu to move back to the folder.
••
• To view the files on a Memory disk: change the current
••
disk by tapping the disk (‘C’) icon in the Title bar and select
the disk you want to view, or select the command for disk
‘D’ from the Current disk commands on the Disk menu.
21Files & folders
Page 31

Close folderClose folder
Close folder
Close folderClose folder
MemoryMemory
Memory
MemoryMemory
informationinformation
information
informationinformation
Change diskChange disk
Change disk
Change diskChange disk
FilesFiles
Files
FilesFiles
22Files & folders
Page 32

23Files & folders
Opening files, folders & programsOpening files, folders & programs
Opening files, folders & programs
Opening files, folders & programsOpening files, folders & programs
• To open a file or folder from the System screen: tap it
twice, or highlight it and press Enter. Files that are currently
open have their names displayed in bold on the System
screen. Opening a file automatically saves and closes any
other file that is currently open in the associated program.
• To open two or more files of the same type at the
same time: hold down the Fn key while opening the
second file from the System screen. Then tap the program
icon to cycle through the open files.
••
• To move to a program: tap the relevant Program icon; tap
••
the Extras icon to display more program icons. If the
program is file-based, e.g. Data or Word, the program
displays the last file you were looking at. You can start a new
file using the New file Toolbar button or the command on
the File menu (see ‘Creating new files’ later for more
details).
Note: If the last file you were looking at has been deleted,
moved or renamed, the program automatically looks for a file
with a standard filename (e.g. Word, Data, Agenda and so on) in
the standard folder, and opens this file instead. It will create a
new file if necessary.
Note: Tap on the Extras icon to display additional icons for
programs installed on your netBook. If there are more programs
than will fit on the screen, tap the More button.
Closing programs/filesClosing programs/files
Closing programs/files
Closing programs/filesClosing programs/files
••
• To close the current folder: tap on the Close folder icon
••
at the top of the screen, or highlight it and press Enter.
When you close all folders in the System screen, you move
to the highest level of the disk, called the “root” of the disk.
••
• To close a file: use the Close command on the File menu,
••
either in the program in which the file is open, or in the
System screen. Any changes you have made to the file are
automatically saved.
••
• To Close a document without saving your changes, you need
••
to select Revert from Saved from the program’s File
menu, before exiting in the normal way. Some applications,
like Agenda and Data, always save your entries as you enter
them, so do not provide this facility.
You can also close files or programs by holding down Ctrl and
tapping the System icon, then using the Close file button in the
list of open files and programs.
How can I see which files and programs are open?
Select the List open files command from the File menu, or hold
down the Ctrl key and tap the System icon. To move to a file or
program in the list, highlight it and press the Go to file button.
Page 33

Creating new foldersCreating new folders
Creating new folders
Creating new foldersCreating new folders
You can keep a maximum of 64 items (each file or folder counts
as one item) in the “root” (top level) of the netBook’s internal
disk. It’s best to create a number of folders in which to store all
your files to prevent the top level of the System screen from
becoming too full.
You might want to create some folders for work projects and
others for home use. For example, you may create a folder
called “House” for files relating to work on your house, and
create another folder within the “House” folder called “Letters”
for Word files of correspondence. Using folders in this way will
also make your files easier to find.
To create a new folder:
1. Move to the folder in which you wish to create the new
folder.
2. Select the New folder command from the Toolbar or File
menu, and type in the folder name.
You cannot use the following characters in a folder name:
<>:/\*?
If you use netBook files with a PC, you may wish to create
folders that match equivalent folders on your PC. This will make
transferring files between the netBook and PC easier.
24Files & folders
Page 34

Creating new filesCreating new files
Creating new files
Creating new filesCreating new files
You can create files from the System screen, or from within
programs. As a general rule:
• Create a file from the System screen to start with the
standard netBook settings.
• Create a file from within a program to use the settings that
are in use in the file currently open, e.g. labels in a Data file.
To create a file from the System screen:
1. Move to the folder where you wish to keep the file.
2. Select the Create new command from the File menu, then
select File.
3. Select the program you wish to use, e.g. Word for a Word
document.
4. A filename is suggested. If you do not wish to use this, type
a name of your own before pressing the OK button.
Note: If you have an existing file already open within the
program, and wish to leave it open so that you can refer to both
files, hold down the Fn key while pressing the OK button.
25Files & folders
What names can I use for my files & folders?
You can use most characters in file and folder names including
spaces, so it is fine to have folders called, for example, “1997
Purchase Orders and Invoices”. The only characters which cannot
be used in a file or folder name are/<>:\*and?.
The maximum length of a filename is 256 characters, although note
that this includes the disk drive letter, and the names of the folders
within which the file is contained (known as the “path”). The
maximum length of a folder name, including the path, is 252
characters.
This will not generally be a problem, although it means that you
may encounter difficulties if you use very long filenames for files
which you store in folders which have long names, nested within
other folders with long names, and so on. If you do exceed the
maximum allowed length, rename a folder or file to a shorter
name.
Important:
Note that files are not stored with a filename extension so that an
Agenda file, e.g. called ‘1997’, will have the same filename as a
Sheet file called ‘1997’. You cannot store two files with the same
name in the same folder, even if the files are created using different
programs. If you save a file with the same filename as a file already
existing in that folder, the original file will be deleted and replaced
with the new file.
Page 35

26Files & folders
Page 36

Browsing foldersBrowsing folders
Browsing folders
Browsing foldersBrowsing folders
A quick way to find a file is to use the Browse folders command
on the File menu. This displays a Browser which shows a tree
structure of all the files and folders on the current disk. You can
also display the Browser by tapping the Title bar or pressing Tab
in the System screen.
• To move between files and folders in the Browser: use
the pen or arrow keys.
• To“expand” the folder display: highlight the folder name
and tap it again or press Tab. To “collapse” the folder
display, tap the folder name twice or press Tab.
27Files & folders
• To create a folder from the Browser: press the New
folder button.
• To rearrange the order of the files in the currently
highlighted folder: press the relevant Sort by button.
• To select a file from the Browser: highlight the file and
press the OK button. This selects the file in the System
screen from where you can open it, rename it, or copy,
move or delete the file.
Note: A quick way of opening a file direct from the Browser is
simply to highlight it and press Enter twice.
FoldersFolders
Folders
FoldersFolders
Sort files bySort files by
Sort files by
Sort files bySort files by
FilesFiles
Files
FilesFiles
......
...
......
Page 37

Finding files and foldersFinding files and folders
Finding files and folders
Finding files and foldersFinding files and folders
To search for files or folders tap the Find file button on the
Toolbar or select the command on the Edit menu.
• If you know the name or part of the name, type it on the
Name line; leave it blank to find all files and folders.
• To search only for files used with a specific program, select
the program name on the Program line; select ‘Any’ to search
for all files used with any program.
Tap OK to start the search. This checks all files and folders on the
Internal disk and includes a Memory disk if present. The search
results appear in a list.
• To sort the list by filename, file type, file size or creation
date, press the Sort button and choose the sorting type
required. To sort the list again in reverse order, just select
the same sorting type again.
••
• To go to a file or folder: highlight it and tap it again, or
••
press Enter.
28Files & folders
Page 38

29Files & folders
Using passwordsUsing passwords
Using passwords
Using passwordsUsing passwords
You can prevent other people from opening your Word and
Sheet files by setting a password for each file. For example,
you may have a Sheet spreadsheet containing your personal
finance details. To set a password on a file:
1. Open the file and select the password command from the
File menu.
2. Type your password twice for confirmation. Choose a
password that you won’t easily forget, but one that won’t
be easy for other people to guess.
3. Press the OK button, and the file is saved immediately
with the password.
When you want to open the file, you will be asked to type in
the password.
Important: don’t forget your password!
If you have forgotten the password for a file then you will not be
able to open it.
The password on an individual file will protect it if you transfer
it to a Memory disk or another machine. If you copy the file,
the copy will be protected by the same password. The
password also prevents the file being converted to another
format and read on a PC.
Changing file attributesChanging file attributes
Changing file attributes
Changing file attributesChanging file attributes
You can prevent a file from being accidentally changed by making
ita“read-only” file. To do this, highlight the file in the System
screen and select Properties from the File menu. Then tick the
Read-only box.
Files that have been created on a PC and then transferred to the
netBook may also be “read-only” files.
To check whether a file is a “read-only ” file, highlight it in the
System screen and select Properties from the File menu.
Note: If you transfer a “read-only” file to another machine, it can
be viewed, and the “read-only” attribute can be removed.
Page 39

Managing foldersManaging folders
Managing folders
Managing foldersManaging folders
To move one or more folders or files from one location to
another:
1. First highlight the file(s) or folder(s) to select them. To
highlight a consecutive list of files or folders, highlight the
first one, hold down the Shift key, and then highlight the last
one. To select items that are not consecutive, hold down the
Ctrl key and tap each file/folder in turn.
To select all the files/folders in the current folder, use the
Select all command on the Edit menu. To deselect items,
press the Esc key.
2. Select the Cut (move) command from the Edit menu. A
dotted line appears round the file/folder icon(s).
3. Go to the disk drive and open the folder into which the
highlighted items are to be moved.
4. Select the Paste command from the Edit menu.
Note: Moving a folder also moves all the files within that folder.
Note: If you move (or rename) your most recently opened
Agenda or Data file, you should open it again by selecting it from
the System screen, rather than tapping the Agenda or Data
program icon. Tapping on the program icon will create a new
Agenda or Data file.
••
• To copy a file or folder, or multiple files/folders to a
••
different folder: follow the earlier instructions, but select
the Copy as opposed to the Cut (move) command from
the Edit menu.
• To make a copy of a file or folder within the same
folder: highlight it on the System screen and select the
Copy command followed by the Paste command. A new
file is automatically created for you using the following
naming convention (with Word as the example): Word(01),
Word(02), etc. You can rename the file or folder later if you
wish.
• To copy the entire contents of a disk to a folder on
another disk: e.g. to back up the entire contents of your
Internal disk (‘C’) to a backup folder on a Memory disk
(‘D’), select Copy disk from the Disk menu.
• To rename a single file or folder: highlight it, select
Rename from the File menu, and then type in a new name.
• To rename a disk: select Name disk from the Disk menu.
• To remove one or more files or folders: first highlight
them and then either press the Delete key, or select the
Delete command from the File menu.
Important: If you are deleting folders, remember that the entire
contents of the folders (including all the other folders contained
within them and all their files) will also be deleted.
30Files & folders
Page 40

Checking memory useChecking memory use
Checking memory use
Checking memory useChecking memory use
• To display the amount of memory remaining: select
Show disk gauge from the View menu to see the amount
of free memory in the System screen Title bar.Tap on this
gauge, or select the Disk command from the Information
menu to see more detailed information about a selected
disk.
• To see information about total memory usage: select
the Memory command from the Information menu.
Which files use the most memory?Which files use the most memory?
Which files use the most memory?
Which files use the most memory?Which files use the most memory?
Certain types of files use more memory than others.
Sound files can become very large, so you should take care to
delete unwanted Record and Voice note files so that they do not
use up space on the Internal disk.
When recording a sound, the netBook will allow you to continue
recording until the ‘Time available’ runs out. Even if the Time
available is zero, the Record program will always leave
approximately 100 kilobytes of free memory.
If you find that the amount of free memory is suddenly reduced,
it is a good idea to check the size of any Record files.
Agenda files can also become very large. You should tidy your
Agenda periodically in order to remove entries; see the ‘Agenda’
chapter for more details.
31Files & folders
What will happen when the memory is full?
When the memory is nearly full, you will see warning dialogs when
running programs to indicate that the netBook’s memory is almost
full, and there is not enough memory to perform some tasks.
Many of the things you do need just a little free memory in order
to work - displaying dialogs, menus, etc. These can fail with a
message like ‘Memory full’. Don’t worry though, the netBook will
not allow you to use all of the available memory; it will always set
aside enough memory for you to close a program or save an open
file to a Memory disk.
Files saved on the Internal disk and “open” programs both use
memory. So, if the memory is nearly full you should be able to free
some memory by closing some programs. You can use the List
open files command from the File menu in the System screen to
check which programs are running, and then close the programs or
files that you do not need to have open.
You can also delete any unwanted files from the System screen, or
move files to a Memory disk or your PC to free more memory.
Page 41

Additional disks & programsAdditional disks & programs
Additional disks & programs
Additional disks & programsAdditional disks & programs
You can insert Memory disks into the tray on the left hand side of
the netBook. You might use them as additional memory for
storing files, or to add more programs to the netBook.
• If a Memory disk contains additional programs: their
icons will automatically appear in the Extras bar when you
insert the disk. They will be removed from the Extras bar
when you take out the disk.
• To delete all the files on a Memory disk: put it in the
slot, and then select the Format disk command from the
Disk menu; select ‘D’ as the ‘Disk’ in the Format disk
dialog. Do not format the ‘C’ disk - this will remove all
the files you have stored on the netBook’s Internal disk, and
remove all the preferences and settings that you have set up.
There are four additional Apps icons at the edge of the screen.
Any programs appearing in the Extras bar can be allocated one of
these icons so that they can be launched with one tap of the pen.
To do this, tap the Extras icon on the Toolbar then tap the word
‘Extras’ on the title bar and select the appropriate program for
each of the User Application entries. This may be particularly
useful if you have loaded a new program which you will often
use.
If you wish to run a translated OPL program, locate the file in the
System screen, highlight the filename and tap it or press Enter to
run it.
Can I run Series 3/3a/3c/3mx/5/5mx programs on a netBook?
There are no major differences between OPL for Series 3/5
machines and OPL for the netBook. If you have written programs
in OPL on a Series 3/5, you should be able to translate them so
that you can run them on a netBook. Series 3/3a/3c/3mx
applications (which are not written as OPL programs) will not
run on a netBook, however, applications written for Series5/5mx
should work but may not scale to cover the full screen size.
32Files & folders
Page 42

33Word
WORDWORD
WORD
WORDWORD
Word is the word processing program. It has many of the editing
and formatting features that you would expect from a fullyfeatured word processor.
Many types of text formatting, e.g. alignment and font settings,
can be applied to individual paragraphs or defined as a paragraph
“style”.
TT
op toolbarop toolbar
T
op toolbar
TT
op toolbarop toolbar
Entering teEntering te
Entering te
Entering teEntering te
The text you type always appears at the current cursor location
(there is a marker in the margin to help you find the cursor). All
text after the current cursor position moves to make way for the
new text. To delete characters, press Delete to delete
backwards or hold down Shift and press Delete to delete
forwards from the cursor.
xtxt
xt
xtxt
Page 43

When text reaches the right-hand side of the screen, it
automatically “wraps” the text onto the next line. If you want to
view your page as it will be printed (“WYSIWYG”), switch off
word-wrapping by removing the tick from the command on the
View menu.
As you might expect, you can apply many commands to sections
of text by highlighting them first. To highlight text, drag the pen
over it or hold down Shift and use the arrow keys. To select all
text in the file, use the command on the Edit menu. The Cut,
Copy and Paste commands can be accessed from the Edit
menu or the Clipboard
• To remove text: highlight the text and press Delete or
select the Cut command. If you accidentally delete a section
of text, you can replace it by selecting the Undo delete
command from the Edit menu.
• To copy text without deleting the original: highlight it
and select the Copy command from the Edit menu. To
insert copied text, place the cursor where you want the text
to appear and select the Paste command from the Edit
menu.
• To move a section of text: highlight it and select the Cut
command from the Edit menu. Place the cursor where you
want the text to appear, then select the Paste command.
• You can make the text appear larger or smaller on the
screen by selecting the Zoom in and Zoom out commands
from the View menu. You can also select the Set zoom
command to set a “custom” zoom level. Note that zooming
does not affect printing.
button on the Toolbar.
Finding & replacing teFinding & replacing te
Finding & replacing te
Finding & replacing teFinding & replacing te
You can search through an entire file for a particular word or
phrase and, if you wish, replace it with a different one.
• To find text: tap the Find button on the Toolbar or select
the command from the Edit menu and type in the text that
you want to find. You can search “down” or “up” through a
file - down searches from the current position to the end of
the file, and up searches backwards to the beginning of the
file. While searching, you can match the whole word, or
make the search case sensitive.
• To find and then replace text: select the Replace
command from the Edit menu. Type the text that you want
to find, as before, and the text that you want to replace it
with. You can replace a single occurrence of the chosen
text, or all occurrences from this point onwards.
Changing the appearance of teChanging the appearance of te
Changing the appearance of te
Changing the appearance of teChanging the appearance of te
You can highlight text then apply formatting to it, or select a
format to use and then start typing:
• Press the
underlined text (or use the commands on the Text menu).
• Press the button again, or remove the tick from the menu
command to remove the effect, or switch it off.
• Use the button on the Top toolbar (e.g.
choose from a list of available fonts. Note that the text that
appears on the button will reflect the current font. Use the
size button (e.g.
You can apply any of these effects, and also set the text position
(e.g. for superscript and subscript text), use strikethrough text
(crossed out), and change the text colour using the Font
command on the Text menu.
xtxt
xt
xtxt
xtxt
xt
xtxt
button for bold text, for italics or for
)to
) to change the size of text.
34Word
Page 44

Formatting paragraphsFormatting paragraphs
Formatting paragraphs
Formatting paragraphsFormatting paragraphs
Many formatting and spacing options can be applied to whole
paragraphs. A paragraph may be a single word or title, a standard
paragraph of text, or several lines grouped together, e.g. an
address.
Each time you press the Enter key you start a new paragraph.
To start a new line without starting a new paragraph (e.g. for an
address), hold down Shift and press Enter to insert a “forced line
break”.
• To apply formatting to an entire paragraph, e.g. to change
the horizontal alignment, place the cursor within the text of
the paragraph using the pen or arrow keys, then tap the
button or select the menu option. To apply formatting to a
number of paragraphs, make sure that the highlight covers
at least part of each paragraph. You don’t need to highlight
all the text in the paragraphs you want to format.
Aligning paragraphsAligning paragraphs
Aligning paragraphs
Aligning paragraphsAligning paragraphs
Alignment changes the horizontal position of paragraphs on the
page. You may wish to align the text left or right with the
appropriate margin, centre a title, or justify text to align both
edges with the margins.
• To change the alignment: select the paragraph(s) to align,
then tap
menu, then select the alignment you want.
Note: Margins are set as part of the file’s page setup. See ‘How
the page looks’ later for more information.
or select the command from the Paragraph
Indents & tabsIndents & tabs
Indents & tabs
Indents & tabsIndents & tabs
Indents set the position of a paragraph between the margins,
while tabs allow you to line up text on the page.
You can set left, right and first line indents for selected
paragraphs by selecting the command from the Paragraph
menu and entering a measurement (measured from the existing
margins) in the boxes. The left indent applies to all lines except
the first line, so that you can create a “hanging indent” by
applying different left and first line settings.
You can change the standard tab setting, and set up custom tab
stops for individual paragraphs by selecting the command from
the Paragraph menu.
Bullets & symbolsBullets & symbols
Bullets & symbols
Bullets & symbolsBullets & symbols
To emphasise paragraphs that are items on a list you can precede
each paragraph with a bullet.
• To add a bullet to a paragraph, tap
command from the Paragraph menu. Use the menu
command to change the bullet format, i.e. the size or colour
of the bullet character, or the character to use.
or select the
35Word
Page 45

Special charactersSpecial characters
Special characters
Special charactersSpecial characters
You can insert foreign and other special characters in your file by
selecting the Special character command from the Insert
menu.
You can also insert non-printing characters which control word
wrapping on the screen and in the printed document:
• For a non-breaking space, press Shift and the Spacebar. This
will prevent a line breaking at the space.
• For a non-breaking hyphen or “hard hyphen”, press Ctrl
with the - key. This will prevent a line breaking at the
hyphen.
You can use the View preferences command on the Tools
menu to select which non-printing characters are displayed on
screen.
Line spacingLine spacing
Line spacing
Line spacingLine spacing
When you select a particular font size, Word automatically uses
an appropriate line spacing to make sure that there will always
be a gap between successive lines of text. You might sometimes
wish to override these settings, e.g. in a paragraph with different
sizes of text.
••
• To set line spacing: select the command from the
••
Paragraph menu and enter a point size. Set the spacing to
‘At least’ to ensure that lines of text never overlap, but will
move further apart to accommodate any larger text
appearing on the same line, or ‘Exactly’ to ensure that lines
of text are always the same distance apart, even if larger
text appears on the same line.
• To insert extra blank space between paragraphs, enter point
sizes for the ‘Space above’ and ‘Space below’.
Note: The other lines in this dialog affect where page breaks
occur when the file is printed. See ‘How the page looks’ later.
PP
aragraph bordersaragraph borders
P
aragraph borders
PP
aragraph bordersaragraph borders
You can draw a border around a paragraph. You can also change
the background colour of a paragraph.
• To draw a border: select the paragraph(s) then tap
and select from the range of options. Or, use the command
on the Paragraph menu to apply the borders and set the
style and colour for each “side” of the border (i.e. Left,
Right, Top or Bottom) and how far you want the border to
be from the text. You can also set a background colour.
• Remember to set different background and text colours,
otherwise the text will be invisible.
36Word
Page 46

Using stylesUsing styles
Using styles
Using stylesUsing styles
A style is a collection of formatting options which can be applied
to a whole paragraph using a single command or keypress.
Word has four built-in styles; Normal, Heading 1, Heading 2 and
Heading 3.
Style buttonStyle button
Style button
Style buttonStyle button
37Word
• To apply a built-in style: select the paragraph(s), then tap
the button on the Top toolbar and select the
style you want, e.g. Heading 1. You can also select the Style
gallery command from the Paragraph menu.
Note: The text on this button changes to display the style of the
current paragraph.
Page 47

Defining stylesDefining styles
Defining styles
Defining stylesDefining styles
In addition to the built-in styles, you can create your own - either
from scratch or by modifying an existing one. Styles are saved
with the file, so each Word file can have different style settings.
1. Tap the Style gallery button on the Toolbar or select the
command from the Paragraph menu and select New to
create your own style, or select Modify to change the
currently selected style in the list.
2. Press the Format button, then modify text and paragraph
options as you wish.
If you are creating a new style, you can then name and assign an
outline level and shortcut key.Your new style will now appear in
the list of paragraph styles for the current file.
To delete a style you have created; tap the Style gallery button
on the Toolbar or select the command from the Paragraph
menu, select the style name from the list, and press Delete.
• You cannot delete or rename Word’s built-in styles, but you
can modify their settings for the current file. The built-in
styles in other files will not be affected.
Document outlinesDocument outlines
Document outlines
Document outlinesDocument outlines
You can view an outline of a document, with one line for each
paragraph style which has an “outline level”. The standard
Heading styles use a sequence of different outline levels: Heading
1 is the highest with outline level 1, Heading 2 has outline level 2
and so on.
You can choose which paragraph styles you want to display in the
outline, making it easier for you to see the structure of the
document and move between different sections.
Select Outline on the View menu to see the document
structure in outline. You can then:
• expand the outline to include other styles with a lower
outline level. Highlight a particular line and tap again or
press the right arrow to expand the level. Tap Open all to
show all of the outline levels. Styles which have an outline
level of zero are not shown.
• close the outline to show only the higher outline levels.
Highlight a line and tap again or press the left arrow to close
one level. Tap Close all to only show the highest outline
level.
• tap Done or press Esc to return to the document.
You can change the outline level for any style so that you can
display a document structure including your own headings or
other styles. See ‘Using styles’ earlier for more about creating
styles.
38Word
Page 48

Moving around the document outlineMoving around the document outline
Moving around the document outline
Moving around the document outlineMoving around the document outline
You can use the document outline to move quickly to other parts
of the document. To do this:
1. Select Outline on the View menu to display the document
structure in outline.
2. Move the cursor to the line representing the section of the
document that you want to move to (using the arrow keys
to display or hide other levels as necessary).
3. Tap Go to or press Enter to return to the document with
the cursor at this section in the text.
DocumentDocument
Document
DocumentDocument
outline levelsoutline levels
outline levels
outline levelsoutline levels
39Word
Page 49

Information from other programsInformation from other programs
Information from other programs
Information from other programsInformation from other programs
You can add pictures, graphs, spreadsheets and sounds to your
Word files by inserting information created by the other netBook
programs. When a piece of information is inserted, it is known as
an “object”.
Inserting an “objectInserting an “object
Inserting an “object
Inserting an “objectInserting an “object
• To insert a sketch: tap the Insert Sketch button in the
Toolbar or select the command from the Insert menu. A
copy of the Sketch program will open where you can create
your picture.
Graph insertedGraph inserted
Graph inserted
Graph insertedGraph inserted
from Sheetfrom Sheet
from Sheet
from Sheetfrom Sheet
””
”
””
• To insert a table or graph: tap the Insert Graph button
in the Toolbar or select the command from the Insert
menu. A copy of the Sheet program will open. Word
displays the inserted Sheet object as a graph or a
spreadsheet, depending on the view displayed when you
close the copy of Sheet.
••
• To insert a sound or other object: select the Other
••
object command, and select from the programs which
support this feature, e.g. Record for a sound recording.
Close the program using the Done button at the top of the
screen to return to Word.
40Word
Page 50

41Word
When you have inserted a sketch, table or graph you can select
it, then use the pen to drag one of the “handles” to resize it. You
can tap an object to edit it again. You can also format an object to
resize it, or crop the edges to control the amount of the object
displayed, by highlighting it and using the Object commands on
the Edit menu.
You can also use the Format object command to display an
object as an icon of the program that created it to save space on
screen. To set a preference so that objects are always displayed
as icons when first created, use Object preferences on the
Tools menu.
Some objects, e.g. sounds from Record, are always displayed as
icons and cannot be formatted. Tapping the icon (or selecting it
and pressing Enter) opens a copy of Record so that you can play
the sound.
Important: Note that inserting objects into a file causes a
considerable increase in file size.
Spell checkingSpell checking
Spell checking
Spell checkingSpell checking
To check the spelling of a Word file, tap the Spell button on the
Toolbar or select the command from the Tools menu (to check
the spelling of a single word or phrase, highlight it first). Spell will
display any words that are not found in the Spell dictionary,or
included in the Personal dictionary (if applicable). You can then:
• correct the unrecognised word. Type in the correct spelling,
or choose from the list of suggested alternatives.
• ignore the word and leave it unchanged in the Word file, or
ignore all instances of the word in the file.
• add the word to Spell’s Personal dictionary.
See the ‘Spell’ chapter for more about spell checking.
Creating a new fileCreating a new file
Creating a new file
Creating a new fileCreating a new file
To create a new Word file, use the Create new file command
on the File menu in Word or the System screen. If you do this in
the Word program you can enter a filename and location and
select a “template” for the new file.
File templatesFile templates
File templates
File templatesFile templates
A template is a document design that you can use as a starting
point for new documents. The template can include text,
paragraph styles and page layout information. When you create a
new document using a template, Word copies the information in
the template into the new file which you can then change as you
require. For example, you can use the standard Fax template to
create a fax - the template includes the coversheet text and you
can add the fax details and number.
You can select from a number of standard templates. When you
open a document using a particular template, you then work on
a document based on the template; you don’t change the
template itself.
Creating a templateCreating a template
Creating a template
Creating a templateCreating a template
If you can’t find a suitable built-in template, you can create your
own file template. To do this:
1. Create the Word file with the text, styles, page layout,
headers, footers, and so on that you want to include in the
template. Note that other settings such as the cursor
position and printer setup are also stored.
If you want to change an existing template, open a new
document using the template and make the changes to this
Word file.
Page 51

2. Select Save as template from the More commands on the
File menu.
3. Enter a name for the template. If you are making changes to
an existing template, type the original template’s name.
Word displays templates with (C) or (D) added to the name,
according to the disk you use to store the file.
You cannot change the standard built-in templates in Word,
although you can use them as a starting point for your own
customised templates.
DocumentDocument
Document
DocumentDocument
templatetemplate
template
templatetemplate
You can use the Delete template command (from the More
commands on the File menu) to delete a template you’ve
created. You cannot delete the built-in templates.
Setting the “default” template.
If you create a new Word document from the System screen,
Word uses the built-in ‘Blank document’ template. If you want to
start documents in the System screen using a different template,
create a template as before but type the name “Normal” for the
file. Word will use the ‘Normal’ template if it exists, otherwise it
will use the blank template.
42Word
Page 52

43Word
Saving WSaving W
Saving W
Saving WSaving W
When you edit a Word file you are actually working on a copy of
the file stored in memory. When you close Word this file is
automatically saved to disk. If you do not specify a filename it will
be called Word, and subsequent files will be saved as Word(01),
Word(02), and so on. To save a file using a different name, or in a
different folder, select the Save as command from the More
commands on the File menu.
To create a new Word file, use the command on the File menu
and enter a filename and folder. The current file is closed and
automatically saved.
You can undo all changes since the last “save” using the Revert
to saved command on the File menu. This will re-open the
most recently saved version of the file.
Note: If you password-protect a file, it is immediately saved as
“password-protected”. If you revert to saved, you will need to
enter the password for the file.
How the page looksHow the page looks
How the page looks
How the page looksHow the page looks
When you create a new file, Word uses standard page settings to
control how your text will appear when printed. To change the
page setup for the current document, select the Page setup
command from the Printing commands on the File menu;
adjust the paper size, orientation and margins as appropriate.
PP
age breaksage breaks
P
age breaks
PP
age breaksage breaks
Word automatically fits text to the paper size and continues on
to another page where necessary. If you want to have more
control over where new pages start, you can insert your own
page breaks and set page breaking options for individual
paragraphs.
ord filesord files
ord files
ord filesord files
• To start a new page, place the cursor at the desired point
and select the Page break command from the Insert
menu, or hold down Ctrl and press Enter.
To define how Word prints a specific paragraph, place the cursor
in the relevant paragraph, or highlight several paragraphs, then
select the Line spacing command from the Paragraph menu.
You can select from the following:
• ‘Keep together’ to prevent a page break within the
paragraph.
• ‘Keep with next’ to ensure that a paragraph always appears
on the same page as the paragraph that follows it.
• ‘Start new page’ to ensure that a paragraph will always
appear at the top of a new page.
• ‘Allow as widow/orphan’ to let a single line at the beginning
or end of the paragraph appear on a separate page from the
remainder of the paragraph.
You can display where page breaks will occur in a file by selecting
the Paginate command from the Tools menu. The position of
each page break is then shown with a dotted line. Note that the
dotted lines are not automatically updated if you edit the
document further, so you will need to select the Paginate
command again if you wish to repaginate and update the position
of the dotted lines.
Headers, footers & page numbersHeaders, footers & page numbers
Headers, footers & page numbers
Headers, footers & page numbersHeaders, footers & page numbers
Headers and footers are pieces of text (e.g. page numbers or a
chapter title) which appear at the top and bottom of each page
of a printed file. To add a header or footer, select the Page
setup command from the Printing commands on the File
menu, and select the Header or Footer page in the dialog. Enter
your text in the box and format it as desired.
Page 53

To insert page numbers, the current time or date, or the file
name, press the Insert button and select from the options
available. Word automatically updates page numbering as you
edit your file.
PP
rintingrinting
P
rinting
PP
rintingrinting
If you have a printer ready for use with the netBook, you can
print your Word files. You can preview how your printed file will
appear on paper and review all your page setup options
beforehand.
PP
age setupage setup
P
age setup
PP
age setupage setup
• To preview your printed document, tap the Print button on
the Toolbar or select the command from the Printing
commands on the File menu. Word paginates your file and
displays the first page(s) on screen. You can use the Setup
options to control the number of pages displayed in the
preview and whether or not visible margin lines are shown.
• To print the file, select the command from the Printing
commands on the File menu. You can choose to print the
entire file, or only a selection of pages. You can also print
multiple copies of the file.
See the ‘Printing’ chapter for more details.
44Word
Page 54

45Sheet
SHEETSHEET
SHEET
SHEETSHEET
Sheet is the spreadsheet program. It has many of the features
and functions that you would expect from a fully-featured
spreadsheet.
You can use Sheet to create worksheets, and use PsiWin to
transfer worksheets to and from your PC.
Column headingColumn heading
Column heading
Column headingColumn heading
RR
ow headingow heading
R
ow heading
RR
ow headingow heading
Sheet has two views:
• The Sheet view, where information is displayed in cells on a
worksheet. Cells are referred to by their position in the grid
of columns and rows, e.g. D3. You can present information
in table form in Sheet, and perform calculations based on
sets of numbers stored in the worksheet.
• The Graph view, where you can create graphs based on
information stored in the worksheet.
TT
op toolbarop toolbar
T
op toolbar
TT
op toolbarop toolbar
Page 55

Moving aroundMoving around
Moving around
Moving aroundMoving around
The current cell is indicated by a dark border around a cell. The
information you enter in the input line applies to this cell.
• Tap any cell to select it, or use the arrow keys to move
around. You can use the scrollbars or the arrow keys to
move to other areas of the worksheet. Hold down the Ctrl
key and use the arrow keys to move by a whole screen at a
time.
• Use the Find commands on the Edit menu to move to
other cells. Use Find and Find next to move to cells if you
know their content, or Go to to jump to a specific cell.
Note: You can alter the number of cells displayed by using the
zoom commands, or by setting the zoom level using the
command on the View menu.
Highlight more than one cell to perform actions which apply to
an area:
• To highlight more than one cell: drag the pen from the
first cell in the block to cover the desired cells, or hold
down Shift and use the arrow keys.
• To highlight a whole column or a whole row: tap the
shaded column or row heading, e.g. “C” or “2”.
• To highlight the entire worksheet: tap the square in the
top left corner of the worksheet headings.
Entering informationEntering information
Entering information
Entering informationEntering information
To enter information in a cell, select it and start typing. You will
see the information you are entering on the input line. The first
character you type tells Sheet what kind of information the cell
will contain:
• To enter numbers: begin with a number or with one of
these characters:.-+and(.
• To enter text: simply type it in. If your text starts with a
number, type a ’ first, e.g. ’24 Longton Road. If you want the
text itself to containa’atthebeginning, type two of them,
e.g. ’’97 sales figures.
• To enter a formula for a calculation: begin with a =. For
example, to make a given cell display the sum of the
contents of cells B1 and B2, type in =B1+B2.
• To edit the information in a cell: simply highlight the cell
and press Enter.You can then edit the contents on the input
line.
• To enter a date: type the day, month and year on the input
line, separating them with a space or the date separator
character as set in the System screen, e.g. 1 Oct 69 or 1 10
69, or 10 1 69 if you use this date format.
• To enter a time: type the hour, minutes and seconds,
separating them with a colon (or the time separator
character as set in the System screen).
46Sheet
Page 56

47Sheet
You can also change the width of columns and the height of
rows, to suit the information contained in them. To do this:
• Drag the right-hand edge of the column heading to adjust its
width, and the lower edge of the row heading to adjust its
height.
• Use the commands on the Format menu to set the height
of a row in points and the width of a column in characters.
Note: If you enter more text than can be displayed in the current
cell, the information will run over into the next column if that
column is empty, so you may want to adjust the column width. If
you enter a number that’s too long for the cell, you will see a
series of # signs in the cell, though the actual number will still be
stored.
• To freeze panes on the worksheet: type the information
you wish to “freeze” in the rows and columns, position the
pointer in the cell below the row to freeze, and to the right
of the column to freeze (this will often be B2). Tap the
button, or select the command from the View menu. The
“frozen” panes will stay on screen when scrolling through
the rest of the worksheet.
• To protect the worksheet from changes: select the
Protection command from the Tools menu.
• To allow changes to some cells only: highlight the area
for which you wish to allow changes, select the Protection
command on the Tools menu and remove the tick to
“unlock” the highlighted cells. If you then protect the
worksheet, changes are only allowed to the cells that are
not locked.
PP
erforming calculationserforming calculations
P
erforming calculations
PP
erforming calculationserforming calculations
There are two ways to perform calculations:
• Type the calculation into a single cell. When you press Enter
or move to another cell, the result will be displayed on the
worksheet.
• Use a formula for a calculation; just type the different parts
of your calculation in separate cells and note their
references, e.g. income in B2 and tax in C2. In a new cell,
enter the formula, beginning with a =. Use the cell
references for the components of the calculation rather
than the numbers themselves. For example, =C2-(B2*C2).
The value displayed in this cell is calculated for whatever
values you use in the component cells.
Note: If you have a row or column of cells and want to know
their sum, position the pointer in the cell at the end of the row
or column and tap the
for the sum of the preceding group of cells and calculate the
result.
button. Sheet will insert the formula
Page 57

There are two types of cell reference you can use in a formula:
• Relative references, such as A2. These get updated when
copied and moved elsewhere. For example, a reference to
cell A2 in a formula in cell B3 will change to B2 if the
formula is copied to cell C3.
• Absolute references, such as $A$2. These contain a $ sign in
front of the parts of the reference that you don’t want to
change even if the formula is moved elsewhere. So, $A$2 in
cell B3 remains $A$2 when copied to cell C3.
Use=toUse=to
Use=to
Use=toUse=to
enter formulaeenter formulae
enter formulae
enter formulaeenter formulae
• You can combine the two types of reference: A$5 in A6 will
become B$5 when copied to B8.
A formula which contains a reference to its own cell, either
directly or indirectly, is called a “circular reference”. You can find
any circular references in the worksheet using the Find
commands on the Edit menu. You should avoid making circular
references as they produce unpredictable results.
48Sheet
Page 58

RR
ecalculationecalculation
R
ecalculation
RR
ecalculationecalculation
Sheet automatically recalculates your worksheet every time you
change part of a calculation. You may want to turn this feature off
if you are making a large number of changes in the worksheet. To
do this:
• Tap the View Prefs button on the Toolbar or select the
Preferences command from the Tools menu, and set Auto
recalculation to off. When Auto recalculation is off,a‘
symbol will be displayed at the right end of the input line
whenever you need to recalculate manually to update
results.
To make Sheet recalculate the worksheet, select the command
from the Tools menu.
+?-’
Using rangesUsing ranges
Using ranges
Using rangesUsing ranges
A range is a rectangular block of cells. The reference for a range
consists of the cell references of the top left and bottom right
corners of the block, separated by a colon, e.g. B2:C6. You can
use ranges to define areas of the worksheet for applying
formatting, creating graphs, or include range references in
formulae, e.g. =SUM(B2:C6).
• To select a range: highlight all the cells you want to be a
part of your range.
• To use a range in a formula: highlight the range to be
inserted while entering the formula. For example, type
“=SUM(” then drag the highlight to cover the appropriate
range, type a “)” and press Enter.
49Sheet
FF
unctionsunctions
F
unctions
FF
unctionsunctions
Sheet has a large number of functions, e.g. mathematical,
financial and trigonometric functions, that you can incorporate in
your calculations. See the built-in help on the netBook for a full
list and details of syntax.
• To use a function in a calculation: just type it in.
Alternatively, tap the function button or select Function
from the Insert menu. Choose the function you require.
Naming rangesNaming ranges
Naming ranges
Naming rangesNaming ranges
• To name a range: highlight the range and add a name using
the Add name command from the Name commands on
the Insert menu. You can use this name in sums and
formulae, e.g. “=AVERAGE(Bills)”. You can edit the range
name using the Edit name command.
Page 59

Changing how information is displayedChanging how information is displayed
Changing how information is displayed
Changing how information is displayedChanging how information is displayed
You can format the information in the worksheet in a number of
ways, e.g. to differentiate the parts of tables and calculations.
Formatting is applied to the currently selected cells.
• To change the alignment of information: tap
the horizontal alignment, or use the command on the
Format menu to set both the horizontal and the vertical
alignment.
• To change the font: use the buttons in the Top toolbar to
change the font or font size. Alternatively, use the command
on the Format menu to select the font, font size and other
attributes, e.g. bold, superscript, strikethrough etc.
• To add bold, italic or underline: use the
buttons, or use the Font command as described above.
• To add a border: tap
the Format menu and select a border style for the each
side of cell.
• To add shading: tap
Format menu, and select the shading you want to apply.
or select the command from
or select the command on the
to set
Sorting informationSorting information
Sorting information
Sorting informationSorting information
You can sort rows in a list based on values in a single column or
in several columns. You can also sort columns based on values in
rows, if your list is set up that way. In either case, you can sort
using more than one row or column. For example, if you want to
sort a table based on a ‘surname’ column, but have more than
one entry for each surname, you can also sort again using a ‘first
name’ column.
Sorting from top to bottomSorting from top to bottom
Sorting from top to bottom
Sorting from top to bottomSorting from top to bottom
You can sort information in order from highest to lowest value,
or into alphabetical order, according to the information in a
particular column. Use this type of sorting if you want to change
the order of the rows in a table, e.g. to sort entries in a table into
the order specified by an ‘Amount’ column.
To sort from top to bottom:
1. Highlight the range of information that you want to sort.
Sheet will only sort information inside this range.
2. Tap the Sort button on the Toolbar and select Top-to-
bottom or select the command from the Tools menu.
3. In the dialog, select the column that you want to use to
order the rows, and specify the way that you want to sort.
Click Options if you want to make the sort case sensitive.
50Sheet
Page 60

Sorting from left to rightSorting from left to right
Sorting from left to right
Sorting from left to rightSorting from left to right
You can also sort from left to right. Use this type of sorting if you
want to change the order of the columns in a table.
To sort from left to right:
1. Highlight the range of information that you want to sort, rows
and columns. Sheet will only sort information inside this range.
2. Tap the Sort button on the Toolbar and select Left-to-
right or select the command from the Tools menu.
3. In the dialog, select the row that you want to use to order
the columns, and specify the way that you want to sort.
Click Options if you want to make the sort case sensitive.
Changing the number formatChanging the number format
Changing the number format
Changing the number formatChanging the number format
Select the Number command from the Format menu to change
the number format. You can set the formats for the current
highlighted range or all cells in the worksheet.
The number formats include general, triad (e.g. 3 000 000) and
scientific number display, as well as special formats for displaying
text, currency, dates and times, percentages.
Note: Some settings for the way numbers are displayed, e.g. the
thousands separator, are set in the System screen.
NumberNumber
Number
NumberNumber
formatsformats
formats
formatsformats
51Sheet
Page 61

GraphsGraphs
Graphs
GraphsGraphs
You can use Sheet to create, format and print graphs based on
information on the worksheet, for example to show annual sales
figures, or the distribution of revenue.
You can create many types of graphs including line graphs, bar
and column graphs, scatter charts and pie charts, and can add to
or alter many aspects of the graph’s appearance by tapping on
the area of the graph you wish to change.
Creating a graphCreating a graph
Creating a graph
Creating a graphCreating a graph
To create a graph:
1. Highlight a column or row of numbers in the Sheet view.
This will be the first “range” that your graph depicts. You
can add other ranges later on to build up your graph.
2. Tap the Graph button on the Toolbar to move to the graph
view.You will see your graph displayed on the screen.
Use the Sheet and Graph buttons on the Toolbar to switch
between the two views.
Graph viewGraph view
Graph view
Graph viewGraph view
52Sheet
Page 62

RR
eplacing the graph rangeeplacing the graph range
R
eplacing the graph range
RR
eplacing the graph rangeeplacing the graph range
When you create a graph, it is set to the range you first specified.
It will reflect changes to the data within that range, but will not
reflect other ranges you highlight on the worksheet. To replace
the current graph range (or ranges) with a new one:
1. In the Sheet view, highlight the new range you want the
graph to use.
2. Switch to the Graph view, then press the Set ranges
button. The new range(s) will replace the old one(s) as the
subject of the graph.
AA
dding a range to a graphdding a range to a graph
A
dding a range to a graph
AA
dding a range to a graphdding a range to a graph
You can add further ranges to graphs to display additional
information, e.g. to include a previous year’s sales figures as well
as the current ones.
• To add a range to a graph: select the range you want to
add to your graph in the Sheet view, switch to the Graph
view and then select the command from the Ranges menu.
Graph type & appearanceGraph type & appearance
Graph type & appearance
Graph type & appearanceGraph type & appearance
When you first create a graph, it will be a column graph. Change
the type using the button, or the Graph settings
command. The graphs types include line graphs, bar and column
graphs, scatter graphs and pie charts.
• To change the graph from 2D to 3D and back: use the
3D button on the Top toolbar,ortheGraph settings
command.
• To change the pattern used for a range: select the
Change range command from the Ranges menu, then
choose the range and the fill colours and styles for each
range.
• To change the background, text and line colours of a
graph: use the Colours and Styles pages in the Graph
settings and Change range dialogs.
Note: You can alter many aspects of the graph appearance by
tapping on the area of the graph you wish to change.
53Sheet
Page 63

AA
dding titles, labels and grid linesdding titles, labels and grid lines
A
dding titles, labels and grid lines
AA
dding titles, labels and grid linesdding titles, labels and grid lines
• To add a title to a graph: select the Graph settings
command from the Graphs menu and insert the title. You
can change the style and font of the title using the Title
font command on the Graphs menu or by tapping on the
Title Font button.
• To add axis titles: use the Format X-axis and Format
Y-axis commands. You can also use these commands to
format the X and Y axes, e.g. to add grid lines, tick marks,
add or remove axis labels, alter the axis position and scale,
or hide them completely.You can change the style and font
of the axis title using the Axes font button on the Toolbar
or the command on the Axes menu.
• To add labels to each range: use the Change range
command to specify the type of label you want and the cells
in which your labels are stored.
• To add a legend to a graph: tap the Legends button and
select the desired position for the legend. Alternatively, use
the Graph settings command.
WW
orking with more than one graphorking with more than one graph
W
orking with more than one graph
WW
orking with more than one graphorking with more than one graph
You can create more than one graph for a worksheet and switch
between them easily.
• To create a new graph: highlight the first range for the
new graph, then switch to the Graph view. Select the New
graph command from the Graphs menu, and specify the
settings for the new graph.
• To switch between the graphs you have created: tap
the Graph button on the Top toolbar or use the command
on the Graphs menu.
PP
rinting from Sheetrinting from Sheet
P
rinting from Sheet
PP
rinting from Sheetrinting from Sheet
You can print a range of pages, the entire worksheet or a graph
from Sheet using the Printing commands on the File menu. You
need to set up the page layout and printer first, using the Page
setup and Print setup commands. You can use the Print
preview command or the Print button in the Toolbar to display
a preview.
See the ‘Printing’ chapter for more details.
54Sheet
Page 64

CONTCONT
ACTSACTS
CONT
ACTS
CONTCONT
ACTSACTS
You can use the Contacts program to store information about
your “contacts”, such as those found in an address book. Each
contact includes “labels” for details such as names, addresses,
email addresses, telephone and fax numbers.
Adding a contactAdding a contact
Adding a contact
Adding a contactAdding a contact
You can add contact details in any order.To add a contact:
1. Tap the New contact button or select the command from
the File menu.
2. Type the contact information next to the appropriate labels.
• Tap on a label or use the arrow keys to move between the
boxes. Use the scroll bar to see labels which are not
currently displayed.
• Tap on the page headings to move between the personal
and work pages.
3. Tap the Save button when you’ve finished typing in the
contact details.
Note: If there is no suitable label for the information you wish to
enter, you can add a new label. See ‘Contact labels’ later.
Looking at your contactsLooking at your contacts
Looking at your contacts
Looking at your contactsLooking at your contacts
Contact details are displayed as a single page, with the contacts
list shown alongside.
• To sort contacts alphabetically by first name, last name or
company name, use the Sort button on the Toolbar or the
command on the View menu.
• To adjust the width of the list and contact details, use
Preferences on the Tools menu.
How do I dial a telephone number?
You can dial a contact’s telephone number by selecting the contact
and tapping the Dial button on the Toolbar. See the ‘Dialling’
chapter for details of how to dial numbers directly from Contacts
and other programs.
55Contacts
Page 65

FF
inding contactsinding contacts
F
inding contacts
FF
inding contactsinding contacts
You can find contacts by typing part of the name, or search for
text contained anywhere within the contact details.
• To search for a contact by name, simply type the first few
letters of the name in the ‘Find:’ box and press Enter. Only
the name and company name are searched.
• To search for text contained anywhere within a contact’s
details, e.g. text in an address, email or notes label, tap on
the Find in all text button on the Toolbar or use the
command on the Edit menu.
List of contactsList of contacts
List of contacts
List of contactsList of contacts
Search tips.
Type a ? for a single unknown letter or a * for any number of
unknown letters (known as “wildcards”), e.g. typing ‘?ath’ would
find ‘cath’ and ‘kath’, whereas typing ‘*ath’ would also find
‘goliath’.
After a search, only those entries including the search text will be
displayed. To display all the contact entries again, tap on the
‘Find:’ box.
LabelLabel
Label
LabelLabel
Details ofDetails of
Details of
Details ofDetails of
selected contactselected contact
selected contact
selected contactselected contact
56Contacts
Page 66

57Contacts
Editing & deleting contactsEditing & deleting contacts
Editing & deleting contacts
Editing & deleting contactsEditing & deleting contacts
To change a contact’s details:
1. Select the contact you wish to edit, then tap on the Edit
contact button on the Toolbar or select the command from
the File menu.
2. Change the contact details as required, and tap the Save
button to save your changes.
To delete a contact, select the command from the File menu.
Note: If you delete a contact accidentally, select Undo delete on
the Edit menu to get it back again.
Contact labelsContact labels
Contact labels
Contact labelsContact labels
If the current contact labels are not suitable for the information
you wish to enter, you can add, remove and rename the labels
used by all new contacts. It is best to set up the labels you want
before you start to type in your entries.
Note: If you wish to store different types of information, you can
use the Data program to create a custom database. See the
‘Data’ chapter for more information on creating your own
databases.
Changing labelsChanging labels
Changing labels
Changing labelsChanging labels
Each individual contact can have different labels from other
contact entries. To add a label to a single contact:
1. Open a contact by adding a new contact or editing an
existing entry.
2. Tap Add item and select the label to add to the contact.
Note: The label you select will only be added to this individual
contact.
Page 67

You can add, remove, rename and change the order of labels
used for all new contacts. To do this, select Set up labels on
the Tools menu.
• To add a new label, tap Add item and select a label type.
• To change the name of a label, select it and tap Rename.
LabelLabel
Label
LabelLabel
• To change the order of a label in the list, select it and use
Move up and Move down.
• To delete a label, select it and tap Delete.
Note: You can’t delete labels from existing contacts, but you
can prevent a label’s title appearing by deleting its contents.
PP
age labelage label
P
age label
PP
age labelage label
appears onappears on
appears on
appears onappears on
58Contacts
Page 68

ExEx
changing contactschanging contacts
Ex
changing contacts
ExEx
changing contactschanging contacts
You can exchange contact details with other programs and
machines which support the ‘vCard’ standard. You can also
exchange contacts using Infrared with other machines which
support the ‘vCard’ and ‘IrObex’ standards (see ‘Infrared’ for
more details).
To do this, use the More command on the File menu to:
• import information from a vCard file into Contacts.
• export contacts as a vCard file for use with another
program.
Note: You can choose to export only the selected contact, or all
contacts currently in view (e.g. the result of a search).
PP
rinting contactsrinting contacts
P
rinting contacts
PP
rinting contactsrinting contacts
You can print all your contacts, or choose a set of contacts to
print by using a search.
• Before you print, refer to the instructions in the ‘Printing’
chapter to select a printer.
To print contacts:
1. Display the contacts you wish to print.
Note: If you do not wish to print all the contacts, select a contact
or use the find commands to display a selection of contacts (see
‘Finding contacts’).
2. Tap on the Print button on the Toolbar or use the Printing
commands on the File menu:
• Use the Page setup command to control the page size,
margins, and add headers and footers. See the ‘Printing’
chapter for more details.
• Use the Print setup command to specify which contacts to
print, and the number of copies.
• Use the Print preview command to see how your printed
copy will look.
• Use the Print command to print your entries.
59Contacts
Page 69

Search resultsSearch results
Search results
Search resultsSearch results
Search clueSearch clue
Search clue
Search clueSearch clue
Dial dialogDial dialog
Dial dialog
Dial dialogDial dialog
60Contacts
Page 70

61Agenda
AGENDAGEND
AGEND
AGENDAGEND
You can use the Agenda program as a time manager, for
recording appointments, events, birthdays, anniversaries and lists
of things to do.
When you first open Agenda, you’ll see a planner for the current
week, or the “Week view ”. You can start adding your
appointments and other entries straight away by moving to the
appropriate day and typing them in.
AA
A
AA
TT
oo
--
do entrydo entry
T
o
-
do entry
TT
oo
--
do entrydo entry
HandwrittenHandwritten
Handwritten
HandwrittenHandwritten
entryentry
entry
entryentry
What if I already use a PC scheduler?
If you already keep your schedule on your PC, you can use PsiWin
to synchronize your PC scheduler with a new Agenda file to
quickly bring all your PC entries across. You can then synchronize
regularly to keep the information up to date in both places. See the
PsiWin on-line help for more details.
Change viewChange view
Change view
Change viewChange view
Entry crossingEntry crossing
Entry crossing
Entry crossingEntry crossing
midnightmidnight
midnight
midnightmidnight
Page 71

Moving aroundMoving around
Moving around
Moving aroundMoving around
• Use the arrow keys to move around the days.
• Press the Today button on the Toolbar, or the Spacebar to
go to today’s date. Press the Spacebar again to move back
to the day you were on.
• Tap on the Goto button on the Toolbar and enter the date
that you want to go to. Tap OK.
• Tap on the “dog ears” in the bottom corners of the pages to
move between pages.
• To move between dates, tap on the title of the view or
press Ctrl+J to see a calendar (you can also press Tab in
some views). Move the highlight to the date you want and
press Enter.
Note: The Agenda has a number of other views, e.g. a Day view
andaYear view.You can set preferences to change which view
you see when you first open the Agenda program, and customise
other aspects of the way Agenda works. See ‘Customising
Agenda’ later.
Adding appointments & eventsAdding appointments & events
Adding appointments & events
Adding appointments & eventsAdding appointments & events
Agenda has 3 types of entries for appointments and events:
• Timed day entries for appointments that you wish to give
a duration, e.g. a meeting or dental appointment. The
duration can be displayed in the Agenda views so that you
can see when you are busy. A timed entry can have any
duration (up to 31 days).
• Untimed day entries for an appointment without a
duration.
• Events for entries that you wish to last a specified number
of days, which do not have start and end times, e.g.
holidays.
62Agenda
Page 72

63Agenda
Timed & untimed entriesTimed & untimed entries
Timed & untimed entries
Timed & untimed entriesTimed & untimed entries
To enter a “timed” or “untimed” day entry:
1. Move the cursor to the date of the appointment and start
typing. As soon as you start typing the New entry dialog is
shown where you can set the start time and duration of the
appointment. If the appointment does not need a start time,
remove the tick from the Timed entry box.
• A timed entry appears with a start time, and can also be
displayed with a duration. Entries which cross midnight are
marked with « on subsequent days.
• An untimed entry appears with a bullet and is displayed in
the time slot where you type it in.
2. You can set the duration or end time of a timed entry in the
New entry dialog, or tap the Alarm/More button and move
to Details page to enter a duration longer than 23 hours.
Note: Each view has a standard entry type that is created when
you start to type. To add other types of Agenda entry, select
Create new entry from the Entry menu, and then select the
type of entry you want. You can change the standard entry type
for each view. See ‘Customising Agenda’ later.
Note: You can add a handwritten entry by writing the entry as a
sketch; see ‘Attaching a sketch’ later.
EventsEvents
Events
EventsEvents
• To enter an event: select the command for creating a new
event from the Entry menu. Type in the details of the event,
e.g. ‘Holiday in Spain’ and set the start date and duration in
days. Event entries are marked with a flag symbol (
“P“P
encilling in” a tentative entryencilling in” a tentative entry
“P
encilling in” a tentative entry
“P“P
encilling in” a tentative entryencilling in” a tentative entry
• To pencil in an Agenda entry, e.g. to reserve a time slot for
an appointment that has not been confirmed: press the
Alarm/More button in the New entry dialog, move to the
Other page and tick the tentative entry box. The entry will
be displayed as grey text in the Agenda views.
• To confirm a tentative entry: highlight the tentative entry,
then select the Make tentative command from the Entry
menu to remove the tick from the menu command.
).
Page 73

Viewing entriesViewing entries
Viewing entries
Viewing entriesViewing entries
Agenda has the following views, for looking at Agenda entries in
different ways:
• Day view - shows all the entries for one day, hour by hour.
• Week view - shows the entries for the whole week.
• Anniversary view - shows birthdays, anniversaries, etc.
• Busy view - showing your free and busy time over a four
week period.
UntimedUntimed
Untimed
UntimedUntimed
day entryday entry
day entry
day entryday entry
Event entryEvent entry
Event entry
Event entryEvent entry
• To-do view - shows lists of things to do.
• Year planner - shows an overview of entries for the year,
and displays entry symbols.
Switch between the views by tapping on the View button or by
selecting the view from the View menu.
You can set preferences to change the way the views look. See
‘Customising Agenda’ later.
TT
imed day entryimed day entry
T
imed day entry
TT
imed day entryimed day entry
64Agenda
Page 74

65Agenda
Entry symbolsEntry symbols
Entry symbols
Entry symbolsEntry symbols
You can group entries together using “entry symbols”. An entry
symbol is a letter you can use to identify particular entries, for
example, M for meetings. The entry symbol can also be used to
show entries in the Year planner.
Birthdays and anniversariesBirthdays and anniversaries
Birthdays and anniversaries
Birthdays and anniversariesBirthdays and anniversaries
1. Move to the Anniversary view and just start typing, or select
the command for creating a new anniversary entry from the
Entry menu in any view.
2. Type in the details of the anniversary, e.g. ‘Jane’s birthday’
and set the day and month of the anniversary.
3. Press the Alarm/More button if you wish to specify other
details about the anniversary, e.g. the start year and
whether you want to see the start year (e.g. a person’s year
of birth) and/or the number of years since the start year
(e.g. their age).
Anniversaries are marked with a candle symbol ( ).
RR
eminders for entries - alarmseminders for entries - alarms
R
eminders for entries - alarms
RR
eminders for entries - alarmseminders for entries - alarms
To set an alarm for an Agenda entry:
1. Move the cursor to the entry.
2. Set the alarm using the command from the Entry menu.
You can also set an alarm while adding an entry, by pressing
the Alarm/More button in the New entry dialog and then
moving to the Alarm page.
3. Set the amount of warning that you want, or the time at
which you want the alarm, and the alarm sound you want.
Initially you will see the list of standard alarm sounds, but you can
add your own sounds for alarms using the Record program. See
the ‘Customising your netBook’ chapter for more details.
Entries which have alarms are marked with a bell symbol (
• To remove an alarm, select the Set alarm command from
the Entry menu and remove the tick from the alarm box.
).
Page 75

Will alarms still ring if I close Agenda?
If you close an Agenda file, the Agenda informs the netBook clock
to ring the next Agenda alarm at the appropriate time. However,
the netBook will not be able to ring any further Agenda alarms
from that file until you open it again.
If you use alarms a lot in your Agenda, it is therefore a good idea to
leave the Agenda file open when you are not using it, even when
the netBook is switched off.
Alarm warningAlarm warning
Alarm warning
Alarm warningAlarm warning
If you do need to close the Agenda file, do not set an alarm and
then immediately close the file or switch off. This is because the
Agenda program needs a certain amount of time to calculate when
the next alarm should ring, and if you switch off before the
calculation is complete, the netBook clock will not have been
informed to sound the alarm.
66Agenda
Page 76

Finding entries and datesFinding entries and dates
Finding entries and dates
Finding entries and datesFinding entries and dates
You can search through the Agenda entries for a particular piece
of text or for entries with particular settings, or a particular entry
symbol.
1. Tap the Find button on the Toolbar or select the command
from the Edit menu.
2. Type the text you want to find (you can leave the line blank
if you want to list all of the entries). Select the dates you
want to search using the range lines. Select any other
settings as appropriate; press the Options button to select
the entry types you want to find.
A list of matching entries is shown. Move the cursor to an entry
in the list and press Enter to display it in full.
Use the commands from the Edit menu to go to the previous or
next entry or to go to a specific day.
Using the calendarUsing the calendar
Using the calendar
Using the calendarUsing the calendar
You can also go to a specific day using the built-in calendar.Tap
on the date titles or press Tab to display it in the Day,Week, or
Anniversary views; alternatively select the Calendar command
from the View menu in any view.Today’s date is circled, and the
currently selected date is highlighted. In a calendar you can:
• Press the buttons in the top of the calendar to see a 1, 3 or
12 month calendar.
• Tap on the “dog ears” in the bottom corners of the calendar
to move between the calendar “pages”.
• Use the left and right arrow keys to move between days.
Use Shift at the same time to move between dates in a
month, Ctrl to move to the same day in the previous or
next month, or Fn to move to the first or last date on the
“page”.
When the highlight is on the day you want, press Enter to move
to that day.
67Agenda
Page 77

Changing and deleting entriesChanging and deleting entries
Changing and deleting entries
Changing and deleting entriesChanging and deleting entries
• To move or copy an entry: use the Cut or Copy
commands from the Edit menu to move or copy an entry.
Move the cursor to the new entry position and paste the
entry. All entry details are transferred to the new location;
alarm settings are adjusted accordingly.
• To change an entry ’s “type”, e.g. to change a day
entry to an event: highlight the entry you want to change
and select the command from the Entry menu. Select the
new entry type, and complete the settings for the new entry
type.
• To change the entry text: highlight the entry you want to
change and tap on it, or press Enter. Now you can edit the
text, making use of the normal text selection and emphasis
keys. If you wish to change the font, letter size, etc. press
the Alarm/More button, then move to the Text page. You
can also move an entry by editing the entry in this way and
changing the entry time or date.
Deleting entries & crossing outDeleting entries & crossing out
Deleting entries & crossing out
Deleting entries & crossing outDeleting entries & crossing out
To remove an individual entry from the Agenda, select it and
press Delete or use the command from the Edit menu.
• You don’t have to delete individual entries in the past, these
can be removed automatically by “tidying” the Agenda file.
See ‘Tidying an Agenda file’ later.
• If you want to mark an entry as completed, without
removing it from the Agenda, move the cursor to it and
cross it out using the command from the Entry menu. The
entry will now appear in the Agenda views with a line
through it, and any alarm for this entry will be cancelled.
68Agenda
Page 78

RR
epeating entriesepeating entries
R
epeating entries
RR
epeating entriesepeating entries
You can set an entry to repeat automatically, e.g. a monthly
meeting.
1. Move the cursor to the entry and set the repeat using the
command on the Entry menu.
2. Set up the repeat type as appropriate, e.g. Daily, Monthly,
Weekly etc. You can also set the repeat to ‘Monthly by
date’, e.g. the 7th of each month, ‘Monthly by days’, e.g. the
first Monday of each month, ‘Yearly by date’, e.g. once
every year on the same date or ‘Yearly by day of week’, e.g.
the third Tuesday in March every year.
3. Press the Alarm/More button to set up the days and dates
for the repeats (except for ‘Daily ’ repeats). Set the interval
for how many days, weeks, months or years you want
between repeats.
• If you only want the entry to repeat a few times, remove
the tick from the ‘Repeat forever’ line and set the number
of occurrences, or type in the date of the last occurrence on
the ‘Until’ line.
• If you only want to see the next occurrence of a repeated
entry, you can choose to show ‘Next only ’.
Entries which are set to repeat are marked with ».
Note: If you select ‘Next only ’ and the last occurrence has
passed, you will not see the entry any more. Use the Find
command from the Edit menu to be able to see them.
Lists and things to doLists and things to do
Lists and things to do
Lists and things to doLists and things to do
You can use a “to-do list” to note down tasks or items you want
to remember. Initially you have two to-do lists, and you can add
more lists later.
You can also give each item on a to-do list a due date, and assign
priorities to to-do entries to control the order they appear in the
Agenda views.
To-do entries are marked with a circled ‘T’ symbol (
AA
dding a todding a to
A
dding a to
AA
dding a todding a to
1. Move to the To-do view and just start typing, or create a
2. Type in the details of the to -do, e.g. ‘Buy paper’. The
3. If the to-do entry has a deadline, press the Alarm/More
--
dodo
-
do
--
dodo
new to-do entry using the command from the Entry menu.
“Priority” can be used to determine the order in which todo entries are listed in the to -do list, priority 1 is highest.
button and tick the ‘Dated’ box. Then set the due date to
the deadline date. If you want advanced warning of the
deadline, set up warnings as appropriate. You can set how
due dates are shown, e.g. Date, Days or Auto (date, days
and ‘tomorrow’) if you want to see when the to-do is due.
).
69Agenda
Page 79

Creating a new toCreating a new to
Creating a new to
Creating a new toCreating a new to
You can create new to-do lists so that you can categorise the
things you want to remember, for example you can keep a
private to-do list and a work to-do list. Each to-do list is
displayed on a “page” in the To-do view. Move between the todo list pages by tapping on the “dog ears” in the bottom corners,
or using the left and right arrow keys. Tap on the to-do list title
to see a list of available lists.
1. Create a new to-do list using the command from the To-do
lists menu.
TT
oo
--
do prioritydo priority
T
o
-
do priority
TT
oo
--
do prioritydo priority
--
do listdo list
-
do list
--
do listdo list
2. Type in a name for the list, e.g. ‘Wedding plans’. You can
rename the list later if you need to using the command from
the To-do lists menu.
3. Specify the page number that you want this to-do list to
appear on, and which to-do list you want to base the
settings of the new list on.
4. Press the OK button to save the new list, and you’ll see the
new list in the To-do view.
You can delete an unwanted to-do list and all its entries, using the
command from the To-do lists menu.
Crossed outCrossed out
Crossed out
Crossed outCrossed out
entryentry
entry
entryentry
70Agenda
Page 80

71Agenda
Customising a TCustomising a T
Customising a T
Customising a TCustomising a T
You can change the way the to-do list looks and how to-do
entries are shown in the Day and Week views.
Select To-do list preferences from the To-do lists menu.
• Each to-do list is displayed on a “page”; the page number
controls the order in which the to-do lists are displayed. If
you want to move the to-do list to another page, set the
page number as appropriate.
TT
oo
--
do entriesdo entries
T
o
-
do entries
TT
oo
--
do entriesdo entries
(standard(standard
(standard
(standard(standard
position at 8am)position at 8am)
position at 8am)
position at 8am)position at 8am)
oo
--
o
-
oo
--
do listdo list
do list
do listdo list
• If you want to be able to arrange to-do entries on the list
yourself, set the sort order to Manual. New entries you add
to the list will appear at the cursor position, and you can
cut, copy and paste to-do entries to put them in the order
you want.
• Tick the boxes according to what you want to see in the
To-do view and other views.
• If you want to see to-do entries in a specific time slot in the
Day view, for example personal to-do entries in the evening,
set the time as the standard position.
CustomisedCustomised
Customised
CustomisedCustomised
time slotstime slots
time slots
time slotstime slots
Page 81

Information from other programsInformation from other programs
Information from other programs
Information from other programsInformation from other programs
You can use the Paste command to insert text copied in other
programs straight in as an Agenda entry. For example, copy some
text in Word using the Copy command, move to Agenda and to
the position you wish the Agenda entry to appear and select Paste.
Y ou can also insert information from other programs into an
Agenda entry, e.g. add a sketch of a map to the entry for a
meeting appointment. This information is called an “object”.
Attaching WAttaching W
Attaching W
Attaching WAttaching W
You can attach a Word document as a “memo” to any Agenda
InsertedInserted
Inserted
InsertedInserted
WW
ord objectsord objects
W
ord objects
WW
ord objectsord objects
ord documents to entriesord documents to entries
ord documents to entries
ord documents to entriesord documents to entries
entry, for example a list of things you want to discuss at a
meeting. To do this:
1. Highlight the entry to which you want to attach the Word
document.
2. Tap the Word button on the Toolbar or select the command
from the Edit object commands on the Edit menu.
3. This takes you to a new Word document where you can
type in your text. See the ‘Word’ chapter for more about
using Word. When you have finished editing the document,
close it to return to Agenda.
• To see or edit the document later, select the entry with the
attached memo and then select the Word command again.
InsertedInserted
Inserted
InsertedInserted
SkSk
etch objectetch object
Sk
etch object
SkSk
etch objectetch object
72Agenda
Page 82

73Agenda
Attaching a “voice note”Attaching a “voice note”
Attaching a “voice note”
Attaching a “voice note”Attaching a “voice note”
You can attach a spoken memo (a “voice note”) or another
sound to any Agenda entry.To attach a voice note:
1. Select the entry to which you want to attach the voice note.
2. Select the Voice note command from the Edit object
commands on the Edit menu.
3. This takes you to a Record file where you can make the
recording in the normal way. See the ‘Record’ chapter for
more about using the Record program. When you have
finished making the recording, close Record to return to
Agenda.
• To listen to the voice note later, select the entry with the
attached voice note and then select the Voice note
command again. Play the sound in Record and close Record
to return to Agenda.
Attaching a sketchAttaching a sketch
Attaching a sketch
Attaching a sketchAttaching a sketch
You can add a sketch in one of 2 ways:
• by adding a sketch as an entry using the Sketch button in
the Toolbar.You can add a picture, or handwritten note in
this way. Just create the picture in Sketch and close the
Sketch program to return to Agenda.
• by attaching a sketch to a text entry as an icon. Select the
entry to which you want to add the sketch, then select the
Sketch command from the Edit object commands on the
Edit menu.
In either case, to see or edit the picture later, select the entry
with the attached picture and then select the Sketch command
from the Edit object commands from the Edit menu.
Page 83

Customising AgendaCustomising Agenda
Customising Agenda
Customising AgendaCustomising Agenda
You can change the view that you see when you open the
Agenda and set preferences for inserted objects by selecting the
General preferences command from the Tools menu.
You can change the way each view looks by selecting View
preferences from the Tools menu, while in the view.
• In the View preferences, you can select which type of entry
you will add if you select an empty day or time slot and just
start typing, press Enter or tap on an empty slot.
• You can also select which types of entry you want to show
in the Day,Week and Year planner views.
• If you want to change the times shown in the day view to
suit your working day, change slot definitions in the Day
view preferences.
• If you only want to show one entry symbol in the Year
planner, set the ‘Show which symbols’ line in the Year
planner preferences to ‘One’. Then select the entry symbol
you want to show.
You can change the standard settings for entries by selecting
Entry preferences from the Tools menu, and then selecting the
entry type.
Agenda filesAgenda files
Agenda files
Agenda filesAgenda files
You may wish to keep separate Agenda files for business, hobbies
and so on.
Create a new Agenda file for your information (using the
command on the File menu).
• You can now add entries to the new Agenda file. You can
use cut, copy and paste to move entries between Agenda
files.
• If you have two Agenda files and want to combine them, use
the Merge command from the File menu.
““
Tidying” an Agenda fileTidying” an Agenda file
“
Tidying” an Agenda file
““
Tidying” an Agenda fileTidying” an Agenda file
You should tidy the Agenda on a regular basis to stop the file
from getting too large. To do this:
1. Select the Tidy/archive file command from the More
commands on the File menu.
2. You can select whether you want to copy or move old
entries to a new file, or delete them. If you move or copy
them to a new file, you must specify the name and location
of the new file.
If you copy them to a new file, the entries are not removed
from the current Agenda file.
3. Select which entries you wish to tidy, e.g. crossed out
entries, and select the entry types you want to tidy by
pressing the Entry types button.
4. Select the range of entries you want to tidy.
Note: If you have moved or copied entries to a new file, you
should see the file on the System screen and be able to open it
like any other Agenda file.
74Agenda
Page 84

PP
rinting Agenda entriesrinting Agenda entries
P
rinting Agenda entries
PP
rinting Agenda entriesrinting Agenda entries
You can print all the Agenda entries, or limit the range you print
to certain dates of interest, for example only the coming week.
• Before you print, refer to the ‘Printing’ chapter; this tells
you how to set up the printer and page.
Tap the Print button on the Toolbar or select the Printing
command from the File menu:
• Use the Page setup command to specify how the entries
will appear in the printed copy.You can control the page
size, margins, and add headers and footers. See the
Printing section for more about this.
• Use the Print preview command to display pages showing
how the printed copy will look.
• Use the Print command to print the entries.
75Agenda
When you select Print or Print preview, you’ll see a dialog in
which you specify the date range of the entries you want to
print.
Press the Entry types button to set:
• Whether you want to print all repeat entries or only the
next one.
• Whether you want to print crossed out entries.
• Whether you want to print only entries with a specific entry
symbol.
Page 85

Synchronising with a PC SchedulerSynchronising with a PC Scheduler
Synchronising with a PC Scheduler
Synchronising with a PC SchedulerSynchronising with a PC Scheduler
You can synchronise the Agenda with the PC agenda on your PC
using PsiWin, to ensure that both agendas are kept in step with
each other.
Note: Refer to the PsiWin on-line help for details of how to
synchronise your diaries.
Synchronising entries with a PC schedulerSynchronising entries with a PC scheduler
Synchronising entries with a PC scheduler
Synchronising entries with a PC schedulerSynchronising entries with a PC scheduler
You can specify for each entry, whether you want to synchronise
it with your PC agenda. Entries that aren’t synchronised are
marked with a
YY
ear viewear view
Y
ear view
YY
ear viewear view
Entry symbolEntry symbol
Entry symbol
Entry symbolEntry symbol
, private entries are marked with a .
1. When adding or editing an entry, press the Alarm/More
button in the entry dialog, then move to the Other page.
2. Tick the Synchronise box if you want to synchronise the
entry with the PC agenda. Tick the Private on
synchronised agenda box if you want to keep the entry
confidential in the PC agenda.
To change the settings of a whole To-do list, select Agenda
synchronisation from the To-do lists menu. If the To-do list is
not synchronised, none of the individual To -dos will be. If the
To-do list is set to Private, so are all individual To-dos.
76Agenda
Page 86

SETTING UP WEB AND EMAILSETTING UP WEB AND EMAIL
SETTING UP WEB AND EMAIL
SETTING UP WEB AND EMAILSETTING UP WEB AND EMAIL
Before Web and Email can be used on your netBook, you need
to set up ISP and Email account details.
Where to find out moreWhere to find out more
Where to find out more
Where to find out moreWhere to find out more
After you’ve set up email on your netBook, you can find out
more by consulting the:
• Email on-line help, for detailed information about setting
up and using the Email program.
• Email and Web sections of this User Guide, for more
information on sending and receiving email messages and
using the Web application.
• Email manual (on the PsiWin CD ROM), for detailed
information about setting up and using email, fax and SMS
messages, and using the Email program.
• Web on-line help, for detailed information about using the
Web program.
• Web manual (on the PsiWin CD ROM), for detailed
information about using the Web program.
Displaying the on-line help.
To display on-line help about Email on your netBook, open the
Email program and select Help on Email from the Tools menu.
Before you start…Before you start…
Before you start…
Before you start…Before you start…
How can I use WHow can I use W
How can I use W
How can I use WHow can I use W
You can use your netBook to:
• Access the Internet and view web pages.
• View locally stored web pages and graphics files.
• Download files e.g. additional programs for your netBook.
How can I use Email on my netBook?How can I use Email on my netBook?
How can I use Email on my netBook?
How can I use Email on my netBook?How can I use Email on my netBook?
You can use your netBook to send and receive email messages
using either one, or both, of the following methods:
1. Connecting by telephone line to a ‘Remote’ mailbox.
This is when you make a ‘live’ connection to your email
mailbox via a telephone line (without needing a PC). For
example, you could access your personal mailbox by dialling
your Internet Service Provider (ISP), or access your work
mailbox by dialling your company’s service provider or
office mailbox.
What to do next…
If you want to access your work mailbox, you will first need to
contact your network administrator to find out whether you can
make a ‘remote’ (dial-up) connection to your mailbox.
See ‘What type of Email accounts can I use?’ to continue.
2. Connecting to a PC which can access your mailbox.
This is when you connect directly to a PC which can access
your mailbox. Using PsiWin’s ‘Email Synchronization’, you
can write emails off-line on your netBook, and then connect
to your PC to send and receive messages.
How do I do this?
To access your mailbox via a PC, you will first need to install PsiWin
on the PC and set up ‘Email Synchronization’. This guide does
not include information on Email Synchronization. If you
wish to use Email Synchronization see the PsiWin CD ROM.
eb on my netBook?eb on my netBook?
eb on my netBook?
eb on my netBook?eb on my netBook?
77Web & Email Setup
Page 87

What type of email accounts can I use?What type of email accounts can I use?
What type of email accounts can I use?
What type of email accounts can I use?What type of email accounts can I use?
There are a number of different types of email account. See the
list below to find out which types of account you can connect to
using the Email program on your netBook:
• A personal ‘dial-up’ account. This could be a dial-up
email account which you’ve signed-up for with an Internet
Service Provider (ISP), e.g. Freeserve or Pipex Dial.
Which ISPs can I use?
You can use most ISPs which use ‘Internet standard’ methods for
connecting to your email account. However, some ISPs (such as
America Online) use proprietary methods for connecting, and
cannot be accessed by your netBook (i.e. you must use a PC).
Move on to ‘Setting up your netBook’ to continue.
• A‘remote’ (e.g. office) email account. This could be an
email account at your workplace, e.g. using Lotus cc:Mail or
Microsoft Mail.
How do I find out if I can use my account?
You will need to find out from your network administrator whether
you can access your email mailbox using this type of account.
If you can, move on to ‘Setting up your netBook’ to
continue.
• AWeb based email account. This is an email account
which you must connect to using a Web browser, e.g.
HotMail or Yahoo! Mail.
You can’t connect to this type of account using the Email
program.
To use Web based email, you must first set up your netBook for
Internet access. To do this, follow all the stages in the ‘Setting up
your netBook’ section, except ‘Setting up the Email program’. You
will need to use the Web program to access your email provider’s
Web site.
If you don’t have an Internet/email accountIf you don’t have an Internet/email account
If you don’t have an Internet/email account
If you don’t have an Internet/email accountIf you don’t have an Internet/email account
You will require an email account before you can access the
internet and send and receive email messages on your netBook.
• To get a personal email account, you must ‘sign-up’ with an
Internet Service Provider (ISP). ISPs usually provide an email
account as part of an Internet access package.
• Most ISPs will provide software (e.g. a CD ROM) which will
help you set up Internet access and the email account on a
PC.
Important: Some ISPs require that you connect to them
using a PC in order to sign-up. If you can’t do this, contact
the ISP to find out if you can sign-up without using a PC. If
you have Internet access, see “www.mobile.psion.com”
for more details.
78Web & Email Setup
Page 88

Setting up your netBookSetting up your netBook
Setting up your netBook
Setting up your netBookSetting up your netBook
79Web & Email Setup
What do I need to use WWhat do I need to use W
What do I need to use W
What do I need to use WWhat do I need to use W
To access the Internet and send and receive email on your
netBook you must have the following:
1. An appropriate Email account.
To access the Internet and use email, you will need an
Internet ‘standard’ email account. See the ‘Before you
start…’ section for more details.
2. A Modem.
You will need a modem to connect your netBook to the
telephone network. You can use the following types of
modem with your netBook:
• Standard external PC modems.
• ‘PC Card’ modems.
• Mobile phones with built-in modems.
Note: if your mobile phone doesn’t have a built-in modem,
you will need to use it with a PC Card modem.
eb/Email?eb/Email?
eb/Email?
eb/Email?eb/Email?
3. A telephone connection.
If you are using a standard external modem or PC Card
modem, you will need to connect your modem to a
telephone socket. If you are using a mobile phone, your
network operator will need to enable your SIM (Subscriber
Identity Module) card so that you can make fax and data
calls on your phone. If your phone has been enabled for fax
and data calls, you should have two extra phone numbers.
Contact your network operator if you are unsure whether
your phone’s SIM card is ‘data-enabled’.
Note: If your mobile phone supports IrDA you can use it
without the need for additional cables.
Getting help.
If you are having connection problems, you can find information
about connecting using specific service providers, modems or
mobile phones on our Web site at “www.mobile.psion.com”.
Page 89

What information do I need?What information do I need?
What information do I need?
What information do I need?What information do I need?
Before you can set up your netBook, you will need to find out
some information about your modem and your Internet email
account by:
• Checking any documentation your ISP supplied about your
Internet account, or contacting your network administrator
at work.
• Checking your ISP’s Web site for technical support.
• Contacting your ISP by email or phone for technical
support.
• Checking the Psion Web site at “www.mobile.psion.com”
for details of worldwide ISPs and to use the ISP
configuration wizard.
Templates for popular service providers.
The PsiWin CD ROM contains ‘templates’ for popular Internet
Service Providers, including those in the UK, US and Germany.You
can use these templates to help you quickly set up your email
account.
Information checklistInformation checklist
Information checklist
Information checklistInformation checklist
The checklist overleaf shows what information you will need to
set up your netBook. Only your ISP or your network
administrator can supply all the information required about your
Internet email account.
Glossary of termsGlossary of terms
Glossary of terms
Glossary of termsGlossary of terms
Email
An email (Electronic mail) is a text message which is sent over
the Internet.
ISP
Internet Service Providers are companies which provide you
with access to the Internet. An ISP ‘account’ normally includes
the facility to send and receive email using a personal email
address.
POP3/IMAP4
Internet ‘protocols’ (standards) for receiving email.
SMTP
An Internet protocol used for sending email.
TCP/IP
An Internet protocol used by computers to communicate with
each other.
DNS
The Domain Name System is an address book which allows
computers on the Internet to find each other by using ‘IP
addresses’ and ‘Hostnames’.
IP address
A computer’s unique Internet address, e.g. “194.129.243.153”,
used by computers to communicate with each other.
Hostname
A human readable version of an IP address, e.g.
“www.psion.com” could be the same as the IP address
“194.129.243.153”.
80Web & Email Setup
Page 90

81Web & Email Setup
Information you needInformation you need
Information you need
Information you needInformation you need
The speed at which you should Your modem’s documentation
use your modem (called the baud rate)
The phone number you need to dial to From your ISP/administrator
connect to your ISP (often called a
Point of Presence or POP )
The username for your Internet account From your ISP/administrator,
The password for your Internet account From your ISP/administrator,or
POP3 or IMAP4 server address From your ISP/administrator,
(for incoming messages) e.g. “pop3.myisp.com”
SMTP server address From your ISP/administrator,
(for outgoing messages) e.g. “smtp.myisp.com”
Where to find itWhere to find it
Where to find it
Where to find itWhere to find it
e.g. “jcrook” or “nd44”
you may have chosen this yourself
WW
rite it hererite it here
W
rite it here
WW
rite it hererite it here
Email address From your ISP/administrator,
(your personal address) e.g. “myname@myisp.com”
Page 91

Some service providers require additional information to ‘log on’ to their server.
You may need the following information when using some service providers.
Optional information Where to find it Write it here
IP address (if your ISP’s server doesn’t From your ISP/administrator,
provide one automatically) e.g. “194.129.243.153”
DNS addresses (primary and secondary From your ISP/administrator,
DNS addresses if your ISP’s server doesn’t e.g. “123.255.78.90” and “123.255.78.92”
provide them automatically)
Mailbox login (if different from your From your ISP/administrator
Internet account username)
Mailbox password (if different from your From your ISP/administrator,oryou
Internet account password) may have chosen this yourself
82Web & Email Setup
Page 92

Setting up Email on your netBookSetting up Email on your netBook
Setting up Email on your netBook
Setting up Email on your netBookSetting up Email on your netBook
If you have collected all the information in the checklist, you are
now ready to set up your netBook to connect to your ISP.
Connecting your modemConnecting your modem
Connecting your modem
Connecting your modemConnecting your modem
1. If you are using a PC Card modem:
• Insert the modem into the PC card slot on your netBook.
or if you are using an external PC modem:
• Connect your netBook to the modem using the netBook’s
serial cable.
What do I need to do this?
To connect your netBook serial cable to your modem you may
require a Psion modem cable adapter.You can only useaPsion
adapter, which can be obtained from your local distributor.
2. Connect your modem to the telephone socket and switch
on the modem.
Location optionsLocation options
Location options
Location optionsLocation options
83Web & Email Setup
Page 93

Setting up your dialling locationSetting up your dialling location
Setting up your dialling location
Setting up your dialling locationSetting up your dialling location
When you connect to the Internet, your Psion will need to dial
your service provider’s telephone. You can set up different
dialling ‘locations’ so that your netBook k nows how to dial the
number correctly, e.g. if you’re dialling from the ‘office’ location,
you might need to add a ‘9’ before the number you want to dial.
To set a dialling location:
1. Move to the System screen and tap the Control Panel
button on the Toolbar.
2. Open the Dialling icon
to display the dialling settings.
3. Tap on the Current location line, and select the location
you’re dialling from:
• Select ‘Home’ if you can dial without needing a prefix
number.
• Select ‘Mobile’ if you’re using a mobile phone.
• Select ‘Office’ if you need to use a prefix (‘dial-out’) number
before dialling, e.g. ‘9’.
If you don’t want to use any of these pre-defined locations,
you can add a new location by tapping the New button and
entering the appropriate details.
Settings forSettings for
Settings for
Settings forSettings for
chosen locationchosen location
chosen location
chosen locationchosen location
84Web & Email Setup
Page 94

85Web & Email Setup
4. Tap on Edit and check that the dialling settings are correct
for your location (this is not necessary for the ‘Mobile’
location), e.g. you may need to change the Area code.
5. Tap OK when you have finished setting up your dialling
location.
Setting up your modemSetting up your modem
Setting up your modem
Setting up your modemSetting up your modem
To specify the type of modem you are using:
1. Move to the System screen and tap the Control Panel
button on the Toolbar.
2. Open the Modems icon to display the modem settings.
3. Tap on the Current modem line, and select the modem
you’re using:
Select ‘Generic modem settings’ if your type of modem isn’t
shown. If the generic settings don’t work for your modem,
tap New to add a new entry for your modem. See the
documentation supplied with your modem for the required
settings.
4. Tap OK when you have finished setting up your modem.
Modem optionsModem options
Modem options
Modem optionsModem options
Page 95

Setting up your Internet serviceSetting up your Internet service
Setting up your Internet service
Setting up your Internet serviceSetting up your Internet service
Once you have set up your dialling location and modem, you
need to create a new ‘Internet service’ and enter your Internet
account settings for your service provider. See ‘What information
do I need?’ earlier for more details on the information required.
To set up your Internet service:
1. Move to the System screen and tap the Control Panel
button on the Toolbar.
2. Open the Internet icon
settings.
3. Tap New to create a new Internet service (account).
4. On the Based upon line, select ‘Standard settings’, or if you
have a ‘template’ file containing your ISP settings, select
‘Settings from file’ and choose the file.
5. On the Service page, enter a name for your account and
enter your service provider’s dial-up number (or POP phone
number).
to display the Internet service
Enter a name forEnter a name for
Enter a name for
Enter a name forEnter a name for
your new accountyour new account
your new account
your new accountyour new account
Enter a validEnter a valid
Enter a valid
Enter a validEnter a valid
access phone no.access phone no.
access phone no.
access phone no.access phone no.
86Web & Email Setup
Page 96

6. On the Account page, remove the tick from Manual login
and enter the username and password for your Internet
account.
Untick thisUntick this
Untick this
Untick thisUntick this
optionoption
option
optionoption
Enter yourEnter your
Enter your
Enter yourEnter your
username andusername and
username and
username andusername and
passwordpassword
password
passwordpassword
87Web & Email Setup
Page 97

7. If your service provider requires you to specify IP and DNS
addresses, you can set these on the Addresses page. Before
you can enter IP and DNS addresses, you must first remove
the ticks from the Get IP address from Server and Get
DNS address from server boxes.
8. When you have finished entering the settings, tap Done to
return to the ‘Internet service settings’ dialog. The new
service you’ve created will be shown on the Current
Internet service line. Tap OK to return to the Control
Panel.
EitherEither
tick thetick the
Either
tick the
EitherEither
tick thetick the
bobo
xx
oror
enter aenter a
bo
x
or
enter a
bobo
xx
oror
enter aenter a
valid IP addressvalid IP address
valid IP address
valid IP addressvalid IP address
What if I need to use a ‘login script’?
Some Internet Service Providers require that you use a login script
when you connect, e.g. to send details such as your username and
password.You can type in a login script on the Login page of your
Internet service settings. See the Email manual on the PsiWin CD
ROM for more information on writing login scripts.
EitherEither
ticktick
Either
tick
EitherEither
ticktick
the bothe bo
xx
the bo
the bothe bo
enter validenter valid
enter valid
enter validenter valid
DNS addressesDNS addresses
DNS addresses
DNS addressesDNS addresses
oror
x
or
xx
oror
88Web & Email Setup
Page 98

Setting up the Email programSetting up the Email program
Setting up the Email program
Setting up the Email programSetting up the Email program
Once you have set up your Internet service, you can set up your
email account in the Email program.
To create a new account in Email:
1. Tap on the Email program icon
2. Select Email from the Add new account command on the
Tools menu.
3. On the Account page:
Enter a name forEnter a name for
Enter a name for
Enter a name forEnter a name for
your accountyour account
your account
your accountyour account
Enter email addressEnter email address
Enter email address
Enter email addressEnter email address
.
• Enter a name for your account (this can be anything you want).
• Enter your name as you want it to appear on all emails you
send on the Your name line.
• Enter your email address, e.g. “my.name@myisp.com”.
• If the Mailbox type line is displayed, choose the mailbox
type, e.g. ‘POP3’ or ‘IMAP4’.
Enter a nameEnter a name
Enter a name
Enter a nameEnter a name
that you wish tothat you wish to
that you wish to
that you wish tothat you wish to
appear on yourappear on your
appear on your
appear on yourappear on your
messagesmessages
messages
messagesmessages
89Web & Email Setup
Page 99

4. On the Outgoing page:
• Enter your outgoing mail (SMTP) server address,
e.g. ”smtp.myisp.com”.
Enter yourEnter your
Enter your
Enter yourEnter your
OUTGOING mailOUTGOING mail
OUTGOING mail
OUTGOING mailOUTGOING mail
server addressserver address
server address
server addressserver address
90Web & Email Setup
Page 100

91Web & Email Setup
5. On the Incoming page:
• Enter your incoming mail (POP3 or IMAP4) server address,
e.g. ”pop3.myisp.com”.
• Enter your mailbox login (or username) and mailbox
password (these may be the same as your Internet username
and password).
Enter yourEnter your
Enter your
Enter yourEnter your
INCOMING mailINCOMING mail
INCOMING mail
INCOMING mailINCOMING mail
server addressserver address
server address
server addressserver address
(POP3 or IMAP4)(POP3 or IMAP4)
(POP3 or IMAP4)
(POP3 or IMAP4)(POP3 or IMAP4)
6. Tap OK when you’ve finished entering your email account
settings.
You are now ready to use your Web and Email applications.
Enter yourEnter your
Enter your
Enter yourEnter your
mailbomailbo
mailbo
mailbomailbo
username andusername and
username and
username andusername and
passwordpassword
password
passwordpassword
xx
x
xx
 Loading...