

Page 1
Teklogix 8570
Vehicle-Mount Computer
User Manual
October 17, 2002 Part No. 80467.E
ISO 9001 Certified
Quality Management System
Page 2

© Copyright 2002 by Psion Teklogix Inc., Mississauga, Ontario
This document and the information it contains is the property of Psion Teklogix Inc.,
is issued in strict confidence, and is not to be reproduced or copied, in whole or in
part, except for the sole purpose of promoting the sale of Psion Teklogix manufactured goods and services. Furthermore, this document is not to be used as a basis for
design, manufacture, or sub-contract, or in any manner detrimental to the interests of
Psion T eklogix Inc.
All trademarks are the property of their respective holders.
Page 3

Return-To-Factory Warranty
Psion Teklogix warrants a return-to-factory warranty for a period of 90 days from
shipment or 120 days from shipment where Psion Teklogix installs the equipment.
The warranty on Psion Teklogix manufactured equipment does not extend to any
product that has been tampered with, altered, or repaired by any person other than
an employee of an authorized Psion Teklogix service organization. See Psion
T eklogix terms and conditions of sale for full details.
Service
When requesting service, please provide information concerning the nature of the
failure and the manner in which the equipment was used when the failure occurred.
Type, model, and serial number should also be provided. Before returning any
products to the factory, call the Customer Services Group for a Return
Authorization number.
Support Services
Psion Teklogix provides a complete range of product support services to its
customers. In North America, these services can be accessed through the Psion
Teklogix Helpdesk. The Helpdesk coordinates repairs and training, helps you to
troubleshoot problems over the phone and arranges for technicians or engineers to
come to your site. For contact information and a listing of worldwide offices, please
refer to Appendix A: “Support Services And Worldwide Offices”.
Disclaimer
Every effort has been made to make this material complete, accurate, and up-todate. Psion Teklogix Inc. reserves the right to make changes without notice and shall
not be responsible for any damages, including but not limited to consequential
damages, caused by reliance on the material presented, including but not limited to
typographical errors.
Page 4

Page 5

ABLE OF
T
ONTENTS
C
Approvals & Safety Summary
.............................vii
Chapter 1: Introduction
1.1 About This Manual ............................3
1.2 T ext Conventions .............................4
1.3 Product Features..............................4
1.4 The 8570 Accessories ...........................8
Chapter 2: Getting Started
2.1 Unpacking The Box ............................13
2.1.1 Item Checklist .........................13
2.1.2 Standard Features .......................14
2.1.3 Optional Features .......................15
2.2 Parts And Controls Of The 8570 .....................16
2.2.1 The Front Of The Computer..................16
2.2.2 Side Buttons ..........................17
2.2.3 Ports ..............................18
2.3 Precautions ................................20
2.3.1 Important Safeguards .....................20
2.3.2 Handling Your 8570 Vehicle-Mount Computer .......21
2.3.3 Using The Power Adaptor...................21
2.4 Starting Up ................................21
2.5 Connecting Accessories ..........................22
Chapter 3: Operating Information
3.1 Processor .................................25
3.2 Hard Disk Drive..............................25
3.3 Memory..................................25
3.4 Touch Screen Display ...........................26
Teklogix 8570 Vehicle-Mount Computer User Manual
i
Page 6

Contents
3.4.1 TFT Monitor .........................26
3.4.2 Touch Screen.........................27
3.4.3 My-T-Soft Onscreen Keyboard ...............27
3.4.4 Touch Right Onscreen Mouse ................28
3.5 Ports ...................................29
3.5.1 Connecting Cables ......................29
3.5.2 Power.............................32
3.5.3 Ethernet Port .........................33
3.5.4 Serial Ports (COM1/COM2) .................33
3.5.5 Keyboard/Mouse Port ....................33
3.5.6 Multimedia Port .......................34
3.5.7 USB Ports ..........................34
3.5.8 PC Card Slots.........................34
3.6 8570 Vehicle-Mount Computer: Freezer Version ............35
3.6.1 Operating The 8570 In Freezer And Outdoor Environments 35
3.7 Accessories................................36
3.7.1 External Keyboard ......................37
3.7.2 Mouse ............................37
3.7.3 Printer ............................37
3.7.4 Scanners ...........................37
3.7.5 CD ROM Kit .........................37
3.7.6 USB Floppy Drive ......................38
3.7.7 Multimedia Cable ......................38
3.7.8 Mounting Options ......................38
3.7.9 Antennas ...........................39
3.8 Installing Software............................39
3.9 The BIOS Firmware ...........................39
3.10 Typical Resource Allocation For Windows 98..............40
3.11 Backing Up Your 8570 Vehicle-Mount Computer............42
Chapter 4: Installation
4.1 Mounting Accessories ..........................47
4.1.1 8570 Mounting Brackets ...................47
4.1.2 Security Mounting Options .................48
4.1.3 Standard Mounting Options .................48
4.1.4 8570 With Keyboard Mounting Brackets ..........49
ii
Teklogix 8570 Vehicle-Mount Computer User Manual
Page 7

Contents
4.1.5 Pedestal Mounts ........................50
4.2 Installation.................................50
4.2.1 Important Safeguards .....................50
4.2.2 Handling Your 8570 Vehicle-Mount Computer .......51
4.2.3 Bracket Options ........................51
4.2.4 Mounting The 8570 ......................52
4.2.5 Installing Security Mount Options ..............57
4.2.6 Installing Cables ........................59
4.2.7 External Antennas .......................59
4.2.8 Power Options .........................60
Chapter 5: Maintenance
5.1 Introduction ................................67
5.2 Maintenance................................67
5.2.1 Important Safeguards .....................67
5.2.2 Handling Your 8570 Vehicle-Mount Computer .......67
5.3 Inspection .................................68
5.4 Cleaning ..................................68
5.4.1 Display.............................68
5.4.2 Housings............................69
5.4.3 Optional Keyboard ......................69
Chapter 6: Troubleshooting
6.1 Introduction ................................73
6.2 Preventi ve Measures............................73
6.3 Problems..................................74
6.3.1 Display.............................74
6.3.2 Hard Drive...........................74
6.3.3 Optional Keyboard ......................75
6.3.4 PCMCIA............................75
6.3.5 Power .............................75
6.3.6 I/O Ports ............................76
6.4 D: Install Partition.............................76
6.5 Software Loading/Installation Procedure .................77
6.5.1 Computers Using Microsoft Windows 98...........77
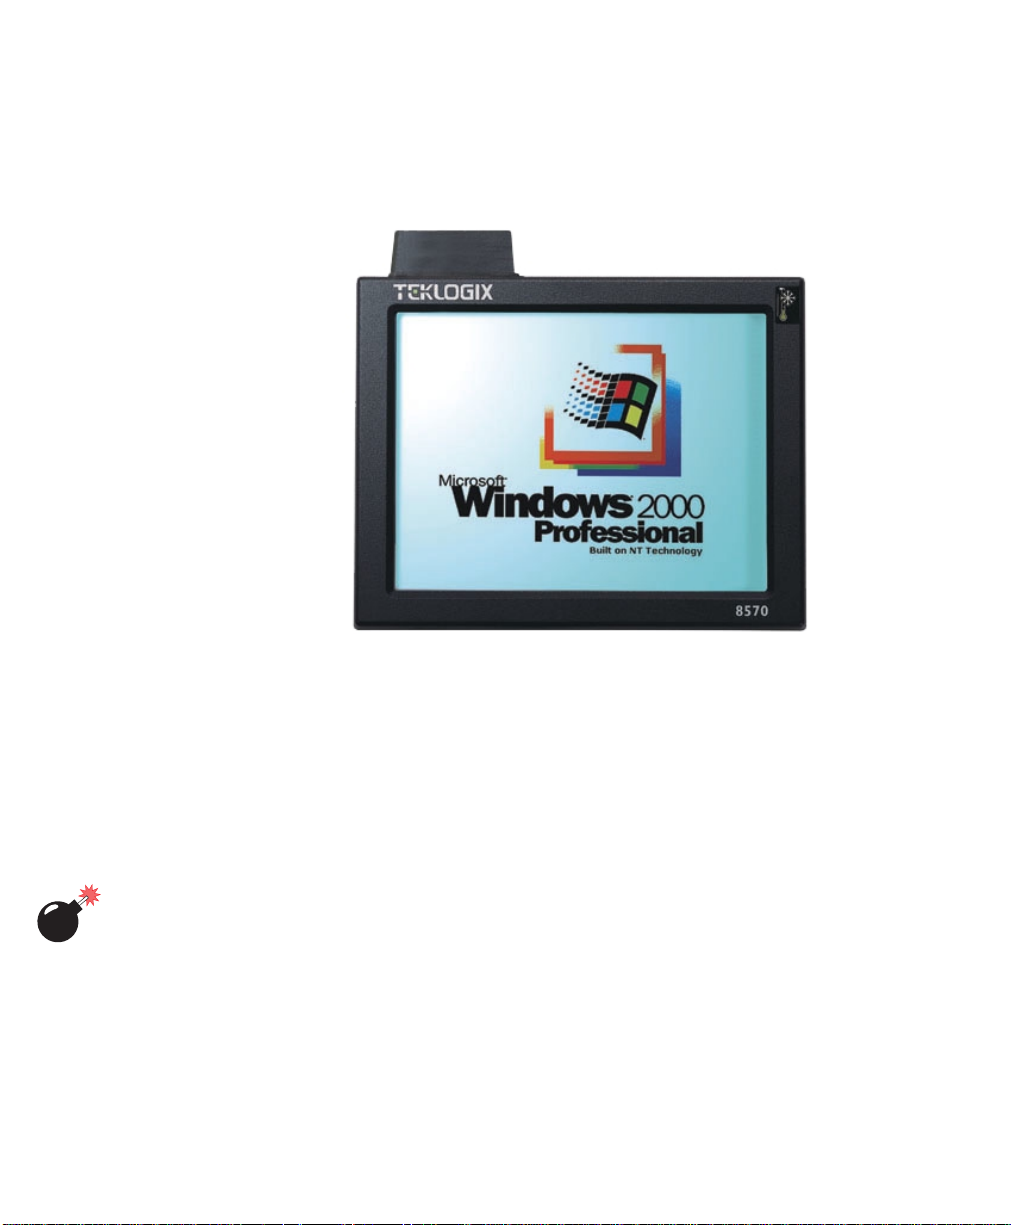
6.5.2 Computers Using Microsoft Windows 2000 .........78
Teklogix 8570 Vehicle-Mount Computer User Manual
iii
Page 8

Contents
Chapter 7: Specifications
7.1 8570 Hardware Specifications ......................81
7.1.1 Physical............................81
7.1.2 Environmental Characteristics ................81
7.1.3 Standard Display .......................83
7.1.4 Power Requirements .....................83
7.1.5 Standard Processor And Memory ..............83
7.1.6 PC Radio Cards .......................83
7.1.7 Network Interface ......................84
7.2 Standard Operating System .......................84
7.3 8570 External Keyboard Option.....................85
7.3.1 Industrial Ratings.......................85
7.3.2 Physical............................85
7.3.3 Environmental ........................85
7.3.4 Power.............................86
7.3.5 Cable .............................86
7.3.6 Compatibility.........................86
7.3.7 Backlighting .........................86
7.4 Regulatory Information: Lucent/Agere WaveLAN PC Card ......87
7.5 Regulatory Information: Cisco Air350 PC Card.............89
Appendix A: Support Services And Worldwide Offices
A.1 Support Services .............................A-1
A.1.1 Canada and U.S.A: Technical Support and Repair Services.A-1
A.1.2 International Support.....................A-1
Appendix B: The 8570 Keyboard
B.1 Keyboard Features ............................B-1
B.2 Keyboard Connection And Maintenance ................B-2
B.3 Installing The Keyboard .........................B-2
B.4 Function Keys ..............................B-4
B.4.1 Accessing The Embedded Numeric Keypad Functions . . .B-4
B.4.2 Overview Of Windows 98 Function Keys ..........B-4
B.4.3 Using The 12 Virtual Function Keys Under Windows....B-4
B.4.4 Macro Key ..........................B-5
iv
Teklogix 8570 Vehicle-Mount Computer User Manual
Page 9

Contents
B.4.5 HulaPoint Pointing Device .................B-5
Appendix C: Touch Screen Calibration
Teklogix 8570 Vehicle-Mount Computer User Manual
v
Page 10

Page 11

A
PPROVALS
ECLARATION OF CONFORMITY
D
Product:
Application of Council Directives: EMC Directive:89/336/EEC
Conformity Declared to Standards: EN 55022: 1998; Class B
Manufacturer: PSION TEKLOGIX INC.
Year of Manufacture: 2001
& S
8570 V ehicle-Mount Computer
Low Voltage Directive:73/23/EEC
EN 50082-1:1997; EN 55024:1998
EN 61000-4-2; ±4kV CD; ±8kV AD
EN 61000-4-3; 3V/m, 80-1000 MHz, 80% AM(1kHz)
EN 61000-4-4; 1kV on AC lines
EN 61000-4-5; ±2kV Common; ±1kV Differential mode
EN 61000-4-6; 3V
EN 61000-4-11; Voltage dips and interruptions on AC
EN 61000-3-2; Harmonic current emissions
EN 61000-3-3; Voltage fluctuation and flicker on AC line
2100 Meadowvale Blvd.
Mississauga, Ontario; Canada L5N 7J9
AFETY
, 150kHz-80MHz, 1kHz 80% AM on A C
RMS
S
UMMARY
Manufacturer’s Address in the
European Community: PSION TEKLOGIX S.A.
La Duranne
135 Rue Rene Descartes; BP 421000
13591 Aix-En-Provence
Cedex 3; France
Type of Equipment: Information Technology Equipment
Equipment Class: Commercial and Light Industrial
Manufacturer: Hector Perez
Director of Engineering
Psion Teklogix Inc. Ontario
Legal Representative in Europe: Dominique Binckly
Vice President International Sales
Psion Teklogix S.A. France
Teklogix 8570 Vehicle-Mount Computer User Manual
vii
Page 12

Safety Summary
This device complies with Part 15 of the FCC Rules. Operation is subject to the following two conditions:
1. This device may not cause harmful interference, and
2. This device must accept any interference received, including interference that may cause undesired operation.
RF E
XPOSURE REQUIREMENTS
To satisfy FCC RF exposure requirements for mobile transmitting devices,
a separation distance of 20 cm or more should be maintained between the
antenna of this device and persons during device operation. To ensure compliance, operation at closer than this distance is not recommended.
USE IN CANADA
FOR
This device requires a radio licence, unless it is installed totally within a
building. (User shall obtain this licence from Industry Canada).
This equipment has been tested and found to comply with the limits for a Class B
digital device, pursuant to Part 15 reasonable protection against harmful interference
in a residential installation. This equipment generates, uses and can radiate radio frequency energy and, if not installed and used in accordance with the instructions,
may cause harmful interference to radio communication. Howev er, there is no guarantee that interference will not occur in a particular installation.
(2412 - 2462 MHZ)
Important:
If this equipment does cause interference to radio or television reception, which can
be determined by turning the equipment on and off, the user is encouraged to try to
correct the interference by one or more of the following measures:
• Reorient or relocate the receiving antenna.
• Increase the separation between the equipment and receiver.
• Connect the equipment into an outlet on a circuit different from that to
• Consult the dealer or an experienced radio/TV technician for help.
viii
Teklogix 8570 Vehicle-Mount Computer User Manual
The 500 MHz 8570 Vehicle-Mount Computer is not for home or
office use.
which the receiver is connected.
Page 13

Safety Summary
ISCO END USER LICENSE AGREEMENT
C
EXHIBIT C
M
INIMUM
T
ERMS AND CONDITIONS
1. Each end user license agreement shall contain terms that are legally
sufficient to:
i. Authorize the end user to make one copy of the Driver Software for
backup purposes only;
ii. Prohibit further copying and/or transfer of the software included in the
Cisco Adapter or Driver Software;
iii. Prohibit reverse assembly, reverse compilation, or other translation of
the software included in the Cisco Adapter or Driver Software or any
portion thereof; and
iv. Prohibit export of the software included in the Cisco Adapter or Driver
Software in violation of United States and other national laws.
2. Each such license agreement shall also include the following statements or their equivalents:
i. Except as otherwise expressly provided under this agreement, end user
shall have no rights in the software included in the Cisco Adapter or
Driver Software.
ii. Software provided under this agreement may contain or be derived
from portions of materials provided by a third party under license to
licensor. LICENSOR AND ITS SUPPLIERS DISCLAIM ALL
WARRANTIES, EXPRESS OR IMPLIED WITH RESPECT TO THE
USE OF SUCH MATERIALS IN CONNECTION WITH
PRODUCT(S), INCLUDING WITHOUT LIMITATION) ANY
WARRANTIES OR MERCHANTABILITY OR FITNESS FOR A
PARTICULAR PURPOSE.
iii. In no event will licensor or its suppliers be liable for consequential,
incidental or special damages.
Teklogix 8570 Vehicle-Mount Computer User Manual
ix
Page 14

Safety Summary
iv. The limitation of liabilities described in this section also apply to any
third-party supplier of materials supplied to licensor. The limitations of
liabilities of License and its third-party supplier are not cumulative.
Such third-party supplier is an intended beneficiary of this section.
v. The software included in the Cisco Adapter and Driver Software was
developed at private expense and that if licensed to the US government
it is licensed only with restricted rights.
vi. Cisco is an intended third party beneficiary of the agreement.
vii. The software included in the Cisco Adapter and Driver Software and
any related documentation constitutes the confidential information of
licensor or its suppliers and cannot be disclosed to any third parties.
IMPORTANT SAFETY INSTRUCTIONS
DO NOT OPERATE IN AN EXPLOSIVE ATMOSPHERE
Operating Teklogix equipment where explosive gas is present may result in
an explosion.
DO NOT OPEN ENCLOSURE
T o a v oid injury caused by high voltage, the equipment and enclosure should
only be opened by qualified service personnel.
DO NOT HOLD ANTENNA
To avoid discomfort due to the local heating effect of Radio Frequency
energy, do not touch the antenna when a computer is transmitting.
CONNECTION TO OUTDOOR ANTENNA
Outdoor antenna to be earthed in accordance with International Standard
EN 50083-1 (1993), “Cabled Distribution Systems for Television and
Sound Signals - Safety Requirements”.
FOR GERMANY
ANSCHLUß AN ANTENNENNANLAGEN
Außenantennennanlagen müssen nach nationalen Normen
(z.B. DIN VDE 0855) geerdet werden.
x
Teklogix 8570 Vehicle-Mount Computer User Manual
Page 15

INTRODUCTION 1
1.1 About This Manual ...............................3
1.2 Text Conventions ................................4
1.3 Product Features ................................4
1.4 The 8570 Accessories .............................8
1
Teklogix 8570 Vehicle-Mount Computer User Manual 1
Page 16

Page 17

Chapter 1: Introduction
About This Manual
1.1 About This Manual
This manual provides information on the operation and features of the Teklogix
8570 V ehicle-Mount Computer.
Chapter 1: Introduction
The manual is introduced by a brief product and features overview, along with
illustrative diagrams of the computer.
Chapter 2: Getting Started
reviews information on the standard and optional items for the 8570
Vehicle-Mount Computer and provides directions for setting up and starting
the computer.
Chapter 3: Operating Information
presents information on the operating computer: processor, memory, user
interfaces, ports and storage media.
Chapter 4: Installation
describes vehicle installation options and power connections.
Chapter 5: Maintenance
provides the inspection and cleaning recommendations for the preventative
maintenance of the 8570 Vehicle-Mount Computer.
Chapter 6: Troubleshooting
assists in the recognition and correction of problems that you may encounter
when operating the 8570.
Chapter 7: Specifications
details the physical, environmental and v arious operating specifications for
the computer.
Appendix A: Support Services And Worldwide Offices
presents information for technical support, contacts and the Psion Teklogix
world wide web address.
Appendix B: The 8570 Keyboard
describes the features of the optional rugged backlit keyboard, and its installation and functions.
Appendix C: Touch Screen Calibration
describes the step-by-step procedures in W indows Pen Services to modify the
touch screen sensitivity, response speed, double-click speed and calibration.
Teklogix 8570 Vehicle-Mount Computer User Manual 3
Page 18
Chapter 1: Introduction
Text Conventions
1.2 Text Conventions
Note: Notes highlight additional helpful information.
Important: These statements provide particularly important instructions or
Warning: These statements provide important information that may prevent
1.3 Product Features
The 8570 Vehicle-Mount Computer is a powerful, rugged, high-speed computer that
has been designed to operate in environments that are hostile to regular computers.
It has the capabilities of a high-performance commercial computer and yet
withstands the rain, shocks, vibration and temperature extremes encountered in the
real world of portable computing. It is available in both Standard Temperature and
Freezer/ Extreme Temperature versions (see page 35 for detailed freezer operating
information, and page 81 for environmental specifications).
additional information that is critical to the operation of the
computer and other equipment.
injury, damage to the equipment, or loss of data.
The 8570 computer is spill, dust, and dirt-proof to handle the harsh conditions found
in manufacturing, warehousing, distribution and intermodel operations. The
computer can be conveniently mounted on forklift trucks, carts, v ehicles and
transtainers. It can also be mounted at fixed locations adjacent to cross-dock doors
or manufacturing stations. For detailed information on installation options, please
refer to Chapter 4: Installation.
The 8570 Vehicle-Mount Computer features a number of input choices, including a
touch screen that is compatible with W indows 98/2000, My-T -Soft and other
leading pen-based software programs. The two PCMCIA card slots and v arious
connectors allow you to extend the capabilities of the 8570 by adding dif ferent
accessories, such as an external keyboard, scanners, disk dri ves, radio cards,
modems, LAN cards, etc. The 8570 includes 802.11b 2.4 GHz RF compatibility,
which provides seamless integration with the Teklogix wireless backbone and
terminals, ensuring free roaming without interruption.
Teklogix 8570 Vehicle-Mount Computer User Manual
4
Page 19

Chapter 1: Introduction
Product Features
With the features listed belo w, the 8570 provides mobile workers with user-friendly
versatility and functionality. For a detailed list of the 8570 standard and optional
features, please refer to Chapter 2: Getting Started.
• Intel Mobile Pentium 266 MHz MMX processor.
(Intel Mobile Pentium III 500 MHz option available.)
• 128 MB SDRAM standard.
• 512KB SRAM/L2 memory cache.
• 20 GB hard drive standard.
• 31 cm (12.1"), 800x600 SVGA High Bright colour display (500 NIT).
• Resistive touch screen that emulates a PS/2 mouse.
• Lucent/Agere 802.11b 2.4GHz DS SS radio card (TRX7431).
For radio card specifications, please see page 83.
• Cisco Air350 802.11b 2.4GHz DS SS radio card (TRX7441).
For radio card specifications, please see page 83.
• SoundBlaster 16-compatible PCI audio drive.
• ATI RAGE Mobility with 4 MB video RAM.
• Windo ws 98 operating system.
• Two externally-accessible PC card ports.
• On-board 10Base-T/100Base-TX Ethernet.
Teklogix 8570 Vehicle-Mount Computer User Manual 5
Page 20
Chapter 1: Introduction
B
Product Features
Super VGA
TFT Display
Touch Screen
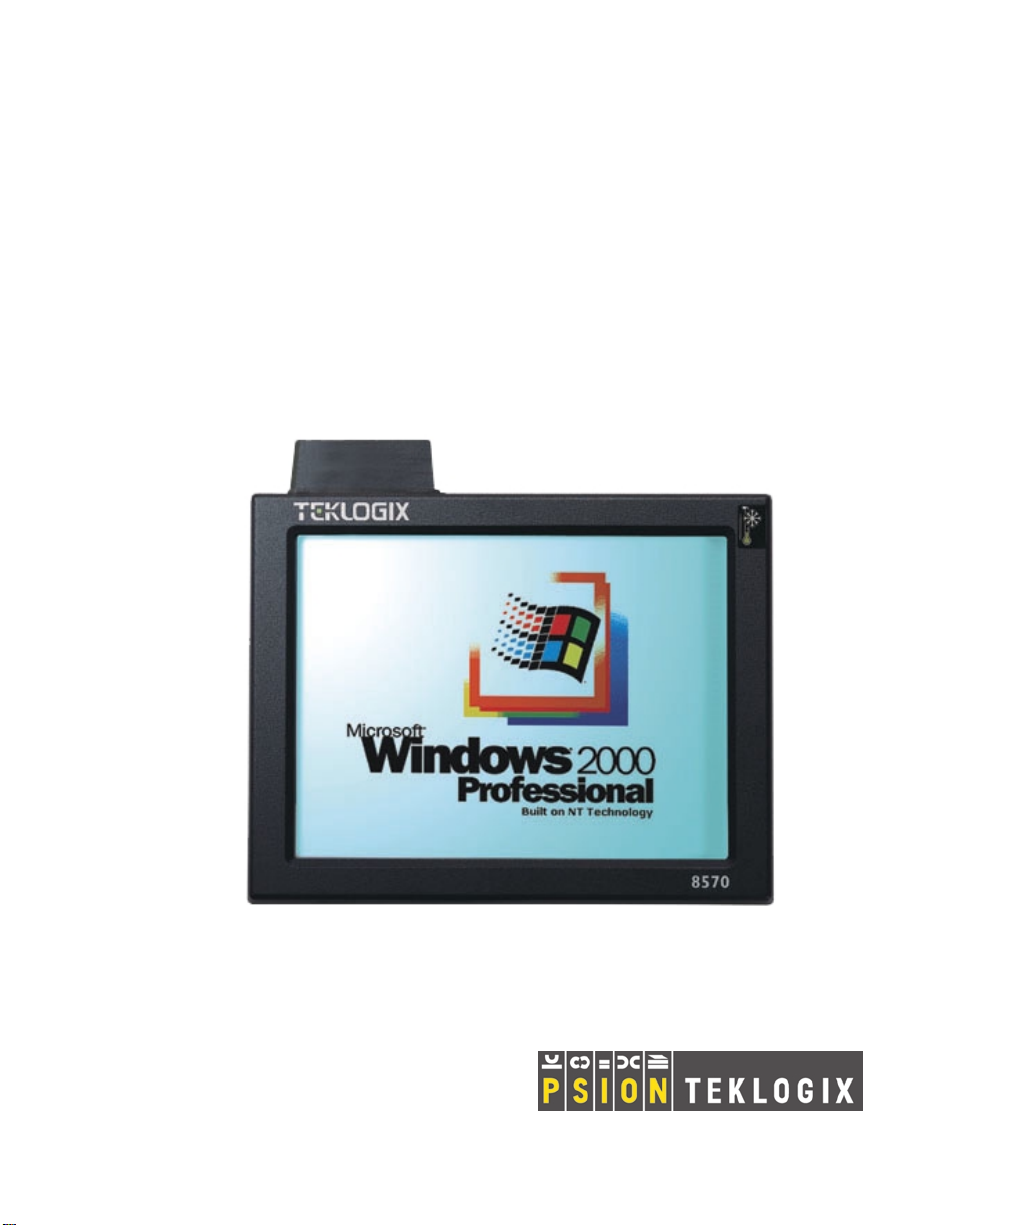
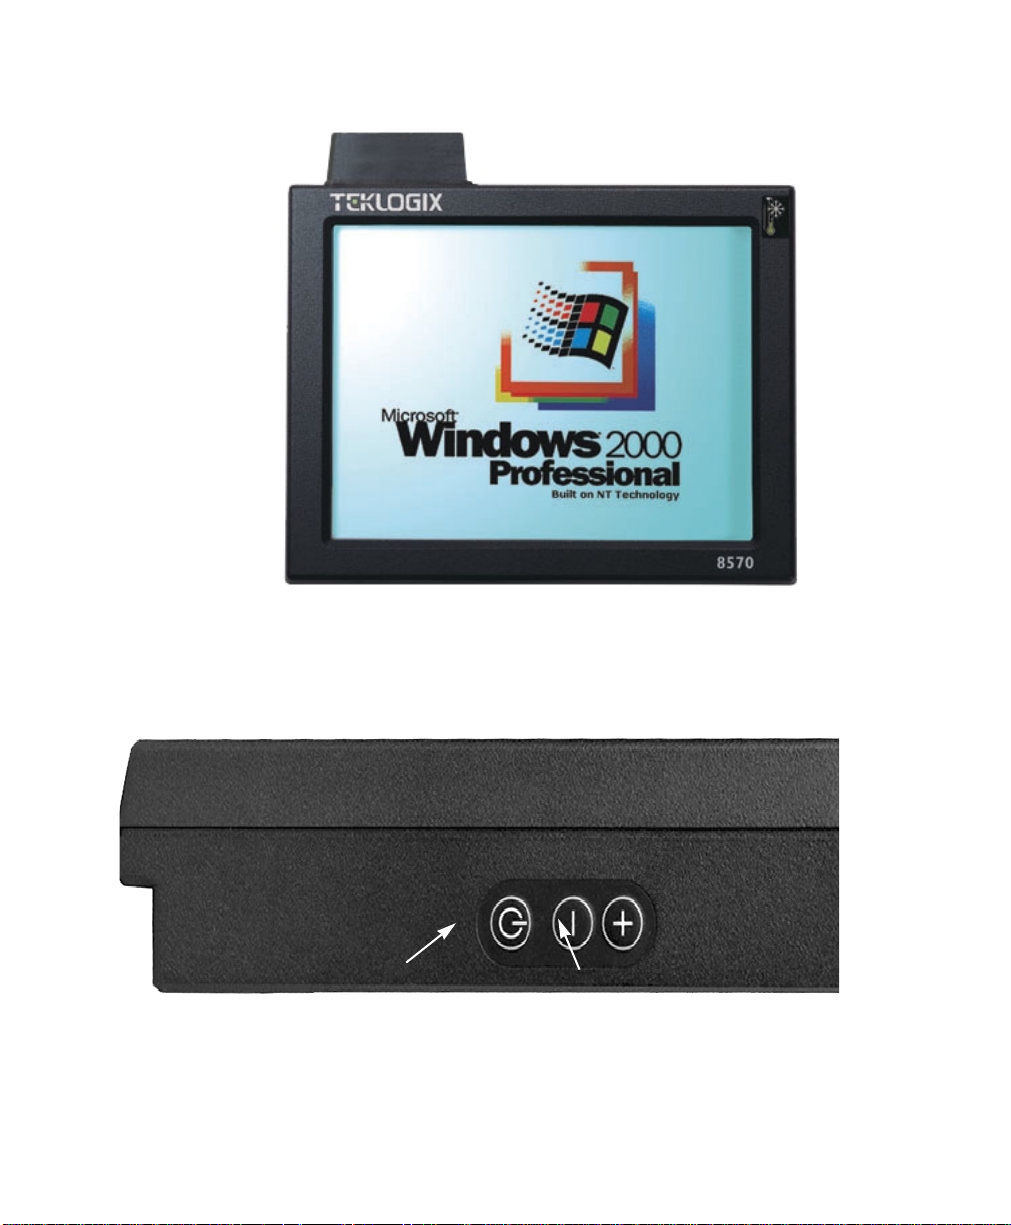
Figure 1.1 8570 Front (Freezer/Extreme Temperature Version shown)
Power Button
Figure 1.2 8570 Right Side: Power/Dimmer Buttons
Teklogix 8570 Vehicle-Mount Computer User Manual
6
Display Backlight Dimmer
Page 21
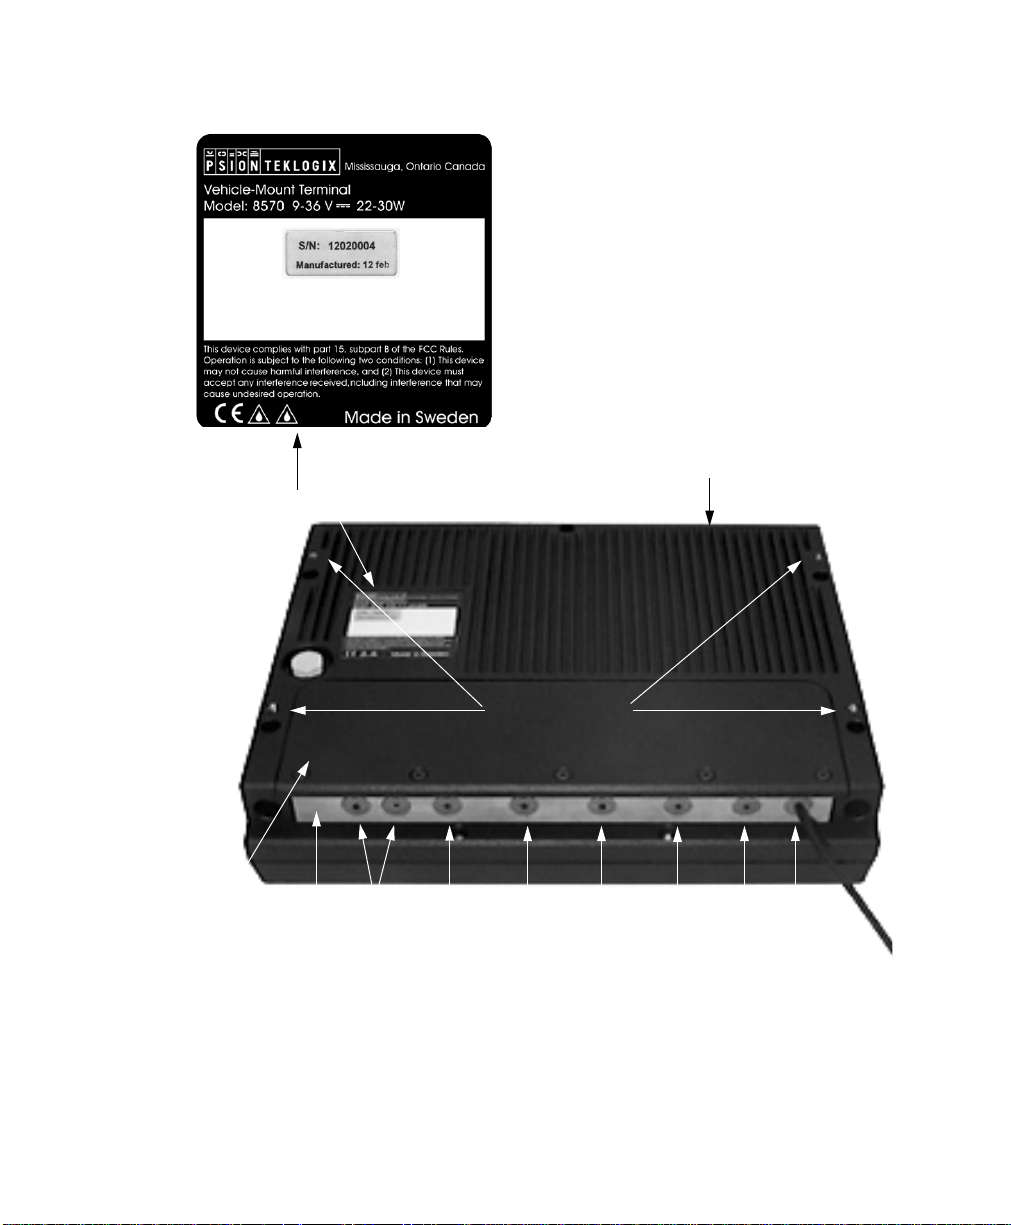
Product Safety Label
Chapter 1: Introduction
Product Features
PCMCIA Card Slots
Cable Cover
Cable Gasket
Mounting Holes
Keyboard
USB Ports
Multimedia
/Mouse
Figure 1.3 Back Of 8570: Ports
Teklogix 8570 Vehicle-Mount Computer User Manual 7
COM2
1
COM
Ethernet
Connector
Power
Page 22

Chapter 1: Introduction
The 8570 Accessories
1.4 The 8570 Accessories
The 8570 Vehicle-Mount Computer supports a wide range of peripheral accessories:
keyboard, CD R OM Kit, USB Flopp y, scanners, and any standard serial or USB
peripherals. The following is a list of accessories and their part numbers.
For detailed information, please refer to Chapter 3: Operating Information.
Peripheral Accessories
• External Keyboard: DB9 backlit unit. PN 31612
• External Keyboard: PS/2 backlit unit. PN 31612-001
• Keyboard/Mouse Cable PN 31617
DB9 male at one end, and 2 PS/2 connectors at the other.
• PowerScan decoded scanners: Standard Range PN 7666-1251
• CD ROM Kit PN 31340
• USB Floppy Drive, bootable PN 31627
Long Range PN 7666-2251
Extra Long Range PN 7666-3251
High Density PN 7666-5251
Warning: The USB and ethernet ports are not to be used for typical end user
applications and installations. These ports are designed to be used
for maintenance and setup purposes only. They should only be used
for temporary service connections required for file transfers, set up,
configuration, etc.
• Multimedia Cable PN 31618
• Natural Lubricating Grease (for cable gasket) PN 98083
• Nyogel Connector Lubricant PN 95146
Teklogix 8570 Vehicle-Mount Computer User Manual
8
Page 23

Chapter 1: Introduction
The 8570 Accessories
Mounting Options
• 8570 Dual Ball and Socket Mounting Kit PN 31624
• 8570 & Keyboard Dual Ball and Socket Mounting Kit PN 31624-001
• 8570 Mounting Bracket to Ball Mount or Pedestal Mount PN 31658
• 8570 Keyboard Bracket PN 31596
• 3" Clamp Base for Universal Dual Ball and Socket Mount PN 31625
• 4" Clamp Base for Universal Dual Ball and Socket Mount PN 31625-001
• Universal Dual Ball and Socket Mount PN 31623
Pedestal Mounts
• 12" Pedestal mount PN 30921-100
• 14" Pedestal Mount PN 30921
• 16" Pedestal Mount PN 30921-200
• 20" Pedestal Mount PN 30921-300
Quick-Release Brackets
• 8570 Quick-Release Bracket PN 30876-400
• Keyboard Quick-Release Bracket PN 30876-401
• Cantilevered Horizontal Mounting Structure PN 17293
• Full-width Horizontal Mounting Structure PN 17280
Security Mount Kits
• 8570 Universal Dual Ball and Socket Mount Security Kit PN 1000398-570
• 8570 Quick Release Mount Security Kit PN 1000304-570
• 8570 Quick Release Mount Security Kit PN 1000509
(designed to replace an existing
, installed quick release mount)
Antennas
• 2.4 GHz 0dBi Omni, Magmount Antenna PN 97583
• 2.4 GHz 5dBi Omni, Magmount Antenna PN 1000159
• 2.4 GHz 2dBI Omni, Articulating Antenna PN 96302
• Adaptor 90˚ RPSMA plug-jack PN 1000109
Teklogix 8570 Vehicle-Mount Computer User Manual 9
Page 24

Chapter 1: Introduction
The 8570 Accessories
Power Options
• DC/DC Pre-Regulator 10-55 volts range, use for PN 19893-400
12 volt nom. trucks that require isolation
• DC/DC Pre-Regulator* 55- 90 volts PN 19893
• Transient Suppressor PN 19893-500
• Active Transient Filter Power Supply* 15-55 volts PN 19893-600
• AC Power Supply PN 19894
• Extension Power Cable PN 13985
• Cart Battery and 8871 Cart Battery Charger Model# 8870
*Required on forklift trucks.
Teklogix 8570 Vehicle-Mount Computer User Manual
10
Page 25

GETTING STARTED 2
2.1 Unpacking The Box ..............................13
2.1.1 Item Checklist ..............................13
2.1.2 Standard Features ............................14
2.1.3 Optional Features ............................15
2.2 Parts And Controls Of The 8570 ........................16
2.2.1 The Front Of The Computer .......................16
2.2.1.1 Display/Touch Screen......................16
2.2.2 Side Buttons ...............................17
2.2.2.1 Power Button ..........................17
2.2.2.2 Dimmer Buttons ........................17
2.2.3 Ports ...................................18
2.2.3.1 PCMCIA Card Slots ......................18
2.2.3.2 Power Connector ........................19
2.2.3.3 Ethernet Port ..........................19
2.2.3.4 COM1 and COM2 Ports ....................19
2.2.3.5 Keyboard/Mouse Connector ..................19
2.2.3.6 Multimedia Port.........................20
2.2.3.7 USB Ports............................20
2.2.3.8 Mounting Holes.........................20
2
2.3 Precautions ...................................20
2.3.1 Important Safeguards ..........................20
2.3.2 Handling Your 8570 Vehicle-Mount Computer .............21
2.3.3 Using The Power Adaptor ........................21
2.4 Starting Up ...................................21
2.5 Connecting Accessories ............................22
Teklogix 8570 Vehicle-Mount Computer User Manual 11
Page 26

Page 27

Chapter 2: Getting Started
Unpacking The Box
2.1 Unpacking The Box
Please take the time to read this chapter thoroughly to familiarize yourself with the
operation and use of your Teklogix 8570 Vehicle-Mount Computer.
2.1.1 Item Checklist
Check to make sure that all of the following items* were shipped with your 8570
Vehicle-Mount Computer:
• The Teklogix 8570 Vehicle-Mount Computer.
• Power Cable PN 31619 (attached to the 8570).
• One of: AC/DC Power Conv ertor, Vehicle Pre-regulator, or Power Cable
PN 13985, as ordered:
- AC/DC Power Conv ertor (with power cord) for use with 8570
Vehicle-Mount Computers installed in fixed locations.
- DC/DC (12V nom, 15-55 or 55-90 volt) Pre-regulator (with Power
Cable PN 13985) for use with 8570 Vehicle-Mount Computes installed
in vehicles.
- Power Cable PN 13985 for use in simple 12 volt installations, where
vehicle has a negati v e ground power system.
Note: Most electric-powered vehicles have isolated gr ounds that will r equir e the
use of the DC/DC pre-regulators (see above).
• T eklogix 8570 Vehicle-Mount User Manual.
• Documentation and licenses for installed software.
• T eklogix stylus.
• Optional accessories, as ordered.
*Refer to the packing slip for an exact list of items shipped.
The above list contains the standard items which should come with every 8570
Vehicle-Mount Computer. If an y of the abo v e items are missing or damaged, please
contact your local Psion Teklogix office. For a listing of worldwide offices, refer to
Appendix A: “Support Services And Worldwide Offices”.
For a list of the standard features of your 8570 Vehicle-Mount Computer, refer to
Table 2.1 on page 14. Optional features and accessories are listed in Table 2.2 on
page 15, and in the Part Numbers list on page 8.
Teklogix 8570 Vehicle-Mount Computer User Manual 13
Page 28

Chapter 2: Getting Started
Standard Features
2.1.2 Standard Features
FEATURE DESCRIPTION
8570 Computer
Casing
Processor
Operating System
Display
Digitizer/Digitizing
Device
Graphic Controller
Hard Disk Drive
RAM Memory
Cache
Chipset
PC Card Compart-
ments (PCMCIA
2.1)
Audio
Software Programs
External I/O Ports
Power
Clock/Calendar
Environment
Rugged, IP66 sealed computer with rear cable cover.
30.5 x 24 x 6.1 cm (12 x 9.4 x 2.4 inches), weight: 3.7 kg (7.7 lb.).
Intel Mobile Pentium 266MMX.
• Windows 98 (English).
• Phoenix IBM PC/AT “Plug and Play” compatible BIOS.
High Bright TFT-screen, 30.7 cm (12.1") SVGA (800x600 pixels/256k
colours, 120˚ viewing angle, 500 NIT brightness).
High-transparency resistive digitizer with hardened glass.
ATI RAGE Mobility-M; integrated LCD-VGA controller with 4 MB
Video RAM.
IBM Travelstar internal 20 GB hard disk.
128 MB SODIMM (144 pin SDRAM PC100).
512 KB Pipelined-burst SRAM/L2 memory cache.
Ali M1541 Aladdin V AGPset.
T w o PCMCIA ports:
• Port 1: for Type II PC cards, or one Type III card.
• Port 2: for Type II PC cards.
One port is dedicated to the Type II PC card 802.11b radio.
PCI audio drive, SoundBlaster 16 compatible, internal buzzer.
My-T-Soft onscreen keyboard (English only).
Expansion port for attachment of:
• PS/2 mouse/keyboard.
• Serial RS-232 (two ports: COM 1-2, up to 115 k/s).
• Multi-media port (Audio In, Audio Out, and MIC In (D-sub 9-pin).
• USB 1.1A (two ports).
• 10Base-T/100Base-TP Ethernet (RJ-45).
Requires DC voltage 9V to 36V. (5W stand-by/20W operating,
max 32W)
On-board clock/calendar with battery backup.
See detailed information in Chapter 7: Specifications.
Table 2.1 The 8570 Vehicle-Mount Computer Standard Features
Teklogix 8570 Vehicle-Mount Computer User Manual
14
Page 29

2.1.3 Optional Features
OPTION DESCRIPTION
Scanners
Operating System
• WIN2000 (NT-5): English
• WIN XP: English
Additional languages (WIN98 2nd Edition and WIN2000):
Keyboard
Keyboard/Mouse
Cable
External backlit IBM PC/AT-compatible k e yboard (Nema 4).
DB9 male at one end, and 2 PS/2 connectors at the other.
Multimedia Cable
Processor
Intel Mobile Pentium III 500 MHz option with 256 KB Pipelined-burst
RAM Memory
Diskette Drive
CD ROM kit
Mounting Options
Radios
Antennas
Power Options
Note: For a listing of Part Numbers for these accessories, please refer to page 8.
Mounting options for vehicle and fixed locations are described in
Lucent/Agere 802.11b Direct Sequence Spread Spectrum PC card radio.
Cisco Air350 802.11b Direct Sequence Spread Spectrum PC radio card.
• 2.4 GHz 0dBi Omni Magmount Antenna (includes 8570 metal dome
with antenna cable to radio card).
• 2.4 GHz 5dBi Omni Magmount Antenna (includes 8570 metal dome
with antenna cable to radio card).
• 2.4 GHz 2 DBI Omni Articulating Antenna (includes 8570 metal dome
with antenna cable to radio card).
• Adaptor 90˚ RPSMA plug-jack
• DC/DC 15-55VDC Active Filter Pre-Regulator.
• DC/DC 10-55 volts Pre-Regulator.
• DC/DC Pre-Regulator (55 - 90 volts).
• Transient Suppressor.
• AC/DC convertor.
• Power Extension Cord.
• Cart Battery and Cart Battery Charger.
PowerScan decoded tethered scanners.
The following operating systems are also available:
Chinese simplified / French / German / Spanish
PS/2 or DB-9 pin connector.
T o attach media peripheral accessories.
SRAM/L2 integrated memory cache.
256 MB SODIMM (144 pin SDRAM PC100).
External USB 1.44-MB bootable floppy drive.
External CD ROM driv e.
Chapter 4: Installation.
Chapter 2: Getting Started
Optional Features
Table 2.2 The 8570 Vehicle-Mount Computer Optional Features
Teklogix 8570 Vehicle-Mount Computer User Manual 15
Page 30
Chapter 2: Getting Started
Parts And Controls Of The 8570
2.2 Parts And Controls Of The 8570
2.2.1 The Front Of The Computer
Super VGA
TFT Display
Touch Screen
2.2.1.1 Display/Touch Screen
The 12.1-inch high resolution colour display incorporates a backlit touch screen.
The standard resolution for the 8570 is 800 x 600. The display has a 120-degree
viewing angle and a backlight which is 0-100% dimmable, using the two buttons
located on the side of the computer (see page 17).
The touch screen is factory-mounted and uses a PS/2 port. An y passive pen or
non-electronic pointing device may be used (including fingertip).
Warning: Do not use sharp objects, such as regular pens, pencils, tools, etc.,
on the touch screen as they may damage its surface and impair
display visibility, or cause it to be inoperable.
If you don’t have an e xternal k e yboard, use the comprehensive My-T-Soft onscreen
keyboard program installed on your computer. For a description of the program and
start-up instructions, please refer to page 27.
Teklogix 8570 Vehicle-Mount Computer User Manual
16
Page 31

2.2.2 Side Buttons
Chapter 2: Getting Started
Side Buttons
Power Button
Dimmer Buttons
2.2.2.1 Power Button
The power switch is located on the right side of the computer. Depressing this
switch for approximately one second will turn the computer ON. If the switch is
held down for more than sev en seconds, the computer will power OFF and the
hardware will reset fully.
Note: When the 500 MHz 8570 Vehicle-Mount Computer is first supplied with
power, the unit will power up automatically. Subsequent operation is the
same as the standard 8570. If the 500 MHz unit is disconnected and then
reconnected to a power source, it will again power up automatically.
Important: Use the Windows Shut Down function to normally power off
the computer.
2.2.2.2 Dimmer Buttons
The two dimmer buttons on the right side of the computer allow adjustments of the
display’s backlight brightness, from 0 to 100%. Brightness can be controlled by
repeatedly pressing the or button.
+
|
Teklogix 8570 Vehicle-Mount Computer User Manual 17
Page 32

Chapter 2: Getting Started
Ports
2.2.3 Ports
Cable Cover
Cable Gasket
PCMCIA Card Slots
Mounting Holes
1
COM2
/Mouse
USB Ports
Multimedia
Keyboard
COM
Ethernet
Connector
Power
2.2.3.1 PCMCIA Card Slots
There are two PCMCIA card slots located in the top of the computer . These can be
used to install additional serial ports, hard drives, LAN cards, or you can plug in a
PC card radio for wireless communications.
PC Card Covers
There are three covers for the PC card slots. A PC Card Lid that lies flush with the
computer casing is used when there is no radio card installed. A Plastic Dome Co ver
is used for a radio card using an internal antenna. For an external antenna, a Metal
Dome Cover with antenna cable to the radio card and external proprietary
SMA-type connector is used.
Teklogix 8570 Vehicle-Mount Computer User Manual
18
Figure 2.1 8570 Ports
Page 33

Chapter 2: Getting Started
2.2.3.2 Power Connector
The three-pin power receptacle in the 8570 connects to the PN 31619 power cable.
The power cable is passed through the cable gasket and is then connected to any of
the Teklogix power accessories (see “Using The Power Adaptor” on page 21).
2.2.3.3 Ethernet Port
The ethernet port is a 10Base-T/100Base-TX LAN interface, with an RJ45
connector.
Warning: The USB and ethernet ports are not to be used for typical end user
applications and installations. These ports are designed to be used
for maintenance and setup purposes only. They should only be used
for temporary service connections required for file transfers, set up,
configuration, etc.
2.2.3.4 COM1 and COM2 Ports
The COM1 and COM2 serial ports are DB-9 male connectors (RS232-compatible),
which allow for the connection of serial peripheral accessories, such as printers.
Ports
2.2.3.5 Keyboard/Mouse Connector
The Dsub9 female keyboard/mouse port allows the connection of an e xternal
AT-compatible keyboard. Connection of a PS/2 keyboard or mouse requires an
adaptor. F or further details on k eyboard and mouse connections, please refer to
page 33.
The 8570 Keyboard (PN 31612 or 31612-001) is an optional external k eyboard.
When the keyboard is attached to the 8570, the touch screen will still operate. For
detailed information on the keyboard, refer to Appendix B: “The 8570 Keyboard”.
Some types of scanners may also use this port. The 8570 supports the following
tethered, decoded PowerScan scanners with keyboard wedges:
• Standard Range PN 7666-1251
• Long Range PN 7666-2251
• Extra Long Range PN 7666-3251
• High Density PN 7666-5251
Teklogix 8570 Vehicle-Mount Computer User Manual 19
Page 34

Chapter 2: Getting Started
Precautions
2.2.3.6 Multimedia Port
The multimedia port is SoundBlaster 16-compatible. If you purchased multimedia
cable PN 31618 with the 8570, connect it to the SoundBlaster-compatible
multimedia port (see Figure 2.1 on page 18). The multimedia cable has a Dsub9
connector and three stereo audio connections: Line In, Line Out, and Mic (input).
Connect your speakers to the correct port on the end of the cable. The speakers must
be amplified.
2.2.3.7 USB Ports
The two USB ports are used to connect any type of USB-compatible device. Each
port has a total 1.1 Amp output.
Warning: The USB and ethernet ports are not to be used for typical end user
applications and installations. These ports are designed to be used
for maintenance and setup purposes only. They should only be used
for temporary service connections required for file transfers, set up,
configuration, etc.
2.2.3.8 Mounting Holes
The mounting holes are used to install the 8570 where needed. For installation
instructions, please refer to Chapter 4: Installation.
2.3 Precautions
2.3.1 Important Safeguards
• To avoid possible injury, this device must be properly secured when in a
moving vehicle.
• Keep this device a w ay from magnetic fields.
• Do not place the computer near a television or radio receiv er.
• For operating the 8570 in freezer and outdoor environments, it is critical
that the information on page 35 is reviewed and that the guidelines are
strictly followed.
• Do not disassemble your 8570 computer—there are no user-serviceable
parts inside.
Teklogix 8570 Vehicle-Mount Computer User Manual
20
Page 35

Chapter 2: Getting Started
Handling Your 8570 Vehicle-Mount Computer
2.3.2 Handling Your 8570 Vehicle-Mount Computer
• Do not use sharp objects, such as regular pens, pencils, tools, etc., on the
touch screen as they may damage its surface and impair display visibility , or
cause it to be inoperable.
• Do not poke at the cable gasket, or the water seal will be compromised.
• Do not misplace the cable gasket inserts, or the computer seal will
be compromised.
• Do not place heavy objects on top of the unit.
2.3.3 Using The Power Adaptor
AC/DC indoor po wer adaptors and DC/DC vehicle po wer adaptors are a v ailable for
the 8570 Vehicle-Mount Computer. Use of any other power adaptors may damage
the computer. To connect power to the 8570, connect the appropriate adaptor (A C or
DC) to the power connector at the back of the computer (see Figure 2.1 on page 18).
The power connector is keyed to prevent an improper connection. Secure the AC or
DC adaptor connector to the power connector by mating the connectors and turning
the adaptor connector ring clockwise until it stops.
External power is provided through a three-pin stationary receptacle. When
disconnecting the power adaptor , do not pull or twist the cords. Doing so may result
in the cord malfunctioning and/or the connector being damaged
For instructions on installing DC/DC power connections, please refer to “Po wer
Options” on page 60.
2.4 Starting Up
Powering Up
In general, when the following steps are taken, the 8570 will be ready for use:
1. Attach the 8570 to a mounting bracket (for installations, see Chapter 4:
Installation).
2. Connect any accessories to the 8570; e.g. keyboard, scanner, etc.
Teklogix 8570 Vehicle-Mount Computer User Manual 21
Page 36

Chapter 2: Getting Started
Connecting Accessories
Important: If peripherals are connected to the 8570, the IP66 cover must be
3. Connect the power cable to the power source, and to the power connector (for detailed instructions, see “Power Options” on page 60).
4. Turn on your 8570 by pressing the power button.
Note: When the 500 MHz 8570 Vehicle-Mount Computer is first supplied with
power, the unit will power up automatically. Subsequent operation is the
same as the standard 8570. If the 500 MHz unit is disconnected and then
reconnected to a power source, it will again power up automatically.
5. When the start-up sequence is complete, you may run your applications.
Powering Down
1. Close all applications.
removed. The cables for the peripheral(s) are then placed through
the blue cable gasket. For detailed instructions, refer to “Connecting Cables” on page 29.
2. Choose “Shut Down” from the Start menu.
3. Alternatively, if you need to reset the computer hardware, hold in the
power button until the system shuts do wn.
2.5 Connecting Accessories
For the location of the different connectors and card slots, please refer to Figure 2.1
on page 18. For instructions on installation and options, refer to “Accessories” on
page 36.
Teklogix 8570 Vehicle-Mount Computer User Manual
22
Page 37

OPERATING INFORMATION 3
3.1 Processor ....................................25
3.2 Hard Disk Drive ................................25
3.3 Memory.....................................25
3.4 Touch Screen Display .............................26
3.4.1 TFT Monitor ...............................26
3.4.1.1 Backlight Dimmer Buttons ...................26
3.4.2 Touch Screen...............................27
3.4.3 My-T-Soft Onscreen Keyboard .....................27
3.4.4 Touch Right Onscreen Mouse ......................28
3.5 Ports ......................................29
3.5.1 Connecting Cables ............................29
3.5.2 Power...................................32
3.5.2.1 Power Button ..........................32
3.5.3 Ethernet Port ...............................33
3.5.4 Serial Ports (COM1/COM2).......................33
3.5.5 Keyboard/Mouse Port ..........................33
3.5.6 Multimedia Port .............................34
3.5.7 USB Ports ................................34
3.5.8 PC Card Slots ..............................34
3
3.6 8570 Vehicle-Mount Computer: Freezer Version ...............35
3.6.1 Operating The 8570 In Freezer And Outdoor Environments ......35
3.7 Accessories ...................................36
3.7.1 External Keyboard ............................37
3.7.2 Mouse ..................................37
3.7.3 Printer ..................................37
3.7.4 Scanners .................................37
3.7.5 CD ROM Kit...............................37
3.7.6 USB Floppy Drive ............................38
Teklogix 8570 Vehicle-Mount Computer User Manual 23
Page 38

3.7.7 Multimedia Cable............................38
3.7.8 Mounting Options ...........................38
3.7.9 Antennas ................................39
3.8 Installing Software ..............................39
3.9 The BIOS Firmware..............................39
3.10 Typical Resource Allocation For Windows 98................40
3.11 Backing Up Your 8570 Vehicle-Mount Computer..............42
24 Teklogix 8570 Vehicle-Mount Computer User Manual
Page 39

Chapter 3: Operating Information
Processor
This chapter describes the 8570 Vehicle-Mount Computer in detail and explains
each hardware feature.
3.1 Processor
The 8570 Vehicle-Mount Computer provides processing power capable of operating
today's commercial-off-the-shelf software as well as custom applications written for
the MS-DOS and W indows operating systems.
The 8570 is equipped with an Intel Mobile Pentium 266 MHz* MMX processor.
This processor is a full 32-bit internal and external bus device with integrated
numeric co-processor and 512KB SRAM/L2 memory cache. This processing
capability allows the computer to support the latest application software on the
market, including a local-bus video controller , high speed zero w ait RAM,
AT-compatible peripherals, and Real-Time-Clock.
*Intel Mobile Pentium III 500 MHz option available (see “Optional Features” on page 15).
3.2 Hard Disk Drive
Your 8570 contains a very rugged, shock-mounted IDE Hard Disk Drive (HDD).
The 2.5-inch HDD, a 20 GB IBM Tra velstar dri v e, provides storage of the operating
system, application programs, and user data files. The HDD will appear to the
system as Drive C:. The HDD may be set up at in the BIOS to automatically spin
down when not in use. This increases the shock tolerance of the dri ve (see “The
BIOS Firmware” on page 39).
3.3 Memory
The 8570 Vehicle-Mount Computer has a minimum of 128 MB SDRAM via a 144
pin SDRAM PC100. An y future memory upgrades are f actory installed.
Teklogix 8570 Vehicle-Mount Computer User Manual 25
Page 40

Chapter 3: Operating Information
Touch Screen Display
3.4 Touch Screen Display
3.4.1 TFT Monitor
The 8570 Vehicle-Mount Computer is equipped with a high-resolution colour
SVGA display, which supports the newest technology and enables full use of the
display both in graphics and in text mode. The TFT 30.7 cm (12.1 in.) display
provides a resolution of 800 pixels by 600 pixels and supports 256 colour mode.
The colour monitor is a thin film transistor (TFT), which uses a backlight for
viewing. The display is capable of operation in a full range of ambient lighting, from
direct sunlight to complete darkness. The display has a standard brightness of 500
NIT. Backlighting intensity should be adjusted for optimal readability. The display
incorporates a fixed, pre-set contrast. Colour intensity is a function of display
viewing angle and ambient light intensity. The screen has a 120-degree viewing
angle. If necessary , adjust computer angle and position for optimal colour and
character visibility .
Important: F or 8570 Vehicle-Mount Computer Freezer/Extreme Temperature
units, please see page 35 for information on the operation of the
display in freezer and outdoor environments.
3.4.1.1 Backlight Dimmer Buttons
The display brightness is adjustable by means of two buttons on the right side of the
computer (as seen from the front). LCD brightness can be controlled by repeatedly
pressing the up or down button. The tw o dimmer buttons allow adjustments of
brightness from 0 to 100%.
Power Button
Teklogix 8570 Vehicle-Mount Computer User Manual
26
Dimmer Buttons
Figure 3.1 Dimmer Buttons
Page 41

Chapter 3: Operating Information
Touch Screen
3.4.2 Touch Screen
The 8570 digitizer (touch screen) has a backing made of hardened glass, which
provides clarity and strength. The digitizer matrix uses resistive pressure-sensitive
technology to deliver X and Y coordinates to the applications and programs that run
on the 8570 Vehicle-Mount Computer. The touch screen is responsi v e to both finger
touch and stylus. The force/movement relationship can be optimized to pro vide the
user with a wide range of response. The drivers pre-installed in the computer can be
accessed to modify the touch screen sensitivity, response speed, double-touch speed
and calibration to improve user control. For instructions, see Appendix C: “Touch
Screen Calibration”.
The touch sensitivity rejects any input if the area is too large. This allows you to
“write” with the tip of the Teklogix stylus, while resting your hand on the display.
The computer will ignore your hand because it is too large.
An added advantage of touch screen technology is that the cursor position is not as
important as with other pointing devices. With the touch screen, you simply tap on
the screen, and the cursor will move there, instead of having to mo ve in a specific
direction—which requires finding the cursor first.
The My-T-Soft program, a comprehensive and versatile onscreen ke yboard
program, is installed on your computer. F or a description of the program and
start-up instructions, see below.
3.4.3 My-T-Soft Onscreen Keyboard
My-T-Soft software is intended to give you all the functionality of a keyboard
without using a keyboard, allowing the user to remain on the 8570’s touch screen.
The “virtual” keyboard has a wide variety of functions and menu options, including
several language selections. Sho wn below is the 101-keyboard, without the many
options panels available that may be added to the display.
Figure 3.2 Onscreen Keyboard
Teklogix 8570 Vehicle-Mount Computer User Manual 27
Page 42

Chapter 3: Operating Information
Touch Right Onscreen Mouse
My-T-Soft can be used for secure applications, network logons, password entry , and
various other controlled-input situations. It is also a very useful tool for macros and
Windo ws commands. My-T-Soft
expand and retract dependent upon your requirements.
To access the program in Windo ws 98, go to the My-T-Soft menus in the W indows
Start/Programs menu. Select “My-T-Soft Welcome” to view the online manual or
tutorial, or open “My-T-Soft Setup” to configure your options (see Figure 3.3).
You can also go straight to the program by selecting “My-T-Soft” to begin using the
onscreen keyboard. The program configuration options are also accessible from
within the keyboard program itself.
has twelve screen sizes and its options panels can
Figure 3.3 My-T-Soft Welcome And Setup Menus
3.4.4 Touch Right Onscreen Mouse
The T ouch Right onscreen mouse allo ws you to define right- and left-click action for
your pointer. Y ou can anchor the onscreen mouse icon in the location of your choice
on the 8570 touchscreen. The Touch Right mouse is available under the My-T-Soft
menu. Remember that you can always access the My-T-Soft help files for additional
information.
Teklogix 8570 Vehicle-Mount Computer User Manual
28
Figure 3.4 Onscreen Mouse
Page 43

Chapter 3: Operating Information
3.5 Ports
There are eight connectors on the back of the 8570, which can be used for the
addition of a variety of peripheral accessories. These connectors are protected from
harsh environments by an IP66 cable cov er and gask et. The connector locations and
gasket arrangement are shown in Figure 3.5 on page 31.
In addition, there are two PCMCIA slots on the top of the computer that are
available for PC card de vices.
Specific accessories are described in section 3.7 on page 36.
Important: If peripherals are connected to the 8570, the IP66 cover must be
removed. The cables for the peripheral(s) are then placed through
the blue gasket. For detailed instructions, refer to “Connecting
Cables”, below.
3.5.1 Connecting Cables
There are several steps to take to properly seal the computer around the attached
cables. Before following these instructions, refer to Figure 3.5 on page 31 for a
diagram of the cable gasket, cover and screws.
Ports
1. Remove the sealing plate screws (five TORX 10 [T10] screws
and washers).
2. Carefully remove the plate and bottom half of the cable gasket.
Important: Do not misplace the black sealing plugs since you may need them
for future use.
3. Ensure that each required cable position is correctly identified. Remove
the peelable sections of the cable gasket until the correct cable diameter
is obtained, and retain the sections for future use.
4. Install each required cable into its correct connector on the computer,
and run the cable through the prepared gasket slot. Leave 1-2 cm of
slack under the cover.
5. Carefully replace the cable gasket, ensuring proper alignment of the
cables that are passed through.
6. Re-install the cover by aligning the slots at the back and securing the five
screws and washers.
Teklogix 8570 Vehicle-Mount Computer User Manual 29
Page 44

Chapter 3: Operating Information
Connecting Cables
Important: If the computer is used in a high-moisture environment, it is rec-
ommended that natural lubricating grease (PN 98083) be applied
prior to re-installing the cable cover. Apply the lubricant around
the cables where they pass through the blue cable sealing gasket,
and between the cable gasket halves. As well, Nyogel connector
lubricant (PN 95146) should be applied to all connectors.
It is also particularly important to adhere to this practice for the
8570 Vehicle-Mount Computer Freezer/Extreme Temperature
units. Please see “8570 Vehicle-Mount Computer: Freezer Version” on page 35 for detailed information.
The following is a list of the connectors, and the reference page number for
each description:
• DC Power Input (page 32).
• Ethernet (page 33).
• COM2 (page 33).
• COM1 (page 33).
• Keyboard/Mouse (page 33).
• Multimedia (page 34).
• USB1 (page 34).
• USB2 (page 34).
• PCMCIA Slots (page 34).
Teklogix 8570 Vehicle-Mount Computer User Manual
30
Page 45

Chapter 3: Operating Information
Connecting Cables
Metal Dome Cover
(with Antenna Connector)
Mounting Holes
Cable Gasket
PC Card Lid
IP66 Cover with Gasket
USB2
1
USB
Multimedia
Keyboard
/Mouse
COM2
COM
1
Ethernet
Figure 3.5 The 8570 Ports
Teklogix 8570 Vehicle-Mount Computer User Manual 31
Screw
Cable Gasket
Power
Page 46

Chapter 3: Operating Information
Power
3.5.2 Power
The 8570 Vehicle-Mount Computer can be connected to either an AC or DC power
supply , depending on whether its use is for mounting on v ehicles or at fixed
locations adjacent to cross-dock doors or manufacturing stations. Power is supplied
to your 8570 computer through the power connector (see Figure 3.5 on page 31).
Note: When the 500 MHz 8570 Vehicle-Mount Computer is first supplied with
power, the unit will power up automatically. Subsequent operation is the
same as the standard 8570. If the 500 MHz unit is disconnected and then
reconnected to a power source, it will again power up automatically.
The 8570 is capable of operation from several po wer sources:
• Pre-regulator power module for vehicle input voltage in the range of 10 to
55 Volt DC.
• Optional pre-regulator power module (55-90 Volt DC).
• Optional universal 120/240 VAC/DC adaptor.
• Optional transient suppressor (recommended for vehicles with large
hydraulic or traction motors).
For instructions on installing power connections, see “Po wer Options” on page 60.
3.5.2.1 Power Button
The power button is located on the right side of the computer . Depressing this b utton
for approximately one second will turn the computer ON. Normally when turning
off the computer , do not use the power button. Close all applications and then
choose “Shut Down” from the Windows Start menu. If the power button is held
down for more than sev en seconds, the computer will power OFF and the hardware
will reset fully .
Important: Use the Windows Shut Down function to power off the computer.
Teklogix 8570 Vehicle-Mount Computer User Manual
32
Page 47

Chapter 3: Operating Information
Ethernet Port
3.5.3 Ethernet Port
Warning: The USB and ethernet ports are not to be used for typical end user
applications and installations. These ports are designed to be used
for maintenance and setup purposes only. They should only be used
for temporary service connections required for file transfers, set up,
configuration, etc.
The Ethernet on the 8570 Vehicle-Mount Computer is integrated within the unit and
provides the LAN interface. A multi-function RJ-45 connector provides access to
the Ethernet port (see Figure 3.5 on page 31). The 8570 supports 10BaseT (twisted
pair) Ethernet at a speed of 10/100 Mbps. The Ethernet port is supported under most
operating systems, such as W indows 98 or 2000.
Connect any Cat. 5 cable with an RJ45 connector to the Ethernet port. The 8570
Ethernet features include:
• Embedded 10Base-T/100Base-TX Mbps RJ-45 connector.
• Implements industry-standard Plug and Play technology .
• Full-duplex operation.
• Auto-negotiation of Full and Half duplex modes.
3.5.4 Serial Ports (COM1/COM2)
The 8570 has two Dsub9 male connectors which provide the RS-232 serial ports.
These ports conform to the RS-232 specification and are connected to the system as
COM1 and COM2. They operate at data rates up to 115 kbps. The COM ports allo w
for the direct connection of serial peripheral accessories, such as printers.
3.5.5 Keyboard/Mouse Port
The Dsub9 female keyboard/mouse port allows the connection of an e xternal
AT-compatible keyboard. Connection of a PS/2 keyboard or mouse requires an
adaptor. F or details on k eyboard and mouse options, please refer to page 37. Some
types of scanners may also use this port (refer to page 37).
Teklogix 8570 Vehicle-Mount Computer User Manual 33
Page 48

Chapter 3: Operating Information
Multimedia Port
3.5.6 Multimedia Port
The multimedia (sound) port is a Dsub9 female with key pin connector. The
multimedia port on the computer provides stereo connections for line input,
microphone input, and line output, which is used for external amplified speakers.
The sound components of the 8570 Vehicle-Mount Computer enable you to record,
compress, as well as play back voices, sound and music. Volume control can be
achieved onscreen through the built-in mixer. See the Windows 98 on-line help for
more information about the volume control.
The heart of the sound system is the AudioDrive ESS Solo-1 chip from ESS
T echnology. This chip (the ES1938S) gives you 16-bit stereo audio, and it consists
of an embedded microprocessor, 16-bit stereo A/D and D/A, ESFM music
synthesizer, DMA control, and adv anced power management logic. The AudioDriv e
is compatible with SoundBlaster, SoundBlaster Pro, and Microsoft W indo ws Sound
System.
3.5.7 USB Ports
The two USB ports have standard USB 1.1 Amp (total output) connectors. These
ports are used to connect any USB-compatible external devices, such as printers,
floppy drives, etc.
Warning: The USB and ethernet ports are not to be used for typical end user
applications and installations. These ports are designed to be used
for maintenance and setup purposes only. They should only be used
for temporary service connections required for file transfers, set up,
configuration, etc.
3.5.8 PC Card Slots
The 8570 contains a dual PCMCIA interface port compatible with the PCMCIA
version 2.1 standard. It is located behind the cover located on the top right side of
the computer (see Figure 3.5 on page 31). This interface will support:
• two TYPE II cards or ,
• one TYPE III card.
The PC card interface is a fully-integrated Cirrus Logic PCMCIA 2.1, 16-bit
controller. Third party PC cards are, for the most part, user-installable.
Teklogix 8570 Vehicle-Mount Computer User Manual
34
Page 49

Chapter 3: Operating Information
8570 Vehicle-Mount Computer: Freezer Version
If either the Lucent/Agere 802.11b or the Cisco Air350 802.11b PC card radio*
have not been installed, then both Type II slots are available. When no radio is
installed, the PC card slots are covered with a flat lid, rather than a dome cov er.
Howev er, one PC card slot is usually reserved for the radio, leaving the other slot
ready for peripheral cards such as: ATA Flash cards, GPS cards, Nokia Cell phone
cards, etc. A communication card can also be installed for system back up, upgrade,
installation of software drivers, or for interfacing with another computer. For
installation of software drivers, see “Installing Software” on page 39.
*
For details on the PC Card radios, see page 83.
3.6 8570 Vehicle-Mount Computer: Freezer Version
The 8570 Vehicle-Mount Computer Freezer/Extreme T emperature version is for use
in temperatures ranging from -35˚C to 60˚C (-31˚F to 140˚F). Although the 8570
Freezer computer can be stored at -30˚C and operated at -35˚C, a cold start below
-20˚C (- 4°F) is not recommended due to radio limitations.
The 8570 Freezer computer is water-sealed to withstand rain in outdoor
environments and condensation in freezer en vironments, when contact lubricant and
natural grease are properly applied as described below.
Regular maintenance precautionary steps should be taken, such as periodically
inspecting and replacing the contact lubricant (PN 95146) and the natural grease
cable sealant (PN 98083). Check with your Psion Teklogix Service Centre
for details.
3.6.1 Operating The 8570 In Freezer And Outdoor Environments
Warning: It is critical that this information is reviewed and the guidelines
strictly followed.
• To help maintain an adequate internal temperature to ensure optimal operation, the computer should be switched on prior to entry into a freezer environment and should be left on at all times while in a freezer environment.
• When not in use, the 8570 can be stored at -30˚C, but ideally should be
stored in temperatures above 0˚C (32˚F).
Teklogix 8570 Vehicle-Mount Computer User Manual 35
Page 50

Chapter 3: Operating Information
Accessories
• All LCD computers used in freezers may require some brightness adjustment because displays may darken as the surrounding temperature drops.
Adjust the brightness as required. Response time of the display may also
slow down.
• When moving between a freezer and warm, humid en vironments, window
condensation or icing on the outside of the display window is a natural
occurrence. W iping the condensation from these windows may help, b ut the
operator may need to wait until the condensation stops forming before use.
• To reduce condensation and frost on the terminal display, use an anti-fogging agent once a week or as required.
• If a computer is left in a freezer environment for extended periods of time
with the power off, display response time, brightness and radio co verage
may be affected. After turning the computer on, the operator should allo w a
15 minute warm-up period before use.
• Connector lubricant (PN 95146) around all connectors, and natural lubricating grease cable sealant (PN 98083) around the blue sealing gasket joints
and around the cable as they pass through it, must be used in freezer/outdoor applications to ensure adequate moisture sealing. To maintain the
moisture barrier and to prevent corrosion, the connector lubricant and
natural lubricating grease cable sealant should be re-applied periodically as
necessary .
3.7 Accessories
There are a number of peripheral accessories that can be added to the 8570
Vehicle-Mount Computer. The two PCMCIA card slots and various connectors
allow you to extend the capabilities of the 8570 by adding dif ferent accessories,
such as an external keyboard, scanners, disk dri ves, radio cards, modems, LAN
cards, etc. For the location of the connectors, see Figure 3.5 on page 31.
Important: If peripherals are connected to the 8570, the IP66 cover must be
removed. The cables for the peripheral(s) are then placed through
the blue gasket.
Teklogix 8570 Vehicle-Mount Computer User Manual
36
Page 51

Chapter 3: Operating Information
External Keyboard
3.7.1 External Keyboard
The rugged 8570 Keyboard (PN 31612 or 31612-001) is an optional external
keyboard, designed specifically for mobile computing applications. The touch
screen will still operate when the keyboard is attached to the computer.
The external keyboard PN 31612 is a DB9 backlit unit. If both the ke yboard and a
scanner are to be used together, a PS/2 version of the same k e yboard is available
(PN 31612-001). For detailed information, please refer to Appendix B: “The 8570
Keyboard”.
3.7.2 Mouse
The 8570 can be operated through different types of mouse devices: serial or PS/2.
1. The serial mouse is connected to the COM1 or the COM2 port. For
installation of software drivers, see “Installing Software” on page 39.
2. The PS/2 mouse is connected through the keyboard DB9 connector.
This requires keyboard cable PN 31617, which has a DB9 male
connector at one end and two PS/2 connectors at the other .
3.7.3 Printer
Any serial (RS 232/9-pin) printer can be connected to the 8570. For the installation
of software drivers, see “Installing Software” on page 39.
3.7.4 Scanners
The 8570 supports the following tethered, decoded PowerScan scanners with
keyboard wedges:
• Standard Range PN 7666-1251
• Long Range PN 7666-2251
• Extra Long Range PN 7666-3251
• High Density PN 7666-5251
3.7.5 CD ROM Kit
The CD ROM (PN 31340) plugs in through the PCMCIA slot on the top of the 8570.
Teklogix 8570 Vehicle-Mount Computer User Manual 37
Page 52

Chapter 3: Operating Information
USB Floppy Drive
3.7.6 USB Floppy Drive
The bootable floppy drive (PN 31627) connects through the USB port. This drive
will also allow administrators to boot from the driv e to perform any software
maintenance if required.
Important: To use the USB floppy boot feature, USB BIOS Legacy Support
must be enabled., and the Parallel P ort must be disabled in the 8570
BIOS Setup (see “The BIOS Firmware” on page 39).
Warning: The USB and ethernet ports are not to be used for typical end user
applications and installations. These ports are designed to be used
for maintenance and setup purposes only. They should only be used
for temporary service connections required for file transfers, set up,
configuration, etc.
3.7.7 Multimedia Cable
The multimedia cable (PN 31618) is used to attach media peripherals such as
speakers, microphones, CD players, etc.
If you purchased the multimedia cable with the 8570, connect it to the
SoundBlaster-compatible multimedia port (see Figure 3.5 on page 31). The
multimedia cable has a Dsub9 connector and three stereo audio connections: Line
In, Line Out, and Mic (input). Connect your speakers to the correct port on the end
of the cable. The speakers must be amplified.
3.7.8 Mounting Options
The wide variety of mounting provisions available for the 8570 allow it to be
mounted to various surfaces and tilted to a convenient angle. Mounting hardware is
also available for the optional ke yboard. For detailed descriptions of mounting
hardware and installation, refer to Chapter 4: Installation.
Teklogix 8570 Vehicle-Mount Computer User Manual
38
Page 53

Chapter 3: Operating Information
Antennas
3.7.9 Antennas
If a PC card radio is installed in one of the 8570 PCMCIA slots, the antenna may be
internal or external. When equipped with an antenna, the 8570 has a dome cover on
the top left of the computer. The type of dome cover depends on the antenna used:
plastic cover for an internal antenna, and a metal cov er for an external antenna. For a
description of available antennas, please see page 59.
3.8 Installing Software
Some accessories require that you install software drivers on the system. There are
four ways to copy/install a software driv er to the 8570:
1. Use a PCMCIA disk containing the software driver.
2. Boot the computer from an external USB floppy drive (see page 38).
3. Use an “interlink” cable to another computer containing the software
driver (this assumes that a communication card with software driver is
already installed).
4. Use an external CD-ROM player, connected through the PC card slot
(this assumes that software for the CD-ROM is already installed) (see
page 37).
3.9 The BIOS Firmware
Normally , the BIOS firmware should not be accessed. All settings, i.e. date and time
etc., should be programmed though the interface of the operating system, as on any
non-rugged PC. In exceptional cases the BIOS is available for use. For instance,
if the 8570 function is abnormal or unstable, you can restore the computer to the
default CHIPSET settings. Date and time can be changed within the BIOS
firmware.
1. Attach an external keyboard to the 8570.
2. Power up the 8570.
3. Press the <F2> key on the keyboard while the 8570 is booting, to enter
the BIOS setup.
4. Use the arrow keys to navigate through the BIOS firmware.
5. Press <F9> to restore the default CHIPSET values.
Teklogix 8570 Vehicle-Mount Computer User Manual 39
Page 54

Chapter 3: Operating Information
Typical Resource Allocation For Windows 98
6. Then go to the Advanced Menu of the BIOS and set the following
values:
Reset Configuration Data = Yes
In the I/O Device Configuration Sub-menu:
Serial port A = Auto
Serial port B = Auto
IRDA = Disabled
Parallel port = Disabled
USB Host Controller = Enabled
USB BIOS Legacy Support = Enabled
7. Press <F10> to save and restart.
Important: To use the USB floppy boot feature, USB BIOS Legacy Support
must be enabled, and the Parallel Port must be disabled in the
BIOS Setup.
3.10 Typical Resource Allocation For Windows 98
In any computer it is critical to have a good understanding of the computer’s
resource allocation. Compatibility with previous standards requires the system to
have a specific hardware environment for interrupts, DMA and memory address.
The 8570 Vehicle-Mount Computer uses plug and play technology. This means the
resource allocation can be controlled by software. Typical resource allocations are
shown in Table 3.1 "Typical Resource Allocations - IRQs" through Table 3.3
"T ypical Resource Allocations - Memory". Looking at IRQ allocations from 0 to 15,
you will note that most of them are already assigned.
Reallocating resources like IRQs can be done at different levels. At the BIOS lev el
you can turn on or off devices such as COM ports, freeing those IRQs for other uses.
Another level of control is from a plug and play operating system such as Windows
98, where the device manager allows you to control resources.
Teklogix 8570 Vehicle-Mount Computer User Manual
40
Page 55

Chapter 3: Operating Information
Typical Resource Allocation For Windows 98
IRQ Device Available Comment
0 TIMER 0 No
1 KEYBOARD No
2 SLAVE 8259 No
3 COM2 No Note*
4 COM1 No Note*
5- Yes
6 FDC Yes Note*
7 LPT1 No Note*
8RTC No
9- Yes
10 - Yes
11 - Yes
12 PS/2 MOUSE No Note*
13 FPU No
14 IDE0 No Note*
15 IDE1 No Note*
*Note: If a device is disabled in setup, the corresponding interrupt is
available for other devices.
Table 3.1 Typical Resource Allocations - IRQs
Teklogix 8570 Vehicle-Mount Computer User Manual 41
Page 56

Chapter 3: Operating Information
Backing Up Your 8570 Vehicle-Mount Computer
DMA Device Available Comment
0Yes
1Yes
2 FDC No
3Yes
4 CASCADE No
5Yes
6Yes
7Yes
Table 3.2 Typical Resource Allocations - DMAs
Upper Memory Device Available Comment
C0000h-CBFFF
h
CC000h-DFFFF
h
E0000h-EFFFF
h
F0000h-EC000h SYSTEM BIOS No
VGA BIOS No
Yes
Yes ISA bus only
ISA bus or shallow
RAM
Table 3.3 Typical Resource Allocations - Memory
3.11 Backing Up Your 8570 Vehicle-Mount Computer
It is recommended that you back up the data supplied with your computer as soon as
possible to prevent the loss of important data and system software. As an end-user, it
is your responsibility to ensure that regular backups are performed. A backup will
provide you with a means to restore your system to its original status. In particular,
the directory D:\Install should be backed up in its entirety. See also “D: Install
Partition” on page 76 and “Software Loading/Installation Procedure” on page 77).
Teklogix 8570 Vehicle-Mount Computer User Manual
42
Page 57

Chapter 3: Operating Information
Backing Up Your 8570 Vehicle-Mount Computer
Methods of backing up data include:
• Copying your data to a network server or another networked computer.
• Copying your data to a CD-ROM drive to create a permanent,
incorruptible archive.
• Copying your data to a backup device such as a tape drive or to an external
hard drive.
Important: A Microsoft Windows licensed registration number is affixed
under the port cover of each 8570 unit. The My-T-Soft license
information is printed on a paper tag that is shipped with each
8570. This information is required to reinstall the 8570 operating
system and My-T-Soft.
IT IS CRITICAL that you write down the Microsoft Windows
registration number and then store it and the My-T-Soft
registration tag in a safe place alongside the computer’s
backup information.
Teklogix 8570 Vehicle-Mount Computer User Manual 43
Page 58

Page 59

INSTALLATION 4
4.1 Mounting Accessories .............................47
4.1.1 8570 Mounting Brackets.........................47
4.1.2 Security Mounting Options .......................48
4.1.3 Standard Mounting Options .......................48
4.1.4 8570 W ith Keyboard Mounting Brackets ................49
4.1.5 Pedestal Mounts .............................50
4.2 Installation ...................................50
4.2.1 Important Safeguards ..........................50
4.2.2 Handling Your 8570 Vehicle-Mount Computer .............51
4.2.3 Bracket Options .............................51
4.2.4 Mounting The 8570 ...........................52
4.2.4.1 Attaching The Mounting Bracket................52
4.2.4.2 Installing The Quick-Release Bracket .............54
4.2.4.3 Installing The Keyboard Quick-Release Brack et........56
4.2.6 Installing Cables .............................59
4.2.5 Installing Security Mount Options....................57
4.2.5.1 Attaching Dual Ball Sock et Security Mounts – PN 1000398 .57
4.2.5.2 Attaching 8570 QR Security Mounts – PN 1000304-570 . . .58
4.2.7 External Antennas ............................59
4.2.8 Power Options ..............................60
4.2.8.1 Non-Vehicle Installation ....................61
4.2.8.2 Installing The Pre-regulator...................61
4.2.8.3 Installing The Active Transient Filter Power Supply ......63
4
Teklogix 8570 Vehicle-Mount Computer User Manual 45
Page 60

Page 61

Chapter 4: Installation
Mounting Accessories
4.1 Mounting Accessories
The 8570 Vehicle-Mount Computer is equipped with four mounting holes on the
bottom surface of the computer to permit attachment of either the 8570 Mounting
Bracket or Quick-Release Bracket for fixed mounting to a variety of vehiclemounting systems for forklift trucks, push carts, hostling vehicles and transtainers.
As well, the 8570 can be mounted at fixed locations adjacent to cross-dock doors or
manufacturing stations.
The mounting provisions available for the 8570 Vehicle-Mount Computer allow it to
be mounted to various surfaces and tilted to almost any angle. Mounting hardware is
also available for the optional ke yboard. The following is a description of all the
mounting options and their part numbers.
4.1.1 8570 Mounting Brackets
• 8570 Mounting Bracket PN 31658
The 8570 attaches to this plate, which then attaches to
the Universal Dual Ball and Socket Mount (31623) or
one of the pedestal mounts. The plate includes stylus
clips to hold the touch screen pen.
• 8570 Quick-Release Bracket PN 30876-400
The 8570 attaches to this bracket (3 pieces in
total), which includes a quick-release plate. The
unit is then mounted directly to the surface of a
cantilever mount (17293), a full-width mount
(17280), or directly to the dash or other appropriate surface of the vehicle.
Teklogix 8570 Vehicle-Mount Computer User Manual 47
Page 62

Chapter 4: Installation
Security Mounting Options
4.1.2 Security Mounting Options
Security mount kits are designed to prevent the 8570 computer from being remov ed
from the mount without a special tool.
• 8570 Universal Dual Ball and Socket Mount Security Kit PN 1000398-570
This kit includes a clamp with security hardware and a special Philips bit and
hex socket. The security clamp attaches to an existing 31623 dual ball sock et
mount, preventing the mount from being loosened; the security scre ws prevent
the computer from being removed from the ball and socket mount.
• 8570 Quick Release Mount Security Kit PN 1000304-570
This kit is similar to the standard quick release kit (see “Installing The Quick-
Release Bracket” on page 54) with one exception – the bottom plate includes
security hardware and a Philips bit and hex socket to prevent the mount from
being loosened and the computer removed.
• 8570 Quick Release Mount Security Kit PN 1000509
This kit is designed for use with an existing
This security kit is designed to replace an already installed quick release mount.
It includes a new bottom plate with security screws and a Philips security bit.
, installed quick release mount.
4.1.3 Standard Mounting Options
• Universal Dual Ball and Socket Mount PN 31623
The 10.75 inch long ball and socket mount attaches to one of
the two brackets that attaches to the 8570 (31658 or 30876-
400). The other end of the mount can be attached horizontally or vertically to almost any surface. The ball design
allows both ends to be angled to suit the operator's needs.
Two sizes of Clamp base are also available (see below),
which allows the Univ ersal Dual Ball and Sock et Mount to
be attached to the cage of a lift truck. One of the existing
round bases is removed and replaced with the Clamp base.
Teklogix 8570 Vehicle-Mount Computer User Manual
48
Page 63

Chapter 4: Installation
8570 With Keyboard Mounting Brackets
• 3" Clamp Base for Universal Dual Ball and Socket Mount PN 31625
The clamp base is available in a 3" or 4" clamp size. This
clamp base with ball attaches to one end of the Universal
Dual Ball and Socket Mount (31623). It can be used to
mount the 8570 on the overhead cross-bars on a forklift or
any similar surface.
• 4" Clamp Base for Universal Dual Ball and Socket Mount
PN 31625-001 (see description for 3" Clamp Base, above).
• 8570 Dual Ball and Socket Mounting Kit PN 31624
This kit includes the Universal Dual Ball and Socket Mount (31623), the 8570
Mounting Bracket (31658), and all the necessary hardware fasteners.
4.1.4 8570 With Keyboard Mounting Brackets
• 8570 Keyboard Bracket PN 31596
The 8570 (attached to the 31658 bracket) and
optional keyboard attach to this bracket. The
entire system is then mounted to the Universal
Dual Ball and Socket Mount (31623) or a pedestal mount. This system allows the 8570 and
keyboard to be mounted close together.
• 8570 With Keyboard Dual Ball and Socket
Mounting Kit (PN 31624-001)
This kit includes the Universal Dual Ball and
Socket Mount (31623), the 8570 Mounting
Bracket (31658), the Keyboard Bracket
(31596), and all the necessary hardware fasteners.
See Figure 4.3 on page 53.
Teklogix 8570 Vehicle-Mount Computer User Manual 49
Page 64

Chapter 4: Installation
Pedestal Mounts
• Keyboard Quick-Release Bracket PN 30876-401
The optional keyboard is attached to
this quick-release bracket (3 pieces in
total). The unit is then mounted
directly to the surface of a cantilever
mount (17293), a full-width mount
(17280), or directly to the dash or other
appropriate surface of the vehicle.
4.1.5 Pedestal Mounts
The Mounting Bracket (31658) or the Keyboard Bracket
(31596) will attach to the following pedestal options:
• 12" Pedestal mount PN 30921-100
• 14" Pedestal Mount PN 30921
• 16" Pedestal Mount PN 30921-200
• 20" Pedestal Mount PN 30921-300
4.2 Installation
The installation of the computer depends on the type of vehicle or location, and the
application environment.
4.2.1 Important Safeguards
• To avoid possible injury, this device must be properly secured when in a
moving vehicle.
• Keep this device a w ay from magnetic fields.
• Do not place the computer near a television or radio receiv er.
• Do not disassemble your 8570 computer—there are no user-serviceable
parts inside.
Teklogix 8570 Vehicle-Mount Computer User Manual
50
Page 65

Chapter 4: Installation
Handling Your 8570 Vehicle-Mount Computer
4.2.2 Handling Your 8570 Vehicle-Mount Computer
• Do not use sharp objects, such as regular pens, pencils, tools, etc., on the
touch screen as they may damage its surface and impair display visibility , or
cause it to be inoperable.
• Do not poke at the cable gasket, or the water seal will be compromised.
• Do not misplace the cable gasket inserts, or the computer seal will
be compromised.
• Do not place heavy objects on top of the unit.
4.2.3 Bracket Options
The 8570 can be attached to the bracket types described in the previous pages:
• PN 31658, the 8570 Mounting Bracket.
• PN 30876-400, the 8570 Quick-Release Bracket (3 pieces in total).
• PN 31596, the 8570 Keyboard Bracket, which accommodates the
external keyboard.
• PN 1000398, the 8570 Universal Dual Ball and Socket Mount Security Kit.
• PN 1000304-570, the 8570 Quick Release Mount Security Kit.
• PN 1000509, the 8570 Quick Release Mount Security Kit for use with an
existing
, installed quick release mount.
Teklogix 8570 Vehicle-Mount Computer User Manual 51
Page 66

Chapter 4: Installation
Mounting The 8570
4.2.4 Mounting The 8570
A typical installation includes:
1. Mounting the computer (refer to “Mounting The 8570” on page 52).
2. Connecting the external antenna, if applicable (refer to “External
Antennas” on page 59).
3. Installing the power accessories (refer to “Power Options” on page 60).
Notes:
1. Make sure that the unit is mounted inside the roll cage of the vehicle.
2. The bolts used for all installations are SAE 1/4-20.
4.2.4.1 Attaching The Mounting Bracket
The 8570 can be attached to several types of mount: the Uni versal Dual Ball and
Socket Mount (page 48), a pedestal mount (page 50), or it can be attached jointly to
the Keyboard Mount and either of the other two items (Figure 4.3 on page 53).
To attach the 8570 to any of these mounting devices, Mounting Bracket PN 31658
must be used. Align the four holes on the bottom of the computer with those on the
Mounting Bracket (Figure 4.2 on page 53), and attach using the screws and washers
provided with the assembly.
Figure 4.1 8570 Back: Mounting Holes
Teklogix 8570 Vehicle-Mount Computer User Manual
52
Mounting Holes
Page 67

Mounting holes
Figure 4.2 Mounting Bracket (PN 31658)
PN 31623
(Universal Dual Ball/Socket Mount)
Chapter 4: Installation
Mounting The 8570
Stylus Clips
PN 31658 (8570 Mounting Bracket)
PN 31596 (Keyboard Bracket)
Figure 4.3 8570/Keyboard Mounting Kit (PN 31624-001)
Teklogix 8570 Vehicle-Mount Computer User Manual 53
Page 68

Chapter 4: Installation
Mounting The 8570
4.2.4.2 Installing The Quick-Release Bracket
Assembling The Bracket
To construct the 8570 Quick-Release Bracket (PN 30876-400), carefully attach the
8570 to the mounting bracket provided in the kit, and then to the mounting cradle, as
shown in Figure 4.4. Place the computer in the cradle so that the top of the display is
on the same side as the tabs of the cradle. The computer connectors should be on the
same side as the quick-release fasteners. Match the side screw holes on the
mounting bracket with the appropriate pairs of holes on the cradle and screw them
together. The choice of holes on the mounting cradle determines the tilt angle of the
computer.
Screws and Washers
Washer
Quick-Release
Fastener
Mounting Bracket
Mounting Cradle
Washer
Quick-Release
Fastener
Cradle Mounting Plate
8570 Quick-Release Bracket
Figure 4.4 The 8570 Quick-Release Bracket (PN 30876-400)
Teklogix 8570 Vehicle-Mount Computer User Manual
54
Page 69

Chapter 4: Installation
Mounting The 8570
Installing The Cradle Mounting Plate
Next, the cradle mounting plate is usually attached directly to the vehicle, but the
Cantilevered Mount Kit (PN 17293) or a Full-width Mount (PN 17280) can also be
used. The cradle mounting plate shown in Figure 4.5 holds the computer and cradle
in place on the vehicle or on either of these vehicle mounts.
The Cantilevered Mount Kit is a horizontal mount designed to provide support for
the vehicle-mount computers using the frame of the forklift vehicle. The kit contains
a cross-bar which is bolted to either the right or left side of the roll cage support
beam of the vehicle. The cantilevered mount plate is attached to the support beam
using “U” bolts which permit the angle of the terminal screen to be adjusted to
accommodate the operator’s w orking line of vision.
The Full-Width Mount is a horizontal mounting structure designed to straddle the
full width of the forklift vehicle, allowing space for accessories. The Full-Width
Mount is a steel tube that spans the forklift roll cage from side to side, providing the
vehicle-mount computers with secure fastening and room for a label printer , scanner
holder, or cradle.
• Screw the cradle mounting plate onto the installed vehicle mount, using the
four 1/4" holes.
Post
Tab Guides
Figure 4.5 The Cradle Mounting Plate
Teklogix 8570 Vehicle-Mount Computer User Manual 55
Page 70

Chapter 4: Installation
Mounting The 8570
Attaching The Cradle To The Cradle Mounting Plate
Next, the 8570 with cradle must be attached to the cradle mounting plate.
• Align the tabs on the rear of the cradle to the tab guides on the mounting
plate and push the cradle back and down.
• Slide the fasteners on the front of the cradle until they snap to the posts on
the mounting plate.
Warning: Never operate the vehicle if the quick-release fasteners are
4.2.4.3 Installing The Keyboard Quick-Release Bracket
To assemble and install the Keyboard Quick-Release Bracket (PN 30876-401),
follow the instructions for installing the 8570 Quick-Release Bracket (page 54),
carefully attaching the keyboard to the mounting bracket provided in the kit, and
then to the mounting cradle, as illustrated in Figure 4.4 on page 54.
Place the keyboard in the cradle so that the top is on the same side as the tabs of the
cradle. The bottom of the keyboard should be on the same side as the quick-release
fasteners.
not locked.
Figure 4.6 Keyboard Quick-Release Bracket (PN 30876-401)
Teklogix 8570 Vehicle-Mount Computer User Manual
56
Page 71

Chapter 4: Installation
Installing Security Mount Options
4.2.5 Installing Security Mount Options
4.2.5.1 Attaching Dual Ball Socket Security Mounts – PN 1000398
Security Brackets
Rubber strips for
Security Brackets
Security Screws
Figure 4.7 Dual Ball Socket Security Mount Kit
• Place the rubber strips inside the security brackets.
• Use the security screws included with your kit to attach the security brackets to the dual ball socket mount. Use the special Philips Bit (PN 9000052)
and Hex Socket (PN 9000054) to tighten the screws.
Security Brackets
Figure 4.8 Security Bracket Attached to Dual Ball Mount
• Mount the pedestal to mounting plate PN 31658 using four security screws
(PN 9002010).
Teklogix 8570 Vehicle-Mount Computer User Manual 57
Page 72

Chapter 4: Installation
Installing Security Mount Options
• Mount the 8570 to the mounting plate (PN 31658) using four security
screws (PN 9000049).
Note: If you are using an external keyboard, sandwich the keyboard bracket
(PN 31596) between the mounting plate (PN 31658) and the dual ball
socket mount. Use security screws (PN 9002011) to attach the three
pieces. Then you can go ahead and mount the 8570 to the mounting plate.
4.2.5.2 Attaching 8570 QR Security Mounts – PN 1000304-570
Mounting Plate PN 31659
Figure 4.9 8570 QR Security Mount – PN 1000304-570
• Attach the mounting plate to the 8570 with four security screws
(PN 9000049). Use the special Philips Bit (PN 9000052) and Hex
Socket (PN 9000054) to tighten the screws.
• Attach the security mounting bracket to the mounting plate using four security screws (PN 9000053), two on either side of the bracket.
Important: If you are planning to replace an already
bracket with a security bracket, you’ll need to use the 8570 Quick
Release Mount Security Kit – PN 1000509.
Teklogix 8570 Vehicle-Mount Computer User Manual
58
Security Mounting Bracket
PN 1000303
installed quick release
Page 73

Chapter 4: Installation
Installing Cables
4.2.6 Installing Cables
For detailed instructions on connecting cables to the 8570, please refer to
“Connecting Cables” on page 29. When installing the cables between the computer
and other devices, consider the following:
• Ensure the vehicle body and underlying wiring is not damaged while drilling mounting holes.
• Protect cable runs from pinching, overheating and physical damage.
• Protect cables by using grommets when cables pass through metal.
• Prevent cables and connectors from moving and loosening by using
plastic straps.
• Keep the cables away from heat sources, grease, battery acid, and other
potential hazards.
• Keep the cables away from control pedals and other mo ving parts that
may pull on the cables or interfere with the operation of the vehicle.
• Leave enough slack on the cables so that the computer can be remov ed
easily for maintenance.
Note: Make sure the cables run inside the roll cage of the vehicle.
4.2.7 External Antennas
Warning: Operating the terminal without an antenna may damage the radio.
If the 2.4 GHz PC card radio is installed in the 8570, the antenna may be internal or
external. When equipped with an antenna, the 8570 has a dome cov er on the top left
of the computer.
The type of dome cover depends on the antenna used: plastic cov er for an internal
antenna, and a metal cover which has an antenna cable to the radio card and a
proprietary SMA-type connector for the external antenna.
Figure 4.10 8570 Dome Covers: Plastic (left) and Metal (right).
Teklogix 8570 Vehicle-Mount Computer User Manual 59
Page 74

Chapter 4: Installation
Power Options
The external antennas consist of a 2.4 GHz Magmount antenna (PN 97583) and a
2.4 GHz 2 DBI Omni Articulating antenna (PN 96302). The antennas connect to the
proprietary SMA-type connector on the metal dome cover of the computer . T urn the
antennas in a counter-clockwise direction.
The magmount antenna works best when placed vertically and away from metal
objects that may interfere with the radio signal. The best location for the magnetic
mount on a forklift truck is on the middle of the roof or cab cover , at least 20
centimeters away from the operator.
Warning: As a safety precaution, USERS AR E NOT PERMITTED TO
4.2.8 Power Options
AC/DC indoor po wer adaptors and DC/DC vehicle po wer adaptors are a v ailable for
the 8570 Vehicle-Mount Computer. Use of any other power adaptors may damage
the computer. To connect power to the 8570, connect the appropriate adaptor (A C or
DC) to the power connector at the back of the computer (see Figure 3.5 on page 31).
The power connector is keyed to prevent an improper connection. Secure the AC or
DC adaptor connector to the power connector by mating the connectors and turning
the adaptor connector ring clockwise until it stops.
CHANGE THE ANTENN A.
External power is provided through a four-pin stationary receptacle. When
disconnecting the power adaptor , do not pull or twist the cords. Doing so may result
in the cord malfunctioning and/or the connector being damaged
The following is a list of the power cables and accessories, with their part numbers.
• DC/DC Pre-Regulator, 10-55 volts DC PN 19893-400
• DC/DC Pre-Regulator, 55- 90 volts DC PN 19893
• Transient Suppressor PN 19893-500
• Active Transient Filter Power Supply, 15-55 volts DC PN 19893-600
• AC Power Supply, 120/240 VAC PN 19894+
• Extension Power Cable PN 13985
• Cart Battery and 8871 Cart Battery Charger Model# 8870
Teklogix 8570 Vehicle-Mount Computer User Manual
60
N.A. 93351
EU 93159
Page 75

Chapter 4: Installation
Power Options
4.2.8.1 Non-Vehicle Installation
Using AC power, the 8570 Vehicle-Mount Computer can be mounted at fixed
locations adjacent to cross-dock doors, manufacturing stations, or in offices. The
universal 120/240 VAC power supply (PN 19894) should be used to power the
computer from an AC source.
4.2.8.2 Installing The Pre-regulator
The Pre-regulator should be used on all vehicles that run off voltages greater than
12 VDC nom. This helps to eliminate power irregularities that may affect the
computer’s operating system.
W arning: The Pre-regulator is required on all electrical vehicles (non-engine
driven) since the 8570 has a grounded (non-isolated) chassis.
Install the Pre-regulator to the vehicle using the appropriate hardware, listed belo w.
See Figure 4.11 on page 62 for a cable diagram.
1. PN 19893-400 10-55 VDC in: 36 watts 18V out
Note: --400 should be installed on 12V trucks that require that the terminal be
isolated from the truck power supply.
PN 19893 55-90 VDC in: 50 watts 15V out
PN 19893-600 15-55 VDC in: 36 watts 18V out
2. Connect the DC output power cable to the 8570.
3. Next, connect the Extension Power Cable PN 13985 to the vehicle as
per the instruction sheet supplied with the cable.
Important:
1. The Teklogix Extension Power Cable PN 13985 positive lead is red
2. It is recommended that all connections be secured with electrical
3. Water will not harm the Pre-regulator and T ransient Suppressor if the
and the negative lead is black.
tape or heat shrink to prevent contaminants from degrading the
connection.
Pre-regulator is mounted vertically, with the mounting flange facedown, so that water cannot pool in the upper case. The power module
inside the unit is sealed. If mounted properly, any water will drain
out of the unit and will not harm the power supply inside.
Teklogix 8570 Vehicle-Mount Computer User Manual 61
Page 76

Chapter 4: Installation
Power Options
Note: Transient Suppressor
Keep in mind that this transient suppressor is not required on 24-48V
trucks if the Active Filter Power supply (PN 19893-600) is installed.
On 12 V trucks, the Transient Suppressor (PN 19893-500) can be installed
between the vehicle battery and the computer (or between the battery,
pre-regulator and the computer) to reduce high voltag e spik es from a
power supply.
To 8570 Vehicle-Mount Computer
External Power Connector
to vehicle power (positive)
DC Output Power Cable
Fuse Assembly
to vehicle power (negative)
Extension Power Cable
PN 13985
Figure 4.11 The Pre-Regulator
Note: When installing the 8570 on vehicles operating on 24 Volts and above, the
diode assembly (supplied with the extension power cable 13985) must be
used to reduce the AC ripple produced by the SCR traction motor controller on the vehicle.
To connect the diode, push the male connector on the diode assembly into
the female connector on the positive (red) lead of the power cable. If the
fuse assembly is already installed, connect the diode assembly to the fuse
assembly as described in the previous sentence . Connect the red wire fr om
the diode assembly to a fused power source on the vehicle.
It is recommended that all connections be secured with electrical tape or
heat shrink to prevent contaminants from degrading the connection.
Teklogix 8570 Vehicle-Mount Computer User Manual
62
Page 77

Chapter 4: Installation
Power Options
4.2.8.3 Installing The Active Transient Filter Power Supply
The Active Transient Filter Po wer Supply (PN 19893-600) is designed to filter out
large volumes of transients and surges. It can be used to power both standard temp.
and freezer 8570 vehicle-mount computers.
Note: The -600 must be installed on all 24-48 VDC battery powered trucks.
Figure 4.12 Active Transient Filter Power Supply – 19893-600
The diagram below illustrates the recommended method of connection for this filter .
Power Supply
Truck Battery
Very Dirty Power
Nom 24-48VDC
13985 Cable
19893-600
Active Transient Filter
15-55VDC IN Nom
8570 Terminal
Withstands 180V transients
and 168VDC 20ms surges.
18V-36W Out
Figure 4.13 Connection Method For The Active Transient Filter Power Supply
Teklogix 8570 Vehicle-Mount Computer User Manual 63
Page 78

Page 79

MAINTENANCE 5
5.1 Introduction...................................67
5.2 Maintenance ..................................67
5.2.1 Important Safeguards ..........................67
5.2.2 Handling Your 8570 Vehicle-Mount Computer .............67
5.3 Inspection....................................68
5.4 Cleaning ....................................68
5.4.1 Display ..................................68
5.4.2 Housings .................................69
5.4.3 Optional Keyboard............................69
5
Teklogix 8570 Vehicle-Mount Computer User Manual 65
Page 80

Page 81

Chapter 5: Maintenance
Introduction
5.1 Introduction
This chapter describes how to maintain, inspect and clean your 8570 Vehicle-Mount
Computers. These instructions are intended to identify the cleaners, tools, and
actions required by 8570 users to clean the LCD (liquid-crystal display) screen
and computer housings.
5.2 Maintenance
5.2.1 Important Safeguards
• To avoid possible injury, this device must be properly secured when in a
moving vehicle.
• Keep this device a w ay from magnetic fields.
• Do not place the computer near a television or radio receiv er.
• Do not disassemble your 8570 computer—there are no user-serviceable
parts inside.
5.2.2 Handling Your 8570 Vehicle-Mount Computer
• Do not use sharp objects, such as regular pens, pencils, tools, etc., on the
touch screen as they may damage its surface and impair display visibility , or
cause it to be inoperable.
• Do not poke at the cable gasket, or the water seal will be compromised.
• Do not misplace the cable gasket inserts, or the computer seal will
be compromised.
• Do not place heavy objects on top of the unit.
Teklogix 8570 Vehicle-Mount Computer User Manual 67
Page 82

Chapter 5: Maintenance
Inspection
5.3 Inspection
At least weekly , or more frequently if the user environment warrants, visually
inspect the computer for missing or damaged items:
• PCMCIA cover.
• Loose or missing screws.
• Damaged cables.
• Loose connections.
• Compromised cable gasket seal.
Report damaged or missing items immediately and repair the computer prior to reassigning it.
5.4 Cleaning
The 8570 is maintenance-free, except for normal cleaning. At least bi-weekly, or
more often if the user environment warrants, clean the 8570 computer as follows.
Important: Prior to cleaning, turn off the 8570 and disconnect it from
its power source.
No sharp objects or tools should be used when cleaning.
5.4.1 Display
If the display/touch screen needs to be cleaned, you should use an alcohol-based
liquid on a soft lint-free cloth and wipe the display face to remove finger prints, dirt
and grime.
Note: DO NOT attempt to clean the face of the display using a dry cloth or
paper products such as paper towels or Kimwipes. These can scratch the
screen and permanently degrade readability.
Teklogix 8570 Vehicle-Mount Computer User Manual
68
Page 83

Chapter 5: Maintenance
Housings
5.4.2 Housings
Using a soft, lint-free cloth, try to regularly keep the 8570 clean and free from dust
and dirt. If available, you can also use compressed air, but some caution is to
be observed.
Important: DO NOT use full strength liquid household detergents,
solvents, or other chemicals such as benzine, gasoline,
kerosene, thinners or chemical cloths to clean your
equipment.
5.4.3 Optional Keyboard
Spray a mild all-purpose cleaner onto a cloth and gently wipe the surface.
1
1
Psion Teklogix provides Cleaning, Inspection, and Preventative Maintenance Instructions to aid users of Psion Teklogix
products in obtaining optimum performance from those products. The information contained herein is believed to be
accurate at the time of release. Psion Teklogix reserves the right to make changes at any time without incurring
obligations.
Teklogix 8570 Vehicle-Mount Computer User Manual 69
Page 84

Page 85

TROUBLESHOOTING 6
6.1 Introduction...................................73
6.2 Preventi ve Measures ..............................73
6.3 Problems ....................................74
6.3.1 Display ..................................74
6.3.2 Hard Drive ................................74
6.3.3 Optional Keyboard............................75
6.3.4 PCMCIA .................................75
6.3.5 Power...................................75
6.3.6 I/O Ports .................................76
6.4 D: Install Partition ...............................76
6.5 Software Loading/Installation Procedure ...................77
6.5.1 Computers Using Microsoft W indows 98 ................77
6.5.2 Computers Using Microsoft W indows 2000...............78
6
Teklogix 8570 Vehicle-Mount Computer User Manual 71
Page 86

Page 87

Chapter 6: Troubleshooting
Introduction
6.1 Introduction
This chapter provides information on the recognition and correction of problems
that you may encounter when operating the 8570 Vehicle-Mount Computer.
If problems are encountered that are not identified here or that can’t be resolved,
please refer to Appendix A: “Support Services And Worldwide Offices” for
contact information.
6.2 Preventive Measures
• Check that the computer is connected to a working power source.
• Make sure that the computer is on. Touch the screen to take the computer
out of Suspend.
• To ensure that no data are lost, always exit from Windows before turning
the computer power off.
• A Microsoft W indows licensed re gistration number is affix ed under the port
cover of each 8570 unit. The My-T-Soft license information is printed on a
paper tag that is shipped with each unit. This information is required to reinstall the 8570 operating system and My-T-Soft.
IT IS CRITICAL that you write down the Microsoft Windows registration
number and then store it and the My-T-Soft registration tag in a safe place
alongside the computer’s backup information.
• Backup the directory D:\Install in its entirety , including the drivers directory , the W in98 or i386 directory and the DOS utilities. In case of hard dri ve
corruption, these files are required to restart your computer. F or additional
information, see “D: Install Partition” on page 76 and “Software Loading/Installation Procedure” on page 77.
• Create a bootable system disk.
• Turn up the brightness control if the display is dim or of f.
• Make sure that the display backlight is set correctly for your needs in
the BIOS.
• Check all cable connections for loose or incorrect installation.
• Take out any PCMCIA cards before booting the computer.
• In the unlikely event that an error is detected during the Po wer-On-Self-Test
(POST) after the computer is turned on, the system will display the BIOS
Setup entry or a “resume boot” prompt, or will continue to try to boot.
Teklogix 8570 Vehicle-Mount Computer User Manual 73
Page 88

Chapter 6: Troubleshooting
Problems
6.3 Problems
6.3.1 Display
No Backlight
• Boot the unit and increase the brightness control.
• Make sure that Suspend is off.
No Video
• Verify that the backlight is on, adjust up.
• Check that there’s power to the unit.
• Verify with a keyboard that the Num Lock LED works.
• Make sure that Suspend is off.
Display Quality Poor
• Clean the screen.
• Adjust the brightness.
• Verify with a keyboard that the Num Lock LED works.
6.3.2 Hard Drive
Boot Failure
• Check that the Boot Sequence is set correctly in the BIOS Setup (see
page 39).
Important: To use the USB floppy boot feature, USB BIOS Legacy Support
must be enabled., and the Parallel P ort must be disabled in the BIOS
Setup.
File Corruption
• Run CKPRO, SCAN DISK or CHKDSK and then rebuild or reinstall
as necessary . If you don’t have a keyboard, a DOS virtual keyboard can be
activated by touching the upper left corner of the screen when in DOS.
Then, if you want to reboot in MS-DOS mode from Windows 95, a screen
keyboard will be av ailable to run SCAN DISK or other DOS commands.
Teklogix 8570 Vehicle-Mount Computer User Manual
74
Page 89

Chapter 6: Troubleshooting
Optional Keyboard
Time Or Date Incorrect
• Correct the time and/or date in the W indows program. If the problem persists, the lithium battery may need to be replaced by Psion Teklogix.
Beep Codes
If beep codes are being received, the computer should be serviced by
Psion T eklogix.
6.3.3 Optional Keyboard
• If the keyboard has stopped responding, check that the application has not
disabled the keyboard.
• Press and hold any key. If the system beeps, the keyboard is
operating properly .
6.3.4 PCMCIA
Windows 98
• Insert a known good PCMCIA card and verify access to the card.
• PCMCIA status can be checked by clicking on the PCMCIA icon in
Start/Settings/Control Panel. Additionally , the device status can be
checked using the device manager in Start/Settings/Control Panel/
System/Device Manager.
6.3.5 Power
AC Power Source
• Confirm that all power connections are properly plugged in and press the
power button to look for any indications of power on.
• Use a known good power supply (18 v olts) to determine whether a power
source problem exists.
• Push the power button once, then press the Dimmer button for
10 seconds.
• Inspect the DC power receptacle for a bent or broken pin (if present, the
unit must be returned to Psion Teklogix for repair).
Teklogix 8570 Vehicle-Mount Computer User Manual 75
+
Page 90

Chapter 6: Troubleshooting
I/O Ports
DC Power Source
• Inspect the fuse in the DC power cable. If the fuse is blown, replace it
with an equivalent value. If fuses are blown repeatedly, the computer or
pre-regulator should be serviced.
6.3.6 I/O Ports
• Verify that the BIOS setup for I/O is correct (see “Typical Resource Allocation For Windows 98” on page 40).
• Make sure that the PCMCIA card and the I/O are not conflicting.
6.4 D: Install Partition
The files on the D: partition can be used to restore a corrupted operating system or
C: drive without using any e xternal storage devices. Keep in mind, howev er, that an
external keyboard is required.
This procedure will only restore the C: drive to factory software; it will not restore
data or reload client applications.
• Boot the unit into safe mode by pressing <F8> before W indows boots.
• Select command prompt only .
• Type d: to switch to the D drive.
• Type Format C: to erase the entire contents of the C drive.
• Once the drive has been formatted, type “cd win98” to switch to the W in98
directory .
• Follow Microsoft help to install Microsoft Windows 98.
Once W in98 is installed, the PCI, radio and touch screen drivers will need to be
installed. “Software Loading/Installation Procedure” on page 77 describes the steps
you must follow to complete this task.
Teklogix 8570 Vehicle-Mount Computer User Manual
76
Page 91

Chapter 6: Troubleshooting
Software Loading/Installation Procedure
6.5 Software Loading/Installation Procedure
Important: It is critical that you carry out the instructions listed in the appro-
priate section below step
6.5.1 Computers Using Microsoft Windows 98
1. Load/Install Network/Ethernet driver
Go to My computer> update drivers> next> next
Browse> Go to D:\driv er\netw ork.
2. Load/Install Video Drivers A TI
Go to My computer
Go to D:\driver\Ati select setup
3. Load/Install Sound drivers
4. Load/Install WaveLan driv ers
by step, beginning at step 1.
5. Reboot the 8570
6. Load/Install Touch Screen dri ver
Run the touch screen install utility located in the drivers directory on the D
drive. You must have a keyboard connected to the unit because the mouse
will stop functioning during this procedure.
Change the device name from “Device 1” to ‘Touch Screen”.
Use “Semtech, ScreenCoder JLT, PS/2 (UPDD)” driver. The PS/2 port is
disabled during setup. Finish the setup using the keyboard.
7. Reboot the unit and calibrate the touch screen (see Appendix C:
“Touch Screen Calibration” for calibration details).
Teklogix 8570 Vehicle-Mount Computer User Manual 77
Page 92

Chapter 6: Troubleshooting
Computers Using Microsoft Windows 2000
6.5.2 Computers Using Microsoft Windows 2000
1. Load/Install Network drivers
Go to My computer> Properties> Hardware> device manager
Go to Other device> Ethernet controller> properties> driv ers
Update drivers> next> next
Browse to D:\driv er\netw ork
2. Load/Install Touch Screen
Run the touch screen install utility located in the drivers directory on the D
drive. You must have a keyboard connected to the unit because the mouse
will stop functioning during this procedure.
Change the device name from “Device 1” to ‘Touch Screen”.
Use “Semtech, ScreenCoder JLT, PS/2 (UPDD)” driver. The PS/2 port is
disabled during setup. Finish the setup using the keyboard.
3. Reboot the unit and calibrate the touch screen (see Appendix C:
“Touch Screen Calibration” for calibration details).
4. Load/Install WaveLan driv ers
Teklogix 8570 Vehicle-Mount Computer User Manual
78
Page 93

SPECIFICATIONS 7
7.1 8570 Hardware Specifications .........................81
7.1.1 Physical .................................81
7.1.2 Environmental Characteristics......................81
7.1.3 Standard Display.............................83
7.1.4 Power Requirements ...........................83
7.1.5 Standard Processor And Memory ....................83
7.1.6 PC Radio Cards .............................83
7.1.7 Network Interface ............................84
7.2 Standard Operating System ..........................84
7.3 8570 External Keyboard Option ........................85
7.3.1 Industrial Ratings ............................85
7.3.2 Physical .................................85
7.3.3 Environmental ..............................85
7.3.4 Power...................................86
7.3.5 Cable ...................................86
7.3.6 Compatibility...............................86
7.3.7 Backlighting ...............................86
7.4 Regulatory Information: Lucent/Agere WaveLAN PC Card..........87
7.5 Regulatory Information: Cisco Air350 PC Card ................89
7
Teklogix 8570 Vehicle-Mount Computer User Manual 79
Page 94

Page 95

Chapter 7: Specifications
8570 Hardware Specifications
7.1 8570 Hardware Specifications
7.1.1 Physical
Enclosure 2-piece precision-milled, powder-coated
aluminum for major mechanical housing
and components, with high-impact strength
at high and low temperature extremes, and
resistance to common chemicals.
Dimensions 30.5 x 24 x 6.1 cm (12 x 9.4 x 2.4 inches)
Weight 3.7 kg (7.7 lb.)
7.1.2 Environmental Characteristics
The 8570 Vehicle-Mount Computer meets or exceeds the environmental
characteristics tested in accordance with applicable sections of NATO
MIL-STD-810, IP66.
Vibration Operating (rotating disk)
0.67 g-rms/5-500 Hz, 3 hours XYZ.
Non-Operating (non-rotating disk)
4.5 g-rms/5-500 Hz, 3 hours XYZ.
Shock Operating (rotating disk)
30 g for 11 ms, 3 times XYZ.
Non-Operating (non-rotating disk)
30 g for 11 ms, 3 times XYZ.
Dust and Water IEC 529 IP66
(when cable cover is properly installed)
Teklogix 8570 Vehicle-Mount Computer User Manual 81
Page 96

Chapter 7: Specifications
Environmental Characteristics
8570 Standard Temperature
T emperature Operating
Relative Humidity Operating
8570 Freezer/Extreme Temperature
T emperature Operating
High +60°C (+140°F)
Low -20°C (- 4°F)
Storage
High +75°C (+167°F)
Low - 30°C (-22°F)
5% to 96% non-condensing.
High +60°C (+140°F)
Low - 35°C (-31°F)
Storage
High +75°C (+167°F)
Low - 30°C (-22°F)*
*Ideally, store computer above 0°C (32°F).
Relative Humidity Operating
Note: Although the 8570 Freezer computer can be stored at -30˚C and operated
at -35˚C, a cold start below -20˚C (- 4°F) is not recommended due to
radio limitations.
Teklogix 8570 Vehicle-Mount Computer User Manual
82
5% to 96% condensing.
Page 97

Chapter 7: Specifications
Standard Display
7.1.3 Standard Display
High Bright TFT-screen, 30.7 cm (12.1") SVGA.
800x600 pixels/256k colours.
120˚ viewing angle.
500 NIT brightness, 0-100% dimmable.
High-transparency resistive digitizer with hardened glass.
7.1.4 Power Requirements
DC Power 9-36 VDC
5W standby/20W operating, max 32W.
AC Po wer Input Voltage Ranges:
100-127 VAC, 200-240 V AC
Frequency: 47-63 Hz
7.1.5 Standard Processor And Memory
Intel Mobile Pentium 266MMX Intel Mobile Pentium III 500 MHz option
available with 256 KB Pipelined-b urst
SRAM/L2 integrated memory cache.
128 MB SDRAM.
512 KB level 2 cache.
7.1.6 PC Radio Cards
Lucent/Agere WaveLAN IEEE 802.11 2.4GHz DS SS (TRX7431)*
Transmit Power 32 mW
Frequency Range 2.4 to 2.4835 GHz
Data Rate 11 Mbps
No. of Channels 11 (FCC) 13 (ETSI)
4 (FR) 1 (JP)
2 (SP)
* For regulatory information concerning the Lucent/Agere WaveLAN PC Card, please see
page 87.
Teklogix 8570 Vehicle-Mount Computer User Manual 83
Page 98

Chapter 7: Specifications
Network Interface
Cisco Air350 802.11b DS SS (TRX7441)*
Transmit Power 1, 5, 20, 30, 50, 100mW
Frequency Range 2.4 GHz - 2.5 GHz
Channels 11 (FCC) 13 (ET)
Data Rates 1, 2, 5.5, 11Mbps
* For regulatory information concerning the Cisco Air 350 PC Card, please see page 89.
Also refer to the “Cisco End User License Agreement” on page ix.
7.1.7 Network Interface
On-Board Ethernet 10Base-T/100Base-TX (10/100 Mbps) card
Maximum power setting will vary according to individual country regulations.
14 (JP) 2 (SP)
4 (FR)
Warning: The USB and ethernet ports are not to be used for typical end user
applications and installations. These ports are designed to be used
for maintenance and setup purposes only. They should only be used
for temporary service connections required for file transfers, set up,
configuration, etc.
7.2 Standard Operating System
Windo ws 98 (English).
Phoenix IBM PC/AT “Plug and Play” compatible BIOS.
Teklogix 8570 Vehicle-Mount Computer User Manual
84
Page 99

8570 External Keyboard Option
7.3 8570 External Keyboard Option
7.3.1 Industrial Ratings
NEMA 4
UL-1950
CE
FCC Class 15, Part B
7.3.2 Physical
Enclosure ABS-Polycarbonate plastic case
Dimensions 28.9 x 16.0 x 4.7 cm
(11.4 x 6.3 x 1.86 inches)
Key Switch:Material Industrial silicone rubber
Life Greater than 10 million cycles
Trav el 1.5 mm (0.060 in.)
Actuation Force 130g (5 oz.)
Feedback Tactile with mechanical snap
Chapter 7: Specifications
7.3.3 Environmental
T emperature High +90°C (+194°F)
Low -40°C (-40°F)
Humidity 80%
Shock 3x11 ms pulses of 50g on each of 3 axes.
Vibration:
Power Spectral Density 0.04 g/Hz
Frequency Range 20 Hz - 2 kHz
Duration Of Test Per Axis 3 hours
Flammability:
Printed Circuit Board 94 V O
Silicone Overlay 94 HB
Interface Cable 94 VO
Teklogix 8570 Vehicle-Mount Computer User Manual 85
Page 100

Chapter 7: Specifications
Power
7.3.4 Power
Keyboard 5V@10ma (from CPU port)
HulaPoint 5V@10ma (from mouse conn. port)
Backlight 5V@200ma (from CPU port)
7.3.5 Cable
Length 1.2 m (4 ft.) coiled
Design “Y” Cable (pro viding separate k eyboard
7.3.6 Compatibility
Keyboard PS/2, AT, Windows, and NT
HulaPoint Microsoft, PS/2, Serial, and Logitech
7.3.7 Backlighting
Four levels of backlighting (including Off).
Low ma green LEDs.
Operates from key on keyboard.
and mouse connections)
Teklogix 8570 Vehicle-Mount Computer User Manual
86
 Loading...