


www.prolink2u.com
USER MANUAL
PROLiNK® PWH2004
3G HPSA Wireless Router
Revision 1.0 (Aug’09)

PROLiNK® PWH2004 User Manual |
www.prolink2u.com |
|
|
COPYRIGHT
The contents of this publication may not be reproduced in any part or as a whole, stored, transcribed in an information retrieval system, translated into any language, or transmitted in any form or by any means, mechanical, magnetic, electronic, optical, photocopying, manual, or otherwise, without the prior written permission.
TRADEMARKS
All products, company, brand names are trademarks or registered trademarks of their respective companies. They are used for identification purpose only. Specifications are subject to be changed without prior notice.
FCC INTERFERENCE STATEMENT
This equipment has been tested and found to comply with the limits for a Class B digital device pursuant to Part 15 of the FCC Rules. These limits are designed to provide reasonable protection against radio interference in a commercial environment. This equipment can generate, use and radiate radio frequency energy and, if not installed and used in accordance with the instructions in this manual, may cause harmful interference to radio communications. Operation of this equipment in a residential area is likely to cause interference, in which case the user, at his own expense, will be required to take whatever measures are necessary to correct the interference.
CE DECLARATION OF CONFORMITY
This equipment complies with the requirements relating to electromagnetic compatibility, EN 55022/A1 Class B.
Revision 1.0 (Aug’09) |
i |

PROLiNK® PWH2004 User Manual |
www.prolink2u.com |
|
|
TABLE OF CONTENTS |
|
|
TABLE OF CONTENTS......................................................................................................................... |
I |
|
CHAPTER 1 – PACKAGE CONTENTS.................................................................................................... |
2 |
|
CHAPTER 2 |
– INTRODUCTION........................................................................................................... |
3 |
CHAPTER 3 |
– OPERATION MODES ..................................................................................................... |
6 |
CHAPTER 4 |
– CONFIGURATION ......................................................................................................... |
9 |
CHAPTER 5 |
– PC CONFIGURATION .................................................................................................. |
42 |
APPENDIX A – TROUBLESHOOTING ................................................................................................. |
49 |
|
APPENDIX B – ABOUT WIRELESS LAN.............................................................................................. |
51 |
|
APPENDIX C – TECHNICAL SUPPORT ............................................................................................... |
54 |
|
Revision 1.0 (Aug’09) |
i |
PROLiNK® PWH2004 User Manual |
www.prolink2u.com |
|
|
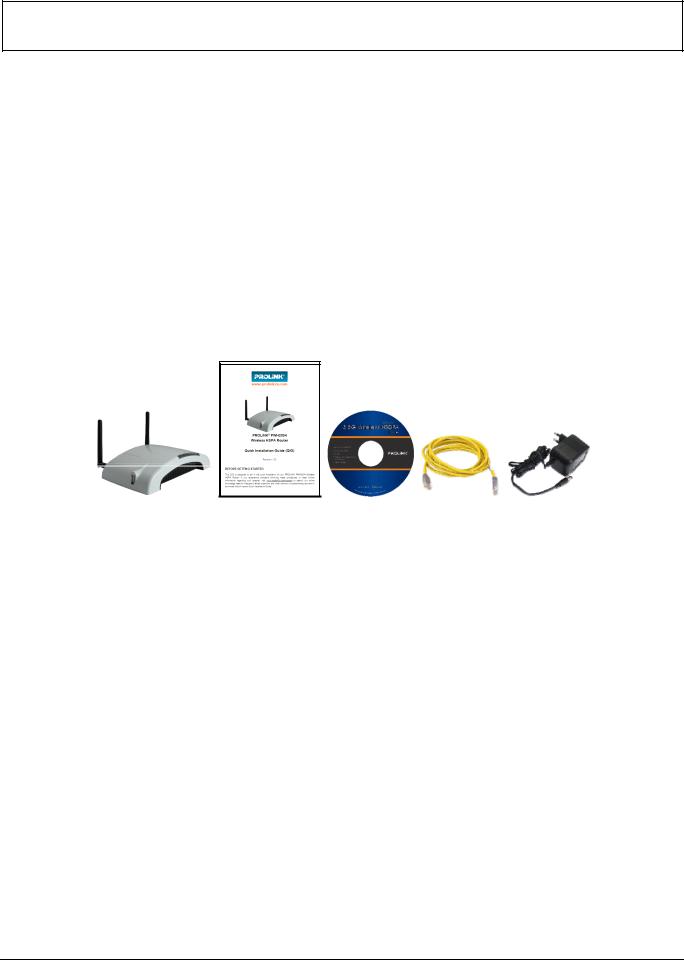
CHAPTER 1 – PACKAGE CONTENTS
Importance: Check your product package contents FIRST.
The PROLiNK® PWH2004 Wireless HSPA Router package should contain the items listed below. If any of the items are missing, please contact your reseller immediately!
n One (1) Unit of PROLiNK® PWH2004 3G HSPA Wireless Router with 2 antennas o One (1) Piece of Quick Installation Guide
pOne (1) Piece of Setup CD
q One (1) Piece of RJ-45 Cable (≈1M length)
rOne (1) Unit of Power Adapter
n o p q r
CAUTION:
Using a power supply with a different voltage rating than the one included with the PROLiNK® PWH2004 Wireless HSPA Router will cause damage and void the warranty for this product.
System Requirements for Configuration
1.A compatible either USB HSPA modem with service,
2.Computers with Windows, Macintosh, or Linux-based operating systems with an installed Ethernet adapter,
3.Internet Explorer version 6.0 or Netscape Navigator version 7.0 and above.
Note: Subject to services and service terms available from your carrier.
Wi-Fi System Requirements
•A 802.11b, 802.11g, or 802.11n USB Dongle (USB Wireless Adapter)
Revision 1.0 (Aug’09) |
2 |
PROLiNK® PWH2004 User Manual |
www.prolink2u.com |
|
|
CHAPTER 2 – INTRODUCTION
The PROLiNK® PWH2004 Wireless HSPA Router is a draft 802.11n/b/g compliant Wireless Broadband Router with 4-port Fast Ethernet Switch. It is designed with the latest Draft 802.11n technology that delivers up to 150Mbps wireless, provides multi-functional capabilities, particularly the high-performance throughput and high-quality security to propose an integrated, thorough SOHO solution. The incredible speed of the PROLiNK® PWH2004 Wireless HSPA Router makes it ideal for media-centric applications like streaming video, gaming, and Voice over IP technology, ensure optimum performance and maximum coverage with an external antenna. With the PROLiNK® PWH2004 Wireless HSPA Router, government employees or corporate users can create a wireless network and provide colleagues with remote access to their secure private networks. By installing the PROLiNK® PWH2004 Wireless HSPA Router on a bus, train, or even a boat, you can allow passengers to check e-mail or chat online while commuting.
2.1Overview of the Device
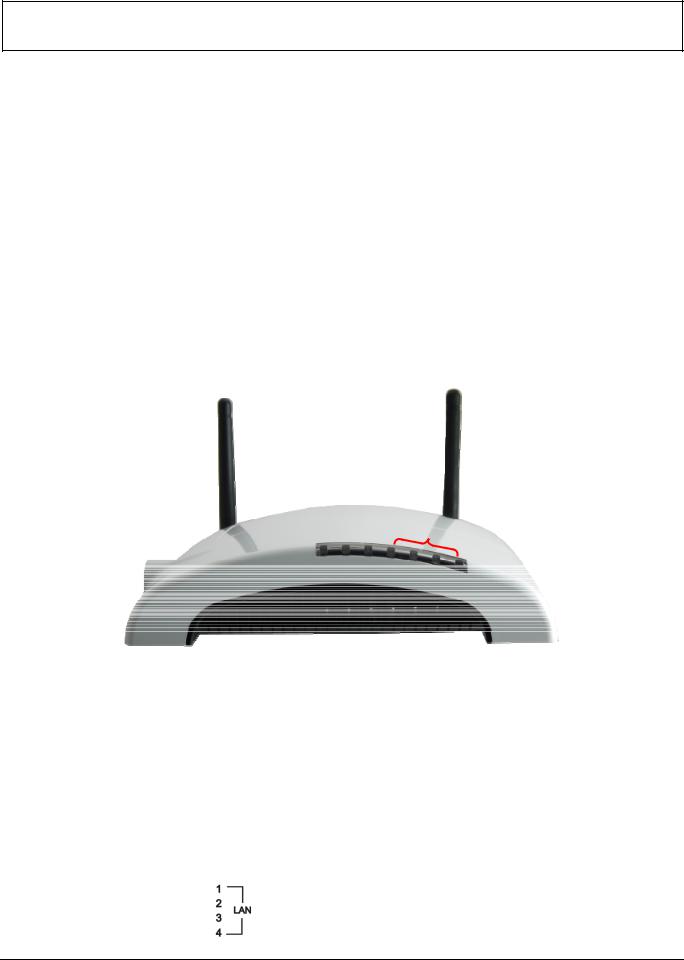
2.1.1 Front View
n o p |
q |
|
|
|
|
|
Front View |
|
|
||
|
LED |
|
Label |
|
Color |
|
Behavior |
|
Indication |
|
|
|
|
|
|||||
|
|
|
|
|
|
|
|
|
|
n |
POWER |
|
Power |
|
Green |
|
ON |
|
Power On |
|
|
|
|
|
|
||||
|
|
|
OFF |
|
Power Off |
||||
|
|
|
|
|
|
|
|
||
|
|
|
|
|
|
|
|
|
|
|
|
|
|
|
|
|
On |
|
WLAN link or WPS Active |
|
|
|
|
|
Green |
|
|
|
|
o |
WLAN/WPS |
|
WLAN/WPS |
|
|
Off |
|
WLAN Off |
|
|
|
|
|
|
|
|
|||
|
|
|
|
Blinking |
|
WLAN traffic transmitting |
|||
|
|
|
|
|
|
|
|
||
|
|
|
|
|
|
|
|
|
|
|
|
|
|
|
Orange |
|
Blinking |
|
WPS is enabled to make connection |
|
|
|
|
|
|
|
|
|
|
|
|
|
|
|
|
|
On |
|
WAN link or active |
p |
WAN |
|
WAN |
|
Green |
|
|
|
|
|
|
|
Off |
|
WAN Off |
||||
|
|
|
|
|
|
|
|
|
|
|
|
|
|
|
|
|
Blinking |
|
WAN traffic transmitting |
|
|
|
|
|
|
|
|
|
|
|
|
|
|
|
|
|
On |
|
LAN link or active |
q |
LAN1 ~ LAN4 |
|
|
|
Green |
|
|
|
|
|
|
|
|
Off |
|
LAN Off |
|||
|
|
|
|
|
|
|
|
|
|
|
|
|
|
|
|
|
Blinking |
|
LAN traffic transmitting |
|
|
|
|
|
|
|
|
|
|
Revision 1.0 (Aug’09) |
3 |
PROLiNK® PWH2004 User Manual |
www.prolink2u.com |
|
|
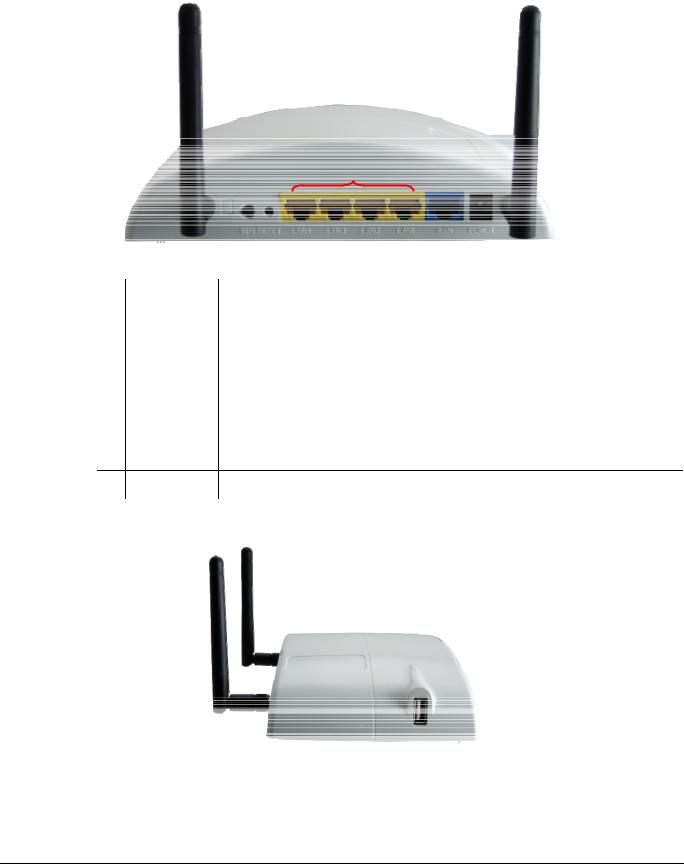
2.1.2 Rear View
n o |
p |
q r |
|
|
Rear View |
|
|
Port / Button |
Indication |
|
|
|
|
|
n |
WPS |
To enable the WPS function via web configuration (Wireless f WPS), then press the WPS |
|
button once on the Wireless Router; the WPS LED will start to flash. To make a connection with |
|||
|
|
other WPS supported device within 3 minutes. |
|
|
|
|
|
o |
RESET |
Keep on pressing the Reset button more than 3 seconds, the Wireless Router will set all setting |
|
back to factory default values. |
|||
|
|
||
|
|
|
|
p |
|
Use standard LAN cables (RJ45 connectors) to connect your PCs to the port. If required, any |
|
LAN 1~4 |
port can be connected to another hub. Any LAN port will automatically function as an "Uplink" |
||
|
|
port when necessary. |
|
|
|
|
|
q |
WAN |
Connect the ADSL or Cable Modem here with RJ45 cable. If your modem came with a cable, |
|
use the supplied cable, otherwise, use a standard LAN cable. |
|||
|
|
rPOWER
2.1.3Side View
n
Side View
n USB 2.0 Port |
Insert the USB 3.5G card that provided by your ISP (Internet Service Provider) here. |
Revision 1.0 (Aug’09) |
4 |

PROLiNK® PWH2004 User Manual |
www.prolink2u.com |
|
|
2.2Features of the Device
•Support the IEEE 802.11n/b/g standard, high speed date rate up to 300Mbps.
•Support USB 2.0 storage function device
•Support WPS (Wi-Fi Protected Setup) with reset button.
•High security with build-in Security: WEP 64/128, WPAPSK,WPA2PSK, WPA, WPA2, 802.1x and 802.11i
•Support Router, WDS (Bridge + Repeater)
•Wireless Quality of Service (QoS) - 802.11e,WMM
•Easy configuration for home user setup.
Revision 1.0 (Aug’09) |
5 |
PROLiNK® PWH2004 User Manual |
www.prolink2u.com |
|
|
CHAPTER 3 – OPERATION MODES
Please go to the WirelessfWDS to set up the WDS function (Bridge or Repeater) of the Wireless Router.
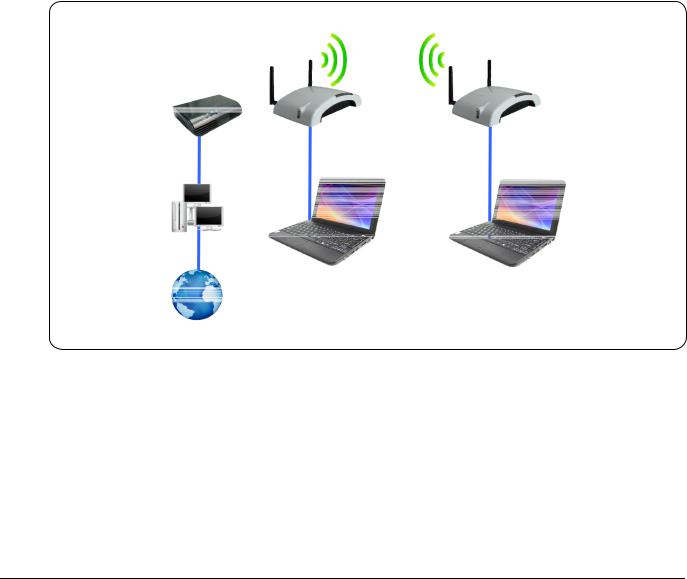
3.1Gateway Mode
The wireless connection will be set up from a point-to-point local LAN into a point-to-multipoint WAN. This device connects all the stations (PC/notebook with wireless function) to a wireless network. All stations can have the Internet access if only the device has the Internet connection.
Scenario 1
PROLiNK
PWH2004
3G Router
PROLiNK TA009
Netbook
PROLiNK PHS100
3G Modem
WWW |
ISP |
Scenario 2
PROLiNK TA009
Netbook
WWW |
ISP |
PROLiNK |
PROLiNK |
PWH2004 |
H5201C |
||
|
|
3G Router |
ADSL Modem |
Revision 1.0 (Aug’09) |
6 |
PROLiNK® PWH2004 User Manual |
www.prolink2u.com |
|
|
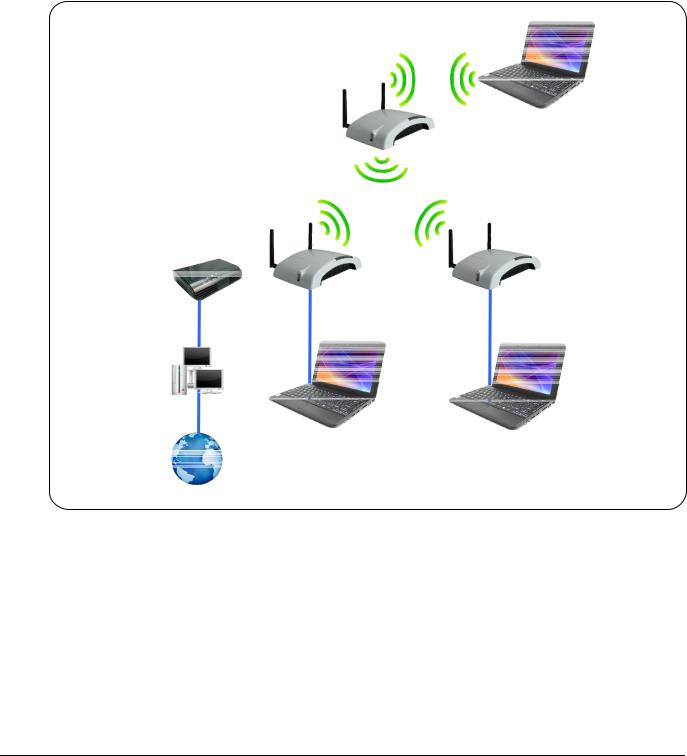
3.2Bridge Mode (WDS)
The WDS (Wireless Distributed System) function lets this access point act as a wireless LAN access point and repeater at the same time. Users can use this feature to build up a large wireless network in a large space like airports, hotels and schools and so on. This feature is also useful when users want to bridge networks between buildings where it is impossible to deploy network cable connections between these buildings.
In this mode, all Ethernet ports and wireless interface are bridge together and NAT function is disabled. All the WAN related function and firewall are not supported.
Wireless Distribution System uses wireless media to communicate with other APs, like the Ethernet does. To do this, you must set these APs in the same channel and wireless MAC address to each other APs that you want to communicate with.
PROLiNK |
|
|
PWH2004 |
|
PROLiNK |
3G Router |
|
H5201C |
|
|
ADSL Modem |
ISP
PROLiNK TA009 |
PROLiNK TA009 |
Netbook |
Netbook |
WWW
Revision 1.0 (Aug’09) |
7 |
PROLiNK® PWH2004 User Manual |
www.prolink2u.com |
|
|
3.3Repeater Mode (WDS+AP)
If set to Repeater mode, a device connects to each other through an access point or a base station (gateway or router.) This device can also work like a wireless station when it’s connected to a computer directly, so that the computer can send packets from wired end to wireless interface.
PROLiNK |
PROLiNK TA009 |
H5201C |
Netbook |
ADSL Modem |
|
PROLiNK |
|
|
PWH2004 |
|
PROLiNK |
3G Router |
|
H5201C |
|
|
ADSL Modem |
ISP
PROLiNK TA009 |
PROLiNK TA009 |
Netbook |
Netbook |
WWW
Revision 1.0 (Aug’09) |
8 |
PROLiNK® PWH2004 User Manual |
www.prolink2u.com |
|
|
CHAPTER 4 – CONFIGURATION
4.1Hardware Connection
4.1.1Connect one end of the Ethernet cable to the LAN port of the PWH2004 Wireless HSPA Router, another end to your PC or Notebook
4.1.2There are two connection methods to connect to Internet (Only one can be selected): X Connection via HSPA (3G) Modem
X Connection via ADSL Modem
4.1.3Finally, connect the PWH2001 Wireless HSPA Router with a power to an outlet.
Revision 1.0 (Aug’09) |
9 |
PROLiNK® PWH2004 User Manual |
www.prolink2u.com |
|
|
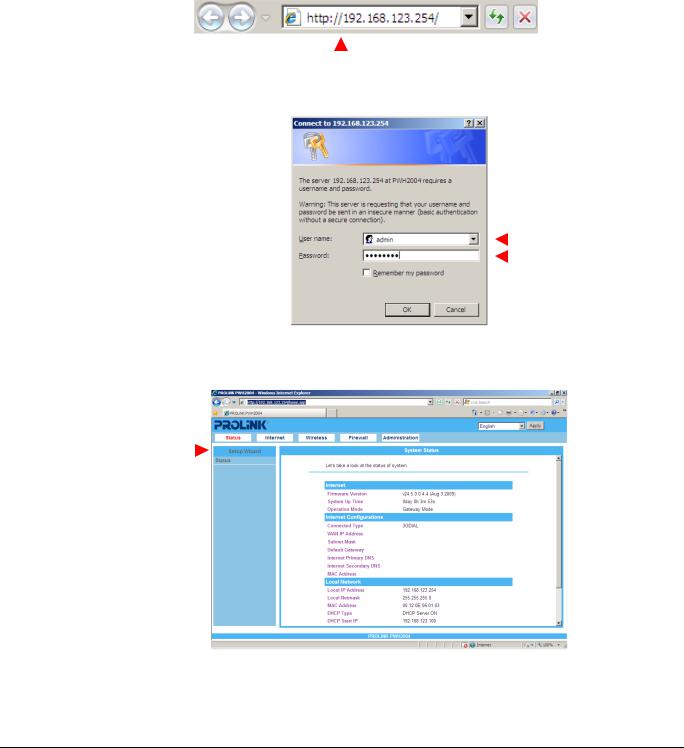
4.2Login to Router
4.2.1.Start your computer and make sure the connection by an Ethernet cable between your computer and the PWH2004 Wireless HSPA Router.
4.2.2.Start a web browser, type IP address “192.168.123.254” into address box
4.2.3.After connected successfully, the login screen will be prompted on screen. Default username is ‘admin’ and password is ‘password’.
4.2.4.Click the Setup Wizard item that provides a primary configuration of the PWH2004 Wireless HSPA Router.
NOTE:
If you have difficult in connecting the PWH2004 Wireless HSPA Router, refer to Appendix A for troubleshoots.
Revision 1.0 (Aug’09) |
10 |

PROLiNK® PWH2004 User Manual |
www.prolink2u.com |
|
|
4.3Common types of connections
4.3.1. Cable Modems
|
Type |
|
Details |
|
ISP Data required |
|
|
|
|
|
|
|
|
|
Your IP Address is allocated |
|
Usually, none. However, some ISP's |
|
Dynamic IP |
|
|
may require you to use a particular |
|
|
|
automatically, when you connect to |
|
||
|
Address |
|
|
Hostname, Domain name, or MAC |
|
|
|
you ISP. |
|
||
|
|
|
|
(physical) address. |
|
|
|
|
|
|
|
|
|
|
|
|
|
|
|
|
|
|
IP Address allocated to you. Some |
|
Static (Fixed) IP |
|
Your ISP allocates a permanent IP |
|
ISP's may also require you to use a |
|
Address |
|
Address to you. |
|
particular Hostname, Domain name, |
|
|
|
|
|
or MAC (physical) address. |
4.3.2. |
DSL Modems |
|
|
|
|
|
|
|
|
||
|
Type |
|
Details |
|
ISP Data required |
|
|
|
|||
|
|
|
|
|
|
|
Dynamic IP |
|
Your IP Address is allocated |
|
|
|
|
automatically, when you connect to |
|
None. |
|
|
Address |
|
|
||
|
|
you ISP. |
|
|
|
|
|
|
|
|
|
|
|
|
|
|
|
|
Static (Fixed) IP |
|
Your ISP allocates a permanent IP |
|
IP Address allocated to you. |
|
Address |
|
Address to you. |
|
|
|
|
|
|
||
|
|
|
|
|
|
|
|
|
You connect to the ISP only when |
|
|
|
PPPoE |
|
required. The IP address is usually |
|
User name and password. |
|
|
|
allocated automatically. |
|
|
4.3.3. |
HSPA Modems |
|
|
|
|
|
|
|
|
||
|
Type |
|
Details |
|
ISP Data required |
|
|
|
|||
|
|
|
|
|
|
|
|
|
Your IP Address is allocated |
|
The ISP may require you to use a |
|
Dynamic IP Address |
|
automatically, when you connected to |
|
particular Hostname, Domain name, or |
|
|
|
your HSPA ISP. |
|
MAC (Physical) address |
|
|
|
|
|
|
Revision 1.0 (Aug’09) |
11 |
PROLiNK® PWH2004 User Manual |
www.prolink2u.com |
|
|
4.4Wizard (Gateway Mode)
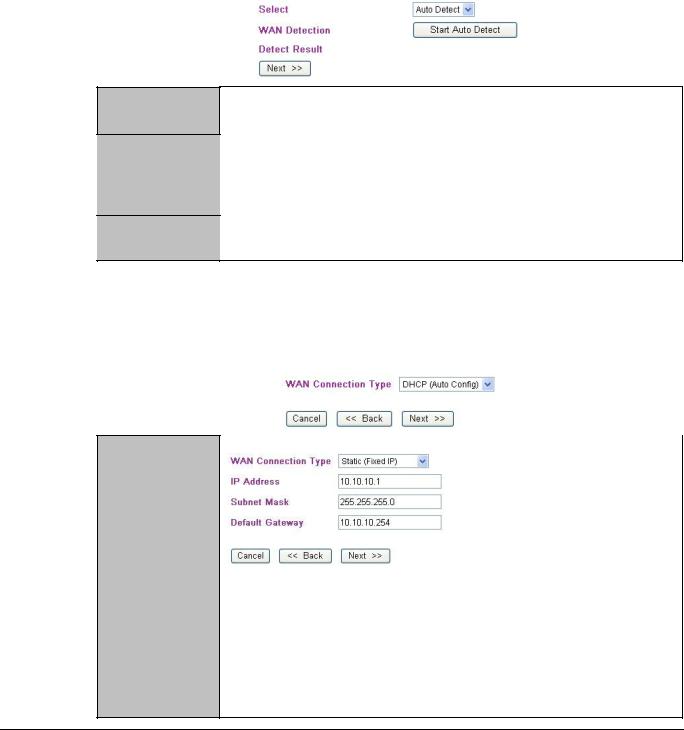
4.4.1.WAN Connect Detection
This page is used to detect the WAN connection of network. User can select Auto Detect form the pull-down menu and click Start Auto Detect button, the system will detect whether there is WAN connection or not. If user wants to set up the WAN detection manually, please select Manual form the pull-down menu, then click Next to continue.
Select
WAN Detection
Detect Result
To use the WAN detect function, user can select Manual or Auto Detect form the pull-down menu.
Select Auto Detect form the pull-down menu and click Start Auto Detect button, the detecting screen will be pop-up to detect whether there is WAN connection or not. If user wants to set up the WAN detection manually, please select Manual form the pull-down menu, then click Next to continue.
Here shows the WAN detection result. If there is no WAN connection, the system will show NONE or Unplugged Cable.
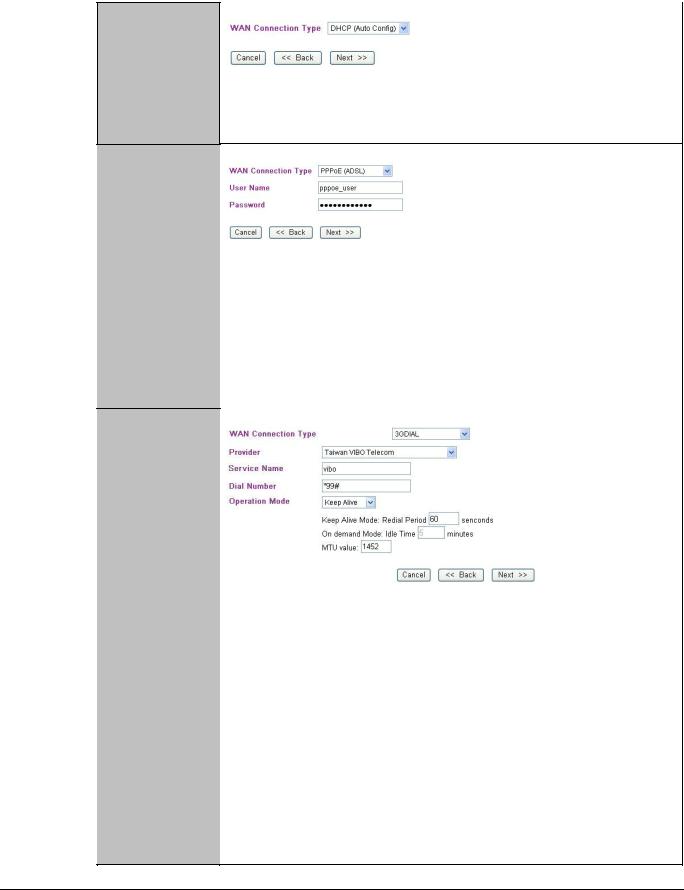
4.4.2.WAN Access Types
Here user can set up the WAN connection type easily. Select the WAN Connection Type Static (Fixed IP), DHCP (Auto Config), PPPoE (ADSL), or 3G (DIAL) and click Next to continue.
Static (Fixed IP)
If the Static IP be selected, user has to set up the IP address, subnet mask and default gateway according to the ISP that provided the related information.
IP Address: |
Enter the WAN IP address provided by your ISP here. |
Subnet Mask: |
Enter the subnet mask here. |
Default Gateway: Enter the default gateway IP address provided by your ISP here.
Revision 1.0 (Aug’09) |
12 |
PROLiNK® PWH2004 User Manual |
www.prolink2u.com |
|
|
DHCP
(Auto Config)
PPPoE (ADSL)
3G Dial
If the DHCP (Auto Config) be selected, the PC will obtain the IP address automatically.
If the PPPoE (ADSL) be selected, user has to set up the user name and password according to the ISP that provided the related information.
User Name: |
Enter the username that provide by your ISP provider. Maximum |
|
input is 32 alphanumeric characters (case sensitive). |
Password: |
Enter the password that provide by your ISP provider. Maximum |
|
input is 32 alphanumeric characters (case-sensitive). |
User have to insert USB card therefore, the 3G (DIAL) function can be used.
Provider: |
Select the ISP (Telecommunications) that provide the USB card |
|
from the pull-down list. |
Service Name: |
Enter the service name that the ISP provided. |
Dial Number: |
Enter the dial number that the ISP provided. |
Operation Mode: Select Keep Alive, On Demand or Manual form the pull-down list.
• Keep Alive Mode: Enter the Redial Period seconds in the box.
• On demand Mode: Enter the Idle Time minutes in the box.
• MTU Value: MTU (Maximum Transmission Unit, namely the maximum packet size, the default value is 1452) for your application. Reducing the packet size can help connecting to certain web sites or speeding up packet transfer rate. If the incorrect selection is entered, you may not be able to open certain web sites.
Revision 1.0 (Aug’09) |
13 |
PROLiNK® PWH2004 User Manual |
www.prolink2u.com |
|
|
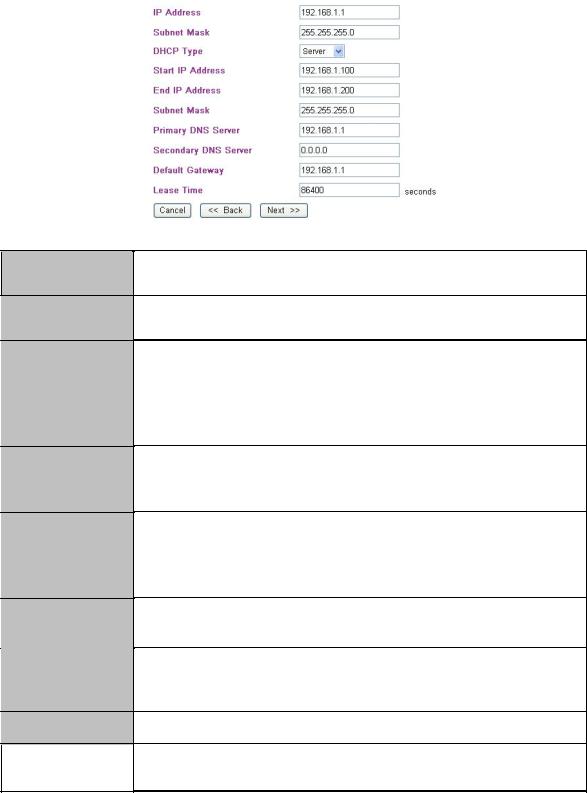
4.4.3.LAN
This step can set up local area network of the Wireless Router, such as IP address, subnet mask, DHCP type, DHCP IP addresses range, and DHCP subnet mask and DHCP lease time.
IP Address
Subnet Mask
DHCP Type
Start IP Address
End IP Address
Subnet Mask
Primary &
Secondary
DNS Server
Default Gateway
Shows the IP address of the Wireless Router (Default IP address is 192.168.1.1).
The subnet mask of the Wireless Router (Default subnet mask is 255.255.255.0).
Disable: Select to disable this Wireless Router to distribute IP addresses to connected clients.
Server: Select to enable this Wireless Router to distribute IP Addresses (DHCP Server) to connected clients. And the following field will be activated for you to enter the starting IP Address.
The starting addresses of this local IP network address pool. The pool is a piece of continuous IP address segment. Keep the default value 192.168.1.100 should work for most cases.
The end IP address, the maximum is 254. If “Start IP Address” is set at 192.168.1.100 and the “End IP address” is 192.168.1.200, the device will distribute IP addresses from 192.168.1.100 to 192.168.1.200 to all the computers in the network that request IP addresses from DHCP server (Router).
The subnet mask of the distribute IP addresses clients, the subnet mask must be set at the same segment as the Wireless Router.
The DNS should be set to the address provided by your ISP.
Enter the default gateway IP address provided by your ISP in this column.
|
Lease Time |
The lease time of the distribute IP Addresses. Default settings are 86400 seconds. |
|
|
|
|
|
|
Revision 1.0 (Aug’09) |
14 |
PROLiNK® PWH2004 User Manual |
www.prolink2u.com |
|
|
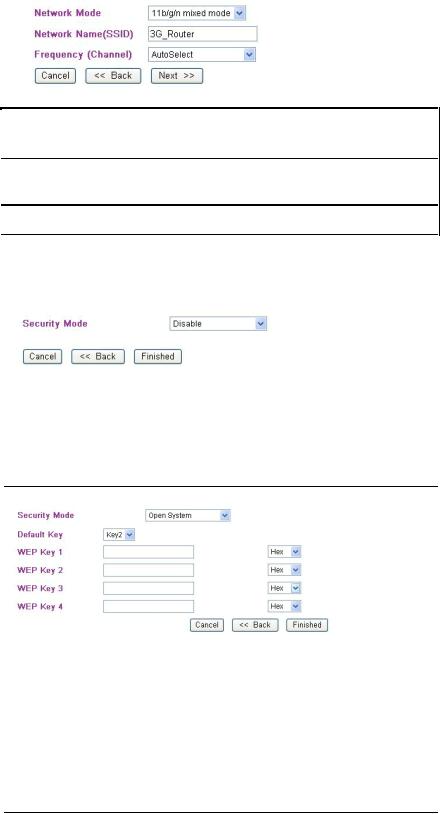
4.4.4.Network Mode
This step can set up wireless network mode, network name and channel.
|
Network Mode |
|
Select 11b/g mixed mode, 11b only, 11g only, or 11b/g/n mixed mode from the |
|
|
pull-down menu (Default is 11b/g/n mixed mode). |
|
|
|
|
|
|
|
|
|
|
Network Name |
|
A SSID is referred to a network name because essentially it is a name (case- |
|
(SSID) |
|
sensitive) that identifies a wireless network. |
|
|
|
|
|
Frequency (Channel) |
|
Select 1~11 or Auto Select from the pull-down menu. |
|
|
|
|
4.4.5.Security
Here can set up the wireless security of the Wireless Router.
Select desired security type from the pull-down menu Disable, Open System, Shared Key, AUTO (Open/Shared), WPA-PSK, WPA2-PSK, and WPA-PSK/WPA2-PSK. The default setting is Disable. It is strongly recommended to set up security mode (Open, Shared, AUTO (Open/Shared), WPA-PSK, WPA2-PSK, WPA- PSK/WPA2-PSK) to prevent any unauthorized accessing.
|
Open System |
|
|
|
Shared Key |
|
|
|
AUTO (Open/Shared) |
Default Key: |
Select the default key Key1~4. |
|
|
WEP Key 1~4: |
Enter the key in the selected key field. Only valid when |
|
|
|
using WEP encryption algorithm. The key must match with |
|
|
|
the AP’s key. There are several formats to enter the keys. |
|
|
|
• Hexadecimal (WEP 64 bits): 10 Hex characters (0~9, a~f). |
|
|
|
• Hexadecimal (WEP 128 bits): 26 Hex characters (0~9, a~f). |
|
|
|
• ASCII (WEP 64 bits): 5 ASCII characters (case-sensitive). |
|
|
|
• ASCII (WEP 128 bits): 13 ASCII characters (case-sensitive). |
|
|
|
|
|
|
|
|
Revision 1.0 (Aug’09) |
15 |

PROLiNK® PWH2004 User Manual |
www.prolink2u.com |
|
|
WPA-PSK
WPA2-PSK
WPA-PSK
WPA2-PSK
4.5Internet
4.5.1. LAN Interface Setup
WPA Algorithms: Select the type of algorithm, TKIP or AES for WP-PSK; and TKIP, AES or TKIP/AES for WPA2-PSK, WPA-PSK/WPA2- PSK.
Pass Phrase: Enter the pass phrase 8~63 ASCII or 64 hexadecimal characters in the column.
IP Address |
Shows the IP address of the Wireless Router (Default IP address is 192.168.1.1). |
|
|
Subnet Mask |
The subnet mask of the Wireless Router (Default subnet mask is 255.255.255.0). |
|
|
MAC Address |
Shows the MAC address of this Wireless Router. |
|
|
Revision 1.0 (Aug’09) |
16 |
 Loading...