

Page 1

Page 2
TABLE OF CONTENTS
Page 3
Thank you to choose the LED backlight LCD TV made by our company, a valuable product with excellent quality and
multiple functions. This machine will bring you more audiovisual enjoyment. Its design can insure user's safety. All
machine are strictly tested before leaving factory. But incorrect use can lead to electric shock or fire. In order to insure
safety and extend its life, please read below regulations carefully before using it and comply with the following safety
instructions.
1) Read the manual and marking label before using the machine, and keep the user manual for later use.
2) There is high voltage inside the machine, follow all the warnings and instructions strictly on the manual.
3) Don't use the attachments which are not recommended by the machine manufacturer as they may cause hazards.
4) The power cord must be placed correctly so as to avoid be trample or crush.
5) Please do not make the power socket overloaded or the power cord extended. Otherwise it will cause fire or electrical
shock.
6) If you are going to pull out the power cord from this product, please dry your hands, pull the cord by grasping the plug.
Never pull the cord itself.
7) If you will not use the machine for a long time, please pull out the power cord. Do not keep the sleeping mode for too
long time.
8) Please put this machine in the place of well ventilation instead of extremely hot, cool or moist, and direct sunshine.
9) The slots on the case is designed to release heat so as to assure that all inside components will not reach an extra
high temperature and can work normally for a long time. Please do not cover the holes while place it. Don't place the
machine near or over heat source or place in built-in installation.
10) The power cord must be taken off before you clean the machine. Don't use the liquid cleanser or aerosol cleanser. It
is recommended to use a wet soft cloth to clean the machine. Don't use the alcohol, impregnant or ammoniac liquid
to wipe the screen.
11) Please don't place it on an unstable position so as to avoid falling off.
12) Don't place the LCD TV near water source, like a bathtub, pool, washing machine, or moist cellar and similar
environment.
13) The LCD panel is fragile and expensive. The surface of the panel is easy to be scratched. Please don't use the hard
1
Page 4
thing to knock, press, score the panel. Otherwise it will be harmful for the panel. The exchange cost is very high.
14) There is high voltage inside the machine but no parts which can be repaired by users themselves. In order to assure
the people's safety, please don't open the case to repair it by yourself. If it is needed to repair, please contact
qualified engineer to repair.
15) All cables can be connected or pull out only after power supply is turned off.
16) During a thunder rain weather, do not touch the power cord and antenna cable.
17) When the following troubles occur, please pull out the plug and call the professional engineers to repair.
A. The cable or plug is damaged.
B. The product was fallen down or the case is damaged.
C. Obvious abnormal situation occurs. In spite of correct operation according to the user manual but it still can't work
normally.
D. Some abnormal substances or liquid fall into it.
E. Unusual sound or smell sends out.
18) When the MAINS plug or an appliance coupler is used as the disconnect device, the disconnect device shall remain
readily operable.
19) The machine should not suffer from waterdrop or watersplash, do not place the vessel with water (or other liquids) on
it, for like this it is possibly to cause fire or electric shock.
20) The attaching plug should be inserted into the power point completely, otherwise it may cause spark to bring fire.
21) Please do not put candle, ash-tray, incense, inflammables or explosive nearby this machine.
22) Please do not stretch into any sharp object, metal or liquid, or touch the signal attachment or the inner of radiation
hole, in order to avoid short circuit and product damage, or possibly causing electric shock. Especially pay attention
when there are children on the spot.
23) Please don't use the machine immediately when moving the machine from low temperature place to high temperature
one, or install and use at the place of facing air conditioning, otherwise it may cause the condensation in the machine,
to cause fault.
24) Must be careful when moving this machine, avoiding being struck, especially pay attention to protect the screen part.
In addition, if using handcart, must note the injury as the product is overturned from the handcart because of hard
braking, overexerting and uneven ground.
2
Page 5
3
Page 6
● interface specification:
Inter face
VGA
HDMI
CVBS Input/Output
S-VIDEO Input
YCbCr/Ypbpr
Audio Input/Output
TV(RF)
Earphone
● Work ing E nvi ron men t:
Atmos phe re pr ess ure : 86k Pa~10 4kP a Tempe rat ure : 5℃ ~40℃ Hu mid ity : 10%~8 5%
● Stor age E nvi ron men t:
Atmos phe re pr ess ure : 86k Pa~10 4kP a Tempe rat ure : -20℃ ~5 5℃ Hum idi ty: 5 %~95%
DB-15, 75Ω 0.5~0.7Vp-p H/V:TTL Level (Support mode refer to VGA Input Mode )
Video signal: 1080p, 1080i, 720p, 576p, 576i, 480p, 480i
Audio: LPCM
48KHz, 44.1KHz, 32KHz, 24Bit, 20Bit, 16Bit
75Ω 1Vp-p (PAL/NTSC/SECAM)
Y: 75Ω 1Vp-p; C: 75Ω 0.286Vp-p
Y: 75Ω 1Vp-p; Cb/Cr: 75Ω 0.7Vp-p
Signal mode: 1080p, 1080i, 720p, 576p, 576i, 480p, 480i
20KΩ, 0.5Vp-p
75Ω Imbalance
16~300Ω 100mW+100mW
Specifica tion
4
Page 7
● The Techni cal S pec ifi cat ion s for F ina l Pro duc t● The Techni cal S pec ifi cat ion s for F ina l Pro duc t
Panel size
Max. Resolution
Best resolution
Pixel pitch
Active area
Power adapter
Volume
TV receive system
Unpacking Dimension(L×H×W )
Packing Dimension(L×H×W)
Net weight
Gross weight
Color
Remote control range
Storage channels
21.5"
1920×1080
1920×1080@60Hz
0.25mm×0.25mm
476.64mm×268.11mm
100-240V 60/50Hz
3W+3W
PAL+NTSC/PAL+SECAM
535×394×36 mm
595×445×100 mm
5.0Kg
6.0Kg
16.7M
≥8m±30°
199
5
Page 8
VGA input mo de●
21.5 "
S/N
1
2
3
Mode Resolut ion
VGA
SVGA
4
5
XGA
6
7
8
9
10
No te : Rec omm end ed mo de: @60Hz1920×1080
SXGA
WXGA
WUXGA
720×400
640×480
800×600
1024×768
1280×720
1280×960
1280×1024
1360×768
1600×900
1920×1080
Refresh(Hz)
70
60
60
60
60
60
60
60
60
60
6
Page 9

● Powe r sup ply : Com ply w ith E PA stan dar d,c omp ati ble w ith V ESA DP MS standard.
Mode
On
Stan dby
No te : Thi s spe cif ica tio n is su bje ct to c han ge wi tho ut no tic es. I f the re ar e dif fer enc es be twe en ma nua l and r eal
operati on, plea se do a cco rdi ng to r eal o per ati on.
Please make sure that all of the following items are complete:
● LCD TV (Include base);
● User manual;
● Remote control ;
If any of above listed items is missing, please contact your dealer or our service department.
Powe r LED i ndi cat or
Off
On
7
Powe r con sum pti on
≤35W
≤1W
Page 10
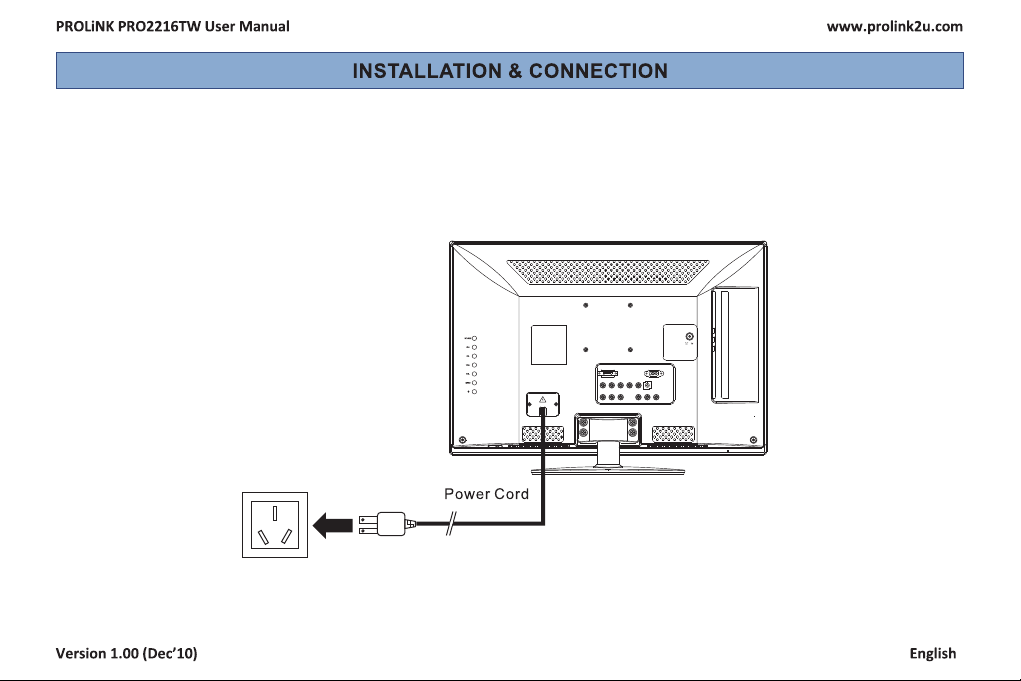
Power Connection
I AC 100V-240V, 60/50Hz).nsert the power plug into the socket of the electrical source (
Note s:
1. When connecting the power cord, be sure to turn off the machine and other equipment's power.
2. If a long time at leisure, please disconnect it from power supply.
To power socket AC 100V-240V, 60/50Hz
8
Page 11

Antenna Connection
It is better to use outdoor antenna or CATV cable if you want to watch the colorful and hi-definition pictures.
Attenti on:
Please turn off TV power before the outdoor antenna is connected to the TV signal input port. Outdoor antenna can't be
located near the high-voltage wires. Please pull out the plug of outdoor antenna to avoid thunder shock in thunder
weather.
9
Page 12

Computer Connection
Please connect one end of VGA cord with the output port
of the computer (available for both desktop or laptop
computer), and another end of VGA cord with the input
port of the VGA on its rear cover.
HDMI digital port Connection
Connect external HDMI high signal source to HDMI digital
input port of this machine through HDMI digital connector
cable; push "SOURCE" button to select "HDMI" signal
source.
Aud io/Vi deo mac hine
wit h HDMI in terfa ces
10
Page 13

AV1 Video Signal Connection
Through composite cable, connect AV equipment VIDEO output termination to this machine VIDEO input, and AV
equipment AUDIO output termination to this machine AUDIO input, respectively; Press "SOURCE" key to select "AV1"
signal source.
S-VIDEO Input Connection
Through S-VIDEO/AUDIO cables to connect external AUDIO/VIDEO equipment to the machine's AUDIO/VIDEO input port,
and press "SOURCE" key to select "SVIDEO" si l source
gna
USB in terfa ce
Earph one So cket
CVBS, D VD P la ye r or o th er
machine with CVBS/S -V id eo .
Earphone Socket: The TV speakers will be shut off when earphone is inserted into this socket.
AV2 Video Signal Connection
The connection method is the same as AV1; Press "SOURCE" key to select "AV2" signal source.
11
Page 14

AV-OUT Connection
If you need watch image of DV and connect your TV game machine, you can connect audio or video output end of
DV and game machine to the monitor.
CVBS, DVD P la ye r or o th er
machine with CVBS /S -V id eo .
AV machine
12
Page 15

YPbPr/YCbCr Input Connection
If the signal source is DVD, Digital wired receiver or equipments with the YPbPr/YCbCr output, recommends you to
connect YPbPr or YCbCr output with the TV YPbPr/YCbCr input. In order to obtains the better picture quality, at the same
time, please connect its audio output with TV audio input as shown in the following chart. If you choose the YPbPr/YCbCr
signal, please set signal source selection under YPbPr pattern.
CVBS, D VD P la ye r or o th er
machine with YP bP r/ YC bC r.
G Green (Y)
B Blue (Pb/Cb)
W White(AUDIO-L )
R Red (AUDIO-R, Pr/Cr)
13
G B R
W
R
Page 16

Base installation
Base equipment act as the picture. Equip the base with the machine according to arrow point, and lock the bolt tightly.
Wall M ounti ng Stan d
Wall M ounti ng Boar d
Wall Mounting subassembly installation
Installation for VESA Wall Mounting
1. Take off the base.
2. Fasten the wall mounting board. ( The height can be confirmed by the user).
3. Fasten the wall mounting stand at the position of VESA on the rear cover with bolts.
4. Spin M4 bolts into the left-right nuts on the wall mounting stand. 3-4 mm of depth from bolts washer to stand is
recommended.
5. Hang the machine onto the slot of the wall mounting board. Then lock the two bolts on the sides.
Note : ● Installation method is different because of Hanging arm hardware's structure.
● Must install the wall pendant on firm wall surface, please do not install this machine on ceiling or vehicles.
14
Page 17

4
5
6
7
1
2 3
8
3
1. Remote Receiving Sensor.
2. Power Indicator.
3. Power switch.
4. SOURCE: Press this key to enter the menu of signal source and choose signal source.
5. CH+/CH-: Press these two keys to choose channel, and adjust the options you need under OSD operation.
6. VOL+/VOL-: Press these two keys to add or reduce volume, and adjust the analog value under OSD operation.
7. MENU: Press this key to enter main menu.
8. Power on/Standby .
Note : There are some apparent differences between modes, please according to practicality.
15
Page 18

Pow er
Num erica l key
Sma rt soun d
Volu me
Inf o
Time
Col or
POWER
F1
SMART S
OK
MENU
VOL CH
SOURCE
INFO
P/N
COLOR
MUTE
SMART P
16:9
AUDIO
Mut e
Pro gram li st
Freeze picture
Sma rt imag e
OK
Cur sor Key
Men u
Cha nnel
Sou rce
Zoo m
Ret urn
Col or syst em
Key
POWER
MUTE
Numerical key
F1
Program list
SMART S
SMART P
Cursor key
VOL+/VOLMENU
SOURCE
CH+/CHINFO
Time
Return
16:9
Color
P/N
AUDIO
OK
Function
Turn on or standby
Eliminate sound
Number input button
Freeze picture
Look through or edit Program list
Intelligent sound mode selection
STANDARD NEWS MUSIC PERSONAL
Intelligent image mode selection
STANDARD DYNAMIC SOFT PERSONAL
Up or Down cursor button: function select
Left or right cursor button; analog add or reduce
Sound volume add or reduce button
Press this button to display menu
Press this button to display signal source selection menu
Select channel Number
System information display switch
Timer setting button, press this key can set time of turning down.
Off 15 30 45 60 120
Press this button to return to last watching channel
"FULL", "MOVIE", "CAPTION", "4:3", "PANORAMA"
Color temperature mode selection button:
Color system mode selection button:
Normal Warm Cool
PAL NTSC(SECAM) Auto
Optional
Confirm operation
16
Page 19

Remote control battery installation method:
Take off the cover of battery box, fix two AAA batteries with 1.5 volt, and conform with the polarity of remote control
battery box.
Note : Appearance of the remote control may be different from this picture, please according to practicality.
Precautions for use of remote control:
1. When using remote control you should point it to the remote-control inductive window. The goods between remote
control and inductive window may hinder normal operation.
2. Do not cause the remote control to receive fierce vibration. In addition, do not set or place the remote control under
direct sunlight, for the thermal energy will cause the distortion of remote control.
3. When remote-control inductive window of main machine is under direct sunlight or intense illumination, the remote
control may malfunction, by now, please change the angle of illumination or this machine, or approach the inductive
window to operate the remote control.
4. When the battery voltage is insufficiency it influences the remote control distance, you should replace with new battery;
when not to use the remote control for long or the battery is exhausted, please take out the battery, in order to avoid
bringing the battery leakage to corrode the remote control and thus cause it out of commission.
5. Do not use different batteries. The mix use of new and old batteries is not allowed, you should use battery pair.
6. Do not throw battery into fire, charge or disassembly, especially do not charge, assemble and disassemble, heat or
burn to the used battery. Please observe the related environmental protection stipulation on wasted battery.
17
Page 20

18
T V
AV 1
AV 2
S V I D E O
Y P b P r
H D M I 1
H D M I 2
P C
U S B
Page 21

C ON T R AS T
B RI G H TN E SS
H UE
S AT UR AT I O N
S HA R P NE S S
P IC T U RE M O DE
S CA L E
C OL O R T ON E
3 D N R
S E L A D J
P I C T U R E
S TA N D AR D
F U L L
N O R M AL
M I D D LE
M EN U
E X I T
5 0
5 0
5 0
5 0
5 0
Page 22

★Special Attention
1. The Hue function is available only for NTSC system.
2. The value adjusted by user, such as Contrast, Brightness,
Saturation, Hue, and Sharpness will be saved automatically
by the machine as personal mode.
★Remote Control Shortcut Keys
SMART P: Press SMART P key on the remote control. You can
switch the function among the "STANDARD", "DYNAMIC",
"SOFT", "PERSONAL" four modes.
16:9: Press 16:9 key on the remote control, you can switch the
mode among the "FULL", "MOVIE", "CAPTION", "4:3",
"PANORAMA" five modes.
Opti on
CONT RAS T
BRIG HTN ES S
HUE
SATU RAT IO N
SHAR PNE SS
PICT URE M OD E
SCALE
COLOR TONE
3D NR
Adjust the contrast of whole
picture
Adjust brightness and blackness
of whole picture
Adjust the hue of whole picture
Adjust the saturation of whole
picture
Adjust the sharpness of whole
picture
Select picture mode
Sele ct pi ct ure s cal e
Select color temperature mode
of the picture
Sele ct mo de l of 3D N R
Func tio n
Increasing analog value increases Contrast;
Decreasing analog value decreases Contrast(0-100).
Increasing analog value increases brightness;
Decreasing analog value decreases brightness(0-100).
Increasing analog value increases green;
Decreasing analog value increases purple(0-100).
Increasing analog value increases color;
Decreasing analog value decreases color (0-100).
Increasing analog value increases definition;
Decreasing analog value decreases definition (0-100).
"STANDARD", "DYNAMIC", "SOFT", "PERSONAL" four modes.
"FULL", "MOVIE", "CAPTION", "4:3", "PANORAMA",
There are three Color Temperature modes,
"NORMAL , , " "WARM" "COOL ".
"MIDDLE", "STRONG", "WEAK", "OFF".
C ON T R AS T
B RI G H TN E SS
H UE
S AT UR AT I O N
S HA R P NE S S
P IC T U RE M O DE
S CA L E
C OL O R T ON E
3 D N R
S E L A D J
Descrip tio n
P I C T U R E
S TA N D AR D
F U L L
N O R M AL
M I D D LE
M EN U
E X I T
5 0
5 0
5 0
5 0
5 0
20
Page 23

SOUND
Select to enter the SOUND submenu. Press "Up/Down" key on the remote control or the key "CH+/CH-" on the front
panel to choose what you need. Press the "Left / Right" key on the remote control or the "VOL+/VOL-" key on the front
panel to adjust analog value or state (see below table).
★Special Attention
1. Normally, 50 value of adjustment is recommended;
2. The treble or bass analog value which is adjusted by the
users will be saved as the personal mode by the machine
★Remote Control Shortcut Keys
SMART S: Press SMART S key on the remote control. You can
switch the function among the
" " four modes.
PERSONAL
, "STANDARD","NEWS", "MUSIC",
MUTE: Open or close sound.
VOL+/VOL-: Add or reduce volume.
Opti on
BASS
TRE BLE
Adjust ba ss va lue
Adjust tre ble v alu e
BALA NCE Ad jus t bal anc e of le ft or r igh t sou nd
SOUN D MOD E
Adjust au dio effe ct mo de
Func tio n Descriptio n
Increasing analog value increases bass;
Decreasing analog value decreases bass (0-100).
Increasing analog value increases treble;
Decreasing analog value decreases treble (0-100).
Increasing analog value decreasing left volume;
Decreasing analog value decreases right volume(0-100).
"STANDARD", "NEWS", "MUSIC", "PERSONAL" four modes.
B AS S
T RE B L E
B AL A N CE
S OU N D M OD E
S E L A D J
S OU ND
S TA N D AR D
M EN U
E X I T
5 0
5 0
5 0
21
Page 24

OSD
Select to enter the OSD submenu. Press "Up/Down" key on
the remote control or "CH+/CH-" key on the front panel to choose
what you need. Press the "Left/Right" key on the remote control
or the "VOL+/VOL-" key on the front panel to adjust analog value
or state (see below table).
O S D - H PO SI TI O N
O S D - V P OS IT IO N
O S D - D UR AT IO N
O S D - H AL F T O NE
O S D - L AN G U AG E
O SD
E N GL IS H
5 0
5 0
1 5
1 0 0
S E L A D J
Opti on Fu nct ion D esc rip tio n
OSD-H POSITION
OSD-V POSITION
OSD-DURATION
OSD-HALFTONE
OSD LANGUAGE
Adjust H-position of OSD menu
Adjust V-position of OSD menu
Adjust duration of OSD menu
Adjust halftone of OSD menu
Choose OSD menu display
language
Increasing analog value, OSD menu move toward right;
Decreasing analog value, OSD menu move toward left (0-100).
Increasing analog value, OSD menu move toward down;
Decreasing analog value, OSD menu move toward up(0-100).
Increasing analog value, extend duration time of OSD menu(5-60).
Increasing analog value increases halftone;
Decreasing analog value decreases halftone(0-100).
There are many languages to select.
22
M EN U
E X I T
Page 25

ADVANCE
Select to enter the ADVANCE submenu. Press "Up/Down" key
on the remote control or "CH+/CH-" key on the front panel to
choose what you need. Press the "Left/Right" key on the remote
control or the"VOL+/VOL-" key on the front panel to adjust analog
value or state (see below table).
S L EE P - TI ME R
D C C
B L UE S CR EE N
R E SE TT IN G
A DVA N C E
O F F
O F F
O N
S E L A D J
Opti on Fu nct ion D esc rip tio n
SLEEP - TIMER
DCC
BLUE SCREEN
RESETTING
Set sleep time of the machine
Open or close DCC
Open or close BLUE SCREEN
Resume to setting of factory
Off, 15M, 30M, 45M, 60M, 120M unit: minute.
" ",
"ON/OFF" two states.
"ON/OFF" two states.
Reset all values to setting of factory.
23
M EN U
E X I T
Page 26

TV
Select to enter the submenu. Press "Up/Down" key on the
remote control or "CH+/CH-" key on the front panel to choose
what you need. Press the "Left/Right" key on the remote control
or the "VOL+/VOL-" key on the front panel to adjust analog value
or state (see below table).
TV
C O LO R S YS TE M
S O UN D S YS TE M
M T S
S K IP
A U TO S CA N
M A NU AL S E A RC H
F I NE T UN IN G
C H AN NE L E D IT
T V
A U TO
M
M O NO
O F F
Opti on Fu nct ion D esc rip tio n
COLOR SYSTEM
SOUND SYSTEM
Sele ct co lor s yst em
Select so und s yst em
MTS Select MT S mod es
SKIP
AUTO SCAN
MANUAL SEARCH
FINE TUNING
CHANNEL EDIT
Select sk ip or n ot
Select au to se arc h
Select ma nul s ear ch
Select fine tuning
Select ch ann el edit
" "PAL, NTSC, AUTO three modes.
"I, D/K, M, AUTO, B/G" five modes.
"STEREO, MONO, DUALⅠ, DUALⅡ" four modes.
"ON/OFF" two states.
Please refer t o "AUT O SCA N"
Please refer t o " "MANUAL SEAR CH
Please refer t o " "FI NE TUNING
Please refer t o " "CHANNEL EDI T
24
S E L A D J
M EN U
E X I T
Page 27

AUTO SCAN
Select to enter the submenu of . Then press ''Up/Down'' key TV
on the remote control or ''CH+/CH-'' on the front panel to select
5 3 . 0 0
MHZ
CH
2
'' ''. The machine perform search after pressing ''Right''AUTO SCAN
key on the remote control or ''VOL+''on the front panel. (In the process of searching the channel automatically, press the
key of ''MENU'' on the remote control to stop searching). Meanwhile, it will show Current Channel, Frequency. All of the
TV programs will be saved automatically.
MANUAL SEARCH
Select to enter the submenu of . Then press ''Up/Down'' key TV
on the remote control or ''CH+/ CH-''on the front panel to select
CH AN NEL
SE AR CH
2
4 5 . 2 5
MHZ
'' ''. Then press the key of ''Right'' on the remoteMANUAL SEARCH
control or ''VOL+'' on the front panel to enter submenu of MANUAL SEARCH. Press ''Left/Right'' key on the remote control
or ''VOL+/VOL-'' on the front panel to select channel No.. Press ''Up/Down''key on the remote control to select ''SEARCH '',
press ''Left/Right'' key on the remote control again, the machine begin searching toward low frequency or high frequency.
(In the process of searching the channel automatically, press the key of ''MENU'' on the remote control to stop searching).
FINE TUNING
Select to enter the submenu of . Then press ''Up /Down'' TV
key on the remote control or ''CH+/ CH-'' key on the front panel to
F IN E T U N IN G
5 5 . 2 5
MHZ
select ''FINE TUNING''. Press ''Right'' key on the remote control to enter submenu of ''FINE TUNING''. Press ''Left/Right''
key on the remote control to adjust from low frequency or high frequency.
CHANNEL EDIT
Select to enter the submenu of . Then press ''Up/Down'' key on the remote control or ''CH+/CH-'' on the front panel TV
25
Page 28

to select '' ''. Press ''Right'' key on the remote
control to enter submenu of '' '' (Press program
list key on the remote control to enter submenu of ''
EDIT
NAME: Press ''Cursor'' key on the remote control to select
channel. Press ''1'' key on the remote control to name. Press
''UP/Down'' key on the remote Control to select l or number.
Press ''Left/Right '' key on the remote control to and
then press ''UP/Down'' key on the remote control to select l
CHANNEL EDIT
'').
CHANNEL EDIT
CHANNEL
etter
move digit
etter
0 0 1
0 0 2
0 0 3
0 0 4
0 0 5
0 0 6
0 0 7
0 0 8
0 0 9
0 1 0
1 NAME 2 DELE TE 3 SWAP MEN U E X I T
0 1 1
0 1 2
0 1 3
0 1 4
0 1 5
0 1 6
0 1 7
0 1 8
0 1 9
0 2 0
0 2 1
0 2 2
0 2 3
0 2 4
0 2 5
0 2 6
0 2 7
0 2 8
0 2 9
0 3 0
or number. Press ''1'' key on the remote control to confirm.
DELETE: Press ''Cursor'' key on the remote control to select channel which you wish delete. Press ''2'' key on the remote
control, and then press ''1'' to confirm.
: Press key on the remote control to select channel which you wish change name's position, press ''3'' key
SWAP ''Cursor''
on the remote control, then press ''UP/Down'' key on the remote control to select channel, press ''1'' to confirm.
Select Channels with "CH+/CH-" Key
Press Program key on the remote control or "CH+/ CH-" key on the front panel to select the channels.
Select channels with the Return key you can go to the last channel when pressing the Return key. For example, if the last
channel is 10 and the current channel is 20, you will go to channel 10 when pressing the Return key. You can switch the
two favourite channels as you like.
26
Page 29

Select Channels with Numeric Keys
1. Operations to select channels with 1 digit (0-9):
Press the number keys (0-9)on the remote control to select TV channel directly .
2. Operations to select channels with 2 digits (10-99):
Press the number keys with 2 digits (10-99) on the remote control to select TV channels.
3. Operations to select channels with 3 digits (100-199):
Press the number keys with 3 digits (100-199) on the remote control to select TV channels.
No te : Wi th t he m ode of AV1, AV 2, S VID EO, YPb Pr, H DMI 1, HDMI2, PC, all functions and
adjustments ar e si mil ar w ith TV. U ser can che ck i t at convenience. HDMI connector can
realize DVI con nec tor fun cti on w ith ext ern al H DMI /DV I co mmu tat or.
USB signal source operation
Please insert USB memory card into USB interface of TV, press "SOURCE" key on the remote control or front panel to
select USB signal source (if you don't insert the USB memory card into USB interface of TV, operation is invalid), press
"OK" key to enter.
Note : This USB interface only support move U dish, can't connect move hard drive, also can't connect to USB interface of
computer. USB support file format with Mp3/JPG. It isn't compatible with some of move U dishes, please replace move U
dish.
27
Page 30

Sympt om
Snowflake speckle and
sound noise.
TV image is better, but
has noise.
No image. No sound.
TV image have stripe.
TV image have shadow.
No color
TV no sound
Factor
1.Antenna cable connector is
loose, cable is damaged.
2.Channel setting is incorrect.
3.Antenna cable type is not
matching.
4.Direction or position of antenna
cable is incorrect.
5.Signal is weak.
TV system setting is incorrect. Enter to menu, reset sound system again ."TV"
Power plug is loose, power
cord don't connect well.
Signal is exposed to disturb,
such as car, neon light, electric
blower etc.
1.TV signal is reflected by valley
or building.
2.Toward direction of antenna
cable is incorrect.
1.Color saturation is too low.
2.Color system is incorrect .
1.Volume setting is too low.
2.Sound is muted.
3.Sound system is incorrect.
1.Check the antenna cable connector plug whether
or not loose, cable whether or not perfect.
2.Refer to channel setting method, resetting again.
3.Check antenna cable type(VHF/UHF)
4.Adjust direction or position of antenna cable .
5.Attempt to use signal amplifier.
1.Check power cord whether or not connect well.
2.Check if the machine is on standby.
3.Check if the power switch button is on
Don't use electric blower around machine, adjust
antenna cable direction to reduce disturb.
1.Use high directional antenna cable. Use FINE
TUNING of .
2.Adjust toward direction of antenna cable.
1.Enter to add up color saturation.
"PICTURE"
2.Enter to change color system.
"TV"
1.Adjust volume to proper value.
2.Press MUTE button on remote control to
eliminate mute.
3.Enter to change sound system.
" "
"TV"
28
Solution
"TV"
Page 31

Symptom
Computer no display, and
prompt no signal input, red
indicator LED twinkling.
Remote control distance is
short, lose control.
Computer display faintly.
Computer display image
excursion, not full screen,
over screen.
Noise Signals at turning off.
Can not operate this
machine.
CA UT I ON : Don 't le t you r mac hin e dis pla y the s ame p ict ure f or a lo ng ti me, p lea se se t up a sc ree n pro tec tio n
proc edu re. I f a hig h con tra st pi ctu re re mai ns fo r alo ng ti me, t his p ict ure w ill b rin g a 'le ave s had ow' i n scr een .
Usua lly t he 'l eav e sha dow ' wil l dis app ear gradually when you tur n off t he ma chi ne po wer. Ho wev er, th is tr oub le
can' t be re pai red , W hic h isn 't in r ang e of wa rra nty.
Signal cable is loose or fall off.
1.Receive window of remote
continue was covered by
objects.
2.The battery energy of remote
control is to low.
1.Adjustment is incorrect.
2.Display mode is incorrect.
1.Adjustment is incorrect.
2.Display mode is incorrect.
Electrical release at turning off.
Exterior influence, for example
lightning, static electricity and so
on, which are possibly to disturb
the normal operation of this
machine.
Factor
Solution
Check signal cable whether or not loose, fall off,
reconnect well again.
1.Remove objects, avoiding cover the receive
window of remote control.
2.Change battery.
1.Use auto-adjustment function.
2.Use commend mode.
1.Use auto-adjustment function.
2.Enter to adjust horizontal or
"GEOMETRIC"
vertical position.
3.Use recommended mode.
It is normal.
Press " " button to turn off electrical source,
then press " " button to turn on the TV again
after 1-2 minutes.
29
Page 32

30
Page 33

 Loading...