

Page 1
PFL 106 F
PFL 106 E
MACHINE À LAVER
WASHING MACHINE
WASMACHINE
LAVADORA
Page 2

FR
TABLE DES MATIÈRES
ATTENTION....................................................
MISES EN GARDE IMPORTANTES...................
DESCRIPTION DE L'APPAREIL........................
INSTALLATION...............................................
PANNEAU DE CONTRÔLE...............................
Signal sonore...............................................
UTILISATION..................................................
Premier lavage.............................................
Mettre du produit dans l'appareil....................
Lavage........................................................
Liste des programmes..................................
Changement de programme et de
température en cours de route......................
Conseils pour le lavage................................
NETTOYAGE ET ENTRETIEN..........................
Nettoyage de l'extérieur...............................
Nettoyage du tambour..................................
Réparation d'une machine à laver gelée.........
Nettoyage du tiroir et de son logement...........
Nettoyage du tuyau et du filtre d'arrivée d'eau
10
11
12
12
14
14
14
14
15
4
6
6
7
8
8
9
9
9
..................................................................
Nettoyage de la pompe d'évacuation.............
DÉPANNAGE.................................................
DONNÉES TECHNIQUES................................
15
15
16
17
Page 3

FR
ATTENTION
Cet appareil est destiné à un usage
domestique uniquement. Toute utilisation
autre que celle prévue pour cet appareil,
ou pour une autre application que celle
prévue, par exemple une application
commerciale, est interdite.
Cet appareil peut être utilisé par des
enfants âgés d'au moins 8 ans et par des
personnes ayant des capacités physiques,
sensorielles ou mentales réduites ou
dénuées d'expérience ou de connaissance,
s'ils (si elles) sont correctement
surveillé(e)s ou si des instructions
relatives à l'utilisation de l'appareil en
toute sécurité leur ont été données et si
les risques encourus ont été appréhendés.
Les enfants ne doivent pas jouer avec
l'appareil.
Le nettoyage et l'entretien par l'usager ne
doivent pas être effectués par des enfants
sans surveillance.
4
Page 4

FR
Si le câble d'alimentation est endommagé,
il doit être remplacé par le fabricant, son
service après vente ou des personnes de
qualification similaire afin d'éviter un
danger.
Les ensembles de raccordement neufs
fournis avec l'appareil doivent être
utilisés; Il convient de ne pas réutiliser
les ensembles de raccordement usagés.
Les détails concernant la méthode du
nettoyage sont définis en page 14 & 15
dans la section de “NETTOYAGE ET
ENTRETIEN”.
ATTENTION: Ne pas raccorder à une
alimentation en eau chaude.
Les ouvertures d'aération ne doivent pas
être obstruées par un tapis.
La pression d'eau ne doit pas être
inférieure à 0.05MPa et n'est pas
supérieure à 1MPa.
La masse maximale de linge à l'état sec
pour l'appareil est 6kg .
5
Page 5
FR
MISES EN GARDE IMPORTANTES
- Pour des raisons de sécurité, les matériaux d'emballage de l'appareil doivent être
gardés hors de portée des enfants.
- Ne branchez pas l'appareil avec les mains mouillées.
- Ne touchez en aucun cas l'appareil avec les mains ou les pieds mouillés.
- En cas de dysfonctionnement, débranchez l'appareil puis fermez l'arrivée d'eau.
N'essayez pas d'effectuer des réparations par vous-même. Faites appel à un
réparateur agréé.
- La capacité maximale de l'appareil ne doit pas être dépassée.
- La porte en verre est portée à haute température pendant le lavage. Les enfants et
les animaux domestiques doivent être maintenus à distance de l'appareil pendant
qu'il fonctionne.
- Après usage, débranchez toujours l'appareil et fermez l'arrivée d'eau.
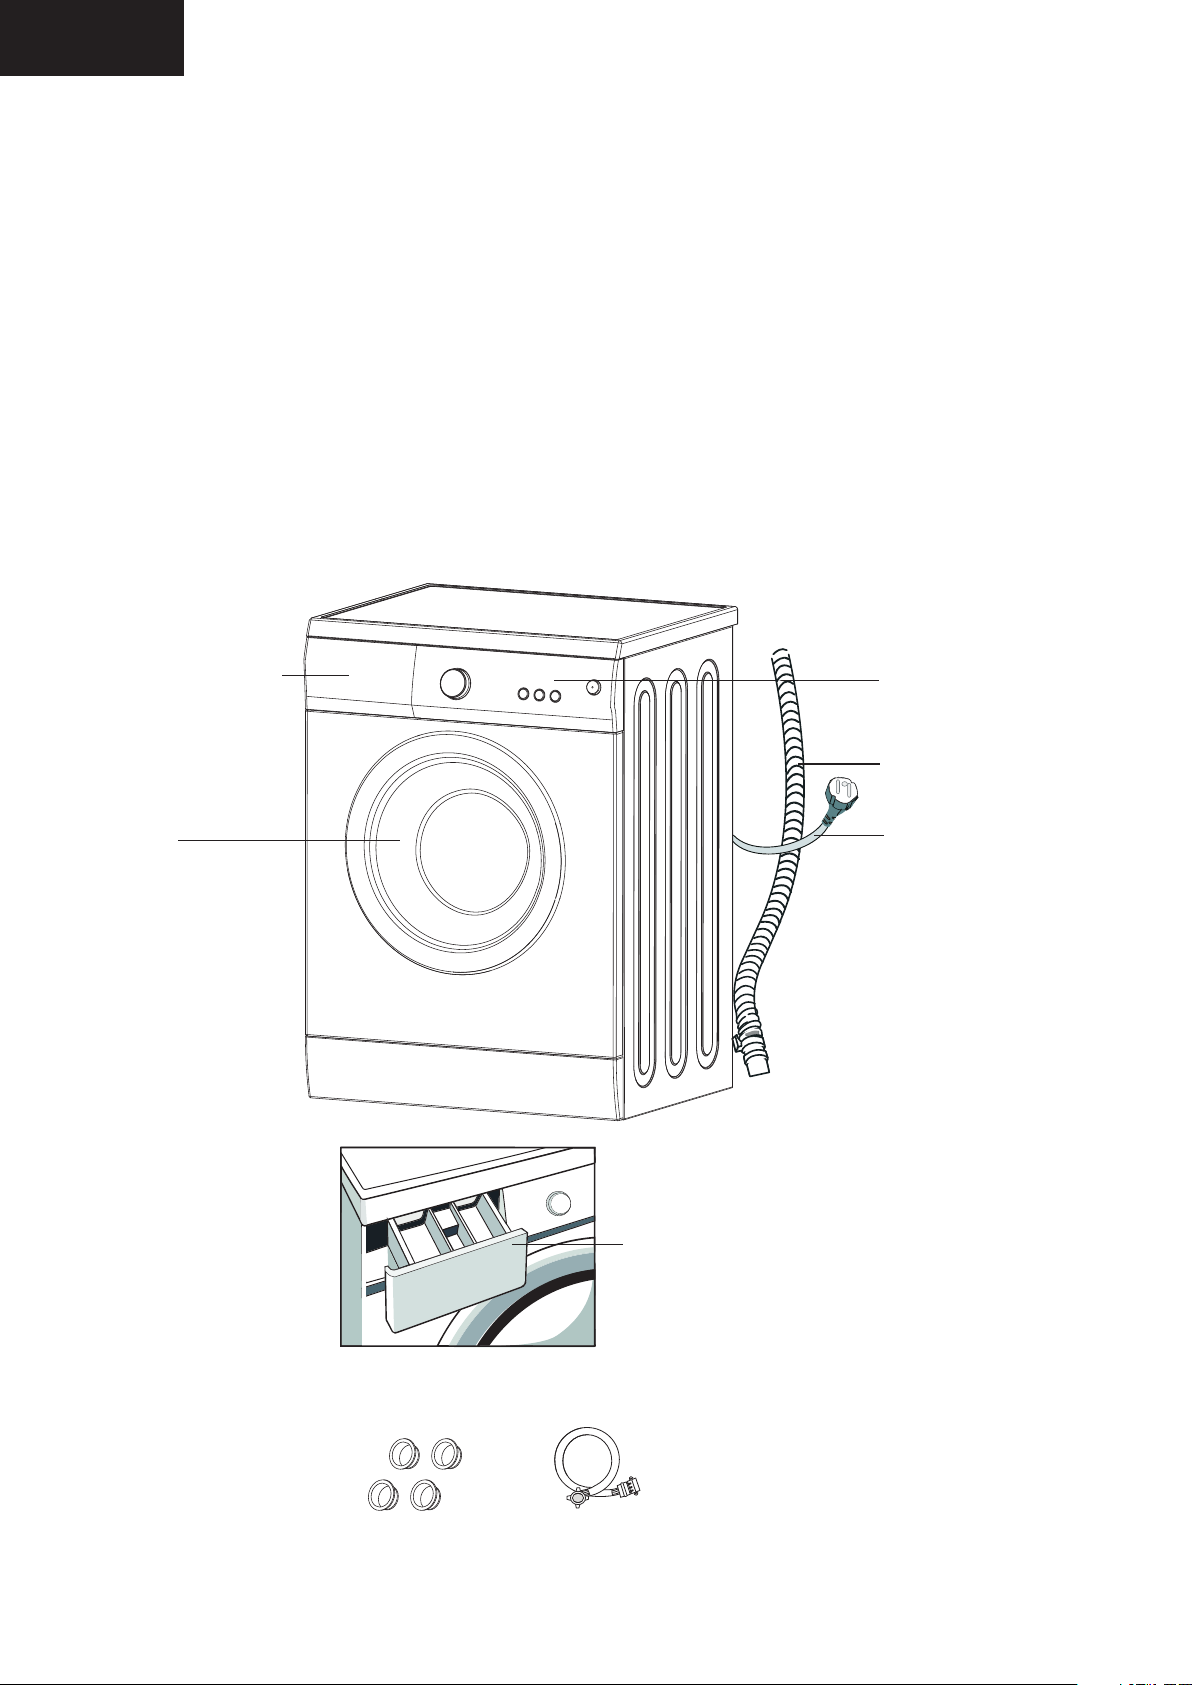
DESCRIPTION DE L'APPAREIL
Bac à produit
lessiviel
Porte
Panneau de commande
Tuyau d'évacuation
Câble d'alimentation
Accessoires
Bouchons de
transport
Bac à produit lessiviel
Tuyau d'arrivée d'eau
6
Page 6
FR
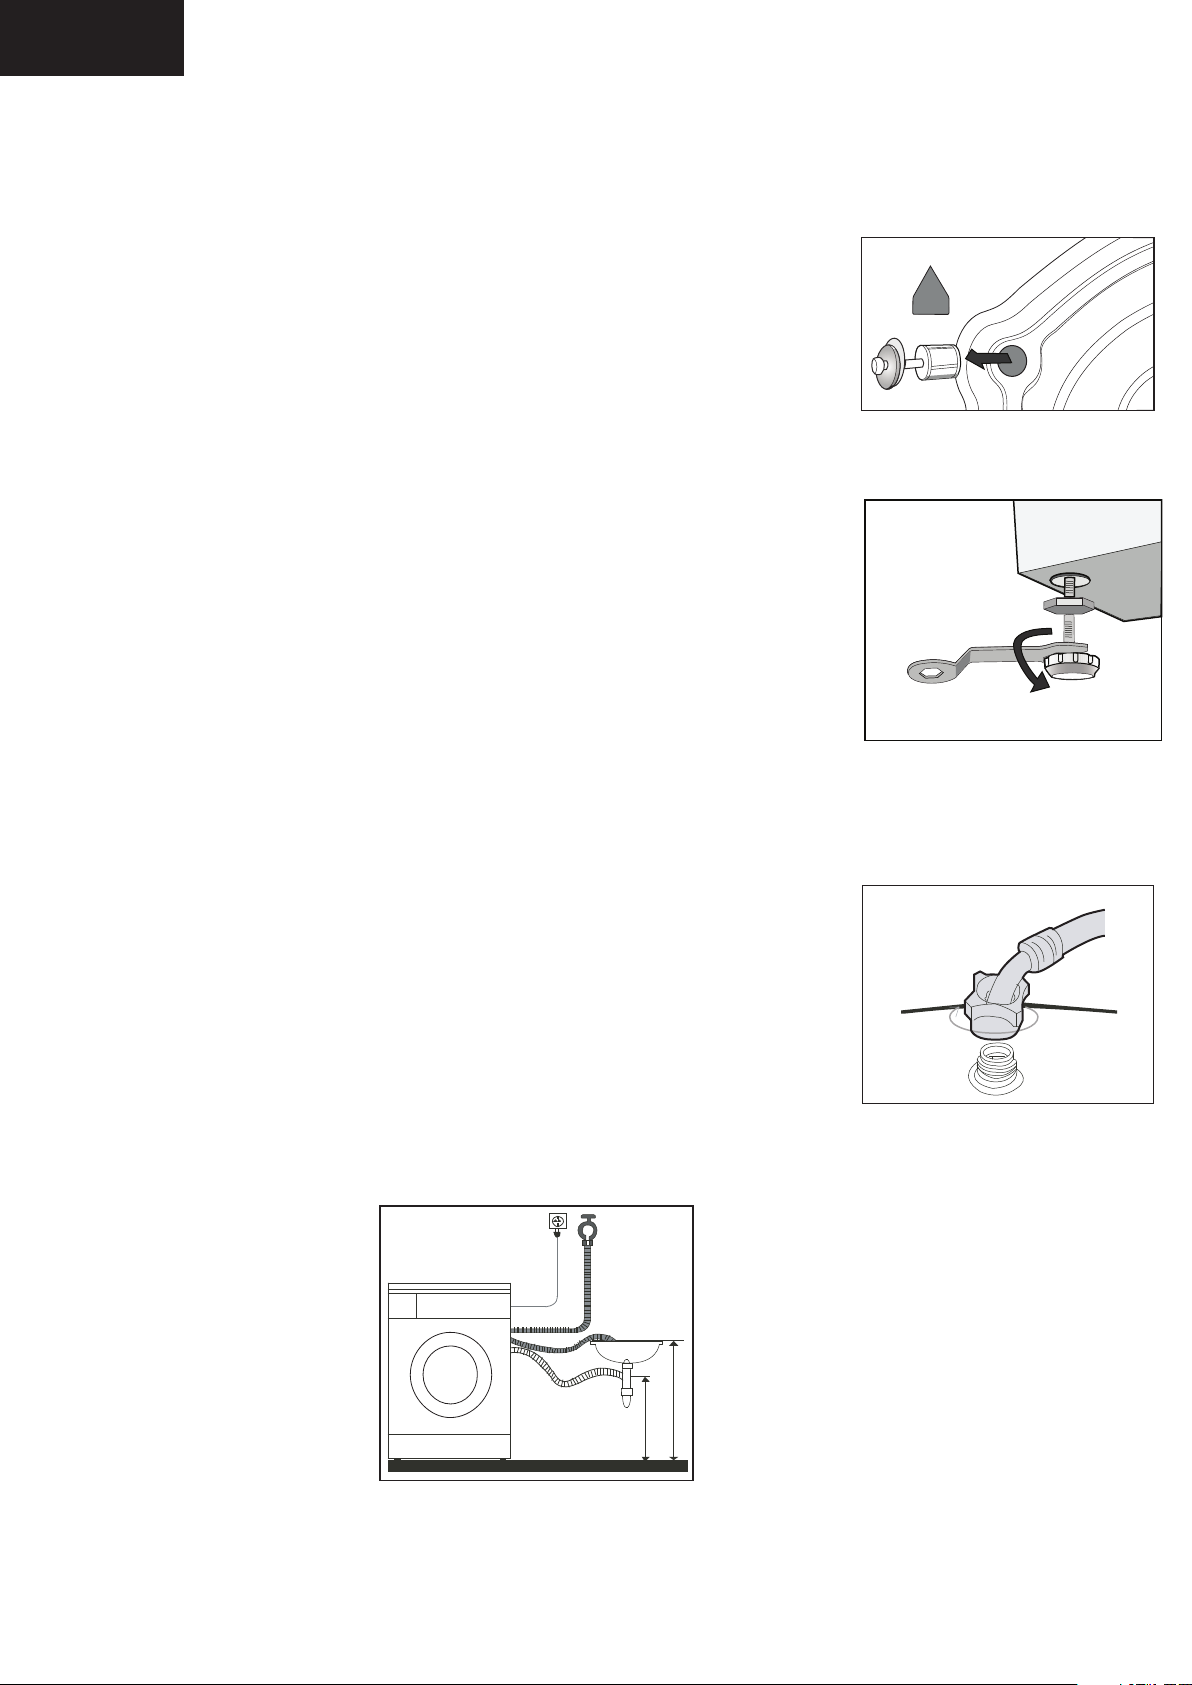
INSTALLATION
Déballage
Tous les boulons de transport situés derrière l'appareil et sur
l'emballage doivent être enlevés avant usage.
Gardez tous les matériaux d'emballage hors de portée des enfants.
Gardez les boulons de transport : vous pourrez ainsi les réutiliser pour
transporter à nouveau l'appareil en cas de besoin.
Emplacement
Installez l'appareil sur
Assurez-vous que la circulation de l'air est suffisante autour de l'appareil.
L'appareil ne doit pas être installé sur une moquette.
Mise à niveau
Mettez l'appareil d'aplomb en augmentant ou en diminuant la longueur
des pieds.
Desserrez l'écrou de verrouillage à l'aide d'une clé (non fournie) et
tournez le pied à la main jusqu'à ce qu'il touche par terre.
Puis tenez le pied d'une main et, de l'autre main, serrez de nouveau
l'écrou contre l'appareil avec une clé.
N'essayez en aucun cas de corriger les irrégularités du sol en mettant du
carton, une cale en bois ou tout autre matériau similaire sous la machine.
Une machine parfaitement d'aplomb est plus stable, plus silencieuse
et vibre moins.
une surface plane et solide.
Arrivée d'eau
Vissez du tuyau d'arrivée d'eau à l'arrière de l'appareil.une extrémité
L'appareil doit être relié à un robinet d'eau froide.
Reliez l'autre bout du tuyau à un robinet fileté 3/4".
Branchements électriques
Votre machine à laver fonctionne avec une alimentation de 220-240V et
50Hz.Les branchements électriques doivent être effectués par un
technicien qualifié, conformément aux réglementations de sécurité en
vigueur.Cette machine à laver doit être correctement mise à la terre.
Nous ne saurions être tenus responsables des éventuels dommages
résultant d'une utilisation sans mise à la terre adéquate.N'utilisez pas
de rallonge ou de multiprise.
Évacuation de l'eau
Pour l'évacuation de l'eau, utilisez l'une des méthodes suivantes:
1.Insérez le tuyau dans la colonne d'évacuation.
OU
2. Insérez suffisamment profondément le tuyau dans la bonde d'évacuation d'un évier.
correctement
Max .100c m
Min .60cm
Remarques:
Le tuyau d'évacuation ne doit en aucun cas être plié, tordu, étiré ou comprimé.
Le tuyau d'évacuation doit être monté à une hauteur comprise entre 60 et 100 cm par rapport au sol.
7
Page 7

FR
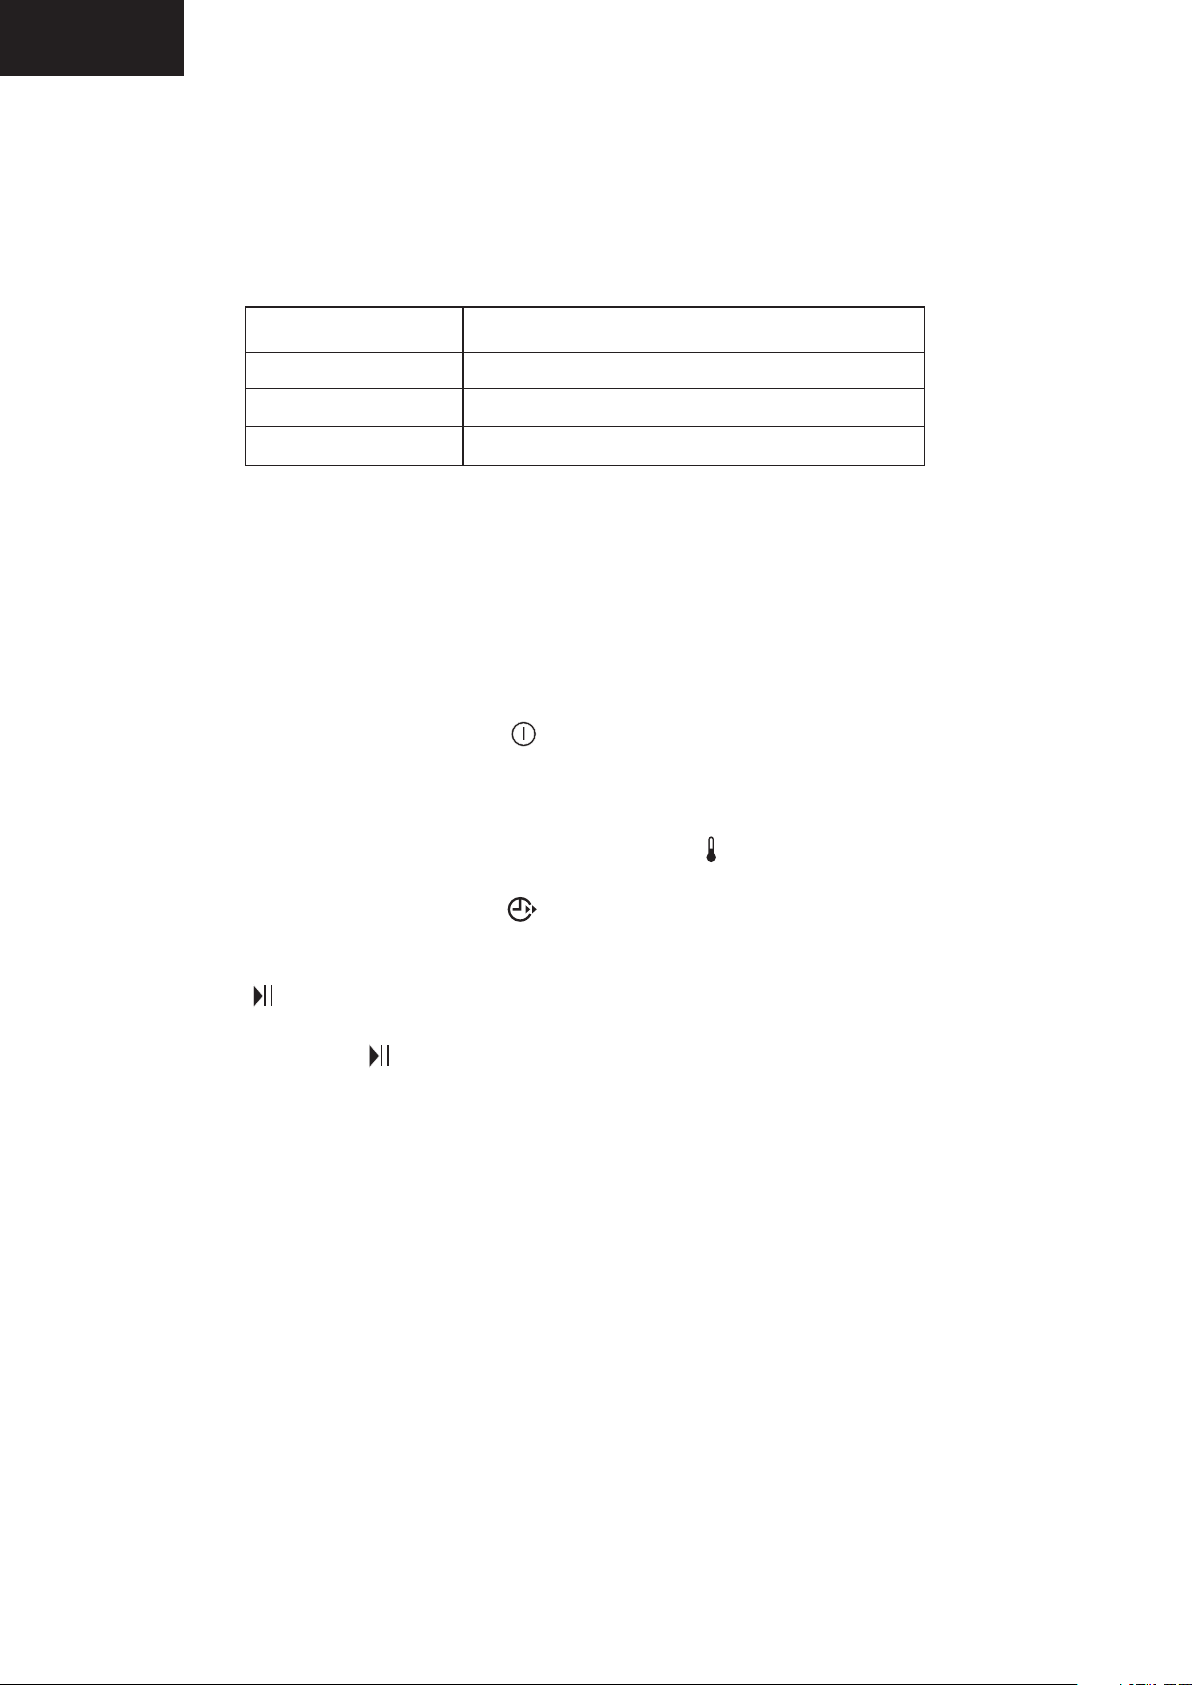
PANNEAU DE CONTRÔLE
PFL 106 F
Cot on
Syn théti que
Lai ne
Jea ns
PFL 106 E
Rap ide
Cot on inte nsif
Ess orage
Aut o
net toyag e
Chrono
Dép art dif féré Temp. Dép art/P ause
12h
9h
6h
3h
90
60
40
20
Mar che/A rrêt
Bouton de programme
Départ différé
Bouton de température
Activation/désactivation
du signal sonore
Bouton départ/pause
Bouton marche/Arrêt
Tournez ce bouton pour sélectionner le programme
souhaité. 8 programmes sont disponibles. Une fois le
programme choisi, le témoin lumineux correspondant
s'allume.
Choisissez le délai de départ différé (3H, 6H, 9H ou 12H) en
appuyant le nombre de fois nécessaire sur cette touche;
le témoin correspondant s'allume. L'appareil démarrera
une fois le délai écoulé.
Appuyez de manière répétée sur ce bouton pour
sélectionner la température de l'eau. Le témoin de
température correspondant s'allume.
Maintenez enfoncé ce bouton pendant 3 secondes ; un
signal sonore retentit et la fonction signal est désactivée.
Pour activer cette fonction, maintenez enfoncé ce bouton
de nouveau pendant 3 secondes.
Appuyez sur ce bouton pour lancer les programmes; le
témoin s'allume. Appuyez de nouveau pour mettre sur
pause; le témoin clignote.
Appuyez une fois sur ce bouton pour allumer l'appareil.
Appuyez de nouveau pour l'éteindre.
8
Page 8

FR
UTILISATION
Premier lavage
Avant de faire un premier lavage, faites d'abord tourner la
machine à vide pendant un cycle entier.
1.Appuyez sur .
2.Mettez un peu de lessive dans le compartiment II du tiroir
3.Ouvrez l'arrivée d'eau de l'appareil.
4.Appuyez sur .
Compartiment I : Produit pour le prélavage.
Compartiment I I: Produit pour le lavage principal.
Compartiment : Additifs (ex: adoucissants ).
Mettre du produit dans l'appareil
1.Sortez le tiroir.
2.Mettez de la lessive dans le compartiment II.
3.Mettez la quantité souhaitée d'adoucissant dans le compartiment .
4.Le cas échéant, mettez du produit de prélavage dans le compartiment I.
Remarque : Votre consommation de détergent dépendra du niveau de saleté du linge.
Pour un linge légèrement sale, ne faites pas de prélavage et mettez une petite quantité
de détergent dans le compartiment II du tiroir.
Pour savoir quelle quantité de détergent utiliser pour votre linge, référez-vous au mode
d'emploi figurant sur le paquet de détergent.
La quantité de détergent à utiliser dépendra également de la quantité de linge et de la
dureté de l'eau.
Attention : Les adoucissants et les additifs concentrés doivent être dilués avec un peu d'eau avant
d'être versés dans le compartiment, faute de quoi le siphon risque de se boucher et de bloquer le
passage de l'adoucissant.
9
Page 9
FR
Lavage
1.Ouvrez la porte et mettez le linge dans le tambour.
ÉVITEZ DE TROP REMPLIR L'APPAREIL: le linge ne serait pas lavé correctement.
Référez-vous au tableau ci-dessous pour connaître la capacité correspondant au type de tissu à laver.
Type de tissu
Coton
Synthétique
Laine
2.Fermez la porte.
3.Mettez la lessive et, le cas échéant, l'adoucissant et le produit de prélavage, dans les
compartiments correspondants.
4.Ouvrez l'arrivée d'eau et appuyez sur .
5.Choisissez le programme en tournant le bouton de sélection.
6.Sélectionnez la température souhaitée en appuyant sur le nombre de fois nécessaire.
Retardateur : Vous avez la possibilité de lancer le programme 3h, 6h, 9h ou 12h plus tard.
Sélectionnez un délai en appuyant sur le nombre de fois nécessaire. Le témoin lumineux
correspondant à la durée sélectionnée s'allume.
Capacité de charge
6 kg
3 kg
2 kg
7.Appuyez sur ;l'appareil démarre.
-Le témoin lumineux Départ/Pause s'allume.
-Appuyez de nouveau sur pour mettre sur pause; veuillez noter que cette manipulation est
impossible dans les 1-2 minutes précédant la fin du cycle de lavage.
8.Une fois le cycle terminé, le témoin Départ/Pause clignote et l'appareil émet un signal
sonore toutes les 30 secondes pendant 5 minutes.
9.Ouvrez la porte de l'appareil.
10.Sortez le linge.
10
Page 10
FR
Liste des programmes
Température
par défaut/
Température
maximale (°C)
60/90
40/60
40/40
40/90
N/A / 40
40/90
N/A
90 seulement
Durée de
fonctionnement par
défaut (min)
113
100
85
110
15
273
15
75
Vitesse de rotation
par défaut (t/m)
1000
700
500
1000
1000
1000
1000
500
Programme
Coton
Synthétique
Laine
Jeans
Rapide
Coton intensif
Essorage
Nettoyage
tambour
Charge
maximale (kg)
6
3
2
6
2
6
6
0
Compartiment
I II
- Optionnel - Oui - Non
REMARQUE : La durée du lavage dépend de la quantité de linge et de la température de l'eau.
Les programmes standard coton intensif à 60°C et à 40°C coton intensif sont les programmes
de lavage standard.
Programme de lavage
Coton
Synthétique
Laine
Jeans
Express
Coton intensif
Type de linge / Correspondance
Draps, housses de couette, taies d'oreiller,
robes, sous-vêtements etc.
Chemises, manteaux, rideaux, dentelles ou
autres mélanges.
Lainages lavables en machine seulement.
Jeans
Linge légèrement sale
Vêtements de bébé ou de personnes souffrant
d'allergies cutanées
11
Page 11

FR
Température
90°C
Type de linge
Linge très sale, pur coton blanc, lin (ex: nappes de tables basses,
nappes de cantines, serviettes, draps).
Linge moyennement sale, lin coloré, coton et synthétiques déteignant
60°C
légèrement (ex: chemises, pyjamas).
Linge légèrement sale, pur lin blanc (ex: sous-vêtements)
40°C, 20°C
Linge normalement sale (laine, synthétiques)
Eau froide
Changement de programme et de température en cours de route
1.Appuyez sur ; le témoin clignote.
Départ/Pause
2.Choisissez le nouveau programme en tournant le bouton.
3.Sélectionnez la température souhaitée en appuyant sur le nombre de fois nécessaire.
4.Appuyez sur pour lancer le lavage. Le témoin Départ/Pause arrête de clignoter.
Fonction d'élimination de bulles
Des bulles en excès se forment lorsqu'il y a trop de détergent, ce qui a une incidence sur les
performances de lavage et de rinçage. Avec cette fonction, l'appareil éliminera automatiquement
les bulles lorsqu'il détectera un excès de bulles, qui vous rappellera également d'utiliser moins de
détergent pour les cycles de lavage suivants.
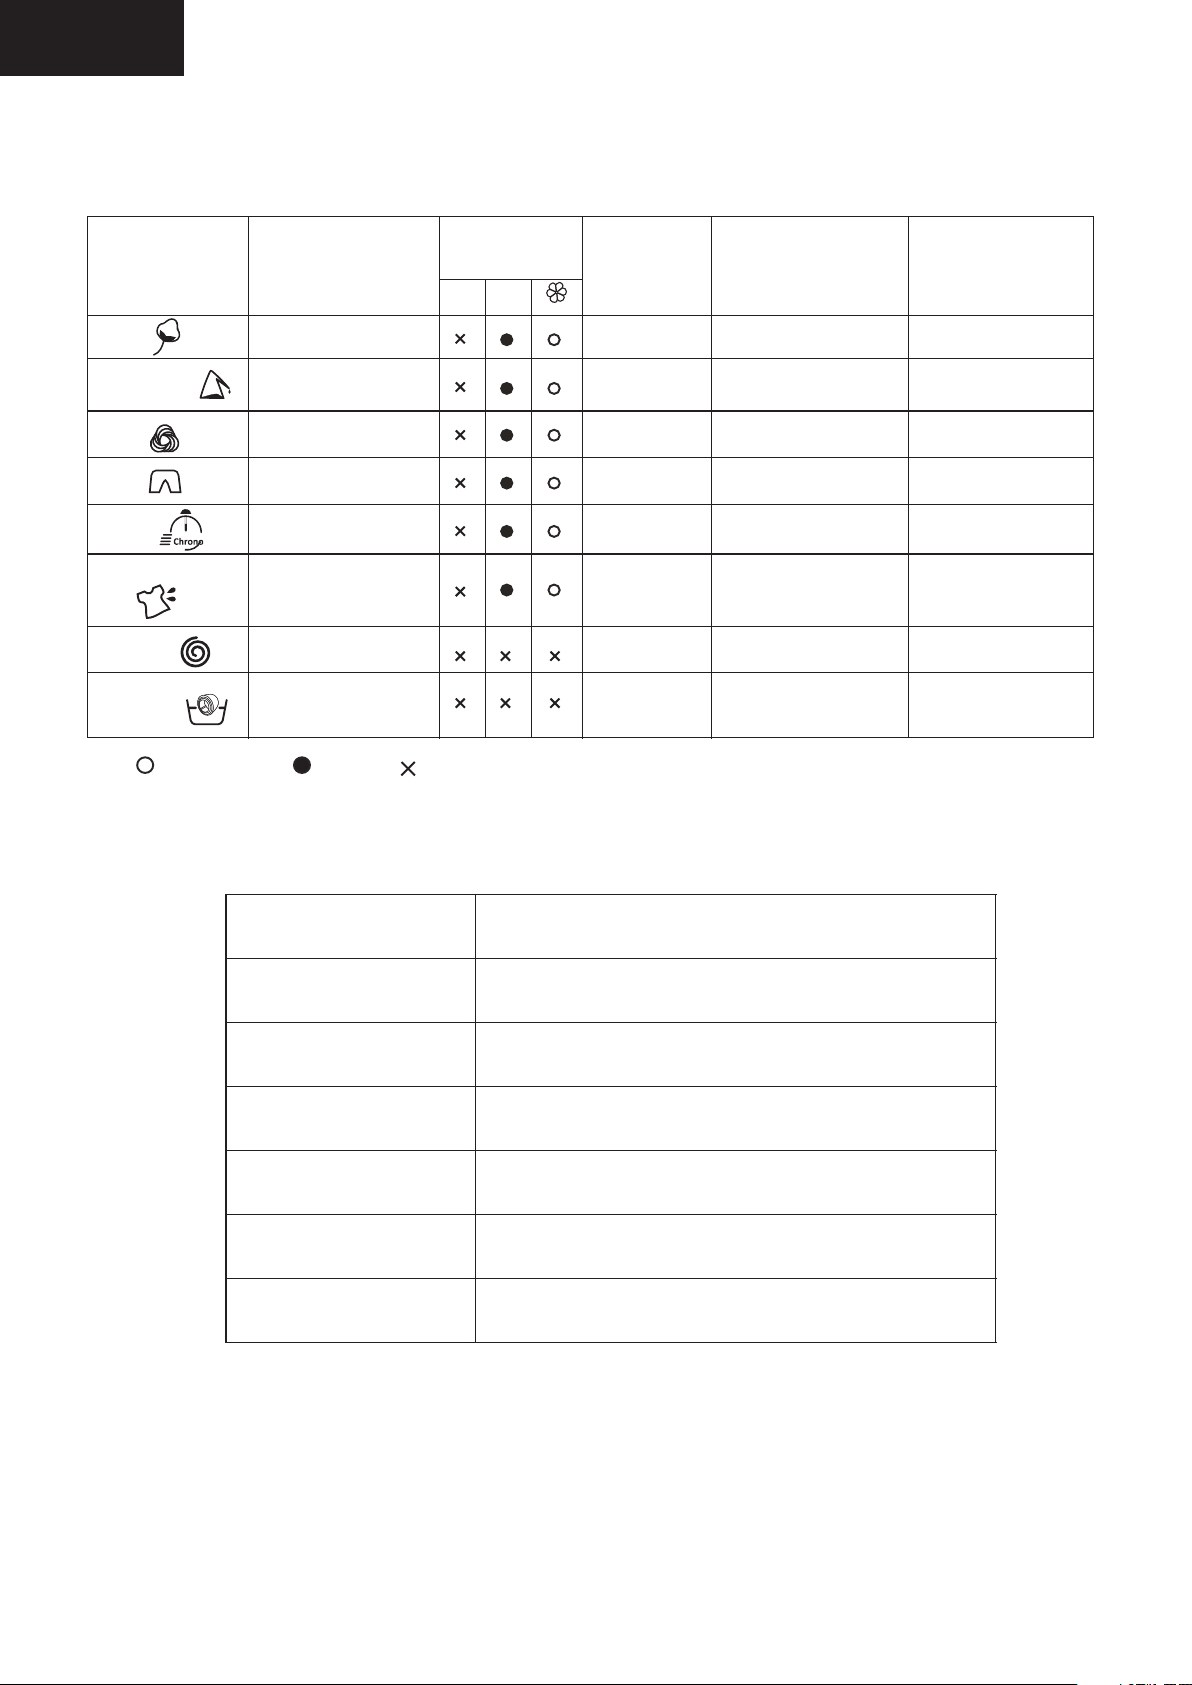
Conseils pour le lavage
Triez votre linge selon les critères suivants:
-Type de symbole sur l'étiquette: Séparez le coton, les fibres mélangées, les synthétiques, la soie,
les lainages et la soie artificielle.
-Couleur: Séparez les blancs des couleurs. Les vêtements de couleur neufs doivent être lavés
séparément.
-Taille: Le lavage sera plus efficace si les vêtements de différentes tailles sont mélangés.
-Sensibilité: Les articles fragiles doivent être lavés séparément. Référez-vous aux étiquettes
des vêtements respectifs ou reportez-vous au tableau ci-dessous.
Symbole gra phique
Laver à la main
Lavage (en ma chine ou à
la main)
Nettoyage à s ec
Nettoyage à s ec et à chaud
Eau de Javel
CI
Sèche-lin ge
Repassage
Repassage à l a vapeur
Moyenne tem pérature et
températu re maximale (150° C)
Sécher sur un f il
Illustrat ion
Symbole gra phique
CI
Illustrat ion
Ne pas laver à la m achine
Ne pas laver
Ne pas nettoy er à sec
Ne pas tordre
Ne pas utilis er d'eau de Javel
Ne pas sécher e n machine
Ne pas repass er
Repasser av ec un chiffon
Sécher aprè s lavage
Sécher à l'om bre sur un fil
12
Page 12
FR
-Videz les poches de leur contenu (clés, pièces etc.) et enlevez tous les objets durs décoratifs
(ex : broches).
-Fermetures
Refermez les fermetures éclairs, boutonnez les boutons et les crochets ; les ceintures et les rubans
doivent être attachés.
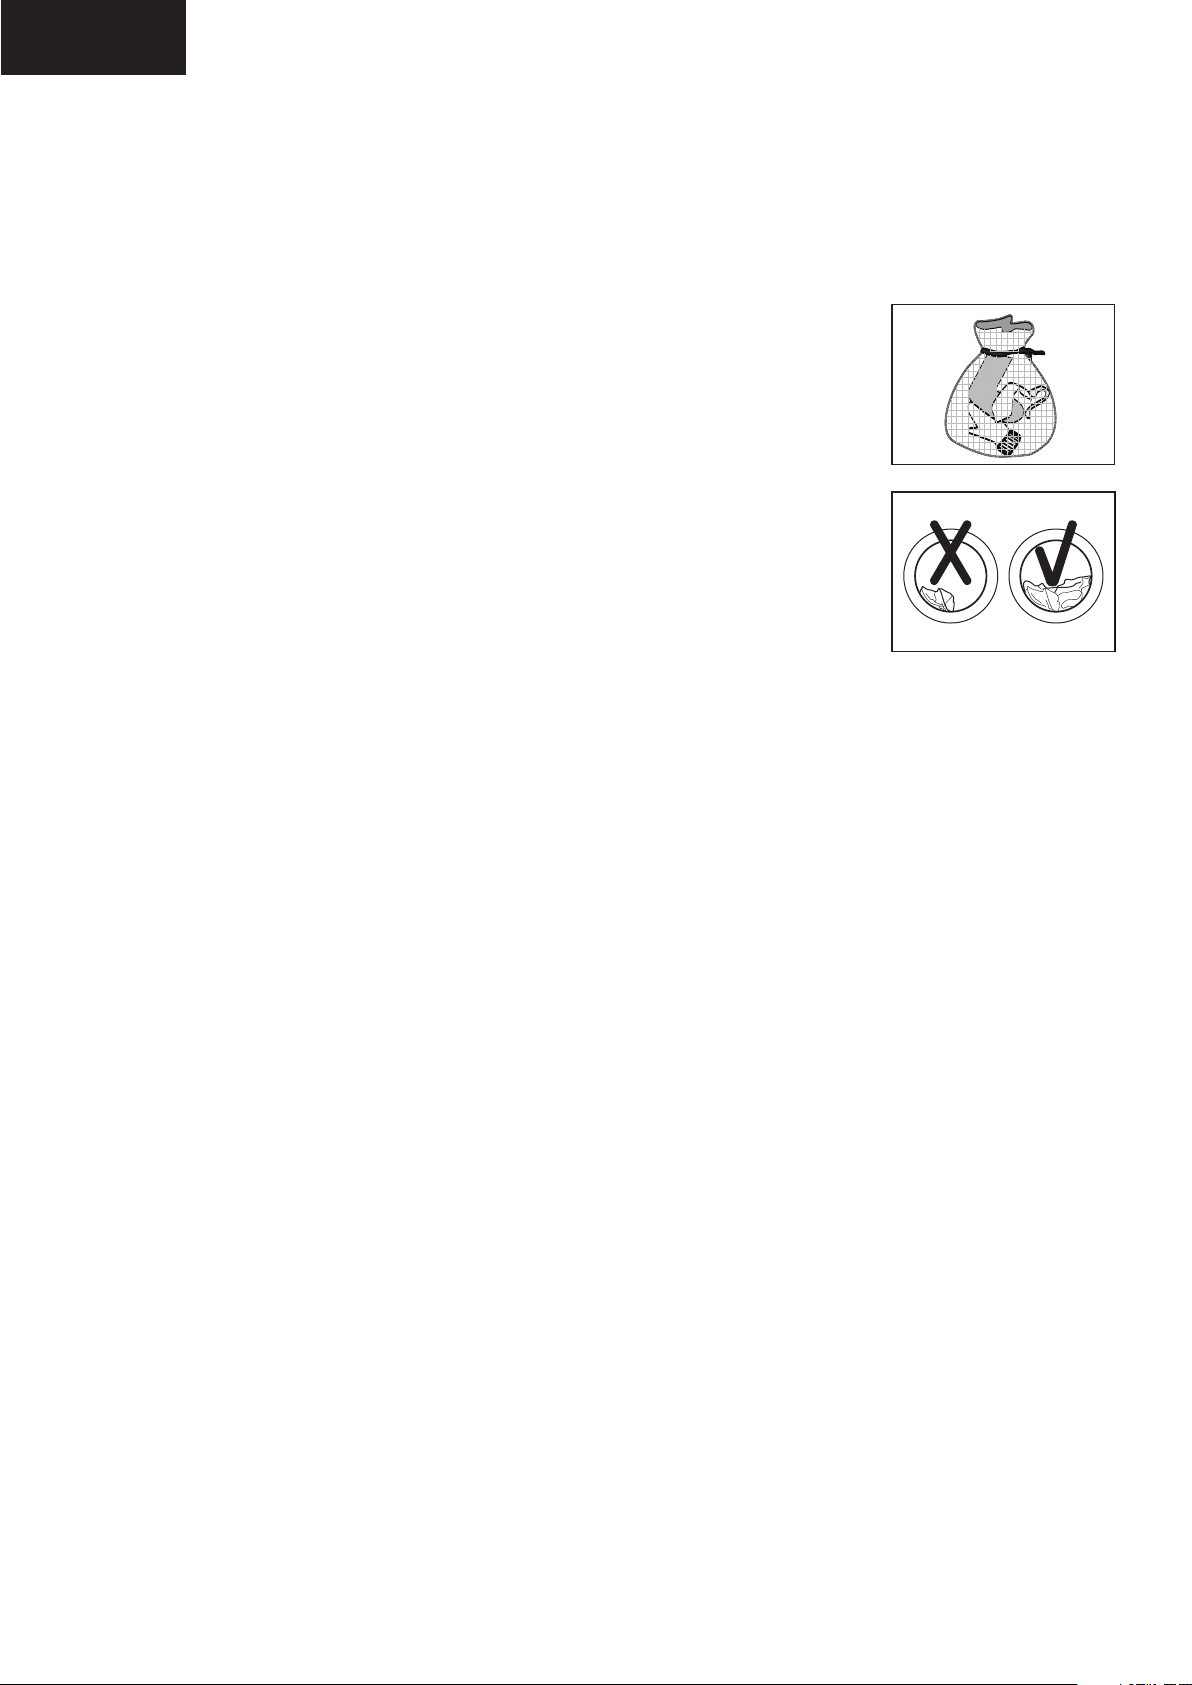
-Mettez les petits articles (chaussettes, ceintures etc.) dans un sac de lavage.
-Le fait de laver un seul gros vêtement lourd (ex: une serviette de
bain, un jean, une veste ouatée etc.) peut déséquilibrer le tambour.
Il est donc recommandé d'ajouter un ou deux articles
supplémentaires afin que l'évacuation de l'eau puisse se
faire normalement.
-Les articles pour bébé (vêtements, serviettes de bain ou de table)
doivent être lavés séparément.
S'ils sont lavés en même temps que les vêtements des adultes, ils risquent
d'être infectés. Rallongez le temps de rinçage afin d'assurer un rinçage
complet ne laissant aucune trace de détergent.
-Les articles très salissants (chaussettes blanches, cols de chemises, manches etc.) doivent de
préférence être lavés à la main avant d'être mis à la machine, pour un meilleur résultat final.
-Les vêtements très pelucheux doivent de préférence être lavés séparément.
Autrement, les autres articles risquent d'être recouverts de poussières, peluches etc.
Les vêtements noirs et blancs doivent également être de préférence lavés séparément.
Ne lavez pas des articles imperméables (combinaisons de ski, serviettes hygiéniques,
-
imperméables, parapluies, bâches, sacs de couchage, etc.).
Les tissus qui ne s'imprègnent pas facilement (ex : vêtements et coussins imperméables) ne
doivent de préférence pas être lavés en machine. Pendant le rinçage et l'évacuation, de fortes
vibrations et des projections d'eau pourraient se produire et les articles risqueraient d'être
endommagés.
-Conseils concernant les détergents
Le type de produit à utiliser est fonction du type de tissu (coton, synthétique, lainages, articles
délicats), de la couleur, de la température, du degré et du type de saleté. Utilisez de préférence
de la lessive à faible production de mousse.
REMARQUE : Évitez de mettre plus de produit que nécessaire. Veuillez suivre les instructions
figurant sur les paquets de détergents.
-Respectez les indications du fabricant du détergent concernant le poids du linge, le degré de saleté
et la dureté de l'eau dans votre région. Si vous ne connaissez pas le degré de dureté de votre eau,
demandez aux autorités compétentes.
REMARQUE : La lessive et les additifs doivent être gardés dans un endroit sec, sûr et hors de
portée des enfants.
13
Page 13

FR
NETTOYAGE ET ENTRETIEN
Assurez-vous que l'appareil est débranché.
Nettoyage de l'extérieur
Nettoyez l'appareil avec un chiffon mou imbibé de savon liquide.
N'utilisez pas de produits chimiques organiques ou de solvants corrosifs.
Nettoyage du tambour
Les traces de rouille laissées dans le tambour par les objets métalliques doivent être enlevées
immédiatement ; utilisez un détergent sans chlore pour cela.
N'utilisez en aucun cas de la paille de fer.
Réparation d'une machine à laver gelée
Si votre machine à laver est congelée en raison de températures négatives , par exemple si votre
appareil est situé dans une pièce ou la température est inférieure à 0°C :
1.Débranchez la machine.
2.Versez de l'eau chaude sur le robinet de manière à pouvoir démonter le tuyau.
3.Démontez le tuyau et laissez-le tremper dans l'eau chaude.
4.Versez de l'eau chaude dans le tambour et laissez agir pendant 10 minutes.
5.Reconnectez le tuyau d'arrivée d'eau au robinet et vérifiez si l'arrivée d'eau et l'évacuation
fonctionnent de nouveau normalement.
REMARQUE : Une fois le problème résolu, faites attention à toujours faire fonctionner la machine
dans une pièce dont la température ambiante est supérieure à 0°C.
14
Page 14
FR
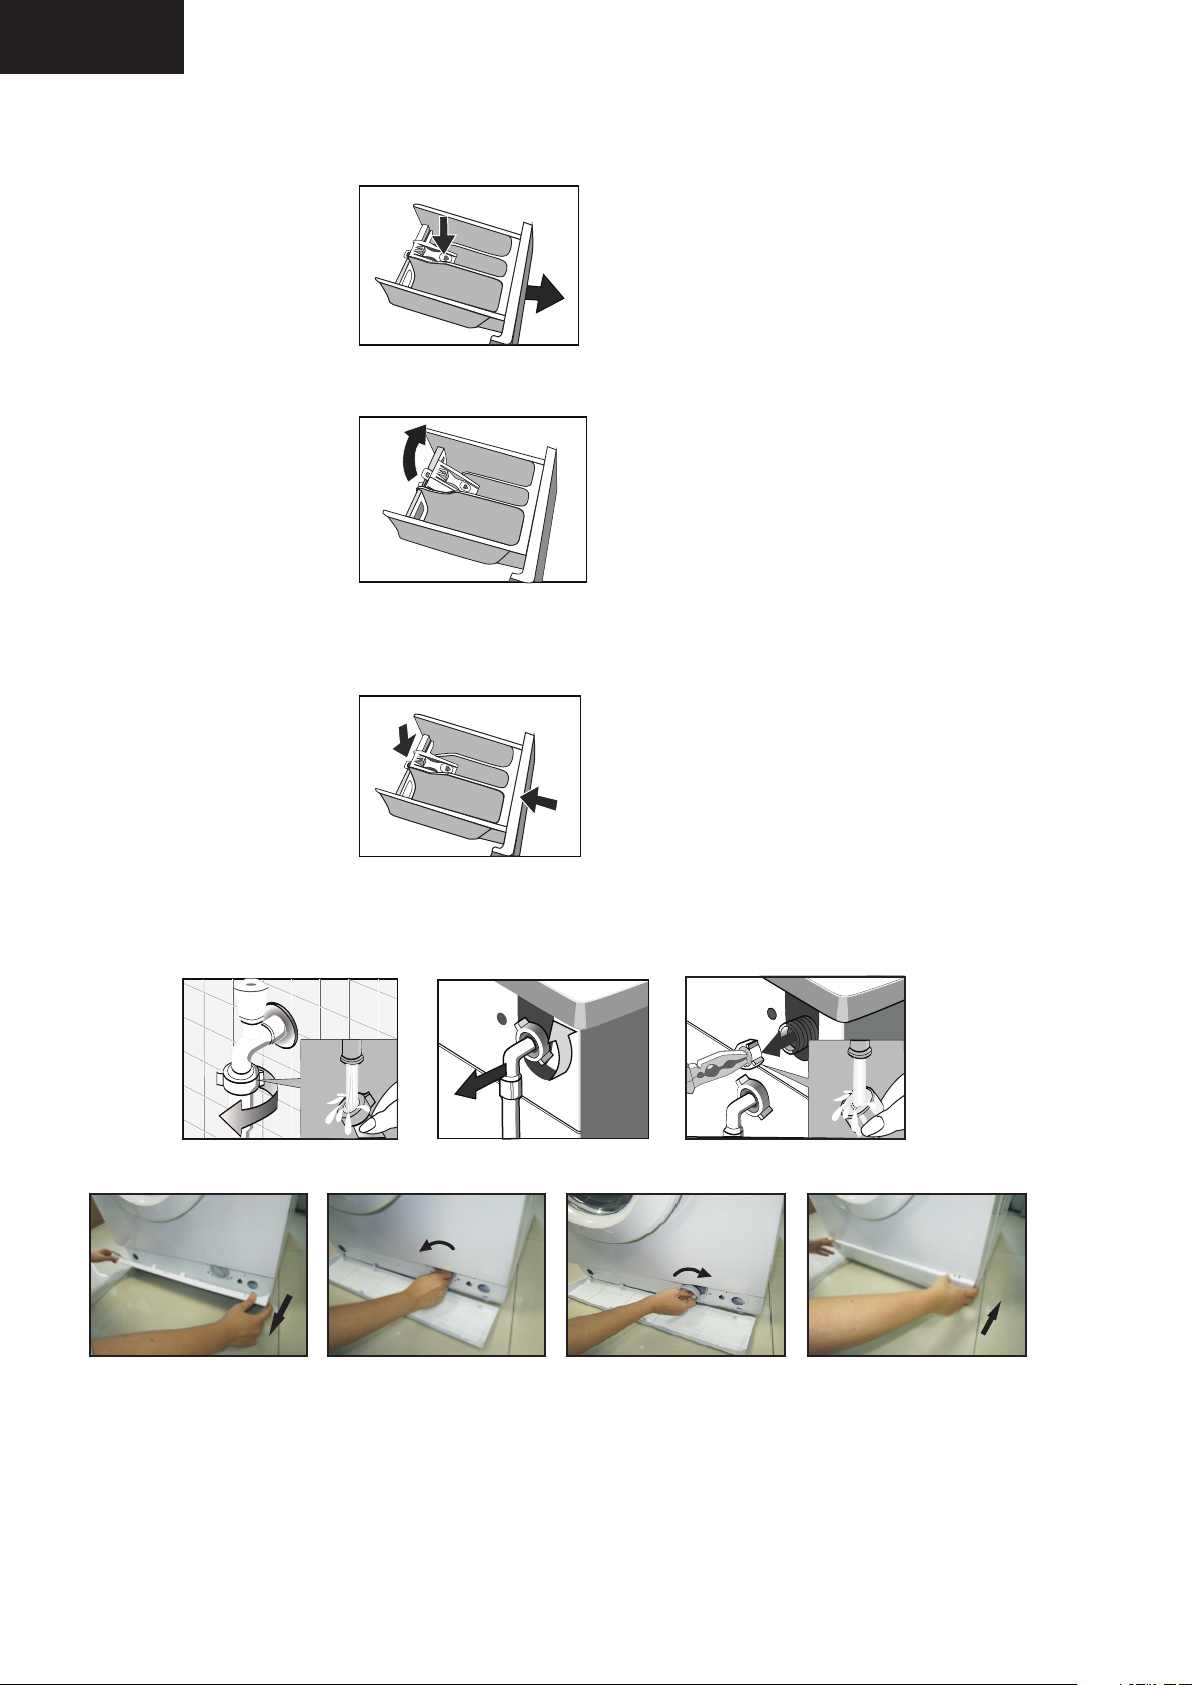
Nettoyage du tiroir et de son logement
1.Appuyez sur la manette de déverrouillage située dans le tiroir, puis sortez-le.
2.Ôtez le couvercle du compartiment.
3.Nettoyez
4.Refermez le couvercle en appuyant fort.
5.Remettez le tiroir en place.
Nettoyage du tuyau et du filtre d'arrivée d'eau
Le filtre d'arrivée d'eau doit être nettoyé régulièrement afin d'éviter que l'arrivée d'eau ne
soit obstruée par des saletés.
Nettoyage de la pompe d'évacuation
à l'eau les différentes pièces ainsi que le logement du tiroir.
Videz l'eau restant dans la machine, puis nettoyez la pompe d'évacuation.
La pompe d'évacuation doit faire l'objet d'un examen et d'un nettoyage régulier.
N'essayez en aucun cas d'ôter le couvercle de la pompe au cours d'un lavage. Après avoir
remis le couvercle en place, assurez-vous qu'il est bien étanche afin d'éviter tout risque
de fuite.
15
Page 15
FR
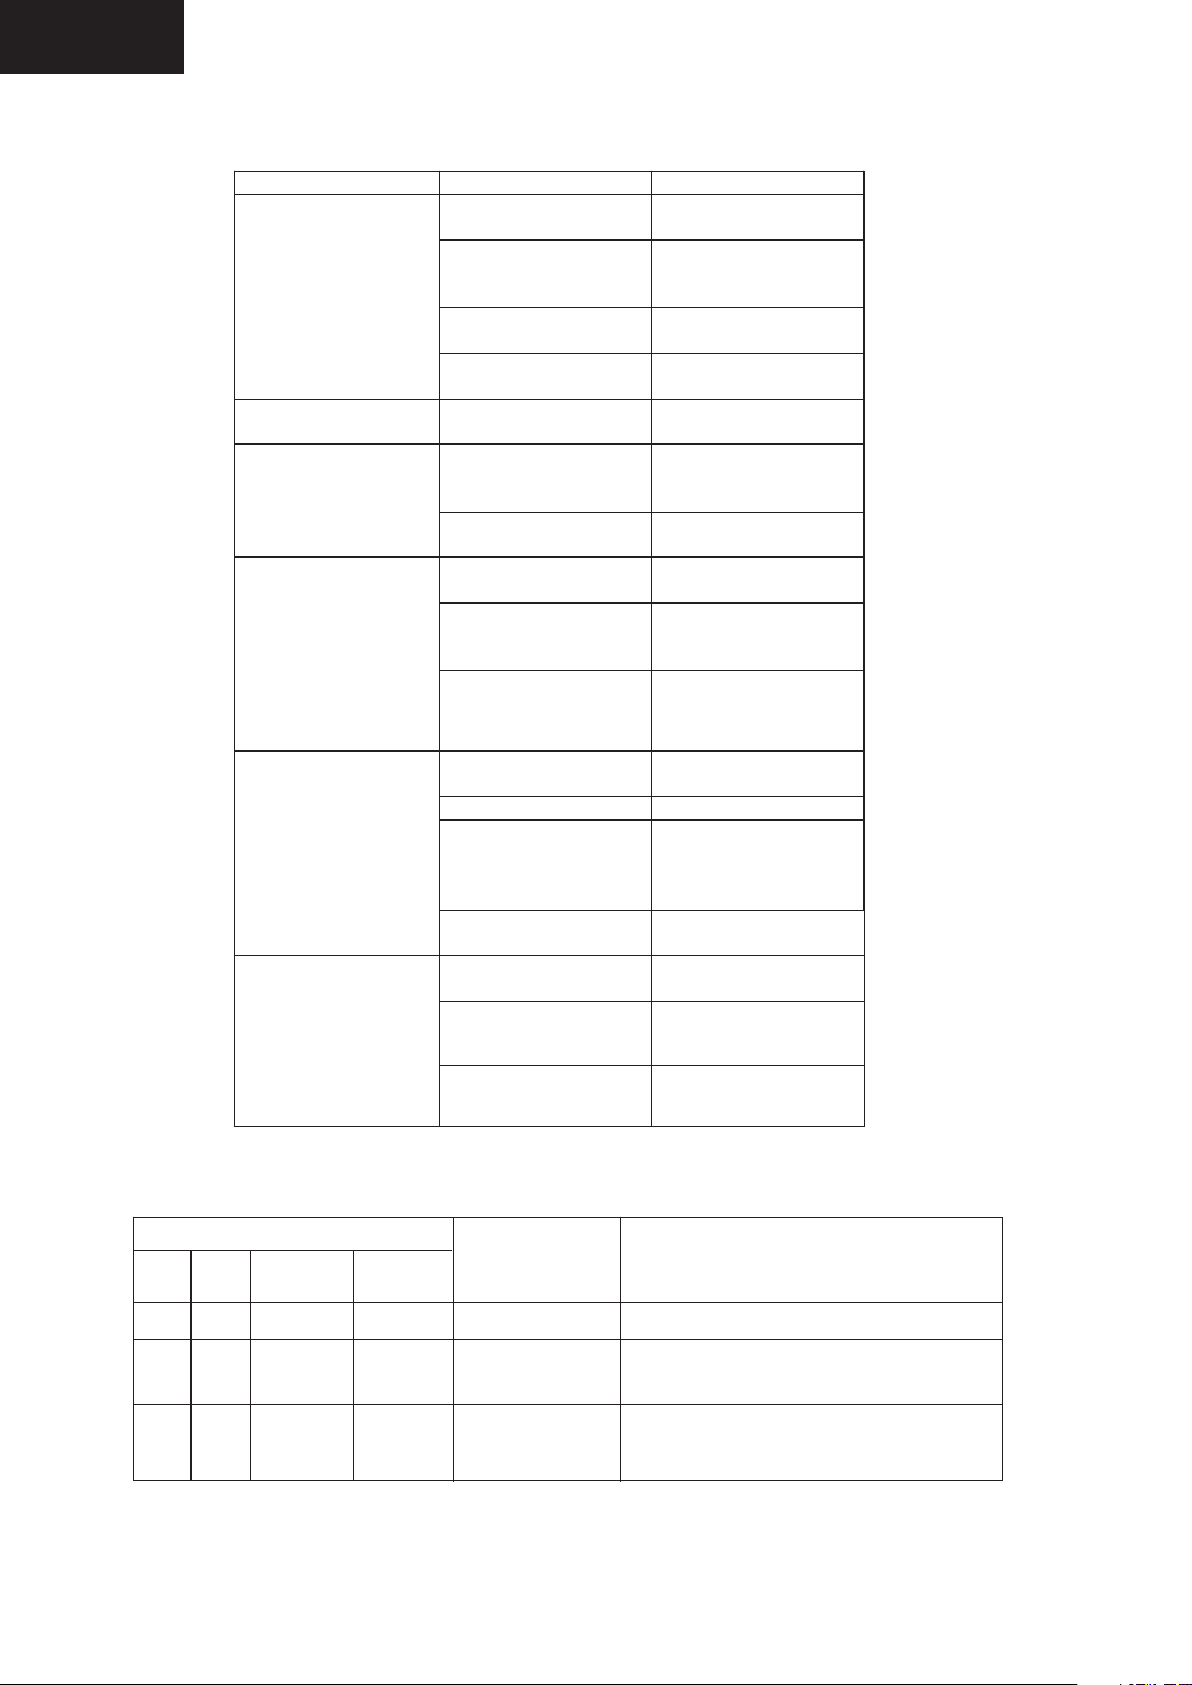
DÉPANNAGE
Problèmes
La machine à laver ne
démarre pas.
La porte ne s'ouvre pas. Le dispositif de sécurité est
Il reste du produit dans le
tiroir après la fin du
programme.
La machine vibre ou fait
trop de bruit.
La machine n’essore pas
et/ou l’évacuation ne
marche pas.
Le résultat du lavage
est insatisfaisant.
Cause possible
La porte est mal fermée. Fermez bien la porte.
L'appareil est mal branché.
Coupure de courant
L’appareil n’est pas allumé. Allumez l’appareil.
activé.
Le produit utilisé n’était
pas un produit à faible
production de mousse.
Vous avez utilisé trop de
produit.
Les boulons de transport
n’ont pas tous été enlevés.
La machine n’est pas
d’aplomb ou repose sur
une surface irrégulière.
La machine est remplie
au-delà de sa capacité
maximale.
Le tuyau d’évacuation est
bouché.
Le filtre est verrouillé.
L'extrémité du tuyau
d’évacuation est à située
plus d’1 m au-dessus du
sol.
Le linge est mal équilibré
dans la machine.
Le linge était trop sale pour
le programme choisi.
La quantité de détergent
utilisée ne convient pas.
La machine à laver était
remplie au-delà de sa
capacité.
Solutions possibles
Vérifiez le branchement
sur la prise.
Vérifiez l'alimentation.
Débranchez l'appareil.
Assurez-vous que le
produit utilisé est adéquat.
Réduisez la quantité de
produit dans le tiroir.
Enlevez tous les boulons
de transport.
La machine doit être
d’aplomb et reposer sur
une surface plane.
Mettez moins de linge
dans le tambour.
Débouchez le tuyau
d’évacuation.
Débloquez le filtre.
L'extrémité du tuyau doit
être située à moins d’1 m
au-dessus du sol.
Ajoutez du linge ou refaites
un autre essorage.
Choisissez un programme
approprié.
Utilisez une quantité de
détergent supérieure ou
inférieure, selon les
indications du fabricant.
Évitez de remplir la
machine au-delà de sa
capacité.
Messages d'erreur
État du témoin lumineux
Cause
90°C 60 °C 40°C
Éteint Éteint Éteint
Éteint Éteint Éteint
Éteint Éteint
Clignotant
Clignotant Clignotant
20°C
Clignotant
Porte mal fermée.
Dysfonctionnement
de l'arrivée d'eau
Dysfonctionnement
de l'évacuation
Si le problème persiste, faites appel à un réparateur professionnel.
Solution
Fermez bien la porte.
Assurez-vous que le robinet est ouvert.
Vérifiez la pression de l'eau.
Nettoyez le filtre d'arrivée d'eau.
Le tuyau d'évacuation est peut-être plié ou
bouché.
Vérifiez l'installation du tuyau d'évacuation.
Nettoyez la pompe d'évacuation.
16
Page 16
FR
DONNÉES TECHNIQUES
La fiche technique ci-dessous est celle d'une machine à laver domestique conforme à la
directive européenne 1015/2010.
Marque
Type/description
Capacité
Vitesse de rotation
Classe d'efficacité énergétique
Consommation
Consommation à l’arrêt
Consommation en mode veille
Consommation d’eau annuelle
Classe d’efficacité d’essorage
Cycle de lavage standard
Consommation d'électricité pour un cycle standard à 60° à charge pleine
Consommation d'électricité pour un cycle standard à 60° à charge partielle
Consommation d'électricité pour un cycle standard à 40° à charge partielle
Durée du programme standard à 60° à charge pleine
Durée du programme standard à 60° à charge partielle
Durée du programme standard à 40° à charge partielle
Consommation d'eau pour le programme coton standard à 60°C à pleine charge
Consommation d'eau pour le programme coton standard à 60°C à charge partielle
Consommation d'eau pour le programme coton standard à 40°C à charge partielle
Taux d'humidité résiduelle pour le programme coton standard à 60°C à pleine charge
Taux d'humidité résiduelle pour le programme coton standard à 60°C à charge
partielle
Taux d'humidité résiduelle pour le programme coton standard à 40°C à pleine charge
Niveau sonore pour un cycle de lavage standard à 60°C avec l'appareil
plein à charge pleine
Niveau sonore pour un cycle d'essorage standard à 60°C avec l'appareil
plein à charge pleine
Montage
Hauteur
Largeur
Profondeur
Consommation électrique
Tension/fréquence nominales
Pression d’eau
❶
d'énergie annuelle 173 kWh
❷
❸
❹
❺
Proline
PFL 106 F,
PFL 106 E
6 kg
1000 t/m
++
A
0,5 W
0,5 W
9240 L
C
Coton intensif
0,93 kWh
0,68 kWh
0,62 kWh
273 min
243 min
241 min
48 L
37 L
37 L
59%
63%
63%
58 dB
74 dB
Pose libre
850 mm
595 mm
470 mm
2100 W
220-240V~/50 Hz
0,05-1 MPa
17
Page 17

FR
EMARQUE :
PFL 106 F,PFL 106 E
+++
❶ A (efficacité maximale) à D (efficacité minimale)
❷Consommation d'énergie de kWh par an, sur la base de 220 cycles de lavage standard avec
un programme standard à 60°C et 40°C, à charge pleine ou partielle, et sur la base de la
consommation des modes à faible puissance. La consommation réelle d'énergie dépend
des conditions d'utilisation de l'appareil.
❸Consommation d'eau de 9240 L par an, sur la base de 220 cycles de lavage standard avec
un programme standard à 60°C et 40°C, à charge pleine ou partielle. La consommation d'eau
réelle dépend des conditions d'utilisation de l'appareil.
❹ Classe d'efficacité d'essorage C sur une échelle allant de G (moins efficace) à A (plus efficace)
❺Les programmes standard coton intensif à 60°C et à 40°C coton intensif sont les
programmes de lavage standard. Ces programmes conviennent pour le lavage de linge en
coton normalement sale ; ils ne sont cependant pas les programmes les plus efficaces, en
termes de consommation combinée d'eau et d'électricité, pour laver ce type de coton.
La température effective de l'eau peut être différente de celle indiquée pour le cycle en question.
Choisissez un type de détergent approprié aux différentes températures de lavage afin d'obtenir
les meilleures performances de lavage tout en minimisant les consommations d'eau et d'énergie.
173
En raison des mises au point et améliorations constamment apportées à nos produits, de petites
incohérences peuvent apparaître dans le mode d'emploi. Veuillez nous excuser pour la gêne
occasionnée.
18
Darty Plc © UK: EC1N 6TE 19 / 11/ 2014
Page 18

GB
CONTENTS
WARNINGS.........................................................................
IMPORTANT SAFETY INSTRUCTIONS.................................
DESCRIPTION OF THE APPLIANCE.....................................
INSTALLATION....................................................................
CONTROL PANEL................................................................
Signal function..................................................................
OPERATION........................................................................
Washing for the first time....................................................
Putting detergent in the appliance.......................................
Washing Clothes...............................................................
Programme chart...............................................................
Changing the programme and temperature during operation
........................................................................................
Washing Tips and Hints......................................................
CLEANING AND MAINTENANCE..........................................
Cleaning the exterior.........................................................
Cleaning the drum.............................................................
Repairing a frozen washing machine...................................
Cleaning the detergent drawer and recess...........................
Cleaning the inlet hose and the inlet filter.............................
Cleaning the drain pump.....................................................
TROUBLESHOOTING..........................................................
TECHNICAL DATA SHEET....................................................
20
22
22
23
24
24
25
25
25
26
27
28
28
30
30
30
30
31
31
31
32
33
Page 19

GB
WARNINGS
This appliance is intended for domestic
household use only and should not be
used for any other purpose or in any
other application, such as for
non-domestic use or in a commercial
environment.
This appliance can be used by children
aged from 8 years and above and persons
with reduced physical, sensory or mental
capabilities or lack of experience and
knowledge if they have been given
supervision or instruction concerning
use of the appliance in a safe way and
understand the hazards involved.
Children shall not play with the appliance.
Cleaning and user maintenance shall
not be made by children without
supervision.
If the supply cord is damaged, it must be
replaced by the manufacturer, its service
agent or similarly qualified persons in
order to avoid a hazard.
20
Page 20

GB
The new hose-sets supplied with the
appliance are to be used; old hose-sets
should not be reused.
For the details concerning the method of
cleaning, please see section “Cleaning
and maintenance” on pages 30&31.
CAUTION: Do not connect to the hot water
supply.
The openings must not be obstructed by a
carpet.
The water pressure must not be less than
0.05 MPa and not greater than 1 Mpa.
The maximum mass of dry clothes to be
used in the washing machine is 6kg.
21
Page 21

GB
IMPORTANT SAFETY INSTRUCTIONS
- Keep the packing materials of the appliance away from children to avoid hazards.
- Do not plug the appliance to the power supply with wet hands.
- Never touch the appliance with wet hands or feet.
- In the event of any failure, first unplug the appliance and close the water tap.
Do not attempt to repair by yourself. Please contact your authorised service agent.
- Do not exceed the maximum loading capacity.
- The glass door becomes very hot during the washing cycle. Keep children and pets
away from the appliance whilst it is in operation.
- Always unplug the appliance and turn off the water supply after use.
DESCRIPTION OF THE APPLIANCE
Detergent Drawer
Door
Control Panel
Drain Hose
Power Plug
Detergent Drawer
Accessories
Transport
hole plug
Water inlet pipe
22
Page 22

GB
INSTALLATION
Unpacking
All transit bolts at the rear of the appliance and packing must be
removed before using the appliance.
Keep all packaging away from children.
Keep all the transit bolts for re-use in case the appliance is to be
transported again.
Positioning
Install the appliance on a flat hard floor.
Make sure that there is sufficient space for air circulation around the appliance.
Do not install the appliance on the carpet floor.
Levelling
Level the appliance by raising or lowering the feet.
Loosen the lock nut using a spanner (not supplied) and turn the foot by
hand until it contacts the floor.
Hold the foot with one hand and fasten the nut against the cabinet
with a spanner.
Never put cartons, wooden blocks or similar materials under
the machine to balance the irregularities on the level of the
ground.
Accurate levelling prevents vibration, noise and displacement of the
appliance during operation.
Water inlet
Screw one end of the inlet hose on the back of the appliance.
The appliance must be connected to a cold water supply.
Connect the other end of the inlet hose to a tap with a 3/4” thread.
Electrical connection
Your washing machine works with 220‐240V and 50Hz.
Electrical connections must be carried out by a qualified technician in
compliance with the current safety regulations.
Your washing machine must be properly earthed. We will not be held
responsible for any damage that may occur as a result of usage without
correct earth connection.Do not use extension leads or multi‐sockets.
Water drainage
To plumb in the appliance, please use one of the following methods.
1.Push the hose firmly into a drainage standpipe.
OR
2. Connect the drain hose onto a sink outlet spigot securely.
Max .100c m
Min .60cm
Notes:
Make sure that the water discharge hose does not bend, buckle, is not crushed or extended.
The water drain hose should be mounted at a height of minimum 60 cm, maximum 100 cm from
the ground.
23
Page 23

GB
CONTROL PANEL
PFL 106 F
Cot on
Syn théti que
Lai ne
Jea ns
PFL 106 E
Rap ide
Cot on inte nsif
Ess orage
Aut o
net toyag e
Chrono
Dép art dif féré Temp. Dép art/P ause
12h
9h
6h
3h
90
60
40
20
Mar che/A rrêt
Programme knob
Delay button
Temperature button
Activation/ deactivation
of signal function
Start/Pause button
On/Off button
Turn the knob to select the desired programme.
There are 8 programmes available. After a programme is
selected, the corresponding light will illuminate.
Press the button repeatedly to select the delay time
(3H, 6H, 9H or 12H) and the corresponding indicator light
will illuminate. The appliance will start operation after
the set time.
Press the button repeatedly to select the water
temperature. The corresponding temperature indicator
light will illuminate.
Press and hold the button for 3 seconds, a beep will be
heard and then signal function will be disabled. To activate
this function, press and hold the button again for 3 seconds.
Press the button to start programmes and the indicator
light will illuminate. Press again to pause, the indicator
light will flash.
Press the button once to turn the appliance on. Press
again to turn the appliance off.
24
Page 24

GB
OPERATION
Washing for the first time
Before washing clothes for the first time, you must run
a complete cycle without clothes.
1.Press .
2.Pour a little detergent into compartment II in the
detergent drawer.
3.Turn on the water supply to the appliance.
4.Press .
Compartment I: Detergent for pre-wash.
Compartment II : Detergent for main wash.
Compartment : Additives, e.g. fabric softener.
Putting detergent in the appliance
1.Pull out the detergent drawer.
2.Add laundry detergent into compartment II.
3.Add softener into Compartment as desired.
4.Add pre-wash detergent into compartment I as desired.
Note:
Your detergent consumption will change according to the level of dirtiness of your clothes.
For slightly dirty clothes, do not pre-wash and put a small amount of detergent in the
compartment II of the detergent drawer.
To know what quantity of detergent you should use for your clothes, refer to the instructions
on the packing of the detergents.
The amount of detergent to be used will also depend on the quantity of laundry and on the
water hardness.
CAUTION: Concentrated softener or additive shall be diluted with a little water
before being poured into the compartment, otherwise it may obstruct
the siphon and prevent the flow of softener.
25
Page 25

GB
Washing Clothes
1.Open the door to load the articles into the drum.
DO NOT OVERLOAD the appliance or your laundry may not wash properly.
Please refer to the chart below to determine the load capacity for the type of
laundry you are washing.
Fabric Type
Cotton
Synthetic
Wool
2.Close the door.
3.Put the detergent and, if required, softener or pre-wash detergent, in the
appropriate compartments.
4.Turn the water supply on and press .
5.Turn the programme knob to select the desired programme.
6.Press repeatedly to select the desired temperature.
Delay timer: You can start the programme 3 hours, 6 hours, 9 hours or 12 hours later.
Repeatedly press to set a delay timer. The selected delay hours indicator light will illuminate.
Load Capacity
6kg
3kg
2kg
7.Press and the appliance will begin the cycle.
-The start/pause indicator light will illuminate.
-To pause, press again but at the last 1 to 2 minutes before the end of a
washing cycle, the pause function does not work.
8.When the cycle is finished, the start/pause indicator light will flash and the
appliance will beep for a few seconds.
9.Open the door.
10.Remove the laundry.
26
Page 26

GB
Programme chart
Default
Temperature
/ Maximum
temperature
(°C)
60/90
40/60
40/40
40/90
N/A / 40
40/90
N/A
90 only
Default Running
Time (Min)
113
100
85
110
15
273
15
75
Default Spin Speed
(rpm)
1000
700
500
1000
1000
1000
1000
500
Programme
Cotton
Synthetic
Wool
Jeans
Quick
Cotton Intensive
Spin
Drum Clean
Max Load
(Kg)
6
3
2
6
2
6
6
0
Detergent
Compartment
I II
- Optional - Yes - No
NOTE:
The running time will vary depending on the water temperature and the load.
The standard 60°C cotton intensive programme and the standard 40°C cotton intensive programme
are the standard washing programmes.
Washing Programme
Cotton
Synthetic
Wool
Jeans
Quick
Cotton Intensive
Type of Laundry
Bed sheets, quilt covers, pillowcases, gowns,
underwear, etc.
Shirts, coats, curtains, laced textiles or similar
other blends.
Only machine washable woollens.
Jeans
Lightly soiled clothes
Clothes for babies or people who have skin
allergies
27
Page 27

GB
Temperature
90°C
Type of Laundry
Heavily soiled articles, pure white cotton or flax, e.g. coffee table
cloths, canteen table cloths, towels, bed sheets.
Moderately soiled articles, colourful flax, cotton and synthetic
60°C
articles with certain decolourising degree, e.g. shirts, pyjamas.
Slightly soiled items, pure white flax, e.g. underwear
40°C, 20°C
Normally soiled articles, including synthetic and wool
Cold water
Changing the programme and temperature during operation
1.Press and the start/pause indicator light will flash.
2.Turn the programme knob to select a new programme.
3.Press repeatedly to select the desired temperature.
4.Press to start washing. The start/pause indicator light will stop flashing.
Bubble removal function
Excessive bubbles will form when there is too much detergent, which will affect wash and
rinse performance. With this function, the machine will automatically remove bubbles when
excessive bubbles are checked, which will also remind you of using less detergent during next
washing cycles.
Washing Tips and Hints
Sort your laundry according to the following characteristics:
-Type of fabric care label symbol: Sort laundry into cottons, mixed fibres, synthetics, silks,
wools and rayon.
-Colour: Divide whites and colours. Wash new, coloured items separately.
-Size: Placing articles of different sizes in the same load will improve the washing
performance.
-Sensitivity: Wash delicate items separately. Check the labels on the items you are washing or
refer to the fabric care chart below.
Graphic Symbol
CI
Illustration
Hand Wash
Washing (including Machine
Wash and Hand Wash)
Dry Clean
Warmly Dry Clean
Bleach
Tumble dry
Iron
Steam Iron
Medium Temperature and
Max. Temperature 150 C
Line Dry
Graphic Symbol
CI
Illustration
No Machine Wash
Do not Wash
No Dry Clean
No Wring
No Bleach
Do not Tumble Dry
Do not Iron
Iron with Cloth
Dry after Wash
Line Dry in Shade
28
Page 28

GB
-Empty pockets (key, coins, etc) and remove the harder decorative objects (e.g. brooches).
-Securing fasteners
Close zippers and fasten buttons or hooks; loose belts or ribbons should be tied together.
-Place small items such as socks, belts, etc. in a washing bag.
-Washing a single big and heavy item such as bath towel, jeans,
wadded jacket etc. may unbalance the laundry in the drum.
Therefore it is suggested to add one or two more clothes to be
washed together so that draining can be done smoothly.
-Baby articles (baby clothes, towels and napkins) shall be washed
separately.
If they are washed together with the adults' clothes, they may be infected.
Rinsing times shall be increased to ensure the thorough rinsing and
cleaning with no detergent residues left.
-It is suggested that the items that are easily stained such as white socks, collars and sleeves etc.
shall be hand washed before being put into washing machine to achieve more ideal washing effects.
- The clothes which easily get fuzzed shall be washed separately; otherwise the other articles
can be stained with dust and lint particles, etc. Preferably, black clothes and cotton clothes
shall be washed separately.
-Do not wash materials (ski suits, outside napkin pads, raincoats, umbrella,
car covers, sleeping sacks,bags, etc).
It is better not to wash fabrics that cannot get soaked easily (such as waterproof cushions and
clothes) in the washing machine. Otherwise there will be water bursting out or abnormal
vibration to cause danger during rinsing and draining so that the clothes may be damaged.
-Detergent tips
The type of detergent you should use is based on the type of fabric (cotton, synthetic, delicate
items, wool), colour, washing temperature, degree and type of soiling. Please use “low suds”
laundry detergent.
NOTE: Do not add more detergent than needed. Please follow the usage recommendation on
the detergent package.
waterproof
Follow the detergent manufacturer's recommendations based upon the weight of the laundry,
the degree of soiling, and the hardness of the water in your area. If you do not know how hard your
water is, ask your water authority.
NOTE: Keep detergents and additives in a safe, dry place out of the reach of children.
29
Page 29

GB
CLEANING AND MAINTENANCE
Make sure that the appliance is unplugged from the mains socket.
Cleaning the exterior
Clean the appliance surface with a soft cloth dampened with soap liquid.
Do not use organic chemicals or corrosive solvents.
Cleaning the drum
The rusts left inside the drum by the metal articles shall be removed immediately with
chlorine-free detergents.
Never use steel wool.
Repairing a frozen washing machine
If the temperature drops below freezing and your washing machine is frozen:
1.Unplug the washing machine.
2.Pour warm water on the tap to loosen the water supply hose.
3.Remove the inlet hose and soak it in warm water.
4.Pour warm water into the drum and wait for 10 minutes.
5.Reconnect the inlet hose to the tap and check if the water supply and drain operations are normal.
NOTE: When the appliance is operated after repair, please make sure that the ambient temperature
is above 0°C.
30
Page 30

GB
Cleaning the detergent drawer and recess
1.Press the release lever inside of the detergent drawer and pull it out.
2.Remove the cap from compartment.
3.Clean all parts and drawer recess under running water.
4.Reinsert the cap by pushing it firmly into place.
5.Push the drawer back into place.
Cleaning the inlet hose and the inlet filter
To prevent blockage to the water supply by ingress of foreign substances, clean the water
inlet valve filter regularly.
Cleaning the drain pump
Drain the water out of the machine and then clean the drain pump.
Please inspect and clean the drain pump regularly.
Never remove the pump cover during a wash cycle. When replacing the pump cover, ensure it
is securely tightened so as to stop leaks.
31
Page 31

GB
TROUBLESHOOTING
Problems
The washing machine
will not start.
The door does not open. Machine safety protection
Detergent remains in the
detergent drawer after
the programme is
complete.
Washing machine
vibrates or is too noisy.
The washing machine
does not drain and/or
spin.
The washing result is
not good.
Possible Cause
The door is not properly
closed.
Poor connection to the
power supply.
Power failure
Machine has not been
switched on.
is working.
The detergent is not a low
suds type.
Excessive use of detergent Reduce amount of
Not all transit bolts have
been removed.
Washing machine is
located on an uneven
surface or is not level.
Machine load is over the
maximum capacity.
Drain hose is blocked.
The filter is blocked.
Drain hose end is higher
than 100 cm above the
floor.
Unbalance of the laundry Add clothes or run a
Your laundry was too dirty f
or the programme you
selected.
The amount of detergent
used is not appropriate.
Clothes exceeding the
maximum capacity have
been filled in your machine.
Possible Solutions
Close the door properly.
Check connection to the
power supply.
Check the power supply.
Switch the machine on.
Unplug the machine from
the mains socket.
Check if the detergent is
appropriate.
detergent in the detergent
drawer.
Remove all transit bolts.
Make sure the washing
machine is set on an even
surface and levelled.
Reduce amount of laundry
in the drum.
Unblock the drain hose.
Unblock the filter.
Make sure the drain hose
end is lower than 100 cm
above the floor.
spinning programme again.
Select a suitable programme.
Use more or less detergent
following the manufacturer's
instructions.
Do not exceed the maximum
capacity of your machine.
Error messages
Status of indicator light
90°C 60 °C 40°C
Off
Off Off
Off Off
Off Off
Flash
Flash Flash
20°C
Flash
Off
Cause
Door is not properly
closed.
Water inlet error
Drainage error
Solution
Close the door properly.
Make sure the tap is turned on.
Check the water pressure.
Clean the water inlet filter.
Make sure the drain hose is not twisted or
blocked.
Make sure the drain hose is installed correctly.
Clean the drain pump.
If error still exists, please contact the maintenance personnel.
32
Page 32

GB
TECHNICAL DATA SHEET
Below is the sheet of household washing machine according to EU Directive 1015/2010.
Brand
Type/Description
Capacity
Spin Speed
Energy efficiency class ❶
Annual energy consumption ❷
Power consumption of off-mode
Power consumption of left-on mode
Annual water consumption ❸
Spin-drying efficiency class
Standard washing cycle ❺
Energy consumption of the standard 60° at full load
Energy consumption of the standard 60°at partial load
Energy consumption of the standard 40°at partial load
Programme duration of standard 60°at full load
Programme duration of standard 60°at partial load
Programme duration of standard 40°at partial load
Water consumption of the Standard cotton 60°C at
full load
Water consumption of the Standard cotton 60°C at
partial load
Water consumption of the Standard cotton 40°C at
partial load
Remaining moisture content of the Standard cotton 60°C
at full load
Remaining moisture content of the Standard cotton 60°C
at partial load
Remaining moisture content of the Standard cotton 40°C
at partial load
Noise level of washing
Noise level of spinning
Mounting
Height
Width
Depth
Power consumption
Rate voltage/frequency
Water pressure
❹
Proline
PFL 106 F,
PFL 106 E
6 kg
1000 rpm
A
173 kWh
0.5 W
0.5 W
9240 L
C
Cotton intensive
0.93 kwh
0.68 kwh
0.62 kwh
273 min
243 min
241 min
48 L
37 L
37 L
59%
63%
63%
58 dB
74 dB
Free standing
850 mm
595 mm
470 mm
2100 W
220-240V~/50 Hz
0.05-1 MPa
++
33
Page 33

GB
NOTE:
PFL 106 F,PFL 106 E
+++
❶ A (highest efficiency) to D (lowest efficiency)
❷Energy consumption kWh per year, based on 220 standard washing cycles for standard
programme at 60°C and 40°C at full and partial load, and the consumption of the low-power
modes. Actual energy consumption will depend on how the appliance is used.
❸Water consumption 9240 litres per year based on 220 standard washing cycles for standard
programme at 60°C and 40°C at full and partial load. Actual water
consumption will depend on how the appliance is used.
❹Spin-drying efficiency class C on a scale from G (least efficient) to A (most efficient)
❺The standard 60°C cotton intensive programme and the standard 40°C cotton intensive
programme are the standard washing programmes. These programmes are suitable to clean
normally soiled cotton laundry and that they are the most efficient programmes in terms of
combined energy and water consumptions for washing that type of cotton laundry. The actual
water temperature may differ from the declared cycle temperature.
Please choose the suitable type of detergent for the various washing temperatures to get the
best washing performance with less water and energy consumption.
173
We apologise for any inconvenience caused by minor inconsistencies in these instructions,
which may occur as a result of product improvement and development.
34
Darty Plc © UK: EC1N 6TE 19 / 11 / 2014
Page 34

NL
INHOUDSOPGAVE
WAARSCHUWINGEN.................................................
BELANGRIJKE VEILIGHEIDSVOORZORGEN..............
BESCHRIJVING VAN HET APPARAAT.........................
INSTALLATIE.............................................................
BEDIENINGSPANEEL................................................
Signaalfunctie.........................................................
BEDIENING...............................................................
De eerste wasbeurt..................................................
Detergent in het apparaat doen.................................
Kleren wassen.........................................................
Tabel van de programma's........................................
Een ander programma en temperatuur kiezen tijdens
de werking...............................................................
Tips voor het wassen................................................
REINIGEN EN ONDERHOUD......................................
De behuizing reinigen..............................................
De trommel reinigen..................................................
Een bevroren wasmachine repareren.........................
De wasmiddellade en -uitsparing reinigen..................
De toevoerslang en -filter reinigen.............................
De afvoerpomp reinigen...........................................
PROBLEMEN OPLOSSEN..........................................
TECHNISCHE FICHE.................................................
36
38
38
39
40
40
41
41
41
42
43
44
44
46
46
46
46
47
47
47
48
49
Page 35

NL
WAARSCHUWINGEN
Dit apparaat is uitsluitend bedoeld
voor huishoudelijk gebruik en mag niet
worden gebruikt voor enig ander doel of
in andere toepassingen, zoals voor
niet-huishoudelijk gebruik of in een
commerciële omgeving.
Dit apparaat mag worden gebruikt door
kinderen vanaf 8 jaar oud en personen
met beperkte fysische, visuele of
mentale mogelijkheden, of die een
gebrek aan ervaring en kennis hebben
indien ze gepaste instructies hebben
gekregen zodat ze het apparaat op een
veilige manier kunnen gebruiken en op
de hoogte zijn van de gevaren die het
gebruik van het apparaat met zich
meebrengen. Laat kinderen niet met
het apparaat spelen. Laat kinderen het
apparaat niet zonder toezicht
schoonmaken en onderhouden.
Een beschadigd netsnoer mag uitsluitend
worden vervangen door de fabrikant, zijn
dealer of personen met vergelijkbare
kwalificaties om gevaar te voorkomen.
36
Page 36

NL
Gebruik het nieuwe slang-assemblage
dat met het apparaat wordt meegeleverd,
hergebruik geen oude slang-assemblages.
Voor details over de reinigingsmethode,
zie de rubriek "Reiniging en onderhoud”
op pagina 46 & 47.
OPGELET: niet op de warmwaterleiding
aansluiten.
Een tapijt mag de openingen niet
blokkeren.
De waterdruk mag niet meer zijn dan
0.05MPa en niet hoger dan 1 MPa.
Het maximum gewicht aan droge kleding
dat in de wasmachine mag worden
geplaatst is 6 kg .
37
Page 37

NL
BELANGRIJKE VEILIGHEIDSVOORZORGEN
- Houd het verpakkingsmateriaal van het apparaat uit de buurt van kinderen om
gevaarlijke situaties te voorkomen.
- Stop de stekker van het apparaat niet in een stopcontact wanneer u natte handen heeft.
- Raak dit apparaat nooit met natte handen of voeten aan.
- In het geval van een defect haalt u eerst de stekker van het apparaat uit het
stopcontact en sluit u de watertoevoer af. Probeer dit apparaat niet zelf te repareren,
doch neem contact op met een erkend reparateur.
- Overschrijd het maximale laadvermogen niet.
- De glazen deur wordt tijdens het wassen zeer heet. Houd kinderen en huisdieren uit
de buurt van het apparaat terwijl het in werking is.
- Haal na elk gebruik de stekker van het apparaat uit het stopcontact en draai de
waterkraan dicht.
BESCHRIJVING VAN HET APPARAAT
Wasmiddellade
Deur
Bedieningspaneel
Afvoerslang
Netsnoer
Accessoires
Doppen voor
transportgaten
Wasmiddellade
Watertoevoerslang
38
Page 38

NL
INSTALLATIE
Uitpakken
Alle transportbouten op de achterzijde van het apparaat en de
verpakking moeten worden verwijderd voordat het apparaat in
gebruik wordt genomen.
Houd alle verpakkingsmateriaal uit de buurt van kinderen.
Bewaar de transportbouten voor hergebruik in geval het apparaat
opnieuw moet worden vervoerd.
Plaatsing
Installeer het apparaat op een vlakke, harde ondergrond.
Zorg voor voldoende ruimte rondom het apparaat voor luchtcirculatie.
Installeer het apparaat niet op vloerkleed.
Waterpas zetten
Zet het apparaat waterpas door de voeten te verhogen of verlagen.
Draai de borgmoer los met behulp van een moersleutel
(niet meegeleverd) en draai de voet met de hand totdat deze de
vloer raakt.
Houd de voet met een hand vast en draai de moer tot tegen de behuizing
met behulp van een moersleutel.
Plaats nooit karton, houten blokken of gelijkaardige materialen onder
de machine om onregelmatigheden van de vloer te balanceren.
Het nauwkeurig waterpas zetten voorkomt trillingen, lawaai en
verplaatsing van dit apparaat tijdens de werking.
Watertoevoer
Schroef het ene uiteinde van de toevoerslang op de achterzijde van het
apparaat.
Het apparaat moet op de koudwaterleiding worden aangesloten.
Sluit het andere uiteinde van de toevoerslang aan op een kraan
met 3/4” schroefdraad.
Elektrische aansluiting
Uw wasmachine werkt op 220-240V en 50Hz.
Elektrische aansluitingen moeten uitgevoerd worden door een
gekwalificeerde technieker en overeenkomstig de huidige veiligheidsregels.
Uw wasmachine moet correct geaard zijn.We zijn niet verantwoordelijk
voor enige schade die kan optreden ten gevolge van een gebruik zonder
de correcte aarding.
Gebruik geen verlengsnoeren of multi-stopcontacten.
Waterafvoer
Gebruik één van de volgende methoden om het apparaat op de
waterafvoer aan te sluiten.
1.Duw de slang stevig in een afvoerstandpijp.
OF
2.Sluit de afvoerslang aan op de afvoersifon van een spoelbak.
Opmerkingen:
De afvoerslang mag niet gebogen of kromgetrokken zijn noch platgedrukt of verlengd worden.
De waterafvoerslang moet op een hoogte van ten minste 60 cm en maximaal 100 cm vanaf de grond
worden gemonteerd.
39
Min . 60 cm
Max . 100 cm
Page 39

NL
BEDIENINGSPANEEL
PFL 106 F
Cot on
Syn théti que
Lai ne
Jea ns
PFL 106 E
Rap ide
Cot on inte nsif
Ess orage
Aut o
net toyag e
Chrono
Dép art dif féré Temp. Dép art/P ause
12h
9h
6h
3h
90
60
40
20
Mar che/A rrêt
Programmaknop Draai deze knop om het gewenste programma te selecteren.
U heeft de keuze uit 8 verschillendeprogramma’s. Het overeenkomstige lampje
Uitsteltoets
Temperatuurknop
Activering/deactivering
van signaalfunctie
Start/pauzeknop
gaat brandennadat een programma is geselecteerd.
Druk herhaaldelijk op deze toets om een uitsteltijd (3u, 6u, 9u of 12u) te selecteren.
Het overeenkomstige lampje gaat branden en het apparaat start pas op na de
ingestelde tijd.
Druk herhaaldelijk op deze toets om de watertemperatuur te selecteren.
Het indicatorlampje van de gekozen temperatuur gaat branden.
Houd de knop 3 seconden lang ingedrukt. U hoort een pieptoon, waarna de
signaalfunctie uitschakelt. Houd de knop opnieuw 3 seconden lang ingedrukt
om deze functie te activeren.
Druk op deze toets om een programma op te starten. Het overeenkomstige
gaat branden.indicatorlampje Druk nogmaals om de werking tijdelijk te onderbreken,
Aan/uitknop
het indicatorlampje knippert dan.
Druk eenmaal op deze knop om het apparaat in te schakelen.
Druk nogmaals om het apparaat uit te schakelen.
40
Page 40

NL
BEDIENING
De eerste wasbeurt
Voordat u de eerste keer kledingstukken gaat wassen,
moet u een volledige cyclus draaien zonder kleren.
1.Druk op .
2.Giet een weinig wasmiddel in de wasmiddellade.
3.Draai de watertoevoerkraan van het apparaat open.
4.Druk op .
Vak I : wasmiddel voor voorwas.
Vak I I: wasmiddel voor hoofdwas.
Vak : additieven, bijv. wasverzachter of dergelijke
Detergent in het apparaat doen
1.Trek de wasmiddellade uit het apparaat.
2.Voeg wasmiddel toe in vak II.
3.Voeg indien gewenst wasverzachter toe in het vak .
4.Voeg indien gewenst voorwasmiddel toe in vak I .
Opmerking:
Het verbruik van wasmiddel hangt af van de mate van vervuiling van uw kleding. Voor light
bevuilde kledij is voorwassen niet nodig. Plaats enkel een kleine hoeveelheid wasmiddel in vak
II van de wasmiddelschuif.
Om te weten hoeveel wasmiddel U moet gebruiken voor uw kleren kan U de instructies op de
wasmiddelverpakking lezen.
De hoeveelheid gebruikt wasmiddel zal ook afhangen van de kwaliteit van het wasgoed en van
de waterhardheid.
Opgepast: Geconcentreerde wasverzachter of additieven moeten verdund worden met een
beetje water voordat U deze in het vak giet. Zoniet kan dit de sifon blokkeren waardoor de
wasverzachter niet zal doorlopen.
41
Page 41

NL
Kledingstukken wassen
1.Open de deur en laad de kledingstukken in de trommel.
OVERLAAD HET APPARAAT NIET om te voorkomen dat het was goed niet schoon wordt.
Raadpleeg de onderstaande tabel om het laadvermogen voor elk type wasgoed te bepalen.
Soort stof
Katoen
Synthetisch
Wol
2.Sluit de deur.
3.Giet wasmiddel en eventueel wasverzachter of voorwasmiddel in de overeenkomstige vakken.
4.Draai de watertoevoer open en druk op .
5.Draai de programmaknop om het gewenste programma te selecteren.
6.Druk herhaaldelijk op om de gewenste temperatuur te selecteren.
Uitsteltimer: u kunt het programma ook na 3 uur, 6 uur, 9 uur of 12 uur laten opstarten.
Druk herhaaldelijk op om de uitsteltimer in te stellen. Het indicatorlampje van de geselecteerde
uitsteltijd gaat branden.
Laadvermogen
6 kg
3 kg
2 kg
7.Druk op om de cyclus van het apparaat te starten.
- De indicator start/pauze gaat branden.
- Druk nogmaals op om de werking tijdelijk te onderbreken. De pauzefunctie werkt niet in de
laatste 1 tot 2 minuten voor het einde van een wascyclus.
8.De indicator start/pauze knippert wanneer de cyclus is voltooid en het apparaat laat
gedurende 5 minuten om de 30 seconden een pieptoon horen.
9.Open de deur.
10.Verwijder het wasgoed.
42
Page 42

NL
Tabel van de programma's
Standaard
centrifugesnelheid
(ram)
1000
700
500
1000
1000
1000
1000
500
Programma
Katoen
Synthetisch
Wol
Jeans
Snel
Katoen intensief
Centrifugeren
Trommel reinigen
Max. lading
(kg)
6
3
2
6
2
6
6
0
Detergentia
I II
Standaard
temperatuur
/ maximum
temperatuur (°C)
60/90
40/60
40/40
40/90
NVT / 40
40/90
NVT
Alleen 90
Standaard
werkingstijd (min.)
113
100
85
110
15
273
15
75
-Optioneel - Ja - Neen
OPMERKING:
De werkingstijd is afhankelijk van de watertemperatuur en de belasting.
Het standaard 60°C katoen intensieve programma en het standaard 40°C katoen intensief programma
zijn de standaard wasprogramma's.
Wasprogramma Type wasgoed
Katoen Lakens, dekbedovertrekken,kussenslopen,kamerjassen,
ondergoed enz.
Synthetisch Hemden, jassen, gordijnen, textiel met kant of andere gemengde
stoffen
Wol Alleen wolgoed dat in de machine kan worden gewassen
Jeans Jeans
Snel Licht bevuild wasgoed
Katoen Intensief Wasgoed voor baby’s of personen met huidallergieën
43
Page 43

NL
Temperatuur Type wasgoed
90°C Sterk bevuild wasgoed, zuiver wit katoen of linnen, zoals
tafelkleden, handdoeken, lakens
60°C Matig bevuild wasgoed, gekleurd linnen en synthetisch wasgoed dat
gemakkelijk verkleurt, zoals hemden, pyjama’s.
Licht bevuild wasgoed en zuiver wit linnen, zoals ondergoed
40°C, 20°C
koud water
Een ander programma en temperatuur kiezen tijdens de werking
1.Druk op , de indicator start/pauze gaat knipperen.
2.Draai de programmaknop om een ander programma te selecteren.
3.Druk herhaaldelijk op om de gewenste temperatuur in te stellen.
Normaal bevuild wasgoed, waaronder synthetisch en wol
4.Druk op om te wassen. De indicator start/pauze knippert niet langer.
Bellenverwijderingsfunctie
Er worden overmatig veel bellen gevormd wanneer er teveel wasmiddel wordt gebruikt.
Dit leidt tot mindere was- en spoelprestaties. Met deze functie zal de machine automatisch
bellen verwijderen wanneer er teveel bellen worden waargenomen. Deze functie zal u tevens
eraan herinneren om bij de volgende wasbeurten minder wasmiddel te gebruiken.
Tips voor het wassen
Sorteer uw wasgoed op basis van de volgende kenmerken:
-Soorten stof volgens het etiket: sorteer het wasgoed op katoen, gemengde weefsels, zijde,
wol en rayon.
-Kleur: sorteer wit en gekleurd wasgoed. Was nieuw gekleurd wasgoed afzonderlijk.
-Grootte: het wasresultaat is beter wanneer wasgoed van verschillende groottes in eenzelfde
lading wordt gewassen.
-Gevoeligheid: was delicate items afzonderlijk. Controleer de etiketten van te wassen kledingstukken
of raadpleeg de onderstaande wasvoorschriften.
Grafisch symbool
Handwas
Wassen (inclusief machineen handwas)
Stomen
Warm chemisch reinigen
CI
Bleekmiddel
Wasdroger
Strijken
Stoomstrijkijzer
Medium temperatuur en max.
temperatuur 150 º C
Drogen aan waslijn
Beschrijving
Grafisch symbool
CI
Beschrijving
Geen machinewas
Niet wassen
Niet stomen
Niet uitwringen
Geen bleekmiddel
Niet in de wasdroger
Niet strijken
Strijken met doek
Drogen na wassen
Drogen aan waslijn in
de schaduw
44
Page 44

NL
-Ledig zakken (sleutels, munten enz.) en verwijder harde decoratieve voorwerpen (bijv. broches).
-Maak sluitingen dicht
Sluit ritsen en maak knopen of haken vast, losse riemen of linten moeten worden samengebonden.
-Stop kleine artikelen zoals sokken, riemen enz. in een waszak.
- Het wassen van één enkel groot en items kledingstuk zoals een
badhandoek, jeans, gestoffeerde jas, etc. kan de was in de
trommel uit balans brengen. Daarom is het raadzaam altijd één
of twee kledingstukken samen te wassen zodat de afvoer
gelijkmatig kan gebeuren.
-Babyartikelen (babykleertjes, handdoeken en luiers) moeten
afzonderlijk worden gewassen.
Kleding van volwassenen kan geïnfecteerd raken als deze samen met
babygoed worden gewassen. De spoeltijd moet worden verhoogd om
grondig reinigen en spoelen te verzekeren en te voorkomen dat
wasmiddelresten in het wasgoed achterblijven.
-Voor een optimaal wasresultaat is het raadzaam wasgoed waarop gemakkelijk vlekken
voorkomen, zoals witte sokken, kragen en mouwen enz. met de hand te wassen voordat
men ze in de wasmachine stopt.
-Kledingstukken waarvan de vezels gemakkelijk loskomen moeten afzonderlijk worden gewassen.
Zo niet zullen andere kledingstukken er stoffig of pluizig gaan uitzien. Was bij voorkeur zwart en
katoenen wasgoed afzonderlijk.
- Was geen waterbestendige stoffen (skipakken, ondoorlaatbare luiers, regenjassen, paraplu's,
autohoezen, zakken, enz.).
Stoffen die weinig water opnemen zoals waterbestendige kussens en kleding worden beter niet in
een wasmachine gewassen, omdat bij dergelijke stoffen teveel water in de machine kan komen
of zich tijdens het spoelen en aftappen abnormale trillingen kunnen voordoen die het wasgoed
kunnen beschadigen.
-Tips voor het gebruik van wasmiddel
Het te gebruiken soort wasmiddel is afhankelijk van de soort stof (katoen, synthetisch, delicate
items, wol), de kleur, de wastemperatuur en de mate en soort van bevuiling. Gelieve “weinig
schuimend” wasmiddel te gebruiken.
OPMERKING: gebruik niet meer wasmiddel dan nodig is. Volg de gebruiksinstructies op de
verpakking van het wasmiddel.
Volg de aanbevelingen van de wasmiddelfabrikant op basis van het gewicht van het wasgoed,
de mate van bevuiling en de hardheid van het water in uw omgeving. Neem contact op met uw
waterleidingbedrijf indien u de hardheid van uw water niet kent.
OPMERKING: bewaar wasmiddelen en additieven buiten het bereik van kinderen op een veilige,
droge plaats.
45
Page 45

NL
REINIGEN EN ONDERHOUD
Haal altijd eerst de stekker van het apparaat uit het stopcontact.
De behuizing reinigen
Reinig de buitenkant van het apparaat met een zachte doek die u heeft bevochtigd met een sopje.
Gebruik geen organische chemicaliën of bijtende oplosmiddelen.
De trommel reinigen
In de trommel achtergebleven roest van metalen voorwerpen moet meteen met een chloorvrij
middel worden verwijderd.
Gebruik nooit staalwol.
Een bevroren wasmachine repareren
Wanneer de temperatuur onder het vriespunt is gezakt en uw wasmachine bevroren is:
1.Haal de stekker van de wasmachine uit het stopcontact.
2.Giet warm water op de kraan om de watertoevoerslang te ontdooien.
3.Verwijder de watertoevoerslang en week in warm water.
4.Giet warm water in de trommel en wacht 10 minuten.
5.Sluit de toevoerslang aan op de kraan en controleer of de werking van de watertoevoer en -afvoer
normaal is.
OPMERKING: om het apparaat voor het eerst na deze reparatie te gebruiken moet de
omgevingstemperatuur minstens 0°C bedragen.
46
Page 46

NL
De wasmiddellade en -uitsparing reinigen
1.Druk op de ontgrendelingshendel binnenin de wasmiddellade en trek deze uit.
2.Verwijder de dop uit het vak.
3.Reinig alle onderdelen en de uitsparing van de lade onder stromend water.
4.Duw de dop stevig weer op zijn plaats.
5.Duw de lade terug op zijn plaats.
De toevoerslang en -filter reinigen
Controleer regelmatig de filter in de watertoevoer om verstopping door binnengedrongen
vreemde stoffen te voorkomen.
De afvoerpomp reinigen
Laat het water uit de machine weglopen en reinig de afvoerpomp.
Gelieve de afvoerpomp regelmatig te controleren en reinigen.
Verwijder het pompdeksel nooit tijdens een wascyclus. Bij het terug inzetten van het
pompdeksel moet men dit stevig vastdraaien om lekken te voorkomen.
47
Page 47

NL
PROBLEMEN OPLOSSEN
Probleem
De wasmachine start
niet op.
De deur opent niet.
Er blijft na de
wasscyclus wasmiddel
achter in de
wasmiddellade.
De wasmachine trilt
of is lawaaierig.
De wasmachine voert
geen water af en/of
centrifugeert niet.
Mogelijke oorzaak Mogelijke oplossing
De deur is niet goed gesloten. Sluit de deur goed.
Slechte aansluiting op het
elektriciteitsnet.
Stroomstoring
Het apparaat is niet ingeschakeld.
De
veiligheidsvergrendeling van het
apparaat is geactiveerd.
Het wasmiddel is van een
teveel schuim maakt.
Overmatig gebruik van wasmiddel.
Niet alle transportbouten
verwijderd.
De was
machine staat op een oneffen
ondergrond of staat niet waterpas.
De lading van de wasm achine
bedraagt meer dan 7kg.
De afvoerslang is verstopt. Ontstop de afvoerslang.
De filter is verstopt..
Het ui
teinde van de afvoerslang
bevindt zich hoger dan 100 cm boven
de grond.
Onevenwicht van het wasgoed.
type dat
zijn
Controleer de aansluiting
elektriciteitsnet.
Controleer de voeding.
Schakel het apparaat in.
Haal de stekker van het apparaat
uit het stopcontact.
Controleer of het
geschikt is.
Verminder de hoeveelheid
wasmiddel in de wasmiddellade.
Verwijder alle transportbouten.
Controleer of de
waterpas en op een vlakke
ondergrond staat.
Verwijder een gedeelte
van het wasgoed uit de trommel.
wasmiddel
wasmachine
Ontstop de filter.
Zorg ervoor dat het
de afvoerslang zich op minder
dan 100 cm boven de grond bevindt.
Voeg kledingstukken toe of
centrifugeprogramm a opnieuw lopen.
uiteinde van
op het
laat het
Het wasresultaat is
niet goed.
Uw was was te vuil voor het door U
gekozen programma.
De hoeveelheid wasmiddel die U
heeft gebruikt is niet geschikt.
De maximumcapaciteit aan kleren in
uw machine is bereikt.
Selecteer een geschikt programma.
Gebruik meer of minder wasmiddel,
afhankelijk van de instructies van de
fabrikant.
Ga niet over de maximumcapaciteit
van uw machine.
Foutmeldingen
Status of indicatorlampje
90°C 60 °C 40°C
Uit
Uit
Uit Uit
Uit Uit
Uit
Knippert
Knippert Knippert
20°C
Knippert
Uit
Oorzaak
De deur is niet goed
gesloten.
Probleem met de
watertoevoer
Probleem met de
afvoer
Oplossing
Sluit de deur goed.
Controleer of de kraan is opengedraaid.
Controleer de waterdruk.
Reinig de watertoevoerfilter.
Controleer of de afvoerslang niet gedraaid of
verstopt is.
Controleer of de afvoerslang goed geïnstalleerd is.
Reinig de afvoerpomp.
Neem contact op met het onderhoudspersoneel als dit het probleem niet verhelpt.
48
Page 48

NL
TECHNISCHE FICHE
Hieronder vindt u de fiche voor huishoudelijke wasmachines in overeenstemming met de
EU-richtlijn 1015/2010.
Merk
Type/beschrijving
Inhoud
Centrifugesnelheid
Energie-efficiëntieklasse
Jaarlijks energieverbruik ❷
Stroomverbruik in de uit-stand
Stroomverbruik in de aan-stand
Jaarlijks waterverbruik
Efficiëntieklasse centrifugeren
Standaard wascyclus
Energieverbruik van standaard programma 60° met volle lading
Energieverbruik van standaard programma 60° met
gedeeltelijke lading
Energieverbruik van standaard programma 40° met
gedeeltelijke lading
Duur van standaardprogramma 60°met volle lading
Duur van standaard programma 60° met gedeeltelijke lading
Duur van standaard programma 40° met gedeeltelijke lading
Waterverbruik voor het standaard katoenprogramma op 60°C
bij volledige lading
Waterverbruik voor het standaard katoenprogramma op 60°C
bij gedeeltelijke lading
Waterverbruik voor het standaard katoenprogramma op 40°C
bij gedeeltelijke lading
Resterend vochtgehalte voor het standaard katoenprogramma
op 60°C bij volledige lading
Resterend vochtgehalte voor het standaard katoenprogramma
op 60°C bij gedeeltelijke lading
Resterend vochtgehalte voor het standaard katoenprogramma
op 40°C bij gedeeltelijke lading
Geluidsniveau wassen
Geluidsniveau centrifugeren
Inbouw
Hoogte
Breedte
Diepe
Stroomverbruik
Nominale spanning/frequentie
Waterdruk
❺
❶
❸
❹
Proline
PFL 106 F,PFL 106 E
6 kg
1000 rpm
A
173 kWh
0,5 W
0,5W
9240 L
Katoen intensief
0,93 kwu
0,68 kwu
0,62 kwu
273 min.
243 min.
241 min.
48 L
37 L
37 L
59%
63%
63%
C
++
58 dB
74 dB
Vrijstaand
850 mm
595 mm
470 mm
2100 W
220-240V~/50 Hz
0,05-1 MPa
49
Page 49

NL
OPMERKINGEN:
PFL 106 F,PFL 106 E
+++
❶ A (hoogste efficiëntie) tot D (laagste efficiëntie).
❷ Het jaarlijkse energieverbruik van kWh is gebaseerd op 220 standaard wascycli in het
standaardprogramma van 60°C en 40°C met volle en gedeeltelijke lading en het verbruik in
de spaarstanden. Het feitelijke energieverbruik zal afhankelijk zijn van de manier waarop het
apparaat wordt gebruikt.
❸ Het jaarlijkse waterverbruik van 9240 liter per jaar is gebaseerd op 220 standaard wascycli in
het standaardprogramma van 60°C en 40°C met volle en gedeeltelijke lading. Het feitelijke
waterverbruik zal afhankelijk zijn van de manier waarop het apparaat wordt gebruikt.
❹ De efficiëntieklasse centrifuge C op een schaal van G (laagste efficiëntie) tot A (hoogste efficiëntie).
❺ Het standaard 60°C katoen intensieve programma en het standaard 40°C katoen intensieve
programma zijn de standaard wasprogramma's. Deze programma's zijn geschikt voor normaal
bevuild katoenen wasgoed en zijn de meest efficiënte programma's op het gebied van
gecombineerd energie- en waterverbruik voor het wassen van dat type katoenen wasgoed.
De feitelijke watertemperatuur kan verschillen van de opgegeven cyclustemperatuur.
173
Kies het gepaste wasmiddel naar gelang de wastemperatuur om de beste wasprestaties te
krijgen met minder water en een lager energieverbruik.
We verontschuldigen ons voor enig ongemak veroorzaakt door kleine inconsistenties in
deze gebruikershandleiding, die kunnen ontstaan door productverbetering of -ontwikkeling.
50
Darty Plc © UK: EC1N 6TE 19 / 11 / 2014
Page 50

ES
ÍNDICE
ADVERTENCIAS....................................................................
INSTRUCCIONES IMPORTANTES SOBRE SEGURIDAD
DESCRIPCIÓN DEL ELECTRODOMÉSTICO
INSTALACIÓN
PANEL DE CONTROL
FUNCIONAMIENTO...............................................................
Primer ciclo de lavado..........................................................
Vertido del detergente en el electrodoméstico........................
Lavado de Ropa..................................................................
Cuadro del programa...........................................................
Cambio de programa y temperatura durante el funcionamiento
..........................................................................................
Consejos y Sugerencias sobre el lavado................................
LIMPIEZA Y MANTENIMIENTO...............................................
Limpieza del exterior............................................................
Limpieza del tambor.............................................................
Reparación de una lavadora congelada.................................
Limpieza de la cubeta de detergente y del
compartimento de la cubeta..................................................
Limpieza de la manguera de entrada y del filtro de entrada......
Limpieza de la bomba de vaciado de agua..............................
RESOLUCIÓN DE PROBLEMAS.............................................
FICHA DE ESPECIFICACIONES TÉCNICAS............................
.......................................................................
............................................................
............................
..........
52
54
54
55
56
57
57
57
58
59
60
60
62
62
62
62
63
63
63
64
65
Page 51

ES
ADVERTENCIAS
Este electrodoméstico está concebido
para una utilización exclusivamente
doméstica y no debe ser utilizado con
ningún otro objeto ni aplicación, como
un uso no doméstico o con fines
comerciales.
Este electrodoméstico no está concebido
para ser utilizado por personas
(incluidos los niños) con capacidades
físicas, sensoriales o mentales reducidas,
o carentes de experiencia y conocimiento,
a menos que una persona responsable de
su seguridad les supervise o les instruya
sobre la utilización del electrodoméstico.
Los niños deben ser vigilados para
asegurar que no juegan con el
electrodoméstico.
Si el cable de alimentación eléctrica
resulta dañado, debe ser sustituido por
el fabricante, su servicio técnico o
personas similarmente cualificadas para
evitar cualquier riesgo.
52
Page 52

ES
Para obtener información sobre el
método de limpieza,consulte la sección
de "Limpieza y mantenimiento" de la
página 62&63.
PRECAUCIÓN: No lo conecte al suministro
de agua caliente.
Los orificios no debe estar obstruidos por
una alfombra.
La presión del agua no debe ser inferior
a 0,05MPa ni superior a 1 Mpa.
El peso máximo de una prenda seca para
lavarla en el modelo de lavadora
es de 6 kg.
53
Page 53

ES
INSTRUCCIONES IMPORTANTES SOBRE SEGURIDAD
-Mantenga los materiales de embalaje del electrodoméstico lejos del alcance de los niños
para evitar cualquier riesgo.
-No enchufe el electrodoméstico a la toma de alimentación eléctrica con las manos húmedas.
-Nunca toque el electrodoméstico con las manos o los pies húmedos.
-En caso de avería, desenchufe primero el electrodoméstico y cierre la llave del agua.
No trate de repararlo usted mismo. Póngase en contacto con su servicio técnico autorizado.
-No exceda la capacidad de carga máxima.
-La puerta de cristal alcanza temperaturas muy altas durante el ciclo de lavado. Mantenga a
los niños y mascotas alejados del electrodoméstico durante su funcionamiento.
- Nunca fuerce la puerta para abrirla mientras la lavadora esté funcionando.
- No deje a los niños sin vigilancia cerca de la lavadora ya que podrían encerrarse ellos mismos
dentro de la lavadora.
-Desenchufe siempre el electrodoméstico y cierre el suministro de agua tras su utilización.
DESCRIPCIÓN DEL ELECTRODOMÉSTICO
Cubeta del
Detergente
Puerta
Panel de Control
Manguera de Vaciado
de Agua
Cable de Alimentación
Eléctrica
Accesorios
Tapones de orificios
para el transporte
Cubeta del Detergente
Manguera para
entrada de agua
54
Page 54

ES
INSTALACIÓN
Desembalaje
Todos los pernos para transporte de la parte posterior del
electrodoméstico y el material de embalaje deben ser retirados
antes de utilizar el electrodoméstico.
Mantenga todo el material de embalaje lejos del alcance de los niños.
Conserve todos los pernos para transporte para poder volver a
utilizarlos en caso de que el electrodoméstico sea transportado de nuevo.
Colocación
Instale el electrodoméstico sobre un suelo plano y duro.
Asegúrese de que hay suficiente circulación de aire alrededor del electrodoméstico.
No instale el electrodoméstico sobre suelo con moqueta.
Nivelado
Nivele el electrodoméstico elevando o bajando los pies.
Afloje la tuerca de bloqueo mediante una llave inglesa (no suministrada)
y gire el pie con la mano hasta que quede apoyado sobre el suelo.
Sujete el pie con una mano y apriete la tuerca contra el chasis con
una llave inglesa.
Nunca coloque cartones, bloques de madera o materiales similares bajo
la lavadora para nivelar las irregularidades de nivel en el suelo.
Un nivelado preciso evita vibraciones, ruidos y desplazamientos del
electrodoméstico durante su funcionamiento.
Entrada de agua
Enrosque un extremo de la manguera de entrada de agua en la parte
posterior del electrodoméstico.
El electrodoméstico debe ser conectado al suministro de agua fría.
Conecte el otro extremo de la manguera de entrada de agua a un grifo
con rosca de 3/4”.
Conexión electrica
Su lavadora funciona a 220-240V y 50Hz. Las conexiones eléctricas deben
ser realizadas por un técnico cualificado de acuerdo con las existentes
normativas de seguridad. Su lavadora debe ser adecuadamente
conectada a la toma de tierra. No seremos responsables de cualquier
daño ocurrido como resultado de una utilización sin una adecuada
conexión a la toma de tierra. No utilice cables alargadores o ladrones.
Vaciado de agua
Para conectar el electrodoméstico, utilice uno de los siguientes métodos.
1.Introduzca firmemente la manguera en un tubo de drenaje.
O
2.Conecte la manguera de vaciado de agua a la espiga de salida del lavabo de manera segura.
Máx. 1 00cm
Mín . 60cm
Notas:
Asegúrese de que la manguera para la descarga de agua no quede doblada, torcida, aplastada
ni demasiado estirada.
La manguera de desagüe debe ser instalada a una altura mínima de 60 cm, y máxima de 100 cm del suelo.
55
Page 55

ES
PANEL DE CONTROL
PFL 106 F
Coton
Synthéti que
Laine
Jeans
PFL 106 E
Rapide
Coton inte nsif
Essorage
Auto
nettoyag e
Chrono
Départ dif fér é Te mp. Départ/P ause
12h
9h
6h
3h
90
60
40
20
Marche/A rrêt
Selector de Programa
Botón de lavado
retardado
Botón de temperatura
Botón de Inicio/Pausa
Botón
Encendido/Apagado
(On/Off)
Gire el selector para seleccionar el programa deseado .Hay 8
programas disponibles. Tras seleccionar un programa,el
piloto correspondiente se iluminará.
Pulse el botón reiteradamente para seleccionar el tiempo de
retardo (3H, 6H, 9H o 12H) y el piloto correspondiente se
iluminará. El electrodoméstico comenzará a funcionar tras el
tiempo establecido.
Pulse reiteradamente el botón para seleccionar la temperatura
de lavado. El piloto de temperatura correspondiente se iluminará.
Pulse y mantenga pulsado el botón durante 3 segundos, escuchará
un pitido y entonces la función de señal quedará desactivada. Para
activar esta función, pulse y mantenga pulsado de nuevo el botón
durante 3 segundos.
Pulse el botón para iniciar los programas y el piloto se
iluminará. Pulse de nuevo para efectuar una pausa, el piloto
destellará.
ulse el botón una vez para encender el electrodoméstico.
P
Pulse de nuevo para apagar el electrodoméstico.
56
Page 56

ES
FUNCIONAMIENTO
Lavado por primera vez
Antes de lavar ropa por primera vez, debe completar
un ciclo sin ropa.
1.Pulse
2.Vierta un poco de detergente en el compartimento II
del cajón para el detergente.
3.Abra el suministro de agua para el electrodoméstico.
4.Pulse
Compartimento I: Detergente para prelavado.
Compartimento II: Detergente para lavado principal.
Compartimento *: Aditivos, por ejemplo, suavizante.
Vertido de detergente en el electrodoméstico
1. Tire para sacar el cajón para el detergente.
2. Vierta detergente de ropa en el compartimento II.
3. Añada suavizante en el Compartimento tal y como desee.
4. Añada detergente de prelavado en el compartimento I tal y como desee.
NOTA: Su consumo de detergente variará en función del grado de suciedad de su ropa.
Para ropa ligeramente sucia, no realice prelavado y vierta una pequeña cantidad de
detergente en el compartimento II del cajón para el detergente. Para conocer la cantidad
de detergente que debe utilizar para su ropa, consulte las instrucciones en el envase del
detergente.
La cantidad de detergente que deba usar también dependerá de la cantidad de prendas y de
la dureza del agua.
PRECAUCIÓN: El suavizante o aditivo concentrado debe ser disuelto con un poco de agua
antes de ser vertido en el compartimento o de lo contrario podría obstruir el sifón e impedir
el flujo del suavizante.
57
Page 57

ES
Lavado de Ropa
1.Abra la puerta para cargar los artículos en el tambor.
NO SOBRECARGUE el electrodoméstico o su colada podrá no quedar adecuadamente lavada.
Consulte el cuadro inferior para determinar la capacidad de carga para el tipo de colada que
va a lavar.
Tipo de Material
Algodón
Sintético
Lana
2.Cierre la puerta.
3.Vierta el detergente y, en caso necesario, el suavizante o el detergente de pre-lavado,
en los compartimentos apropiados.
4.Abra el suministro de agua del electrodoméstico y pulse .
5.Gire el selector de programa para seleccionar el programa deseado.
6.Pulse reiteradamente para seleccionar la temperatura deseada.
Retardador del lavado: Puede iniciar el programa 3 horas, 6 horas, 9 horas o 12 horas después.
Pulse reiteradamente para establecer el retardo del lavado. El piloto del retardo
seleccionado se iluminará.
7.Pulse y el electrodoméstico comenzará el ciclo.
- El piloto inicio/pausa se iluminará.
- Para realizar una pausa, pulse de nuevo. No obstante, la función de pausa no funciona
durante el último o los 2 últimos minutos del ciclo de lavado.
Capacidad de Carga
6 kg
3 kg
2 kg
8.Una vez finalizado el ciclo, el piloto inicio/pausa destellará y el electrodoméstico emitirá
una señal acústica cada 30 segundos durante 5 minutos.
9.Abra la puerta.
10.Extraiga la ropa.
58
Page 58

ES
Cuadro del programa
NOTA: Los parámetros en este cuadro sirven solo como referencia.
Temperatura
por defecto /
Temperatura
máxima (°C)
60/90
Programa
Algodón
Carga Máx. (Kg)
6
Compartimento
de Detergente
I II
Tiempo de Duración
por Defecto (Min)
113
Velocidad de
Centrifugado por
Defecto (rpm)
1000
Sintético
Lana
Vaqueros
Rápido
Algodón
Intensivo
Centrifugado
Lavado de
Tambor
3
2
6
2
6
6
0
40/60
40/40
40/90
N/A / 40
40/90
N/A
Solo 90
100
85
110
15
273
15
75
700
500
1000
1000
1000
1000
500
-Opcional - Sí - No
NOTA:
El tiempo de duración variará en función de la temperatura del agua y de la carga.
El programa estándar de algodón intensivo a 60°C y el programa estándar de algodón intensivo
a 40°C son los programas de lavado estándar.
Programa
Tipo de Colada
de Lavado
Algodón Sábanas, colchas, fundas de almohada, batas, ropa interior, etc.
Sintético Camisas, abrigos, cortinas, tejidos con encajes o similares.
Lana Solo prendas de lana lavables a máquina.
Vaqueros Vaqueros
Rápido Ropa poco sucia
Algodón
Ropa de bebé o de personas con alergias en la piel
Intensivo
59
Page 59

ES
Temperatura Tipo de Colada
90°C Prendas muy sucias, algodón o lino de blanco puro, por ejemplo,
manteles de mesillas, manteles de comedores, toallas, sábanas.
60°C Prendas moderadamente sucias, lino, algodón y prendas sintéticas
coloridas con cierto grado de decoloración, por ejemplo camisas,
pijamas. Prendas ligeramente sucias, lino de blanco puro, por
ejemplo ropa interior.
40°C, 20°C
Agua fría
Cambio del programa y la temperatura durante el funcionamiento
1.Pulse y el piloto inicio/pausa destellará.
2.Gire el selector de programa para seleccionar un nuevo programa.
Prendas con suciedad normal, incluidas las sintéticas y la lana.
3.Pulse reiteradamente para seleccionar la temperatura deseada.
4.Pulse para iniciar el lavado. El piloto inicio/pausa dejará de destellar.
Función de eliminación de burbujas
Cuando se utiliza demasiado detergente se forman demasiadas burbujas que afectan el lavado
y el aclarado. Con esta función la máquina eliminará las burbujas automáticamente cuando se
detecten demasiadas, y además le recordará que debe utilizar menos detergente en el próximo
lavado.
Consejos y Sugerencias sobre el lavado
-lasifique su colada de acuerdo con las siguientes características:
-Símbolo de cuidado del tipo de tejido en la etiqueta: Clasifique la colada en algodones,
tejidos mezclados, sintéticos, sedas, lanas y rayón.
-Color: Separe blanco y color. Lave las prendas nuevas de color por separado.
-Tamaño: Mezclar artículos de diferentes tamaños en la misma carga mejorará el rendimiento
del lavado.
-Delicadeza: Lave las prendas delicadas por separado. Examine las etiquetas de las prendas que
va a lavar o consulte el cuadro inferior de cuidado del tejido.
Símbolo Gráfico
CI
Ilustración
Lavado a Mano
Lavado (incluido Lavado a
Máquina y lavado a Mano)
Limpieza en Seco
Limpieza en Seco Delicada
Lejía
Secadora
Plancha
Plancha a Vapor
Temperatura Media y
Temperatura Máx. 150ºC
Secado en Tendedero
Símbolo Gráfico
CI
Ilustración
No Lavado a Máquina
No Lavar
No Limpieza en Seco
No Escurrir
No Lejía
No Secadora
No Planchar
Planchar con Paño
Secar tras Lavar
Secado en Tendedero a la
Sombra
60
Page 60

ES
-Vacíe los bolsillos (llaves, monedas, etc.) y retire los objetos decorativos más duros
(por ejemplo, broches).
-Cierre cremalleras
Cierre las cremalleras y ate los botones o enganches; las cintas o los cinturones sueltos han
de atarse juntos.
-Coloque los objetos pequeños como calcetines, cinturones, etc.
en una bolsa de lavado.
- Lavar un único artículo grande y pesado, como una toalla de baño, un
par de jeans, una campera de abrigo, etc., puede desbalancear la prenda
en el tambor.
Por lo tanto, se recomienda agregar una o dos prendas más para lavar
juntas a fin de que el desagote se realice sin problemas.
-Los artículos de bebé (ropa de bebé, toallas y pañales) han de lavarse
por separado.
Si se lavan junto con ropa de adulto, pueden contaminarse. El tiempo de
aclarado deberá ser aumentado para asegurar un aclarado completo y
limpieza sin que queden residuos de detergente.
-Recomendamos que los artículos que se manchan con facilidad como calcetines blancos,
cuellos, mangas, etc. Sean lavados a mano antes de lavarlos a máquina para lograr resultados
de lavado ideales.
-Las prendas que forman pelusa con facilidad deben lavarse por separado; de lo contrario,
el resto de artículos podrían mancharse de polvo, partículas de pelusa, etc. Preferentemente,
las prendas de color negro y las de algodón deben lavarse por separado.
-No lave tejidos impermeables (trajes de esquí, compresas sanitarias, chubasqueros, paraguas,
cubiertas de coches, sacos de dormir, etc.).
Es mejor no lavar tejidos que no pueden ser fácilmente empapados (como por ejemplo almohadones
y prendas de ropa impermeables) en la lavadora.. De lo contrario habrá agua salpicada o vibraciones
anormales que pueden suponer un riesgo de daños a la ropa durante el aclarado y el drenaje.
-Consejos sobre el detergente
El tipo de detergente que debe utilizar depende del tipo de tejido (algodón, sintético, artículos
delicados, lana), color, temperatura de lavado, grado y tipo de suciedad. Utilice detergente para
lavadora de “baja espuma”.
NOTA: No añada más detergente que el necesario. Siga las recomendaciones de utilización
del envase del detergente.
Siga las recomendaciones del fabricante del detergente en función del peso de la lavada,
el grado de suciedad, y la dureza del agua en su zona. Si desconoce el grado de dureza del agua
de su zona, pregunte a sus autoridades sobre el agua.
NOTA: Guarde los detergentes y aditivos en un lugar seco y seguro, fuera del alcance de los niños.
61
Page 61

ES
LIMPIEZA Y MANTENIMIENTO
Asegúrese de que el electrodoméstico está desenchufado de la toma de alimentación eléctrica.
Limpieza del exterior
Limpie la superficie del electrodoméstico con un paño suave humedecido con jabón líquido.
No utilice químicos orgánicos ni disolventes corrosivos.
Limpieza del tambor
Los residuos de óxido que quedan dentro del tambor procedentes de artículos metálicos deben
ser retirados inmediatamente con detergentes sin cloro.
Nunca utilice lana de acero.
Reparación de una lavadora congelada
Si la temperatura cae por debajo de cero y su lavadora queda congelada:
1.Desenchufe la lavadora.
2.Vierta agua caliente en el grifo para aflojar la manguera de suministro de agua.
3.Extraiga la manguera de entrada de agua y sumérjala en agua caliente.
4.Vierta agua caliente en el tambor y espere 10 minutos.
5.Vuelva a colocar la manguera de entrada de agua en el grifo y compruebe si el suministro de
agua y el drenaje funcionan con normalidad.
NOTA: Cuando utilice el electrodoméstico tras una reparación, asegúrese de que la temperatura
ambiente sea superior a 0°C.
62
Page 62

ES
Limpieza de la cubeta de detergente y del compartimento de la cubeta
1.Pulse la palanca de liberación dentro de la cubeta de detergente y extráigala.
2. Extraiga la tapa del compartimento.
3. Limpie todas las partes y el hueco del cajón bajo el grifo.
4. Vuelva a colocar la tapa en su lugar presionando firmemente.
5. Vuelva a colocar el cajón en su sitio empujándolo.
Limpieza de la manguera de entrada y del filtro de entrada
Para evitar bloqueos en el suministro de agua por la entrada de objetos extraños,
limpie con regularidad el filtro de la válvula de entrada de agua.
Limpieza de la bomba de vaciado de agua
Drene el agua del aparato y limpie entonces la bomba de vaciado de agua.
Examine y limpie la bomba de vaciado de agua con regularidad.
Nunca extraiga la cubierta de la bomba durante un ciclo de lavado. Cuando vuelva a colocar la
cubierta de la bomba, asegúrese de que quede firmemente apretada para evitar fugas.
63
Page 63

ES
RESOLUCIÓN DE PROBLEMAS
Problemas Posible Causa Posibles Soluciones
La lavadora comienza a
funcionar.
La puerta no se abre. La protección de seguridad
Queda detergente en la
cubeta de detergente
una vez completado el
programa.
La lavadora vibra o hace
demasiado ruido.
La lavadora no drena ni/o
centrifuga.
El resultado del lavado
no es bueno.
La puerta no está
adecuadamente cerrada.
No adecuadamente
enchufada al suministro
eléctrico.
Cierre la puerta
adecuadamente.
Compruebe la conexión al
suministro eléctrico.
Fallo en el suministro
eléctrico.
El aparato no ha sido
encendido.
del aparato está activada.
El detergente no es del
tipo de baja espuma.
Excesivo uso de detergente Reduzca la cantidad de
No se han retirado todos
los pernos para el
transporte.
La lavadora está situada
sobre una superficie
irregular o no está
nivelada.
La carga de la lavadora
supera la capacidad
máxima.
La manguera de vaciado de
agua está bloqueada.
El filtro está bloqueado. Desbloquee el filtro.
El extremo de la manguera
de vaciado de agua está
más alta que 100 cm sobre
el suelo.
Desequilibrio en la colada Añada prendas o ejecute
Su ropa estaba demasiado
sucia para el programa que
eligió.
La cantidad de detergente
utilizada no es apropiada.
Se han colocado prendas que
superan la capacidad máxima
en su máquina.
Compruebe el suministro
eléctrico.
Encienda el aparato.
Desenchufe el aparato de
la toma de alimentación
eléctrica.
Compruebe si el
detergente es el adecuado.
detergente en la cubeta de
detergente.
Retire todos los pernos
para el transporte.
Asegúrese de que la
lavadora esté situada sobre
una superficie plana y
nivelada.
Reduzca la cantidad de
colada en el tambor.
Desbloquee la manguera
de vaciado de agua.
Asegúrese de que el
extremo de la manguera
de vaciado de agua no esté
más alta que 100 cm sobre
el suelo.
un programa de
centrifugado de nuevo.
Seleccione un programa
adecuado.
Utilice más o menos
detergente según las
instrucciones del fabricante.
No supere la capacidad
máxima de su máquina.
Mensajes de error
Estado del piloto
Causa Solución
90°C 60 °C 40°C
Apagado
Apagado Apagado
Apagado Apagado
Apagado Apagado
Destella
Destella Destella
20°C
Destella
Apagado
La puerta no está
adecuadamente
cerrada.
Error en la entrada
de agua
Error en el drenaje
Cierre la puerta adecuadamente.
Asegúrese de que la llave esté abierta.
Compruebe la presión del agua.
Limpie el filtro de entrada de agua.
Asegúrese de que la manguera de vaciado de
agua no esté retorcida o bloqueada.
Asegúrese de que la manquera de vaciado de
agua esté correctamente instalada.
Limpie la bomba de vaciado de agua.
Si el error subsiste, póngase en contacto con el servicio técnico.
64
Page 64

ES
FICHA DE ESPECIFICACIONES TÉCNICAS
A continuación se indica la ficha de especificaciones de la lavadora doméstica de acuerdo a la
Normativa UE 1015/2010.
Fabricante
Tipo/Descripción
Capacidad
Velocidad de Centrifugado
Clase Eficiencia Energética
Consumo Anual de Energía
Consumo de Energía en modo desconectado (off)
Consumo de Energía en modo conectado (on)
Consumo anual de agua
Clase eficiencia centrifugado-secado
Ciclo de lavado estándar
Consumo de energía del estándar 60° a plena carga
Consumo de energía del estándar 60° a carga parcial
Consumo de energía del estándar 40° a carga parcial
Duración del programa estándar 60°a plena carga
Duración del programa estándar 60°a carga parcial
Duración del programa estándar 40°a carga parcial
Consumo de agua de 60 °C estándar con carga completa
❶
❷
❸
❹
❺
Proline
PFL 106 F,
PFL 106 E
6 kg
1000 rpm
+++
A
173 kWh
0,5 W
0,5 W
9240 L
C
Algodón
0,93 kWh
0,68 kWh
0,62 kWh
273 min
243 min
241 min
48 L
Consumo de agua de 60 °C estándar con carga parcial
Consumo de agua de 40°C estándar con carga parcial
Contenido de humedad restante de 60 °C
estándar con carga completa
Contenido de humedad restante de 60 °C
estándar con carga parcial
Contenido de humedad restante de 40°C
estándar con carga parcial
Nivel de ruido de lavado estándar a 60°C a plena carga
Nivel de ruido de centrifugado estándar a 60°C a plena
carga
Montaje
Altura
Anchura
Profundidad
Consumo de energía
Voltaje/frecuencia
Presión del agua
37 L
37 L
59%
63%
63%
58 dB
74 dB
Libre
850 mm
595 mm
470 mm
2100 W
220-240V~/50 Hz
0.05-1 MPa
65
Page 65

ES
PFL 106 F,PFL 106 E
+++
❶ A (máxima eficiencia) a D (mínima eficiencia)
❷Consumo de energía kWh por año, basado en 220 ciclos de lavado estándar para programa
estándar a 60°C y 40°C a plena carga y carga parcial, y el consumo de los modos de bajo consumo.
El consumo real de energía dependerá del modo de utilización del aparato.
❸Consumo de agua 9240 litros por año, basado en 220 ciclos de lavado estándar para programa
estándar a 60°C y 40°C a plena carga y carga parcial. El consumo real de agua dependerá del modo
de utilización del aparato.
❹Clase de eficiencia de centrifugado-secado C en una escala de G (mínima eficiencia) a A
(máxima eficiencia)
❺ El programa estándar a 60°C algodón intensivo y el programa estándar a 40°C algodón intensivo
son los programas de lavado estándar. Estos programas son adecuados para limpiar ropa de
algodón con la suciedad normal y son los programas más eficientes en términos de consumos
combinados de energía y de agua para lavar ese tipo de ropa de algodón. La temperatura real
del agua puede diferir de la temperatura declarada para el ciclo.
173
Rogamos disculpas por cualquier inconveniente causado por inconsistencias menores en estas
instrucciones, que pueda suceder como resultado de las mejoras y el desarrollo del producto.
Pedimos disculpas por cualquier molestia debido a inconsistencias menores en estas
instrucciones como consecuencia del esfuerzo continuo por mejorar y desarrollar
nuestros productos.
66
Darty Plc © UK: EC1N 6TE 19 / 11 / 2014
 Loading...