

Page 1

INSTRUCTION MANUAL
MODEL No.: PF120WD
48cm UNDER COUNTER FRIDGE
Page 2

Please read this instruction manual carefully before operation
Keep these instructions in a safe place for future reference
CONTENTS
Part Identification 1
Safety Information 2
Installation 2
Electrical Connection 3
Operating your refrigerator 4
Setting the Thermostat Control 4
Defrosting 4
Cleaning your refrigerator 5
Reversing the door 6
Maintenance 7
Trouble shooting 8
Do’s and Don’ts 10
Technical data 11
Helpline 12
Disclaimer 12
Page 3
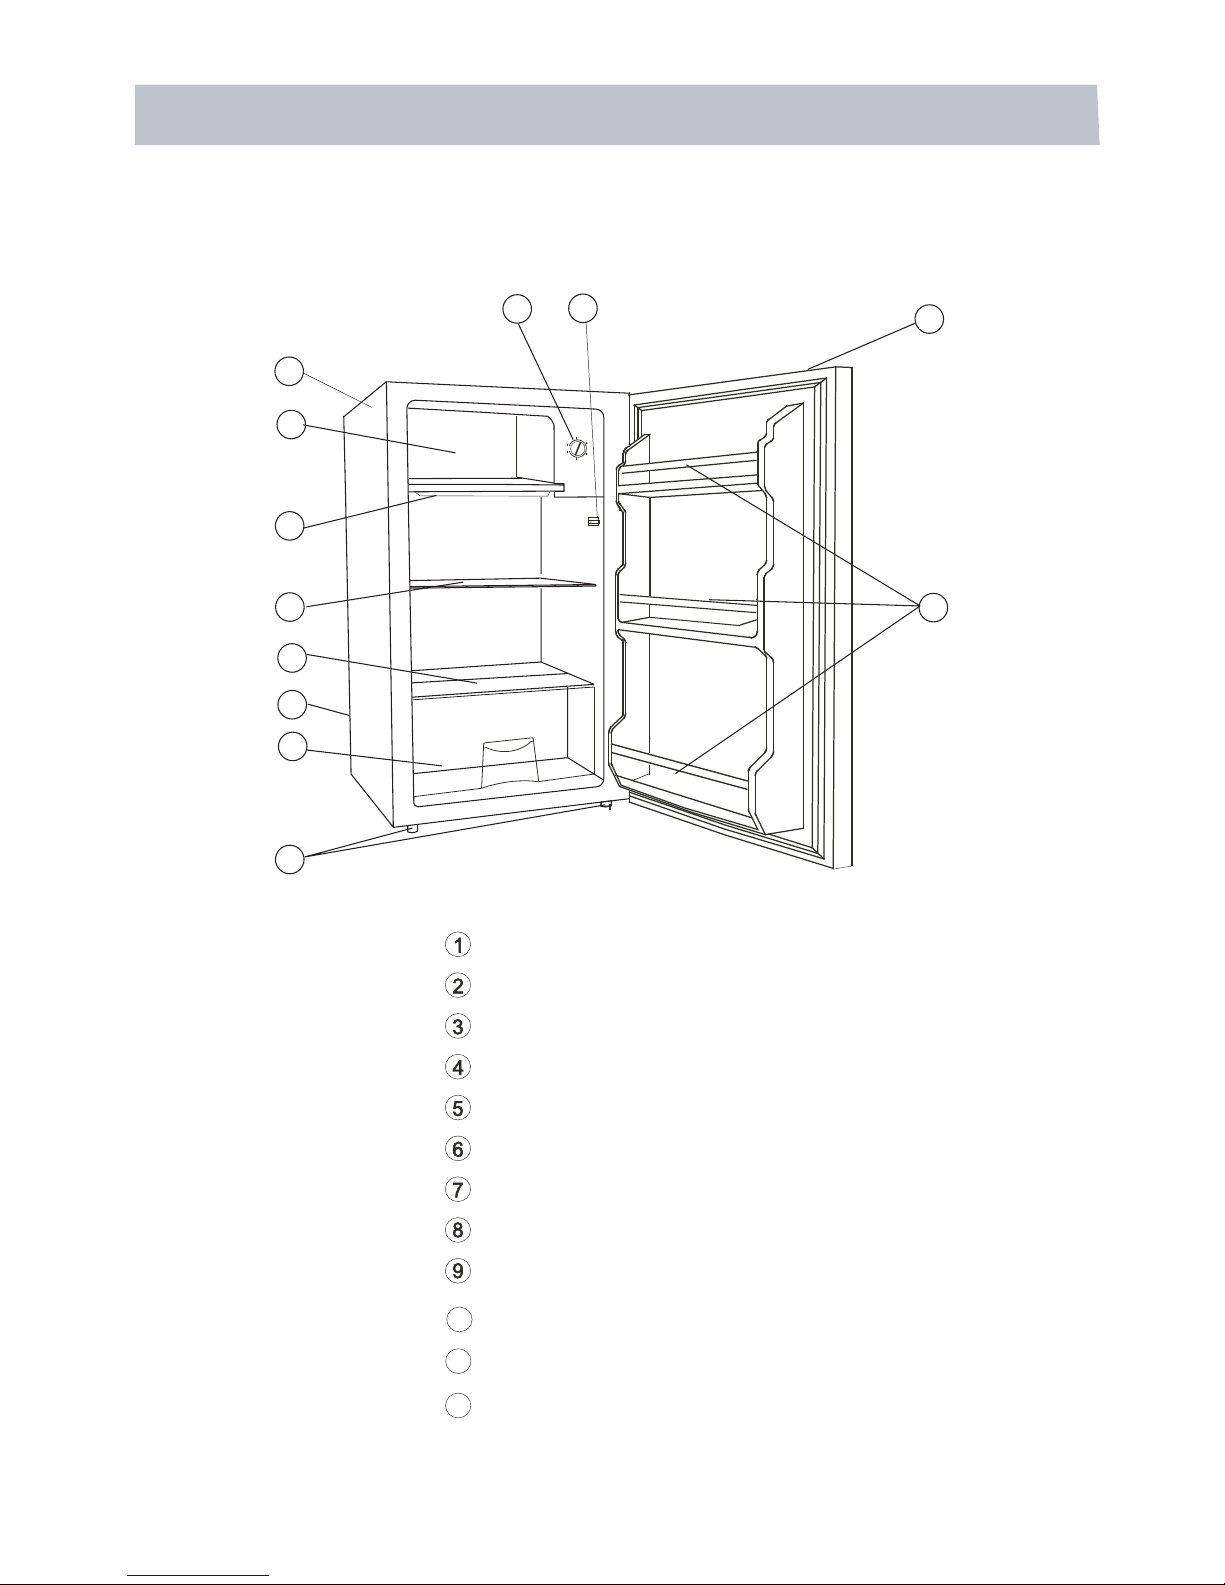
Name of parts
PARTS AND FEATURES
1
3
4
2
8
Ice Box Room Door
Cabinet
Drip Tray
Wire Shelf
Leveling Legs
Bottle Racks
Temperature Control Knob
Recessed Handle
5
6
10
Crisper box
12
11
10
11
12
Glass cover
Door switch
7
Compressor(back)
1
9
Page 4

Dear Customer:
Thank you for buying a Proline Refrigerator. To ensure that you get the best results
from your new refrigerator, please take time to read through the simple instructions in
this manual.
Please ensure that the packing material is disposed of in accordance with the current
environmental requirements.
Safety information
This information is provided in the interest of your safety. Please read the following
carefully before carrying out the installation or use of the refrigerator.
If you are discarding an old freezer or refrigerator/chiller with a lock/catch fitted.
Ensure that it is left in a safe condition with the lock/catch broken to prevent the
entrapment of children.
Old refrigerator equipment may contain CFC’s that will damage the ozone layer.
When disposing of any refrigerator equipment please contact your local waste
disposal department for advise on safe disposal.
This refrigerator must be only used for its intended purpose.
If the power cable requires replacement, this must only be undertaken by a suitably
qualified person, as special purpose tools are required.
A clearance of 10cm must be left between the sides of the appliance and any adjacent
cabinets or walls to allow for adequate air circulation. This refrigerator is not designed
for a recessed installation (“building in”)
Install on a good firm level surface, you can turn the front feet to stabalise any minor unevenness.
The refrigerator is heavy, carry the refrigerator by the casing not the door.
For purpose of safety all electrical repairs or maintenance must be carried out by a
qualified electrician or service agent.
Warning the plug must be accessible after the refrigerator is in position
This appliance is for refrigerating food and making ice cubes.
If the supply cord is damaged, it must be replaced by the manufacturer or its service
agent or a similarly qualified person in order to avoid an electrical hazard.
WARNING: This appliance is intended for domestic use only, any other use may
invalidate the warranty and might be dangerous. If you are disposing of an old
appliance with a lock or latch fitted, ensure it is left in a safe condition with the
lock or catch broken or disabled to avoid the entrapment of children when playing.
INSTALLATION:Position the refrigerator and allow to stand for two or three hours
before it is turned on for the first time to allow the system to settle. Do not position
next to any heatsource e.g. cooker, boiler or in direct sunlight etc.
2
Page 5

ELECTRICAL CONNECTION
For your safety please read the following information
Warning: This appliance must be earthed.
The appliance must be connected to a 220-240 volts 50 cycle AC supply by
means of a three pin socket, suitably earthed and should be protected by a 13
amp fuse in the plug.
The appliance is supplied with a 13 amp 3 pin plug fitted with a 13 amp fuse.
Should the fuse require replacement, it must be replaced with a fuse rated
at 13 amp and approved to BS1362.
If the mains plug is unsuitable for the socket outlet in your home or is removed
for any other reason, then the cut off plug should be disposed of safely to
prevent the hazard of electric shock, Remove the fuse before disposal.
There is a danger of electric shock if the cut off plug is inserted into any 13
amp socket outlet.
How to wire a 13 amp plug.
Important
The wires in the mains lead on this appliance are coloured in accordance with
the following code:
Green and Yellow - Earth
Blue – Neutral
Brown – Live
As the colours may not correspond with the markings identifying
the terminals in your plug proceed as follows.
The green and yellow wire must be connected to the terminal in the plug
which is marked with the letter E or with the earth symbol or coloured
green and yellow.
The blue wire must be connected to the terminal marked N or coloured black.
The brown wire must be connected to the terminal marked L or coloured red
Make sure the cord is held firmly under the cord clamp.
3
Page 6

Operating your refrigerator
Before plugging in your refrigerator for the first time remove all packing, clean the
refrigerator with warm water and bicarbonate of soda. Wipe dry with a soft cloth.
Plug the refrigerator into the mains power supply ensuring that the voltage is the same
as the rating label and then turn the thermostat control knob that is situated at the right
hand side of the unit to the midway position. The compressor should then start.
Do not operate your refrigerator in a room where the temperature is likely to fall
below 16 degrees C (61 degrees F) at night and /or especially in winter, as it is designed
to operate in ambient temperatures between +16 to +32 degrees C at lower
temperatures the refrigerator may not operate, resulting in a reduction in the storage
life of the food.
Setting the temperature control
To control the internal temperature, adjust the thermostat control knob according to
the ambient temperature or purpose of use.
The temperature control knob has 6 settings
from the coldest “5” to the warmest “1".
( 0, 1,2,3,4,5).
Adjust the temperature control to the setting that best suites your needs normal
position 3.
Turning the control to the “0” position stops the cooling cycle, but does not turn off
the power to the refrigerator.
If the unit is unplugged, power lost, or turned off, you must wait 10 minutes before
restarting the refrigerator. If you attempt to restart before this time delay, the
refrigerator may not start.
Defrosting
The surface of the evaporator ices up when the refrigerator is in use. When the frost
layer reaches 3-4 mm thick the refrigerator must be defrosted and cleaned.
Otherwise it may result in lower efficiency and high energy consumption.
1. Take out all the food from the fridge and the ice tray and keep the door open.
2. Turn the thermostat to the off position ( 0 ) unplug the refrigerator from the
mains supply.
3. Position the water collection tray under the ice box on the shelf below.
4. After all the ice as melted dry the unit carefully and empty the water collection
tray.
5. Reinsert the mains plug and set the thermostat to its original setting.
6. Leave to stand until the correct temperature as been reached then introduce your
food.
4
Page 7

Cleaning your refrigerator
Turn the Thermostat control to “OFF” position then remove the mains plug from the
wall socket, open the door and remove all the contents to a cool place remove the
shelf.
Wipe the inside surface with a warm water and bicarbonate of soda solution. The
solution should be about 2 tablespoon of bicarbonate of soda to 2 pints of water.
Wash the shelf and tray with a mild detergent solution.
Wring excess water out of the sponge or cloth when cleaning area of the controls.
Wash the outside cabinet with warm and mild liquid detergent. Rinse well and wipe
dry with a clean soft cloth.
Replacing The Lamp
1. Turn the thermostat to the off position (0) and disconnect from the mains.
2. Remove and empty if required, the drip tray underneath the ice compartment.
3. The Lamp is located in the back of the thermostat housing, unscrew the lamp
in a clockwise direction untill the lamp comes out of the lamp fitting.
Screw a new 10 Watt (E14 Base) lamp into the lamp fitting in a anti-clockwise
direction until tight.
5. Replace the drip tray and re-connect to the wall outlet.
6. Set the thermostat to your preferred setting and close the door
4.
If the plastic parts in the refrigerator remain contaminated for a long time by oil
(animal or vegetable),they will age and possibly crack. The drain pan gets dirty
very easily if it is not cleaned regularly, bad odours will be produced, get into the
habit of cleaning this pan regularly. Make sure you keep the door seal and adjacent
surface clean to maintain a good air tight seal.
5
Page 8

This refrigerator has been built with the door hinges on the right. If you wish
to cha nge the opening direction, follow the ins tructions below:
2. R emove the two s c re ws ( 1) tha t hold th e uppe r hing e ( 5) (rig ht s ide ) to the
Fridge body. Remove the upper hinge (5).
3.Lift the door and place it on a padded surface to prevent scratching it.
4. R emove the two s c rews (8) that hold the lower hinge(2) and remove
the lower hinge(2).
5. R emove the left front foot ( 4) a nd tra ns fe r it to the right s ide .
6. R everse theholecoverplate(7)from the left side to the right.
7.
Before fitting th e lower hinge (2), remove the hinge-pin (9) and revers e
the direction of the lower hinge (2). T hen install the lower hinge (2) onto
the le ft s ide of the lo wer fra me with two s c re ws ( 8) .
9. position the door in place making sure the door seats onto the lower hinge(2)
10.While holding the door in the closed position secure the upper hinge (5) in the
top fra me on left s ide with two s crews (1). Remember, do not tighten
the two s crews (1) until the top of the door is levelled with the top of the fridge.
Changing the reversible door
1. R emove the upper hinge cover (6) first
11. Install the upper hinge cover (6) and the hole cover plate (7) on the uppe r hinge .
8. Insert the hinge-pin (9) to the lower hinge (2).
6
Page 9

4
8
3
9
2
4
8
3
7
2
9
7
1
6
5
1
6
5
Wipe the inner and outer surface of the refrigerator and its accessories with
wet cloth. If they are too dirty, scrub them with neutral detergent, and then
clean them with water and dry them with clean cloth. After this, a small
quantify of glass wax is recommended to polish the refrigerator surface with
a flannelette.
Maintenance
7
Page 10

8
Troubleshooting
1. When the refrigerator does not work.
Check if there is a power failure.
Check if the power plug is plugged into the power outlet.
Check that the fuse has not blown.
2. When the refrigerator is cooling excessively.
The temperature control dial may be set too high.
If you place foodstuffs containing a lot of moisture directly under the cool
air outlets, they will freeze easily. This does not indicate a malfunction.
3. When the refrigerator is not cooling sufficiently.
The food may be packed too tightly together which will block the flow of cool air.
You may have put something hot or a lot of foodstuffs into the refrigerator .
The door may not have been closed properly.
The door gaskets may be damaged.
The refrigerator may not be ventilated.
There may be insufficient clearance between the refrigerator and the surfaces.
The temperature control dial may not be set properly.
4. When condensation form on the outside of the refrigerator.
Condensation may form on the outside when the humidity is high such as during
a wet season. This is the same result as the condensation formed when chilled
water is poured into a glass. It does not, therefore, indicate a failure, wipe dry
with a dry cloth.
5. When you hear a sound like water flowing.
A sound like water flowing is the refrigerant flowing. It does not Indicate a
malfunction.
6. When the cabinet's side panel heats up.
The side panel of the cabinet will heat up when the door is opened or closed
frequently, when starting the unit and when the unit operates in summer with
high ambient outside temperature, In such case, do not touch the panel, it
results from the dissipation of the heat from inside the cabinet, and it does
not mean that something is wrong with the refrigerator.
Page 11

Before calling for service
Please check the following points:
1. The refrigerator is not working
Check the plug is inserted correctly into the wall socket
Check there is power to the wall socket by plugging in another appliance, if the other
appliance works, check the fuse in the appliance plug.
2. The refrigerator is noisy when running
Check the appliance is level and is not in contact with another appliance or kitchen
furniture.
3. The refrigerator does not cool sufficiently.
If the door has been opened too often, or it has been left open for a while it will take
time for the appliance to reach its set temperature.
Check the air flow around the refrigerator has not been reduced due to insufficient
clearance.
NOTE: The following characteristics should not be l
A gentle tricking sound caused by coolant flowing through the pipe.
Compressor operating at high temperature.
Prolonged off periods
If the refrigerator is not in use for a long period of time, proceed as follows:
Disconnect the refrigerator from the main supply by removing the plug from the
socket.
Clean and dry the inside as instructed under the heading of cleaning the appliance.
Leave the door open to prevent any unpleasant smells from building up while the
appliance is not in use.
If there is a power failure for a short time keep the door closed check the contents of
the refrigerator every so often.
9
Page 12

Do’s and don’ts
Do- Clean and defrost your appliance regularly (See “Defrosting”)
Do- Take off any unusable leaves on vegetables and wipe off any soil.
Do- Leave lettuce, cabbage, parsley and cauliflower on the stem.
Do- Wrap raw meat and poultry loosely in polythene
Do- Wrap fish and offal in polythene bags.
Do- Wrap food with a strong odour or which may dry out, in polythene bags, or
aluminium foil or place in airtight container.
Do- Keep food for as short a time as possible and adhere to “best before” and “Use
by” etc. dates.
Do- Store commercially prepared food in accordance with the instructions given on
the packets.
Do- Wrap all food in food quality polythene bag
s and make sure any air is excluded.
Do-Keep ventilation openings, in the appliance enclosure clear of obstruction.
Don’t- Cover the shelves with any protective materials which may obstruct air
circulation.
Don’t- Store poisonous or any dangerous substances in your larder fridge. It has been
designed for the storage of edible foodstuffs only.
Don’t- Store cooked and fresh food together in the same container. They should be
packaged and stored separately.
Don’t- Leave the door open for long periods, as this will make the appliance more
costly to run and cause excessive ice formation.
Don’t- Use sharp edged objects such as knives or forks to remove the ice.
Don’t- U se hairdryers, or electrical appliances for defrosting only use item
recommended by the manufacture
r.
Don’t- Put hot food into the appliance. Let it cool down first.
Don’t- Damage the refrigerant circuit at any time.
Siting of the appliance
Do not keep your appliance in a room where the temperature is likely to fall below 16
degrees C (61 degrees F) at night and/or especially in winter, as it is designed to
operate in ambient temperatures between +16 and +32 degrees C (61 and 90 degrees
F). At lower temperatures the appliance may not operate, resulting in a reduction in
the storage life of the food.
NOTE:
Do- Chill white wines, beer, larger and mineral water before serving.
Do- Old refrigerator equipment may contain CFC s which will damage the ozone
,
layer, When disposing of any refrigerator equipment please contact your local waste
disposal department for advise on safe disposal.
Do- This appliance must be only used for its intended purpose storing food.
Don t-If the power cable requires replacement, this must only be undertaken by a
,
suitably qualified person as special purpose tools are required.
Don t- Store poisonous or any dangerous substances in your refrigerator. It has been
,
designed for the storage of edible foodstuffs only.
Don t -allow children to play with the refrigerator or tamper with the controls.
,
10
DO NOT POSITION YOUR APPLIANCE IN AN EXCESSIVELY COLD OR HUMID
AREA SUCH AS A GARAGE/CELLAR OR OUT BUILDING ETC.
Page 13

Technical data
Brand Proline
Appliance type Refrigerator
Star rating No
Total gross volume (L) 92L
Total storage volume (L) 90L
Ice box room storage volume(L) 10L
Refrigerator storage volume(L) 80L
Maximum bulb power (W) 10W
Climate Class +Ambient Range N (+16C to +32C)
Energy class (1) A
Power consumption (kWh/year) (2) 146
Supply voltage (V/Hz) 220-240V~ , 50Hz
Noise [dB(A)re 1 pW] <40
Refrigerating agent R600a/26g
Outside dimensions (W x D x H) 480*500*840mm
Insulation Blowing Gas C-Pentane
(1) Energy class: A…..G (A= economical…G= less economical)
(2) The real power consumption depends on using conditions and
appliance location.
472mm
492mm
480mm
935mm
440mm
580mm
11
Page 14

Service
If you have any questions regarding the installation or operation of your new
appliance please contact our help line on 0113 2793520 during normal office
hours.(Please note: you can not book a service call through this number).
If you require a Service Engineer to call The number is on your sales receipt.
Environmental Notes:
Do not dispose of your packaging materials with normal household waste.
These materials are recyclable and should be sorted (e.g. cardboard, plastic,
polystyrene) and disposed of in accordance with local regulations.
Waste electrical and electronic
Products must not be disposed
Of with household waste.Please
Refer to the retailer from whom
You purchased this item for
Disposal instructions.
We undertake the policy of one of continuous development and for this reason we
reserve the right to change specifications without prior notice.
12
Kesa UK, HU1 3AU 20/08/2008
Page 15

CKPRL-L01
 Loading...