

Page 1

PCH460T-E
OPERA TING AND INSTALLATION INSTRUCTIONS
BUIL T-IN VITROCERAMIC HOB
Page 2

CONTENTS
1. DESCRIPTION OF THE HOB
2. SAFETY INSTRUCTIONS
3. INSTALLATION
4. ELECTRICAL CONNECTION
5. USAGE
6. TOUCH CONTROL SAFETY FUNCTIONS
7. CLEANING AND CARE
Page 3

Dear Customer,
Thank you for purchasing this Proline Cooking Hob.The safety precautions and
recommendations in these instructions are for your own safety and that of
others. They will also provide a means by which to make full use of the features
offered by your appliance.
Please keep this booklet in a safe place. It may be useful infuture, either to
yourself or to others in the event that doubts should arise relating to its
operation.
This appliance must be used only for its intended purpose, that is for the
domestic cooking of foodstuffs. Any other form of usage is to be considered as
inappropriate and therefore dangerous.
The manufacturer declines all responsibility in the event of damage caused
by improper or incorrect use of the appliance.
CE Declaration of conformity
• Thi s cooking hob has been designed to be used only for cooking. Any other
use (su ch as h ea tin g a r oo m) is im pr o pe r an d d a n g e ro u s.
• This cooking hob has been designed, constructed, and marketed incompliance
with:
- Safety requirements of the
- Safety requirements of the “EMC” Directive 89/336/EC;
- Requirements of the Directive 93/68/EC.
"Low voltage" Directive 2006/95/EC;
GB
Page 4

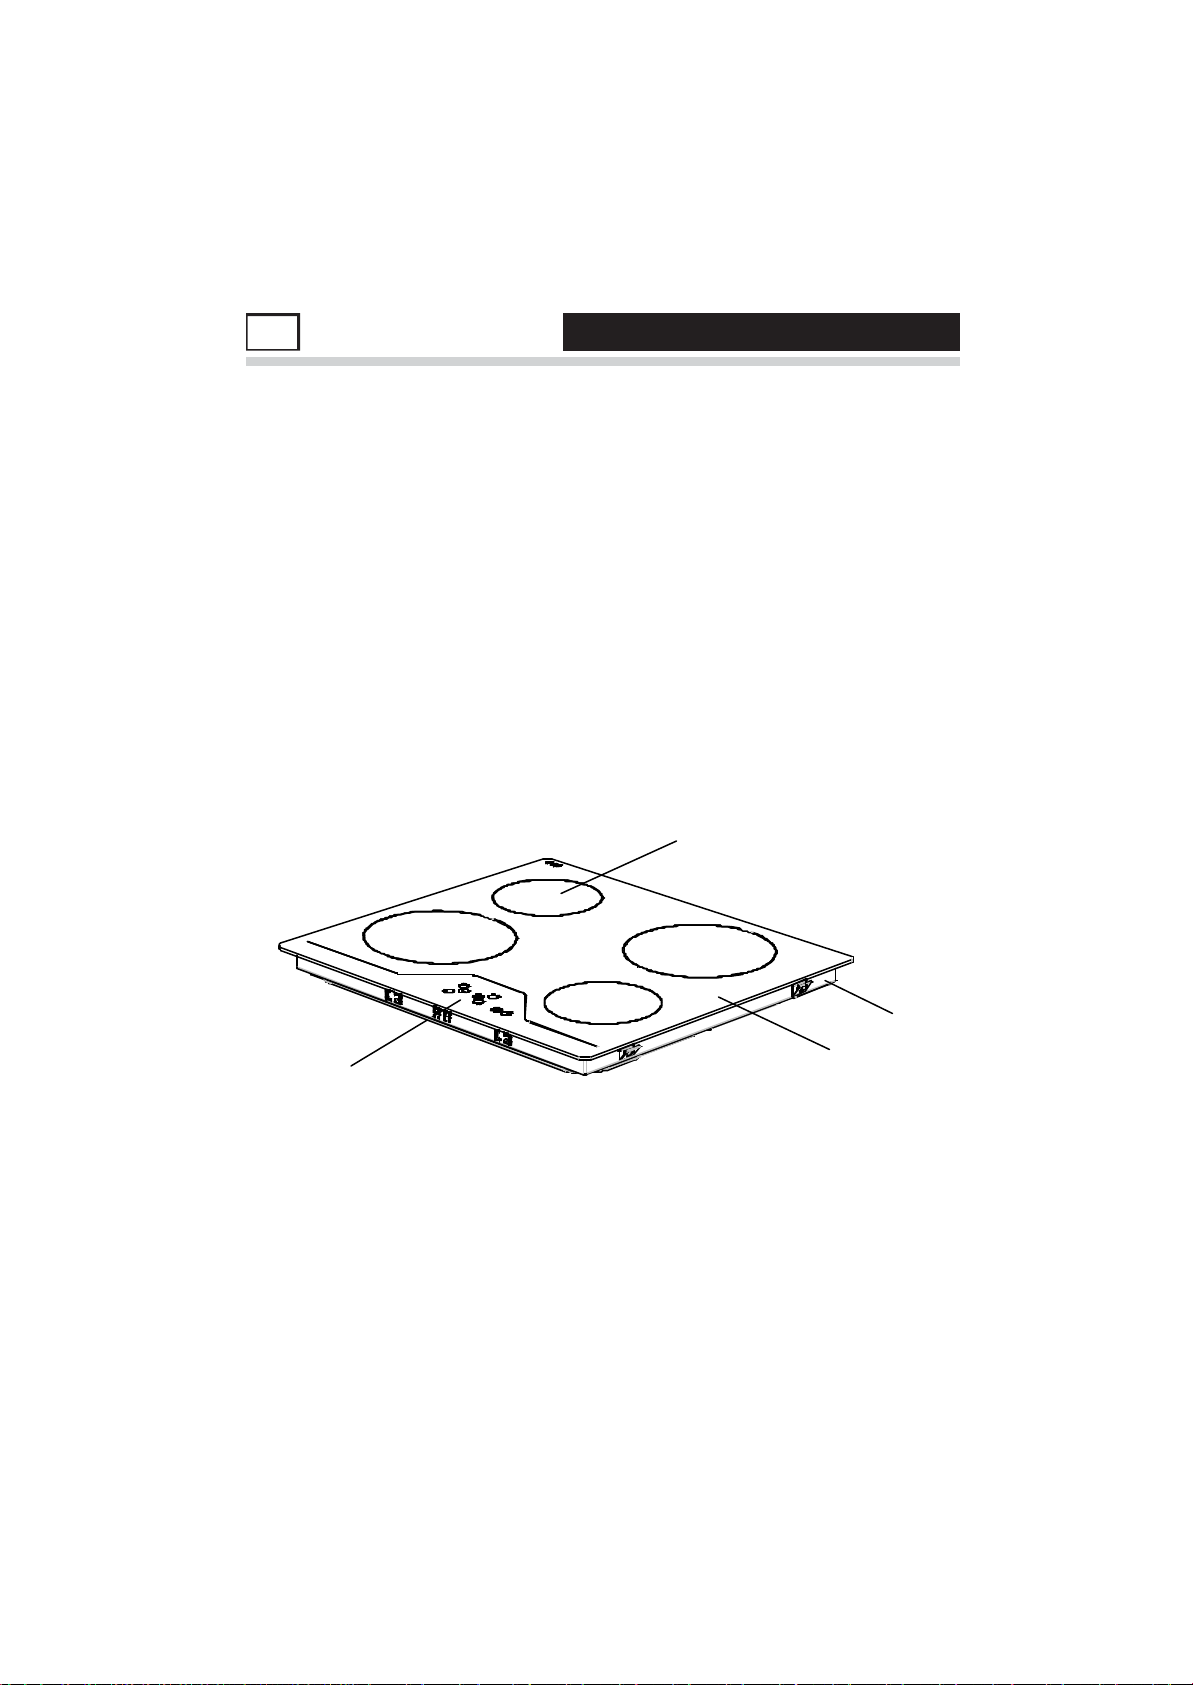
1 DESCRI PTION OF THE HOB
BEFORE USING FOR THE FIRST TIME .
Read the instructions carefully before installing and using the appliance.
After unpacking the appliance, make sure it is not damaged. In case of
doubt, do not use the appliance and contact your supplier or a qualified
engineer. .
Remove all packaging and do not leave the packing material (plastic bags,
polystyrene, bands etc ) in easy reach of children as they may cause serious
injury. The packaging materials are recyclable. .
The appliance should be installed and all the electrical connections made
by a qualified engineer in compliance with local regulations in force and
following the manufacturers instructions. .
Do not attempt to modif y the technical properties of the appliance, as it may
become dangerous to use.
SINGLE ZONE
HEATER
HOB
FRAME
CERAMIC
PANEL
SURFACETOUCH CONTROL
Note: Appearance of your hob maybe different than the model shown above
due to production changes.
1
Page 5

SAFETY INSTRUCTIONS2
Please comply with these instructions. If you do not, any damage
resulting from improper, incorrect or negligent use or improper
con nection or installation is not covered by the warranty.
· This appliance is intended for domestic use only, any other use may
inv a lid ate th e wa rranty and mi ght be dang erou s.
· This appliance must only be used for the purpose of heating or cooking
food, any other use, for example heating rooms, working surface or
storage surface, is dangerous. .
· Additions or modifications to the appliance are not permitted.
· Do not place or store flammable liquids, highly inflammable materials or
fusible objects on or near the appliance. .
· Children must be kept away from the appliance. .
· T he appliance may only be installed and connected by an authorised and
qualified installer. .
· The electrical safety of this hob is guaranteed only if it is connected to
a properly earthed system, which complies with the electrical safety
standards. .
· Built-in appliances may only be used after they have been installed in
suitable built-in units and work surfaces that meet the standards.
· Do not put pressure on the power supply cable while fitting the hob.
· Power supply cable length should not exceed 2m for isolation safety.
· In the event of faults with the appliance or damage to the glass ceramic
(cracks or splits), the appliance must be switched off and disconnected
from the electrical supply to prevent the possibility of an electric shock.
· Repairs to the appliance must only be carried out by authorised service
personal. .
· Make sure all the packaging has been removed before you use the
appliance. .
· Cables from electrical appliances must not touch the hot surface of any
appliance or hot cookware. .
· Never leave the hob unattended when cooking with fat or oil. They can
rapidly catch fire if overheated. .
· Do not cut any food on the glass of the ceramic hob. Glass panels should
not be used as working surfaces.
2
Page 6

· Be careful when using small household appliances, such as irons, near
the elements. .
· Do not use the cooking zones with empty cookware or without cookware.
· Make sure all the controls are in the off position when not in use.
· For cleaning, the appliance must be switched off at the supply and cooled
down. .
· Do not use a steam cleaner to clean the appliance as this could damage
the product and may invalidate the warranty. .
· Use only stable flat-based pans.
WA RNING .
When correctly installed, your product meets all safety requirements laid
down for this type of product category. However special care should be
taken around the underneath of the appliance as this area is not designed
or intended to be touched and may contain sharp or rough edges, that may
cause injury. .
Fire Risk! Do not leave inflammable materials on the Hob top.
Make sure that electrical cords connecting other appliances in the proximity
cannot come in to contact with the hob top. .
Do not allow heavy or sharp objects to drop on the ceramic hob. If the hob
is cracked or damaged, unplug and call the after-sales serv ice.
Do not scratch the hob with sharp objects. Don't use the hob as a work
surface. .
Before disposing of an unwanted appliance, it is recommended that it is
made inoperative and that all potentially hazardous parts are made harmless.
Important: This appliance has been designed for domestic use only. The
appliance is NOT suitable for use within a semi-commercial, commercial or
communal environment. .
If the supply cord is damaged, it must be replaced by the manufacturer,
its service agent or similarly qualified person in order to avoid an
electrical hazard.
3
Page 7

INSTALLATION3
The electrical connection of this hob should be carried out by an
authorised service personal or a qualified electrician, according to the
i nstruc tions in this guide and in compliance with the c urrent regulations.
· Prior to installation, ensure that the local distribution conditions and the
adjustment of the appliance are compatible.
· The laws, ordinances, directives and standards in force in the country of
use are to be followed (safety regulations, proper recycling in accordance
with the regulations, etc.)
Locating your built-in hob
After removing the packaging material from the appliance and its accessories,
ensure that the hob is not damaged. If you suspect any damage, do not use
t he appliance , contact an authorised service personal or a qualified electrician
immediately.
· This built-in hob is to be inserted into a cut out of a worktop. It will be
electrically connected with the switch box below counter level, especially
provided for this purpose.
· Cut an opening with the dimensions shown in the picture below.
4
Page 8

· Apply the one-sided self-adhesive sealing tape supplied all the way round
the lower edge of the cooking surface along the outer edge of the glass
ceramic panel. Do not stretch it.
· Screw the 4 worktop mounting brackets on the side walls of product.
worktop mounting bracket
5
Page 9

ELECTRICAL CONNECTION4
Electrical connection of your hob
· Before proceeding with the electrical connection, verify that the current
carrying capacity of the system and the socket is adequate for the maximum
power rating of the hob.
· Electrical installation of the residence and the electrical current plug in
use must be earthed and conform with safety regulations.
· If there is no dedicated hob circuit and fused switch, they must be installed
by a qualified electrician before the hob is connected.
· The fused switch must be easily accessible once the hob has been
installed.
· Do not use adaptors, multiple sockets and/or extension leads.
· This appliance conforms with the requirements ofthe following EEC
Directives:
1. Vitroceramic hob EEC/73/23 and 93/68, EEC/89/336 relating to
radio interference,
2. EEC/89/109 relating to contact with foods.
· A circuit breaker with a contact opening of at least 3 mm, rated 20 A and
delayed functioning type must be installed in the supply circuit.
E
2
2
2
* This appliance must be earth ed.
* For this c onnetion a power le ad
of wire type H05V V -F s hould be
us ed.
· The supply cable must be H05VV-F 3X2,5 mm² / 60227 IEC 53. You will
find the connection diagram shown on the back of your appliance.
· During in stallation, please insure that isolated cables are used. An incorrect
connection might damage your appliance. The guarantee will not cover
such damages.
· All repairs must be carried out by an authorised service personal or a
qualified electrician.
· Unplug your appliance before each maintenance. For reconnection, follow
the connection diagrams.
6
Page 10
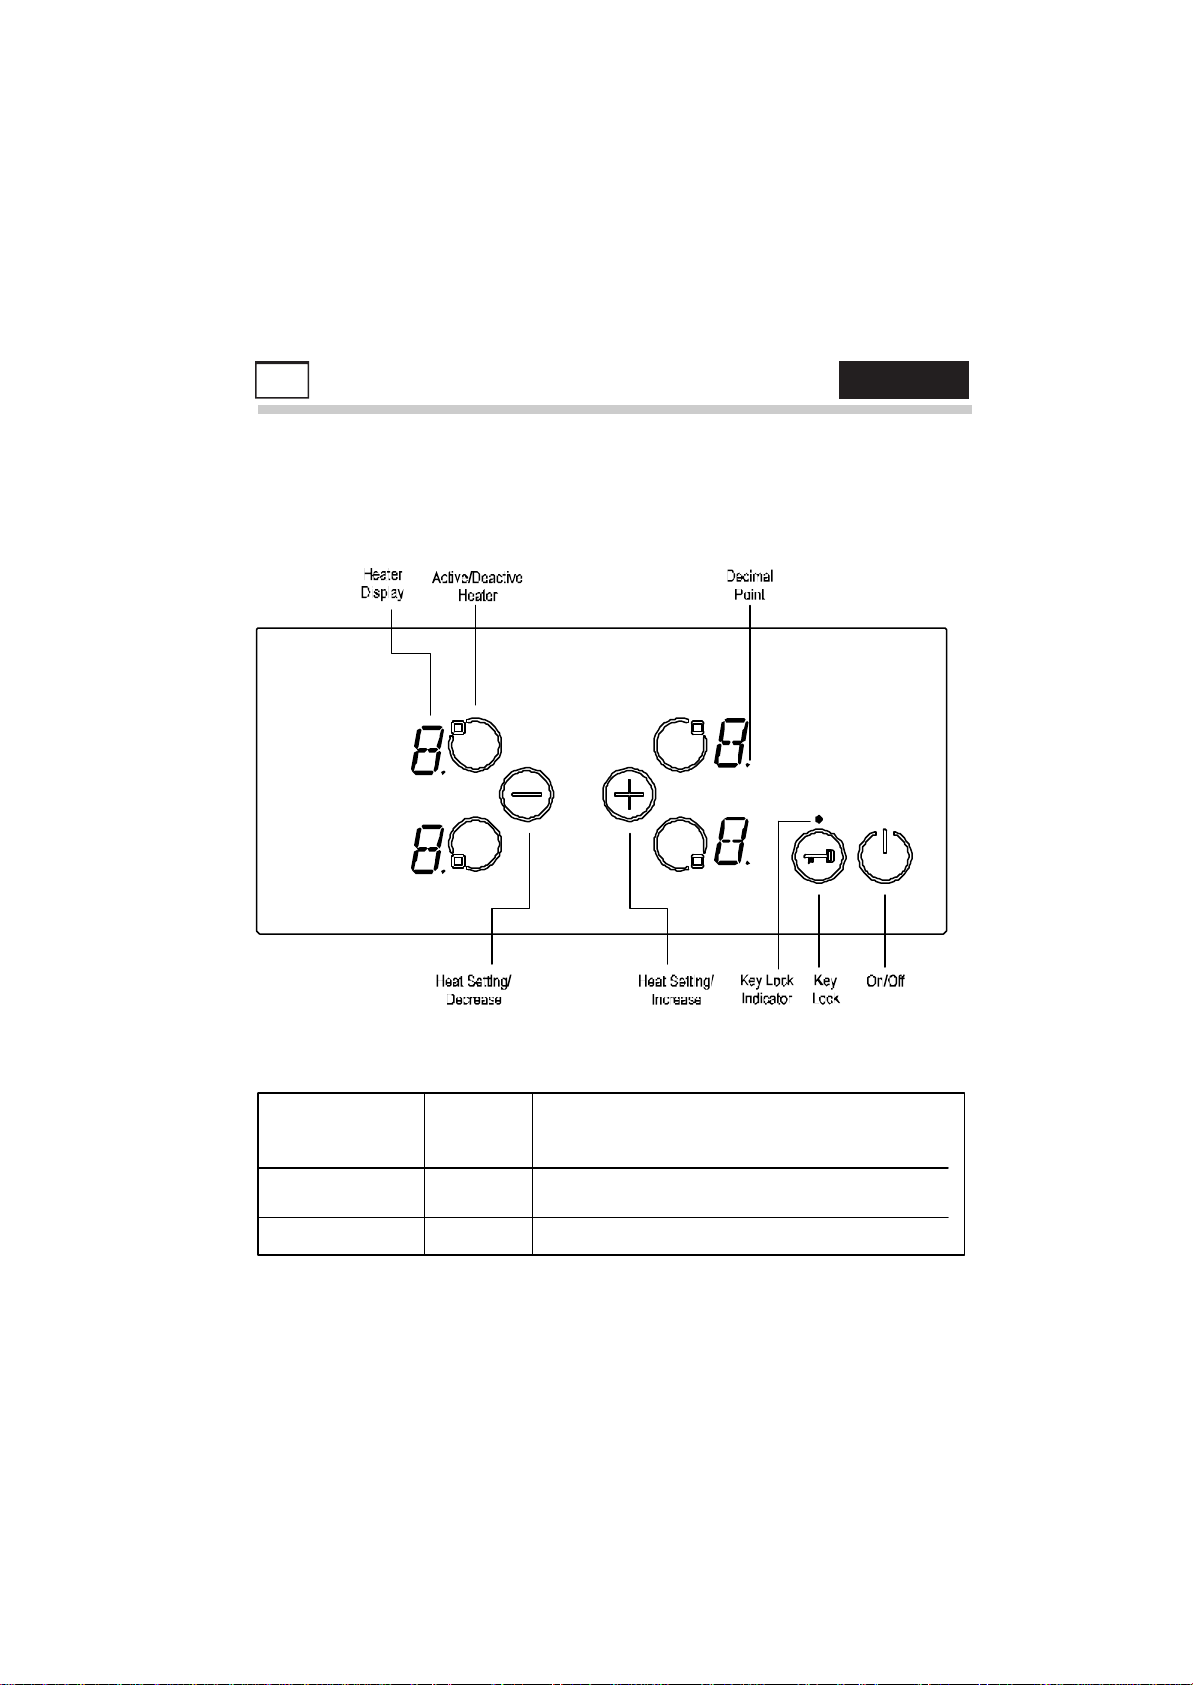
USAGE5
The appliance is operated by touching buttons and the functions are
confirmed by displays and acoustic signals.
NOTE: See the section on HOB RESET if you see a flashing H in any of
the displays.
Stand-By-Mode S-Mode
Operating-M ode
Lock Mode
7
B-Mode
VR-Mode The hob control is locked.
The mains are applied to the hob control
and all heater displays are off or a residual
heat display is active.
At least one heater display shows a heat
setting between ´0`and ´9`
Mode Descriptions
Page 11

T urning the appliance on / off . .
If the appliance is in Stand-By-Mode, it is put in Operating-Mode by pressing
the On/Off button at least 1 second. A beep indicates a successful
operation.
On all heaters a ´0` appears and all Decimal Point of the heater flashes.
If there is no operation within 10 sec, the display of all heaters will turn off.
If the displays are turned off, the heater w ill be set to off.
If is pressed more than 2 sec (in Operating-Mode), the appliance is
switched off and is set into the of f mode again. The appliance can be turned
off by pressing at any time; even if other buttons are pressed
simultaneously..............................................................................
If there is residual heat remaining, this will be indicated by a flashing H in
the corresponding Heater Display.
Select Heater .
If a single heater is chosen with the corresponding Active/Deactive Heater
Button , the Decimal Point of the related Heater Display flashes. F or the
selected heater, you can set the heat level between 1-9 by touching the
Heat Setting Buttons or . .
The buttons must be pressed within 3 sec, otherwise the heater selection
is erased and heat setting dot will disappear (Decimal Point). If there is no
further operation within 10 sec, the heater falls back into off mode.
The heat setting can always be changed by pressing or between
level 1-9. .
Each button operation or each display change is accompanied by a beep.
8
Page 12
Set Cooking Level With and Without Heat Boost .
All heaters are equipped with heat boost functionality.
If the heat boost is active, then the heater will be operated with maximum
power for the period of the heat boost time, which is dependent on the
selected heat setting. This is indicated by a flashing ´A`, alternating with the
heat setting value (e.g. ´A` and then ´9`) in the heater display. Once the
heat boost time has ended, only the heat setting will be displayed.
If you want to use heat boost level 9 must be select ed by pressing starting
from level 0. After setting the heat to level 9 , ´A`and the heat setting will
be displayed alternately. This means that level 9 and heat boost is active.
Continue to press the button to set a lower heat setting.
T he heat boost can be turned off by pressing until heat setting ´0` is
selected.
If the heat boost should be used, it can always be activated by actuating
again if the heat setting is set to level 9. In the heat display ´A/9` flashes.
T urn Off Individual Heaters
A selective heater can be turned off in two ways:
. Simultaneous operation of and buttons
· Reduction of the heat setting to ´0` by operating button
Simultaneous operation of and buttons
T he corresponding heater must be chosen with one of the Active/Deactive
Heater Button , the Decimal Point of the selected Heater Display flashes.
To turn off the heater, and must be pressed at the same time. A bee p
signal sounds and ´0` appears in the heat setting display.
If there is a residual heat for this heater remaining, this will be indicated by
a static display ´H` in the heat setting display.
Reduction of the heat setting to ´0` by operating button
9
Page 13
The heater can also be turned off by reducing the heat setting to ´0`.
W hen Heater Display indicates ´0`, the Decimal Point of the selected heater
will also turn off.
If there is a residual heat for this heater remaining, this will be indicated by
a static display ´H` in the heat setting display.
K ey Lock .
Key lock functionality is for blocking and set the appliance into a save
modus during operation. Touch modifications as for example rise heat
settings and others should not be possible. It is only possible to switch the
appliance off. .
T o lock the current operating mode, press the Key Lock button for at
least 2 seconds. This operation is acknowledged by a beep. The Key Lock
Indicator flashes and the controls are locked. .
The heater can only be locked in Operating Mode.
If the heater is locked, only can be operated, all other buttons are
disabled. Only the O n-Off switch will operate. If you switch off the
appliance, you must switch it on again and press the lock button to unlock
the appliance before you can use it. .
.
After pressing 2 sec, the Key Lock Indicator disappears. Now, the hob
control is unlocked and can be operated normally.
10
Page 14

6
The following safety functions are available to avoid unintended operations
of the hob control.
Sensor Safety Cut Off
To prevent the appliance from unwanted, random sensor operation, sensor
monitoring is included.
In case of one or more buttons are pressed longer than 12 sec, the sensor
monitoring routine indicates with a beep, that wrong operation (pot or other
object placed on the button, sensor failure, etc.) and switches off the
appliance.
The safety turn off causes the hob to turn off to standby. An ´F` will flash
in all heater displays once before switching to standby.
If residual heat is present, ´H` will be displayed in the appropriate heater
displays.
TOUCH CONTROL SAFETY FUNCTIONS
Over Temperature Switch Off
Due to the control panel being close to the front two heaters it can get too
hot to touch if the pans have been badly placed so the bottom edge of the
pan is close to but not touching the control buttons.
To prevent the hob control unit from damage, the control monitors the
tempe rature and switches off, if the control panel exceeds 60ºC. All 4 heater
displays show ´t`, until the hob cools down.
11
Page 15

After the hob cools the ´t` displays will be erased and the hob control enters
standby mode. This means that the user can reactivate the appliance by
touching .
Residual Heat Functions .
After the hob is turned off when cooking is finished, there is some heat
stored in the vitroceramic glass called residual heat. The hob can calculate
roughly how hot the glass is. If the calculated temperature is higher than
+ 60 ° C, the corresponding heater display will flash an ´H` symbol. The
residual heat display is shown as long as the calculated heater temperature
is higher than + 60 ° C. .
The display of the residual heat has the lowest priority and is overwritten
by every other display value such as safety turn off's and displaying error
c odes. .
HOB RESET .
When the Hob is first turned on after installation or after a power outage
during operation, the Hob will display a flashing ´H` on all or some heater
displays. .
Which displays flash an ´H` depends on mode of operation when the power
outage happened. .
This is due to the Hob retaining heater information in its memory, this is not
a fault and is normal. .
To reset the Hob, press and hold the top left heater, bottom left heater and
the buttons at the same time for roughly 2 seconds.
hold these buttons
to re se t the Ho b.
12
Page 16

CLEANING AND CARE7
Cookware with rough bottoms should not be used since these can scratch
the ceramic surface. The bottom of the cookware should be as thick and
flat as possible. Before use, make sure that cookware bottoms are clean
and dry.
Always place the cookware on the cooking zone before it is switched on.
If possible, always place the lids on the cookware. Bottom of the cookware
must not be smaller or larger than the cooking zones, they should be at the
proper size as indicated below.
CORRECT FALSE FALSE FALSE
Before cleaning the hob, first disconnect from the electrical supply socket.
The n ensure that there is n o residual heat stored in the appliance. Vitroceramic
glass is very resistant to high temperature and overheating. If there is residual
heat stored in the appliance, ´H` is flashing in the Heater Display. In order
to avoid burns, let the appliance cool down.
CLEANING THE CERAMIC HOB .
Before you begin cleaning make sure that the hob is switched off.
Remove spillages and other types of encrustations.
D ust or food particles c an be removed with a damp cloth.
If you use a detergent, please make sure that it is not abrasive, Do not use
abrasive cleaners or scouring powders as these can damage the ceramic
surface of the hob.
All traces of the c leaner must be removed with a damp cloth.
Dust, fat and liquids from food that has boiled over must be removed as
soon as possible.
If they are allowed to harden they become increasingly difficult to remove.
13
Page 17

This is especially true in the case of sugar/syrup mixtures which could
permanently pit the surface of the hob if left to burn on it.
If any of these products has melted on the ceramic surface, you should
remove it immediately (when the surface is still hot) by using a scraper to
avoid any permanent damage to the surface of the hob (available from the
sto r e whe re you p u r cha se d th i s app l i a n c e ) .
Do not put articles on the hob which can melt: i.e. plastic, aluminium foil,
sugar, sugar syrup mixtures etc.
Avoid using a knife or other sharp utensil as these may damage the ceramic
surface.
Do not use steel wool or an abrasive sponge which could scratch the surface
permanently.
14
Page 18

Disposal
W aste electri cal and electronic products must not be disposed
of with household waste. Please refer to the retailer from
whom you purchased this item for disposal instructions.
Packaging materials should be recycled using local facilities.
If something doesn't seem to work
If there is something about your appliance which you d o not understand
and you live in the UK you can phone our help line during normal office
hours on: 01 13 2793520 If you require service, call the number on your
sales receipt.
Calls are charged at standard rates.
W e apologise for any inconvenience caused by minor inconsistencies
in these instructions, which may occur as a result of product improvement
and development.
Kesa U.K HU1 3AU 01/ 09/2007
52012436
Page 19
PCH460T-E
INSTRUCTIONS RELATIVES A L'UTILISATION ET A
L'INST ALLATION
T ABLE DE CUISSON VITROCÉRAMIQUE ENCASTRABLE
Page 20

TABLE DES MATIÈRES
1. DESCRIPTION DE L'APPAREIL
2. CONSIGNES DE SÉCURITÉ
3. INSTALLATION
4. BRANCHEMENT ELECTRIQUE
5. UTILISATION
6. FONCTIONS SECURITAIRE DU BOUTON DE COMMANDE
7. NETTOYAGE ET ENTRETIEN
Page 21

Chère cliente, cher client,
Merci d' avoir acheté la présente table de cuisson de marque Proline. Les
précautions de sécurité et les recommandations contenues dans les présentes
instructions sont destinées à votre propre sécurité et à celle de vos proches.
Elles vous donneront par ailleurs un moyen avec lequel utiliser entièrement
toutes les fonctions offertes par votre appareil.
Veuillez conserver cette brochure dans un endroit sûr. En cas de doute relatif
à son fonctionnement, elle peut être utile à l'avenir, à vous-même, ou à vos
proches.
Le présent appareil doit être utilisé uniquement aux fins pour lesquelles il a été
conçu, à savoir pour la cuisson domestique des aliments. Toute autre forme
d'utilisation doit être considérée comme inappropriée et, en conséquence,
dangereuse.
La responsabilité du fabricant ne saurait être engagée en cas de dommage
provoqué par une utilisation inadaptée ou incorrecte de l'appareil.
Déclaration de conformité CE
• La présente table de cuisson a été conçue pour être utilisée uniquement pour la
cuisson. Toute autre utilisation (telle que le chauffage d'une pièce) est inappropriée
et dangereuse.
• Cet te table de cuisson a été conçue, construite, et commercialisée conformément
aux :
- Consignes de sécurité de la directive 2006/95/CE portant sur la " basse tension " ;
- Consignes de sécurité de la directive 89/336/CE portant sur l' " EMC " ;
- Consignes relatives à la directive 93/68/CE.
FR
Page 22
1 DESCRIPTION DE L'APPAREIL
AVANT D'UTILISER VOTRE APPAREIL POUR LA PREMIERE FOIS
Lisez attentivement les instructions avant d'installer cet appareil et de l'utiliser.
Après l'avoir enlevé de son emballage, assurez-vous qu'il n'est pas
endommagé. En cas de doute, n'utilisez pas l'appareil mais cont actez plutôt
votre fournisseur ou un technicien qualifié.
Enlevez l'emballage et ne laissez son matériel (sacs en plastique, polystyrène,
ban des, etc.) à la portée des enfants car il peut provoquer d es conséquences
graves. Les matériaux d'emballage sont recyclables.
L'appareil doit être installé et tous les branchements électriques effectués
par un technicien qualifié, conformément aux réglementations locales en
vigueur et selon les ins tructions données par les fabricants.
Évitez de modifier les propriétés techniques de l'appareil, dans la mesure
où son utilisation peut devenir dangereuse.
ELEMENT CHAUFFANT MONOZONE
CADRE DE LA TABLE DE CUISSON
PANNEAU DE COMMANDES A TOUCHES SENSITIVES
SURFACE EN CERAMIQUE
Remarque: L'apparence de votre table de cuisson peut être différente du
modèle présenté ci-dessus en raison des modifications apportées lors de
la production.
1
Page 23

CONSIGNES DE SÉCURITÉ2
Veuillez respecter ces consignes. Si vous ne le faites pas, tout dommage lié
à u ne utilisation inadaptée, incorrecte, ou négligente, voire d'un branchement
ou d'une installation inadaptés, ne sera pas couvert pas la garantie.
· Le présent appareil est réservé uniquement à une utilisation domestique.
Toute autre utilisation peut rendre la garantie nulle et de nul effet, et
constituer un danger.
· Le présent appareil doit être utilisé uniquement pour réchauffer ou cuire
les aliments. Toute autre utilisation de la surface de travail ou de la surface
de conservation, aux fins de chauffage de la pièce, est dangereuse.
· Il est interdit d'effectuer des additions ou des modifications sur l'appareil.
· Évit ez de mettre ou de conserver de s liquides inflammables, des maté riaux
hautement inflammables ou encore des objets fusibles au-dessus ou tout
près de l'appareil.
· Les enfants doivent être tenus à l'écart de l' appareil.
· L'appareil peut être installé et branché uniquement par un technicien
agrée et qualifié.
· La sécurité de cette table de cuisson en matière d'électricité n'est garantie
que si la table en question est branchée à un système correctement mis
à la terre et répondant aux normes de sécurité en vigueur en matière
d'électricité.
· Les appareils encastrables ne peuvent être utilisés qu'après avoir été
installés dans des unités encastrables appropriées et à des surfaces de
travail appropriées qui respectent les normes établies.
· N'exercez pas de pression sur le câble d'alimentation électrique pendant
l'installation de la table de cuisson.
· Pour d es raisons de sécurit é, la longueur du câble d'alimentation électrique
ne doit pas dépasser 2 m .
· Dans l'éventu alité de défaillances ob servées sur l'app areil ou de dommages
encourus par la surface vitrocéramique (fissures ou rayures), il convient
d'éteindre l'appareil et de le débrancher de la source d'alimentation
électrique afin de prévenir la possibilité d'un choc électrique.
· Les éventuelles réparations à apporter à l'appareil doivent uniquement
être effectuées par un personnel du service agrée.
· Assurez-vous que l'emballage a été entièrement enlevé avant d'utiliser
votre appareil.
· Les câbles des appareils électriques ne doivent ni toucher la surface
chaude de l'appareil, ni les ustensiles lorsque ceux-ci sont chauds.
· Ne laissez jamais la table de cuisson sans surveillance lorsque vous
cuisinez avec de la graisse ou de l'huile. Il peut rapidement prendre feu
en cas de surchauffe.
· Ne coupez pas d'aliment sur la vitre de la table de cuisson en céramique.
Les panneaux vitrés ne doivent pas être utilisés comme surfaces de
travail.
2
Page 24

· Soyez prudent lorsque vous utilisez de petits appareils électroménagers,
comme les fers à repasser, tout près des éléments.
· N'utilisez pas les zones de cuisson sans ustensiles ou avec des ustensiles
vides.
· Assurez-vous que toutes les commandes se trouvent à la position Off
(Arrêt) lorsque l'appareil n'est pas en cours d'utilisation.
· Pour le nettoyage, l'appareil doit être éteint à l'alimentation et refroidi.
· Évitez d'utiliser un nettoyant à vapeur pour votre appareil dans la mesure
où ce produit peut endommager ledit appareil, et rendre ainsi la garantie
nulle et de nul effet.
· Utilisez uniquement des ustensiles de cuisine stables avec une base plate.
AVERTISSEMENT
Une fois correctement installé, votre appareil remplit désormais toutes les
consigne s de sécurité prévues pour ce type de catégorie de produit. T outefois,
des précautions spéciales doivent être prises autour du dessous de l'appareil
car cet endroit n'a ni été conçu, ni n'a été prévu pour être touché, et est
susceptible à cet effet de contenir des bords pointus ou durs qui pourront
à leur tour entraîner des blessures.
Risque d'incendie! Évitez de laisser les matériaux inflammables au-dessus
de la table de cuisson.
Assurez-vous que les cordons électriques branchés aux autres appareils
alentours ne seront pas en contact avec la partie supérieure de la table de
cuisson.
Évitez de faire tomber des objets lourds ou pointus sur la table de cuisson
en céramique. Au cas où la table de cuisson présente une fissure ou est
endommagée, débranchez et appelez le serv ice après vente.
Évitez de rayer la table de cuisson avec des objets pointus N'utilisez pas
la table de cuisson comme surface de travail.
Avant d'effectuer la mise au rebut d'un appareil, il est recommandé de le
rendre inopérant et de faire en sorte que toutes les parties potentiellement
dangereuses soient inoffensives.
Important: Le présent appareil a été conçu uniquement pour une utilisation
domestique. L'appareil ne convient PAS à une utilisation dans un
environnement semi commercial ou communal.
En cas de dommage du cordon d'alimentation, celui-ci doit être remplacé
par le fabricant, son agent de service ou tout autre technicien qualifié
afin d'éviter un choc électrique.
3
Page 25

INSTALLATION3
Le branchement électriq ue de cette tab le de cu isson doit être effectué par un
personnel du service agrée ou par un électricien qualifié, selon les instructions
contenues dans ce guide et conformément aux réglementations en vigueur.
· Avant toute installation, assurez-vous que les conditions de distribution
et le réglage de l'appareil sont compatibles.
· Les lois, ordonnances, directives et normes en vigueur dans le pays
d'utilisation du produit doivent être respectées (réglementations en matière
de sécurité, recyclage adéquat conformément à la réglementation en
vigueur, etc.)
Emplacement de votre table de cuisson encastrable
Après avoir enlevé le matériel d'emballage et ses accessoires de l'appareil,
assurez-vous que la table de cuisson n'est pas endommagée. Si vous
suspectez un dommage au niveau de l'appareil, ne l'utilisez pas. Contactez
immédiatement un personnel du service agrée ou un technicien qualifié.
· Cette table de cuisson encastrable doit être insérée dans une fente, hors
d'une surface de travail. Elle sera électriquement branchée au boîtier
d'interruption e n dessous d u nive au du plan de travail, prévu essentielleme nt
à cet effet.
· Créez une ouverture avec les dimensions présentées dans le schéma cidessous.
4
Page 26
· Appliquez le ruban d'étanchéité autocollant unilatéral fourni tout autour du
côté inférieur de la surface de cuisson, le long du côté extérieur du panneau
vitrocéramique. Ne l'étirez pas.
· Vissez les 4 crochets de montage du plan de travail sur les parois latérales
du produit.
Crochet de montage du plan de travail
5
Page 27

BRA NCHEMENT ELECTRIQUE4
Branchement électrique de votre table de cuisson
· Avant de procéder au branchement électrique, vérifiez que la capacité de
transport actuelle du système et la prise sont appropriées pour la puissance
nominale maximale de la table de cuisson.
· L'installation électrique de la résidence et le branchement du courant
électrique utilisé doivent être mis à la terre et respecter la réglementation
en matière de sécurité.
· S'il n'existe pas de circuit pour table de cuisson et d'interrupteur à fusibles
spécialisés, l'installation doit être effectuée par un électricien qualifié avant
tout branchement de la table de cuisson.
· L'interrupteur à fusibles doit être facilement accessible une fois la table
de cuisson installée.
· Évit ez d'utiliser de s adaptateurs, de multiples prises et/ou câbles de raccord.
·
Cet appareil est conforme à la réglementation des directives CEE suivant
1. Table de cuisson vitrocéramique. CEE/73/23 et 93/68, CEE/89/336
relatif à l'interférence radio,
2. CEE/89/109 relatif au contact avec les aliments.
· Un disjoncteur avec un écartement de contact d'un minimum de 3 mm 20
A, fonctionneme nt retardé, doit être installé à l'intérieur du circu it d'alimentation.
es :
E
2
2
* Cet appareil doit être branché à une
borne de mise à la terre.
* Pour ce branchement, un conducteur
d'aliment ation de type H05VV-F doit être
utilisé.
2
· Le câble d'alimentation doit être de H05VV-F 3X2, 5 mm² / 60227 IEC 53.
Le schéma de branchement figure à l'arrière de votre appareil.
· Pendant l'installation, veuillez vous assurer que les câbles isolés sont
utilisés. Un branchement inadéquat pourrait endommager votre appareil.
La garantie ne couvrira pas de tels dommages.
· T out travail de réparation doit être effectué par un personnel du service
agrée ou par un électricien qualifié.
· Débranchez votre appareil avant tout travail d'entretien. Pour brancher à
nouveau, respectez les schémas de branchement.
6
Page 28

UTILISATION5
Pour faire fonctionner votre appareil, appuyez sur les touche s et les fonctions
sélectionnées seront confirmées par des affichages et des signaux
acoustiques.
REMARQUE: Reportez-vous à la section relative au REGLAGE DE LA
T ABLE DE CUISSON dans le cas où vous voyez un H clignotant dans l'un
des affichages.
Affichage de
l'élément chauffant
Activer/Désacti
ver l'élément
chauffant
Point
décimal
Réglage de chaleur/
Mode de veille Mode S
Mode de
fonctionnement
Mode verrouillé
7
Mode B
Mode VR
Diminution
Les secteurs sont appliqués à la commande de la
table de cuisson, et tous les affichages de l'élément
chauffant sont éteints, ou alors un affichage de
l'élément résiduel est actif.
Au moins un affichage de l'élément chauffant présente
un réglage de chaleur compris entre ´0` et ´9`
La commande de la table de cuisson est verrouillée.
Descriptifs du mode
Réglage de chaleur/
Augmentation
Indicateur
de
verrouillage
Verrou Marche/
Arrêt
Page 29

Allumer/Eteindre l'appareil.
Si l'appareil est en mode de veille, vous pouvez le mettre en mode de
fonctionnement si vous appuyez sur la touche On/Off (Marche/Arrêt)
pendant au moins 1 seconde. Un bip sera émis pour indiquer que l'opération
a été effectuée avec succès.
Sur tous les éléments chauffants, un ´0` apparaît et tout point décimal de
l'élément chauffant clignote.
Si l'appareil n'enregistre aucune opération après 10 secondes, l'affichage
de tous les éléments chauffants s'éteindra.
Si les affichages sont éteints, l'élément chauffant sera réglé à la position
éteinte.
Si vous appuyez sur le bouton pendant plus de 2 secondes (en Mode
de fonctionnement), l'appareil est éteint, et bascule à nouveau en mode Off
(éteint). Vous pouvez éteindre l'appareil en appuyant sur le bouton à tout
moment, même s i d' au tre s b ou to ns s o nt ap pu yé s
simultanément.................................................................
En cas de chaleur résiduelle restante, un H clignotant l'indiquera dans
l'affichage de l'élément chauffant correspondant.
Sélectionner l'élément chauffant .
Si un seul élément chauffant est sélectionné avec le bouton
Activer/Désactiver le bouton de l'élément chauffant, le Point décimal de
l'affichage de l'élément chauffant correspondant clignote. Pour l'élément
chauf fant sélectionné, vous avez la possibilité de régler le niveau de chaleur
entre 1 et 9 en appuyant sur les boutons de réglage de l'élément chauffant
ou . .
Vous devez appuyer sur les boutons dans un intervalle de 3 secondes,
faute de quoi la sélection de l'élément chauffant sera effacée et le point de
réglage de chaleur disparaîtra (Point décimal). Si aucune autre opération
ne se produit pendant 10 secondes, l'élément chauffant retourne en mode
Off.
Le réglage de chaleur peut toujours être modifié en appuyant sur le bouton
ou entre les niveaux 1 et 9. .
Le fonctionnement de chaque bouton ou chaque modification d'affichage
s'accompagne d'un bip.
8
Page 30

Réglez le niveau de cuisson avec ou sans pompe à chaleur .
Tous les éléments chauffants comportent la fonctionnalité de la pompe à
chaleur.
Si la pompe à chaleur est active, le fonctionnement de l'élément chauffant
se fera alors avec une puissance maximale pendant la période de la durée
de la pompe à chaleur, qui dépend du réglage de chaleur sélectionné.
L'indication se fait à ce niveau par un ´A` clignotant, qui alterne avec la
valeur de réglage de la chaleur (ex : ´A` puis ´9`) dans l'affichage de l'élément
chauffant. Une fois le temps de la pompe à chaleur terminé, seul le réglage
de chaleur s'affiche.
Si vous voulez utiliser la pompe à chaleur, le niveau 9 doit être sélectionné.
Pour ce faire, appuyez sur le bouton à commencer par le niveau 0. Après
avoir réglé le niveau de chaleur à 9, ´A` et le réglage de chaleur s'afficheront
alternativement. Ceci signifie que le niveau 9 et la pompe à chaleur sont
actifs. Continuez à appuyer sur le bouton pour définir un réglage de
chaleur inférieur.
Vous pouvez éteindre la pompe à chaleur en appuyant sur le bouton jusqu'à
ce que le réglage de chaleur ´0` soit sélectionné.
Si vous devez utiliser la pompe à chaleur, vous pouvez toujours l'activer en
déclenchant à nouveau le bouton si le réglage de chaleur est défini au
niveau 9. À l'écran d'affichage de chaleur, ´A/9` clignote.
Eteignez les éléments chauffants individuels
Un élément chauffant sélectif peut être éteint de deux manières :
. Par un fonctionnement simultané des boutons et
·
Par une réduction du réglage de chaleur à ´0` en appuyant sur le bouton
F onctionnement simultané des boutons et
L'élément chauffant correspondant doit être sélectionné avec l'un des boutons
Activer/Désactiver le bouton de l'élément chauffant, le Point décimal de
l'affichage de l'élément chauf fant sélectionné clignote.
Pour éteindre l'élément chauffant, les boutons et doivent être appuyés
au même moment. Un bip est émis, et ´0` apparaît à l'écran d'affichage du
réglage de chaleur.
S' il y a un reste de chaleur résiduelle pour cet élément chauffant, celui-ci sera
indiqué par un affichage statique de ´H` à l'écran d'af fichage du réglage de
chaleur.
Réduction du réglage de chaleur à ´0` en appuyant sur le bouton
9
Page 31

Vous pouvez également éteindre l'élément chauffant en réduisant le réglage
de chaleur à ´0`.
Lorsque l'écran d'affichage indique 0`, le point décimal de l'élément chauffant
sélectionné s'éteindra aussi.
S'il y a un reste de chaleur résiduelle pour cet élément chauffant, celui-ci
sera indiqué par un affichage statique de ´H` à l'écran d'affichage du réglage
de chaleur.
Verrou
La fonctionnalité de verrouillage est réservée au blocage et au réglage de
l'appareil en mode d'enregistrement durant l'opération. Les modifications
relatives aux touches, comme les réglages liés à l'augmentation de chaleur
et autres, ne doivent pas être possibles. Il n'est possible que d'éteindre
l'appareil. .
Pour verrouiller le mode de fonctionnement actuel, appuyez sur le bouton
Verrou pendant au moins 2 secondes. Cette opération est indiquée par
un bip. L'indicateur de verrouillage clignote et les commandes sont
verrouillées.
L'élément chauffant ne peut être verrouillé qu'en Mode de Fonctionnement
Si l'élément chauffant est verrouillé, seul le bouton peut fonctionner, tous
les autres étant désactivés. Seul le bouton de mise en marche et de mise
à l'arrêt fonctionnera. Si vous éteignez l'appareil, vous devez l'allumer
à nouveau, puis appuyer sur le bouton de verrouillage pour déverrouiller
l'appareil avant de pouvoir l'utiliser.
Après avoir appuyé sur le bouton pendant 2 secondes, l'indicateur de
verrouillage disparaît. À présent, la commande de la table de cuisson est
déverrouillée et peut fonctionner normalement.
10
Page 32

6
FONCTIONS SECURITAIRE DU BOUTON DE COMMANDE
Les fonctions sécuritaires suivantes sont disponibles pour éviter les
fonctionnements non voulus de la commande de la table de cuisson.
Coupure du capteur de sécurité
Pour éviter au capteur de l'appareil de rencontrer un fonctionnement
involontaire et hasardeux, un détecteur de contrôle est inclus.
Au cas où un ou davantage de boutons sont appuyés pendant plus de 12
secondes, la routine du détecteur de contrôle indique la fausse manipulation
en émettant un bip, (pots ou autres objets posés sur le bouton, échec du
capteur, etc.) et éteint l'appareil.
L'arrêt de la fonction sécuritaire amène la table de cuisson à basculer en
mode de veille. Un ´F` clignotera dans tous les affichages de l'élément
chauffant une fois avant de passer en mode de veille.
En cas de présence de la chaleur résiduelle, ´H` s'affichera dans les écrans
d'affichage de l'élément de chauffage approprié.
Protection co ntre la surchauffe
Étant donné que le panneau de commande est proche des deux éléments
chauffants avant, celui-ci peut devenir trop chaud au toucher si les récipients
ont été mal positionnés de sorte que le bord inférieur du récipient soit près
mais ne touche pas les boutons de commande.
Pour éviter d'endommager la table de cuisson, la commande contrôle la
température et éteint, si le bandeau de commande dépasse 60ºC. Tous
les 4 affichages de l'élément chauffant affichent ´t`, jusqu'à ce que la table
de cuisson refroidisse.
11
Page 33

Après refroidissement de la table de cuisson, ´t` est effacé et la commande
de ladite table passe en mode de veille. Ceci signifie que l'utilisateur peut
réactiver l'appareil en appuyant sur la touche .
Fonctions de la chaleur résiduelle .
Après que la table de cuisson soit éteint e à la fin de l'opération, il y a une
quantit é de chaleur appelée chaleur résiduelle qui est emmagasinée dans le
verre en céramique. La table de cuisson peut calculer de manière approximative
le degré de chaleur de la vitre. Si la température calculée est supérieure à +
60 ° C, l'affichage de l'élément chauffant correspondant clignotera en affichant
un symbole ´H `. La chaleur résiduelle s'affiche aussi longtemps que la
températ ure de l'élément chauffant est supérieure à 60 ° C.
L'affichage de la chaleur résiduelle a la plus faible priorité et est remplacé
par toutes les autres valeurs d'affichage à l'e xemple des coupures sécuritaires
et l'affichage des codes d'erreur. .
REG LAGE DE LA TABLE DE CUISSON .
Lorsque la table de cuisson est allumée pour la première fois après
l'installation ou après une panne d'électricité au cours de l'opération, la
table de cuisson affichera un ´H` clignotant sur tout ou quelques-uns des
affichages de l'élément chauffant.
L'affichage qui clignote en formant la lettre ´H` dépend du mode de
fonctionnement lorsque la panne d'électricité intervient.
Ceci est dû aux informations relatives à l'élément chauffant de retenue de
la t able de cuisso n contenues dans sa mémoire. Ceci ne constitu e nullement
un défaut. Au contraire, c'est un phénomène tout à fait normal. .
Pour régler la table de cuisson, appuyez et maintenez appuyés les côtés
gauche supérieur et inférieur de l'élément chauffant, ainsi que les boutons
au même moment pendant 2 secondes environ.
maintenez ces
boutons e nfo ncé s
pour rég le r la table de
cuisson.
12
Page 34

NETTOYAGE ET ENTRETIEN7
Les ustensiles de cuisson aux fonds durs ne doivent pas être utilisés dans
la mesure où ils peuvent rayer la surface en céramique. Le fond de l'ustensile
de cuisson doit être aussi épais et plat que possible. Avant toute utilisation,
assurez-vous que les fonds de l'ustensile en question sont propres et secs.
Positionnez toujours l'ustensile sur la zone de cuisson avant sa mise en
marche. Dans la mesure du possible, couvrez toujours l'ustensile. Le fond
de l'ustensile de cuisson ne doit pas être plus petit ni plus grand que les
zones de cuisson. Il doit en revanche avoir la taille ap propriée telle qu'indiquée
ci-dessous.
CORRECT FAUX FAUX FAUX
Avant de nettoyer la table de cuisson, débranchez-la d'abord de la source
d'alimentation électrique.
Ensuite, assurez-vous qu'il n'existe aucune chaleur résiduelle dans l'appareil.
Le verre en céramique est très résistant aux températures élevées et à la
surchauffe. S'il existe une quelconque quantité de chaleur emmagasinée
dans l'appareil, ´H` clignote dans l'affichage de l'élément chauffant. Afin
d' éviter de vous faire brûler par l'appareil, lais sez-le refroidir.
N ETTOYAGE DE LA TABLE DE CUISSO N EN CERAMIQUE
Avant de commencer le nettoyage, assurez-vous que la table de cuisson
est débranchée.
Enlev ez tous les déversements et autres types d'incrus tation.
La poussière ou les particules d'aliments peuvent être retirés à l'aide d'un
tissu imbibé d'eau.
Si vous utilisez un détergent, veuillez vous assurer qu'il n'est pas corrosif.
De plus, n'utilisez en aucun cas des nettoyants corrosifs, ni de poudres à
récurer dans la mesure où ces produits peuvent endommager la surface en
céramique de la table de cuisson.
T oute trace de nettoyant doit être enlevée à l'aide d'un tissu imbibé d'eau.
La poussière, les matières grasses et les liquides provenant des aliments
doivent être enlevés le plus tôt possible.
S'ils ont le temps de durcir, ils deviennent progressivement difficiles à enlever.
13
Page 35

Il s'agit notamment des produits comme le sucre/les mélanges de sirop qui
pourraient ronger en permanence la surface de la table de cuisson si un
nettoyage préalable n'est pas ef fectué avant la prochaine utilisation.
Si l'un de ces produits a fondu sur la surface en céramique, vous devez
l'enlever immédiatement (lorsque la surface est encore chaude) en utilisant
un grattoir afin d'éviter tout dommage permanent à la surface de la table
de cuisson (disponible dans le magasin dans lequel vous avez acheté cet
appareil).
Ne déposez pas d'articles qui peuvent fondre sur la table de cuisson : il
s'agit entre autres de plastic, de feuille d'aluminium, se sucre, de mélanges
de sirop sucrés, etc.
Évitez d'utiliser un couteau ou tout autre ustensile pointu car ils peuvent
endommager la surface en céramique.
Évitez d'utiliser des pailles de fer, ou des éponges corrosifs susceptibles de
rayer la surface de votre table de cuisson de manière permanente.
14
Page 36

Mise au rebut
Les appareils électriques et électroniques ne doivent pas
être mis au rebut avec les déchet s ménagers. Veuillez vous
renseigner auprès du détaillant chez qui vous avez acheté
ce produit afin d'en savoir plus sur les consignes relatives
à la mise au rebut.
Les emballages doivent être recyclés à l'échelle locale.
En cas de perturbation
Si votre appareil vous pose un problème que vous ne comprenez pas,
et que vous résidez au RU, vous pouvez nous contacter par téléphone
aux heures ouvrables au numéro ci-après: 0113 2793520. Si vous
souhaitez rentrer en contact avec le service agrée, composez le numéro
figurant sur la facture qui vous a été remise.
Les appels sont facturés au tarif normal.
Nous vous présentons toutes nos excuses pour les éventuels
désagréments que pourront entraîner les incohérences mineures
contenues dans ces instructions, et qui pourraient se produire à la faveur
de l'amélioration ou du développement du produit.
Kesa U.K HU1 3AU 01/ 09/2007
52012436
Page 37

PCH460T-E
Bedienungs- und Installationsanleitung
Glaskeramik-Einbauherd
Page 38

INHALT
1. Übersicht über das Gerät
2. Sicherheitshinweise
3. Installation
4. Elektrischer Anschluss
5. Betrieb
6. Touch Control-Sicherheitsfunktionen
7. Reinigung und Pflege
Page 39

Lieber Kunde!
Vielen Dank für den Kauf unseres Proline-Kochfeldes. Die Sicherheitshinweise
und Empfehlungen in dieser Anleitung dienen Ihrer eigenen Sicherheit und der
Sicherheit anderer Personen. Hier erfahren Sie auch, wie Sie die Funktionen
Ihres neuen Gerätes optimal nutzen können.
Bitte bew ahren Sie diese Anleitung an einem sicheren Ort auf. Eventuell
möchten Sie zukünftig darin nachschlagen - zum Beispiel, wenn Fragen
während des Betriebes aufkommen oder sich andere Personen mit der
Bedienung des Gerätes vertraut machen möchten.
Das Gerät darf nur für seinen bestimmungsgemäßen Einsatzzweck genutzt
werden: Zur Zubereitung von Lebensmitteln im H aushalt. Jede andere
Art des Einsatzes muss als nicht bestimmungsgemäß und als gefährlich
betrachtet werden.
Der Hersteller haftet keinesfalls bei Schäden, die durch den unsachgemäßen
oder falschen Einsatz des Gerätes entstehen.
CE-Konformitätserklärung
• Dieses Kochfeld wurde ausschließlich zum Erhitzen von Speisen entwickelt.
Jeglicher sonstiger Einsatz (z. B. als Raumheizung) ist bestimmungswidrig und
gefährlich.
• Dieses Kochfeld wurde in Übereinstimmung mit folgenden Regelungen entwickelt,
konstruiert und vertrieben:
- Sicherheitsanforderungen der Niederspannungsdirektive 2006/95/EC;
- Sicherheitsanforderungen der EMV-Direktive 89/336/EC;
- A nforderungen der Direktive 93/68/EC.
DE
Page 40

1 Übersicht über das Gerät
Vor der ersten Inbetriebnahme
Lesen Sie die Anleitung aufmerksam durch, bevor Sie das Gerät installieren und
benutzen.
Vergewissern Sie sich nach dem Auspacken, dass nichts beschädigt ist. Im Zweifelsfall
wenden Si e sich bit te an Ihren Händler oder an einen qualifizierten Techniker.
Entfernen Sie sämtliches Verpackungsmaterial, lassen Sie das Verpackungsmaterial
(Kunst stoffbeutel, Bänder und ähnliche Dinge) nicht in Kinderhände geraten; diese
Dinge können schwere Verletzungen verursachen. Das Verpackungsmaterial ist
recyclingfähig.
Die Installation des Gerätes und der Anschluss der elektrischen Verbindungen sollte
gemäß gültiger örtlicher Richtlinien und gemäß der Anweisung des Herstellers durch
einen qualifizierten Techniker erfolgen.
Versuchen Sie nicht, technische Merkmale des Gerätes zu modifizieren - dies kann
zu Gefahren führen.
Einzelkochzone
Kochfeldrahmen
Touch Control-Bedienfeld
Hinweis: Das Aussehen Ihres Kochfeldes kann wegen Änderungen der Produktion
etwas von den Abbildungen abweichen.
1
Glaskeramik
Page 41

Sicherheitshinweise2
Bitte halten Sie sich an diese Hinweise. Andernfalls werden jegliche Schäden, die durch
unangemessene, falsche oder fahrlässige Nutzung sowie durch falschen Anschluss
oder unsachgemäße Installation entstehen, nicht durch die Garantie abgedeckt.
· Dieses Gerät ist ausschließlich für den Einsatz im Haushalt ausgelegt; jeglicher
anderer Einsatz kann die Garantie erlöschen lassen und kann darüber hinaus
gefährlich sein.
· Dieses Gerät darf ausschließlich zum Erhitzen und Kochen von Lebensmitt eln
genutzt werden; jegliche andere (missbräuchliche) Verwendung - z. B. als
Raumheizung, Arbeit splatte oder Ablage - ist gefährlich.
· Erweiterungen oder Modifikationen des Gerätes sind nicht zulässig.
· Plat zieren und lagern Sie brennbare Flüssigkeiten, leicht entflammbare Materialien
und Gegenstände, die schmelzen können, nicht auf oder in der Nähe des Gerät es.
· Kinder müssen grundsätzlich vom Gerät ferngehalten werden.
· Das Gerät darf nur von einem autorisierten und qualifizierten Installateur installiert
und angeschlossen werden.
· Die elektrische Sicherheit Ihres Kochfeldes ist nur dann gewährleistet, wenn es
ordnungsgemäß geerdet an Systeme angeschlossen wird, die den Richtlinien
für elektrische Sicherheit entsprechen.
· Einbaugeräte dürfen nur benutzt werden, wenn sie in für den Einbau geeignete
Möbel oder Arbeitsplatten eingesetzt werden, die den zutreffenden Richtlinien
entsprechen.
· Üben Sie beim Einbauen des Kochfeldes keinen Druck auf das Netzkabel aus.
· Aus Gründen der Isolationssicherheit sollte die Länge des Netzkabels 2 m nicht
überschreiten.
· Bei Fehlfunktionen des Gerätes oder Beschädigungen der Glaskeram ik (Risse
oder Sprünge) muss das Gerät ausgeschaltet und von der Stromversorgung
getrennt werden, damit es nicht zu Stromschlägen kommen kann.
· Reparaturen des Gerätes dürfen nur von autorisierten Fachkräften durchgeführt
werden.
· Überzeugen Sie sich davon, dass sämtliches Verpackungsmaterial restlos entfernt
wurde, bevor Sie das Gerät benutzen.
· Kabel von E lektrogeräten dürfen keine heißen Flächen von anderen Geräten
oder heißes Kochgeschirr berühren.
· Lassen Sie das Kochfeld niemals unbeaufsichtigt, wenn Sie mit Fett oder Öl
kochen. Bei Überhitzung kann es schnell zur Entzündung kommen.
· Schneiden Sie keine Lebensmittel auf der Glaskeramik. Die Glasfläche darf nicht
als A rbeitsplatte missbraucht werden.
2
Page 42

· Geben Sie gut Acht, wenn Sie kleine Haushaltsgeräte wie Bügeleisen in der Nähe
der Glaskeramik verwenden.
· Benutzen Sie die Kochzonen nicht, wenn sich leeres Kochgeschirr oder überhaupt
kein Kochgeschirr darauf befindet.
· Vergewissern Sie sich, dass sämtliche Bedienelemente abgeschaltet sind, wenn
Sie das Gerät nicht benutzen.
· Vor dem Reinigen muss das Gerät von der Stromversorgung getrennt werden
und abgekühlt sein.
· Benutzen Sie keine Dampfreiniger zum Reinigen des Gerätes - dadurch kann das
Gerät beschädigt werden und die Garantie erlöschen.
· Benutzen S ie nur stabiles Kochgeschirr mit flachem Boden.
WARNUNG
Bei korrekter Installation erfüllt Ihr Produkt sämtliche Sicherheitsanforderungen, die
für diese Produktkategorie festgelegt wurden. Allerdings sollten Sie im Hinblick auf
die Unterseite des Gerätes eine gewisse Vorsicht walten lassen: Dieser Bereich
sollte normalerweise nicht zugänglich sein; hier finden sich eventuell scharfe Kanten,
die zu Verletzungen führen können.
Brandgefahr! Legen Sie keine brennbaren Materialien auf dem Kochfeld ab.
Vergewissern Sie sich, dass in der Nähe verlaufende Stromkabel nicht mit der
Oberseite des Kochfeldes in Berührung kommen können.
Lassen Sie keine schweren und/oder spitzen Objekte auf die Glaskeramik fallen.
Falls das Kochfeld gesprungen oder anderweitig beschädigt sein sollte, trennen Sie
die Stromversorgung und wenden sich an den Kundendienst.
Kratzen Sie nicht mit scharfen Gegenständen über das Kochfeld. Missbrauchen
Sie das Kochfeld nicht als Arbeitsfläche.
Bevor Sie ein Altgerät entsorgen, sollten Sie es unbrauchbar machen und dafür
sorgen, dass si ch keine potentiell gefährlichen Teile mehr daran befinden.
Wichtig: Dieses Gerät wurde ausschließlich für den Hausgebrauch konzipiert. Das
Gerät eignet sich NICHT zum Einsatz im kommerziellen, halb-kommerziellen oder
öffentlichen Um feld.
Falls das Netzkabel beschädigt sein sollte, muss es vom Hersteller, einer
seiner Kundendienstniederlassungen oder einer ähnlich qualifizierten Fachkraft
instandgesetzt werden, damit es nicht zu Gefährdun gen du rch Stromschl ag
kommen kann.
3
Page 43

Installation3
Der elektrische Anschluss dieses Kochfeldes sollte von einer autorisierten
Fachkraft oder einem qualifizierten Elektriker ausgeführt werden; dabei sind
die An weisung en in dieser Anleitung sowie zutreffende Richtlinien zu beachten.
· Überzeugen S ie sich vor der Installation, dass örtliche Stromversorgung und
Einstellung des Gerätes aufeinander abgestimmt sind.
· Gültige Gesetze, Vorschriften, Direktiven und Richtlinien des Landes, in dem das
Gerät genutzt wird, müssen eingehalten werden (z. B. Sicherheitsbestimmungen,
sachgerechte Entsorgung, etc.).
Einbaukochfeld platzieren
Entfernen Sie zunächst sämtliches Verpackungsmaterial vom Gerät und von seinen
Zubehörteilen, überzeugen Sie sich davon, dass das Kochfeld nicht beschädigt ist.
Falls Sie jegliche Beschädigungen feststellen oder auch nur vermuten, benutzen
Sie das Gerät nicht, sondern setzen sich sofort mit dem autorisierten Kundendienst
oder einem qualifizierten Techniker in Verbindung.
· Ihr Einbaukochfeld wird in den Ausschnitt einer Arbeitsplatte eingesetzt. Die
elektrische Verbindung mit dem Stromnetz wird über einen speziellen Verteiler
unterhalb der Arbeit splatte hergestellt.
· Beim Ausschneiden der Aussparung orientieren S ie sich bitte an den in der
nachstehenden Abbildung angegebenen Abmessungen.
4
Page 44

· Verlegen Sie das einseitig klebende Dichtungsband um die gesamte äußere
Unterseitenkante des Kochfeldes. Dehnen Sie das Band nicht.
· Schrauben Sie die 4 Arbeitsplattenklemmen an die Seitenflächen des Produktes.
Arbeitsplattenklemme
5
Page 45

Elektrischer Anschluss4
Elektrischer Anschluss
· Bevor Sie mit dem elektrischen Anschluss beginnen, überzeugen Sie sich zunächst
davon, dass Stromversorgung und Steckdose für den maximalen Leistungsbedarf
des K ochfeldes ausgelegt sind.
· Die elektrische Installation im Haus sowie der Netzstecker müssen geerdet sein
und den Vorschriften zur elekt rischen Sicherheit entsprechen.
· Falls kein separater Stromkreis mit eigener Sicherung für das Kochfeld vorhanden
sein sollte, müssen diese Dinge von einem qualifizierten Elektriker eingerichtet
werden, bevor das Kochfeld angeschlossen wird.
· Ein mit einer Sicherung abgesicherter Schalter muss auch nach der Installation
des K ochfeldes frei zugänglich bleiben.
· Verwenden Sie keinerlei Adapter, Mehrfachsteckdosen und/oder Verlängerungskabel.
· Dieses Gerät erfüllt die Anforderungen der folgenden Direktiven der europäischen
Gemeinschaft:
1. Glaskeramik-Kochfeld EEC/73/23 und 93/68, EEC/89/336 hinsichtlich
Funkst örungen,
2. EEC/89/109 hinsichtlich Kontakt mit Lebensmitteln.
· Ein 20 A-Unterbrecher mit einer Kontaktöffnung von mindestens 3 mm und
verzögerter Auslösung muss in den Versorgungskreis eingeschliffen werden.
E
2
2
2
* Dieses Gerät muss geerdet werden.
* Zum Anschluss sollte ein Netzkabel
vo m Typ H05VV-F verwendet werden.
· Das Netzkabel muss dem Typ H05VV-F 3 x 2,5 mm² / 60227 IEC 53 entsprechen.
Ein Anschlussdiagramm finden Sie an der Rückseite des Gerätes.
· Achten Sie bei der Installation darauf, ausschließlich ausreichend isolierte Kabel
zu verwenden. Durch unsachgemäß ausgeführte Verbindungen kann Ihr Gerät
beschädigt werden. Solche Schäden werden nicht durch die Garantie abgedeckt.
· Sämtliche Reparaturen müssen durch autorisierte Fachkräfte oder einen
qualifizierten Elektriker ausgeführt werden.
· Ziehen Sie grundsätzlich den Netzstecker, bevor Wartungsarbeiten ausgeführt
werden. Beim Wiederanschluss halten Sie sich bitte an die Anschlussdiagramme.
6
Page 46

Betrieb5
Das Gerät wird über Sensortasten ("Touch Control") bedient, sämtliche Funktionen
werden durch optische und akustische Signale bestätigt.
HINWEIS: Falls in den Anzeigen ein blinkendes "H" angezeigt werden sollte, lesen
Sie bitte im Abschnitt "Kochfeld zurücksetzen" nach.
Kochstelle
Kochstuf enanzeige
einschalten/ausschalten
Kochstufeneinstellung:
Vermindern
Bereitschaftsmodus S-Modus
Dezimalpunkt
Kochst ufeneinstellung:
Erhöhen
Tastensperre-
Anzeige
T astens
perre
Ein/Aus
Das Gerät wird mit Strom versorgt, sämtliche
Kochstufenanzeigen sind ausgeschaltet; eventuell
leuchtet die Restwärmeanzeige.
Betriebsmodus
Gesperrter Modus
7
B-Modus
Mindestens eine Kochstufenanzeige zeigt eine
Kochstufeneinstellung zwischen 0 und 9.
VR-Modus Das Bedienfeld ist gesperrt.
Beschreibungen der Modi
Page 47

Gerät ein- und ausschalten.
Wenn sich das Gerät im Bereitschaftsmodus befindet, können Sie es in den
Betriebsmodus versetzen, indem Sie die Ein-/Austaste mindestens 1 Sekunde
lang gedrückt halten. Der Vorgang wird durch ein akustisches Signal bestätigt.
Bei säm tlichen Kochstellen wird die K ochstufe 0 angezeigt, die Dezimalpunkte in
säm tlichen Kochstuf enanzeigen blinken.
Wenn innerhalb 10 Sekunden keine Tasten betätigt werden, schaltet sich die Anzeige
für sämtliche Kochstellen aus.
Wenn sich die Anzeigen abschalten, werden auch sämtliche Kochstellen abgeschaltet.
Wenn Sie (im Betriebsmodus) länger als 2 Sekunden gedrückt halten, schaltet
sich das Gerät ab. Sie können das Gerät jederzeit durch Drücken von abschalten;
auch dann, wenn vorher andere Tasten betätigt wurden.
.............................................................................
Falls noch Restwärme vorhanden ist, wird dies durch ein blinkendes "H" in der
Anzeige der ent sprechenden Kochstelle angezeigt.
Kochstelle auswählen .
Wenn eine einzelne K ochstelle über die zugehörige Taste Kochstelle
einschalten/ausschalten ausgewählt wird, blinkt der Dezimalpunkt in der Anzeige
der jeweiligen Kochstelle. Sie können nun die Kochstufe der ausgewählten Kochstelle
durch Berühren der Kochst ufeneinstellungstasten oder im Bereich 1 bis 9
einstellen.
.
Die Tasten müssen innerhalb von 3 Sekunden betätigt werden. Andernfalls wird
die A uswahl der Kochstelle wieder aufgehoben, der Dezimalpunkt verschwindet
aus der Anzeige. Falls innerhalb von 10 Sekunden keine weitere Eingabe stattfindet,
wird die Kochstelle wieder abgeschaltet.
Die Kochstufeneinstellung kann jederzeit durch Betätigen von oder im Bereich
von 1 bis 9 geändert werden. .
Jede Tastenbetätigung und jede Änderung der Anzeige wird von einem akustischen
Signalton begleitet.
8
Page 48

Kochstufe mit und ohne Zusatzhitze einstellen
.
Sämtliche Kochstellen sind mit einer Zusatzhitze-Funktion ausgestattet.
Wenn die Z usatzhitze aktiv ist, heizt sich die Kochstelle über einen bestimmten
Zeitraum, der von der gewählten Kochstufeneinstellung abhängt, mit Maximalleistung
auf. Dies wird durch ein blinkendes A, das abwechselnd mit der Kochstufeneinstellung
angezeigt wird (z. B. erst A, dann 9) in der Kochstufenanzeige dargestellt. Nach
Ablauf der Zusatzhitze-Zeit wird lediglich die Kochstufeneinstellung angezeigt.
Wenn S ie die Zusatzhitze-Funktion in der Stufe 9 nutzen möchten, wählen Sie die
Kochstufe 9 mit (wählen also "rückwärts" ab Stufe 0). Nachdem Sie die Stufe
9 ausgewählt haben, werden abwechselnd A und die Kochstufe angezeigt. Dies
bedeutet, dass K ochstufe 9 und Zusatzhitze aktiv sind. Wenn Sie eine niedrigere
Kochstufe auswählen möcht en, drücken Sie die Taste entsprechend mehrmals.
Sie können die Zusatzhitze abschalten, indem Sie drücken, bis die Einstellung
0 ausgewählt ist.
Die Z usatzhitze kann jederzeit zugeschalt et werden, indem Sie betätigen, bis
die Stufe 9 ausgewählt ist. A /9 blinkt in der Kochstufenanzeige.
Einzelne Kochstellen ab schalten
Sie können einzelne Kochstellen auf zwei Weisen abschalten:
. Durch gleichzeitiges Betätigen der Tasten und .
· Durch Reduzieren der Kochstufeneinstellung auf 0 durch Betätigen der
Taste .
Tasten und gleichzeitig betätigen
Die entsprechende Kochstelle wird mit einer der Tasten Kochstelle
einschalten/ausschalten ausgewählt, der Dezimalpunkt in der Anzeige der
jeweiligen Kochstelle beginnt zu blinken.
Zum Abschalten der Kochstelle betätigen Sie die Tasten und gleichzeitig.
Ein akustisches Signal erklingt, "0" erscheint in der Kochstufenanzeige.
Falls bei dieser Kochst elle noch Restwärme vorhanden ist, wird dies durch ein
blinkendes "H" in der Kochstufenanzeige angezeigt.
Kochstufeneinstellung durch Betätigen der Taste auf "0" reduzieren.
9
Page 49

Sie können eine Kochstelle auch abschalten, indem Sie die Kochstufe auf 0
reduzieren.
Wenn "0" in der Kochstufenanzeige angezeigt wird, erlischt auch der Dezimalpunkt
in der Anzeige der ausgewählten Kochst elle.
Falls bei dieser Kochstelle noch Restwärme vorhanden ist, wird dies durch ein
blinkendes "H" in der Kochstufenanzeige angezeigt.
Tastensperre
Mit der Tastensperre blockieren Sie das Gerätim Betrieb und versetzen es in einen
sicheren Betriebsmodus. Änderungen (beispielsweise Erhöhen der
Kochstufeneinstellung) sind nicht möglich. Das Gerät kann lediglich ausgeschaltet
werden. .
Zum Sperren des aktuellen B etriebsmodus halten Sie die Tastensperre-Taste
mindestens 2 Sekunden lang gedrückt. Dieser Vorgang wird durch einen Signalton
bestätigt . Die Tastensperre-Anzeige blinkt, die Bedienelemente sind gesperrt.
.
Das Gerät kann nur im Betriebsmodus gesperrt werden.
Wenn das Gerät gesperrt ist, kann lediglich die Taste betätigt werden; sämtliche
anderen Tasten sind deaktiviert. Wenn Sie das Gerät abschalten, müssen Sie die
Tastensperre-Taste nach dem Wiedereinschalten erneut betätigen, bevor Sie das
Gerät bedienen können.
Die Tastensperre-Anzeige verschwindet, nachdem die Taste 2 Sekunden lang
betätigt wurde. Das Bedienfeld des Gerätes ist nun freigegeben und kann normal
bedient werden.
10
Page 50

6
Die folgenden Sicherheitsfunktionen wirken, um unbeabsichtigte Betätigung der
Kochfeld-Bedienelemente zu unterbinden.
Sensor-Sicherheitsabschaltung
Um unerwünschte, zufällige Betätigung von Sensortasten zu vermeiden, werden
die S ensortasten auf bestimmte Weise überwacht.
Falls eine oder mehrere Tasten länger als 12 Sekunden lang betätigt werden, wird
dieser Zustand (zum Beispiel ausgelöst durch Kochgeschirr, das auf der Sensortaste
abgestellt wurde oder Fehlfunktionen des Sensors) durch ein akustische Signal
angezeigt und das Gerät abgeschaltet.
Bei der Sicherheitsabschalt ung wechselt das Kochfeld in den Bereitschaftsmodus.
Bevor das Gerät in den Bereitschaftsmodus wechselt, blinkt ein "F" in sämtlichen
Kochstellenanzeigen.
Falls Restwärme vorhanden ist, blinkt ein "H" in den entsprechenden
Kochstellenanzeigen.
Touch Control-Sicherheitsfunktionen
Abschaltung bei Überhitzung
Da sich das Bedienfeld in der Nähe der beiden vorderen Kochstellen befindet,
kann es sich stark erwärmen, wenn Kochgeschirr so unglücklich abgestellt wurde,
dass seine Kante die Sensortasten zwar nicht berührt, sie durch seine Nähe jedoch
stark aufheizt.
Damit das Bedienfeld nicht beschädigt wird, wird seine Temperatur ständig
überwacht und das Gerät abgeschaltet, wenn die Temperatur des Bedienfeldes
60 °C überschreitet. In sämtlichen vier Kochstellenanzeigen wird "t" angezeigt, bis
das K ochfeld entsprechend abgekühlt ist.
11
Page 51

Nachdem das Kochfeld abgekühlt ist, verschwindet das "t" aus der Anzeige,
das Gerät wechselt in den Bereitschaftsmodus. Dies bedeutet, dass Sie
das Gerät durch Berühren von wieder einschalten können.
Restwärmeanzeige .
Wenn das Kochfeld nach dem Einsatz abgeschaltet wird, bleibt die Glaskeramik
noch einige Zeit heiß - dieser Effekt wird Restwärme genannt. Das Gerät kann die
Restwärme der Glaskeramik grob abschätzen. Falls die geschätzte Temperatur 60
°C überschreitet, blinkt ein "H" in der Anzeige der entsprechenden Kochstelle. Die
Restwärme wird angezeigt, solange die geschätzte Kochstellentemperatur mehr
als 60 °C beträgt. .
Die Restwärmeanzeige genießt die niedrigste Priorität und wird von sämtlichen
anderen Anzeigen überschrieben; zum Beispiel Anzeigen von Sicherheitsabschaltung
und Fehlercodes. .
Kochfeld zurücksetzen .
Wenn das Kochfeld nach der Installation zum ersten Mal eingeschaltet wird oder
ein Stromausfall während des Betriebs eingetreten ist, blinkt ein "H" in einigen oder
sämtlichen Kochstellenanzeigen.
.
In welchen Anzeigen ein "H" angezeigt wird, hängt vom zum Zeitpunkt des
Strom ausfalls aktiven Betriebsmodus ab.
Dieser Ef fekt erklärt sich dadurch, dass sich das Kochfeld "merkt", bei welchen
Kochstellen noch Restwärme vorhanden war. Dies ist völlig normal und sinnvoll..
Zum Zurücksetzen des Kochfeldes halten Sie die Sensortasten der oberen linken
Kochstelle, der unteren linken Kochstelle und die Taste etwa 2 Sekunden lang
gleichzeitig gedrückt.
Halten Sie diese
Ta sten zu m
Zurücksetz en des
Kochfe ld es ged rückt.
12
Page 52

Reinigung und Pflege7
Kochgeschirr mit unebenem Boden (oder mit Rückständen am B oden) sollte nicht
benutzt werden, da dies die Glaskerami k verkratzen kann. Der Boden des
Kochgeschirrs sollte so dick und flach wie nur möglich sein. Bevor Sie Kochgeschirr
benutzen, überzeugen Sie sich davon, dass der Boden sauber und trocken ist.
Stellen Sie das Kochgeschirr grundsätzlich zuerst auf die Kochstelle auf, bevor Sie
sie einschalten. Setzen Sie wenn möglich immer einen Deckel auf. Der Boden des
Kochgeschirrs darf nicht kleiner oder größer als die jeweilige Kochzone sein; bitte
beachten Sie die nachstehende Abbildung.
RICHTIG FALSCH FALSCH FALSCH
Bevor Sie das Kochfeld reinigen, trennen Sie zuvor grundsätzlich die Stromversorgung.
Anschließend vergewissern Sie sich, dass keine Restwärme mehr vorhanden ist.
Glaskeram ik ist überaus unempfindlich gegenüber hohen Temperaturen und
Überhitzung. Falls noch Restwärme in den Kochstellen vorhanden sein sollte, blinkt
ein "H" in der Kochstellenanzeige. Lassen S ie das Gerät abkühlen, damit es nicht
zu Verbrennungen kommt.
GLASKE RAMISCHES KOCHFELD REINIGEN .
Vor dem Reinigen vergewissern Sie sich, dass das Kochfeld abgeschaltet ist.
E ntfernen Sie übergelaufene Lebensmittel und andere Verkrustungen.
S taub und Lebensmitt elreste ent fer nen Sie mit einem feuchten Tuch.
Wenn Sie Reinigungsmittel verwenden, überzeugen Sie sich davon, dass diese
keine scheuernden Bestandteile enthalten. Benutzen Sie keine Scheuermittel; diese
können die Glaskeramik des Kochfeldes beschädigen.
Sämtliche Reinigungsmittelreste müssen mit einem feuchten Tuch entfernt werden.
Staub, Fett und übergelaufene flüssige Bestandteile von Lebensmitteln müssen so
schnell wie möglich entfernt werden.
Wenn solche Verunreinigungen antrocknen, lassen sie sich erheblich schwieriger
entfernen.
13
Page 53

Dies gilt insbesondere für Zucker, Sirup und ähnliche stark zuckerhaltige Lebensmittel,
die irreparable Beschädigungen der Oberfläche verursachen können, wenn sie sich
einbrennen.
Falls solche Produkte auf der Glaskeramik schmelzen, sollten diese sofort (solange
die Glaskeramik noch heiß ist ) mit einem Schaber entfernt werden, damit es nicht
zu irreparablen Beschädigungen der Oberfläche kommt. Einen passenden Schaber
erhalten Sie im Geschäft, in dem Sie das Kochf eld erworben haben.
Legen Sie keine Gegenstände, die schmelzen können, auf das Kochfeld: Zum
Beispiel Kunststof f, Alufolie, Zucker und stark zuckerhaltige Lebensmittel.
Berühren Sie die Glaskeramik nicht mit Messern oder anderen scharfen oder spitzen
Gegenständen; dies kann zu Beschädigungen der glaskeramischen Oberfläche
führen.
Benutzen Sie keine Stahlwolle oder Scheuerschwämme - solche Hilfsmittel können
zu permanenten K ratzern führen.
14
Page 54

Entsorgung
Elektrische und elektronische Altgeräte dürfen nicht mit dem regulären
Hausmüll entsorgt werden. Zur Entsorgung wenden Sie sich bitte
an den Händler, bei dem Sie das Gerät erworben haben.
Verpackungsmaterialien sollt en über örtliche RecyclingSammelst ellen entsorgt werden.
Falls etwas nicht funktionieren sollte
Falls Sie in Großbritannien leben und Fragen zu Ihrem Gerät haben sollten,
können S ie unseren Kundendienst während der üblichen Bürozeiten erreichen:
0113 2793520. Bei Kundendienstanfragen nutzen Sie bitte die auf dem
Kaufbeleg angegebene Rufnummer.
Reguläre Telefongebühren fallen an.
Im Zuge der Produktverbesserungen können sich Änderungen und
Abweichungen dieser Anleit ung ergeben. Für kleinere Fehler entschuldigen
wir uns im Voraus.
Kesa U.K HU1 3AU 01/ 09/2007
52012436
Page 55

PCH460T-E
GEBRUIKS- EN INST ALLATIEHANDLEIDING
VITROKERAMISCHE INBOUWKOOKPLAAT
Page 56

INHOUD
1. BESCHRIJVING VAN DE KOOKPLAAT
2. VEILIGHEIDSINSTRUCTIES
3. INSTALLATIE
4. ELEKTRISCHE AANSLUITING
5. GEBRUIK
6. TOUCH CONTROL VEILIGHEIDSFUNCTIES
7. REINIGING EN ONDERHOUD
Page 57

Geachte klant,
W ij danken u voor de aankoop van deze Proline Kookplaat. De
veiligheidsmaatregelen en aanbevelingen in deze handleiding zijn bedoeld voor
uw eigen veiligheid en die van anderen. De handleiding biedt u tevens een middel
om de functies van het apparaat ten volle te kunnen gebruiken.
Bewaar dit boekje op een veilige plek. In geval van twijfel over de werking van
het apparaat, kan het in de toekomst voor uzelf en eventuele andere personen
nuttig zijn.
Dit apparaat mag uitsluitend voor het beoogde doeleinde worden gebruikt, dat
wil zeggen huishoudelijke bereiding van etenswaren. Het gebruik voor andere
doeleinden is niet toegestaan en kan gevaarlijk zijn.
De fabrikant kan niet aansprakelijk worden gesteld voor schade die wordt
veroorzaakt door onjuist of verkeerd gebruik van het apparaat.
EG Conformiteitverklaring
• Deze kookplaat is alleen bedoeld voor het bereiden van voedsel. Het gebruik
voor andere doeleinden (zoals het verwarmen van een ruimte) is niet toegestaan
en gevaarlijk.
• Deze kookplaats is ontworpen, vervaardigd en op de markt gebracht conform:
- Veiligheidsvereisten van de "Lage spanning"-richtlijn 2006/95/EC;
- Veiligheidsvereisten van de "EMC"-richtlijn 89/336/EC;
- Vereisten van de Richtlijn 93/68/EC.
NL
Page 58

1
BESCHRIJVING VAN DE KOOKPLAAT
VÓÓ R HET EERSTE GEBRUIK .
Gelieve de instructies vóór gebruik of installatie van het apparaat zorgvuldig
te lezen.
Controleer na het uitpakken van het apparaat of het niet beschadigd is. In
geval van twijfel: het apparaat niet in gebruik nemen en contact opnemen
met uw leverancier of een gekwalificeerd technicus.
Alle verpakking verwijderen en het verpakkingsmateriaal (plastic zakken,
polystyreen, riemen enz.) buiten bereik van kinderen bewaren aangezien
zij hiermee serieus letsel kunnen oplopen. Het verpakkingsmateriaal is
recyclebaar.
Dit apparaat mag uitsluitend door een vakman worden geïnstalleerd en
elektrisch worden aangesloten. Deze technicus is op de hoogte van de
geldende lokale voorschriften en volgt de instructies van de fabrikant.
Technische eigenschappen van het apparaat niet proberen te wijzigen.
Hierdoor kan het gebruik van het apparaat gevaarlijk worden.
ENKELE KOOKZONE
FRAME KOOKPLAAT
TOUCH CONTROL BEDIENINGSPANEEL
KERAMISCH OPPERVLAK
Opmerking: Als gevolg van productiewijzigingen, kan het aanzien van uw
kookplaat afwijken van het getoonde model.
1
Page 59

VEILIGHEIDSINSTRUCTIES2
Gelieve deze instructies op te volgen. Indien u de instructies niet opvolgt,
wordt schade die is ontstaan door onjuist, verkeerd of onoplettend gebruik
of een verkeerde aanslu iting of installatie niet door de garantie gedekt.
· Dit apparaat is uitsluitend bedoeld voor huishoudelijk gebruik. Gebruik
voor andere doeleinden kan gevaarlijk zijn en de garantie doen vervallen.
· Dit apparaat mag alleen worden gebruikt voor het verwarmen of bereiden
van etenswaren. Gebruik voor andere doeleinden, zoals het verwarmen
van een ruimte, werk- of bewaaroppervlak is gevaarlijk.
· Aanvullingen en veranderingen aan het apparaat zijn niet toegestaan.
· Geen brandbare vloeistoffen, zeer brandbare materialen of smeltbare
voorwerpen op of nabij het apparaat plaatsen.
· Houd het apparaat buiten bereik van kinderen.
· Het apparaat mag uitsluitend worden geïnstalleerd en aangesloten door
een erkend en gekwalificeerd installateur.
· De elektrische veiligheid van deze kookplaat wordt alleen gewaarborgd
als het op een correct geaard systeem wordt aangesloten. Het systeem
moet aan alle elektrische veiligheidsnormen voldoen.
· Inbouwapparatuur mag alleen worden gebruikt als het is geïnstalleerd in
geschikte inbouwunits en werkbladen die aan de normen voldoen.
· Bij het plaatsen va n de kookplaat, geen druk uitoe fenen op de aanslu itkabel.
· De lengte van de aansluitkabel mag in verband met isolatieveiligheid niet
langer zijn dan 2m.
· In geval van een defect aan het apparaat of beschadiging van de
keramische glasplaat (barsten of scheuren), schakel dan het apparaat
uit en koppel het los van de elektrische stroomtoevoer om kans op
elektrische schokken te voorkomen.
· Reparaties mogen alleen door erkend onderhoudspersoneel worden
uitgevoerd.
· Controleer vóór gebruik of alle verpakking is verwijderd.
· Kabels van elektrische apparaten mogen niet in aanraking komen met
hete oppervlakken van apparaten of heet kookgerei.
· Houdt het apparaat goed in de gaten wanneer u met olie of vetten kookt.
Deze kunnen bij oververhitting vlam vatten.
· Geen etenswaren op het glas van de keramische kookplaat snijden.
Glasplaten mogen niet als werkblad worden gebruikt.
2
Page 60

· Wees voorzichtig met het gebruik van kleine huishoudelijke apparatuur,
zoals strijkijzers in nabijheid van het apparaat.
· De kookzones niet zonder of met leeg kookgerei gebruiken.
· Zorg ervoor dat alle bedieningstoetsen uitgeschakeld zijn wanneer het
apparaat niet wordt gebruikt.
· Vóór het reinigen moet het apparaat uitgeschakeld zijn en voldoende
afgekoeld zijn.
· Reinig het apparaat nooit met een stoomreiniger. Dit kan het product
beschadigen en de garantie ongeldig maken.
· Gebruik alleen stabiele pannen met platte bodems.
W AARSCHUW ING
W anneer correct geïnstalleerd, voldoet uw product aan alle veiligheidseisen
voor dit type productcategorie. U dient echter extra zorgvuldig te werk te
gaan bij het reinigen van de onderkant van het apparaat. Dit deel is niet
ontworpen of bedoeld voor aanraking en kan scherpe of ruwe randen hebben
die mogelijk letsel kunnen veroorzaken.
Brandgevaar! Laat geen brandbare materialen achter op de kookplaat.
Controleer of de elektrische snoeren van andere apparaten in de buurt niet
met de kookplaat in aanraking komen.
Laat geen zware of scherpe voorwerpen op de keramische plaat vallen. Als
de kookplaat gebarsten of beschadigd is, de stekker uittrekken en
onderhoudsservice bellen.
Geen krassen maken op de plaat met scherpe voorwerpen. De kookplaat
niet als werkblad gebruiken.
Het wordt aanbevolen om een apparaat, voordat u het afdankt, onbruikbaar
te maken en ervoor te zorgen dat alle mogelijk gevaarlijke onderdelen
onschadelijk zijn gemaakt.
Belangrijk: Dit apparaat is alleen bedoeld voor huishoudelijk gebruik. Het
appa raat is NIET geschi kt voor gebruik in een semi-commerciële, commerciële
of gemeenschapsruimte.
Als de aansluitkabel beschadigd is, moet deze door de fabrikant, zijn
service-agent of gelijksoortig gekwalificeerd persoon worden vervangen
om elektrische risico's te voorkomen.
3
Page 61

INSTALLATIE3
De elektrische aansluiting van deze kookplaat mag uitsluitend worden
uitgevoerd door erkend onderhoudspersoneel of een gekwalificeerd
elektricien en overeenkomstig de instructies van deze handleiding en
conform de geldende voorschriften.
· Vóór installatie controleren of de plaatselijke distributie-omstandigheden
en de afstelling van het apparaat compatibel zijn.
· De geldende wetten, verordeningen, richtlijnen en normen van het land
van gebruik van het apparaat moeten worden opgevolgd
(veiligheidsvoorschriften, correct recycling conform regelgeving, enz.)
Het plaatsen van de inbouwkookplaat
Na verwijdering van het verpakkingsmateriaal van het toestel en de
accessoires, controleren of de kookplaat niet beschadigd is. Indien u schade
veronderstelt, het apparaat niet gebruiken en onmiddellijk contact opnemen
met erkend servicepersoneel of een gekwalificeerd elektricien.
· Deze inbouwkookplaat moet in een uitsparing van een werkblad worden
geplaatst. Het apparaat wordt elektrisch aangesloten met het stopcontact
onder het werkblad dat speciaal wordt dit doeleinde wordt geleverd.
· Snijd een opening met de afmetingen getoond in onderstaande tekening.
4
Page 62

· Breng de bijgeleverde eenzijdige zelfklevende tape aan rond de onderkant
van het kookoppervlak, langs de buitenrand van de keramische plaat. Rek
het niet uit.
· Schroef de 4 bevestigingshaakjes voor het werkblad aan de zijwanden van
het product.
bevestigingshaakje werkblad
5
Page 63

ELEKTRISCHE AANSLUITING4
Elektrische aansluiting van de kookplaat
· Voordat u verder gaat met de elektrische aansluiting, eerst controleren
of het actuele draagvermogen van het systeem en de stekker geschikt
zijn voor de maximum spanning van de kookplaat.
· De elektrische huisinstallatie en de elektrische stekker die wordt gebruikt
moete n geaard zijn en confo rm de veiligheidsvo orschriften zijn aangeslote n.
· Als er geen afzo nderlijk circuit en gezekerde schakelaar voor de kookplaat
zijn, moe ten deze onmiddellijk worden geïnstalleerd door e en gekwalificeerd
elektricien, voordat de kookplaat wordt aangesloten.
· Nadat de kookplaat is geïnstalleerd moet de gezekerde schakelaar
eenvoudig bereikbaar zijn.
· Gebruik geen adapters, meerwegstekkers en/of verlengkabels.
· Dit apparaat voldoet aan de vereisten van de volgende EEG Richtlijnen:
1. Keramische kookplaat EEC/73/23 en 93/68, EEC/89/336
aangaande radio-interferentie,
2. EEC/89/109 inzake contact met etenswaren.
· I n het stroomci rcuit moeten een stroomon derbreker met ee n contactopening
van minimaal 3 mm, 20 A gewaardeerd en een vertragingswerkend type
worden geïnstalleerd.
E
2
2
2
* Dit toestel moet worde n geaard.
* Voor deze aansluiting m oet
stroomkabel van he t type H05VVF worden gebruikt.
· De aansluitkabel moet H05VV-F 3X2,5 mm² / 60227 IEC 53 zijn. U vindt
het aansluitschema op de achterzijde van het apparaat.
· Tijdens installatie ervoor zorgen dat er geïsoleerde kabels worden
gebruikt. Een onjuiste aansluiting kan uw apparaat beschadigen. Dit
soort beschadigingen valleen niet onder de garantie.
· Reparaties mogen alleen door erkend onderhoudspersoneel of een
gekwalificeerd elektricien worden uitgevoerd.
· Trek altijd de stekker van het apparaat uit voordat u onderhoud uitvoert.
Voor het opnieuw aansluiten, gelieve de aansluitschema's te gebruiken.
6
Page 64

GEBRUIK5
Het apparaat wordt bediend via tiptoetsen en de functies worden via het
display en geluidssignalen bevestigd.
OPMERKING: Zie het hoofdstuk RESETTEN VAN DE KOOKPLAAT als u
in het scherm een knipperende H ziet.
Kookzone
display
Actieve/inactie
ve kookzone
Warmtestand /
verminderen
Stand-By-stand S-stand
Bedieningsstand
Vergrendelstand
B-stand
VR-stand De bediening van de kookplaat is vergrendeld.
Komma
Warmtestand /
toenemen
Indicator
toetsvergrendeling
T oetsvergren
deling
Aan/Uit
De elekt riciteit naar de kookplaatbediening staat
aan, alle kookzonedisplays zijn uit of restwarmtedisplay is actief.
Ten minste één kookzonedisplay toont een
warmtestand t ussen '0' en '9'.
Beschrijving van standen
7
Page 65

Zet het apparaat aan / uit.
Als het apparaat in standby staat, wordt deze bedieningsstand gezet door
ten minste 1 seconde op de Aan/Uit knop te drukken. Een piepje geeft
aan dat dit is gelukt.
Op alle kookzones verschijnt een '0' en alle komma's van de kookzones
knipperen.
Als het apparaat niet binnen 10 seconden wordt bediend, wordt het display
van alle kookzones uitgeschakeld.
Als de displays uitgeschakeld worden, wordt de kookzone uitgezet.
Als langer dan 2 seconden wordt ingedrukt (in Bedieningsstand), wordt
het apparaat uitgeschakeld en opnieuw in de "uit"-stand gezet. Op ieder
moment kan het apparaat worden uitgeschakeld door op te drukken,
zelfs als er andere toetsen tegelijkertijd worden ingedrukt.
Als er restwarmte is, wordt dit aangegeven door een knipperende H in het
overeenkomstige kookzonedisplay.
Selecteer kookzone .
Als een enkele kookzone wordt gekozen met de corresponderende Toets
actieve/inactieve kookzone , knippert de Komma van het betreffende
Kookzonedisplay. U kunt voor de gekozen kookzone een vermogensstand
kiezen tussen 1 en 9 door de Toetsen warmtestand of in te drukken..
De toetsen moeten binnen 3 seconden worden ingedrukt, anders wordt de
kookzoneselectie gewist en verdwijnt de warmtestand (Komma). Als het
apparaat niet binnen 10 seconden wordt bediend, wordt de kookzone weer
uitgeschakeld.
De warmtestand kan altijd worden gewijzigd door de toets of tussen
1-9 in te drukken. .
Elke toetsbediening of displaywijziging gaat gepaard met een piepje.
8
Page 66

Instellen Kookniveau Met en Zonder Aankookbooster
Alle kookzones zijn uitgerust met de functie aankookbooster.
Als de aankookbooster actief is, wordt de betreffende kookzone bepaalde
tijd op het hoogste niveau ingeschakeld, afhankelijk van de geselecteerde
warmtestand. Dit wordt in het kookzonedisplay aangegeven door een
knipperende 'A' die wordt afgewisseld met de waarde van de warmtestand
(bijv. 'A' en daarna '9'). Als de boostertijd is afgelopen, wordt alleen de
warmtestand weergegeven.
Als u de aankookbooster op niveau 9 wilt gebruiken, moet u indrukken,
beginnend bij niveau 0. Na instelling van de warmte op niveau 9, worden
'A' en de warmtestand afwisselend weergegeven. Dit betekent dat niveau
9 en de aankookbooster actief zijn. Blijf op de toets drukken om een
lagere warmtestand te kiezen.
De aankookbooster kan worden uitgeschakeld door toets in te drukken
totdat warmtestand '0' wordt geselecteerd.
Als de aankookbooster moet worden gebruikt, kan deze altijd worden
geactiveerd door opnieuw in te drukken als de de warmtestand op 9 is
ingesteld. In het kookzonedisplay knippert 'A/9'.
Uitschakelen van afzonderlijke kookzones
Een gekozen kookzone kan op twee manieren worden uitgeschakeld:
. G elijktijdig bedienen van de toetsen en
· Verlaging van de warmtestand naar ´0` via de toets
Gelijktijdig bedienen van de toetsen en
De betreffende kookzone moet worden gekozen met één van de toetsen
Actieve/Inactieve kookzone , de Komma van het betreffende
Kookzonedisplay knippert. Om de kookzone uit te schakelen moeten en
tegelijkertijd worden ingedrukt. U hoort een piepsignaal en in het display
warmtestand verschijnt '0'.
Als deze kookzone nog heet is, wordt restwarmte aangegeven door een
stilstaande 'H' in het overeenkomstige kookzonedisplay.
Verlaging van de warmtestand naar ´0` via de toets
9
Page 67

De kookzone kan ook worden uitgeschakeld door de warmtestand naar '0'
te brengen.
Als het Kookzonedisplay ´0` aangeeft, wordt ook de Komma van de
geselecteerde kookzone uitgeschakeld.
Als deze kookzone nog heet is, wordt restwarmte aangegeven door een
stilstaande 'H' in het overeenkomstige kookzonedisplay.
T oetsvergrendeling
De functie toetsvergrendeling wordt gebruikt om het apparaat te blokkeren
en tijdens bediening in een veiligheidsstand te zetten. Toetsen voor het
wijzigen van de warmtestand en andere toetsen kunnen niet meer worden
bediend. Het is alleen mogelijk om het apparaat uit te schakelen..
Om de actuele bedieningsstand te vergrendelen, drukt u minimaal 2
seconden op de Toetsvergrendeling . Deze actie wordt bevestigd door
een piepje. De Indicator toetsvergrendeling knippert en bediening is
vergrendeld.
De kookzone kan alleen in de Bedieningsstand worden vergrendeld.
Als de kookzone vergrendeld is, kan alleen worden bediend. Alle andere
toet sen zijn uitgeschakeld. Alleen de Aan-Uit schakelaar werkt. Als u het
apparaat uitschakelt, moet u het opnieuw inschakelen en op de
vergrendeltoets drukken om het apparaat te ontgrendelen voordat u het
kunt gebruiken.
Als 2 seconden wordt ingedrukt, verdwijnt de Indicator toetsvergrendeling.
De bediening van de kookplaat is ontgrendeld en het apparaat kan normaal
worden bediend.
10
Page 68

6
Het apparaat is voorzien van de volgende beveiligingen om onbedoelde
bediening van de kookplaat te voorkomen.
Sensorbeveiliging
Om te voorkomen dat het apparaat door ongewenste, willekeurig
sensorbediening, is het voorzien van sensorbewaking.
Als één of meer toetsen langer dan 12 seconden worden ingedrukt, geeft
de sensorbewaking een piepsignaal. Dit geeft weer dat er een verkeerde
be diening plaatsvindt (pan of ander voorwerp op toets geplaatst, sensordefect,
enz.) en het apparaat wordt uitgeschakeld.
Deze veiligheidsuitschakeling zorgt ervoor dat de kookplaat in standby wordt
gezet. In alle kookzonedisplays knippert één keer een 'F' voordat het apparaat
in standby wordt gezet.
In de disp lays van de nog hete kookzones, verschijnt de restwarmte-indicator
'H' .
Oververhittingsbeveiliging
Omdat het bedieningspaneel zich dicht bij de voorste twee kookzones
bevindt, kan dit te heet worden als pannen verkeerd geplaatst zijn waardoor
de onderrand van de pan te dicht bij de bedieningstoetsen komt (maar
deze niet raakt).
TOUCH CONTROL VEILIGHEIDSFUNCTIES
Om te voorkomen dat de bediening beschadigd raakt, wordt de temperatuur
bewaakt en wordt het apparaat automatisch uitgeschakeld als het
bedieningspaneel warmer wordt dan 60 C. Alle 4 de kookzonedisplays
tonen 't', totdat de kookplaat is afgekoeld.
11
Page 69

Nadat de kookplaat is afgekoeld verdwijnt 't' en gaat de bediening van de
kookplaat over in de standby-stand. Dit betekent dat de gebruiker het
apparaat opnieuw kan activeren door aan te raken.
Restwarmte-functies .
Als de kookplaat na het koken wordt is uitgeschakeld, wordt er warmte
opgeslagen in het keramische glas. Dit wordt restwarmte genoemd. De
kookplaat kan ruw berekenen hoe warm het glas is. Als de berekende
temp eratuur hoger is dan + 60 C, verschijnt he t 'H' symboo l in het betreffende
kookzonedisplay. De indicatie restwarmte wordt getoond zo lang de berekende
kookzonetemperatuur hoger is dan + 60 C..
De weergave restwarmte heeft de laagste prioriteit en wordt door elke
andere displaywaarde overschreven zoals veiligheidsuitschakeling en
weergave van foutcodes. .
RESETTEN VAN DE KOOKPLAAT
.
Als de kookplaat voor de eerste keer wordt ingeschakeld na installatie of
na een stroomstoring, geeft de kookplaat een knipperende 'H' weer op alle
of bepaalde kookzonedisplays.
Welke display een 'H' laat zien is afhankelijk van de bedieningsstand op
het moment van de stroomstoring.
Dit is gevolg van de bewaarde kookzone-informatie in het geheugen van
de kookplaat; het is normaal en geen defect.
Om de kookplaat te resetten: druk de toetsen in voor de kookzone linksboven,
de kookzone linksonder en de toetsen tegelijkertijd en houd deze
gedurende 2 seconden ingedrukt.
deze to etse n in ge dru kt
houden om d e ko okp la at
te resetten.
12
Page 70

REINIGING EN ONDERHOUD7
Gebruik nooit kookgerei met ruwe bodem aangezien dit krassen kan
veroorzaken op het keramisch oppervlak. De onderkant van het kookgerei
moet zo dik en plat mogelijk zijn. Co ntroleer voor het gebruik of de onderkant
van het kookgerei schoon en droog is.
Plaats het kookgerei altijd op de kookzone voordat u deze ingeschakeld.
Plaats bij voorkeur altijd een deksel op de pan. De bodem van het kookgerei
mag niet kleiner of groter zijn dan de kookzone. Ze moeten van de juiste
afmeting zijn zoals hieronder vermeld.
GOED FOUT FOUT FOUT
Voordat u de kookplaat schoonmaakt, de stekker uit het stopcontact trekken.
Controleer of er geen restwarmte in het apparaat is opgeslagen. Keramisch
glas is zeer bestand tegen hoge temperaturen en oververhitting. Als er
restwarmte in het apparaat is opgeslagen, knippert er een 'H' in het
kookzonedisplay. Laat het apparaat goed afkoelen om zo brandwonden te
voorkomen.
REINIGEN VAN DE KERAMISCHE KOOKPLAAT .
Controleer, voordat u met reinigen begint, of de kookplaat is uitgeschakeld.
Verw ijder gemorst materiaal en andere s oorten korsten.
Stof of etensresten kunnen met een vochtige doek worden verwijderd.
Als u een afwasmiddel gebruikt, zorg dan dat dit geen schurend middel is.
Gebruik geen bijtende reinigingsmiddelen of schuurpoeders. Deze kunnen
het k eramisch oppervlak van de kookplaat beschadigen.
Alle sporen van reiniger moeten met een vochtige doek worden verwijderd.
Stof, vet en vloeistof fen van overgekookt etenswaar moeten zo snel mogelijk
worden verwijderd.
Als deze hard worden, wordt het lastig om ze te v erwijderen.
13
Page 71

Dit is het in het bijzonder van toepassing op suiker/siroopmengsels die het
oppervlak van de kookplaat permanent kunnen beschadigen wanneer ze
inbranden.
Als één van deze producten op het keramisch oppervlak gesmolten is, moet
u dit onmiddellijk met een schraper verwijderen (zolang de plaat nog heet
is) om permanente beschadiging van de kookplaat te voorkomen. (Een
schraper is verkrijgbaar bij de winkel waar u dit apparaat heeft gekocht).
Plaats geen materialen op de kookplaat die kunnen smelten: d.w.z. plastic,
aluminiumfolie, suiker, suiker/siroopmengsels enz.
Gebruik geen messen of andere scherpe voorwerpen. Deze kunnen het
keramisch oppervlak beschadigen.
Gebruik geen staalwol of schuurspons. Dit kan permanente krassen op het
oppervlak maken.
14
Page 72

Afvoeren
Als iets niet lijkt te werken
Als er iets met uw apparaat aan de hand is dat u niet begrijpt en u
woont in het Vereni gd Koninkrijk, bel dan onze hulpli jn tijdens kantooruren
via: 01 13 2793520 Als u service nodig heeft, bel dan het nummer op
uw verkoopbon.
T elefoongesprekken worden tegen normaal tarief in rekening
gebracht.
W ij verontschuldigen ons voor enig ongemak als gevolg van kleine
onvolkomenheden in deze handleiding. Deze kunnen het gevolg zijn
van productverbetering en -ontwikkeling.
Kesa U.K HU1 3AU 01/ 09/2007
Oude elektrische en elektronische apparaten mogen niet
met het huishoudelijk afval worden afgevoerd. Raadpleeg
d e winkelier waa r u dit apparaat heeft gekoch t voor instru cties
voor het afvoeren van het apparaat.
Verpakkingsmateriaal moet via de plaatselijke dienst worden
gerecycled.
52012436
Page 73

PCH460T-E
ISTRUZIONI PER L'INSTALLAZIONE ED IL
FUNZIONAMENTO
PIANO COTTURA IN VETROCERAMICA INCASSATO
Page 74

INDIC E
1. DESCRIZIONE DEL PIANO COTTURA
2. ISTRUZIONI PER LA SICUREZZA
3. INSTALLAZIONE
4. COLLEGAMENTI ELETTRICI
5. USO
6. FUNZIONI DI SICUREZZA TOUCH CONTROL
7. PULIZIA E MANUTENZIONE
Page 75

Gentile Cliente,
Grazie per aver acquistato il piano cottura Proline. Le precauzioni e i consigli
per la sicurezza in queste istruzioni sono per la sicurezza propria e quella degli
altri. Offrono anche uno strumento per utilizzare al meglio le funzioni offerte da
questo elettrodomestico.
Conservare questo opuscolo in un luogo sicuro. Potrebbe essere utile in futuro,
sia per sé che per altre persone in caso insorgano dubbi relativi al funzionamento.
Questo elettrodomestico deve essere usato solo allo scopo per cui è stato
realizzato, cioè la cot tura di alimenti. Altre forme di uso devono essere considerate
inappropriate e pertanto dannose.
Il produttore declin a ogni responsabilità in caso di danni p rovocati da uso improprio
o non corretto dell'elettrodomestico.
EC - Dichiarazione di conformità
• Questo piano cottura è stato progettat o per essere usato solo per la cucina.
Qualsiasi altro uso (ad esempio per riscaldare una stanza) è improprio e dannoso.
• Questo piano cottura è stato progettat o, costruito e messo in commercio in
conformità con:
- Requisiti di sicurezza della Direttiva "Bassa tensione" 2006/95/EC;
- Requisiti di sicurezza della Direttiva "EMC" 89/336/EC;
- Requisiti della Direttiva 93/68/EC.
IT
Page 76

1 DESCRI ZIONE DEL PIANO COTTURA
PRIMA DI USARLO LA PRIMA VOLTA .
Leggere le istruzioni con attenzione prima di installare e usare questa
apparecchiatura.
Dopo aver tolto l'imballaggio, assicurarsi che l'elettrodomestico non sia
danneggiato. In caso di dubbi, non usare l'elettrodomestico e contattare il
fornitore o un tecnico qualificato. .
Rimuovere tutto l'imballaggio e non lasciare il materiale (buste di plastica,
polistirene, fasce, ecc.) a portata di bambino poiché potrebbero provocare
lesioni gravi. I materiali di imballaggio possono essere riciclati.
L'elettrodomestico deve essere installato e tutti i collegamenti elettrici devono
essere fatti da un tecnico qualificato in conformità con i regolamenti locali
in vigore e seguendo le istruzioni del produttore.
Non tentare di modificare le proprietà tecniche dell'elettrodomestico, poiché
esso potrebbe diventare pericoloso da usare.
RISCALDATORE SINGOLO
ST RUTTURA PIANO COTTURA
PANNELLO TOUCH CONTROL
SUPERFICIE IN CERAMICA
Nota: l'aspetto del piano cottura potrebbe essere diverso rispetto al modello
mostrato sopra, a causa di modifiche alla produzione.
1
Page 77

ISTRUZI ONI PER LA SICUREZZA2
Rispettare queste istruzio ni. In caso contrario, i danni risultanti da un
uso improprio, scorretto o negligente o da collegamento o in stallazioni
non adatti n on sono coperti dalla garanzia.
· Questo elettrodomestico è inteso solo per uso domestico, ogni altro uso
potrebbe invalidare la garanzia e potrebbe essere pericolo.
· Questo elettrodomestico deve essere usato solo allo scopo di riscaldare
o cuocere gli alimenti, ogni altro uso, per esempio riscaldamento delle
stanze, superficie di lavoro o superficie per conservare, è pericoloso.
· Aggiunte o modifiche all'elettrodomestico non sono consentitite.
· Non mettere o conservare liquidi infiammabili, materiali altamente
infiammabili o oggetti che si fondono sopra o vicino all'apparecchio.
· I bambini devono essere tenuti lontano dall'elettrodomestico.
· L'elettrodomestico può essere installato e collegato solo da un installatore
autorizzato e qualificato.
· La sicurezza elettrica di questo piano cottura è garantita solo se esso è
collegato ad un sistema di messa a terra adatto, conforme agli standard
di sicurezza elettrica.
· Gli elettrodomestici incassati possono essere usati solo dopo che sono
stati installati in unità adatte e superfici di lavoro che siano conformi agli
standard.
· Non fare pressione sul cavo di alimentazione quando si monta il piano
cottura.
· La lunghezza del cavo di alimentazione non deve superare i 2 m per la
sicurezza dell' isolamento.
· In caso di guasti all'apparecchio o di danni al materiale in vetroceramica
(crepe o tagli), l'elettrodomestico deve essere spento e scollegato
dall'alimentazione elettrica per evitare la possibilità di uno shock elettrico.
· Le riparazione all'elettrodomestico devono essere eseguite solo da
personale autorizzato per l'assistenza.
· Assicurarsi che tutto il materiale per l'imballaggio sia stato rimosso prima
di usare l'apparecchio.
· I cavi degli apparecchi elettrici non devono toccare la superficie calda
di altri apparecchi o di pentole calde.
· Non lasciare mai il piano di cottura incustodito quando si cucina con
grasso o olio . Que sti elementi prendono fuoco rapidamente se surriscaldati.
· Non tagliare alimenti sul vetro del piano cottura in ceramica. I pannelli
di vetro non devono essere usati come superfici di lavoro.
2
Page 78

· Fare attenzione quando si usano piccoli elettrodomestici, come ferri da
stiro, vicino agli elementi.
· Non usare le aree di cottura con pentole vuote o senza pentole.
· Assicurarsi che tutti i comandi siano in posizione off quando non sono in
uso.
· Per la pulizia, l'apparecchio deve essere scollegato dall'alimentazione e
lasciato raffreddare.
· Non usare pulitori a vapore per pulire l'apparecchio poiché questo potrebbe
danneggiare il prodotto e potrebbe rendere non valida la garanzia.
· Usare solo padelle stabili con base piatta.
AVVERTENZA
.Se correttamente installato, il prodotto è conforme a tutti i requisiti per la
sicurezza elaborati per questa categoria. In ogni caso deve essere prestata
una cura speciale per quanto riguarda la parte inferiore dell'elettrodomestico,
poiché quest'area non è progettata o intesa per essere toccata e potrebbe
contenere bordi taglienti o ruvidi che potrebbero causare lesioni.
Rischio di ince ndio! Non lasciare mate riali infiammabili sulla parte superiore
del piano cottura.
Assicurarsi che i cavi elettrici che collegano gli altri elettrodomestici vicini
non possano entrare in contatto con la parte superiore del piano cottura.
Non lasciare che oggetti pesanti o taglienti cadano sul piano cottura in
ceramica. Se il piano cottura è lesionato o danneggiato, scolle gare e chiamare
il servizio di assistenza post-vendita.
Non graf fiare il piano cottura con oggetti taglienti. Non usare il piano cottura
come superficie di lavoro.
Prima di smaltire l'elettrodomestico, si consiglia di renderlo non funzionante
e di rendere innocue tutte le parti che potrebbero essere potenzialmente
dannose.
Im portante: Questo apparecch io è stato designa to solo per un uso domestico.
L'a pparecchio NON è adatt o ad essere usato in ambiente semi-commerciale,
commerciale o comune.
Se il cavo di alimentazione è danneggiato, deve essere sostituito dal
produttore, dal suo agente per l'assistenza o da una persona
analogamente qualificata per evitare pericoli elettrici.
3
Page 79

INSTALLAZIONE3
La connessione elettrica di questo piano cottura deve essere eseguita da un
tecnico autorizzato per l'assistenza o da un elettricista qualificato, secondo
le istruzioni in q uesta guid a e in conformi tà con i regolamenti correnti.
· Prima dell'inst allazione, assicurarsi che le condizioni locali di distribuzione e il
regolamento dell'elettrodomestico siano compatibili.
· Le leggi, le norme, le direttive e gli standard in vigore nel paese d'uso devono
essere rispett ati (regolamenti di sicurezza, riciclo corretto secondo i regolamenti,
ecc.)
Collocazione del piano cottura incassato
Dopo aver tolto i materiali di imballaggio dal dispositivo e dagli accessori, assicurarsi
che il piano cottura non sia danneggiato. Se si sospetta un danno, non usare il
dispositivo e contattare una persona autorizzata per l'assistenza o un tecnico
qualificato im mediatamente.
· Questo piano cottura incassato deve essere inserito in uno spazio del piano di
lavoro. Esso sarà collegato elettricamente con la scatola degli interruttori sotto
al piano, fornita proprio a questo scopo.
· Tagliare un'apertura con le dimensioni mostrate nell'immagine che segue.
4
Page 80

· Applicare il nastro sigillante autoadesivo in dotazione intorno al bordo
inferiore della superficie del piano cottura lungo tutto il bordo esterno del
pannello in vetroceramica. Non tirarlo troppo.
· Avvitare le 4 staffe per il montaggio del piano di lavoro sulle pareti laterali
del prodotto.
staffa per il montaggio del piano di lavoro
5
Page 81

COLLEGAMENTI ELETTRICI4
Collegamen to elettrico del piano cottura
· Prima di procedere con la connessione elettrica, verificare che la capacità
elettrica del sistema e la presa siano adeguate al valore massimo di
alimentazione del piano cottura.
· L'installazione elettrica domestica e la presa della corrente elettrica devono
essere messe a terra conformi ai regolamenti di sicurezza.
· Se non vi è un circuito apposito per il piano cottura ed un interruttore con
fusibili, l'installazione deve essere eseguita da un elettricista qualificato
prima di collegare il piano cottura.
· L'interruttore con fusibili deve essere facilmente accessibile dopo
l'installazione del piano cottura.
· Non usare adattatori, prese multiple e/o prolunghe.
· Questo elettrodomestico è conforme ai requisiti delle seguenti direttive
CEE:
1. Piano cottura in vetroceramica EEC/73/23 e 93/68, EEC/89/336
relativa alle interferenze radio,
2. EEC/89/109 relativa al contatto con gli alimenti.
· Bisogna installare nel circuito di alimentazione un interruttore di circuito
con un'apertura di contatto di almeno 3 mm, con valore nominale di 20 A
e di tipo a funzionamento ritardato.
E
2
2
2
* Questo apparecc hio deve essere
messo a terra.
* Per questo c ollegamento,
bi sogna us are un ca vo di
alimentazione di tipo H05VV-F.
· Il cavo di alimentazione deve essere e H05VV-F 3X2,5 mm² / 60227 IEC
53. Il diagramma di collegamento è mostrato sul retro dell'apparecchio.
· Dura nte l'istallazio ne, assicurarsi che siano usati cavi isolat i. Un colleg amento
non corretto potrebbe danneggiare l'apparecchio. La garanzia non coprirà
tali danni.
· T utte le riparazione devono essere eseguite da personale autorizzato per
l'assistenza o da un elettricista qualificato.
· Scollegare il dispositivo prima di ciascun intervento di manutenzione. Per
ricollegarlo, seguire i diagrammi di collegamento.
6
Page 82

USO5
L'apparecchio è azionato grazie ai pulsanti e le funzioni sono confermate
dai display e dai segnali acustici.
NOTA: vedere la sezione sulla REIMPOSTAZIONE DEL PIANO COTTURA
se si vede una H che lampeggia in uno dei display.
Display
riscaldatore
Attiva/disattiva
riscaldatore
Impostazione/dimin
uzione calore
M odalità stand-by S-Mode
Modalità di
funzionamento
Modalità blocco
B-Mode
VR-Mode Il comando del piano cottura è bloccato.
Punto
decimale
Impostazione/ aum
ento calore
Spia blocco
chiave
Blocco
chiave
Accensione/
spegnimento
L'alimentazione di rete viene applicata al piano
cottura e tutti i display del riscaldatore sono
spenti o è attivo un display di calore residuo.
Almeno un display del riscaldatore mostra una
impostazione di calore tra ´0` e ´9`
Descrizioni modalità
7
Page 83

Accensione/spegnimento dell'apparecchio.
Se l'apparecchio è in modalità stand-by, viene portato in modalità operativa
premendo il pulsante di accensione/spegnimento per almeno 1 secondo.
Un bip indica che l'operazione è riuscita.
Su tutti i riscaldatori compare uno '0' e ogni punto decimale del riscaldatore
lampeggia.
Se non ci sono operazioni entro 10 sec., il display di tutti i riscaldatori si
spegne.
Se i display si spengono, il riscaldatore viene disattivato.
Se è premuto per più di 2 sec (in Modalit à di funzionamento), l'apparecchio
si spegne e viene di nuovo portato in modalità spegnimento. L'apparecchio
può essere spen to premendo in qualsiasi momento; anche se alt ri pulsanti
sono premuti contemporaneamente.................
Se vi è calore residuo, sarà indicato da una H che lampeggia nel
corrispondente display del riscaldatore.
Selezionare il riscaldatore .
Se un riscaldatore singolo viene scelto con il corrispondente pulsante
attiva/disattiva riscaldatore , il punto decimale del relativo display del
riscaldatore lampeggia. Per il riscaldatore selezionato, è possibile importare
il livello di calore tra 1-9 grazie ai pulsanti di impostazione del calore o
. .
I pulsanti devono essere premuti entro 3 secondi, altrimenti la scelta del
riscaldatore viene annullata e il punto di impostazione del calore scompare
(punto decimale). Se non ci sono altre operazioni entro 10 sec., il riscaldatore
torna in modalità spegnimento.
L'impostazione del riscaldamento può sempre essere cambiata premendo
o tra livello 1-9. .
Ciascun cambiamento di funzionamento mediante i pulsanti o di display è
accompagnato da un bip.
8
Page 84

Impo stazione del livello di cottura con e senza la funzione boost calore
T utti i riscaldatori sono dotati con la funzione boost calore.
Se la funzione boost calore è attiva, il riscaldatore funzione rà con la massima
potenza per il periodo indicato, che dipende dall'impostazione di calore
selezionata. Questa è indicata da una ' A' lampeggiante, che si alterna con
il valore di impostazione di calore (per esempio 'A' e poi '9') nel display del
riscaldatore. Una volta che il tempo di boost è terminato, solo l'impostazione
di calore sarà visualizzata.
Se si desidera usare il livello 9 di boost, bisogna selezionarlo premendo
a partire dal livello 0. Dopo aver impostato il riscaldamento a livello 9, 'A'
e l'impostazione del riscaldamento saranno mostrati alternativamente.
Questo vuol dire che il livello 9 e la funzione boost sono attivi. Continuare
a premere il pulsante per impostare un calore minore.
I l boost ca lore può essere disattivat o prem endo fino a che viene seleziona ta
l'impostazione di calore '0'.
Se il boost calore deve essere usato, può sempre essere attivato azionando
di nuovo se il calore è impostato a livello 9. Nel display lampeggia ´A/9`.
Spegnimento dei singoli riscaldatori
Un riscaldatore a scelta può essere spento in due modi:
. Funzionamento contemporaneo dei pulsanti e
· Riduzione dell'impostazione di calore a '0' azionando il pulsante
F unzionamento contemporaneo dei pulsanti e
I l riscalda tore corrisponden te deve essere scelto con il pulsante attiva/disattiva
riscaldatore , il punto decimale del display del riscaldatore selezionato
lampeggia.
Per spegnere il riscaldatore, e devono essere premuti
contemporaneamente. Si sente un bip e '0' compare nel display di
impostazione del calore.
Se c'è calore residuo per questo riscaldatore, ciò sarà indicato da un display
statico 'H' nel display di impostazione del calore.
Riduzione dell'impostazione di calore a '0' azionando il pulsante
9
Page 85

Il riscaldatore può anche essere spento riducendo l'impostazione del calore
a '0'.
Quando il display del riscaldatore indica ´0`, anche il punto decimale del
riscaldatore selezionato si spegne.
Se c'è calore residuo per questo riscaldatore, ciò sarà indicato da un display
statico 'H' nel display di impostazione del calore.
Blocco chiave
La funzionalità di blocco chiave serve per bloccare ed impostare
l'elettrodomestico ad una modalità di risparmio durante il funzionamento.
Le modifiche come l'aumento delle impostazioni di calore e altre non sono
possibili. È possibile solo spegnere l'apparecchio.
.
Per bloccare la modalità operativa corrente, premere il pulsante blocco
chiave per almeno 2 secondi. Questa operazione viene segnalata da
un bip. La spia di blocco chiave lampeggia e i comandi sono bloccati. he
Il riscaldatore può essere bloccato solo in modalità operativa.
Se il riscaldatore è bloccato, solo può essere azionato, tutti gli altri
pulsanti non sono attivi. Solo il pulsante di accensione/spegnimento
funzionerà. Se si spegne l'apparecchio, è necessario riaccenderlo e premere
il pulsante di blocco per sbloccarlo prima di poterlo usare.
Dopo aver premuto per 2 secondi, la spia blocco chiave scompare. Ora
i comandi del piano cottura sono sbloccati e possono essere usati
normalmente.
10
Page 86

6
Le funzioni di sicurezza che seguono sono disponibili per evitare operazioni
non volute dei comandi del piano cottura.
Isolamento di sicurezza del sensore
Per evitare che l'apparecchio esegua operazioni indesiderate e casuali, è
incluso il monitoraggio del sensore.
Se uno o più pulsanti vengono premuti per più di 12 secondi, la routine di
monitoraggio del sensore indica, con un bip, un funzionamento errato
(pentola o altro oggetto posti sul pulsante, errore del sensore, ecc.) e spegne
l'apparecchio.
Lo spegnimento di sicurezza fa passare il piano di cottura in stand-by. Una
'F' lampeggia in tutti i display del riscaldatore una volta prima che si passi
in stand-by.
FUNZIONI DI SICUREZZA TOUCH CONTROL
Se è presente calore residuo, sarà visualizzata una 'H' nell'apposito display
del riscaldatore.
Spegnimento in caso di temperatura in eccesso
Dato che il pannello di controllo è chiuso sulla parte anteriore dei due
riscaldatore, esso può diventare troppo caldo se le pentole sono state poste
male in modo e il fondo della padella è vicino ma non tocca i pulsanti dei
comandi.
Per evitare che l'unità dei comandi del piano cottura si danneggi, viene
monitorata la temperatura e l'apparecchio si spenge se il pannello di
controllo supera i 60°C. T utti i 4 riscaldatori mostrano una 't', fino a che il
piano cottura si raffredda.
11
Page 87

Dopo che il piano cottura si è raffreddato, la 't' scompare e il piano cottura
entra in modalità stand-by. Questo vuol dire che l' utente può riattivare
l'apparecchio toccando .
Funzioni calore residuo .
Dopo che il p
che rest a nel vetroceramica, e questo calore è detto residuo. Il piano cottura
può calcolare approssimativamente quanto è caldo il vetro. Se la temperature
calcolata
lamp eggia una ´H`. Il display di c alore res id
t empe ratu ra ca lco lata p er il r isca ldatore è su perio re a + 6 0 ° C.
iano cottura viene spento quando la cottura è finita, c'è del calore
è superi
ore a + 60 ° C, sul display del riscaldatore corrispondente
uo è mostrato
fintanto che la
.
Il display del calore residuo ha la priorità più bassa e viene sovrascritto da
tutti gli altri display come lo spegnimento di sicurezza o la visualizzazione
dei codici di errore. .
REIMPOSTAZIONE PIANO COTTURA
Quando il piano cottura è acceso per la prima volta dopo l'installazione o
dopo assenza di elettricit à durante il funzionamento , il piano cottura mostrerà
una 'H' lampeggiante su tutti o su alcuni display.
Quale visualizzi la 'H' dipende dalla modalità di funzionamento quando si
è verificata l'interruzione elettrica.
Ciò è dovuto al fatto che il piano cottura conserva in memoria le informazioni,
non è un errore ed è normale.
Per reimpostare il piano cottura, tenere premuti i pulsanti del riscaldatore
in alto a sinistra, del riscaldato re in basso a sinistra e contemporaneamente,
per circa 2 secondi.
Tenere p rem uti q ue sti pu lsa nti
per reimposta re i l pi an o cottur a.
12
Page 88

PULIZIA E MANUTENZIONE7
Pentole con fondi duri non devono essere usate poiché possono graffiare
la superficie in ceramica. Il fondo delle pentole deve essere quanto più
spesso e piatto possibile. Prima dell'uso assicurarsi che i fondi siano puliti
e asciutti.
Mettere sempre le pentole sull'area per la cottura prima dell'accensione. Se
possibile, tenere sempre i coperchi sulle pentole. Il fondo delle pentole non
deve essere più piccolo o più grande delle aree di cottura, deve essere della
dimensione giusta, come indicato di seguito.
CORRETTO FALSO FALSO FALSO
Prima di pulire il piano cottura, scollegare dalla presa di alimentazione.
Poi assicurare che non via calore residuo nell'apparecchio. Il materiale
vetroceramica è molto resistente alle alte temperature e si surriscalda. Se
vi è calore residuo nell'apparecchio, la 'H' lampeggia nel display del
riscaldatore. Per evitare bruciature, lasciare che l' apparecchio si raffreddi.
PULIZIA DEL PIANO COTTURA IN CERAMICA .
Prima di cominciare a pulire, assicurarsi che il piano cottura sia spento.
Rimuovere macchie e altri tipi di incrostazioni.
Particelle di polvere o cibo possono essere rimosse usando un panno umido.
Se si usa un detergente, assicurarsi che non sia abrasivo. Non usare agenti
abrasivi o polveri abrasive perché potrebbero danneggiare la superficie in
ceramica del piano cottura.
Tutte le tracce di detergente devono essere rimosse con un panno umido.
Polvere, grassi e liquidi degli alimenti che sono stati cotti devono essere
eliminati appena possibile.
Se vengono lasciati indurire, diventano sempre più difficili da rimuovere.
13
Page 89

Questo vale soprattutto per le miscele di zucchero/sciroppi che potrebbero
macchiare in modo permanente la superficie del piano cottura se lasciate
bruciare.
Se questi prodotti si sono fusi sulla superficie in ceramica, è necessario
rimuoverli immediatamente (quando la superficie è ancora calda) usando
un raschietto per evitare danni permanenti alla superficie del piano cottura
(disponibile presso il rivenditore dove è stato acquistato l'apparecchio).
Non mettere sul piano cottura oggetti che potrebbero sciogliersi: cioè,
plastica, alluminio, zucchero, sciroppi zuccherosi, ecc.
Evitare di usare coltelli o altri utensili taglienti perché potrebbero danneggiare
la superficie in ceramica.
Non usare lana d'acciaio o spugne abrasive che potrebbero graffiare la
superficie in modo permanente.
14
Page 90

Smaltimento
I rifiuti di prodotti elettrici ed elettronici non devono essere
smaltiti con quelli domestici. Chiedere al rivenditore presso
il quale è stato acquistato l'articolo informazioni sullo
smaltimento.
I materiali di imballaggio devono essere riciclati usando le
strutture locali.
Se qualcosa non funzion a
Se c'è q ualcosa che non è chiaro e si risiede nel Regno Unito, è possibile
telefonare all'assistenza telefonica durante il normale orario d'ufficio:
01 13 2793520 Se si ha bisogno di assistenza, chiamare al numero
telefonico sulla fattura.
Le telefonate sono tariffate secondo lo standard.
Ci scusiamo di tutti gli inconvenienti provocati da piccole incoerenze di
queste istruzioni, che potrebbero essere il risultato di miglioramenti e
sviluppo del prodotto.
Kesa U.K HU1 3AU 01/ 09/2007
52012436
Page 91

Page 92

Page 93

Page 94

Page 95

Page 96

Page 97

Page 98

Page 99

Page 100

 Loading...