

Page 1

PT-1361 Li-ion Cordless Screwdriver 3.6V
User
’s Manual
st
Edition, 2011
1
©2011 Copy Right by Prokit’s Industries Co., Ltd.
Page 2
Important!
When using equipment, a few safety precautions must be observed to avoid injuries and
damage.
Please read the complete operating manual with care. Keep this manual in a safe place, so
that the information is available at all times. If you give the equipment to any other person,
give them these operating instructions as well.
We accept no liability for damage or accidents which arise due to non-observance of these
instructions and the safety information.
1. Safety information
Please refer to the booklet included in delivery for the safety instructions.
Caution!
Read all safety regulations and instructions.
Any errors made in following the safety regulations and instructions may result in an electric
shock, fire and / or serious injury
Keep all safety regulations and instructions in a safe place for future use.
2. Layout and items supplied
1
1
Page 3
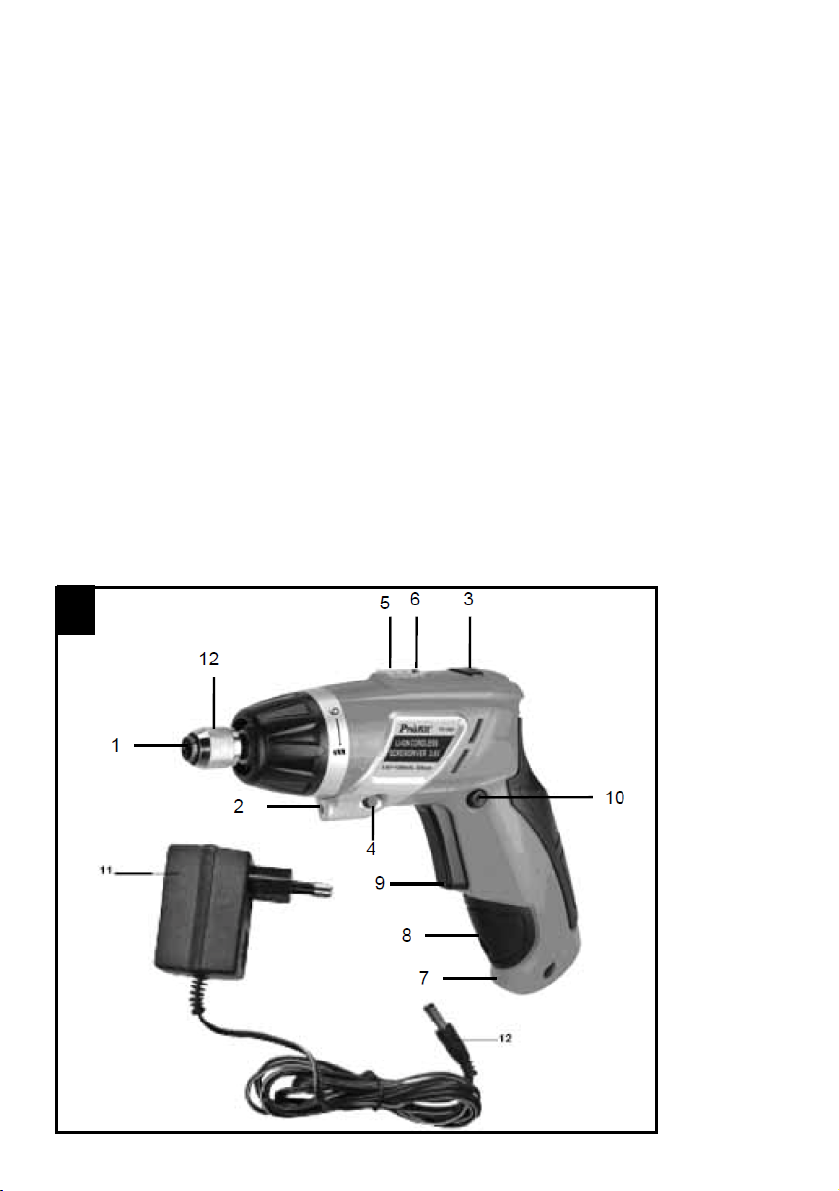
2.1 Layout
1. Bit chuck
2. Lamp
3. Locking button
4. ON/OFF switch for lamp
5. Battery capacity indicator
6. Switch for battery capacity indicator
7. Charging control lamp
8. Charging connection
9. On / Off switch
10. Clockwise/Counter-clockwise selector switch
11. Battery charger
12. Charging cable
13. Locking sleeve
2
Page 4

2.2 Items supplied
Open the packaging and take out the equipment with care.
Remove the packaging material and any packaging and/or transportation braces (if
available).Check to see if all items are supplied. Inspect the equipment and accessories for
transport damage. If possible, please keep the packaging until the end of the guarantee
period.
Important
The equipment and packaging material are not toys. Do not let children play with
plastic bags, or small parts. There is a danger of swallowing or suffocating!
1. Cordless screwdriver
2. Battery charger
3. Bits x 4pcs (50 mm, SL5,SL6,PH1,PH2)
4. User’s manual
3. Proper use
The cordless screwdriver is designed for tightening and undoing screws.
The machine is to be used only for its prescribed purpose. Any other use is deemed to be a
case of misuse. The user /operator and not the manufacturer will be liable for any damage
or injuries of any kind caused as a result of this.
4. Technical data
Model No. PT1361F PT1361A
Battery charger supply voltage 230 V 50 Hz 120V 50Hz
Motor power supply 3.6 V DC
Idling speed 200 rpm
Clockwise/Counter-clockwise Yes
Charge voltage for rechargeable battery 6 V DC
Charge current for rechargeable battery 300 mA
Charging time: max. 3-5 hours
Battery type Li-Ion
Sound and vibration
Sound and vibration values were measured in accordance with EN 60745.
Additional information for electric power tools
Warning!
The specified vibration value was established in accordance with a standardized testing
method. It may change according to how the electric equipment is used and may exceed
the specified value in exceptional circumstances. The specified vibration value can be used
to compare the equipment with other electric power tools. The specified vibration value can
be used for initial assessment of a harmful effect.
Keep the noise emissions and vibrations to a minimum.
3
Page 5

Only use appliances which are in perfect working order. Service and clean the appliance
regularly. Adapt your working style to suit the appliance. Do not overload the appliance.
Residual risks
Even if you use this electric power tool in accordance with instructions, certain
residual risks cannot be rules out. The following hazards may arise in connection
with the equipment’s construction and layout:
1. Lung damage if no suitable protective dust mask is used.
2. Damage to hearing if no suitable ear protection is used.
3. Health damage caused by hand-arm vibrations if the equipment is used over a
prolonged period or is not properly guided and maintained.
5. Before starting the equipment
Be sure to read the following information before you use your cordless screwdriver for the
first time:
1. Charge the battery pack with the charger supplied.
2. Only ever use screwdriver bits which are suitable for the purpose and in faultless
condition.
3. Always check for concealed electric cables and gas and water pipes when drilling and
screwing in walls.
6. Operation
6.1 Charging the battery (Fig. 1)
The battery is protected from exhaustive discharge. An integrated protective circuit
automatically switches off the equipment when the battery is flat. In this case the bit chuck
will cease to turn.
Warning!
Do not press the ON/OFF switch any more if the protective circuit has actuated. This may
damage the battery.
1. Check that your mains voltage is the same as that marked on the rating plate of the
battery charger. Plug the battery charger in the plug socket and connect the charging
cable to the charging connection. The charging process starts as soon as the charging
cable is connected to the charging adapter.
2. The red LED (7) will come on to indicate that the battery pack is being charged.
3. The charging control lamp (7) goes out when charging is completed.
Important!
The handle may become a little warm during the charging process. This is normal. If the
battery pack fails to charge, please check whether there is voltage at the socket-outlet and
check for proper contact with the charging contacts in the battery charger If the battery still
fails to charge, send the battery charger and the screwdriver to our customer services
department. Timely recharging of the battery pack will help it serve you well for a long time.
You must recharge the battery pack when you notice that the power of the screwdriver
drops.
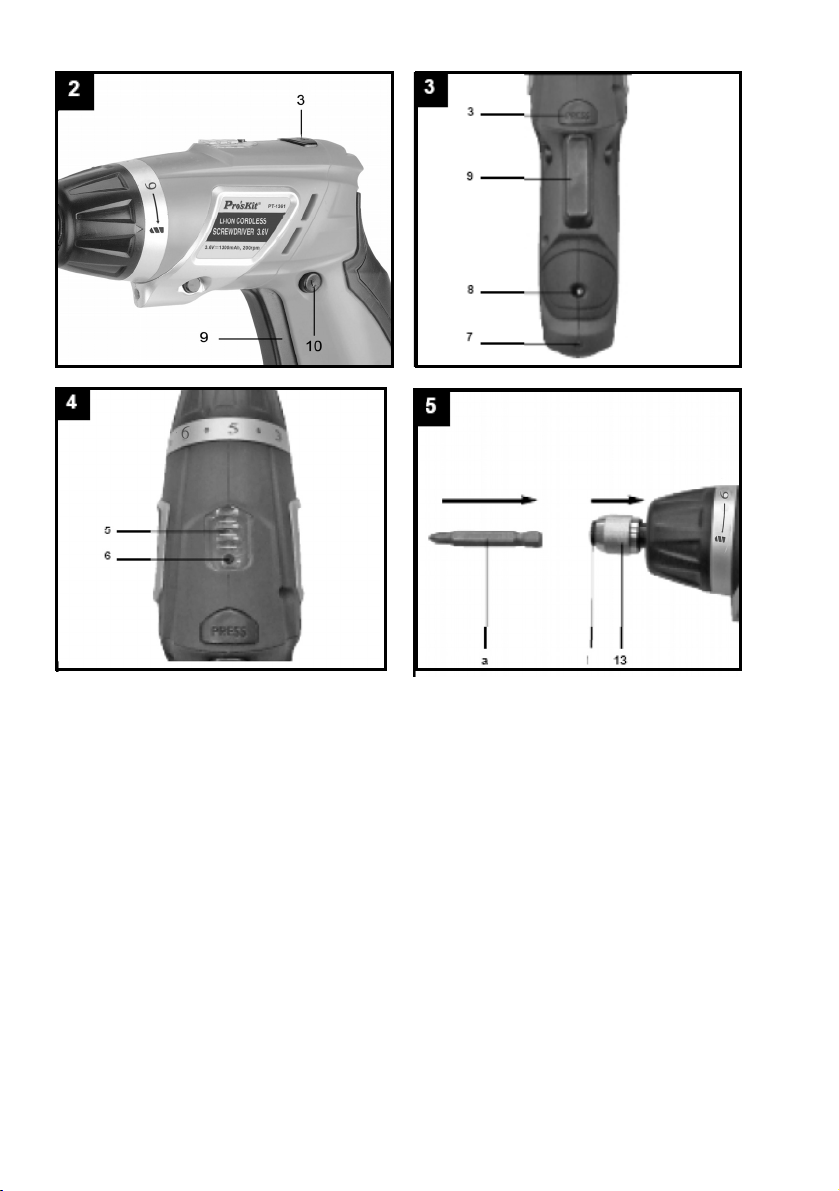
6.2 Changeover switch (Fig. 2/Item 10)
The slide switch above the ON/OFF switch is for setting the direction of rotation of the
4
Page 6

cordless screwdriver and for preventing the cordless screwdriver from being switched on
inadvertently. You can select between clockwise and counter- clockwise rotation. Change
the direction of rotation only when the equipment is at a standstill. If you fail to observe this
point, the gearing may become damaged. When the slide switch is in the middle position,
the ON/OFF switch is blocked.
6.3 ON/OFF switch (Fig. 2 / Item 9)
Press the On/Off switch to switch the cordless screwdriver on. Release the ON/OFF switch
to switch off the tool.
6.4 LED lamp (Fig. 1/Item 2)
The LED lamp (2) can be used in poor lighting conditions to illuminate the area where you
want to screw. To switch ON, press the switch (4) and to switch OFF press the switch (4)
again.
6.5 Angle setting (Fig. 1,3/Item 3)
The screwdriver can be locked into 2 different angle settings. To do so, press the locking
button (3) and move the screwdriver into the desired position. Then release the locking
button (3).
Important.
Before you switch on the screwdriver, make sure that it is correctly locked in the
angle position in question.
6.6 Battery capacity indicator (Fig. 4/Item 5)
Press the button for the battery capacity indicator (6). The battery capacity indicator (5)
indicates the charge state of the battery on 3 colored LEDs.
All LEDs illuminate:
The battery is fully charged
The yellow and red LED illuminate:
The battery has an adequate remaining charge
Red LED:
The battery is empty, recharge the battery
6.7 Changing the tool (Fig. 5)
Important!
Set the changeover switch to its centre position whenever you carry out any work (for
example changing the tool, maintenance work, etc.) on the cordless screwdriver. Pull back
and hold the locking sleeve (13). Insert the bit (a) into the bit chuck (1) and let go of the
locking sleeve (13). Check that it is secure by attempting to pull the tool apart again.
5
Page 7

6.8 Screw driving
We recommend using self-centering screws (e.g. Torx screws, recessed head screws)
designed for reliable working. Be sure to use a bit that matches the screw in shape and size.
Set the torque, as described elsewhere in these operating instructions, to suit the size of
screw.
7. Cleaning, maintenance and ordering of spare parts
Always pull out the mains power plug before starting any cleaning work.
7.1 Cleaning
Keep all safety devices, air vents and the motor housing free of dirt and dust as far as
possible.
Wipe the equipment with a clean cloth or blow it with compressed air at low pressure.
We recommend that you clean the device immediately each time you have finished using it.
Clean the equipment regularly with a moist cloth and some soft soap. Do not use cleaning
agents or solvents; these could attack the plastic parts of the equipment. Ensure that no
water can seep into the device
7.2 Maintenance
There are no parts inside the equipment which require additional maintenance.
7.3 Ordering replacement parts
Please quote the following data when ordering replacement parts: Type of machine Article
number of the machine Identification number of the machine Replacement part number of
the part required For our latest prices and information please go to www.prokits.com.tw
8. Disposal and recycling
The unit is supplied in packaging to prevent its being damaged in transit. This packaging is
raw material and can therefore be reused or can be returned to the raw material system.
The unit and its accessories are made of various types of material, such as metal and
plastic. Defective components must be disposed of as special waste. Ask your dealer or
your local council.
9. Storage
Store the equipment and accessories out of children’s reach in a dark and dry place at
above freezing temperature. The ideal storage temperature is between 5 and 30 °C. Store
the electric tool in its original packaging.
6
Page 8

PT-1361 3.6V 鋰電池電動起子
重要!
使用設備時,安全防範措施必須遵守,以避免人員傷亡和損害。請閱讀完整的操作手冊,並
適當存放。請將本手冊存放在一個安全的地方,從而使資訊是隨時可用。如果你將設備給任
何其他人,請給他們這些操作說明。不遵守這些指令和安全資訊將導致產品損壞或意外產生。
1. 安全資訊
請參閱說明書
警告!
閱讀所有安全法規和指令.
任何錯誤可能會導致觸電,火災和/或嚴重傷害,將說明書放置于安全的地方以利使用
2. 外觀和配件
1
7
Page 9

2.1 外觀
1. 夾頭
2. LED燈
3. 鎖定鍵
4. LED燈開關
5. 電池容量指示燈
6. 電池容量指示燈開關
7. 充電指示燈
8. 充電插頭
9. 開關按鈕
10. 順時針/逆時針選擇開關
11. 電池充電器
12. 充電線
13. 鎖緊套筒
2.2 配
件提供
打開包裝,小心取出設備拆掉包裝材料或任何運輸防護材料。檢查是否所有的配件都有提供.
如果可能的話,請保持包裝到質保期結束為止。
1. 電動螺絲起子,
8
Page 10

2. 電池充電器
3. 4個起子頭(50 mm, SL5,SL6,PH1,PH2) 4. 操作使用說明書安全說明
重要
設備和包裝材料不是玩具。切勿讓孩子玩塑膠袋,或小零件,否則有吞咽或窒息的危險!
3. 正確使用
無電源線的電動起子是為螺絲鎖緊和放鬆用的設計, 電動起子只用於其既定的目的。任何其他
用途,被認為是使用不當的情況.用戶/操作員將為造成任何損害或傷害承擔責任,而非製造商。
4. 技術資料
項目
充電器輸入電壓
電源
無負載轉速
正反轉設定 可以
充電電壓
充電電流
充電時間 3-5 小時
電池類型 鋰電
振動雜訊
聲音與振動值的測定按照EN 60745
電動工具的其他資訊
警告!
指明的振動值是按照標準化的測試方法。它根據電氣設備使用的不同可能發生變化,特殊情
況下可能超過規定值。
保持雜訊的排放量和振動到最低限度。
使用器具于正常的工作條件。
定期清潔器具,使之適應你的工作要求,善用設備,不要超負荷使用設備。
剩餘風險
即使您使用這個電動工具時按照指示操作,某些不確定的風險可能不能排除。可能產生以下
危害
1. 如果沒有合適的防護防塵口罩使用,可能損害肺部
2. 如果沒有合適的護耳產品,可能損害聽力
3. 如果該設備使用時間過長或沒有正確引導和維護,手臂遭受振動可能損害健康,
5.在啟動設備之前
在首次使用前您的充電電批,請務必閱讀以下的資訊
1. 使用充電器將電池充滿電
2. 測試過,才能找到合適的扭力。
3. 鑽孔或在牆壁鎖螺絲時請務必檢查隱蔽在牆內的電纜和煤氣管道,水管等
PT-1361F PT-1361A
230 V 50 Hz 120V 60Hz
3.6 V DC
200 rpm
6 V DC
300 mA
9
Page 11

6. 操作
6.1 電池充電 (圖 1)
電池有過充保護, 內部有自動保護電路,
警告! 不要一直不斷的重覆按ON / OFF開關引起保護電路啟動。這可能損壞電池。
1. 檢查您的電源電壓是否與銘牌上標明的一樣.充電過程中充電電纜連接到充電適配器。
2. 紅色LED燈亮表示正在充電過程中
3. 充電完成時,充電控制燈(7)熄滅
重要!
充電過程中手柄可能有點發熱,這是正常的 如果電池無法充電,請檢查:插座是否有電壓,是
否有接觸到,如果電池仍然無法充電,請將電池充電器和電批發送到我們的客戶服務部門。
及時給電池充電,將有利於延長電池使用壽命。
當您發現電批扭力下降時,您應馬上充電。
6.2 轉向開關 (圖 2/ 10)
上述轉向開關是配合ON / OFF開關設置旋轉方向的,您可以選擇順時針方向和反順時針方向
旋轉。只有當設備處於停頓狀態時,才可以改變旋轉方向。如果你不注意這一點,齒輪可能
會損壞。當滑動開關在中間位置時,ON / OFF開關是被鎖住的。
6.3 ON/OFF 開關 (圖 2 / 9)
壓下開關啟動電批,釋放開關停止電批運轉
6.4 LED 燈 (圖1/ 2)
LED 燈(2)主要在光線不好的地方使用電批. 按下燈開關打開LED燈, 釋放燈開關關閉LED燈
6.5 角度選擇(圖 1,3/ 3)
螺絲刀可以被設定在2個不同的角度。要做到這一點,按下鎖定按鈕(3)將電批移動到所需
的位置。然後鬆開鎖定按鈕(3)。
重要!在您使
6.6 電池容量指示燈 (圖 4/ 5)
按下電池容量指示燈開關(6),電池容量指示燈(5)顯示3個彩色LED電池的充電狀態︰
所有LED點亮: 電池完全充電
黃色和紅色的LED點亮: 電池有足夠的剩餘電量
紅色 LED: 電池沒電,需對電池充電
6.7 更換工作部件(圖 5)
重要! 每當你進行任何工作(例如更換配件,進行維護工作,等)請將電批鎖定按鈕設置到
中心位置。按住鎖套(13)。插入批頭(1)(a)鬆開鎖套(13)。再次檢查它是安全固定
的,再使用電批
6.8 螺絲
請務必使用匹配形狀和大小的螺絲釘,并設置好扭矩。我們建議採用自攻螺絲(如Torx螺釘,
凹頭螺釘)。無論在何種場合, 請注意以上事宜
用電批之前, 確保它是正確的鎖定角度位置。
10
Page 12

7. 清洗,保養和配件訂購
在進行任何清潔工作開始之前,務必拔出電源插頭。
7.1 清潔
保持部件的清潔, 盡量遠離塵土和灰塵, 使用濕布或低壓氣泵擦拭吹淨。每次使用完電批,我
們建議您立即清潔設備。.定期用濕布加一些肥皂水清潔設備,請勿使用清潔劑或溶劑,
這可能會損壞設備的塑膠部件。確保沒有水可以滲入設備。
7.2 維護
設備內其他部件無須維修保養
7.3 訂購更換零件
訂購更換零件時,請注明下列數據: 1. 機器型號 2. 機器的數量 3. 機器的系列號
對於我們的最新價格和資訊,請訪問www.prokits.com.tw
8. 處置和回收利用
外包裝是防止其在運輸途中受損。這種包裝原料,可以被重複利用。各類材料,如金屬和塑
膠,配件。有缺陷的部件必須作為特殊廢物處置,請詢問您的經銷商或當地政府。
9. 存儲
將設備和配件存放在兒童不能接觸的地方。理想的存儲溫度是5°-30°,請以原包裝存儲
©2011 Prokit’s Industries Co., LTD. All rights reserved 2011001(C)
11
 Loading...