

Page 1
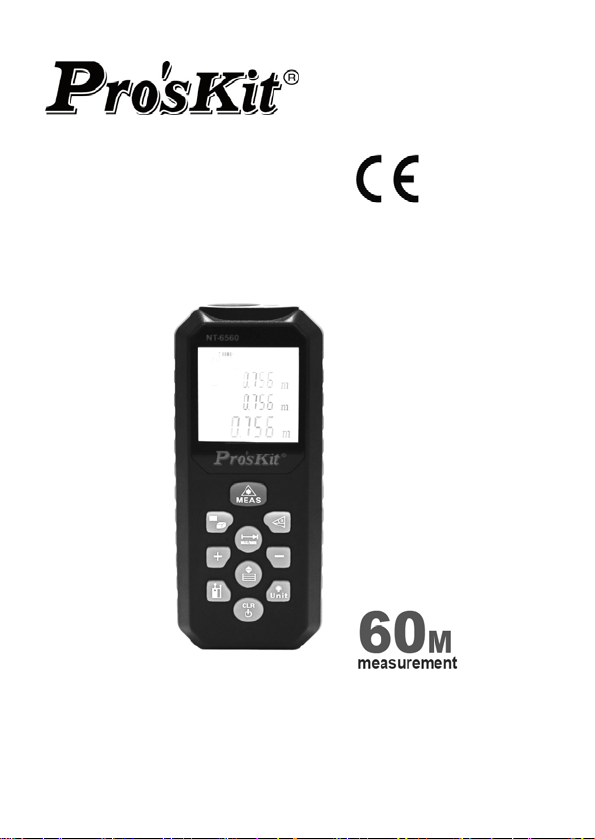
NT-6560
Laser Distance Measurer
User Manual
1st Edition
©2013 Copyright by Prokit’s Industries Co., Ltd
Page 2

Thanks for buying Pro’sKit NT-6560 Laser Distance Measurer
(60M).Please read these instructions carefully before using the product.
User Manual
English
Content
Safety instrument .............................................................................. 1
Start-up ............................................................................................. 3
Initial Operation and Setting.............................................................. 5
Measuring ......................................................................................... 6
Functions........................................................................................... 7
Troubleshooting – Causes and C
Technical data................................................................................. 10
Care ................................................................................................ 11
The compact and handy base model was specifically designed for
indoor application professionals. Shortcut and Soft grip keys for addition,
subtraction, area and volume calculation make measuring fast and very
reliable. Moreover, the NT-6560 with Pythagorean Theorem calculation
performs various indirect heights.
orrective Measures ....................... 9
SAFETY INSTRUMENT
Permitted use
Measuring distances
Computing functions, e. g. areas and volumes
Indirect Measuring with Pythagorean Theorem
- 1 -
Page 3

Prohibited use
Using the instrument without instruction
Using outside the stated limits
Deactivation of safety systems and removal of explanatory and
hazard labels
Opening of the equipment by using tools (screwdrivers, etc.), as far
as not specifically permitted for certain cases
Carrying out modification or conversion of the product
Use after misappropriation
Use of accessories from other manufacturers without the express
approval of PROKIT'S INDUSTRIES CO., LTD.
Deliberate or irresponsible behavior on scaffolding, when using
ladders, when measuring near machines which are running, or near
parts of machines or installations which are unprotected
Aiming directly into the sun
Deliberate dazzling of third parties; also in the dark
Inadequate safeguards at the surveying site (e.g. when measuring
on roads, construction sites, etc.)
Laser classification
The NT-6560 produced a visible laser beam which emerges from the
front of the instrument.
Laser Class 2 products:
Do not stare into the laser beam or direct it towards other people
unnecessarily. Eye protection is normally afforded by aversion
responses including the blink reflex.
WARNING:
Looking directly into the beam with optical aids
(e.g. binoculars, telescopes) can be hazardous.
- 2 -
Page 4

Precauti
Do not look directly into the beam with optical aids.
Looking into the laser beam may be hazardous to the eyes.
Precautions:
Do not look into the laser beam. Make sure the laser is aimed above or
below eye level.
ons:
CAUTION:
START-UP
Inserting/replacing batteries
fig.A
See fig.A and operating as following steps
1. Turn of the screw, remove battery compartment lid.
2. Insert batteries in the two space respectively, observing correct
polarity.
3. Close the battery compartment again, and fix the screw for reliability.
Replace the batteries when the symbol
the display.
※ Use alkaline batteries only.
※ Remove the batteries before any long period of non-use to avoid
the danger of corrosion.
flashes permanently in
- 3 -
Page 5

Keypad
1 ON / MEAS (On/measuring) button
2 Area / volume button
3 Indirect measurement button
4.Continuous measurement button
5 Plus (+) button
6 Minus (-) button
7 Storage button
8 Reference level button
9 LCD back light button
10 Clear/off button
LCD Display
1 Laser active
2 Reference level (front)
3 Reference level (rear)
4 Reference level (End piece)
5 Continuous measurement
6 Instrument error warning
7~11.
Variable measuring
functions
Length measurement
Area measurement
Volume measurement
Indirect (2 times) measurement
Indirect (3 times) measurement
12 Battery status
13 Historical memory, call up values
14 First value display line, minimum value
15 Second value display line, maximum value
16 Third value display line
17. Summary line for last measure or calculation result
- 4 -
Page 6

INITIAL OPERATING AND SETTING
Switching on and off
Switches on the instrument and laser. The display shows the
battery symbol until the next button is pressed.
Press and hold this button to switch off the instrument..
The instrument switches off automatically after three minutes of
inactivity.
CLEAR button
The last action is canceled or the data display is cleared, while
making measurements. If in mode of History storage
single measurement will be deleted from the memory after clicking
the button.
Reference level setting
The default reference setting is from the rear of the instrument.
Press button
selection from the front edge
,A special beep sounds
whenever the reference
setting is changed. After a
re-startup the reference
returns automatically to the
default setting (rear reference). See fig.D
Press button
Press this button,
In a word, to select the reference level, push button 8 repeatedly until
the required reference level is indicated in the display. Each time after
switching on, the rear edge of the measuring tool is preset as the
reference level.
each
to take the
Fig.D
again to take the next selection from end piece edge.
to set the rear reference again.
- 5 -
Page 7

Display back light
The illumination button of the display can be switched on or off, User
can trigger the function when he/she is in darkness situation. The value
is clearly visible on the LCD
Distance unit setting for instrument
Click and hold the button longer to change to the next type of unit,
m, ft. in, ft+/in then to continue click the button for the next unit
selection.
MEASURING
Single distance measurement
Press to activate the laser. Press again to trigger the distance
measurement. The measured value is displayed immediately.
Continuous Measurement (Tracking)
Maximum and Minimum Measurement
See fig.E
The continuous measurement fu
for the transferring of measurements, e.g., from
construction plans. In continuous measurement mode,
the measuring tool can be moved close to the target,
whereby the measured value is updated approx. every
0.5 seconds. The corresponding dynamically maximum
and minimum values are displayed in the first and
second line.
As an example, the user can move from a wall to the required distance,
while the actual distance can be read continuously. For continuous
measurement, push button
measurement appears in the display. And press it again or
the function. The function is terminated after continuous measurement
for 5 minutes.
nction (tracking) is used
Fig.E
until the indicator for continuous
to stop
- 6 -
Page 8

FUNCTIONS
Addition / subtraction
Distance measuring.
The next measurement is added to the previous one, then press
the second measured value is shown and the result is shown
automatically.
The next measurement is subtracted from the previous one. Then
press
previous value in the second line.
Area
Press
Press
After taking the second measurement, the area/surface is automatically
calculated and displayed in the summary line. The last individual
measured value is indicated at the second line in the display.
Volume
For volume measurements, push button
indicator for volume measurement appears in the display.
Afterwards, Press this button
Press this button
Press button to
After taking the third measurement, the volume is automatically
the result is always shown in the summary line with the
The last step is canceled.
Press once. The symbol appears in the display.
button to take the first length measurement (e.g. length).
again to take the second length measurement (e.g. width).
twice until the
to measure the length,
for width
take the height,
- 7 -
Page 9

calculated and display
displayed.
Indirect measurement determining a distance using 2
measurements
when measuring heights that require the
measurement of two or three
measurements as following step:
Press this button
shows. The laser is switched on.
Aim at the upper point (1) and trigger
the measurement. After the first
measurement the value is adopted, the
second distance to be measured flashes in the symbol. Keep the
instrument as horizontal as possible. The tool default
measurement result is the horizontal value.
Press this button to trigger the measurement; the measured
value is displayed in the second line. At the same time, the
result is displayed in the summary line.
Indirect Measurement - determining a distance using 3
measurements
Press this button
shows the following symbol.
switched on.
Aim at the upper point (1) and trigger the
measurement. After the first measurement
the value is adopted, keep the instrument
as horizontal as possible, the tools default
the
measurement result is the horizontal
value
The display shows in the second line,
Aim at the middle point (2) and Press
ed. The last individual measured value is not
, the display
Fig.F
twice; the display
The laser is
圖示 G
measurement button.
- 8 -
Page 10

The value is adopted.
The display shows the third line,
Aim at the lower point and Press this button to
trigger the
measurement (3).
The result is displayed in the summary line, the third results
third lines
at same time.
in the
History storage
Continually press
(measurements or calculated results) are shown in the
Press
Press
Press the
and the next value of the previous 20 records
reverse order.
to retrieve the next value of 20 records .
to retrieve the previous value of 20 records
then button to erases the value of historical storage
one by one in the reverse sequence.
TROUBLESHOOTING
Causes and Corrective Measures
All message codes are displayed with either a numeric code or the word
"Error". The following errors can be corrected:
Code Cause Corrective Measure
204 Calculation error Refer to user menu, repeat the procedures
208
220 Battery too low Replace new batteries
253 Temperature too low Warm up instrument
255 Receiver signal too
256 Received signal too
Error Hardware error and
Temperature too high Cool down instrument, use it in a stable
* Please operate this unit with outside temperature from 0°C to +40°C
weak, measurement
time too long
strong
uncertainty error
temperature environment
Use target plate or change to a surface with
better reflectivity
Target too reflective. Use target plate or a
surface that is less reflective
Switch on/off the device several times. If the
symbol still appears, then your instrument is
defective. Please call your dealer for
assistance
- 9 -
Page 11

TECHNICAL DATA
Part Number NT-6560
Range 0.1 ~ 60m (0.003~200ft)
Measuring accuracy ±1.5mm (0.06in)
Measuring units m/in/ft / in+ft
Laser Class Class II
Laser Type 635nm, < 1mW
Auto Bias Technology™ ●
Area, Volume Calculations ●
Indirect measurement using
Pythagorean Theorem
Addition/Subtraction ●
Continuous Measurement ●
Min/Max Distance Tracking ●
Display back light and
multi-line display.
Buzzer indication ●
History measurement recodes 20 sets
Operating Temperature
●
●
0°C ~ +40°C
(+32°F ~ +104°F)
Storage Temperature
Battery Life up to 5,000 measurements
Batteries Type AAA x 2pcs (1.5V)
Auto. laser switch-off after 0.5 mins
Auto instrument switch-off after 3 mins
Dimension 120 x 50 x 28mm
Weight 100.5g (without Battery)
※ During daylight or if the target has poor reflection properties!
※ In favorable conditions (good target surface properties, room
temperature) up to 60m.
※ In unfavorable conditions, such as intense sunshine, poorly
-10°C ~ +60°C
(14°F ~ +140°F)
- 10 -
Page 12

reflecting target surface (black surface) or high temperature variations,
the deviation over distances above 10m may increase more.
CARE
Wipe off dirt with a damp, soft cloth.
Do not immerse the instrument in water.
Do not use aggressive cleaning agents or solutions.
NT-6560 鐳射測距儀 (60M)
使用說明書
感謝您購買和使用 Pro’sKit NT-6560 鐳射測距儀 (60M),使用前請仔細
閱讀說明書,閱讀後請妥善保存,以備查閱。
目 錄
安全使用指南...................................................................... 11
啟動 ....................................................................................13
初始操作和设置................................................................... 14
测量 ....................................................................................15
功能 ....................................................................................16
故障原因和排除方式 ...........................................................18
技術參數 .............................................................................18
保養 ....................................................................................19
NT-6560 鐳射測距儀特為專業用戶提供高精度,一個人測量和多功能測
量輔助功能,功能包括計算面積,體積和房子周長,和畢氏(勾股)定理計
算,令測量即容易又可靠。
- 11 -
Page 13

安全使用指南
指定的使用範圍
•測量距離
•計算面積和體積
•利用畢氏(勾股)定理間接測量
禁用範圍
• 在未閱讀本手冊的情況下啟動本儀器
• 在儀器指定的使用範圍之外使用
• 破壞安全系統,取掉說明或危險標誌
• 用工具(如螺絲刀)打開本儀器
• 更新或改造本儀器
• 盜竊後使用
• 使用未經寶工實業股份有限公司認可的,其他廠家的附件
• 在腳手架上,登梯子時,測量空轉的機器或未設保護設施的設備附近測
量,不負責任的操作
• 直接瞄準太陽
• 故意或在黑暗中晃照第三者
• 在未設安全設施的地方測量(如在馬路上測量等)
鐳射等級
NT-6560 設有可見鐳射,並從儀器的前端發射。
本產品屬於二級鐳射產品,
二級鐳射產品
不要直視雷射光束,在不必要的情況下不要瞄準他人。眼睛會本能地通過
轉視或眨眼等行為來保護眼睛。
●警告:
通過光學鏡片(如:目鏡,望遠鏡等)直視雷射光束,會對眼睛造成危害。
預防措施:
不要通過光學鏡片直視雷射光束。
:
- 12 -
Page 14

●小心
:
用眼睛直視雷射光束會對眼睛造成危害。
預防措施:
不要直視雷射光束。注意使雷射光束在眼睛的上或下方射過。(特別是在
將儀器固定在機械設備上等情況下)。
啟動
安裝/ 更換電池
圖示 A
見圖示 A,按照如下步驟:
1 旋轉螺絲,打開儀器尾部的固定擋板。
2 按照極性正確裝入電池。
3 關閉電池盒蓋,裝上螺絲。 當顯示幕上持續閃爍顯示電池的標誌
時應及時更換電池。
*只使用鹼性電池
**當長時間不使用儀器時,請取出電池,以避免電池的腐蝕。
按鍵
1.O
N / MEAS (開啟/測量) 鍵
2.面積/體積鍵
3.間接測量鍵
4.連續測量鍵
5.加法(+)鍵
6.減法(-)鍵
7.儲存鍵
8.測量基準邊鍵
9.LCD 背光鍵
, 此
- 13 -
Page 15

10.清除/ 關機
LCD 顯示面板
1 鐳射開啟
2 測量基準邊 (前沿)
3 測量基準邊 (後沿)
4 測量基準邊 (底座延伸
5 連續測量
6 錯誤代碼顯示
7~11 各種輔助測量功能
12 電池狀態
13 歷史記錄, 調出資料
14 第一顯示行,最小值顯示行
15 第二顯示行,最大值顯示行
16 第三顯示行
17 主顯示行,最後測量和計算結果顯示
鍵
處)
長度
面積
體積
畢氏定理 2 次間接測量
畢氏定理 3 次間接測量
初始操作和設置
開啟和關閉
開啟儀器和鐳射。再次按鍵,電池的圖示都一直將顯示在顯示幕上。
較長時間按鍵可關閉儀器。
在未按任何鍵 3 分鐘的情況下,儀器自動關機。
清除鍵
當測量時,最後一個指令或者資料被取消。在翻閱歷史紀錄時 ,當
按此鍵,此記錄將被永久刪除。
設置測量基準邊
- 14 -
Page 16

圖示 D
見圖示 D, 儀器默認的基準邊設置是後沿
按鍵,下一個測量將以前沿為基準邊 ,改變測量基準邊時會有蜂鳴
聲提醒。在重行開啟後,測量基準邊將自動返回到預設(默認)設置:後沿。
請參見圖示 D。
按鍵
,將測量基準邊底座伸延處為基準邊。
按此鍵,
總之,要選擇合適的測量基準,重複的按
置,每次開啟儀器,基準點都會重置到後沿處。
照明顯示
按鍵,可以開啟和關閉 LCD 的背光功能,用戶可以在黑暗環境下隨
時開啟這個功能,測量數值很清晰的顯示在 LCD 上面。
測量單位設置
長按此鍵,每次可以得到, 以下單位可供選擇,m、ft.、in、ft+in。
又返回以後沿為基準邊的設置。
鍵,直到得到需要的基準位
測量
單次距離測量
按鍵,啟動鐳射。 再次按鍵,觸發測量。
測量結果立即顯示在顯示幕上。
連續測量(追蹤)最大/ 最小距離測量
見圖示 E
這個功能
最小的距離. 在測量模式下,儀器可以移動接近目標,
測量資料每 0.5 秒被顯示一次。從而,在這個測量過
程中的最大和最小值動態的顯示在第一和第二行。
舉個例子,用戶從一面牆開始,向目標點連續移動,同
可以使用戶從一個測量點出發,測量出最大或
- 15 -
圖示 E
Page 17

時當時的
要連續測量,長按
連續測量功能在連續測量 5 分鐘後自動停止。
資料被連續的讀出來。
鍵直到連續測量指示出現。按 鍵停止此功能,
功能
加/減 距離測量
下一個測量值將會與前一個值相加,然後按鍵第二個測量結果顯示,
同時自動加上之前的數值顯示在主顯示行。
下一個測量值將會與前一個值相減,然後按 鍵第二個測量結果顯
示,同時減去之前的數值顯示在主顯示行。
最後一個步驟將被還原。
面積
按鍵一次。 圖示將顯示在顯示幕內。
按鍵進行第一個長度的測量(如:長)。
再次按鍵進行第二個長度的測量(如:寬)。
第二次測量後,面積/周長測量結果將計算後顯示在主顯示幕內。
體積
連續兩次按鍵 圖示將顯示在顯示幕內。
按此鍵進行第一個長度的測量(如:長)。
按此鍵進行第二個長度的測量(如:寬)。
按此鍵進行第三個長度的測量(如:高)。
第三次測量後體積的計算結果自動顯示在主顯示行。
間接測量
•本儀器可以利用勾股定律原理計算距離。這個功能可以實現對不易到達
的地方的距離測算。
•請按照下面的步驟進行測量:
• 所有的被測量點都應在同一水準或垂直面上。
• 為能得到更準確的測量結果,建議將儀器在一個點上固定旋轉進行測量
(如:將儀器的拐角完全展開靠在牆面上進行測量)。
- 16 -
Page 18

間接
測量 利用兩次輔助測量來確定一段距離通過
見圖示 F,如:測量一個建築物的高或寬。當一個
高度需要通過兩個或三個距離來確定時,
一次按鍵,顯示幕上顯示出 圖示。此時鐳
射開啟,被測距離的圖示閃爍顯示在顯示幕裏。
瞄準最上面的點 (1) 然後進行測量。第一次測
量進行完成後測量值被採集。儘量保證本次測量
水準,儀器默認水準測量
第二個被測距離的圖示閃爍顯示在顯示幕裏。
瞄準最上面的點 (2) 然後進行測量。測量結果顯示在顯示幕主顯示
內,而分部測量結果顯示在輔助顯示內。
間接測量 - 通過三次輔助測量來確定一段距離
見圖示 G
按鍵 兩次, 此圖示將顯示在顯示幕內。此時
光開啟。
瞄準最上面的點 (1) 然後進行測量。第一次測
量完成後測量值將被採集。儘量保持儀器的水準。
第二個被測距離的圖示閃爍顯示在顯示幕裏。
瞄準最上面的點 (2) 然後進行測量。資料將被
採集。第三個被測距離的圖示閃爍顯示在顯示幕
裏。
瞄準最上面的點 (3) 然後進行測量。資料將被採集。
測量結果顯示在顯示幕主顯示內,而分部測量結果顯示在輔助顯示內。
歷史儲存值
連續按鍵, 最後 20 個測量或計算資料逆序顯示出來。
按鍵,向下進行翻閱。
按鍵,向上進行翻閱。
按鍵,然後按鍵 ,一個個的清除歷史紀錄。
- 17 -
圖示 F
圖示 G
Page 19

故障原因和排除方式
所有的資訊都以代碼或"Error" 顯示出來。 下面所顯示的代碼及其解釋和
對應解決方法:
代碼 原因 解決方法
204 計算錯誤 按照說明書要求,重新操作
208 儀器降溫 儀器的外部測量溫度要在,0°C to
+40°C
220 電池電量太低 更換電池
253 溫度太低 儀器升溫
255 接收反射光太
弱,測量時間過
長。
256 接收信號過強 目標反光過強 (使用覘板,或者不要
Error 硬體故障 在儀器開啟/ 關閉多次後還同樣出
技術參數
產品型號 NT-6560
測量範圍 0.1 ~ 60m
測量精度 ±1.5mm / (±0.06in)
測量單位 m/in/ft / in+ft
鐳射等級 Class II
鐳射類型 635nm, < 1mW
自動矯正技術 ●
面積,體積測量 ●
間接畢氏定理測量 ●
加減法 ●
連續測量 ●
最大和最小值測量 ●
四行背光顯示 ●
反射面要更易反射,或者使用覘板,
或者白紙等
對準強光)
現,說明您的儀器已經損壞。請與您
的經銷商聯繫。
- 18 -
Page 20

蜂鳴器指示 ●
歷史測量記載 20 組
操作溫度範圍
存儲溫度範圍
電池壽命 可達 5000 次測量
電池選擇 Type AAA x 2pcs (1.5V)
鐳射自動關閉 30 秒
儀器自動關閉 180 秒
儀器尺寸 120 x 50 x 28mm
儀器重量 100.5g(不含電池)
* 在日光或者目標反光不好的情況下,請使用覘板或者較好的放射面!
* 在良好的測量條件下(良好的測量表面,室溫,室內光照)可至 60m。
* 在不良測量條件下,如光線過強、被測物表面反光較弱或溫差過大,
誤差會增大。
0°C ~ +40°C
(+32°F ~ +104°F)
-10°C ~ +60°C
(14°F to +140°F)
保養
用柔軟潮濕的布擦拭灰塵。
絕對不能將儀器浸在水裏。
不要使用腐蝕和揮發性物質來清理儀器。
PROKIT’S INDUSTRIES CO., LTD.
http://www.prokits.com.tw
©2013 Copyright by Prokit’s Industries Co., Ltd(C).
E-mail:pk@mail.prokits.com.tw
- 19 -
 Loading...