

Page 1
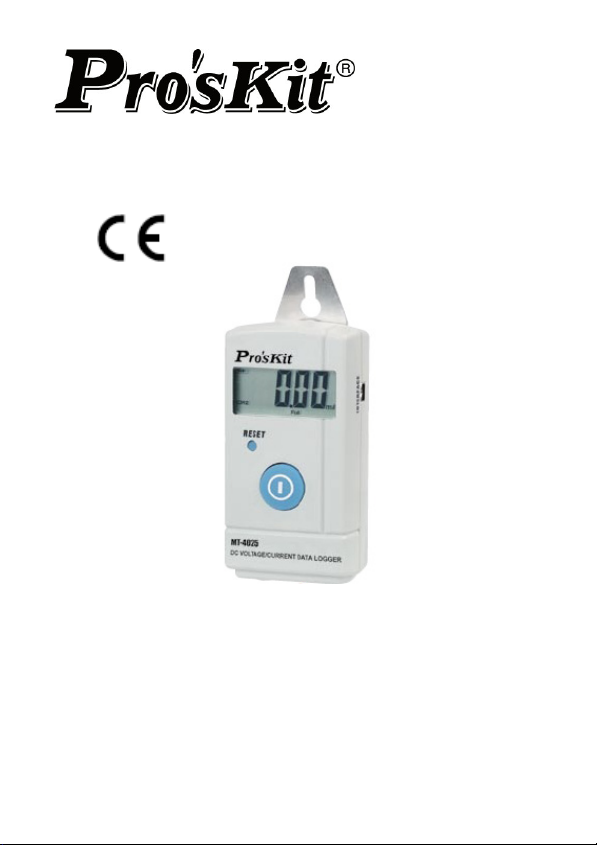
MT-4025 DC Voltage / Current Datalogger
User’s Manual
st
Edition, 2011
1
©2011 Copy Right by Prokit’s Industries Co., Ltd.
Page 2

Introduction:
The MT-4025 DC Voltage / Current Datalogger is a recorder unit
comes with USB connector & window software for easy
measured data monitoring and recording by your computer
Accessory:
Hanger x 1 set
Voltage /current connecting wire x 2pcs)
User’s manual x 1pcs
Record Monitor software CD x 1pcs
USB transmit cable x 1pcs
Warning
!
T
o avoid electrical shock or personal injury, follow these
guidelines:
Before using the recorder inspect the case. Do not use the
recorder if it appears damaged. Look for cracks or missing
plastic. Pay particular attention to the insulation around the
connectors.
Disconnect the connecting wire from the recorder before
opening the case.
Be careful use at any circuit, hide high voltage and current in
circuit may cause strong electric shock and health to be
injured.
Don't exceed recorder specification max input voltage or
current value.
When the case of the recorder is opened, make sure not to
use the recorder.
In front of measuring the voltage or the current, should be first
to correct insert the connecting wire the input of the recorder.
When using MT-4025 voltage / current recorder measure
voltage & current at the same time, both black leads must
connect to negative input terminal together. (Refer Fig. 1)
1
Page 3
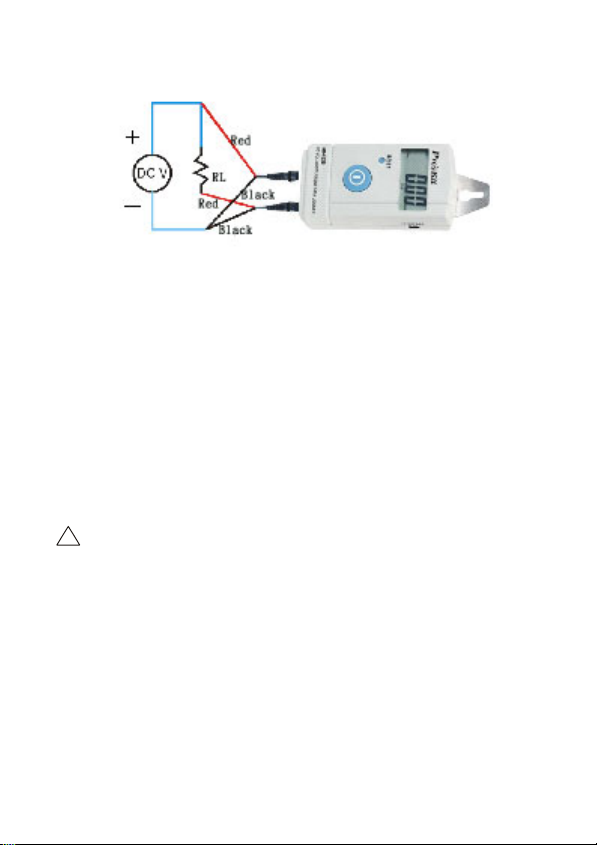
Reference Fig 1.
(Fig 1)
While using the recorder, please don't input voltage to the
current input terminal as current input terminal only comes
with low loop impedance, although it is protected by fuses but
an excessive instantaneous current probably will damage the
recorder or injury to the user
Do not operate the recorder around explosive gas, vapor, or
dust.
Do not use the recorder if it operates abnormally. Protection
may be impaired. When in doubt, have the recorder serviced.
Caution
!
A Caution identifies conditions and actions that may damage the
recorder or the equipment under test.
Use the proper function, and range for your recorder.
Do not attempt to recharge the batteries.
To prevent explosion, do not throw batteries into a fire.
Follow local laws or regulations when disposing of batteries
Match the + and - polarities of the battery with the battery
case.
2
Page 4
Parts:
⑥
⑦
⑧
⑨
⑩
Display ⑥ Bottom cover
①
Reset button ⑦ Screw hole
②
Power button & function
③
⑧ CR2032 battery seat
button
DC 20V input ⑨ CR2032 battery(Not
④
included)
DC 200mA input ⑩ 500mA fuse
⑤
Display Elements:
①
②
Intv
③
CH1
④
CH2
① Batteries power indication. ⑥ Indicate main display to
Full
Yea r h: m:d
⑤⑥⑦⑧
⑨
V
⑩
mA
show year of the perpetual
calendar.
② Interval symbol of
measure record.
⑦ Indicate main display to
show hour: minute of the
perpetual calendar.
3
Page 5
③ Main display ⑧ Indicate main display to
show month: date of the
perpetual calendar.
④ Indicate main display is
⑨ Voltage unit.
CH1 or CH2 input.
⑤ Indicate memory has
⑩ Current unit.
been already full, stop
recording. Or indicate that
is inquiring percentage of
the memory has already
been used.
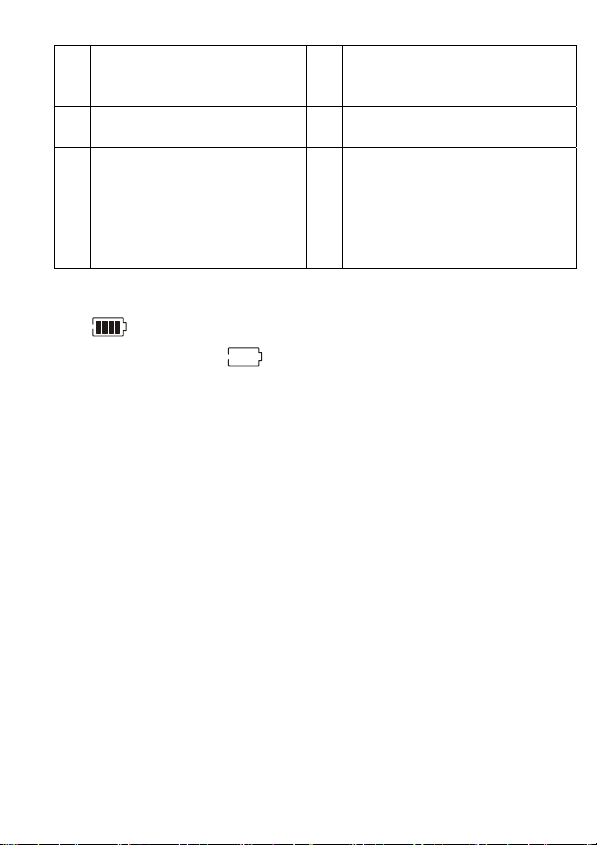
Battery power indicator and replacement:
The power of the battery indicated by the battery symbol
( )
When the symbol ( ) display, the battery power is low,
please turn off the power and change CR2032 battery, in
order to keep measuring accuracy.
When battery power is lower than maintaining recorder
normal operation, will shut-down automatically, until battery
change, could start the recorder again and normal operation
While changing the battery, use a cross screwdriver to open
the bottom cover, change CR2032 battery from battery seat,
please pay attention to the battery seat and polarity of
CR2032 battery while changing, don’t mistaken.
When the recorder is not used for a long time, please take out
the battery, prevent depositing in the high temperature, high
wet place.
While changing battery, recorder will reset and enter
perpetual calendar set up function, if recorder is unable to
produce reset automatically, and unable normal operation,
please press Reset key with a screwdriver, let recorder
produce Reset and enter the perpetual calendar to set up
function.
4
Page 6
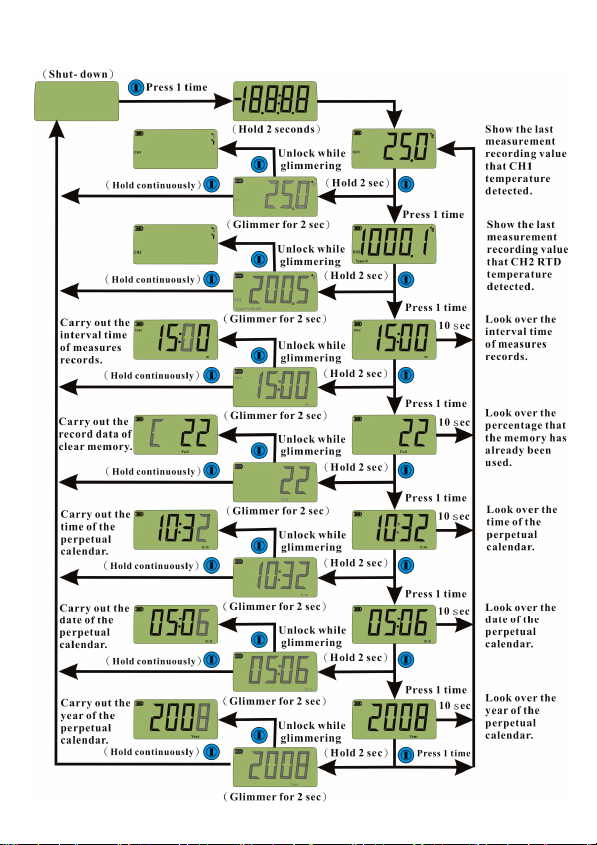
Operation:
Set up function procedure:
recorder, can also set up on- line through Record Monitor S software
(please consult Record Monitor S software manual).
As below shows in order to operate on
5
Page 7

Intv
Set up measure record interval time: When
entering set up measuring record interval
time, the second digit begins to glimmer, it
m
represents digit number changed to
glimmer, digit number adds 1 upwards to press power key
each time, until digit number is added to 9 upwards, press
power key again at this moment, digit number is returned to
zero, repeat circulated. As press power key two seconds,
glimmer digit number move to left one, set free power key, and
then adjust to the digit number hoped as above. Repeat above
setting up steps again, until digit number on the left the
glimmers, press the power key for 2 seconds, namely finish
setting up and getting back to looking over the measures
record interval time. The range of measuring record interval
time minimum is 10 seconds; maximum is 59 minutes and 50
seconds.
y out clear the record data of memory:
Carr
When entering carry out and clearing the
Full
record data of memory, the digit number on
the left is showing C and glimmering, and
two digit number on the right shows the percentage of memory
has been already used. Press power key, it is to cancel clear
function and get back to look over the percentage of memory
has been used. If under C state of glimmering, press power
key for 2 seconds, will make the record data of memory
cleared, and percentage of has used memory is zero, get back
to look over the percentage of memory has been already used
shows at the same time.
6
Page 8

The time to set up perpetual calendar:
When entering the time to set up perpetual
calendar, the units of minute on the right
h:m
begin to glimmer, it represents digit number
changed to glimmer, digit number adds 1 upwards to press
power key each time, until digit number is added to 9 upwards,
press power key again at this moment, digit number get back 0,
repeat circulation. Press power key for two seconds, glimmer
digit number to move left, unlock the power key, begin to
adjust ten digit number of minute, adjust digit number and
repeat circulation between 0 to 5. And then press the power
key for 2 seconds, glimmer digit number to move left one,
unlock the power key, and begin to adjust units of hour, digit
number repeat circulation between 0 to 9. Press power key for
two seconds, glimmer digit number to move left one, unlock
the power key, begin to adjust ten digit number of hour, digit
number repeat circulation between 0 to2. Press power key for
2 seconds at this moment, If accord with the time to set up for
24 hours system, finish of perpetual calendar set up and can
get back to look over time of perpetual calendar. If it does not
accord with 24 hours system to set up, it will be unable to
finish set up and will get back to the wrong place automatically,
must finish setting up after revising the mistake and finishing.
he date to set up perpetual calendar:
T
Begun to glimmer by units of day on
the right when entering the date to set
m:d
up the perpetual calendar, is it
represent digit number that adjust to glimmer, every digit
number add 1 upwards according to power key, until digit
number is added to 9 upwards, pressing the power key again
at this moment, digit number get back 0, repeat circulation.
Press power key for two seconds, glimmer digit number to
move left one, unlock power key, begin to adjust ten digit
7
Page 9

number of day, as above explain the digit number adjusted
repeat circulation between 0 to 3. Press power key for two
seconds, glimmer digit number to move left one, unlock power
key and then begin to adjust the units of month, as above
explain the digit number adjusted repeat circulation between 0
and 9, press power key for two seconds, glimmer digit number
to move left one, unlock power key, begin to adjust ten digit
number of month, as above explain the digit number adjusted
repeat circulation between 0 to 1. Press power key for 2
seconds at this moment, if the set up of date is correct, will
finish the set up of date of perpetual calendar and will go back
to look over perpetual calendar date. If the mistake that there
are the date set up, it will be unable to finish set up and will get
back to the wrong place automatically, must finish setting up
after revising the mistake correctly.
Set up year of the perpetual calendar:
Begun to glimmer by units on the right
Year
when entering year which set up the
perpetual calendar, is it show digit number adjusted, every time
digit number add 1 upwards according to power key, until digit
number is added to 9. Press power key again at this moment,
digit number get back to 0, repeat circulation. As press power
key for two seconds, glimmer digit number to move left one,
unlocking power key, begins to adjust the second digit number,
as above explain adjusts digit repeat circulation between 0 and
9. And then press power key for 2 seconds, will finish the set up
of perpetual calendar year and go back to look over year of the
perpetual calendar. Set up of year of perpetual calendar
minimum is 2000, maximum is 2099 year.
8
Page 10

Specification
Display mode 4 1/2 of digit LCD, max digit 19999
Polarity showing
Overload indicator
DC voltage ±19.999V Measurement
range
Accuracy
Temperature Coefficient
Input impedance of voltage 1MΩ≒
Loop impedance of current 1Ω≒
DC current ±199.99mA
Positive value not show, negative
value show " -"
Positive value show " OL ",
negative value show " -OL "
0.2﹪+10dgt(inside temperature
range of 18 ~28 /64 ~82℃℃℉℉)
0.04﹪/℃(outside temperature
range of 18 ~28 /64 ~82℃℃℉℉)
Measure interval time of
record
Logger 9999 samples at most
Battery CR2032 (Not included)
Battery life
(Interval=15Min)
Operating temperature -10 ~+60℃℃(14 ~140℉℉)
Storage Temperature -20 ~+70℃℃(-4 ~+158℉℉)
Dimension 86mm×45mm×25mm(L×W×H)
Weight (include battery) About 63g
10 seconds ~ 59 minutes 50
seconds
About one year
9
Page 11

MT-4025 直流電壓電流記錄器
使用手冊
簡介
MT-4025 記錄器主機透過 Mini USB 埠
利用電腦 USB 埠連線需選用 USB 傳輸線
配件:
掛架一片
電壓/電流連接線二條
使用手冊一份
Record Monitor S軟體CD一片
USB傳輸線一條
10
Page 12

!
警告
為避免觸電或人身受到傷害,請遵守下列各項準則:
使用本記錄器前應先檢查外殼
塑膠件,特別需注意接頭周圍的絕緣,如果外表已損壞就不
要使用。
打開記錄器外殼前,應先將輸入端上的連接線拔除,避免和
測試電路連接。
請小心謹慎的使用在任何電路上,潛藏在電路的高壓和電流
可能會造成強烈的觸電及人身受到傷害。
不要輸入超過記錄器規格的最大輸入電壓或電流值。
記錄器的外殼打開時,切勿使用記錄器。
使用記錄器量測電壓或電流前,應先正確的將連接線插好在
記錄器的輸入端上。
使用 MT-4025 電壓/電流記錄器同時量測電壓和電流時,必
需將輸入端的(-)端接在一起,參圖一。
(圖一)
使用附有電流輸入端的記錄器時,請勿對電流輸入端輸入電
壓,因電流輸入端為低迴路阻抗,雖有保險絲保護但過大的
瞬間電流恐會對記錄器及人身造成傷害。
切勿在爆炸性的氣體,蒸汽或灰塵附近使用記錄器。
如果記錄器工作不正常,請不要使用,若有疑問,應把記錄
器送去維修。
。檢查外殼是否有斷裂或缺少
11
Page 13

小心
可能導致記錄器或被測試設備損壞的情形或動作。
使用記錄器應選擇正確的功能檔或量程檔。
切勿嘗試對電池充電。
為避免爆炸,切勿將電池拋棄在火焰裡。
棄置電池時,應遵循當地的法令和規定。
安裝電池時,應注意電池的+和-極性。
部件:
⑥
⑦
⑧
⑨
⑩
1. 顯示螢幕 6. 底蓋
2. 重置(Reset)按鈕 7. 底蓋螺絲孔
3. 電源鍵+功能操作鍵 8. CR2032 電池座
4. DC 20V 輸入孔 9. CR2032 電池 (不含)
5. DC 200mA 輸入孔 10. 500mA 保險絲
12
Page 14

顯示螢幕各部份:
①
②
③
④
五段式電池電力指示
①
Intv
CH1
CH2
Full
Yea r h: m:d
⑨
V
⑩
mA
⑤⑥⑦⑧
指示主螢幕顯示萬年曆的年
⑥
量測記錄間隔符號
②
主顯示螢幕
③
指示主顯示螢幕是 CH1 或
④
CH2 輸入
指示記憶體已滿停止量測
記錄。或指示在查詢記憶
⑤
體已使用的百分比功能下
指示主螢幕顯示萬年曆的小
⑦
時:分鐘
指示主螢幕顯示萬年曆的月
⑧
份:日期
電壓單位
⑨
電流單位
⑩
13
Page 15

電池電力指示和更換
電池電力的強弱由五段式的電池符號( )來表示
當電池符號顯示為
即關機並且更換 CR2032 電池,以維持量測記錄的準確性
當電池電力低於維持記錄器正常運作時
更換 CR2032 電池後,才能重新開機並正常運作
更換電池時,需使用一支十字起子開啟底蓋,才能從電池座
上更換 CR2032 電池,更換時需注意電池座和 CR2032 電池
的極性,不可弄錯
記錄器長時間不使用時,請將電池取出,並避免存放於高
溫、高溼之場所
更換電池時,記錄器應會自動重置並直接進入萬年曆設定功
能,如記錄器無法自動產生重置,而無法正常運作,請用小
起子壓下 Reset 鍵,讓記錄器產生重置並進入萬年曆設定功
能
( )時,表示電池電力不足,請立
,將會自動關機,需
14
Page 16

功能操作:
15
Page 17

設定功能流程:如下所示為在本機上操作,亦可透過 Record Monitor
S 軟體來進行連線設定(詳參 Record Monitor S 軟體使用手冊)。
設定量測記錄間隔時間:當進入設定量測記錄間隔時間時,第二
Intv
位數開始閃爍,閃爍代表受調整的位數,每
按電源鍵一下位數向上加 1,直到位數向上加
到 9,此時再按電源鍵一下,位數回復為零,
m
重覆循環。當按住電源鍵不放 2 秒,閃爍位
數向左移一位,放開電源鍵,再如上調整到所希望的位數。重
覆上述的設定步驟,直到最左邊的位數閃爍,再按住電源鍵 2
秒,即完成設定並回到查看量測記錄間隔時間。量測記錄間隔
時間的設定範圍為最小 10 秒,最大 59 分 50秒。
執行清除記憶體記錄資料:當進入預執行清除記憶體記錄資料
時,最左邊位數顯示為
C 並在閃爍,而右邊
二位數顯示記憶體已使用的百分比,此時按
Full
電源鍵一下,取消清除功能並回到查看記憶
體已使用的百分比顯示。如在 C 閃爍狀態下,按住電源鍵 2 秒,
將會將記憶體記錄資料清除,並將記憶體已使用的百分比清除
為零,同時回到查看記憶體已使用的百分比顯示。
設定萬年曆的時間:當進入設定萬年曆的時間時,由最右邊分的
個位數開始閃爍,閃爍代表受調整的位數,
每按電源鍵一下位數向上加 1,直到位數向上
加到 9,此時再按電源鍵一下,位數回復為 0,
h:m
重覆循環。當按住電源鍵不放 2 秒,閃爍位數向左移一位,放開
電源鍵,開始調整分的十位數,如上所述調整位數在 0 到 5 之間
重覆循環。再按住電源鍵不放 2 秒,閃爍位數向左移一位,放開
電源鍵,開始調整時的個位數,如上所述調整位數在 0 到 9 之間
重覆循環,再次按住電源鍵不放 2 秒,閃爍位數向左移一位,放
開電源鍵,開始調整時的十位數,如上所述調整位數在 0 到 2 之
16
Page 18

間重覆循環。此時按住電源鍵 2 秒,如設定的時間符合 24 小時制,
將完成萬年曆時間設定並回到查看萬年曆時間。如設定不符合 24
小時制,將無法完成設定而會自動回到錯誤的地方,必需將錯誤
修正無誤後才能完成設定。
設定萬年曆的日期:當進入設定萬年曆的日期時,由最右邊日的
個位數開始閃爍,閃爍代表受調整的位數,
每按電源鍵一下位數向上加 1,直到位數向上
m:d
加到 9,此時再按電源鍵一下,位數回復為 0,
重覆循環。當按住電源鍵不放 2 秒,閃爍位數向左移一位,放
開電源鍵,開始調整日的十位數,如上所述調整位數在 0 到 3
之間重覆循環。再按住電源鍵不放 2 秒,閃爍位數向左移一位,
放開電源鍵,開始調整月的個位數,如上所述調整位數在 0 到 9
之間重覆循環,再次按住電源鍵不放 2 秒,閃爍位數向左移一
位,放開電源鍵,開始調整月的十位數,如上所述調整位數在 0
到 1 之間重覆循環。此時按住電源鍵2 秒,如設定的日期無誤,
將完成萬年曆日期設定並回到查看萬年曆日期。如設定日期有
誤,將無法完成設定而會自動回到錯誤的地方,必需將錯誤修
正無誤後才能完成設定。
設定萬年曆的年:當進入設定萬年曆的年時,由最右邊的個位數
開始閃爍,閃爍代表受調整的位數,每按電
源鍵一下位數向上加
Year
9,此時再按電源鍵一下,位數回復為 0,重
1,直到位數向上加到
覆循環。當按住電源鍵不放 2 秒,閃爍位數向左移一位,放開
電源鍵,開始調整第二位數,如上所述調整位數在 0 到 9 之間
重覆循環。再按住電源鍵不放 2 秒,將完成萬年曆年設定並回
到查看萬年曆的年。萬年曆的年設定範圍最小為 2000 年,最大
為 2099 年。
17
Page 19

規格
顯示方式 4 1/2 位數液晶顯示,最大顯示位數 19999
極性顯示 正值不顯示,負值顯示"- "號
過載指示 正值過載顯示"OL ",負值過載顯示"-OL "
DC 電壓 ±19.999V 量測
範圍
(Interval=15 分)
重量(含電池) 約 63g
DC 電流 ±199.99mA
DC 電壓 0.001 解析
度
DC 電流 0.01
精度 ±0.2﹪+10dgt(18℃~28℃/64℉~82℉溫度範圍
內)
溫度系數 ±0.04﹪/℃(18℃~28℃/64℉~82℉溫度範圍外)
電壓輸入阻抗 ≒1MΩ
電流迴路阻抗 ≒1Ω
量測記錄間隔 10 秒 ~ 59 分 50 秒
記錄筆數 最多 9999 筆
電池 CR2032 (不含)
電池壽命
操作溫度 -10℃~+60℃(14℉~140℉)
儲存溫度 -20℃~+70℃(-4℉~+158℉)
尺寸(本體) 86mm×45mm×25mm(L×W×H)
約一年
18
Page 20

©2011 Prokit’s Industries Co., LTD. All rights reserved 2011001(T)
19
 Loading...