

Page 1
SOUND LEVEL METER
Users Manual
Page 2

■. Introduction
Please read the following information carefully
before using the meter. The Sound Level Meter has
been designed to measure sound level for various
environments. It is used to detect noise, music level
or sound engineering...
1.1 Precautions safety measures
Please use it according to the following usage.
Environment conditions:
● Altitude: less than 2000 meters.
● Relatively humidity 80% max
● Operation temperature 0~40℃
Maintenance & save:
Do not clear the meter using alcohol and impregnant.
if you do not use it for a long time, please take out the
battery and place the instrument in a dry surrounding.
Safety symbols:
Meter is protected by double insulation
Page 3

Comply with European Union’s 93/68/EEC
1.1.1 During use
1. Do not use
wet place.
2. When you do not use for a long time, please take
out batteries
electrolyte.
3. Auto-range measuring (30-120dB) is unfit for
measuring instantaneous and impactive noise.
4. To measure sound level in a windy environment,
please put windscreen
avoid noise from wind.
5. If battery symbol is on the screen, it indicates
voltage is low and must replac
you to use alkaline battery.
6. Do not measure when meter is vibrant.
7. After power of
two seconds.
the meter in a high temperature or
to avoid damaging the meter by
on the microphone to
e battery. Suggest
f, to turn power on again, wait for
Page 4

1.2 Functions & Features
● automatic ranging / manual ranging selection.
● Analog bar indicator.
● Frequency weig
● Range display.
● A utdown / continuous working mode
utomatic sh
selection.
● Low battery voltage indication.
● Sound OVER or UNDER display.
● Software calibrating to insure high reliab
Good circuit designed to save power.
●
hting A Type.
ility.
■. Features
● Th cording to the IEC651
e meter has been designed ac
Type 2, ANSI S1.4 Type 2.
● Response frequency: 31.5Hz—8kHz.
● Accuracy:30~60dB ±
● Resolution: 0.1 dB.
● M 60dB, 50—80dB,
easurement range:30—
70—100dB, 90—120dB.
3 dB; 60~120dB ±2 dB.
Page 5

● Digital display:4 digitals.
● Frequency weighting: A Type.
● Response time:Analog bar 125ms Digital 750ms.
● Microphone: Electret Condenser
● Power supply: DC1.5V(AAA)*3 .
● Operating temperature :0 ~ +40℃.
● Operating humidity: 10 ~ 80%RH.
● Storage temperature: -10 ~ +60℃.
● Storage humidity : 10 to 70%RH.
● Dimensions: 156(L)×60(W)×32(H) mm.
● Weight : Appr
● A
ccessories:
DC1.5V (AAA)
String x 1pcs
Plastic box x 1pcs
Users manual x 1pcs
Windscreen x 1pcs
ox 150 g (including battery).
x 3pcs
microphone.
Page 6

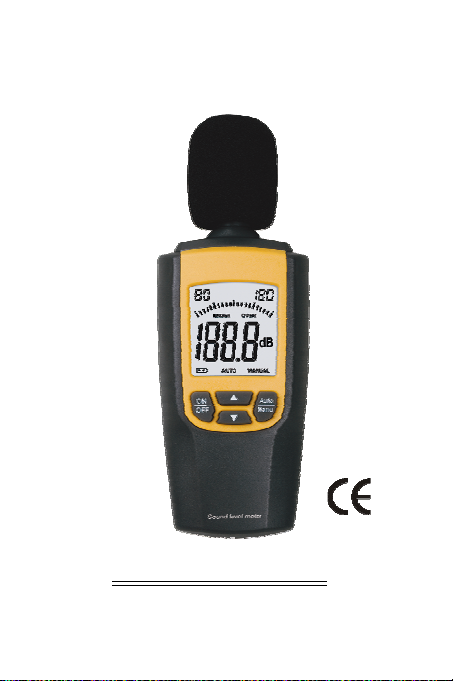
■. Names of parts
Instrument Familiarization
1. Windscreen
2. Sound level sensor
3. LCD display
4. Function key
LCD Display
ON
OFF
Sound level meter
Auto
Manu
Page 7

The meaning of the symbols represented by the
following:
1. Analog bar
2. UNDER indication to high range
3. OVER indication to low range
4. Display zone
5. Auto mode
6. Manual mode
7. Sound unit: dB
8. Indication to low voltage of the batteries
■. Operation instruction
1. Press button On/Off , the meter starts auto-range
measuring after the screen displays all the LCD
segments. symbol AUTO displays and the micro-
controller selects a proper range to measure sound
automatically. The range is displayed on top of the
screen. Analog bar and digits indicate the value of
Sound to be measured. If symbol UNDER or
OVER appears, it means that environmental sound
Page 8

is less than 30 dB or is higher than 120 dB.
2. To set range manually
If it is necessary to set range manually, press
button Auto/Manu, symbol MANUAL displays. You
can press button Up or Down to choose the proper
range. The range is displayed on top of the screen.
When LCD appears UNDER symbol, it indicates
that the range is high, you need to press button
Down to set lower range until no UNDER symbol.
When LCD appears OVER symbol, it indicates that
the range is low, you need to press button Up to
set higher range until no OVER symbol. If you want
to enter auto-range measurement, press button
Auto/Manu again.
3. To set power off
When meter is working, pressing button On/Off will
get shutdown immediately.
4. Automatic shutdown
When meter is working and stop to press button for
two minutes, shutdown will occurs automatically.
Page 9

5. Continuous working mode
When you need to measure sound continuously,
should cancel automatic shutdown function. To get
that, before meter starts working, press button
Down and button ON/OFF at the same time,
automatic shutdown will not occur.
6. Low voltage indication
When battery voltage is too low to work, a battery
symbol appears on screen. It reminds you to
change battery.
■. Keys instruction
1. ON/OFF key
Press the key to turn the power ON. When meter is
working and stop to press button for two minutes,
shutdown will occurs automatically.
2. AUTO/M ANU key
Press AUTO/MANU key to shift auto or manual
measurement mode.
Page 10

Under the state of auto-range measuring,
symbol AUTO displays and the micro- controller
selects a proper range to measure sound
automatically. The range is displayed on top of the
screen.
Under the state of manual-range measuring,
symbol MANUAL displays. You can press button Up
or Down to choose the proper range. The range is
displayed on top of the screen.
3. UP key
Under the state of manual-range measuring, You
can press button Up or Down to choose the proper
range.
When LCD appears OVER symbol, it indicates
that the range is low, you need to press button Up to
set higher range until no OVER symbol.
4. DOWN key
Under the state of manual-range measuring, You
Page 11

can press button Up or Down to choose the proper
range.
When LCD appears UNDER symbol, it indicates
that the range is high, you need to press button
Down to set lower range until no UNDER symbol.
Press button Down and button ON/OFF at the
same time, automatic shutdown will not occur.
■. Calibrating Sound level Meter
When Sound Level Meter is used for a long time,
the accuracy may reduce, you need to check and
calibrate it, normally a time for each year.
Calibration needs a standard sound source, please
contact with us about the method.
■. Maintenance
1. CLEANING INSTRUCTIONS
The meter may be wiped down with a wet sponge or
cloth using a mild water based detergent or
anti-bacterial soap and rinsed under a gentle stream
Page 12

of cold water.
NOTE:
This unit is not designed for complete submersion or
washing in water.
2. BATTERY REPLACEMENT
Use the following procedure:
When the battery voltage drop below proper operation
range the symbol will appear on the LCD display
and the battery need to be replaced.
* Press the battery cover and towards arrowhead
direction to open the battery cover.
* Replace the battery with three new 1.5V batteries
(AAA).
* Replace the battery cover.
WLS2114
 Loading...