

Page 1
TEMPERA TURE AND V ANE
ANEMOMETER
Users Manual
Page 2

ntroduction
■. I
Thank you for purchasing the temperature and vane
anemometer from us. Please take a few minutes to
browse through this user manual before you begin to
operate the meter to ensure that you are fully
familiarized with how best to operate the meter as
accurately and safely as possible.
This meter is a flow/temperature measuring instrument.
It is normally used to measure the air speed at
ventilation outlets. In addition to the measurement of
temperature, climatic co nditions can also be analysed .
1.1 Precautions safety measures
To get the best service from this meter, please read
this user's manual carefully and observe the detailed
safety precautions strictly.
1.1.1 During use
1. If the OL symbol will show on the LCD, it means the
readings is outside the measuring range. Please keep
to the permitted measuring range.
-1-
Page 3

2. Never store the product together with solvents, acides
or other aggressive substances.
3. When the battery voltage is under proper operation
requirement, the symbol will show on the LCD
and the battery needs to be replaced with new.
1.1.2 Maintaining the product
Don’t measure at a high temperature, high
humidity places.
To guarantee correct r eadings : pos it ion in strume nt
so that flow impacts at the rear.
When not using the instrument for a long time,
please remove the battery and avoid storing in
high temperature and high humidity.
■. Features
1. Display: the top display line always shows the
Velocity, the bottom display line always show the
temperature.
2. Parameters:m/s km/h fpm mph kts Beaufort ℃ ℉
-2-
Page 4

3. Resolution: 0.1m/s 1fpm;
0.1℃ 0.1℉;
4. Range: 0.4 ~ 20m/s, 80 ~ 4000fpm
-10 ~ 50℃ 14 ~ 122℉
5. Accuracy:
± (2% of reading + 0.5m/s)
± (2% of reading + 100fpm)
±1℃ ±1.8℉
6. Sample rate: 2 time /sec
7. Auto power off: about 20 minutes
8. Low battery indicator
9. Operating environment:
-10℃ ~ 50 ℃(14℉~122℉),0 ~ 80%RH
10. Storage environment:
-20℃ ~ 60℃(-4℉~140℉),0 ~ 80%RH
11. Dimension and Weight:
157(L) x60(W) x30(H) mm, about 180g
12. Accessories:
DC1.5V (AAA) x 3pcs String x 1pcs
Plastic box x 1pcs Users manual x 1pcs
-3-
Page 5

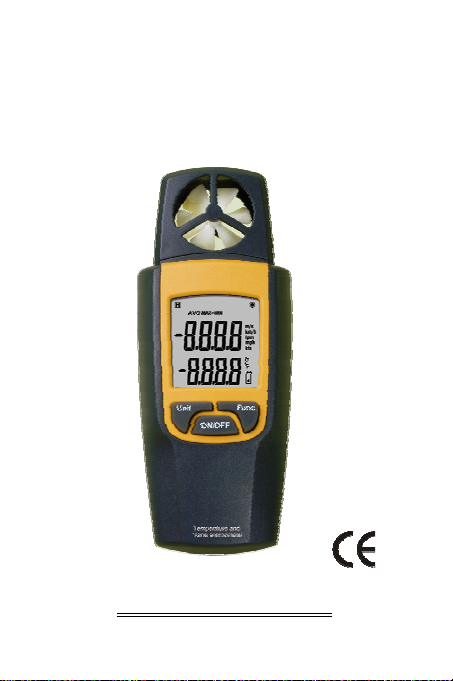
■. Names of parts
Instrument Familiarization
1. Sensor cover
2. Vane sensor
3. Temperature sensor
4. LCD display
5. Function key
LCD Display
1
2
3
4
Func
.
Unit
5
ON/OFF
Temperature and
Vane anemometer
-4-
Page 6

The meaning of the symbols represented by the
following table
Number
of Order
1
2
3
4
5
6
Symbol
-5-
Functions
Indicating it is now in
the data-holding mode
Indicating the display
value being the
maximum value(MAX)
Indicating the display
value being the
minimum value(MIN)
Measure values
Velocity unit
Temperature unit
Page 7

7
8
Indication to the
calibration mode
Indication low power of
batteries.
Batteries should be
replaced.
■. Operation instruction
1. Please install new batteries on the meter.
2. Press the ON/OFF key to turn the power on.
3. Put the meter on the environment to be measured
and make the vane sensor upright to the wind
direction for measurement.
4. When the reading has been stable, read the value.
* If you still need more operations, please see the
description of keys instruction.
NOTE:
If the vane sensor is not aimed at the wind direction, it
will bring error to the measurement.
■. Keys instruction
1. ON/OFF key
-6-
Page 8

Press the key to turn the power ON and p ress the key
once more to turn the power OFF.
2. Func. key
1) Press the key can select th e state of MAX、MIN、
HOLD.
The cycle of views shows as following figure:
Func. ke
Measure mode Hold mode Max mode
Func. key Func. key
Hold mode: Reading are held.
Max mode: Maximum values since the instrument
was last switched on or last reset.
Min mode: Minimum values since the instrument
was last switched on or last reset.
2) Back light control
Press and hold the FUNC. key >1sec. The back
light will be turned on, Press and hol d the key once
y Func. key
Min mode
-7-
Page 9

>1sec. the light will be turned off. If the back light is
not closed within 60 seconds, it will be turned off
automatically.
3. Unit key
1) Unit set
Velocity unit.
Press Unit key <1sec. can change the Velocity unit.
(m/s, km/s, fpm, mph, kts, Beaufort scale)
Temperature unit
Press and hold the Unit key >1sec. can ch ange the
Temp erature unit. (℃,℉)
2) Auto power off
When the meter is powered on, it is under auto
power off mode. The meter will power itself off after 20
minutes if no key operation.
Cancelled auto power off functio n: Press and hol d
the ON/OFF key until the LCD display AP ON, .press
Unit key to select AP ON or AP OF F, then press the
Func. key to confirm the setting.
AP ON ----- Auto power off availability.
AP OFF --- Auto power off unavailability.
-8-
Page 10

■. Maintenan
1. CLE ANING INSTRUCTIONS
The meter may be wiped down with a wet sponge or
cloth using a mild water based detergent or
anti-bacterial soap and rins ed under a gentle stream
of cold water.
NOTE:
This unit is not designed for complete submersion or
washing in water.
2. BATTERY REPLACEMENT
Use the following procedure:
When the battery voltage drop below proper operation
range the symbol will appear on the LCD display
and the battery need to be replaced.
Press the battery cover and towards arrowhead
direction to open the battery cover.
Replace the battery with three new 1.5V batteries
(AAA).
ce
-9-
Page 11

Replace the battery cover.
WLS2106
-10-
 Loading...