


Cellpro Multi4 Charger
Model LC04S04A-MC, for use with LiPo, Li-Ion, A123, NiCd, NiMH and Lead Acid battery packs
Automatic and manual charge rates at up to 4A with overcharge protection and cell balancing (for packs with node connectors)
Features
New in v1.55 firmware: Press and hold Mode button at power on (see page 7) to...
nSet current input limit to prevent charger from overstressing power supply.
nTurn Auto Start on/off (off is factory default). With Auto Start on, simply connect battery to begin charging using selected preset.
New in v1.58 firmware: Multi4 now fully supports charging two parallel-connected packs using two chargers. See page 11 for details.
nSimple to operate: just connect the Cellpro Multi4 Charger between a power source and a pack, select a pack-specific preset and start charging. No jumpers, plugs or dials to set! Charger automatically determines pack capacity and sets optimal current, then dynamically adjusts charge rate as needed. Manual charge rates up to 4.0Aallow for special situations.
nCharges LiPo, Li-Ion, LiFePO4,A123©, LiMn, NiCd, NiMH and LeadAcid chemistries (adapters for many node connector types are available from FMADirect). Supports both balanced (depending on chemistry) and non-balanced charging (with certain safety limitations).
nCharger holds up to 25 user configurable presets (User Presets), optimized for the different chemistries, providing charging strategies for most common RC charging needs. Charger also holds up to 50 Library Presets. When using the free Charge Control Software, the number of custom presets is virtually unlimited and will grow over time to meet industry needs. Replace and customize presets to match your battery inventory.
nCharges Lithium (2s to 4s balanced charge, 1s to 2s unbalanced charge) andA123 packs (2s to 4s balanced, 1s to 5s unbalanced) in any capacity up to 32Ah. During balanced charging, each cell is charged independently, providing exceptional charging safety and elevating RC packs to the safety level of cellphones. Typical packs of up to 4Ah capacity charge in 50 minutes or less using charger’s 2CAuto Current Mode.
nLatest technology provides the ultimate in safety—even charges packs having hidden physical damage without danger of fire. Apack will not charge if individual cell voltages don’t equal total pack voltage.
nCell balancing to 5mV and automatic overcharge protection assure longest pack life. Automatic temperature monitoring prevents pack overcharging at low ambient temperatures and charger damage at high ambient temperatures.
nBacklit display lets you select presets, replace default presets from a library and shows charging data such as individual cell voltages, charge current, supply voltage, and amount of charge (mAh) put into pack. Plus, the unique Fuel display shows percent capacity in a pack.
nCharge Control Software (CCS, a free download) allows you to customize, save and load presets (including charger data displays), and view real-time charging data and graphs. CCS also manages firmware updates to keep your charger operating smoothly.
Precautions
Follow all instructions in this manual to assure safe operation.
Always watch LiPo packs while charging. Never leave them unsupervised during charging.
See additional warning sheets provided with this charger and FMALiPo packs.
Follow all guidelines for charging, discharging, handling and storing packs of all kinds.
FMA, Inc.
5713 Industry Lane, Suite 50 Frederick, MD 21704
Sales: (800) 343-2934 Technical: (301) 668-4280 www.fmadirect.com

2
Connecting the charger
Connecting packs with a Cellpro connector
Connect packs as shown in this diagram:
Optional connection to PC |
|
|
Data display |
|
|
||||
using FMA FUIM2 |
||||
|
||||
or FUIM3 cable |
|
|||
|
||||
Cellpro Multi4 Charger
Connect to 10–16 VDC (e.g., gel cell or power supply)
Mode |
|
Button |
From pack being charged: |
|
|
|
Node Connector* |
|
(for balanced or unbalanced |
|
charging) |
|
or |
|
Power Connector* |
|
(for unbalanced charging) |
|
*may require adapter |
To charge two packs that are connected in parallel, using two Multi4 Chargers, follow the instructions on page 11.
CAUTION: When two LiPo/Li-Ion/A123 packs are connected in series, do not connect them to two separate chargers that are wired to a single power source. The single power source provides a common ground to both packs, and the result is a direct short across one of the battery packs if charging were to start. The Multi4 Charger contains protective circuitry that prevents it from starting a charge when it detects this situation. However, one or both chargers, as well as the packs, could be damaged. This condition can be avoided if the chargers are driven from two unconnected power sources (e.g., two lead acid batteries). For safest charging of series-connected packs, disconnect the packs from each other before connecting them to chargers.
Connecting non-Cellpro packs
FMADirect offers plug-and-play adapters for charging LiPo/Li-Ion/A123 packs equipped with node connectors made by other vendors. Check the Cellpro section at www.fmadirect. com for the latest adapters.
If an adapter isn’t available for the pack you want to charge, or if the pack doesn’t have a node connector, the FMACPBP7 LiPo Pack Node Connector cable assembly will make the pack compatible with the Cellpro Multi4 Charger. The diagrams below show how the Node Connector attaches to packs of various configurations. Additional assembly information is provided with the Node Connector.
|
|
|
|
|
|
|
|
|
|
|
|
|
|
|
|
|
|
|
|
Red |
|
|
|
|
|
|
|
|
|
|
|
|
|
|
|
|
|
|
|
|
|
|
|
|
|
|
|
|
|
|
|
Pack positive |
|
|
|
|
|
|
|
FMA CPBP7 LiPo Pack |
|
|
|
|
|
|
|
|
|
|
|
|
Node 3 |
|
|
|
|
|
|
|
|||||||||
|
Node Connector |
|
|
|
|
|
|
|
|
|
|
|
|
Node 2 |
|
|
|
|
|
|
|
||||||||
|
|
|
|
|
|
|
|
|
|
|
|
|
|
|
|
|
|
|
|
|
|
|
|
|
|
|
|
|
|
|
|
|
|
|
|
|
|
|
|
|
|
|
|
|
|
|
|
|
|
|
|
Node 1 |
|
|
|
|
|
|
|
|
|
|
|
|
|
|
Pin 1 |
|
|
|
|
|
|
|
|
|
|
|
Pack negative |
|
|
|
|
|
|
|
|||
|
|
|
|
|
|
|
|
|
|
|
|
|
|
|
|
|
|
|
|
|
|
|
|
|
|||||
|
|
|
|
|
|
|
|
|
|
|
|
|
|
|
|
|
|
Black |
|
|
|
|
|
|
|
|
|
||
Pack positive |
|
4s Pack |
|
|
Pack postive |
|
3s Pack |
Pack postive |
|
2s Pack |
|||||||||||||||||||
|
|
|
+ |
|
|
|
|
|
|
|
|
|
|
|
|
|
|
|
|
|
|
|
|
|
|
||||
(red), 14.8V* |
|
|
|
|
Cell 4 |
|
|
(red), 11.1V* |
|
|
|
|
|
|
|
|
(red), 7.4V* |
|
|
|
|
|
|
|
|||||
|
|
|
– |
|
|
|
|
|
|
|
|
|
|
|
|
|
|
|
|
||||||||||
Node 3, 11.1V* |
|
|
|
+ |
|
Cell 3 |
|
|
|
|
|
|
+ |
|
Cell 3 |
|
|
|
|
|
|
|
|
||||||
|
|
|
|
|
|
|
|
|
|
|
|
|
|
|
|
|
|
||||||||||||
Node 2, 7.4V* |
|
|
|
|
– |
|
Node 2, 7.4V* |
|
|
|
|
– |
|
|
|
|
|
|
|
|
|
||||||||
|
|
|
|
|
|
|
|
|
|
|
|
|
|
|
|
||||||||||||||
|
|
|
+ |
|
Cell 2 |
|
|
|
+ |
|
Cell 2 |
|
|
|
|
+ |
|
Cell 2 |
|||||||||||
|
|
|
|
|
|
|
|
|
|
|
|
|
|||||||||||||||||
|
|
|
|
|
|
|
|
|
|
|
|
|
|
|
|||||||||||||||
Node 1, 3.7V* |
|
|
|
|
– |
|
Node 1, 3.7V* |
|
|
|
|
– |
|
Node 1, 3.7V* |
|
|
|
|
– |
|
|||||||||
|
|
|
|
|
|
|
|
|
|
||||||||||||||||||||
|
|
|
+ |
|
Cell 1 |
|
|
|
+ |
|
Cell 1 |
|
|
|
+ |
|
Cell 1 |
||||||||||||
|
|
|
|
|
|
|
|
|
|
|
|
||||||||||||||||||
|
|
|
|
|
|
|
|
|
|
|
|
|
|
||||||||||||||||
Pack negative |
|
|
|
|
– |
|
Pack negative |
|
|
|
– |
|
Pack negative |
|
|
|
|
– |
|
||||||||||
|
|
|
|
|
|
|
|
|
|||||||||||||||||||||
(blk), 0V |
|
|
|
|
|
|
|
|
|
|
|
|
(blk), 0V |
|
|
|
|
|
|
|
|
(blk), 0V |
|
|
|
|
|
|
|
|
|
|
|
|
|
|
|
|
|
|
|
|
|
|
|
|
|
|
|
|
|
|
|
|
|
|
|||
* Nominal voltage with respect to pack negative.

3
Charging a pack
As shipped from the factory, the Multi4 Charger is equipped with 20 User Presets optimized for common battery types, plus five Empty Presets. In many cases, you can simply select the User Preset that matches the pack you want to charge, connect the pack and start charging.
User Presets cover LiPo, Li-Ion,A123, NiCd, NiMH and LeadAcid chemistries paired with commonly-used charging strategies. (If the User Presets aren’t quite what you need, see the instructions beginning on page 6.) The charger also includes a Preset Library containing up to 50 presets. ALibrary Preset is like a User Preset, except that it must be loaded into the User Preset bank before it can be changed and used for charging (see “Loading a Library Preset,” later).
1.Connect the charger to a 10V to 16V (maximum), 5Apower source.
2.After the Welcome screen (Cellpro Multi4) times out, you’ll see the Preset Menu.
Tip: More information about the display—and how to navigate it—is provided on the next page.
3.The Preset Menu displays last User Preset you used. If this is the User Preset you want to use to charge the pack, go to step 4.
otherwise
Press the Mode button until the User Preset you want is displayed (see “Factory-installed User Presets” for descriptions). (If you see EMPTY PRESET, press the Mode button to go back to the beginning of the list.)
Tip: Quickly press and release, press and hold, then release the Mode button to reverse the sequence of items being displayed in the Preset Menu. The tone indicates which direction you are going: high tone for forward, low tone for reverse.
4.Connect the pack to the charger.
5.IfAuto Start is OFF (factory default), press and hold the Mode button. This displays the Operations Menu, which cycles through several screens. When you see START, release the Mode button. The display will briefly show CHECKING PACK.
otherwise
IfAuto Start is ON (see page 7), go directly to step 6.
6.The next screen displays the preset’s chemistry (for example, LiPo) and prompts you to verify it is the same as the pack’s chemistry (which should also be, for example, LiPo). This
safety check is your chance to prevent charging if the preset and pack don’t match.
nIf the displayed chemistry matches the pack’s chemistry, press the Mode button to start charging. Go to step 7.
or
nIf the displayed chemistry does not match the pack’s chemistry, do nothing—the screen will time out. At the prompt, press the Mode button to see the Preset Menu. Go to step 3.
7.During charging:
nPress the Mode button to view various charging data screens (the number of screens and the data displayed depends on how the User Preset is configured).
nTo stop charging:
a.Press and hold the Mode button. You’ll see Stop Charge? >No.
b.Press the Mode button to see Stop Charge? >Yes. Press and hold the Mode button.
c.You’ll see CHARGER STOPPED. Press the Mode button to go to the Preset Menu.
8.When charging is complete, the charger will “beep beep beep” several times and the display will show ELAPSED [time] / [chemistry] DONE. Press the Mode button to review charging data screens.
9.Disconnect the pack from the charger. The screen displays PACK REMOVED.
10.Press the Mode button to return to the Preset Menu. The charger is ready to charge another battery (step 3).
4
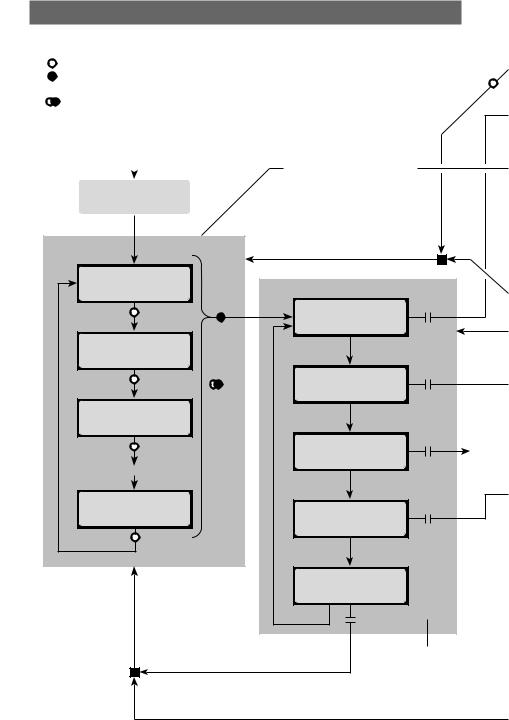
Navigating the charger’s screens
|
will help you understand how to move from screen to screen using the Mode but- |
|
ton |
are four basic things you can do with the Mode button, as indicated in the diagram: |
|
|
press and release the Mode button. In most cases, the next screen is displayed. |
Press |
n |
Press & Hold: press and hold the Mode button. |
n
 Release: release the Mode button after you press and hold it.
n“Reverse Press”: Quickly press and release the Mode button, then press and
hold it, then release it to reverse the sequence items are displayed in certain lists (high tone = forward, low tone = reverse).
Apply power to charger |
If Auto Start is ON, simply connect |
||
|
|
pack to charger to begin charging |
|
|
|
with selected preset |
|
Cellpro Multi4 |
|||
(see page 7 for Auto Start |
|||
Firmware |
VX.XX |
||
configuration details) |
|||
|
|
|
|
|
Timeout |
|
|
|
Preset Menu |
|
|
Return to preset previously |
|
|
|
|
selected in Preset Menu |
|
[last-used |
|
Operations Menu |
|
|
user preset†] |
Press |
|
||
|
|
|
|
|
|
Press |
& Hold |
START CHARGE |
Release |
|
|
|
|
|
[next preset†] |
|
|
|
|
|
Press |
|
CHOOSE CHG. RATE |
Release |
|
Press”“Reverseto sequence*reverse |
|
|
|
[next preset†] |
|
|
||
|
|
|
||
|
Press |
|
CLEAR PRESET |
Release |
|
|
|
See |
|
|
Etc. |
|
|
page 6 |
|
|
|
|
|
[next preset†] |
|
PRESET LIBRARY |
Release |
|
|
|
|
||
|
Press |
|
|
|
|
Return to preset previously |
EXIT |
|
|
|
selected in Preset Menu |
|
|
|
†If slot is empty, |
*Tone changes to |
Release |
|
|
display shows |
indicate direction: |
|
||
EMPTY PRESET |
High tone = forward |
|
|
|
|
Low tone = reverse |
Note: Operations selected |
||
|
|
|
||
|
|
|
in Operations Menu apply to |
|
|
|
|
preset selected when you Press |
|
|
|
|
& Hold in Preset Menu |
|

5
Charging
PACK REMOVED
 Press
Press
Disconnect |
|
[various charge |
Press |
Elapsed [time] |
||
|
||||||
pack from |
|
data screens] |
|
|
[chemistry] DONE |
|
|
|
|
||||
charger |
|
|
|
|
||
|
Note: Press ONLY if displayed |
Charge complete |
Press |
Press |
||
CHECKING PACK |
|
|
& Hold |
|||
chemistry is same as pack chemistry |
|
|
& Hold |
|
||
|
|
CHARGING Press |
|
|
STOP CHARGE? |
|
[chemistry] |
Press |
MODE for info. |
Press |
|
>No |
|
|
|
|
|
|||
|
|
|
|
|
||
Press to Verify |
|
Press |
& Hold |
|
Press |
Press |
|
|
|
||||
|
|
|
|
|
|
|
Timeout |
|
[various charge |
|
|
STOP CHARGE? |
|
|
|
data screens] |
|
|
>Yes |
|
MODE not pressed |
|
Press |
|
|
|
Press |
Push to Reset |
|
|
|
|
||
|
|
|
|
& Hold |
||
Press |
|
|
|
CHARGER STOPPED |
||
Press |
|
|
|
|
|
|
|
|
|
|
|
|
|
|
& Hold |
|
|
|
|
|
Press |
Press |
|
& Hold |
||
|
|
Press |
Choose Charge Rate |
CHOOSE CHG. RATE |
& Hold |
Apply selected charge |
|
||
Charge @ [value] |
|
rate to preset selected in |
|
|
Preset Menu |
“Reverse Press” to |
Press for |
|
reverse sequence |
next value |
|
[library preset]
 Press
Press
[next preset]
 Press
Press
Etc.
[last preset]
 Press
Press
Choose Preset from Library
Note: Press & Hold when desired Library Preset is displayed.
Press
& Hold Replace Preset
 from Library? >N
Press”“Reverseto sequence*reverse |
Press |
Press |
|
Replace Preset |
|
|
from Library? >Y |
Press
& Hold
Press
& Hold Overwrite preset selected in Preset Menu with selected Library Preset.
or
Create new preset if EMPTY PRESET was selected in Preset Menu

6
Changing a User Preset’s charge rate
You can change the charge rate for any User Preset. The new rate is retained (even after power is cycled) until you change it again (this behavior can be changed via Charge Control Software).
1.Navigate to the Preset Menu.
2.If the User Preset you want to change is displayed, go to step 3. otherwise
Press the Mode button until the preset you want is displayed.
3.Press and hold the Mode button. This displays the Operations Menu, which cycles through several screens. When you see CHOOSE CHG. RATE, release the Mode button.
4.The display now shows the preset’s charge rate (on the bottom line).
5.Press the Mode button to cycle through available charge rates (some rates are currents [A or mA], others are multiples of pack capacity [C]; the list wraps around).
Tip: Quickly press and release, press and hold, then release the Mode button to reverse the sequence of charge rates. This enables you to go back to a rate, rather than running through the entire list. The tone you hear when you press the Mode button indicates which direction you are going: high tone for forward, low tone for reverse.
Tip: Currents change in 5mA increments for small packs, and in 0.250A increments for large packs (depending on how presets are configured).
6.When the charge rate you want is displayed, press and hold the Mode button. This applies the charge rate to the preset and returns you to the Operations Menu.
7.In the Operations Menu, release the Mode button when you see the operation you want.
Clearing a User Preset
You can remove User Presets you don’t need. For example, if you don’t regularly chargeA123 and LeadAcid batteries, you can remove those to limit the Preset Menu to the presets you do use. The first 20 presets in the Preset Library are the same as the 20 factory-installed User Presets (see list and descriptions later in this manual), so you can easily restore any presets you remove.
1.Navigate to the Preset Menu.
2.If the User Preset you want to remove is displayed, go to step 3. otherwise
Press the Mode button until the preset you want is displayed.
3.Press and hold the Mode button. This displays the Operations Menu, which cycles through several screens. When you see CLEAR PRESET, release the Mode button.
4.You are prompted to confirm your action with the message CLEAR PRESET?. Press the Mode button to switch between confirming the removal (>Yes) or denying the removal
(>No).
5.When you have selected the desired response to the prompt, press and hold the Mode button. If you selected Yes in step 4, the preset is deleted.
6.You are returned to the Operations Menu. Release the Mode button when you see the operation you want.
Tip: If you are using the Charge Control Software, you can shorten the Preset Menu by hiding User Presets you don’t use, as well as hiding Empty Presets. See “Configuring
User Presets,” later in this manual.
 Loading...