


 Loading...
User guide Pro-10
For other languages visit: www.profoto.com/support

Pro-10
2
www.profoto.com

Congratulations on your new
Profoto product!
Regardless if you chose a new flash or a new light shaping tool, know thatalmosthalfacentury’sworthofexperiencewasputintoitsmaking.
If the years have taught us one thing, it is to never neglect a single detail.We only put our name on a product in which we have the fullest confidence. Before shipping, every one of our products passes an extensive and strict testing program. Unless it complies with the specified performance,quality and safety,it is a no-go.
As a result, we are confident that your new Profoto product will stay withyouforyearsandhelpyougrowasaphotographer. Butgettingthe productisonlythebeginningofthatjourney. Usingitforlightshapingis the real adventure.That iswhywe take pride in providingyouwith such awideassortmentoflightshapingtools,allowingyoutoshapethelight in anywayyou can imagine.
The almost infinite possibilities might seem bewildering at first, but we’re certain you will soon get the hang of it.
Still, I encourage you to sign up for our newsletter at www.profoto. com/newsletter orvisit our blog at www.profoto.com/blog so that we can share our experience from almost 50 years of light shaping and hopefullyinspireyou to growevenfurther. EnjoyyourProfoto product!
Conny Dufgran,founder
Pro-10
3
www.profoto.com

Pro-10
General safety instructions
Safety Precautions!
Donotoperatetheequipmentbeforestudyingtheinstructionmanualandtheaccompanyingsafety.Make surethatProfotoSafetyInstructionsisalwaysaccompaniedtheequipment!Profotoproductsareintended forprofessionaluse!Generator,lampheads,andaccessoriesareonlyintendedforindoorphotographicuse. Do not place or use the equipment where it can be exposed to moisture, extreme electromagnetic fields, or in areas with flammable gases or dust! Do not expose the equipment to dripping or splashing. Do not place anyobjectsfilledwith liquids,such asvases,on ornearthe equipment.Do not expose the equipment to hasty temperature changes in humid conditions as this could lead to condensation water in the unit.Do notconnectthisequipmenttoflashequipmentfromotherbrands.Donotuseflashheadswithoutsupplied protectiveglasscoversorprotectivegrids.Glasscoversshallbechangedifithasbecomevisiblydamaged
4to such an extent that theireffectiveness is impaired,forexample bycracks ordeep scratches.Lamps shall be changed if they are damaged or thermally deformed.When placing a lamp into the holder ensure not to touch the bulb with bare hands.Equipment must only be serviced,modified or repaired by authorized and competent service personnel!Warning -The terminals marked with the flash symbol are hazardous live.
WARNING – Electrical Shock Hazard – High Voltage!
Mainspoweredgeneratorsshallalwaysbeconnectedtoamainssocketoutletwithaprotectiveearthing connection! Onlyuse Profoto extension cables! Do not open ordisassemble generators orlamp heads! Equipment operateswith highvoltage.Generatorcapacitors are electricallychargedfora considerable length of time after being turned off. Do not touch modeling lamps or flash tubes when mounting an umbrella metal shaft in its reflector hole. Disconnect the lamp head cable between the generator and lampheadwhenchangingthemodelinglamporflashtube!Themainsplugorappliancecouplerisused as disconnect device.The disconnect device shall remain readily operable. Batteries (battery pack or batteries installed) shall not be exposed to excessive heat such as direct sunlight,fire,or the like.
Caution – Burn Hazard – Hot Parts!
Do not touch hot parts with bare fingers! Modeling lamps, flash tubes, and certain metal parts emit strong heatwhen used! Do not point modeling lamps orflash tubes too close to persons.All lamps may onrareoccasionsexplodeandthrowouthotparticles!Makesurethattheratedvoltageforthemodeling lamp corresponds with the technical data in the user guide regarding the power supply!
Note about RF!
This equipment makes use of the radio spectrum and emits radio frequency energy. Proper care should be taken when the device is integrated in systems.Make sure that all specifications within this documentarefollowed,especiallythoseconcerningoperatingtemperatureandsupplyvoltagerange. Make sure the device is operated according to local regulations.The frequency spectrum this device is using is shared with other users.Interference cannot be ruled out.
Final Disposal
Equipment contains electrical and electronic components that could be harmful to the environment. Equipment may be returned to Profoto distributors free of charge for recycling according to WEEE. Followlocallegalrequirementsforseparatedisposalofwaste,forinstanceWEEEdirectiveforelectrical and electronic equipment on the European market,when product life has ended!
www.profoto.com

Table of Contents |
|
Nomenclature...................................................................................................................... |
7 |
Quick operation guide...................................................................................................... |
8 |
Connect mains cable and start-up............................................................. |
8 |
Connect lamp heads....................................................................................... |
8 |
Turn heads on/off............................................................................................. |
9 |
Change light output (energy level).............................................................. |
9 |
Turn modeling light on/off............................................................................. |
9 |
Trigger a test flash............................................................................................ |
9 |
Change settings in menu display.............................................................. |
10 |
Turn off and disconnect mains cable...................................................... |
10 |
Menu display settings....................................................................................................... |
11 |
MODEL settings................................................................................................ |
11 |
SPEED settings................................................................................................. |
11 |
READY settings................................................................................................ |
12 |
MODE settings................................................................................................ |
13 |
SYNC settings................................................................................................. |
16 |
Additional integrated functions................................................................................... |
19 |
Firmware upgrade.......................................................................................... |
19 |
Firmware version check............................................................................... |
19 |
Factory default reset...................................................................................... |
19 |
Automatic safety functions........................................................................ |
20 |
Pro-10 use with petrol-electric generators............................................ |
20 |
Compatible lamp heads................................................................................................. |
22 |
Technical data.................................................................................................................. |
23 |
Warranty............................................................................................................................. |
25 |
Regulatory information.................................................................................................. |
26 |
Pro-10
5
www.profoto.com

Pro-10
6
www.profoto.com

Nomenclature
1 |
4 |
3 |
5 |
6 |
2 |
Pro-10
7 |
8 |
7 |
|
||
|
||
|
|
|
9 |
14 |
11 |
17 |
16 |
13 |
18 |
12 |
15 |
10 |
1. |
Lamp head outlet Left |
|
10. |
Energy display Right |
|
|||||
2. |
Lamp head outlet Right |
|
11. |
MODEL button Left |
|
|||||
3. |
Power supply (AC) input |
|
12. |
MODEL button Right |
||||||
4. |
SYNC port |
|
|
|
13. |
Menu dial |
|
|
|
|
5. |
ON button |
|
|
|
14. |
Energy dial Left |
|
|
||
6. |
USB port |
|
|
|
15. |
Energy dial Right |
|
|||
7. |
IR-slave /Photocell |
|
16. |
Test button |
|
|
||||
8. |
Menu display |
|
|
|
17. |
HEAD button Left |
|
|||
9. |
Energy display Left |
|
|
18. |
HEAD button Right |
|
||||
www.profoto.com
Pro-10
Quick operation guide
Connectmainscableandstart-up
1.Connect the included mains cable to the power supply input [3] andtotheACmainssupply.TheONbutton[5]willbered,indicating that the Pro-10 is powered and in standby mode.
2.Press the ON button [5]. The ON button [5] will now be white, indicating that the Pro-10 is in operational mode.
8NOTE
The Pro-10 can be connected to 100-127 VAC or 200-240 VAC,50-60 Hz.The Pro-10 automatically senses and adapts to the voltage and frequency supplied. The mains power supplyfuse must not be smaller than specified in theTechnical data section.
WARNING
Never use ordinary household extension cords to elongate the mains cable.They may overheat. Always unwind cord reel extension winders fully before use. Contact your Profoto dealerfor proper equipment.
Connectlampheads
With Profoto’s lamp head connector,the heads can be connectedand disconnected safely even if the Pro-10 is turned on.
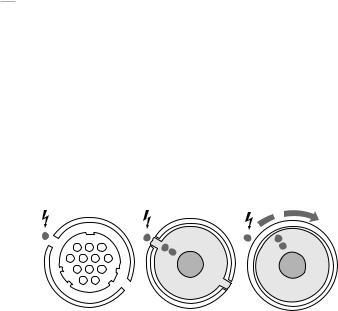
1.When connecting the lamp head plug,align the white dots on the plug with the white dot on the Pro-10 panel.Secure by turning the ring on the plug clockwise.
1. |
2. |
3. |
2.If the Pro-10 is turned on when a lamp head is connected, the related energy display [9] or [10] will show the current light output setting.
www.profoto.com

Turnheadson/off
Press the HEAD button left [17] or right [18] to turn on/off the related lamp head.When the lamp head is activated, the white HEAD button indicator is lit up and the related energy display [9] or [10] shows the current light output (energy) setting.
Changelightoutput(energylevel)
Use the energy dial left [14] or right [15] to set the light output on the related outlet:
•Turn the dial clockwise to increase the output in 1/10 f-stop increments and counter-clockwise to decrease.
•Press and hold the dial and turn the dial clockwise to increase the outputin1/1f-stopincrementsandcounter-clockwisetodecrease.
NOTE
If only one lamp head is activated (left or right),the maximum light output is 10.0.If two lamp heads are activated,the maximum output is shared between them.
Turnmodelinglighton/off
Press the MODEL button left [11] or right [12] to turn on/off the related modelinglight.Whenthemodelinglightisactivated,thewhiteMODEL button indicator is lit up.
Triggeratestflash
The white test button [16] is lit when the Pro-10 is fully charged and ready to flash.
Press the test button [16] to release a flash and test the light output settings. After flashing the test button will turn off while the Pro-10 is recharging. When the recharge is completed, the test button will be lit again.
Pro-10
9
www.profoto.com
Loading...