

Page 1
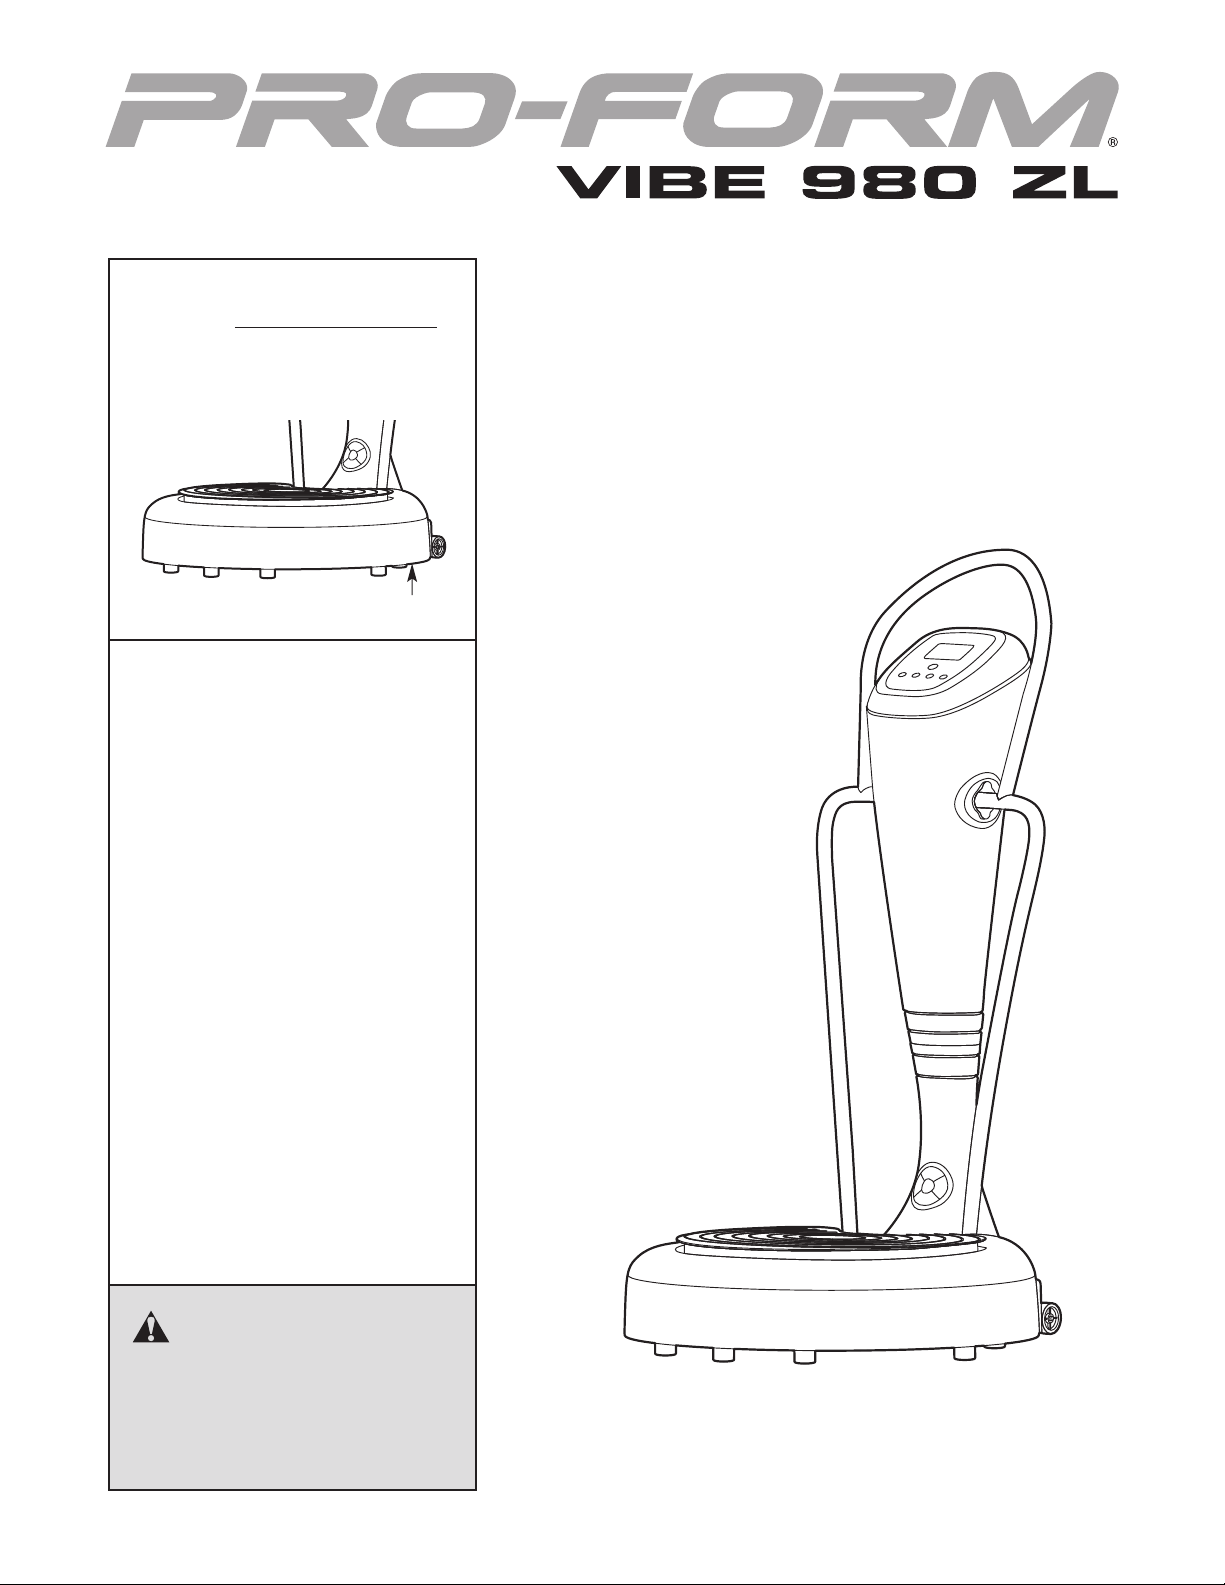
Model No. PIVB49608.0
Serial No.
Write the serial number in the
space above for reference.
Serial Number Decal
QUESTIONS?
If you have questions, or if there are
missing or damaged parts, please
contact the establishment where
you purchased this product.
USERʼS MANUAL
CAUTION
Read all precautions and instructions in this manual before using
this equipment. Keep this manual for future reference.
Page 2
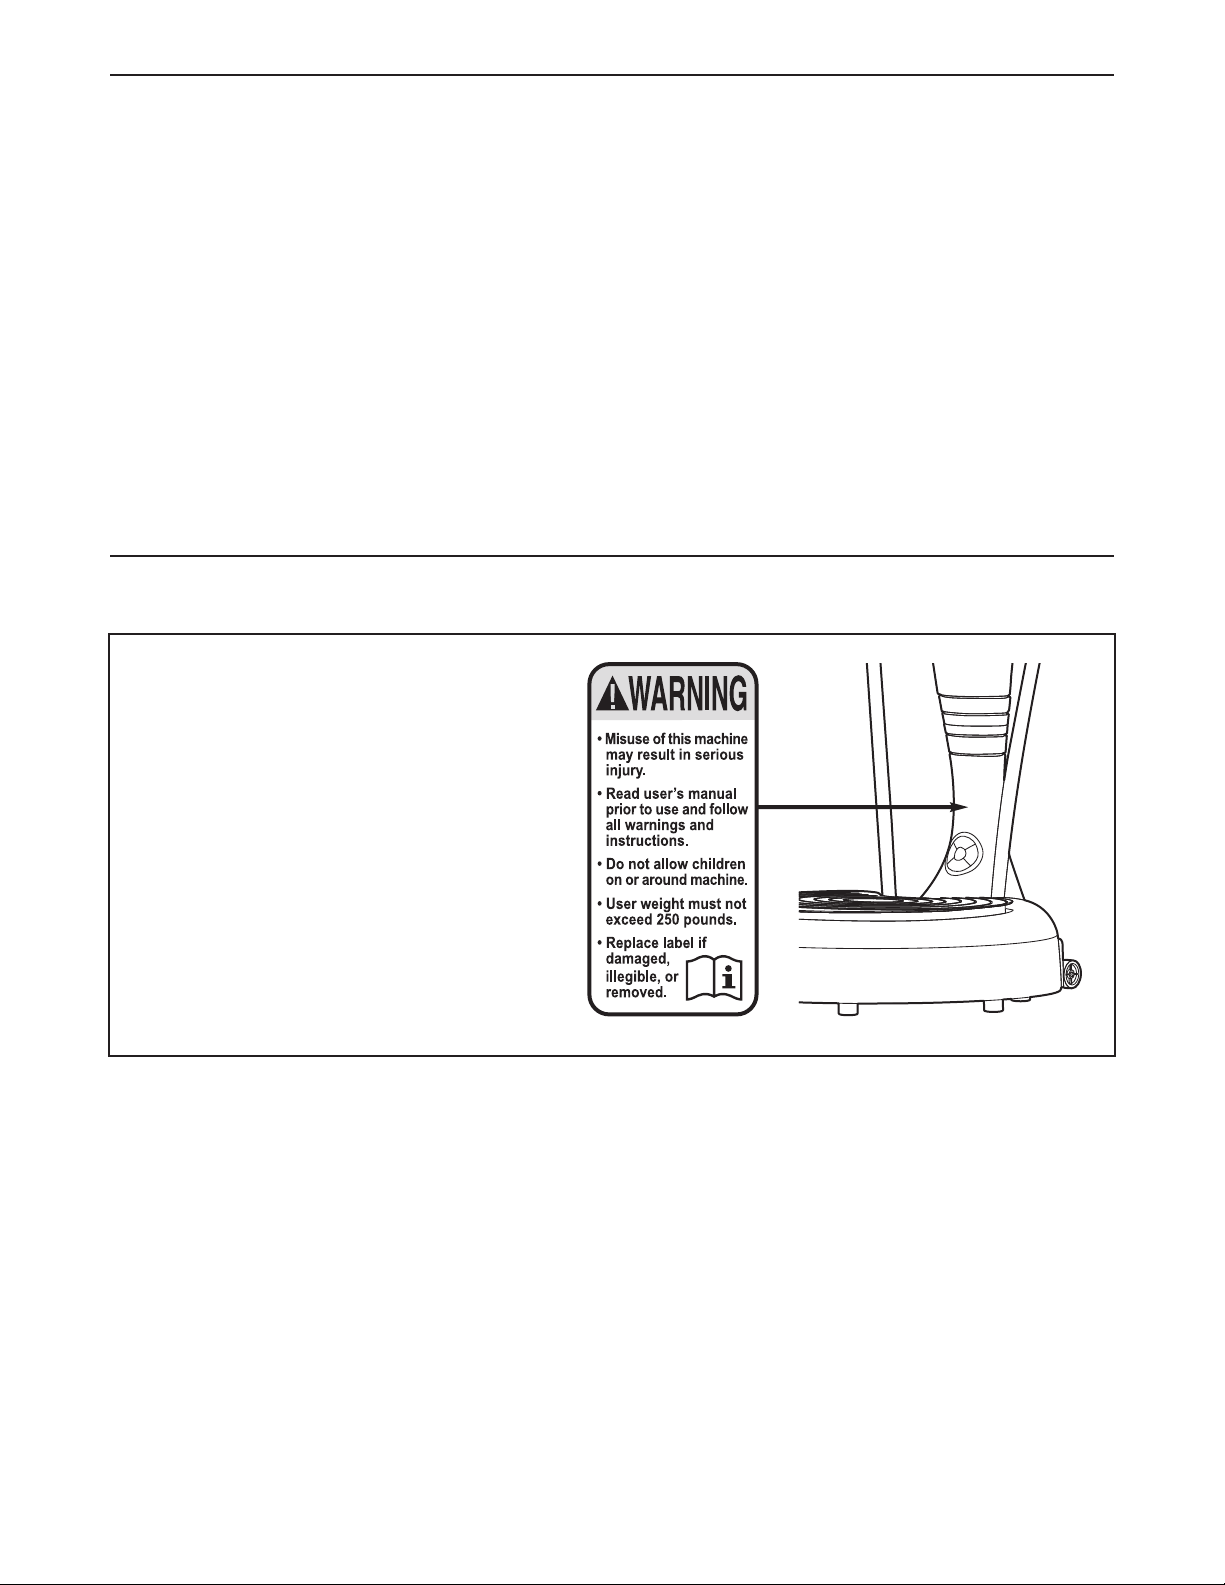
TABLE OF CONTENTS
WARNING DECAL PLACEMENT . . . . . . . . . . . . . . . . . . . . . . . . . . . . . . . . . . . . . . . . . . . . . . . . . . . . . . . . . . . . . .2
IMPORTANT PRECAUTIONS . . . . . . . . . . . . . . . . . . . . . . . . . . . . . . . . . . . . . . . . . . . . . . . . . . . . . . . . . . . . . . . .3
BEFORE YOU BEGIN . . . . . . . . . . . . . . . . . . . . . . . . . . . . . . . . . . . . . . . . . . . . . . . . . . . . . . . . . . . . . . . . . . . . . .5
ASSEMBLY . . . . . . . . . . . . . . . . . . . . . . . . . . . . . . . . . . . . . . . . . . . . . . . . . . . . . . . . . . . . . . . . . . . . . . . . . . . . . . .6
OW TO USE THE VIBRATION PLATFORM . . . . . . . . . . . . . . . . . . . . . . . . . . . . . . . . . . . . . . . . . . . . . . . . . . . .9
H
EXERCISE GUIDE . . . . . . . . . . . . . . . . . . . . . . . . . . . . . . . . . . . . . . . . . . . . . . . . . . . . . . . . . . . . . . . . . . . . . . . .13
TROUBLESHOOTING . . . . . . . . . . . . . . . . . . . . . . . . . . . . . . . . . . . . . . . . . . . . . . . . . . . . . . . . . . . . . . . . . . . . .15
WARNING DECAL PLACEMENT
This drawing shows the location(s) of the
warning decal(s). If a decal is missing or
illegible, see the front cover of this manual and request a free replacement
decal. Apply the decal in the location
shown. Note: The decal(s) may not be
shown at actual size.
PROFORM is a registered trademark of ICON IP, Inc.
2
Page 3

IMPORTANT PRECAUTIONS
WARNING: To reduce the risk of serious injury, read all important precautions and
instructions in this manual and all warnings on the vibration platform before using the vibration
platform. ICON assumes no responsibility for personal injury or property damage sustained by or
hrough the use of this product.
t
1. Before beginning any exercise program,
consult your physician. This is especially
important for persons over age 35 or persons with pre-existing health problems.
2. It is the responsibility of the owner to ensure
that all users of the vibration platform are
adequately informed of all precautions.
3. The vibration platform is intended for home
use only. Do not use the vibration platform
in a commercial, rental, or institutional setting.
4. Keep the vibration platform indoors, away
from moisture and dust. Place the vibration
platform on a level surface, with a mat
beneath it to protect the floor or carpet. Do
not place the vibration platform in a garage
or covered patio, or near water.
5. Inspect and properly tighten all parts regularly.
6. Keep children under age 12 and pets away
from the vibration platform at all times.
7. The vibration platform should not be used
by persons weighing more than 250 lbs.
(113 kg).
10. It is recommended that you use the vibration
platform for no longer than 15 minutes per
day and no more than 3 times per week.
11. Be careful when stepping down from the
vibration platform; your muscles will feel different after you exercise on the vibration
platform.
12. Following is a list of factors and conditions
that may make exercising on the vibration
platform inadvisable (this list is not exhaustive; it is intended only for reference). If one
or more factors or conditions apply to you,
consult your physician before using the
vibration platform.
• Knee or hip implant
• Pacemaker
• Recently placed screws, pins, bolts, or
spirals
• Acute hernia, discopathy, or spondylitis
• Serious heart or vascular disease
• Acute thrombosis
• Tumor
• Serious migraine
• Epilepsy
• Serious diabetes
• Recent wound due to operation
• Fresh inflammation
• Pregnancy
8. Never allow more than one person on the
vibration platform at a time.
9. Keep your back straight while using the
vibration platform; do not arch your back.
While standing on the vibration platform,
bend your knees slightly and balance your
weight on the balls of your feet.
13. If you feel pain or dizziness while exercising,
stop immediately and cool down.
14. Use the vibration platform only as described
in this manual.
3
Page 4

15. When connecting the power cord (see page
), plug the power cord into an earthed cir-
9
cuit. No other appliance should be on the
same circuit.
16. If an extension cord is needed, use only a 3-
conductor, 1mm
onger than 1.5 m (5 ft.).
l
17. Keep the power cord away from heated sur-
faces.
2
(14-gauge) cord that is no
18. Never leave the vibration platform unattendd while it is running. Always unplug the
e
power cord and switch the on/off switch circuit breaker to the off position when the
vibration platform is not in use. (See the
drawing on page 5 for the location of the circuit breaker.)
19.
DANGER: Always unplug the power
cord when the vibration platform is not in
use and before cleaning the vibration platform. Servicing other than the procedures in
this manual should be performed by an
authorized service representative only.
4
Page 5
BEFORE YOU BEGIN
Thank you for selecting the new PROFORM®VIBE
80 ZL vibration platform. The VIBE 980 ZL vibration
9
platform offers whole body vibration options designed
to make your workouts more effective and enjoyable.
For your benefit, read this manual carefully before
you use the vibration platform. If you have ques-
tions after reading this manual, please see the front
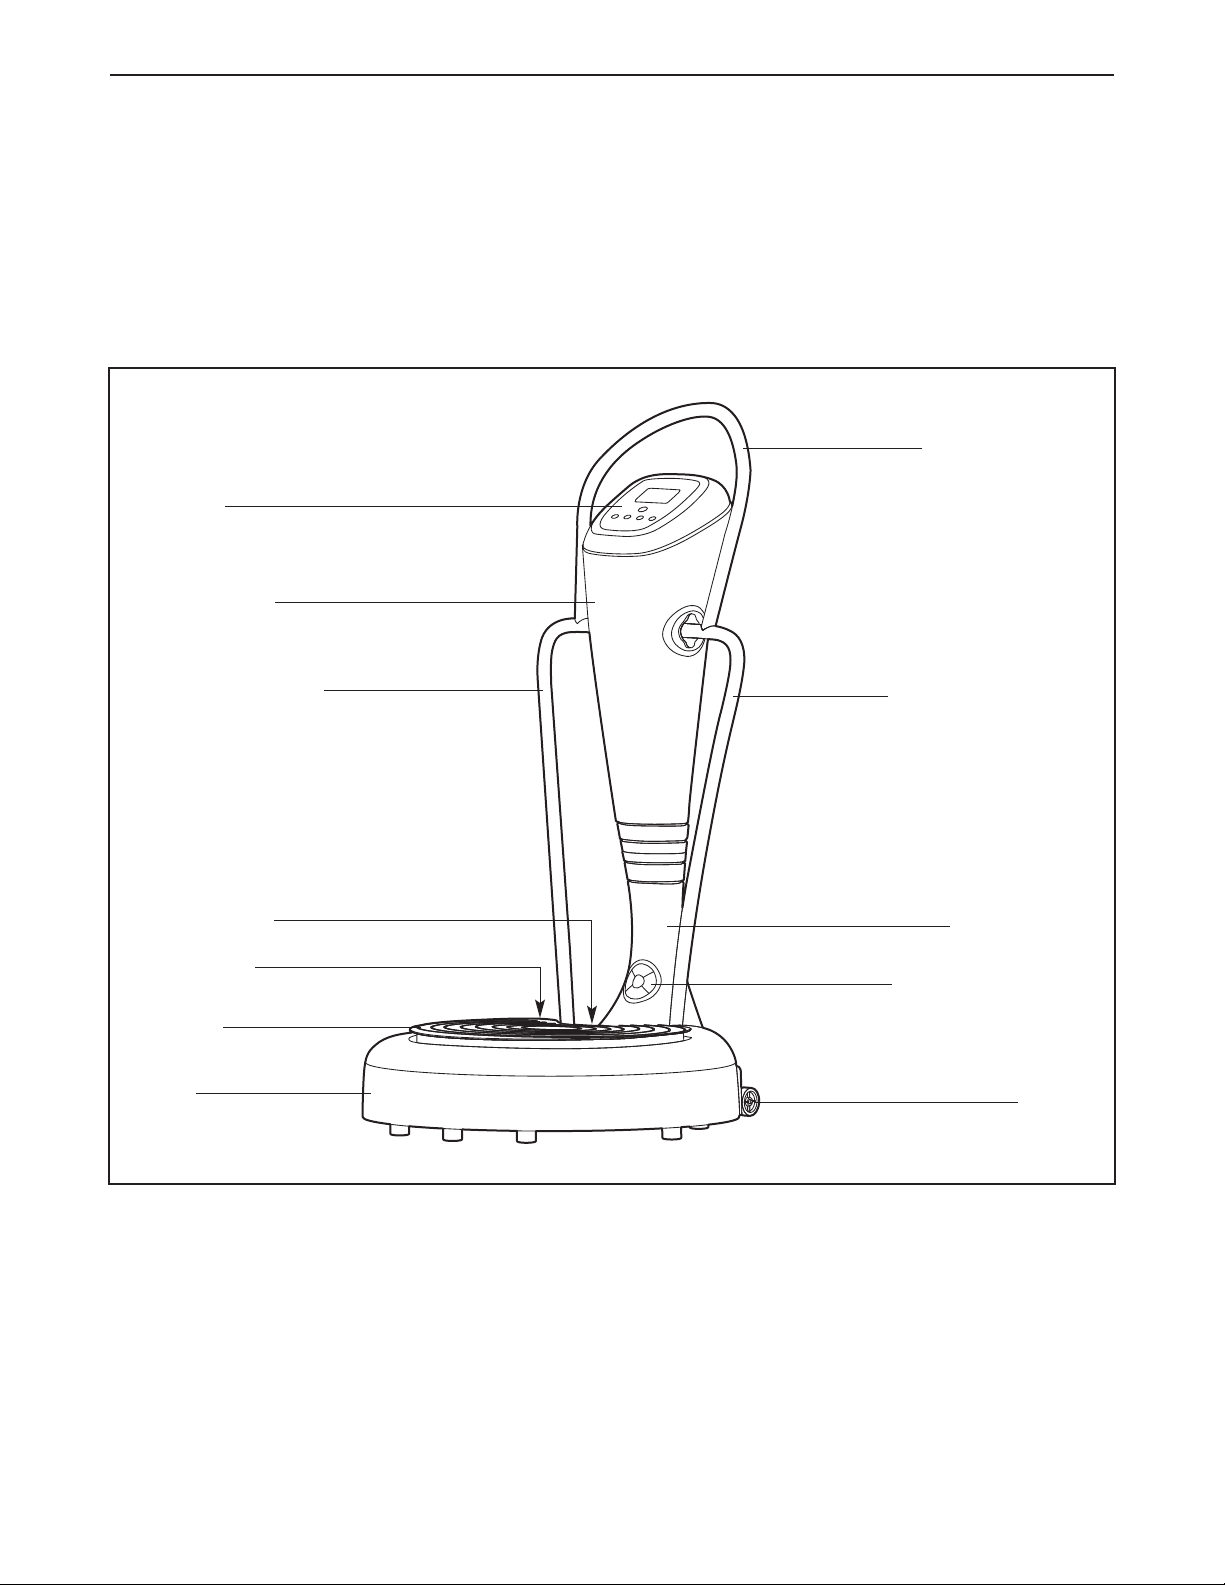
Console
Upper Upright
Left Upright Handle
cover of this manual. To help us assist you, note the
roduct model number and serial number before con-
p
tacting us. The model number and the location of the
serial number decal are shown on the front cover of
this manual.
Before reading further, please familiarize yourself with
the parts that are labeled in the drawing below.
Upper Handlebar
Right Upright Handle
On/Off Switch
Power Cord
Platform
Base
Lower Upright
Lower Control Panel
Wheel
5
Page 6

M8 Split Washer (F)
M8 Washer (O)
M6 Split Washer (M)
M8 Acorn Nut (P)
M8 x 48mm Screw (E)
M5 x 14mm
Screw (G)
M6 x 16mm
Screw (H)
M6 x 20mm
Screw (L)
ASSEMBLY
To make assembly easier, carefully read the
following assembly tips:
• Assembly requires two persons.
• Place all parts in a cleared area and remove the
packing materials. Do not dispose of the packing
materials until the vibration platform is fully
assembled.
• See the drawings below to identify small parts
used in assembly. Note: If a part is not in the
hardware kit, check to see if it has been
preattached.
• Tighten all parts as you assemble them.
Assembly may require the following tools (not
•
included):
one adjustable wrench
one rubber mallet
one Phillips screwdriver
Assembly will be more convenient if you have a
socket set, a set of open-end or closed-end
wrenches, or a set of ratchet wrenches. To avoid
damaging plastic parts, do not use power tools.
1. Orient the Lower Upright (B) so that the lower
control panel is facing the platform.
While a second person holds the Lower Upright
(B) near the Base (A), plug the upright wire into
the indicated jack in the Base.
Next, insert the Lower Upright (B) into the Base
(A).
6
1
Platform
B
A
Lower
Control
Panel
Upright
Wire
Jack
Page 7

2. Attach the Lower Upright (B) to the Base (A)
with four M8 x 48mm Screws (E) and four M8
Split Washers (F).
2
B
A
F
E
3. Orient the Wheel Assembly (D) as shown.
Attach the Wheel Assembly (D) to the Base (A)
with three M5 x 14mm Screws (G).
E
3
F
A
D
G
4. While a second person holds the Upper Upright
(C) near the Lower Upright (B), connect the
upper wires to the lower wires.
Next, attach the Upper Upright (C) to the Lower
Upright (B) with an M6 x 16mm Screw (H).
4
C
Upper
Wire
H
Lower
Wire
B
7
Page 8

5. Insert the Left Upright Handle (J) into the indicated hole in the Base (A).
ttach the Left Upright Handle (J) to the Upper
A
Upright (C) with two M6 x 20mm Screws (L) and
wo M6 Split Washers (M).
t
Attach the Right Upright Handle (I) in the
same way.
5
M
L
M
C
6. Attach the Upper Handle (K) to the Right and
Left Upright Handles (I, J) with two Plastic
Washers (N), two M8 Washers (O), two M8 Split
Washers (F), and two M8 Acorn Nuts (P).
Make sure that all parts of the vibration platform are properly tightened.
J
Hole
A
6
K
I
J
I
N
O
F
P
8
Page 9

HOW TO USE THE VIBRATION PLATFORM
OW TO MOVE THE VIBRATION PLATFORM
H
Hold the upper handlebar and place one foot against
one of the wheels. Tilt the vibration platform until it
olls freely on the wheels.
r
Next, carefully move the vibration platform to the
desired location. To reduce the risk of injury, use
extreme caution while moving the vibration platform. Do not move the vibration platform over an
uneven surface.
Handlebar
OW TO PLUG IN THE POWER CORD
H
DANGER: Improper connection
of the equipment-earthing conductor can
result in an increased risk of electric shock.
Check with a qualified electrician or serviceman if you are in doubt as to whether the
product is properly earthed. Do not modify
the plug provided with the product—if it will
not fit the outlet, have a proper outlet
installed by a qualified electrician.
This product must be earthed. If it should malfunc-
tion or break down, earthing provides a path of least
resistance for electric current to reduce the risk of
electric shock. This product is equipped with a power
cord having an equipment-earthing conductor and an
earthing plug. IMPORTANT: If the power cord is
damaged, it must be replaced with a manufacturerrecommended power cord.
Plug the
power cord
into the
receptacle
on the base.
1
Base
Receptacle
Wheel
Power
Cord
Next, plug
the power
cord into an
appropriate
outlet that is
properly
installed and
earthed in
accordance
with all local
codes and
ordinances. Note: Your power cord and outlet may
appear different. IMPORTANT: The vibration plat-
form is not compatible with GFCI-equipped outlets.
2
Outlet
9
Page 10

TIME SPEED-UPSPEED-DOWN MODE
CONSOLE DIAGRAM
In addition, the vibration platform offers a convenient
lower control panel so that you can easily change the
settings while you perform exercises in a lower posi-
ion.
t
OW TO TURN ON THE POWER
H
IMPORTANT: If the vibration platform has been
exposed to cold temperatures, allow it to warm to
room temperature before turning on the power. If
you do not do this, you may damage the console
or other electronic components.
Plug the power cord into the receptacle on the base of
the vibration platform. Then, plug the power cord into
an appropriate outlet (see page 11).
Next, locate the on/off switch
on the side of the vibration
platform near the power cord.
Make sure that the on/off
switch is in the on position.
On
Position
CONSOLE FEATURES
The console offers a selection of features designed to
make your workouts more effective and enjoyable.
When you use the manual mode, you can select a
session time and a vibration frequency with the touch
of a button.
The console also offers three workouts. Each workout
automatically changes the vibration frequency and
vibration time while you exercise on the vibration platform.
EXERCISE FORM
See the EXERCISE GUIDE beginning on page 16 to
learn the correct form for several exercises that can
be performed on the vibration platform.
While standing on the vibration platform, bend your
knees slightly and balance your weight on the balls of
your feet.
10
Page 11

HOW TO USE THE MANUAL MODE
1. Turn on the power.
See HOW TO TURN ON THE POWER on page
2.
1
2. Select the manual mode.
Each time the
console is
turned on, the
manual mode
will be selected automatically. If you
have already
selected a
workout, return to the manual mode by pressing
the MODE button repeatedly until the display
appears as shown above.
3. Select the desired session time.
Press the TIME button
repeatedly to select a
session time of 9:30,
12:00, or 14:30. The
display will show which
length of time you have selected.
Depending on the session time you selected, the
vibration platform will vibrate for a vibration time of
30, 45, or 60 seconds. The vibration platform will
hen pause automatically for 30 seconds of rest
t
time.
Session Vibration Time Rest Time
Time (Seconds) (Seconds)
9:30 30 30
12:00 45 30
14:30 60 30
The vibration session will continue alternating
vibration time and rest time until the vibration session ends. Note: The console will beep several
times to alert you when a run time begins.
If desired, you can change the vibration frequency
during a vibration session by pressing the SPEEDUP or SPEED-DOWN button.
6. Stop or pause a vibration session.
Press the start/stop button on the console or the
start/stop button on the lower control panel at any
time to stop or pause a vibration session. Press
the start/stop button again to continue the vibration
session.
7. Start additional vibration sessions as desired.
4. Select the desired vibration frequency.
Press the SPEED-UP
or SPEED-DOWN button to select the
desired vibration frequency (speed). The display will show which vibration frequency you have selected.
5. Start a vibration session.
Press the start/stop button on the console or the
start/stop button on the lower control panel to start
a vibration session.
Start/Stop
Button
Start/Stop
Button
Repeat steps 2–5 for as many additional vibration
sessions as desired. IMPORTANT: It is recom-
mended that you use the vibration platform for
no more than 15 minutes per day and no more
than 3 times per week.
8. When you are finished exercising, turn off the
power.
When you are finished using the vibration platform, switch the on/off switch to the off position and unplug the power cord.
11
Page 12

HOW TO USE A WORKOUT
1. Turn on the power.
See HOW TO TURN ON THE POWER on page
2.
1
2. Select a workout.
To select a preset workout, press the MODE button repeatedly until the desired workout is selected.
When this mode is
selected, the vibration
platform will vibrate in
the following pattern:
Vibration Vibration Time Rest Time
Frequency (Seconds) (Seconds)
1 60 30
2 45 30
3 30 30
4 45 30
5 30 30
6 30 30
7 30 30
8 30 30
9 30 30
10 30 30
11 30 30
12 45 30
13 45 30
14 30 30
15 30 30
16 30 End
When this mode is
selected, the vibration
platform will vibrate in
he following pattern:
t
ibration Vibration Time Rest Time
V
Frequency (Seconds) (Seconds)
1 60 30
2 30 30
3 30 30
4 30 30
5 30 30
6 30 30
7 45 30
8 30 30
9 45 30
10 30 30
11 30 30
12 30 30
13 45 30
14 45 30
15 30 30
16 30 End
3. Start a vibration session.
Press the start/stop button on the console or the
start/stop button on the lower control panel to start
a vibration session.
Note: The SPEED-UP and SPEED-DOWN buttons
will not function when a workout is selected.
4. Stop or pause a vibration session.
See step 6 on page 13.
When this mode is
selected, the vibration platform will
vibrate in the following pattern:
Vibration Vibration Time Rest Time
Frequency (Seconds) (Seconds)
1 60 30
2 45 30
3 45 30
4 30 30
5 45 30
6 30 30
7 30 30
8 45 30
9 60 30
10 30 30
11 60 End
5. When you are finished exercising, turn off the
power.
When you are finished using the vibration platform, switch the on/off switch to the off position and unplug the power cord.
12
Page 13
EXERCISE GUIDE
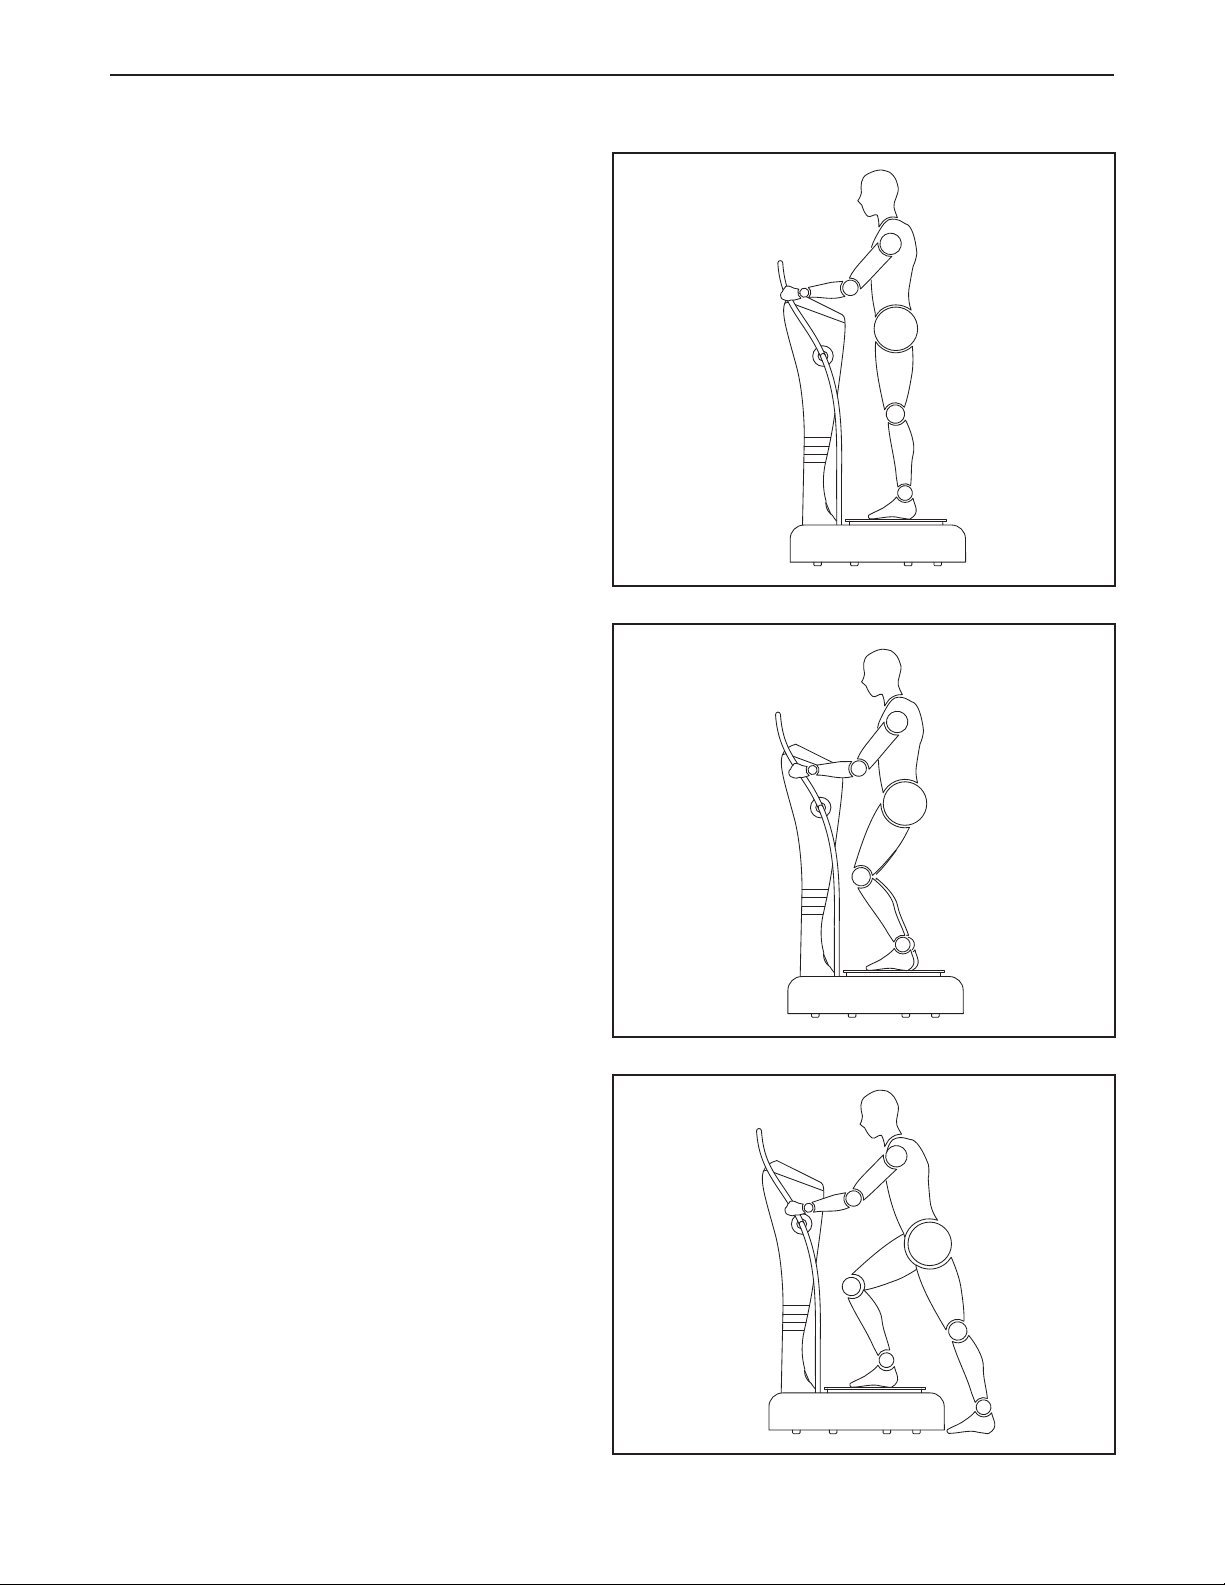
UPRIGHT
Stand on the platform, slightly bend your knees,
alance your weight on the balls of your feet, and
b
hold the upper handlebar. Maintain controlled
reathing while holding this position.
b
Areas affected: Entire Body
SQUAT
Stand on the platform, with your feet hip-width apart
in a 130-degree squat. Engage your abs and maintain a neutral head and spine. Maintain controlled
breathing while holding this position. For dynamic
exercise, extend upward and then slowly lower to
the squat position.
Areas affected: Back, Buttocks, and Calves
STEP UP/STEP DOWN
Stand on the floor facing the vibration platform, with
your feet hip-width apart. Engage your abs. Slowly
step forward onto the platform. Follow with your
other foot. Then, step down with your lead foot, and
follow with your second foot. Alternate stepping and
maintain controlled breathing.
Areas affected: Waist, Stomach, and Thighs
13
Page 14
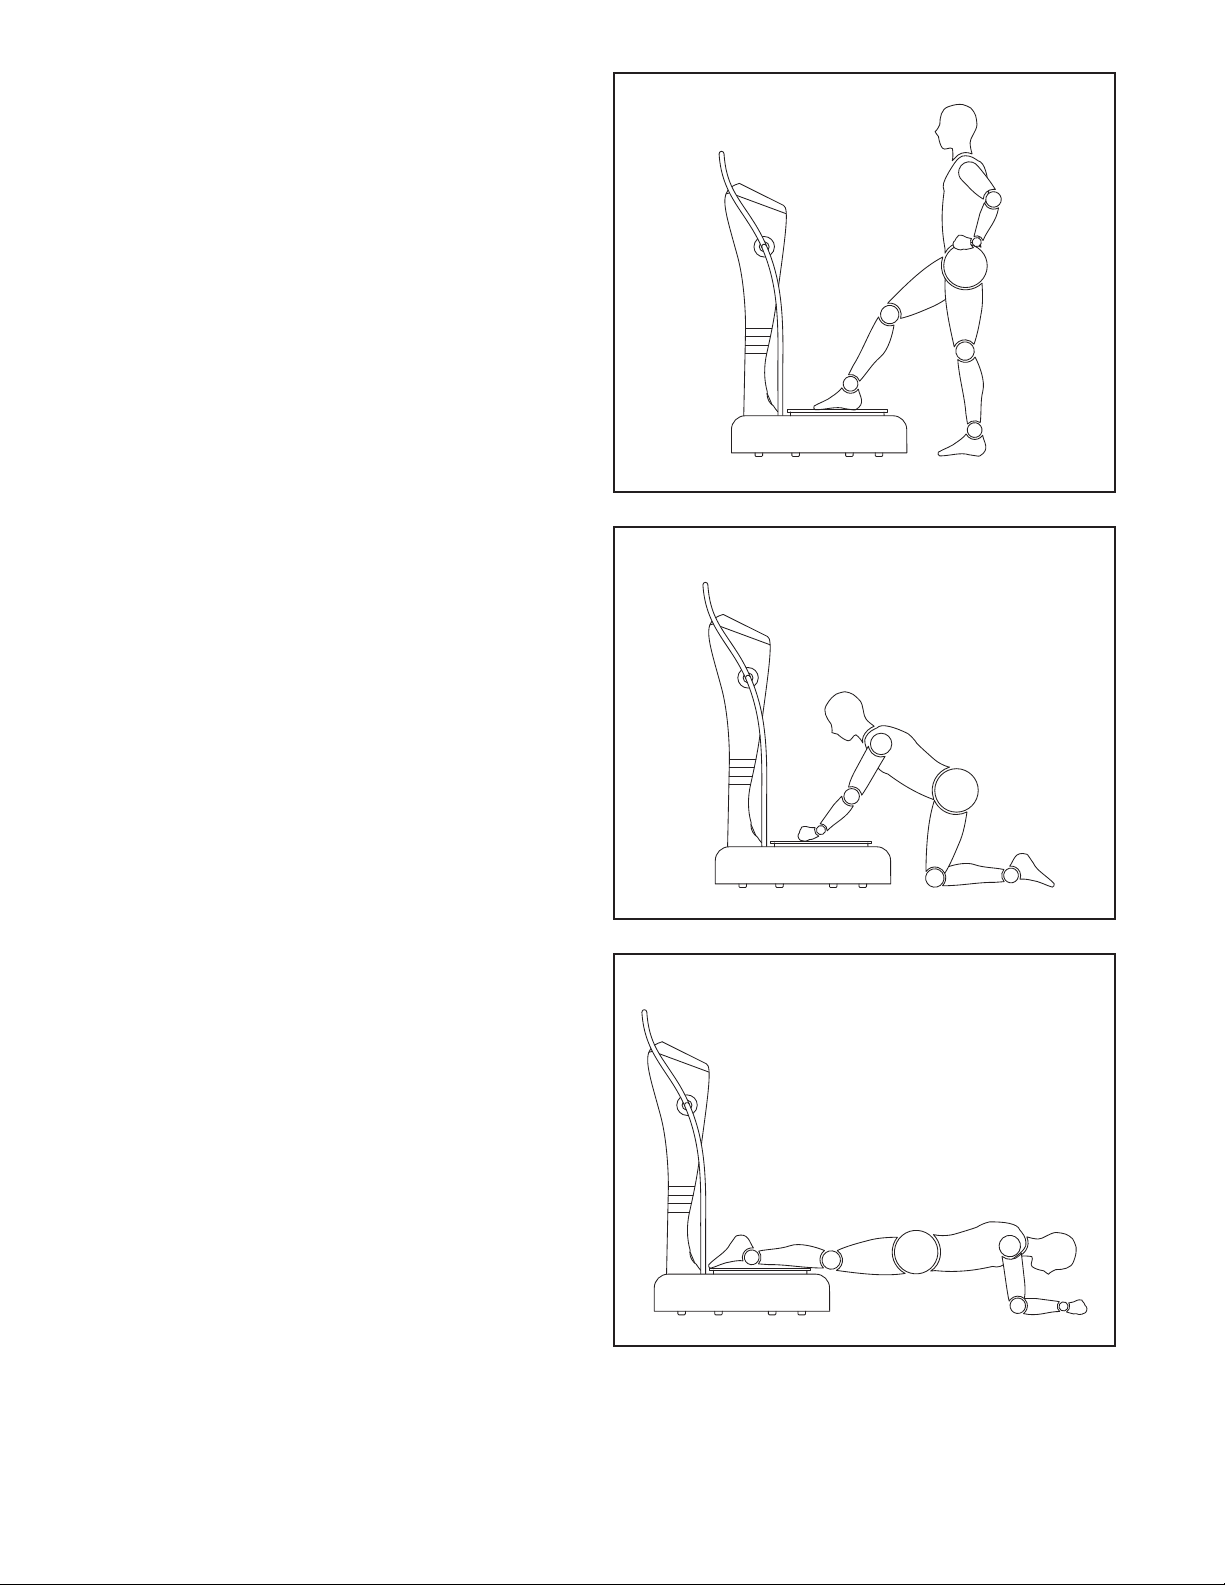
SINGLE LEG
Stand on the floor facing the vibration platform, with
our feet hip-width apart. Place your hands on your
y
hips. Then, place one foot on the platform.
Areas affected: Waist, Stomach, and Thighs
KNEELING
Kneel on the floor and place your hands on the
platform as shown. Maintain controlled breathing
while holding this position.
Areas affected: Legs, Shoulders, Arms, and
Upper Body
PLANK
Lie face down on the floor, resting on your arms as
shown. Then, place the tips of your toes on the
back of the platform and rest your legs on the platform.
Areas affected: Shoulders, Chest, Arms, and
Upper Body
14
Page 15

TROUBLESHOOTING
nspect all parts of the vibration platform regularly. Replace any worn parts immediately. Outer surfaces of the vibra-
I
tion platform can be cleaned with a damp cloth and a mild, non-abrasive detergent; do not use solvents to clean
he vibration platform.
t
ost vibration platform problems can be solved by following the simple steps below. Find the symptom
M
that applies, and follow the steps listed. If further assistance is needed, see the telephone number on
the front cover of this manual.
PROBLEM: The power does not turn on
SOLUTION: a. Make sure that the power cord is fully plugged into the receptacle on the base of the vibration
platform. Next, make sure that the power cord is plugged into an appropriate outlet (see page
11). IMPORTANT: The vibration platform is not compatible with GFCI-equipped outlets.
b. Check the on/off switch located on the vibration plat-
form base near the power cord. Make sure that the
on/off switch is in the on position.
c. If the power cord is plugged in and the on/off switch is in the on position, the fuse may need to
be replaced.
To replace the fuse, first switch the on/off switch to the off position and unplug the power cord.
Using a Phillips screwdriver, remove the fuse holder located above the on/off switch. Remove
the fuse from the fuse holder.
Insert a new fuse into the fuse holder. Note: The correct type of fuse to use is listed on the fuse
holder.
Replace the fuse holder, plug in the power cord, switch the on/off switch to the on position, and
run the vibration platform to check for correct operation.
d. If the vibration platform still will not run, please see the back cover of this manual.
PROBLEM:The power turns off during use
b
Off
On
SOLUTION: a. Check the on/off switch (see the drawing on page 11). Make sure that the on/off switch is in the
on position.
b. Make sure that the power cord is plugged in. If the power cord is plugged in, unplug it, wait for
five minutes, and then plug it in.
c. If the power cord is plugged in and the on/off switch is in the on position, the fuse may need to
be replaced. See step c. above to replace the fuse.
d. If the vibration platform still will not run, please see the back cover of this manual.
15
Page 16

Part No. 281102 R0609A Printed in China © 2009 ICON IP, Inc.
 Loading...