

Page 1
PL-HD240
Installation Guide
This hard disk drive unit is made by Pro-face for use with its panel-type computers,
hereafter referred to as the "PL". This 2.5 inch 40GB hard disk is designed to be installed inside the PL.
Corresponding PL units: PL-X930 Series units
(All product names that appear in this guide are the trademarks of their respective companies)
Pro-face: Digital Electronics Corporation (in Japan and other countries)
MS-DOS, Windows: Microsoft Corporation (USA)
WARNINGS
WARNINGS
• Be sure to check that the PL’s power is disconnected before
installing the unit, in order to prevent an electrical shock.
• Do not attempt to modify or open the PL-HD240, since it can
cause a shock or fire.
• When installing the PL-HD240, be sure to read the following “3.
Installation” section’s information completely to insure that the
unit is correctly installed.
To Prevent Accidents
• Since the PL-HD240 is a precision instrument, be sure it is neither hit by nor pressed
strongly against another object. After unpacking, be sure the unit is not dropped or
jolted during installation. Also, a PL built in to a larger unit (i.e. operation panel)
should be removed and packed separately prior to shipping.
• Be sure water, liquids or metal particles are not allowed to enter the PL-HD240. Any
of these may cause either a breakdown or an electrical shock.
• Do not place or store this unit in a location where there is direct sunlight, excessive
heat, dust or vibration.
• Do not store or operate this unit near chemicals, or where there are chemical fumes.
• Do not allow anyone other than Pro-face’s own service staff to perform maintenance or adjustments to this unit.
• Do not move or shift the PL while the PL-HD240 is installed and the PL unit's power
is ON.
-1-
Page 2
• Do not use the PL-HD240 in locations where corrosive gasses are present, since they
can lead to a hard disk breakdown.
• To prevent damage to file data, be sure to shut down the PL unit's OS before turning
OFF the main power.
To extend the life of your PL unit's hard disk, use the BIOS menu [POWER MAN-
AGEMENT SETUP] - [HDD Power Down] setting to turn the HDD unit's power
OFF when the HDD is not being operated. Recommended setting is the factory
setting of "5Min". When using Windows
Panel] - [Power Options] - [Turn off hard disks] setting to turn the HDD unit's power
OFF when not in use. Recommended setting is [After 5 mins]. When using
Windows
option]-[Turn off hard disks] selection to turn the hard disk off when the unit is not
being operated. Recommended setting is the factory setting of "5Min".
Unit Disposal
• When this HDD unit is disposed of, it should be done so according to your
country's regulations for similar types of industrial wastes.
®
XP, [Control panel]-[Performance and Maintenance]-[Power Management
®
2000, use the [Start] - [Settings] - [Control
Package Contents
Please check that the following items are all included in your package.
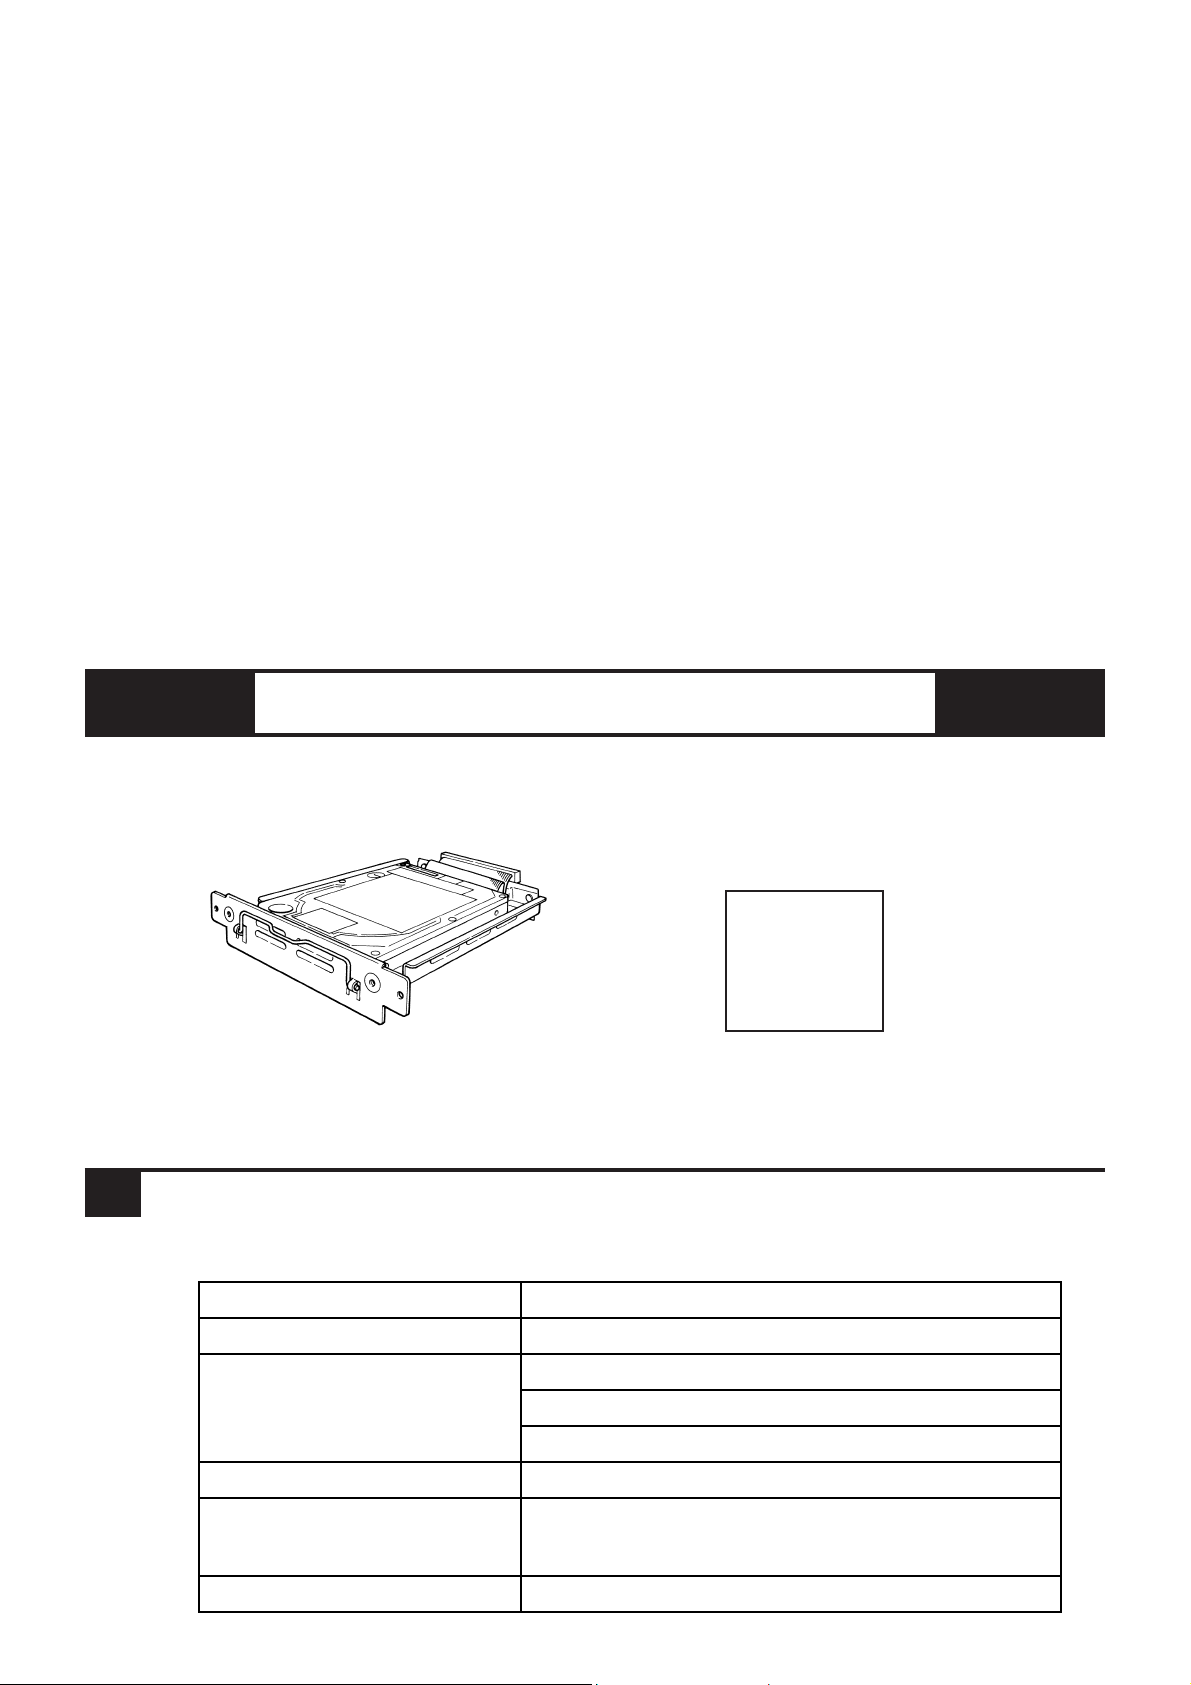
PL-HD240 (1) Installation Guide
(PL-HD240)
Installation
Guide
Pro-face has taken the utmost care to insure the quality of this product when it was
shipped, however, should, for any reason, problems or damage have occurred during
shipping, please contact your Pro-face representative immediately for service.
1
Features
Hardware Specifications
Capacity
Seek Time
Power Consum pti on
Interface
Lifetime
Weight Appr ox. 250g
40GB
12msec(TYP)
At Startup : 5.0W ( TY P)
Read/ W r ite : 1.8/1.8W (T YP)
Dur ing Wait : 0.2W( TYP)
PATA
5 y ears, or 20,000 oper ating hours, whic hever
comes first
-2-
Page 3
• The PL-HD240 has a finite usage lifetime. Therefore, be sure to back
up all HDD data periodically or prepare a backup HDD unit.
• The Hard Disk lifetime specified here may be reduced due to unforeseen environmental factors, however, the disk should operate for
20,000 hours or approximately 5 years, whichever comes first, at an
operating temperature of 20
tion per month. (HDD access frequency of 20% or less)
Environment
o
C and approximately 333 hours of opera-
Surrounding Air
o
5
C t o 50oC
Temperature
St or age Temperature
-10
o
C t o +60oC
10%RH to 85%RH (no condensation,
Ambient Humidity
Wet bulb temperature: 29
o
C or less)
Noi se Resist ance Noise Voltage: 1500Vp- p
(via Noise Simulator)
Pulse Width: 50ns, 500ns, 1µs
Electrostatic Discharge
4kV
Immunity
Vibrat ion Resi st ance
Shock R esistance
4.9m/s
2
(10Hz to 25Hz) (When Operating)
3920m/ s
2
(1ms, Hal f-sine shock pulse)
• When using a PL optional unit, be sure to check that unit’s specifications for any special conditions or cautions that may apply to its use.
• Since the PL unit’s hard disk drive (HDD) is a consumable item, i.e. it
has a limited lifetime, be sure to back up its data regularly and prepare
a spare HDD unit.
• Using the Hard Disk in an environment that is excessively hot and/or
humid will shorten the disk’s operation life. A wet bulb temperature of
o
29
C or less is recommended, which is equivalent to the following
data.
Temperature Humidity
at 35
at 40
0
C
0
C
no higher than 64%
no higher than 44%
-3-
Page 4
2
Hard Disk Unit Settings
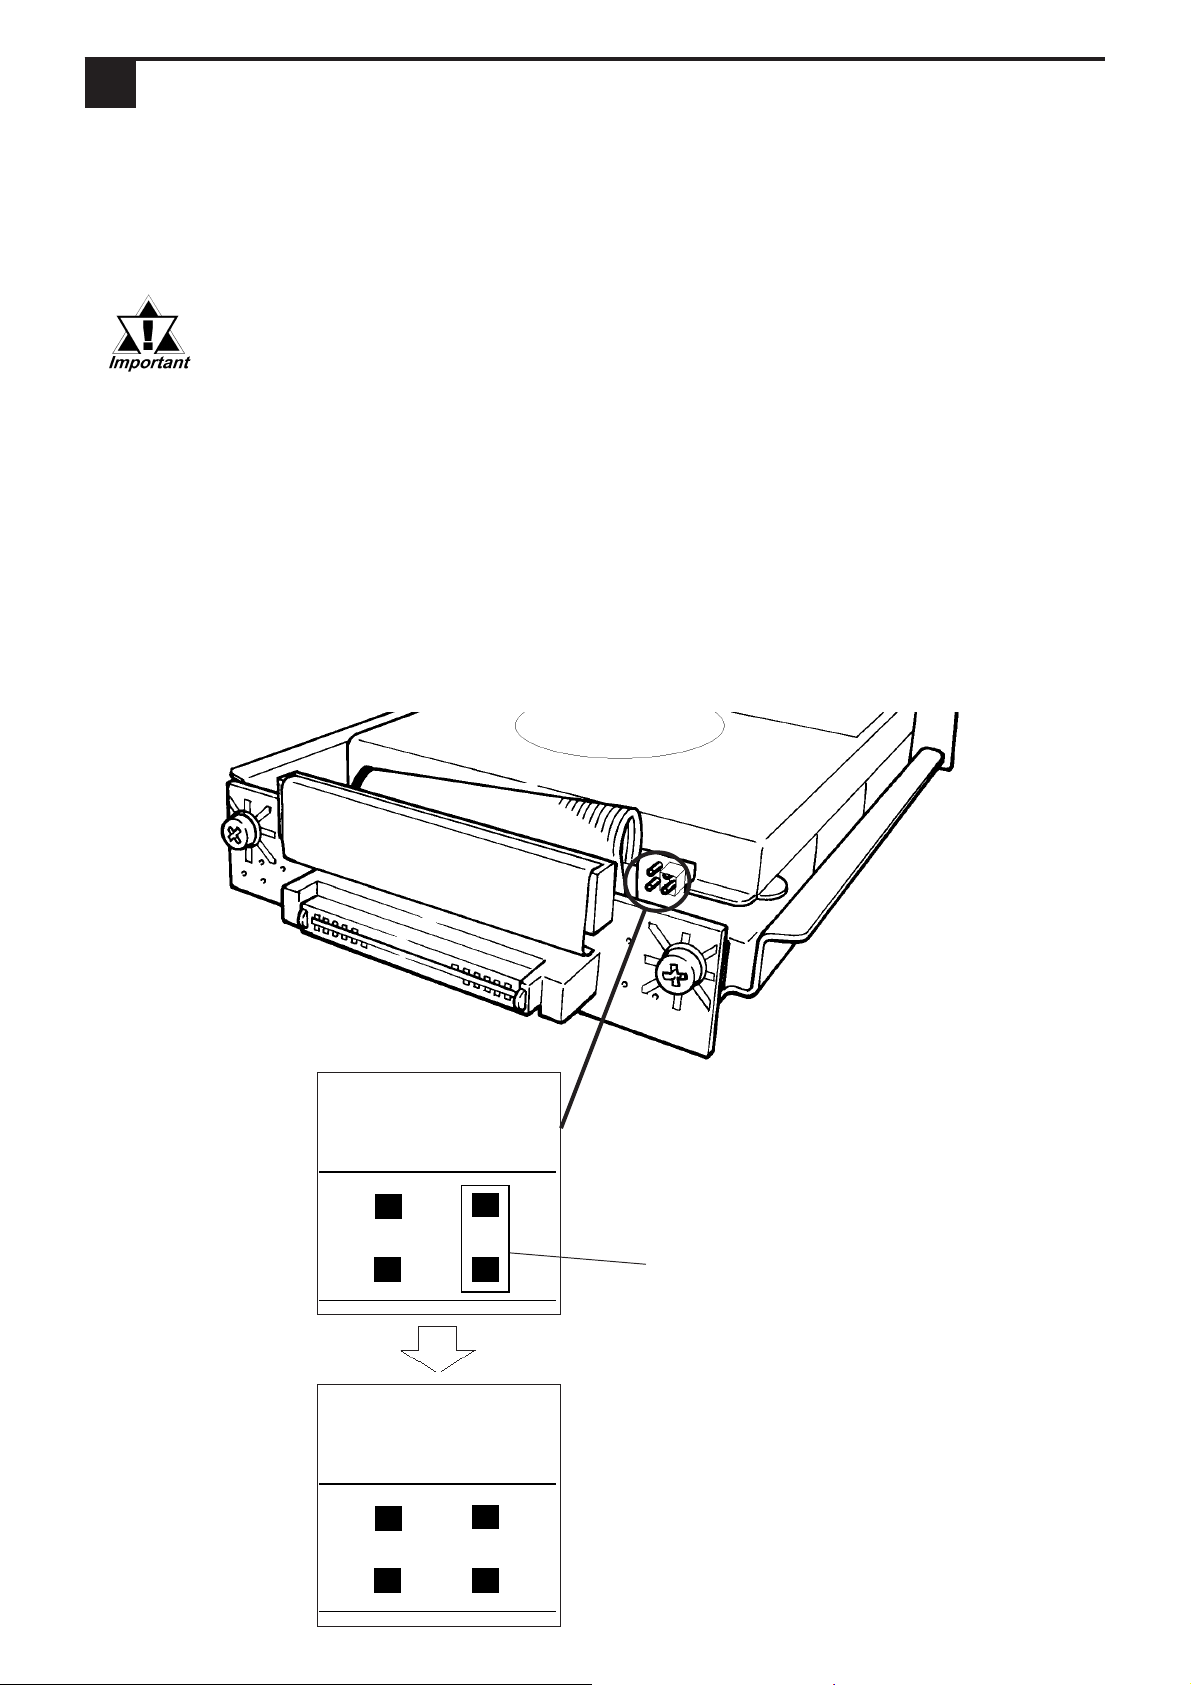
The PL-HD240 is one of the Expansion Options for PL Series, when shipped, set as
the PL's Slave drive (Second Hard Disk).
The PL-HD240 in conbination with PL-X930 Series unit, when shipped, set as the PL's
Master drive (First Hard Disk).
• Be sure to use the PL-HD240 as Master setting for PL-X930 Series
units.
• When using both Pro-face's CD-ROM drive unit "PSS-CD01" and this
unit (PL-HD240) built in PL-X930 Series unit's Expansion Slot 1, be
sure to set PL-HD240's drive as Master, since it can cause a malfunction.
• Except for the jumper plug shown here, do NOT use any other short
plugs with the PL-HD240, since it can cause a malfunction or damage
the unit.
<PL-HD240>
Factory Setting
(for use as Slave)
Master Setting
(for use as Master)
Jumper Plug
When using the PL-HD240 as
a Master, be sure to remove
the jumper plug, as shown in
the left side figure.
-4-
Page 5
3
Installation
Use the following steps to install the PL-HD240 in the PL.
WARNINGS
WARNING
•Shock Danger! Be sure to unplug the PL unit from its power supply
prior to installing the PL-HD240.
• Even when the PL-X930 Series unit's screen display disappears,
the power might be distributed inside (such as the "Soft OFF" status*1 etc). Be sure to confirm that the power supply switch on the
rear side of the PL unit is OFF.
Since the PL-HD240 is a precision instrument that has a low resistance
to shock, be sure it is neither hit by nor pressed strongly against another
object when installing it.
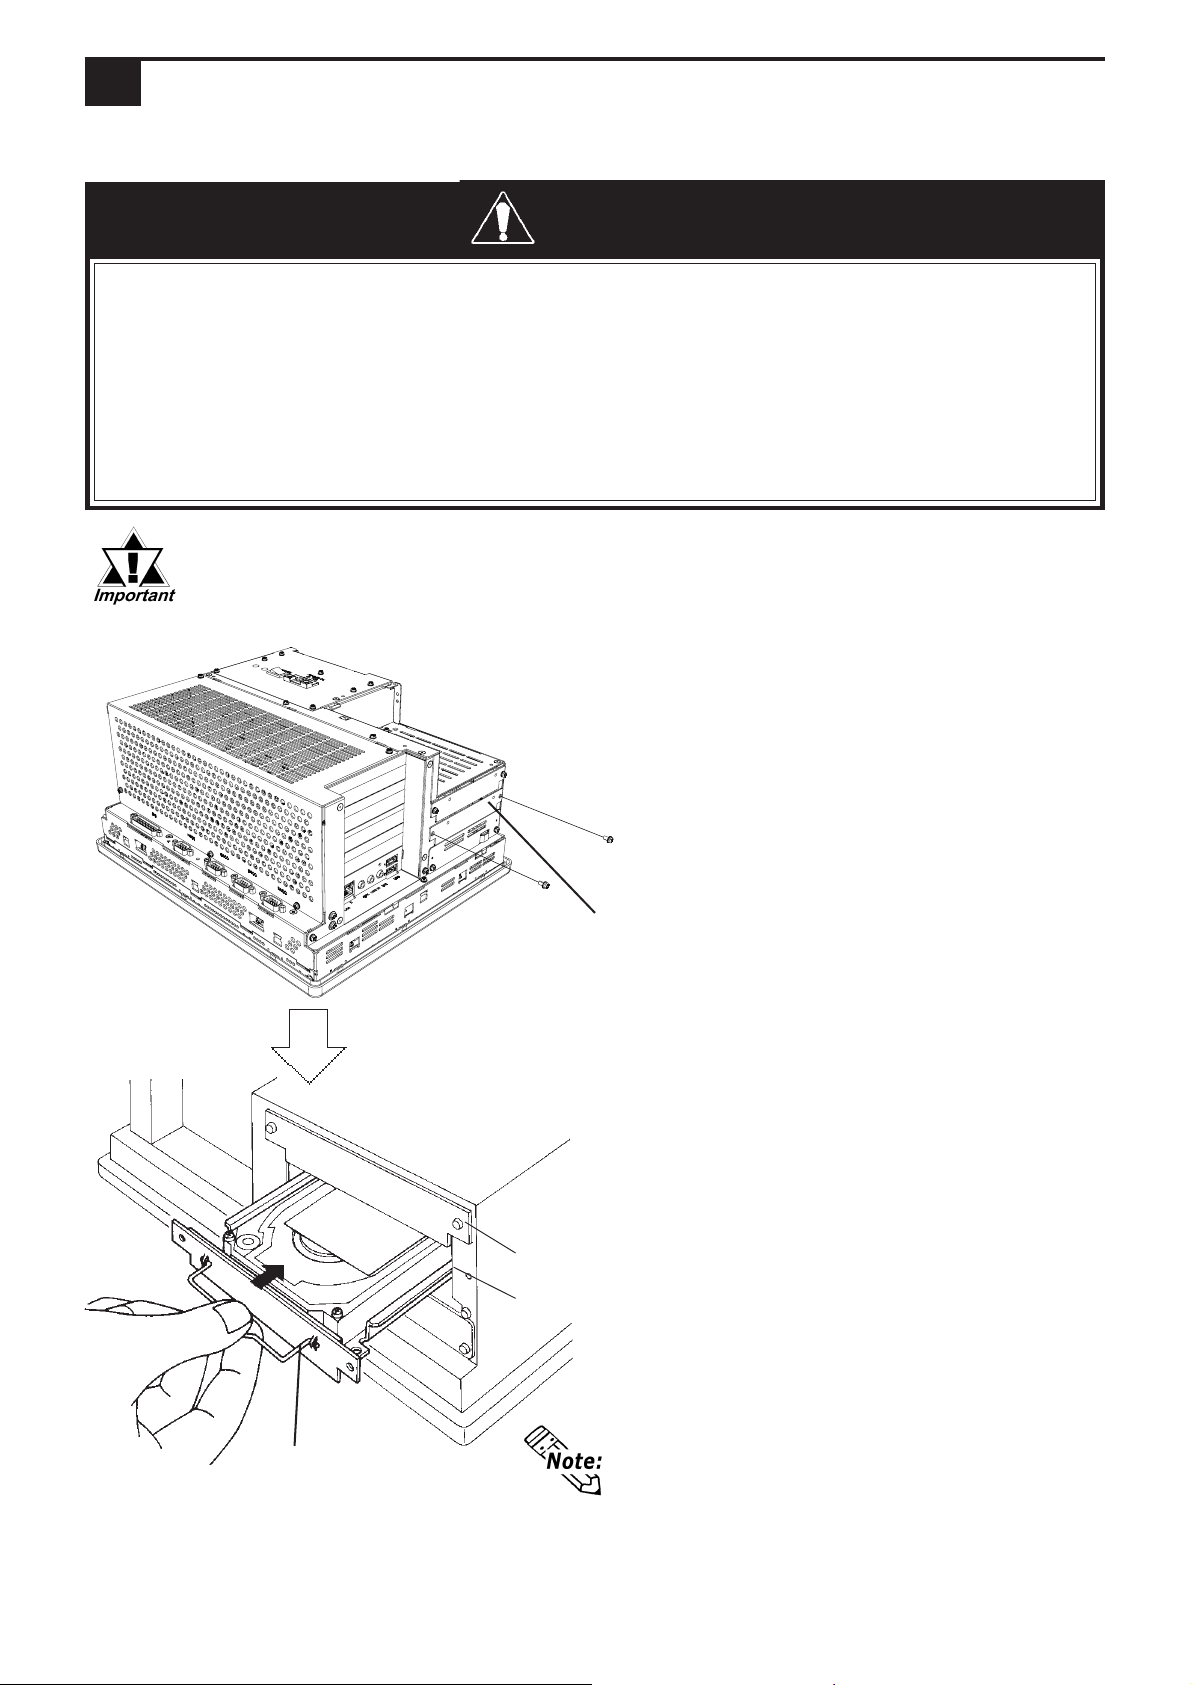
1) Unscrew the Expansion Slot
0 two (2) attachment screws
and remove the cover.
Expansion Slot 0
2)Hold the PL-HD240's removal handle
and slide the unit slowly into the
expansion slot 0, until the rear face
connector is completely inserted into
the slot's connector pins.
Expansion Slot 1
Expansion Slot 0
3 ) Reattach the two (2) expansion slot
0 attachment screws.
Removal
Handle
*1 The Soft OFF refers to the state that Windows(R) has been shut down and the power is
provided only for the electric circuit to boot system. This Soft OFF State is different
from what is System Standby set by Windows(R).
When installing an HDD unit in Expansion
Slot 1, use the above installation procedures.
-5-
Page 6
4
4 Hardware Setup
• Normally, the factory default settings should be used.
• Certain BIOS screen items may differ from those shown here due
to new versions.
All the following explanation screens use the PL's factory settings (default settings).
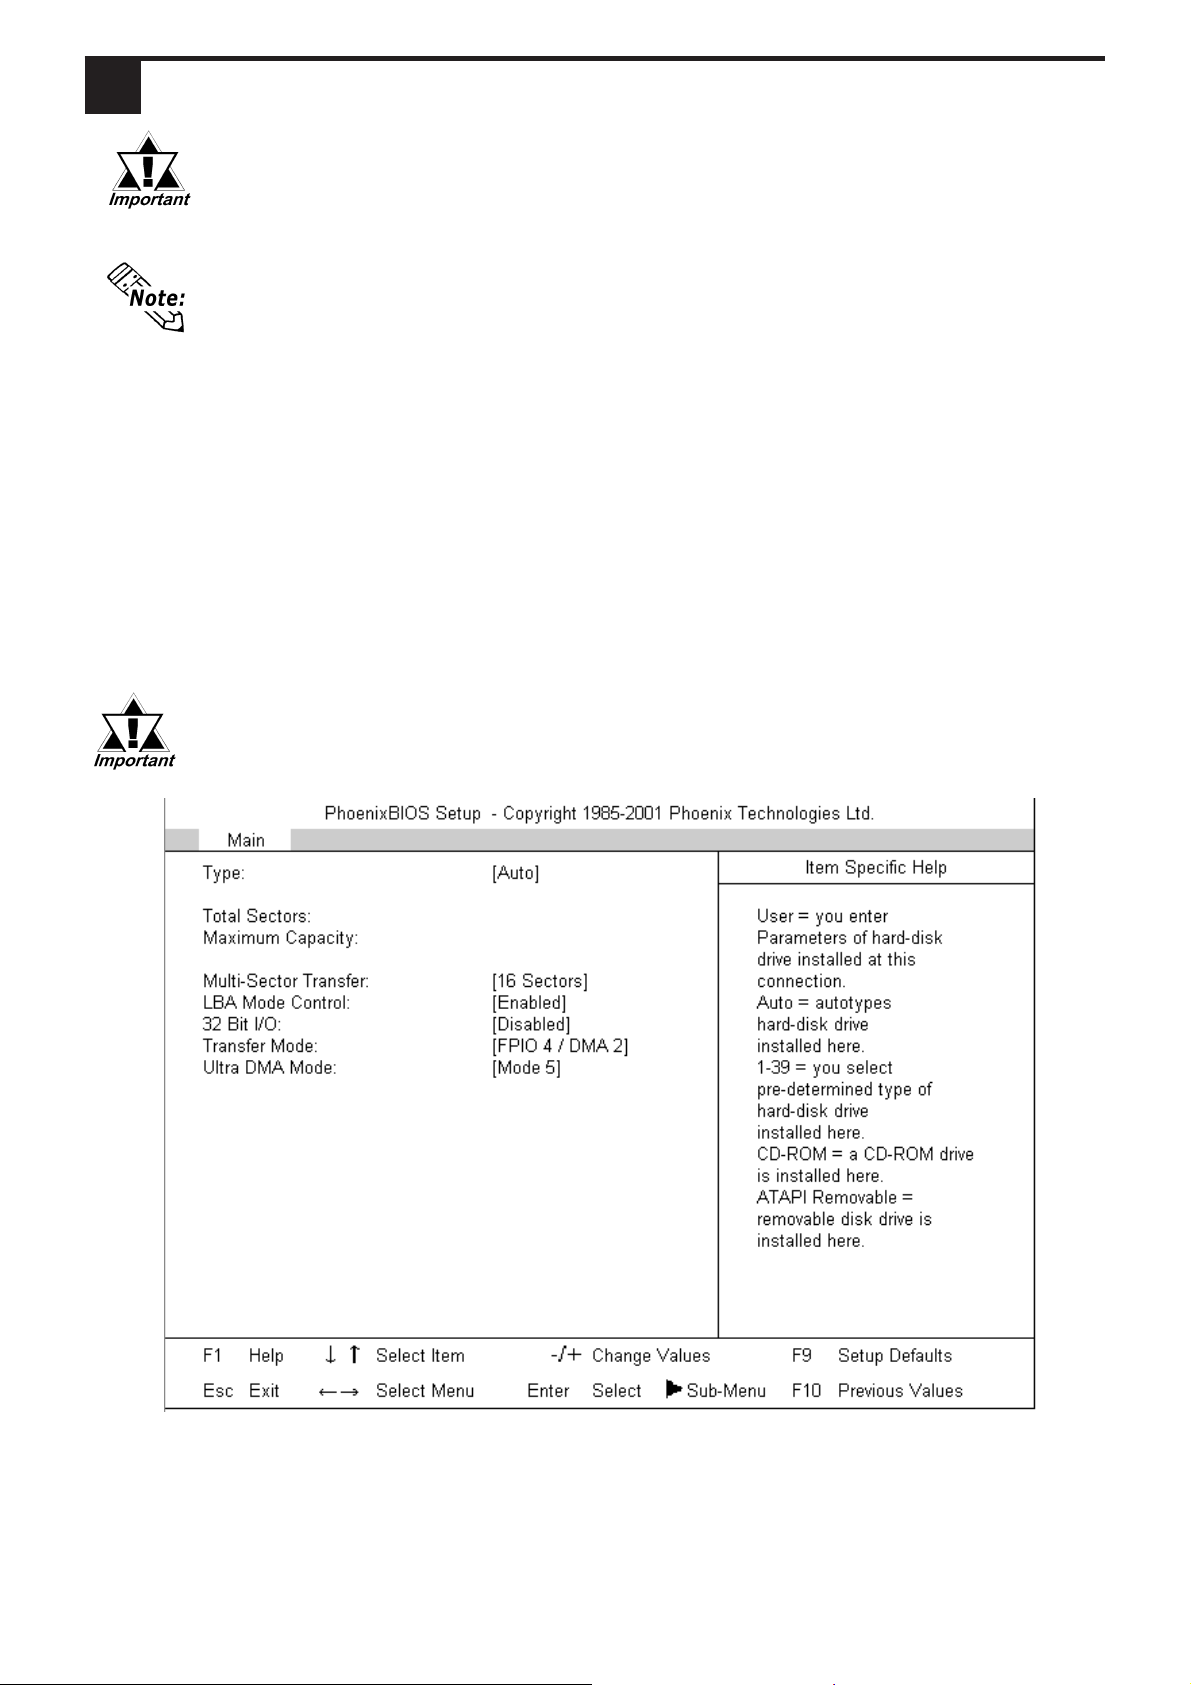
1)Connect a keyboard to the PL.
2)Right after turn the PL unit's power ON, keep on pressing [F2] key.
The Setup utility will start.
3)Depending on the PL-HD240's installation point (Expansion Slot 0 or 1), the follow-
ing menu will be displayed.
• When installing to the Expansion Slot 0: [Primary Master]
• When installing to the Expansion Slot 1: [Secondary Master]
Point the cursor to either [Primary Master] or [Secondary Master] on [Main] menu
and press the [Enter] key and the following screen appears.
• Be sure to use the PL-HD240 as Master setting for PL-X930 Se-
ries units. For the details, see [2. Hard Disk Unit Settings].
4) Confirm whether "AUTO" is selected for [Type]. (The factory setting is "AUTO"
and recommended for most users.)
5) Press the [ESC] key and the screen returns to the previous one. Select [Exit] menu
and point the cursor to [Exit Saving Changes] and press the [Enter] key. The system
settings will be saved and this process will exit and the OS will then start.
-6-
Page 7

5
Software Setup
After completing the hardware setup, in order to save data and application(s) to the
HDD, use your OS to create partitions and format (initialize) the unit. Please consult
your OS’s operation manual for details about these procedures.
Note
Please be aware that Digital Electronics Corporation shall not be held
liable by the user for any damages, losses, or third party claims arising
from the uses of this product.
Digital Electronics Corporation
8-2-52 Nanko Higashi, Suminoe-ku, Osaka 559-0031, Japan
URL: http://www.pro-face.com/
© 2006 Digital Electronics Corporation All rights reserved.
-7-
 Loading...