

Page 1
E-1
Preface
The PSA-HD20 is made by Pro-face for use with PS-3700A Series (hereafter referred
as the "PS-A") units. This 2.5 inch 20GB hard disk is designed to be installed inside
the PS-A unit.
Corresponding units: PS-3700A Series units
(All product names that appear in this guide are the trademarks of their respective companies)
Pro-face: Digital Electronics Corporation (in Japan and other countries)
MS-DOS
®
, Windows®: Microsoft Corporation (USA)
To Prevent Accidents
• Since the PSA-HD20 is a precision instrument, be sure it is neither hit by nor pressed
strongly against another object. After unpacking, be sure the unit is not dropped or
jolted during installation. Also, a PS-A unit built in to a larger piece of equipment (i.e.
operation panel) should be removed and packed separately prior to shipping.
• Be sure water, liquids or metal particles are not allowed to enter the PSA-HD20. Any of
these may cause either a breakdown or an electrical shock.
• Do not place or store this unit in a location where there is direct sunlight, excessive heat,
dust or vibration.
• Do not store or operate the PSA-HD20 near chemicals, or where there are chemical
fumes.
• Do not allow anyone other than Pro-face’s own service staff to perform maintenance or
adjustments to the PSA-HD20.
• Do not move or shift the PS-A unit while the PSA-HD20 is installed and the PS-A unit's
power is ON.
• Do not use the PSA-HD20 in locations where corrosive gasses are present, since they
can lead to a hard disk breakdown.
• To prevent damage to file data, be sure to shut down the PS-A unit's OS before turning
OFF the main power.
• To prevent HDD memory leaks, restart the OS periodically.
• In order to extend the lifetime of the hard disk, Pro-face recommends you set the Windows [Control panel]-[Power Management option]-[Turn off hard disks] selection to
turn the hard disk off when the unit is not being operated. A setting of 5 minutes is
recommended.
• Be sure to check that the PS-A unit’s power is disconnected
before installing the unit, in order to prevent an electrical shock.
• Do not attempt to modify or open the PSA-HD20, since it can
cause a shock or fire.
• When installing the PSA-HD20, be sure to read this guide's “2.
Installation” section’s information completely to ensure that the
unit is correctly installed.
WARNINGSWARNINGS
Page 2
E-2
• The PSA-HD20 has a finite usage lifetime. Therefore, be sure to back
up all HDD data periodically or prepare a backup HDD unit.
• The HDD unit's lifetime will vary, depending on the usage conditions
and environment. The above value is calculated assuming an ambient
temperature of 20
o
C and 333 hours of operation per month. (HDD
access frequency of 20% or less)
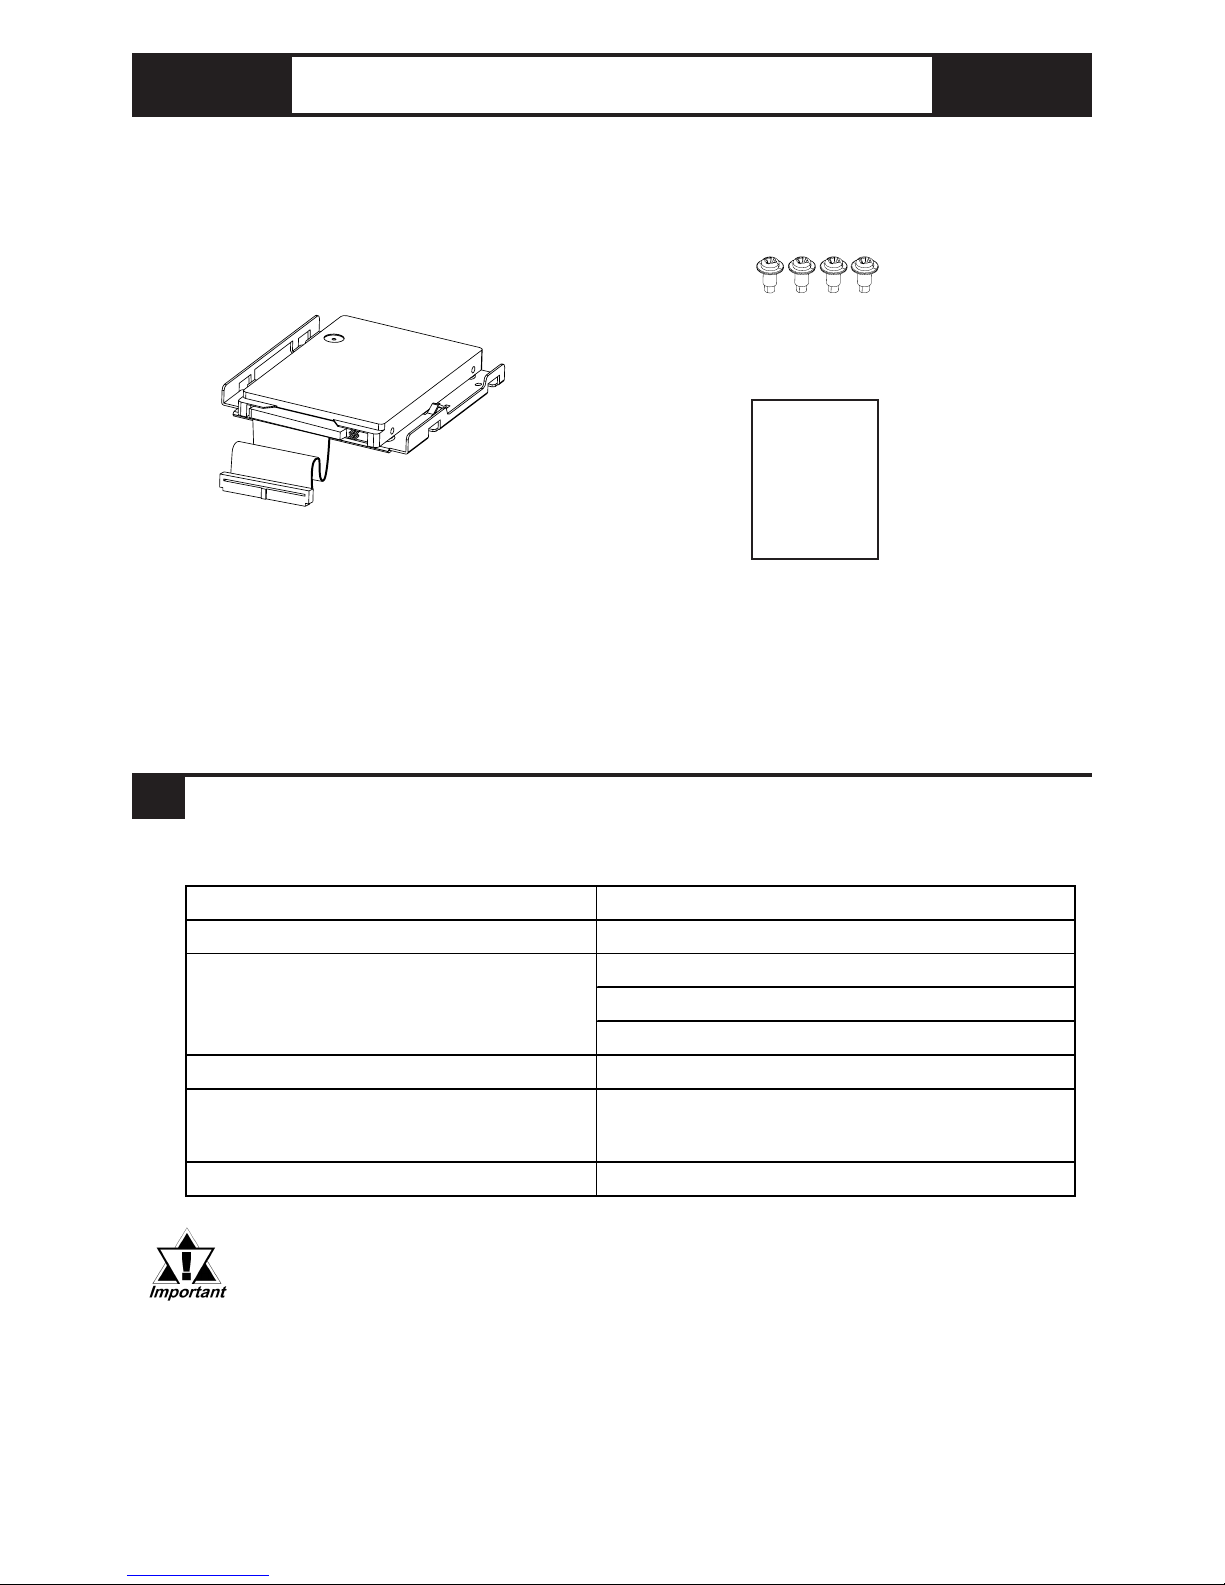
Please check that the following items are all included in your package.
HDD unit (1)
(PSA-HD20)
Installation Guide (this guide)
Pro-face has taken the utmost care to insure the quality of this product when it was
shipped, however, should for any reason problems or damage have occurred during
shipping, please contact your Pro-face representative immediately for service.
Package Contents
Features
Hardware Specifications
1
Capacity
Average Seek Time
At Startup : 4.5W ( TYP)
Read/ W r ite : 1.6/1.6W (TYP)
Dur ing Wait : 0.2W (TYP)
Interface
Oper a tion Lifetim e
Weight
20GB
Appr ox. 200g
Power Consumpt ion
12msec (TY P)
ATA
5 y ears, or 20, 000 operating hour s,
whi chever comes first
Attachment Screws (4)
Installation
Guide
Page 3
E-3
• The environment specifications given here are for a PSA-HD20
installed in a PS-A unit.
• Pro-face does not guarantee the preservation of any data stored on
the PSA-HD20 if the HDD unit has an accident, malfunctions or is
damaged in any way. Therefore, the regular backing up of important
HDD data to either a floppy disk, or other type of suitable magnetic
media is strongly recommended.
• The PSA-HD20 has a finite usage lifetime. The lifetime figure given in
this document is for reference, and the periodic replacement of the
current HDD unit with a new HDD unit is strongly advised.
• Using the PSA-HD20 in an environment that is excessively hot and/or
humid will shorten the disk’s usage lifetime. A wet bulb temperature of
29
o
C or less is recommended. This is equivalent to the following data.
• In order to extend the lifetime of the hard disk, Pro-face recommends
you set the Windows [Control panel]-[Power Management option][Turn off hard disks] selection to turn the hard disk off when the unit is
not being operated. A setting of 5 minutes is recommended.
Environment
Temperature Humidity
at 35
o
C
no higher than 64%
at 40
o
C
no higher than 44%
PS-3700A
+5
o
C t o +50oC
PS-3701A
+5
o
C t o +45oC
-10
o
C t o +60oC
10%RH to 85%RH
(no condensation)
(Wet bulb temperature: 29
o
C or less)
Noise Voltage: 1500Vp-p
Pulse Wi dth: 50ns, 500ns, 1
µ
s
4kV
4.9m/s
2
(10Hz to 25Hz) (When Operating)
3920m/s
2
(1ms , Half-sine shock pulse)(When Op er atin g)
Electrostatic Dis cha r ge Immunity
Vibration Resistance
Shock Resistance
Oper a ting Tem pe ratur e
Storage Te m peratur e
Am bient Humidity
Noi se R e sistance
(via Noise Simulator)
Page 4
E-4
Since the HDD unit is a precision instrument that has a low resistance to
shocks, be sure it is neither hit by nor pressed strongly against another
object when installing it.
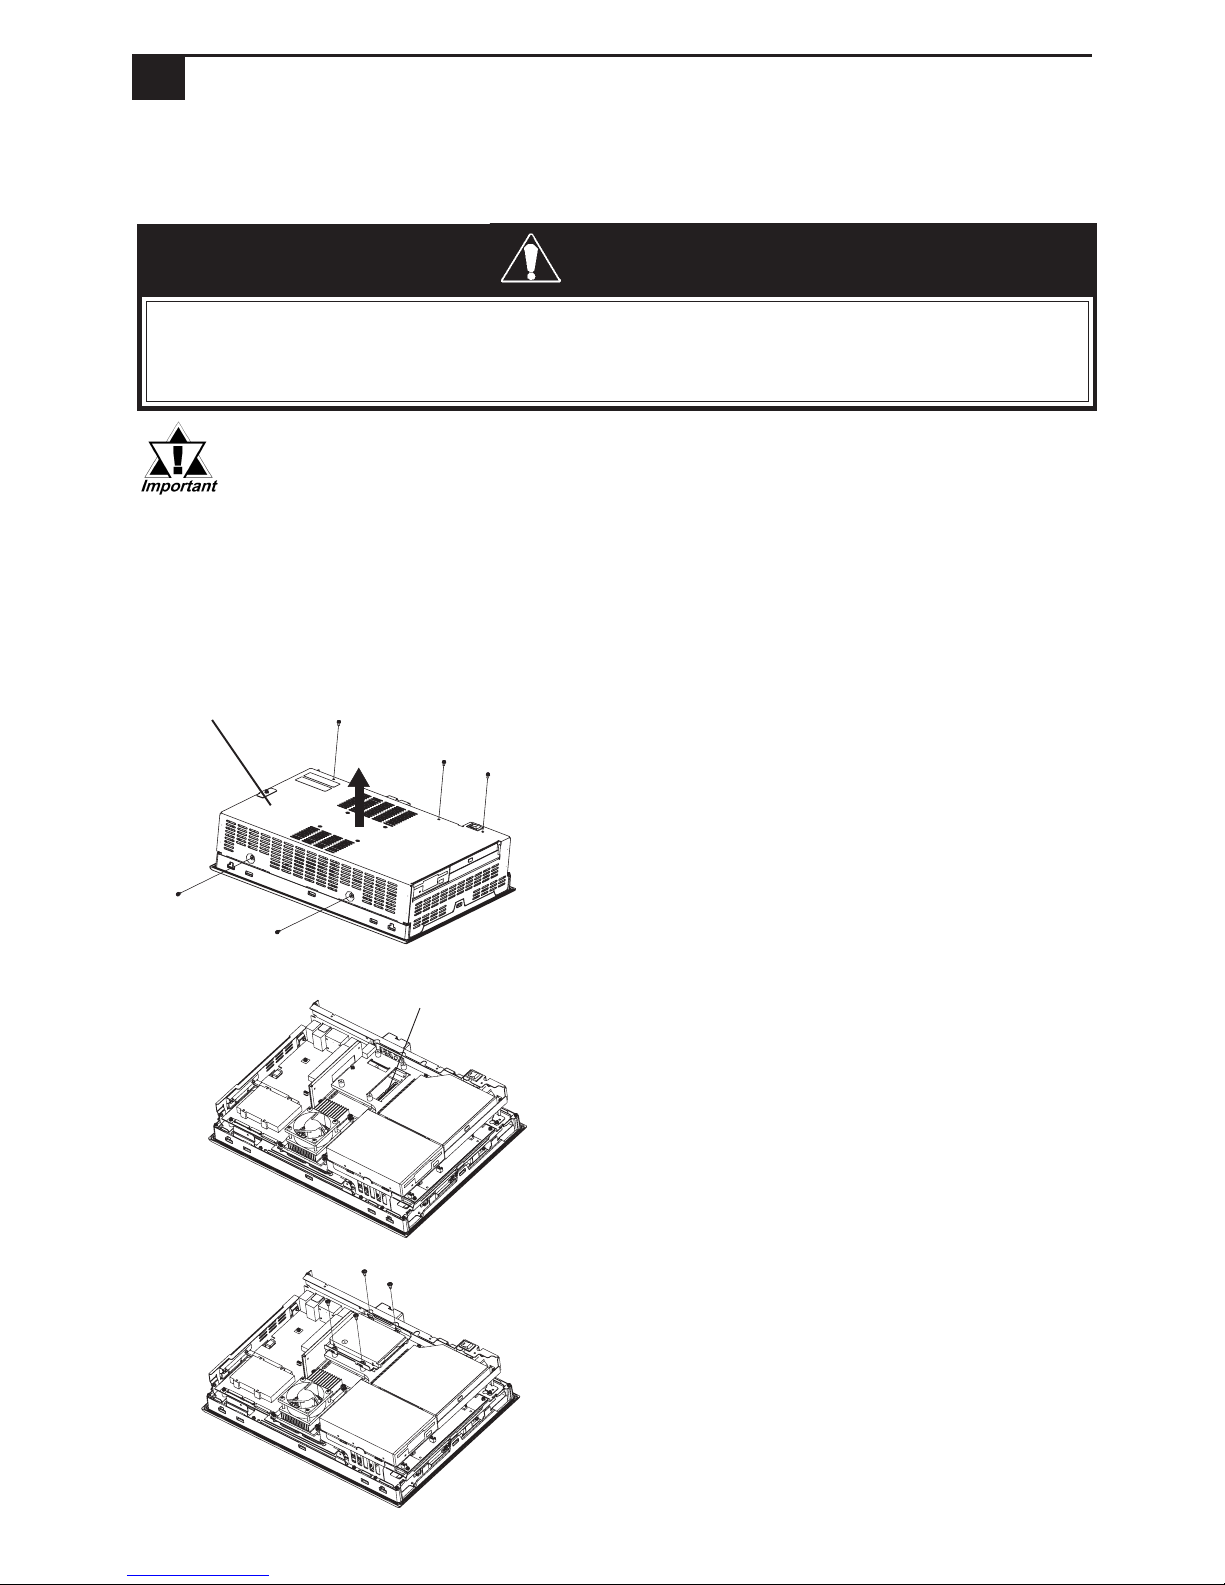
Rear Cover
1) Place the PS-A unit face down and
unscrew five (5) attachment srews.
(See diagram)
2)Lift the Rear Cover off of the PSA unit.
3) Insert the PSA-HD20 cable
connector completely into the IDE
I/F.
4)Attach the PSA-HD20 using four
(4) attachment screws. (See
diagram) The torque should be 0.5
to 0.6 N•m.
5) Replace the PS-A unit's Rear Cover
and reattach five (5) attachment
screws. The torque should be 0.5 to
0.6 N•m.
Installation
2
Be sure to use the following installation procedures to insure that the PSA-HD20 is
correctly installed. Installation location will differ depending on the type of PS-A unit
you are using.
WARNINGS
Shock Danger! Be sure to unplug the PS-A unit from its power
supply prior to installing the PSA-HD20.
WARNING
IDE I/F
When using PS-3700A(Pentium® 4 - 1.7GHz Model)/PS-3700A(Eden
TM
ESP6000 - 667MHz Model)
The following procedure uses a PS-3700A(Pentium® 4 - 1.7GHz Model) unit as an
example.
Page 5
E-5
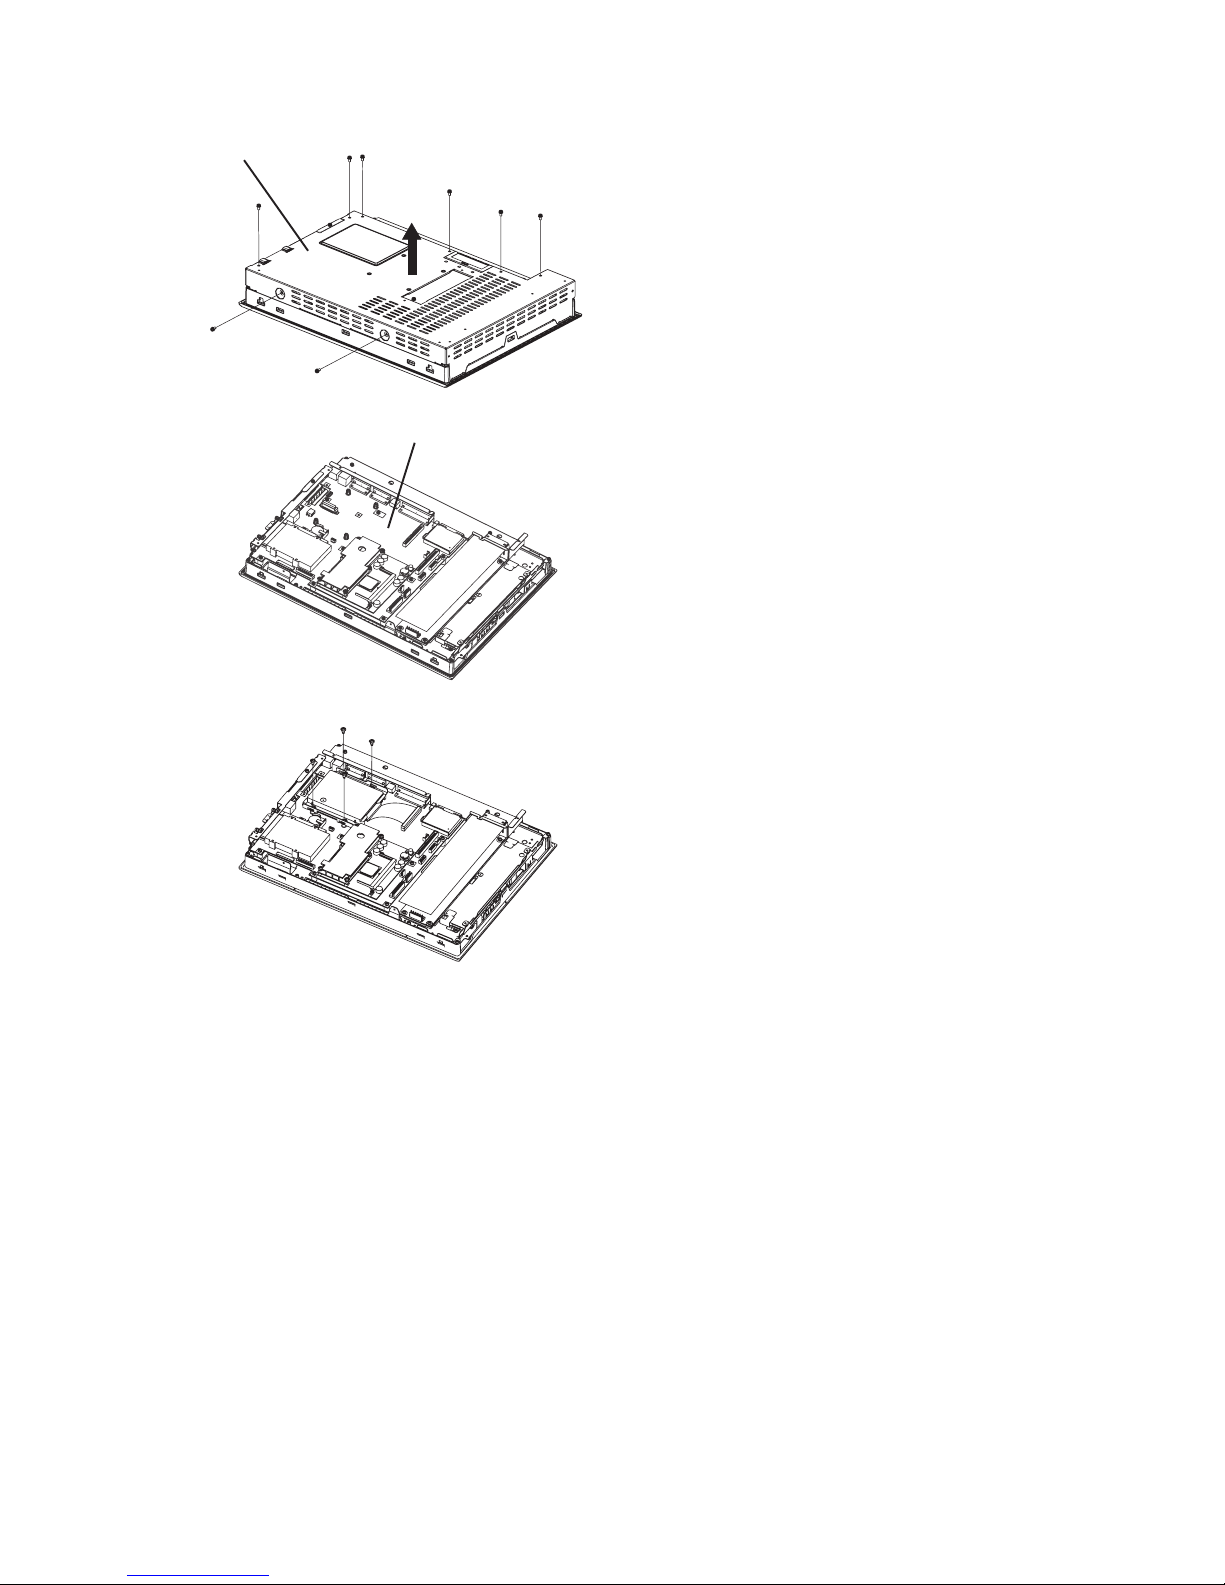
1) Place the PS-A unit face down and
unscrew eight (8) attachment
screws. (See diagram)
2) Lift the Rear Cover off of the PSA unit.
3) Insert the PSA-HD20 cable
connector completely into IDE I/F.
4) Attach the PSA-HD20 using the
four (4) attachment screws. (See
diagram) The torque should be 0.5
to 0.6 N•m.
5) Replace the PS-A unit's Rear Cover
and reattach eight (8) attachment
screws. The torque should be 0.5 to
0.6 N•m.
IDE I/F
Rear Cover
When using PS-3701A(EdenTM ESP6000 - 667MHz Model)
Page 6
E-6
4 Hardware Setup
All the following explanation screens use the PS-A unit's factory settings (default
settings).
• Normally, the factory default settings should be used.
• Certain BIOS screen items may differ from those shown here due
to new versions or the PS-A unit you are using.
1) Connect a keyboard to the PS-A unit.
2) Turn the PS-A unit’s power ON.
3) When the start-up screen appears, press your PC’s [DEL] key.
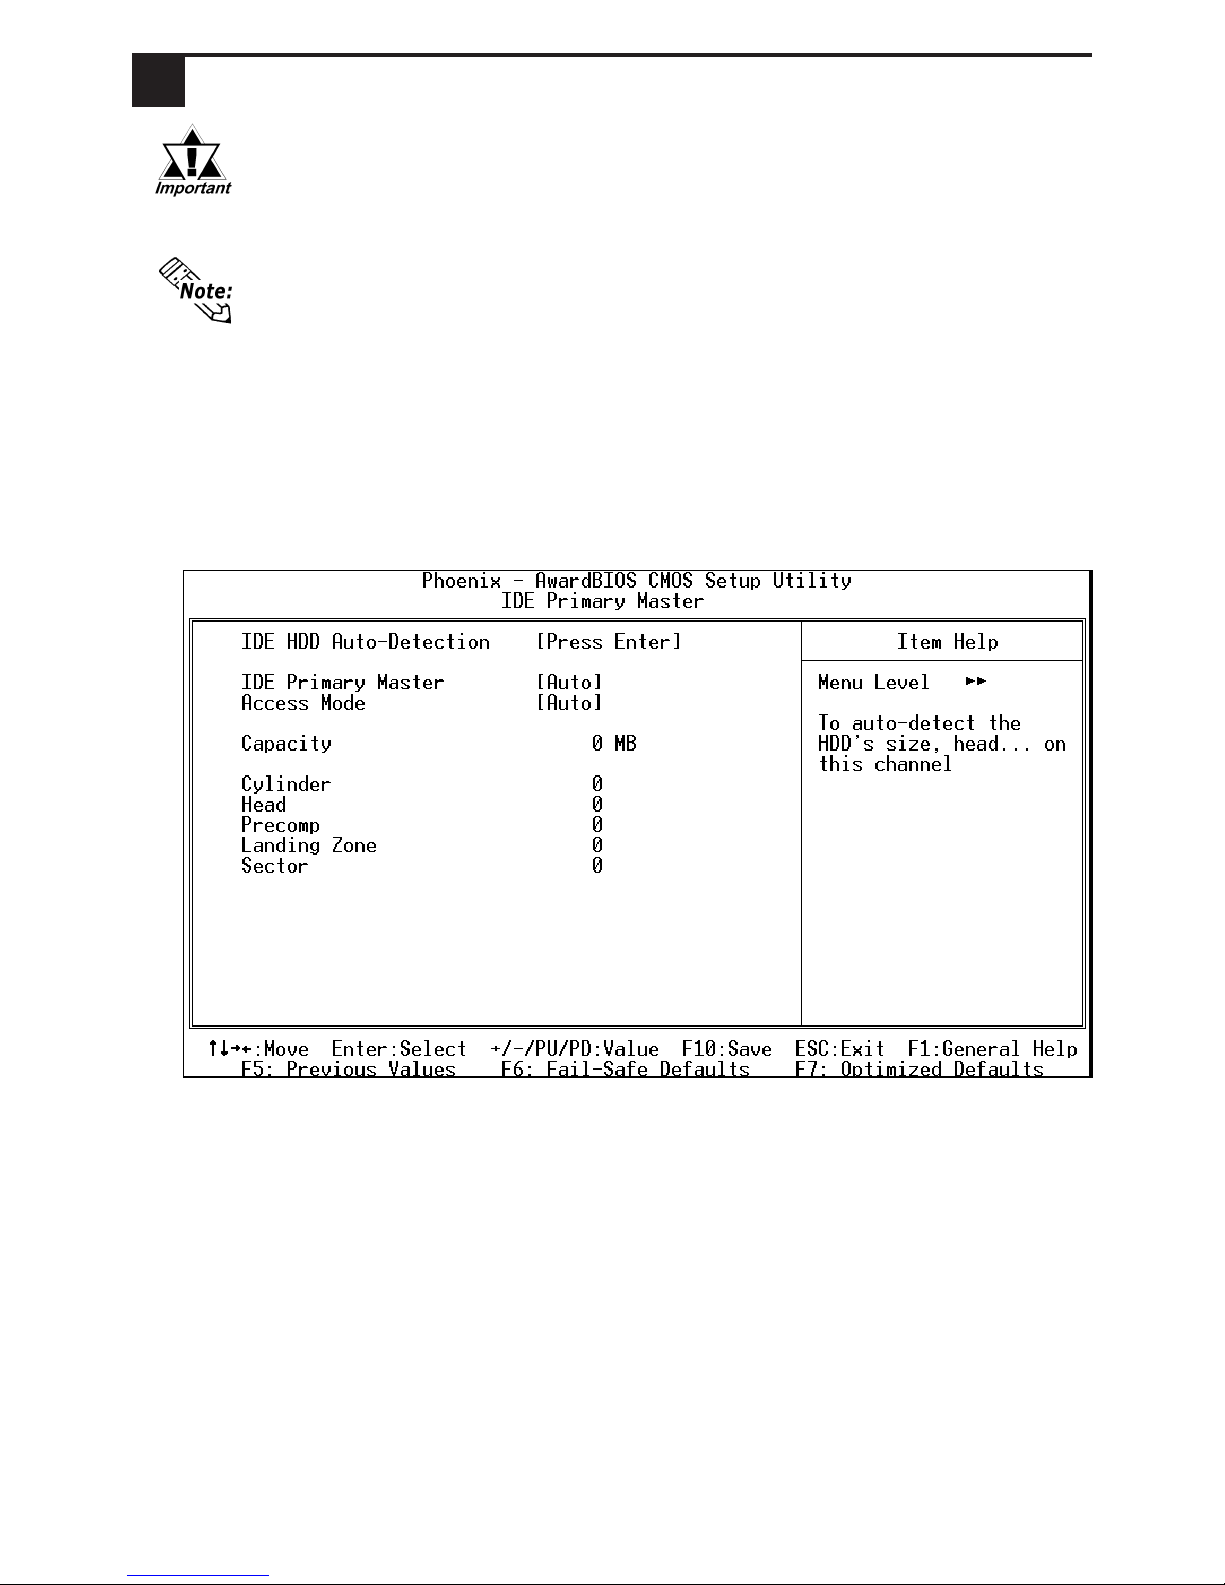
The Setup utility will start. Select [Standard CMOS Features], then, [IDE Primary Master] or [IDE Primary Slave] depending on the settings of the jumper
plug to Master/Slave. The following screen will appear. (When selecting [IDE
Primary Master].)
3
4) Confirm whether "AUTO" is selected for IDE Primary Master/IDE Primary
Slave. Also, confirm whether "AUTO" is selected for [Access Mode]. If AUTO
is not selected, change these settings to AUTO. If AUTO is selected in both,
disk parameters will be automatically read when the PS-A is turned ON. The
factory setting is AUTO and recommended for most users.
5) After all changes are made, press the [ESC] key and select [Save & Exit Setup]
to save the settings.
Page 7

E-7
Software Setup
4
After completing the hardware setup, in order to save data and application(s) to the
HDD, use your OS (MS-DOS
®
or Windows®) to create partitions and format (initialize) the unit. Please consult your OS’s operation manual for details about these procedures.
Page 8

E-8
© 2003 Digital Electronics Corporation All rights reserved.
Note
Please be aware that Digital Electronics Corporation shall not be held
liable by the user for any damages, losses, or third party claims arising
from the uses of this product.
Digital Electronics Corporation
8-2-52 Nanko Higashi, Suminoe-ku, Osaka 559-0031, Japan
URL: http://www.pro-face.com/
 Loading...