

Page 1

Blender Safety ............................2
Parts and Features ......................4
Operation ......................................5
Caring for the Blender ................8
Product Warranty ......................11
Requesting Assistance
or Service ..................................11
840065000
www.commercial.hamiltonbeach.com
Modèle 994
Mélangeur
Mode d’emploi
Page 12
Model 994
Blender
Operation Manual
Page 2
La sécurité du mélangeur ........12
Composants et
caractéristiques ........................14
Utilisation....................................15
Entretien du mélangeur ............19
Garantie du produit ..................23
Demande d’assistance ou
de service ..................................23
840065000-1ENv01 9/27/04 11:26 AM Page 1
Page 2
Blender Safety
You will be killed or seriously injured if
you don’t follow instructions.
You can be killed or seriously injured if
you don’t follow instructions.
Your safety and the safety of others is very important.
We have provided many important safety messages in this manual and on your appliance.
Always read and obey all safety messages.
This is the safety alert symbol.
This symbol alerts you to hazards that can kill or hurt you and others.
All safety messages will be preceded by the safety alert symbol and the word
“DANGER” or “WARNING.” These words mean:
All safety messages will identify the hazard, tell you how to reduce the chance of injury, and
wDANGER
wWARNING
2
IMPORTANT: This operation manual should be reviewed with all equipment operators as
part of your operator training program.
840065000-1ENv01 9/27/04 11:26 AM Page 2
Page 3
IMPORTANT SAFETY INSTRUCTIONS
WARNING – When using electrical appliances basic safety precautions should be
followed, including the following:
• Read the Operation Manual before using
blender.
• Plug into a grounded 3 prong outlet.
• Do not remove ground prong.
• Do not use an adapter.
• Do not use an extension cord.
• To reduce risk of personal injury, unplug
cord from outlet when not in use, and
before putting on or taking off parts.
• Do not store any kitchen utensils in the
container since the blender would be
damaged if inadvertently turned On.
• To prevent possibility of serious personal
injury, keep hands out of blender jar while
operating blender.
• Inspect jar and cutter assembly daily.
Check cutter assembly for wear, nicks,
and loose or broken blades. Replace
jar and cutter assembly at least every
12 months.
• Always operate blender with jar, cover,
and dosing cup in place.
• When moving or repositioning the blender
base, always use the carrying handle. Do
not move or reposition base while unit is on.
3
– SAVE THESE INSTRUCTIONS –
• To reduce risk of personal injury and to
prevent damage to blender or jar and
cutter assembly, DO NOT insert utensils or
any metal objects into blender jar while
operating blender.
• To prevent damage to blender, jar, or cutter
assembly, DO NOT move or shake blender
while in operation. If blending action stops
during operation, turn blender OFF, remove
jar from base, remove jar cover, and use a
thin rubber spatula to push mixture
toward cutters.
• Do not submerge or wash the blender base
in a dishwasher.
• Do not spray the blender base with a
high-pressure spray gun.
• Disconnect power before cleaning.
• Disconnect power before servicing.
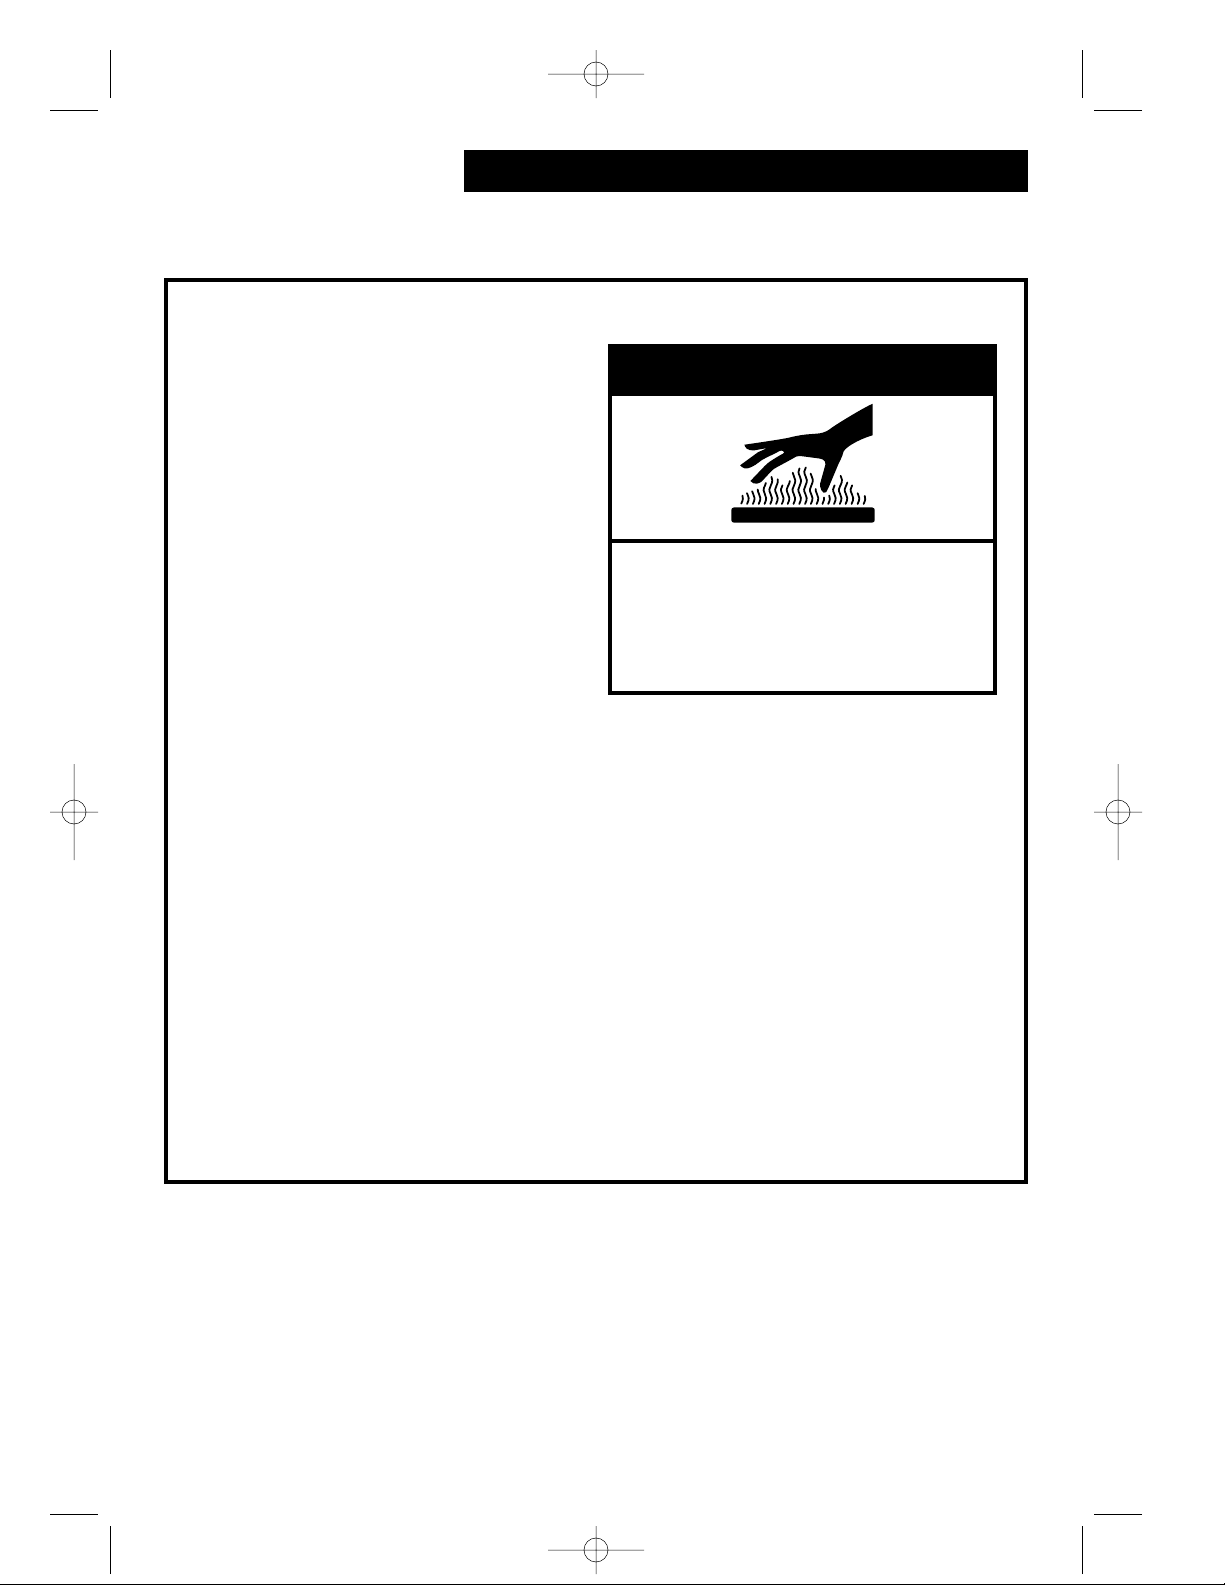
• To prevent burns from hot liquids splashing
out of the jar, always place cover and dosing cup onto jar when blending. Never
exceed 12 cups of content when blending
hot contents.
• Only authorized specialists should repair
the blender or open the blender housing.
• Do not use outdoors.
Blender Safety
840065000-1ENv01 9/27/04 11:26 AM Page 3
Page 4
4
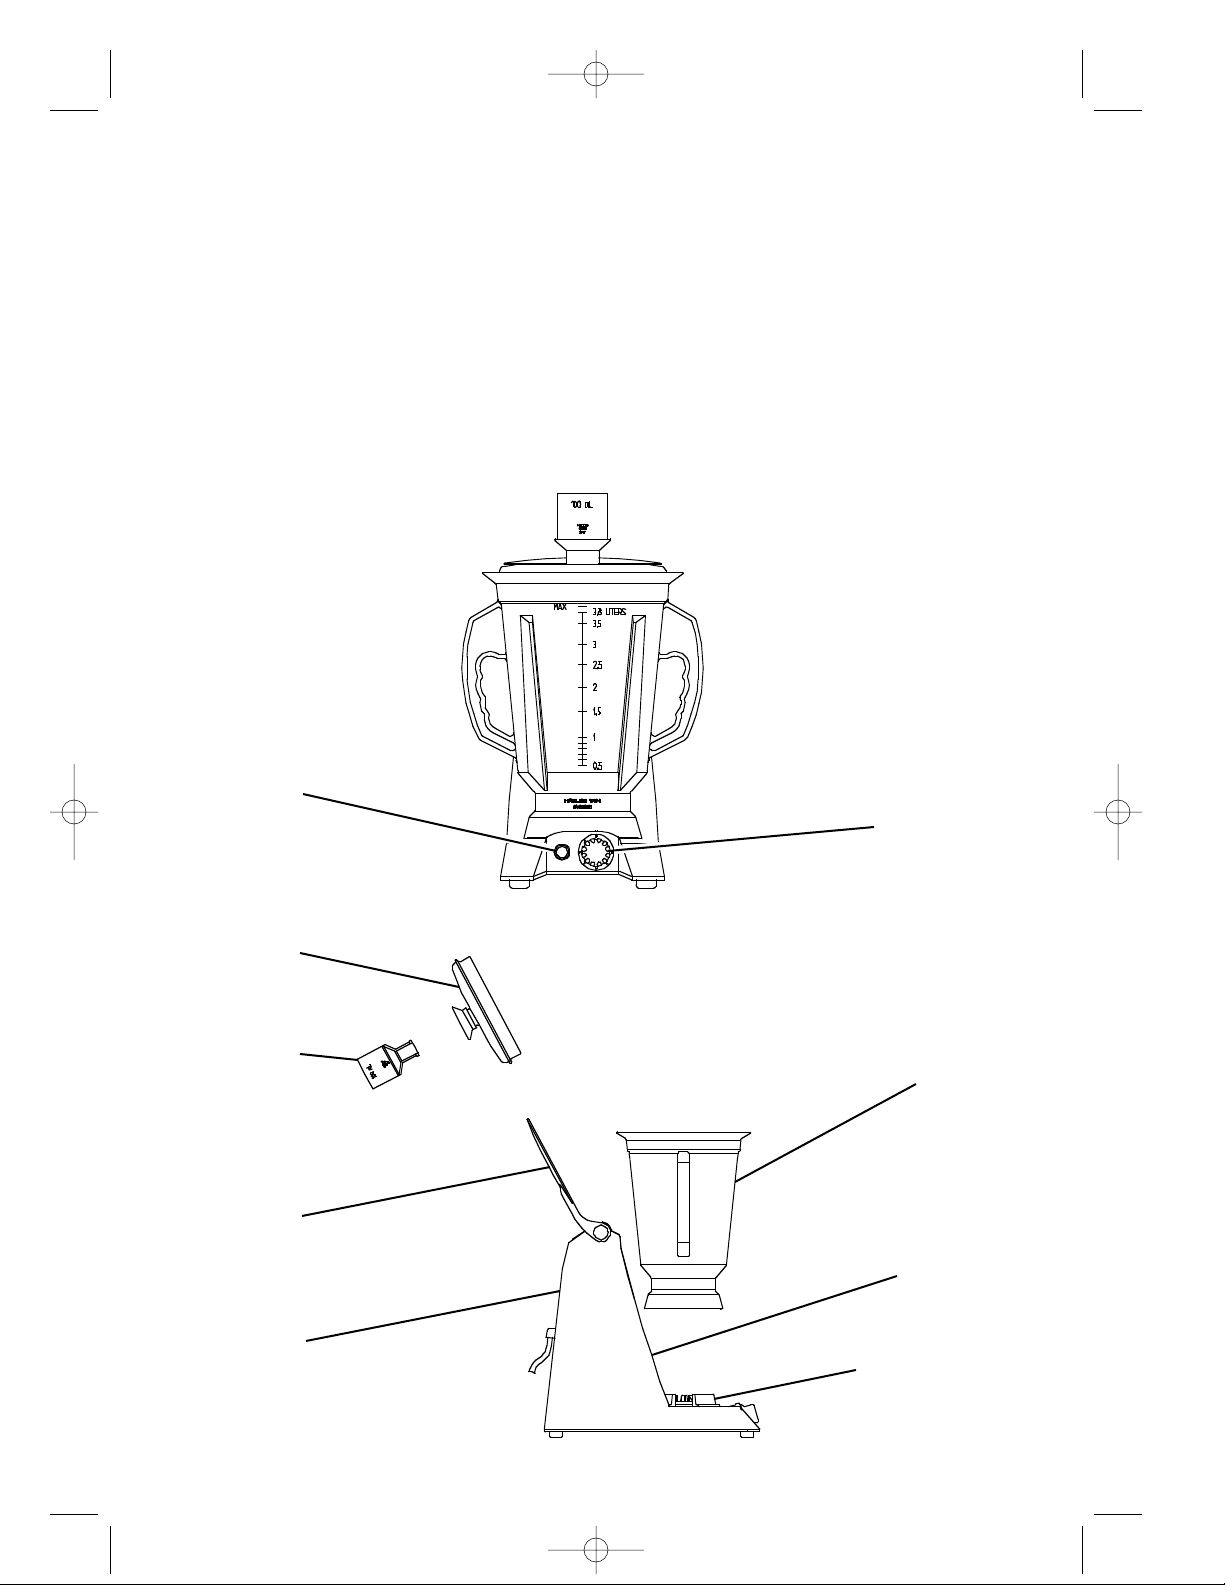
Parts and Features
The parts and features for the 994 Blender are shown on this page. Become familiar with all
parts and features before using your blender. Page references are included next to some features. Refer to those pages for more information about the feature.
Your Model 994 blender is designed for blending, mixing, whipping, and chopping mixtures that
are rich in liquids, such as sauces, soups, thickening, pastry mixtures, salad dressings, herb
oils, aromatic butter, mayonnaise, desserts, etc. The blender will puree foods rich in liquid such
as canned and cooked vegetables, fruits, and combination foods. The blender will process up to
one gallon of product.
Cover
(p.5)
Dosing cup,
3.5 oz.
(p. 5, 7)
Surge
button
(p. 6)
Speed
control
(p. 6)
Cover
holder
(p. 5)
Blender
base
Carrying
handle
(p. 3)
1 Gallon
Polysulfone
jar
Jar
supports
840065000-1ENv01 9/27/04 11:26 AM Page 4
Page 5
5
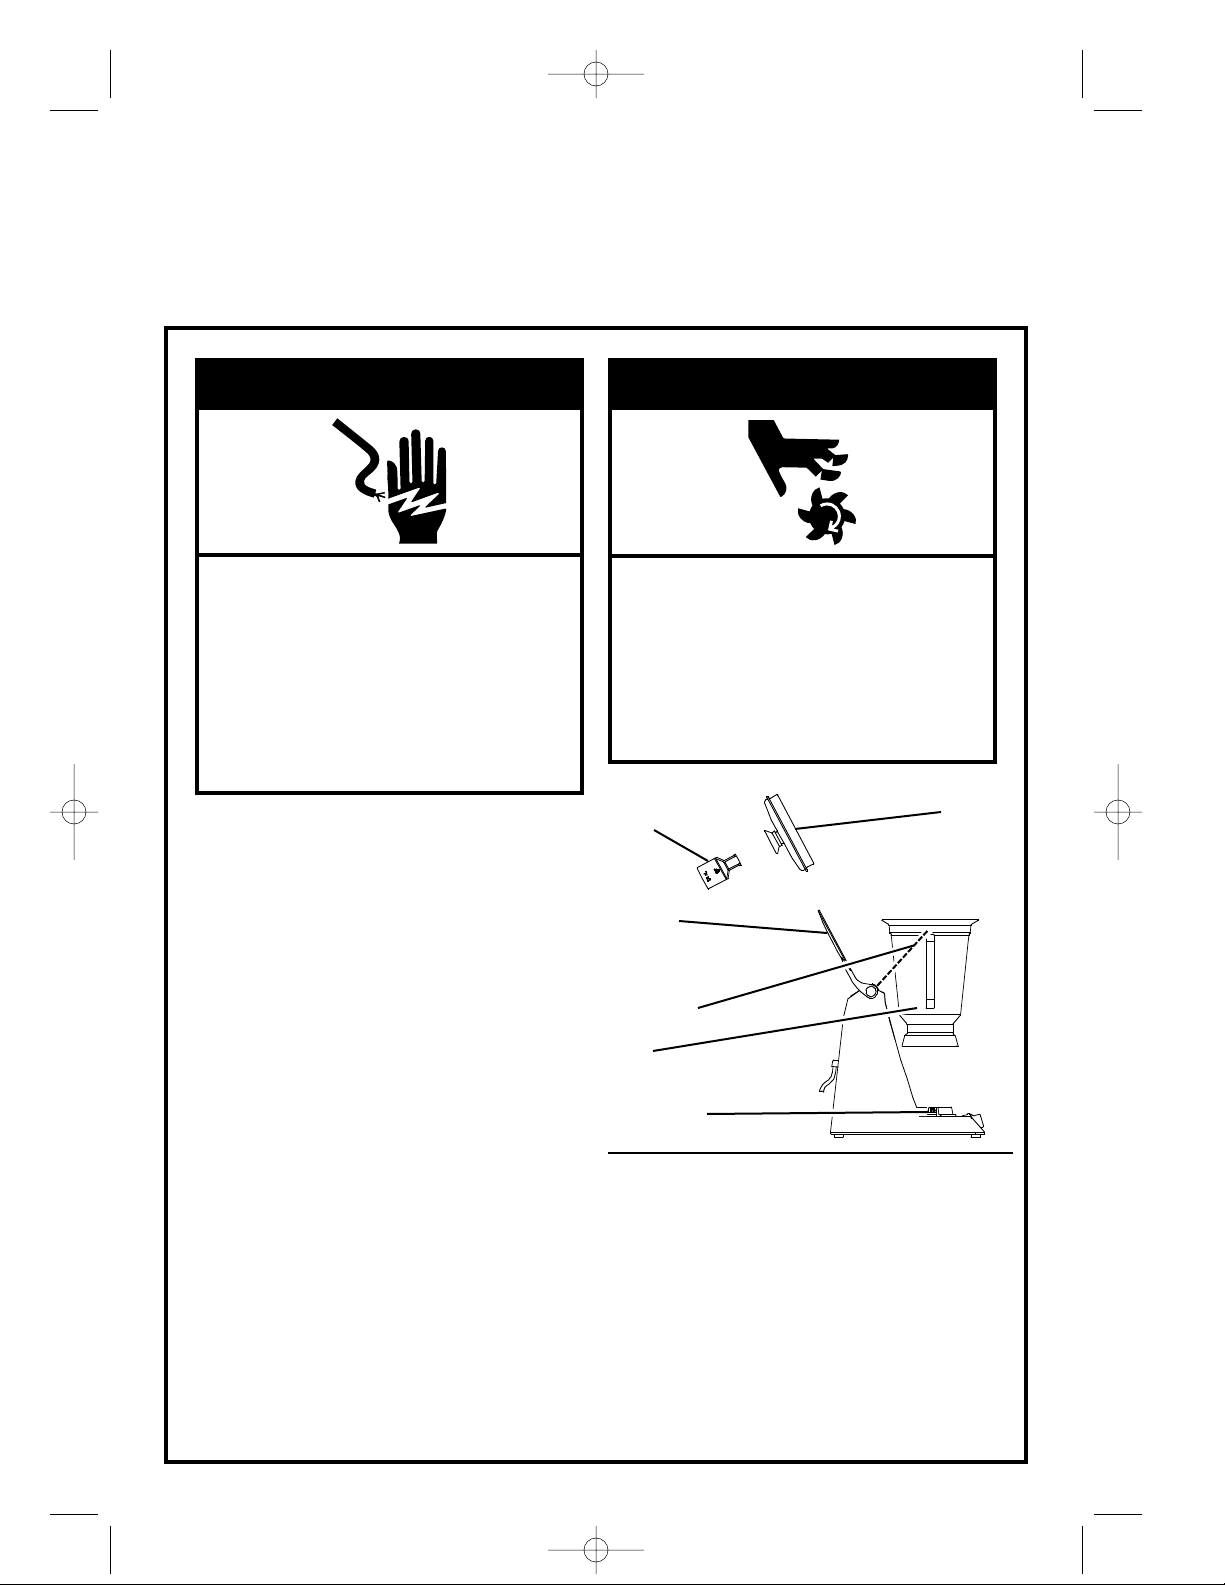
Operation
Setup
To prepare the blender before blending,
complete the following steps:
1. Make sure the blender is unplugged and
the Speed control is set to “0”.
2. Remove the jar from the base and
inspect the jar and cutter assembly
for wear, nicks, and loose or broken
blades. Replace if necessary. See
“Replacement Parts.”
3. Raise the cover holder until it snaps into
the raised position, and then slide the
cover into the cover holder so the cover
rests in the cover holder.
4. Place the jar onto the blender base so it
rests firmly on the four jar supports.
5. Lower the cover onto the jar.
6. Insert the dosing cup into the cover opening
and turn it clockwise as far as it will go.
Blender Checks
To check the blender’s safety features,
complete the following steps:
1. Plug blender into a grounded receptacle.
2. Set the Speed control to the maximum
speed position. With the blender running,
raise the cover/cover holder and confirm
wWARNING
Electrical Shock Hazard
Plug into a grounded 3 prong outlet.
Do not remove ground prong.
Do not use an adapter.
Do not use an extension cord.
Failure to follow these instructions
can result in death, fire, or
electrical shock.
Setup and Operation Checks
wWARNING
Cut Hazard
Always lower cover onto jar before
operating blender.
Do not put spoon or other utensils
in jar when blending.
Failure to follow these instructions
can result in broken bones or cuts.
that when the cover is raised approximately 11⁄4″ (30mm), the blender cutter stops
rotating within 4 seconds.
3. Remove the jar and lower the cover
holder to the first raised position. Set the
Speed control to “2” and verify that the
blender has not started.
NOTE: If the blender does not perform
correctly in either of the two previous steps,
do not operate the blender and refer to
“Requesting Assistance or Service.”
4. Unplug the blender.
Cover
holder
Cover
Dosing
cup
Jar
supports
Jar
First
raised
position
840065000-1ENv01 9/27/04 11:26 AM Page 5
Page 6

6
Operation
Operating the Blender
wWARNING
Electrical Shock Hazard
Plug into a grounded 3 prong outlet.
Do not remove ground prong.
Do not use an adapter.
Do not use an extension cord.
Failure to follow these instructions
can result in death, fire, or
electrical shock.
wWARNING
Cut Hazard
Always lower cover onto jar before
operating blender.
Do not put spoon or other utensils
in jar when blending.
Failure to follow these instructions
can result in broken bones or cuts.
NOTE: Before you use the blender for the
first time, wash the jar, cover, and dosing
cup. Refer to “Caring for the Blender.”
To operate the blender, proceed as follows:
1. Place the blender on a clean, dry, level
surface, and set the Speed control to “0”
(Off position).
2. Place the ingredients to be blended into
the jar.
3. Place the jar onto the base. Make sure it
rests securely on the four jar supports.
4. Lower the cover onto the jar.
5. Set the Speed control to the desired
position. The “1” position is the lowest
speed and the “6” position is the highest
speed.
NOTE: If you want the blender to run at the
highest speed for short bursts, press the
Surge button. Release the Surge button to
return to the set speed.
6. When the blending is complete, set the
Speed control to “0.” The Surge button
will not function when the Speed control
is set at “0.”
7. Remove the food from the jar.
8. Clean the jar, cover, and dosing cup as
directed in “Caring for the Blender.”
Speed
control
Surge
button
Cover
Dosing
cup
840065000-1ENv01 9/27/04 11:26 AM Page 6
Page 7
7
Operation
Special Blending Instructions
Filling the jar
When filling the jar with ingredients, follow
these recommendations:
• Use sufficient amount of liquid to ensure
that the mixture is fluid and free-running
at all times. Pour the liquid into the
jar first.
• Cut solid ingredients into pieces that are
no larger than a 1″ cube.
• Add the ingredients to jar in batches. Do
not blend maximum volume all at once.
• Do not overfill the jar with product. This
may prevent the blender from processing
the product properly. Never fill the jar
higher than the top graduation marking,
and remember that the volume of the
product normally increases during
processing.
• Do not exceed 12 cups of content when
blending hot product.
• Always place the cover and dosing cup on
the jar when blending.
Using the dosing cup
Use the dosing cup to add liquids to the
jar while the unit is running. To remove
the dosing cup from the cover, turn the
cap counterclockwise and pull up.
When making mayonnaise, add the oil last
and add it slowly using the dosing cup.
Blending hot mixtures
IMPORTANT: To minimize the possibility of
scalding, the following precautions MUST
be observed:
• Do not exceed 12 cups of content when
blending hot product. Remember that the
volume of the product normally increases
during processing.
• Always place the cover and dosing cup
on the jar when blending.
• Never stand with your face directly over
the jar when operating the blender where
steam may be released.
Speed selection
Select a speed that produces a column of
air in the center of the jar.
When pureeing, start blender on lowest
speed setting and increase speed gradually
as product is blended.
wWARNING
Burn Hazard
Always use caution when blending
hot contents.
Failure to follow these instructions
can result in burns.
840065000-1ENv01 9/27/04 11:26 AM Page 7
Page 8

8
Caring for the Blender
Cleaning Instructions
WARNING:
Turn blender off and unplug power
cord before cleaning.
General cleaning
The machine housing contains electrical
components. Do not wash it in a dishwasher or immerse it in water. Do not use high
pressure water spray to clean any part of
the machine.
1. Do not allow food residue to dry on the
machine. Wash and rinse jar after use.
2. Use a non-sudsing detergent for
washing. Use hot (less than 115°F/46°C)
water mixed with the amount of detergent
recommended by the detergent manufacturer.
3. For rinsing, use warm (95°F/35°C) water.
4. For sanitizing, chlorine based sanitizing
solutions with a chlorine concentration
between 100-200 PPM are recommended.
The following solution may be used:
1 gallon (3.785 liters) of cold water
(50-70°F/10-21°C) mixed with 1 teaspoon
(4.93 ml) of institutional bleach (8.4%
sodium hypochlorite content).
To wash and rinse jar
1. Remove the container from the machine
and remove the cover and dosing cup.
Rinse the jar interior, cover, and dosing
cup under running water.
2. Add the washing solution to the jar and
scrub with a nonabrasive pad or cloth
and flush out the interior, cover, and
dosing cup to dislodge and remove
as much food residue as possible.
Empty jar.
WARNING:
Cutter blades are sharp; to reduce
the risk of personal injury, use
caution when handling.
3. Wipe down jar exterior with a soft cloth or
sponge dampened with washing solution.
Wash the cover and dosing cup with fresh
washing solution. Fill the jar 1⁄4 full with
fresh washing solution, place on machine
base, replace cover and dosing cup, and
run on speed “5” for two minutes.
Empty jar.
4. Repeat step 3 using clean rinse water in
place of washing solution.
NOTE:
Abrasive pads or cloths will
scratch the container jar and lid.
840065000-1ENv01 9/27/04 11:26 AM Page 8
Page 9

9
Caring for the Blender
To remove, clean, and replace the
cutter assembly
WARNING:
Do not disassemble the
cutter assembly.
1. Position the tool (supplied) over the cut-
ter assembly inside the jar. The tabs on
both ends of the tool fit inside the vanes
on the jar. Push tool as far down as it will
go. If the cutter assembly can still rotate
when turning the coupling, turn the
coupling slightly until the tool seats on
the cutter assembly and it can no longer
move.
2. While holding the tool with one hand, turn
the coupling counterclockwise with the
other hand to loosen the coupling.
Remove coupling.
3. Using a wrench, turn the locking nut
counterclockwise to loosen and remove
the nut.
4. Carefully remove the cutter assembly and
O-ring from inside the jar.
WARNING:
Cutter blades are sharp; to reduce
the risk of personal injury, use
caution when handling.
5. Carefully clean the cutter assembly and
O-ring using hot soapy water. Rinse and
dry.
6. Reassemble the cutter assembly in
reverse order. Make sure the notch on
the cutter assembly aligns with the tab
in the jar bottom.
To sanitize and dry the jar
1. Fill the jar with 1⁄2 gallon (1.9 liters)
sanitizing solution and place on machine
base. Replace cover and dosing cup, and
run on speed “5” for five seconds. Empty
jar. Remove any remaining
moisture from the cutter assembly by
replacing the empty jar and cover on
machine base and running on speed “5”
for five seconds.
2. Wipe down the jar exterior with a soft
cloth or sponge dampened with sanitizing
solution.
3. Sanitize cover and dosing cup by
immersing in sanitizing solution for
two minutes.
4. Do not rinse jar, cover, or dosing cup
after sanitizing, but allow to air dry.
To clean machine housing
1. Do not immerse or use high pressure hos-
ing equipment to clean the machine base.
2. Wipe the exterior of the machine with a
damp cloth or sponge.
Align notch
with tab
Tool
Knife
assembly
Container
Locking nut
Coupling
O-ring
840065000-1ENv01 9/27/04 11:26 AM Page 9
Page 10

10
Troubleshooting Guide
Replacement Parts
Caring for the Blender
Problem . . . Solution . . .
Blender fails to start
or stops while it is
running and cannot
be restarted
• Check to see if unit is securely plugged into an electric outlet.
• Check to see if the fuse for the electric outlet has blown or if a
circuit breaker has tripped.
• Check to see if jar is securely seated on the base.
• Check to see if cover is completely lowered onto jar.
• Unplug unit and check to see if blades are obstructed by anything
and if so, remove obstruction and allow unit to cool.
• Reset speed control at “0” and try again.
Maintenance
Unplug the blender and remove the jar from the base, and then inspect the jar and
cutter assembly for wear, nicks, and loose or broken blades. Replace if necessary.
See “Replacement Parts” below. Ensure that the cutter assembly is tightened properly.
Unplug the blender, and then inspect the power cord insulation and power plug for
cracks. Refer to “Requesting Assistance or Service” for repair or replacement.
Perform “Blender Checks” on page 5 to check the safety features of the blender.
Replace the jar and cutter assembly at least once a year. See “Replacement Parts”
1 gallon Polysulfone jar with cutter assembly
1 gallon Polysulfone jar without cutter assembly
Cutter assembly without jar
Cover
Dosing cup
Jar supports
Description
Part Number
6126-994
823143
823252
823140
823167
823144
Inspect the blender and its various parts and replace as follows:
Daily
Weekly
Yearly
Ingredients will not mix
properly
• Check to see if enough liquid has been added to the ingredients.
Mixture should be fluid and free-running at all times.
• Solid pieces are too large. Pieces should not exceed 1″ cubes.
• Jar is too full. Do not fill past highest graduation marking.
• Cutter blades are not sharp or are damaged. Inspect jar and cutter
assembly daily. Replace jar and cutter assembly at least every
12 months or when damaged.
• Check to see if cutter assembly is tightened properly.
• Adjust Speed control to create a fluid blend.
Refer to “Requesting Assistance or Service” to order parts below.
840065000-1ENv01 9/27/04 11:26 AM Page 10
Page 11

11
This equipment is warranted against defects in materials or workmanship for two years
from date of purchase.
During the warranty period this product will be repaired or replaced, at Hamilton Beach’s
option, at no cost to you.
In the event of a warranted product defect, please deliver or mail the product to the
nearest authorized service center, which you can locate by calling our toll-free customer
service number at 1-800-572-3331 or by looking in your local yellow pages for your
nearest authorized Hamilton Beach Commercial Service Center.
This Warranty does not apply in cases of abuse, mishandling, or unauthorized repair.
Always use in the manner provided in this Operation Manual. This Warranty does not apply
to items subject to wear (motor brushes, jar and cutter assembly, clutches, etc.).
Hamilton Beach/Proctor-Silex disclaims any and all implied warranties, including warranties
of merchantability and fitness for a particular purpose. The company’s liability hereunder is
expressly limited to the repair or replacement of a defective product or an amount equal to
the purchase price paid therefor, and all claims for special and consequential damages are
hereby excluded.
Product Warranty
Hamilton Beach/Proctor-Silex, Inc.
Commercial Customer Service
263 Yadkin Road
Southern Pines, NC 28387
This Warranty supercedes all other Product Warranties
Call our toll-free customer service number
1-800-572-3331
www.commercial.hamiltonbeach.com
8 a.m. – 5:30 p.m. EST Monday – Thursday, 8 a.m. – 5:15 p.m. EST Friday
Requesting Assistance or Service
Before calling for assistance or service,
please check the “Troubleshooting Guide”
on page 10. If you still need help, follow
the instructions below.
Whenever you call to request assistance
or service, you need to know the complete
model number. You can find this information on the label on the bottom of your
blender.
Please also record the purchase date of
your equipment and your dealer’s name,
address, and telephone number.
Model Number ____________________
Purchase Date ____________________
Dealer Name ______________________
Dealer Address ____________________
Dealer Phone ______________________
You can also order replacement parts by
calling your nearest Hamilton Beach
Commercial Service Center or your local
dealer.
4/00
840065000-1ENv01 9/27/04 11:26 AM Page 11
Page 12

12
La sécurité du mélangeur
Risque certain
de décès ou de
blessures graves si vous ne suivez
pas les instructions.
Risque possible de décès ou de
blessures graves si vous ne suivez
pas les instructions.
Votre sécurité et celle des autres, c’est très important.
Nous présentons de nombreux messages de sécurité importants dans ce manuel et
sur votre appareil ménager. Veillez à toujours lire tous les messages de sécurité et à
vous y conformer.
Voici le symbole d’alerte de sécurité.
Ce symbole d’alerte de sécurité vous signale les dangers susceptibles de
causer le décès ou des blessures graves à vous et à d’autres.
Tous les messages de sécurité sont précédés du symbole d’alerte de sécurité
et du mot «DANGER» ou «AVERTISSEMENT». Ces mots signifient :
Chaque message de sécurité identifie le danger et indique comment réduire le risque de
wDANGER
wAVERTISSEMENT
IMPORTANT : Ce manuel d’utilisation doit être examiné en présence de tous les opérateurs de l’équipement, dans le cadre de votre programme de formation des opérateurs.
840065000-1FRv01 9/27/04 11:28 AM Page 12
Page 13

13
• Lire toutes les instructions avant
d’utiliser le mélangeur.
• Brancher l’appareil sur une prise de
courant électrique à 3 alvéoles reliée
à la terre.
• Ne pas enlever la broche de liaison
à la terre de la fiche de branchement.
• Ne pas utiliser un adaptateur.
• Ne pas utiliser un cordon de rallonge.
• Pour réduire le risque de blessure,
débrancher l’appareil de la prise de
courant lorsqu’il n’est pas utilisé, et
avant toute opération d’installation
ou dépose de pièce.
• Ne jamais remiser un ustensile de cuisine dans le récipient du mélangeur;
celui-ci pourrait subir des dommages
lors d’une mise en marche accidentelle.
• Pour éviter les risques de graves
blessures, ne jamais introduire une
main dans le récipient du mélangeur
lorsqu’il fonctionne.
• Inspecter chaque jour le récipient et le
module des lames. Rechercher indices
d’usure, encoches ou lames brisées ou
mal fixées. Remplacer le récipient et les
lames à intervalles de pas plus de 12
mois environ.
• Veiller à ce que le récipient du
mélangeur soit toujours muni de son
couvercle (avec bouchon-doseur)
lorsqu’il fonctionne.
• Saisir toujours l’appareil par son
anse pour le déplacer. Ne jamais
déplacer l’appareil lorsqu’il est
en fonctionnement.
– CONSERVER CES INSTRUCTIONS –
• Pour réduire le risque de blessures et de
dommages matériels (détérioration du
mélangeur, du récipient ou des lames),
NE JAMAIS insérer un ustensile ou un
objet métallique dans le mélangeur pendant qu’il fonctionne.
• Pour éviter de détériorer le mélangeur, le
récipient ou les lames, NE PAS déplacer
ou secouer le mélangeur lorsqu’il fonctionne. En cas d’interruption inattendue
du fonctionnement de l’appareil, appuyer
sur le bouton de commande d’arrêt, retirer
le récipient de sa base sur l’appareil, ôter
le couvercle et utiliser une spatule de
caoutchouc mince pour dégager le
mélange et lui faciliter l’accès aux lames
• Ne pas submerger l’appareil dans un liquide ou laver la base de l’appareil dans
un lave-vaisselle.
• Ne pas arroser la base de l’appareil avec
un outil d’aspersion à haute pression.
• Débrancher l’appareil avant toute opération
de nettoyage.
• Débrancher l’appareil avant toute opération
de réparation.
• Pour éviter des brûlures sous l’effet des
éclaboussures d’un liquide chaud, placer
toujours le couvercle muni de son bouchon-doseur sur le récipient avant l’opération de mixage. Lors du mixage de produits
chauds, ne jamais traiter une quantité
supérieure à 12 tasses.
• Seul un technicien/réparateur agréé est
habilité à ouvrir l’appareil pour y effectuer
des réparations.
• Ne pas utiliser l’appareil à l’extérieur.
La sécurité du mélangeur
IMPORTANTES INSTRUCTIONS
DE SÉCURITÉ
AVERTISSEMENT – On doit observer certaines précautions fondamentales de
sécurité lors de l’utilisation d’un appareil électroménager, dont les suivantes :
840065000-1FRv01 9/27/04 11:28 AM Page 13
Page 14

Composants et caractéristiques
14
Les composants et les caractéristiques du mélangeur modèle 994 sont illustrés à cette page.
Avant d’utiliser le mélangeur, l’utilisateur doit se familiariser avec toutes les pièces et caractéristiques. Des références à certaines pages sont mentionnées près de certains composants;
on trouve aux pages indiquées une description plus détaillée de la pièce ou caractéristique
en question.
Le mélangeur modèle 994 est conçu pour les opérations de mélangeage, mixage, fouettage,
hachage et broyage de mélanges riches en liquide comme sauce, soupe, produit d’épaississement, mélange à pâtisserie, sauce à salade, huile aromatisée, beurre aromatisé, mayonnaise,
dessert, etc. Le mélangeur transforme en une purée les aliments riches en liquide comme les
légumes cuits ou en conserve, fruits, et autres combinaisons d’aliments. Le mélangeur peut
traiter jusqu’à un gallon de matière.
Couvercle
(p.15)
Bouchon-doseur,
3,5 oz
(p.15, 18)
Bouton de
commande
ponctuelle
(p. 17)
Bouton de
sélection
de vitesse
(p. 17)
Porte-couvercle
(p. 15)
Base de
l’appareil
Poignée
(p. 13)
Récipient
de 1 gallon
(polysulfone)
Supports du
récipient
840065000-1FRv01 9/27/04 11:29 AM Page 14
Page 15

15
wAVERTISSEMENT
Risque de choc électrique
Brancher l’appareil sur une prise de courant
électrique à 3 alvéoles, reliée à la terre.
Ne jamais enlever la broche de liaison à la
terre de la fiche de branchement.
Ne pas utiliser un adaptateur.
Ne pas utiliser un cordon de rallonge.
Le non-respect de ces instructions peut
causer un décès, un incendie ou un choc
électrique.
Utilisation
Préparation
Pour préparer le mélangeur avant une utilisation, procéder comme suit :
1. Vérifier que l’appareil est débranché, et
que le bouton de sélection de vitesse est
à la position «0».
2. Séparer le récipient de la base; inspecter
le récipient et le module des lames;
rechercher les indices d’usure,
encoches, lames brisées ou mal fixées,
etc. Remplacer au besoin.
Voir «Pièces de rechange».
3. Soulever le porte-couvercle (on perçoit
un déclic lors du passage à la position
de soulèvement); insérer le couvercle
dans le porte-couvercle.
4. Placer le récipient sur la base de l’ap-
pareil; il doit reposer fermement sur les
quatre supports.
5. Rabattre le couvercle sur le récipient.
6. Insérer le bouchon-doseur dans l’ouverture
du couvercle. Faire tourner le bouchon dans
le sens horaire jusqu’à la position de butée.
Préparation
wAVERTISSEMENT
Risque de coupure
Placer toujours le couvercle sur le récipient
lors d’une opération de mixage.
Ne jamais introduire une cuillère ou un
autre ustensile dans le récipient pendant
une opération de mixage.
Le non-respect de ces instructions peut
provoquer des coupures ou fractures.
Portecouvercle
Couvercle
Bouchondoseur
Supports du
récipient
Récipient
Première
position de
soulèvement
840065000-1FRv01 9/27/04 11:29 AM Page 15
Page 16

Inspection du mélangeur
Pour contrôler les caractéristiques
de sécurité du mélangeur, procéder
comme suit :
1. Brancher le mélangeur sur une prise
de courant reliée à la terre.
2. Régler le bouton de sélection à la
vitesse maximale. Lorsque le
mélangeur fonctionne, soulever
l’ensemble porte-couvercle/couvercle;
vérifier que lorsque le couvercle est
soulevé d’environ 11⁄4 po (30 mm), les
lames de coupe cessent de tourner
en moins de 4 secondes.
3. Retirer le récipient, et placer le porte-
couvercle à la première position de
soulèvement. Sélectionner la vitesse
2; vérifier que le mélangeur ne se
met pas en marche.
NOTE : Si l’appareil n’exécute pas
correctement les deux étapes décrites
ci-dessus, ne pas faire fonctionner
le mélangeur; consulter la section
«Demande d’assistance ou de service».
4. Débrancher le mélangeur.
16
wAVERTISSEMENT
Risque de choc électrique
Brancher l’appareil sur une prise de courant
électrique à 3 alvéoles, reliée à la terre.
Ne jamais enlever la broche de liaison à la
terre de la fiche de branchement.
Ne pas utiliser un adaptateur.
Ne pas utiliser un cordon de rallonge.
Le non-respect de ces instructions peut
causer un décès, un incendie ou un choc
électrique.
Contrôle
wAVERTISSEMENT
Risque de coupure
Placer toujours le couvercle sur le récipient
lors d’une opération de mixage.
Ne jamais introduire une cuillère ou un
autre ustensile dans le récipient pendant
une opération de mixage.
Le non-respect de ces instructions peut
provoquer des coupures ou fractures.
Portecouvercle
Couvercle
Bouchondoseur
Supports du
récipient
Récipient
Première
position de
soulèvement
Utilisation
840065000-1FRv01 9/27/04 11:29 AM Page 16
Page 17

17
Utilisation
Utilisation du mélangeur
NOTE : Avant de faire fonctionner le
mélangeur pour la première fois, laver
le récipient, le couvercle et le bouchondoseur. Voir «Entretien du mélangeur».
Pour faire fonctionner le mélangeur,
procéder comme suit :
1. Placer l’appareil sur une surface propre,
sèche et horizontale; placer le bouton
de sélection de vitesse à la position
«0» (arrêt).
2. Introduire dans le récipient les ingré-
dients à traiter.
3. Placer le récipient sur la base de l’ap-
pareil; il doit reposer fermement sur les
quatre supports.
4. Rabattre le couvercle sur le récipient.
5. Régler le bouton de sélection de vitesse
à la position désirée. La position «1» correspond à la plus basse vitesse; la position «6» correspond à la vitesse
la plus élevée.
NOTE: Pour faire fonctionner brièvement le
mélangeur à la vitesse maximale, appuyer
sur le bouton de commande ponctuelle.
Lâcher le bouton de commande ponctuelle
pour retrouver la vitesse sélectionnée
précédemment.
Bouton de
sélection
de vitesse
Bouton de
commande
ponctuelle
Couvercle
Bouchon-
doseur
wAVERTISSEMENT
Risque de choc électrique
Brancher l’appareil sur une prise de courant
électrique à 3 alvéoles, reliée à la terre.
Ne jamais enlever la broche de liaison à la
terre de la fiche de branchement.
Ne pas utiliser un adaptateur.
Ne pas utiliser un cordon de rallonge.
Le non-respect de ces instructions peut
causer un décès, un incendie ou un choc
électrique.
wAVERTISSEMENT
Risque de coupure
Placer toujours le couvercle sur le récipient
lors d’une opération de mixage.
Ne jamais introduire une cuillère ou un
autre ustensile dans le récipient pendant
une opération de mixage.
Le non-respect de ces instructions peut
provoquer des coupures ou fractures.
6. Lorsque l’opération est terminée, placer
le bouton de sélection à la position «0».
Lorsque le bouton de sélection de vitesse
est à la position «0», le bouton de commande ponctuelle n’est pas opérationnel.
7. Vider le récipient de son contenu.
8. Nettoyer le récipient, le couvercle et
le bouchon-doseur; voir la section
«Entretien du mélangeur».
840065000-1FRv01 9/27/04 11:29 AM Page 17
Page 18

18
Utilisation
Techniques d’utilisation spéciales
Remplissage du récipient
Observer les recommandations suivantes
lors de l’introduction des ingrédients dans
le récipient :
• Verser une quantité suffisante de liquide
pour produire un mélange fluide, qui
s’écoule toujours bien. Verser le liquide
dans le récipient en premier lieu.
• Couper les ingrédients solides en petits
morceaux de moins de 1 po3.
• Introduire les ingrédients dans le récipient
par petites quantités. Ne pas traiter en
une seule fois une quantité représentant
le volume maximum.
• Ne jamais introduire dans le récipient
une quantité d’ingrédients telle que
l’appareil ne peut les hacher. Ne jamais
remplir le récipient au-delà de la marque
supérieure de la graduation; ne pas oublier que normalement le volume
des ingrédients augmente durant
le traitement.
• Lors d’un traitement d’un produit chaud,
ne pas placer dans le récipient une
quantité d’ingrédients représentant
plus de 12 tasses.
• Placer toujours le couvercle avec son
bouchon sur le récipient lors de l’opération de mixage.
Utilisation du bouchon-doseur
Utiliser le bouchon-doseur pour ajouter
un liquide dans le récipient lorsque l’appareil fonctionne. Pour pouvoir séparer
le bouchon du couvercle, faire tourner le
bouchon dans le sens antihoraire, et tirer
vers le haut.
Lors de la préparation de mayonnaise,
ajouter l’huile en dernier lieu, très lentement, avec le bouchon-doseur.
Mixage d’un mélange chaud
IMPORTANT: Pour minimiser le risque de
brûlure, on DOIT observer les précautions
suivantes :
• Lors d’un traitement d’un produit chaud,
ne pas placer dans le récipient une quantité d’ingrédients représentant plus de 12
tasses. Ne pas oublier que le volume du
produit traité augmente normalement
durant l’opération de mixage/broyage.
• Placer toujours le couvercle et le bouchon-
doseur sur le récipient lors d’une opération
de mixage.
• L’opérateur ne doit jamais placer son vis-
age directement au-dessus du récipient
durant une opération de mixage; de la
vapeur pourrait être émise.
Sélection de la vitesse
Sélectionner une vitesse pour laquelle on
peut observer la formation d’une colonne
d’air au centre du récipient.
Pour la préparation d’une purée, commencer le traitement à la plus basse vitesse
et augmenter graduellement la vitesse à
mesure de la progression du broyage.
wAVERTISSEMENT
Risque de brûlures
Exercer toujours une grande prudence
lors du mixage d’un mélange chaud.
Le non-respect de cette instruction peut
provoquer des brûlures.
840065000-1FRv01 9/27/04 11:29 AM Page 18
Page 19

19
Entretien du mélangeur
Instructions de nettoyage
AVERTISSEMENT :
Débrancher le cordon
d’alimentation du mélangeur
et de la prise de courant avant
d’entreprendre le nettoyage.
Nettoyage général
Le carénage de l’appareil contient les
composants électriques. Ne pas laver cette
partie de l’appareil dans un lave-vaisselle,
ni l’immerger dans de l’eau. Ne jamais
utiliser un dispositif d’arrosage sous haute
pression pour nettoyer une partie quelconque de l’appareil.
1. Ne jamais laisser des résidus alimen-
taires sécher sur les surfaces de
l’appareil. Laver et rincer le récipient
après chaque utilisation.
2. Pour le lavage, utiliser un détergent
non moussant. Utiliser de l’eau chaude
(moins de 115°F/46°C) contenant la
quantité de détergent recommandée
par le fabricant du détergent.
3. Pour le rinçage, utiliser de l’eau tiède
(95°F/35°C).
4. Pour le nettoyage sanitaire, on recom-
mande l’emploi d’une solution contenant
du chlore à la concentration de 100-200
PPM. On peut utiliser la solution suivante : 1 gallon (3,785 litres) d’eau froide
(50-70°F/10-21°C) additionnée d’une
cuiller à thé (4,93 mL) de produit de
blanchiment pour applications commerciales (concentration de 8,4 %
d’hypochlorite de sodium).
Lavage et rinçage du récipient
1. Séparer le récipient de l’appareil; enlever
le couvercle et le bouchon-doseur. Rincer
l’intérieur du récipient, le couvercle et le
bouchon-doseur sous le jet du robinet.
2. Verser la solution de nettoyage dans le
récipient; frotter avec un essuie-tout ou
un tampon non abrasif, et rincer l’intérieur,
le couvercle et le bouchon-doseur pour
éliminer tous les résidus alimentaires.
Vider le récipient.
AVERTISSEMENT :
Les lames de coupe sont acérées.
Pour réduire le risque de blessure,
manipuler prudemment le module
des lames.
3. Essuyer les surfaces externes du récipi-
ent avec un linge doux ou une éponge
humi-difiée de solution de lavage. Laver le
couvercle et le bouchon-doseur avec de
la solution de lavage fraîche. Remplir le
récipient à 25 % avec de la solution de
lavage fraîche; placer le récipient sur la
base de l’appareil; placer le couvercle et
le bouchon-doseur, puis faire fonctionner
le mélangeur à la vitesse «5» pendant 2
minutes. Vider le récipient.
4. Répéter l’étape 3 – utiliser de l’eau de
rinçage propre à la place de la solution
de lavage.
NOTE :
Un essuie-tout ou tampon abrasif
laissera des rayures sur le récipient
et le couvercle.
840065000-1FRv01 9/27/04 11:29 AM Page 19
Page 20

20
Entretien du mélangeur
Instructions de nettoyage (suite)
Dépose, nettoyage et réinstallation du module des lames
AVERTISSEMENT :
Ne pas démonter le module
des lames.
1. Positionner l’outil spécial fourni sur le
module des lames, à l’intérieur du récipient. Les onglets de part et d’autre de
l’outil prennent position entre les palettes
ou nervures du récipient. Enfoncer l’outil
aussi loin que c’est possible. Si les lames
peuvent encore tourner lorsqu’on fait
tourner la pièce d’accouplement, faire un
peu tourner la pièce d’accouplement
jusqu’à ce que l’outil de démontage soit
correctement positionné par rapport aux
lames et qu’il ne puisse plus bouger.
2. Tenir l’outil d’une main; faire tourner la
pièce d’accouplement dans le sens antihoraire avec l’autre main pour la desserrer. Enlever la pièce d’accouplement.
3. Avec une clé, faire tourner l’écrou de
blocage dans le sens antihoraire pour
le desserrer et l’enlever.
4. Retirer prudemment le module des
lames et le joint torique de l’intérieur
du récipient.
AVERTISSEMENT :
Les lames de coupe sont acérées.
Pour réduire le risque de blessure,
manipuler prudemment le module
des lames.
5. Nettoyer soigneusement le module
des lames et le joint torique avec de
l’eau chaude savonneuse. Rincer et
laisser sécher.
6. Pour réinstaller le module des lames,
procéder dans l’ordre inverse. Veiller à
ce que l’encoche sur le module des
lames s’aligne avec l’ergot visible au
fond du récipient.
Aligner
l’encoche
avec l’ergot
Outil
spécial
Module
des lames
Récipient
Écrou de
blocage
Pièce
d’accouplement
Joint
840065000-1FRv01 9/27/04 11:29 AM Page 20
Page 21

21
Entretien du mélangeur
Aligner
l’encoche
avec l’ergot
Outil
spécial
Module
des lames
Récipient
Écrou de
blocage
Pièce
d’accouplement
Joint
torique
Nettoyage sanitaire et séchage
du récipient
1. Verser 1⁄2 gallon (1,9 litre) de solution
de nettoyage sanitaire dans le récipient;
placer le récipient sur la base de l’appareil. Placer le couvercle et le bouchondoseur, et faire fonctionner l’appareil à
la vitesse «5» pendant cinq secondes.
Vider le récipient. Pour faire disparaître
toute humidité sur le module des lames,
placer de nouveau le récipient vide muni
de son couvercle sur la base de l’appareil, et faire fonctionner l’appareil à
la vitesse «5» pendant cinq secondes.
2. Essuyer les surfaces externes du
réci-pient avec une éponge ou un
linge doux humidifié de solution
de nettoyage sanitaire.
3. Immerger le couvercle et le bouchon-
doseur dans la solution de nettoyage
sanitaire pendant deux minutes.
4. Après le nettoyage sanitaire, ne pas
rincer le récipient, le couvercle ou le
bouchon-doseur; laisser tous les
composants sécher à l’air.
Nettoyage du carénage
de l’appareil
1. Ne pas immerger la base de l’appareil,
ni la nettoyer avec un équipement à
haute pression.
2. Essuyer les surfaces externes de
l’appareil avec un linge ou une
éponge humide.
Instructions de nettoyage (suite)
840065000-1FRv01 9/27/04 11:29 AM Page 21
Page 22

22
Guide de dépannage
Pièces de rechange
Problème Solution . . .
Le mélangeur ne se
met pas en marche,
ou il s’arrête en cours
de fonctionnement et
on ne peut le remettre
en marche
•
Déterminer si l’appareil est correctement branché sur une prise de courant.
•
Déterminer si la prise de courant est correctement alimentée
(disjoncteur ouvert ou fusible grillé?)
•
Vérifier que le récipient est correctement placé sur la base.
•
Vérifier que le couvercle est complètement abaissé sur le récipient.
•
Débrancher l’appareil et vérifier pour voir si les lames sont obstruées par quoi
que ce soit; dans l’affirmative, enlever l’obsruction et laisser l’appareil refroidir.
•
Placer le sélecteur de vitesse à la position «0» et essayer de nouveau.
Entretien
Débrancher l’appareil; enlever le récipient de la base; inspecter le récipient et les lames;
rechercher les indices d’usure, détériorations, lames brisées, etc. Remplacer selon le besoin.
Voir la section «Pièces de rechange» ci-dessous. Vérifier que le module des lames est convenablement serré.
Débrancher l’appareil; inspecter l’isolant du cordon d’alimentation et la fiche de branchement;
rechercher les fissures. Pour réparations ou remplacement de pièces, voir la section
«Demande d’assistance ou de service». Pour contrôler les fonctions de sécurité du
mélangeur, se référer à la section «Inspection du mélangeur» à la page 16.
Remplacer le récipient et les lames au moins une fois par an. Voir la section «Pièces de
rechange» ci-dessous.
Récipient de 1 gallon (polysulfone), avec module des lames
Récipient de 1 gallon (polysulfone), sans module des lames
Module des lames, sans récipient
Couvercle
Bouchon-doseur
Supports du récipient
Description Numéro de pièce
6126-994
823143
823252
823140
823167
823144
Inspecter l’appareil et ses divers composants; effectuer les opérations nécessaires comme suit :
Chaque
jour
Chaque
semaine
Chaque
année
Mixage incorrect des
ingrédients
•
Déterminer si une quantité suffisante de liquide a été ajoutée
avec les ingrédients. Il faut que le mélange soit fluide et puisse
toujours s’écouler librement.
•
Les morceaux des ingrédients solides sont trop gros. Couper en
morceaux de moins de 1 po (cube).
•
Le récipient est trop rempli. Ne pas remplir au-delà de la marque
supérieure de la graduation.
•
Les lames ne sont pas suffisamment acérées ou elles sont
endommagées. Inspecter chaque jour le récipient et les lames.
Remplacer le récipient et les lames lorsqu’ils sont endommagés,
ou à intervalles de pas plus de 12 mois.
•
Vérifier que le module des lames est convenablement serré.
•
Sélectionner la vitesse appropriée pour produire un mélange fluide.
Pour commander les pièces mentionnées ci-dessous, voir la section «Demande d’assistance ou de service».
Entretien du mélangeur
840065000-1FRv01 9/27/04 11:29 AM Page 22
Page 23

Garantie du produit
23
Cet équipement bénéficie d’une garantie contre les vices de matériau et de fabrication,
pendant une période de deux ans à compter de la date d’achat.
Durant la période de garantie, Hamilton Beach choisira de réparer ou remplacer un produit
défectueux, sans frais pour le propriétaire.
Advenant qu’une anomalie se manifeste sur un produit sous garantie, envoyer ou livrer le
produit au plus proche centre de service agréé. Pour obtenir l’adresse du plus proche centre de service agréé Hamilton Beach (Commercial), téléphoner, au département Serviceclient au 1-910-692-2223, ou consulter les Pages jaunes de l’annuaire téléphonique local.
Cette garantie ne couvre pas une anomalie de fonctionnement imputable à emploi abusif,
manipulation incorrecte ou réparation non autorisée. Utiliser toujours l’appareil conformé-
ment aux instructions présentées dans le manuel d’utilisation. Cette garantie ne couvre
pas les articles sujets à usure (balais de contact du moteur électrique, récipient et lames,
embrayage, etc.).
Hamilton Beach/Proctor-Silex rejette toute garantie implicite, ceci incluant les garanties de
qualité marchande et aptitude d’un produit pour une application particulière. L’obligation de
la compagnie en vertu des présentes est expressément limitée à la réparation ou au remplacement d’un produit défectueux, ou au versement d’une somme égale au prix d’achat
payé lors de l’acquisition du produit; Hamilton Beach/Proctor-Silex rejette expressément
toute responsabilité au titre de dommages secondaires ou indirects.
Hamilton Beach/Proctor-Silex, Inc.
Service-clients (commercial)
263 Yadkin Road
Southern Pines, NC 28387
Cette garantie annule et remplace toute autre garantie concernant le produit
Pour contacter notre centre de service-client, téléphoner au
1-910-692-2223
www.commercial.hamiltonbeach.com
8 h – 17 h 30 HNE Lundi – Jeudi; 8 h – 17 h 15 HNE Vendredi
Demande d’assistance ou de service
Avant de contacter un technicien, consulter la section «Guide de dépannage» à
la page 22. Si une assistance demeure
nécessaire, procéder selon les instructions
ci-dessous.
Lors de toute demande d’assistance ou de
service, vous devrez communiquer le
numéro de modèle de l’appareil.
Celui-ci figure sur l’étiquette placée
sous le mélangeur.
Veuillez également noter la date d’achat
de l’appareil, et le nom, l’adresse et le
numéro de téléphone du revendeur.
Numéro de modèle__________________
Date d’achat ______________________
Nom du revendeur __________________
Adresse du
revendeur ________________________
Numéro de téléphone
du revendeur ______________________
Pour commander des pièces de
rechange, contacter le plus proche centre
de service agréé Hamilton Beach
(Commercial), ou un revendeur local.
4/00
840065000-1FRv01 9/27/04 11:29 AM Page 23
Page 24

840065000
263 Yadkin Road
Southern Pines, NC 28387
4/00
840065000-1FRv01 9/27/04 11:29 AM Page 24
 Loading...