

Page 1
www.presonus.com
®
English
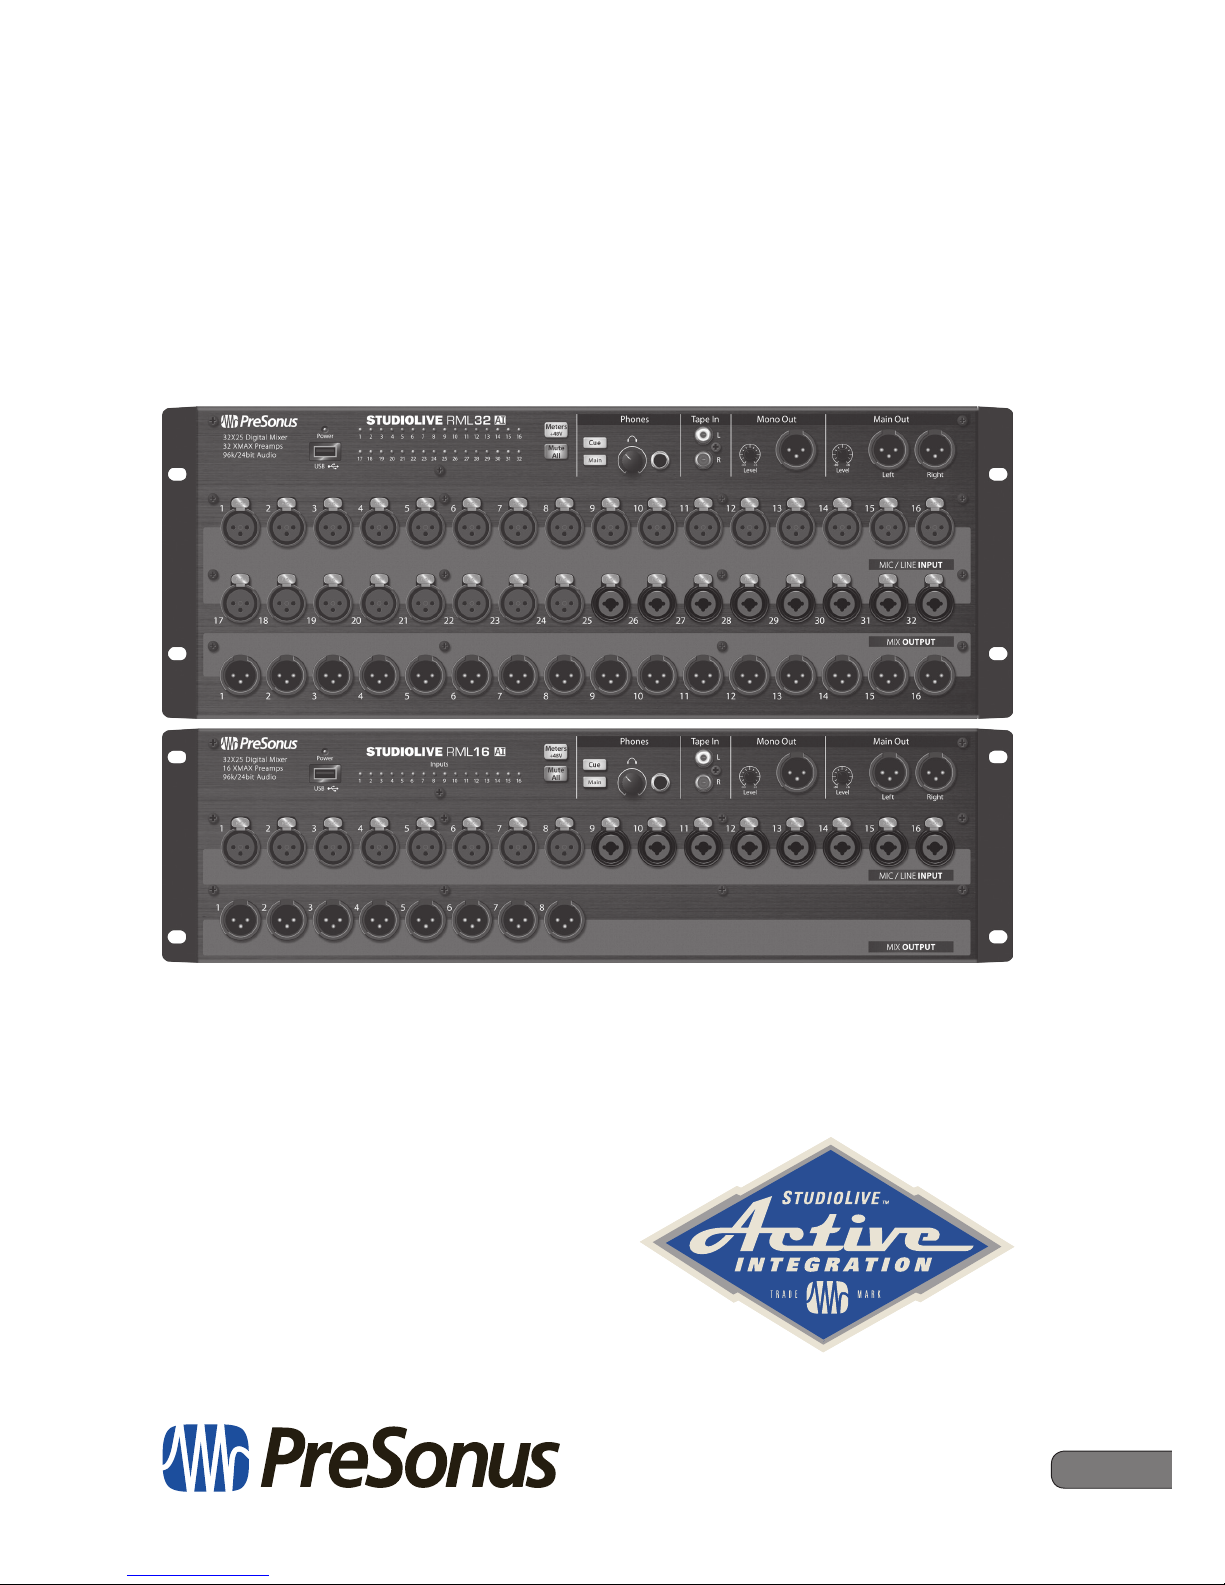
StudioLive™ RML-Series Mixers
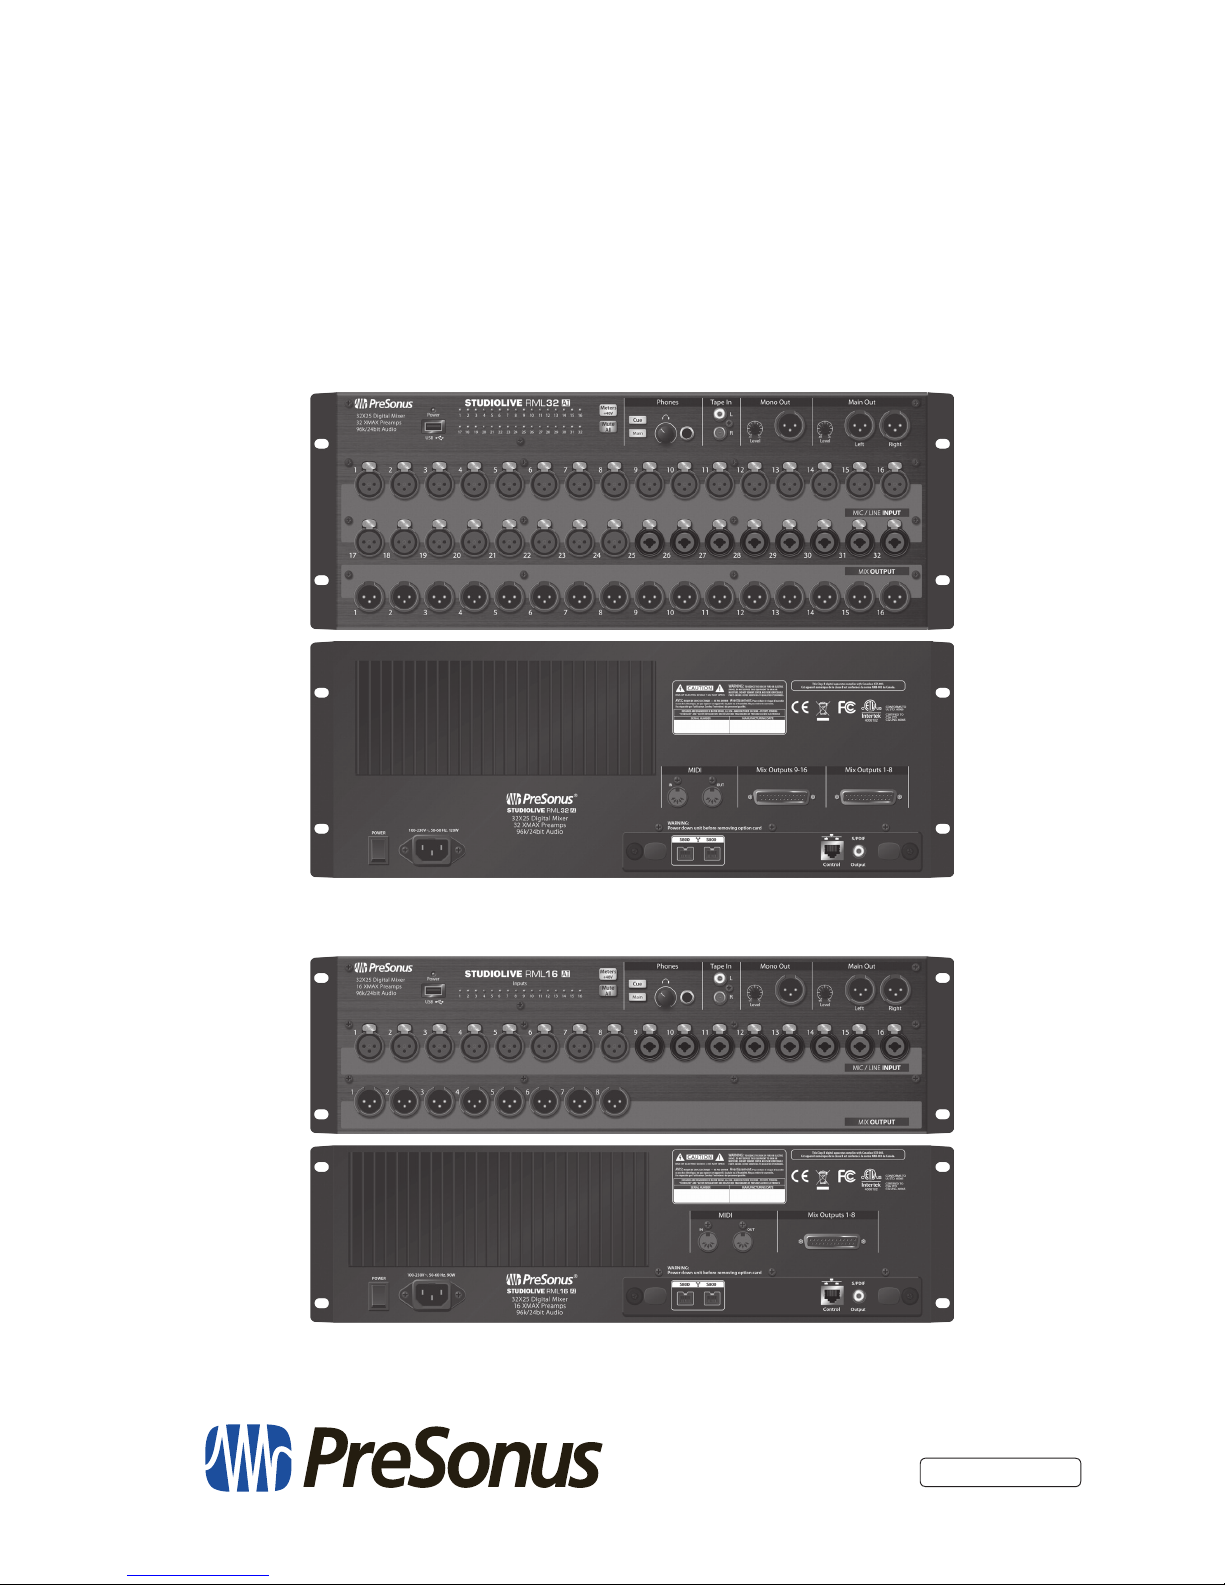
Touch-Software-Controlled, Rack-mount Digital
Mixing System with Active Integration
™
Quick Start Guide
Page 2

Table of Contents
1.0 Overview — 1
1.1 Introduction — 1
1.2 What’s In The Box — 2
1.2 Register your Studiolive RML-series mixer! — 3
1.3 Download UC-Surface foriPad® and Qmix™-Ai — 3
1.4 Update all Firmware and Software — 3
2.0 Networking the RML-series mixer — 4
2.1 IP Address Modes — 4
2.2 Wired Ethernet Control Setup — 4
3 Making the Connections — 5
3.1 Mixer Anatomy — 5
3.2 Single RML Mixer Setup — 6
3.3 Cascading RML Mixer Setup — 7
3.3.1 RML Mixers with UC Surface — 7
3.3.2 RML Mixers with CS18AI and UC Surface — 8
3.3.3 Connecting a computer for recording/playback — 9
3.3.4 Turning on Cascading — 10
4.0 Getting Started with UC-Surface — 11
4.1 Anatomy of the UC-Surface Screen — 11
4.1.1 Connected device tabs. — 12
4.1.2 Settings button. — 12
4.1.3 Fat Channel Area — 13
4.1.4 Presets Button — 14
4.1.5 Channel Strip Area — 14
4.1.6 Flex Master Channel Strip — 15
4.1.7 Mix Selection Area — 15
4.1.8 Main Output Area — 16
4.1.9 Input Meter Bridge and Navigation — 16
Page 3
1.0 Overview
1.1 Introduction
StudioLive™ RML-Series
Owner’s Manual
1
1.0 Overview
1.1 Introduction
Thank you for purchasing a PreSonus® StudioLive™ RML-series Active
Integration™ digital mixer. PreSonus Audio Electronics, Inc., has
designed the RML32AI and RML16AI utilizing high-grade components
to ensure optimum performance that will last a lifetime.
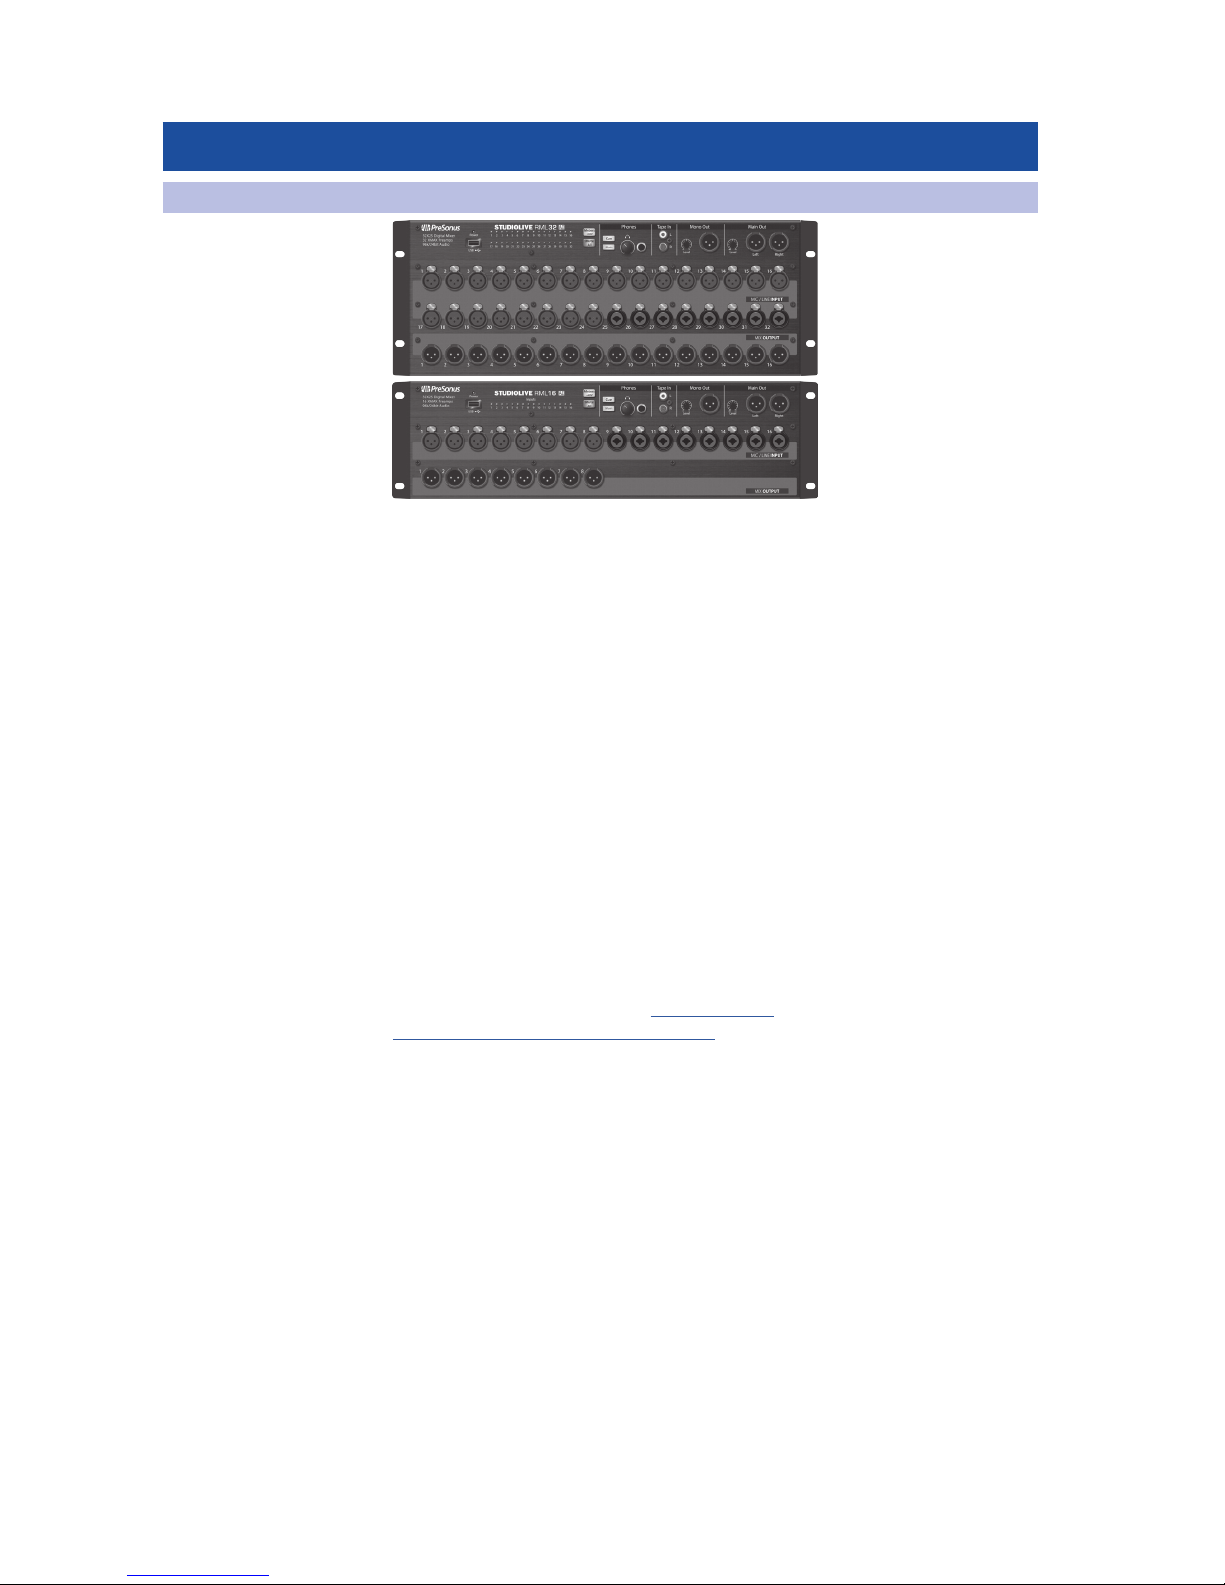
The powerful, scalable, and compact StudioLive RML32AI and RML16AI
32x16x3 rack-mount mixers combine the all new, battle-ready UC Surface
touch-control software for Windows®, Mac® OS X, and iOS® with a powerful
and comprehensive set of facilities for up to 64-channel mixing.
Based on the StudioLive AI-series engine, the StudioLive RML-series’ Active
Integration™ technology provides direct Wi-Fi and Ethernet networking, along
with a tightly integrated software suite that includes Capture™ recording software
with true virtual soundcheck and Studio One® Artist DAW software for Mac and
Windows. Put all of this together and your StudioLive RML-series mixer provides
you with a complete solution for live-sound mixing and studio recording.
We encourage you to contact us with questions or comments regarding
this product. PreSonus Audio Electronics, Inc., is committed to constant
product improvement, and we value your suggestions highly. We believe
the best way to achieve our goal of constant product improvement is by
listening to the real experts: our valued customers. We appreciate the
support you’ve shown us through the purchase of this product.
For technical support, please visit www.presonus.
com/support/Contact-Technical-Support.
Page 4
1.0 Overview
1.2 What’s In The Box
StudioLive™ RML-Series
Owner’s Manual
2
1.2 What’s In The Box
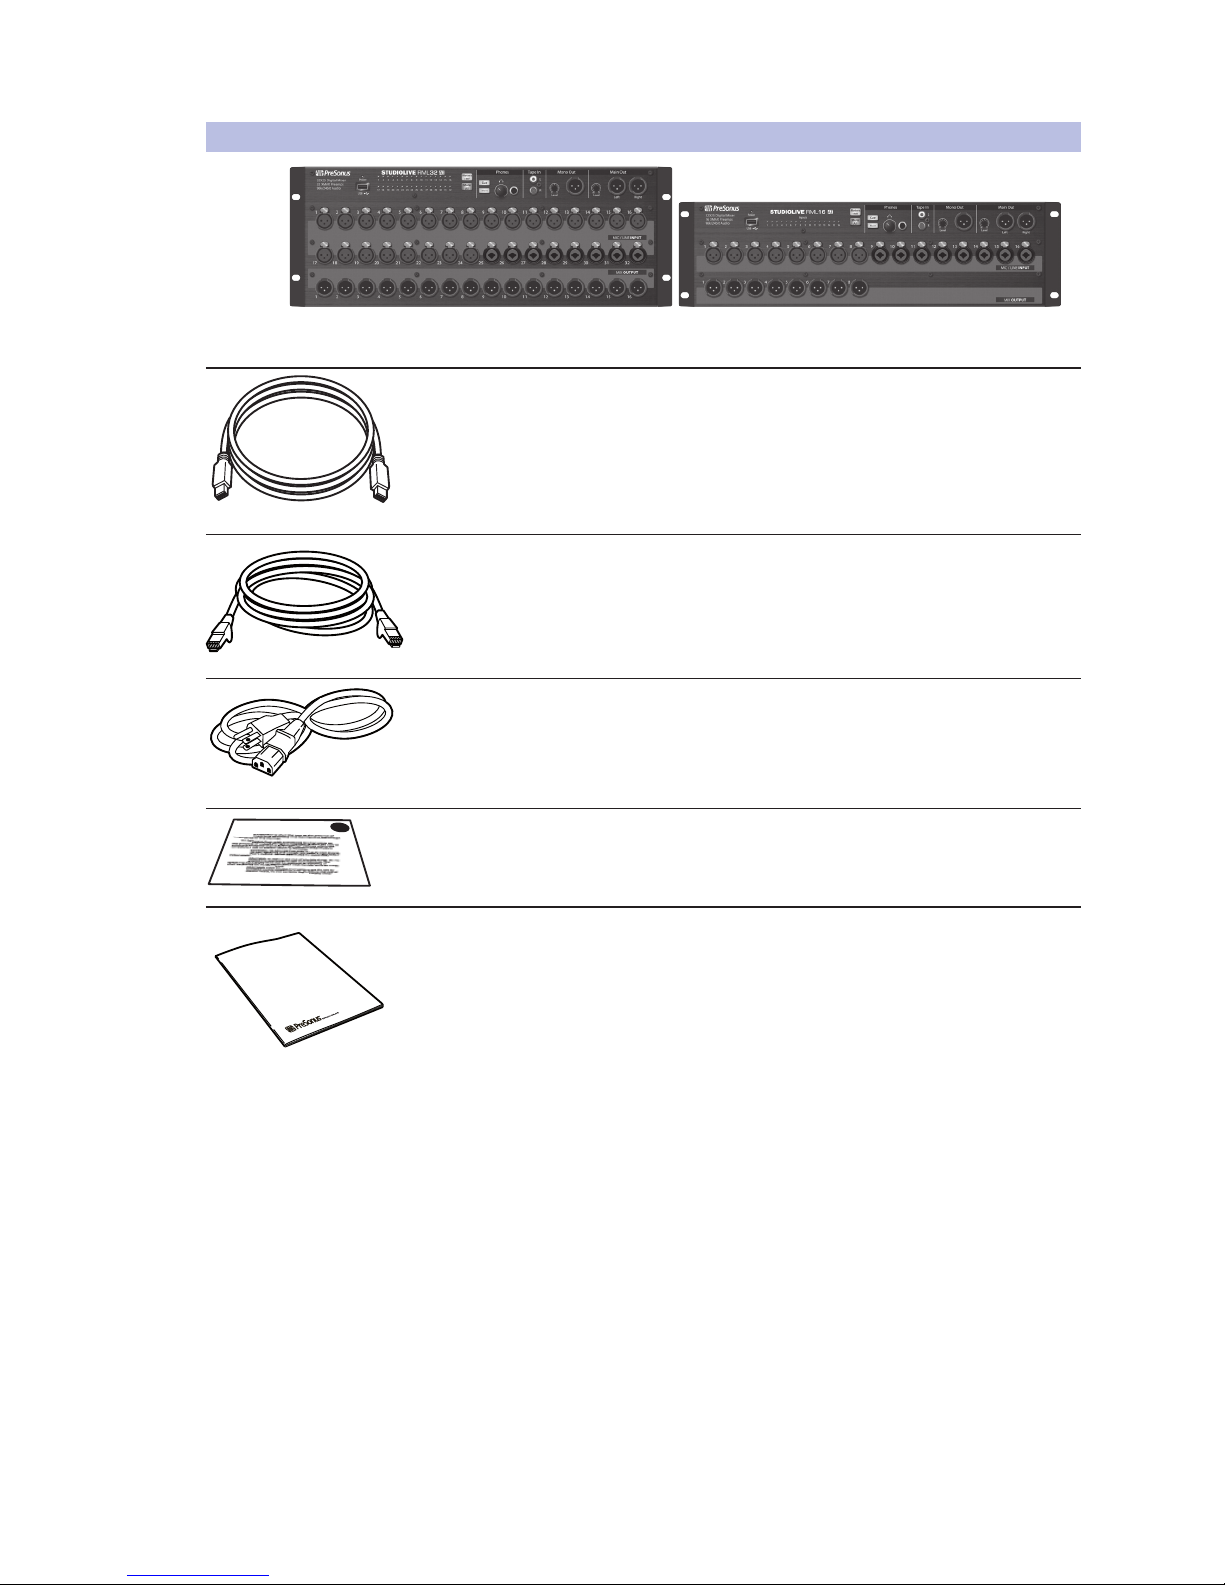
• StudioLive™ RML32AI or RML16AI
• FireWire 800 cable
• Ethernet cable
• Power cable
• Product registration and software authorization card
• This Quick Start Guide
Page 5

1.0 Overview
1.2 Register your Studiolive RML-series mixer!
StudioLive™ RML-Series
Owner’s Manual
3
1.2 Register your Studiolive RML-series mixer!
Before you do anything else, please register your StudioLive RML-series mixer online
at https://my.PreSonus.com so you can download and authorize the included
software, manuals, and video guides.
Your StudioLive RML-series mixer is more than a mixer; it’s a powerful suite of
integrated hardware and software solutions that take you from stage to studio.
The following software is included with the StudioLive RML32AI and RML16AI.
• UC-Surface battle-ready mix-control application
• QMix™-AI personal monitor control
• Capture™ multitrack recording and virtual sound check
• Studio One® Artist professional DAW
1.3 Download UC-Surface for iPad® and Qmix™-Ai
PreSonus’ UC-Surface battle-ready mix-control app for iPad® and
QMix™-AI aux-mix control app for iPhone®/iPod touch® are free downloads from the
Apple App Store. You’ll need this software to control your StudioLive RML-series
mixer, so please download it now.
1.4 Update all Firmware and Software
First be sure you’ve updated all associated firmware and software including
the RML-series mixers, CS18AI, UC Surface, Capture, and Studio One.
Please consult the RML-Series Owner’s Manual or the CS18AI Owner’s
Manual for instructions on updating the associated firmware.
See the RML-Series downloads page about updating
UC Surface and Capture software.
Consult your My Presonus account for updates to Studio One software.
Note: If using a MOTU AVB Switch be sure to update
to the latest firmware available from MOTU.
Page 6
2.0 Networking the RML-series mixer
2.1 IP Address Modes
StudioLive™ RML-Series
Owner’s Manual
4
2.0 Networking the RML-series mixer
2.1 IP Address Modes
An IP Address a unique string of numbers that identifies each computer
or device using the Internet Protocol to communicate over a network.
StudioLive RM Mixers support three IP Address modes.
Dynamic
This is the most common and the default setting for StudioLive devices. In dynamic
mode, the mixer is assigned an IP Address by a DHCP server which is included in
most routers. When a mixer comes online, the router sees it and assigns a unique IP
Address. The mixer will continue to wait for a DHCP server to provide an address.
Static Self Assigned
This mode is used if you’re doing a direct connection between the mixer and
another device like an AI Console mixer or CS18AI without the use of a router. In
this mode the mixer will assign itself an IP Address based on a compatible range.
Static Manual
This mode is typically reserved for more complex networking installations and
is usually setup by an IT professional. In this mode you can manually assign an
IP Address, Subnet Mask, and Gateway. Please consult your IT Administrator
before attempting to configure a Static Manual IP Address Mode.
Setting up the IP Address modes can be done in the Settings view
of UC Surface in the Network tab. Alternatively, you can change the
IP Address modes during bootup with the following method.
Hold down the Cue Source button while booting the mixer to reset from Static/
Self-assigned to Dynamic mode - (The LED meters will flash Yellow to indicate the
mode has been changed)
Hold down the Main Source button while booting the mixer to reset to Self-assigned
IP - (The LED meters will flash Red to indicate the mode has been changed)
2.2 Wired Ethernet Control Setup
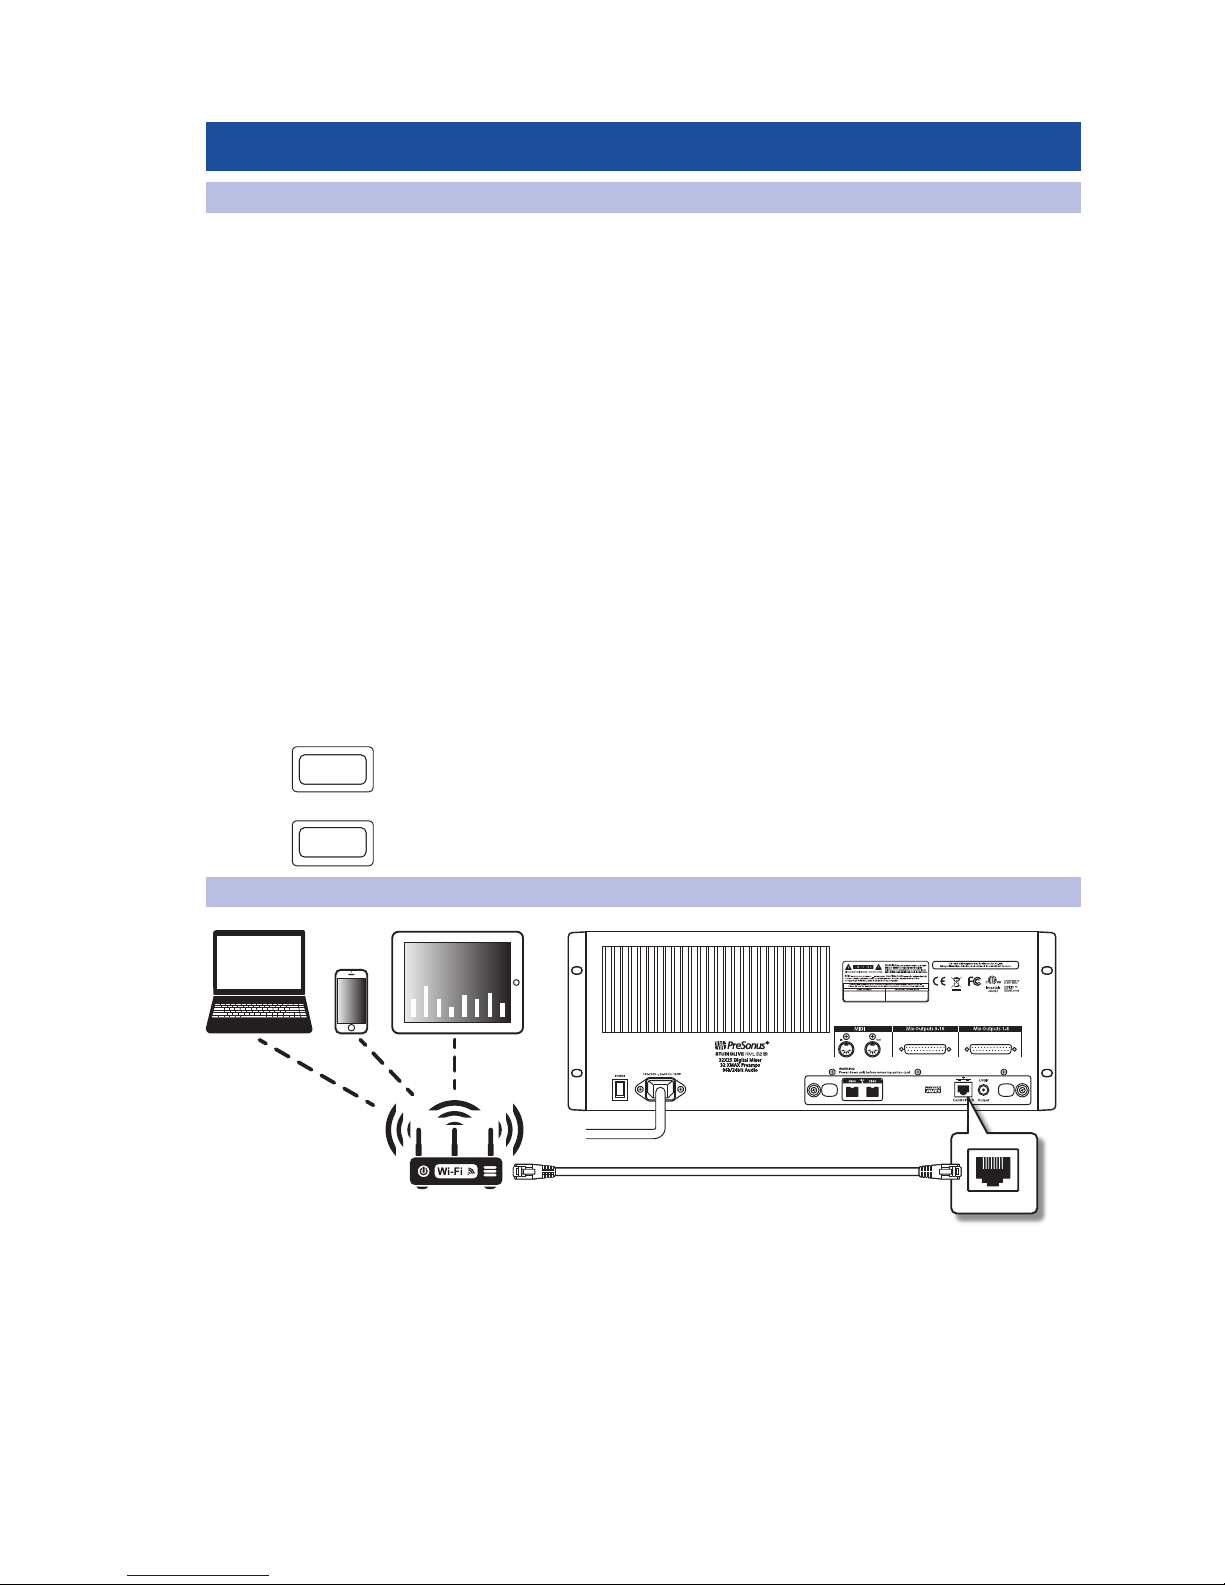
Your StudioLive RML32AI and RML16AI can be set up for control with
a wired Ethernet connection in seconds. Simply connect the included
Ethernet cable to the Ethernet control port on the back of the mixer and
to a network router that is also connected to your computer or iPad.
When you launch UC-Surface with the computer or iPad and
StudioLive RML32AI or RML16AI connected to the same network,
the software should automatically see the mixer.
L
Phones Tape In Mono Out Main Out
Cue
-80
+6
-80
+6
R
L
Phones Tape In Mono Out Main Out
Cue
Main
Ethernet Cable
Page 7
3 Making the Connections
3.1 Mixer Anatomy
StudioLive™ RML-Series
Owner’s Manual
5
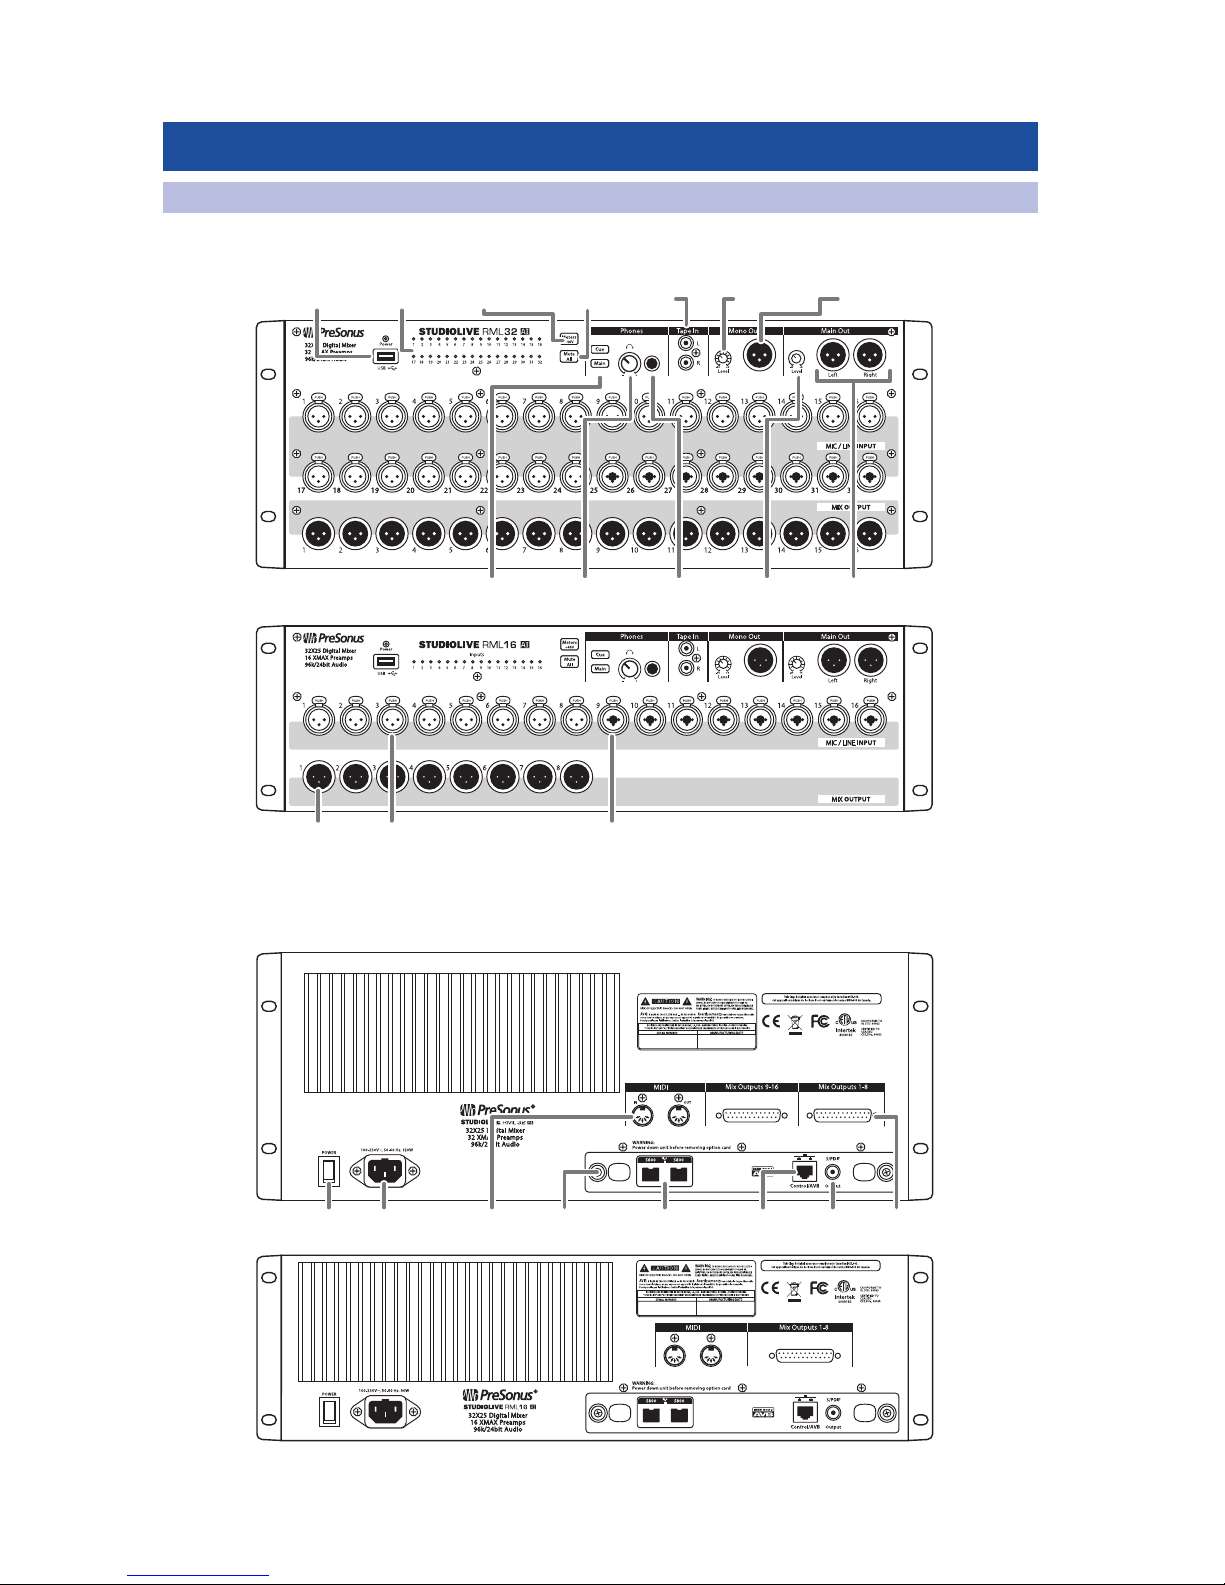
3 Making the Connections
3.1 Mixer Anatomy
Front Panels
Rear Panels
Headphones
Source Select
Headphones
Level
Headphones
Output
Main Output
Level
Main
Outputs
USB
Port
Input
Meters
Meter
Mode Select
Mute All
Button
Tape In
Jacks
Mono/Center
Level
Mono/Center
Output
Mix
Outputs
Microphone
Inputs
Microphone/Line
Inputs
Power
Switch
IEC Power
Connector
MIDI In/Out
[Future]
Option
Card
Firewire S800
Ports
Mix
Outputs
Ethernet
Port
S/PDIF
Output
Page 8
3 Making the Connections
3.2 Single RML Mixer Setup
StudioLive™ RML-Series
Owner’s Manual
6
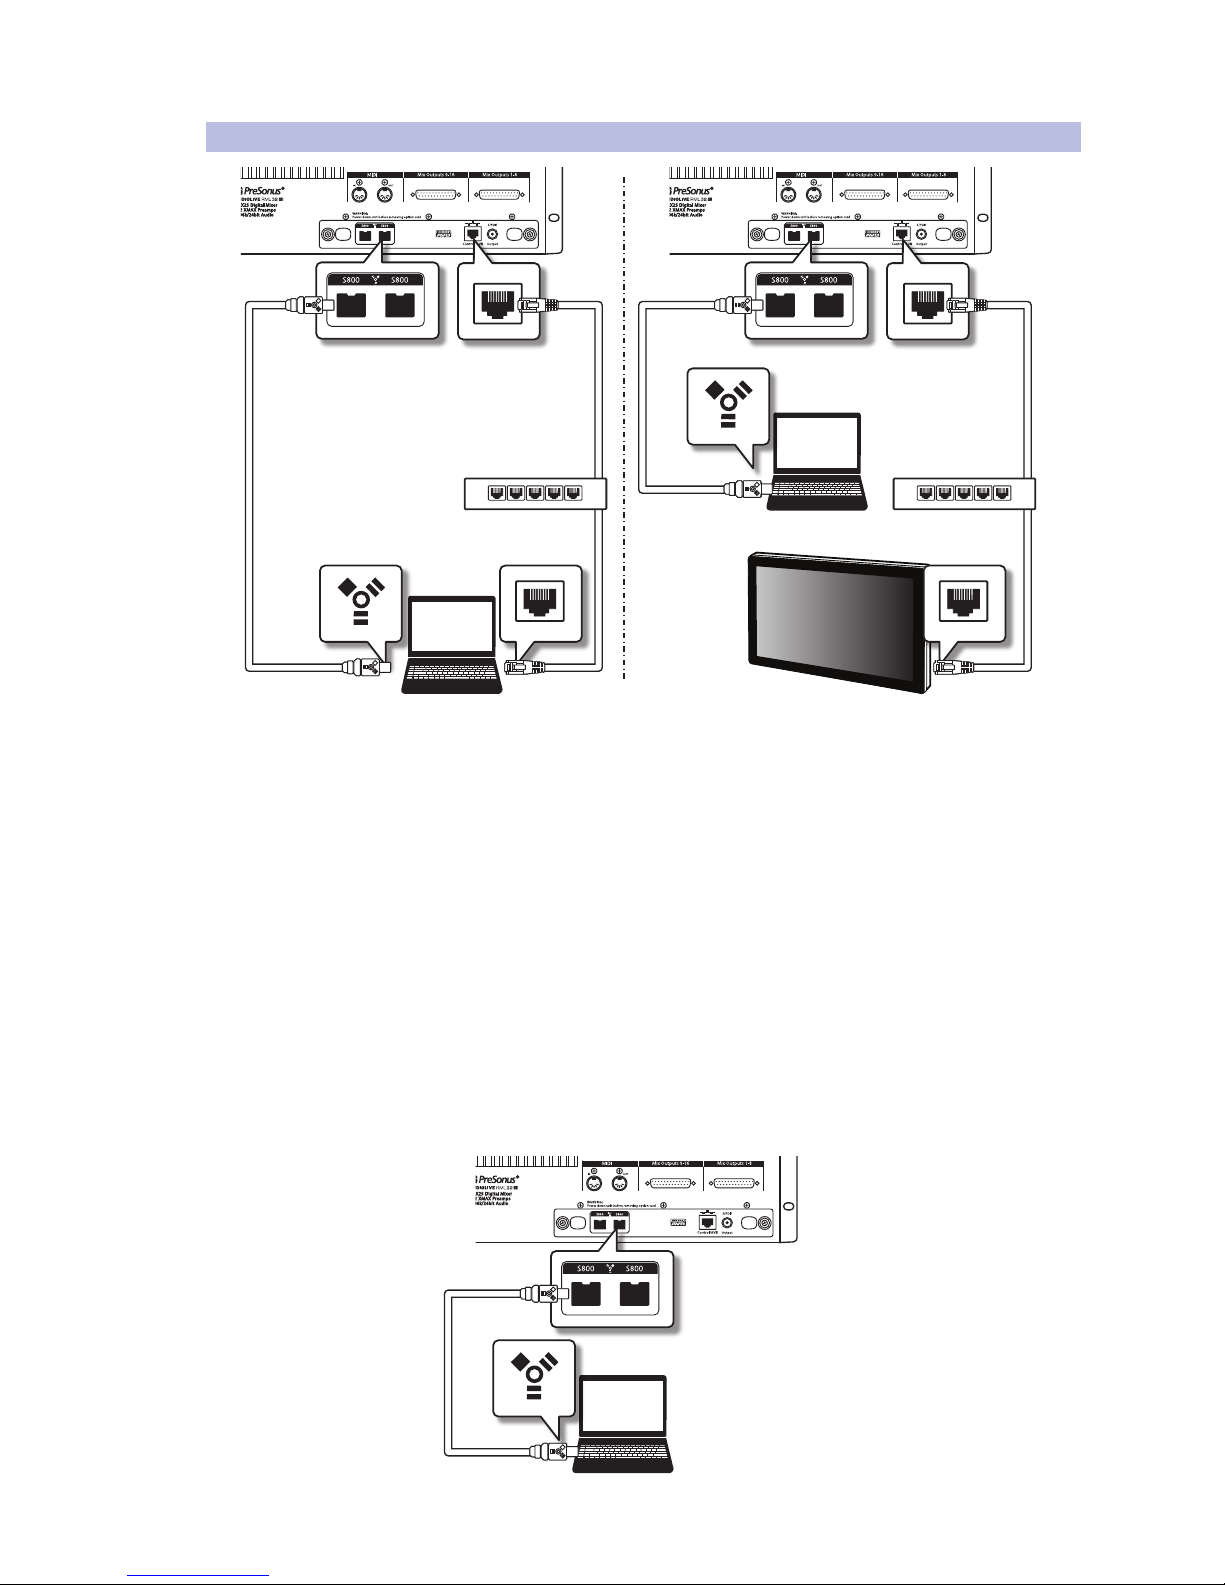
3.2 Single RML Mixer Setup
StudioLive RML32AI and RML16AI have been designed for tight integration with
the included Capture and Studio One Artist software. You can record a live show
quickly and with confidence to Capture, save the StudioLive AI mixer scene with
the Capture Session, and then open that recording, complete with mixer scene,
in Studio One. The Studio One mixer will be set to match your StudioLive AI mixer
scene, including fader values, mutes, pan, and effects-send mixes. Fat Channel
settings will be loaded into Studio One’s new Fat Channel Native Effects™ plug-in.
You can also use the StudioLive AI mixer as an audio
interface and monitor mixer for studio recording.
1. After registering your StudioLive AI mixer, download the Universal Control
installer for Mac or Windows from your My PreSonus account. This installer
includes the UC-Surface mix-control software and necessary drivers.
2. Launch the installer and follow the onscreen instructions. When the
installer is finished, reboot your computer to complete the installation.
3. When the installation is complete simply connect your
StudioLive AI mixer to your computer with the included FireWire
cable and ensure both are on the same network.
Firewire
Cable
Touchscreen
computer
Ethernet
Cable
Firewire
Cable
Ethernet
Cable
Firewire
Cable
1
2
345
Network Router
1
2
345
Network Router
Page 9
3 Making the Connections
3.3 Cascading RML Mixer Setup
StudioLive™ RML-Series
Owner’s Manual
7
3.3 Cascading RML Mixer Setup
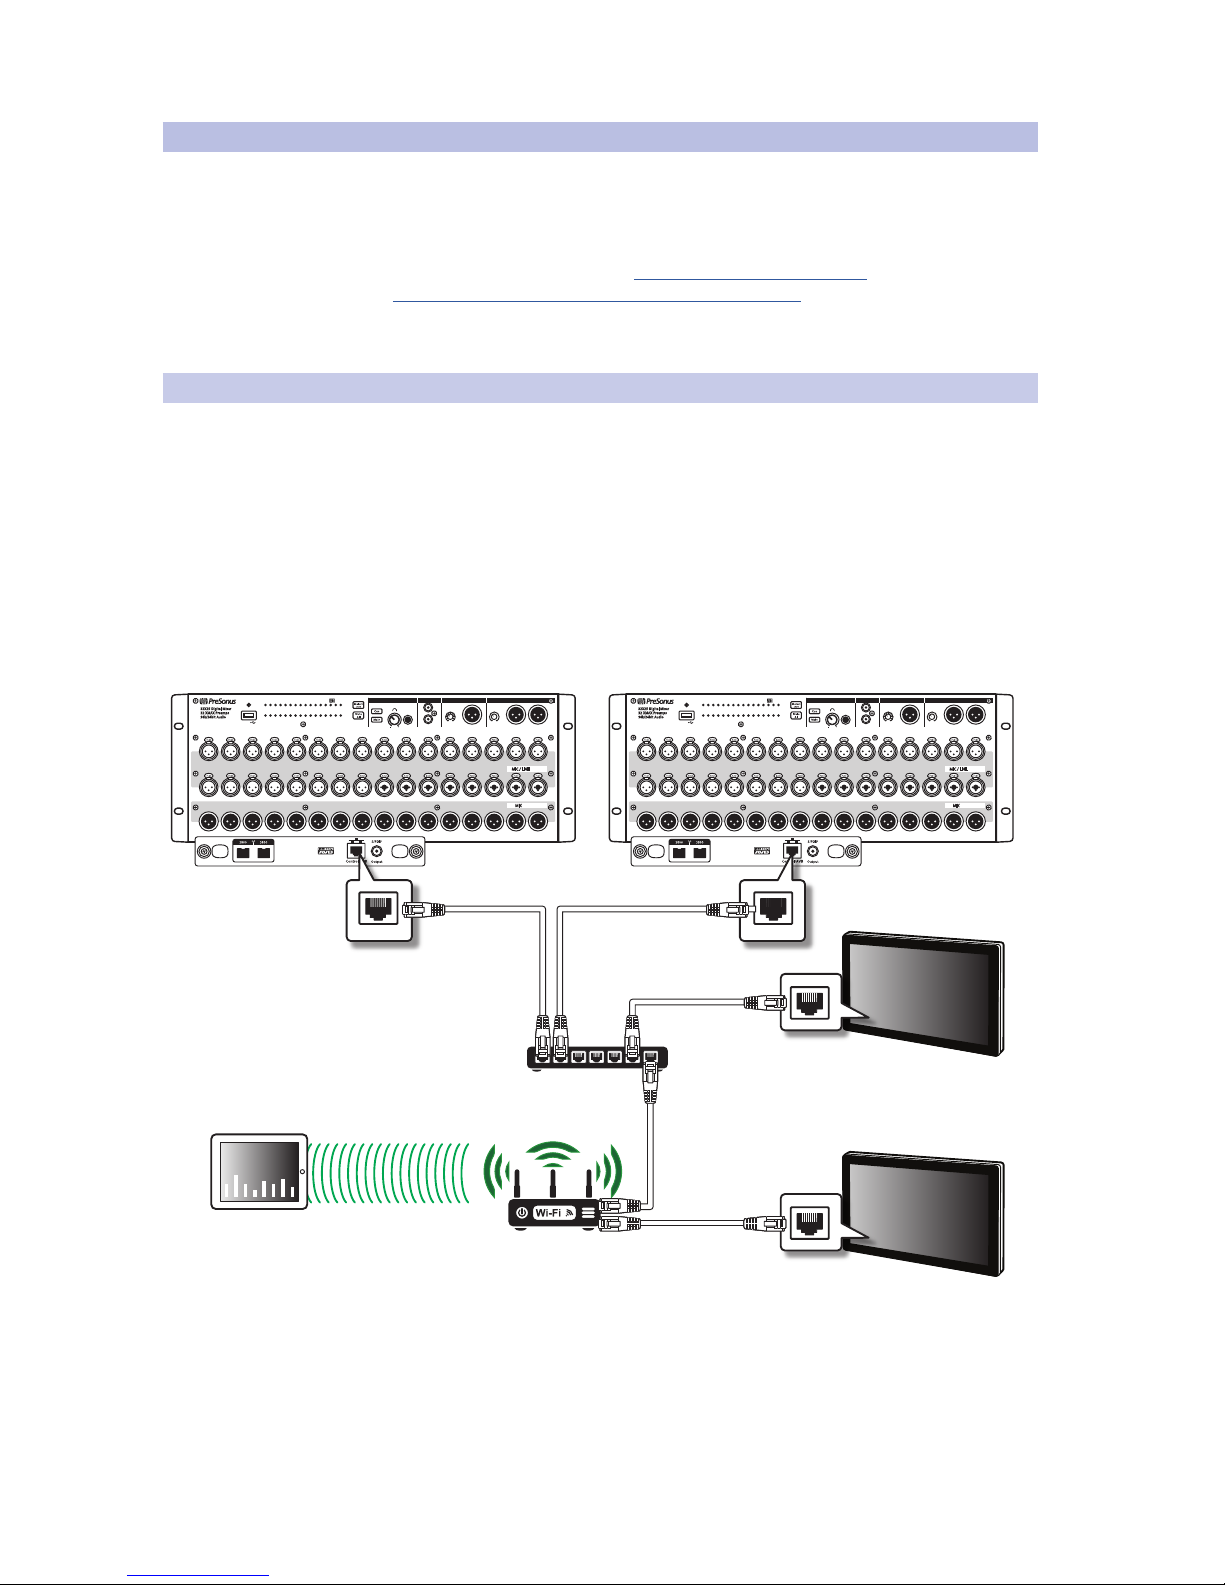
There are a few different ways to use cascaded RML-series mixers.
This section shows how to make the connections between your RML
mixers, control devices and network switches and routers.
For all configurations you’ll need to connect the mixers via Ethernet
using a compatible AVB switch. Refer to our Knowledge Base
for the most current list of compatible AVB switches.
Note: If using a MOTU AVB Switch be sure to update
to the latest firmware available from MOTU
3.3.1 RML Mixers with UC Surface
When cascading RML mixers with control from UC Surface there
are three main ways you can connect the control device.
• Wired to the AVB Switch via Ethernet
• Wired to the Wireless Router via Ethernet
• Wireless connected to the Router
NOTE: If you connect directly to the AVB switch and are NOT using a wireless
router, you’ll need to configure your mixers to use a Static IP Address. If you
need to use a manually assigned static IP address please consult your IT
administrator to ensure you are using a compatible IP address and Subnet
Mask. Refer to section 2.1 IP Addresses for more information.
32313029282726252423222120191817 32313029282726252423222120191817
1 2 3 4 5 6 7 8 9 10 11 12 13 14 15 16
17 18 19 20 21 22 23 24 25 26 27 28 29 30 31 32
Power
1 2 3 4 5 6 7 8 9 10 11 12 13 14 15 16
1 2 3 4 5 6 7 8 9 10 11 12 13 14 15 16
USB
MIC / LINEINPUT
M
IXOUTPUT
32X25 Digital Mix er
32 XMAX Preamps
96k/24bit Audio
Level
-80
+6
Level
-80
RightLeft
R
L
Phones Tape In Mono Out Main Out
STUDIOLIVE RML32
+6
32313029282726252423222120191817 32313029282726252423222120191817
1 2 3 4 5 6 7 8 9 10 11 12 13 14 15 16
17 18 19 20 21 22 23 24 25 26 27 28 29 30 31 32
Power
1 2 3 4 5 6 7 8 9 10 11 12 13 14 15 16
1 2 3 4 5 6 7 8 9 10 11 12 13 14 15 16
USB
MIC / LINEINPUT
M
IXOUTPUT
32X25 Digital Mix er
32 XMAX Preamps
96k/24bit Audio
Level
-80
+6
Level
-80
RightLeft
R
L
Phones Tape In Mono Out Main Out
STUDIOLIVE RML32
+6
Windows 10 Touch computer
with UC Surface
Windows 10 Touch computer
with UC Surface
RML-Series Mixer 1
Wireless Router
RML-Series Mixer 2
Ethernet cables
iPad running
UC Surface
AVB Switch
Page 10
3 Making the Connections
3.3 Cascading RML Mixer Setup
StudioLive™ RML-Series
Owner’s Manual
8
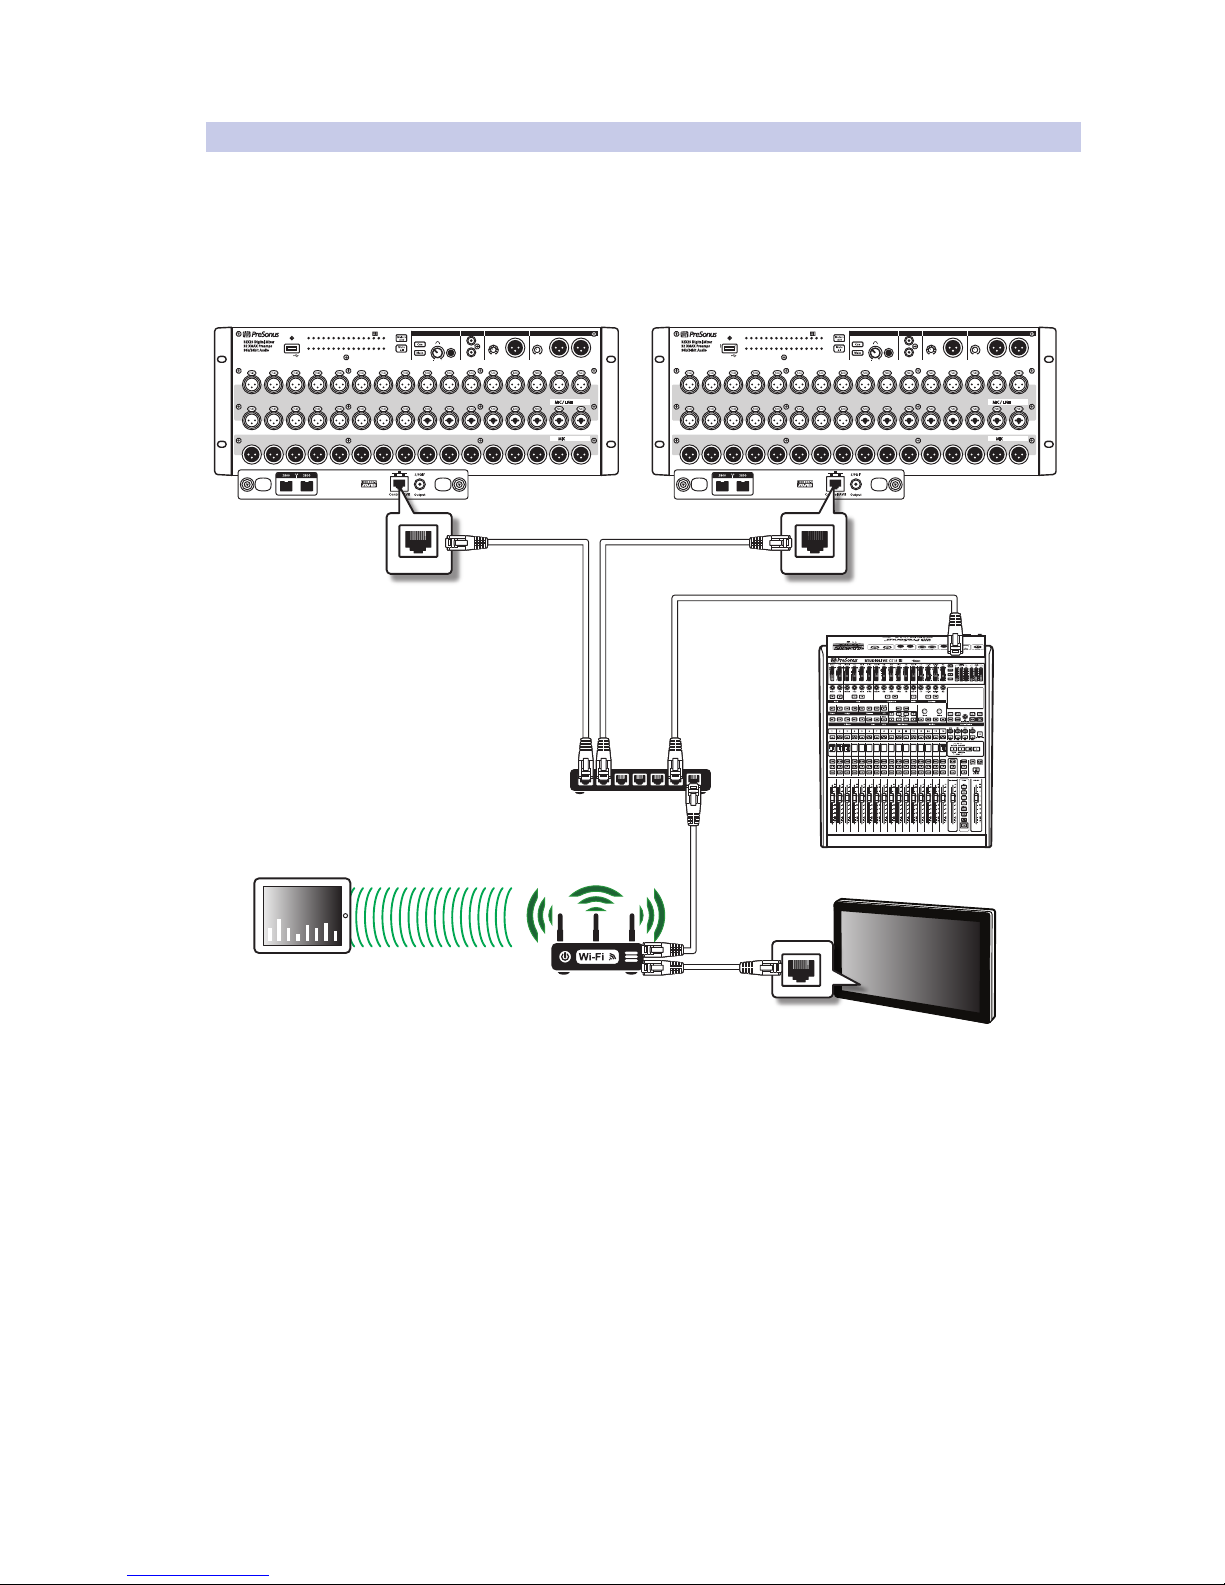
3.3.2 RML Mixers with CS18AI and UC Surface
When using a CS18AI for control of your cascaded RML mixers you’ll want to
connect it via the AVB Ethernet switch. This way you can take full advantage
of the onboard audio IO. You can also connect your UC Surface device
wired or wirelessly using one of the three methods mentioned above.
Note: Cascading of the mixer must be setup with
UC Surface before connecting the CS18AI.
32313029282726252423222120191817 32313029282726252423222120191817
1 2 3 4 5 6 7 8 9 10 11 12 13 14 15 16
17 18 19 20 21 22 23 24 25 26 27 28 29 30 31 32
Power
1 2 3 4 5 6 7 8 9 10 11 12 13 14 15 16
1 2 3 4 5 6 7 8 9 10 11 12 13 14 15 16
USB
MIC / LINEINPUT
M
IXOUTPUT
32X25 Digital Mix er
32 XMAX Preamps
96k/24bit Audio
Level
-80
+6
Level
-80
RightLeft
R
L
Phones Tape In Mono Out Main Out
STUDIOLIVE RML32
+6
32313029282726252423222120191817 32313029282726252423222120191817
1 2 3 4 5 6 7 8 9 10 11 12 13 14 15 16
17 18 19 20 21 22 23 24 25 26 27 28 29 30 31 32
Power
1 2 3 4 5 6 7 8 9 10 11 12 13 14 15 16
1 2 3 4 5 6 7 8 9 10 11 12 13 14 15 16
USB
MIC / LINEINPUT
M
IXOUTPUT
32X25 Digital Mix er
32 XMAX Preamps
96k/24bit Audio
Level
-80
+6
Level
-80
RightLeft
R
L
Phones Tape In Mono Out Main Out
STUDIOLIVE RML32
+6
RML-Series Mixer 1
Wireless Router
RML-Series Mixer 2
Ethernet cables
CS18AI
Windows 10 Touch computer
with UC Surface
iPad running
UC Surface
AVB Switch
Page 11
3 Making the Connections
3.3 Cascading RML Mixer Setup
StudioLive™ RML-Series
Owner’s Manual
9
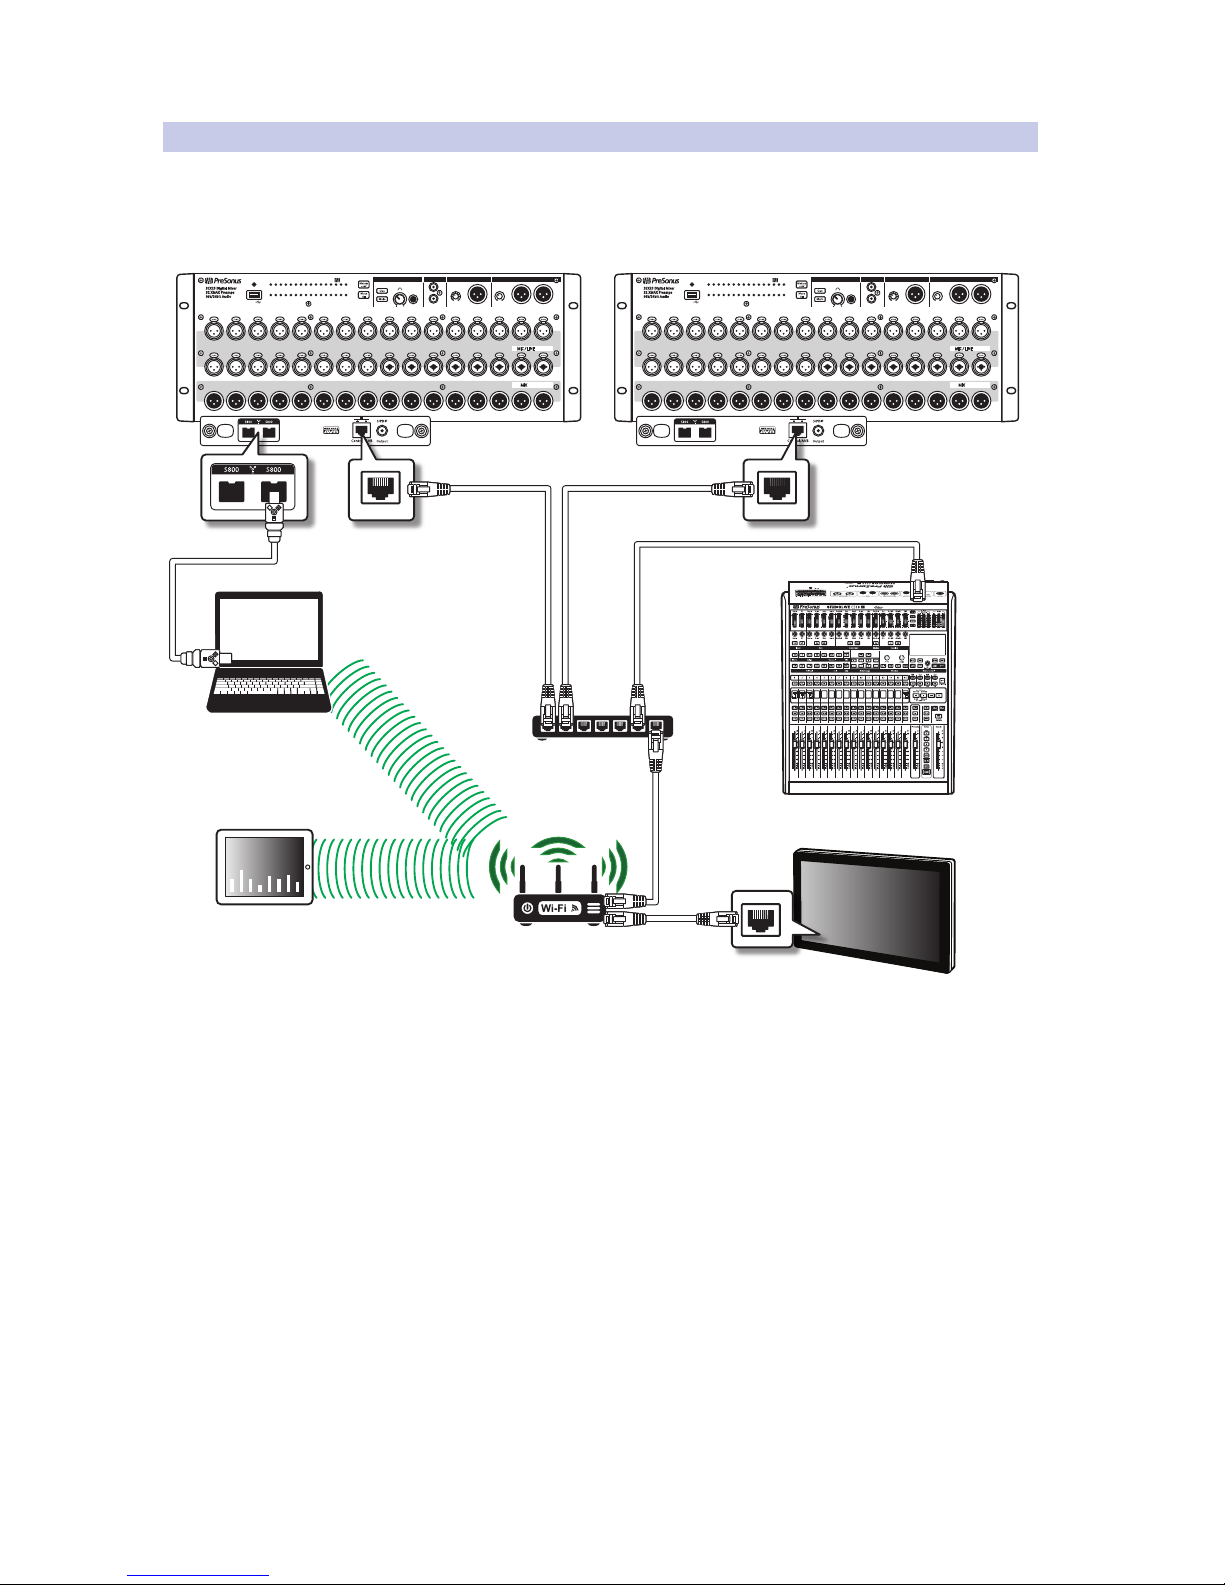
3.3.3 Connecting a computer for recording/playback
To take advantage of computer recording and playback your computer must
be connected to the Master RML mixer via FireWire. If your computer is also
connected to the Wireless Router (either wired or wirelessly) you can remote
control Capture from your CS18AI or UC Surface for true remote operation.
32313029282726252423222120191817 32313029282726252423222120191817
1 2 3 4 5 6 7 8 9 10 11 12 13 14 15 16
17 18 19 20 21 22 23 24 25 26 27 28 29 30 31 32
Power
1 2 3 4 5 6 7 8 9 10 11 12 13 14 15 16
1 2 3 4 5 6 7 8 9 10 11 12 13 14 15 16
USB
MIC / LINEINPUT
M
IXOUTPUT
32X25 Digital Mix er
32 XMAX Preamps
96k/24bit Audio
Level
-80
+6
Level
-80
RightLeft
R
L
Phones Tape In Mono Out Main Out
STUDIOLIVE RML32
+6
32313029282726252423222120191817 32313029282726252423222120191817
1 2 3 4 5 6 7 8 9 10 11 12 13 14 15 16
17 18 19 20 21 22 23 24 25 26 27 28 29 30 31 32
Power
1 2 3 4 5 6 7 8 9 10 11 12 13 14 15 16
1 2 3 4 5 6 7 8 9 10 11 12 13 14 15 16
USB
MIC / LINEINPUT
M
IXOUTPUT
32X25 Digital Mix er
32 XMAX Preamps
96k/24bit Audio
Level
-80
+6
Level
-80
RightLeft
R
L
Phones Tape In Mono Out Main Out
STUDIOLIVE RML32
+6
FireWire-equipped
recording computer
Capture/Studio One
RML-Series Mixer 1
Wireless Router
RML-Series Mixer 2
Ethernet cables
FireWire
CS18AI
Windows 10 Touch computer
with UC Surface
iPad running
UC Surface
AVB Switch
Page 12
3 Making the Connections
3.3 Cascading RML Mixer Setup
StudioLive™ RML-Series
Owner’s Manual
10
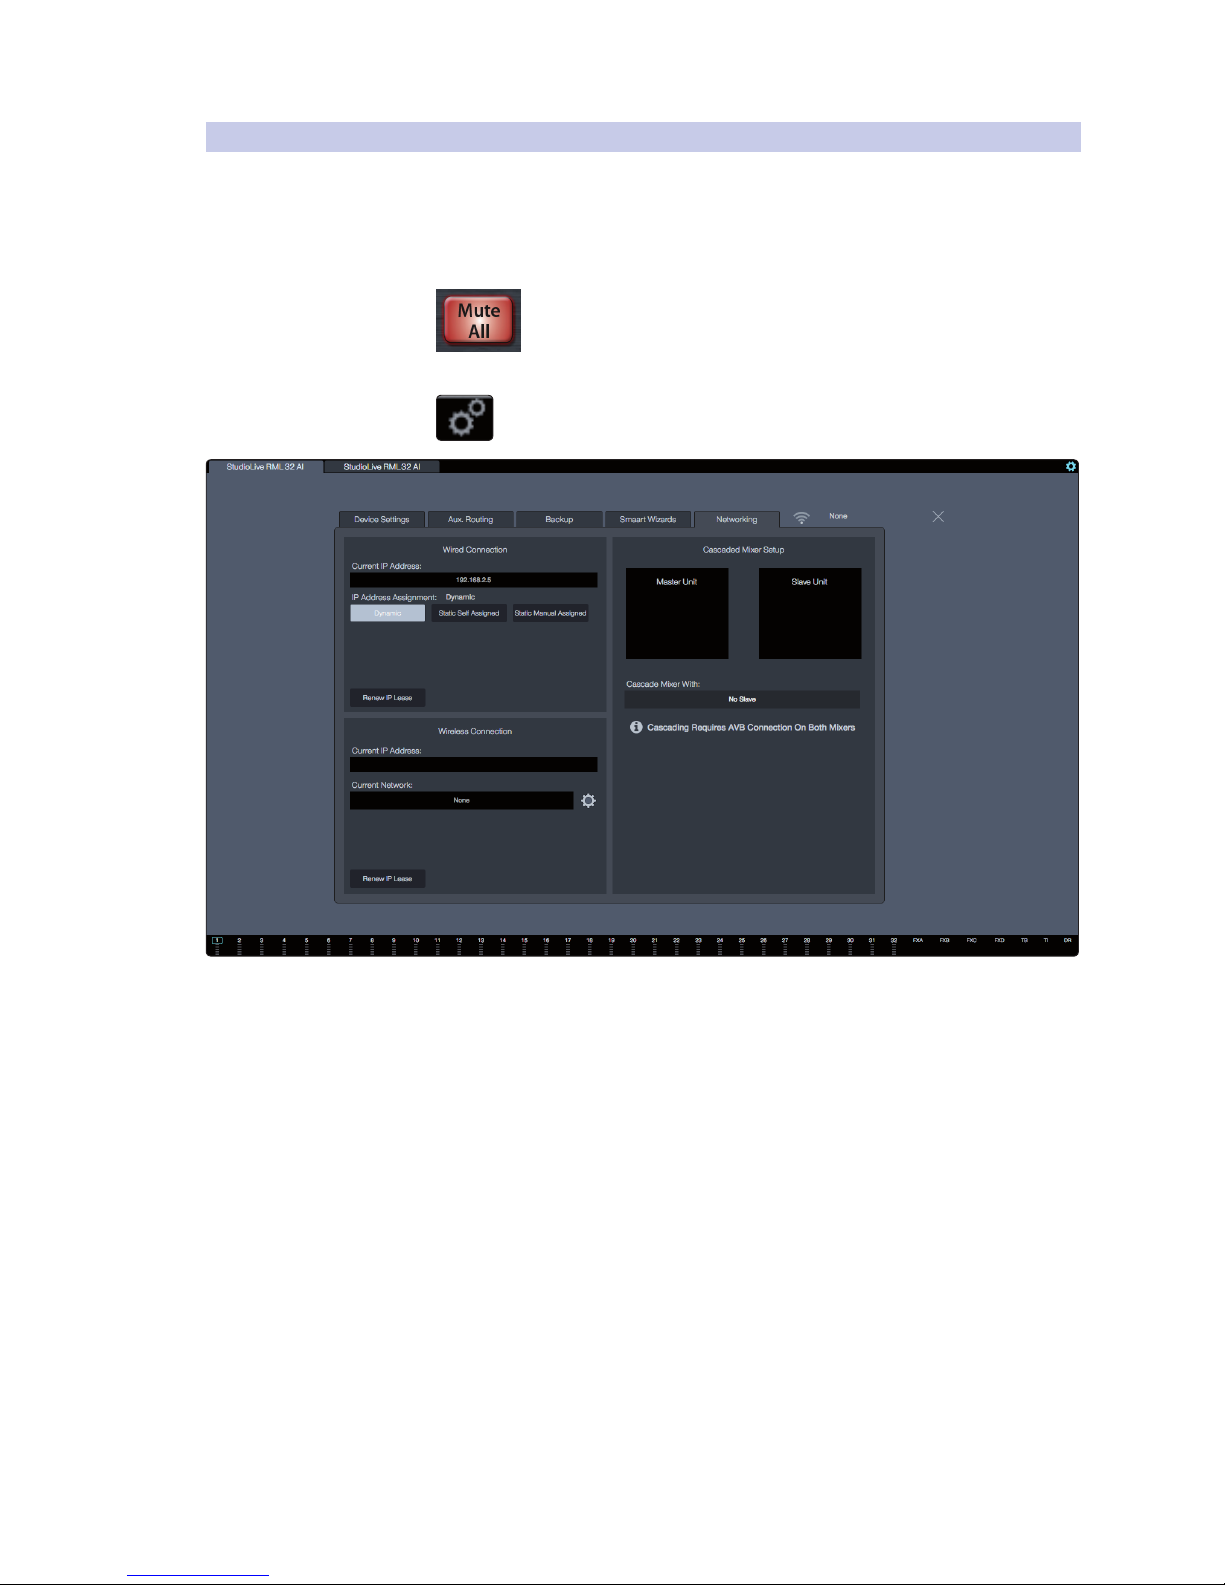
3.3.4 Turning on Cascading
Setting up cascading for the RML mixers is done using UC Surface. First,
select the mixer you’d like to use as the master for channels 1-32.
An easy way to verify that you’re connected to the right mixer is to
press the Mute All button on the front panel of the mixer. If all the
channels in UC Surface mute, you’re connected to the right mixer.
Open the Settings view in UC Surface and then open the Networking tab.
Here you’ll see a section for cascading mixers. Select the mixer
you’d like to be channels 33-64 from the drop down list.
Note: Establishing the cascaded connection may take several seconds. When
complete, you’ll see each mixer displayed in the Master and Slave unit spaces.
You’re now cascaded and using the mixers as a single 64-channel mixer.
1. The tab at the top of the screen for the slave mixer will go away
2. When looking at the mixer view it will now show all 64-channels for both mixers
3. To remove the Cascade simply select None from the
“Cascade with mixer” drop down list
If you’re using a CS18AI, simply select either mixer from the dropdown list in the
UCNET screen and you’ll have control of both mixers as a single 64-channel system.
You are now set up with the amazing StudioLive AVB 64-channel mixing system!
For additional details and instruction on configuring your StudioLive
AI as your default sound input and output device, please refer to your
manual and the video guides in your My PreSonus account.
Page 13
4.0 Getting Started with UC-Surface
4.1 Anatomy of the UC-Surface Screen
StudioLive™ RML-Series
Owner’s Manual
11
4.0 Getting Started with UC-Surface
StudioLive RML32AI and RML16AI are controlled with the UC-Surface
battle-ready mix-control application, which is designed specifically
for live mixing. All primary mixing functionality is at your fingers
without the need to navigate complex views or deep menus.
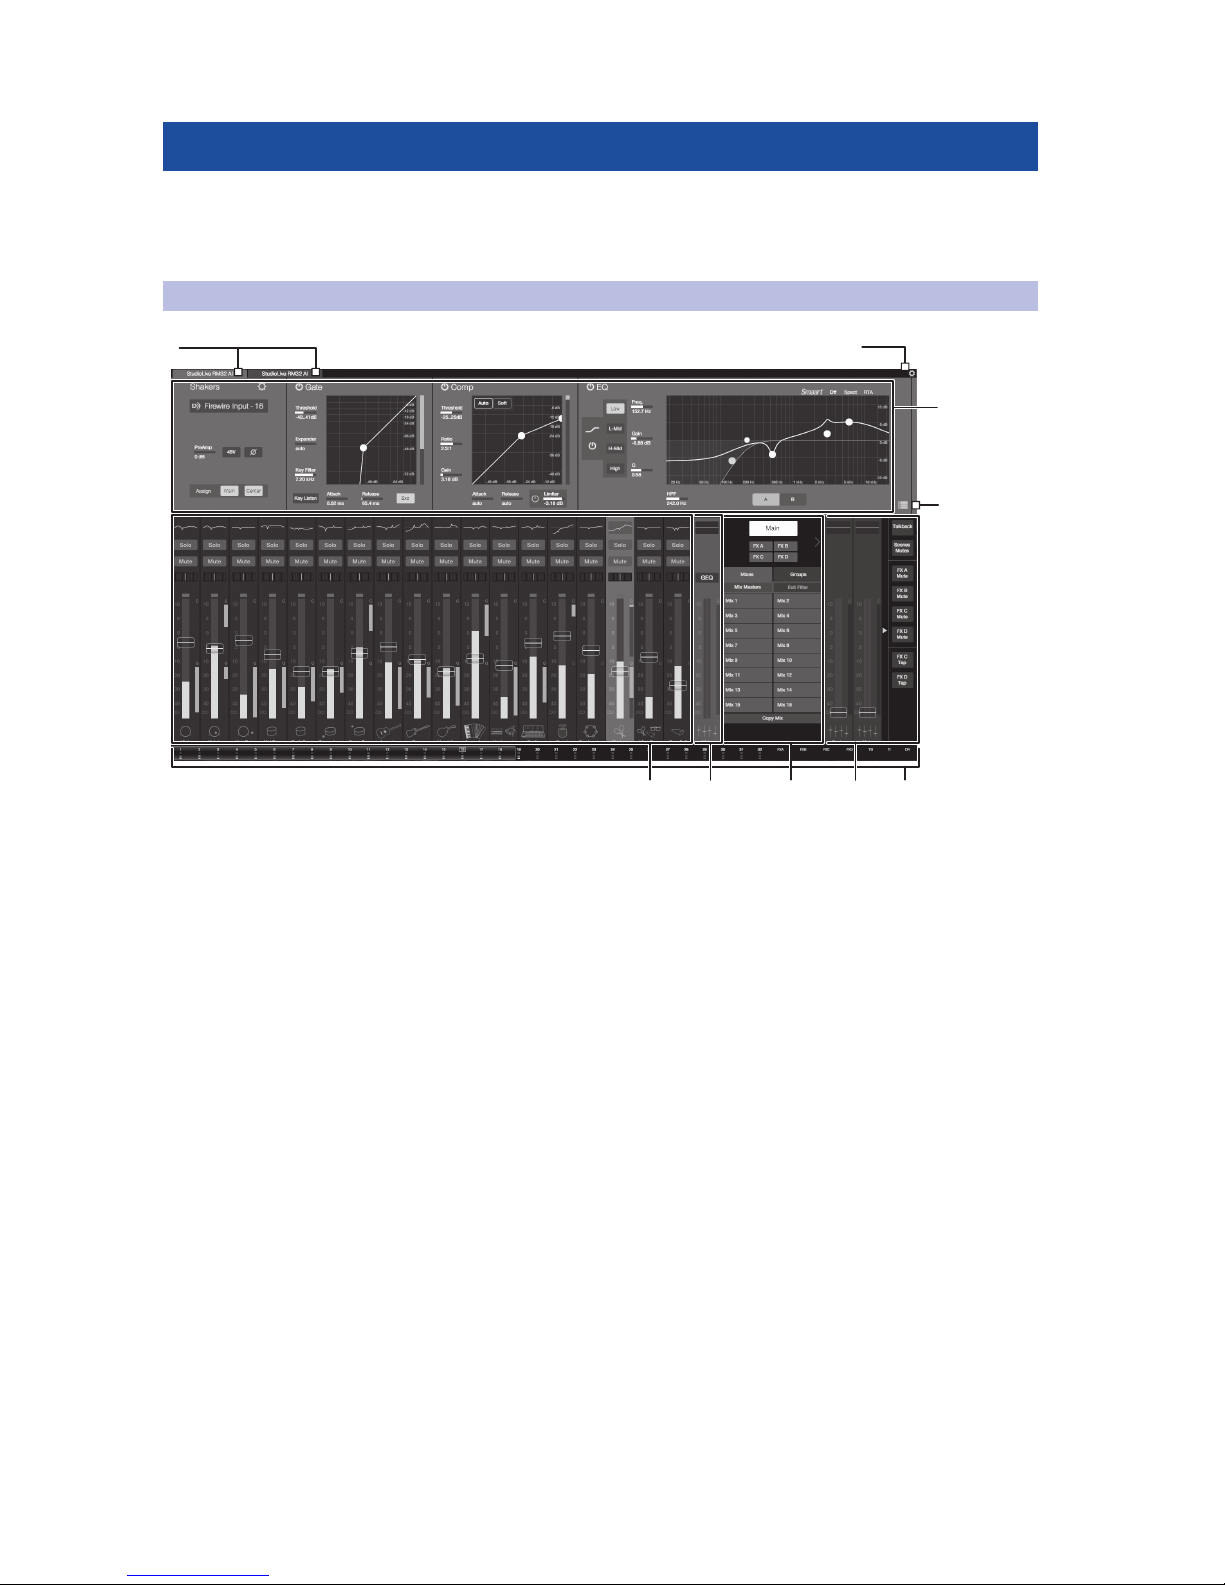
4.1 Anatomy of the UC-Surface Screen
1. Connected device tabs
2. Settings button
3. Fat Channel area
4. Presets button
5. Channel strip area
6. Flex channel strip
7. Mix selection area
8. Main output area
9. Input Meter Bridge and navigation
1
2
3
4
65
7 8 9
Page 14
4.0 Getting Started with UC-Surface
4.1 Anatomy of the UC-Surface Screen
StudioLive™ RML-Series
Owner’s Manual
12
4.1.1 Connected device tabs.
These tabs switch between different mixers available for control on the
network. Selecting a tab will open the associated mixer control.
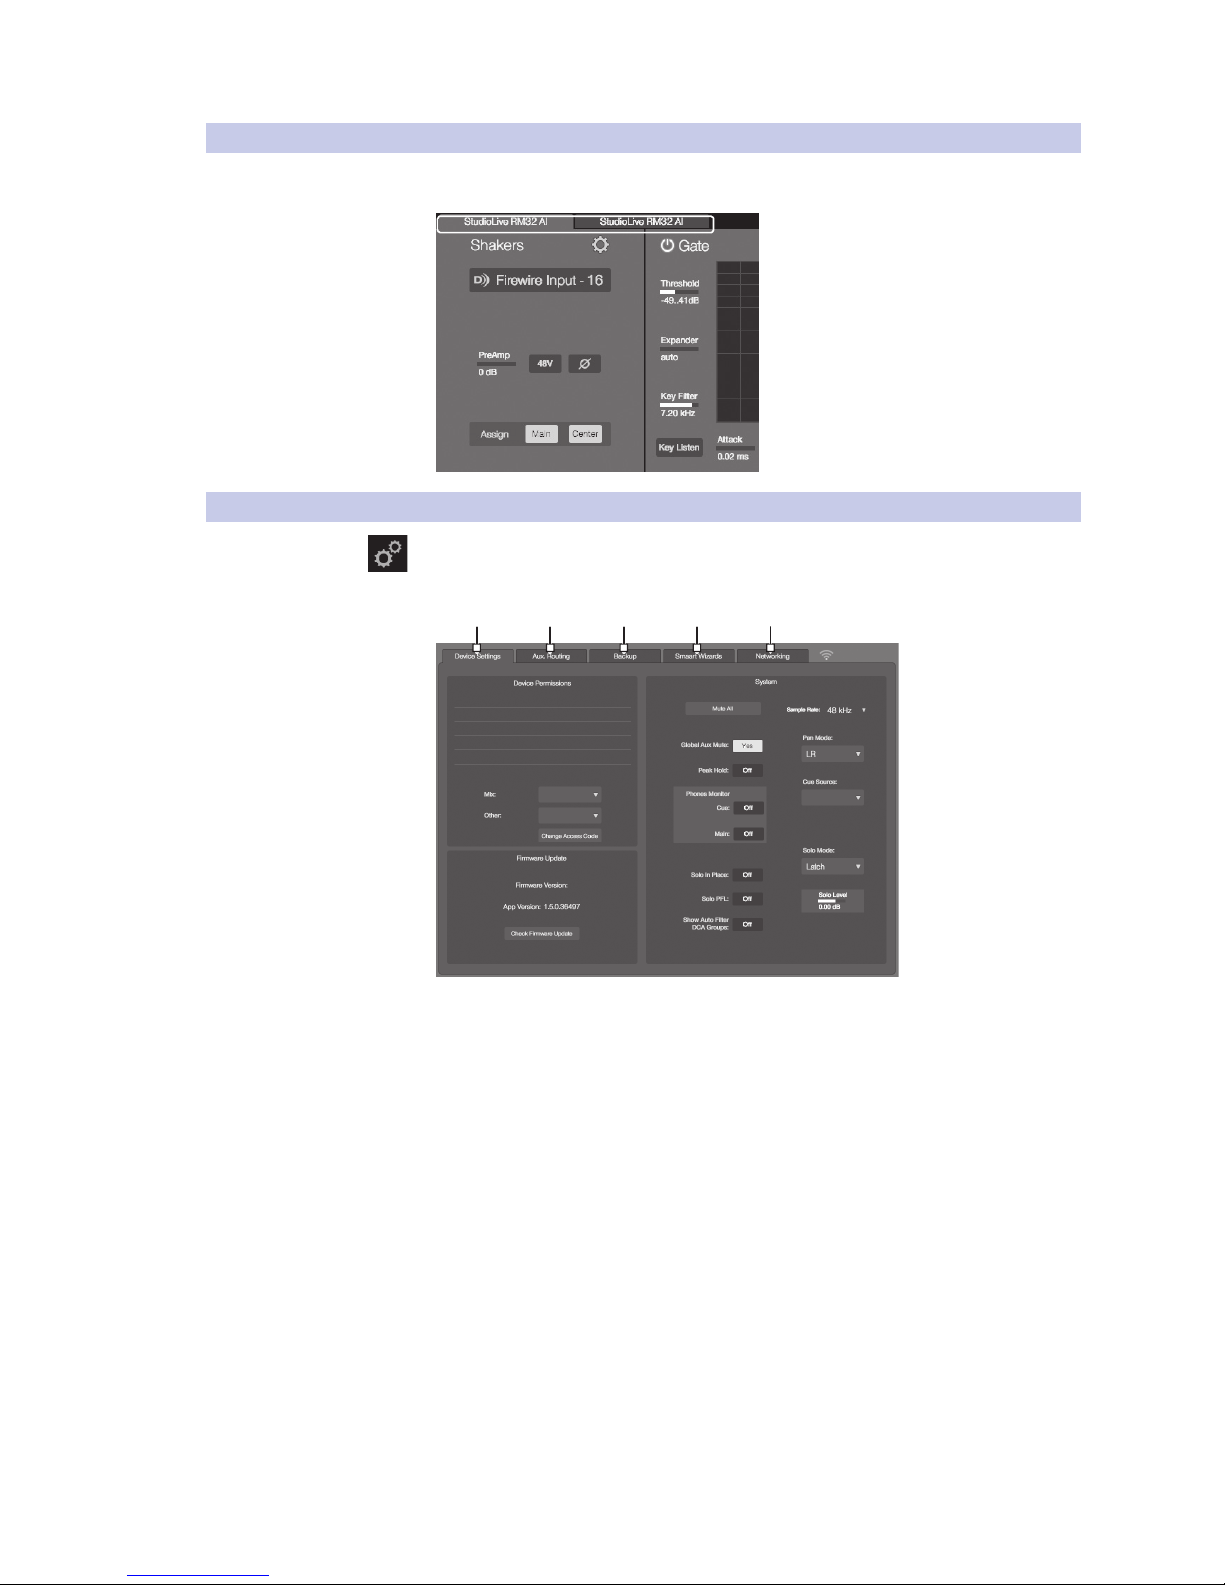
4.1.2 Settings button.
Selecting this button will open the mixer settings screen. This is where you can
configure global mixer settings such as sampling rate, permissions, wireless network
settings, and more.
1 2 3 4 5
1. Device Settings Tab. General settings options for the selected mixer.
2. Aux. Routing Tab. Provides routing options for the
additional digital outputs (FireWire and Network)
3. Backup Tab. Allows you to create and restore a backup of all scenes
and presets on the mixer. Note that Backup does NOT save the
current state of the mixer, only saved scenes and presets.
4. Smaart Wizards Tab. Integrated Smaart Wizards for room
tuning, setting up delays, and checking outputs.
5. Networking Tab. Contains options for setting up IP
Address modes and configuring Cascading.
Page 15
4.0 Getting Started with UC-Surface
4.1 Anatomy of the UC-Surface Screen
StudioLive™ RML-Series
Owner’s Manual
1313
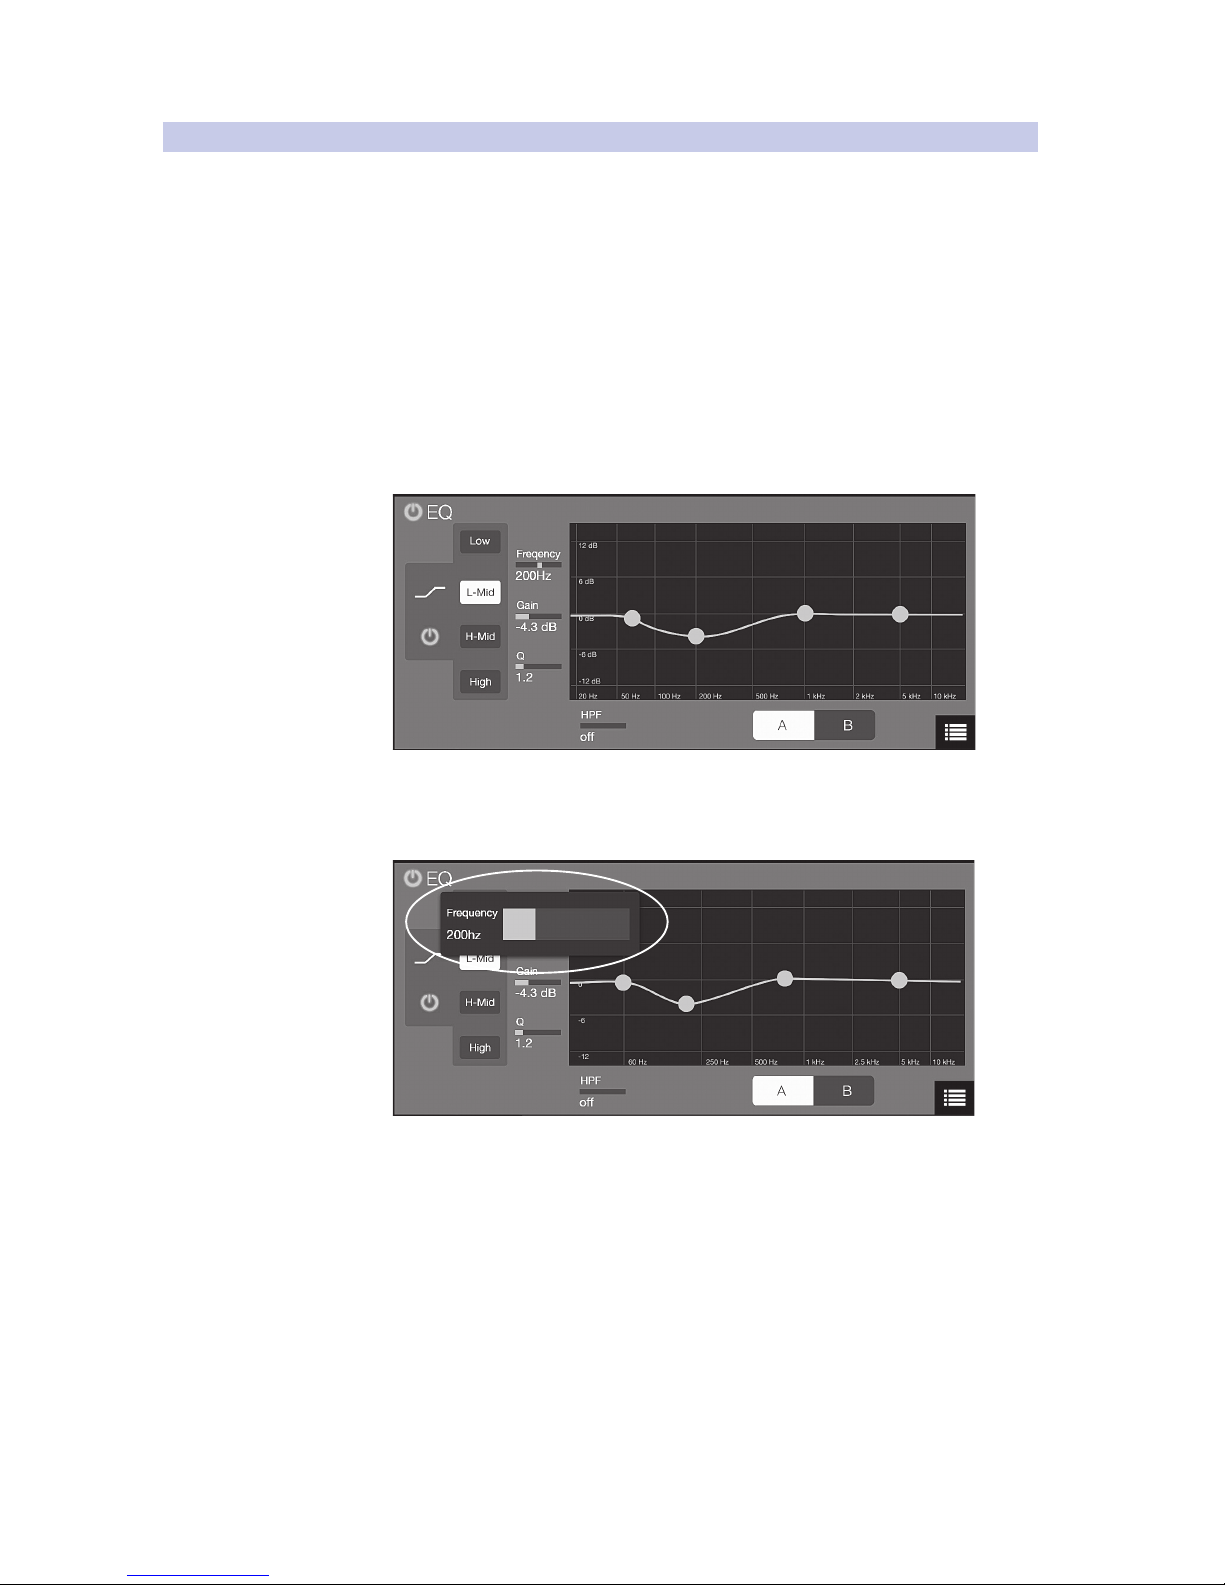
4.1.3 Fat Channel Area
The information displayed in this area will change based on where you are in
your workflow.
• Select any input channel, the Flex Master Channel, or a Main
output to display the associated Fat Channel DSP.
• Select the Flex Master Channel GEQ or FX Edit to display
the associated graphic EQ or effects settings.
• Select Scenes/Mutes (main output area) to display
the Quick Scenes and Mute Groups.
Parameter Box
In UC-Surface, we’ve replaced the traditional “knob” graphics with a
more informative parameter box. This area displays the name of the
parameter, text of the current value, and a meter showing the value.
• When working on a touchscreen, touching the parameter box will
open an adjustment meter under you finger. Move your finger along
the meter to change the value. Remove your finger when done, and
the meter will snap back to show the compact parameter box.
• When working with a mouse, click on the parameter box to
display the adjustment meter or use the scroll wheel to adjust
the value without opening the adjustment meter.
Page 16
4.0 Getting Started with UC-Surface
4.1 Anatomy of the UC-Surface Screen
StudioLive™ RML-Series
Owner’s Manual
14
Channel and Mix Settings
In the Fat Channel view, you can open the channel options to edit the channel name
and choose an input source, the channel type and icon, and stereo linking.
Channel types and icons provide a host of great benefits to your workflow. When
you select a channel type, it will name your channel, display the icon type, and tag
the channel type for contextual filtering of other channel options. For example,
when choosing a Fat Channel preset, if the selected channel is assigned to “guitar,”
the presets displayed will be filtered to only show you presets tagged for guitar,
making it easier to find the preset you need. Choosing a channel type will also
create automatic Filter Groups for quicker navigation and enhanced mixing
workflows. Learn more about Filter Groups in the section describing the Mix
selection area or in the user manual and video guides in your My PreSonus account.
For mixes, opening the settings give you access to the options for Stereo
Linking mixers, changing a mix between an Aux and a Subgroup, naming the
mix, and setting the output Delay for the four mixes with delay available.
4.1.4 Presets Button
This button brings up the Presets menu when working with the Fat Channel,
graphic EQ, or FX bus and calls up the Complete Scenes menu when working in
the Scenes/Mute Groups. For details on working with presets and scenes, please
refer to the user manual and video guides in your My PreSonus account.
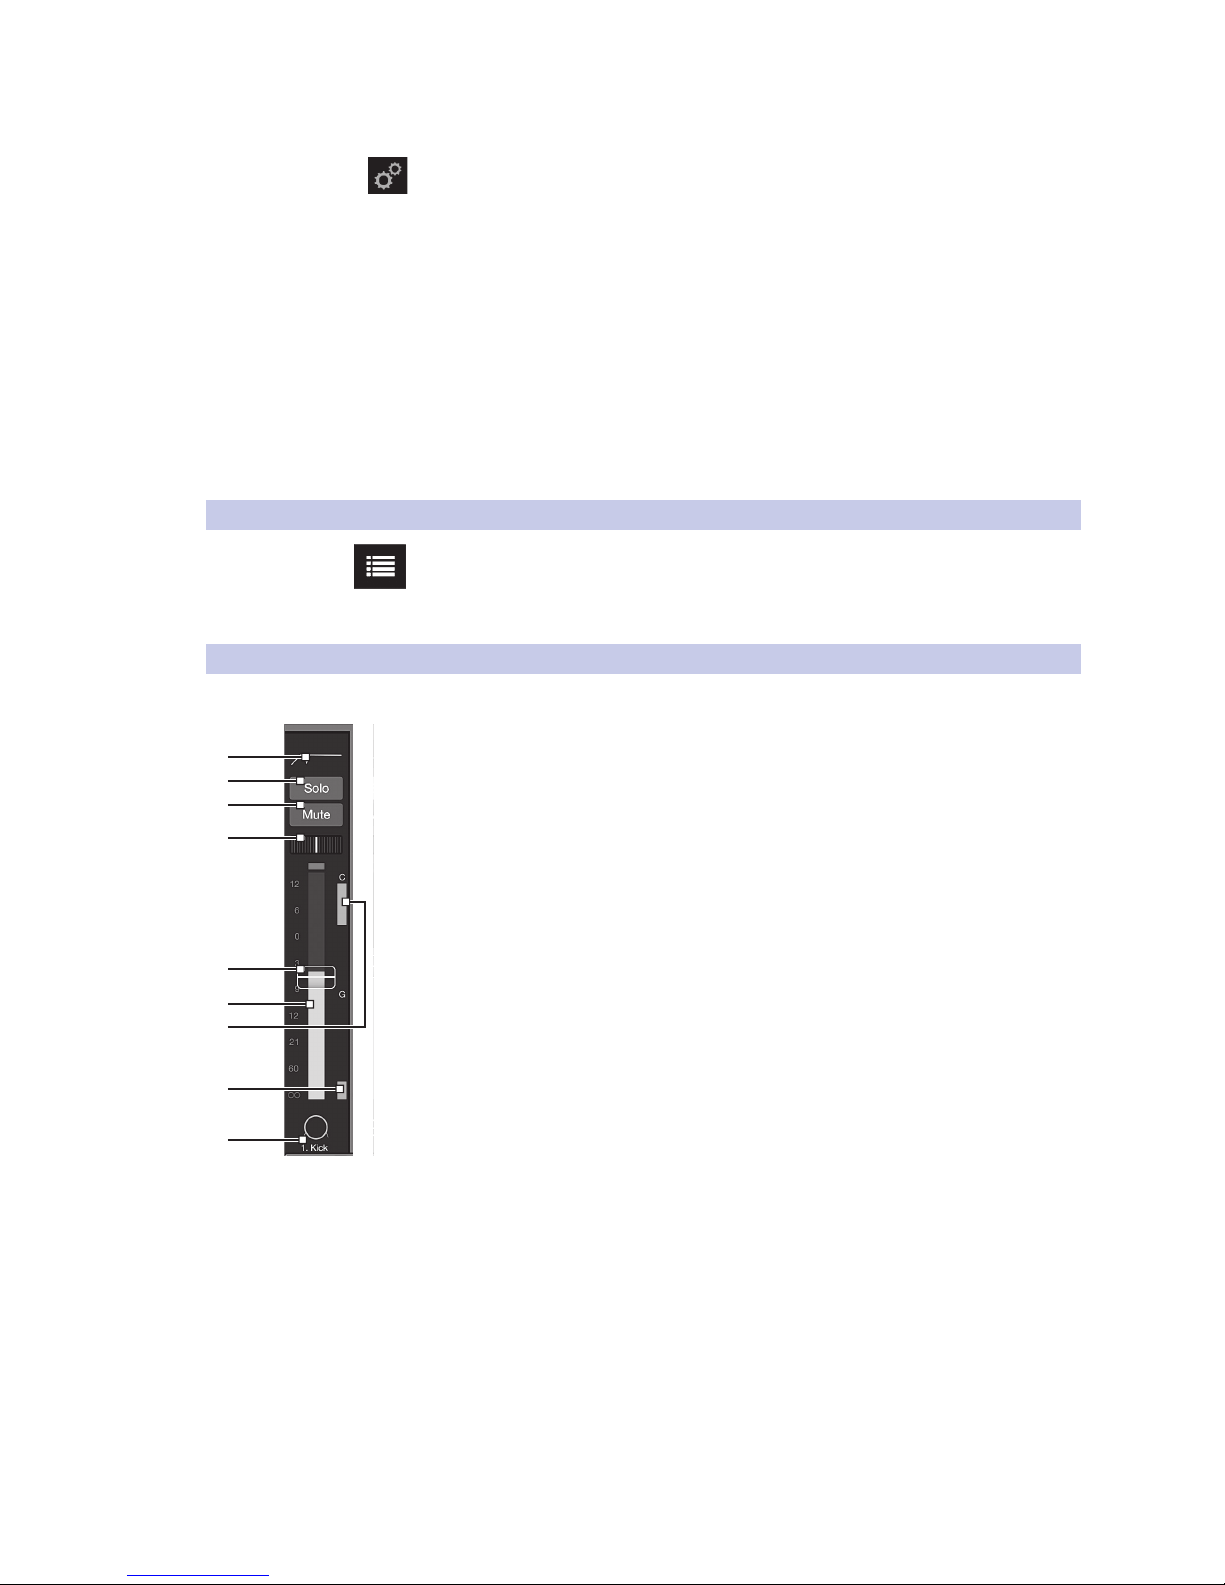
4.1.5 Channel Strip Area
This area displays the input channels and fader levels for the selected mix.
1. EQ micro view. Selects the associated channel and brings up the
Fat Channel.
2. Solo
3. Mute
4. Pan
5. Channel fader. Controls the channel level for the selected mix.
6. Input meter
7. Compressor gain-reduction meter
8. Gate gain-reduction meter
9. Channel number, name, and type icon. Selects the associated channel and
brings up the Fat Channel.
1
2
3
4
6
5
9
8
7
Page 17
4.0 Getting Started with UC-Surface
4.1 Anatomy of the UC-Surface Screen
StudioLive™ RML-Series
Owner’s Manual
15
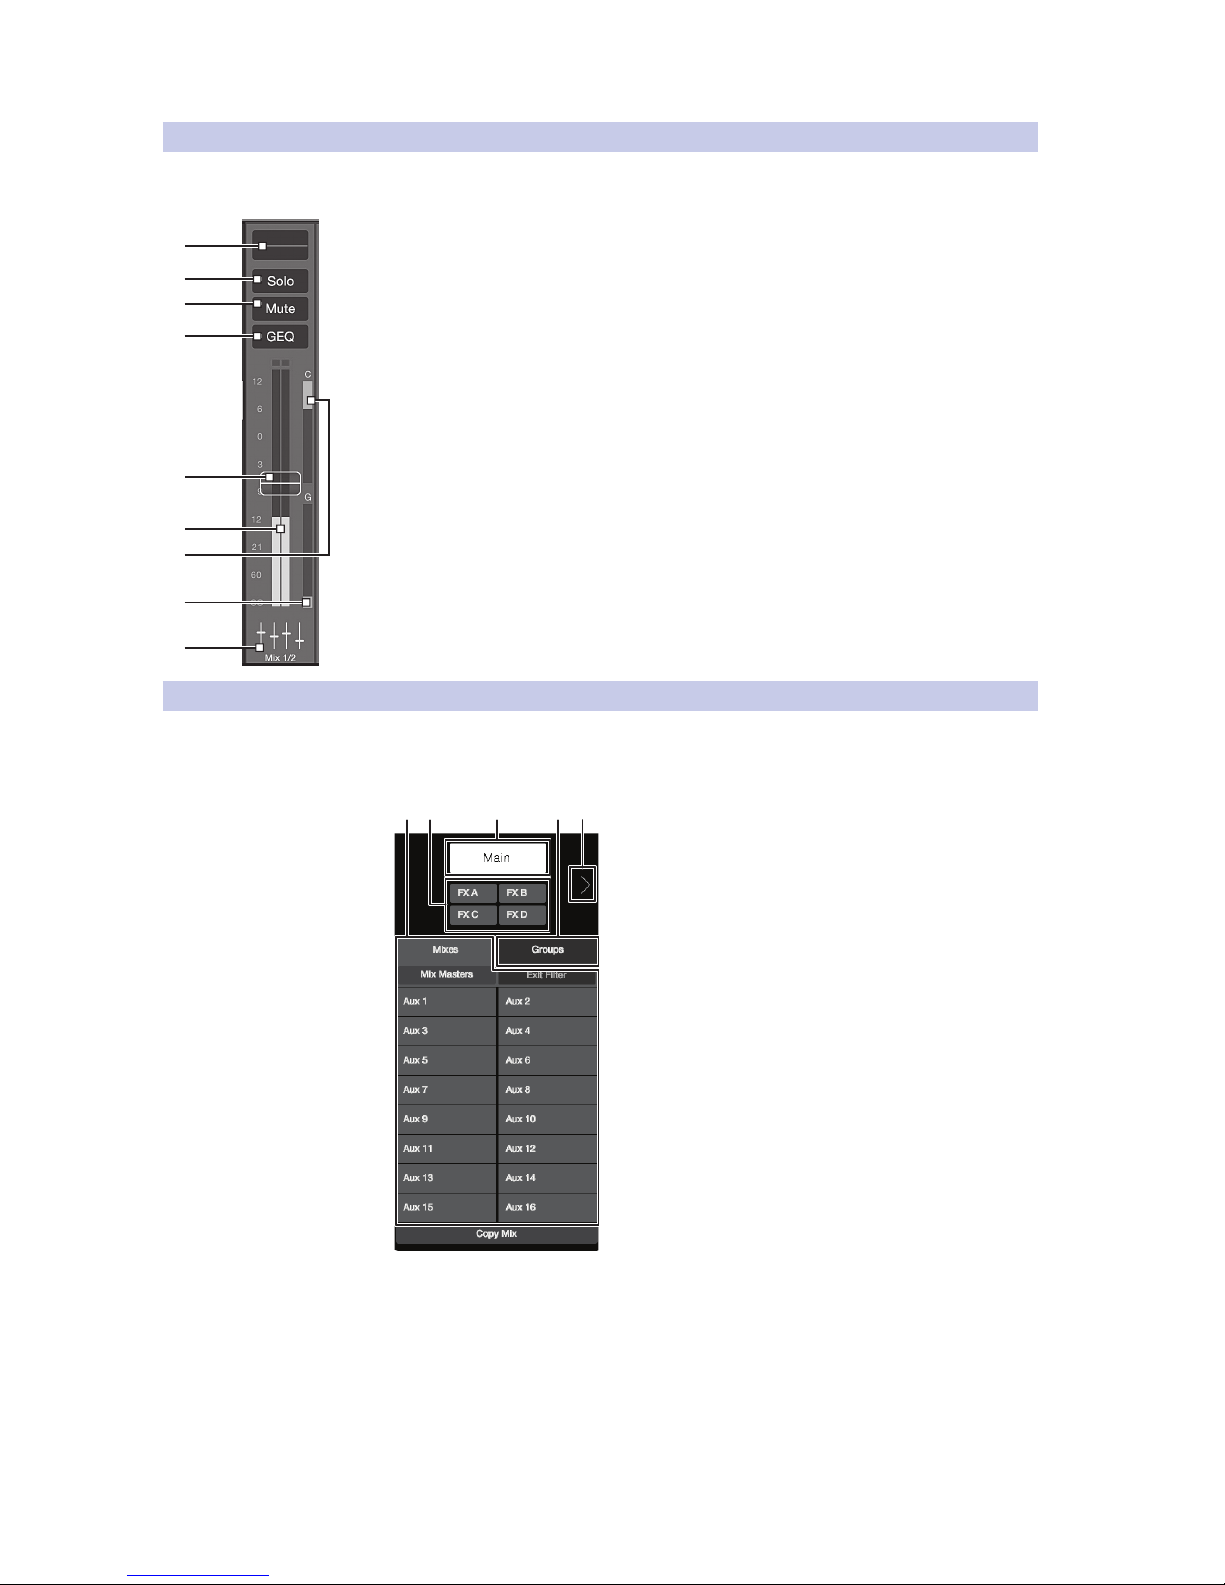
4.1.6 Flex Master Channel Strip
The Flex Master channel strip shows the master channel for the selected mix. For
example, when Mix 3 is selected, the Flex Master is the main output for Mix 3.
1. EQ micro view. Selects the associated Mix master and brings up the Fat Channel.
2. Solo
3. Mute
4. GEQ or FX Edit. Opens the associated graphic EQ
or effects editor in the Fat Channel area.
5. Mix fader
6. Output meter
7. Compressor gain-reduction meter
8. Gate gain-reduction meter
9. Mix number, name, and type icon. Selects the associated Mix master and brings
up the Fat Channel.
4.1.7 Mix Selection Area
This is the primary navigation area for your mixer. Here you’ll select
the mix that’s currently being controlled by the channel faders.
This is also where you’ll find the settings for each mix.
1 3 4 52
1. Mix selection buttons
2. FX Mix selection buttons
3. Main Mix select button
4. Filter DCA Groups tab
5. Hide Main Mix Faders arrow
1
2
3
4
6
5
9
8
7
Page 18
4.0 Getting Started with UC-Surface
4.1 Anatomy of the UC-Surface Screen
StudioLive™ RML-Series
Owner’s Manual
16
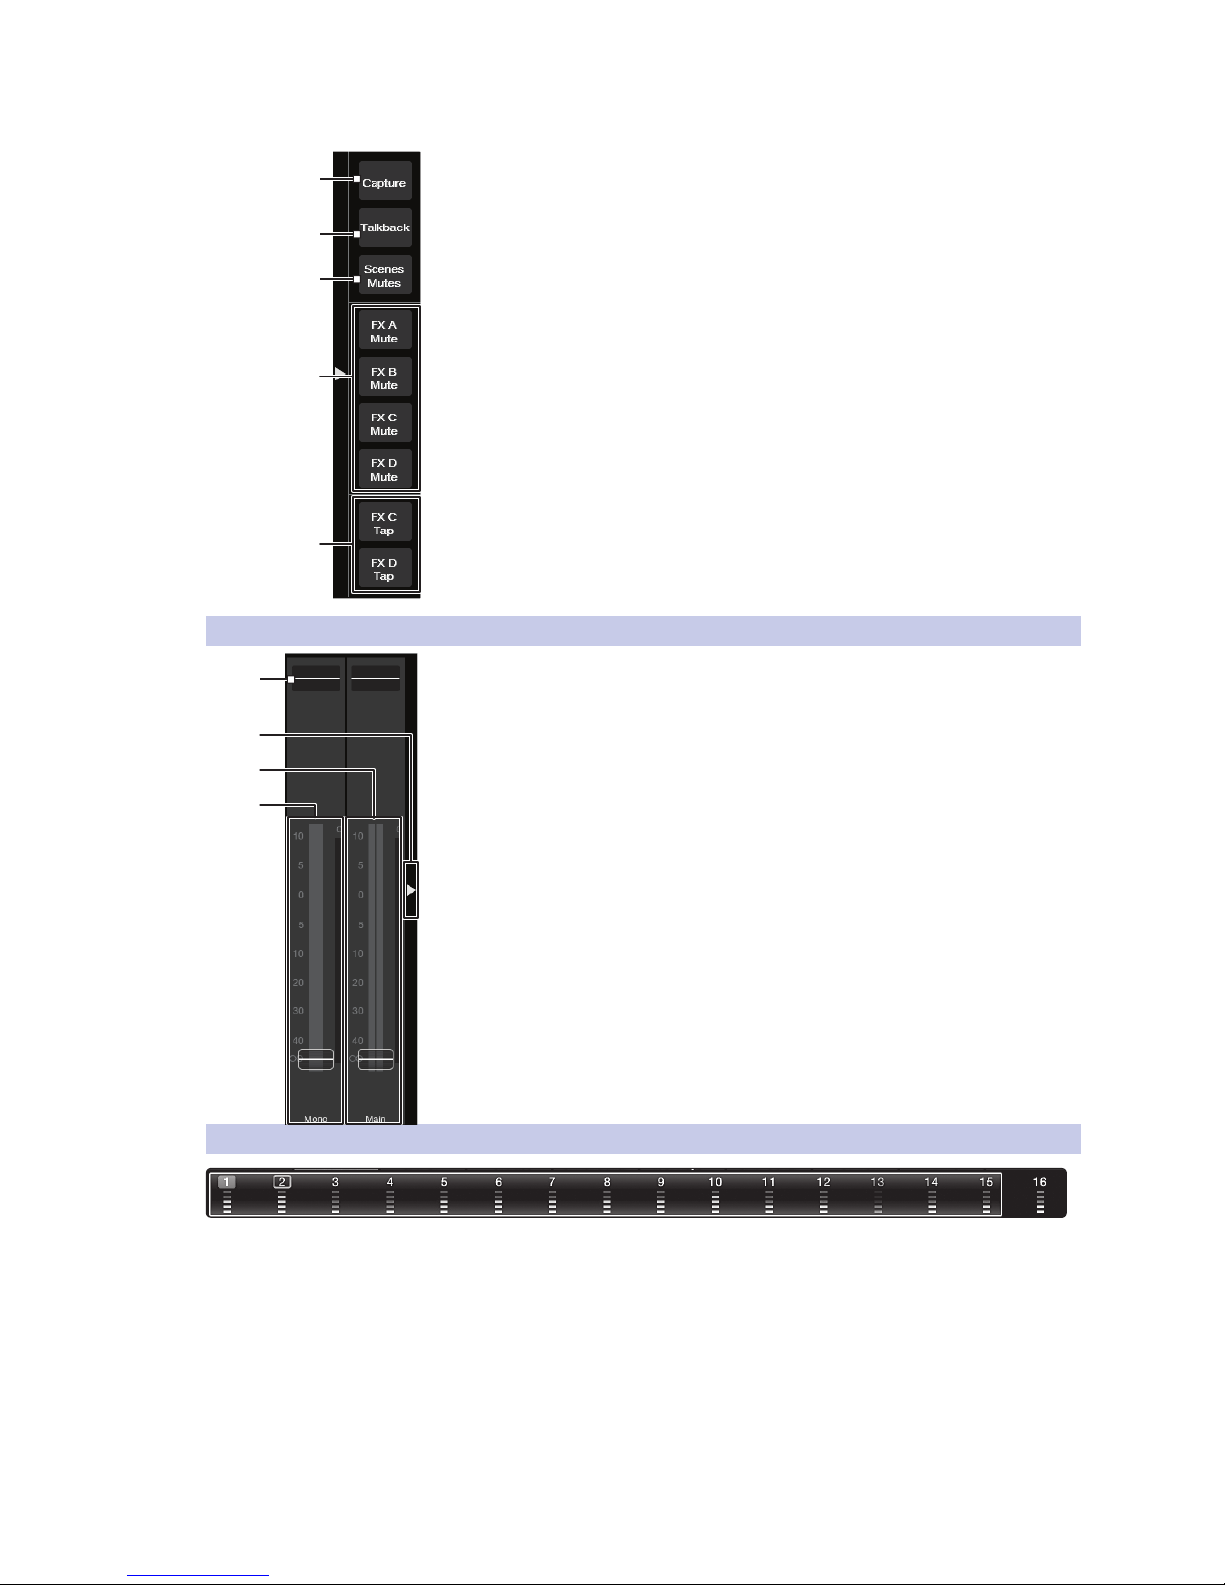
Quick Access Panel
When an FX mix is selected, this area provides quick access to all FX mutes and Tap
Tempo buttons for the delay effects.
1. Capture. Opens the remote Capture control view
2. Talkback. Turns Talkback on/off.
3. Scenes/Mutes. Displays the Quick Scenes and
Mute Groups in the Fat Channel area
4. FX Mutes. Mute buttons for the four FX sends.
5. FX Tap. Tap Tempo buttons for the two delay FX.
4.1.8 Main Output Area
1. EQ microview. Selects the associated main mix and brings up the Fat Channel
2. Quick Access Bar Arrow. Opens the Quick Access Bar.
3. Main Left/Right channel strip. Displays the fader and
meters for the Main Left/Right mix bus.
4. Main Mono/Center channel strip. Displays the fader and meter for the Main
Mono mix bus.
4.1.9 Input Meter Bridge and Navigation
The Meter Bridge along the bottom the application shows the input meters
for all available channels. A highlighted window shows the channels that are
currently displayed in the input channel area. You can use the Meter Bridge
to navigate to a specific channel by selecting the channel to “jump” the input
channel view to that area or drag the highlighted window to scroll to that area.
You can also swipe the input channel area to scroll through the available channel,
and the highlighted window in the Meter Bridge will follow your location.
There’s a lot more you can do with the battle-ready UC-Surface
control application. Please refer to the user manual and video
guides in your MyPreSonus account to learn more.
1
2
3
4
5
1
2
3
4
Page 19

Added bonus: PreSonus’ previously Top Secret recipe for…
Rice Dressing
Ingredients:
• 1 lb ground beef
• 1 lb chopped chicken liver
• 1 onion (diced)
• 2 green peppers (diced)
• 4-6 celery stalks (diced)
• 2 garlic cloves (minced)
• ¼ C. chopped fresh parsley
• 3 C. chicken stock
• 6 C. cooked rice
• 1 Tbs. oil
• Salt and pepper to taste
• Cayenne pepper to taste
Cooking Instructions:
1. In a large pot, heat oil on medium high and add meat, salt, and pepper to taste. Stir until meat begins to brown.
2. Lower heat and add all vegetables. Cook until onions are transparent and celery is very tender. Add stock as necessary to
prevent burning.
3. Stir in cooked rice. Add remaining stock and simmer on low until ready to serve.
Page 20
Part# 825-WLV0073-A
®
18011 Grand Bay Ct. • Baton Rouge,
Louisiana 70809 USA• 1-225-216-7887
www.presonus.com
StudioLive™ RML-Series Mixers
Touch-Software-Controlled, Rack-mount Digital
Mixing System with Active Integration
™
Quick Start Guide
 Loading...