

Page 1

Service Manual
UBK13/ UBK13 BASE SERVICE
MANUAL
20039-174 REV A
Vertical Upright & Recumbent Bicycles
PRECOR CUSTOMER SUPPORT
© Precor Incorporated, Unauthorized Reproduction and Distribution Prohibited by Law Page 1
Page 2

Page 3

Contents
About This Document .............................................................................................. 2
Right, Left, Front, and Back Conventions ..................................................................................................................... 2
Safety...................................................................................................................................................................................... 3
Warning and Caution Statements and General Safety Guidelines....................................................................... 4
General Information ........................................................................................................................................................... 4
Required Tools and Equipment ............................................................................. 5
Preventive Maintenance - Bikes ............................................................................ 6
Regular Preventive Maintenance (Owner) ................................................................................................................. 6
Quarterly Maintenance ........................................................................................................ 7
On-Site Preventive Maintenance (Service Technician) .......................................................................................... 7
Checking the Bicycle Operations ......................................................................... 8
Primary Belt Tension Adjustment .................................................................................................................................. 9
Adjusting the Seat Carriage - RBK Only ..................................................................................................................... 10
RBK13/UBK13 Base Troubleshooting .................................................................. 12
Display does not Illuminate ........................................................................................................................................... 12
No or Incorrect Pedaling Resistance ........................................................................................................................... 13
RBK13/UBK13 Base Replacement Procedures ................................................ 16
Replacing the Covers - UBK13 ....................................................................................................................................... 16
Replacing the Covers - RBK13 ....................................................................................................................................... 21
Replacing a Primary Drive Belt ..................................................................................................................................... 25
Replacing a Crankarm .................................................................................................................................................... 26
Replacing the Primary Pulley ........................................................................................................................................ 28
Replacing the Input Pulley and Axle Assembly ........................................................................................................ 31
Replacing the Idler Pulley .............................................................................................................................................. 36
Replacing a Generator .................................................................................................................................................... 38
Replacing a Battery ........................................................................................................................................................... 41
Replacing the lower PCA ............................................................................................................................................... 42
Replacing the Seat Post Pop-Pin - UBK13 Only ....................................................................................................... 44
Replacing the Seat Post - UBK Only ........................................................................................................................... 46
Replacing a Seat Post Component - UBK Only ....................................................................................................... 48
Replacing All or Part of a Seat Carriage - RBK only ................................................................................................ 51
Wire and Block Diagrams ...................................................................................... 56
Block Diagrams ................................................................................................................................................................. 57
Wire Diagrams ................................................................................................................................................................. 58
Index ............................................................................................................................ 59
© Precor Incorporated, Unauthorized Reproduction and Distribution Prohibited by Law Page 1
Page 4

General Information ....................................................................................................... 4
Section One
About This Document
In This Section
Right, Left, Front, and Back Conventions.................................................................. 2
Safety ................................................................................................................................. 3
Warning and Caution Statements and General Safety Guidelines ................... 4
Right, Left, Front, and Back
Conventions
In this manual, right, left, front, and back are form the perspective of a user operating the equipment
facing the console.
© Precor Incorporated, Unauthorized Reproduction and Distribution Prohibited by Law Page 2
Page 5

Safety
Safety guidelines you should know and follow include:
♦ Read the owner’s manual and follow all operating instructions.
♦ Operate the equipment on a solid, level surface with the unit properly leveled. The equipment is
properly leveled when the feet are in contact with the floor. Visually check the equipment before
beginning service or maintenance operations. If it is not completely assembled or is damaged in any
way, exercise extreme caution while operating and checking the equipment.
♦ When operating the equipment, do not wear loose clothing. Do not wear shoes with heels or
leather soles. Check the soles of your shoes and remove any embedded stones. Tie long hair back.
♦ Do not rock the unit. Do not stand or climb on the handlebars, display enclosure, or cover.
♦ Do not set anything on the handlebars, display enclosure, or cover. Never place liquids on any part
of the equipment while performing service.
♦ To prevent electrical shock, keep all electrical components away from water and other liquids.
♦ Do not use accessory attachments that are not recommended by the manufacturer-such
attachments might cause injuries.
♦ Units equipped with Personal Viewing Screens will have external power supply and coaxial cable
routed through the bottom of the unit to the top of the display console. Cord management must be
maintained.
© Precor Incorporated, Unauthorized Reproduction and Distribution Prohibited by Law Page 3
Page 6

Warning and Caution
Statements and General Safety
Guidelines
Warning statements indicate a particularly dangerous activity. Warning statements you will find in this
manual include:
♦ Self powered units, it will either be necessary to either equip the unit with the optional external
power supply or have an assistant pedal on the unit while voltage measurements are being taken.
Because of the danger of working on the unit while it is in motion using the optional external power
supply is strongly recommended.
♦ When the unit is used, crank arms are in motion; the generator will operate and produce potentially
hazardous voltages even when the battery is disconnected.
Caution statements are intended to prevent damage to the equipment as a result of the current
activity. Caution statements included in this manual are listed below:
♦ When it is necessary to lift or move the equipment, ensure that the equipment has adequate
support and that you use proper lifting techniques.
♦ To remove power from the equipment, the optional external power supply (when equipped) must
be disconnected from the wall outlet and the red (positive) wire must be disconnected from the
battery. Always ensure that the equipment external power supply is unplugged from the wall outlet
and the red (positive) wire is removed from the battery when you inspect or adjust the equipment,
or when you isolate, remove, or replace an component.
♦ Removing the covers exposes high voltage components and potentially dangerous machinery.
Exercise extreme caution when you perform maintenance procedures with the cover(s) removed.
♦ During service operations you will be very close to moving machinery and voltage bearing
components. When you perform maintenance procedures with the covers removed, remove
jewelry (especially from ears and neck), tie up long hair, remove neck ties, and do not wear loose
clothing.
♦ Exercise caution when touching any wire or electrical component during equipment operation.
General Information
For the latest exploded view, part number and part pricing information, visit the Precor dealer website
at www.precor.com/connection.
© Precor Incorporated, Unauthorized Reproduction and Distribution Prohibited by Law Page 4
Page 7

S ection Two
Required Tools and
Equipment
The following is a summary of the tools and equipment that may be required when you service Precor
Equipment.
Tools
♦ Phillip and flat-head screwdrivers
♦ Metric allen wrench set
♦ Open-end metric wrench set
♦ Metric socket wrench set
♦ Snap ring pliers
♦ Drive belt tension gauge
♦ Park Too CCP-22 crankarm puller or Shimano TL-FC10 Crankarm puller
Equipment
♦ Anti-static kit
♦ Digital multimeter
© Precor Incorporated, Unauthorized Reproduction and Distribution Prohibited by Law Page 5
Page 8

On-Site Preventive Maintenance (Service Technician) ....................................... 7
Section Three
Preventive Maintenance -
Bikes
In This Section
Regular Preventive Maintenance (Owner) .............................................................. 6
Preventive maintenance measures are either scheduled or unscheduled. Scheduled preventive
maintenance activities are included here so that you are aware of the preventive measures preformed
on a regular basis.
Regular Preventive
Maintenance (Owner)
Cleanliness of the cycle and its operating environment will keep maintenance problems and service
calls to a minimum. Precor recommends that you perform the following preventive maintenance
schedule.
After Each Use
♦ Turn off and, unplug power adapter (if equipped) from the bicycle.
♦ Wipe down the covers, handlebars, seat and pedals with a damp cloth.
Daily Maintenance
♦ Clean the bicycle's frame, covers, seat and pedals using a water damped cloth. Wipe the surface of
the electronic console with a damp sponge or soft cloth. Dry with clean towel.
Weekly Maintenance
♦ Clean underneath the bicycle, following these steps:
1 Turn off the bicycle with the on/off switch, then unplug it from the power adapter (if equipped).
2 Move the bicycle to gain access to the floor directly underneath the bicycle.
3 Vacuum the rug or damp mop the floor.
© Precor Incorporated, Unauthorized Reproduction and Distribution Prohibited by Law Page 6
Page 9

4 Make sure the floor is dry before returning the bicycle to its original position.
Quarterly Maintenance
1 Remove the covers.
2 Thoroughly clean inside the bicycle. Use a vacuum cleaner and damp rag to remove all the dust
particles, etc.
3 Check the belt tension per procedure,
Primary Belt Tension Adjustment
(on page 9).
On-Site Preventive
Maintenance (Service
Technician)
When you are called to service a bicycle perform these preventive maintenance activities:
♦ Perform the software diagnostics. Check LED and keypad functions. Record the odometer reading.
For more information, consult the console service manual equipped with your equipment.
♦ Visually inspect the drive belts for cracks, fraying or excessive wear.
♦ Visually examine all wires and check connectors and wire connections. Secure connections and
replace wiring as necessary.
© Precor Incorporated, Unauthorized Reproduction and Distribution Prohibited by Law Page 7
Page 10

Adjusting the Seat Carriage - RBK Only ................................................................... 10
Section Four
Checking the Bicycle
Operations
In This Section
Primary Belt Tension Adjustment .............................................................................. 9
This section provides you with a quick method of checking operation.
Procedure
1 Start pedaling.
2 With the banner displayed, press QUICK START.
3 The resistance will start at Level 1.
4 Operate the RBK13/UBK13 for 4–5 minutes. As you operate the bike, concentrate on the operating
sounds made by the unit. Be on the alert for unusual rubbing, hitting, grinding, or squeaking noises.
5 Press the RESISTANCE key until you reach Resistance Level 10. Operate the RBK13/UBK13 for
another 2–3 minutes.
6 If the electronic display does not change appropriately, reference per the, Standard Console service
manual.
7 If the resistance does not change or the operation of the bike feels inconsistent compared with
Resistance Level 1, troubleshoot per procedure, No or Incorrect Pedaling Resistance .
8 Press the RESISTANCE key until you reach Resistance Level 20. Operate the bike for another 2–3
minutes.
9 If the resistance of the bike does not change or operation feels inconsistent with Resistance Levels 1
and 20, troubleshoot per procedure, No or Incorrect Pedaling Resistance.
10 Check the LED’s mounted on the upper PCA and the function keys displayed on the electronic
console by performing the diagnostics test in the Standard Console service manual.
© Precor Incorporated, Unauthorized Reproduction and Distribution Prohibited by Law Page 8
Page 11

Figure 1: Belt Gauge
Figure 2: Drive Belt Adjustment
Primary Belt Tension
Adjustment
1 Remove the covers as per Procedure
Covers - RBK13
2 Place the belt tension gauge on the primary drive belt.
3 The correct belt tension is 70 ± 5 pounds. If the belt tension is correct replace the covers. If the belt
tension is incorrect, continue to the next step.
(on page 21).
Replacing the Covers - UBK13
(on page 16) or
Replacing the
© Precor Incorporated, Unauthorized Reproduction and Distribution Prohibited by Law Page 9
Page 12

4 Slightly loosen the three 4mm idler pulley bracket mounting bolts. The belt tension cannot be
adjusted if the idler pulley bracket mounting bolts are tightened.
5 Loosen the adjustment bolt lock nut.
6 Turn the adjustment bolt clockwise or counter clockwise as required until the gauge is in the range
of 70 ± 5 pounds.
7 Remove and then replace the belt tension gauge on the primary drive belt. If the belt tension is out
range, repeat steps 5 and 6 until the belt tension is in range. If the belt tension is within range,
continue to the next step.
8 Tighten the three 4mm idler pulley bracket bolts. Note: Do not over tighten the bolts, if the bolts
are over tightened it is possible to damage the mounting hole threads of the generator. If by
chance the threads do become damaged, the idler pulley bracket can be removed and flipped
over 360 degrees and reinstalled. Doing this will allow the use of another set of mounting
holes on the generator.
9 Tighten the adjustment bolt lock nut.
10 Replace the covers.
Adjusting the Seat Carriage RBK Only
Perform this procedure if the front to rear movement of the seat is too tight or there is excessive side to
side seat wobble.
1 The end of the adjustment bolts are designed with two flat sides so that an open end wrench can
be used to rotate the bolt. Using a 10mm wrench on the adjust bolt, use a 22mm wrench to loosen
the two lock nuts on the left and right side just enough so the adjust bolt can be turned freely.
2 The seat carriage wheel is mounted on the adjustment bolt, which is offset. The offset bolt enables
the wheel to be tightened or loosened against the seat rail. Perform half of the adjustment using the
right hand adjustment bolt and half of the adjustment using the left hand adjustment bolt. Rotate
the adjust bolt counterclockwise until it just makes contact with the seat rail then turn it an
additional 1⁄8 turn. Hold the 10mm wrench at this position and firmly tighten the lock nut.
© Precor Incorporated, Unauthorized Reproduction and Distribution Prohibited by Law Page 10
Page 13
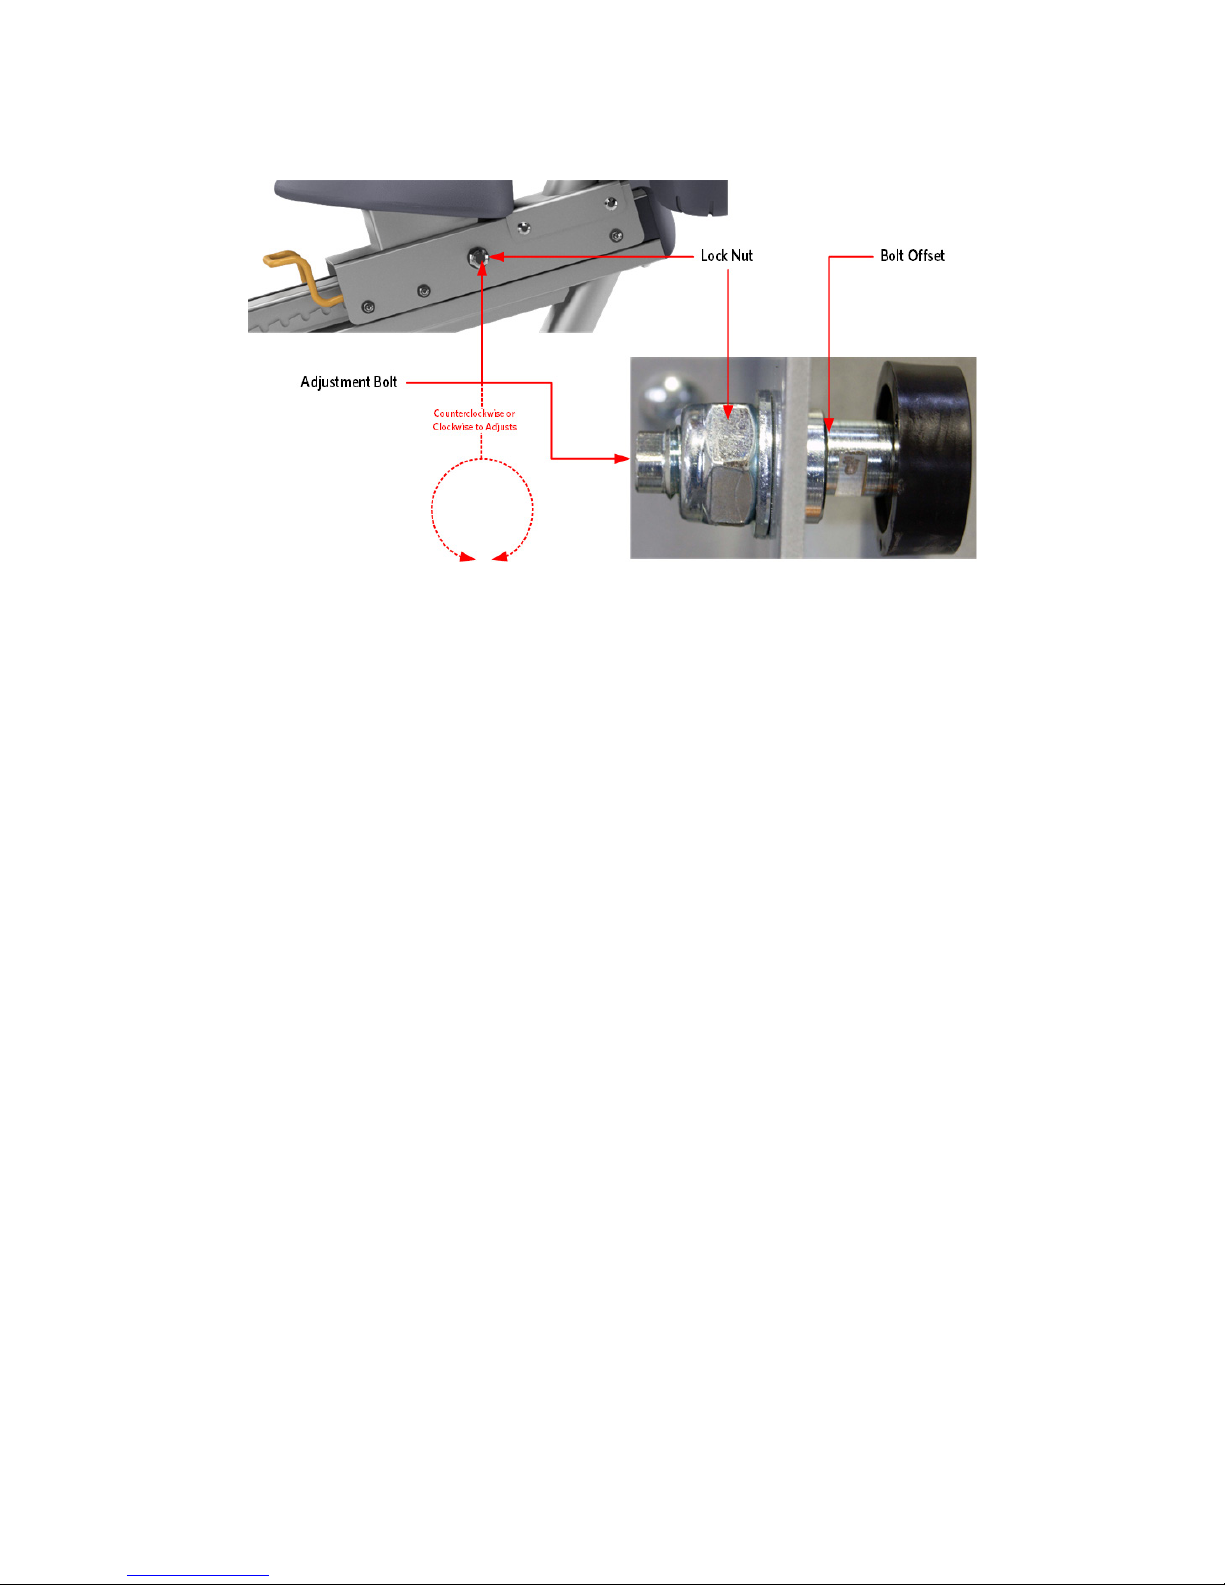
Figure 3: Seat Carriage Adjustment Bolts
3 When the seat is properly adjusted, the angle of the rotation of both adjustment bolts should be
approximately the same. The seat should not wobble side to side and should move forward and
backward easily. If the seat still wobbles side to side, repeat step 2 but increase from 1⁄8 turn to ¼
Note:Tightening any further may result in accelerated wheel and bearing wear.
turn.
© Precor Incorporated, Unauthorized Reproduction and Distribution Prohibited by Law Page 11
Page 14

No or Incorrect Pedaling Resistance ......................................................................... 13
Section Five
RBK13/UBK13 Base
Troubleshooting
In This Section
Display does not Illuminate ......................................................................................... 12
Display does not Illuminate
Note:
In order to conserve battery power when the cycle is not in use, a time out feature is incorporated in
the cycles software. If the cycle is not used (motion not detected by the speed sensor), when in the
program mode, approximately 15 seconds later, the cycle will “power down” The bike will “power up”
again when pedaling is resumed (motion detected by the speed sensor). In order to measure voltages
in the unit it is necessary to keep the unit powered up. This can be accomplished either by pedaling on
the unit or by installing the optional external power adapter.
1 Attach the anti-static wrist strap to your arm, then connect the ground wire of the wrist strap to
the units frame.
2 Pedal on the cycle for a minimum of 5 seconds. The system monitors one of the three phase
generator windings for AC zero cross. The monitoring system notes every time the generator AC
voltage passes through zero volts. By counting the zero cross rate, the system knows how fast the
generator is turning. The system calculates the user RPM from the generator speed. If the system
does not see a zero cross rate, it assumes the bike is not being used and the display will not
illuminate when the bike is pedaled.
3 Disconnect the generator leads from terminals M3 (Red) and M4 (Black) on the lower PCA.
Connect a AC voltmeter to the leads removed from terminals M3 and M4. Pedal the bike at about
60 RPM (1 rotation per second), the voltmeter should read approximately between 80Vac and 120
Vac. If the voltage reading is absent or extremely low, replace the generator.
voltage will vary depending on the speed the crankarms are rotating. If you are trying to
measure the voltage and rotate the crankarm at the appropriate RPM may be difficult. It is
recommended that you have someone assist with pedaling the bicycle while taking this
voltage measurement. Use extreme caution by staying clear of the bicycles moving parts
while taking the voltage measurement.
Note: The output
© Precor Incorporated, Unauthorized Reproduction and Distribution Prohibited by Law Page 12
Page 15

Figure 4: Lower PCA Connectors
4 If the voltage reading in step 3 was normal, replace the lower PCA. If the lower PCA did not correct
the problem, continue with step 5.
5 With the unit powered up, measure between test point 24 and test point 37 for approximately 7.5
Vdc. If the measurement is correct, skip to step 8.
6 If the measurement in step 5 is significantly low or high, disconnect the interconnect cable from the
J2 connector and repeat the measurement in step 5.
7 If the measurement in step 5 is still significantly low or high, replace the lower PCA. If replacing the
lower PCA does correct the problem, skip to step 8.
8 Remove the upper display panel and disconnect the interconnect cable form the upper PCA. With
the unit powered up, check the voltage between the outer two pins of the interconnect cable for DC
volts. It should read approximately 7.5 Vdc. Note: The interconnect pins can be difficult to get good
connections with the meter leads. If the voltage is absent or significantly low, troubleshoot the
interconnect cable.
9 If the voltage measurement in step 5 is correct, replace the upper PCA.
If you have performed all of the previous tests and have not been able to locate the trouble, call Precor
customer support.
No or Incorrect Pedaling
Resistance
1 If the display is not illuminated, go to Procedure, Display does not Illuminate.
© Precor Incorporated, Unauthorized Reproduction and Distribution Prohibited by Law Page 13
Page 16

Figure 5: Lower PCA Connectors
2 Enter the "manual" program and set the work level at "level 20". Pedal the cycle and confirm that
there is no resistance or that the resistance is abnormally low.
Note:
The voltage readings in this procedure will vary with the pedaling rate. Pedal the cycle at approximately
60 RPM with the work level set at "10" while taking the voltage readings in this procedure. Resistance
readings must be taken with the power off and the cycle idle.
3 Measure the DC voltage at the terminals M1 and M8 of the lower PCA. The voltage reading should
be approximately 11 Vdc. If the reading is significantly low, or significantly high, skip to step 5.
4 If the reading in step 3 was correct, the pedaling resistance should be correct, skip back to step 2.
5 Disconnect the eddy current magnet wires from terminals M1 and M8 of the lower PCA. Measure
between the eddy current magnet wires with an ohmmeter. It should read approximately 10
Ω (ohms).
6 If the measurement in step 5 was significantly high or low, replace the generator.The eddy current
magnet is furnished with the generator. After replacing the generator, tension the primary belt as
per procedure,
Primary Belt Tension Adjustment
7 If the measurement in step 5 was correct, replace the lower PCA.
© Precor Incorporated, Unauthorized Reproduction and Distribution Prohibited by Law Page 14
(on page 9).
Page 17

Figure 6: Lower PCA Cables
8 It is highly unlikely that the RPM reading could be present but incorrect. If this condition should
occur, replace the lower PCA
© Precor Incorporated, Unauthorized Reproduction and Distribution Prohibited by Law Page 15
Page 18

Replacing All or Part of a Seat Carriage - RBK only ............................................... 51
Section Six
RBK13/UBK13 Base
Replacement Procedures
In This Section
Replacing the Covers - UBK13 ..................................................................................... 16
Replacing the Covers - RBK13 ..................................................................................... 21
Replacing a Primary Drive Belt .................................................................................... 25
Replacing a Crankarm ................................................................................................... 26
Replacing the Primary Pulley ....................................................................................... 28
Replacing the Input Pulley and Axle Assembly ...................................................... 31
Replacing the Idler Pulley ............................................................................................. 36
Replacing a Generator ................................................................................................... 38
Replacing a Battery ........................................................................................................ 41
Replacing the lower PCA .............................................................................................. 42
Replacing the Seat Post Pop-Pin - UBK13 Only ...................................................... 44
Replacing the Seat Post - UBK Only .......................................................................... 46
Replacing a Seat Post Component - UBK Only ....................................................... 48
Replacing the Covers - UBK13
Top Cover Removal
1 Remove the left side screw and the right side screw that secures the top cover.
2 Lift and remove the top cover.
© Precor Incorporated, Unauthorized Reproduction and Distribution Prohibited by Law Page 16
Page 19

Left Side Cover Removal
3 Move the pedal to its highest position in its rotation.
4 Remove the six screws that secure the left side cover to the frame.
5 Pull and remove the left cover.
Right Cover Removal
6 Move the pedal so that it is at the top of its rotations.
© Precor Incorporated, Unauthorized Reproduction and Distribution Prohibited by Law Page 17
Page 20

7 Remove the five screws that secure the right cover to the frame.
8 Pull and remove the right cover.
Left Side Cover Installation
9 Place the left side cover against the frame and align the cover with the screw holes. Ensure the right
side cover edge is seated in the seat post gasket.
10 Secure the left side cover to the frame with the six screws removed earlier.
© Precor Incorporated, Unauthorized Reproduction and Distribution Prohibited by Law Page 18
Page 21

Right Side Cover Installation
11 Place the right side cover against the frame and align the cover with the left side cover and the
screw holes. Ensure the right side cover edge is seated in the seat post gasket.
12 Secure the right side cover to the frame with the five screws removed earlier.
© Precor Incorporated, Unauthorized Reproduction and Distribution Prohibited by Law Page 19
Page 22

Top Cover Installation
13 Place the top cover on the side covers; align the back of the top cover so that the edge is seated in
the seat post gasket.
14 Secure the left and right side of the top cover with the screws removed earlier.
© Precor Incorporated, Unauthorized Reproduction and Distribution Prohibited by Law Page 20
Page 23

Replacing the Covers - RBK13
Top Cover Removal
1 Remove the left side screw and the right side screw that secures the top cover.
2 Lift and remove the top cover.
© Precor Incorporated, Unauthorized Reproduction and Distribution Prohibited by Law Page 21
Page 24

Figure 7: Top Cover Screw Locations-RBK13
Figure 8: Left Side Cover Screw Locations - RBK13
Left Side Cover Removal
3 Move the pedal to its highest position in its rotation.
4 Remove the four screws that secure the left side cover to the frame.
5 Pull and remove the left cover.
© Precor Incorporated, Unauthorized Reproduction and Distribution Prohibited by Law Page 22
Page 25

Figure 9: Right Side Cover Screw Locations - RBK13
Right Cover Removal
6 Move the pedal so that it is at the top of its rotations.
7 Remove the three screws that secure the right cover to the frame.
8 Pull and remove the right cover.
Right Side Cover Installation
9 Place the right side cover against the frame and align the cover with the left side cover and the
screw holes.
10 Secure the right side cover to the frame with the three screws removed earlier.
© Precor Incorporated, Unauthorized Reproduction and Distribution Prohibited by Law Page 23
Page 26

Figure 10: Right Side Cover Screw Locations - RBK13
Figure 11: Left Side Cover Screw Locations - RBK13
Left Side Cover Installation
11 Place the left side cover against the frame and align the cover with the screw holes.
12 Secure the left side cover to the frame with the four screws removed earlier.
© Precor Incorporated, Unauthorized Reproduction and Distribution Prohibited by Law Page 24
Page 27

Figure 12: Drive Belt Adjustment
Top Cover Installation
13 Replace the top cover.
14 Secure the top cover with the two screw removed earlier.
Replacing a Primary Drive Belt
1 Remove the covers as per procedure,
Covers - RBK13
(on page 21).
Replacing the Covers - UBK13
(on page 16) or
Replacing the
Removing the Primary Drive Belt
2 Slightly loosen the three idler pulley bracket mounting bolts.
3 Loosen the adjustment bolt lock nut.
4 Turn the adjustment bolt counter clockwise as required to remove the tension from the primary
drive belt.
5 Remove the primary drive belt.
Installing the Primary Drive Belt
6 Place the primary drive belt in its mounting position around the input pulley, under the idler pulley
and around the primary pulley.
7 Tension the primary drive belt as per procedure,
8 Replace the covers as per procedure,
Covers - UBK13
© Precor Incorporated, Unauthorized Reproduction and Distribution Prohibited by Law Page 25
(on page 16).
Primary Belt Tension Adjustment
Replacing the Covers - RBK13
(on page 21) or
(on page 9).
Replacing the
Page 28

Figure 13: Crankarm Removal Tools
Replacing a Crankarm
Removing a Crankarm
1 Using a 15mm open end wrench, remove the pedal from the crankarm being replaced.
2 Using an 8mm allen wrench, remove the crankarm mounting bolt by turning the bolt clockwise.
3 To remove the crankarm, one of the following crankarm removal tools will be required: Shimano
TL-FC10 Crankarm puller or a CCP-22 Crankarm puller; available at most bike repair shops.In this
procedure the Shimano Crankarm Puller will be used.
4 Remove the nut from the crankarm puller. Thread the nut fully into the crankarm.
Note: If the nut is not fully threaded into the crankarm, the crankarm threads may be destroyed when
the crankarm is removed.
5 Thread the crankarm puller into the nut removed from the crankarm puller. When the crankarm
puller is tightened, the crankarm will be extracted from the crankarm axle. Use a opened wrench to
tighten the crankarm puller, continue to tighten the crankarm puller until the crankarm is removed.
© Precor Incorporated, Unauthorized Reproduction and Distribution Prohibited by Law Page 26
Page 29

Figure 14: Crankarm & Crankarm Removal Tool
Figure 15: Crankarm Position
Installing a Crankarm
1 Place the crankarm onto the crankarm axle; ensure the crankarm is positioned 180° opposite the
other crankarm.
2 Thread the crankarm mounting bolt into the crankarm axle and fully tighten.
3 Install the pedal to the crankarm.
4 Pedal the bike for one minute and then re-tighten the crankarm mounting bolt.
© Precor Incorporated, Unauthorized Reproduction and Distribution Prohibited by Law Page 27
Page 30

Figure 16: Crankarm Removal Tools
Replacing the Primary Pulley
1 Remove the covers as per procedure,
Covers - UBK13
2 Remove the left hand crankarm and pedal.
(on page 16).
Replacing the Covers - RBK13
(on page 21) or
Replacing the
Removing a Crankarm
3 Using a 15mm open end wrench, remove the pedal from the crankarm being replaced.
4 Using an 8mm allen wrench, remove the crankarm mounting bolt by turning the bolt clockwise.
5 To remove the crankarm, one of the following crankarm removal tools will be required: Shimano
TL-FC10 Crankarm puller or a CCP-22 Crankarm puller; available at most bike repair shops.In this
procedure the Shimano Crankarm Puller will be used.
6 Remove the nut from the crankarm puller. Thread the nut fully into the crankarm.
Note: If the nut is not fully threaded into the crankarm, the crankarm threads may be destroyed when
the crankarm is removed.
7 Thread the crankarm puller into the nut removed from the crankarm puller. When the crankarm
puller is tightened, the crankarm will be extracted from the crankarm axle. Use a opened wrench to
tighten the crankarm puller, continue to tighten the crankarm puller until the crankarm is removed.
© Precor Incorporated, Unauthorized Reproduction and Distribution Prohibited by Law Page 28
Page 31

Figure 17: Crankarm & Crankarm Removal Tool
Figure 18: Drive Belt Adjustment
Removing the Primary Drive Belt
8 Slightly loosen the three idler pulley bracket mounting bolts.
9 Loosen the adjustment bolt lock nut.
10 Turn the adjustment bolt counter clockwise as required to remove the tension from the primary
drive belt.
11 Remove the primary drive belt.
Removing the Primary Pulley
12 Remove the 32mm retaining nut from the center of the primary pulley while holding the opposite
side crank arm and pedal, turning counterclockwise.
13 Remove the primary pulley.
© Precor Incorporated, Unauthorized Reproduction and Distribution Prohibited by Law Page 29
Page 32

Figure 19: Primary Pulley
Figure 20: Crankarm Axle & Key
Installing the Primary Pulley
14 Slide the primary pulley onto the crankarm axle assembly, ensure the axle key is in place and aligns
with the slot on the primary pulley.
Note: The concaved side of the primary pulley will be facing
the frame.
15 Thread the 32mm retaining nut onto the input axle and fully tighten.
© Precor Incorporated, Unauthorized Reproduction and Distribution Prohibited by Law Page 30
Page 33

Figure 21: Crankarm Position
Installing a Crankarm
16 Place the crankarm onto the crankarm axle; ensure the crankarm is positioned 180° opposite the
other crankarm.
17 Thread the crankarm mounting bolt into the crankarm axle and fully tighten.
18 Install the pedal to the crankarm.
Pedal the bike for one minute and then re-tighten the crankarm mounting
bolt.Installing the Primary Drive Belt
19 Place the primary drive belt in its mounting position around the input pulley, under the idler pulley
and around the primary pulley.
20 Tension the primary drive belt as per procedure,
21 Replace the covers as per procedure,
Covers - RBK13
(on page 21).
Replacing the Covers - UBK13
Primary Belt Tension Adjustment
(on page 16) or
(on page 9).
Replacing the
Replacing the Input Pulley and
Axle Assembly
1 Remove the covers as per procedure,
Covers - UBK13
2 Remove the left hand crankarm and pedal.
(on page 16).
Replacing the Covers - RBK13
(on page 21) or
Replacing the
© Precor Incorporated, Unauthorized Reproduction and Distribution Prohibited by Law Page 31
Page 34

Figure 22: Crankarm Removal Tools
Removing a Crankarm
3 Using a 15mm open end wrench, remove the pedal from the crankarm being replaced.
4 Using an 8mm allen wrench, remove the crankarm mounting bolt by turning the bolt clockwise.
5 To remove the crankarm, one of the following crankarm removal tools will be required: Shimano
TL-FC10 Crankarm puller or a CCP-22 Crankarm puller; available at most bike repair shops.In this
procedure the Shimano Crankarm Puller will be used.
6 Remove the nut from the crankarm puller. Thread the nut fully into the crankarm.
Note: If the nut is not fully threaded into the crankarm, the crankarm threads may be destroyed when
the crankarm is removed.
7 Thread the crankarm puller into the nut removed from the crankarm puller. When the crankarm
puller is tightened, the crankarm will be extracted from the crankarm axle. Use a opened wrench to
tighten the crankarm puller, continue to tighten the crankarm puller until the crankarm is removed.
© Precor Incorporated, Unauthorized Reproduction and Distribution Prohibited by Law Page 32
Page 35

Figure 23: Crankarm & Crankarm Removal Tool
Figure 24: Drive Belt Adjustment
Removing the Primary Drive Belt
8 Slightly loosen the three idler pulley bracket mounting bolts.
9 Loosen the adjustment bolt lock nut.
10 Turn the adjustment bolt counter clockwise as required to remove the tension from the primary
drive belt.
Remove the primary drive belt.Removing the Primary Pulley
11 Remove the 32mm retaining nut from the center of the primary pulley while holding the opposite
side crank arm and pedal, turning counterclockwise.
12 Remove the primary pulley.
© Precor Incorporated, Unauthorized Reproduction and Distribution Prohibited by Law Page 33
Page 36

Figure 25: Primary Pulley
Figure 26: Crankarm Retainning Screws
13 Remove the right hand crankarm.
Removing the Crankarm Axle Assembly
14 Remove the three 3mm screws and washers that secure the crankarm axle assembly.
15 Pull on the crankarm axle shaft to remove the crankarm axle assembly.
© Precor Incorporated, Unauthorized Reproduction and Distribution Prohibited by Law Page 34
Page 37

Figure 27: Crankarm Axle Assembly Removed
Figure 28: Crankarm Axle & Key
Installing the Crankarm Axle Assembly
16 Slide the crankarm axle assembly into the frame.
17 Secure the crankarm axle assembly into the frame with the three screws and washers, fully tighten.
Installing the Primary Pulley
18 Slide the primary pulley onto the crankarm axle assembly, ensure the axle key is in place and aligns
with the slot on the primary pulley.
the frame.
Note: The concaved side of the primary pulley will be facing
19 Thread the 32mm retaining nut onto the input axle and fully tighten.
© Precor Incorporated, Unauthorized Reproduction and Distribution Prohibited by Law Page 35
Page 38

Figure 29: Crankarm Position
Installing the Primary Drive Belt
20 Place the primary drive belt in its mounting position around the input pulley, under the idler pulley
and around the primary pulley.
21 Tension the primary drive belt as per procedure,
Primary Belt Tension Adjustment
(on page 9).
22 Replace both left and right crankarms.
Installing a Crankarm
23 Place the crankarm onto the crankarm axle; ensure the crankarm is positioned 180° opposite the
other crankarm.
24 Thread the crankarm mounting bolt into the crankarm axle and fully tighten.
25 Install the pedal to the crankarm.
26 Pedal the bike for one minute and then re-tighten the crankarm mounting bolt.
27 Replace the covers as per procedure,
Covers - UBK13
(on page 16).
Replacing the Idler Pulley
1 Remove the covers as per procedure,
Covers - RBK13
© Precor Incorporated, Unauthorized Reproduction and Distribution Prohibited by Law Page 36
(on page 21).
Replacing the Covers - RBK13
Replacing the Covers - UBK13
(on page 21) or
(on page 16) or
Replacing the
Replacing the
Page 39

Figure 30: Drive Belt Adjustment
Removing the Primary Drive Belt
2 Slightly loosen the three idler pulley bracket mounting bolts.
3 Loosen the adjustment bolt lock nut.
4 Turn the adjustment bolt counter clockwise as required to remove the tension from the primary
drive belt.
5 Remove the primary drive belt.
Removing the Idler Pulley
6 Remove the retaining ring that secures the idler pulley to the axle.
7 Remove the idler pulley.
© Precor Incorporated, Unauthorized Reproduction and Distribution Prohibited by Law Page 37
Page 40

Figure 31: Idler Pulley & Retaining Ring
Installing a Idler Pulley
8 Place the idler pulley onto the axle.
9 Secure the idler pulley to the axle with the retaining ring.
Installing the Primary Drive Belt
10 Place the primary drive belt in its mounting position around the input pulley, under the idler pulley
and around the primary pulley.
11 Tension the primary drive belt as per procedure,
12 Replace the covers as per procedure,
Covers - UBK13
(on page 16).
Replacing the Covers - RBK13
Primary Belt Tension Adjustment
(on page 21) or
(on page 9).
Replacing the
Replacing a Generator
1 Remove the covers as per procedure,
Covers - UBK13
(on page 16).
Removing the Primary Drive Belt
2 Slightly loosen the three idler pulley bracket mounting bolts.
3 Loosen the adjustment bolt lock nut.
4 Turn the adjustment bolt counter clockwise as required to remove the tension from the primary
drive belt.
Replacing the Covers - RBK13
(on page 21) or
Replacing the
© Precor Incorporated, Unauthorized Reproduction and Distribution Prohibited by Law Page 38
Page 41

Figure 32: Drive Belt Adjustment
Figure 33: Generator Cable Connectons
5 Remove the primary drive belt.
Removing the Generator
6 Fully remove the three Idler pulley mounting bolts that secure idler pulley bracket to the generator.
7 Disconnect the generator cable connectors and the eddy current source magnet. One cable
connector is plugged directly into the generator; the other is connected to a cable extension.
8 Remove the four 5mm mounting bolts, nuts and washers that secure the generator to the frame,
two bolts on each side.
© Precor Incorporated, Unauthorized Reproduction and Distribution Prohibited by Law Page 39
Page 42

Figure 34: Generator Mounting Bolts
Figure 35: Generator Mounting Bolts
Figure 36: Generator Cable Connectons
9 Remove the generator.
Installing a Generator
10 Place the generator on the frame, aligning the generator mounting holes with the frame mounting
holes.
11 Secure the generator to the frame using the four 5mm mounting bolts, nuts and washers; fully
tighten.
12 Connect the two generator connector cables, one directly to the generator and the other to the
cable extension connector.
13 Thread the three mounting bolts through the idler pulley bracket and into the generator, only hand
tighten at this time.
© Precor Incorporated, Unauthorized Reproduction and Distribution Prohibited by Law Page 40
Page 43

Figure 37: Battery
Installing the Primary Drive Belt
14 Place the primary drive belt in its mounting position around the input pulley, under the idler pulley
and around the primary pulley.
15 Tension the primary drive belt as per procedure,
16 Replace the covers as per procedure,
Covers - UBK13
(on page 16).
Replacing the Covers - RBK13
Primary Belt Tension Adjustment
(on page 21) or
(on page 9).
Replacing the
Replacing a Battery
1 Remove the covers as per procedure,
Covers - UBK13
(on page 16).
Removing the Battery
2 Disconnect the cable connectors from the positive (White Wire) and negative (Black Wire)
terminals of the battery.
3 Remove the two screws that secure the battery bracket to the frame, one screw on each side of the
frame.
4 Release the tension from the velcro strap.
Replacing the Covers - RBK13
(on page 21) or
Replacing the
5 Remove the battery.
Installing the battery
6 Place the battery in the battery bracket.
7 Tighten the velcro strap to secure the battery to the battery bracket.
© Precor Incorporated, Unauthorized Reproduction and Distribution Prohibited by Law Page 41
Page 44

Figure 38: Lower PCA Cables
8 Secure the battery bracket to the frame with the two screws and fully tighten.
9 Connect the cable connector with the fuse holder to the positive (White Wire) terminal of the
battery, the positive terminal of the battery will be marked with a red square.
10 Connect the remaining cable connector (Black Wire) to the negative terminal on the battery.
11 Replace the covers as per procedure,
Covers - UBK13
(on page 16).
Replacing the Covers - RBK13
Replacing the lower PCA
1 Remove the covers as per procedure,
Covers - UBK13
(on page 16).
Removing the Lower PCA
2 Disconnect all of the wires from the lower PCA.
Replacing the Covers - RBK13
(on page 21) or
(on page 21) or
Replacing the
Replacing the
3 Remove the two screws that secure the lower PCA mounting bracket to the frame.
© Precor Incorporated, Unauthorized Reproduction and Distribution Prohibited by Law Page 42
Page 45

Figure 39: Lower PCA Mounting Bracket
Figure 40: Lower PCA Mounting Screws
4 Remove the four screws that secure the lower PCA to the mounting bracket.
5 Remove the lower PCA and four stand-offs located underneath the PCA from the bracket .
Installing the Lower PCA
6 Set the lower PCA in the mounting bracket, the data connector should be on the right hand side of
the bracket.
7 Secure the lower PCA to the mounting bracket with the four screws and stand-offs removed earlier.
8 Set the lower PCA bracket in its mounting position and fasten it to the frame with the two screws.
9 Reconnect the wiring to the lower PCA as follows: two red load wires to M1, M8; red generator wire
to M3, white generator wire to M4; generator wire to M5; red battery wire to M6, Black battery
wire to M7; data cable to connector J2.
© Precor Incorporated, Unauthorized Reproduction and Distribution Prohibited by Law Page 43
Page 46

Figure 41: Lower PCA Connectors
10 Replace the covers as per procedure,
Covers - UBK13
(on page 16).
Replacing the Covers - RBK13
(on page 21) or
Replacing the
Replacing the Seat Post Pop-Pin
- UBK13 Only
Removing the Seat Post Pop-Pin
1 Remove the pop-pin knob; turn the knob counter clockwise to remove. Note: Sitting on the seat
while removing the knob will help prevent the pop-pin from rotating.
2 Remove the retaining ring.
© Precor Incorporated, Unauthorized Reproduction and Distribution Prohibited by Law Page 44
Page 47

Figure 42: Seat Post Pop-pin Retaining Ring
Figure 43: Seat Post Pop-Pin Assemble
3 Pull up slightly on the seat post to relieve the pressure off the pop-pin. Pull the pop-pin out of the
frame.
4 The seat post is now unsupported, ease the seat post into its lowest position.
Installing the Seat Post Pop-Pin
5 Assemble the seat post as follows: Starting from the threaded side of the pin, slide on the spring
and bushing; on the non-threaded side of the pin, slide on the rubber insert. See Figure Below.
6 Pull the seat post up until one of the height level holes is aligned with the pop-pin housing on the
frame.
7 Slide the pop-pin assembly into place so the pin locks the seat post into place.
8 Secure the pop-pin assembly in place with the retaining ring.
9 Replace the pop-pin knob.
© Precor Incorporated, Unauthorized Reproduction and Distribution Prohibited by Law Page 45
Page 48

Figure 44: Seat Post Pop-pin Retaining Ring
Replacing the Seat Post - UBK
Only
Removing the Seat Post Pop-Pin
1 Remove the pop-pin knob; turn the knob counter clockwise to remove. Note: Sitting on the seat
while removing the knob will help prevent the pop-pin from rotating.
2 Remove the retaining ring.
3 Pull up slightly on the seat post to relieve the pressure off the pop-pin. Pull the pop-pin out of the
frame.
4 The seat post is now unsupported, ease the seat post into its lowest position.
Removing the Seat Post
5 Lift the seat post until you see the window in the post, than lower the post so that only the top
portion of the window can be seen above the collar. Press on the seat post collar tabs located on
the left and right side of the seat post frame.
© Precor Incorporated, Unauthorized Reproduction and Distribution Prohibited by Law Page 46
Page 49

Figure 45: Seat Post Window & Collar
Figure 46: Seat Post Pop-Pin Assemble
6 Lift and remove the seat post from the bicycle.
Installing the Seat Post
7 Slide the seat post into the bicycle frame until only the top portion of the window can be seen
above the collar and then snap the collar into place.
Installing the Seat Post Pop-Pin
8 Assemble the seat post as follows: Starting from the threaded side of the pin, slide on the spring
and bushing; on the non-threaded side of the pin, slide on the rubber insert. See Figure Below.
9 Pull the seat post up until one of the height level holes is aligned with the pop-pin housing on the
frame.
10 Slide the pop-pin assembly into place so the pin locks the seat post into place.
11 Secure the pop-pin assembly in place with the retaining ring.
© Precor Incorporated, Unauthorized Reproduction and Distribution Prohibited by Law Page 47
Page 50

Figure 47: Seat Post Pop-pin Retaining Ring
12 Replace the pop-pin knob.
Replacing a Seat Post
Component - UBK Only
Removing the Seat Post Pop-Pin
1 Remove the pop-pin knob; turn the knob counter clockwise to remove. Note: Sitting on the seat
while removing the knob will help prevent the pop-pin from rotating.
2 Remove the retaining ring.
3 Pull up slightly on the seat post to relieve the pressure off the pop-pin. Pull the pop-pin out of the
frame.
4 The seat post is now unsupported, ease the seat post into its lowest position.
Removing the Seat Post
5 Lift the seat post until you see the window in the post, than lower the post so that only the top
portion of the window can be seen above the collar. Press on the seat post collar tabs located on
the left and right side of the seat post frame.
© Precor Incorporated, Unauthorized Reproduction and Distribution Prohibited by Law Page 48
Page 51

Figure 48: Seat Post Window & Collar
Figure 49: Seat Post Components
6 Lift and remove the seat post from the bicycle.
Removing Seat Post Components
7 Remove the two screws that secure the seat axle to the seat post. Pull the seat post axle from the
seat post.
8 Compress one side of the compression spring and then pull to release it from the seat axle.
© Precor Incorporated, Unauthorized Reproduction and Distribution Prohibited by Law Page 49
Page 52

Figure 50: Seat Post Pop-Pin Assemble
Remove the location pin from within the compression spring.
Installing Seat Post Components
9 Place the location pin inside the compression spring.
10 Place one side of the compression spring on a tab of the seat axle. Compress the compression
spring and slide the end on the remaining tab of the seat axle.
11 Slide the seat axle into place of the seat post. Secure the seat axle with the two mounting screws.
Installing the Seat Post
12 Slide the seat post into the bicycle frame until only the top portion of the window can be seen
above the collar and then snap the collar into place.
Installing the Seat Post Pop-Pin
13 Assemble the seat post as follows: Starting from the threaded side of the pin, slide on the spring
and bushing; on the non-threaded side of the pin, slide on the rubber insert. See Figure Below.
14 Pull the seat post up until one of the height level holes is aligned with the pop-pin housing on the
frame.
15 Slide the pop-pin assembly into place so the pin locks the seat post into place.
16 Secure the pop-pin assembly in place with the retaining ring.
17 Replace the pop-pin knob.
© Precor Incorporated, Unauthorized Reproduction and Distribution Prohibited by Law Page 50
Page 53

Figure 51: Seat Carriage End Cap
Replacing All or Part of a Seat
Carriage - RBK only
Removing the Seat Carriage
1 There is a heart rate cable that connects the heart rate hand grips in the seat carriage to the heart
rate cable in the seat rail. Care must be taken when removing the seat carriage to avoid damaging
the heart rate cables.
2 Move the seat carriage to its most forward position. Remove the two Philips screws that fasten the
end cap in the seat rail. Remove the end cap.
3 Move the seat carriage to its most back position. Remove the 3mm screw and washer that secures
the water bottle holder to the seat rail. Carefully unsnap the water bottle holder from the rear of the
seat carriage.
© Precor Incorporated, Unauthorized Reproduction and Distribution Prohibited by Law Page 51
Page 54

Figure 52: Water Bottle Mounting Screw
Figure 53: Heart Rate Cable Cover and Connector
4 Move the seat carriage to its most forward position.
5 Remove the two philips screws that secure the cable cover and remove the cable cover.
6 Disconnect the heart rate cables.
7 Carefully slide the seat carriage off the seat rail, ensure the heart rate cable does not get caught on
the rail when removing the carriage.
Removing the Heart Rate Cables
8 On the underside of the seat carriage, remove the cable cover and disconnect the flat ribbon cable
from the cable to the heart rate grips.
© Precor Incorporated, Unauthorized Reproduction and Distribution Prohibited by Law Page 52
Page 55

Figure 54: Cable Cover - Seat Carriage Bottom
9 Remove the flat ribbon cable.
10 Remove the Philips screws from the underside of the heart rate grips on the left handlebar. Lift the
grips from the handlebar and disconnect the wire from both grips. Repeat this procedure on the
right handlebar.
11 Remove the heart rate cable from the seat carriage.
Installing the Heart Rate Cables
12 Feed the replacement heart rate cable into the access hole on the underside of the seat carriage.
13 On both the right and left handlebars, feed the white wire out of the upper heart rate grip access
hole and the black wire out of the lower heart rate grip access hole.
14 On both handlebars, connect the upper heart rate grip to the white wire and the lower handlebar
grip to the black wire. Replace the screws and fully tighten.
15 Connect the flat ribbon cable to the heart rate cable and replace the cable cover.Replace the screw
and fully tighten.
Replacing a Seat Carriage Wheel
1 Remove the 14mm lock nut and washer from the wheel being replaced, remove the 14mm shoulder
bolt and wheel
© Precor Incorporated, Unauthorized Reproduction and Distribution Prohibited by Law Page 53
Page 56

Figure 55: Seat Carriage Wheel
Figure 56: Seat Carriage Release Handle
2 Set the replacement 14mm shoulder bolt and wheel in its mounting position and fasten it with the
hardware just removed.
Removing the Release Handle Assembly
3 Using a 14mm and 13mm open end wrench, remove the seat carriage wheels located next to the
release handle pivot.
4 Remove the 14mm lock nut that secures the spring and the release handle pivot to the carriage,
remove the release handle.
© Precor Incorporated, Unauthorized Reproduction and Distribution Prohibited by Law Page 54
Page 57

5 Remove the spring assemblies from the release handle pivot.
Installing the Release Handle Assembly
6 Place the springs on the release handle pivot, ensure that the spring arms are closest to the seat
carriage and the spring coil is the farthest from the seat carriage. One spring arm should be sitting
on the seat locking pin.
7 Place the seat carriage wheels underneath the other spring arm and secure the wheel to the
carriage with shoulder bolts and lock nuts.
Installing the Seat Carriage Assembly
8 Slide the seat carriage partially onto the seat rail.
9 Slide the seat carriage fully on the seat rail and all the way forward. Set the seat stop in its position.
10 Connect the flat ribbon cable to the heart rate cable in the seat rail and replace the cable clamp.
Secure the clamp with the screws removed earlier. Fully tighten.
11 Slide the seat carriage fully to back most position. Snap the water bottle holder onto the seat
carriage. Secure the water bottle to the carriage with the screw and washer removed earlier. Fully
tighten.
12 Slide the seat carriage fully to forward most position. Replace the end cap and fasten it to the
carriage with the hardware removed earlier. Fully tighten.
© Precor Incorporated, Unauthorized Reproduction and Distribution Prohibited by Law Page 55
Page 58

Wire Diagrams ................................................................................................................ 58
Section Seven
Wire and Block Diagrams
In This Section
Block Diagrams ............................................................................................................... 57
© Precor Incorporated, Unauthorized Reproduction and Distribution Prohibited by Law Page 56
Page 59

Block Diagrams
© Precor Incorporated, Unauthorized Reproduction and Distribution Prohibited by Law Page 57
Page 60

Wire Diagrams
© Precor Incorporated, Unauthorized Reproduction and Distribution Prohibited by Law Page 58
Page 61

Index
A
About This Document • 2
Adjusting the Seat Carriage - RBK Only • 10
B
Block Diagrams • 57
C
Checking the Bicycle Operations • 8
D
Display does not Illuminate • 12
G
General Information • 4
N
No or Incorrect Pedaling Resistance • 13
O
Replacing a Seat Post Component - UBK Only • 48
Replacing All or Part of a Seat Carriage - RBK only •
51
Replacing the Covers - RBK13 • 9, 21, 25, 28, 31, 36,
38, 41, 42, 44
Replacing the Covers - UBK13 • 9, 16, 25, 28, 31, 36,
38, 41, 42, 44
Replacing the Idler Pulley • 36
Replacing the Input Pulley and Axle Assembly • 31
Replacing the lower PCA • 42
Replacing the Primary Pulley • 28
Replacing the Seat Post - UBK Only • 46
Replacing the Seat Post Pop-Pin - UBK13 Only • 44
Required Tools and Equipment • 5
Right, Left, Front, and Back Conventions • 2
S
Safety • 3
W
On-Site Preventive Maintenance (Service
Technician) • 7
P
Preventive Maintenance - Bikes • 6
Primary Belt Tension Adjustment • 7, 9, 14, 25, 31,
36, 38, 41
R
RBK13/UBK13 Base Replacement Procedures • 16
RBK13/UBK13 Base Troubleshooting • 12
Regular Preventive Maintenance (Owner) • 6
Replacing a Battery • 41
Replacing a Crankarm • 26
Replacing a Generator • 38
Replacing a Primary Drive Belt • 25
© Precor Incorporated, Unauthorized Reproduction and Distribution Prohibited by Law Page 59
Warning and Caution Statements and General
Safety Guidelines • 4
Wire and Block Diagrams • 56
Wire Diagrams • 58
 Loading...