

Page 1

Contents
1 Introduction .............................................. 8
1.1 System requirements ............................................... 8
1.2 Features .................................................................. 9
1.3 Package contents .................................................... 9
1.4 External view ........................................................ 10
1.5 Buttons operation ................................................. 12
1.6 Adjusting the LCD display ................................... 13
2 Getting Started ....................................... 14
2.1 Inserting the memory card(s) ............................... 14
2.2 Inserting the battery ............................................. 16
2.3 Charging the battery............................................. 18
2.4 Turning on/off the digital video camera .............. 19
2.5 Changing modes ................................................... 19
2.6 Initial Settings ...................................................... 20
2.6.1 Setting the date and time ........................ 20
2.6.2 Setting the language ................................ 20
3 Using the Digital Video Camera ......... 21
3.1 Recording videos .................................................. 21
3.1.1 The recording screen ............................... 21
3.2 Video menu ........................................................... 24
3.2.1 Quality....................................................... 24
3.2.2 Pre-recording ............................................ 25
3.2.3 Time Lapse................................................ 25
1
Page 2

3.2.4
3.2.5 White Balance .......................................... 27
3.2.6 AE Meter .................................................. 27
3.2.7 Digital Effect ............................................ 28
3.2.8 Digital Zoom ............................................ 29
3.3 Playback videos .................................................... 30
3.3.1 Slow motion playback ............................ 32
3.4 Video playback settings ........................................ 33
3.4.1 Protect File ............................................... 33
3.4.2 Play Option .............................................. 34
3.4.3 Delete File................................................. 35
3.5 Shooting photos ................................................... 37
3.5.1 The shooting screen ................................ 37
3.6 Camera menu ...................................................... 40
3.6.1 Capture Mode .......................................... 40
3.6.2 Instant View ............................................. 41
3.6.3 Self Timer ................................................. 41
3.6.4 White Balance .......................................... 42
3.6.5 AE Meter .................................................. 43
3.6.6 AE ISO ...................................................... 43
3.6.7 Digital Effect ............................................ 44
3.6.8 Digital Zoom ............................................ 45
3.7 Viewing photos ..................................................... 46
3.8 Photo playback settings ....................................... 48
3.8.1 Protect File ............................................... 48
3.8.2 Slide Show ................................................ 49
3.8.3 Delete File................................................. 50
2
Motion Detection..................................... 26
Page 3

3.8.4
3.8.5 Rotate ......................................................... 53
DPOF ......................................................... 52
4 Using Setup menu................................. 54
4.1 Setup menu ........................................................... 54
4.1.1 System ....................................................... 55
4.1.2 File Number .............................................. 55
4.1.3 Time Setup ................................................ 56
4.1.4 Format ....................................................... 56
4.1.5 Default Setting .......................................... 57
4.1.6 LCD Brightness ........................................ 58
4.1.7 Date/Time Stamp .................................... 58
4.1.8 Auto Power Off ........................................ 59
4.1.9 Language .................................................. 60
4.1.10 Information ............................................... 60
4.1.11 Beep Sound ............................................... 61
4.1.12 Start Logo .................................................. 62
4.1.13 Anti-flicker ................................................ 62
4.1.14 Recording Audio Gain ............................ 63
4.1.15 SD ............................................................... 64
4.1.16 Auto Hide Info ......................................... 64
4.1.17 Touch Correction ..................................... 65
5 Connecting to other devices .............. 66
5.1 Connecting to the computer ................................. 66
5.2 Connecting to TV ................................................. 67
6 Installing the Software ......................... 68
3
Page 4

7 Editing software ..................................... 69
8 Specifications ......................................... 70
4
Page 5

About this Guide
The content in this document is for information purpose and is subject to
change without prior notice. We made every effort to ensure that this User’s
Manual is accurate and complete. However, no liability is assumed for any
errors and omissions that may have occurred.
The manufacturer reserves the right to change the technical specifications
without prior notice.
FCC Statement
This equipment has been tested and found to comply with the limits for a Class
B digital device, pursuant to Part 15 of the FCC Rules. These limits are
designed to provide reasonable protection against harmful interference in a
residential installation. This equipment generates, uses and can radiate radio
frequency energy and, if not installed and used in accordance with the
instructions, may cause harmful interference to radio communications.
However, there is no guarantee that interference will not occur in a particular
installation. If this equipment does cause harmful interference to radio or
television reception, which can be determined by turning the equipment off
and on, the user is encouraged to try to correct the interference by one or
more of the following measures:
• Reorient or relocate the receiving antenna.
• Increase the separation between the equipment and receiver.
• Connect the equipment into an outlet on a circuit different from that to
which the receiver is connected.
• Consult the dealer or an experienced radio/TV technician for help.
This device complies with Part 15 of the FCC Rules. Operation is subject to
the following two conditions: (1) This device may not cause harmful
interference, and (2) this device must accept any interference received,
including interference that may cause undesired operation.
FCC Caution: Any changes or modifications not expressly approved by the
party responsible for compliance could void the user's authority to operate this
equipment.
5
Page 6

6
WEEE Notice
Disposal of Waste Electrical and Electronic Equipment and/or Battery by
users in private households in the European Union
This symbol on the product or on the packaging indicates that this
can not be disposed of as a household waste. You must dispose of
your waste equipment and/or battery by handling it over to the
applicable take-back scheme for the recycling of electrical and
electronic equipment and/or battery. For more information about
recycling of this equipment and/or battery, please contact your city
office, the shop where you purchased the equipment or your
household waste disposal service. The recycling of materials will
help to conserve natural resources and ensure that it is recycled in
a manner that protects human health and environment.
CE Regulatory Notice
This equipment complies with the requirements set out in the Council
Directives on the Approximation of the Laws of the Member States relating
Electromagnetic Compatibility (2004/108/EC); the Low Voltage Directive
(2006/95/EC); the Restriction of The Use of Certain Hazardous Substances in
Electrical And Electronic Equipment Directive (2002/95/EC), Turkish EEE
Directive; the Commission Regulation (EC) No 1275/2008 implementing
Directive 2005/32/EC of the European Parliament and of the Council with
regard to eco-design requirements for standby and off mode electric power
consumption of electrical and electronic household and office equipment, and
the Directive 2009/125/EC of the European parliament and of the council
establishing a framework for the setting of eco-design requirements for
energy-related products.
Page 7

7
Safety Instructions
Do not expose the device to rain or use it in areas near water.
Do not wrap the device or store it in a hot environment.
Do not place the device on unstable surfaces or near any heat
sources such as stoves, heaters, or etc.
Clean only with dry cloth.
Do not subject the LCD display to impact.
Keep the battery out of reach of children.
When inserting battery, pay careful attention to the polarity of the
terminals.
Do not fire the flash close to anyone’s eyes.
Do not use the device while you are driving or riding a
bike/motorcycle.
If the device has fallen or its case has been damaged, turn off the
power and remove the battery. Consult authorized dealers or repair
service center.
Only use the supplied accessories.
Li-ion Battery Pack
MODEL: CA NP40
3.7 1200mAh 4.44Wh
Be sure to use only the supplied battery and charger. The use of any
other type of battery or charger may damage the device and void your
warranty.
Caution
Use the authorized charger only.
Never disassemble by yourself.
Never short-circuit the battery.
Dispose of the battery properly.
Exposing the battery to open flames can cause explosion.
Page 8

1 Introduction
Thank you for purchasing this advanced Digital Video Camera.
This user guide will get you started and ready to make the most of
your digital video camera.
1.1 System requirements
For PC connection, be sure your PC meets the following
specifications:
For Windows:
• Windows XP SP2 / Vista / Win 7
• Processor with at least Pentium IV 3.2GHz / AMD Athlon FX
2.6GHz or higher
• 2GB RAM at least
• nVIDIA Geforce 7600GT / Ati X1600 series or later
• USB port
• 16-bit color display compatible monitor
(1280x1024, 32-bit color display recommended)
• 250 MB of available hard disk space
• CD-ROM drive
For Macintosh:
• Mac OS 10.4 or higher
• Power Mac G3 or higher
• Minimum 256MB RAM
• 110MB of available hard disk space
• USB port
• CD-ROM drive
8
Page 9
1.2 Features
• Full HD camera (1920x1080 @ 30fps)
• 3.0” Touch screen
• Time lapse recording
• Motion detection recording
• Dual memory card slot
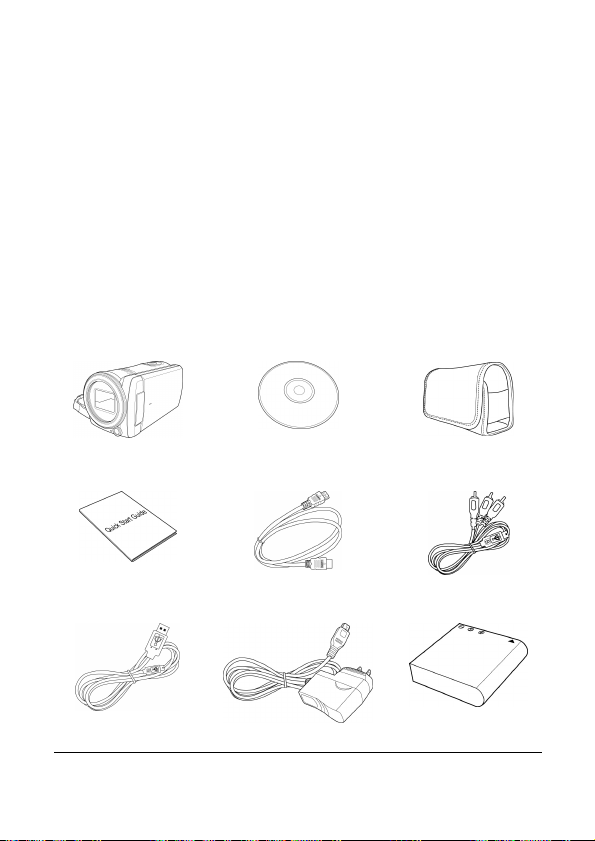
1.3 Package contents
The package contains the following items. In case there is any
missing or damaged item, contact your dealer immediately.
Digital video camera CD-ROM Pouch
Quick guide HDMI cable Video cable
USB cable AC adapter Lithium battery
9
Page 10
10
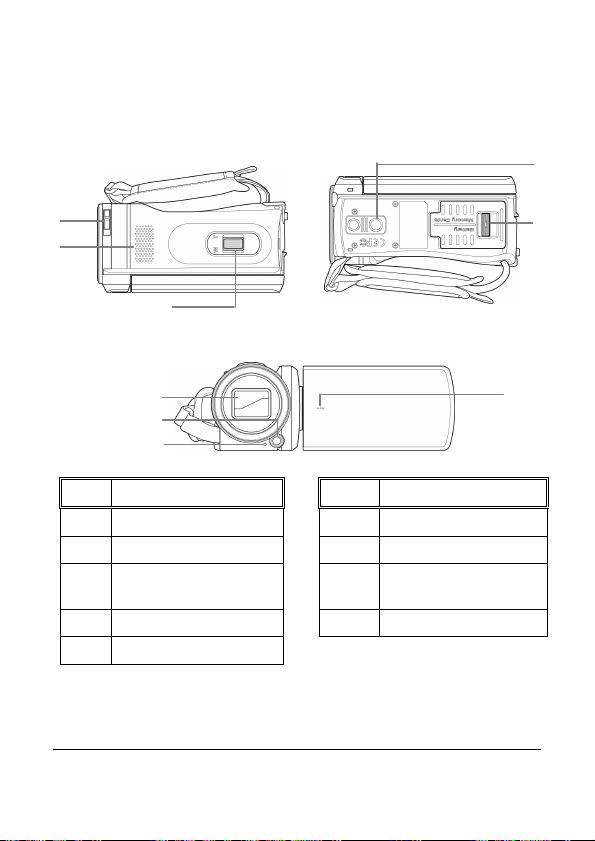
1.4 External view
No. Item
No. Item
Top View
Bottom View
Front View
1
2
4
5
6
7
8
9
3
Top, Bottom, and Front views
1 Lens Cover Latch
2 Speaker 7 Tripod Socket
3 Zoom Lever
4 Lens Cover 9 Microphone
5 LED Light
6 Self Timer Indicator
Battery/Memory
8
Card Cover
Page 11

Left, Right, and Rear views
No. Item
No. Item
Left
View
Rear
View
3
5
Right View
1
1 Hand Strap
2 Power Button 5 Record Button
USB/HDMI Connector
3
Cover
4 LED Indicator
2
4
11
Page 12

1.5 Buttons operation
Item Function
•
•
See the table below for a description of each button’s function.
Power Button
Record Button
Zoom Lever
Press to turn the digital video camera on
or off.
In Video mode, press to start recording
a video. Press it again to stop
recording.
•
In Camera mode, press to capture a
photo.
In Video and Camera modes, slide to
the right/left to zoom in/out when
recording videos or shooting photos.
•
In Video Playback mode, slide to the
right/left to adjust the volume. The
volume can also be adjusted during the
playback.
•
In Camera Playback mode, slide to the
right/left to zoom in/out your photo.
12
Page 13
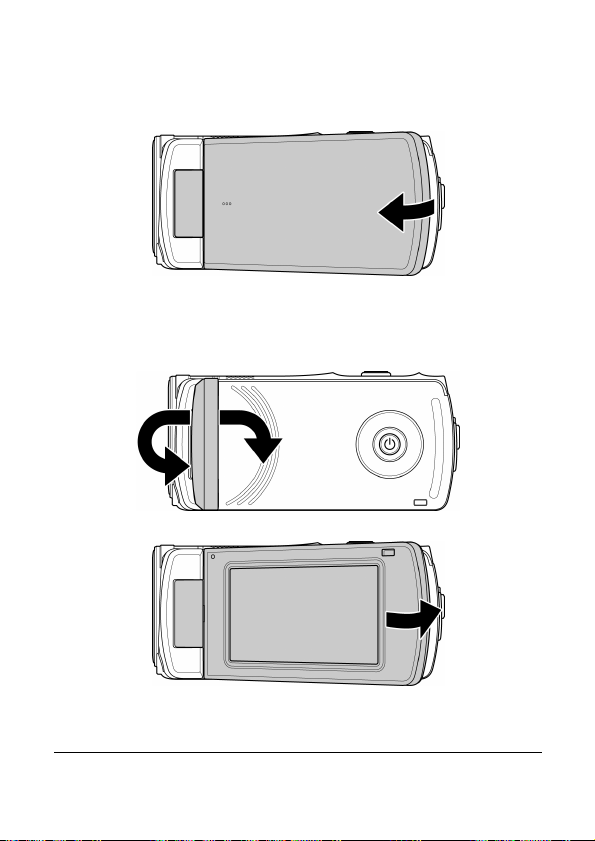
1.6 Adjusting the LCD display
Flip the LCD display outwards 90° to fully open.
Flip and twist the LCD screen at the appropriate angle to suit your
viewing preference.
13
Page 14
14
2 Getting Started
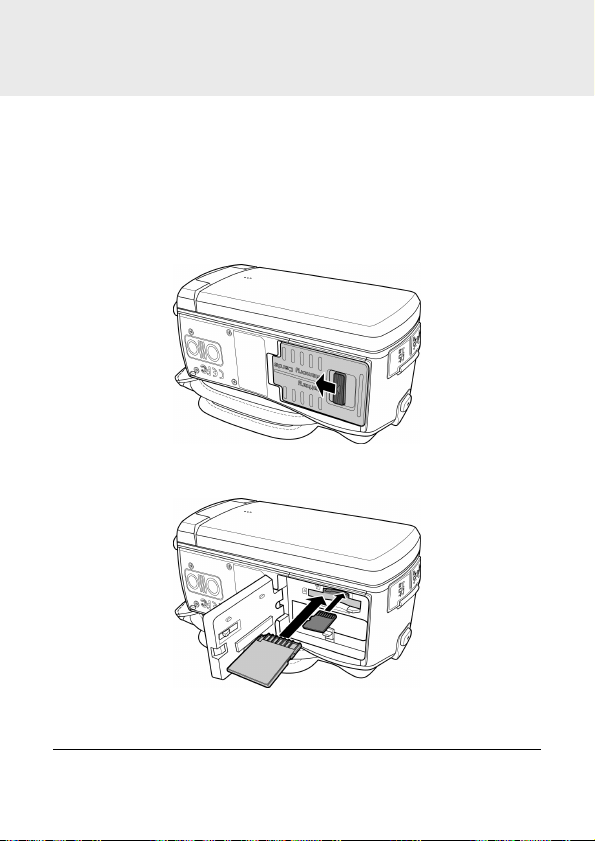
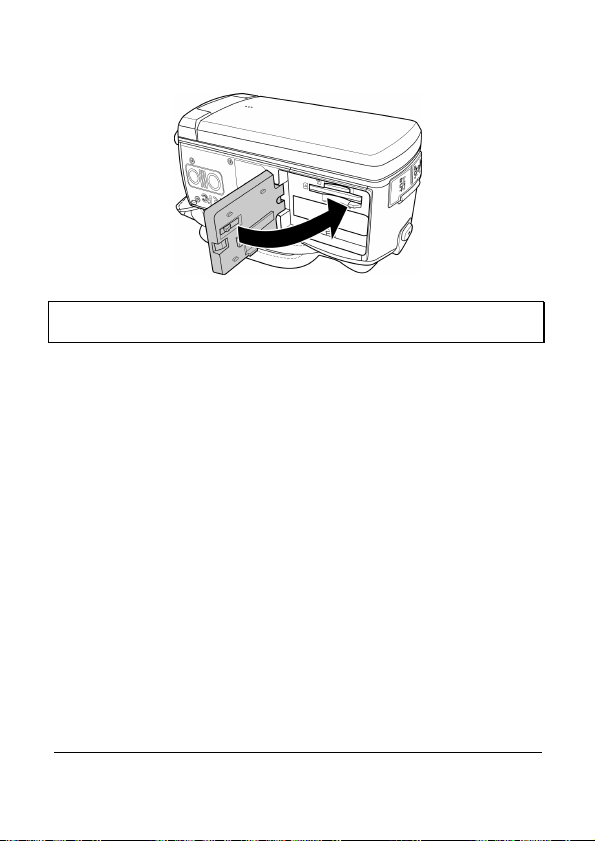
2.1 Inserting the memory card(s)
This device supports dual memory card slot that allows you to insert
two memory cards at the same time. You can insert one SD card
and one micro SD card into the digital video camera.
1. Push the battery/memory card cover latch to open the
battery/memory card cover as shown in the illustration.
2. Insert the memory card(s).
Page 15
15
3. Close the battery/memory card cover.
Note: Do not remove or insert the memory card when the digital video camera is turned on.
This may damage the memory card.
Page 16
16
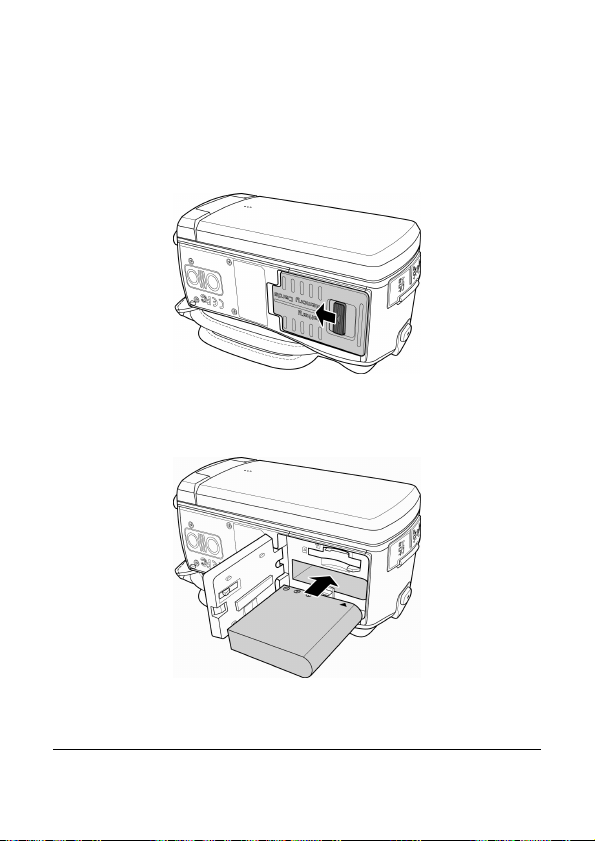
2.2 Inserting the battery
Only use the specified rechargeable battery for the digital video
camera.
1. Push the battery/memory card cover latch to open the
battery/memory card cover as shown in the illustration.
2. Fully insert the battery with the correct orientation until it clicks
into place.
Page 17
17
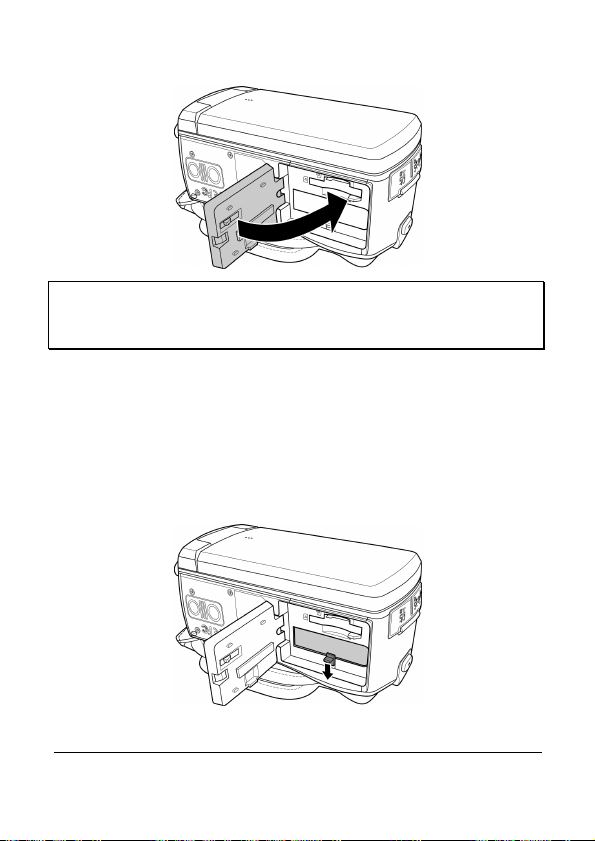
3. Close the battery/memory card cover.
Note:
Turn off the digital video camera before removing the battery.
The battery may be warm after being used. This is normal and not a malfunction.
To remove the battery:
1. Push the battery/memory card cover latch to open the
battery/memory card cover.
2. Press and hold the latch as shown in the illustration and
remove the battery from the battery compartment.
Page 18

2.3 Charging the battery
Use the supplied power adapter to charge the battery.
1. Open the USB/HDMI connector cover.
2. Connect one end of the power adapter to the USB connector of
the digital video camera.
3. Plug the other end of the power adapter to the wall outlet.
Note:
The red LED lights up while the battery is charging.
The charging time depends on the current battery capacity and charging conditions.
Please take note if the environment temperature reaches 45°C or above, the adapter can
still supply power to the digital video camera, but it will not charge the Lithium-ion battery.
This is the characteristic of Lithium-ion and is not a malfunction.
18
Page 19
2.4 Turning on/off the digital video
camera
There are two ways to turn on/off the power:
• Open/close the LCD panel.
• Press the Power button.
Note: Before using this digital video camera, be sure to slide the lens cover latch to the right
to open the lens.
2.5 Changing modes
The digital video camera has two recording modes:
• Video mode: Record videos.
• Camera mode: Shoot photos.
By default, the digital video camera is set to Video mode.
In Video mode, touch the upper left corner icon ( ) to switch to
Camera mode.
In Camera mode, touch the upper left corner icon ( ) to switch
to Video mode.
19
Page 20
20
2.6 Initial Settings
Before using the digital video camera, you may want to set up the
date and time and screen language settings.
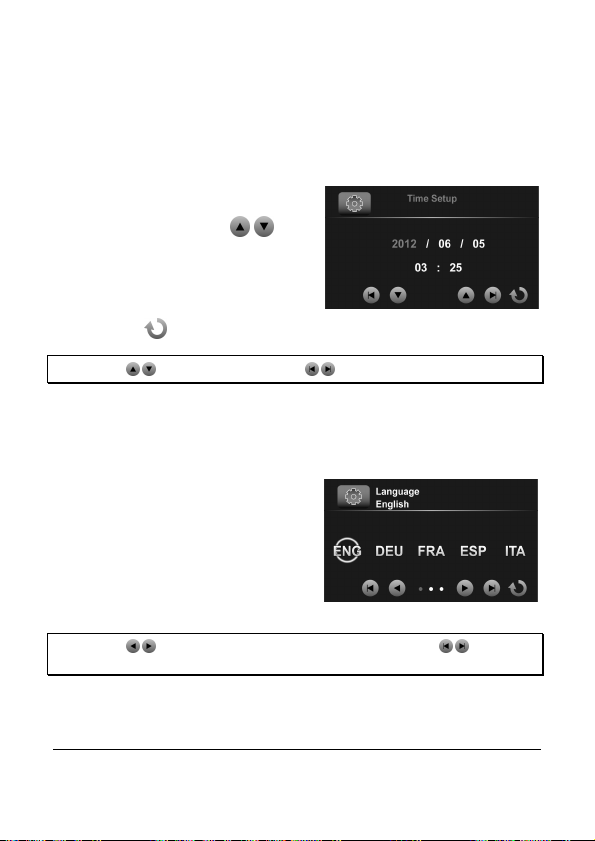
2.6.1 Setting the date and time
1. To adjust the field item, touch
the respective field to select
the field and touch / to
adjust the value.
2. Repeat step 1 to adjust other
fields.
3. Touch to save your changes.
Note: Touch / to adjust the value. Touch / to go to the previous/next field.
2.6.2 Setting the language
1. Touch Language to enter the
menu.
2. Touch the language option to
select the desired language.
Note: Touch / to scroll through the available menu options. Touch / to go to the
previous/next page.
Page 21
3 Using the Digital Video Camera
10
11
15
7 8 9
3.1 Recording videos
1. Turn on the digital video camera. By default, the device is set to
Video mode. In Camera mode, touch to switch to Video
mode.
2. Press the Record button to start recording the video. Press it
again to stop recording.
While recording, you can also use the Zoom lever to zoom/in
on the subject.
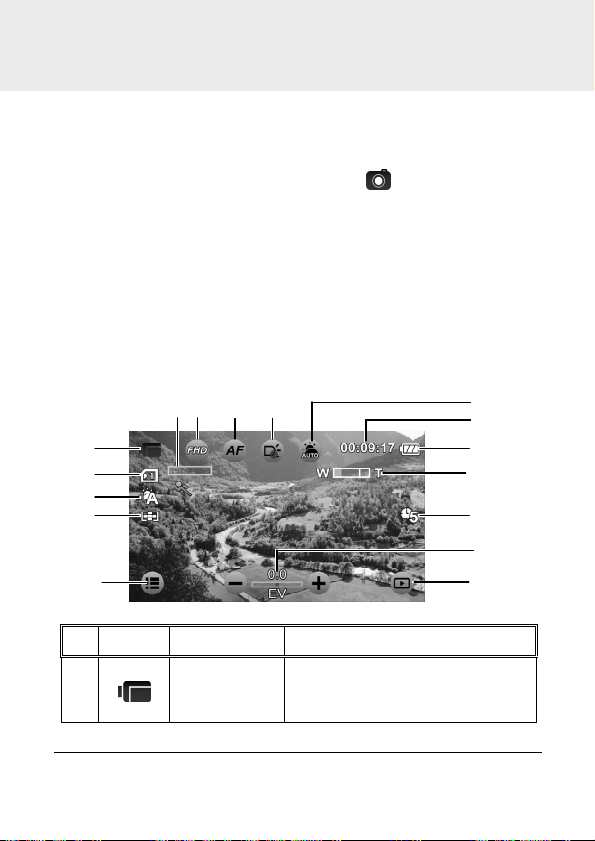
3.1.1 The recording screen
1
2
3
4
5
No.
1
6
Icon Item
Video mode
12
13
14
16
Description
Indicates the digital video camera
is currently in Video mode.
Touch to switch to Camera mode.
21
Page 22

No.
Icon Item
2
3
4
Card type
White balance
Metering
mode
Description
Indicates the memory card type in
use.
Indicates the current white
balance mode.
Indicates the current AE metering
mode.
5
6
7
8
9
10
11
22
Menu
Motion
detection
Video
resolution
AF setting
LED icon
Scene mode
Time duration Indicates the recording time.
Touch to enter the Video menu.
Indicates Motion detection
recording mode is activated.
Touch to select the desired video
resolution.
Available options: FHD / HD (60) /
HD (30)
Touch to select the desired AF
setting.
Available options: Auto Focus
(AF) / AF Lock.
Touch to select the suitable
lighting mode.
Available options: Off / On
Touch to select the desired scene
mode:
Available options: Auto / Night /
Sports / Landscape / Portrait /
Sunset / Sand/Snow / Flower /
Firework / Backlight / Beauty
Page 23

No.
Icon Item
12
13
14
15
Battery status
Zoom
indicator
Time lapse
EV
compensation
Description
Indicates the remaining battery
power.
Indicates the zoom status.
Indicates the Time lapse
recording is set to 5 minutes.
Indicates the current EV
compensation.
Touch / to adjust the EV
value.
16
Playback Touch to enter Playback mode.
23
Page 24

24
3.2 Video menu
The Video menu is used to adjust settings in Video mode.
1. Turn on the digital video camera. By default, the device is set to
Video mode. In Camera mode, touch to switch to Video
mode.
2. Touch to enter the Video menu.
3. Touch the desired menu option to enter the menu.
4. Touch an option to select the desired setting.
5. Touch to exit the menu.
Note: Touch / to scroll through the available menu options. Touch / to go to the
previous/next page.
3.2.1 Quality
Set the video quality.
1. In Video mode, touch to
enter the Video menu.
2. Touch Quality to enter the
menu.
3. Touch an option to select the
desired setting (Super Fine,
Fine, or Normal).
Page 25

25
3.2.2 Pre-recording
Pre-recording function records images even before you press the
Record button.
1. In Video mode, touch to
enter the Video menu.
2. Touch Pre-recording to enter
the menu.
3. Touch the option to select On
or Off.
Note: If Pre-recording is enabled, Time Lapse and Motion Detection will be disabled.
3.2.3 Time Lapse
With the Time Lapse feature, the frames are recorded slower than
the normal recording speed but the recorded videos will be played
back in fast motion than normal playback speed.
You can use this feature to record videos such as evolution of a
construction project, weather changes, tree growth, or flower
blossom.
1. In Video mode, touch
enter the Video menu.
2. Touch Time Lapse to enter
the menu.
to
Page 26

26
3. Touch an option to select the
desired setting.
• Off: Disable this feature.
• 1 min: 1-minute time lapse
recording.
• 5 min: 5-minute time lapse recording.
• 30 min: 30-minute time lapse recording.
Note: If Time Lapse is enabled, Pre-recording and Motion Detection will be disabled.
3.2.4 Motion Detection
With Motion Detection feature, the video recording automatically
starts if the digital video camera detects any movement.
1. In Video mode, touch to
enter the Video menu.
2. Touch Motion Detection to
enter the menu.
3. Touch the option to select On
or Off.
Note: If Motion Detection is enabled, Time Lapse and Pre-recording will be disabled.
Page 27

3.2.5 White Balance
Set the white balance when recording videos under specific lighting
conditions.
1. In Video mode, touch to
enter the Video menu.
2. Touch White Balance to
enter the menu.
3. Touch an option to select the
desired setting.
• Auto: Set the white
balance automatically.
• Incandescent: Indoor
under tungsten lighting condition.
• Sunny: Bright daylight shooting.
• Cloudy: Cloudy day or shady condition.
• Fluorescent: Indoor under fluorescent lighting.
• Preset: Manually adjust the white balance.
3.2.6 AE Meter
Select the metering method for calculating the exposure.
1. In Video mode, touch to
enter the Video menu.
2. Touch AE meter to enter the
menu.
27
Page 28

3. Touch an option to select the
desired setting.
• Average: Calculate
exposure based on the
entire image area.
• Center: Calculate exposure based on the entire image area,
but provides greater exposure to the center of a subject.
• Spot: Calculate exposure based on the small portion of the
screen center.
3.2.7 Digital Effect
Set the color filter effect to be applied on the video you want to
record.
1. In Video mode, touch to
enter the Video menu.
2. Touch Digital Effect to enter
the menu.
3. Touch an option to select the
desired setting.
• Off: No digital effect is
used.
• Art: Add an oil painting
color effect.
• Sepia: Add brown color effect.
• Negative: Add a negative color effect.
• Black/White: Add a monochrome color effect.
28
Page 29

• Vivid: Add a bright color tone effect.
3.2.8 Digital Zoom
Set whether or not to use digital zoom when recording videos.
1. In Video mode, touch to
enter the Video menu.
2. Touch Digital Zoom to enter
the menu.
3. Touch the option to select On
or Off.
29
Page 30

3.3 Playback videos
9
13
12
6 7 8
11
Video Playback
1. In Video mode, touch to enter Video Playback mode.
2. Touch the video to view it in full screen.
3. Touch to play the video.
4. Touch the corresponding icons to adjust the volume and
playback speed.
1
2
3
4
No.
1
2
3
4
30
5
Icon Item
Playback
mode
Volume
up
Volume
down
Menu
10
14
Description
Indicates the digital video camera is
in Video Playback mode.
Touch to increase playback volume.
Touch to decrease playback
volume.
Touch to enter the
menu.
Page 31

No.
Icon Item
5
6
7
8
9
10
11
File
number
Slow
motion
Video
resolution
Protect
Time
duration
Battery
status
Previous
Description
Indicates the file number.
Touch to enable or disable slow
motion playback.
Indicates the file resolution.
Indicates the file is protected.
Indicates the played duration / total
video duration.
Indicates the remaining battery
power.
Touch to view the previous video.
12
13
14
Play
Next
Return Touch to return to the previous
Touch to play the video.
Touch to view the next video.
screen.
31
Page 32

3.3.1 Slow motion playback
To start playback in slow motion:
1. In Video mode, touch to enter Video Playback mode.
2. Touch the video to view it in
full screen.
3. Touch to enable slow motion feature. The icon turns
orange.
4. Touch to play the video.
5. During playback, do the following:
• Touch to adjust the fast-forward speed 1/2X ~ 1/64X.
• Touch to adjust the rewind speed 1/2X ~ 1/64X.
6. Touch the orange to disable slow motion.
Note: If video playback is already in progress, touch to enable slow motion.
32
Page 33

3.4 Video playback settings
3.4.1 Protect File
1. In Video mode, touch to enter Video Playback mode.
2. Select the desired video file that you want to protect.
3. Touch to enter the Video
Playback ( ) menu.
4. Touch Protect File to enter
the menu.
5. Touch an option to select the
desired setting.
• Protect One: Protect the
current file.
• Unprotect One: Unprotect
the current file.
• Protect All: Protect all files.
• Unprotect All: Unprotect all files.
33
Page 34

3.4.2 Play Option
1. In Video mode, touch to enter Video Playback mode.
2. Touch the selected video file to view it in full screen.
3. Touch to enter the Video
Playback ( ) menu.
4. Touch Play Option to enter
the menu.
5. Touch an option to select the
desired setting.
• Play One: Playback on the
current video.
• Play All: Playback all
videos.
• Repeat One: Replay the current video.
• Repeat All: Replay all videos.
34
Page 35

3.4.3 Delete File
1. In Video mode, touch to enter Video Playback mode.
2. Select the desired video file that you want to delete.
3. Touch to enter Video Playback ( ) menu.
4. Touch Delete File to enter the
menu.
5. Touch an option to select the
desired setting.
• Delete this file: Delete the
current file.
• Delete all files: Delete all
files.
• Delete Selection: Delete the selected files.
Touch the desired files to mark them. When the file
selection is complete, touch
.
35
Page 36

6. Touch to confirm delete.
Note: Deleted files cannot be recovered. Ensure the files have backup before deletion.
Protected files cannot be deleted, unlock the file first.
36
Page 37

3.5 Shooting photos
9
10
16
17
5
1. Turn on the digital video camera. By default, the device is set to
Video mode.
2. Touch to switch to Camera mode.
3. Press the Record button to capture a photo.
3.5.1 The shooting screen
1
2
3
4
No.
Icon Item
1
2
3
6 7 8
Camera mode
Card type
White balance
11
12
13
14
15
Description
Indicates the digital video
camera is currently in Camera
mode.
Touch to switch to Video mode.
Indicates the memory card type
in use.
Indicates the current white
balance mode.
37
Page 38

No.
Camera
Icon Item
4
5
6
7
8
9
10
11
12
Metering
mode
Menu
Photo size
AF setting
LED icon
Scene mode
Available shot
Battery status
Zoom
indicator
Description
Indicates the current AE
metering mode.
Touch to enter the
menu.
Touch to select the desired
photo size.
Available options: 16M / 12M /
8M / 5M / 3M.
Touch to select the desired AF
setting.
Available options: Normal /
Macro / AF Lock.
Touch to select the suitable
lighting mode.
Available options: Off / On
Touch to select the desired
scene mode.
Available options: Auto / Night /
Sports / Landscape / Portrait /
Sunset / Sand/Snow / Flower /
Firework / Backlight / Beauty
Indicates the number of available
shots.
Indicates the remaining battery
power.
Indicates the zoom status.
38
Page 39

No.
Icon Item
13
14
15
16
ISO
Capture mode
Self-timer
EV
compensation
Description
Indicates the current AE ISO
mode.
Indicates the Capture Mode is
set to Continue Shot.
Indicates the Self Timer mode is
set to 10 seconds.
Indicates the current EV
compensation.
Touch / to adjust the EV
value.
17
Playback Touch to enter Playback mode.
39
Page 40

3.6 Camera menu
The Camera menu is used to adjust the capture settings in Camera
mode.
1. Turn on the digital video camera. By default, the device is set to
Video mode.
2. Touch to switch to Camera mode.
3. Touch to enter the Camera menu.
4. Touch the desired menu option to enter the menu.
5. Touch an option to select the desired setting.
6. Touch to exit the menu.
Note: Touch / to scroll through the available menu options. Touch / to go to the
previous/next page.
3.6.1 Capture Mode
Set the recording method to use when shooting photos.
1. In Camera mode, touch
to enter the Camera menu.
2. Touch Capture Mode to enter
the menu.
3. Touch an option to select the
desired setting.
• Normal: Shoot one photo
at a time.
40
Page 41

• Continue Shot: Continuously shoot photos as long as you
keep pressing the Record button.
Note:
If Capture Mode is set to Continue Shot, Instant View and Self Timer will be disabled.
The Continue Shot function will be disabled if the Photo size is set to 16M / 12M / 8M.
3.6.2 Instant View
Display a preview of the recorded photo right after the shot is taken.
1. In Camera mode, touch
to enter the Camera menu.
2. Touch Instant View to enter
the menu.
3. Touch the option to select On
or Off.
3.6.3 Self Timer
Set pre-defined time delay for self timer photography.
1. In Camera mode, touch
to enter the Camera menu.
2. Touch Self Timer to enter the
menu.
41
Page 42

3. Touch an option to select the
desired setting.
• Off: Disable this feature.
• 2 sec: 2-second delay self
timer.
• 10 sec: 10-second delay self timer.
3.6.4 White Balance
Set the white balance when shooting photos under specific lighting
conditions.
1. In Camera mode, touch
to enter the Camera menu.
2. Touch White Balance to
enter the menu.
3. Touch an option to select the
desired setting.
• Auto: Set the white
balance automatically.
• Incandescent: Indoor
under tungsten lighting
condition.
• Sunny: Bright daylight shooting.
• Cloudy: Cloudy day or shady condition.
• Fluorescent: Indoor under fluorescent lighting.
• Preset: Manually adjust the white balance.
42
Page 43

3.6.5 AE Meter
Select the metering method for calculating the exposure.
1. In Camera mode, touch
to enter the Camera menu.
2. Touch AE meter to enter the
menu.
3. Touch an option to select the
desired setting.
• Average: Calculate
exposure based on the
entire image area.
• Center: Calculate exposure based on the entire image area,
but provides greater exposure to the center of a subject.
• Spot: Calculate exposure based on the small portion of the
screen center.
3.6.6 AE ISO
Set the sensitivity for shooting photos.
1. In Camera mode, touch
to enter the Camera menu.
2. Touch AE ISO to enter the
menu.
43
Page 44

44
3. Touch an option to select the
desired setting:
Auto (100-400), Auto800
(100-800), Auto1600
(100-1600), 100, 200, 400,
800, 1600.
Note: Use a higher ISO setting in dim conditions and a lower ISO setting in brighter
conditions.
3.6.7 Digital Effect
Set the color filter effect to be applied on the photo you want to
capture.
1. In Camera mode, touch
to enter the Camera menu.
2. Touch Digital Effect to enter
the menu.
3. Touch an option to select the
desired setting.
• Off: No digital effect is
used.
• Art: Add an oil painting
color effect.
• Sepia: Add brown color effect.
• Negative: Add a negative color effect.
• Black/White: Add a monochrome color effect.
Page 45

45
• Vivid: Add a bright color tone effect.
3.6.8 Digital Zoom
Set whether or not to use digital zoom when capturing photos.
1. In Camera mode, touch
to enter the Camera menu.
2. Touch Digital Zoom to enter
the menu.
3. Touch the option to select On
or Off.
Page 46

46
3.7 Viewing photos
9
10
4 5
8
Photo
Playback
1. Turn on the digital video camera. By default, the digital video
camera is set to Video mode.
2. Touch to switch to Camera mode.
3. Touch to enter Photo Playback mode.
4. Touch the photo to view it in full screen.
1
2
No.
1
2
3
3
Icon Item
Playback
mode
Menu
File
number
6
7
11
Description
Indicates the digital video camera is
in Photo Playback mode.
Touch to enter the
menu.
Indicates the file number.
Page 47

47
No.
Icon Item
4
5
6
7
8
Description
Photo
size
Protect
DPOF tag Indicated the file is marked for
Battery
status
Previous
Indicates the file resolution.
Indicates the file is protected.
printing.
Indicates the remaining battery
power.
Touch to view the previous photo.
9
10
11
Next
T (zoom
in)
Return Touch to return to the previous
Touch to view the next photo.
Touch to zoom in the photo up to
10X.
screen.
Page 48

3.8 Photo playback settings
3.8.1 Protect File
1. In Camera mode, touch to enter Photo Playback mode.
2. Select the desired photo file that you want to protect.
3. Touch to enter the
Photo Playback ( ) menu.
4. Touch Protect File to enter
the menu.
5. Touch an option to select the
desired setting.
• Protect One: Protect the
current file.
• Unprotect One: Unprotect
the current file.
• Protect All: Protect all files.
• Unprotect All: Unprotect all files.
48
Page 49

3.8.2 Slide Show
1. In Camera mode, touch to enter Playback mode.
2. Select the desired photo file that you want to start the slide
show first.
3. Touch to enter the
Playback ( ) menu.
4. Touch Slide Show to enter
the menu.
5. Touch the option to select On
to enable the slide show.
The slide show starts right
away.
6. Touch to stop.
49
Page 50

50
3.8.3 Delete File
1. In Camera mode, touch to enter Photo Playback mode.
2. Select the desired photo file that you want to delete.
3. Touch to enter Photo
Playback ( ) menu.
4. Touch Delete File to enter the
menu.
5. Touch an option to select the
desired setting.
• Delete this file: Delete the
current file.
• Delete all files: Delete all
files.
• Delete Selection: Delete the selected files.
Touch the desired files to mark them. When the file
selection is complete, touch
.
Page 51

6. Touch to confirm delete.
Note: Deleted files cannot be recovered. Ensure the files have backup before deletion.
Protected files cannot be deleted, unlock the file first.
51
Page 52

3.8.4 DPOF
Note: A memory card is required for DPOF function.
1. In Camera mode, touch to enter Photo Playback mode.
2. Select the desired photo file that you want to set the DPOF tag.
3. Touch to enter the
Photo Playback ( ) menu.
4. Touch DPOF to enter the
menu.
5. Touch an option to select the
desired setting.
• DPOF One: Set the
number of print on the
current file.
• DPOF All: Set the number of print on all files.
• Reset One: Remove the DPOF tag on the current file.
• Reset All: Remove the DPOF tag on all files.
6. Touch / to select the
desired file.
7. Touch / to set the
number of print.
8. Repeat step 6~7 to tag other
file.
9. Touch
52
to confirm the DPOF setting.
Page 53

3.8.5 Rotate
1. In Camera mode, touch to enter Photo Playback mode.
2. Select the desired photo file that you want to rotate.
3. Touch to enter the
Photo Playback ( ) menu.
4. Touch Rotate to enter the
menu.
5. Touch an option to select the
desired setting.
• Left 90: Rotate the image
90° counter-clockwise.
• Right 90: Rotate the
image 90° clockwise.
53
Page 54

54
4 Using Setup menu
4.1 Setup menu
Configure the digital video camera general settings.
1. Turn on the digital video camera. By default, the device is set to
Video mode. In Camera mode, touch to switch to Video
mode.
2. Touch to enter the OSD menu and switch to Setup ( )
menu.
• In Video mode, touch twice to switch to Setup ( )
menu.
• In Camera mode, touch to switch to Setup ( )
menu.
3. Touch the desired menu option to enter the menu.
4. Touch an option to select the desired setting.
5. Touch to exit the menu.
Note: Touch / to scroll through the available menu options. Touch / to go to the
previous/next page.
Page 55

55
4.1.1 System
Set the TV type based on your local region.
1. Switch to Setup ( ) menu.
2. Touch System to enter the
menu.
3. Touch the option to select
NTSC or PAL.
4.1.2 File Number
Set the file numbering type for recorded files.
1. Switch to Setup ( ) menu.
2. Touch File Number to enter
the menu.
3. Touch an option to select the
desired setting.
• Reset: Reset the file
number to 0001.
• Serial: Continue the file
numbering from the last
recorded file.
Page 56

56
4.1.3 Time Setup
Set the date and time settings.
1. Switch to Setup ( ) menu.
2. Touch Time Setup to enter
the menu.
3. To adjust the field item, touch
the respective field to select
the field.
4. Touch / to adjust the
value.
5. Repeat step 3~4 to adjust other fields.
6. Touch to save your changes.
Note: Touch / to adjust the value. Touch / to go to the previous/next field.
4.1.4 Format
Format the memory card.
1. Switch to Setup ( ) menu.
2. Touch Format to enter the
menu.
Page 57

57
3. Touch to format the card.
4. When the “Format successful!” message appears, touch to
exit the menu.
4.1.5 Default Setting
Reset the digital video camera settings to its factory defaults.
1. Switch to Setup ( ) menu.
2. Touch Default Setting to
enter the menu.
3. Touch to reset.
4. When the “Operation done!” message appears, touch
exit the menu.
to
Page 58

4.1.6 LCD Brightness
Set the LCD display brightness.
1. Switch to Setup ( ) menu.
2. Touch LCD Brightness to
enter the menu.
3. Touch an option to select the
desired setting.
• Normal: Maintain the
brightness level as the
default setting.
• High: Increase the brightness level.
• Auto: Automatically adjust the brightness level based on
the surrounding environment.
4.1.7 Date/Time Stamp
Disable the date/time stamp or select the date/time stamp type when
shooting a photo.
1. Switch to Setup ( ) menu.
2. Touch Date/Time stamp to
enter the menu.
58
Page 59

3. Touch an option to select the
desired setting.
• Off: Disable the date/time
stamp.
• Date: Enable the date
stamp only.
• Date/Time: Enable date and time stamp.
4.1.8 Auto Power Off
Set the digital video camera to automatically turn off if it is left idle for
a preset time.
1. Switch to Setup ( ) menu.
2. Touch Auto power off to
enter the menu.
3. Touch an option to select the
desired setting.
• Off: Disable the Auto
Power Off function.
• 3 min: Automatically turn
off the power if the digital video camera is left idle for 3
minutes.
• 5 min: Automatically turn off the power if the digital video
camera is left idle for 5 minutes.
59
Page 60

60
4.1.9 Language
Set the on-screen display language.
1. Switch to Setup ( ) menu.
2. Touch Language to enter the
menu.
3. Touch the language option to
select the desired language.
Note: Touch / to scroll through the available menu options. Touch / to go to the
previous/next page.
4.1.10 Information
Select the information type to be displayed on the preview screen.
1. Switch to Setup ( ) menu.
2. Touch Information to enter
the menu.
Page 61

3. Touch an option to select the
desired setting.
• Normal: Display basic
information on the preview
screen.
• Advance: Display detail information on the preview screen.
4.1.11 Beep Sound
Enable/Disable the beep sound.
1. Switch to Setup ( ) menu.
2. Touch Beep Sound to enter
the menu.
3. Touch the option to select On
or Off.
61
Page 62

4.1.12 Start Logo
Set the start up image to be displayed on the screen when the digital
video camera is turned on.
1. Switch to Setup ( ) menu.
2. Touch Start Logo to enter the
menu.
3. Touch an option to select the
desired setting.
• Default: Use the default
start-up logo.
• User Setting: Use one of
the captured photos as the start-up logo.
4.1.13 Anti-flicker
Set the refresh rate of the digital video camera.
1. Switch to Setup ( ) menu.
2. Touch Anti-flicker to enter
the menu.
62
Page 63

3. Touch an option to select the
desired setting.
• Auto: Automatically adjust
the frequency system
based on the System
setting.
• 60Hz: Set the frequency system to 60Hz.
• 50Hz: Set the frequency system to 50Hz.
4.1.14 Recording Audio Gain
If the automatic volume gain function is enabled and the recording
volume is increased, subtle sounds and dialogue are recorded as
clearly as possible. However, when recording with the automatic
volume gain function, a larger surrounding sound will be added to
the recording; this is a normal situation and is not of poor quality. At
normal environment, it will automatically disable the automatic
volume gain function.
1. Switch to Setup ( ) menu.
2. Touch Recording Audio
Gain to enter the menu.
3. Touch the option to select On
or Off.
63
Page 64

64
4.1.15 SD
Select the memory card type to be used as the default storage.
1. Switch to Setup ( ) menu.
2. Touch SD to enter the menu.
3. Touch the option to select
micro SD or SD.
4.1.16 Auto Hide Info
Select whether or not to automatically hide the information icons
shown on the screen.
1. Switch to Setup ( ) menu.
2. Touch Auto Hide Info to enter
the menu.
3. Touch the option to select On
or Off.
Page 65

4.1.17 Touch Correction
Calibrate the touch panel screen to ensure accuracy.
1. Switch to Setup ( ) menu.
2. Touch Touch Correction to
enter the menu.
3. Follow the on-screen instruction by tapping icon at the
corner of the screen successively to complete the screen
calibration.
65
Page 66

5 Connecting to other devices
5.1 Connecting to the computer
You can connect the device to a PC or notebook to transfer or view
files as well as charge the device.
1. Turn on the digital video camera.
2. Open the USB/HDMI
connector cover.
3. Connect one end of the
USB cable to the device.
4. Connect the other end of
the USB cable to an
available USB port on your
computer.
5. After the connection is established, a “Removable Disk” icon
appears in “My Computer”. Click this icon to access the files in
your device.
6. Copy the desired files to a folder on your computer.
66
Page 67

67
5.2 Connecting to TV
You can play files in your digital video camera on a TV using an
HDMI cable.
1. Turn on the digital video camera.
2. Open the USB/HDMI
connector cover.
3. Connect one end of the
HDMI cable to the digital
video camera.
4. Connect the other end of the
HDMI cable to an HDMI TV.
5. Turn on the TV, and then switch the input source of the TV to
“HDMI”.
6. Follow the on-screen instructions to operate the device via the
TV.
Note:
The synchronized output depends on the current digital video camera mode (Video or
Camera). These two modes cannot be switched.
In HDMI mode, you cannot use the digital video camera to record videos, capture
photos, utilize the digital zoom function, or playback videos in slow motion.
Be sure to turn the digital video camera on before connecting to a TV using an HDMI
cable.
Page 68

6 Installing the Software
1. Insert the supplied CD-ROM in a CD-ROM drive.
2. An Autorun screen will be displayed.
If the Autorun screen is not displayed, go to My Computer
> CD-ROM and double-click Install_CD.exe.
3. Click the respective software name. Follow the on-screen
instructions to complete the software installation.
68
Page 69

7 Editing software
ArcSoft Total Media Extreme (TME) ™ manages your media for you,
and gives you tons of fun and exciting ways to create and share
projects featuring your photo, video, and music files. Edit, enhance
and add creative effects to your photos. You can
• Create your own movies or photo slide shows complete with
soundtrack.
• Upload your files easily to YouTube™!
• Or share them through simple email attachments or popular
photo printing.
• You can go to http://www.arcsoft.com/ for more information.
69
Page 70

70
8 Specifications
, 30fps and 60fps
Specifications
Image sensor
Effective pixels
Storage media
Memory
Lens
1/3.2” CMOS sensor
5.0 Megapixels (2592 x 1944)
Supports SDHC, up to 32GB class 4 or above
1Gbits NAND Flash
10X Optical zoom lens
F2.8-F3.5,
f=4.6mm-46mm (35-350mm, 35mm equivalent)
Focus range
Movie Clip
Movie
Still image Normal
Resolution: Full HD (1920 x 1080), 30fps
Playback Function: Play/Pause, Forward, Rewind;
Slow Motion On: 1/2X ~ 1/64X
Slow Motion Off: 2X ~ 64X
Wide: 10cm~Infinity
Tele: 90cm~Infinity
Wide: 70cm~Infinity
Tele: 200cm~Infinity
Macro
Wide: 10cm~70cm
Tele: 90cm~200cm
HD (1280 x 720)
Page 71

Specifications
Still image
TFT screen
Assist Lamp
Shutter
Exposure
ISO
Interface
Microphone
Speaker
Battery
Operating
Temperature
Resolution: 16M (4608x3456, by interpolation),
12M (4000x3000, by interpolation),
8M (3200x2400, by interpolation),
5M (2592x1944),
3M (2048x1536)
Format: DCF 1.1 (JPEG, Exif2.2)
Playback:10x digital zoom
3.0” Touch Panel screen (16:9)
White LED: 1m effective distance
Electronic shutter
Auto:1/2 ~1/2000 sec, Night: 2~1/2000 sec.
Average, Center, Spot
Movie Auto
Still image
Mini B Type USB 2.0 (high-speed),
Mini C Type HDMI
Yes
Yes
1200mAH CA NP-40 Lithium-ion rechargeable
battery
0° ~ 40° C
Auto (100-400), Auto800 (100-800),
Auto1600 (100-1600), 100, 200, 400,
800, 1600
71
Page 72

Specifications
Operating
Humidity
Dimensions
Weight
20 ~ 70% RH
120 x 57.5 x 57.5 mm
Approx. 268 g (without battery/memory card)
72
Page 73

Copyright © 2012
All rights reserved.
All other marks, products or company names mentioned in this guide are
trademarks of their respective companies.
 Loading...