

Page 1

HD-DV Camera
User’s Manual
Page 2

Page 3

Table of Contents
About this manual.............................................................v
Copyright...........................................................................v
Precautions ......................................................................vi
Waterproof......................................................................viii
Before You Start ...............................................................xi
1 Introducing the video camera ................... 1
1.1 System requirements...............................................1
1.2 Features..................................................................1
1.3 Unpacking the video camera..................................2
1.4 About the video camera..........................................3
1.4.1 Front view...................................................3
1.4.2 Top view .....................................................3
1.4.3 Bottom view ...............................................3
1.4.4 Right and Left views .................................4
1.4.5 Back view....................................................4
1.4.6 About the LED ...........................................7
2 Getting started............................................ 8
2.1 Inserting an SD card..............................................8
2.2 Inserting the batteries.............................................9
2.3 Turning on/off the video camera .........................12
2.4 Connecting to TV with a USB/AV Cable .............12
2.5 Connecting to PC with a USB/AV Cable .............13
2.6 Changing modes...................................................14
i
Page 4

2.7
Before you start .................................................... 14
2.7.1 Setting the date and time........................14
2.7.2 Setting the language................................15
2.7.3 Setting the beep........................................15
3 Using the Video Camera.......................... 16
3.1 Recording Videos..................................................16
3.2 Video Menu ..........................................................18
3.2.1 Resolution.................................................19
3.2.2 White Balance...........................................19
3.2.3 Quality.......................................................20
3.2.4 EV...............................................................20
3.2.5 Capture Mode ..........................................21
3.3 Playing Videos......................................................22
3.4 Video Playback Menu...........................................24
3.4.1 Delete.........................................................25
3.4.2 Protect .......................................................26
3.4.3 Copy to Card............................................27
3.5 Voice Mode ...........................................................28
3.5.1 Recording voice files ...............................28
3.5.2 Playing voice files....................................29
3.6 Shooting Photos ...................................................30
3.7 Photo Menu..........................................................33
3.7.1 Size.............................................................34
3.7.2 Quality.......................................................34
3.7.3 White Balance...........................................35
ii
Page 5

3.7.4
EV...............................................................36
3.7.5 Effect..........................................................36
3.7.6 Night Mode ..............................................37
3.7.7 Burst Mode ...............................................37
3.7.8 Face Detect................................................38
3.7.9 Date Stamp ...............................................38
3.8 Viewing Photos.....................................................39
3.9 Photo Playback Menu ..........................................41
3.9.1 Delete.........................................................42
3.9.2 Protect .......................................................43
3.9.3 Autoplay ...................................................44
3.9.4 Copy to Card............................................44
3.9.5 DPOF.........................................................45
3.10 System Menu ........................................................ 46
3.10.1 Format .......................................................47
3.10.2 Default.......................................................47
3.10.3 Language ..................................................48
3.10.4 Auto Power Off........................................48
3.10.5 Beep ...........................................................48
3.10.6 Frequency .................................................48
3.10.7 TV Standard..............................................49
3.10.8 Date / Time ..............................................49
3.11 Thumbnail mode ..................................................50
3.12 USB mode.............................................................51
3.12.1 Using the PC Cam feature ......................51
3.12.2 Using the Mass Storage feature .............51
iii
Page 6

3.12.3 Using the DPS (Direct Print Standard)
feature…………………………….……….51
3.13 Diving mode..........................................................52
3.14 Game mode........................................................... 53
4 Installing software and drivers ............... 54
4.1 Drivers ..................................................................54
4.1.1 Mass Storage.............................................54
4.1.2 PC Camera................................................55
4.2 Presto! Video Works .............................................56
4.3 Presto! Mr. Photo ................................................. 57
Specification....................................................................58
Troubleshooting ..............................................................61
iv
Page 7

Preface
Congratulations on your purchase of this advanced video camera.
Ensure that you read this manual carefully and keep it in a safe
place for future reference.
About this manual
Every effort has been made to ensure that the contents of this
manual are correct and up to date. However, no guarantee is made
regarding the accuracy of the contents. If the contents of this
manual do not tally with the camera, please take the camera as a
criterion, and our company reserves the right to change the
contents or technical rules without notice in advance. Also, the
manufacturer reserves the right to change the technical specification
in advance without notice.
If the accessories do not tally with the actual package, please take
the actual package as a criterion.
Copyright
© Copyright 2010.
All rights reserved. No part of this publication may be reproduced,
transmitted, transcribed, stored in a retrieval system or translated
into any language or computer language, in any form or by any
means, electronic, mechanical, magnetic, optical, manual or
otherwise, without the prior written permission of the
manufacturer.
v
Page 8

Precautions
General precautions
• Do not use or store the product in dusty, dirty, or sandy areas,
as its components may be damaged.
• Do not store the product in a hot environment. High
temperatures can shorten the life of electronic devices, damage
batteries and warp or melt certain plastics.
• Do not store the product in cold areas. When the product
warms up to its normal temperature, moisture can form inside,
which may damage the electronic circuits.
• Do not attempt to open the casing or attempt your own repairs.
High-voltage internal components create the risk of electric
shock when exposed.
• Do not drop or knock the product. Rough handling may
damage the internal components.
• Do not use harsh chemicals, cleaning solvents or strong
detergents to clean the product. Wipe the product with a
slightly damp soft cloth.
• Do not fire the flash while it is too close to the subject's eyes.
Intense light from the flash can cause eye damage if it is fired
too close to the eyes. When using the flash, the camera should
be at least one meter from the eyes of the subject.
• Do not open the battery cover while an image is being
recorded. Doing so will not only make storage of the current
image impossible, it can also corrupt other image data already
stored in file.
• If the product or any of its accessories are not working
properly, take them to your nearest qualified service center.
The personnel there will assist you and if necessary, arrange
for the product to be repaired.
• Test for proper operation before using the camera.
vi
Page 9

Notes on the LCD Screen
Be very careful to ensure the fluid contained in the LCD screen does
not escape if the screen becomes cracked or damaged. If this occurs,
follow these steps:
• If the fluids make contact with skin, wipe it with a clean cloth
then rinse with a large amount of water.
• If the fluid makes contact with eyes, wash eyes with clean
water for at least 15 minutes and go to the hospital as soon as
possible.
• If the fluid is swallowed, first rinse mouth with water, then
drink a large amount of water and induce vomiting. Go to the
hospital as soon as possible.
Operation conditions
• This camera is designed for use in temperatures ranging from
0°C to 40°C (32°F to 104°F).
• Do not use or keep the camera in the following areas:
- In areas subject to direct sunlight
- In areas subject to high humidity or dust
- Near air conditioners, heaters, or other areas subject to
temperature extremes
- Inside of a closed vehicle, especially one parked in the sun.
- In areas subject to strong vibration
Power supply
• Use only the type of battery that came with your camera.
Using any other type of battery may damage the equipment
and invalidate the warranty.
• Ensure the battery is inserted correctly. Inserting the battery
incorrectly can cause damage to the product and possibly start
a fire.
vii
Page 10

• Remove the battery to avoid the fluid leakage if the camera is
not going to be used for a long time.
• If the battery is crushed or damaged, remove it immediately to
avoid the battery fluid leakage and abnormal expansion.
Waterproof
Waterproof performance
• The camera’s waterproof performance is equivalent IPX8
• Underwater time limit: Do not use the camera underwater for
more than 60 minutes to ensure water resistance.
• The camera is not dust-proof.
• The supplied accessories are not waterproof.
Notes before going underwater:
(Do not do the following actions on sandy /dusty environment or
near the water’s edge, please check indoors)
• Check if the area surrounding the battery/USB port is clean,
do not allow dirt or sand or foreign objects around it.
• Ensure that the battery/USB compartment cover has no cracks
or scratches.
• Ensure that the battery/USB compartment cover is closed.
• Ensure that the camera has no cracks, if the camera has been
dropped; it is recommended to return it to your dealer.
viii
Page 11

Notes for general use:
(If the USB cable is directly connected to a computer or if the AV
cable is connected to a TV, be careful in plugging it, do not allow it
to touch the battery/USB compartment cover to avoid waterproof
loss.)
• Avoid opening or closing the battery/USB compartment cover
near the water’s edge (sea, lake, beach, lake, etc.). Do not open
or close the cover with wet hands, or hands with sand or dust.
• If taking pictures near the water’s edge, pay attention not to
drop the front lens. If it is dropped, wipe off water drops using
a non-fiber clean cloth or a soft absorbent cotton cloth as soon
as possible so as not to leave water drop marks.
• The accessories (batteries, etc.) used with the camera are not
water resistant, be careful in using them.
• Do not drop the camera to ensure waterproof durability.
• Do not place the camera in temperatures above 40°C or below
0°C to ensure waterproof durability.
• Do not attempt to make the camera waterproof or seal the
vents yourself, doing so may damage the camera’s waterproof
ability.
When using the camera
• The waterproof properties of the camera apply to fresh water
and saltwater only; they do not apply to cleaning substances,
chemicals, or water from spas, etc. Any such liquids should be
wiped off immediately.
• Do not immerse in water at a depth greater than 3.0 m (10 ft).
• Do not subject the camera to highly pressurized water.
• Do not immerse in water for longer than 60 minutes. After 60
minutes of use in water, allow the camera to dry for at least 10
minutes.
ix
Page 12

x
• Do not immerse in water warmer than 40°C (104°F).
• Do not open or close the battery/USB compartment cover
when the camera is wet or underwater.
• Do not open or close the battery/USB compartment cover with
wet hands.
• Do not open the battery/USB compartment cover next to
water or a pool.
• The camera is not dust-proof.
• Do not bump or knock the camera underwater, otherwise the
battery/USB compartment cover may open.
After using the camera
• Be sure to come ashore within 60 minutes after going
underwater, this will maintain the appearance, quality and
water resistance of the camera.
• After taking pictures underwater, clean the camera in a bucket
of water without salt. Ensure that the battery/USB
compartment cover is closed; then soak the camera in the
bucket of water for about 10 minutes. After 10 minutes, wipe
the camera and the lens dry with absorbent cotton. Place the
camera in a well ventilated cool place to dry naturally (do not
place under direct sunlight or exposed areas). Be sure to wait
until the camera is completely dry before opening the
battery/USB compartment cover (open the compartment cover
while holding an absorbent cotton to dry off water or clean
other impurities around the cover).
• Wipe off water drops on the camera and the lens with a soft
lint-free cloth (to avoid fiber) and place it in a well-ventilated
place to dry. The cover at the battery/IO DOOR can be opened
only after dry to prevent water from entering the camera when
opening.
Page 13

xi
• Before you open the cover at the battery/IO DOOR, always
wipe off water drops inside the cover. Note that it should face
down when opening.
Notes on maintenance
• Be sure to wipe any dirt or sand off the waterproof sealing
material or its contraction surface. Dirt or sand may scratch the
material or the surface, making the camera less resistant to
water.
• Do not use any soapy water, mild detergents, alcohol or
similar liquids to clean the camera. They may make the camera
less resistant to water.
• The waterproof of sealing material is replaceable at cost. The
material should be replaced once a year to maintain the
camera water resistance.
Other Notes
• If water accidentally enters the camera or any problem occurs
when it is in water, please get out of water immediately and
take proper actions. Dry the camera and send it to repair.
• Information is subject to change without notice. Refer to the
important notes in the manual supplied with the camera.
Before You Start
Taking test shots
Before taking pictures with this DV camera in any important
occasion (such as a wedding ceremony or an overseas trip), do test
the DV camera beforehand to ensure that it functions properly. Any
additional loss caused by the malfunction of this product (such as
costs of photography or any loss of benefit generated by the
Page 14

xii
photography) is not the responsibility of the manufacturer and no
compensation will be given for it.
Copyright information
Take care to observe "No Photography" notices in certain locations.
In these cases, you cannot record any live performance,
improvisation or exhibits, even for personal purposes. Any transfer
of pictures or memory card data must be conducted under the
constraints of copyright law.
Page 15

1 Introducing the video camera
Read this section to learn about the features and functions of the
video camera. This chapter also covers system requirements,
package contents, and descriptions of the hardware components.
1.1 System requirements
The video camera requires a PC with the following specifications:
• Windows® 2000/XP SP2/Vista/
Windows 7 operating system (All 32-bit only)
• Intel® Pentium IV 2.8GHz/AMD Athlon 64 or higher
• At least 512 MB of RAM or higher
• Graphic card with DirectX 9 support (DirectX 10 recommended)
• Standard USB 1.1 port or higher
• At least 800 MB of available disk space
z Note:
A USB 1.1 port will enable you to transfer files to and from
your host PC, but transfer speeds will be much faster with a
USB 2.0 port.
1.2 Features
The video camera offers a variety of features and functions including:
• HD 720p (30fps)
• HD digital video camera
• Voice recorder
• USB mass storage
• Waterproof IPX8
• Digital camera – (max. 16 Megapixels)
• Face detection
• DPS (Direct Print Service) support
1
Page 16
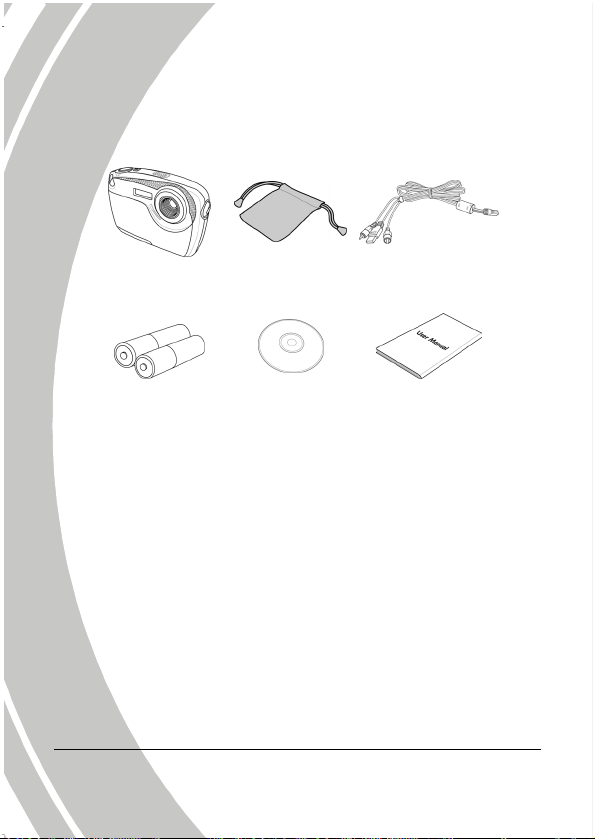
1.3 Unpacking the video camera
The following items should be present in the package. If any item is
missing or appears damaged, contact your dealer immediately.
Video camera Pouch USB/AV cable
2 x “AAA”
alkaline batteries
2
CD ROM User’s Manual
Page 17

1.4 About the video camera
Refer to the following illustrations to familiarize yourself with the
buttons and controls of this video camera.
1.4.1 Front view
LED light
1.4.2 Top view
1.4.3 Bottom view
SD card slot
Battery compartment
USB
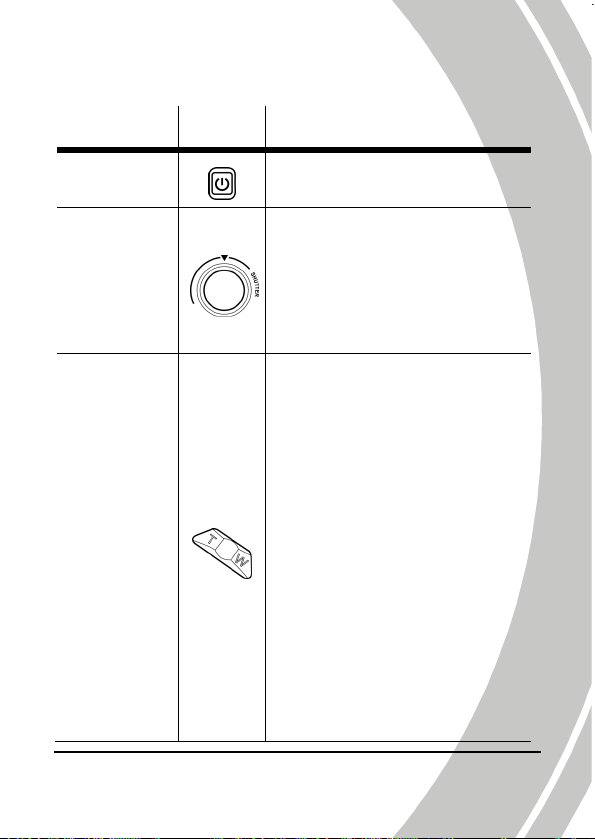
Power button
Record button
Speaker
Tripod socket
Lens
Microphone
3
Page 18

1.4.4 Right and Left views
Macro button
1.4.5 Back view
Power LED
Strap hole
Zoom button
LCD screen
Playback button
Menu button
Mode button
4-way Navigation
button
4
Page 19
See the table below for a description of each button’s function.
Name Button
Power
Button
Record
Button
Zoom
Button
Function
Press and hold to turn the
power on or off.
In Video mode:
• Press to start recording a
video. Press again to stop.
In Photo mode:
• Press to take a picture.
In Video and Photo modes:
• Press the T/W Button to
zoom out/in.
In Video Playback and Photo
Playback modes:
• Press the T Button to enter
the Thumbnail mode.
• Press the T/W Button to
toggle four or nine
thumbnail view.
In Photo Playback mode:
• Press the W Button to enter
the Zoom mode.
While playing video:
• Press to adjust the volume.
5
Page 20

Name Button Function
Press to switch to different
Mode
Button
modes: Video, Video (in
Diving), Photo, or Photo (in
Diving).
In OSD menus:
• Use the 4-way Navigation
Button to select items in the
menu and press the middle
button to confirm.
In Video and Photo modes:
• Press the Down Navigation
Button to toggle the display
4-way
Navigation
Button
mode.
In Photo mode:
• Press the Up Navigation
Button to toggle the flash
mode.
• Press the Right Navigation
Button to view the latest
taken photo.
• Press the Left Navigation
Button to toggle the
self-timer.
6
Page 21
Name Button Function
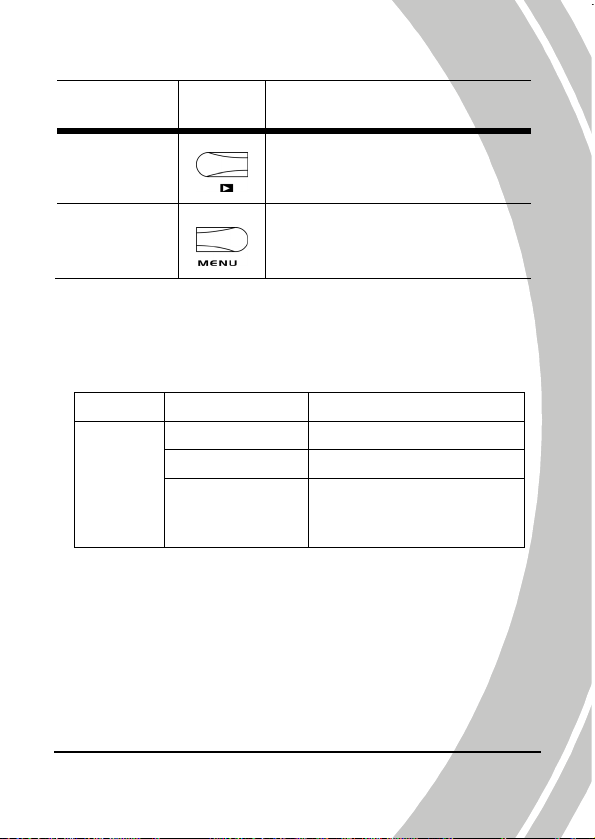
Playback
Button
Menu
Button
Press to switch to Playback
mode.
Press to display the menu for
the current mode.
1.4.6 About the LED
The following table describes the camera LED:
LED Color Definition
Green Power-on
Power
Green Blinking Low battery
Red Blinking
Protect/Unlock All
Format/Delete/Recording/
USB Mass Storage operation
7
Page 22

2 Getting started
Read this section to learn how to start using the video camera. This
section covers basic functions such as switching on, inserting the
batteries and memory card, and configuring preliminary settings.
See later chapters for advanced functions.
2.1 Inserting an SD card
An SD card can be installed in the video camera to provide
additional storage space for still images, video clips, or other files.
1. Push the tab upwards to open the bottom cover lock then
push right to open the bottom cover.
2. Insert the memory card. We recommend using a memory
card with a capacity of 1 GB or higher.
8
Page 23
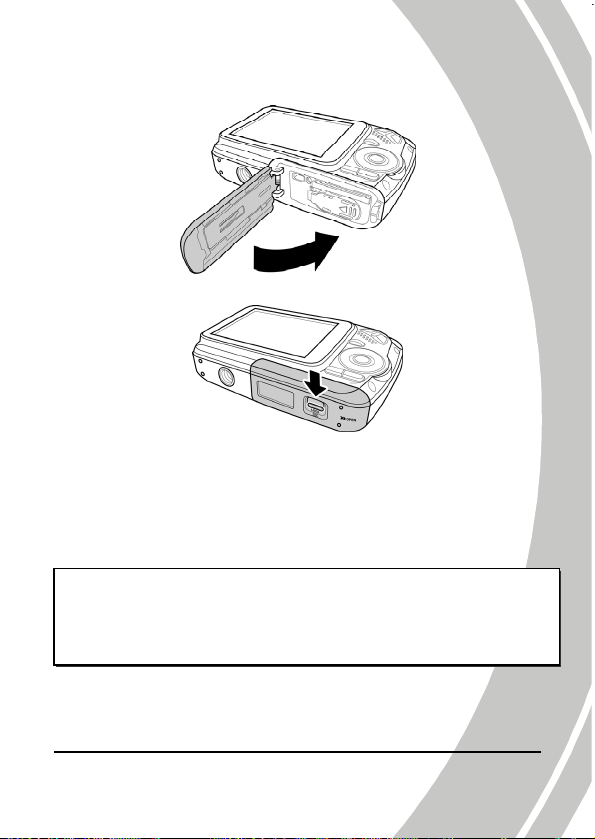
3. Close the bottom cover.
4. Push the tab downwards to secure the bottom cover lock.
2.2 Inserting the batteries
This video camera is designed to use two AAA alkaline batteries.
Only use the batteries supplied or similar batteries recommended
by the manufacturer or your dealer.
z Note:
Install the batteries exactly as described here. Installing the
batteries incorrectly could cause damage to the video camera
and possibly start a fire.
9
Page 24

1. Push the tab upwards to open the bottom cover lock then
push right to open the bottom cover.
2. Push left to open the battery cover.
3. Insert the batteries. Ensure that the + and – symbols on the
batteries line up with the + and – symbols on your video
camera.
10
Page 25

4. Close and push right to secure the battery cover.
5. Close the bottom cover.
6. Push the tab downwards to secure the bottom cover lock.
11
Page 26

2.3 Turning on/off the video camera
Press and hold the Power Button to turn the video camera on/off.
2.4 Connecting to TV with a USB/AV Cable
To view pictures or videos on a TV, connect the video camera to a
TV using the supplied USB/AV cable as shown.
12
Page 27

2.5 Connecting to PC with a USB/AV Cable
To manage your pictures or videos on a PC, connect the video
camera to a computer with the supplied USB/AV cable as shown.
13
Page 28

2.6 Changing modes
The video camera can operate in four modes: Video, Video (in
Diving), Photo, and Photo (in Diving). Press the Mode Button to
toggle different modes.
2.7 Before you start
Before you start using the video camera, some basic settings such as
the Date/Time, Language, and Beep functions need to be
configured.
2.7.1 Setting the date and time
To adjust the date and time, please do the following:
1. Press the Menu Button to
display the OSD menu.
2. Use the Left/Right Navigation
Button to select the Setting tab.
3. Use the Up/Down Navigation
Button to select DATE/TIME.
4. Press the Middle Navigation
Button to confirm.
5. Use the Left/Right Navigation Button to select the desired
field.
6. Use the Up/Down Navigation Button to adjust the value.
7. Repeat steps 5-6 to adjust other fields.
8. Press the Middle Navigation Button to confirm.
14
Page 29

2.7.2 Setting the language
To select the language, please do the following:
1. Press the Menu Button to
display the OSD menu.
2. Use the Left/Right Navigation
Button to select the Setting tab.
3. Use the Up/Down Navigation
Button to select Language.
4. Press the Middle Navigation
Button to confirm.
5. Use the Left/Right Navigation Button to select the desired
language.
6. Press the Middle Navigation Button to confirm.
2.7.3 Setting the beep
To adjust the beep, please do the following:
1. Press the Menu Button to
display the OSD menu.
2. Use the Left/Right Navigation
Button to select the Setting tab.
3. Use the Up/Down Navigation
Button to select Beep.
4. Press the Middle Navigation
Button to confirm.
5. Use the Left/Right Navigation Button to select
disable/enable the beep.
6. Press the Middle Navigation Button to confirm.
or to
15
Page 30

3 Using the Video Camera
3.1 Recording Videos
To record a movie, please do the following:
1. Press the Power Button to turn on the video camera.
2. Press the Mode Button to switch to Video mode.
3. Press the Record Button to start recording the video.
To adjust the video, you may:
• Use the Zoom Button to zoom in and out.
4. To stop video recording, press the Record Button again.
The Video Recording Screen
11
10
9
12 13
1
2
3
4
16
8
6
7
5
Page 31

# Icon Description
1
2
Indicates the number of saved files.
Memory status indicator
: indicates that an SD card is used.
: indicates that no SD card is inserted
and the internal memory is used.
3
4
5
6
7
8
9
10
11
12
13
Indicates the current resolution.
Indicates the current Quality setting.
Indicates the current date and time.
Indicates the remaining recording time.
Indicates the current image histogram.
Indicates the current battery status.
Indicates that Macro is enabled.
Indicates the current White Balance setting.
Indicates that the video camera is in Video
mode.
Indicates the current EV compensation value.
Indicates the current Zoom status.
17
Page 32

3.2 Video Menu
To access the Video menu, please do the following:
1. Make sure you are in the Video mode. Press the Mode
Button to switch to the Video mode if not.
2. Press the Menu Button to open the Video menu.
3. Use the Up/Down Navigation Button to scroll through the
selections until the desired one is highlighted.
4. Press the Middle Navigation Button to confirm.
5. Press the Menu Button to exit.
The following selections are available in the Video menu:
1. Resolution 4. EV
2. White Balance 5. Capture Mode
3. Quality
18
Page 33

3.2.1 Resolution
The Resolution selection allows you to set the resolution before you
record a video. The higher the resolution, the more memory space
is required.
To select the resolution, please do the following:
1. Use the Left/Right Navigation Button to select the desired
option:
• QVGA: Select this option
for 320 x 240 resolution.
• VGA: Select this option for
640 x 480 resolution.
• HD: Select this option for
1280 x 720 resolution.
2. Press the Middle Navigation Button to confirm.
3.2.2 White Balance
The White Balance selection allows you to set the white balance
when recording videos under specific lighting conditions.
To set the white balance, please do the following:
1. Use the Left/Right Navigation Button to select the desired
option:
• Auto: Select this option to let
the video camera set the
white balance automatically.
• Sunny: Select this option for
daylight.
• Cloudy: Select this option
for cloudy days.
19
Page 34

• Tungsten: Select this option for normal indoor lighting
conditions.
• Fluorescent: Select this option for fluorescent lighting.
2. Press the Middle Navigation Button to confirm.
3.2.3 Quality
The Quality selection allows you to set the quality before you
record a video. The higher the quality, the more memory space is
required.
To select the quality, please do the following:
1. Use the Left/Right Navigation
Button to select the desired
option:
• Fine: Select this option for
fine quality.
• Normal: Select this option
for normal quality.
2. Press the Middle Navigation Button to confirm.
3.2.4 EV
The EV selection allows you to adjust the exposure compensation of
the motion picture.
To set the exposure compensation,
please do the following:
1. Use the Left/Right Navigation
Button to select the desired
value.
2. Press the Middle Navigation
Button to confirm.
20
Page 35

3.2.5 Capture Mode
The Capture Mode selection allows you to select the capture mode
for recording movie or recording voice.
To select the capture mode, please do the following:
1. Use the Left/Right Navigation
Button to select Video Mode
or Voice Mode.
2. Press the Middle Navigation
Button to confirm.
21
Page 36

3
5
3.3 Playing Videos
To play videos, please do the following:
1. Make sure you are in the Video mode. Press the Mode
Button to switch to the Video mode if not.
2. Press the Playback Button to enter the Video Playback mode.
3. Press the Left/Right Navigation Button to browse the videos.
4. Press the Middle Navigation Button to play the desired video.
• To pause during playback, press the Middle Navigation
Button. To resume, press the Middle Navigation Button.
• To rewind/fast-forward, press and hold the Left/Right
Navigation Button to toggle different speeds (2X, 4X, or
8X). To return to the normal speed, press the Middle
Navigation Button.
• To skip to the previous/next clip, press the Left /Right
Navigation Button.
• To adjust the volume, press the T/W Button.
5. Press the Up Navigation Button to stop playback.
The Video Playback Screen
4
6
1
2
22
Page 37

# Icon Description
1
2
Indicates the number of the current video
and the total number of videos.
Indicates the elapsed time and total clip
length.
3
4
5
6
Indicates the current battery status.
Indicates that the file is protected.
Indicates that the video camera is in
Playback mode.
Indicates the current volume level.
23
Page 38

3.4 Video Playback Menu
To access the Video Playback menu, please do the following:
1. Make sure you are in the Video Playback mode. When in
Video mode, press the Playback Button to switch to the
Video Playback mode.
2. Press the Menu Button to open the Video Playback menu.
3. Use the Up/Down Navigation Button to scroll through the
selections until the desired one is highlighted.
4. Press the Middle Navigation Button to confirm.
5. Press the Menu Button to exit.
The following selections are available in the Video Playback menu:
1. Delete 3. Copy to Card
2. Protect
24
Page 39

3.4.1 Delete
The Delete selection allows you to delete files.
To delete files, please do the following:
1. Use the Left/Right Navigation
Button to select Cancel, Delete
One, or Delete All.
2. Press the Middle Navigation
Button to confirm.
• Delete One: Use the
Left/Right Navigation
Button to select the desired file. Use the Up/Down
Navigation Button to select
Navigation Button to confirm.
• Delete All: Use the Left/Right Navigation Button to select
or . Press the Middle Navigation Button to
confirm.
z Note:
Once deleted, files cannot be recovered. Ensure the files are
transferred to the PC via the USB cable or saved to another
storage device. Files that have been protected will not be
deleted. You have to unlock the files first before deleting
them.
and press the Middle
25
Page 40

3.4.2 Protect
The Protect selection allows you to protect files from being deleted.
To protect files, please do the following:
1. Use the Left/Right Navigation
Button to select Cancel, Protect
One, or Protect All.
2. Press the Middle Navigation
Button to confirm.
• Protect One: Use the
Left/Right Navigation
Button to select the desired file. Use the Up/Down
Navigation Button to select
Navigation Button to protect the file. A lock
displayed on the screen to show that the file is protected.
• Protect All: Use the Left/Right Navigation Button to
select Lock All. Press the Middle Navigation Button to
protect all saved files. To unlock all files, select Unlock All
instead.
z Note:
To unlock a file, repeat the Protect One steps. The lock
icon disappears when the file is unlocked.
and press the Middle
icon is
26
Page 41

3.4.3 Copy to Card
The Copy to Card selection allows you to copy all saved files in the
internal memory to the inserted memory card.
To copy all files to the memory card, please do the following:
1. Use the Left/Right Navigation
Button to select
2. Press the Middle Navigation
Button to confirm.
or .
27
Page 42

6
3.5 Voice Mode
3.5.1 Recording voice files
To record a voice file, please do the following:
1. Make sure you are in the Video mode. Press the Mode Button
to switch to the Video mode if not.
2. Press the Menu Button to open the Video menu.
3. Use the Up/Down Navigation Button to select Capture Mode.
4. Press the Middle Navigation Button to confirm.
5. Use the Left/Right Navigation Button to select Voice Mode.
6. Press the Middle Navigation Button to confirm.
7. Press the Menu Button again to exit the menu.
8. Press the Record Button to start recording the audio.
9. To stop audio recording, press the Record Button again.
The Voice Recording Screen
1
2
5
4
28
3
Page 43

# Icon Description
1
2
3
4
Indicates the number of saved files.
Memory status indicator
: indicates that an SD card is used.
: indicates that no SD card is inserted
and the internal memory is used.
Indicates the current date and time.
Indicates the remaining recording time.
5
6
Indicates the current battery status.
Indicates that the video camera is in Voice
mode.
3.5.2 Playing voice files
To play a voice file, please do the following:
1. Make sure you are in the
Video mode. Press the
Playback Button to enter the
Video Playback mode.
2. Use the Left/Right Navigation
Button to select the desired
audio clip.
3. Press the Middle Navigation Button to play the desired audio
clip.
• To pause playback, press the Middle Navigation Button.
To resume, press the Middle Navigation Button again.
4. Press the Up Navigation Button to stop playback.
29
Page 44

3.6 Shooting Photos
To shoot a photo, please do the following:
1. Press the Power Button to turn on the video camera.
2. Press the Mode Button to switch to Photo mode.
3. Press the Record Button to capture a photo.
To adjust the camera, you may:
• Use the Zoom Button to zoom in and out.
• Press the Left Navigation Button to set the self-timer.
• Press the Up Navigation Button to toggle the flash mode.
• Press the Down Navigation Button to toggle the display
mode.
The Photo Shooting Screen
17 18
30
16
15
14
13
12
11
10
9
8
1
2
3
4
5
6
7
Page 45

# Icon Description
1
2
Indicates the number of the saved pictures
and the remaining number of pictures.
Memory status indicator
: indicates that an SD card is used.
: indicates that no SD card is inserted
and internal memory is used.
3
4
5
6
7
8
9
10
11
12
Indicates the current file size.
Indicates the current Quality setting.
Indicates the current Self-timer setting.
Indicates that Face Detect is enabled.
Indicates the current date and time.
Indicates the current image histogram.
Indicates that Burst mode is enabled.
Indicates the current battery status.
Indicates that Macro is enabled.
Indicates that Date Stamp is enabled.
31
Page 46

13
14
15
16
17
18
Indicates that Night Mode is set to On.
Indicates the current White Balance setting.
Indicates the current Flash mode.
Indicates that the video camera is in Photo
mode.
Indicates the current EV compensation
value.
Indicates the current Zoom status.
32
Page 47

3.7 Photo Menu
To access the Photo menu, please do the following:
1. Make sure you are in the Photo mode. Press the Mode
Button to switch to the Photo mode if not.
2. Press the Menu Button to open the Photo menu.
3. Use the Up/Down Navigation Button to scroll through the
selections until the desired one is highlighted.
4. Press the Middle Navigation Button to confirm.
5. Press the Menu Button to exit.
The following selections are available in the Photo menu:
1. Size 6. Night Mode
2. Quality 7. Burst Mode
3. White Balance 8. Face Detect
4. EV 9. Date Stamp
5. Effect
33
Page 48

3.7.1 Size
The Size selection allows you to set the resolution before you
capture an image. The higher the resolution, the more memory
space is required.
To select the resolution, please do the following:
1. Use the Left/Right Navigation Button to select the desired
option:
• 1M: Select this option for
1280 x 960 resolution.
• 3M: Select this option for
2048 x 1536 resolution.
• 5M: Select this option for
2592 x 1944 resolution.
• 8M: Select this option for
3264 x 2448 resolution.
• 16M: Select this option for 4616 x 3462 resolution.
2. Press the Middle Navigation Button to confirm.
3.7.2 Quality
The Quality selection allows you to set photo qualities. A file in
better quality requires more storage space than a file in the normal
quality.
To set the quality, please do the following:
1. Use the Left/Right Navigation Button to select the desired
option:
• Fine: Select this option for high quality.
• Normal: Select this option for normal quality.
34
Page 49

2. Press the Middle Navigation
Button to confirm.
3.7.3 White Balance
The White Balance selection allows you to adjust the white balance
when capturing images under specific lighting conditions.
To set the white balance, please do the following:
1. Use the Left/Right Navigation Button to select the desired
option:
• Auto: Select this option to
let the video camera set the
white balance
automatically.
• Sunny: Select this option
for daylight.
• Cloudy: Select this option
for cloudy days.
• Tungsten: Select this option for normal indoor lighting
conditions.
• Fluorescent: Select this option for fluorescent lighting.
2. Press the Middle Navigation Button to confirm.
35
Page 50

3.7.4 EV
The EV selection allows you to adjust the exposure compensation of
the picture.
To set the exposure compensation, please do the following:
1. Use the Left/Right Navigation
Button to select the desired
value.
2. Press the Middle Navigation
Button to confirm.
3.7.5 Effect
The Effect selection allows you to change the camera effect.
To set the effect, please do the following:
1. Use the Left/Right Navigation Button to select the desired
option:
• Color: Select this option for
color photography.
• Sepia: Select this option for
brown color effect.
• Black and white: Select this
option for monochrome
effect.
2. Press the Middle Navigation Button to confirm.
36
Page 51

3.7.6 Night Mode
The Night Mode helps you to get better results while shooting at night.
To set the night mode, please do the following:
1. Use the Left/Right Navigation
button to select Auto or Night
Mode.
2. Press the Middle Navigation
button to confirm.
3.7.7 Burst Mode
The Burst Mode selection allows you to take three consecutive
photos by pressing the Record Button.
To set the Burst mode, please do the following:
1. Use the Left/Right Navigation Button to select the desired
option:
• Single: Select this option for
capturing a single photo.
• Burst: Select this option for
capturing three consecutive
photos.
2. Press the Middle Navigation
Button to confirm.
37
Page 52

3.7.8 Face Detect
The Face Detect selection allows you to detect and track faces
automatically.
To set the face detection, please do the following:
1. Use the Left/Right Navigation
Button to select
disable or enable the face
detection.
2. Press the Middle Navigation
Button to confirm.
or to
3.7.9 Date Stamp
The Date Stamp selection allows you to turn on or off the date
stamp while taking a photo.
To set the date stamp, please do the following:
1. Use the Left/Right Navigation
Button to select
disable or enable the date stamp.
2. Press the Middle Navigation
Button to confirm.
or to
38
Page 53

3.8 Viewing Photos
To view photos, please do the following:
1. Make sure you are in the Photo mode. Press the Mode Button
to switch to the Photo mode if not.
2. Press the Playback Button to enter the Photo Playback mode.
3. Press the Left/Right Navigation Button to browse the
recorded photos.
• Press the W Button to enter the Zoom mode. Press the
T/W Button to select the desired zoom view (up to 16X).
Use the Up/Down/Left/Right Navigation Button to
view the zoomed image.
• Press the Middle Navigation Button to exit the Zoom mode.
• Press the T Button to enter the Thumbnail mode. Use
T/W Button to toggle nine or four thumbnail view.
4. Press the Playback Button again to return to the Photo mode.
The Photo Playback Screen
4
3
1
2
39
Page 54

# Icon Description
1
2
3
4
Indicates the number of current image and
total number of saved images.
Indicates the current battery status.
Indicates that the file is protected.
Indicates that the video camera is in
Playback mode.
40
Page 55

3.9 Photo Playback Menu
To access the Photo Playback menu, please do the following:
1. Make sure you are in the Photo Playback mode. When in
Photo mode, press the Playback Button to switch to the
Photo Playback mode.
2. Press the Menu Button to open the Photo Playback menu.
3. Use the Up/Down Navigation Button to scroll through the
selections until the desired one is highlighted.
4. Press the Middle Navigation Button to confirm.
5. Press the Menu Button to exit.
The following selections are available in the Photo Playback menu:
1. Delete 4. Copy to Card
2. Protect 5. DPOF
3. Autoplay
41
Page 56

3.9.1 Delete
The Delete selection allows you to delete files.
To delete files, please do the following:
1. Use the Left/Right Navigation
Button to select Cancel, Delete
One, or Delete All.
2. Press the Middle Navigation
Button to confirm.
• Delete One: Use the
Left/Right Navigation Button
to select the desired file. Use the Up/Down Navigation
Button to select
Navigation Button to confirm.
• Delete All: Use the Left/Right Navigation Button to select
or and press the Middle Navigation Button to
confirm.
z Note:
Once deleted, files cannot be recovered. Ensure the files are
transferred to the PC via the USB cable or saved to another
storage device. Files that have been protected will not be
deleted. You have to unlock the files first before deleting
them.
or and press the Middle
42
Page 57

3.9.2 Protect
The Protect selection allows you to protect files from being deleted.
To protect files, please do the following:
1. Use the Left/Right Navigation
Button to select Cancel, Protect
One, or Protect All.
2. Press the Middle Navigation
Button to confirm.
• Protect One: Use the
Left/Right Navigation Button to select the desired file.
Use the Up/Down Navigation Button to select
press the Middle Navigation Button to protect the file. A
icon is displayed on the screen to show that the
lock
file is protected.
• Protect All: Use the Left/Right Navigation Button to
select Lock All. Press the Middle Navigation Button to
protect all saved files. To unlock all files, select Unlock All
instead.
z Note:
To unlock a file, repeat the Protect One steps. The lock
icon disappears when the file is unlocked.
and
43
Page 58

3.9.3 Autoplay
The Autoplay selection allows you to enable a slide show function,
which displays each image in turn at a regular interval.
To start the auto play, please do the following:
1. Use the Left/Right Navigation
Button to select
2. Press the Middle Navigation
Button to confirm.
3. The image will be displayed one
after another.
4. Press the Middle Navigation Button to stop the slide show.
.
3.9.4 Copy to Card
The Copy to Card selection allows you to copy all saved files in the
internal memory to the inserted memory card.
To copy all files to the memory card, please do the following:
1. Use the Left/Right Navigation
Button to select
2. Press the Middle Navigation
Button to confirm.
.
44
Page 59

3.9.5 DPOF
The DPOF selection allows you to use the DPOF (Digital Print
Order Format) function to tag pictures stored in the memory card
with print information. You can tag all or individual pictures.
To set the DPOF, please do the following:
1. Use the Left/Right Navigation Button to select Single Print
or Print All.
2. Press the Middle Navigation Button to confirm.
• Single Print: Use the
Up/Down Navigation Button
to select the desired file. Press
the T/W Button to select the
number of prints. The
maximum of prints for each
picture is 9.
• Print All: The number of prints for all pictures will be set
to 1. Repeat the above step to remove the DPOF tag from
all pictures.
z Note:
¾ To remove the DPOF tag from a picture, use the T/W
Button to reduce the number of prints to zero.
¾ A memory card is required for the DPOF function.
45
Page 60

3.10 System Menu
To access the System menu, please do the following:
1. Press the Menu Button to open the OSD menu.
2. Use the Left/Right Navigation Button to select the Setting
tab.
3. Use the Up/Down Navigation Button to scroll through the
selections until the desired one is highlighted.
4. Press the Middle Navigation Button to confirm.
The following selections are available on the System menu:
1. Format 5. Beep
2. Default 6. Frequency
3. Language 7. TV Standard
4. Auto Power Off 8. Date/Time
46
Page 61

7
3.10.1 Format
The Format selection allows you to format your memory card or the
internal memory when no memory card is inserted.
To format your memory card or internal memory, please do the
following:
1. Use the Left/Right Navigation
Button to select
2. Press the Middle Navigation
Button to confirm.
z Warning:
Formatting will delete everything on the media.
.
3.10.2 Default
The Default selection allows you to reset the video camera to
factory defaults.
To reset, please do the following:
1. Use the Left/Right Navigation
Button to select
2. Press the Middle Navigation
Button to confirm.
.
4
Page 62

3.10.3 Language
See section 2.7.2 “Setting the language”.
3.10.4 Auto Power Off
The Auto Power Off selection allows you to set an idle time after
which the video camera automatically sets to sleep mode to save
power.
To set the auto power off, please do the following:
1. Use the Left/Right Navigation Button to select:
• Off: Disable the Auto Power
Off function.
• 1 min.: Auto power off after 1
minute.
• 5 min.: Auto power off after 5
minutes.
2. Press the Middle Navigation Button to confirm.
3.10.5 Beep
See section 2.7.3 “Setting the beep”.
3.10.6 Frequency
The Frequency selection allows you to set the refresh rate of the
video camera. Increasing the refresh rate decreases flickering,
thereby reducing eyestrain.
To set the refresh rate, please do the following:
1. Use the Left/Right Navigation Button to select 60Hz or
50Hz.
48
Page 63

2. Press the Middle Navigation
Button to confirm.
3.10.7 TV Standard
The TV Standard selection allows you to select the TV standard of
the recorded videos.
To adjust the TV standard, please do the following:
1. Use the Left/Right Navigation
Button to select NTSC or PAL.
2. Press the Middle Navigation
Button to confirm.
3.10.8 Date / Time
See section 2.7.1 “Setting the date and time”.
49
Page 64

3.11 Thumbnail mode
In Playback mode, you can view images, video clips, and audio
clips in thumbnails.
1. Turn on the video camera and ensure it is in Playback mode.
2. The most recent image/video clip/audio clip is displayed on
the screen.
3. Press the T Button to enter the Thumbnail mode.
4. Use the T/W Button to toggle four or nine thumbnail view.
5. Press the Left/Right Navigation Button to highlight an
image/video clip/audio clip, and press the Middle
Navigation Button to view the image/video clip/audio clip in
full screen.
50
Page 65

3.12 USB mode
You can use the USB mode to connect to a printer or a host PC.
Before connecting to a printer or PC, refer to “Installing software
and drivers” in chapter 4.
When the video camera is connected to a
computer or printer using the USB cable
and the video camera is turned on, the
menu to the right is displayed.
Press the Up/Down Navigation Button
to select the desired selection and press
the Middle Navigation Button to
confirm.
3.12.1 Using the PC Cam feature
When set as PC Cam, the video camera can be used as a webcam for
video conferencing.
3.12.2 Using the Mass Storage feature
When used as a USB mass storage device, the video camera is
displayed as a removable drive in Windows Explorer. Drag and
drop files to and from the removable drive just like any other
storage device.
3.12.3 Using the DPS (Direct Print Standard) feature
Connect to a printer using the USB cable exactly in the same way, as
you would connect a PC.
51
Page 66

3.13 Diving mode
The Diving mode allows you to shoot videos or capture images in
underwater conditions. In Diving mode, the video camera will
automatically adjust the White Balance setting.
z Note:
Except for the White Balance setting, you can adjust all the
other video/image settings just like in the Video/Photo
To switch to the Diving mode, please do the following:
1. Press the Mode Button to
switch to the Video in Diving or
Photo in Diving mode.
2. An icon is displayed on the
screen to indicate the video
camera is in Diving mode.
52
Page 67

3.14 Game mode
This video camera includes several pre-installed games such
Boxman, Tetris, Memory and Gobang.
To start playing the game, please do the following:
1. Press the Mode Button to
switch to the Game mode.
2. Press the Up/Down
Navigation Button to select
the desired game and press the
Middle Navigation Button to
confirm.
53
Page 68

4 Installing software and drivers
Read this section to learn how to install drivers and software for the
video camera.
4.1 Drivers
You can use the “Mass Storage” function of the camera on the PC.
4.1.1 Mass Storage
The digital video camera offers Mass Storage function via the
built-in card reader. You can treat this digital video camera as a
USB device.
Windows 2000/XP SP2/Vista/Windows 7 is a plug and play
operating system and does not require a driver to be manually
loaded.
When the video camera is connected, the video camera memory or
any inserted SD card displays as Mass Storage in Windows
Explorer. Files can be dragged and dropped in the same way as
with an ordinary disk.
54
Page 69

4.1.2 PC Camera
You need to install a driver for the video camera to use as a PC or
web cam in all Windows operating systems: Windows 2000/
XP SP2/Vista/Windows 7 (All 32-bit only).
z Note:
The video camera can be used as a PC camera or a web cam.
Please follow the instructions below:
Driver installation is required for all operating systems.
1. Insert the supplied CD-ROM in the CD-ROM drive.
2. If the CD-ROM does not automatically boot, use
Windows Explorer to execute the InstallMgr.exe file in
the root directory.
The following screen is displayed.
Install button
3. Click Install to start driver installation.
4. Follow the on-screen instructions.
5. Click Finish to restart the computer. Video camera driver
installation is complete.
55
Page 70

4.2 Presto! Video Works
Presto! Video Works is an advanced software application for
editing video.
To install Presto! Video Works:
1. Insert the supplied CD-ROM in the CD-ROM drive.
2. If the CD-ROM does not automatically boot, use
Windows Explorer to execute the InstallMgr.exe file in
the root directory.
The following screen is displayed.
Install button
3. Click the Install button to begin the installation and
follow the instructions on-screen.
More information about Presto! Video Works can be found in the
help files when the application is started.
56
Page 71

7
4.3 Presto! Mr. Photo
Presto! Mr. Photo is an advanced photo editing software
application.
To install Presto! Mr. Photo:
1. Insert the supplied CD-ROM in the CD-ROM drive.
2. If the CD-ROM does not automatically boot, use
Windows Explorer to execute the InstallMgr.exe file in
the root directory.
The following screen is displayed.
Install button
3. Click Install to begin the installation process and follow
the instructions on-screen.
More information about Presto! Mr. Photo can be found in the help
files when the application is started.
5
Page 72

Appendix
Specification
General
Imaging
sensor
Active pixels
Storage media
Color effects Color/B&W/Sepia
Lens
Focus range Normal: 1.5m~infinity
Still image Formats: JPEG (EXIF 2.2), DCF, DPOF
Movie clips MJPEG (AVI)
1/3.2” CMOS 5.0 Megapixel Sensor
5.0 Megapixel
Internal: Built-in 16MB Flash Memory
SD Card, SDHC Compatible (Up to
SDHC 16GB Class6)
F3.2, f=5.1mm
Fixed lens
Macro: 20~21 cm
Resolution: 1M, 3M, 5M, 8M,
16M (Firmware Interpolation)
Resolution: QVGA (30fps), VGA (30fps),
HD 720p (30fps max.)
Quality: Fine, Normal
58
Page 73

General
Zoom Movie: Digital Zoom 4X,
Advance Zoom 2X
Camera: Digital Zoom 4X,
Advance Zoom 2X
Still Image Playback: Digital Zoom 16X
(max.)
TFT Monitor 2.5” TFT (480 x 240 pixels)
LED Flash Effective range: 1.2 ~1.8 m
Mode: Auto/Off/Forced
White balance
EV
compensation
Self-timer Off, 5, 10 seconds
PC interface USB 2.0 (High Speed)
TV out format NTSC/PAL
Shutter
Auto/Sunny/Cloudy/Tungsten/
Fluorescent/Special WB for diving mode
-2.0 EV~+2.0 EV
Electronic shutter
8 ~1/2000 second
59
Page 74

General
Auto power
off
Power supply
Dimension 95.5 (W) x 63.6 (H) x 24.5 (D) mm
Weight
Off, 1 min., 5 min.
2 x AAA (Alkaline/Ni-cd/Ni-MH)
Approx. 100±5g (without batteries)
60
Page 75

Troubleshooting
Problem Possible
Cause
Cannot turn on
the video
camera.
The video
camera
suddenly turns
off.
The captured
image is not
stored in
memory.
The video
camera turns
off when
capturing
image using
the self-timer.
The image is
out of focus.
The batteries are
not inserted
correctly.
The batteries have
no power.
The auto power off
function is
enabled.
The video camera
is running out of
battery power.
Before the image
is saved the
power has been
cut off.
The video
camera is
running out of
battery power.
The subject is
beyond focus
range.
Solution
Insert the batteries
correctly.
Replace the batteries.
Turn the power on
again.
Replace the batteries.
When the battery
indicator turns red,
replace the
batteries
immediately.
Replace the
batteries.
Please take a
picture within the
available focus
range.
61
Page 76

Problem Possible
Cause
Memory card
cannot be
used.
The memory
card is protected.
The memory
card contains
non-DCF images
taken by other
video cameras.
Solution
Unlock the
memory card.
Format the
memory card.
Before formatting
the card, ensure
you back up the
files.
62
Page 77

Page 78

 Loading...